#save me thumbnails and tiny doodles save me
Text
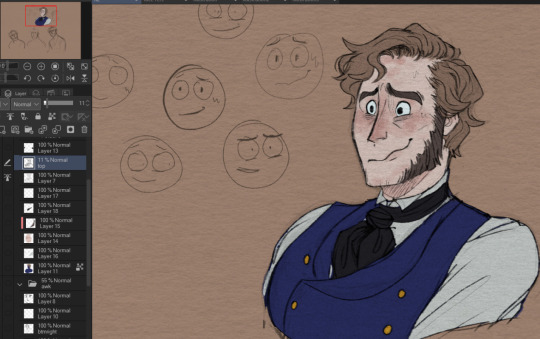
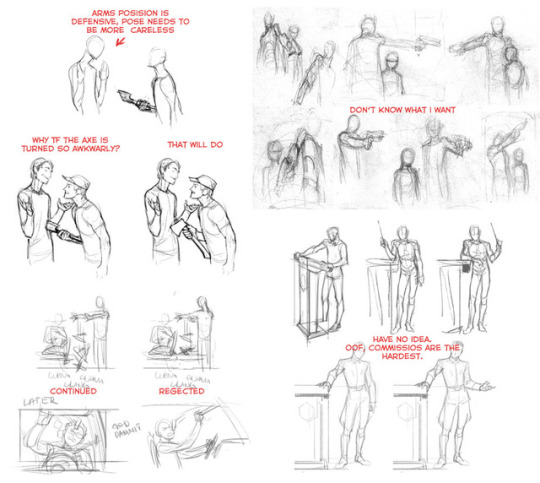
girl help this comic is taking forever to make
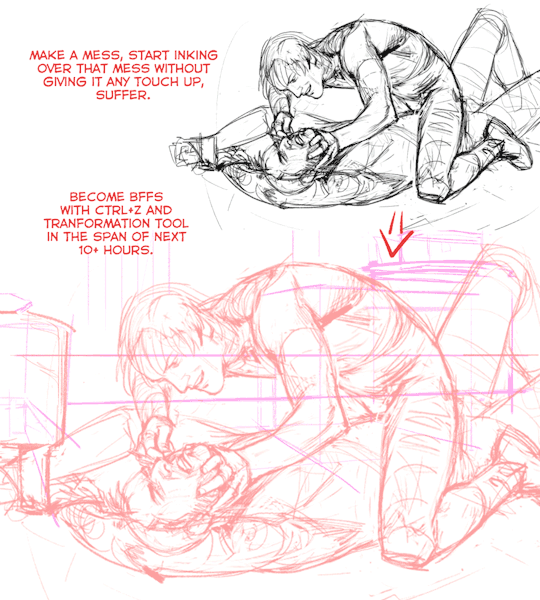
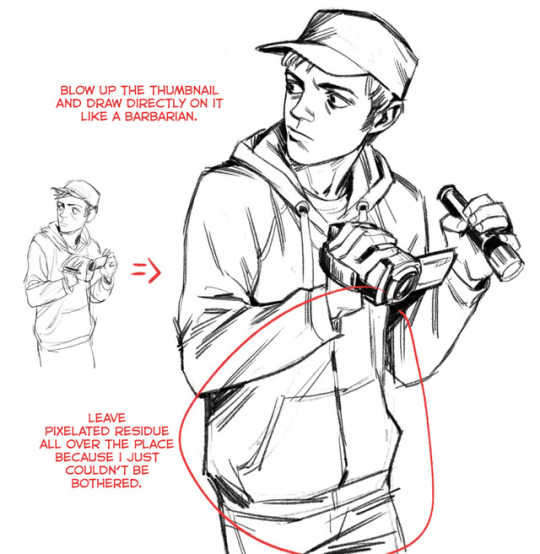
#i've been in a drawing slump i'm making this one on paper first it's a bit faster for me <- does not get distracted by the ability to zoom#this thing is 16-17 panels so far and i'm only now getting to the actual plot now#it's also the hardest part for me to pace and write so. you know.#i will see this dang thing through!!!!!!!#save me thumbnails and tiny doodles save me#apparently i talk sometimes#i've been working on and off on this for a month but i!!! will prevail!!!!
19 notes
·
View notes
Note
do you have any tips for drawing expressions? it’s one thing that I always notice about your art, I love how expressive your characters are.
thank you so much!! it really means a ton bc expressions are one of the things i've focused & worked the hardest on over the years :D ♥
which ALSO MEANS--HA, YOU ACTIVATED MY SPECIAL INTEREST TRAP CARD i am now going to talk at you all for far too long about it >:) buckle up!
prefacing this by saying i Love animation, this makes me biased as hell with where i get my sources + how i study art. anyway!
i think my biggest #1 tip is don't be afraid to get goofy with it--characters don't have to look cool and stoic all the time, they can be silly! if an expression reads better, but looks a little off-model, do it anyway! make that guy look weird!
i draw little thumbnail expressions a Lot, whether for actual art or for just fun doodling. i don't have any recent ones to hand-- but here's some from a while ago. they help a ton to figure out what works quickly without worrying about actual facial features
they also help to see if i can push an expression further, it's easier to test out weird things on a tiny round doodle and then translate that into an actual drawing later on. pushing expressions To The Limits is a really good exercise in itself!
gonna put the rest under the cut bc it's getting long & i have a lot more to say
ok this in itself is a whole topic i can go on about for hours, but i'll try to keep it semi brief--i Love considering how different characters would show emotions! how one character would express sadness, how that would be different to another, how one character would smile vs. another, stuff like that!
related, giving characters individual expression quirks. twitch's :3 mouth & lazy lidded eyes if you could see them anyway & Very Smug Eyebrows, while grace has heavy low eyebrows & sad puppy eyes & usually looks at least 10% unsure at all times. it makes every single twitch smile look slightly not genuine and makes grace look. well. you know. the quirks are really fun to think of, and it makes drawing expressions feel a lot more fun when you personalise them!!
expressions can be easier to think of when you put characters in scenarios & consider how they'd react. it can also help to think of the character Moving/talking, instead of as a static image. mini comics or just adding dialogue to art helps a lot with this, i've only just started doing it and i'm having a blast!!
ok this one is weird and hard to explain and might only be applicable to me bc i can't see images in my brain-- but i'll throw it out there just in case! lots of artists make faces in the mirror to reference their own expressions, but it's never worked for me
i Do still act stuff out in my brain & make faces irl, but instead of doing it in the mirror, i just make the expression & consider how my face is moving in Words? ok for example This Comic, last panel for twitch--i'd run through the dialogue in my head and move around how i feel like they would, and list it off in Words--raised eyebrows, closed eyes, tilted head, etc etc. then i have a framework to base the expression on! and i don't need to stare into my own face in the mirror for reference. no mirror needed at all, actually. win/win. i do this for body language too
(yes this makes you look insane btw. sorry. if you do it too long best case scenario you get very dextrous eyebrows and worst case scenario you might start making cartoon character faces irl (or both) (i'm both))
not sure how much it helps specifically with expressions outside of animation, but it's a fun exercise--learning the limits of a character's face, animation calls it squash & stretch. drawing a face in the two most extreme states. so on character expression sheets you'll see weird faces like this⤵️ that's what that is

another exercise, i always have a ton of art saved that i like the expressions of. usually a lot of concept art for films. i'll do studies of them & redraw them, and/or take ocs and redraw them with those expressions! it's a great way to look at how other artists do stuff and yoink bits you like.
you'll hear this a lot if you look up Any art tips, but references & studies are great. i get a lot of inspo from disney concept art bc their artists are very talented people, but currently i hope disney studios' own hubris eats it alive. i want to see mickey mouse buried in a hole, the rat bastard. anyway some places i personally take inspiration from:
i look at a lot of animation concept art, some good sources are characterdesignreferences, livinglineslibrary, there's pdfs of animation art books all over the place too.
specific concept artists i like are jin kim & shiyoon kim !! they do Great expressions.
outside of film industry, tealin and tracy butler of lackadaisy cats are some inspirations! tracy butler has a great expressions tutorial here
if you find this stuff interesting & like reading, the illusion of life by ollie johnston & frank thomas is an incredible insight into the thought process behind stuff like this! there's a pdf here, unfortunately just a scanned copy but worth a read if you like this stuff!! specifically chapters 'character development', 'animating expressions & dialogue', and 'acting & emotions'
sorry that was an essay and a half but hopefully it was a little bit helpful!! i always love talking about this stuff so if you want anything clarified/just wanna talk about it more i am Always ready to go off >:3
#inquiries#solreefs#i have no idea how to explain these things in a way that feels Tangibly Helpful but i do love talking about it#hopefully it helps a Bit!! ty for giving me the excuse to go off hehehe#i wanted to do doodles to go along with stuff but my arms are achey today#alas. words will have to do#fredspeaks
24 notes
·
View notes
Note
If we may, pretty please, a tiny peek at how you guys make the pages?
Sure! This is a good segue into a quick announcement that Spice is out on vacation, so there's no comic page this week, but hopefully this behind-the-scenes post makes for a fun change of pace in the meantime. As an example, here's the process we went through for page 10, written from the perspective of Spice.
LTTA started out as a notebook doodle I made while bored during a Zoom meeting. That means the first draft of the comic existed on pencil and notebook paper. Here's a look at page 10:
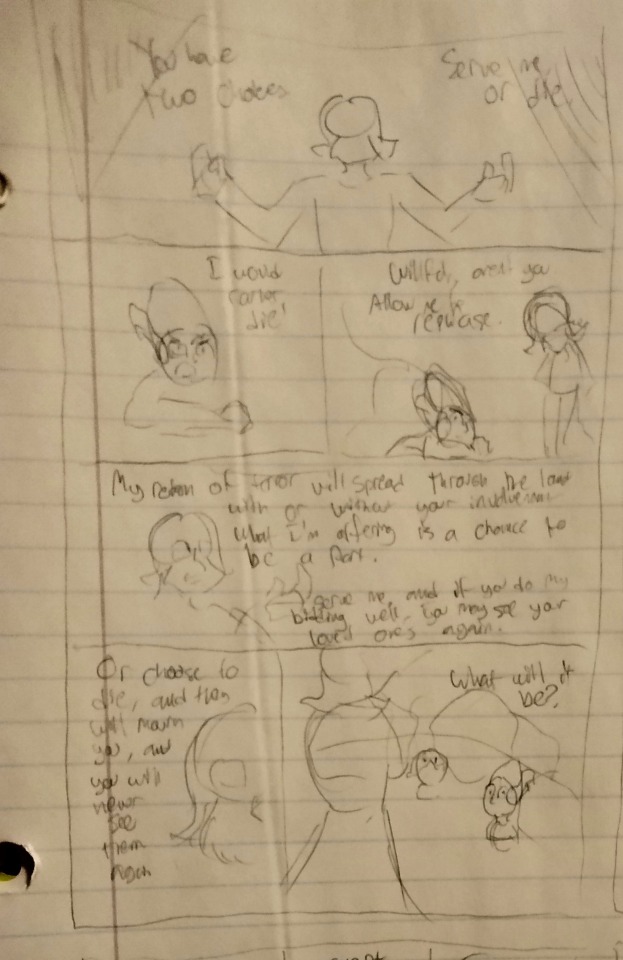
(When I first started doodling comics in high school, I used to fit four comic pages per notebook page just to save on paper, but I've kept doing it to keep my writing economical. If the thing I want to write doesn't fit in the panel, then I probably need to redraw the panel or stop using so many words hahaha)
For people who aren't me, the low contrast and scribbly handwriting on the notebook page make it kinda hard to read/work with, so I transcribed it into something a little easier to parse:
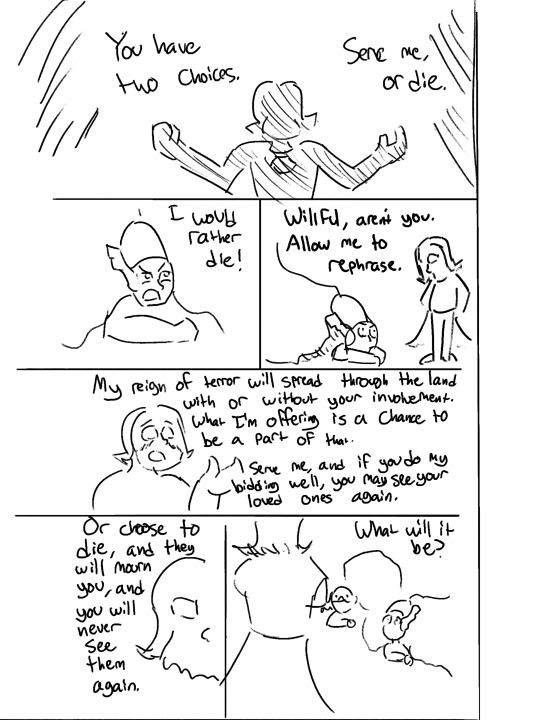
Most of these thumbnail pages are just storyboard-esque lines on a blank background, but sometimes I start blocking in basic lighting, which you can see here in panel 1. Some of the other pages have plot-relevant Enchanter Purple in their thumbnails as well.
This is usually the stage where I share them with Carpet for feedback, since it's easier to revise dialogue/pacing/continuity errors at this stage than it is later in the process. These thumbnails are easy and quick to make, and I don't have a problem discarding/redrawing if needed. Carpet tends to have really valuable feedback on character voice and motivations as well. For example, the reason page 10 came into existence in the first place was because of a conversation we had about the page before it and fleshing out Shield's objections more.
After any initial problems are cleared up, I'll do a first pass of layout, lighting, and colors:

The goal of this stage is not to produce a perfectly rendered page, but rather to start solving some of the puzzles of the page-- where's the lighting coming from? What's the lightest and the darkest thing in each panel? Is the composition directing the eye where it needs to go? Where's the camera relative to the characters? What's the perspective used for the background? I also do my best to get the lettering/bubbles in good shape, but I always inevitably end up changing something by the time the page goes live hahaha
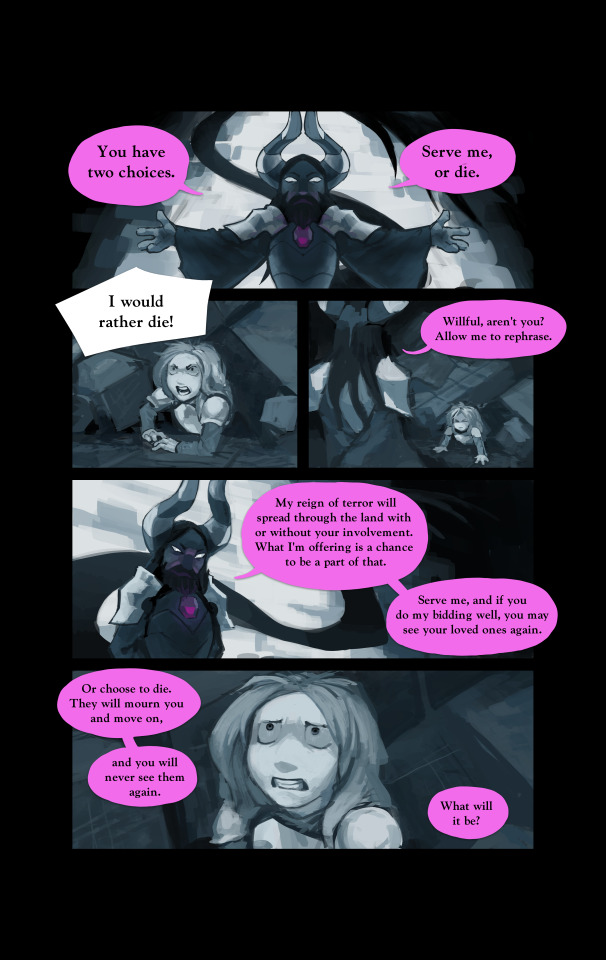
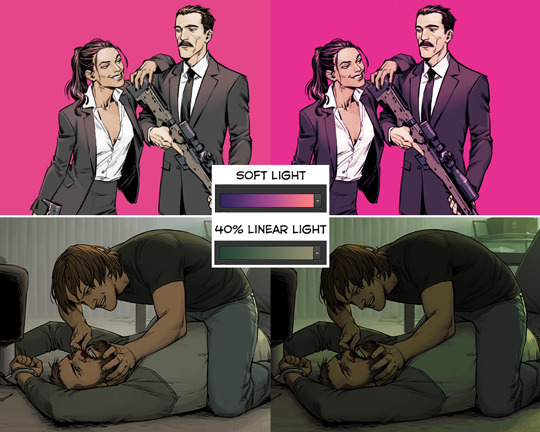
From here, the page goes to Carpet, who will do painting/lighting/rendering and sometimes rearrange panels entirely. Here's how page 9 came back from Carpet:

This page iteration uses The Enchanter's finalized character design, whereas the previous iterations came from before we had nailed it down. Apart from that, Carpet redrew the characters and backgrounds, flipped Shield Knight horizontally in panel 2, changed the perspective in panel 3, and changed the panel layout for panels 4 and 5. Zooming in on Shield's face in the last panel helps bring out the tension of her conundrum, and streamlining Enchanter's line delivery in panel 4 helps him read a bit more clearly. Carpet also offered some bubble suggestions in light of the layout changes.
Carpet also had this to say about the decision to remove Shield's helmet: "Removing her helmet would be like removing her knighthood from her, so you just see her as a regular person who’s scared and vulnerable vs a knight who was spitting out demands and breaking the walls earlier."
There have been a few times when the two of us go back and forth with revisions at this stage, figuring out the clearest way to portray something. The fight scene in the first few pages comes to mind, as well as one of Enchanter's poses on page 11. In the case of page 10, I had no notes, so the page came back to me for a final round of bubble cleanup and lettering.
Here's the final product:
So the quick summary of our collaboration process would look a little like this:
Thumbnails - Spice
Writing - Spice
Narrative feedback - Carpet
Color keys - Spice
Background rendering - Carpet
Character rendering - Carpet
Other artistic revisions - Carpet
Lettering, gutters, other page design - Spice
And there you have it!
22 notes
·
View notes
Text
Aizawas bizzare icon tutorial
A couple of people asked for tutorials so have a icon general one (most steps I apply to make headers too since that also got requested but I might make a headers one as well)
Before we begin some things
I use Photoshop CC 2019 (imo any CS6+ version will do). Most things probably can be translated to Gimp, you will have to Google them
I WON'T show how to make transparents, that's a whole other can of worms (can make another tutorial for it)
English isn't my first language n I meme a lot so
I will use a mangacap for the example but you can apply this for anything tbh (I will make a pride icon too but again those things apply for any kind of icon)
If I don't explain something well ask away
I will cover also how I make circle icons 'v' I won’t do however cover full-on colored manga icons, but I might make a tutorial for that some other time
Tutorial under the cut

I will use this mangacap of Aizawa and we gonna make a bi icon bc self indulgency juice helps me get by
My icons are 300 x 300, so using the crop tool in the square option (1:1 Square) I play with the croppin until I’m satisfied, then I use adjustments like brightness/contrast and curves to make the black lines as black as possible and the whites as white as possible. Then I remove the white fringe (you can see if your transparent has them with a solid fill layer under, I use black. There are many ways to remove them too and by googling you will find tons of tutorials on doing just that). After I go to Image->Image size and put 300 (make sure the chain thingy is checked and I have the resample option to biliniar)
This is how it looks like now

You,,,put a background. Depending what you’re doing this can either be a solid fill layer, a gradient or in my case, the pride flag I wanna use. You put all that under the layer with your subject (you can also play with textures and all), this is how it looks like now

If you want you’re basically done at this point and can save if you would like, but I like coloring so. You can play with gradients, with selective color and other adjustments for this. This is how the icon looks like now

Looks good but I really like adding stroke so after you right click on the subject layer you go to blending options and check stroke (I play with size but I’m pretty sure the other settings are default). You can also play with drop shadow and all, this is how it looks after I added stroke and drop shadow

I ADORE doin the nails so I pick a small brush on 100% hardness and on a new layer I do them with whatever color fits, this is how it looks now

Bam! A bi icon with a gucci manicure uwu. Keep reading for mediocre steps in case you wanna make a circle icon
Basically you right click on your subject and press on Rasterize layer style (this will make so the blending options are now merged with the pic) and merge the nails layer too and basically now you should have your background and the layer with subject, copy the subject layer and hide one of them and then w the eclipse tool you press and input 270 x 270 then you move it around, lower the opacity until it looks good
Then you make a group and you put the background and the subject layer that is visible in it. Then you press ctrl and the thumbnail of the eclipse layer, now it should be selected. You select the group and you press the Add layer mask button (it’s after the fx one). You can delete the eclipse layer you don’t need it anymore. Now remember that duplicated subject layer that you hid? Unhide it and lower the opacity, then with the eraser tool remove parts you don't want then put opacity back to full, this is the icon I ended up with

Some tips ye ye
-You can also add doodles !! I just pick a small brush with still full on hardness and well,,,doodle. There are also tons of doodle packs on tumblrs w/ photoshop resources!!
- A mangacap chances are won’t look great if you size it up so if you got a tiny smol cap I suggest you use this website to make it lorge uwu https://waifu2x.booru.pics/
- I didn’t touched on it in this tutorial but after your icon is done you can add sharpening, there are tons of tutorials on it and actions (if a white line appears around lower the opacity tho bc that means its overdone)
- color palette tumblrs and sites will be your saviour so accept them into ur life
- I find most of my textures by googling but there are tons of texture packs on tumblr and sites specifically with textures
- be free!! this is a general guide but please add your own touch!! add textures pngs patterns flower crowns whatever you like!! Editin is supposed to be fun not just you following specific steps with no input from urself like a robot, and this goes for other tutorials as well. Use them as guides not must do exactly like that tutorial says, have fun w/ ur edits!
- here is a free online website that is very similar to Photoshop https://www.photopea.com/
62 notes
·
View notes
Photo

So here we go, a post about my drawing process, hope you can get something out of it.
I start from searching a composition/character pose by making a bunch of tiny thumbnails (pic.1). They don't take much time and keep me from useless over-detailing.
When I found something I'm satisfied with I upscale the thumbnail to desired size. Now to get from here to lineart I can take one of three routs:
Pic.2. Proper. I don’t take it often enough.
Pic.3. I’m an expert, hold my beer.
Pic.4. Savage. Works for little drawings/doodles.
Generally, my sketches are varied from bunch of vague lines to roughly constructed objects and more or less anatomically correct “mannequins”(if it’s for a bigger picture), and stuff like clothes I often leave to figure out later in the lineart. I tried to do very elaborate sketches in the past but they would get cluttered and brought more confusion than actual help. Also inking would turn into a burden, because when every little detail has already been laid out, going over everything again felt like I was doing the same thing twice. After all, an undersketch just needs to provide some guidance so a better picture could be built on top of it, it doesn’t matter if it’s clean or looks “good”.
And you know that popular problem of hating your lineart because you think that a sketch looked much better? If your sketches never look nice in the first place then that problem is solved, ha! Okay, that may be an ill advice.
For inking part I can’t say anything substantial, I’m afraid. A demonstration of how it goes down is all I can offer, so check two videos at the end of this post.
Now, onto coloring. Going to take advantage of the moment and promote this efficient way of filling in a lineart. I keep seeing people filling in with a brush, and it hurts my non-existent soul when someone desperately tries to not go over the outer edges of the inks; oh honey, what are you doing, grab a magic wand and save yourself some time and effort.
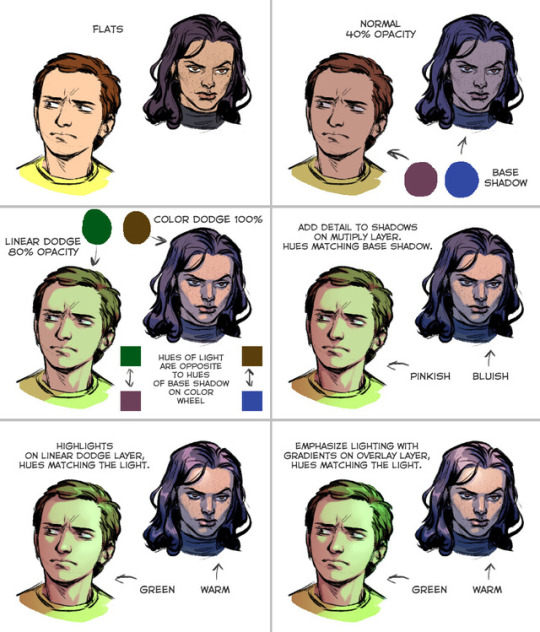
I often keep coloring simple (either giving picture an overall tint of one color, using related colors, or two complimentary colors), because I have hard time managing lots of different colors at once. But I also don’t forget that rule of making hue of shadows opposite to hue of light. On pic.5 there are some old tests of using opposite hues for light and shadow, tad bit extreme but descriptive examples of my approach to shading.
After all of that I might through some correction layers on top of the picture. My favorite crutch is gradient map, it can add an atmosphere to dull coloring, gather a picture full of colors that don’t go together very well, or simply liven up a grayscale drawing.
I rely heavily on different layer modes and correction layers. When everything is separated like that it's very easy to change color and lighting. There are people who seem to know exactly what result they want to achieve, so they just paint directly on flats, goddamn wizards. I'm never sure of what I'm doing so I stick to my convoluted layer juggling.
And to wrap it up here are time-lapse videos of two recent drawings.
youtube
youtube
#timelapse#drawing process#speed drawing#tutorial#not really buuut :p#hope i didn't butcher the grammar too much#video#some random stuff
1K notes
·
View notes
Text
Graphic Novel Illustration Process:
- How long does the process take from start to finish?
On average, a graphic novel takes a total of one to three years to fully complete. Everybody's creative journey is going to look slightly different depending on multiple factors in the production process, and the process of creating a graphic novel from idea to finished product tends to vary on commitment to the project as a whole. Especially because graphic novels are usually collaborative (written by one person and illustrated by another).
- Different methods used:
Mark Fearing (art process):
1) I wrote the entire story in comic book/screenplay format. The goal was to produce a manuscript that was as easy to read as possible without seeing drawings. I included scene headings, transitions and included plenty of action description to explain what was happening visually in the story and shown on the page.
2) I revised the manuscript with editor feedback until it was considered final.
3) I then drew page roughs (often revising the script in small ways to meet the needs of the final layout).
4) I placed these rough drawings into Adobe Illustrator and placed all the text (this makes it easy for an editor to review).
5) Only after a final review did I start final line art and painting (Photoshop).
Raina Telgemeier (art process):
1) All good stories have to start somewhere. My ideas come from many places, and the origins of my stories can either be pictures or simple sentences.
2) Eventually, an idea needs to be turned into a pitch. Can the story idea be summarised in a couple of paragraphs? It needs to be, if it’s going to be published.
3) The next step was to create a full outline. I typed up several pages, explaining what would happen in every scene in the story. I worked and re-worked this until it felt right. Scenes that were clear in my mind didn’t always fit the overall story, and were cut or re-arranged. Others were added.
4) Writing comics means writing out the pacing, panel by panel, spread by spread, which sometimes includes panels where there is no dialog at all. Thumb nailing is just like writing with a pencil on paper. You’re just doodling too, and putting everything into boxes.
5) Once the thumbnails script was approved, I had a perfect template for drawing the finished book. I switched over to large, sturdy paper, and started laying out the final pages.
6) I pencil right over my layouts. This is refinement. The energetic underdrawing is there, and now I’m working out all the details. Facial features, hands, clothes, backgrounds, everything you’ll see in the finished artwork. Again, I’m constantly refining. This stage takes a lot of concentration, but it’s very rewarding.
7) At this point I’m going over my pencils, varying the pressure on my brush to create thick and thin ink lines. This is when everything starts to really come to life for me. I do all my brush inking first (I can ink up to eight pages in a full workday!), and then go back in with a technical pen and fill in tiny details like eyeballs, shirt buttons, and anything else the brush would be too large for.
8) I sit in front of my computer for a couple hours and scan all my pages in. I scan at 600dpi, black and white / line art.
9) Also kind of boring, but because my inking style is fast and loose, I tend to have a lot of messy crossed lines and screw-ups that need a quick correction. Instead of using white-out on my physical pages, I make my corrections digitally. I also drop in my panel borders, and make sure all my stray lines are closed off before sending the finished, cleaned up pages off to my colourist.
10) I work with a colourist, often giving them samples of the colours I want or sending them reference photos if they’re colouring a real place or thing. The pages come back to me for final approval before getting sent back to my publisher, so if anything is the wrong colour or I just had something different in mind, I make corrections to the files. Then I flatten the colours, prep the line art for print, and stick them all on a server for Scholastic’s art director.
11) I typed up the manuscript once the thumbnails were approved. It’s pretty basic: “Page 1. Panel 1. Callie: Hey, Matt. Matt: Hey. Panel 2…” And so on. This gets copyedited, and sent to my letterer! This is another stage of the process I could probably do myself, but it saves me some time to let someone else help out. The letters are pulled right from the manuscript, and put into word balloons using Adobe Illustrator. The letterer sends these files directly to my art director, and he puts everything together on his end!
12) My editors and I come up with some cover concepts, I do a bunch of sketches, and we pick our favourite. I create the final cover art, and the art director puts in the type and any other features (foil details, spot gloss, and so on).
Website links:
https://www.markfearing.com/how-to-make-a-graphic-nove
https://goraina.com/how
0 notes
Note
god!! I love your art so much! You’re super talented and I recently started drawing because of you! Thank you so much for being such an amazing inspiration!
oh gosh,,,, so flattering,,, thank you !! inspiring other people to draw is just,,, big artist goal so,,, im glad !!
just, here are a few tips so you start off better than i did ! (i swear, this be a lil complicated, but it’ll save you a few years, simply cause a work method /helps/)
1) don’t draw something. draw your understanding of how something functions.
okay that sounded weird-
so uh. what i mean by that is that. when you draw. don’t concentrate on the lines or style or whatever. that won’t help, or at least not when you start. that’s for much later on, when you mastered it so can start to play with how you display that understanding. tbh, if anything if you start out with style n linework you’ll get bad habits and that’s it.
when you draw something you have to concentrate on how that thing is- what is an arm ? what gives it THAT shape ? how long/thick is it compared to other body parts ? and so instead of tracing the outline of a sometimes vague and sloppy mental image of an arm, sometimes disconnected from the rest of the body too, you instead try to trace its volume and structure (ex : bones and muscles), and that will wind up being significantly more correct. plus, drawing from just a mental image can lead to trying to get a clean lineart right off the bat and everyone who drew once knows that stuff leads to stiff, lifeless shit cause it’s just an image rather than the representation of a system that can move.
summed up, dont draw a body. draw a system where you have this bigass stack of organs, bones and muscles and whatever else brought down by gravity but with cool legs to maintain it up thanks to muscles and bones placed in a manner adapted to all of this stuff’s gravity center, and so on.
its a little complicated- and it is, ill be honest, what i said up here is how fuckin da vinci worked. dude was crazy with his paintings, he drew everything from the skull to the veins and up to every single hair. (I just stop at muscles and bones structure). anyway, you’re starting out, we ain’t da vinci, so...2) let’s just try to concentrate on drawing with basic volumes.
why ?
cause it’s easier to start out with, say, a pile of cubes, spheres and yadda yadda and you can note its centers, ect... and according to that, you can slap stuff on them such as eyes and a nose and other shapes, you get me.
basically, it’s easier to complexify shapes than to make a coherent whole by drawing it detail per detail. think about drawing a sphere and then patterns on it, VS drawing patterns and then the sphere the patterns are on.
overall, if you were a perfect artist, you “should” draw like this (and so “should” learn how to do what in this order, so you have the proper bases for starting another ruleset cause shit is kinda like a pyramid and ya dont want to build it from the top) :
(doodling a tiny stickman of the pose/thumbnailing ->) drawing a cylinders n shit base -> checking the proportions and perspective -> slapping anatomy on the structure -> adding fancy shit, w/e just finish, linework and colours, yadda yadda
it’s like a sculptor, you start with a rough shape and make it progressively more detailed.
but anyway,,, try to keep that in mind !! learning how to draw is harsh, and yeah, another important thing is that you need to research for it, you can’t “wing it”/just learn by just “drawing everyday”, even if one needs to draw frequently to progress indeed. it’s not talent- talent does little to nothing, aside from perhaps making understanding and learning/applying things easier. and honestly, most of what people admire on the internet can be acheived thanks to raw technique. anyway- learning how to draw means mastering a bunch of rules, and training a lot so you start to apply said rules automatically when you draw. so yeah, good luck with that !!
....that got long
please come at my eddsworld discord server
i have an entire channel here for ranting about art and advice
and i post way more of my art in it, too.
ill be honest, im a much better teacher than an artist. ive drawn the “image” way for years, so im stuck fighting with myself a /lot/ when i draw, notably to make bad habits back off, and to stop skipping the steps i wrote about earlier. im kinda frustrated bout it so i help people instead.
so yeah !! id be eager to talk some more and teach you !!
#boi#oh gee i ran my mouth#bless u anon#note that i explained for bodies but it (should) work for anything#Anonymous#ask
2 notes
·
View notes
Text
I’ve been thinking about my comic making process lately.
(just a rant for myself -- I’d post it on livejournal but I forgot my password =w=)
I love drawing comics. Sequential art is something I genuinely love above all other story telling forms. You can be artist, writer, director, producer — every single job in one. In a single panel you can reveal what would take paragraphs in a novel, or minutes in a film. A single microexpression and you convey oceans. I love it, I love it.
But it takes time to create. An expontential amount of time relative to how long it takes to consume it. A panel that took you hours takes less than a second to digest. The creation:consumption ratio is massive. And I have a life outside art -- I’m a med student entering fourth year. Time is not something I have in spades, y’know? I have to be realistic in how much time I can invest in a hobby.
I’ve had the same concern before, so over the years I’ve gotten extremely efficient at every step of the process. I am very, very fast at what I do. I remember a single page of my DMC comic taking me 4-6 hours, and I was already very fast for I updated four times a week when most webcomics updated once a week (if even that much, then).
Hell, I remember drawing my Kingdom Hearts comic in 2006 and spending HOURS per page when each page was functionally a tiny 350x450 panel. And!! I used to thumbnail stuff. I used to write down the dialogue and doodle concept thumbnails — the whole shebang. To get from idea to delivery, it took so much time compared to how long it took to glance at it and understand.
Now? I crunch everything. I come up with an idea and I immediately start drawing the final lineart. Sometimes I quickly ghost a sketch but it takes me seconds. I can draw a panel in 10 minutes. I can create dialogue on the fly. I have an end goal, but I let my hand wander on how to get there, so the story becomes organic, more natural to consume instead of carefully tailored. I like it! I like what I’m doing.
It keeps me entertained, too. Before, I used to micro-plan every single line of dialogue, every single nuanced change of expression, hours before I ever put my pen to paper. I was already exhausted and bored of the story before I had begun, because I knew how everything would work out, and then it was just a chore to draw it. It was work with no fun. And then posting it gave me feedback of course, but it was never proportional to the amount of energy I’d expended to put it out there.
Now I fly by the seat of my pants and I learn the story as I show it to my readers. It’s super engaging, it’s fast and snappy and the payoff is more equal to the amount of energy I put in, sometimes even greater. Plus, I can juggle it with my studying and class. I can handle it and do well in life outside art.
But.
Because I don’t plan my stories out well, because I let my hand do whatever if wants at the moment it touches the tablet, I don’t thread the story together as coherently as a well planned final product would be. And always, in retrospect, I wince and want to change things but it’s already done, it’s already polished and posted. This is what the planning stage is for, I chastise myself in frustration. You’re supposed to iron out the kinks and tie together threads ages before you start drawing so you don’t have to erase so much work.
But my brain is like a train — either you keep going or you fall off the rails, and good luck trying to get that lazy mammoth back on its tracks.
And I know my brain — it’ll come back within 3-6 months with the same fervor, and I’ll chug along for a while before burning out and rinse and repeat. It’s how I’ve been drawing the same DMC comic for 8 years going on 9, now. I wax and wane and slowly something coherent is crafted, something I cared for and raised and enjoyed creating.
But webcomics can’t be done like that and keep an audience engaged. You can’t post at a dumbass unpredictable rhythm if you want your readers to keep reading while your work is a WIP.
So my mantras are “you have to be fast, consistent, efficient — plan just enough to have a goal but not too much that you lose interest” and “if you fuck up, you can’t retcon, so try as hard as you can not to fuck up — else, from your gamut of options, make the best of your mistake: just be decisive and stick with it”.
But what if your fuck up is such a dumb cockup? I’m fully capable of erasing hours upon hours of work with just grit teeth for the sake of the story, but I’ve already posted it. I’ve already strung people along for a good long while with it.
It’s a dumb frustration, honestly. I’m the master of my own story. I can do whatever I want...
I’m losing steam. Where was I going with this again? Haha, you can start to see the flaws in my creative process just by reading this semi-coherent rant that was ill-planned and executed on the fly.
Let’s stop writing prose and start writing bulletpoints. Maybe that’ll help.
Don’t sacrifice good planning for speed, or you’ll regret it in the future. Be okay with sinking in the time to thumbnail and dialogue before you open photoshop. Use your school square notebook, like you used to. It’s okay. It’ll save you time in the long run.
Set realistic update speeds. You could do daily over the summer, but you can’t anymore. Be okay with that. When you were a kid you read webcomics that updated one measly page a week and you were hooked for years. If the story is good, folks won’t lose interest. Make sure the story is good.
Be okay with indulging yourself in however dark you want to take it. Not everything has to be kept pure simply because a lot of people have become invested in it and you’re worried about their feelings. Your primary audience is YOU. What would YOU like to read?
If you cockup and you’re losing steam because of the cockup, RETCON IT. This is YOUR story. You don’t have to delete what you fucked up from the internet if you don’t want to, since you spent time on it and its otherwise good; you can just label it as “unused” or “reworked” and cut it off from the index and it can exist as a discarded draft.
For fuck’s sake, have fun. This isn’t a job, you dumbass, this is what you do during your minuscule amounts of free time. Don’t tie yourself into knots over it. That’s what pathology homework is for XD
9 notes
·
View notes
Note
Do you have any randomly cute TC doodles laying around?? I need to see more of my tol son....
HMMM, I’ve been posting some little thumbnail snippets of TC on my instagram stories but I don’t think I saved any of them off, tragically!!! I did draw something with him in it yesterday, and earlier this week. (On that note, if someone knows how to find a theme that doesn’t make my images in an ask response SUPER SMOL, please let me know because I’ve quite had it with these themes not working)
Anyhoo, here is a teeny, TEENY, TC babies that I sketched a couple days ago:

I was trying to brainstorm about potential enamel pin designs (haha spoiler). Was thinking about making a set of tiny babby book monsters. ANYHOO, glad you’re missing him. We got a scene change. >:}

You’re up, big boy!
#a tc post for u anon#asks#fantomestein#tc/erik#he's like 'good job on ur first kiss kid'#frankenstein#frankenstein's monster#i pretend they all work on a movie set sometimes because I'm a nerd akjdfhskfdh#The Phantom of the Opera
97 notes
·
View notes
Last Seen Blogs

artfilmphy
my art film.

anniewysocki
Gmail Ondersteuning Nederland

ijovialcollectorearthquake-blog
Untitled
suit-em-up
Suit 'Em Up

bithekat
Kat Tells Yaoi Like It Is