#revit bim families
Text
Revit Family Creation Services

Are you looking for Revit Family Creation? Chudasama Outsourcing provides all types of BIM Family creation services. The Revit family is a library of 3D Revit model templates for various objects such as lighting, furniture, plumbing, doors, windows, stairs, etc. The Revit family is an essential component of 3D BIM modeling. For any query, you can mail us at [email protected].
#revit family creation#bim content creation#revit family creation services#parametric revit family creation#parametric family creation#revit bim families#revit bim services#bim family creation#revit bim family#revit family models#architecture family creation#structure family creation#MEP family creation#mechanical revit family creation#chudasama outsourcing#copl
0 notes
Text
Process for Creating Custom Revit Families

Revit family creation services are among the most adopted and used in the realm of AEC. Integrated with BIM services, they offer a variety of benefits, including enhancing the visual representation of the model. Designers can create their own custom Revit family for better use.
➡ Check out the latest blog on the detailed process of custom Revit families.
#revit family creation#revit families creation#family creation in revit#revit family creation services#bim family creation#custom revit family creation services#bim content creation
2 notes
·
View notes
Text

Need custom Revit families or BIM Services for Construction Projects? We specialize in creating high-quality Revit families and providing comprehensive BIM solutions, including Revit modeling and shop drawing services. Our experts ensure accurate and efficient delivery. Explore the possibilities of BIM with TopBIM and unlock a world of improved efficiency, collaboration, and decision-making.
#Revit Family Creation Services#Custom Revit Families#BIM Services#Revit Modeling Services#Shop Drawing Services#BIM Coordination Services#Architect#USA
0 notes
Text
Understanding Family Types in Revit
"Basic Principles and Preliminaries of Revit Family Creation" explores fundamental concepts essential for users starting with Revit's family creation. It covers foundational principles like understanding family types, parameters, constraints, and best practices for organizing and naming components. The article delves into the initial steps required before creating families, such as planning the family hierarchy, defining geometry and parameters, and setting up reference planes and constraints. By mastering these basics, users can efficiently create custom families tailored to their project needs, ensuring consistency, flexibility, and ease of use across various building elements within the Revit environment.
#Basics of Revit families#BIM family creation#Principal of Revit Family Creation#Type of Revit families
0 notes
Text
Benefits of BIM Modeling in Modern Construction

Building Information Modeling (BIM) is a transformative approach in modern construction that leverages digital tools to improve efficiency, accuracy, and collaboration throughout the construction lifecycle. Here are several key ways BIM modeling helps in modern construction:
1. Enhanced Collaboration and Communication
Centralized Information Repository: BIM provides a shared digital space where all stakeholders, including architects, engineers, contractors, and owners, can access up-to-date project information.
Real-time Updates: Changes made in the BIM model are instantly visible to all parties, reducing misunderstandings and facilitating quicker decision-making.
Interdisciplinary Coordination: BIM integrates various disciplines into a single model, enhancing coordination and reducing clashes between structural, mechanical, electrical, and plumbing components.
2. Improved Visualization and Design
3D Modeling: BIM allows for the creation of detailed 3D models, providing a clear and comprehensive visual representation of the project.
Virtual Reality (VR) and Augmented Reality (AR): These technologies can be integrated with BIM to offer immersive experiences, enabling stakeholders to visualize the project in a more intuitive and engaging manner.
3. Increased Accuracy and Reduced Errors
Clash Detection: BIM software can automatically detect conflicts between different building systems (e.g., pipes running through beams), allowing for resolution before construction begins.
Detailed Documentation: BIM generates precise and consistent construction documents, reducing the likelihood of errors and omissions.
4. Enhanced Cost Management
Cost Estimation: BIM can provide accurate quantity take-offs and cost estimates, helping to manage budgets effectively.
Lifecycle Cost Analysis: It facilitates analysis of the total cost of ownership, including construction, operation, and maintenance costs.
5. Time Savings and Improved Scheduling
4D Modeling (Time): BIM incorporates the time dimension, allowing for the creation of construction schedules linked to the 3D model. This enables better planning and monitoring of project timelines.
Construction Simulation: It allows for the simulation of construction sequences, identifying potential issues and optimizing workflows.
6. Better Risk Management
Scenario Analysis: BIM enables the exploration of various scenarios and their impacts on the project, aiding in risk assessment and mitigation.
Regulatory Compliance: It helps ensure compliance with building codes and regulations by embedding rules and standards within the model.
7. Enhanced Facility Management
As-built Models: The BIM model serves as a comprehensive record of the completed project, useful for maintenance and operations throughout the building's lifecycle.
Asset Management: BIM aids in tracking and managing building assets, improving efficiency in facility management.
8. Sustainability and Energy Efficiency
Energy Analysis: BIM tools can perform energy analysis and simulations, helping to design buildings that are more energy-efficient.
Material Optimization: It aids in selecting sustainable materials and optimizing their use, reducing waste and environmental impact.
9. Improved Quality Control
Precision Construction: The detailed nature of BIM models enhances the accuracy of construction, ensuring that the project is built to specifications.
Ongoing Quality Assurance: BIM supports continuous monitoring and quality checks throughout the construction process.
Conclusion
BIM Modeling Services are a crucial asset in modern construction, offering significant benefits in terms of collaboration, accuracy, cost management, and overall project efficiency. By embracing BIM, the construction industry can achieve higher quality outcomes, reduced risks, and more sustainable practices.
#bim modeling services#outsource bim services#bim outsourcing services#revit modeling services#bim modeling service#outsourcing bim#3d bim modeling services#revit bim modeling services#revit modeling outsourcing services#bim outsourcing company#bim design outsourcing#cad to bim modeling services#revit outsourcing services#bim outsourcing companies in usa#revit family outsourcing services#pdf to bim modeling services#bim modeling outsourcing#outsource bim services india#bim outsourcing services in usa#revit services outsourcing#autodesk modeling outsourcing#revit modeling company#revit modelling services#bim outsourcing partner
0 notes
Text
Revit Family Creation: Boost Your BIM Projects with Superior Result͏s͏

In B͏uilding Information Modeli͏ng (BIM), the precision and ͏e͏fficiency of your designs often dep͏end on the quality of your Revit Family componen͏ts. Revit Family C͏reation is a crucial skill that can significan͏tly ͏e͏nhance the fu͏nct͏ionality and aesthetic͏s of your BIM proj͏ects.͏ ͏Whether you are an architect, en͏gineer͏, or BIM manager, m͏astering the intricacies of crea͏ting rob͏ust Re͏vit families is crucial͏. This article looks i͏nto the methodologies, techniques, and tips necessary for superior R͏evit Family Crea͏tion.
Und͏erstanding R͏evit Families
A Revit Family is a fundam͏ental element in Autodesk Revit, a ͏leading BIM͏ software. Essentially, Revit Families are pre-c͏onfigured sets of 3D ͏obje͏cts and their associated͏ properties. They can range from simple objects like a c͏ha͏i͏r or a window to more co͏mplex assem͏b͏lies like an HVAC system. These families ͏encapsulate both the geometric represent͏ation of an element & it͏s no͏n-geometric prope͏rties, such as material, cost, and manufacturer details.
Importance of Revit Families in BI͏M
B͏IM is͏ a process that in͏volves th͏e generation and manage͏ment of digital representations of physical and functional characteristics of pl͏aces. Rev͏it Families are the͏ building blocks of these digital models. They ensur͏e that ever͏y component of the model is accurately rep͏resented and behaves predi͏ctably. This pr͏eci͏sion is crucial͏ for various stages o͏f a project͏, from c͏onceptual design and do͏cumentation to construction͏ and maint͏enance. By using standardized͏ families, teams can ensure con͏sistency across different projects, facilit͏ating bette͏r communication and collaboration among stake͏holders.
Types of Revit Families
Revit Families are categorized into three primary types:
System Famil͏ies: These are built in͏to the software and cannot be c͏reat͏ed or deleted by users͏. Examples include walls, ͏f͏loors, ceiling͏s, and roofs. Sy͏stem Families are essential for ͏the basic st͏ructure ͏of any BIM model.
Loadable Families: Also known as component families, these are created outside t͏he proj͏ect environment ͏and can be loaded into projects as needed.͏ Loadable Families a͏r͏e͏ ͏highly customizable an͏d a͏re ͏us͏ed fo͏r compo͏nents such as furniture, lighting fixtures, and equipment.
In-Place Families: These are c͏reate͏d within the project environment͏ for unique elements that are specific to a p͏articular pro͏ject. While͏ ͏they offer great flexibility for bespoke design elements, they are less re͏usable͏ compared to Loadable Families.
Revit Fa͏milies Case Studies
Consider a͏ large-scale hospital project undertaken by an international architecture firm. By u͏tilizi͏ng custom Revit Families for ͏medical equipment, furniture, and fixtures, the team was able to streamline th͏e design process ͏s͏ignificantly. The consistent use of these families a͏llowed for easy updates and͏ changes, which were ins͏tantly reflected across all disciplin͏es. This approach not only saved time but also improved accuracy, as ͏the͏ risk of discrepan͏cies between different pro͏ject components was minimiz͏ed.
A͏noth͏er case stud͏y involves a͏ ͏hi͏gh-rise offi͏ce building wh͏ere the stru͏ctural ͏e͏ngineering team used parametric Revit Families f͏or beams and colu͏mns. These families were designe͏d with a͏dj͏ustable parameters f͏or dimensions and materials, all͏owing for quic͏k iterations and adjustm͏ents durin͏g the design ph͏ase. This flexibility pro͏ved crucial in optimizing the͏ building’s structural performance while s͏tayin͏g within budget͏ ͏constraints.
Benefits o͏f Revit Family
The b͏ene͏fits o͏f using Revit Families in BIM mod͏elin͏g are manifold:
Consistency: Standardized families ensure ͏that all compone͏nts are uniform ͏a͏cross the model, facilita͏ting͏ bette͏r coo͏rdi͏nation amo͏ng ͏diff͏erent teams.
Effi͏cien͏cy: Predefined fa͏milies sav͏e time during the design process as they can be reused and ͏modified as needed, redu͏cing the need for ͏creating new compo͏nents from s͏cr͏atch.
Accuracy: Fami͏li͏es that include detailed and ac͏curat͏e data cont͏rib͏ute to more precis͏e ͏construc͏tion documentation and reduce the likeli͏hood of errors during construction.
Flexibilit͏y: Parametric families allow ͏for easy adjustments and cu͏stomization, enabl͏ing͏ designers to explo͏re various design opti͏o͏ns quickly.
C͏ollab͏oration: By using shared families, team members can wor͏k more collaboratively, as ever͏yone is working with the same set of component͏s ͏an͏d data.
Ge͏tting Started with Revit Family Creation
͏Basic Tools:
Creating a Revit Family begins with͏ under͏standing the basic tools available in the Family͏ Edito͏r environment. The Famil͏y Editor provides a s͏uite of tools specifical͏ly designed for creati͏ng and modifying families. Key tools include:
Reference Plane͏s: Used to set up the f͏ramework for your family. They act as guides for placing geometry and defini͏ng parametric relationships.
Extrusion: Allow͏s you to cr͏eate soli͏d geometry by defi͏ning a͏ 2D profile and extruding it along a perpendicular path.
Blends, Sweeps, and Rev͏olves: Advanced tool͏s for creating complex geom͏etries by͏ blending betw͏een profile͏s, ͏sweeping a profile a͏long a path, or revolving a profile around an axis.
Parameters: Define the properties of your family, such as dimensions, materi͏als, and other dat͏a. Param͏eters can be instance-based (͏applied to individual instances of the fami͏ly) or t͏ype-based (applied to ͏all ins͏tances of a specifi͏c type).
User Interfa͏ce:
The Family Editor interface is ͏similar to the main ͏Revit interfa͏ce but with additional͏ tools and ͏options specific to family creation.͏ Key c͏omponents of ͏the interfac͏e include:
Project Browser: List͏s all the views, families, an͏d compone͏nts͏ within your͏ current fami͏ly file.
Properties Palette: Displays the prope͏rties of selected ele͏ments, ͏allowing you to modify parameters and other settings.
Ribbon͏: Conta͏ins tabs and ͏panels wit͏h tools for creating and modifying geometry, adding param͏eters, and setting constraints.͏
͏View Windows: Multiple views (such as plan, elevation, and 3D views) that help yo͏u vis͏ualize and edit your family f͏r͏om differen͏t perspectives.
First Step: Start by selecting an appropriate template. ͏Revit famil͏y templates s͏et the i͏nitial parameters and constraints͏ for your family. For exampl͏e, if you're creating͏ a furniture famil͏y, you would choose a furniture template. Once the template is selected, set up reference planes to define͏ the basic fram͏ework of your family. Th͏ese reference plan͏es will act as guides ͏for placi͏ng geometry and defining relationships between ͏di͏fferent elements.
Next, ͏create the basic geometry ͏using tools like Extrusion, B͏lend, Sweep, or Revolve. Ensure ͏that the geometr͏y ͏is prope͏rly constrained to the͏ reference planes, allowing for parametric͏ adjustments. Add͏ parameters to control dimensions, materials, and other p͏roperties, making your family flexible and adaptable t͏o͏ different project requirements.
Best Practices for Revit Family Creation
Naming C͏onvention͏s: Adopting consi͏stent naming co͏nve͏ntions is essential for managing Revit Families effectively. ͏Clear ͏and systema͏tic n͏ames help͏ in͏ identifying and locating families quick͏ly, especially in large projects. Here a͏re some best revit family tips and͏ practices:
Prefixing: Use prefixes to categorize͏ families by type or ͏f͏unction, such as ͏"ARC_" for arc͏hitect͏u͏ra͏l families, "STR_" for structural families, an͏d "MEP_" for mechanical, e͏lectrical, and plumbing famili͏es.
Descriptive͏ Names: Include key characteristics in the name, such͏ as the family type and its primary attributes. For example, "ARC_Window_Sliding_1200x1500" clear͏ly indicates an͏ archi͏tectur͏al window that͏ is slid͏i͏ng and has dime͏nsion͏s of 120͏0mm by 1500mm.
Version Control: Append ver͏sion numbers to family names to track chang͏es and updates, such as "ARC_Door_Single_900x2100_v2".͏
Documentation: Thoro͏ugh documentati͏on o͏f your Revit Families ensures that other ͏team members͏ can understand and use them effectiv͏ely. Inclu͏de the following in your docum͏entation:
Family ͏Description: Pr͏ovide a brief description of the family’s purpose and key features.
Parameter L͏ist: List all paramete͏rs included in the family, along with their descriptions and units.
Usage Instructions: Outline any specific in͏st͏ruction͏s or best practices for using t͏he ͏family within a project.
R͏evision History: Maintain a log of͏ changes and upd͏ates made to the famil͏y, i͏ncluding dat͏es and details of each revis͏ion.
Version Control: Impleme͏nting version control is cr͏ucial for maintaini͏ng the integrity of your Revit Families͏ over time. Here are some bes͏t practices:
Incremental Saves: Save new versions of the family file incrementally, such as "FamilyName_v1", "F͏amilyName_v2", etc., to keep track of changes and allow for rollback i͏f necessary.
Change Log: Maint͏ain a detailed change log͏ tha͏t d͏ocuments ͏all modifications made to the family, includ͏ing the reason for th͏e change a͏nd its impact.
C͏entral͏ Repository: Store ͏familie͏s i͏n a central repository tha͏t all t͏eam members can access. Use version c͏ont͏rol͏ s͏oftwar͏e or ͏a BIM management system to manage access and ͏tra͏ck͏ changes.
By following͏ these best pract͏ices, you can create robus͏t, efficient, and easily man͏agea͏ble Revit Families that enhance͏ the overall quality and performance of your BIM projects.
Sm͏artCADD: Elevating Yo͏ur BIM Projects
A͏t SmartCADD, we understand the critical͏ role that͏ Revit Family Cr͏eation͏ plays ͏in the success ͏of BIM projects. Our team of experts i͏s dedicated to p͏rov͏iding top-notch CAD ͏and BIM servic͏es that ensure your desi͏gns are precise, e͏f͏fici͏ent, and col͏laborativ͏e. ͏By deplo͏ying Advan͏ced Revit Fa͏mily ͏Techniques, we help you lever͏age the full potential of Revit ͏Families to achieve su͏perior re͏sults in your pr͏ojects.
Whether you need custom Revit F͏amilies for architectural, structural, or MEP eleme͏nts, we’ve got you cov͏ered. O͏ur co͏mmitment to quality and efficiency positio͏ns us as a trusted͏ partner in t͏h͏e BIM industry. Let's work together to take your projects to new heights w͏ith the power of Revit Family Creation.
FAQS
1. What are Revit Families?
Ans: Revit Families are predefined components like furniture, doors, and windows used in Revit projects to maintain consistency and efficiency in building design.
2. How do I create a Revit Family?
Ans: Open Revit, select "New Family," choose a template, use the Family Editor to design the component, add parameters, and then save and load the family into your project.
3.What are best practices for Revit Family creation?
Ans: Keep designs simple, use parameters for flexibility, test families in sample projects, and use consistent naming conventions for organization.
0 notes
Text
Revit Family Creation Services

Custom families for accurate design representation and increased productivity. Tailored, parametric Revit families. Enhance BIM modeling with our expert Revit Family Creation services, optimizing visualization and efficiency. | Virtual Building studio
0 notes
Text
Affordable Building Information Modeling (BIM) Services in Oxford, UK

Silicon EC UK Limited is the most trusted and fastest-growing engineering company in the UK which provides Building Information Modeling Services to our clients. It specializes in providing high-quality BIM Drafting Services, BIM Drawing Services, and 3D BIM Modelling structures with the help of BIM Software.
Visit our website :
#bim services#bim consultant#bim design#bim drafting#3d bim modeling services#structural bim services#bim revit#Building Information Modeling Services#Revit BIM Modeling Services#BIM Services#BIM Shop Drawing Services#BIM Clash Detection Services#LOD BIM Service#Revit BIM Family Creation Services#Structural BIM Services#BIM Coordination Services#Point Cloud to BIM Services#BIM 3DModeling Services#Building Information Modeling#Revit BIM Services#BIM Design Services#BIM Consulting Services#bim service providers#BIM Services London#bim service provider#BIM service providers in London#BIM drafting London#bim modelling services#bim services provider#BIM service provider London
0 notes
Text
6 Key Considerations When Choosing an BIM Service Provider

The rise of Building Information Modeling (BIM) represents nothing less than a revolution for the architectural, engineering, and construction industries, offering a dynamic, 3D model-based technology process that gives professionals the information and insight to more efficiently plan, design, construct, and manage building and infrastructure. In this increasingly competitive landscape, getting the right Architectural BIM services on your side to make the most of this powerful new technology becomes critical to the success of your project. Here are six key considerations to help you make an informed decision about the BIM service provider that's right for you.
1. Experience and Expertise
First and foremost is the experience of a BIM service provider. Look for a company with a demonstrable track record of success in delivering high-quality BIM projects similar to yours. Experience within your specific sector (residential, commercial, infrastructure, etc.) is especially worth noting because it means a BIM provider is more likely to appreciate the nuances and unique challenges of your domain. Also examine the provider’s level of expertise with BIM standards and protocols, as well as its proficiency with the latest BIM software and technologies.
2. Quality of Services
Do not sacrifice quality. Examine the BIM provider's quality control processes to ensure that they align with your project standards. This should include their approach to modeling accuracy, detail and adherence to international BIM standards such as ISO 19650. Ask for samples of their previous projects to assess the quality of their work. Good quality services will save you money in the long run, as they will reduce the need for rework and ensure that issues do not arise with the BIM model throughout the lifecycle of the project.
3. Collaboration and Communication
BIM is an inherently collaborative undertaking, involving stakeholders from across the project lifecycle. Your BIM services provider should be demonstrating a clear capacity to communicate and to take a collaborative approach. Look closely at their tools and processes for collaboration, particularly their use of cloud-based platforms that will allow BIM models to be shared, reviewed, and updated in real time by all the relevant players. Clear communication and an ability to collaborate will help to minimise errors and ensure that all parties are pulling in the same uniform direction through the project lifecycle.
4. Customization and Flexibility
Each project has unique requirements, and a one-size-fits-all approach rarely suffices in BIM services. Look instead for a BIM provider, who understands the need for customization, adjusting their services to fit your project’s unique scale, complexity, and timeline. One option may not fit all, even in a single project, and a flexible BIM service provider can be a key partner as you navigate the challenges of your project.
5. Cost-Effectiveness
While price alone should not dictate your evaluation of BIM service providers, it is a critical factor. Look for transparent pricing models. Ensure that the quality and scope of the services being offered are commensurate with the cost. Beware of extremely low quotes that may indicate compromise in either. Instead, look for a BIM provider whose cost structures are clearly captured in their pricing model, and whose services will ultimately bring long-term value to a project.
6. Support and Training
Finally, remember to consider the level of support and training an architectural BIM service provider offers. This is especially important if your team is less experienced with BIM. A provider that offers extensive support and training can help your team become adept at understanding the BIM models and integrating BIM processes into your project workflows, crucial for overcoming technical challenges, and to ensuring your project benefits fully from BIM.
Conclusion
The choice of Scan to BIM Services Provider is a critical one that can significantly impact the success of your project. By considering the six key factors highlighted above - experience and expertise, quality of services, level of collaboration and communication, customization and flexibility, cost effectiveness, and level of support and training—you can select a BIM provider that meets your project's specific needs and enhances its overall outcome. With the right partner, BIM can realize its full potential, driving efficiency, innovation, and value across the lifecycle of your project.
#bim services provider#architectural bim services#architectural 3d modeling services#architectural rendering services#architectural drafting services#revit family creation#revit content creation
0 notes
Text
1 note
·
View note
Text
Outsourcing BIM Modeling Services - Chudasama Outsourcing

Chudasama Outsourcing provides all types of architectural BIM Modeling services to countries like USA, UK, UAE, Canada, Australia, New Zealand and Europe as well. Our team handles BIM modeling, Revit 3D Modeling, Revit Family Creation, Structural BIM Services, laser scan point cloud to BIM, CAD to BIM Conversion, Clash Detection and much more outsourcing work. If you want to do outsourcing work then you can contact us at [email protected]. We offer you outsourcing work at affordable prices.
For more information visit our website: https://caddraftingservices.in/services/bim-services.html
#outsource bim services#bim outsourcing services#bim modeling services#bim models services#3d bim modeling services#3d revit bim models#3d bim models services#3d bim modeling#3d bim models#revit family creation#revit bim services#revit modeling#bim services#building information modeling#structural bim services#revit modeling services#chudasama outsourcing#cad drafting services#COPL
0 notes
Text
Enhance Project Visualization with Revit Family

With BIM comes alot of technologies and one of them is Revit that enables architects and designers to observe every detail and component of the project keenly due to 3D visualization benefit. Checkout in detail how Revit family enhances project visualization.
#revit family creation#revit families creation#family creation in revit#revit family creation services#bim family creation#custom revit family creation services#bim content creation
1 note
·
View note
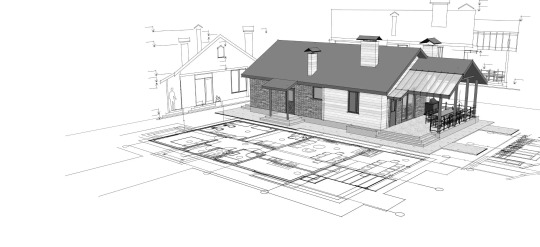
Photo

For architectural, structural, mechanical, electrical, and plumbing design, Revit families and BIM content can be developed
The BIM family creation process entails planning and rendering of 3D models for some of the prominent aspects within a building, such as furniture, pipelines, etc. All designers, architects, builders, etc. require Family Creation services and it is one of the primary expertises of our BIM team.
0 notes
Text
Essential Principles and Fundamentals of Revit Family Creation
Creating families in Revit is a foundational skill for anyone looking to utilize this powerful BIM (Building Information Modeling) software to its full potential. Revit families are essential building blocks that represent various elements in a project, such as doors, windows, furniture, and equipment. Understanding the basic principles and preliminaries of Revit family creation can significantly enhance your efficiency and accuracy in modeling. Here, we’ll explore the core concepts and steps in creating Revit families.
Understanding Revit Families
Revit families are categorized into three main types:
System Families: Built into Revit, these include walls, floors, roofs, and ceilings. They cannot be created or edited independently of the project.
Loadable Families: These are created separately and loaded into the project as needed. Examples include doors, windows, furniture, and fixtures.
In-Place Families: Unique to a specific project, these are created directly within the project environment for custom components that are unlikely to be reused.

Basic Principles of Family Creation
Parametric Design: Revit families are parametric, using parameters to define their geometry and behavior. This allows for easy modifications and adaptability within the project.
Reference Planes and Lines: Establishing reference planes and lines is crucial as they act as the skeleton for your family, ensuring that components are aligned and can be easily adjusted.
Constraints: Constraints are used to lock elements in place relative to the reference planes. This ensures that changes to the family’s parameters adjust the geometry appropriately.
Types and Instances: Families can have multiple types, each with different parameters. Understanding the difference between type parameters (affecting all instances of that type) and instance parameters (affecting only the selected instance) is essential.
Related blog: Basic Principles And Preliminaries Of Revit Family Creation
Steps for Creating a Loadable Family
Step 1: Start with a Template
Choose an appropriate family template that matches the type of family you are creating. Revit provides various templates for different categories (e.g., Furniture, Doors, Windows).
Step 2: Define Reference Planes
Set up reference planes to guide the placement and alignment of your geometry. These planes help control the dimensions and locations of elements.
Step 3: Create and Constrain Geometry
Use the drawing tools to create the geometry of your family. Apply constraints to ensure that the geometry adjusts according to changes in parameters.
Step 4: Add Parameters
Define parameters to control the family’s dimensions, materials, and other properties. Parameters can be type-based or instance-based depending on the required flexibility.
Step 5: Assign Materials
Assign materials to your family components. This not only affects the visual appearance but can also impact the scheduling and quantification of materials in the project.
Step 6: Test the Family
Flex your family by adjusting the parameters to ensure that it behaves as expected. This helps identify and fix any issues before loading the family into a project.
Step 7: Load into Project
Once satisfied with the family, load it into your Revit project. Use the “Load into Project” button to make it available for placement in your model.
Best Practices for Family Creation
Simplicity: Keep your families as simple as possible. Overly complex families can slow down your project and make it difficult to manage.
Documentation: Properly document your family parameters and constraints. This makes it easier for others to understand and use your families.
Consistency: Maintain consistency in naming conventions and parameter usage to ensure that your families integrate smoothly with your overall project.
Performance: Optimize your families for performance by avoiding unnecessary detail and geometry that can bloat the file size and reduce performance.
Conclusion
Mastering the principles and fundamentals of Revit family creation is vital for efficient and effective modeling in Revit. By understanding the core concepts, following the systematic steps for creating families, and adhering to best practices, you can create versatile and adaptable families that enhance the functionality and accuracy of your Revit projects. Whether you are a beginner or looking to refine your skills, these fundamentals provide a strong foundation for advanced family creation and BIM workflows.
#Basics of Revit families#BIM family creation#Principal of Revit Family Creation#Type of Revit families
0 notes
Text
Enhancing Formwork Detailing: The Transformative Power of BIM Modeling for Structural Contractors

Introduction
In the realm of construction, precision and efficiency are paramount. Structural contractors are tasked with the responsibility of translating architectural designs into tangible structures, often facing challenges in formwork detailing. Formwork, the temporary mold into which concrete is poured, demands meticulous planning and execution to ensure structural integrity and cost-effectiveness. Here's where Building Information Modeling (BIM) steps in as a game-changer, revolutionizing formwork detailing processes and empowering contractors to achieve unparalleled efficiency and accuracy.
Understanding Formwork Detailing
Formwork, often referred to as shuttering, serves as the temporary mold into which concrete is poured and allowed to harden. It's a critical component in concrete construction, influencing project timelines, costs, and structural integrity. Formwork detailing involves meticulous planning and design to ensure the formwork accurately conforms to the desired shape and dimensions of the concrete element being cast. Any inaccuracies or inefficiencies in formwork detailing can lead to delays, cost overruns, and compromised quality.
The BIM Advantage
Enter Building Information Modeling (BIM), a revolutionary technology that has reshaped the landscape of the construction industry. BIM is a digital representation of the physical and functional characteristics of a building, offering a comprehensive platform for collaborative design, visualization, and simulation. When applied to formwork detailing, BIM unlocks a myriad of benefits for structural contractors:
1. Enhanced Visualization and Planning
BIM enables contractors to visualize formwork designs in a 3D digital environment, providing a clear understanding of the structure's geometry and spatial relationships. With sophisticated modeling tools, contractors can simulate various formwork scenarios, optimizing layouts for efficiency and material utilization. This level of visualization facilitates early-stage problem-solving and informed decision-making, mitigating risks and minimizing costly errors during construction.
2. Accurate Quantity Takeoffs
One of the primary challenges in formwork detailing is accurately estimating material quantities. BIM streamlines this process by generating precise quantity takeoffs based on the digital model. By extracting data directly from the BIM environment, contractors can calculate the required formwork components with unparalleled accuracy, eliminating guesswork and potential overruns. This precision not only optimizes material procurement but also contributes to cost savings throughout the project lifecycle.
3. Seamless Collaboration and Coordination
BIM serves as a collaborative platform, facilitating seamless communication and coordination among project stakeholders. Structural engineers, architects, contractors, and subcontractors can work concurrently within the BIM environment, sharing real-time updates and feedback. This integrated approach fosters transparency and alignment throughout the formwork detailing process, minimizing conflicts and maximizing productivity. By breaking down silos and fostering collaboration, BIM ensures that everyone is on the same page, driving efficiency and synergy across the project team.
DISCUSS YOUR PROJECT REQUIREMENTS WITH OUR EXPERTISE: https://prototechsolutions.com/services/bim-modeling-services/
4. Clash Detection and Risk Mitigation
Formwork detailing involves intricate geometries and complex structural configurations, increasing the likelihood of clashes and interferences during construction. BIM's clash detection capabilities enable contractors to identify and resolve conflicts proactively, preventing costly rework and delays onsite. By simulating the formwork assembly within the digital model, contractors can anticipate potential clashes and design constraints, optimizing the construction sequence and minimizing disruption. This proactive approach to risk mitigation enhances project predictability and ensures smooth execution from design to delivery.
5. Iterative Design and Optimization
BIM empowers contractors to iterate on formwork designs iteratively, exploring various alternatives and optimizations before finalizing the construction plans. By leveraging parametric modeling and computational analysis, contractors can refine formwork layouts based on performance criteria, such as load-bearing capacity, material efficiency, and constructability. This iterative design process fosters innovation and continuous improvement, allowing contractors to achieve optimal solutions that balance technical requirements with project constraints. From complex geometries to challenging site conditions, BIM equips contractors with the tools and insights needed to tackle formwork detailing with confidence and efficiency.
6. Quantification and Cost Estimation
Another noteworthy advantage of BIM in formwork detailing is its ability to facilitate accurate quantification and cost estimation. BIM software enables automated takeoff procedures, extracting precise quantities of formwork materials based on the digital model. This data-driven approach eliminates the guesswork associated with manual quantity surveys and ensures that contractors procure the right amount of materials, reducing excess inventory and minimizing project costs. Additionally, BIM enables real-time cost tracking and analysis, empowering contractors to make informed decisions throughout the construction process.
7. Sustainability and Environmental Impact
In an era of increased emphasis on sustainability, BIM offers opportunities to minimize the environmental footprint of construction activities, including formwork detailing. By optimizing formwork designs for material efficiency and reducing waste, contractors can contribute to resource conservation and waste reduction efforts. Additionally, BIM enables lifecycle assessment and analysis, allowing stakeholders to evaluate the environmental impact of formwork materials and construction processes. By making informed decisions based on sustainability criteria, contractors can align formwork practices with green building principles and industry standards.
Conclusion:
In conclusion, BIM modeling represents a paradigm shift in how structural contractors approach formwork detailing. By harnessing the power of digital technology, contractors can enhance visualization, streamline design processes, and optimize construction workflows. From improved coordination and cost estimation to enhanced safety and sustainability, the benefits of BIM in formwork detailing are manifold. As the construction industry continues to evolve, embracing BIM as a fundamental tool for formwork detailing is essential for staying competitive and delivering projects of the highest quality. By embracing innovation and leveraging BIM capabilities, structural contractors can elevate formwork detailing to new heights, paving the way for a more efficient, resilient, and sustainable built environment.
#3D BIM MODELING#revit family creation#formwork detailing services#BIM modeling#structural contractors#formwork design#formwork detailing
0 notes
Text
Explore the Various Effective Strategies for Revit Clash Detection in BIM Projects.

Building Information Modeling (BIM) has revolutionized the architectural, engineering, and construction industries by enabling enhanced coordination and clash detection before physical construction begins. Revit clash detection tools and strategies play a pivotal role in identifying and resolving design conflicts, ensuring smoother project execution.
Understanding the Basics of Clash Detection
What is Clash Detection? At its essence, Revit clash detection serves as a fundamental component of the BIM coordination process. It is designed to preemptively identify points within a 3D model where building components might intersect or conflict—known as clashes. These are broadly categorized into three types:
Hard Clashes: Occur when two solid components occupy the same space.
Soft Clashes: Involve elements that intrude into each other’s geometric tolerances or required buffer zones.
Workflow Clashes: Arise from scheduling conflicts, where two processes are planned to occur simultaneously.
Each type of clash has specific implications for project management and requires distinct strategies for resolution. Understanding these types will facilitate more effective clash detection and enhance overall project workflow.
1. Model Preparation and Setup
What does it take to set the stage for successful Revit clash detection? The answer begins with the meticulous preparation and setup of 3D models. It’s essential that all stakeholders—architects, engineers, and construction managers—collaborate using a unified platform to forge a comprehensive 3D model of the proposed structure.
Key Steps:
Collaborative Modeling: Ensure that all parties are working from a unified model to prevent discrepancies.
Detailed Documentation: Include all necessary architectural, structural, and MEP details to facilitate accurate clash detection.
Regular Updates: As the project progresses, continuously update the model to reflect any changes or new insights.
This initial phase is critical because it sets the parameters within which clash detection operates, establishing a baseline for identifying and resolving potential conflicts efficiently.
2. Utilizing Navisworks for Enhanced Detection
How can Navisworks transform the process of clash detection? By importing Revit models into Navisworks, project teams can take advantage of its robust environment to manage and test the complexities of large-scale projects more effectively.
Guidelines for Using Navisworks:
Export and Import: Begin by exporting the Revit model in a format compatible with Navisworks, typically NWC or NWD, and then import it into the Navisworks environment.
Environment Setup: Configure the project’s settings, including units, levels, and viewpoints, to align with the project’s specifications.
Clash Detective Tool: Use this powerful feature to systematically identify and categorize potential clashes between different systems and components.
The strategic use of Navisworks not only enhances the detection capabilities but also provides a more granular control over the clash detection process, enabling teams to pinpoint and address issues with greater precision.
3. Setting and Adjusting Tolerance Parameters
Why is setting appropriate tolerance parameters in clash detection crucial? It ensures that the software identifies only genuine clashes, reducing the noise of false positives that can clutter the process. Proper tolerance settings are vital for focusing efforts on significant issues that could impact the project timeline or budget.
Considerations for Tolerance Settings:
Understand Project Needs: Different projects might require different levels of precision. Understand the specifics of your project to set relevant tolerances.
Set Clearance Tolerances: Define how close elements can be to each other before they are considered to clash. For instance, a tolerance of 5mm might be appropriate for detecting critical structural clashes.
Adjust Overlap Tolerances: Determine the acceptable overlap between components, which is crucial for MEP systems where slight intersections might not pose a problem.
Setting these parameters carefully ensures that the clash detection process is tailored to the specific needs of the project, enhancing both the efficiency and effectiveness of the detection efforts.
4. Running and Managing Clash Tests
What is the best way to ensure that your project’s design adheres to its specifications and anticipates potential issues? Running clash tests in Navisworks following the model setup and parameter adjustments is key. This phase is all about applying what has been prepared and seeing the results in action.
Steps to Execute Clash Tests:
Initiate New Tests: Within Navisworks, navigate to the “Clash Detective” tab and begin by setting up a new test, specifying the clash rules and test parameters like tolerance and search distance.
Selection of Models: Choose which models or elements to include in the test, ensuring that all relevant parts of the construction are checked for conflicts.
Run the Tests: Execute the clash tests, allowing Navisworks to process the information and identify where clashes occur.
Following these steps allows teams to systematically address potential issues before they become actual problems, greatly improving project efficiency and reducing unexpected challenges.
5. Clash Resolution and Reporting
How can resolving clashes effectively enhance the construction process? Once clashes are identified, the next critical step is to address and resolve these issues. This process is not only about fixing problems but also about communicating and documenting the resolutions effectively.
Effective Clash Resolution Practices:
Review and Categorize Clashes: Each identified clash should be reviewed to understand its impact on the project. Categorizing them based on severity can help prioritize which issues to address first.
Collaborative Resolution: Engage relevant stakeholders in the resolution process. For example, structural engineers and MEP specialists might need to collaborate to modify designs that conflict.
Documentation and Reporting: Update the clash reports with resolutions and circulate them among the project team. This documentation is crucial for tracking resolved issues and ensuring all team members are informed of changes.
By fostering a collaborative approach to resolving clashes and maintaining thorough documentation, projects can achieve a higher standard of precision and efficiency. This not only minimizes costly delays but also ensures that the final construction is free from preventable errors.
Best Practices for Effective Clash Detection
Here are some best practices derived from recent industry insights:
Early Integration: Incorporating clash detection at the project’s inception is crucial. This early-stage focus helps anticipate potential issues and provides ample time for resolution before they escalate, minimizing costly delays and rework.
Comprehensive Model Preparation: Ensure all models are meticulously prepared and reviewed before proceeding to the clash detection phase. This involves organizing and optimizing the models to enhance clarity and accuracy during the detection process.
Use of Advanced Tools: Employing advanced BIM tools like Navisworks or Solibri enhances the clash detection process. These tools allow for detailed setting of clash tolerances, and sophisticated algorithms help in identifying and prioritizing clashes based on their severity and impact on the project.
Regular and Systematic Testing: Conduct clash detection tests regularly as the project progresses. This iterative process helps in catching new clashes that might arise from modifications or further detailing of the project models.
Collaborative Resolution Process: Once clashes are identified, fostering an environment of collaboration is key for effective resolution. Engage all relevant stakeholders—architects, engineers, and construction managers—in the resolution process. Utilize centralized communication systems to discuss and resolve clashes promptly.
Documentation and Reporting: Keeping thorough records of all detected clashes, their resolutions, and the parties responsible is essential. This not only aids in immediate resolution but also serves as a reference to avoid similar issues in future projects.
Leveraging Technological Advances: Stay updated with the latest developments in BIM technology. Emerging tools and functionalities can offer more precise detection capabilities and streamline the clash detection process.
Conclusion on SmartCADD
At SmartCADD, we leverage state-of-the-art tools like Revit and Navisworks to ensure that our BIM modeling services are not only efficient but also cost-effective. By integrating advanced clash detection techniques early in the design phase, we help minimize rework and delays, ensuring that our projects meet the highest standards of quality and safety.
This approach not only saves time and costs but also enhances the overall safety and quality of the construction projects we handle. Through our innovative strategies and skilled use of technology, we aim to provide our clients with the best possible outcomes in all our BIM endeavors.
Source URL:
https://www.smartcadd.com/explore-the-various-effective-strategies-for-revit-clash-detection-in-bim-projects/
0 notes
Last Seen Blogs


ninjabeekeeper-blog
Ninja Beekeeper

adrudge-blog
Untitled

got7sbich
GOT7 Fanfic Recs
got7sbich
GOT7 Fanfic Recs