#retroarch shaders
Explore tagged Tumblr posts
Text

#disney#walt disney#nostalgia#animation#vintage#90s#movie#game#snes#super nintendo#aladdin#japanese#retroarch shaders#retroarch#emulation#retrogaming
4 notes
·
View notes
Text


I've been working on a set of lightweight Retroarch shaders for low power/resolution devices, check em out!
31 notes
·
View notes
Text


This is one reason why I like using GPU shaders with retro games in emulation.. the ability to make for example GameBoy games look like this...
5 notes
·
View notes
Text
Handheld LCD Shader Projects
Welcome to the introduction of a collection of the handheld LCD shaders that emulates the colorspace and LCD metrics from the offical handheld gaming consoles. Ranging from Gameboy Color to the PSP being the main focus for emulating the displays from their colorspace to specified gamma and color temperatures. Most users would be playing Gameboy Color and Gameboy Advance in raw RGB on emulators as well as on the Gameboy Player, and that's totally cool. Playing these games on the backlit displays have been much easier to see the game you're playing than ones without any light on the LCDs. Heck, even having much better contrast that gives off darker blacks, or even perfect blacks from OLEDs. However, once you start playing some of those games, you can really see something off from those games from your childhood handheld consoles, most prominent, the Gameboy Color and the Gameboy Advance. Those screens are really different from modern displays we use on a daily basis, on every single specifications. GBC and GBA would look too saturated and odd color hues in a lot of games, under raw RGB picture. In GBA's case, a lot of games can have lighter gamma that looks overbrightened in raw RGB, since those were only calibrated for the old GBA screens that has darker gamma. Oversaturation from those games were also calibrated for these older displays that has less saturation. This project is meant to replicate the colors and gamma from the real console model, to any project, such as emulators, Gameboy Interface, scalers like the Retrotink 4K, LCD mods, and HDMI/FPGAs projects. It would allow users to pick any shaders or LUT textures to replicate the LCD color display to your preferred way to play games beyond pure original hardware. Of course, there is also Nintendo DS from the first model, the DS Lite, Gameboy SP AGS-101 (Backlit version), Gameboy Micro, and the PSP on its first model, as of current. The project is also meant to preserve the display data and metrics from those handhelds.
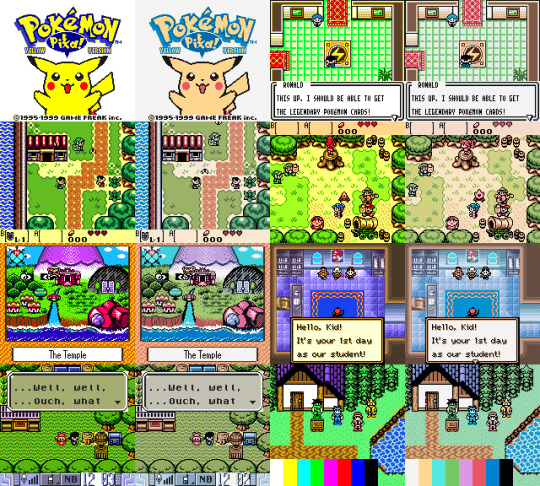
(GBC shader preset with default settings)
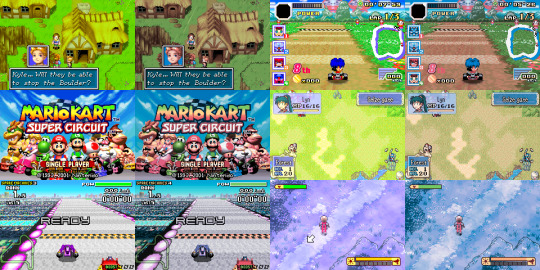
(GBA shader preset with default gamma, and LUT set to "2" for colder greyscale)
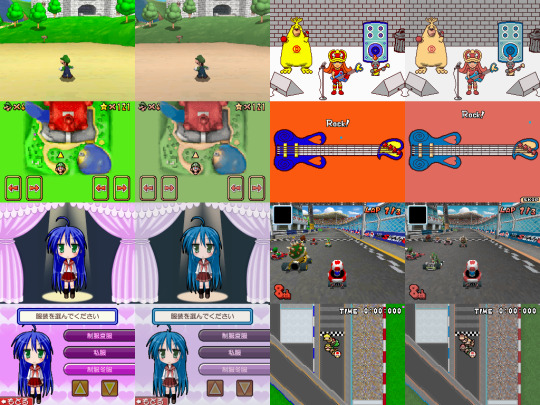
(NDS shader preset with default settings)
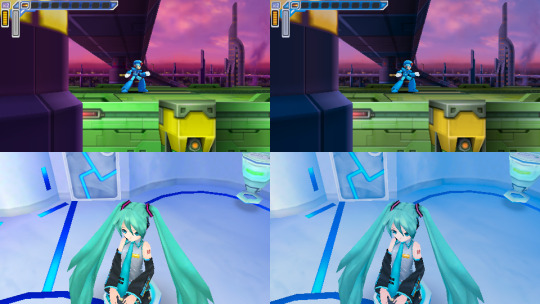
(PSP shader preset with LUT set to "2" for PSP's known colder greyscale)
Downloads:
Instructions: If you haven't already installed shaders, do so inside retroarch under slang shaders. After downloading my package, extract the zip file to "shaders_slang" inside Retroarch's shader folder. It can be implemented inside libretro's shader once the slang shader pack gets updated. I suggest loading the shaders by presets, under .slangp, in both Handheld and Reshade folder (latter being under the handheld-color-LUTs folder). Presets inside handheld folder has switchable settings, including presets containing LCD shaders. Presets inside reshade only loads in LUT textures rather than just shaders. Useful for emulators or projects that only loads in LUT textures as their only filter.
The shaders is based on HunterK's shader, Color-Mangler from the misc folder in slang shaders from Libretro, which was made from a help for my project. It defaults to sRGB on the shader's option for many average users. A shader preset from Handheld folder has LUT choices to change the greyscale color temperature replicated from the real handheld console. GBA one can adjust the gamma to make the image darker, while GBC and GBM has gamma option to brighten or darken. In Reshade, it only had adjustable greyscale temperature except for GBA_GBC variant. The shader supports DCI-P3 and Rec2020 colorspaces on its option to use on your display that may support either of those to reach better color saturation to present more accurate blue primary color from my shaders that common sRGB colorspace is limited from. The GBA and GBC have external gamma options to adjust the gamma on the greyscales if not using any LUT shader preloaded.
Developer notice: For developers of any GB/GBA (or any handheld) projects involving emulators, FPGAs, or screen mods, shall take some advices when it comes to implementing the shader or color filter to your projects. To implement as a shader, the gamma has to be lower first by 1/2.2 (Can be used to change the GBA gamma itself to darken the screen), then use my color values from the shader to change the color primaries, and then revert the gamma by 2.2 afterwards to have great color correction while respecting luminance and color tones. Also I prefer if you take color values from white balance correction that are outside of GBC/GBA shader. For only LUT texture, a more easy approach for devs, I prefer using the non-cold variants if preserving the greyscale color tone. GBA and GBC LUTs have their gamma and greyscale adjusted to emulate the screen's default gamma. If you only want just the color gamut correction as an LUT, use the GBA_GBC variant inside Reshade's LUT folder. -If you decide to implement a basic GBC or GBA colorspace to the emulator, use the sRGB data. The gamma change must happen before the color correction. -If the project is aimed for TV such as Gameboy Interface or GBA Consolizer, use the sRGB LUT shader, since SD and HDTV resolutions aim for sRGB colorspace. -If the FPGA such as Analogue Pocket, IPS screen mods, or emulation device uses a display gearing towards sRGB colorspace, use the shader, color filter, or LUT accordingly. -If the OLED screen mods or emulation devices have its native colorspace target around 100% DCI-P3 Volume, use any filter accordingly. -If implementing the shader to your emulation project, do port the shader to your shader or filter libraries. The shader and LUTs are in public domain after all, to spread about the color correction regarding GBC/GBA displays. -If using a professional scaler like Retrotink 4K with either GBA Consolizer or Gameboy Interface without any filters used, play with its gamut matrix settings for both GBC and GBA as "Red: 0.4925 0.3100" "Green: 0.3150 0.4825" "Blue 0.1625 0.1925" to emulate the color correction, and can be used on SDR or HDR mode to give out consistent image. Gamut info for other consoles below.
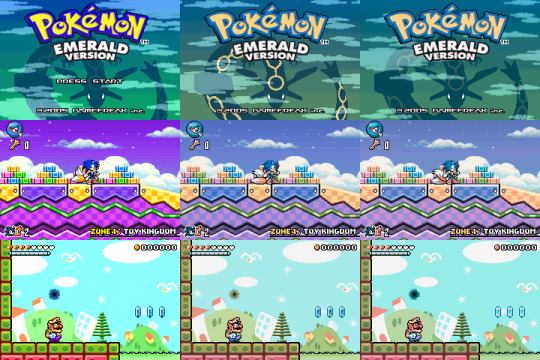
(Raw RGB, Gameboy Micro, and GBA shader with darken set to 0)
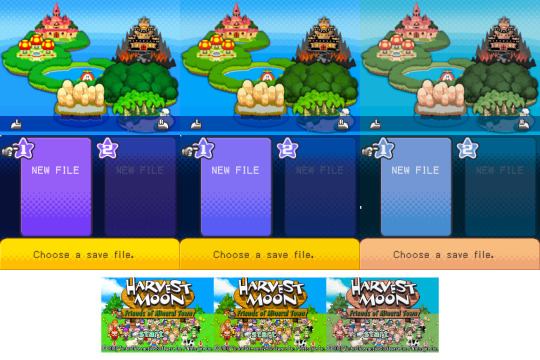
(Top: NDS; Raw RGB, DS-Lite, and NDS Phat)
(Bottom: GBA; Raw RGB, GBA-SP AGS-101, and GBA with darken set to 0)
Note: While DS-Lite and SP-101 are really close to sRGB that developers don't really need adjustments, it is shown to preserve on how far they reached from older models to newer ones in mid to late 2000s.
Story:
So when did I start the project and why I was invested in doing this? It was back in August 2014 when I first saw a forum on someone wanting to desaturate the GBA and mentioned the filters from emulators like VisualBoyAdvance, or VBA-M, as well as NO$GBA that has options to emulate the colorspace that is close to the real hardware. I was reminded how the latter emulator has those options when I used it long time ago. I mostly use unfiltered colors as that was how close it looks on my GBA-SP with "Better Screen" than the GBA. Yeah I actually have the backlit version of GBA-SP known as AGS-101. The display was a huge jump from old GBA to GBA-SP, as well as the Nintendo DS Phat under GBA. However, I had good amount of memories of playing my old GBA with the lights around me and I do remember the color saturation being very different overall. So I wanted to take a look on how to replicate the VBA-M's colorspace.
(Link to the forum I created of my histories of re-creating the GBA colors)
I first decide to use simple desaturation with a mix of shaders by playing with saturation and contrast levels. At first, it looks very similar to how VBA-M's attempt looked. That is, until I saw the blue color has a different hue, being more torqourise in VBA-M's recreation. Then a LUT shader appeared in libretro forums and I first used that for my photoshop to use crazy amount of filters to recreate the whole thing, even though it wasn't perfect, but close. Then I tried to replicate the original NDS model that I have for many years, and also played with the LUT textures from Photoshop. Yeah I just simply tried to copy the colors from the console, without any tools, on my uncalibrated old LCD TN panel screen, because I had such no experience on how colorspaces work, but it was worth a try. Then in 2015, I somehow found a shader that plays with RGB and I got help with Hunterk, a contributor on Libretro who has been involved with a lot of shaders for Retroarch. He made an amazing color mangler shader for me to put data of colors and gamma on the shader itself than just using a LUT texture. Then in May of 2015, I found another GBA on my house that was not used by a family for a long time. Yeah I lost my GBA somehow as a kid from another family, but a long story to tell. Thankfully I was allowed to use another GBA for full use just for this project. This was just the beginning of my progress on grabbing screen data starting with just a flashlight with my old LCD monitor. The only issue I always have is the common sRGB screens don't have deep blue colors that is needed for both GBA and NDS (and more), so I always had issues replicating the blue primary color. That's what got me to start learning about colorspace and what sRGB and color gamut means. And that's where my progress to get the right tools begins. I then later got a superior IPS 1080p monitor, the GBC, Colormunki Display, using DisplayCal and HCFR, Colormunki Photo, the PSP, GBA Micro, a 4K monitor, and a portable light to use on GBC and GBA. Now in 2024, I have really progressed with help of such tools I need, have become much better way of getting the LCD data from the handhelds to contain the color gamut, the greyscale, gamma, and color temperature.
So now the story is out of the way, here are the tools I used to gather infos from the handheld screens.
Samsung S80AU - A 4K IPS Monitor that supports DCI-P3 colorspace with great Delta Error scores especially for sRGB colorspace. It's also used to test out LCD shaders on a high DPI display. Colormunki Display - A Colorimeter that calibrates your display and gathers color data from your target screen. Colormunki Photo - A Spechrometer that behaves the same as Display, except gathers the white colors temperatures more accurately regardless on any type of LCD or OLED displays. It's used to make profiles for the Display to be calibrated for a specific monitors as the Display reads data much faster than Photo as well as reading darker blacks better. Displaycal has infos on colormeter matrix correction to add in why this combo is best used for serious color calibration. It's also used primarily for handheld console displays to sample color data. DisplayCal - Used to completely calibrate my monitor and other screens to give off pure sRGB colorspace with 6500K whitepoint. It's also used with its own ICC Profile creator to make .icc with given data from ColorHCFR for a specific Handheld Console display to emulate from. It's 3DLUT tool was also used to generate LUT textures to check the color and luminance on primary and secondary colors. ColorHCFR - A free alternative for Calman. It's used to gather data on the greyscale, the color gamut, and tons more info to check how your targeted display looks. It shows you graphical images of the screen's color gamut on the CIE diagram. MCH2 - A tool that used your generated DisplayCal monitor calibration data to create an .icc profile made for Windows 11 to convert the entire screen to your targeted colorspace such as sRGB and DCI-P3. G2 Pocket RGB Camera Light - A portable light that shoots out lights to use on handhelds that lacks any light, such as the Gameboy Color and Gameboy Advance. It toggles between RGB and pure whitelights with color temperature adjustments. It's used to match the whitepoint on both GBC and GBA to match my monitor's whitepoint as the closest. It's much better tool than me previously using my collection of phones to use the flashlight for color sampling, as GBC and GBA suffers from rainbowing, no adjustments on white balance, and less saturation by a flashlight, unlike proper lights like the G2 Pocket that eliminates those issues. 240p Test Mini - The handheld version of the well known 240p Test Suite. Used to check RGB, greyscale, motion flickering, and color scrolling on real hardware. https://github.com/pinobatch/240p-test-mini EZ Flash Jr - A GB/GBC Flashcarts to load ROMs and Homebrew for GBC and GBA. EZ Flash 3-in-1 Expansion Pack NDS - A GBA Cartridge to load in a ROM and homebrew in to load inside GBA and NDS. Used NDS to insert a ROM on its NOR memory. GIMP - A Photoshop-like image editor that is used to check generated LUTs from 3DLUT to check on the color values to adjust the shader. Retroarch - Using mGBA and Sameboy emulator core to check out the games while using the shaders I created for color correction. It also loads in image files for my best way to check out my shaders during adjustments.
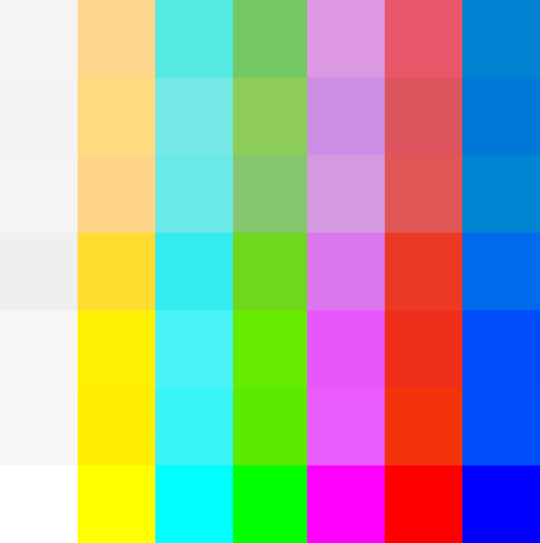
(Top to Bottom: gba-color & gbc-color, gbMicro-color, nds-color, psp-color, DSLite-color, SP101-color, and raw RGB, all in sRGB)
Note: Why the white color is darker is due to clipping on the yellow color because of how color correction works with the blue color being out of sRGB gamut. Also, sRGB can't display those handhelds blue saturation due to it. Will soon post DCI-P3 and Rec2020 variants for displays that can see more saturation without internal color adjustments.
List of handheld consoles I owned to create shaders out of: Gameboy Color Gameboy Advance Gameboy Advance SP (AGS-101) Gameboy Micro Nintendo DS Nintendo DS Lite PSP (1000)
Nintendo Switch Online emulates GBC and GBA with their own color filters. GBA only desaturates the screen in more simple manner for sRGB, which was easy to implement. GBC, was very hard to do in shaders currently, so to use full experience, the LUT version can only be used to fully emulate the effect for other emulators.
I also found someone's Switch OLED data from a youtube video. The colorspace is taken with bigger saturation than even DCI-P3 when using vivid mode. Here's a link to the video by GamingTech:
youtube
I also made Palm Treo 700p shader long time ago by taking DisplayMate's data long ago while trying to translate the gamut pin points to HCFR since I don't have those in possession. I only made it for experiment long ago and only archived.
Replicating existing filters from emulators or dev tools such as No&GBA and VBA-M for GBA image replication, and GBC tools like Gameboy HiColour Converter V1.2 for GBC image replications. Even No$GBA and No$GMB docs had mentioned the LCD color differences:
(HiColour Convertor)
My Handheld LCD review datasheet and showcase for each platform (Coming Soon):
Gameboy Color Gameboy Advance Gameboy Advance SP AGS-101 Gameboy Micro Nintendo DS (Phat) Nintendo DS Lite PSP-1000
Handheld consoles I plan on getting and make data out of: PSP-3000 or GO PS Vita Nintendo 3DS (Owned, but not yet examined)
Handhelds I don't plan on getting or reviewing: Gameboy or Gameboy Pocket (Many have made their own shaders and filters out of their monochromic display) Gameboy Advance SP AGS-001 (Uses the same exact display as the original GBA except with frontlight added) Knockoff GB Boy Colour (I only allow any official handheld consoles for my project) PSP-2000 (Same colorspace and data as PSP-1000, except brighter screen) PS-Vita 2000 (Uses LCD instead of OLED, with less color gamut than original PS Vita) Nintendo NEW 2DS XL/3DS (or XL) IPS displays (Hard to find and a lottery to obtain; not common) Nintendo Switch (Owned and targets sRGB and its gamma well; whitepoint can vary between units)
Notes: On GBA, A lot of games are calibrated for the GBA's gamma due to how dark its screen's gamma looks. For some games, often Nintendo and a couple of companies with closest relationship to Nintendo, are adjusted for its colorspace. Certain games, often SNES ports, may have its original palettes on its setting. On GBC, many games were made for the screen during its run. It's unknown which amount of games weren't calibrated for the screen. Although certain games like Link's Adventure DX were completely adjusted for the screen on colorspace, gamma, and color temperature, which made purple-grey colors looks more grey overall. On both NDS and PSP, pretty often the first few years of games can be adjusted for those screens. Those are until both NDS-Lite and PSP-3000 have colorspace that closely aims for sRGB where no adjustments can be made. Many multi-ports for PSP of the same game from home consoles are very likely not calibrated for the first two PSP models. I didn't make a Switch OLED preset (from Vivid mode) with LCD shader, since the Switch OLED is not LCD, its RGB pattern is very different, and either original LCD or OLED are too high resolution to notice its RGB patterns. It's best to use only the shader to use with Reshade on a Switch emulator to emulate the OLED's vivid mode, but preserved in Libretro to see its effect. While I explain what the shaders are meant to use for, it's also your preference on using the shaders or just using the Raw RGB colors that fits your needs. You can use other color shaders on a GBA or GBC emulator, such as using NDS, Micro, or PSP shaders to your preference. The PSP shaders have much more saturation than any Gameboy line or NDS Phat, while preserving its hue.
To end off on this page, I would also like to give respect to other projects that tried their attempt to create their own color correction. While I prefer the best accuracy of the color correction from my shaders, many of their color corrections are pretty impressive with varying degree levels of accuracy, and they all motivate me to continue with the project to give out the best quality of color correction. Their blogs have pretty interesting ideas on how displays work on GBC and GBA.
(BGB's "Reality" Color Correction filter)
(GBCC's page on GBC screen tech notes)
(Bsnes/Higan Color emulation page)
(Gameboy Interface having their own Color Matrix correction, and including our shaders and filters alongside)
youtube
(Nintendo showing their GBC and GBA color correction under Virtual Console from Nintendo Switch Online, the former having bigger difference)
#gameboy advance#gameboy color#nintendo ds#playstation portable#gbc#gba#nds#psp#colors#handheld#shaders#libretro#retroarch#emulation#emulators#gameboy micro#color correction#colorspace#nintendo switch oled
6 notes
·
View notes
Text

good fucking news i got mods working in retroarch. i want to turn into an oyster now
#soda offers you a can#i am terribly uninterested in trying to make standalone citra play nice atm so this was immensely more preferable#as a bonus i can have all of retroarch's goofy shaders#why do all my alola experiences have to be like this im dying squirtle
5 notes
·
View notes
Text
Tudo Sobre Filtros & Imagem (MD)
0 notes
Text
Do any of my followers have experience developing RetroArch shaders? I'm trying to make an animated scan line effect for Rio Terminal, but it doesn't animate.
I know I'm properly referencing the FrameCount uniform, but as soon as I try to actually use it the effect breaks, and the scan line stays at the bottom of the screen.
The code I have works as follows:
Define a float called time equal to float(mod(FrameCount, screenHeight)). The mod function makes it so the effect will wrap when it reaches the bottom of the screen, and prevents the value from getting large enough to make floats behave weird.
Multiply time by a scale factor to control the speed of the animation.
If a pixel's vertical UV coordinate is less than or equal to the result of step 2, add a tint color to the pixels value, remembering to multiply that tiny color by an intensity modifier between 0.0 and 1.0, as well as by a falloff value (dependent on vertical position) to make the effect look like it's fading out over time.
My falloff function (restricted for uv.y <= time) is:
abs( 1.0 / pow( uv.y - 1.0 - time, 2.0 ))

Without the restriction, the function has a vertical asymptote at x=t+1. Is that causing the problem?
#math#please help.#graphics programming#slang shader#retroarch#shader development#shader#code#terminal
0 notes
Text
youtube
Some more running around in Platinum.
#pokemon#retroarch#retroachievements#fan art#retro gaming#Is there a way to show the shaders in the recording retroarch?#Youtube
1 note
·
View note
Text


Getting stupid with it. Left one is closest approximation of my old Sony CRT, right one I've named Blinding Nostalgia


Spent like 40 minutes making a ReShade filter for Crazy Taxi that mimicked the lightly cooked cabinet I first played it on. Think I got pretty close!
#shoutout to the person porting all the libretro shaders over from retroarch to reshade btw. you may ruin my life with this#not pictured is the signal interference/ntsc wiggles that you can only see in motion. crucial part of the faux CRT shaders imo
35 notes
·
View notes
Text


CRT Comparison - X-Men | Sega Genesis/Mega Drive (1993)
The blending and smooth gradients are fantastic in this! Lovely piece of art 😸
[Retroarch Shader Used: crt-royale-ntsc-svideo]
#magneto#x men#x-men#sega#sega mega drive#sega genesis#crt#crt shader#crt tv#crt comparison#gaming#video games#mine
44 notes
·
View notes
Note
Hi Jeff, you’ve made your feelings on CRT filters in general clear, but I’d be interested to hear what you think of some of the Retroarch shaders like the mega bezel packs by Cyberlab. By and large I agree with you and never use CRT filters in commercial products because they look awful and are dumb conceptually, doubly so for myself because I work for a vintage tech museum and see games running on CRTs every day. But crt-royale, in particular, looks so amazing that it’s become the first thing I’ve found that I prefer to unprocessed pixels. It doesn’t look like shitty fake scanlines, it looks indistinguishable from a real CRT (to the extent that you can actually see the individual RGB pixels if you’re up close), and more importantly it doesn’t feel like it’s occluding the screen or taking anything away from the pixels, only adding a bit of shape and more complex shading to games that enhance the look immensely to me.
Of course I’m not looking to convert you or act like you’re dumb for rawdogging your pixels or anything, just to let you know that there’s now an option there that was impressive to someone who otherwise agrees with you completely on the subject!
I think the only thing I've tried that's managed to sell me on the idea of fake scanlines is the RetroTink-4K, which is very capable in a ton of really fascinating ways. Once you start mixing in VRR and OLED screens and all that, it starts to get interesting. Still not exactly enthusiastic about them, but I'll usually use them via the RT4K with the MiSTer, since it has very handy presets.
CRT Royale looks fine, it's been around for awhile now.
Either way, fake scanlines tend to look like shit when you're streaming it out, so I don't really devote much time to them.
9 notes
·
View notes
Text
The Best Way to Enjoy Retro Games Today
This is a pretty subjective topic, so just to be clear: everything I’m about to share here is simply my opinion.
There are so many older games that are still worth playing today. They’re true works of art. In many ways — story, gameplay, technical innovation — these games are amazing.They pushed the limits of what was possible at the time and paved the way for what we enjoy today.In a perfect world, these games would get new versions that stay faithful to the original gameplay while taking full advantage of today’s technology.That way, new generations could experience them properly.Unfortunately, that’s not usually what happens. Aside from a few rare exceptions, to enjoy these classics, we have to turn to emulation or modern re-releases — and most of those tend to be lazy ports to new platforms.
There’s also the issue of what’s commonly called Pixel Art, which, in my opinion, is another part of the problem.Pixel Art should be about doing the best you can with pixels, using today’s technology — not about artificially limiting a game’s resolution.Especially now, when Ultra HD is the norm, it makes no sense to hold games back.Imagine how incredible it would be to play Chrono Trigger, with all the characters and settings true to Akira Toriyama’s original art, polished gameplay, and all the benefits of modern resolution.

So all I can do is hope this misguided Pixel Art movement fades away, and that we can finally enjoy everything modern technology has to offer — without losing the heart of these classic games.
A Strategy for Dealing with the Current Reality
Since the ideal doesn’t exist (yet), what I do is use emulation with shaders — algorithms that process the game's image in real time to improve how it looks.
RetroArch is, without a doubt, the best emulation project available today.That said, it’s extremely complex.The number of settings and options is almost endless, and navigating it can be overwhelming.
After months of experimenting, I ended up realizing that most classic games basically fall into three visual categories:
1. Simple
These are games with basic, rudimentary graphics, from a time when the technical possibilities weren’t fully understood yet.They’re usually older games that leaned heavily into simplicity.
Best approach:For these, the ideal is to use a shader that turns the raw pixels into smooth lines.One great example is edge-smoothing/scalefx/scalefx-9x.slangp.The results are simply incredible — it keeps the original look while making the image much more pleasant to the eyes.
2. Trickster
These are games that squeezed every bit of available technology to create stunning visuals.They often took advantage of the quirks and limitations of old TVs — like screen interference and interlacing effects — to create visual effects that wouldn't be possible with just raw pixel art.A classic example is the waterfall reflection in Sonic’s second level.
Challenge:These games are a real challenge for modern shaders.Simply smoothing the pixels would ruin the fine details and the artists’ original intentions.
Best approach:The best way to handle this is to emulate the old display technology itself.Among the many shaders that simulate old CRT TVs, the best one I’ve found is edge-smoothing/presets/crt-hyllian-sinc-smartblur-sgenpt.slangp.It does an outstanding job of recreating the glow, interlacing, and special charm of CRT monitors.
3. Detailed
These are games with super detailed pixel work, like mosaics that, when displayed properly, create truly rich and vibrant images.Chrono Trigger is a perfect example — the vegetation, the characters, the way the wind moves through the scenery — it’s all packed with incredible detail.In these games, the pixels are honest: they don’t rely on TV quirks to create effects.
Best approach:For this kind of game, the goal is to boost the resolution while slightly softening the image, letting the pixels blend naturally and harmoniously.The shader that does this best is edge-smoothing/xsoft/4xsoft.slangp.It upscales the image nicely, reduces excessive sharpness, and preserves the original artistic depth, while lightly mimicking the softer look of old TV screens.
Conclusion
My goal with this post was to share my experience and hopefully help anyone just starting out with emulation.Of course, taste is subjective — but I’m confident that following this strategy will give you a very satisfying result.
I'm definitely open to suggestions and would love to expand this article with new ideas and strategies in the future.
Update
I recently tested a new shader:
shaders/shaders_slang/crt/shaders/crtsim/Tv-NTSC_Generic-AA_sharp-Selective.slangp.
The results are outstanding—better than the image quality of old TVs while preserving the era’s visual aesthetics. The shader includes extensive customization options, such as flat or curved screen, with or without screen glare, transparency for games like Sonic for MegaDrive and optional screen border.
Good luck!
4 notes
·
View notes
Note
by any chance do you think we could get a quick tutorial on how y'all did that old monitor effect for the animation that was just posted? no worries if its too much of a hassle
(Absolutely adore the art btw!!)
ok so its a pretty garbage workflow because we haven't found a better way yet but
essentially while working in aseprite were running retroarch on the side using the built in image loader core with a mix of crt and ntsc shaders on it, and every once in a while export the image and reload it. (done during the creation process so we can optimize the pixel art for the effect) We'd love to find a replacement because we really don't like retroarch and the process is extremely finnicky and took a lot of tweaking to make work, but haven't found one yet that matches the per-pixel accuracy and tweaking it allows.
When producing the final image, we use the built in screenshot function and take multiple screenshots to capture both frames of interlacing and composite them together in a photo editor to get the final result.
We did that for each frame of the animation, then put them together for the final result.
Update: we couldnt remember what preset we used for the shader in the animation but we found it! its Mame-hlsl with many tweaks to the parameters to defocus the x axis and add more color blending
16 notes
·
View notes
Text


I spent most of the day setting up the Softmod for my Street Fighter II Dynamo HS-5 style cabinet.. it now runs RetroArch, Daijisho as the front end and has a lot more games than before...
I didn't go too nuts though I am keeping it mainly 80's-mid 90's Capcom themed!
Also since it's running Retroarch now instead of the commercial emulation it included pre-installed I can now run more advanced CRT shader filters on the games..
Also I gained access to the Android settings of the mini PC running it and I turned down the backlight a bit.. think it looks better!
The only true downside is the combination of software and MAME is giving me a hard time setting up the controls and it'll often give me a black screen of death if I don't choose the right emulator core to run the games..
#retro#aesthetic#arcade#video games#street fighter II#Capcom#Dynamo#Dynamo HS-5#homearcade#home arcade#Kama Arcade#the kama arcade#tamara kama#updates#mods#modifications#soft mod#arcade1up
3 notes
·
View notes
Text


RetroArch CRT shaders adjusted to match as closely as possible to an actual CRT.
11 notes
·
View notes
Note
I'd love to know how you post possess your images!! It's like you ran it rough a vhs player or a video synth!!
occasionally i do take a photo of my CRT displaying a drawing. BUT in other instances i use ntscqt or just fuck around a LOT with blending modes and g'mic in Krita. before i found out about ntscqt, i also would load images in retroarch and apply its built-in vhs/crt shaders and use that as my post-processing.
also i should maybe make an FAQ or something since enough people seem interested in the way i post-process, will add to my to-do-but-may-never-get-done list
4 notes
·
View notes