#resize multiple pictures at once mac
Explore tagged Tumblr posts
Visit Tumblr Blog
Explore Tumblr blogs with no restrictions, modern design and the best experience.
Last Seen Tumblr Blogs


Fun Fact
Tumblr Inc. is funded by 13 investors.
Text
C++ and Java Development Services

C++ and Java Development Services C++ is a very powerful general-purpose programming language. It is being widely used now-a-days by C++ java programmers for competitive programming. It has an imperative, object-oriented, and generic programming feature. C++ usually runs on lots of platforms like Windows, Linux, Unix, Mac, etc. C++ is a very versatile language and can interface any programming language on any system. It can run and compile the code very smoothly and effectively. Since C++ is a combination of both high- and low-level features, it offers great performance and speed. This language is loved by programmers as it gives complete control over their code. C++ has almost every possible feature that a developer could ever wish for such as- multiple inheritances, templates, operator overloading, pre-processor commands, and many more such features. C++ Java Programmers Before moving to the C++ Java Programmers, we should know the basic differences between C++ and Java. These two are quite similar in certain basic terms of syntax. It means Java and C++ have quite a similar syntax for basic concepts. The basic constructs like, “if statements”, loops, function syntax, switch-case statements of C++ are valid for Java as well. However, other notions such as the syntax for comments and the idea of static class variables are also used in both Java and C++. There are some noticeable differences between the languages. Once you use cout/cin for output/input in C++ or printf/scanf in C, you’ll be able to make specific comparisons between Java and C++. The syntax for C++ classes is, however, not the same as the syntax for Java classes, except for certain basics. The templates used in C++, are in some ways even better than Java generics. It is because they are computed at the compiling time. Though both C++ and Java allow basic parameterized types, yet the syntax for templates differs from Java generics. Differences between C++ and Java
Toolset and compilation model: A Java VM and a Java compiler are required in Java and the Java compiler produces files that are easily understood by VM. Whereas you don’t need any VM in C++. In the case of CPP, you can individually compile source files into object files and the process of creating the EXE file is called linking which is similar to the creation of JAR file in Java.
The C pre-processor vs. Import: Java uses imports and does not have a pre-processor. It imports statements to include references from the Java class library. Whereas in the case of C++, header files are included that provide declarations for library objects.
Memory Allocations: Java automatically frees the memory that is no longer used but in the case of C++, you have to de-allocate the memory that was allocated previously.
Security: Java was designed for security purposes, as everything is networked and it deals with thousands of threats. Java has various interesting features like range-checked arrays, immutable strings, auto-resizing containers, and garbage collection which prevent common security problems like double-free attacks and buffer overflow. But you have to be very careful and security conscious when you are working with C++. C++ and Java Development Services Java and CPP both are meant to improvise your productivity. However, you can identify the similarities and differences among both the application by keeping an eye on the memory management as well as a functional class library.
C++ only comes into the picture while you are working on a large application and you need low-level language features to write back-end codes giving importance to the performance as well. Whereas Java is quite a less actively developed language but it has the largest ecosystem in terms of various libraries as well as third party products.
Java should be used for back-end development since it will give you a variety of options in terms of platforms. CPP though a popular language, yet essentially limits you to Windows. Hence, C++ is hardly used for web application development purposes.
C++ network programming is most widely used as a high-performance application providing language. It is the only industrial language that is built around this concept of Scope Bound Resource Management (SBRM) which is otherwise called RAII. Whereas Java is widely adopted because it can be run securely on nearly any platform regardless of the architecture of the device or the operating system provided the system has Java Runtime Environment (JRE) installed.
C++ provides lifetimes for all objects. It also guarantees that resources are obtained and released conclusively. Whereas, Java is quite a simpler platform as compared to CPP and it allows its programmers to provide more services and improvise end-user productivity, communication, as well as collaboration. Hence, C++ Java programmers have the combining benefits of both Java as well as C++ by which the gaps of one language will be filled by the other. A CPP Java programmer has the power and ability to conduct any provided test using both languages to reduce the cost as well as the complexity. Responsibilities of C++ Java Developers CPP Java development services allow its developers to carry out the following duties –
Construct server-side applications for stores, online forums, polls, HTML forms processing, and many more thing.
Structure programs that can run within a defined web browser and can access available web services.
Write software on any particular platform and run it virtually on any other platform.
Combine applications or services that are using the Java or C++ language to create highly customized applications or services having the benefits of both the language, Java as well as C++.
Create powerful and efficient applications suitable for remote processors, microcontrollers, mobile phones, wireless modules, sensors, gateways, consumer products, and practically any other electronic device. OdiTek’s C++ Services Offerings Full-cycle C, C++ software development services from Oditek are tailored to specific requirements. Whether you are looking to develop, upgrade, modernize or support and maintain C, C++ based applications and product solutions, OdiTek’s development team has over 15 years of experience to efficiently assist you no matter what environments or development platforms you are using. 1.Custom Software and Application development
Maintenance and support of new or legacy applications developed in C, C# or C++
Development and optimization of high-performing software or product solutions
Cross-Platform Application development
C or C++ Server-Side Software development
Hardware-specific software solutions
Extensions, 3rd parties integrations and Plugins Conclusion While technology is continuously evolving it seems that only language will not be sufficient for a developer to modify or build any application. To bring creativity and provide the users with a better experience, two or more applications should be mastered together by the developers. The potential C++ Java Programmers are already ahead of this thing because they can consistently upgrade the present model to be competitive enough to perfectly fit into modern technological standards. OdiTek Solutions have prospective developers who are well-experienced with CPP and Java language to provide you with software development for a wide variety of applications in various industries. To Know More about cpp and java check our website:-OdiTek
0 notes
Text
PhotoCut’s

Are you looking to enhance your images by giving them a transparent background? Look no further! Our free PNG maker allows you to easily convert JPG images to PNG, improving image quality and adding filters in just a few seconds. Learn how to use the green screen with our beginner's guide.
PhotoCut’s online PNG maker can instantly remove the background from an image for free and edit it.
Convert JPG Images to PNG in a Snap

PhotoCut offers a convenient solution for converting photos from JPG to transparent PNG online. Simply upload your JPG image, and PhotoCut will automatically remove the background and replace it with a transparent one. Say goodbye to manual editing in Photoshop! Additionally, you have the option to manually adjust the subject to retain specific parts of the photo that you want to keep.
Learn how to remove backgrounds on Mac with our step-by-step guide.

Our cutting-edge transparent PNG maker utilizes state-of-the-art AI technology to seamlessly convert images to PNG format without any loss in quality. This innovative tool ensures that the clarity and intricate details of the original image are preserved, even when dealing with images containing hair or fur. Upon completion of the conversion process, users have the option to download the high-resolution PNG image at no cost. Learn how to effortlessly remove backgrounds from images for Depop with our user-friendly tool.

PhotoCuts offers a free online PNG maker that allows you to upload multiple images and convert them all at once, saving you time and effort. Whether you are working with animal pictures, portraits, logos, or vectors, PhotoCut can handle it all. Enhance your productivity and workflow with PhotoCuts hassle-free experience. Explore the world of color temperature and how it can impact your photography.

Do not worry if you have low-quality, blurry PNG images. PhotoCuts PNG maker comes equipped with an AI image enhancer that can improve the quality of your images.
Are you wondering how to change the green screen background?

Elevate the quality of your PNG images using our complimentary PNG maker. Customize your backgrounds with pre-set options, your own images, or AI-generated designs. Utilize the blur feature to enhance privacy and maintain focus on your content. PhotoCut provides a wide range of tools to help your PNG images make a lasting impression. Discover the power of our Background Remover app designed for photographers.

PhotoCut provides a comprehensive range of editing tools that go beyond simple image conversion to PNG format. With our suite of editing features, you can enhance and combine your PNG images to produce visually striking designs. Easily crop, resize, add text, change backgrounds, apply filters, and more with just a few simple clicks.
Are you looking to take a professional photo for your CV?

Creating stunning graphics is made easy with PhotoCut. Select from a wide range of templates including LinkedIn banners, Facebook covers, presentations, mobile wallpapers, and more. Seamlessly blend your images with lines, shapes, icons, photos, and other versatile elements to craft captivating visual effects effortlessly. Learn how to remove backgrounds using Fotor Photo Editor.
What Can You Do with PhotoCut’s PNG Maker?
PhotoCut's PNG image maker is your go-to platform for creating high-quality PNG pictures whenever you need them.

Transform your car photos into high-quality car PNGs to enhance conversion rates. Learn about Amazon's Product Image Requirements.

Easily create PNG images of people, whether it's a portrait or a group photo. Celebrate National Puppy Day with these 7 fun and heartwarming activities.

Create transparent logos for various uses.

Create stunning sticker PNGs with transparent backgrounds.

Create your digital signature instantly.

Convert text to PNG images online quickly.
Make Image Transparent for Any Purpose
Our PNG maker is perfect for both personal and commercial use.

Edit product images with clear backgrounds for e-commerce platforms like Amazon, eBay, and Shopify. Use PNGs with Alpha Channels for brand websites, product pictures, and digital business cards to boost sales.

Create transparent backgrounds for social media graphics to captivate more audience. Use Alpha channels for social media marketing or website pasting effortlessly.
Create PNG with an Erased Backdrop for Individuals
Create unique profile pictures or avatars for personal use with our online BG remover. Make your pictures transparent, remove distracting elements, and create a blank backdrop easily.
How to Make a PNG Online for Free?
Click the "Make PNG Now" button to get started with PhotoCut's online PNG maker.
Upload the image you want to convert into a PNG.
PhotoCut will automatically convert your image into a transparent PNG within seconds.
Customize your backdrop with preset colors, your images, or AI backgrounds.
Add text, overlay images, resize, and more with photo editing tools.
Download your new transparent PNG picture in high quality.
Why PhotoCut Transparent Background Maker is Awesome!
Fast Processing
Do not worry about complex steps or layouts. Simply upload your image and receive a background-free picture quickly. Discover the top 9 Passport Photo Customization Tools of 2024.
Automatic AI
PhotoCut uses AI technology to make removing backgrounds super easy and automatic.
Free Exports
You can download your background-free images for free. Edit them and make them look even better without spending a dime.
Online BG Remover
No need to download any software. You can access PhotoCut's transparent image creator online from any device without any hassle.
Editing Tools
After removing the background, you can use PhotoCut's free editing tools to make your image look even cooler.
Batch Editor
Save time by editing multiple PNG images at once with PhotoCut's bulk image background remover. It's super easy.
FAQs
Q1. What is a PNG file?
Ans. PNG stands for Portable Graphics Network. It's a type of image format that keeps all the details without losing any quality.
Q2. What is PNG good for?
Ans. PNG is perfect for storing images without losing any quality. It supports true color images and transparent backgrounds, making it a popular choice for web graphics.
Q3. How to remove a white background from a PNG?
Ans. Removing a white background from a PNG is easy with PhotoCut. Just upload your image, click 'Remove background,' and let PhotoCut do the work for you.
Q4. What image format is transparent?
Ans. File formats like PNG, GIF, BMP, and TIFF can all have transparent backgrounds. Give PhotoCut's transparent image maker a try to create your own.
0 notes
Link
Light image resizer Crack through Apparent Idea is free of charge device that sets up your pictures by getting smaller image resolutions or relocating them
1 note
·
View note
Photo
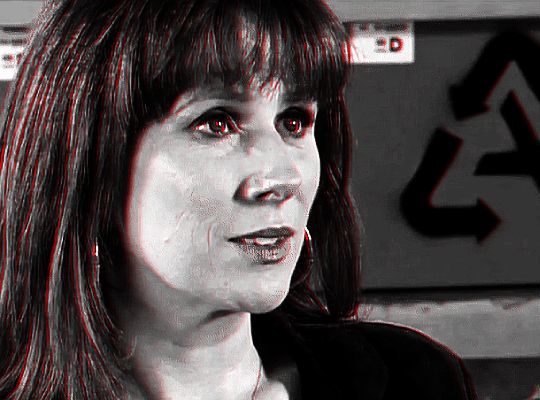
@lightasthesun requested a tutorial for how to create the colored outline effect on black and white gifs, so i am here! this was heavily inspired by @usergif’s wonderful tutorial for the same effect on photoshop, which you can find here. i am constantly in awe of the whole team over at usergif. they’re crazy talented.
onward!
so to start off, you first want to make and upload your gif to photopea, then sharpen, crop, and resize. i cover how to do all of this in my intro to photopea tutorial, which you can find here.
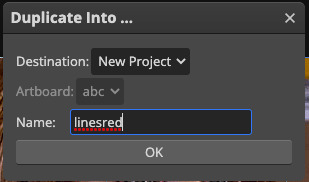
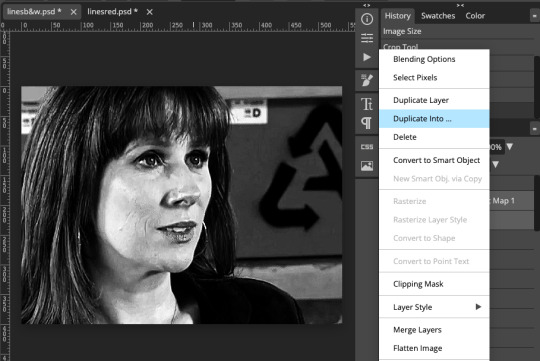
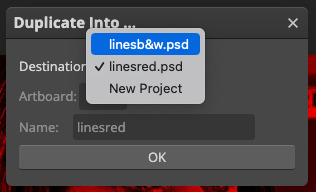
now that you’ve done this, you want to make a second copy of your gif. right-click (or two-fingered click for mac users) the gif folder in the workbar, then select “duplicate into”:

now choose “new project” as the destination and name it something fun and funky.
go back to your original gif. next up is coloring! you’ll want to do some very basic coloring here (i literally only did a levels layer), then add a black & white gradient map layer.
once you’ve finished your coloring, duplicate your coloring into your second gif by selecting all your coloring frames. click the first frame, then hold shift and click the last frame. you then want to right-click one of the frames, select “duplicate into”, then select your second gif. click okay.

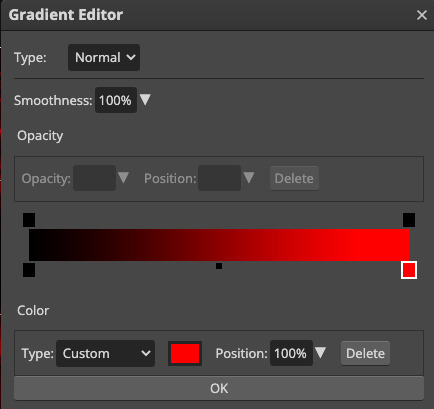
now we have our black and white layer ready to go. in order to make your color layer, go into your second gif. select the gradient map layer, then adjust the coloring so that the map is black and whatever your color is (instead of white). you can do this by double-clicking the white rectangle on the gradient scale (it’s the highlighted red one in the image below) and then selecting your new color. i chose red. click okay.
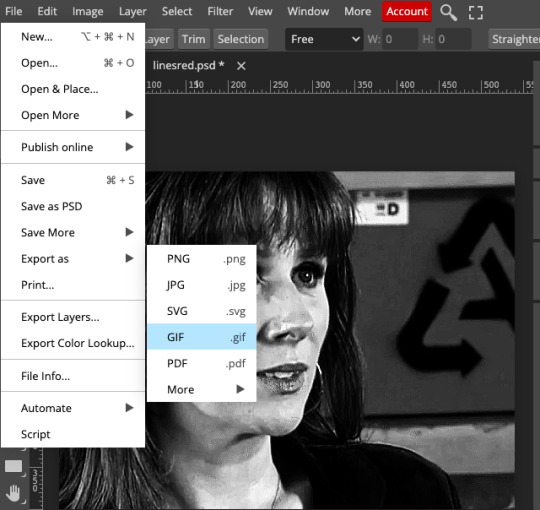
now both our layers are done! export both gifs at 100% speed by going to file, then choosing “export as” and following through to “gif.” repeat for both gifs.
now- and this is super important- reupload both gifs to photopea. you can even close out of the two you had open if you’d like, although i would recommend leaving them up just in case you have a download/upload issue in the future. from here on out, i’m going to refer to the completed two gifs you just reuploaded as gifs one (b&w) and two (color).
go to your second gif (the color one). we now want to duplicate the color gif on top of the black & white one. select the folder in the work bar, then right-click, select “duplicate into”, and choose your b&w gif as the destination.
if you go to your b&w gif, you should now have your color gif on top. make sure you ONLY have gif frames and not adjustment frames, and that the gifs are in two separate folders in the same workstation, or else these next steps won’t work!
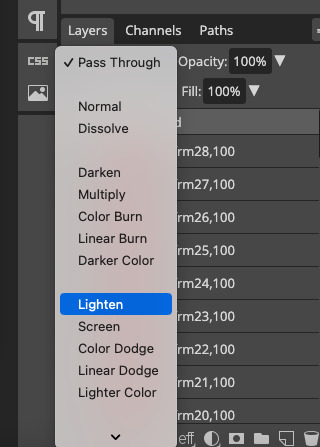
we’re almost done! next, you want to change the blending mode of the color gif. select its gif folder, then go to the blending mode dropdown just above it (it’ll likely say “pass through” or “normal”). scroll until you reach “lighten”, then select it.
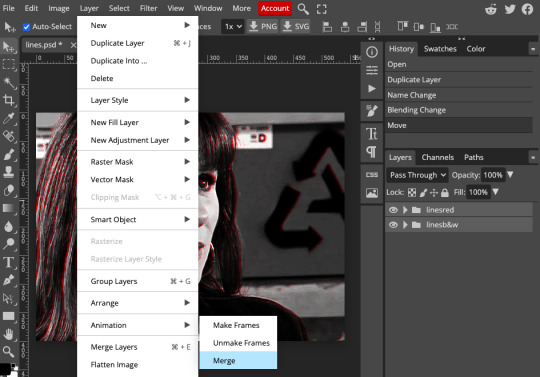
you’re now going to move the color gif to form the outline. it’s VERY important that you make sure you have the arrow selected in the toolbar on the left (it’s at the top). select all of the frames in the color gif by clicking the top frame, then holding shift and clicking the bottom frame. use the arrow keys on your keyboard to move the color gif a few pixels to the left or the right. i don’t have a picture for this step because it’s kind of hard to actually show, lol.
finally, you want to merge your two gifs into one gif. close both gif folders by clicking the arrows next to the eyes in the workbar, then select both as you’ve been selecting multiple things all throughout this tutorial. go to layer in the master menu, then scroll to “animation” and select “merge”. DON’T select “merge layers”. that only helps you if you’re not dealing with animation.
export gif, and you’re done! as ever, let me know if you have any questions!
#arwen.text#resources#tutorials#photopea tutorials#completeresources#allresources#dailyresources#gif tutorial
96 notes
·
View notes
Text
GIF Tutorial for Beginners
People keep asking me to teach them how to make gifs and I end up writing them long confusing messages, so I figured maybe it’s time to just write up an actual clean tutorial instead! This is supposed to be for total beginners! (Or people who want to switch to a new process that I’ve curated and streamlined over 8 years of making gifs.) I’ll try to keep this as barebones as possible, and won’t include all the advanced stuff I usually add. I hope it’s easy enough to follow, and I’ll include some links at the end for more stuff. I really do think it’s better to make a few simple gifs before doing more complicated stuff though, just to get used to it!
There will be three sections in this tutorial: #1 Basics - How to make a gif in PS at all #2 Sharpen - How to use sharpen/denoise filters in an easy way #3 Colouring - Just a few very basic adjustment layers
What you need:
A video (most common formats should work, although .mkv doesn’t always)
Photoshop (I use PS CC 2018 - this one because I'm morally opposed to Adobe’s subscription model - but versions aren’t super different from each other)
In the end, you should hopefully be able to make something like this:
This is gonna be so long. Sorry. You can make a gif with just part #1! The rest is just to make it look better.
#1 Basics
If any of the tools/functions aren’t where they should be for you, your best bet is googling it, you might need to change something in your preferences!
Make sure to save your PS file... often. PS has a tendency to crash, especially on laptops.
First, you need to get the video file. I recommend a shorter video, a few minutes long, if it’s longer you might want to cut it into shorter parts beforehand. This is just because PS’s video import tool sucks.
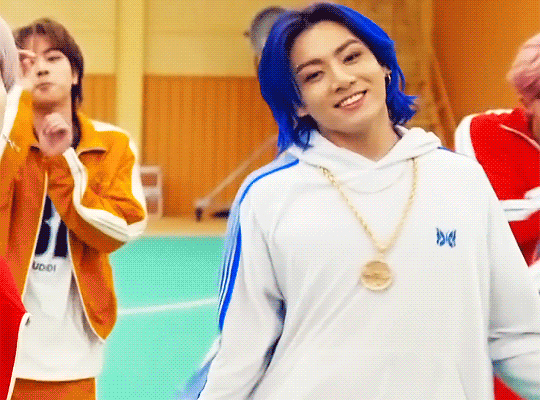
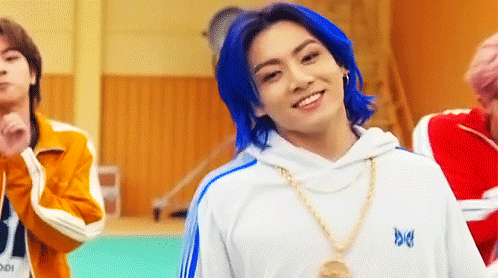
I chose the Butter MV, specifically Jungkook’s body roll at 1:24 because that’s what I want to look at for the duration of this tutorial. No further questions, thanks.
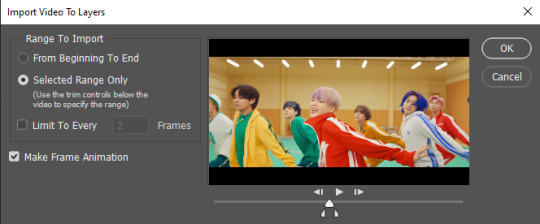
1. Open PS, go to File > Import > Video Frames to Layers

2. In the little pop-up, choose the part of the video that you want to gif. This will import every frame of the video into PS as a layer, so it has to be a relatively short part, or it’ll take ages (and gifs can’t be that big anyway). Now you can also see why it’s almost impossible to select the correct part if the video is too long.
The little controls at the bottom are for trimming, the one in the middle just for the preview. Make sure “Make Frame Animation” is selected! Then click OK.
3. Now you have your layers, and you have a frame animation! On the right are your layers, that’s where we’ll apply the colouring etc. later on. On the bottom, that’s your timeline or frame animation - that’s what the gif will be in the end! So if you delete frames, the layers will still be there, but they won’t show up in the gif. If you click on a frame, you can see the little eye checkmark on the layer that’s currently visible.
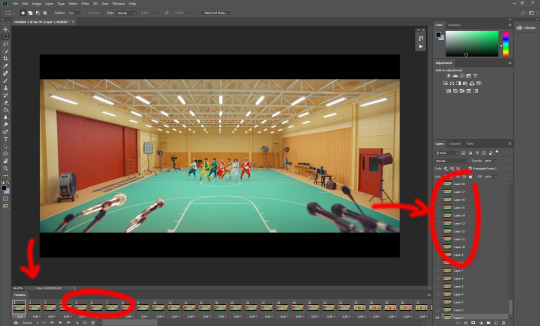
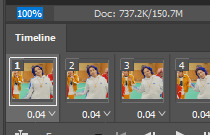
4. The timeline controls at the bottom that are relevant right now: set to “forever” so the gif will loop, you can play the animation with the play button, and you can delete the selected frame(s). The number on each frame is the speed of the gif, depending on the video I usually set it to 0.05 or 0.06 (photoshop lies to you when you play the animation, the only way to test this is to open the finished gif, preferably on tumblr or wherever you want to upload it).
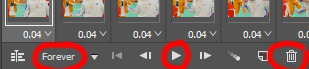
5. As you can see, the animation starts a bit before the actual part that I want, so go ahead and delete all the frames in the animation that you don’t want! You can delete the corresponding layers too if you want, to make the PS file smaller, but it has no influence on the gif. (Hold Shift to select multiple frames as usual)
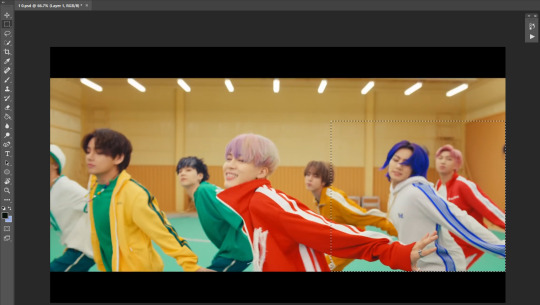
6. Next, we’re gonna crop the gif however we want! You can do this with the crop tool in the left sidebar, but with gifs like this where there’s a lot of moving parts, I sometimes just use the selection tool in the left sidebar, like so:
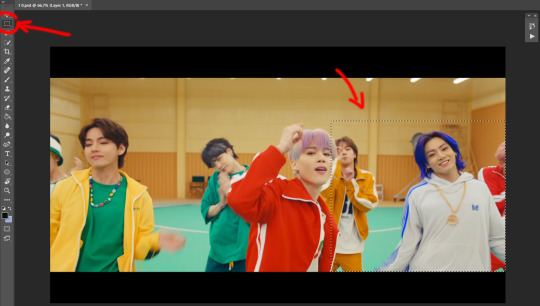
When you click on different frames, the selection stays, and you can check to make sure Jungkook doesn’t suddenly go out of frame if you crop it like that!
At this point, make sure the selection/crop isn’t smaller than you want the gif to be! For tumblr, what matters is the width (in pixels) of gifs. In the end, the width dimensions on tumblr should be 540px (1 gif per row), 268px (2 gifs per row), or 177/178px (3 gifs per row). Anything else will lead to very shitty resizing!
For this gif I’m going full sized, meaning 540px wide, so I made sure my selection isn’t smaller than that.
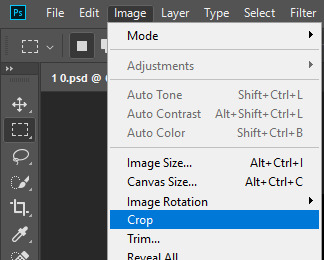
Then just go to Image > Crop, and it’s done!
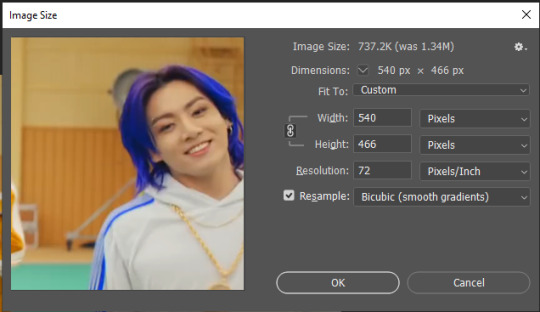
7. Check to see if this is what you want, then resize: go to Image > Image Size to resize the picture. Make sure the little “link” between Width and Height is active (to keep the same aspect ratio), then set the width to 540px or whatever you chose. I always set the resample option to Bicubic.
Once that’s done, set the zoom to 100% right above the timeline, to see what it really looks like.
Almost done! A little note about the sizing: width is the important part for tumblr, but if you want to make a whole gif set (especially with more than 1 gif per row!!!) make sure to make all the gifs the same height, otherwise they won’t line up and tumblr will do whatever it wants.
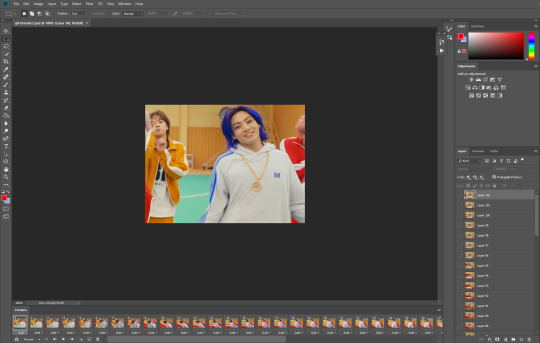
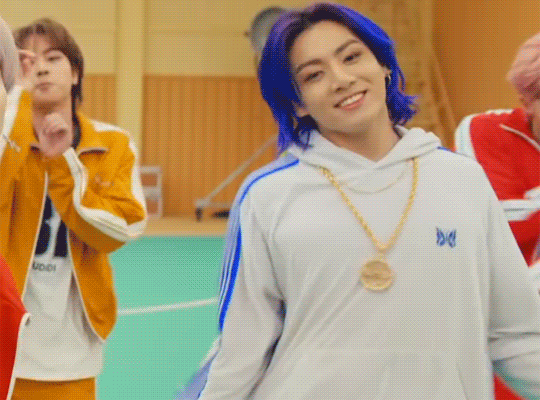
I ended up making mine 540 x 400 and ended up with this:
8. Time to save the gif!! Go to File > Export > Save for Web (OR just use the shortcut Ctrl + Shift + Alt + S) (or whatever it is on Mac).
In the pop-up, you can change things about the gif, but most things should already be the way you want it (Image size, Looping option forever). Selective should be the default, just like the rest.
You can choose between Pattern and Diffusion, some gif makers swear on one or the other, I go back and forth.
On the bottom left, you can see the size of your gif. Keep an eye on that! I believe Tumblr allows every single gif to be up to 10mb, but I try to keep mine under 5mb or close to it, because I think tumblr adds compression if it gets closer to 10mb?? Anyway back in my day you couldn’t upload anything over 1mb. You’ll never know our struggles.
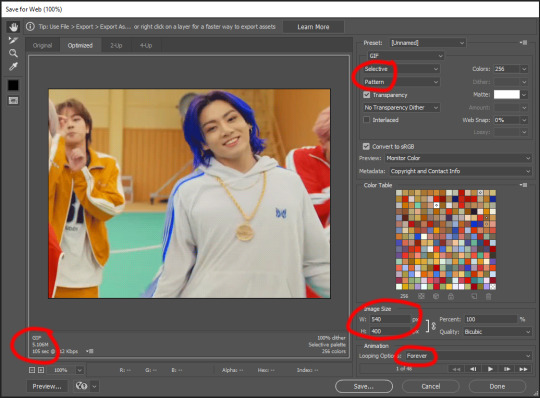
Then just save it, and that’s it, you made a gif! Well done!! Here’s the end result:
:)
#2 Sharpen
There are countless ways out there to make gifs as smooth and clean as possible! Here I’ll show you the easiest way, but it also provides a good basis for other methods. The main difficulty is that you you need to sharpen the layers, but you don’t want to 100 layers one by one. So what we’re gonna do is convert the layers into a Smart Object, which functions as one layer!
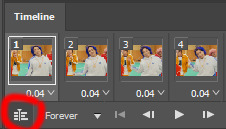
1. Convert the frame animation timeline to a video timeline with the little button right underneath on the left:
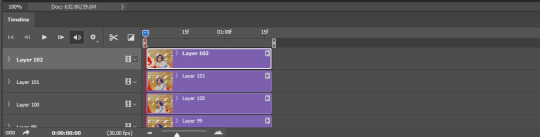
It should look like this, and I’m sorry but I can’t explain this one because I’m not an expert here, but you can just ignore it:
2. Select all layers: Select > All Layers, or just manually.
Then right click on the layers > Convert to Smart Object. Now there’s only one layer left, but don’t worry, the frames are still there!

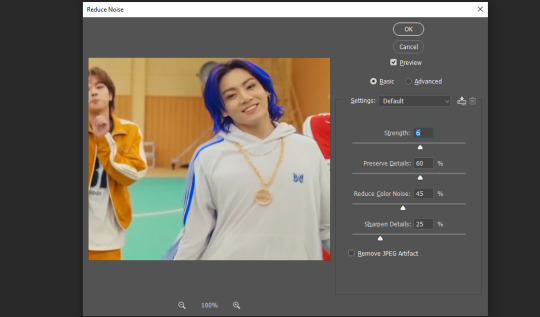
3. De-noise! It reduces noise, takes away some of that grain. More necessary in some videos. It also makes it less sharp, so I do this one first. Filter > Noise > Reduce Noise

My default settings are, Strength: 6, Preserve Details: 60, Reduce Color Noise: 45, Sharpen Details: 25, Remove JPEG Artifact: No. But you can play around, especially with the strength, and see how the little preview looks. Don’t apply too much of it! Or it will look weirdly smooth with no details in the end.
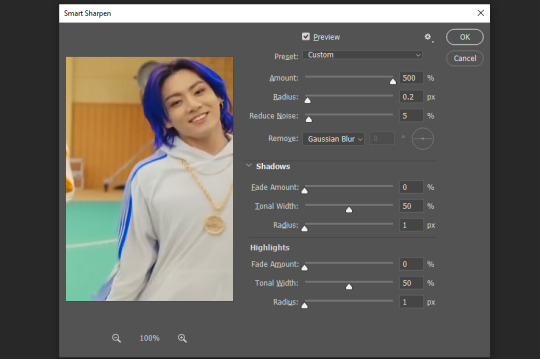
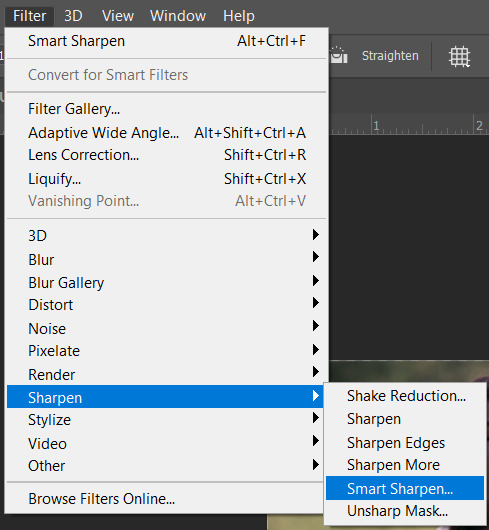
4. File > Sharpen > Smart Sharpen.
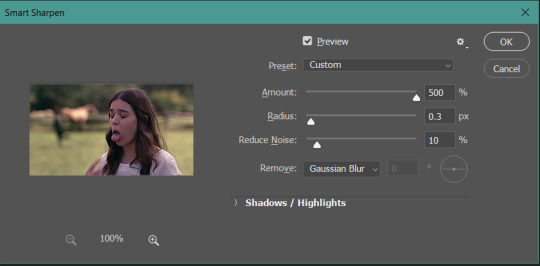
Settings: I usually have mine at Amount: 500, Reduce Noise: 5, and Radius at either 0.2 or 0.3, depending on the video. I’ll actually do 0.3 here, because I find it a bit blurry otherwise. If you sharpen more, it can quickly get grainy.
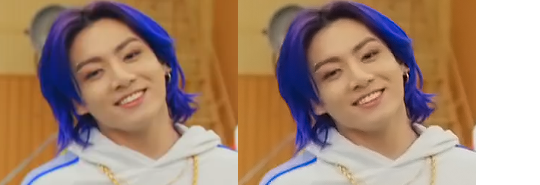
The difference isn’t huge, but here’s a little before and after denoise & sharpen:
5. Technically you can just save it as a gif (save for web) as shown above now, or you can convert it back to a frame animation, which I’d recommend especially if you use certain other sharpening methods (I’ll show you how to convert it back at the end of the colouring part), but for now, let’s go straight to the next part:
#3 Colouring
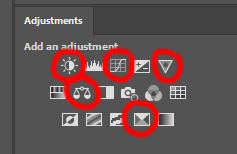
Now, you CAN do this part right after part #1, still in frame animation, without a smart object. I prefer it like this because sometimes PS acts weird, but if you want to skip the smart object stuff: select all frames, and add the adjustment layers at the very top, above all the other layers. (It only affects selected frames; and it only affects the layers under it.)
The adjustment layers should be above the layer tray, and these are the ones we’ll use today: Brightness/Contrast, Curves, Vibrance, Color Balance, Selective Color.
All of these are optional! You can do one, or all, or any combination. This is just the very most basic for me to get a gif to a point that I like. I’d recommend sticking to these for a start, but once you get the hang of it, definitely feel free to play around! It’s fun! Every gif maker has different preferences here, too, so there’s tutorials for everything.
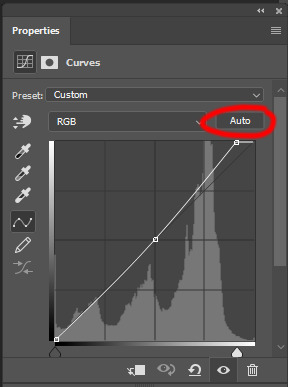
1. Curves: Just click Auto, tbh. You can play around, but Auto works fine for me as a start, just to brighten or darken some parts as a base.
2. Brightness/Contrast: Usually videos are a bit dark, and contrast can help to make it seem sharper AND cut down on gif size, so I usually just up both of them a bit (but not too much! Or it’ll look cheap). Here I put them at B: 19, C: 23

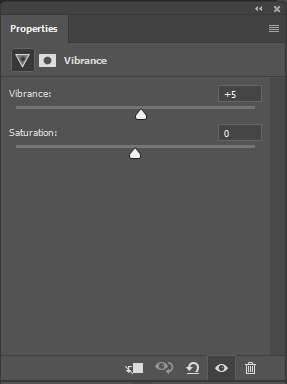
3. Vibrance: I love very vibrant and colourful gifs, so I usually up the vibrance (and sometimes the saturation). This one is already very vibrant, so I only put +5, but if you try to colour, say, a very moody tv show, this can help wonders, especially if you want to work with the colours more later.
If you prefer less vibrant gifs, you can also lower the values here!
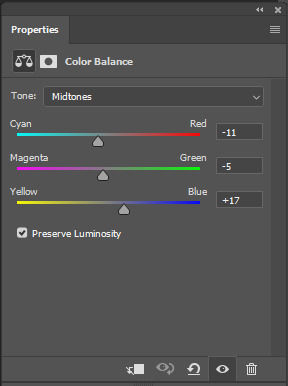
4. Color Balance: getting a bit more complicated now. Often, videos will have a slight yellow or green or blue tint, and this is where you can correct that. This video is a bit yellow, so I added +17 Blue. It was still too warm, so i added -11 Cyan as well. This neutralized the yellow tint, but I wanted some of the reddish tone back, so I added -5 Magenta. I usually do a similar process like that, depending on the tone.
Instead of Midtones, you can also do this for Shadows and Highlights individually.

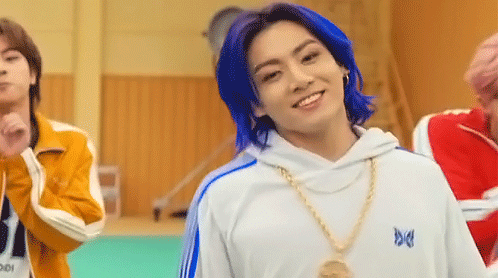
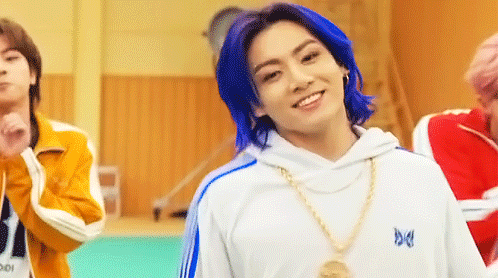
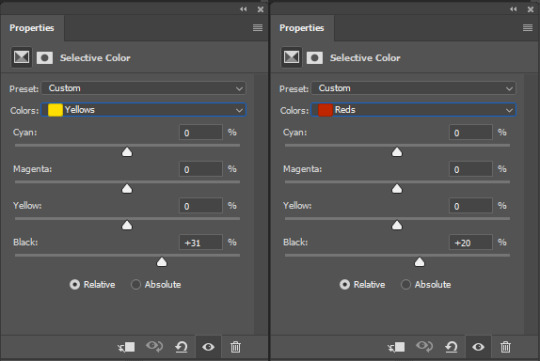
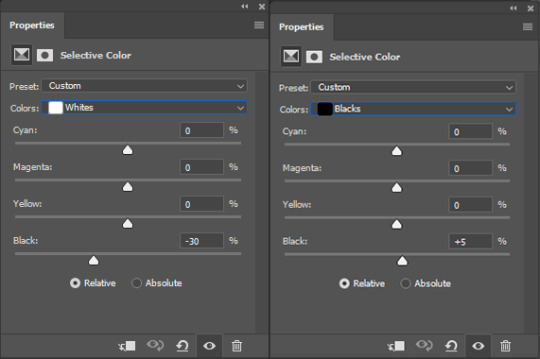
5. Selective Color: now this is the most complicated, but also the most fun to play around in my opinion! Be careful here, if you do something too extreme it’ll look like shit or make the gif super grainy. I some rough goals in mind here: make the blue hair as blue as possible, make their skin tone a bit less pale, and enhance the black and white (which I always do).
You choose a colour at the top, and then add or subtract cyan/magenta/yellow/black values for that colour.
Skin tone: yellow and red. For this gif, I just added black to both, making them darker. Sometimes, if you change one or both those colours for a different part of the gif (for example, if I wanted to make the background less yellow, I’d subtract yellow from the yellows - but then I’d add yellow to the reds, to make the skin tone natural again.)

Blue hair: Just ramp up the cyan for the blues. Be careful with putting anything to +100, but here it’s already so bright that it should be fine. His roots are more purple, so I changed the magentas by adding cyan and black, and subtracting magenta and yellow. It’s not super clean, but fine for our purposes.
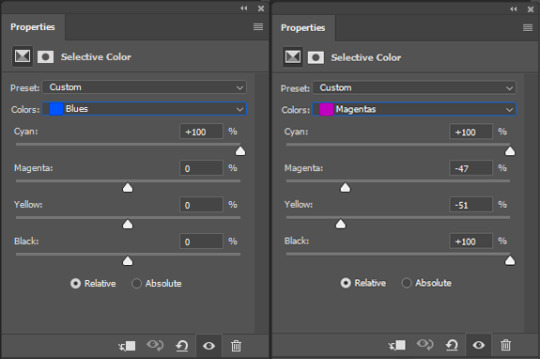
Black/white: depending on the gif, I often either add or subtract black to the whites. Adding makes the highlights less blinding, a bit darker, and flatter (I like to do that if one side of the face is bright white in the sunlight, for example). Subtracting creates contrast, makes it brighter, can wash it out. It can also lessen the gif size, and here it’s mostly just the tracksuit instead of important details, so I subtracted black. For the blacks, I almost always just add a bit of black, to make it more intense. Just like adding contrast, this can make the gif seem sharper and less grainy.

And done!
6. You could just save it as gif now, but as I said, I prefer to convert it back to frame animation timeline first, if only because I like to let it play through before I save it, and it works better for me there than in the video timeline.
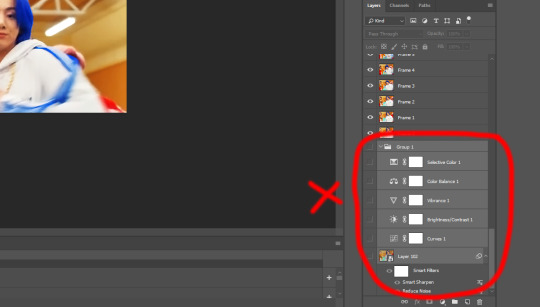
Select all frames, then click the little menu on the top right of the video timeline > Convert Frames > Flatten Frames into Clips
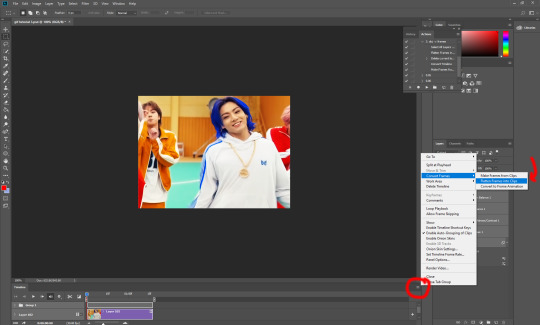
7. When you scroll down to the bottom of the layers now, the old smart object + adjustment layers should be at the bottom, under all the new layers. Delete the old ones, we don’t need them anymore.
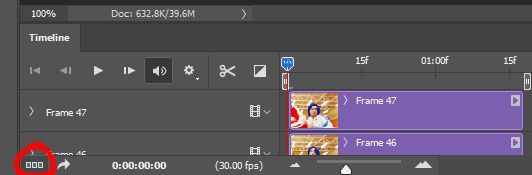
8. Convert the timeline back to frame animation, by clicking the little button at the bottom left of the video timeline:
9. Click on the menu top right of the timeline again > Make Frames from Layers
10. Now, just some potential cleaning left to do. Sometimes, there’s a doubled or empty frame or layer at the beginning or end, just delete those as necessary. The timing of the frames is probably off, too, just select all frames and set the delay time to 0.05 (or whatever).
Now your done! Save as gif, and you should get this:
I included some bonus links and tips after this but tumblr ate that whole part so I guess it’s going into a separate post. (Here is is)
Anyway, I tried to make this as easy to follow as possible for beginners, but feel free to send me an ask for clarification anytime. Hope this helps, now go make gifs and have fun!!
#photoshop#tutorial#gif tutorial#ps tutorial#btsgif#*#*tutorial#this took so much longer than i expected i'm not giffing for at least a week now
240 notes
·
View notes
Text
Free Batch Watermark Software Mac
Here check out 5 Best Watermark Software for Mac 2021 free that you should be using.


Nov 29, 2019 PhotoBulk is an easy-to-use photo watermark software for Mac. The app comes with a modern and intuitive design, with real-time preview and with all the main functions located on the left side of the interface. Speaking of the main functions, this Mac app allows you to a perform a couple of operations such as watermarking, resizing, optimizing. Batch Photo Watermarker allows you to protect your photos. Add text and image watermarks to hundreds of photos in one minute quickly and with high quality. A lot of watermark effects, adding.
Mac users like to use watermarking for protecting their photos. There are many benefits of watermark images the first of which is that you can keep your self-prepared pictures secure. Secondly, readers will be able to know that you own those images. The third and interesting thing is that you will get credits when anyone will use your watermarked images on social media platforms.
Try Visual Watermark for free for 30 days. Click the Download button below to begin downloading the batch watermark software. There are no registration, no payment, no ads, no malware, no tricks up our sleeve. And we don’t collect any information about your computer. The trial version allows you to try out all of Visual Watermark’s features. You can put a watermark on all of your photos for free by using the best free watermark software on the Internet so far is Bitwar Watermark Expert! It is the most efficient watermark software on the Internet for Windows 7, 8, and 10. Besides, it allows users to edit the watermark on a photo or video by adding or removing the watermark.
Best Watermark Software for Mac
Finding an advance Mac watermark apps is also good for the reason they are specially designed for watermarking images on Mac system and offering a better foundation to users.
If you are also one of them and want to use watermarking for protecting your photos, you should check out the list of the following Mac watermark software –
Iwatermark Pro
People who are looking for professional watermark photos without any hassles will find Iwatermark totally suitable as per their choice.
Free Batch Watermark Software Mac Free
The most popular features of this extensive watermark tools are as follows:
Compatible with all cameras
Resizing and renaming facilities
Watermark in any language
Facility for adding special effects
Simplified system for sharing the image on multiple social media sites
This extensive software offers you 6 kinds of watermarks; signature, metadata, graphic, text, QR, and steganographic watermark. Many other user-friendly features are there to notice in this special watermark software.
Impression 2
Impression 2 is a prominent watermark app for OS X that supports you not only for adding high-quality watermarks but also for automation of the process. The most important feature to know about the app is that it doesn’t alter your original images after watermarking.

Download Impression 2 for Mac
Watermark pro
Watermark pro is another popular watermark tool that works well for Mac devices. A variety of watermark options are there such as Text, logo, line art, smart text, QRcode, map, export module and many other things. Adding watermark, renaming photos in bulk, resizing and all is possible with this extensive OS X watermark software. The biggest thing to know about this app is that it is free for everyday use.
uMark
uMark is an outstanding photo watermark software that supports you for adding visible watermarks on multiple images at a time. Apart from using this app for watermarking on images in Mac devices, you can utilize the same on a windows system. As this software is absolutely free to use, you can add watermarks to even hundreds of images once. Here are some important features to know about uMark –
Totally customizable watermarks
Facility of adding shadow and border
Batch watermarking
Image and text watermarking
QRcodes and Shapes
Liberty of placing watermarks anywhere
Watermark tiling to ensure maximum protection
The software supports various languages such as English, Dutch, German, Spanish, Turkish, Italian, and French.
PhotoBulk
In the series of easy to use watermark apps, PhotoBulk is extensively popular software. It offers the facility of resizing, optimization, renaming files which are subjected for watermark. Apart from the facility of watermarking thousands of files together, this Mac app is available in free version also. The paid version of the software is available at very minimal cost i.e. $5.99 only.
Also Read:
So now, you know well about the best Mac watermark software tools which are available on the internet. All the above-mentioned software tools are highly useful for professional photo editors.
You can download these software tools from their official websites but one of the most important things to be taken under consideration is that you should not apply watermark on the images that have not been created by you.
Free Batch Watermark Software Mac Version
Putting a watermark on pirated or copied images are subjected to punishment under the offense of violation of copyright law that causes serious legal problems.
Free Batch Watermark Software Mac Pro
Also Read:
⇒ Spotlight Search on Mac
Free Watermark Software For Mac
So those were some of the best Mac watermark software that you can use this year.
Watermark Software Free
This post was last modified on November 8, 2020 7:08 AM
2 notes
·
View notes
Text
✨ basic gif tutorial pt. 1 by vvondergifs !!
so i’ve been looking for a way to show people how i make my gifs but couldn’t find any way better than making a tutorial myself so here it is ! as the title refers this will be the first part of a few tutorials, they will be broken up so they are easy bite size so everyone can start making the gifs of their dreams !
in this part i’ll be showing you how i make my gifs from screen caps for a gif set ( i use a different method for gif packs that i’ll be covering in a later tutorial ). keep on reading if you’d like to know how i get to this !!

what you’ll need:
photoshop ( i’ll be using cc but i believe anyone you have would be fine! )
KMPlayer
your video/show/movie of choice downloaded into your computer
1. the first thing you want to do when you have your video downloaded is open up your KMPlayer, once you have it open you need your frame extraction window, you get there pressing ctrl + g ( i believe for mac would be command + g ). this will pop up for you:
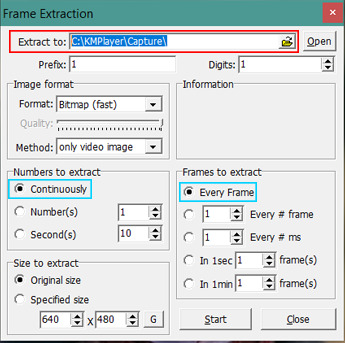
now you will want to replace the destination of your caps where i put a red rectangle, you do that by clicking on the little folder next to the box and choosing the folder on your computer. tip: i suggest making a folder for each gif you will want to make for your gifset so your caps are sorted for you, you do that by changing the destination every gif you cap.
make sure the settings are exactly like in the picture above specially the ones in blue !
2. now it’s time to open your video on the player, i just use ctrl + o but you can also go here:

3. once the video starts to play it’s when the fun part starts ! firstly you have to find the time frame that you would like to gif, just scroll by the timeline or just have a watch make a activity out of it, it’s up to you. but once you find were you’d like to gif go a few frames before and hit play, as you hit play you should also start to screen cap the video by hitting this handy button on the frame extraction window:

and that button will become a stop button that you will click once the scene you want to gif is over:

now you have your screen caps ! yay. if you want to do multiple gifs i’d suggest capping them all now so you can get over with using KMPlayer, just repeat the same process for every gif and you’re golden.
tip: after i do all of that i like to go into the folder i put my caps in and delete the unnecessary ones, like the leftovers from another scene before or after. but you can also do it on photoshop and i’ll show you how, i just think it’s easier to do before hand.
4. now it’s the part we’ve all been waiting for.. photoshop ! open yours and let’s get cracking.
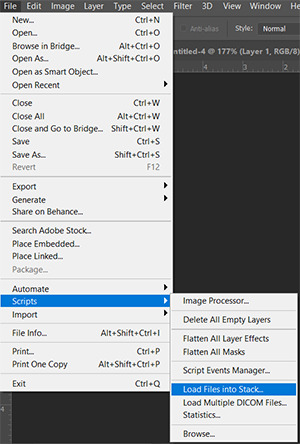
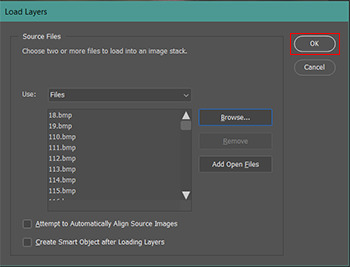
once you have it open what you’ll want to do is go in file > scripts > load files into stack...
5. a new window will pop up and in there you want to click on browse...
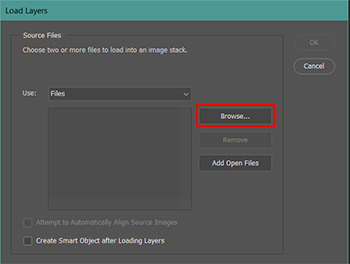
when you click browse your file explorer will pop up and there you’ll need to find where you put your screen caps on. once you’re there select all of them and click ok
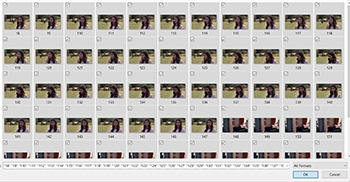
once your photoshop loads your caps the ok in the top right corner of that pop up will turn white and when it does you click it,
photoshop will now get all your screen cap and put it in a file for you, for that step all you have to do is watch and have patience with it. it normally doesn’t take long but if you are doing a gif with many frames it will take a while.
6. now we going to start to gif, once photoshop finishes with your caps your workspace will be something similar to this

if it doesn’t go into window > timeline, on the top bar.
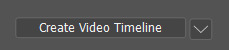
now on the bottom part of your screen there’s a button that says create video timeline, click it
when you do the bottom part will be turned into this:

and you’ll be able to see in the bottom left corner a button with three squares, click that

now you should have this:

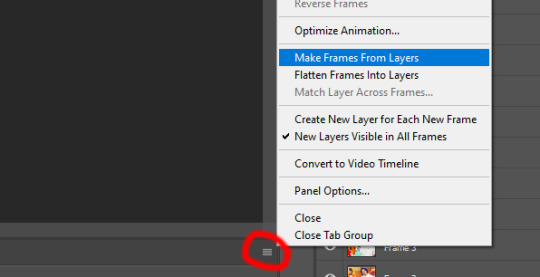
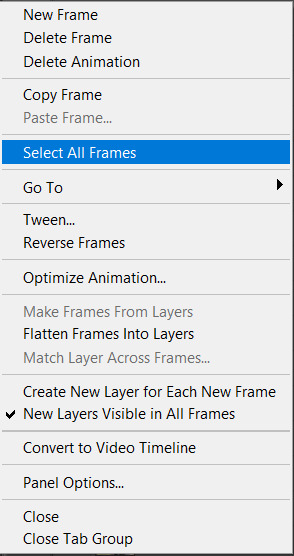
7. now look for the little list icon on the top right of this area and click it:

it will open up a menu, in there you have to find the make frames into layers, select it
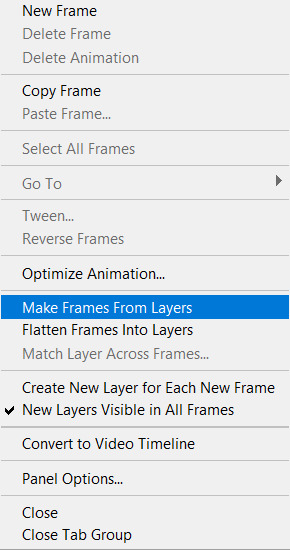
now you have all your layers as frames in your timeline, however they are reverse from what you want, to fix that go in the little list icon once again and select reverse frames

we are almost there !!
8. ok if you left your leftover frames to be deleted in photoshop now it’s when we are going to fix that. go over your timeline and look for the frames that don’t belong in this gif, select them by clicking on the first you don’t want holding shift you click on the last one you don’t want:

and then hit delete or the little trash icon

photoshop will ask you if you’re sure just hit yes.
9. now we are going to crop the gif whichever dimensions you’d like ( here is a good reference for you ) in this case i’ll be making my 268px x 150px. for cropping gifs you’ll want to find the cropping tool that is located in the tools bar on the far left of your screen and it looks like this:

once you click it your top bar will change to cropping settings, which you will change to these settings ( disregard the numbers, put your own dimensions there )
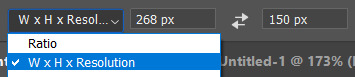
now we have to decide where to crop the gif,

just play around with your grid by dragging and resizing from the corners, until you are satisfied with where you want to crop and hit enter

photoshop will crop it and resize it for you.
10. you’re on the finish line, now all we have to do is fix the time stamp and maybe sharpen it. let’s start by selecting all frames in that same place we made the frames and reversed them:
and now on the bottom of your frame preview there’s a “0 sec.” and an arrow

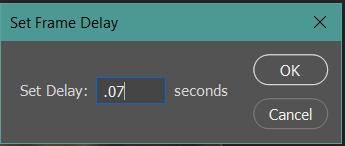
click it and you will get a menu, select other:

once you do it a pop up window will appear for you, there’s were you set the time your frames will go from one to the next. i find it that the delay 0.07 is the perfect one for a gif, so type that in the box of the pop up and hit ok.
once you hit ok you’re basically done, if you hit play on your timeline you’ll see your gif. but we like to go the extra mile, right ?

( this next part will be totally optional, it makes your gif cleaner but you are free to choose not to do it, just jump ahead on this tutorial to see how to save your gif on step 13 ! )
11. let’s see how to simply sharpen your gif now ! select all your frames once again the same way we did it before and this time make sure you select all your layers too ( click on the first one and shift + click on the last ). now that you have everything selected we are going back to the video time line, on the same place there was three squares now there’s this icon:

click it and now we once again have this:

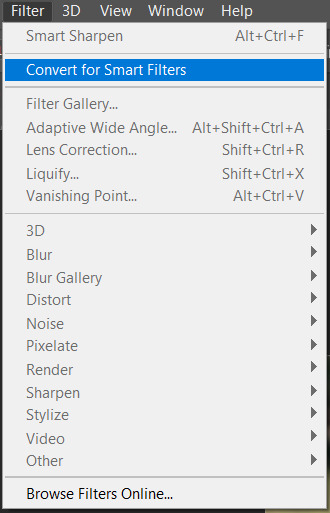
now what we want to do it is go to the top bar and look for filter > convert for smart filters, select it and say ok when photoshop asks you if you’re sure.
your workspace should be looking like this now
next thing you do is go back to filter > sharpen > smart sharpen
the smart sharpen window will show up to you and here is were you fix your settings, this next picture is how i like to sharpen my gifs and you’re more then welcome to just copy every setting, but if you feel like playing with the settings a little that’s also ok, it’s your gif make it how you like it !
click ok and you have a sharpened gif !
12. now we are done ! if you like to color your gif, this is the step that you would do it ( if you’re familiar with psd and coloring feel free to drop them in now ) but i’ll make a separate tutorial on how i make a base coloring for my gifs soon so i’ll skip this step for now and go directly to saving.
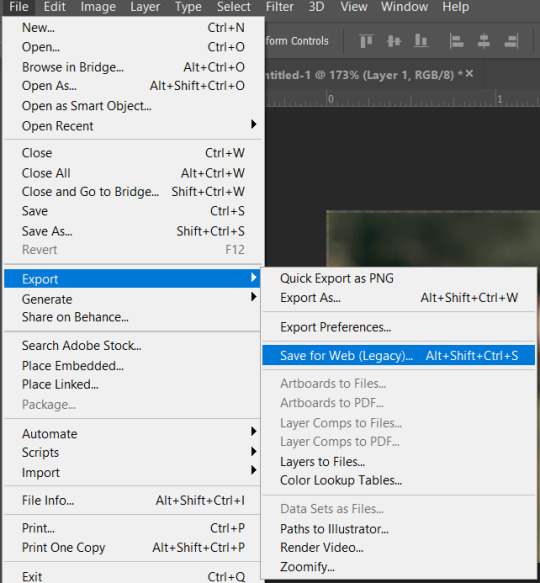
13. to save it is a little different than a picture, you need to go to file > export > save for web
tip: if you’re a windows user you can use the shortcut alt + shift +crtl + s it will make your life so much easier, trust me ! ( i’m not sure what the shortcut is for mac but i’m sure there is one )
now your final pop up ! you will see the preview of your gif and a bunch of information on the side, the most important one lays on the looping options that if it isn’t set to forever already you have to change to it, if not your gif will only loop once and stop.

now click save and choose the folder destination of your file and TA DA you make yourself a gif !!
if you still have any questions about this process my inbox is always open and i’ll gladly help you understand how to do it !
i know this is a lot of information to take in at once, and i know it seems daunting at first, i’ve been where you are and this is going to be cheesy but practice makes perfect. once you got the hang of this whole process it’s like second nature and you’ll be making gifs in no time. ( also in a next tutorial i’ll teach you how to make an action in your photoshop that will cut this process in half, but you need all the steps to learn ! )
stay tuned for that though, my next tutorials will be how to make a gif from video frames to layer, how to color a gif, how to make an action and/or load them, how i screen cap for packs and how i make gif icons, if you are interested in anything else leave me a ask and i’ll help you out !
#gif tutorial#tutorial#itsphotoshop#rph#rpc#*m#*m:tutorial#it goes against my nature to post an unedited gif but#we gotta#hope this makes sense#im not usually the best at explaining stuff but i tried to be thorough#hope it helps someone
84 notes
·
View notes
Text
Webflow tutorial: the absolute beginner's guide
By the end of this tutorial, you’ll learn how to create your first homepage in Webflow and leave with a solid understanding of how to build powerful websites in Webflow — by visually coding HTML and CSS.
There’s a lot of hype around the no code movement — a wave of technologies that allow us to build software without code. But code is at the internet’s core. It’s not about the absence of using it to build websites and apps. This movement is actually focused on making it easier (and faster) to code — by making it visual. Meaning, you just design and platforms like Webflow write the code for you.
If you approach Webflow with the mindset of designing, based on the fundamentals code, you’ll be able to learn it quickly. And on top of that, you might end up learning how to code as well.
What is Webflow? Webflow is a design and web development tool, ecommerce, CMS, and hosting platform. Each aspect of the platform is represented by a particular product/feature set:
The Designer gif of building a website in Webflow A visual web design tool firmly grounded in web standards and best practices, the Designer translates your design decisions into clean, production-ready HTML, CSS, and JavaScript. We built it to enable designers to develop websites in a familiar way — i.e., visually — without sacrificing quality.
If you’re mostly a prototyper, you can use the Designer alone, either sharing the prototype with devs to reproduce, or exporting the code.
But to experience the full power of Webflow, you’ll want to combine the Designer with the CMS and our Hosting.
The CMS gif of creating CMS collection in Webflow Like the Designer, the CMS is a code-free web development tool. It has both in-Designer elements (where the site designer works) and on-site elements (where the client and/or content managers work). We call the latter element the Editor, but more on that later.
For now, just know that in the Designer, the CMS lets you structure content types you’ll publish over and over again — like blog posts, product pages, etc. — by combining modular “fields.” Once you’ve created your content types, which we call Collections, you can then use the Designer to determine how Collection items look on the site (like how individual blog posts look).
Ecommerce
Webflow Ecommerce lets you take the power of the Designer and CMS to create a fully custom ecommerce experience. Any Webflow project can be converted into an ecommerce site, but the hosting price differs slightly from a regular website.
You can connect your ecommerce website with payment gateways like Stripe, Apple Pay, Paypal, or Google Pay, while also extending your stores capabilities with various integrations.
Hosting Webflow's hosting stack The final piece of the Webflow puzzle is our Hosting platform. Backed by Amazon Web Services (AWS) and Fastly, it’s blazing fast, super-reliable, has enterprise grade security, and you’ll need it to enjoy some of our best features, including:
The CMS
The Editor
Form management
Responsive images (automatic resizing of images by device to improve performance)
Free SSL/HTTPS (improved site security that Google is basically making a must for sites that ask for visitor information)
Okay, now that we have the lay of the land, let’s talk about diving in.
Designing and building a homepage Before we create our first blank project, we need to understand how websites are fundamentally built on the web — HTML and CSS.
The fundamentals: box model Websites use the box model, a design principle that lets us understand that everything on a web page is basically a box within a box. These boxes are HTML components known as “divs.”
showing the box model principle on the Webflow homepage In the image above, we have a section (outlined in black), a container (outlined in red) to keep everything responsive within the section, and various divs (outlined in blue) that act as content within the container.
The nomenclature for section, container, and div comes down to how you style and label the divs, using what are known as CSS classes.
We use CSS for spacing, positioning, alignment, fonts, and styles of these HTML boxes and their contents. We add what is known as a CSS class to each box, which is like a preset you create for style settings. Classes are reusable throughout the site and allow you to stay organized as you build out your website.
To sum it up:
HTML is the component on a page
CSS is the design of that component
Congratulations, you now have a general understanding of how websites are built. A fun exercise you can do now is go to your favorite website, say apple.com, and open up your web browser’s inspect element.
picture of apple.com using inspect element You can view the code (on the right) and see how everything is a box (aka a div). Within those divs are sometimes other divs with content like headings, paragraphs, and buttons. This is all HTML. You can see how the designer of apple.com labeled their classes for each component/element and div, while also being able to view the CSS in the Styles section.
Okay, let’s get building.
Building in the Designer The best way to learn Webflow is to actually build in Webflow. To get the most out of this guide, I’ll need you to follow me in all of the steps we are about to go over.
The first step is to create a blank project.
blank project in the Webflow Designer Here you’ll see everything you need to build any powerful website. On the left side, you’ll see everything you need to add and edit components, and on the right, you’ll see everything you need to style those components.
In Webflow, the first 3 buttons on the left side of the Designer are what you use for HTML elements.
adding HTML components buttons The first is your Add Elements panel. Here you can add components like divs, buttons, text, images, forms, etc. The second is where you can add and manage symbols. These are sections that you can pre-save and reuse on multiple pages, like your navbar or footer. The third is the Navigator, where you can see the hierarchy and structure of your components.
Before we drop any elements onto the canvas, let’s determine our typeface and the font size of our Body (the main page we build on).
Start by selecting Body in the Navigator. Then, head over to the Style panel (on the right) and select the class "Body (All Pages)." Any style edits we do to this class can be reused on additional pages of our website. For example, if we want to add a main background color to all of our pages we would do that here. In this case, we’re keeping it the default white color.
gif of adding typography to Body (All Pages) class We’ll want to establish our base font and sizes by going to Typography and selecting a font from the list. You can also add a custom font in your project settings which will reflect in the dropdown.
We selected the font Verdana, and now we want to select the base font size. 16px is a standard for font size, and adding “1.4-” for the height will make sure that the font height is 1.4 times the font size. If you want to learn more about advanced web typography and font settings check out this video:
Okay, let’s add some elements. We’ll start by adding a pre-built navbar.
Next, below that we’ll add a Section div for our hero section. Once we drop in the Section div, we can add a class to it and name it “Hero Section,” just so we can stay organized and see all the elements neatly in our Navigator.
gif of adding navbar and section in the Designer We can now make some styling changes to our navbar, starting with making the background the same color as our Body.
gif of changing navbar color Just select the navbar in the Navigator and change the background color in the Style panel.
Now let’s add a logo. Make sure to have your logo saved as either a PNG or SVG and upload it to the asset manager in your Webflow project. From there, you can drag and drop the icon asset onto your canvas.
gif of adding logo in navbar Now let's adjust the padding on the logo and add an extra nav link.
adding padding on the logo Adding a new navbar link is as simple as copy and pasting — Command C and Command V on Mac, Control C and Control V on Windows.
Nice, we have a simple navbar. Let’s get down to the hero section.
We’ll start by adding a Container to our Hero Section. We want to recreate the current Webflow homepage (kinda) so we’ll also need to add a Grid to our container.
gif of adding grid to container Once the Grid is added, we can right click on it and delete the default extra row. This way we have a simple two column grid within our container.
Referring back to the box model, we’ll also want to add a div into each column and add classes to them (Left Column Grid and Right Column Grid) so we have them labeled properly and can style them later.
We added an image element to our Right Column Grid and now we can add our content within the Left Column Grid.
gif of adding heading, paragraph, and button to grid We start with a heading, a paragraph, and a button. As you can see in the video above, we can add our elements by dragging and dropping them onto the canvas, or by dragging and dropping them straight into our Navigator. When working with grids, it’s easier to align things within the Navigator. As you can see, we added the paragraph in the Navigator instead of on the canvas. This is because the element wasn’t going where we wanted it to go.
Now, we can add our content and style them using the Style panel on the right. Let's adjust the font size and add margin for spacing.
gif of changing font size and spacing Okay let’s make this look a bit better, starting with the CTA (call to action) button.
gif of styling button Let’s change the button color and add more padding between the button text and the inside edges of the actual button.
Button padding Padding on the CTA button We use padding for creating space inside elements, and margin for creating space outside of elements. For something like separating our heading, paragraph, and button, we used margin because we wanted to create space between these elements. But for our button, we wanted to create more space inside of the button element, so we used padding.
Which leads us nicely into the part where we add padding to our Hero Section to give our Grid some room from our navbar.
gif of adding top padding to hero section After adding padding to our Hero Section, we also want to center our image within the Right Column Grid to line it up with our Left Column Grid.
To do this, we just select on the Right Column Grid we made earlier and within the Style panel, click Align to Center. This will make sure all contents within the Right Column Grid fall to the center of the box.
Now let’s add a section to show off all the clients that we have.
gif of adding client logos grid After we create our five column grid, let's set the class name on the Grid to Client Logo Grid. Now, we'll want to upload our logos to our asset manager. I’ll be using one logo five times for demonstration purposes.
gif of adding logo images within the five column grid Simply drag and drop your logos into each column on the grid. After dropping the first image, we want to make sure our logo is in the middle of our grid. To center the logo, select the image and in the Style panel click Justify to center.
Because we are using the same logo for all five columns, I simply copied and pasted them (Command C and Command V on Mac, Control C and Control V on Windows) in the video above.
We just built our first homepage!
I’m not a great web designer, but hopefully you have a better understanding of how to approach Webflow as a beginner. If you can get this far, your Webflow development skills will pick up in no time.
For reference, here is how my Navigator looks. Notice the placement of our components:
image of components withing the Webflow Navigator But wait, we only know that this looks good on desktop. What about tablet or mobile?
Make it responsive Now, if you’ve ever worked with responsive design before, you’ll know that things can get a little hairy at this stage.
The good news is: Webflow has already done a lot of the hard work for you! To see that in action, we’ll step down through the various device previews available at the center of the Designer’s top bar:
image of top of Designer Now toggle through each breakpoint and see how it affects your design.
gif of toggling through different Webflow breakpoints If you design the way we did, Webflow will automatically try and make everything responsive. But sometimes you need to scale down, or move things around, if using Grid (which we are).
We can see that anything in tablet mode, or smaller, makes our featured image look off. Our font size is also a bit too big, along with our content being too close to the edges.
Let’s fix all of this.
Whatever design changes we make in tablet mode will reflect down to the smaller sizes. So start in tablet mode and work your way down as needed.
First, start by fixing the way the featured image is displayed. Instead of the image being squished to the right, we want to move it to the bottom of the hero section.
To do this, click on edit grid. From there add one extra row, and right click to delete the left column our featured image is in. This will automatically force our Right Column Grid, with our image in it, to the new bottom row we created.
gif of making grid responsive in tablet mode Once that happens, click Right Column Grid and move the image to the center of the div by clicking on Justify center. From there, add some top margin to Right Column Grid to bring it down.
Looking good, let’s move down to mobile landscape mode.
gif of mobile landscape First thing we see is that the font size is too big, let’s decrease that. Next, we want to bring our content in from the edges. To fix this, select the Container that our entire Grid is in and add padding to the sides.
Last one, let’s go to mobile portrait mode.
gif of mobile portrait Again, the font is too big. Let’s downsize the heading, paragraph, and button text.
We’re done!
As you can see, the client logos at the bottom stayed responsive and downscaled themselves. But if you want the logos to stack on top of each other, follow the exact same process we went through for the grid in our hero section.
You did it, your first responsive homepage, built in Webflow.
gif demonstrating responsive Webflow website You should be proud, I know I am. We just visually developed a whole homepage with code. Building in Webflow let us experience the power of code, without actually writing it. Check out all the HTML and CSS we visually wrote in this guide:
gif of showing Webflow code export That’s pretty cool if you ask me. If you have any questions, feel free to leave them in the comments below — happy creating!
Unleash your creativity on the web Build completely custom, production-ready websites — or ultra-high-fidelity prototypes — without writing a line of code. Only with Webflow.
Get started for free
More resources If you want to develop your web design skills, we highly recommend you check out our Ultimate web design course and other resources below:
Webflow University: learn web design, development, and time travel Webflow Forum: Q&A center Webflow Community: to talk to other people about your projects and learn about upcoming events and launches Webflow Blog: web design inspiration, guides, and tips Template Marketplace: purchase pre-made templates Webflow Showcase: the community hub for websites, including cloneables Webflow Experts: hire Webflow designers to help
1 note
·
View note
Text
graphics guide
a guide filled with basic info, tips, and answers to common questions that i hope helps people who want to start making graphics
*this was made based on my experiences of making graphics and is what i thought was important to cover but everyone has different ways and approaches so dont feel the need to follow everything on here
what is a graphic?
a graphic (also known as ‘gfx’) is a image edit that incorporates various elements (textures, filters, text, etc) in order to visualize a idea or to create a aesthetic composition
unlike making gifs, there is no right or proper way to make a graphic so dont get too caught up in the idea that a graphic should look a certain way - just stick with your style and what you think looks good
anatomy
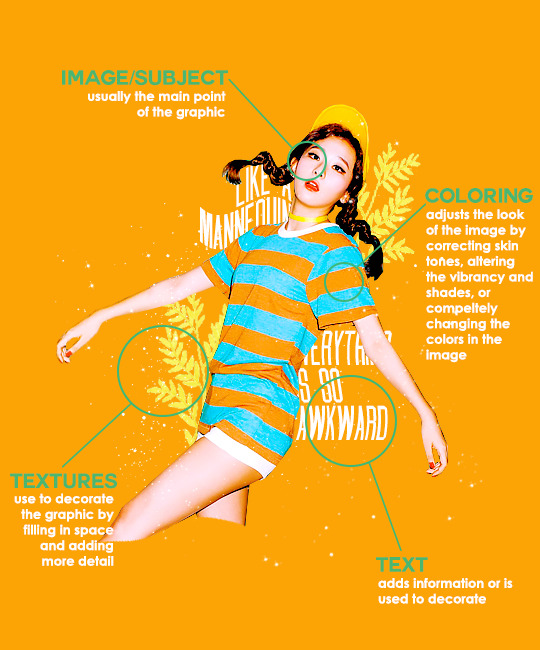
image/subject
usually the main focus of the whole graphic
you should always try to use a sharp hd picture - getting it from the original source is always the best option
make sure the source of the picture allows editing - pictures from public sources like a company or the news can be edited while fansite pics and scans need to have permission asked (and if they give you permission make sure you link them when you post your graphic!)
coloring
often referred as ‘psd’ because that is the format they are in (i.e. pink psd pack)
comprise of multiple layers that can alter the images look
a lot of people make their own colorings since the outcome of the look also depends on the image’s original coloring
textures
smaller cut out images that are often used to decorate the graphic
can also refer to a image that can be use as a background of a graphic
can be found in the form of a png (copy + paste into graphic) or a brush (”painted” on to the graphic)
avoid using any textures that does not state the original poster made them - you could unintentionally be using someone’s work that was not made to be used [read more about it here + resources that you can actually use]
text
text can be used to tell information or just for decoration
try to choose fonts and colors that are legible
faq
what software can i use to make graphics
most people use some version of photoshop (i currently use photoshop cc 2018) and a lot people have it cracked but if you cant afford photoshop, find a cracked version or a patcher (i used adobe zii 3.0.4 for mac), or are uncomfortable with getting a cracked version then there are other softwares that are just as good!
i can only vouch for gimp since i used it when i first started making gfxs. it is very similar to photoshop and shares most of the same tools and has a similar look to photoshop. it is also probably the most popular photoshop alternative and would totally recommend it if you cant get photoshop!
[visit + download gimp here]
where do you get your pictures from
official sources such as teasers companies release, photos released by press, photos from idol���s instagram - basically photos that are made for the public to see are whats best to use for a gfx. you should download the photos straight from the source so you get it at its highest quality
some phrases you can use to search for pictures on google: - [group name] photoshoot - [idol name] press - [group name] showcase - [idol name] teaser
remember the more specific you are in your search the better! also when you search through google make sure you check your source!
avoid getting photos from reposting websites like we heart it and pinterest avoid using fansite pictures and scans unless you are granted permission
i don’t know where to start/i’m overwhelmed and i don’t know what to do/ where should i begin
figure out what you want to make or a theme you want to follow - do you want to make a simple graphic or a infographic? do you want it to center around a certain theme like a comeback or a photoshoot? once you determine what you want to do it becomes easier getting ideas and finding stuff you will need for the gfx
example thought process: “i want to make a loona graphic” → do you want it to be the whole group or a certain member or unit? will it just be a simple gfx or a AU gfx or based on a event that the group is doing? “i’ve decided on doing a kim lip one” → do you want it to have a certain theme like kim lip smiling or kim lip with blonde hair? is there a certain frame of time in which you want the graphic to represent like during eclipse era or hi high era? “i want it to be from max and match era with her teasers” → from here you can start finding pictures to use and thinking of colors and textures that would fit your theme
where do you get ideas/inspiration from
i mean it’s different for everyone but for me i literally just think of stuff and i’m like wow i want to make that happen asdfsdfj but mostly when i see pictures or watch something thats where i suddenly get a idea
but tumblr is full of graphic makers!!! ive seen so many amazing graphics from various fandoms like kpop, anime, marvel, etc.
some amazing graphic editors i know myself include: primirene, ireone, nctjaemin, celo-mar, 1hyungseo, jeongahn, haechxnie, sonxiumin, syua, lulumelody, dinomite, lovelyeo, joohys, whatchatalkabout, yveu, maerinah, mihyon, lorbits, cherryjennie, thatporcelain, monoka, ifbin, 7ww
some other places you can look at are behance (dont go on behance if you have a cracked ver of ps - it might trigger a ingenue software alert that is a huge pain to deal with), pinterest, deviantart, dribble, and probably any social media platform if you just look up #graphicdesign
remember if you take inspiration from someone’s work then you should cite them in your caption - if you are afraid that you might’ve accidentally copied someone when you were trying to take inspiration from them its best to either try to remake the gfx again or just to ask the creator permission if its fine if certain details are similar/same
my stuff sucks how do i get better
literally just keep on making stuff aka practice. you can’t improve if you don’t bother putting effort.
ways i’ve forced myself into practicing making gfxs is by: 1) starting a gfxs series - its self paced and is based on what you want to make (i.e. introducing my biases gfx series, my favorite outfits gfx series, etc) 2) taking in requests - people who would request from you probably like your stuff so its a win win situation (i.e. send me a idol + era, send me your bias + palette, send me a group and i’ll make a gfx of my fav member, etc)
tips
only sharpen your pictures after you are done resizing them, if you sharpen and then resize it might result in a more blurry or grainy picture
always save your graphic every 5-10 mins in case photoshop crashes
have two copies of your image cutout: one will be the original and the other one will be the one you edit with - in case you mess up like over erasing or over sharpening your image you have a back up you can use
stick with a color palette so you don’t get overwhelmed when having to color everything and it makes all the graphic panels you have look more cohesive
on photoshop you can favorite fonts!!! take advantage of it!!! your computer has a lot of fonts saved on it and it takes forever to look through a whole list of fonts so by favoring fonts you can see all of the fonts that you like to use for graphics
combine a png pack to one psd → when you open a png pack you will probably get a lot of png files and it gets annoying having a lot of tabs open in photoshop when most of them are just textures so by putting all of those pngs into one psd you can cut down the files you open and can easily see all of your options
make folders dedicated to colorings and textures that way you can easily access them instead of looking through your computer for a certain file
name your layers... i dont do it because its easy for me to tell what layer is what but when you are working with a lot of layers its best just to name them it’ll make life easier
lock your main image/subject so that when you play with texts’ and textures’ location you don’t accidentally move your main image
use curves to help get a photo back to its original coloring! like if you have a photo that has a weird filter on it just use curves and it’ll help the picture look more natural! [tutorial]
try warping your text to make it stand out more! you can access it by pressing the icon on the top text bar that has a T with a curved line under it. i use flag and wave the most
alter a particular color by using a selective color layer
rather than changing the actual color of an image/texture you can: create new layer → select the image/texture and color it on the new layer instead of on top of the image/texture → change the opacity or the mode of the layer so that the color is put on the image/texture while keeping its detailing and not affecting the actual image/texture
resources
colorings: can be found on deviantart or tumblr just look up ‘psd coloring’ or ‘[color] psd’
textures: can be found on deviantart (check to see if its og content or stolen) simply just search what you are trying to find or ‘png pack’ or ‘texture pack’ common textures you can try to find: vintage flowers, memphis shapes, organic shapes, doodles other wesbites: pngtree, creative market, lost and taken, spoongraphics
fonts: if you are looking for a certain font then you can just do a google search but if you are browsing then dafont and font squirrel are really good websites too some of my favorite fonts: abril fatface, agfatumc, antonellie calligraphy, arcadeclassic, bebas neue, century gothic, couture, daily news 1915, dark larch, hondurhas, kotori rose, krinkles, risingstar, sant joan despi, studly, zing rust
color palettes: i made one myself which you can find here, color hunt, and honestly a quick google search will give you tons of options
if you have any questions, other stuff you want me to cover, or want to add more resources and tips then please dm or send an ask! i hope this helps!
#i really hope this helps someone and that it makes sense#i literally woudlve been so happy if i saw this when i first started it took me so long to figure things out and im still learning#also i basically told where i got everything so like please dont take advantage of this and end up copying my gfxs... its happened to me a#lot#idk what to properly tag this alfkjasd#ps help
129 notes
·
View notes
Note
Hey, may I ask how you make your icons (which are really cute btw)? I would love to give it a try myself but I dont really know where to start vor what size they woud need to be. Do you use a specific program? Thank you in advance ❤
Hi again my love!!! ❤
First of all, thankyou so much!! That’s so kind of you to say and I’m honoured that you’d come tome for advice!!! I’m going to put this under a read more because it might getvery long, I hope that’s okay! Also want to say I am by no means an expert - myicon making stems from a lot of trial and error, hahah!
There’s soooo manydifferent ways to make icons! I have seen and read a thousand tutorials, butthe first thing I have to say is it’s got to be what you’re comfortable with.Whatever works best for you is the best way!
When I first started to make icons, I used paint.net, which is free todownload and such a good program! I still haveit because you can download free ‘plugins’ (like added extra features)that people make and they’re so handy!!!! I used to make coloured backgrounds using the gradient feature, and zoom in very closely and use the rubber tool toerase the background of the characters/people I wanted for the icon, whichworks great if you have a lot of time and patience!
Now however, I use photoshop CS5, which I got from here (no idea if the link stillworks but I hope it does!!!) which I find a lot easier now that I know how touse it! For sizing, as long as the canvas is a perfect square you’re generallygood - I usually go for 150px x 150px, but I know a lot of people use 100px x100px or 200px x 200px!
Here are some tutorials that you might find useful to start you off in explaining how to use PS if you’re not familiar with it!! (x) (x)
Once you’ve got that down, usually you want to cut the people/charactersout from the background. There are soooo many ways to do this but I prefer touse the pen tool to draw around them and then erase the background, a tutorialfor that that I like is this one!
For background, I make my own gradients. Generally, you want to pick acolour you like and then find the lighter version of it, so to do that I pick acolour (for example this is a good list of different colours I referto) and then I use the hex code of that specificcolour to find the lighter version of it - so when you click on it, or searchfor it, it gives you the lighter and darker codes for the colours, which youcan put into Photoshop and then use to make gradients! alternatively you cansearch on places like itsphotoshop and find them,which is coincidentally where I get my textures from that I sometimes put onthe background of icons.
The textures are downloaded, and then once you’ve got them, uploaded into PS and usually set to soft light or overlay (I prefer soft light, but it depends on the colours you’re using I think!) in the drop-down menu on the right side of PS, where there’s different tabs (this one is found directly underneath layers!). It looks like this and put it above my colours to get cool effects in the background :-)

For the shapes part, I actually only learnt this really recently (although I’m going to do a demo of how I did my latest icon further down) and this is the method I used to get the shape!!!! Although I didn’t apply it to the icon in the same way that they did, I found an easier way for me!! Haha.
Something a lot of people also do is change the colours of people’s clothes! This is a great tutorial for that and one that I’ve used for my edits, although still learning with icons!
Okay so I think the easiest way to try and tell you how I make icons is just to show you! So, first things first, you’ve got to get your cap - it’s nice if it’s good quality, but it’s not the end of the world if it’s not!
I decided to use this one from the ITV hub, haha:
Once you’ve got that, I usually crop it so there’s not as much of the background, but that’s just personal preference. Then, with my pen tool, I go around it and outline the bits of them I want for the icon! (I’ve circled the pen tool on the left just for clarity!)

You’ll also notice the boys look a bit brighter and more defined in the above screenshot - I’ve added a PSD to them, which I’ve made myself. I have an ‘emmerdale psd’ that works quite well forall the characters so I use that as a base and adjust it depending on thescene! But there’s plenty of places to download PSDs too!
Once I’ve got the outline, I join up the dots to the first dot to make a solid line around the boys. Then, right click on the picture and choose ‘make selection’.

Then you get a pop up box saying if you’d like a little blurring around them - sometimes I do 1px, sometimes I have none, like in this case, depends on the quality of the photo (and sometimes how well you’ve cut out their hair hahah). Once you’re happy, click okay and you’ll get the solid line around them flashing now.

I’m not sure how to do this on a mac, so really sorry if you have one, but you’ve got to invert this line to select the background instead of them, by pressing Ctrl, shift and i at the same time. Once you’ve done that, you can then click the delete button and the background will disappear! Yay! You should get something that looks like this:

After this, you want to go to the menu at the top that says image and click image size, which will present you with a text box like this:

Change the pixel dimensions’ width and height to whatever your icon size is, so in this case 150px - don’t worry if the height isn’t equal to the width, it’s better that the icon is the full width if its not a person’s full body, as you don’t want the picture to take up the full height of the icon anyways! Like this:
And voila! They are to size. Now, since I’ve made icons before, I have backgrounds already made, so I would drag them onto them. I suggest you make the backgrounds in a separate window and save them for later use (using the gradients for example), meaning you can drag new people onto the backgrounds which will save you time! Once you’ve done that, you’ll get something like this:

Now, you could just leave it there! If you were to do that (I save them with multiple colours for variety!) You might want to go to filter > sharpen > smart sharpen and play around with it until they look more defined, but not overly so!
(Also please don’t judge me - it’s good practice to name your layers informational names but as you can see mine are pretty all over the place, oops.)
For the shape part of the icon, please refer to the link I added above to add a custom shape to your gallery. Once you’ve done that, this is how I added it to my icons!
For now, zoom into your icon and place the shape above the icon and use ctrl and t to make it the size you want, making sure to hold down shift when you’re dragging the sides so it’s in proportion. Once you’re happy with this, press enter to confirm it (its usually best to leave a few pixels between the shape and the edge for the ‘transparent effect’.)
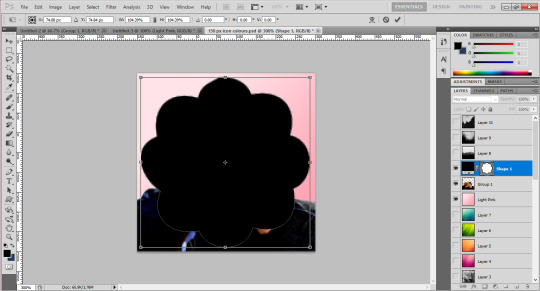
Then, drag the layer down in the bar on the right so it’s underneath whatever colours you want to use for your icon. In this case, I’ve just done a few as an example:
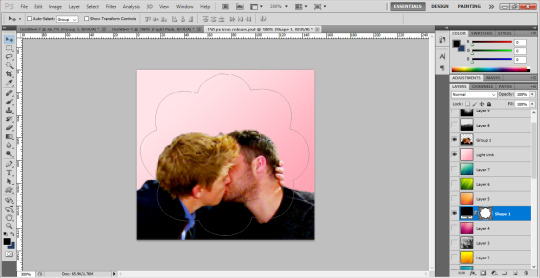
You can see the sort of outline of the shape on them, as well as the background colour. Now, you want to move the boys into the position you want them for the icon, and use something called a ‘clipping mask’.
Right click on the layers at the side and choose ‘create clipping mask’ - the background will then fill into the shape and so will the people once you click it. At this stage, you probably want to use the little eye symbol on each layer to make it visible or invisible, so you can see if this is working or not!
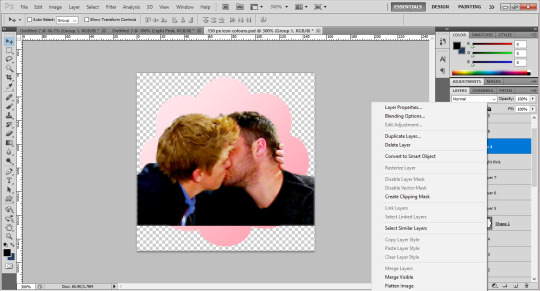
As you can see, there’s a blank bit at the bottom of the icon since I cropped the boys’ bodies there. Luckily as they’re wearing dark colours, I can just paint over this on their layer to fill it in, but you could also resize the original image down to 150px and use a clipping mask on it too! (You can also merge the layers to make sure they’re one layer, by right clicking and using ‘merge down’ which isn’t available in the above screenshot but usually would be!)
Then zoom out, and you should have something that looks like this! (I’ve gone back to the file I made the actual icons on for this screenshot.) Make sure you save the image as .png, not .jpg! Files saved as .jpg can’t read transparency and the edges around the icon will show up as black or white, rather than transparent!

I hope this has been helpful, and that it makes sense, and gives you a good idea of what to do?? If you have anymore questions don’t hesitate to ask❤❤❤
21 notes
·
View notes
Text
Batch image converter windows xp

#Batch image converter windows xp pdf
#Batch image converter windows xp software
#Batch image converter windows xp professional
#Batch image converter windows xp series
Flicking to fullscreen is also quick with a double tap on the image selected with EXIF data and other rating options etc., displayed over the image by dragging the cursor to one of the four sides of the window.
#Batch image converter windows xp series
One of the best features in FastStone Image Viewer is the ability to create a four-up image comparison view where all four images can be zoomed into and out of simultaneously or independently – crucial when trying to decide which shot from a series of images is the best, or to determine sharpness. Possibly the best picture viewer for Windows 10, it includes a wide range of image editing features to make changes to images and is easy to navigate through file structures.
#Batch image converter windows xp software
This free image editing software supports almost all major image formats and is even compatible with camera RAW files. Go to the Apowersoft Photo Viewer download pageīest for: File navigation and image comparison Image support range isn’t huge considering the price
#Batch image converter windows xp pdf
Opens CorelDraw and other layers-based image file formatsĪble to open multiple file formats, including PDF documents It is the most expensive paid-for photo viewer in this rundown but the enhanced image file support and its ability to open PDF documents negate the requirement for additional software.
#Batch image converter windows xp professional
It supports a range of standard and professional imaging formats, including HEIC, PSD, CDR, and RAW, which is perfect if you need to switch between image editing software or have to open a file that’s been sent by someone else as it means extra proprietary (often costly) software isn’t required. You can download the program by following the link below:īest for: Supporting professional image formats like HEIC and RAWĪ user-friendly interface sees this photo viewer adopting efficient computing tech for fast load times on any image. It’ll also categorize photos by location and allow users to share photos from within Picverse by synchronizing with Google Drive. The software can automatically create albums using facial recognition to identify friends, family, and portrait clients. As well as a useful photo viewing option it also comes packed with image editing features such as Artificially Intelligent enhancements for quick, intuitive changes to photo styles, and lots of helpful healing and selective adjustment tools to improve shots. Users can rely on the software to automatically scan images, making it possible to search via name, date, and location. This is a fast, powerful photo viewing and image management software for Windows and Mac. Price: 530 UAH a year, 700 UAH for a lifetime version The free image editor is completely free of cost.įor another free image editor, you should look at GIMP and for: Automatic file organization and AI-powered image editing ImRe is a great free image utility that lets you resize multiple images at once and convert images to put them up anywhere you like to or share them with your nearest and dearest.
The free image editor lets you convert images.
The free image utility supports resizing by pixels or percentage.
You can resize a single picture or resize multiple images at once.
The formats that ImRe supports are: JPG, GIF, BMP, TIFF, PNG, EMF, WMF.
The free image converter supports batch conversion.
You can even specify the height and width as 100%. You just have to specify the height and width in pixels or percentage so that the free image editor can conveniently convert the picture as per your specifications. But this free image utility lets you convert images and even resize multiple images at once, so that you can put up any picture anywhere you wish to and email your favorite pictures to your friends.Īnother free image utility to resize multiple images at once is Kigo Image Converter. Many applications don’t support certain image formats, so you end up compromising and aren’t able to use that favorite picture of yours in your way. This free image resizer is also a free image converter that lets you convert images into the format that you want to so that you can use it the way you wish to. ImRe is a bulk image resizer and bulk image converter that lets you resize multiple images at once in an instant.
0 notes
Text
Batchphoto crack

Batchphoto crack serial key#
Batchphoto crack install#
Batchphoto crack serial#
Batchphoto crack pro#
Batchphoto crack pro#
The image editing BatchPhoto Pro updater consumes few system resources, responds quickly, completes jobs quickly, and produces high-quality picture files. Enjoy its latest version for free, which you can download for free.
Batchphoto crack serial#
Use the provided keygen to generate the serial number.
Before installation, delete its Previous version if installed.
Batchphoto crack install#
Install this software like any other tool.
First of all, download the Software from the shared links below.
By day, a comma was added to the date format (US standard).
Keywords with EXIF metadata fields have been added.
1360 x 768 display resolution with True Color.
The problem did not occur when the setting was disabled.
While using multi-processing, errors occur when using the grunge frame to produce files with multiple files.
There are 7 threads on an 8 CPU (4 Core) machine.
As an output, you can process files in a subfolder of the original folder.
Customizable renaming options are available.
The input and output formats are both very adaptable.
Profiles can be used to quickly specify options.
Video instructions are available on the BatchPhoto website.
Fill in the blanks with content and comment.
BatchPhoto comes with a plethora of effects.
To lessen the noise, you only need to click once.
Auto crop and roll should be supported.
You can also read the entire image review here.
Cropping and cutting the image is simple.
The majority of image formats are supported.
You may alter all of the basic characteristics, such as brightness, clarity, saturation, and digital clutter you can also fix the image, crop, or shrink (the program automatically considers the orientation of the frame so you don’t have to), adjust the white balance, and improve… Some functions require digital data from picture file tags or simple text labels to be inserted. Adjust the Brightness, Sharpness, and Contrast of your photos to make them look better. Use special effects like Sepia, Black and White, Charcoal, and others. Rotate photographs based on EXIF metadata automatically. Stamp images with the date and time they were taken, add watermarks in the form of text or logos and make short comments. Do you have any activities that you can apply to your large photo collection that is repeatable and predictable? Resizing, converting, cropping, watermarking, date stamping, renaming, and other similar operations? We’ve been working on making BatchPhoto Keygen the best tool for automating those repetitive tasks since 2005!Īutomatically resize and modify the DPI of images. Use sepia, black and white, charcoal, and other special effects Adjust the brightness, sharpness, and contrast of your photos. Rotate photographs automatically based on EXIF metadata. Resize the image and adjust the DPI automatically. With the BatchPhoto activation code, you can convert images to JPEG, PDF, TIFF, GIF, PNG, and 170+ other formats. As a result, you may edit several images at once, saving you a lot of time. It allows you to edit several photographs at the same time. BatchPhoto Pro Crack converts image files to JPEG, PDF, TIFF, GIF, PNG, and other formats.
Batchphoto crack serial key#
BatchPhoto Pro With Product Keys (2022):īatchPhoto Pro Crack With Serial Key Full Version 2022 īatchPhoto Serial Keyis a sophisticated image processing tool for Windows and Mac that allows you to resize, convert, watermark, tap, apply special effects, and rename hundreds of photographs in a single operation.
BatchPhoto Pro Crack With Serial Key Full Version 2022.
1 note
·
View note
Text
Manycam for windows 10

MANYCAM FOR WINDOWS 10 PRO
MANYCAM FOR WINDOWS 10 SOFTWARE
MANYCAM FOR WINDOWS 10 PC
MANYCAM FOR WINDOWS 10 PROFESSIONAL
Users of Man圜am gave it a rating of 4 out of 5 stars. Man圜am runs on the following operating systems: Windows/Mac. The most prevalent version is 8.0, which is used by 8 % of all installations. It was initially added to our database on. The latest version of Man圜am is 8.0.1.4, released on. It was checked for updates 1,131 times by the users of our client application UpdateStar during the last month.
MANYCAM FOR WINDOWS 10 SOFTWARE
Man圜am is a Freeware software in the category Audio & Multimedia developed by Man圜am LLC. Tweak the brightness, contrast, and color of your image to create amazing live videos. *Settings: Choose the resolution, fps, and bitrate to get the best results or automate the process. There are so many ways that we can do to have this app running into our Windows OS. It allows broadcasters to use all their favorite tools quicker by customizing their UI. *Modular UI: Man圜am's UI is intuitive and easy to use. *Effects Panel: Create folders, move effects and objects around, to organize them. *Chroma key: Remove your background and replace it with any image or video source during your video call. *Game Streaming: Live stream or record your gameplay with the Game Source. *Record: Prepare tutorials by recording videos on your desktop while using every feature Man圜am has to offer. *Screencast: During a video conference or an online class, screencast your desktop live, add graphics overlays, lower thirds, write and draw on your screen. *Multiple Video sources: Vary your video sources between webcams, smartphones, web sources, images, pre-recorded videos, computer screens & much more. *Picture-in-Picture & Presets: Create multiple layers, add Pic-in-Pic windows, move each layer around and preview before showing it live. Plus, a faster software with hardware acceleration. *Enhanced performance & speed: Get high-quality video with up to 4k resolution with smooth, sharp and clear images. Give some flair to your broadcasts with 3D masks that wrap around your face, objects, digital props, effects and filters. *3D Masks & Effects: Drag and drop images or animated GIFs to use on video calls and resize them live. With Man圜am, you can stream to multiple platforms at once, add effects, record or share your screen and much more. Easy-to-use, Man圜am allows users to add multiple video sources, like webcams, pre-recorded videos, smartphones, and tablets, to live streams and video calls.
MANYCAM FOR WINDOWS 10 PROFESSIONAL
Man圜am 8.0.1.4 is available to all software users as a freeload for Windows.Man圜am is a free webcam software and video switcher that helps you produce professional quality live videos.
MANYCAM FOR WINDOWS 10 PC
This download is licensed as freeware for the Windows (32-bit and 64-bit) operating system on a laptop or desktop PC from webcam tools without restrictions.
Add custom backgrounds to webcam images.
Custom graphics may be created and addded.
Integrates with Windows Live, Skype, Youtube and AIM.
Works with most instant messaging services.
Several feature enhancements are included within Man圜am to produce a professional quality live video production. It is also fun to use with instant messaging programs capable of webcam video chat such as AOL Instant Messenger, Microsoft Live Messenger, Skype and others. Man圜am is an easy-to-use virtual camera and live streaming software that helps you deliver professional live videos on streaming platforms, video conferencing apps, and remote learning tools. With the option to switch between different video sources, Man圜am free is perfect for people who often stream on sites like Twitch.TV. You're able to broadcast your desktop over your video window and add a list of different types of audio effects to your webcam stream. It allows you to use your webcam with multiple applications at the same time. Man圜am free effectively turns your PC hooked up to a webcam into a video studio.
MANYCAM FOR WINDOWS 10 PRO
Man圜am free, as opposed to the pro version, is the cut down version of a program which actually contains many more features. Man圜am free webcam effects software turns your webcam into a live video tool
0 notes
Text
Adobe flash actionscript 3.0 stop function not working

On the first line, type the stop function to stop the pages from cycling through.
Step 9: In the timeline, select the first frame of the Actions layer and hit F9 to bring up the Actions panel.
Repeat this process for the remaining images, incrementing the frame names each time.
Step 8: Right-click on the second frame of the Pictures layer and select "Insert BLANK keyframe." In Properties, change the name of this frame to "pic2." Now drag the next image onto the document, resizing and centering it above the menu.
Step 7: In the timeline, right-click (or command click on a Mac) on the second frame of the Thumbnails layer and select "Insert Frame.".
Move the image to the center of the document above the menu. Resize it in the Properties panel, remembering to click on the chain-link icon to reconstrain the width and height values. In Properties, change the name of this frame to "pic1." Drag the image corresponding with the first menu item onto the stage.
Step 6: From the timeline, select the first frame of the Pictures layer.
In the Properties panel, change the instance name to "button1." Select the next image from the menu and repeat the process, naming it "btn2" and "button2." Continue the process for each menu item. Change the name to "btn1," change the type to "button," and click OK.
Step 5: Select the first image and hit the F8 key on the keyboard.
TIP: Adjust the images' alignment in the row by selecting all of them and choosing the desired options from the Align panel.
Repeat this process for the remaining images so that they are in a row at the bottom of the document. Position the image at the bottom left of the document. In Properties, click on the chain-link icon to unconstrain the width and height values.
Step 4: With the Thumbnails layer selected in the timeline, drag one of the imported images onto the document.
Once you've selected your images, click "Open." You'll see the imported images in the Library panel. You can select multiple pictures by holding down the Control key and clicking multiple images.
Step 3: Import your pictures by going to File, Import, Import to Library.
Starting from the bottom, name the layers: Actions, Thumbnails, and Pictures.
Step 2: From the timeline panel, click the "New Layer" button until you have three layers.
Switch the workspace layout by clicking on the drop-down menu box in the upper left of the top menu bar and selecting "Designer." Change the size and color of the document by adjusting the settings in the "Properties" Panel.

Step 1: In Adobe Flash, select "Flash File (Actionscript 3.0)" from the "Create New" menu.
0 notes
Text
Photoscape x pro


However, these tutorials are limited and don't show you the full extent of PhotoScape X’s capabilities. These lessons help you navigate the app with ease and show you how to enhance your pictures effectively. While no photo editing software is straightforward, there are many tutorials available online.

The free software, PhotoScape X, offers fewer features than PhotoScape X Pro. There are multiple versions available of this app, with varying restrictions. Other options available for managing batch files include resizing and renaming. This option saves you time and speeds up your editing abilities. Step 3: Now you can find a Windows Explorer-like part, on the top left part of the interface, and you can tap on any of the folders to find the images within it. Step 2: Open Photoscape X and in the home screen click on ‘Cut Out’. Step 1: Download Photoscape X on Windows 10 from the following link. Using this process, you can convert large batches of photos at once. Making images transparent using Photoscape X.

Operating as a file converter, you can use PhotoScape X to change an image file type. The app also includes many essential editing tools, such as the copy and paste feature. This user tip shows how: External Editors in Photos Are Here. All you need to do is purchase the 99¢ External Editors For Photos from the App Store. There are over a thousand stickers and hundreds of add-ons to liven up photos.Īdditionally, there are over a thousand different effects, filters, frames, objects, brushes, and tools at your fingertips. You can use PhotoScape X from within Photos to edit your images. The app allows you to use color filters to change how an image is perceived and highlight specific areas. If you are a user of Windows 10 or Mac, please use PhotoScape X.PhotoScape X is a multi-use photo editor that offers many features that enhance your images. You can support future development by donating. Face Search: Find similar faces on the Internet.Paper Print: Print lined, graph, music and calendar paper.Rename: Change photo file names in batch mode.Color Picker: Zoom in on images, search and pick a color.Screen Capture: Capture your screenshot and save it.Splitter: Slice a photo into several pieces.Print: Print portrait shots, carte de visites(CDV), passport photos.(Microsoft Windows NT/2000/XP/Vista/7/8/10) If you are a user of Windows 98 or Me, please use PhotoScape 3. This software is Microsoft Windows compatible. Animated GIF: Use multiple photos to create a final animated photo You can support future development by donating.Combine: Attach multiple photos vertically or horizontally to create one final photo.Page: Merge multiple photos on the page frame to create one final photo.Batch editor: Batch edit multiple photos.Editor: resizing, brightness and color adjustment, white balance, backlight correction, frames, balloons, mosaic mode, adding text, drawing pictures, cropping, filters, red eye removal, blooming,.Viewer: View photos in your folder, create a slideshow.PhotoScape is a fun and easy photo editing software that enables you to fix and enhance photos. Pros: Photoscape X is an excellent software for photo editing, it is possible to make corrections to brightness and exposure, cropping and montage of several photos, has a function to reduce the size of photo files and supports several image formats, with it and It is possible to make edits in batches, a feature that makes it much easier when.
0 notes
Text
Gif brewery 3 frame speed

GIF BREWERY 3 FRAME SPEED HOW TO
GIF BREWERY 3 FRAME SPEED MOVIE
GIF BREWERY 3 FRAME SPEED MP4
GIF BREWERY 3 FRAME SPEED INSTALL
Then you need to choose to share it to iMessage or save it on your computer. After the conversion is done, you can preview the GIF you created.
GIF BREWERY 3 FRAME SPEED MP4
When you’re done, hit the Create button in the top left corner of the screen to start to convert MP4 to GIF. Or configure the output settings by clicking the Settings button. Next, you can use the cropping tool to crop the MP4 file. Here you can set the start point or set the endpoint by moving the green bar or the red bar to the desired place. Click on Videos… to go to the “ Open File…” dialog window and import the MP4 file you want to convert. Launch this MP4 to GIF converter to enter its main interface.
GIF BREWERY 3 FRAME SPEED INSTALL
Download and install GIF Brewery 3 from Mac App Store.
GIF BREWERY 3 FRAME SPEED HOW TO
Related article: 4 Best GIF Croppers: How to Crop A GIF.īelow are the steps on how to convert MP4 to GIF on Mac. Like other MP4 to GIF converters, this program also lets you do some basic editing like resize, crop, apply effects, set frame rate, add captions, etc. In addition, you can use it to make a screen recording or record from your webcam, so you can quickly make GIFs from screen recordings. How to Convert MP4 to GIF on Macĭeveloped by Gfycat – one of the most popular GIF finders, GIF Brewery 3 is a GIF creator that allows you to create funny GIFs from video clips. You may like: How to Remove Watermark from Video and Photo Efficiently.Ĭlick to Tweet Part 2.
Free to use, no ads, no bundles, and no watermarks.
Support exporting videos to various devices.
GIF BREWERY 3 FRAME SPEED MOVIE
Hollywood-style movie templates are provided.Offer a variety of transitions and titles.Support converting MP4 to GIF, MOV, MKV, MP3 and many.Recommend article: Top 7 GIF Viewers for Windows/Mac/Android/iPhone. When you’re done, you can export the converted file by pressing the Export button. Once you’re here, you can choose the GIF format, change the file name, resolution and save path. Then tap on Export to open the Export window. You might be interested in this post: How to Add Text to Video in Windows Movie Maker. Then enter the text and click on OK to save changes. Add text to video: Click on Text to access the Text library, and add the text you like to the text track.See also: How to Flip a Video on Computer & Phone. Choose the Flip Horizontal option to flip video and click the OK button to apply the change. Flip video: Double click on the video to access the edit window.Then click on the scissor icon to split the video, right-click on the unwanted clip and select the Delete option to remove it. Remove the unwanted parts: choose the video and move the playhead to the right place.You may also like: How to Edit MP4 – All Useful Tips You Need to Know. Drag and drop the target video to the timeline. Run this software and close the pop-up window to get the main interface. Download and install MiniTool MovieMaker. Now, let’s take a look at how to convert MP4 to GIF on Windows. What’s more, you can also use this editing software to make a GIF from some pictures on your own. You may also like: How to add text to GIF. It’s also an MP4 to GIF converter that can convert MP4 to any popular format, such as GIF, MP4, AVI, MOV, WMV, F4V, MKV, 3GP, WebM, MPEG 2, MP3 and so on.īefore converting MP4 to GIF, you can do some basic editing like removing unwanted parts, flip video, add text and apply filters. MiniTool MovieMaker is a video editing tool that works on Windows 8/10. This part will tell you how to convert MP4 to GIF with MiniTool MovieMaker. It's free and can convert multiple MP4 files at once. If you like to convert MP4 to other video formats or extract audio from MP4, try MiniTool Video Converter developed by MiniTool. Don’t worry, continue to read this post and you’ll find the answer. Therefore, you may wonder how to make GIFs from MP4. You’ve seen lots of GIFs on the internet and most of them come from movies, TV shows, news, etc. So how to make GIFs from your favorite MP4 clip? In this case, this post presents 5 best ways to help you convert MP4 to GIF. It can exactly convey your emotions and feelings. GIF is a lossless bitmap image format that is widely used on social media platforms.
1 note
·
View note