#rchelis
Explore tagged Tumblr posts
rchelicopterhub · 1 year ago
Text
Helifest is coming
0 notes
rchelicopter · 1 year ago
Text
4. Advanced Sport: RC Helicopter Pilot Proficiency Program (with Oxy Flash)
youtube
4. Advanced Sport: RC Helicopter Pilot Proficiency Program (with Oxy Flash)
Introduction
In this episode we’ll be going through level 4 of the RCHN Pilot Proficiency Program. This is aimed at the advanced sport pilot and covers inverted orientations, flips, rolls and F3C style autorotations.
I’ll be flying the Oxy Flash, which is an ultra-light 700 class helicopter from Lynx Heli Innovations. This particular one is owned by Eddie Thompson, so many thanks to him and Adam Plumbridge for setting it up and allowing me to put a few packs through it. I’ll tell you what I thought of it at the end.
So let’s get on with it.
Sustained Inverted Flight
The first manoeuvre is sustained inverted flight. This is simply 2 circuits around the flying field, one clockwise and the other counter-clockwise. The guide gives no indication of speed or size, so I’ve chosen a medium speed circuit with a bit of bank to go round.
You should do this at whatever height you feel comfortable, and you want to make it as round as possible and centred in front of you with the entrances and exits at the same place. The speed and height should be constant and you should be in complete control.
Sustained Inverter Hover
The next manoeuvre is an inverted hover for 10 seconds in each of the four directions.
This is a really good exercise to do at different heights and with rotations left and right. I often take this a bit further and do travelling shapes, like a hovering square horizontally, or vertically with each side being one of the orientations.
We’re getting deep into the series now and this is where the rubber meets the road. If you’re struggling to progress in 3D, these are exactly the sort of exercises you should be doing, and you should practice them often and in wind, regardless of your level.
For these hovering manoeuvres I run the headspeed at about 1600 or 1700 on a 700 size machine. It settles the model a bit in the hover and you’ll get a decent 8 to 10 minutes out of a pack.
Inverted Pirouettes
There are 2 inverted pirouettes to do, left and right rudder. You want to do these slowly to show you have control of the model as it goes through a complete 360.
This is a well known exercise for improving flights skills, and to get the best out of it, you want to do as slow as you can. Also try them at various heights.
If you notice in the background I have a cone. I use this for my centre, so any hovering manoeuvres like this should be done in line with it. It will make it harder to do most manoeuvres, but things that are more difficult to do, also mean we learn faster and have better results.
Inverted Figure 8
For the inverted figure 8 you want to fly past yourself before you do a 5/8ths circle and cross the centreline at 45 degrees nose-in. Then do a 3 quarter turn for the 2nd half to cross the centre, again at 45 degrees. And a small turn to exit.
The guide says to do a 2nd figure 8 but its explanation is ambiguous, so I’m going back along the same path in forward flight. A small turn to enter before you reach the middle and crossing the centreline at 45 degrees tail-in before you start the first circle.
You’re looking for a constant speed and height, and also for it to be nicely centred and shaped. This is another good manoeuvre that will have you judging the wind conditions and thinking ahead.
Two Consecutive Stationary Rolls
The next manoeuvre is 2 consecutive stationary rolls. There are 4 variations of these. Tail-in left and right, and nose-in left and right.
There’s not much wind, so I’m doing them fairly low, but you should do them at any height that you feel comfortable with.
If you are doing them higher, you want to keep an eye out for drift and height changes. If the model is drifting, that means you have the skills to do the manoeuvre, but you need more practice with a focus on keeping them in the same place.
180-Degree Autorotations
180 degree autorotations are a nice F3C manoeuvre, but tricky to do well. You want to do them with a decent amount of height and starting downwind, so that you land nose into wind. The guide asks for 4 variations, but that seems a bit silly. From the left and right is more than enough.
You want to fly parallel to the flightline a little way out. Start the auto before you cross the centreline, and as you cross it, make a gentle 180 degree turn with a tiny amount of bank to bring it round and land on the spot.
Forward Flips
The next exercise is forward flips. You’ll be doing a flip to inverted, hold for 5 seconds, flip to upright and hold for 5 seconds, and you’re going to do that for each of the 4 points.
Once again, do them at a height comfortable for you, but not so high that they drift around. The flips don’t have to be mega fast either. You’re not looking for full elevator flips. Controlled and medium speed is fine. And after the flip the model should settle quickly. If you’re wobbling around for a bit, then you’ll need to keep practicing. Slow piros are a good exercise for learning to control the helicopter in all orientations and getting it to settle quickly.
Also try practicing other orientations, so make it 8 or 12 points, or move it around in a circle where the flips are towards the centre or out.
Backward Flips
Backwards flips are the same thing. Flip, 5 seconds, flip, 5 seconds and then the next point. These exercises may seem simple, but they are getting you lower and more comfortable all the time. They’re also the pathway to tumbling circuits, which are a highly rated manoeuvre.
You’ll see that wind has quite a bearing on how these are done. If you’re flipping away from the wind, the wind will get under the disk and flips you over with very little collective. If you’re flipping into the wind, you need to add collective before you do the flip, or the wind will push the disk down and you’ll lose a lot of height.
These are the sort of things that exercises like this will teach you and will become natural with enough practice. Simple exercises but lots of value in them.
Side Flips
Side flips are done tail-in and nose in, with left and right half rolls with the same 5 second pause between each one. Just like the forward and back flips, they may seem too simple and not have much value, but they are giving you confidence down low, and the more you practice these, the better you will become. And they may be the difference between you struggling with 3D and breaking into that next level.
I have another video called Figure 8 Exercises that has loads of these practice manoeuvres. They’re easy, they can be down low with very little risk of crashing, but they work on all your orientations in subtle ways to make learning much easier. Any time you spend doing these is 100% worthwhile.
Two Consecutive Stationary Flips
The last exercise is 2 consecutive stationary flips. These are done tail-in and nose-in, rolling to the left and to the right.
They can be tricky with a bit a breeze, so do them at a height where you feel comfortable without risking the helicopter.
If you were to take these consecutive rolls and make them travelling, you’d almost be doing a rolling circuit. So you can see how simple manoeuvres done well will prepare you for much more complex manoeuvres later on. Skip these at your own peril.
Conclusion
And that’s the end of Level 4. Although I went through it fairly quickly, this is not an easy level to attain, and the manoeuvres have becoming significantly more difficult.
The Oxy Flash coped with this level with ease. It’s got a light disc loading and is pleasant to fly to around at lower headspeed. The canopy is bright and unusual and the orange dot on the nose made me smile every time it came round in the sun. Thanks again to Eddie and Adam for organising the use of the helicopter for the day.
Until next time, good luck!
0 notes
funktionsmodellbau · 5 years ago
Photo
Tumblr media
7. Modellsporttreffen Seewen 2019 . . Photo: @fabian.huesser . . rcscale #rccar #scale #swiss_rc_instagramer #funktionsmodellbaupin #funktionsmodellbau #swissrc #swissrcchannel #scalerc #rcporn #rcscaletruck #modellbauer #rcmodellbau #rcgarage #rcheli #rchelis #rcschiffe #tweet #twitter #rcairplane #rcaircraft #rchelicopter (hier: Seebad Seewen) https://www.instagram.com/p/B3FXJ-Hi_wI/?igshid=ne5eliqsvs1b
1 note · View note
thehobbymaster · 3 years ago
Photo
Tumblr media
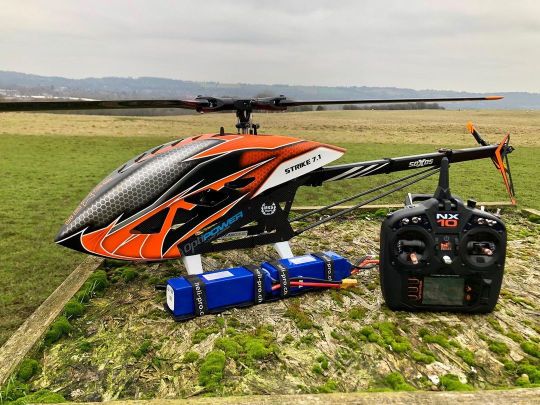
A faultless performance from the Strike 7.1 today in the rolling green hills of England 👍 new Spektrum NX10 radio works perfectly. Powered by a pair of Optipower 5300ma packs. Happy Sunday 😎 @heliprofessional @1st_rc #helicopter #helicopters #rchelicopter3d #rcheli #rchelis #modelhelicopter #radiocontrol #s #vbar #helilife #3dhelicopter #futaba @futabarc #futaba16iz @helyshopuk @soxoshelicopters.co.uk @spektrum_rc @tomthebomb_cogs @horizon_hobby https://www.instagram.com/p/CZFo8Q8tUrR/?utm_medium=tumblr
0 notes
leopard-power-blog · 6 years ago
Photo
Tumblr media
Get it installed for your heli packs. #rchelis #leopardpower #leopardpowerbattery @leopardpowerbattery http://www.leopard-power.com https://www.instagram.com/p/Bwj9CuHnz1Q/?utm_source=ig_tumblr_share&igshid=1e3b8giboaaca
0 notes
mecanerd · 2 years ago
Photo
Tumblr media
Le tout premier avion RC que j'ai crasher et mon trex 100 qui est un bijou . #align #nanoracer #plane #rc #rcheli #rcplane #avion #telecommande #mecanique #technologie #theia #théiarob https://www.instagram.com/p/Cfl_DjNNqWH/?igshid=NGJjMDIxMWI=
0 notes
auselectronicsdirect · 4 years ago
Photo
Tumblr media Tumblr media Tumblr media Tumblr media Tumblr media
4 CHANNEL RC HELICOPTER WITH ALTITUDE HOLD
Stable and Easy to Fly RC Helicopter
This mid-size 4 Channel Rc Helicopter is stable and Easy to Fly. The single propeller blade design makes this helicopter quite agile and with the help of the altitude hold feature, helicopter control is a breeze. With one button take off and landing and 6 axis gyroscope, this helicopter is ideal for beginner flyers.
Supplied with a 2.4GHz Digital Remote Controller, you are able to control the RC Plane up to 120m in distance. The large capacity rechargeable battery will provide between 15 - 20 minutes of play time. A USB Battery Charger is supplied.
https://www.auselectronicsdirect.com.au/4-channel-rc-helicopter-with-altitude-hold
0 notes
livinfreerc · 5 years ago
Photo
Tumblr media
🛩️Air🚗Land🚤Sea ⬇️🚗Enjoy The RIDE💨⬇️ 👉Follow us @livinfreerc for more #RCAction . . . #LivinFreeRC #rchobbies #hobbyrc #rcjet #rchobby #scalerc #rcjets #rchelocopter #rcheli #rcaircraft #serioustoys #scalemodel #customrcbuilds #rcscale #scalerc #scaleaircraft #scaleairplane #rcaviation #scaleaviation #customrc #radiocontrol #radiocontrolled #drone #rcaddiction #rclife #rclifestyle #rccommunity #Portland #ptown #portlandoregon (at Portland, Oregon) https://www.instagram.com/p/B-Pd9TpDIxz/?igshid=13dylooschpre
0 notes
rchelicopterhub · 2 years ago
Text
No so easy to learn....
0 notes
rchelicopter · 1 year ago
Text
5. Basic 3D: RC Helicopter Pilot Proficiency Program
youtube
5 Basic 3D RC Helicopter Pilot Proficiency Program
5.1 Sustained Backward Flight
In level 5 of the Pilot Proficiency Program we start with backwards circles. The guide suggests they should be as big as your flying field, but I guess that depends how big that your flying field is. As long as the helicopter has a bit of speed and bank, and you’re flying the manoeuvre instead of locking the controls, it should be fine.
There are 2 variations, from the left and from the right. The start and end points should be in the same place each time, directly in front of you, and the circles should be round with a constant speed and height.
The wind can make this more difficult, but you should still be able to do this manoeuvre to a high level regardless.
5.2 Backward Figure 8
The Backward figure 8 starts by flying past the centreline before doing a 225 degree turn so the model comes back at 45 degrees. It crosses the centreline and then executes a 270 degree turn so it comes back again at 45 degrees from the other direction. Then you do a small turn and exit along the same line you entered the manoeuvre.
The 2nd variation is flying backwards from the other side, along the same track you just flew. So turn 45 degrees before you hit centre, cross the middle and do a 270 turn. You should cross the centreline going away at 45 degrees again, and into a 225 degree circle before exiting the manoeuvre along the same line you entered.
Speed, height and size of the manoeuvre should be similar to the first one.
5.3 Backward Inside Loop
The backward inside loop starts from straight and level flight. As it reaches you, pull up into a large round loop, without drifting in or out, and it should exit at the same place it entered.
The 2nd variation is similar but starting from the other direction. Wind direction can make these feel like very different manoeuvres, but you will need to fly the model so the shape and size remains the same.
5.4 Travelling Backward Roll
Travelling backward rolls should centred on your position. So as you roll, the helicopter should be inverted when in front of you.
There are 4 variations you need to perform, from the left and the right, and also with the rolls away and towards.
Most pilots will be more comfortable rolling one way than the other, so this is a good exercise to practice. The wind can also make this tricky, as rolling away doesn’t need much collective to maintain height, but rolling into wind means you will need to apply the collective before you start the roll.
Also you don’t want to be doing the roll at maximum rate. This should be a nicely controlled axial roll with no loss of height or change of direction.
5.5 Sustained Backward Inverted Flight
Sustained backward inverted flight is similar to the first manoeuvre we did, only it’s inverted now. The circle should be flown with speed and some bank angle, and the entry and exit points should be at the same place.
At this level in the Pilot Proficiency Program you should be very comfortable with backward inverted, and this should feel easy to give the circle a good shape and keep consistent height and speed.
This will be from both directions.
A good exercise for practicing these is a galaxy or spiral where each circle gets smaller and the model goes slower and slower until you reach centre. Then reverse it and come all the way out again.
5.6 Backward Inverted Figure 8
The backward inverted figure 8 is similar to the backward inverted 8 we did earlier. Cross the centreline before starting the first turn, and continue as we did before.
And don’t forget to reverse and do the figure 8 the other way as well.
This manoeuvre is used a lot in proficiency programs and certifications, as it has turns in both directions, and in wind you will need good control to keep them at the same height and size. Also coming out of the circles and trying to cross at the same place can be really difficult when the model is being blown downwind on one leg and then upwind on the other.
The crossover also tests you in other ways, as you are banked one way, have to level out and bank the other, all while keeping a consistent speed and height.
Not an easy move to do well, but you should doing these with ease now you’re at the basic 3D level.
5.7 Inverted Autorotation
The inverted autorotation should start inverted at no less than 60 feet or 20 meters, either from the left or right. Before you hit the throttle hold switch, you want to already be descending with a slight forward speed. You can roll at any point during the manoeuvre, so I’ve done it while still with a decent height so the headspeed can come back up and stabilise before making the landing.
For the other variation from the left I’ve turned around so that the auto-rotation is still into wind. You want to avoid downwind autorotations whereever you can. Make the roll, and keep forward speed and the downward angle the same all the way to the bottom. Into wind should make for a nice soft landing.
5.8 Knife Edge Pirouette
Knife-edge pirouettes start with straight and level flight, and just before going knife-edge you want to add a bit of collective so the helicopter is moving up when you roll and do the pirouette. After the pirouette you want to descend slightly so you’re back at the same level as when you started.
For F3N you are allowed up to a 15 degree upward angle before making the quarter roll, but as long as it isn’t a big climb, it’ll be fine for this test.
There are 4 variations listed in the guide, with the directions being left and right, quarter rolls both ways and also pirouette in both directions. Technically that means 8 variations, but I think any 4 will do.
Apologies for the use of the sim here. The video I got for the knife-edge pirouettes didn’t turn out very well, and the weather isn’t very good enough for a reshoot currently.
5.9 Death Spiral
The death spiral starts from a high hover, does a quarter roll to knife-edge and 3 elevator flips on the way down.
There are 4 variations here, starting with a left or right roll, and also forward or back elevator.
When starting with the left roll, you will need to start higher than when you start right. That’s because the tail thrust will be pushing the model down instead of lifting, and you’ll find the helicopter will drop a lot faster and further this way.
I can’t say I’ve ever had to do all 4 variations, as most people learn one and don’t bother with the rest, so this was a good exercise in getting them right, especially with having to counter a bit of wind on the way down.
The usual way to exit these at the bottom is to apply collective and turn it into a funnel.
5.10 Tic Tocs (Skids Out)
The next manoeuvre is blades-in tictocs. You will need to do at least 5 tictocs in each of the 4  orientations.
The tail thrust is an important factor even when there isn’t much wind. In some directions it will allow you to keep the tail straight and everything works well. Then in another direction you’ll be fighting the thrust. You shouldn’t be leaning the tail over to counter the wind and thrust, so you’ll need to learn how to do it without lean.
I’ve covered that in my video on controlling tictocs. There’s a link in the description in case you need to have a look at that.
The tail thrust has an effect when the model is horizontal too. You’ll find you’re using more cyclic when the nose is pointing right.
These tictocs should all be at a constant height and shouldn’t drift in or out much.
5.11 Vertical 8
The vertical 8 is basically an outside loop on top of an inside loop. This is more difficult than expected as it all happens with the model high. After the first half loop, you want to keep it flat as you add collective, and as it follows the loop, you can start pushing it over.
The speed back down has to be controlled, so you’ll need to be very good at both the inside and outside loop.
And then on top of that you need to stop it drifting in or out.
The 4 variations needed for this proficiency program are left and right, as well as forwards and backwards.
It is worth spending a bit of time on this manoeuvre as it is used in a few certifications and competitions. There is something called a standing 8 which is a vertical 8 with a half piro at the top.
Getting the shape right will also help when you move onto globes. You’ll need to have an understanding of should the nose be level or down when entering subsequent loops, and managing the speed will be important too.
5.12 Tumbles
For tumbles you want to start from straight and level flight. There are going to be 3 of them, and you want them to be centred, so you should be inverted as you cross the centreline in front of yourself during the 2nd tumble.
There are 4 variations, from the left and right, as well as backward and forward tumbles.
You don’t want to enter these too fast, as you’ll need to be more aggressive on the collective to keep forward speed, but also more careful on the backward tumbles otherwise you’ll gain height.
A really good practice manoeuvre is to do these in a circuit or figure 8. I cover them in my figure 8 exercises video which I linked to in the description.
The height and speed should be consistent across each of the tumbles, and you want to keep them in a nice straight line.
You can also try them as sideways flips for some extra difficulty. You’ll see this being used by a lot of top pilots, as it’s a nice hard manoeuvre to get right, especially in wind.
Conclusion
So this was part 5 of the RCHN Pilot Proficiency Program, Basic 3D.
This episode mostly covered inverted forwards and backwards flight and aerobatics, as well as a few advanced manoeuvres like inverted autos and tictocs,
The links the RCHN and IRCHA programs are in the description below, and if you have any questions, please write them in the comments.
Don’t forget to subscribe to get the next episode as soon as it comes out. Until next time!
0 notes
funktionsmodellbau · 5 years ago
Photo
Tumblr media
7. Modellsporttreffen Seewen 2019 . . Photo: @fabian.huesser . . rcscale #rccar #scale #swiss_rc_instagramer #funktionsmodellbaupin #funktionsmodellbau #swissrc #swissrcchannel #scalerc #rcporn #rcscaletruck #modellbauer #rcmodellbau #rcgarage #rcheli #rchelis #rcschiffe #tweet #twitter #rcairplane #rcaircraft #rchelicopter (hier: Seebad Seewen) https://www.instagram.com/p/B3Kd7tLCY6L/?igshid=1gldvfer7kq1x
0 notes
thehobbymaster · 3 years ago
Photo
Tumblr media
The Blade Fusion 360 Smart helicopter, Spektrum NX10 and Spektrum smart lipo flight pack. The perfect combination for a New Years fly 😎 @logicrcltd @horizon_hobby @bladehelis #blade #bladehelicopters #rcheli #rchelis #rc #rchelicopter #bladefusion #rchobby #rchobbies #rcmodel #3dheli #fusion480 #fusion270 #fusion180 #fusion360 #rotorworld #rotormagazin @helispoolup @tomthebomb_cogs @spektrum_rc https://www.instagram.com/p/CYRucdsNv_D/?utm_medium=tumblr
0 notes
rc-hub · 7 years ago
Photo
Tumblr media
Super slick SAB Goblin Fireball should be available now over at AMAIN!! We have more specs and a video up on the website! Click on RCHUB.com for more details! #amainhobbies #sab #goblin #fireball #helicopter #competition #brushless #kit #lipo #carbonfiber #heli #stunts #flying #upupandaway #airborne #rc #rcheli #rcflight #rchelicopter #rchobbies #flying #rcflying #rchub @rchub @amainhobbies
1 note · View note
van-city-rc-blog · 5 years ago
Photo
Tumblr media
I frequently browse Craigslist looking for deals. Earlier this summer I think I may have found the deal of the year where I purchased a large RC collection that filled the box of my pickup truck. Which included: Yuneec Typhoon Q500 DJI Alien F450 Eachine goggles FLYSKY FS-TH9X Transmitter and much much more. • #rchelicopter #rcheli #walkera #craigslist #craigslistfinds #rc #drone #quadcopter #youtubechannel #vancityrc #contentcreator #youtuber https://www.instagram.com/p/B2dVuwKHeEQ/?igshid=1ibof5dlkp83f
0 notes
hornet-rc · 7 years ago
Video
instagram
Победил китайский #detrum #3gs #rcheli #rcpilot #hrc #hornetrc #razor450 #магазин #ремонт #вертолет #хорнетрс
2 notes · View notes
mecanerd · 3 years ago
Photo
Tumblr media
Mon #align #trex450 et mon #align #trex100 #helirc3d #rc #rcheli #helicoptere #théiarob https://www.instagram.com/p/Cb-MRvhNlOo/?utm_medium=tumblr
0 notes