#quilt templates
Explore tagged Tumblr posts
Text

Free Quilt Pattern: Kaffe Kats Quilt Indulge in the whimsical world of Kaffe Kats, a free cat quilt pattern by Donna Jordan for Jordan Fabrics. Crafted with love, this quilt measures 48 inches x 71 inches and is adorned with charming appliqué cat and heart blocks, effortlessly created using versatile fat quarters. Dive into the creative process with the included heart and cat templates, making crafting a breeze. The quilt showcases a delightful collection of 12 silhouette cats, adding a playful touch to any space.
Pattern Source: Jordan Fabrics Designed by: Donna Jordan Primary Technique: Applique Finished Quilt Measures: 48 inches x 71 inches
Get This Pattern Here: https://ilovequiltingforever.com/wp-content/uploads/2021/09/Kaffe_Kats_Pattern_with_Templates.pdf
#crafts#gifts#decor#sewing#quilting#briar rose quilts#bedding#shopping#quilters of tumblr#holiday#kats quilt#kaffe kats#free quilt pattern#quilt pattern#cat quilt#cat quilt pattern#jordan fabrics#donna jordan#applique#ilovequiltingforever#quilt templates#applique templates#quilts#quilt block#cat block
6 notes
·
View notes
Text
HOLY SHIT this is probably the most mundane thing ever to anyone else but I FOUND THE SOURCE OF THE ESSENTIA ICONS FROM THAUMCRAFT!! https://game-icons.net/ <--- look at it!!
so i was browsing around open source icon sets, yknow, as you do. anyways, i found game-icons and was like “oh neat”. then. the little example grid flipped around a few times and what do i see?

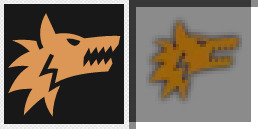
FAMES!
BESTIA!
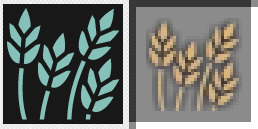
that wheat one (the aspect is called Messis apparently)
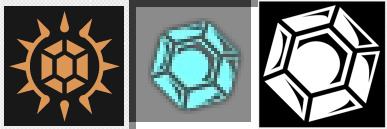
i thought this one on the left was the gem from Vitreus, but it’s actually the one on the right
anyways so at this point i’m FREAKING OUT because OH MY GOD ITS THE THAUMCRAFT ICONS. so i scramble around to find a sprite sheet of all of the icons and

VICTUS!
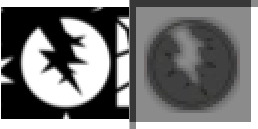
PERDITIO!!!!!
ORDO!!!!!

hehe look at the little guy in Iter go. i love him

TERRA!!!!
so this is awesome and all, but do you know what this means?

this is Potentia, of course (on the left). but what is it? what is this image? i’ve always thought it was a raw fish (on the right) because it looks a lot like it. but that makes no sense because this aspect is "potential energy". also you get it from coal. so that can’t be it. but now that i’ve found the source of the icons, i can finally solve this question that i’ve literally had from childhood, from my earliest memories (early 2000s minecraft lets-plays on youtube). so i searched through the icons, shaking with anticipation. and finally...


it’s "Thor’s fist". it’s a fist grabbing lightning. BECAUSE IT’S ENERGY!!!!! It’s a lightning bolt being harnessed because it’s representing one harnessing the aspect of energy. i would have never guessed this in a bajillion years and i’m stupid (not actually, am just very silly).
anyways that’s all
#also i know that's not really how that meme template is supposed to be used but i do not care#i love thaumcraft that mod was so cool. i've been thinking about basically remaking it with Quilt for modern minecraft versions#to be the magic mod(s) in Gaeacraft. and now i can legally steal all the icons from it too! amazing! (well it's CC-BY)#minecraft#modded minecraft#thaumcraft#ftb#feed the beast
114 notes
·
View notes
Text
new gender loading....


[Image ID: Two rectangular flags. The flags both are patterned with three stripes on either side with one stripe in the middle. The middle stripe has a circle of the same color in the center and that circle has a triangle sticking out of each end. The first flag has colors in this order from top to bottom, bronze, a split stripe of chartreuse (left) and light green (right), a split stripe of light green (left) and chartreuse (right), off white, a split stripe of chartreuse (left) and light green (right), a split stripe of light green (left) and chartreuse (right), bronze. The second flag has colors in this order from top to bottom, bronze, chartreuse, light green, off white, light green, chartreuse, bronze. End ID.]
aeneousHandlic / pesterAbsinthe / aeneousAbsintheHandlic
a gender related to the chumhandle aeneousAbsinthe! this chumhandle does not appear in the original work (nor does it have a fan troll attached to it at the moment to my knowledge) but i like it
tagging @mogai-sunflowers @epikulupu @revenant-coining @radiomogai and @genderyboy ( if you want to be added to the tag list/taken off of it, you can always tell me :] )
#gender coining#mogai#mogai flag#hope you enjoy .✫*゚✫*. quilt's coining#mogai coining#handlic#homestuck#hope that image id worked because i had no template at all
16 notes
·
View notes
Text
Elevate Your Quilting Skills with Machine Quilting Templates

Hello quilting enthusiasts! Have you ever wondered how some quilters manage to create intricate designs with such precision and symmetry? The secret lies in their use of machine quilting templates. These wonderful tools can truly elevate your quilting skills to a whole new level. Here at Hancy Creations, Inc., we're excited to help you explore the world of machine quilting templates and unlock your quilting potential!
Understanding Machine Quilting Templates
So, what exactly are machine quilting templates? These are essentially patterns that are followed when machine quilting to achieve stunning, precise designs. They come in a variety of shapes and sizes, from simple geometric patterns like squares and circles, to complex motifs and pictorial designs.
Machine quilting templates are usually made of a sturdy, durable material like acrylic or hard plastic. This allows the sewing machine's foot to move smoothly over them without causing damage, ensuring you can reuse your templates for many quilting projects to come.
Why Use Machine Quilting Templates?
The beauty of machine quilting templates lies in their ability to help quilters of all skill levels create accurate and consistent designs. If you've ever tried free-motion quilting, you know how challenging it can be to maintain symmetry and precision in your designs. But with machine quilting templates, even beginners can achieve a professional finish!
Using these templates is also a great way to save time. Rather than meticulously marking out your designs on the fabric, you can simply position your template and let your sewing machine do the rest.
Getting the Most Out of Your Machine Quilting Templates
To start, choose a template that matches your skill level and the complexity of the design you want to create. Start with simple shapes if you're new to using templates, and gradually work your way up to more complex designs as you gain confidence.
Next, ensure you're using the right sewing machine foot. A quilting or darning foot allows the machine to glide over the template without causing damage.
When you're ready to start quilting, position the template on your fabric and lower the sewing machine foot onto it. Carefully guide the fabric and template under the machine, letting the template guide your design.
After you're finished quilting, simply remove the template, and voila! You'll have a perfectly quilted design every time.
Wrap Up
Investing in a set of machine quilting templates is a decision you won't regret. They're a great way to elevate your quilting skills and unlock your creative potential, no matter your skill level. Here at Hancy Creations, Inc., we're excited to see what incredible designs you'll create with your machine quilting templates. Happy quilting, everyone!
0 notes
Text

just in the nick of time, i have a little bday gift for the sims 2 community! <3 more info and download under the cut!

-first is 8 recolors of the maxis Beckoning Cat sculpture. I used the gold texture from @pforestsims 's terracotta set as the base texture for the cat. Cat has maxis eyes and windkeeper's cat mouth. I added extra shading and recolored in 8 of poppet's forever palette colors.

then four beddings I made trying out a new bedding texture I was putting together. I combined poppet's edited maxis bedding texture, the maxis quilted bedding texture, and the pinstripes from hysterical paroxysms bedding textures at mts. Fabric patterns are from ruby star fabrics.

six recolors of nengi65 big rug, the rugs are from chairish. I forgot to include the mesh im sorry but its easy to find! edit: here is a link to the rug and HL's add-ons

some recolors of the maxis mr badger painting, and I also included a PSD template with the circle cutout thing on its own layer with a shadow so it is faster and more fun to recolor :)
DL EVERYTHING IN THIS SFS FOLDER
everything has been compressorized and swatches are included thanks to sims 2 and everyone here for being the best!
#ts2 cc#sims 2 cc#ts2 download#ts2 custom content#sims 2 custom content#ts2 recolors#sims 2 maxis recolors#my cc
312 notes
·
View notes
Text
I made some cute sunflower pillows out of scrap fabrics I had been saving from the dump. I couldn't find the right buttons so I made some out of polymer clay I had in my stash 🌻

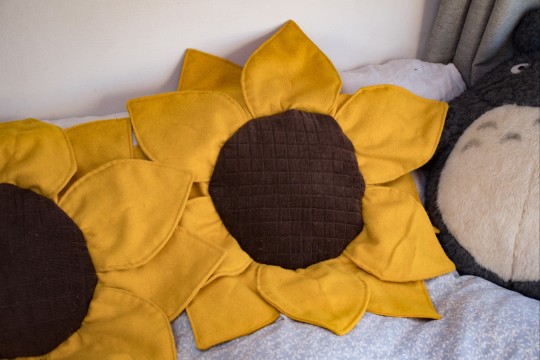
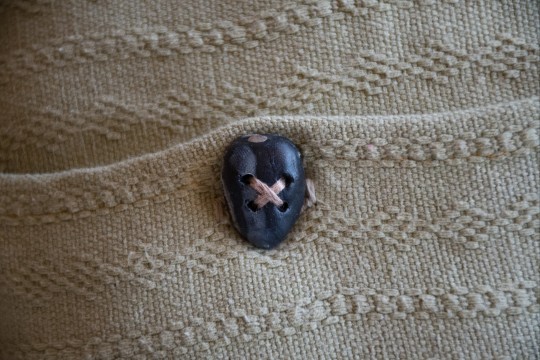
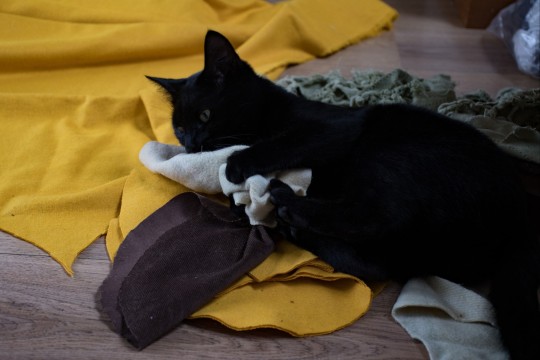
Here's some instructions if you also want to make some 😊
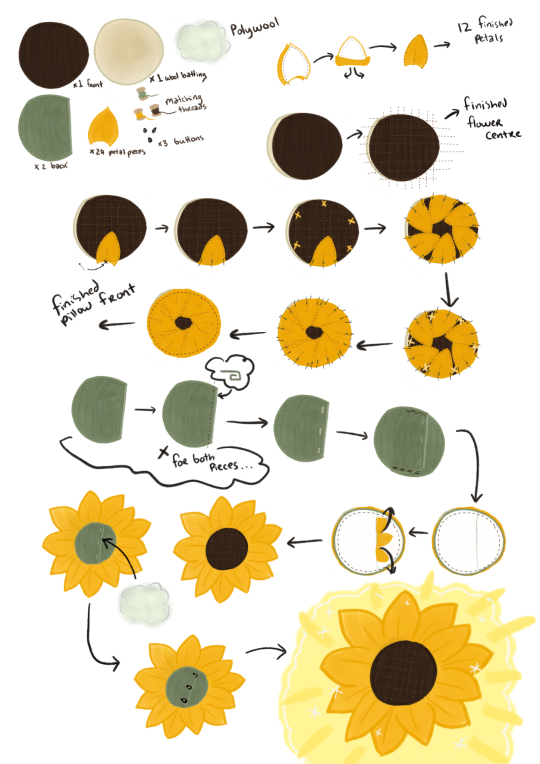
I still need to draw up a sized petal template but I've also made a youtube video (my first one, it's horrible 😂) if you are more of a visual learner.
youtube
1. Cut 1 brown corduroy circle 1 wool batting circle and 2 green 2/3 circles (for the back)
2. Cut 12 pairs of petals (24 pieces total)
3. Sew petal pieces right sides together 1cm away from edges. Turn right sides out and top stitch along the edge. Stitch centre petal seam. Repeat for all petals
4. Quilt your brown centre to the wool. I made lines about 1.5cm apart making a grid.
5 Pin 6 of your petals centre first evenly spaced around the edge. Pin the last 6 over the gaps. Sew 1 cm from the edge
6 Roll hem the straight edge of the 2/3 circle pieces (a rol hem to folding and then folding again)
7 make 3 button holes evenly spaced on one back piece
8 secure the pieces to eachother both having right sides up, creating a pocket
9 fold on your petals and pin your back piece right sides together to your flower front. Sew 1.5cm around the edge and turn out through the pocket.
10 stuff your pillow then add buttons to fit the holes you made earlier. I do the buttons last to make sure they fit nicely when fully puffed.
11 yayyyy pillow!
#cottagecore#slow living#cottagecore aesthetic#hobbitcore#sewityourself#diy#sewing tutorial#free sewing pattern#cottage life#Youtube
563 notes
·
View notes
Text
@anastasiaoftheironwood handquilting Star Story has begun!

I need to find an alternative to white chalk that doesn't stain fabric. Seeing white chalk on nearly-white fabric is a challenge. I've tried Clover and Fons & Porter, but they stain fabric.
Threads I'm using are Sulky, 12 wt, and the colors are 4057 (yellow/gold), 4034 (black/grey), and 4001 (light brown/cream) They're variegated blendables, but stand out just enough to add visual interest.
As for the quilting, details below:
I'll be using a wood star cutout as a template. I found it at a craft shop, and it's supposed to be a wall decoration. After I get the stars quilted, I'll go over it again with crescents. Unfortunately, I haven't been able to find a crescent nor have one made (lack of funds), so I'm making one with embroidery rings and cardboard.
Why this instead of straight lines and following seams? Time and fun. I use a small quilting hoop to make circles on Halloween Dream, and the handquilting was fast. When I handquilted around thr blocks and border seams, it slowed considerably. Plus, the circles were fun. I'm sticking with templates for this, including the borders, because it is so much fun and faster. My client will get their quilt before the end of the summer. Ideally, within six weeks.
To help speed things along, I'm using a longer stitch as well. About a quarter inch. Tiny stitches are my preference for making parts of a quilt pop, like outlining butterflies other parts of a print. The effect is dramatic and very pleasing...bit it takes sooooo much time. I intend to avoid that here.
I'll be working on Star Story in the afternoon, when my sewing room gets too hot. Mornings will be for seeing, which means more project overlap. Monday-Thursday, from 6AM to 10AM, I'm sewing, take a lengthy lunchbreak, noon-4PM handquilting. I'm up at around 5AM, though that may soon be at 4AM because I love mornings, and go to bed at around 9PM now that we have an a/c unit in the bedroom.
When the handquilting is finished, I'll make a new post featuring it. This will be thr most beautiful quilt I have made yet.
257 notes
·
View notes
Text
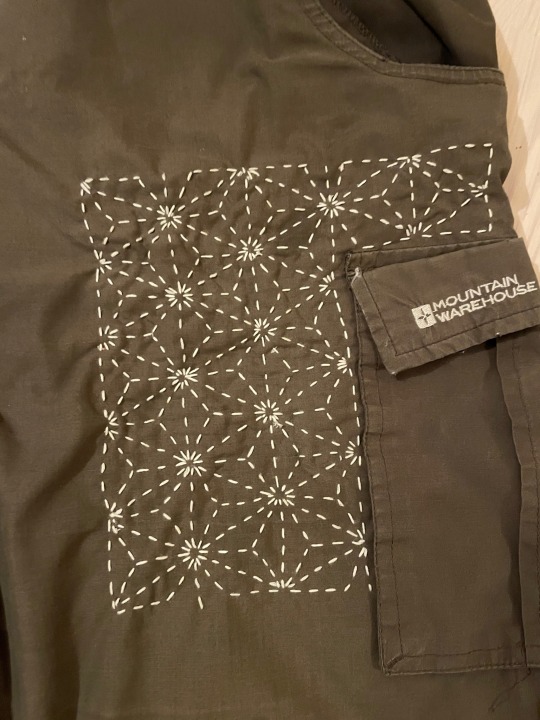
My latest sashiko patch, using the asanoha (hemp leaves) pattern.
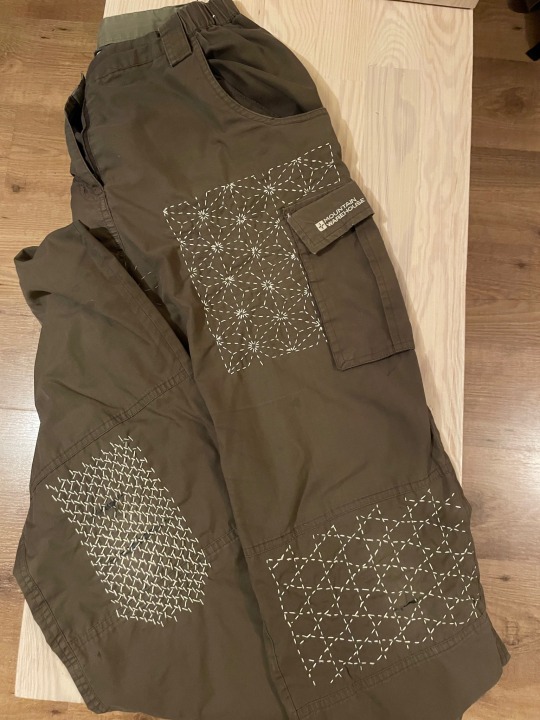
This is the second mend I’ve done using a tissue paper template. See below for details on how it works (or doesn’t - I’m undecided).
1. Pin your patch in place on the inside of the item of clothing.
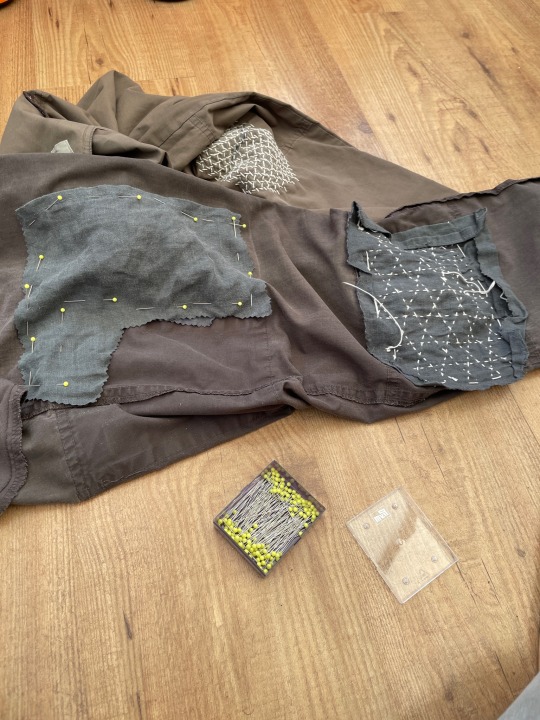
2. Trace grid and design onto tissue paper. My tissue is just scrap from packaging. I traced over a quilting ruler to get everything lined up.
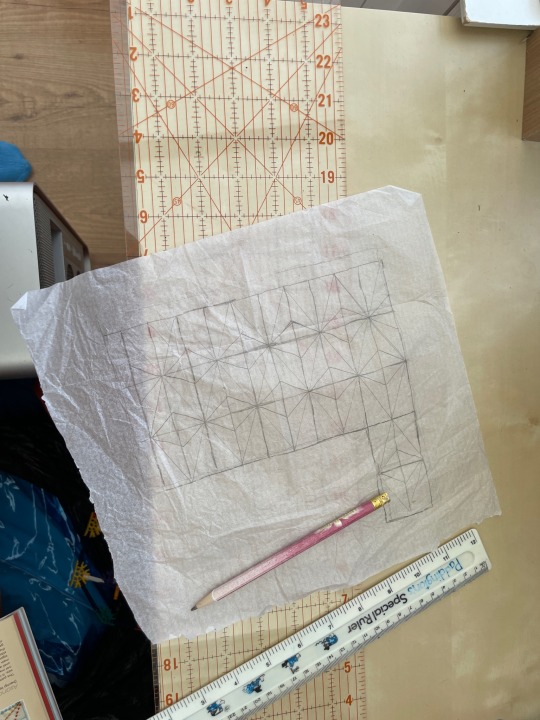
3. Pin in place over the fabric. I didn’t bother removing the original pins, but did leave a wide border round the tissue to help with pinning.
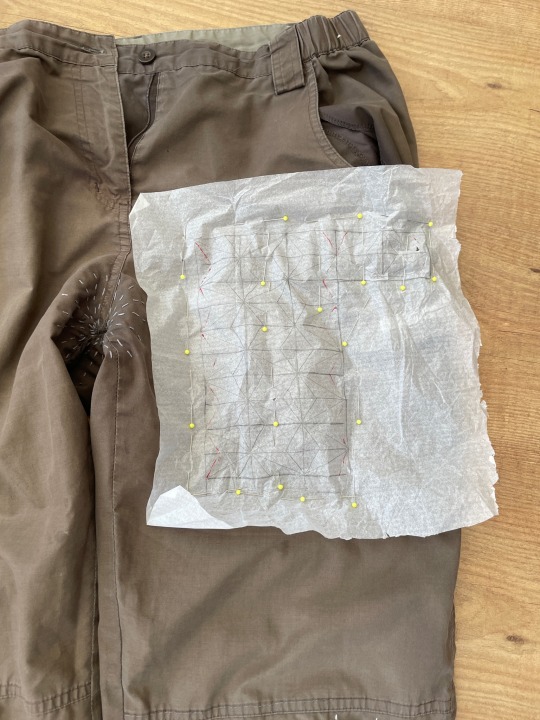
4. Use the pattern guide to sew, stitching through the tissue, original fabric and reinforcing fabric. The tissue will start to tear as you do this. I took out all the pins once I’d stitches all the vertical lines.
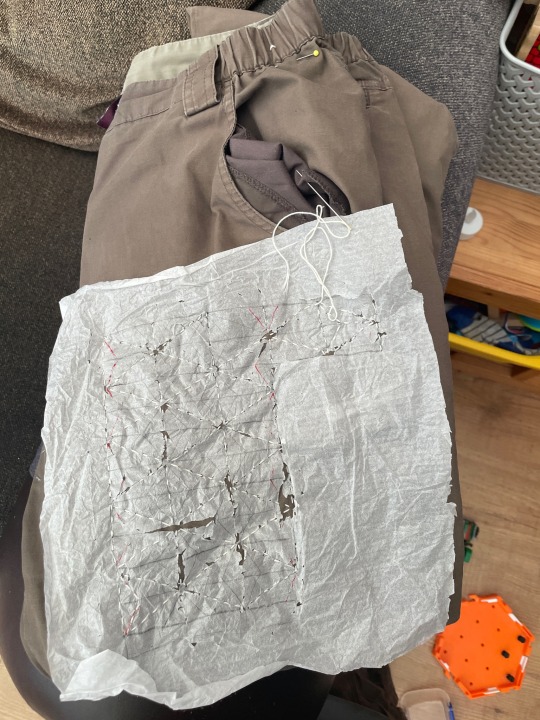
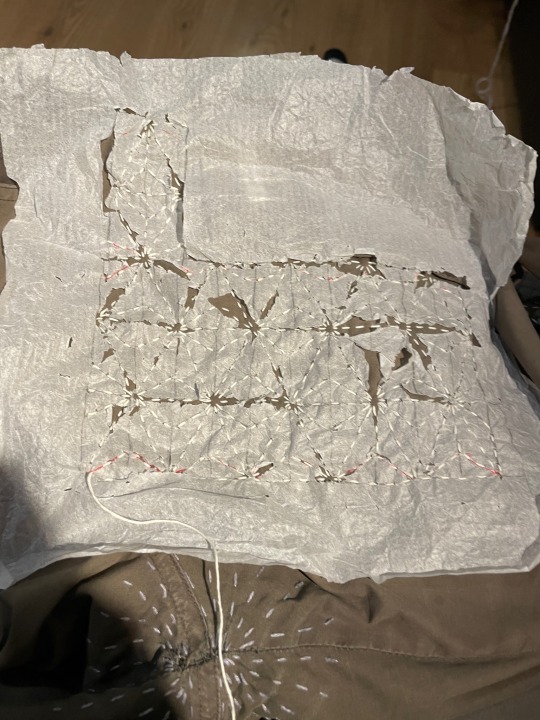
5. Peel away the tissue paper and your pattern is revealed! I actually did this a little early, as I had enough lines in place to complete the pattern without a template.
This is the second time I’ve tried this approach. It is really good for getting an accurate pattern - I’ve never had much luck with marking grids straight onto the fabric. However, it does make it really hard to get the fine details right, as the paper obscures them as you’re stitching. That’s why the centre points on my piece look so messy - I just couldn’t see where the other stitches were.
999 notes
·
View notes
Text
There is something very fun about cutting up weight loss ads though. Like these things are absolutely fucking worthless and I hate them, but the second I cut them up into hexies to use as templates for a nice warm quilt to cover up me (fat) and every other fat person I invite into my bed, they're actually doing something good and meaningful.
#tl;dr weight loss ads are made to be destroyed and only gain value when they are no longer recognisable as such#diet culture#quilting#english paper piecing#purple hexie quilt
58 notes
·
View notes
Text

Fairy Dust - Storytime Quillow https://www.quiltingmayhem.com/shop/Patterns/Free-Patterns/p/Fairy-Dust---Storytime-Quillow---Free-Pattern-x85189737.htm
#crafts#gifts#decor#sewing#quilting#briar rose quilts#bedding#shopping#quilters of tumblr#fair dust#storytime#quillow#quilting mayhem#free pattern#quilt#quilt pattern#block pattern#fiar dust quilt#storytime quilt#book pocket#quilt book pocket#quilt templates
3 notes
·
View notes
Text

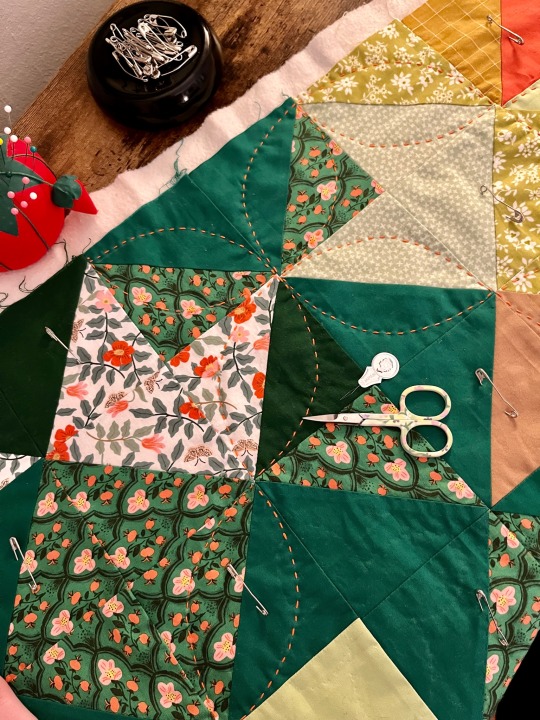
A closer look at the hand stitching on my green quilt. I’m doing what’s called an orange peel design, using a template I made myself. I’m so happy with it and really glad I took the time to start over
Also this quilt has been bought! Thank you so much to that kind person for supporting my art!
1K notes
·
View notes
Text
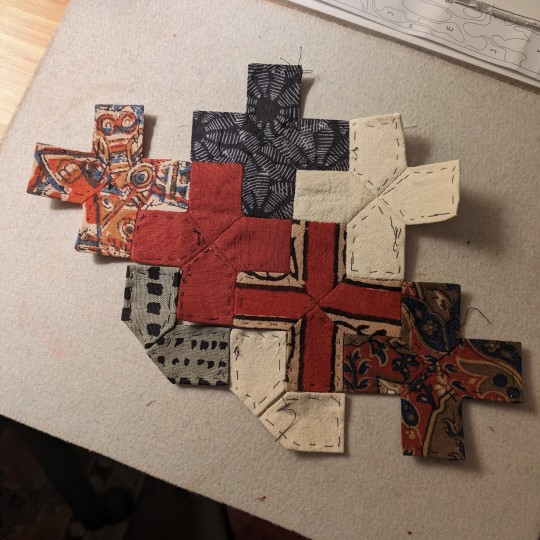
first english paper pieced quilt top is going well, i really like this plus sign design. i'm mostly using cotton fabric from past sewing projects, a lot of it is indian block print fabric as well that i've thrifted. epp quilting is all hand stitched which i really enjoy
the ugly visible stitching is just basting stitches that temporarily attach the paper templates to the fabric, they get removed later
119 notes
·
View notes
Text

Enhance Your Quilting Skills with Continuous Quilting Stencils!
Discover a wide range of high-quality continuous quilting stencils for sale. From intricate designs to classic patterns, these stencils will elevate your quilting projects to new heights. Buy now and unlock endless creative possibilities!
0 notes
Text
Gift Bag Tutorial
In this tutorial, I will explain how to create cute fabric gift bags. I was shown this method several years ago by a quilter as a nice technique to work with jelly rolls (rolls of fabric strips) but I don't know what the actual origin of this technique is. These instructions are based on me figuring out how to do it from the vague memory of what I was shown once when I was first experimenting with quilting.

You will need:
Fabric
General purpose sewing thread
Needle
Pins
Thin ribbon
Step 1: pick your fabric
You will need 8 strips of fabric, 4 to make the outside and 4 to make the lining. You could do all 8 strips the same fabric, you could do all 8 different fabrics, or keep a few of them the same. I like doing pairs of strips, so for my demonstration, I will be showing it using 2 fabrics for the outside and 2 for the inside. Quilting cotton is great for this, but the key this is that you want the fabric to be non-stretch and you want all the fabrics you're using to be about the same weight. You could get away with having the lining pieces be of a lighter weight fabric than the outside fabrics, but aim for consistency in the outside pieces.
Step 2: measure and cut 8 strips
You want your strips to be approximately three times as long as they are wide. You can get away with a bit of variation and if you have longer strips, you'll end up with a taller gift bag. What really matters is that all your strips are the same size. For my demonstration, I cut out a piece of cardboard that was 2 inches by 6 inches and then drew round that as a template.
Make sure you leave yourself a seam allowance that you're comfortable with.

Step 3: Place your pieces to get the relative position correct
For each layer (outside and lining) you are going to want to position the four pieces that make it up so that the bottom of one strip is against one end of the long side of its neighbour. The end result is that you get a sort of spiral cross (if there is an actual name for this shape, I don't know it). All four pieces should meet in the middle.

You will want to do the same for the outside and lining layers, but you want their directions to be reversed. This is so that when you place the layers together in the final bag, they will spiral in the same direction. It's not the end of the world if you get this wrong, but the end result will be a lot neater if you get it right. This is the step I have to check repeatedly to make sure I'm getting it right.

Step 4: Pin pairs of strips
Once you're happy that they're placed correctly, pin the fabric strips in pairs so that the bottom of one strip is pinned to the end of the long side of its partner. Once it's done, your two lining pairs should be identical and your two outside pairs should be identical, but when you compare a lining and an outside pair, the placement should be mirror-images.

Once you've got them pinned, check one more time that you can get them back into the correct spiral cross shapes to make sure you haven't pinned the wrong side.
Step 5: Sew your pairs
Sew the short seams that you pinned in the previous step.
Step 6: Pin & sew your pairs together
Pin your two outside pairs together and your two inside pairs together to make the spiral cross shape and sew along these seams.


Step 7: Cut into the long side so it can turn
When we do the next bit of sewing, you're going to need to turn the long side of your strips at about a 90 degree angle but, as per step 1, we're not working with stretch fabric, so it's not going to want to turn like that. In order to make the next step work nicely, you're going to need to cut into your seam allowance on the long side at the point where your seam ends between the long side and the bottom edge of its neighbour.

I'm sure there's a technical name for this sort of cut. If you know it, please let me know what it is.
You're going to need to make this cut once on each of your eight strips of fabric, right at the point where that long side meets the short side. Cut as close as you dare to your seam without cutting into the seam itself.
Step 8: Pin and sew the long sides together
If you're doing this for the first time or you just want to play it safe, start with the lining as this will be less obvious if you make a mistake. Take one of your strips and find the long side that is joined to the short side of the neighbour. Fold this strip at the cut you just made so that the strip lies against the long side of the neighbouring strip and pin the front sides of the fabric together. You will find that the first strip stops partway up the length of the second strip. The difference in lengths will be the same as the width of the strips, because of the way the long and short sides are attached together at the bottom. This is what will create the triangular close flaps in the final gift bag.

Sew the two long sides together.
Repeat this process for the other three edges of the lining. Then repeat it for the four edges of the outside.
This will give your gift bags shape and you'll see the strips spiralling up the sides and ending in the triangular flaps.


Step 9: Cut your closure ribbons
You want a nice thin ribbon. I'm using 1cm wide ribbon. If you do bigger strips, you could get away with a thicker ribbon, but this width works nicely for the sizes I'm using. I cut 4 lengths each of approximately 5 inches, but I wasn't really measuring them precisely. As long as the 4 lengths of ribbon are pretty close to the same length and long enough to comfortably tie into bows, it should be fine.
Step 10: Assemble your bag - right side to right side
Turn your outside layer so that it is inside-out, with the nice side of the fabric to the inside of the bag. Turn your lining layer so that the nice side of the fabric it facing out, then place your lining layer inside your outside layer so that the good sides of the fabric are facing each other. Position the lining so that the triangle flaps line up with the flaps of the outside layer.
Take one of your ribbon pieces and put it between the two layers and pin one end of the ribbon at the point of the triangular flap where the outside and lining flaps meet. Do the same at the other three points. Make sure that the main length of each ribbon is tucked between the sides of the fabric that will be facing out when the bag is finished, and also take care that it's point straight down so that you won't end up sewing it on at an angle. While you're at it, make sure that the rest of the ribbon is well away from the seams so you don't accidentally sew any of it.

Use more pins at each V where two of the triangular flaps meet. Take your time over this stage to get the lining and the outside layer to line up nicely. The points and the dip of the V are the places that you need to take care with because the remaining edges should all be the same length, so if you get those positioned correctly, the rest of the edge should sort itself out.
Step 11: Sew most of the top
You want to sew a seam around most of the top of the bag to connect the lining to the outside. Note that I said "most" there because you need to leave yourself a gap so that you can turn it all the right way round. It's best if you leave this gap in one of the Vs rather than at a point, so you don't need to worry about the ribbon and so that it will be less noticeable when you sew the final bit closed.
Start about halfway up one of the flap sides and sew towards the point. When you reach the ribbon, sew straight across. If you sew to a point then the ribbon will be weird when you turn it the right way round because the point will be going the wrong direction. So straight across the ribbon and then down the other side of the flap. Keep going around the rest of the top until you're about halfway down the side next to where you started. At this point, the whole of the top should be secure apart from a small gap in the dip of the final V.
Step 12: Turn right side out and finish
Poke the entire thing inside-out through the small gap you have left. You may need to tug gently on the ribbons to get the points of the flaps to be nicely pointy. Once everything is the right way round, finish it off by sewing closed that little gap. Use small stitches in a thread that is a similar shade to your fabric if possible (this may be a challenge if you're using pieces in lots of different colours) to try and make these stitches unobtrusive. I used whip stitch to finish mine.

Step 13: Fill with chocolates
Fill your gift bag with chocolates and tie the ribbons closed. It is now ready to present.

26 notes
·
View notes
Text


The Emily Dickinson Museum Collection
"This fabric is typical of the mid-19th century. The fabric is dress silk with examples of silk satins, silk taffetas, and silk brocades. Plaids were popular during this time. Bright purple pieces are an example of early synthetic dyes - the first synthetic dye, purple mauve, was invented in 1856-7. The jewel-tone colors are other examples of early synthetic dyes. The quilt squares with warp print fabric (pink flowers on white ground) were probably created in the 1860s or later since warp print was popular in the 1850s. This type of quilt work (quilt squares with paper backing) is called template pieced patchwork. The hexagon pieces might be earlier than the square pieces." (source)
170 notes
·
View notes
Text
Have you heard of the term "patterns mills"? These are shopfronts that quickly produce a pattern without any sort of testing or vetting, and then put it on the market with an AI-generated or stolen image for a very tempting price. Patterns produced this way are rampant in the cross-stitching world. However, I've recently noticed an uptick in these types of storefronts in the quilting and foundation paper piecing world. Since I'm well versed in FPP patterns, I would like to describe what an AI-generated quilt pattern looks like as well as provide other suspicious giveaways. AI will only get better, so while these mistakes are dead giveaways now, they might be fixed in the future. FPP patterns seem to be easier to replicate in AI than traditionally pieced patterns, which is why I will focus on FPP in this blogpost. However, you can apply the same clues to any sort of craft pattern (or really anything) you can buy online. Important: AI-generated images are not prohibited on Etsy. However, within their policies they state that you must disclose if you used AI within your listing, and these shops do not have that disclosure.

Below is a listing for a wolf face FPP pattern. When you first look at it, does anything seem suspicious?

First, I would like to draw your attention to the scissors in the bottom left of the photo. These scissors are physically impossible to use and are literally melting into the yellow cutting mat. The lines of this cutting mat are unresolved, as are the lines on the green cutting mat in the bottom right corner. These are your first giveaways. However, not all images have background sewing items that look a little funny. Let's take a look at the actual "completed quilt."

The first thing I notice is that the only background seam line (from this apparently foundation paper pieced quilt) is the one in the top left corner. The seam is merely hinted at and does not go all the way to the edge. Additionally, I notice that the eye is too round. One could argue that the cover photo is merely an enhanced version of the completed quilt, but there are no completed quilt photos in the listing. Another clue for identifying AI generated quilt images is that there are a ton of colors/prints used. The prints in this image seem nebulous and the prints around the eye whiskers (?) lose a lot of fidelity. The individual fabrics themselves do not have consistency.

In the image above, the things I notice are that there are curved seams within the gray and white colors. A typical FPP pattern would not have curved piecing interspersed between regular straight seam piecing. Also, piecing lines that are useless, especially visible in the bluish-gray piece on the left. The amount of piecing within that patch does not make sense. Below you will see another listing from a different Etsy seller.
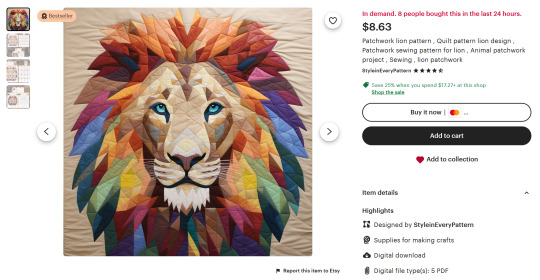
From afar, it looks really good. Plus, the seller has great reviews! And it's a Bestseller! But let us take a closer look…
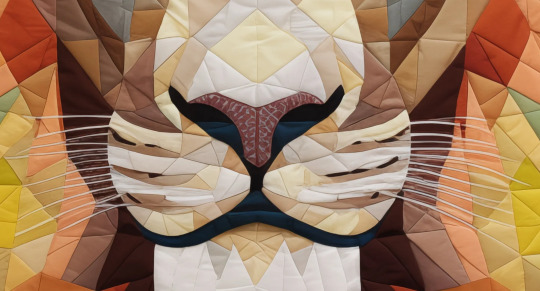
The first thing that sticks out to me is how the whiskers of the lion are resolved. You can see where they fade into the muzzle of the lion without a realistic piecing line. Some of the patches are straight up "smeary" and wrinkly, a telltale sign of AI. The program does not know how to accurately render the design so it creates an approximation. These are things that are hard to see unless you zoom in. Below is a listing for a legitimate lion FPP pattern from designer Pride and Joy Quilting so you can see the difference. It is clear that the first image is an actual completed quilt top.
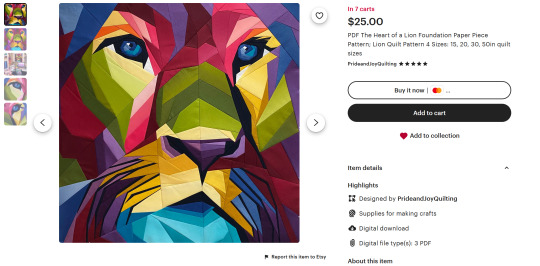
Beyond the AI-generated cover quilts, I'd also like to cover other signs of a pattern generated from a pattern mill.
For the lion pattern, the cost is only $8.63. This is very cheap for what is supposed to be a full sized quilt pattern with a multitude of templates.
Both of these sellers have very generic names. While not an immediate cause for concern, I recommend being skeptical.
There are no actual completed quilt images within the listing.
Both of them are considered "Bestsellers" on Etsy, but the shop with the wolf pattern only has 10 reviews. It makes me wonder about the disparity between "buyers" and reviewers.
The 5 star reviews for the lion pattern are extremely generic and talk only about "how much their friend Lisa will enjoy the pattern" or "how easy it was to download." These are not helpful for understanding the quality of the actual product. The 1 star reviews are way more descriptive about the issues the pattern has. This makes me wonder about fake reviews.

Both of these patterns include a full layout of the FPP diagram within the listing. I personally would never do this and I don't know many designers who would.
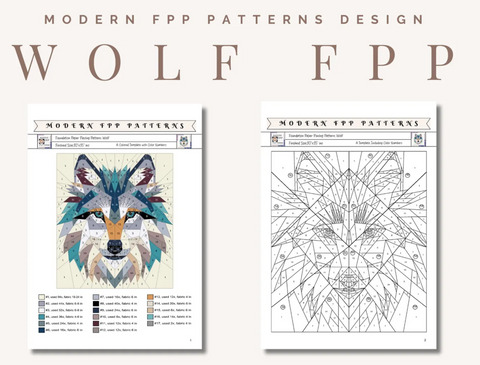
The lion pattern says this within its description: "Before making a purchase, we'd like to inform you about some important aspects. The product stands out for its template, design, and print quality, serving as a valuable tool for sewing projects. The instructions include two techniques: direct fabric marking (with visible stitches) and invisible stitches. Both are general guidelines and not step-by-step instructions. You can choose these techniques or any other that you consider suitable based on your experience and preference. There are no refunds for the digital file. We appreciate your understanding and are available for any questions." This demonstrates to me that the pictures are not accurate because they are clearly attempting to depict FPP and are hoping that you won't read the description until it is too late.
Why is every lowercase i in the wolf pattern missing its dot? Like, why? I find that strange and off putting.
So, how do you avoid accidentally purchasing a pattern like this?
The first step is gaining experience in recognizing listings that seem a bit fishy. Use the bullet points listed above to see what kind of feeling you get when looking over a listing. I also recommend finding out more about the designer from their website or from their social media. Not all legitimate designers have these necessarily, but it's a great place to start. Try messaging the shop owner on Etsy. Does it sound like they know what they are even talking about? You'll then build a good list of designers and shops you trust. A big and worrisome thing to remember is that AI will only get better and produce better looking images. This will make it harder to identify pattern mills by the image alone. However, the clues that I've listed will help if you put them all together and come to a conclusion. I suggest using them for all your online shopping. I hope this helps!
136 notes
·
View notes