#quick simple scribbly with ref
Explore tagged Tumblr posts
Text

Quick scribble with a ref cos I wanted to draw them. 😤
#dragon age#dragon age the veilguard#DAtV#Emmrich volkarin#da rook#xren ingellvar#EmmRook#my art#quick simple scribbly with ref#sometimes I have no ideas for poses but need to get a visual out so#ough I love all my pair ups in the dragon age games#need to draw them all on a quadruple date lmao
460 notes
·
View notes
Note
Hi there! Maybe this is a weird question, but as an artist and A D&D, I thought you might be a good resource! I'm wanting to commission a portrait of my D&D character for roll20 purposes, but I'm struggling with what refs and such I should gather for the artist. How can I make it as easy as possible for an artist when the character I'm wanting a portrait of isn't human? Would a written description suffice, or are images better? Thank you for whatever advice you have! --sincerely, a Loam enjoyer
DELIGHTFUL QUESTION, not weird at all!!! I hope its okay to publish this in case anyone else was wondering the same :']
Speaking as an artist who's done portrait commissions in the very recent past, a mix of images and written description is a sweet spot. Notes about specific features that the reference images might not show, or might not show accurately, help a lot to avoid retakes and corrections down the line.
Using Loam as an example, I have my own drawings of him I can crop and compile as reference, as well as a human model whose face proportions I like and make sure to include in case the realism is helpful at all to the artist. (The model is. EXTREMELY pale, ginger, and blue-eyed, so it really is just for like, Nose, Mouth, Jaw. FORM!) Then bolster what I've provided with additional reference - for Loam's ears, I have some pictures of cow ears saved for the overall shape and fur texture. AND all his jewelry afgkhfldKLJSHFGLSKD <3 Plus various armors, weathered fabrics, pieces of misc gear that complement and offer more options than what I've presented in my own artwork - to give the artist a range to work within, while still representing what I imagine suits Loam.
Simple notepad or Paint sketches also go a long way in conveying which details/features are most important to include in a given commission!!! Even scribbling over a reference image to be like, "this but PURPLE" is quick and easy. The power of the stick figure/smiley face with annotated doodles is never to be underestimated in communicating a bigger idea!!!!!!
SUMMARY?
Any existing artwork of the character
Any models/actors (or animals, for textures in fur/scales/eyes/teeth, etc etc) with features that are accurate to your image of the character
A simple doodle/sketch of the concept you have in mind
Written notes to consolidate the visuals you've provided and fill in any gaps that might still remain
BONUS? Links to the artist's own work depicting non-human features in a way you enjoyed seeing previously, that made you want to commission them for your character! (this has also helped me in the past with clients wanting lighting/rendering styles, hair, magic effects, etc. similar to pieces I'd done previously)
GO FORTH HAVE FUN!! i hope some of this was a little helpful :'D
30 notes
·
View notes
Note
Do you have any advice for understanding hands better? I’ve been practicing them for years but feel like compared to other aspects of anatomy it’s the one thing I haven’t seen much improvement in. I draw both from life and images and draw nearly everyday but nothing I’m doing seems to help
I personally get by mostly from remembering poses that I’ve already practiced a ton, like I figure out how to draw it once and am able to file that away in my brain and use it again later, and tweak bits of the pose or the level of simplification to suit what I’m drawing.
I’ve paid special attention to drawing hands for like.... most of my life so I have a LOT of poses I’m easy comfy with now, but when I need to figure out something complicated or new, I can usually work it out by breaking a hand down into shapes, remembering a few key points/”rules” from what I’ve learned about hands in order to help me break it down in a way that makes sense. And if that’s not enough either, then I take photo refs.
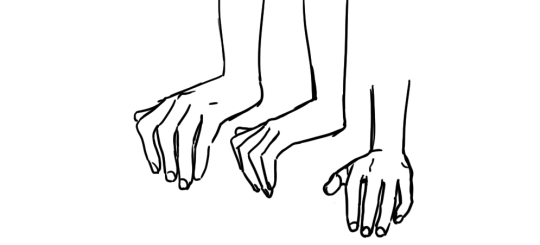
^^^ here is a pose I use a ton. I have a quick way of drawing it from various angles. the first time I had to draw a pose like this, I had to think and figure it out, but in drawing it a bunch of times and having to use various angles like this, I’ve eventually come up with a quick, reliable way to draw it from a few of the most common angles that fits the style I like to draw in. I’m blessed with a good memory for observations, so when I see a beautifully posed hand, I can usually really quickly analyze what I like about that pose and why, and that helps me absorb it so I can recreate my saved impression later. But I know not everyone thinks the same way. it might benefit you to quickly scribble down a study in a sketchbook when you see a pose you find beautiful and want to learn from for later.
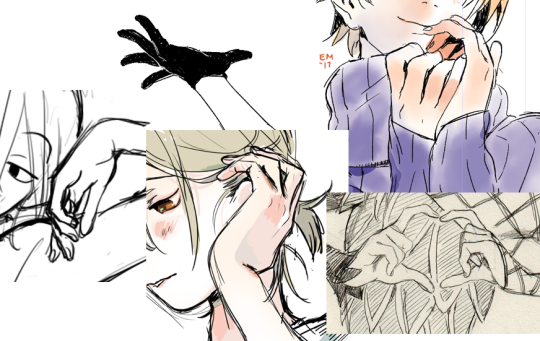
^^^ here are some poses I had to stop and spend time figuring out, calling up the “rules” for how hands are built to kind of logic-out how they should look from angles I’m less familiar with. results can be mixed, but... if I end up with something expressive that fits the style of the rest of the drawing, I’m usually really forgiving of fudged anatomy or slightly wonky proportions. as long as the thumb is on the right side and there aren’t too many fingers, that’s a great start lol.
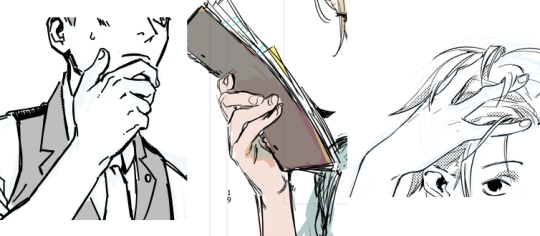
^^^ and here are ones I had to take reference-selfies for. I try to use this as a last resort because 1) it’s a lot of trouble 2) interrupts my drawing and 3) if I’m not careful I stick too close to the reference, and the drawing ends up with the hand looking referenced and the rest of the pose not, which is jarring to me. not to mention I have tiny manlet wrists that without fail, look horrific and emaciated in photos, and the lens distortion makes my fingers look scary too... ugh, photo reference has definite flaws. I actually don’t like the look of drawings for which I can Really Tell the artist drew from photo reference, because most often that means they’re taking the ref too much at face value and incorporating ugly lens distortions into their drawing. so I have to think extra hard not only about interpreting the ref, but also might have to make multiple passes just to get the hand to look normal, AND match the style of the rest of the drawing.
Anyway, here are some of the ““rules””” I mentioned earlier that I fall back on to help me figure out more complicated poses:
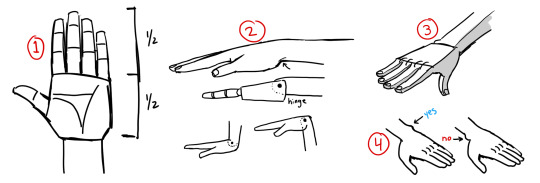
1. probably seen this before, but basic proportions. the palm is usually half the total height of the hand. obviously you can mess with this purposefully.
2. I think of joints as like, ball joints or hinges. I find that easier than trying to remember bones & muscles. here’s a drawing of the wrist as a hinge. note that when you’re thinking of it this way, it’s a shortcut, but a shortcut is only good if you use it with precision. notice the pin for the wrist hinge is not just halfway, it’s closer to the top of the hand. being precise about that is what allows this shortcut to work. the heel of the palm juts out, while the top of the hand transitions into the wrist quite smoothly.
3. simplified planes. planes are important yo. in super simple terms: top is flat, bottom is round. this works on the fingers too, actually. the tops are bony and tendony, and the bottom is where the fat is, so it’s rounder and soft
thinking of the hand as abstract shapes REALLY helps simplify the task of drawing hands, and is just as helpful even if you are drawing from reference. I can say “the palm is a box” and obviously the palm is not really as simple as a box, but if I think of the palm, wrist, and each finger joint as various shapes of box, then all of a sudden, psychologically, my task is SO much easier. I’m not drawing a Hand, which is hard, I’m drawing boxes, which is easy.
4. that prominent knob some people have on their wrist? that’s on the pinky side.
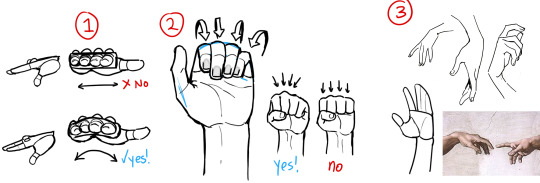
1. the knuckles aren’t really a flat row on top. the hand is like a cup right, so your palm can hold water and things. so we can think of the hand as a box to make figuring out the pose easier, but when it comes down to it, you’ll want to make it more of a curve. this curve is why you can see multiple fingers in a side view
2. when curled up, the fingers nestle together. the fingernails also turn slightly toward the center. even if I’m simplifying the hands significantly, I usually still draw the fingernails because they are SO useful for communicating the pose of the hand effectively.
3. lots of people suggest to think of the hand as a mitten, grouping the pinky/ring/middle fingers and singling out the index finger. this works great, the index finger is more independent from the other three. on the flip side, those three are really stuck together; if you’re drawing the pinky curled up all the way, then you better not draw the ring finger sticking straight up, cause that would HURT. anyway, singling out the index finger leads to more interesting poses in my experience.
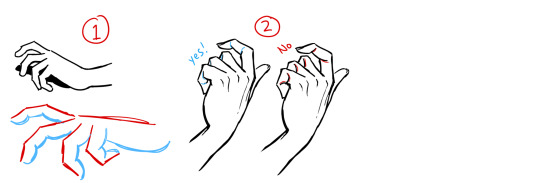
1. this is another illustration of top = flat and bottom = curved. this is a really easy way to organize your line quality. straight lines and sharper angles where there is bone, and soft gentle lines where there is muscle and fat. your drawing as a whole will read very clearly if you find some guidelines like that to stick to, as it means all your lines are intentional and thoughtful.
2. this one’s about overlaps. when forms overlap, it makes a crease, and when you draw that crease you’re communicating which form is in front of the other. in the second drawing I reversed all the creases, and it looks.... messed up. think about how pieces connect.
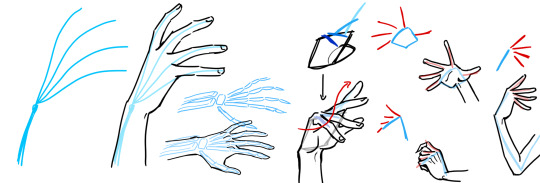
so when you’re trying to make up a pose without using specific reference, I think it’s good to think about the.... flow of energy through the pose. honestly, I know it’s really abstract, but if I have an ability to make interesting poses that communicate weight and movement, the things that make people say your character feels ALIVE, like they really EXIST in a space... it’s because I started to think of poses this way. imagining streams of energy bouncing through the body, flowing down the limbs and out through the fingers. this is why hands are so important to me, cause they’re where the kinetic energy of the pose ultimately ends up. I talk about it when drawing the torso and arms and legs, but an interesting drawing has a bounce back and forth between opposites: for every curve, an opposing straight line, alternating back and forth down the entire body. if you’re sensitive to the energy of the pose, then even very simple poses will be interesting to look at.
anyway, with regards to hands, I imagine the energy getting sort of cinched in as it passes through the wrist, and then emanating out through the fingertips. I hope my drawing at least SORT of communicates this imagery. it makes sense because that’s BASically how the bones in the hand are anyway. and then the right side of the image above is just demonstrating some highly simplified gestures. see how the fingers fan out and curl in, rarely parallel to eachother. when you’re figuring out the pose, using a line to stand in for the row of knuckles is super valuable.
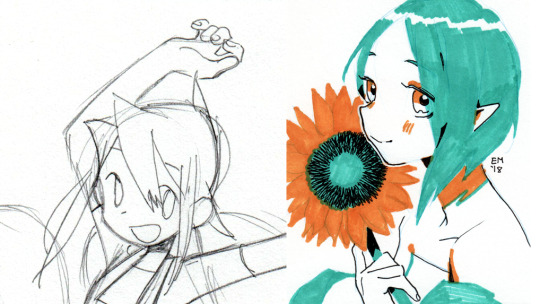
aaand finally, here’s two hands where I intentionally neglected correct anatomy and proportion because I felt it worked better for the style of the whole drawing. Left side: since this is a really simple and cartoonish style, I was thinking back to kids’ and shoujo manga I have read where the style was very solid and distinctive, but definitely NOT overly concerned with correct anatomy, or even really drawing hands, uh, “well” at all. to me, that sort of approach has a Look that I like to invoke sometimes, since for years I felt like I learned a bunch of anatomy and proportion and drawing from life actually in detriment to the liveliness and appealness of my drawings. this hand is mushy and makes very little sense, but it turned out as intended. Right side: sometimes I like to pretend fingers only have 2 bones in them, cause i am a Queen and i do what i want
and there you go. I hope that helped, like, at all? Look at real hands and photos of hands and hands in motion, but also look at drawn hands as well. find what you like, and work towards expressing that yourself. and remember the hand is part of the whole drawing. not only in the art style like I’d been talking about, but because the angle and placement of the hand is reflected in the angles of the arm, which in turn reflects on the angles of the shoulder, which affects the whole torso, etc etc etc. and the techniques you can use to understand and draw the rest of the body, works on hands too. as you improve everything else, your hands will improve as well.
DISCLAIMER: I whipped up these diagrams quickly, they’re not meant to be good drawings or accurate refs, just diagrams to illustrate my thought process lol
3K notes
·
View notes