#punk tutorial
Explore tagged Tumblr posts
Text
Had a few folks interested in how I made the patches I posted for Solarpunk Aesthetic Week, so I thought I'd give y'all my step-by-step process for making hand-embroidered patches!
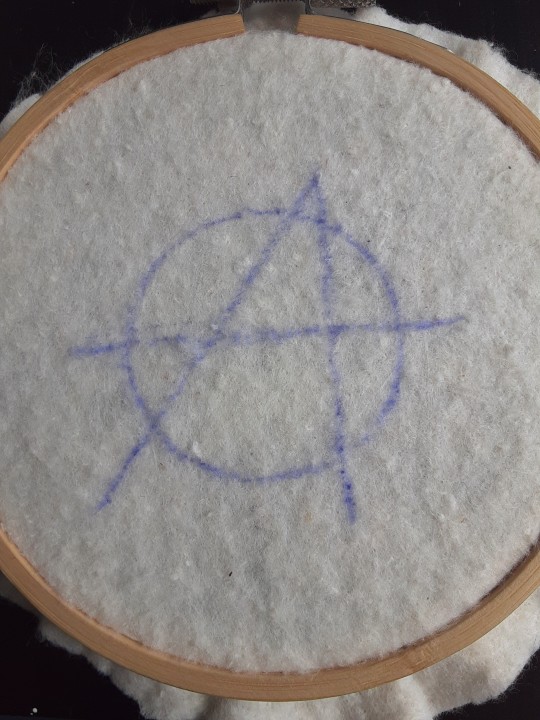
First, choose your fabric and draw on your design. You can use basically any fabric for this - for this project I'm using some felt I've had lying around in my stash for ages.
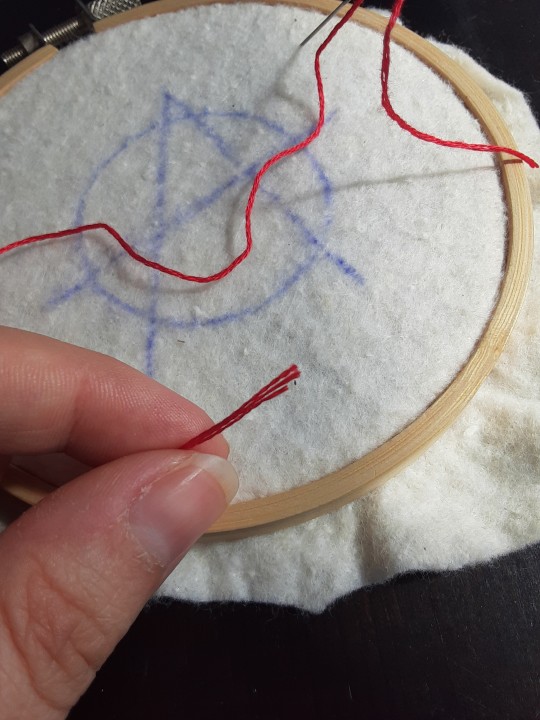
Next, choose your embroidery floss. For my patches I split my embroidery floss into two threads with 3 strands each, as pictured. You can use as many strands in your thread as you prefer, but for the main body of my patches I prefer 3 strands.
Next you're going to start filling your design using a back stitch.
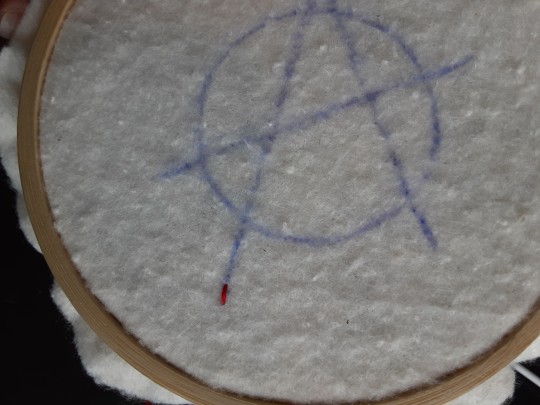
First, put in a single stitch where you want your row to start.
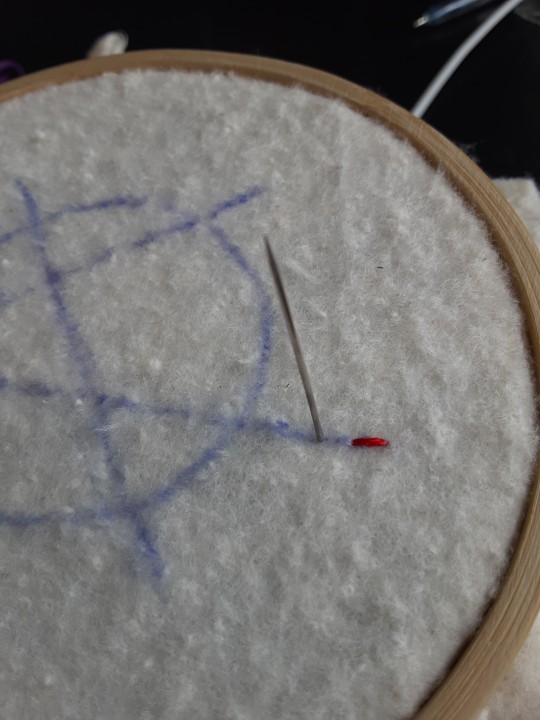
Poke your needle up through the fabric 1 stitch-length away from your first stitch.
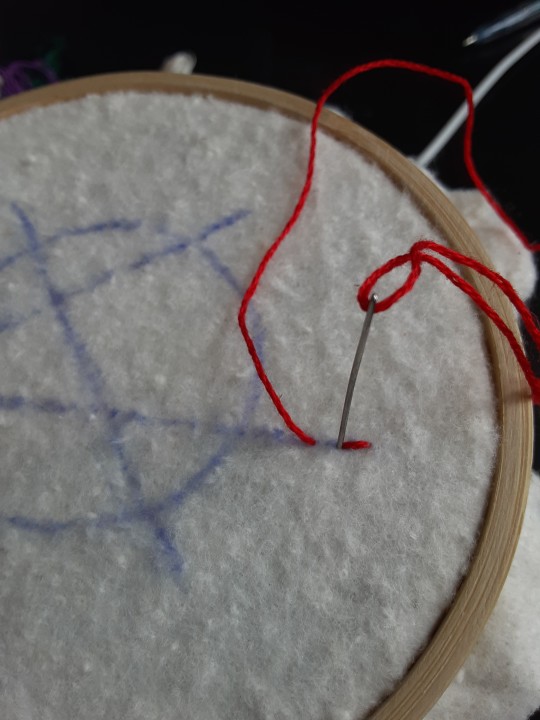
Poke your needle back down the same hole your last stitch went into so they line up end-to-end.
Repeat until you have a row of your desired length (usually the length of that colour section from one end to the other). Once you have your first row, you're going to do your next row slightly offset from your first row so that your stitches lay together in a brick pattern like this:
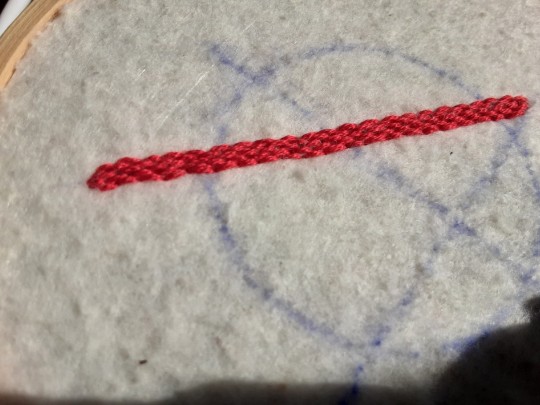
Make sure your rows of stitches are tight together, or you'll get gaps where the fabric shows through.
Rinse and repeat with rows of back stitch to fill in your patch design.
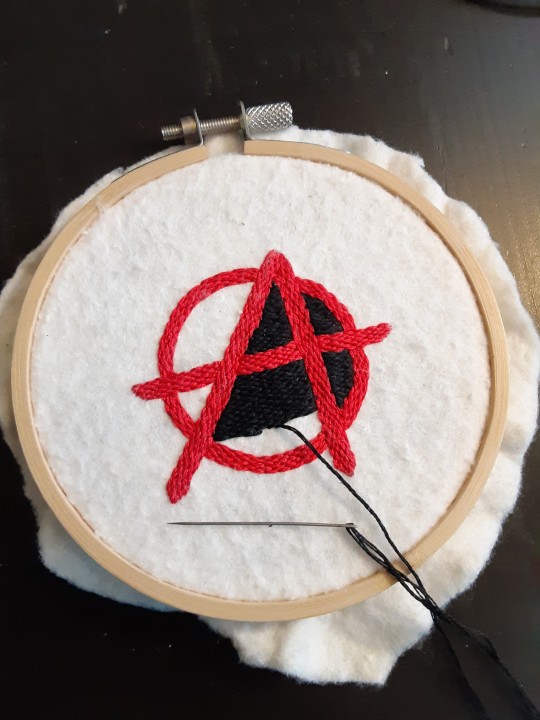
When you're almost to the end of your thread, poke your needle through to the back of the fabric and pull the thread under the back part of the stitching to tuck in the end. Don't worry if it looks messy - no one's gonna see the back anyway.
This next step is fully optional, but I think it makes the patch design really pop. Once your patch is filled in, you can use black embroidery floss to outline your design (or whatever colour you want to outline with - it's your patch, do what you want). I use the full thread (6 strands, not split) of embroidery floss to make a thicker outline.
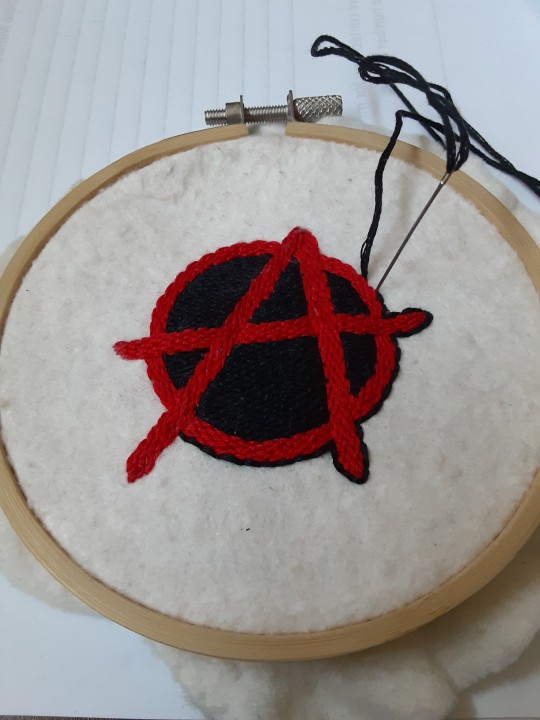
I use the same back stitch I used to fill the piece to make an outline that adds some separation and detail. You could use most any 'outlining' stitch for this, but I just use back stitch because it's just easier for me to do.
Once you're finished embroidering your patch, it's time to cut it out!
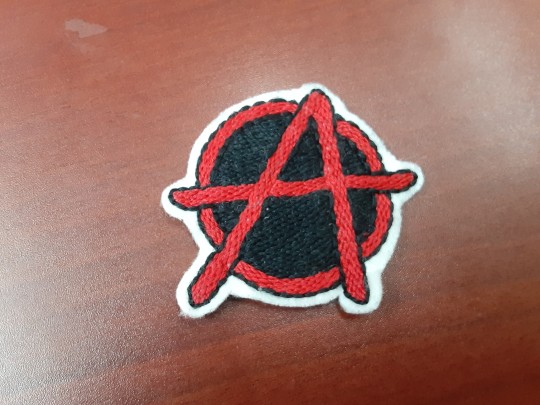
Make sure to leave a little border around the edge to use for sewing your patch on your jacket/bag/blanket/whatever, and be careful not to accidentally cut through the stitches on the back of the patch.
If you have a sturdy enough fabric that isn't going to fray, you can just leave it like this. If not, I recommend using a whip stitch/satin stitch to seal in the exposed edges (I find that splitting your embroidery floss into 3-strand threads works best for this).
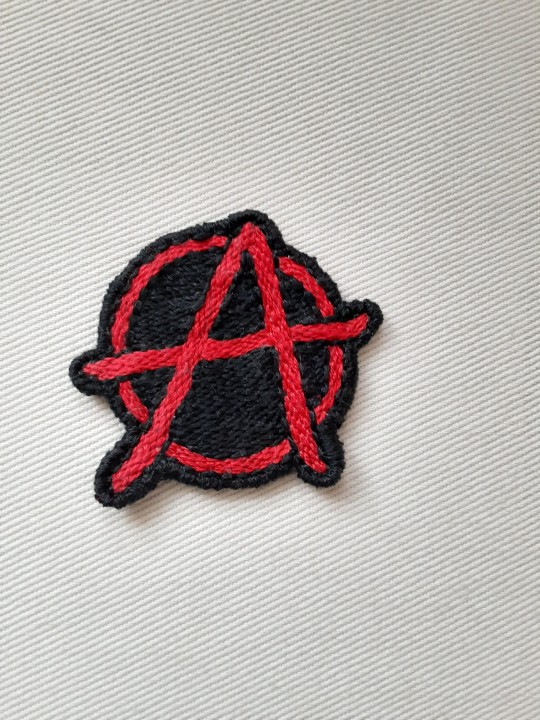
And then you're done! At this point you can put on iron-on backing if you want, or just sew it on whatever you wanna put it on. Making patches this way does take a long time, but I feel that the results are worth it.
Thanks for reading this tutorial! I hope it was helpful. If anyone makes patches using this method, I'd love to see them! 😁
#solarpunk aesthetic week#sewing#tutorial#sew on patch#punk diy#diy punk#punk aesthetic#handmade#solarpunk#handcrafted#embroidery#embroidered patch#how to#how to make a patch
18K notes
·
View notes
Text
hey punkz here's a tut for wrist cuffs/bracelets since some of u are new 2 tha scene

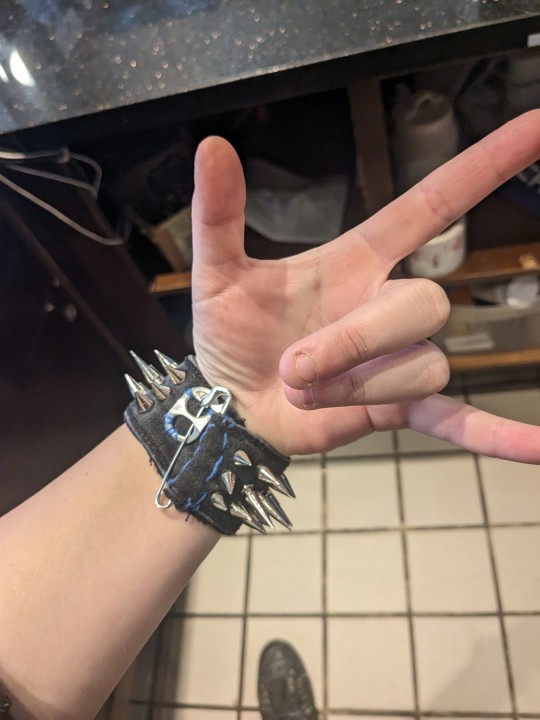
written out 4 ease of access
HOW TO: WRIST CUFFS DIY
Step 1: Old Jeans Waistband
- Cut off waistband from rest of pants
Step 2: Cut to Wrist Size (X2)
- measure around your wrist and cut
Step 3: Add Closure
-button + buttonhole or safety pin + soda tab works best imo
- Sew down soda tab to one side, safety pin to other
Step 4: Add Hardware
- good options are spikes, more safety pins, more soda tabs, staples, chains, and whatever else you can find
Step 5: SHOW OFF!!!!
feel free 2 add any other tuts on this thread or tag #punk tutorials
2K notes
·
View notes
Note
Patch making tutorials?
and here i am once again, with a patch making tutorial
how to make stenciled patches:
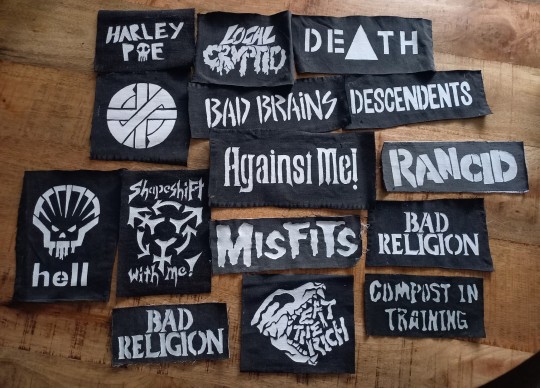
i'll post a part two in the future which will cover freehanding and stamping ur patches
-
first some general info that might be useful:
i get my patch design inspo from pinterest, etsy, and tumblr. if sell your patches make sure you arent ripping off another artists patch design when using etsy for inspo. anarchostencilism also has tons of stencils both on deviantart and reddit which are free to use.
i use acrylic paint for my patches, but if you can afford it id advise fabric paint. to seal paint into the fabric iron the patches, it helps em last longer. some acrylic paint survives very well in the washing machine, but wash your stuff by hand the first time to see how well it holds up.
if you make your patches multiple colors, dont first make the whole patch one color and then paint over it with the other colors. if the paint starts cracking the base color will show through. (if you like that however then dont mind this)
i paint my patches on jean fabric, cause it makes the patches sturdy yet flexible. but shirt fabric or canvas both work very well too. anything except really plasticy/slippery or textured fabric can be used
i pin my patches down with pins onto multiple layers of taped together cartboard, to prevent the fabric from moving around and distorting the print
-
there's two ways in which i make my stencils
1. with paper covered in tape
2. with the plastic folder you put in your binders
-
option 1:
draw out your design onto some paper, make sure there arent any "loose" parts in the design that will get lost when cutting out the stencil

cover the paper in tape front and back, make sure you can still see your design through the tape
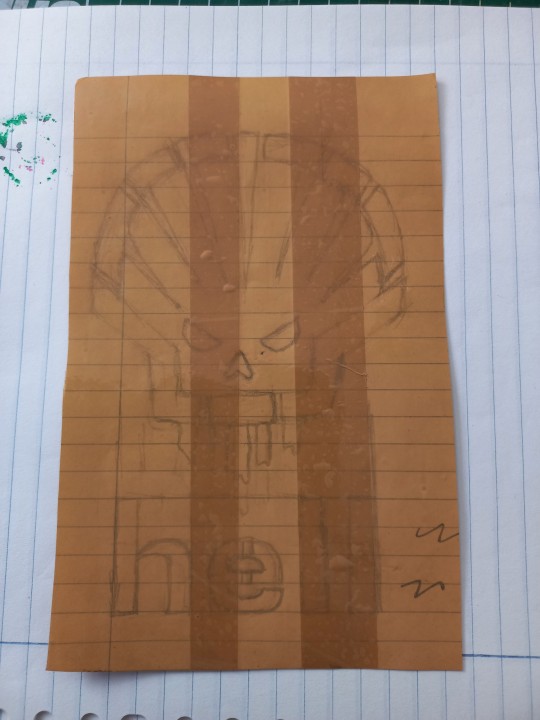
cut out your design, i use scissors and an exacto knife
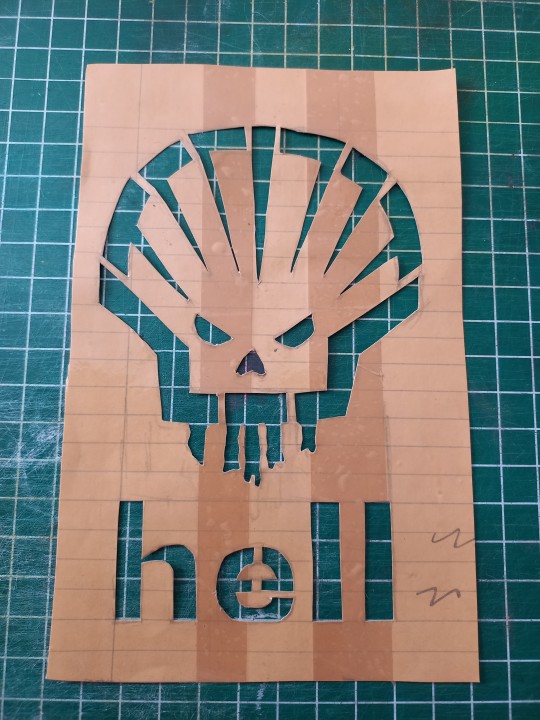
-
option 2:
draw out your design (you can also draw the design directly onto the plastic folder)
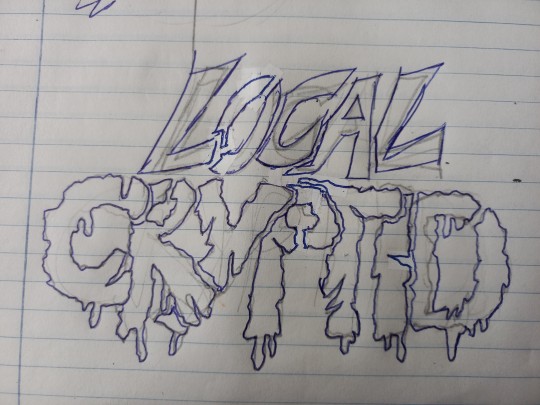
cut a piece of plastic out of the folder big enough to cover your drawing and tape it down.
trace the design onto the plastic with pen or marker (any mistakes can be wiped out)
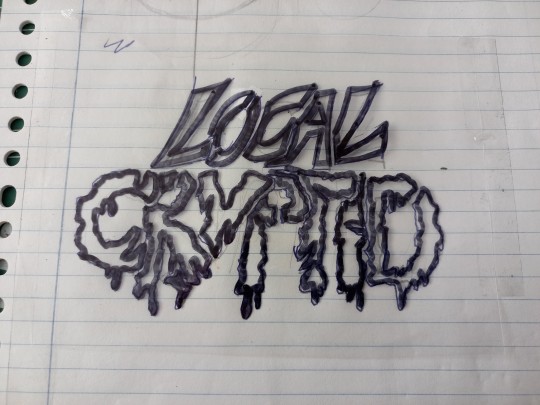
cut out your stencil
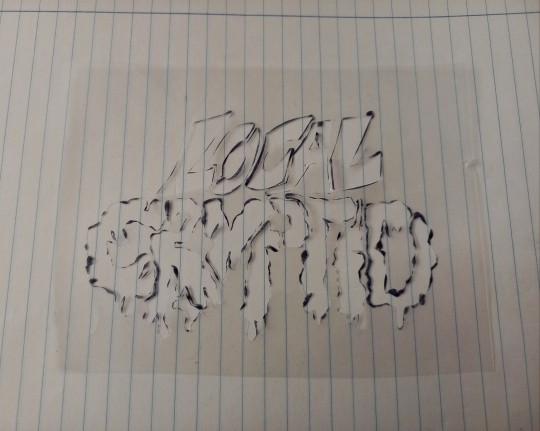
-
continuation from both option 1 and 2
after finishing your stencil you can pin them down on some fabric
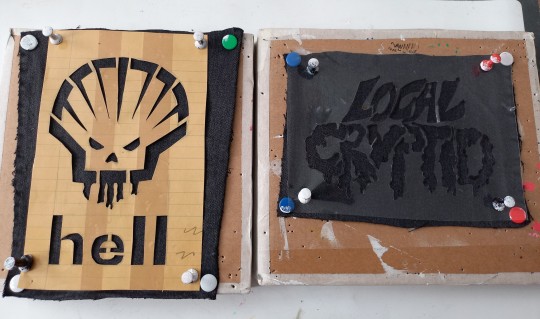
dap on your paint with the point of a big brush or a sponge, depending on the paint it'll take 2-3 layers.
make sure your previous layer dried completely before adding the next one
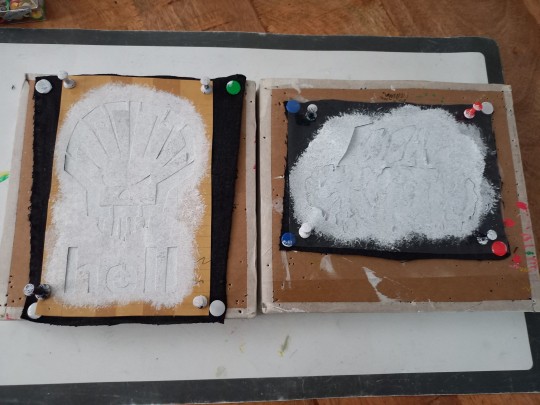
after the paint has fully dried you can carefully take off your stencil.
!!dont unpin the patch before it fully dried, or the drying paint may cause the fabric to warp!!

thats it, questions are always welcome, now go and make stuff!!
#punk diy#diy fashion#punk#queer punk#diy punk#punk clothes#punk style#punk patches#patches#tutorial#my stuff
2K notes
·
View notes
Text
I MADE A DIY PIN TUTORIAL!!!
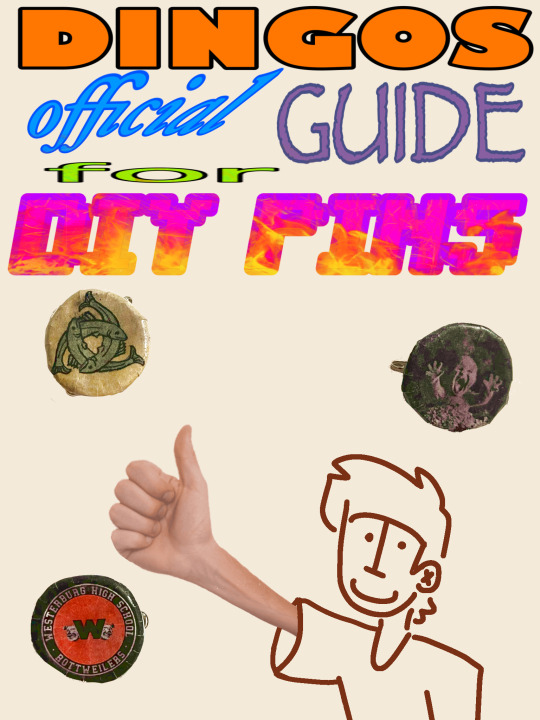
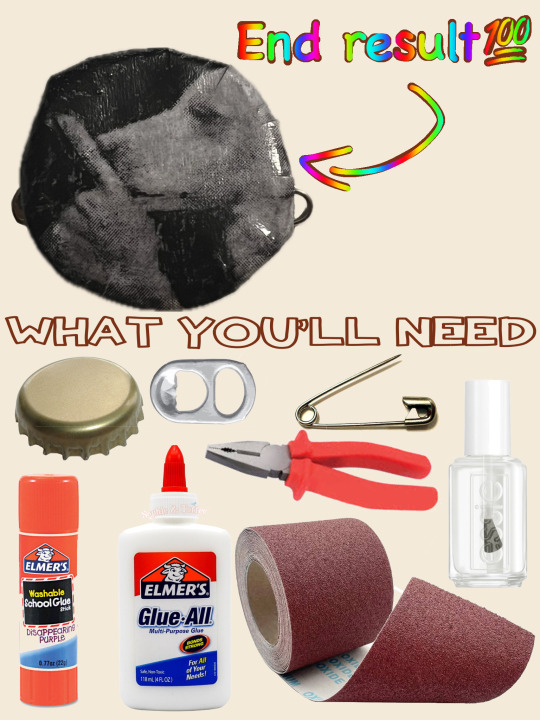


hope you enjoy :-)
360 notes
·
View notes
Text
here's some punk diy tips and ideas
[other than crusty pants and battle jacket, although we still love those greatly.]
why should you diy, when you can just find decorated items everywhere, you can ask. what if you are clumsy at painting or anything?
firstly, good questions. we diy so we don't give credit to the big companies who rule the world. we diy to get more independent from the system we dislike. we diy so to save money. to express uniqueness, recognize eachother and be recognized. and especially to have fun and feel cool. diy is not only about clothing, but anything you can set your mind on. of course, one cannot make EVERYTHING for themselves, there isn't enough time and energy. but making at least small steps are already a statement and more than nothing. also, helping small artists by buying their products is also pretty punk.
that being said, i provide you with some tips of mine, all gained from experience:
anything you drew/painted on, you will WANT TO protect. acrylic paint/markers + acrylic paint varnish/transparent nail polish/textile medium are your best friends. read after anything that's new to you.
i highly recommend working with old clothing or thrift shop finds when it comes to textiles, as it is environmentally friendly and you will stay in budget. Anyways, always make sure that the material you use isn't gonna be problematic. for example, if you want to do some patchwork, the material shouldn't decay easily (if it does, it will come off so quickly.). if you want to paint on it, it shouldn't be rugged.
you can not only draw/paint on your canvas shoes, but can also sew, embroidery (just make sure to use a thimble, plus floss instead of thread could make your work more durable), and add beads and trinkets to your shoelaces. in the case of shoes, never use glue (neither hot nor instant glue) – it will come off quickly. for some inspiration, i'll show you my shoes!
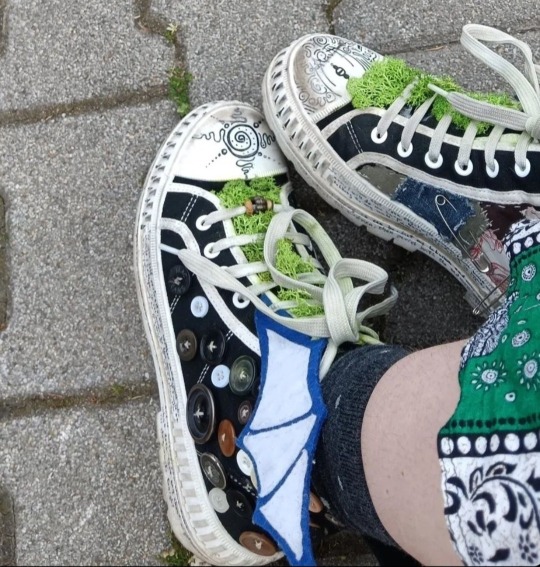
(the fake moss is literally unstoppable from falling off or getting dirty. risky idea.)
it's good to carry around water and food!! you don't even have to pay for decorative water bottles and food boxes, as you can draw on glass and plastic just fine with acrylic markers. just don't forget to paint transparent nail polish all over your drawing. in at least two layers. don't be lazy or laid-back. even posca comes off while washing the dishes. and you WANT TO save your reference pictures/final designs, as the case of emergency is likely. but after all, my water bottle is exactly fine after six months, with no accuring problem.
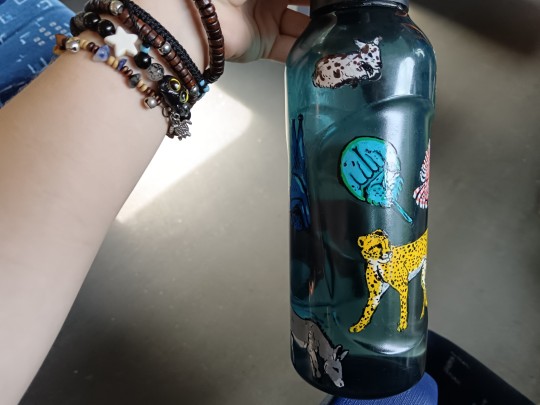
if your current best option to get stickers from is aliexpress or overpriced decor stores, search for local artists and shops on instagram and tiktok, as it may be their most efficent way of getting you to know them. if it seems like you have no chance, you may can still find a print shop with the option of printing on self-adhesive sheets (at least in hungary, those are pretty cheap). and if you want drawings to print out as stickers, you may use your own or –ONLY IF YOU GET PERMISSION– other artist's work. not only good for decorations for like, headphones, but for vandalism too. WAIT WAIT who said that. who said it. not me. no never
(in case that's also impossible, you can create stickers by printing out/drawing a picture, cover it up in transparent adhesive tape, and then put some two-sided adhesive tape on the white side of the pic. it won't be that durable, but it functions.)
if you want to bleach-paint clothing, get some plastic brushes!! any other brush dissolves. draw your design first with chalk!! never forget to put cardboard inside the clothing, and to wash the finished work in a washing machine before you'd put it on. prepare to be patient with the process. and it's not dangerous to touch 5%-9% household bleach, just wash your hands soon after.
if you want your crusty pants to last veryyy long, wax them. look up on youtube jeans waxing.
some more things i made for myself so to give you some inspiration: totebag with pockets, a small crystal holder cabinet, badges, and i decorated some t-shirts, button-ups, an id card case, phonecase, laptop.
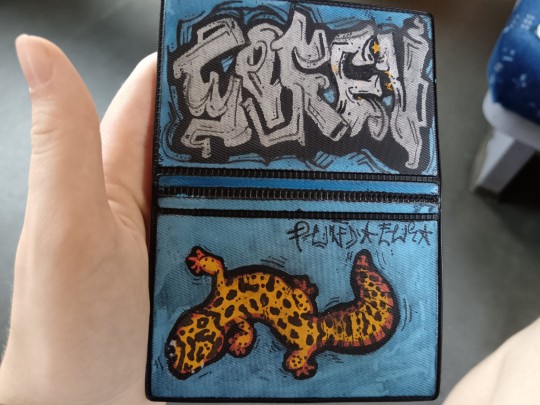
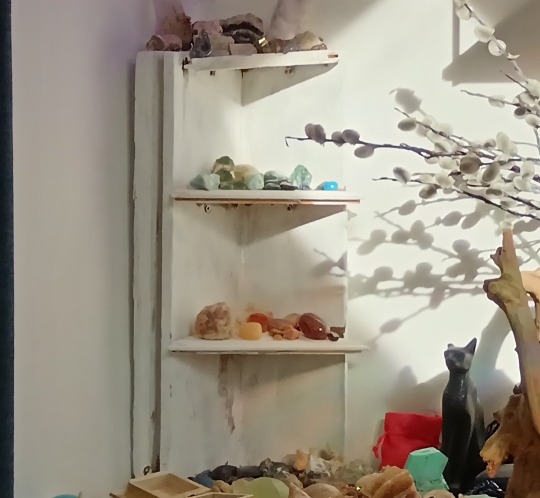
theoretically speaking, there is nothing that an individual would be unable to learn how to make, when it comes to diy. you can't imagine how easy it is to bake bread at home. consuming-focused media makes people believe that it's hard to make anything. of course, everyone has to decide about their own priorities, i don't want to convince or change anyone in here. and if you have any questions, send an ask!! i hope i had been helpful.
#punk diy#tips#tutorial#clothes painting#do it yourself#bleaching#alternative clothing#soren's hoard of words#i hope you'll have fun with this#stay safe and drink water
181 notes
·
View notes
Text
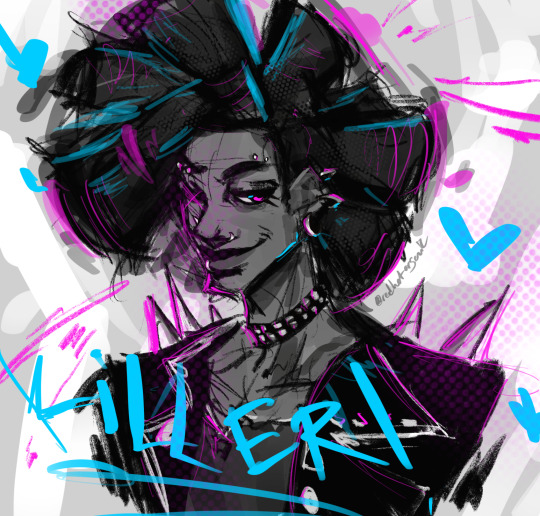
Yay my new friend hobie <33
#watched the movie yesterday finally <333#this is. my first time drawing him and I did this in half an hour and I don’t typically draw Crazily but now I did and I Get It#like. genuinely for half an hour this ain’t bad eh?#gotta learn how to draw wicks properly though which. hmmm I need to find a good tutorial#anyway. I’ll draw him better soon <33#across the spiderverse#hobie brown#spider punk#atsv fanart
371 notes
·
View notes
Text
Easy Paper and Tape Stencil Tutorial
made one for reddit so I might as well post it here as well
Materials
writing utensil (pen, pencil, marker, etc)
paper (i usually use plain printer paper but most other scrap paper works fine as well, just be aware that thicker paper makes it harder to trace existing designs/logos)
clear packing tape
scissors and/or exacto knife (those little scissors you can get in cheap nail care kits work great
Optional Materials: Device w/ screen of your choice, printer

Step 1:
Draw out your design, trace from device, or print out design
(in example image I am tracing from a screen)
r/AnarchoStencilism (Deviantart link if you prefer) is great for free stencil designs

Step 2:
Cover both sides (front and back) of the design in packing tape
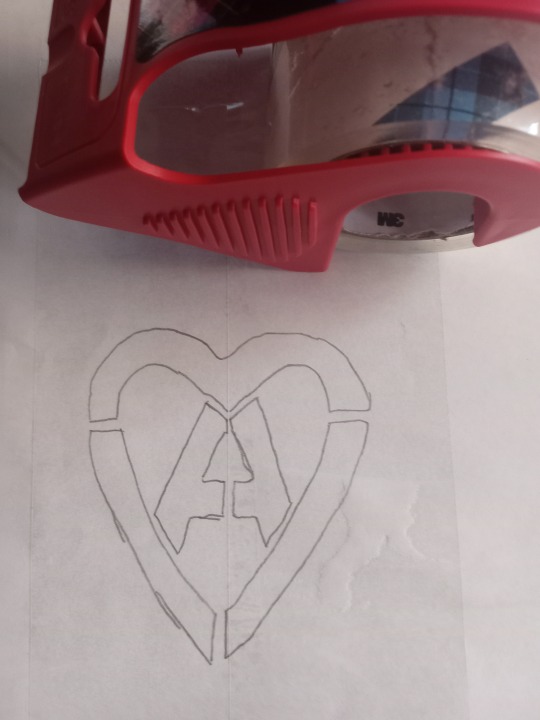
Step 3:
Cut it out
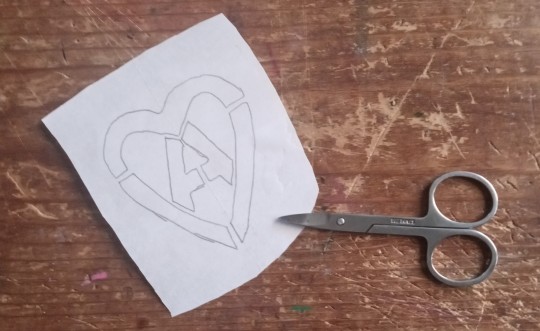
Step 4:
Use your exacto knife/scissors to cut out the design

Step 4:
Apply to whatever you want!
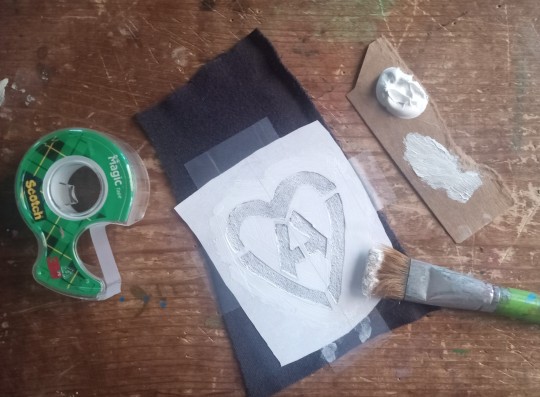
Happy DIYing!

#kahvi draws#patches#stencil#diy stencils#diy tutorial#punk diy tutorial#stencil tutorial#punk diy#folk punk#diy patches#pat the bunny
291 notes
·
View notes
Text
Hello hi greetings a few people have asked me how i make plastic bottle cap pins so here's a hopefully helpful guide for how I personally make them.
***I can't do image descriptions in this post right now, my apologies. But I will try and explain as much detail as possible while writing the steps. If someone reblogs this with image descriptions I will reblog and credit the person
***You'll need: a hot glue gun, pliers, a soda tab, a safety pin, a thumbtack, scissors, and some cardboard
Step 1: Score the inside of the bottle cap with a thumbtack, just the flat circle part. (This is so the glue sticks better) I do it down and across so the surface is thoroughly scratched up

Step 2: cut a piece of cardboard small enough to fit inside the scored part of the cap, inside the ridges too, and glue it in. It doesn't have to be shaped like a circle but it needs to fit flush against the plastic like this:


Once it's glued in there, seal it with some glue. The less you use the better but it really needs to be in there good. You don't need to score the sides on the inside of the cap, the glue will hold on the the ridges that are already there so it should be fine
***note: if you have a way of safely melting down the edges of the cap to make the whole thing thinner, the cardboard can be skipped entirely and you can just glue the soda tab and safety pin directly to the scored plastic
Step 3: bend your soda tab slightly with your pliers and insert the safety pin into it like you would for metal bottle cap pins. Make sure it looks like this:


The bent soda tab should be facing down and the pointy part of the pin should be facing up. Insert the piece that holds the pin closed under the middle part of the tab and back up through the other side, the slight bend of the tab should let it fit snugly in place.
Step 4: glue tab/pin on top of the cardboard piece. Again, the less glue the better, but to make sure it doesn't go anywhere I like to use another pin to move the glue all up in and around the soda tab so make sure it's held in place. Its also good to make sure the side of the pin sitting on the cardboard is thoroughly glued so it won't move around. Sometimes a little extra glue is necessary

Once it cools and you have your pin, you'll want to make sure that it sits balanced on a flat surface upright like this:

You'll wanna try and avoid having the safety pin sticking out too far otherwise it won't sit well on whatever you pin it to. So for it to look nicer it needs to be able to sit flat (painted side up)
And all that's left to do is paint it. Be sure to keep the angle of the pin in mind while painting to make pinning it to things easier. I hope this was helpful :) happy crafting 🌿❤️🌻
#punk#solarpunk#punk diy#punk fashion#diy#solarpunk diy#solarpunk fashion#sustainable fashion#sustainability#recycling#hopepunk#ecopunk#hatchet makes stuff#upcycled fashion#upcycling#tutorial#fashion#buttons#pins#crafting#diy projects#diy craft
59 notes
·
View notes
Text

Look at this weird little bitch I made. He’s a crocheted rucksack named Jorgé and he exclusively eats horse meat.
Just thought y’all needed to see
#diy or die#punk diy#punk rock#diy tutorial#diy craft#diy ideas#diy#crochet diy#diy projects#diy punk#crochet#yarn crafts#yarn#yarnblr#goblincore#goblin girl
143 notes
·
View notes
Text

i make my zines by putting this guy in canva :)
(on canva, you can rotate text by turning the little turning arrow symbol next to your text)
223 notes
·
View notes
Text
DIY Punk Mods and Updates
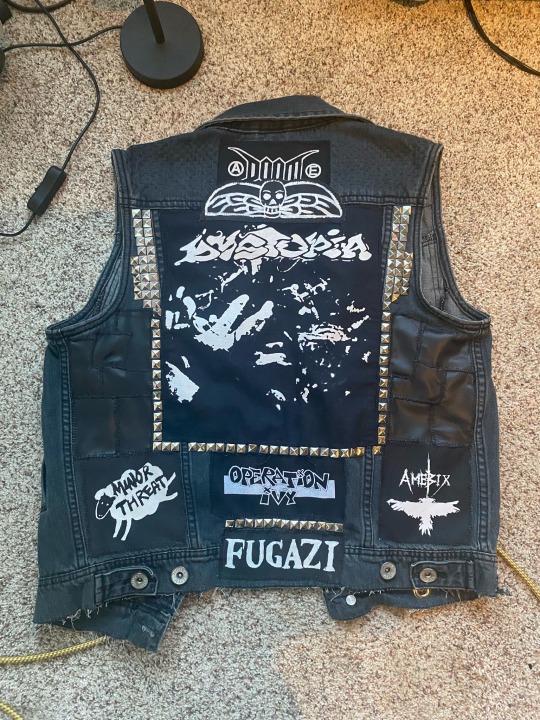

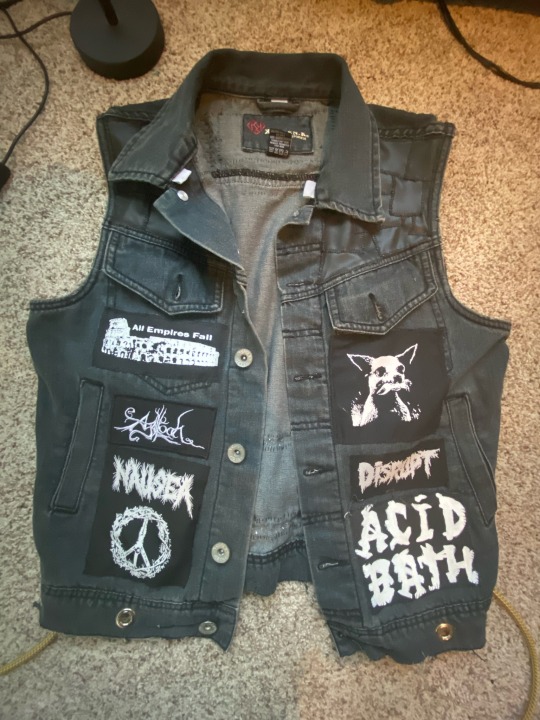
I started beefing up my battle vest!
I cut off the hem for a more flattering look
Added pleather patchwork to the front and back
Added a decorative patch below the Doom patch
Added sashiko stitching so it matches my pants
Added grommets at the bottom for keychains
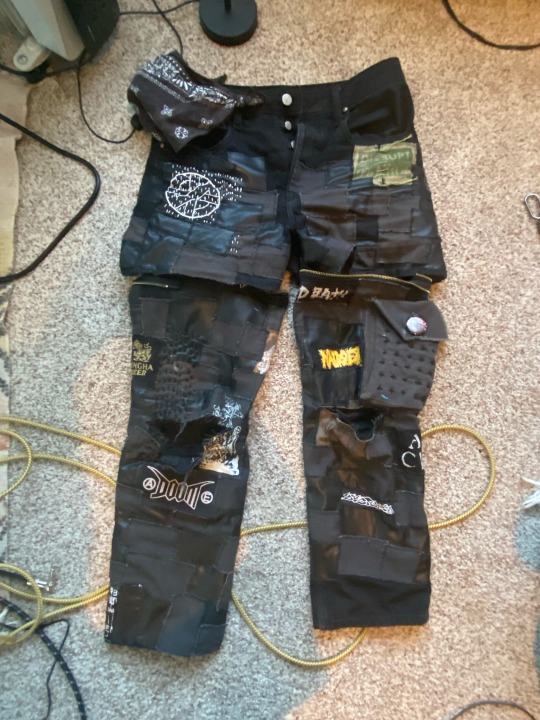
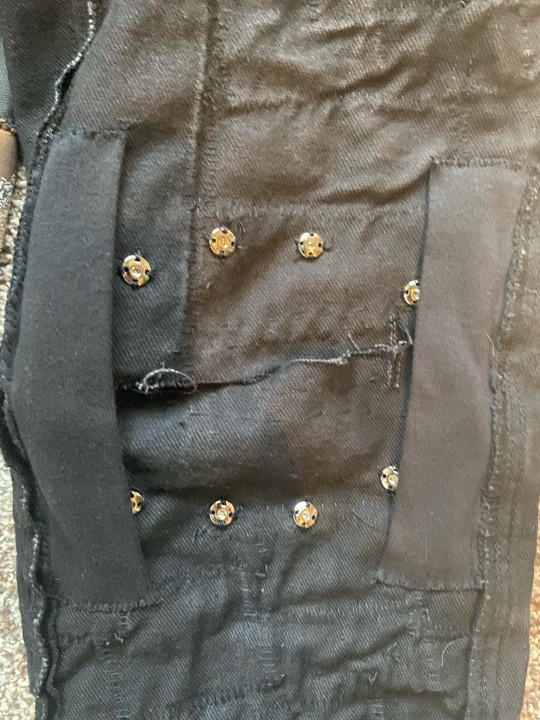

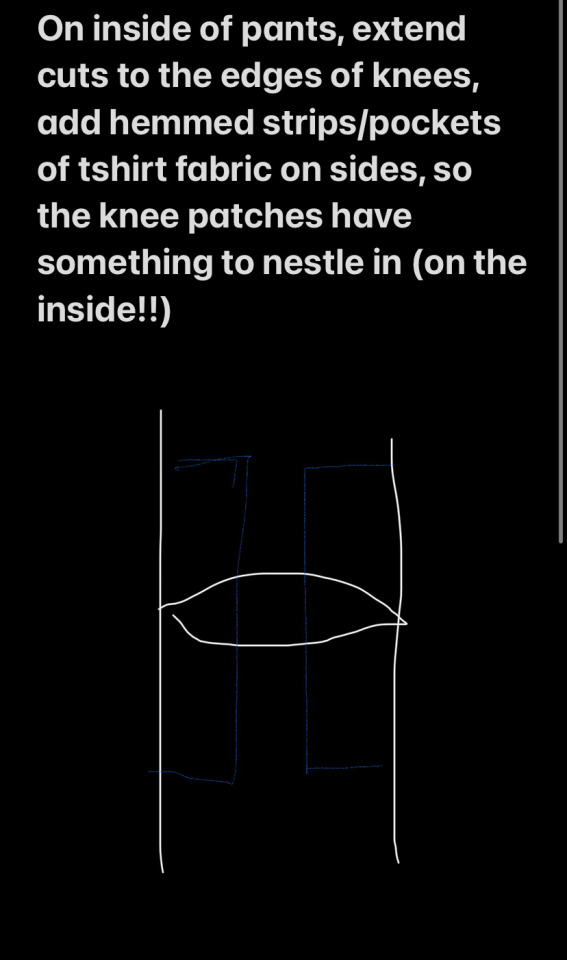
This was a big gamble for my pants, but I’m glad I went through with it. My pants were getting stiff from the amount of patchwork that went into it, so I cut the knees so I could actually bend my legs lol. The issue is that my legs will get cold, so I bought some elbow pads from the craft store, and converted them into knee pads. Using button snaps, I made them removable (last pic). I lined the pads with old t-shirt fabric so my knees won’t chafe, and secured it with fabric glue and a border stitch. The strips of fabric on the inside of the pants are there so that the cuts I made don’t fully expose my legs when it’s cold.
(The half-ass pattern I made at work)
This took me a total of two days, with the sewing, measuring, and all that.
#diy punk#diy or die#punk#punk pants#patch pants#punk fashion#crust punk#anarchopunk#diy tutorial#sewing#punk style#punk aesthetic#crust pants#patches#battle vest#punk vest#spechpunkshit
369 notes
·
View notes
Text

This makeup look is just muah! Chefs kiss 💋! I adore the purple smoked out vibrant shadow 💜 the black lips came out so perfect 👌
I want to recreate this look so bad! 😍 I've been wanting to get back into makeup for a long time now. I stopped wearing makeup for about three years now, I got more into skincare. But damn do I miss looking this haunting 👻!
Source
#goth#gothic#goth aesthetic#goth vibes#goth makeup#makeup#makeup looks#makeup tutorial#purple eyeshadow#black lipstick#emo#punk#grunge#dark grunge#alt#alternative#alt makeup#dark#dark aesthetic#dark vibes#dark makeup#spooky#spooky aesthetic#spooky vibes#darkness#alt girl#goth girl#smokey eye#lipstick#eyeshadow
164 notes
·
View notes
Note
Do you have a tutorial for the denim choker and/or the bat keyholder you made?? They're so cool :0
a tutorial on how to make chokers from some old pants!!


you will need:
-some old jeans
-a button
-strong thread, for these i used emboidery thread
-spikes and/or other decorative stuff you wanna put on the choker
-scissors
-pliers
-sewing needle
-seam ripper or small scissors
•
first get your pair of pants, and cut of the waistband. you can remove the belt hoops with seamrippers (or keep em and sew them on as extra decoration) i always use the part with the buttonhole, it saves on sewing
the band should be a large enough to wrap around your neck plus some extra space


measure and draw on where your button will be placed (on the end where the buttonhole is not) then about 5cm from there, make a small cut in the band and fold the ends in, press together and sew closed. there should be around 2-3 cm of band left next to where youre gonna attach the button (where i drew the white line)


time to gut em!! open the seams on one side (not fully till the ends) and attach your spikes, this prevents the point or screws from pressing/poking into your skin. (i made this part the next day hence the lighting change)
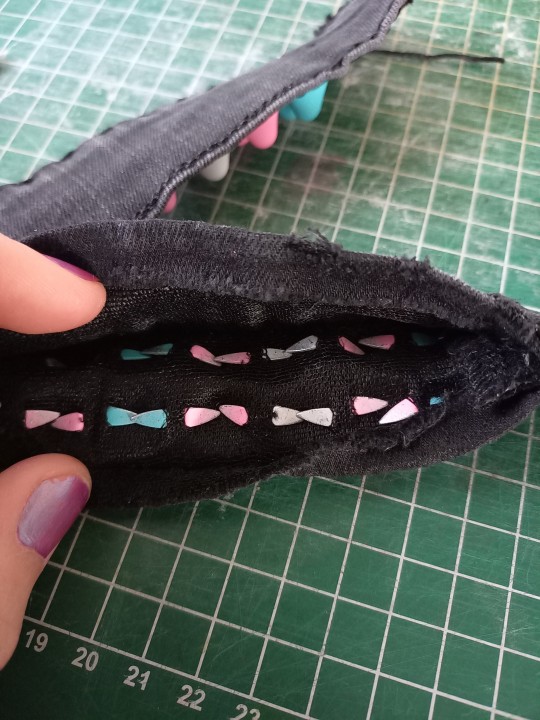
sew em back up and attach your button
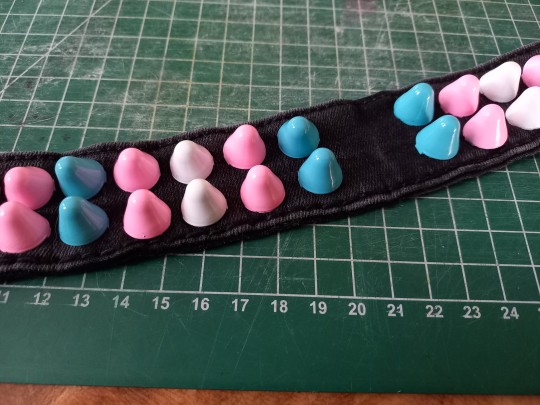

i added an eyelet so i could attach charms to the choker, but you can also attach chains, soda tabs, embroidery or whatever on there. after that youre done! you can also use this exact method to make cuffs, just make the band shorter.
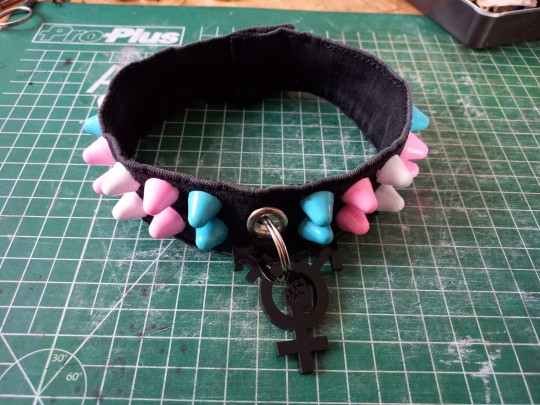
#punk diy#diy fashion#diy punk#punk clothes#punk style#queer punk#tutorial#my stuff#queercore#punk#punx
534 notes
·
View notes
Text
PIN TUTORIAL.
So. You want pins of your favorite band/cartoon/oc/funny thing to put on backpacks/jackets/pants BUT you're broke and/or have no means to Acquire Pins. You find yourself thinking must Man do i need to make these???? And the answer is yes. Sadly, one either needs to purchase items to have items or make items to have items. I know, i know. It's unfair. It'll be alright, though. Fear not, beloved internet user, for i have The Easy Solution to Your Problem. For thee. Let me hold your hand passionately.
What you'll need is:

Safety Pins - you can buy them for hella cheap in packages with Many Of Them. I'm probably not from your country so you'll have to look for them yourself online or in a store) Pair of Scissors - for cuttin' Plastic - Any kind as long as it's thick enough. reutilize something that would go to the trash, if you can. I'm using an old fanta bottle i stole from dad's pepper pot from the garden. you could also used those hard ish plastics from boxes too or packages. It doesn't have to be transparent, but that's recommended. Some sort of Glue - I recommend hot glue. I did not, however, have hot glue, so I used a two-part resin for fixing pipes instead. If it works it works. You can use anything as long as it secures the safety pin to the plastic. The Pin Content - I'm using STICKERS. i bought 200 6 months ago and have many left overs. You could also use a drawing you made or a cutout from a magazine and tape it to the plastic with transparent packaging tape.
That's all you need. However, if you'd like to make your life a bit easier, it'd be nice to have in hand:
tape - for tapin' razorblade - for scrapin' pen - for Penin'
See. easy. doesn't need a lot. I must say that since i'm a craftsperson i have More Materials laying about than the average arguably human population, but that's pretty much it.
tutorial with pictures continues under the read more. selfie under read more too with them on a cool jacket. here are the results so you know what you're getting into. Ooooo you want to make pins so bad oooooooo

TLDR: glue Pin Content onto the plastic, glue the safety pin to that next. Pic IDs added.
STEP 1.
Stick the thing you want to pin on the plastic. I'm using stickers, but you can use the non adhesive stuff. You can tape a piece of paper to the plastic with transparent duct tape. Just make sure to leave a margin on all sides.

STEP 2.
turn the plastic sheet around. Mark where the Up part of the sticker is and where you want the safety pins to go. This part is optional, but it helps making sure you're not going to put the pins in the wrong position. I didn't do it on my last batch and they turned out fine.
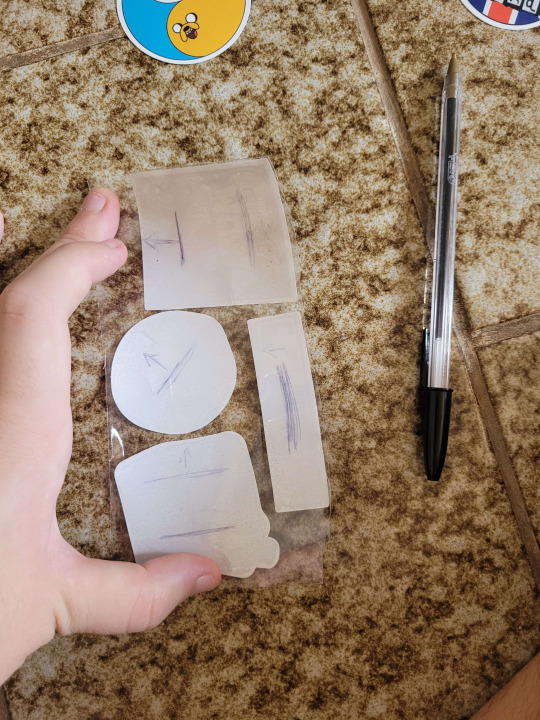
STEP 3.
Secure the plastic to your work surface using tape to keep it still while you work. Again, optional, but it'll help keep the thing straight if your plastic is bent like mine.

STEP 4.
Scratch the surface of the plastic so whatever gluing method you use actually works. The surface shouldn't be smooth or else it'll be hard to glue. You can use anything to scratch it. I did a criss cross pattern as shown in the picture.
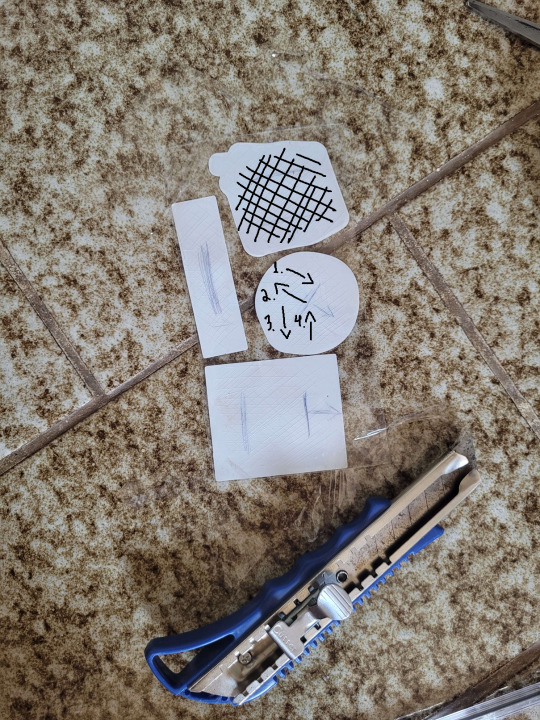
STEP 5.
Glue the pins to the scratched surface.
In my case it was done in two steps since the resin needed time to dry. I made a hard base to secure the pin and waited for two hours for that to dry. Then i put a small layer of resin over the part of the safety pin that doesn't open and waited for it to dry again.
This would be miles easier if you used hot glue. Just hot glue the pin to the plastic, making sure to keep the movable part free.


STEP 6.
Cut the pins! If you taped them to the plastic instead of using premade stickers then make sure to leave more plastic to the sides. so it doesn't fall off. They're done. You now have pins.

If you want to go above and beyond, you can cover the pin with a thin layer of clear nail polish to make it impermeable and more durable, but i'm all out of clear nail polish, so i didn't do it.
RESULTS PART 2.

That's it. That's all. Have fun!
#pins#enamel pins#DIY#adventure times#rock#alternative#grunge#punk#tutorial#art supplies#safety pins#cheap stuff#tutorials#artists on tumblr#diy craft#this took so many tries until i figured out the stupidest and easiest way possible to make it lmao#anyways yeah#enjoy#yayyyy
48 notes
·
View notes
Text
How to Make a Printing Screen from Home
I wanted to share a quick cute little tutorial for how I made my own screen for making patches (and other things that don't require exact measurements). Cute lil how-to under the cut >:)
Disclaimer: I have absolutely no idea what I'm doing at any given moment. There could be a better tutorial out there for you. I'm just guessing for a lot of the things I do and this is no exception. With that out of the way:
THE SUPPLIES YOU DEFINITELY ABSOLUTELY NEED:
a small/medium canvas (depending on what you have and how big your design will be)
paintbrushes
a tight-woven sheer fabric (preferably not stretchy and STRONG)
a fine-tip pen
water-resistant gloss of some kind (mod podge works, but make sure it's a waterproof kind if you want to make more than one print)
paint that won't come off in the wash (acrylic/spray paint work)
good strong tape
a good sturdy card-like thingy
an easy/cool design for your print :)
THE SUPPLIES THAT ARE RECCOMENDED BUT NOT NECESSARY (aka things I like to use):
a good canvas fabric/thick cotton for printing on
fabric paint (will stay on the fabric best duh)
a 1/2in, 1/3in, and fine tip paintbrush for details (depending on your design)
some company for fun :)
Alright, so first you'll want to figure out the design you want to print out and get a good sketch over it. I'm a detail freak so I like sketching out my design then going over it in a black pen. The ideal is hard contrast and clear and discernable lines/fill-in spots, like pictured below:
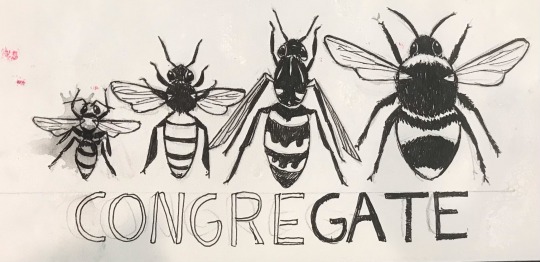
(Note how I emphasized which spots were to have thicker lines, which parts of the stripes were to be printed, etc. I tried to think a lot about which portions I wanted to show up on the finished design and how they would look on the fabric as a whole.)
So you've got your design. Great! Next step is a fun one: Grab a canvas you are willing to part with (this one was a painting I made when I was 16. I hate it), and rip all the fabric off of that fucker!! If you pull off some staples in the process, don't worry. Just make sure you can retain the shape of the frame, since that's the part you'll need to keep. You don't need to take off every single bit of the fabric, but as previously stated, I'm a freak, so I did. You'll come out with something like this:
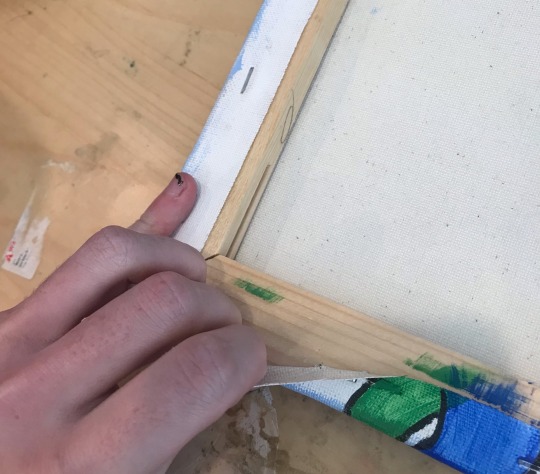
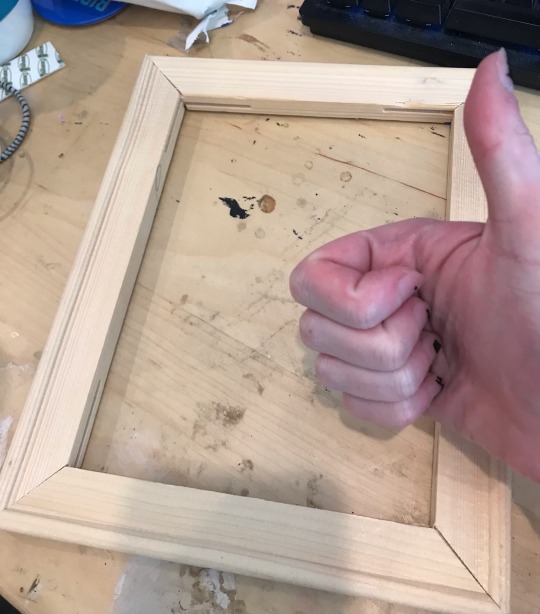
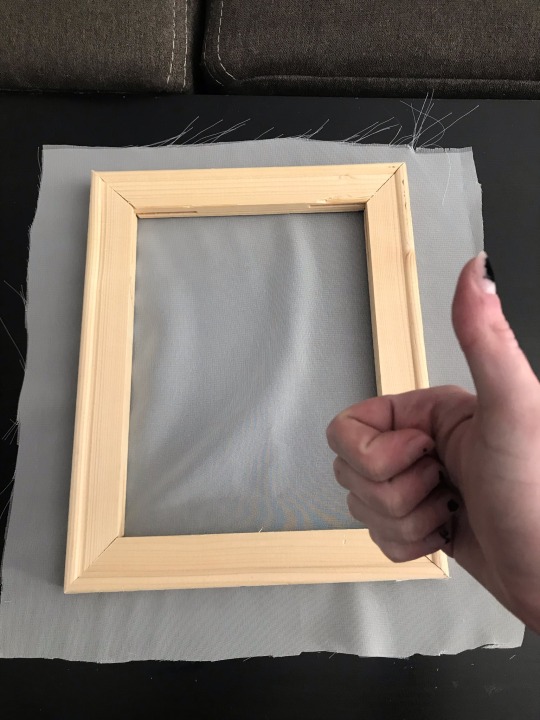
For the next steps you'll need a good pair of scissors as well as your pen and your sheer fabric. You're going to want to set the frame on your fabric and cut about an inch and a half around it so there's extra to wrap around the frame and tape down. You can draw a guideline for where to cut if you want, but once again, I'm a freak:
Now lay the front of the canvas frame (the part without staples on it) face down on the fabric and grab your tape! Now we're going to tape down each end of the frame so the sheer lays taut on the frame. I like to put one or two strips of tape on the ends parallel to each other and pull them tight, then do the same with the other side, then continue adding tape until the whole outside of the frame is covered. See below:
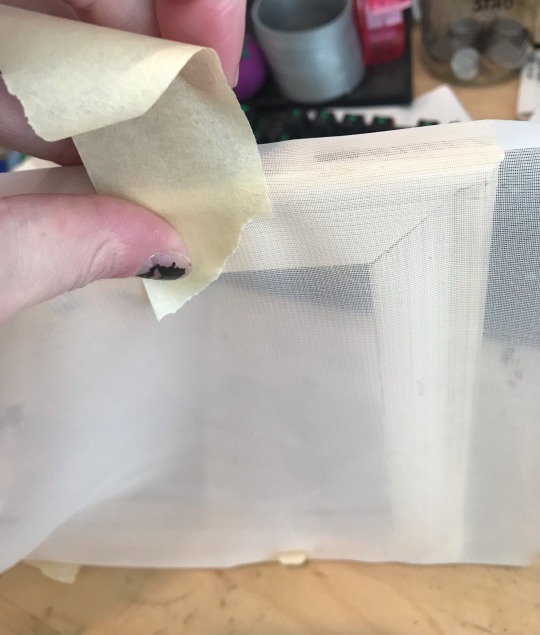
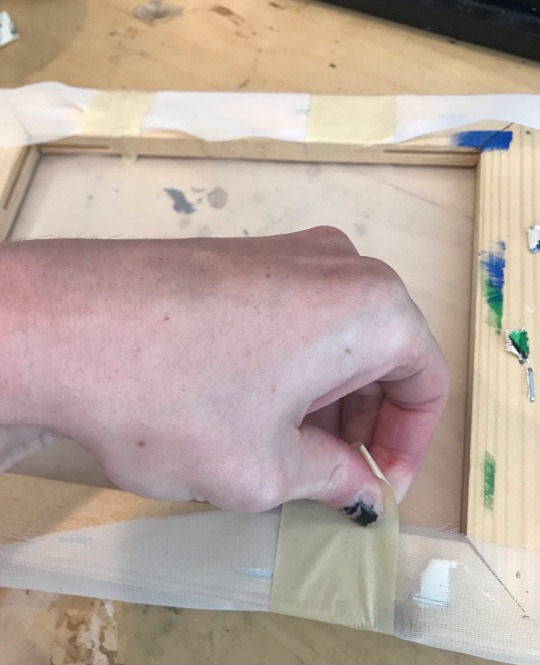
(Note: your goal in this step is to stretch the sheer as tight as it can comfortably go so there are no wrinkles or depressions in the fabric.)
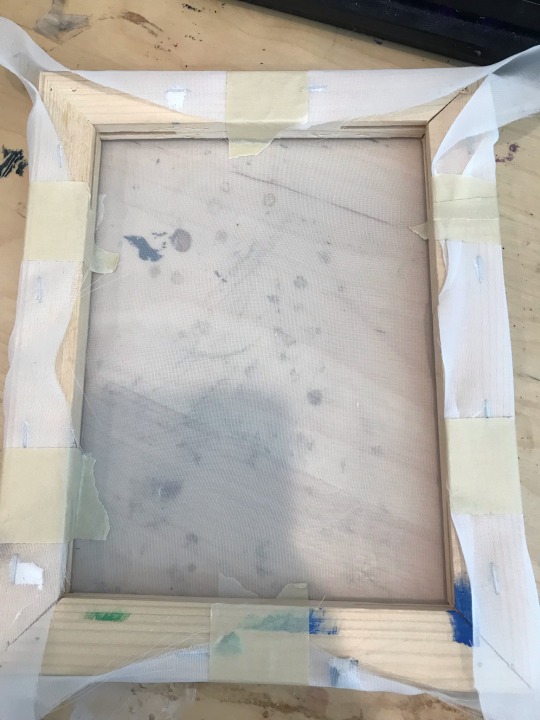
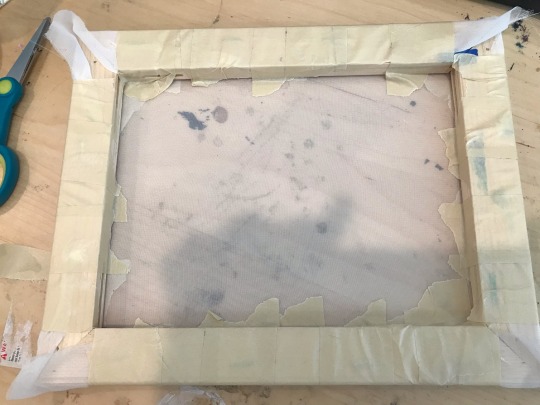
So now you have you're frame. Fuck yes!!! Go ahead and grab the design you came up with as well as your pen (you can use a pencil too, but the pen shows up much better through the fabric so I definitely prefer it), and put the frame front side down onto the sketch.
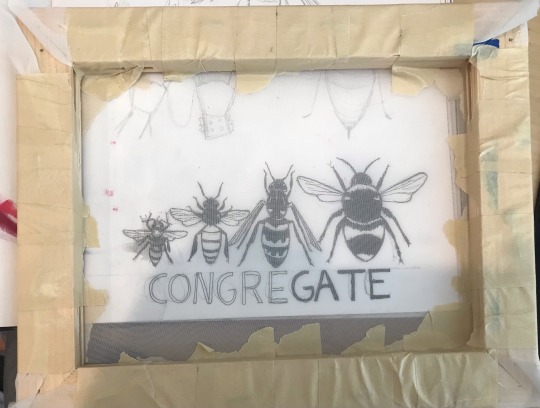
If you're worried about keeping the frame steady, feel free to tape the frame down and go ahead and trace over the design with your pen. Make sure to fill in all the dark parts enough that you can differentiate them from the light parts.
Once you have your sketch copied to the frame, now you can grab your gloss!!! Hurry!!! You're almost done!!!!
With this step I like to start big and go into the details once all the larger portions of the sheer are covered. Pretty much you're going to paint over every part that isn't the black of the pen with your waterproof gloss. This ensures that once you start printing, the only parts that are going to bleed through the fabric will be the black parts that weren't painted over with gloss/varnish/mod podge/whatever you used as long as it's waterproof!!! Take all the time you need, it's not a race. Once you're done and the gloss has dried, your screen is going to look something like this when put up to a light:
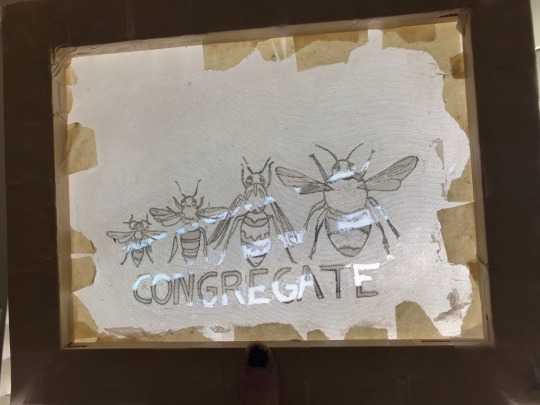
Now that this step is over with, congratulations - you have just made a mesh screen!!! Keep reading to learn how to use it lol
So for the patches that I make I just went with black and white paint, and black and white fabric to keep it traditional, but you can use any colors of paint and fabric you want, truly! The world is your oyster! I do not care! That being said, we're keeping it simple today.
Grab your screen, a piece of fabric that can cover the design and leave at least an inch of space around it, and a surface you won't mid getting paint on on accident. You'll also want to grab that card-like thingy for this as well. It can really be anything that can provide a sturdy, even pressure across the screen consistently. Go ahead and pick up that fabric paint too, I guess. We'll probably need that.
At this point, this is what your workspace might look like:

Next up you are going to center your design onto your piece of fabric-

-and grab your fabric paint. put a thin little stripe over the top (start slow and add more - as you can see I added a little too much and kinda fucked up my design) then grab your card thingy. Make sure you have even pressure on it and swipe it down at a medium speed so you're dragging the paint down the screen:

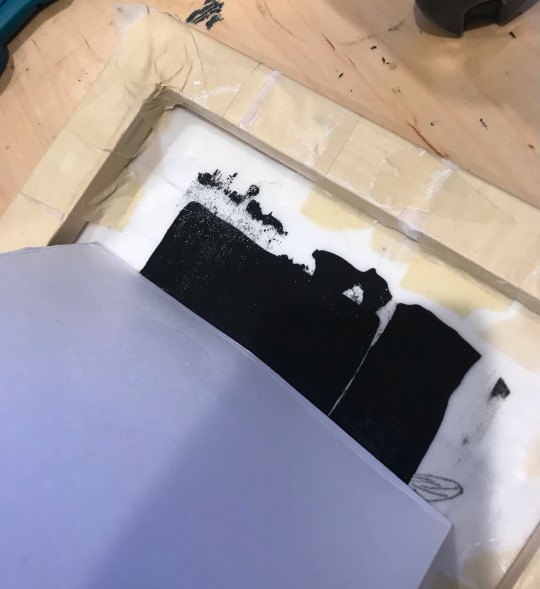

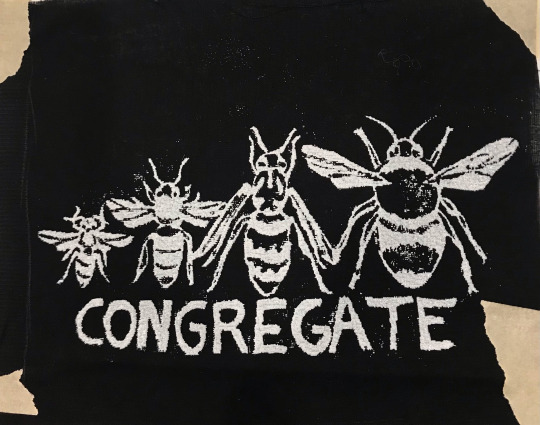
Once you've got everything covered I like to go over it a few more times for even coverage. Then you pull it up from the screen (which you might want to rinse off so no paint sticks to it!!!), wait for that bitch to dry, and you're done!! Congratulations, you have your very own fun silly patch! Go sew it on something! Or not! I do really do not care!!!!!!

#blog post#cant-shake-it#patches#homemade#punk#punk diy#punk patches#tutorial#how to#screen printing#diy#fashion#if i get hate for this im prepared bc i ride life on the seat of my pants#there are no rules and i am so inefficient
160 notes
·
View notes
Text
diy shoe lace crotch on crust pants tutorial from a punk named @reptil_diy whos been patching his crust pants for 17 years
I went out of my way to ask this guy on instagram for permission to reupload his stuff heer and he says its all good :3 he actually liked my pink patch pants which is great :3!
#punk#diy#folkpunk#folk punk#patches#diy patches#patch pants#crust pants#crust punk#crustpants#punk fashion#crust core#crust pants diy#punk diy tutorial#diy shoe lace crotch#diy shoe crotch
241 notes
·
View notes