#pssos
Text


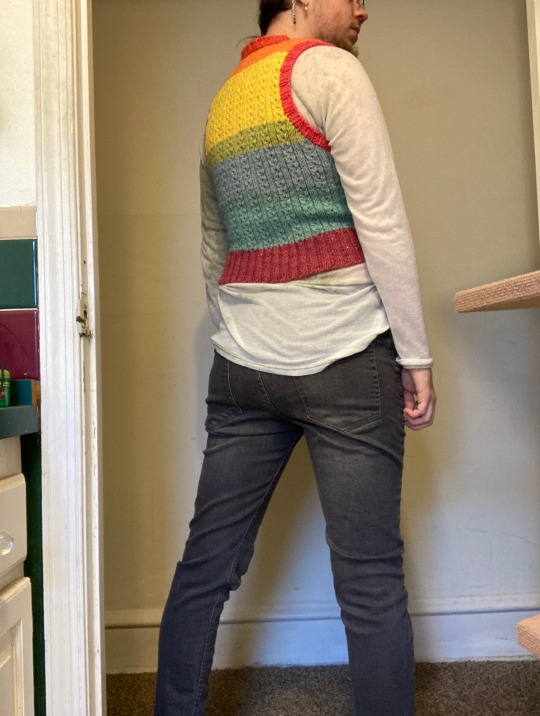
made another sweater vest from the same 1940s vintage pattern! just crop top length instead. This is one I’d wear with high waisted pants (if I had any! that’s on my project queue list). As you can see I knit this one flat. I do like the colors but I wish it was longer so you got more of the rainbow. It’s a lot of orange and yellow, colors I don’t really wear or feel comfy in; it’s also less rainbow-pride than I thought it would be. It’s very comfy though! It looks child sized on the hanger lol but it stretches a lot. All together I really like it! I think it’s great casually but it will also look nice under a suit/blazer.
pattern is: Sleeveless Pullover Pattern #S-113 printed in Spool Cotton #198 Knit for Victory
yarn is: lion brand mandala sparkle in crux
stitch repeat: ok so this was given to me as the following
row 1: k2, p1, k2tog, yf, yrn, sl 1 purlwise, k1, psso, p1, repeat to end, k2
row 2: p2, k1, p1, p1 into yrn and k1 into yf of previous row, p1, k1, repeat until end, p2
row 3: k2, p1, k4, p1, repeat to end, k2
row 4: p2, k1, p4, k1, repeat to end, p2
but I ended up fixing row 1 bc it didn’t look right. After the k2tog the yarn gets wrapped around the needle twice: from the back to the front, from the front to the back, from the back to the front, from the front to the back. There should be two loops on the needle to make two stitches. And then the next stitch is slipped knitwise so that when you pass it over the stitch to its left, it doesn’t get twisted. Not sure if I did something wrong or read it incorrectly but the above is what made the eyelets look symmetrical.
previous post here, the trans colored version of this is here (with purled hearts instead of eyelets)
#fiber arts#knitting#sweater knitting#sweater vest#does this count as#gay pride#hand knitted#handmade#handcrafted#feyknits
137 notes
·
View notes
Text
How about a Kaguya misadventure to find her treasures, like how did she get them in the first place

Headcanon Kaguya is too much for the Lunarian, so they yeet the lil bitch down to Earth
Here's some info bout the "bosses":
1# treasure: "Look at all those chicken"
2# treasure: Rat king and his entangled siblings, also on fire
3# treasure: That one comment remind me that there's indeed, a base camping Buddha on the Moon
4# treasure: Under the sea♪ Under the sea♪
5# treasure: Xli yrhsrkir xvii mw vieppc fieyxmjyp, omrhe viqmrh qi sj xli Wemkcsy Eceoe- SL JYGO
Sl mw rsx hsri cix
6# xviewyvi??: Lelel psso lsa mq ksmrk xs gsrrigx epp sj xlmw xs OekyOimri. Llellelelelllelel, M'q ksmrk mrweri
I have a bad habit of spilling everything about my work when it's not remotely done
So imma just encrypt some part with Caesar cipher, the shift number is the number of character titles Keine has (based on the wiki)
14 notes
·
View notes
Text
[Csy fvsyklx xlex ytsr csyvwipj. M xlsyklx csy asyph'zi viepmwih rsx xs kix exxeglih xs lyqerw ercqsvi cix psso ex csy]
I DIDN'T REALISE HE'D DO THAT, OKAY?!
[Erh rsa qyq orsaw. Kssh nsf Erhc]
SHUT UP! YOU'RE MEANT TO BE HELPING!
[Vmklx, vmklx. Wsvvc. Nywx wecmrk.]
...I-I know. It won't happen again.
[Epvmklx, mj csy'vi wyvi. Rsa csy wlsyph tvsfefpc gligo sr xlex gpsri sj csyvw nywx mrgewi.]
You're right...as always.
2 notes
·
View notes
Note
I'm curious, would these victorian patterns also include gauge the way modern patterns do (as in number of stitches per inch in stockinette), or something similar? Or did you just have to hope your gauge was the same as the pattern maker's and hope for the best?
I have never seen a Victorian knitting manual say anything about a gauge swatch. I don’t think the concept had come to be yet. The most that early writers of knitting manuals have to say about the matter is that a knitter should be careful to knit neither too loose nor too tight, but to keep a medium tension.
A YouTube video by Roxanne Richardson describes her attempting to take on a late 19th-century stocking pattern, only to become confused when the number of stitches and rows given for each part of the stocking produced something that didn't fit her foot. She eventually discovered that these patterns were probably distilled from 16th-century stocking-making philosophy that laid out what proportions a stocking should be knit to based on some kind of ideal (e.g. the circumference of the thigh is equal to 1 1/3 the length of the foot, the circumference around the ankle is the same as the circumference at the ball of the foot, &c.). The Victorian pattern used these same imagined proportions across all of the sizes that it gave instructions for, but provided no insight on how to alter the pattern if your body differed from them. She says "they'll tell you how many to cast on, how many rounds to work straight, how many decreases to work over how many rounds [...]. They never tell you what the gauge is! Stitch gauge or row gauge. So you don't know what size this stocking is." (time stamp 26:48)
More information than you asked for:
The thing about these manuals is that some of them claim to be able to teach someone to knit from scratch, but they’re nigh incomprehensible unless (and often even if) you have a good deal of experience knitting. There are a lot of things that aren’t specified (e.g. the text says “repeat”—but from where? Or the stitch repeat is clear, but it doesn't go evenly into the number of stitches you have. Or the pattern just sort of... ends before the garment is finished), and there are a lot of errata. In many places, you need to be able to figure out what something should look like from the name or description of the stitch, or from knowing what the garment the pattern is for is shaped like, and then figure out the appropriate actions to take to bring that to fruition.
There was also no language of the type used in patterns today, which ime is almost entirely standardised (knit, purl/pearl, K2Tog, Sl1-K1-PSSO, &c.). Patterns were often rendered entirely in longhand prose. Writers generally used “plain” or “knit” for what we would call a knit stitch, and “turned” (n. “turn stitch” or “turned stitch”; v. “turn a stitch”) or “back stitch” or “pearl stitch” for what we would call a pearl stitch. Usually K2Tog and P2Tog are rendered “knit two stitches / loops together” or “take two together,” and “knit two stitches together in turn stitch” or “turn two together,” respectively. Yarning over is generally “make a stitch” or "make a loop." Past this, there is almost no consensus on terminology.
Writers generally got around how long and unwieldy a pattern would be if complex stitches needed to be described anew each time they appeared by creating an index, which gave a brief phrase (or a symbol!!) followed by a description of how to perform that stitch or series of stitches. A lot of these can be ‘translated’ pretty 1:1 with modern stitch notation; others I had never seen called for.

[Jane Gaugain, The lady's assistant. Index shewing symbols such as "O," "O sub B," "S sub upside-down F" etc. and explaining each with a sentence or a few words of instruction.]
One thing I’ve noticed, though, is that some writers will describe a sequence of actions taken, whereas modern notation prefers to notate stitches created. The Winchester Fancy Needlework Instructor, for example, often tells you to bring the yarn forward and then knit the next stitch, which pair of actions will do of course create what we would call a yarn over; a modern pattern would tend to just say “YO” and expect you to know which actions to perform to create that YO based on what kind of stitch the previous and next stitches are (yarn forward if between two K stitches, yarn around if between two P stitches, yarn, yarn backwards if between a P and a K stitch &c.). As a consequence, these knitting manuals often have separate index entries or symbols for each of these actions (as above), though we would consider them to create the same ‘type’ of stitch.
Sometimes a writer seems to have simply messed up and included a phrase in a pattern that was not descried in the index (Workwoman's Guide—otherwise one of the clearer ones out there—asks me to "Put the needle into two stitches, and knit them backwards." Does this mean to purl them? K2Tog tbl?). No other instance of the word "backwards" appears in the book. The author also wrote a pattern that calls for a stitch that was not mentioned in the "stitches" section—it instructs me to
Set on an even number of stitches,
Knit the second row in the Hole-stitch, the next row in Turn-stitch, and so on.
But nothing in the book has been described as "hole-stitch." So you have to look for other patterns that use this stitch, ask yourself what it makes sense for these garments to look like, assume what this might look like from the name (it has. holes in it?) and guess what you're supposed to do to make that happen (perhaps a plain open stitch alternating YO and K2Tog), hunt for engravings illustrating an object intended to be made with this stitch, &c. Or maybe on the description of another stitch (the embossed diamond from this same volume!) the instructions on how to repeat the pattern create completely senseless results, so you have to use the first few correct rows + an assumption about what the stitch should look like (you know.... like diamonds...) to figure out how the rest should go.
So, yeah. Tackling Victorian knitting patterns. Not for the faint of heart.
19 notes
·
View notes
Note
meio q eu já irritei e supostamente enchi o saco de metade desse site já com as asks, agora vai ser sua vez de sofrer com elas MUAHAHAHAAHA
incrível que você diz que é um solzinho e seu unser tem "Sun", nao sei se já te falei isso, tenho a leve impressão q s então... psso te chamar de sunsunzinha? KAJAIAJAIAUS
PRA MIM RESPONDER ASKS NUNCA SERÁ UM SOFRIMENTO!! Ainda mais se forem suas, bb 🤭 (na moral, eu amo conversar, você pode me mandar qualquer coisa, até aquelas que eu não faço a menor ideia do que são KKKKKK sim, eu sou um tanto quanto carente por interação KKKKKK)
É CLARO QUE PODE!! PODE ME CHAMAR DO QUE VOCÊ QUISER!! 🫣🤭
2 notes
·
View notes
Photo
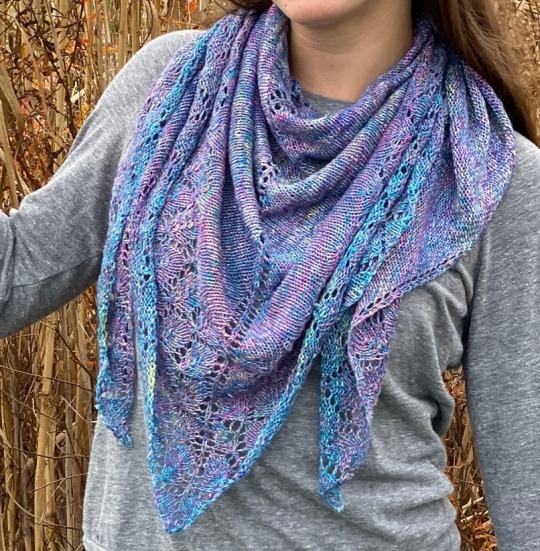
LACE WEIGHT SILK SHAWL
Materials
2 skeins of Lace Weight Silk Yarn
US 5 (3.75 mm) straight or 32” circular needles AND
US 7 (4.5 mm) 24” straight
or 32” circular needles
Scissors
Tapestry Needle
Stitch Markers
Gauge: 4 STS / 8 rows = 1 inch
(On US 5 needles)
• If necessary, switch needle size to match gauge
• To launder: hand wash in cool water add lay flat to dry
Pattern
Cast On: 5 sts (with US 5 needles)
Row 1: k2, yo, k1, yo, k2.
Row 2: k2, p to last 2 sts, k2.
Row 3: k2, yo, k1, yo, PM, k1, yo, k1, yo, k2.
Row 4: Repeat R2.
Row 5: k2, yo, k to marker, yo, SM, k1, yo, k to last 2 sts, yo, k2.
Row 6: Repeat R2.
Row 7: k2, yo, k to marker, yo, SM, k1, yo, k to last 2 sys, yo, k2.
Repeat: R6 and R7 until you have 307 sts
(153 sts before M, 1 center st, and 153 sts after M).
Row 1: k2, yo, *k1, yo, k3, sl1, k2tog, psso, k3, yo*, repeat *’s until 1st st before M, k1, yo, SM, k1,
yo, k1, *yo, k3, sl1, k2tog, psso, k3, yo, k1*, repeat *’s until 2 sts, yo, k2 (311 total sts)
Row 2: k2, p to last 2 sts, k2
Row 3: k2, yo, k1, *k2, yo, k2, sl1, k2tog, psso, k2, yo, k1*, repeat *’s until 2 sts before M, k2, yo,
SM, k1, yo, k2, *k1, yo, k2, sl1, k2tog, psso, k2, yo, k2*, repeat *’s until last 3 sts, k1, yo, k2
(315 total sts)
Row 4: Repeat R2
Row 5: k2, yo, k2, *k3, yo, k1, sl1, k2tog, psso, k1, yo, k2*, repeat *’s until 3 sts before M, k3, yo,
SM, k1, yo, k3, *k2, yo, sl1, k2tog, psso, k1, yo, k3*, repeat *’s until last 4 sts, k2, yo, k2 (319
total sts)
Row 6: Repeat R2
Row 7: k2, yo, k3, *k4, yo, sl1, k3tog, psso, yo, k3*, repeat *’s until 4 sts before M, k4, yo, SM, k1,
yo, k4, *k3, yo, sl1, k2tog, psso, yo, k4*, repeat *’s until last 5 sts, k3, yo, k2 (323 total sts)
Row 8: Repeat R2
Row 9: k1, *k1, yo, k3, sl1, k2tog, psso, k3, yo*, repeat *’s until M, SM, k1, *yo, k3, sl1, k2tog, psso,
k3, yo, k1*, repeat *’s until last st, k1.
Row 10: k2, yo, p to marker, yo, p1, yo, p to last 2, yo, k2 (327 total sts)
Row 11: k2, yo, *k2, yo, k2, sl1, k2tog, psso, k2, yo, k1*, repeat *’s until 1st before M, k1, yo, SM,
k1, yo, k1, *k1, yo, k2, sl1, k2tog, psso, k2, yo, k2*, repeat *’s until to last 2 sts, yo, k2 (331
total sts)
Row 12: Repeat R2
Row 13: k2, yo, k1, *k3, yo, k1, sl1, k2tog, psso, k1, yo, k2*, repeat *’s until 2 sts before M, k2, yo,
SM, k1, yo, k2, *k2, yo, k1, sl1, k2tog, psso, k1, yo, k3*, repeat *’s until last 3 sts, k1, yo, k2 (335 total sts)
Row 14: Repeat R2
Row 15: k2, yo, k2, *k4, yo, sl1, k2tog, psso, yo, k3*, repeat *’s until 3 sts before M, k3, yo, SM, k1,
yo, k3, *k3, yo, sl1, k2tog, psso, yo, k4*, repeat *’s until last 4 sts, k2, yo, k2 (339 total sts)
Row 16: Repeat R2
Row 17: k2, yo, k2, sl1, k2tog, psso, k3, yo, *k1, yo, k3, sl1, k2tog, psso, k3, yo*, repeat *’s until 9sts
before M, k1, yo, k3, sl1, k2tog, psso, k2, yo, SM, k1, yo, k2, sl1, k2tog, psso, k3, yo, k1, *yo, k3, sl1, k2tog, psso, k3, yo, k1*, repeat *’s until last 10 sts, yo, k3, sl1, k2tog, psso, k2,yo, k2
Row 18: Repeat R 10 (343 total sts)
Row 19: K2, yo, k1, yo, k2, sl1, k2tog, psso, k2, yo, k1, *K2, yo, k2, sl1, k2tog, psso, k2, yo, k1*,
repeat *’s until M, yo, SM, k1, yo, *k1, yo, k2, sl1, k2tog, psso, k2, yo, k2*, repeat *’s until
last 11sts, k1, yo, k2, sl1, k2tog, psso, k2, yo, k1, k2 (347 total sts)
Row 20: Repeat R2
Row 21: k2, yo, *k3, yo, k1, sl1, k2tog, psso, k1, yo, k2*, repeat *’s until 1st before M, k1, yo, SM,
k1, yo, k1, *k2, yo, k1, sl1, k2tog, psso, k1, yo, k3*, repeat *’s until last 2sts, yo, k2
(351 total sts)
Row 22: Repeat R2
Row 23: k2, yo, k1, *k4, yo, sl1, k2tog, psso, yo, k3*, repeat *’s until 2sts before M, k2, yo, SM, k1,
yo, k2, *k3, yo, sl1, k2tog, psso, yo, k4*, repeat *’s until last 3sts, k1, yo, k2 (355 total sts)
Row 24: Repeat R2
Row 25: k2, yo, k2, sl1, k2tog, psso, k2, yo, *k1, yo, k3, sl1, k2tog, psso, k3, yo*, repeat *’s until
8 sts before M, k1, yo, k2, sl1, k2tog, psso, k2, yo, SM, k1, yo, k2, sl1, k2tog, psso, k2, yo,
k1, *yo, k3, sl1, k2tog, psso, k3, yo, k1*, repeat *’s until last 8 sts, yo, k2, sl1, k2tog, psso,
k2, yo,k2
Row 26: Repeat R10 (359 total sts)
Row 27: k2, yo, k2, yo, k1, sl1, k2tog, psso, k1, yo, k1, *k2, yo, k2, sl1, k2tog, psso, k2, yo, k1*,
repeat *’s until 9 STS before M, k2, yo, k1, sl1, k2tog, psso, k1, yo, k2, yo, SM, k1, yo, k2,
yo, k1, sl1, k2tog, psso, k1, yo, k2, *k1, yo, k2, sl1, k2tog, psso, k2, yo, k2*, repeat *’s until
last 10 sts, k1, yo, k1, sl1, k2tog, psso, k1, yo, k2, yo, k2 (363 total sts)
Row 28: Repeat R2
Row 29: k2, yo, k4, yo, sl1, k2tog, psso, yo, k2, *k3, yo, k1, sl1, k2tog, psso, k1, yo, k2*, repeat *’s
until 10sts before M, k3, yo, sl1, k2tog, psso, yo, k4, yo, SM, k1, yo, k4, yo, sl1, k2tog,
psso, yo, k3, *k2, yo, k1, sl1, k2tog, psso, k1, yo, k3*, repeat *’s until last 11sts, k2, yo, sl1,
k2tog, psso, yo, k4, yo, k2 (367 total sts)
Row 30: Repeat R2
Row 31: k2, yo, k6, yo, k1, yo, k3, *k4, yo, sl1, k2tog, psso, yo, k3*, repeat *’s until 11sts before M, k4, yo, k1, yo, k6, yo, SM, k1, yo, k6, yo, k1, yo, k4, *k3, yo, sl1, k2tog, psso, yo, k4*, repeat
*’s until last 12 sts, k3, yo, k1, yo, k6, yo, k2 (379 total sts)
Row 32: Repeat R10 (383 total sts)
Row 33: k2, yo, k3, sl1, k2tog, psso, k3, yo, *k1, yo, k3, sl1, k2tog, psso, k3, yo*, repeat *’s until M,
SM, k1, *yo, k3, sl1, k2tog, psso, k3, yo, k1*, repeat *’s until last 11sts, yo, k3, sl1, k2tog,
psso, k3, yo, k2
Row 34: Repeat R10 (387 total sts)
Row 35: k2, yo, *k2, yo, k2, sl1, k2tog, psso, k2, yo, k1*, repeat *’s until, 1sts before M, k1, yo, SM,
k1, yo, k1, *k1, yo, k2, sl1, k2tog, psso, k2, yo, k2*, repeat *’s until last 2sts, yo, k2
(391 total sts)
Row 36: Repeat R2
Row 37: k2, yo, k1, *k3, yo, k1, sl1, k2tog, psso, k1, yo, k2*, repeat *’s until 2sts before M, k2, yo,
SM, k1, yo, k2, *k2, yo, k1, sl1, k2tog, psso, k1, yo, k3*, repeat *’s until last 3sts, k1, yo, k2
(395 total sts)
Row 38: Repeat R2
Row 39: k2, yo, k2, *k4, yo, sl1, k2tog, psso, yo, k3*, repeat *’s until 3sts before M, k3, yo, SM, k1,
yo, k3, *k3, yo, sl1, k2tog, psso, yo, k4*, repeat *’s until last 4sts, k2, yo, k2 (399 total sts)
Row 40: Repeat R2
(Final stitch count should be 399 total; 199 before marker, 1 middle stitch, and 199 after that)
Bind off: on the right side, switch to size US 7 needles for an extra stretchy bind off. Work as
follows: k2, *pass the 2nd stitch over the 1st stitch, k1;* repeat from * to * until only one stitch
remains. Cut yarn and pull the tail through the last stitch to fasten. Weave in all ends.
Block to show off lace detail.
Enjoy!
9 notes
·
View notes
Text
Doilies / Trim and other Lace
So let’s talk a bit about lace knitting.
Bear in mind that I’m mostly talking about knitting, since I find crochet lace to be rough on my wrists. On average, you can get beginner tools (number 10 crochet thread, some US 1 dpns) for about 15$ US, but there’s obviously a million options. Here’s someone using some achingly fine silk, and another person literally using sewing thread.
There’s hundreds of books of lace patterns / trim, and multiple free resources out there on the internet. One example might be Knitting-and.com which has tons of various historical lace patterns.
You can also find a few museums with original magazines, such as this one from the 1930s.
So, let’s go through some of the things you might care about -
Knitting your own lace trim is affordable, infinitely customizable, and also slow. A blouse might need a minimum of a yard of trim for say the cuffs and neckline, but that might take a beginner a few hours. The longer you work, the faster you get.
A doily can, on larger needles, be a scarf or a parasol, or even a tablecloth could be turned into a blanket. At the original size, doilies can be little potato chip like projects that you can carry around that slowly turn into lumpy twisted snoods of fabric. A fast knitter can often do a six inch doily in a couple of days, but that varies depending on complexity, knitting speed, etc. Stretching out a doily after you wash it can involve wires / tons of pins / a lot of work.
Lace curtains can be enjoyable for small windows, and actually get easier since you’re usually repeating the same thing for long periods of time.
Things that you’ll often hear if you’re looking at lace:
Angled decreases - If you look at very old lace patterns, you’ll often find that everything is a knit two together, or some variation on a three stitch decrease. While you can add in left leaning decreases where appropriate, often you’ll find the pattern looks fine with the original instructions. You can use knit to together through the back, or slip one, knit one, pass the slipped stitch over, and there’s multiple variations between knit three together, slip one, knit two together, psso, or slip two, knit one, psso. When you get up to huge decreases, you can start to run into things like knit seven together, or knit nine together. There’s multiple solutions for stitches like this. You might do slip 5, knit 4, psso, or you might do slip 9, then use a hook / dentist tool to pull the yarn through, or you might do some variant of slip a number of stitches, knit 2 together, psso.
Multiple increases - Let’s say you’re adding 4 stitches in one stitch. A common solution is to knit one in the old stitch, purl one, knit one, purl one. Some people suggest for larger increases doing knit one, yarn over, purl one so you’re not pulling the old stitch to be too huge. If you’re adding multiple yarn overs, you may find the yarn overs look floppy, large, and unpleasant on the next row. Some people knit the yarn overs twisted to pull them tighter, and other people suggest reducing the amount of yarn overs you do. So, let’s say the pattern has five yarn overs. It’s huge in your tension / yarn / whatever. You hate it. Knit a smaller number of yarn overs, and then knit one, purl one in your yarn overs to make the stitch count you need.
“True” lace - this is lace that has complicated stitches on every row. This tends to be more “open” and airy, but also tends to be more tricky. A blank row of just knitting or purling gives you time to check your stitches, check your count, and gives your lace fabric space to settle any tension issues. It can be more difficult to do that if you’re doing complex stitches every row. Here’s an example of a “true” lace doily. Here’s an example of one that has those restful rows of plain knitting that has similar “leaf” motifs, and another one with a more open design.
Estonian lace - this often has interesting wrapped stitches, pulling up stitches from other rows to make star like shapes, or nupps (basically making tiny bobbles,) but you can find these stitch techniques in other knitting. This will be difficult if you’re not used to doing the stitches, and can be hard if your tension is very tight, since, like cables, you’re twisting yarn around or dealing with a lot of stitches. While this is not Estonian lace, this doily has wrapped stitches in the center of the violets and this one has nupp like stitches. If you see this kind of texture, you want a strong yarn, and to test the stitches before you commence. The last thing you want is your yarn to snap every time you hit one of those fancy stitches.
Filet - Filet crochet / knitting is based off of netting where you’d fill or not fill in various squares in a grid. Here’s an assortment of filet patterns. Filet tends to be a little tedious if you have tension issues since having a “true” square helps a lot with making your grid look correct.
Twisted stitches - While yarn overs and angled decreases will obviously twist stitches, you can also get right twist / left twist, which are basically tiny cables. These also pop up in 1940′s style cable knitting for yarn efficient texture. In doilies, you can see this pop up for grid shapes, starting the angles of the edge of something, or for texture like wheat. These can be fiddly to do, but are doable without a cable needle. On a slippery yarn, tight tension, hard to use needles, you might find it infuriating.
A final common thing to pop up is hex mesh - Any time you see a decrease, two yarn overs, and then a decrease, you’re probably looking at a variation on hex mesh. This can get super repetitive, and there’s actually variations among various designers as to if they have the decreases angle in to the yarn overs, or out, if they just use the same decrease, etc. Here’s a very standard doily that uses hex mesh. Some people loathe hex mesh since it can be tedious and easy to lose your place. If they have tension issues with the double yarn overs, it becomes a sea of repetitive stuff to be careful doing. Other people find it super relaxing to just fill in hex mesh until you get to the edges of the pattern (this also means that mistakes in charts love to lurk in the edges of hex mesh, since people often don’t count until they get to the pattern.)
3 notes
·
View notes
Note
📜
📜 a cryptic letter
I oughta tell you now that I'm not having a stroke, but you should look up a Caesar cipher translator.
[WRITTEN NOTES MEME]
Xeiws,
Emr'x xss wyvi alex xs wec, wiimr' ew ai emr'x izir wemh lipps xs sri ersxliv cix. Almpi M'q ex mx, xlsykl- lipp-s.
Alex M ger wec mw xlex csyv tviwirgi evsyrh livi qeoiw qi vikvix pskkmrk sr e pmxxpi piww. Csyv xewxi mr qywmg mw tvixxc heqr kssh, csy ksx e liepxlc hswi sj kssh lyqsv mr ce, erh csy'vi epaecw wlevmrk wsqixlmrk rmgi xs psso ex.
Mj csy jmkyvi syx lsa xs vieh xlmw wlmx, orsa xlex M'q feh ex qeomr' jvmirhw. Csy ksxxe mrzmxi qi mrxs csyv mrfsb pmoi e zeqtmvi, ws M'pp aemx.
'Xmp xlir,
Weq
3 notes
·
View notes
Text
Scatole chiuse
Mi capita di prendere libri a scatola chiusa.
Di autori, cioè, che non conosco o conosco soltanto di nome.
In quei casi mi lascio guidare - o dorei forse dire sedurre - dall’estetica del volume, dal titolo.
Anche dal prezzo: sono più disposto a rischiare se pago poco (o nulla, quando si tratti di bookcrssing).
Perché in quel caso il rammarico per aver preso una boiata non brucia più di tanto.
Di solito, comunque, mi va abbastanza bene.
La mia audacia viene spesso premiata.
Con i film è un altro discorso.
Rispetto ai libri hanno uno svantaggio non da poco.
Non posso vederli.
Un volume lo posso anche sfogilare, volendo, prima di acquistarlo.
Ma nel caso di un DVD io devo fidarmi di quel che c’è scritto sulla custodia.
E mica sempre dice la verità.
Si spacciano boiate per capolavori.
Basta mettere le immagini più accattivanti, magari delle uniche scene degne di nota.
Senza contare che a volte il riassunto della trama è impreciso, per non dire inesatto.
Per questo ne prendo pochissimi.
A parte che preferisco da sempre i libri.
E poi riservo il mio coraggio a questioni più pressanti.
Qui il rischio è solo quello di portarsi a casa delle minchiate.
Di quelle al limite mi psso sbarazzare.
Di altre, no.
10 notes
·
View notes
Note
You mentioned being unhappy with your slip-knit-psso decreases.
I think part of why you don’t like them is it looks like you’re twisting some of your stitches when you do it, which can lead to a bit of a wobbly appearance.
It’s happening because you’re slipping it purl-wise instead of knit-wise, if you slipped the stick as of to purl, they wouldn’t twist and you might be happier with the appearance.
Oh, yeah i know now.
I posted this, because someone on the decrease video wanted to know how I do it :D
Thanks for helping anyway 😁
3 notes
·
View notes
Photo

New Post has been published on https://knittingpatern.com/fox-scarf-free-knitting-pattern/
Fox scarf- free knitting pattern
Fox scarf- free knitting pattern
The fox’s tail -Bright, fun, cute and cosy – this delightful knit from the needles of Fiona Goble will fill your evenings with exciting stitches!
Fox scarf- free knitting pattern
YOU WILL NEED
1. King Cole Magnum Chunky (75% premium acrylic, 25% wool, 100g/138m), 3 balls of Yarn A Brick (1980)
1 ball of Yarn B Black (1438)
2.King Cole Timeless Chunky (90% premium acrylic, 10% alpaca, 100g/155m), 1 ball of Yarn C Antique Cream (2911)
3. Small amounts of black and off-white DK yarn
4. A pair of 6mm needles
TENSION
14 sts and 16 rows to measure 10x10cm (4x4in) over st st using 6mm needles
MEASUREMENTS
137cm (54in)
FOX SCARF
Note Make the scarf beginning with the back of the pointed face.
Cast on 2 sts using 6mm needles and Yarn A.
Row 1 (Kfb) twice. [4 sts] Row 2 Purl.
Row 3 K1, M1, K2, M1, K1. [6 sts] Row 4 Purl.
Row 5 K1, M1, K to last st, M1, K1. [8 sts] Row 6 Purl.
Rep Rows 5 and 6, 8 times more. [24 sts] Beg with a K row, work 7 rows in st st.
Row 30 Knit.
Row 31 K3, P to last 3 sts, K3.
Rep Rows 30 and 31, 95 times more.
Rows 222 to 227 Knit.
Now knit the back legs which are separate with a space between them for the tail.
Row 228 K7, cast off 10 sts (to make a space for the tail), K to end.
Turn and work the group of 7 stitches you have just knitted only.
The remaining stitches, on the other side of the gap, stay on the
needle but you don’t work them. *Knit 11 rows.
Break Yarn A and join in Yarn B to make the black paw.
Knit 16 rows.
SHAPE PAW
Next row K1, k2tog, K1, ssk, K1. [5 sts] Next row K2tog, K1, ssk. [3 sts] Next row Sl1, k2tog, psso. [1 st] Break yarn and fasten off.
Now knit the other back paw using the 7 sts you left on the needle
so with WS of main body facing, rejoin the orange yarn to remaining
7 sts. Work from * to end.
FRONT LEG (MAKE 2)
Cast on 7 sts using 6mm needles and Yarn A.
Knit 26 rows.
Break the Yarn A and work remainder of leg in Yarn B to make the
black paw.
Knit 24 rows.
SHAPE PAW
Next row K1, k2tog, K1, ssk, K1. [5 sts] Next row K2tog, K1, ssk. [3 sts] Next row Sl1, k2tog, psso. [1 st] Break yarn and fasten off.
FACE
Cast on 2 sts using 6mm needles and Yarn A.
Row 1 Kfb twice. [4 sts] Row 2 Purl.
Row 3 K1, M1, K2, M1, K1. [6 sts] Row 4 Purl.
Row 5 K1, M1, K to last st, M1, K1. [8 sts] Row 6 Purl.
Rep Rows 5 and 6, 8 times more. [24 sts] Beg with a K row, work 7 rows in st st.
Cast off
EARS (MAKE 2)
Cast on 12 sts using 6mm needles and Yarn A.
Beg with a K row, work 2 rows in st st.
Row 3 K1, ssk, K6, k2tog, K1. [10 sts] Row 4 Purl.
Row 5 K1, ssk, K4, k2tog, K1. [8 sts] Row 6 Purl.
Row 7 K1, ssk, K2, k2tog, K1. [6 sts] Row 8 Purl.
Row 9 K1, ssk, k2tog, K1. [4 sts] Row 10 (P2tog) twice. [2 sts] Row 11 K2tog. [1 st] Row 12 Pfb. [2 sts] Row 13 (Kfb) twice. [4 sts] Row 14 Purl.
Row 15 K1, M1, K2, M1, K1. [6 sts] Row 16 Purl.
Row 17 K1, M1, K4, M1, K1. [8 sts] Row 18 Purl.
Row 19 K1, M1, K6, M1, K1. [10 sts] Row 20 Purl.
Row 21 K1, M1, K8, M1, K1. [12 sts] Beg with a purl row, work 2 rows in st st.
Cast off knitwise.
TAIL
Cast on 8 sts using 6mm needles and Yarn A.
Row 1 Kfb, K to last 2 sts, kfb, K1. [10 sts] Beg with a P row, work 3 rows in st st.
Row 5 K2, M1, K to last 2 sts, M1, K2. [12 sts] Beg with a P row, work 3 rows in st st.
Row 9 K3, M1, K to last 3 sts, M1, K3. [14 sts] Beg with a P row, work 3 rows in st st.
Row 13 K4, M1, K to last 4 sts, M1, K4. [16 sts] Beg with a P row, work 3 rows in st st.
Rep last 4 rows once more. [18 sts] Row 21 K5, M1, K to last 5 sts, M1, K5. [20 sts] Beg with a P row, work 3 rows in st st.
Rep last 4 rows once more. [22 sts] Row 29 K6, M1, K to last 6 sts, M1, K6. [24 sts] Beg with a P row, work 3 rows in st st.
Rep last 4 rows once more. [26 sts] Beg with a K row, work 6 rows in st st.
Row 43 K6, ssk, K10, k2tog, K6. [24 sts] Beg with a P row, work 3 rows in st st.
Row 47 K5, ssk, K10, k2tog, K5. [22 sts] Beg with a P row, work 3 rows in st st.
Row 51 K5, ssk, K8, k2tog, K5. [20 sts] Row 52 Purl
Break the Yarn A and join in Yarn C to make the tip of the tail.
Row 53 Knit.
Row 54 Purl.
Row 55 K4, ssk, K8, k2tog, K4. [18 sts] Beg with a P row, work 3 rows in st st.
Row 59 K4, ssk, K6, k2tog, K4. [16 sts] Row 60 Purl.
Row 61 K3, ssk, K6, k2tog, K3. [14 sts] Row 62 Purl.
Row 63 K3, ssk, K4, k2tog, K3. [12 sts] Row 64 Purl.
Row 65 K2, ssk, K4, k2tog, K2. [10 sts] Row 66 Purl.
Row 67 K1, (ssk) twice, (k2tog) twice, K1. [6 sts] Row 68 P2tog, P2, p2tog. [4 sts] Break yarn, thread it through rem sts, and pull up securely.
MAKING UP
EMBROIDER EYES
On the face, using black DK yarn, work two small coils of black
chain stitch for the centers of the eyes. Using off-white DK yarn,
work a circle of chain stitch around the eye centers.
EMBROIDER THE NOSE AND LASHES Using black DK
yarn, work a coil of chain stitch for the nose. Using the same yarn,
work three straight stitches above each eye for the lashes.
ADD THE HEAD
Place the face on the head part of the main scarf so that the right sides are together. Oversew the side seams. Turn the head the right way out and sew the top edge in place using flat stitch.
BACK LEGS
Sew the seam of the black part of the back legs using flat stitch. Continue 2cm into the orange part of the leg
ADD THE FRONT LEGS
As for back legs, sew the sides of the black part of the front legs together using flat stitch, continuing 5cm into the orange part of the leg. Oversew the front legs in place underneath the head, where the head meets the main part of the scarf.
ADD THE EARS
Fold the ears so that the right side of the front and back pieces are together and oversew the two sides. Turn the right way out and oversew the lower edges. Oversew the ears in place.
ADD THE TAIL
Sew the back seam of the tail using flat stitch and matching yarns. Oversew the tail in place in the center of the fox’s lower end, just where the garter stitch border meets the main part of the scarf.
Weave in all loose ends.
2 notes
·
View notes
Photo

“HO CHIESTO A BERLUSCONI DI CANDIDARMI. HO TANTI VOTI ALL’ESTERO. NEL 2018 MI HANNO PUGNALATO ALLE SPALLE” – A "LA ZANZARA" L’EX SENATORE DI FORZA ITALIA ANTONIO RAZZI SI SCATENA: “PER BERLUSCONI HO FATTO DI TUTTO, HO AVUTO ANCHE LA SCORTA PER UN ANNO. ORA SILVIO MERITA DI DIVENTARE PRESIDENTE DEL SENATO DA DOVE LO HANNO CACCIATO” - “UCRAINA? CI ANDREI DOMANI A RISOLVERE LE COSE, ZELENSKY NON CAPISCE NIENTE”
“Vitalizio? Hanno tutti sete di vitalizio avete visto? Non c’ero solo io…Viste come sono andate le cose, come è andata a finire questa legislatura, io in Parlamento ci psso stare benissimo”. Così Antonio Razzi, ex senatore di Forza Italia, alla Zanzara su Radio 24. “Gli italiani all’estero – dice Razzi – mi adorano e sono l’unico che li può rappresentare vista l’esperienza di vita che ho. Mi conoscono in milioni e posso portare voti. ”.
“Ho mandato un messaggio sia a Tajani che alla Ronzulli – racconta – e vediamo che succede nel 2018 mi sono vergognato per quello che è successo. Io per Berlusconi ho fatto tanto, dopo la fiducia del 2010 ho avuto la scorta per le minacce di morte. Non ho ancora capito perché sono stato scartato.
E adesso Berlusconi merita di diventare presidente del Senato da dove lo hanno cacciato”. “In questi anni – dice ancora – sono diventato molto popolare, mi fermano per strada per fare centinaia di selfie. Io posso andare tranquillamente in Ucraina a risolvere le cose. Questo Zelensky non capisce nulla, non capisce nu cazz, mi ha messo nella black list io che sono una persona docile, ma io sono sicuro di risolvere le cose. Antonio Razzi is back, tanti italiani mi adorano, si vede per strada. Tanti politici non vanno in strada perchè hanno paura della gente”
2 notes
·
View notes
Text
[SPECIAL ISSUE] Communism contracted in Singapore? NATO Engaged to take Action?
The Straits Times
Following the uprising of The Communist Party in Thailand, ASEAN has been shaken by the hit, and the South East Asian countries have all heightened their concerns regarding communist ideals within their borders. Notably, Singapore has been facing these problems with greater force, noting their recent Independence on 9 August 1965 as they broke off from Malaya. Recent sources have found that triads like the Ang Soon Tong have been conferred with communist propaganda and even started spreading anti-democratic ideals in a period fraught with political uncertainty as the Cabinet of Singapore goes through its third reshuffle.
More and more posters regarding propaganda around the locales like Rochore, Siglap and Crawford have been found, and it is alleged that this were the works of communist sympathisers in Singapore, an issue that has been closely monitored by the Singapore Government under the Preservation of Public Service Security Ordinance (PSSO), which was praised by Western countries on the international stage
With NATO being criticised for their performance regarding a similar issue in Thailand, they are once again being called on to address this situation with regards to the ongoing procedures in Singapore. Will NATO just keep this issue on the periphery of their policy or will they take decisive action? Only time will tell.
0 notes
Text
Eu não era assim. Eu não era fria, praticamente alérgica a qualquer abraço, beijos ou coisas assim. Simples assim, eu sou quase incapaz de sentir amor romântico, sentimentos românticos reais e confiar na palavra “eu te amo”. Não consigo nem dizer, ironicamente ou não. Tô fechada. Completamente e protetiva em relação as coisas que eu ainda gosto e sem amigos. Porém, as pessoas que se intitulam ‘meus amigos’ deixam claro que eu sou doce, fraca, burra e que qualquer um poderia me enganar. Mas eu sei que tô longe de ser essa garota que eu costumava ser e mesmo assim eu não era essa pessoa do passado. Era uma máscara, uma coisa idiota que eu costumava fazer pra não deixar ninguém desconfortável. Uma coisa que eu tinha assustava as pessoas, talvez sejam o tamanho dos meus olhos, grandes e secos que eu não psso controlar. Ou talvez seja meu rosto inteiro, masculino e feminino ao mesmo tempo.
Isso ativou a urgência de ser suave, ingênua e um alarme para não machucar ninguém. Prioridades seriam todos, menos eu. Mas só machucava a mim mesma no processo. Claro, a minha natureza me tomava algumas vezes, eu tinha ódio sobre tudo e nada ao mesmo tempo. Era ódio, melancolia e alguma coisa que eu não consigo lembrar. Eu queria ser tocada, amar e ser amada na mesma intensidade. Olhar e ser olhada com a exata devoção que o Elio olha pro Oliver em call me by your name enquanto os dois estão bêbados de amor e outras substâncias. Sem a sensação de que provavelmente era tudo mentira ou uma piada estranha. Uma coisa engraçada pra me pegar. Testar se eu seria tão ingênua o suficiente.
E eu desperdicei tantos dias, minha juventude, meu mid 20’s minha capacidade de sentir pra que? Eu ainda sou jovem, mas não sou capaz de amar romanticamente. Emocionalmente falida e no fundo desejando segurança. Não consigo confiar em ninguém, continuo escapando de encontros, ainda gosto de flertar, de prometer tudo e não cumprir nada. Similar ao que fizeram comigo, é a única coisa que me faz sentir algo. Aquele arrepio que passa na pele, saber que uma garota me quer, sair rua afora comigo, ver as coisas através dos meus olhos e derreter a pele dela na minha.
E semanas depois, desaparecer.
Sério, só acho que fui magoada muitas vezes e me acostumei com a ideia de quase me apaixonar por uma pessoa nova. E eu era boa nisso. Mas tô cansada e entediada demais pra ser honesta.
1 note
·
View note
Note
sobre o sohee fazendo o bumbum do eunseok de travesseiro: ele fez isso no npop sunny, o programa que eles participaram antes ou depois de debutar, n me recordo. mas, tá aqui o link certinho: https://youtu.be/JIqBPrD5frA?si=7w6U8LcuyaTK3o-a
e a minutagem é: 9:48 (uns minutos antes) mandei o link porque eles fizeram outros conteúdos no programa (nem sei se psso chamar assim) e talvez você não conseguisse achar, porém, sohee, a bundinha do eunseok tá aprovada como travesseiro?
ACABEI DE VER
nonie que tristeza, o sohee é muito pitico mds...
nos diga, sohee, aprovada ou não?
0 notes
Last Seen Blogs

a-little-seoul-searching
Travel With Me: The Seoul Edition

eat-pray-lie
IUGH

torshiztourism-blog
TorshizTourism

clim98
Sem título

fishiesforcompliments
plenty of fish