#proper fitting of PPE
Explore tagged Tumblr posts
Text
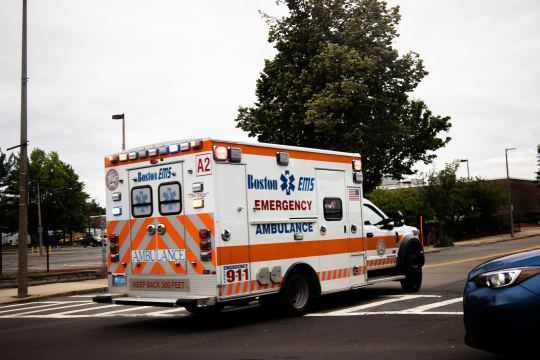
How does one ensure proper infection control practices in emergency medical services?
Infection control is a critical aspect of providing safe and effective care in the field of emergency medical services (EMS). EMS professionals encounter various infectious diseases and must take proactive measures to prevent the spread of infections to patients, themselves, and the community. This article will discuss essential steps and strategies to ensure proper infection control practices in…
View On WordPress
#biohazardous waste#cleaning#communication#cough etiquette#disease control and prevention#disinfectants#disinfection#education#emergency medical services#hand hygiene#hand sanitizers#infection control#infectious diseases#personal protective equipment#PPE#proper fitting of PPE#public health agencies#reporting#respiratory hygiene#training#vaccinations#vaccine-preventable diseases
0 notes
Text
Also preserved in our archive
By Julia Doubleday
For many disabled and immunocompromised people, hospital settings are a significant threat to health and safety. Since the beginning of the COVID-19 pandemic, nosocomial- or healthcare acquired- SARS-COV-2 infections have been an additional risk for sick and vulnerable people seeking care. As of today, there have still been no updates to national-level guidance to reflect that SARS-COV-2 was determined to be airborne in 2021.
In 2020, such a risk was to be expected; hospitals were overwhelmed with patients, PPE was in short supply, proper isolation wasn’t always possible, and public health guidance about transmission was confusing and, it turns out, incorrect. Early on, the WHO confidently and wrongly asserted that COVID was not airborne; this decision led national health bodies to advise against full airborne precautions in healthcare.
But in the nearly five years since, one might assume that any patient visiting their local hospital could reasonably expect safety from infection with COVID-19. After all, we’ve had five years to study transmission, update guidelines, redesign infrastructure, upgrade ventilation, purchase PPE and train staff, right?
As a matter of fact, the CDC has yet to even issue updated infection control recommendations, much less have we seen implementation. The CDC did ask their infection control advisory body, HICPAC, to update the Guideline to Prevent Transmission of Pathogens in Healthcare Settings, last reviewed and updated in 2007. But when HICPAC submitted a first draft of the updated guidelines in November 2023, it was over loud public objections registering that draft’s inadequacy to control airborne infections.
Now, HICPAC is continuing to insist that surgical-style masks are equivalent to N-95 respirators as it pushes forward with its draft guidelines. This decision is emblematic of its commitment to preserving ineffective droplet-based infection control in spite of new information and evidence. While bizarre from a purely scientific standpoint, it makes more sense from a cultural, political and economic point of view.
I’ve written at length about the political and economic factors that led the WHO to immediately claim that COVID wasn’t airborne without the scientific evidence to do so in Spring 2020. Perhaps just as irresponsible as their early decision to spread this misinformation has been their subsequent reluctance to correct their mistake as loudly as they first made it, and ongoing refusal to unequivocally recommend airborne precautions in the years since.
This year, the WHO released a document that rescinded the previous distinction between “droplet” and “airborne” transmission of viruses. This represents progress, as new data showed that no viruses actually transmit solely via “droplets”- i.e., only via sneezes and coughs.
The evolution of the science was tracked beautifully in this Wired article. It’s astonishing that we had such basic science so wrong, for so long. But it’s critical to note that for decades, there was a large financial incentive against looking too closely at the claim that flus, colds, and other common viral and bacterial infections were being spread only via large “droplets.”
“Droplet” precautions are relatively cheap and easy compared to the more complex and expensive requirements of controlling fully airborne infections. If a virus spreads through coughs and sneezes, how do you prevent transmission? Well, we all remember early pandemic guidance. Loose fitting surgical masks, social distancing and keeping diners (or patients) six feet apart, putting up physical barriers to protect from spit, and simply washing hands and covering coughs and sneezes are all examples of droplet-based infection control measures.
But airborne spread is far more difficult to control. Now we’re talking about viruses spreading well beyond six feet, well beyond the radius of a single cough or sneeze. We’re talking about the virus spreading, not just via coughs and sneezes, but via the simple act of exhaling. And not only that, but because airborne particles are so light, they don’t quickly fall to the ground the way droplets do; instead, they can hang in the air, much like smoke. So now, a waiting room or crowded examining area full of patients with flus, colds and COVID suddenly represents a much more complicated and expensive infection control problem for a hospital.
Proper airborne infection control procedures are expensive, but they are not mysterious. Some changes would be relatively simple; masking with proper respirator-style masks, rather than surgical, is an obvious, necessary upgrade. New ventilation and filtration standards are a simple fix technologically, but require investment. Tools like Far UVC are exciting and could mean drastic leaps forward in both patient outcomes and occupational safety for HCW.
Most likely, in order to save money long term and make airborne infection control sustainable, hospitals themselves would be constructed with airborne infection control, patient isolation, airflow, ventilation, etc. as major priorities in the process of designing the infrastructure.
Airborne infection control would require, rather than tinkering at the edges of existing practices, a top-down rethinking of hospital protocols. How are patients being screened upon entry into the hospital? How can COVID, flu, RSV, etc. positive patients be protected from one another in a waiting room? Why are so many hospitals designed without windows in patient care areas?
Are you beginning to see how the economic incentives align against admitting the need for airborne infection control?
Let’s return to the WHO’s document, the one that rescinded the distinction between airborne and droplet spread. Instead, all viruses which spread through the air are now referred to as “infectious respiratory particles” or IRPs. The document encourages moving “beyond the dichotomy of previous terms known as ‘aerosols’ (generally smaller particles) and ‘droplets’ (generally larger particles).”
But problems arise when the WHO attempts to apply what we’ve learned practically- or rather, doesn’t attempt to apply it. Here, it balks at what would be a massive undertaking. As I reported previously, back in 2020, the WHO had been quick to claim:
“Would there be evidence of significant spread of SARS-CoV-2 as an airborne pathogen outside of the context of AGPs [aerosol-generating procedures], WHO would immediately revise its guidance and extend the recommendation of airborne precautions accordingly”
But in 2024, the WHO, now well aware that SARS-COV-2 is a fully airborne pathogen, adopts a new approach to infection control. It’s one totally unprecedented for any other pathogen in healthcare. They advise:
There is NO suggestion from this consultative process that to mitigate the risk of short-range airborne transmission full ‘airborne precautions’… should be used in all settings, for all pathogens, and by persons with any infection and disease risk levels where this mode of transmission is known or suspected. But conversely, some situations will require ‘airborne precautions’. This would clearly be inappropriate within a risk-based infection prevention approach where the balance of risks, including disease incidence, severity, individual and population immunity and many other factors, need to be considered, inclusive of legal, logistic, operational and financial consequences that have global implications regarding equity and access.
In other words, we shouldn’t always try to control airborne disease. That would be so hard and annoying! The document then goes to state that “risks” have to be balanced and goes on to list a bunch of factors that are never considered when it comes to the spread of other pathogens in healthcare.
When it comes to the spread of norovirus in healthcare, do doctors weigh whether to wash their hands, based on the local levels of diarrhea? When it comes to the spread of bacterial wound infections, do doctors clean surfaces based on how deadly they think the wound will be? I mean, if it’s not going to kill you, why bother, right? When it comes to bloodborne illnesses like HIV, do doctors no longer test for it because it’s now a treatable disease, no longer a death sentence?
Or, when you apply this logic to any other type of infection, is it clear that this is an absurd attempt to continue evading liability for nosocomial airborne infections in healthcare, including SARS-COV-2? People should not be infected with diseases in hospitals. Period. Regardless of disease severity. Of course, SARS-COV-2 is also incredibly severe for hospitalized patients; in Australia, nearly 1 in 10 patients who caught COVID in hospitals in 2022 and 2023 died. And these events are far from rare. Of 206 patients admitted for strokes in a hospital in Japan, 44 were infected with COVID-19. 6 of them - or 13% - died. Globally, we see the same thing over and over again: lack of airborne infection control, high rates of nosocomial infections, high rates of patient death.
The WHO chose to incorporate “balance of risks”, “disease severity”, “immunity,” and the rest of its laundry list of “factors”, not because it expects infection control bodies to do serious risk assessments, but in order to provide cover for them not to do any such thing. Universal airborne infection control would be expensive and disruptive so the WHO simply gives disease control bodies a series of “outs”.
This is the international backdrop against which the US has also been updating infection control guidance. The CDC, like other national public health bodies, does not directly report to the WHO; the WHO does not have enforcement power over the CDC. However, guidance from the WHO is taken seriously at the CDC, and experts at the CDC also influence the WHO.
The WHO’s document constructs a mile-wide loophole for HICPAC to drive through. Although HICPAC provides no evidence whatsoever that the characteristics of SARS-COV-2 (or flu, or RSV for that matter) would justify dropping airborne precautions, the language in the WHO document exists to justify dropping them in the face of the ongoing, global pandemic. Despite SARS-COV-2 being a systemic, multi-organ disease with the potential to cause long-term disability, and highly fatal when contracted by vulnerable patients, culturally and politically, we are treating it like a cold. HICPAC members are not making scientific decisions, but political ones.
The science on disease transmission has advanced tremendously since 2020. In a world that actually wanted to implement what we’ve learned from COVID, this would mean dramatically safer care for patients and healthier workplaces for HCWs. Instead, HICPAC does the opposite, working to ignore the advancements in scientific knowledge and fighting to keep infection control as similar as possible to the outdated droplet model of the pre-pandemic era.
For example, they advise that N95 respirators should be worn for “new and emerging pathogens,” but make an irrational distinction between these and other viruses that are already in circulation. You know, the ones that are actually, currently infecting patients. “Emerging/new” isn’t a type of transmission, so shouldn’t denote a type of infection control.
Even the CDC balked at HICPAC’s initial draft, sending it back with pointed questions about this bizarre distinction and other inadequate protections. It asked for clarification, stating:
Another issue relevant to preventing transmission through air is to make sure that a draft set of recommendations cannot be misread to suggest equivalency between facemasks and NIOSH Approved respirators, which is not scientifically correct nor the intent of the draft language. Although masks can provide some level of filtration, the level of filtration is not comparable to NIOSH Approved respirators.
Why would HICPAC equate surgical masks with respirators? HICPAC’s draft was not designed to protect patients; it was designed to protect the status quo and allow hospitals to continue to infect patients with COVID and other airborne diseases. It’s likely that the CDC’s decision to push back on this claim was influenced by the massive outpouring of public outrage at the draft, which was seen in both the public comments submitted and read at HICPAC’s meetings.
Additionally, both OSHA, the Occupational Safety and Health Administration, and NIOSH, the National Institute for Occupational Safety and Health, agree with both the CDC and patients that surgical masks are not sufficient protection. N95s are required to control airborne infections.
However, despite months of pushback, the tears of suffering and scared patients, the word of the experts who design respirators, as well as the input of occupational safety leaders, HICPAC remains unmoved on the subject.
In a series of votes held last month, HICPAC stuck to their guns. Lisa Baum of the New York State Nurses’ Association was the sole dissenting member of the committee, as reported by Judy Stone of Forbes. She not only voted against the anti-science equating of surgical and N95 masks, but also against allowing COVID positive staff to return to work 3 days after a positive test. The 3-day time frame has absolutely no scientific basis, and return to work should be based on negative tests, not on an arbitrary time window or symptoms. Since a quarter of all COVID cases are asymptomatic, staff should also be asymptomatically screened; they aren’t because hospitals don’t want staff taking time off. Again, these are economic, not scientific, decisions.
Putting these two votes together, HICPAC has voted to allow sick, infectious, COVID+ staff to go to work without proper PPE and infect fellow HCW and patients, in hospitals without proper ventilation and filtration. Patients who are infected in hospitals using outdated droplet precautions will have a 10% risk of death. Coworkers- even if fully vaccinated- will have a significant risk of developing a long-term health condition following their acute infection.
At a time when hospitals remain crushed by the ongoing burden of both COVID and post-COVID health problems, failing to protect workers is a particularly short-sighted decision. Studies have already shown that HCWs suffer unusually high rates of Long COVID, with a recent one in the UK finding a whopping 33.6% reporting symptoms, and 7.4% of respondents reporting an official diagnosis.
These decisions not only mean infected doctors and nurses returning to work actively ill; they also mean that hospitals will continue to reinforce false information about how COVID spreads, purposely miseducating doctors and nurses in their employ to save money.
The members of HICPAC understand that surgical masks aren’t really the equivalent of N95s, they simply believe HCWs are more likely to wear surgicals (they’ve explicitly stated such; this is not, incidentally, how infection control decisions should be made). But this reasoning is not shared with patient-care level HCWs. Instead, HCWs are told that surgical masks are a sufficient infection control measure for COVID-19 when infectious. When an informed patient seeking care tries to correct them, they are greeted with condescension; after all, the doctor’s information comes directly from the CDC.
Disabled and immunocompromised people relate stories of medical professionals who believe COVID spreads via droplets, who wear surgical masks instead of N95s, who draw curtains to prevent the spread of COVID and other viruses; in other words, they are continuing to adhere to outdated precautions. This is unsurprising, because they have never received accurate guidance reflecting our updated technical knowledge about how SARS-COV-2 and other common viruses actually spread.
They’ve never received updated information because the medical system does not want to spend money to protect workers or patients.
At the end of the day, this story is not about droplets and airborne particles as much as it is about dollars and cents. What sounds like an in-the-weeds scientific debate, is no more than a common tale of industry greed. We know- and have known- exactly what it would take to protect patients in healthcare settings. Instead, our leaders sit back and watch as day after day, more unnecessary infections and deaths accumulate. As day after day, more healthcare workers acquire illnesses at work which lead to staff shortages, worse patient outcomes, long-term departures, and the loss of talented, highly trained people from the field.
All of us, patients, doctors, nurses, and other healthcare staff alike, deserve medical leadership that will value our rights to safety in these settings. We deserve medical leadership that won’t actively try to slow scientific progress, and instead will welcome its arrival. We deserve to enter a hospital knowing we won’t be infected and killed because HICPAC would rather allow airborne nosocomial infections to continue on its watch than spend money preventing them.
Right now, the biggest factor protecting hospitals as their negligence rolls on into year five is the ignorance of the public. Most people have no idea how COVID and other viruses spread, have no idea that it’s so dangerous to contract COVID as a vulnerable patient (thanks to years of normalizing propaganda), and may themselves believe that social distancing or curtains prevent infections. This public ignorance is a deliberate tool which enables continued public health negligence on multiple fronts. Continuing to educate ourselves and each other is resistance when the state relies on ignorance to tamp down resistance to policies of mass infection and death.
#mask up#public health#wear a mask#pandemic#wear a respirator#covid#covid 19#still coviding#coronavirus#sars cov 2
43 notes
·
View notes
Note
hi! I have a question about hairstyles and which are the most practical when likely to get dirty often (for context, i'm currently in early drafting stages of a story where the main cast are experiencing lots of mud, goo, etc, every other week, in a roughly modern urban fantasy setting)
I'm planning on having a researcher character in the main cast who is Black, and, due to the aforementioned goop, needs to clean that off their hair regularly.
It looks like the styles that would allow this best are twist outs (possibly more chunky ones), which i'm leaning towards as a choice, or an afro? considering the regularity and time needed for upkeep those seem the most practical, and not too costly (which would fit the character)
would these make sense? thank you and have a great day
Ehh on the twist outs. Twists are easy enough to do, so you could very well just do them every two days if you want. But having to wash your hair every day would kind of defeat the purpose of a twist-out (they're two different things!) imo 😅 it's going to become an afro. But if that's what they want!
Also, you could avoid all of this by having proper PPE to cover their hair. They wouldn't have to redo it in any style if there was a cap large and flexible enough to fit over their style. This is fiction, I'm sure you can come up with something.
40 notes
·
View notes
Text

Break down of my melon soda float prop for my Sailor Jupiter Bunny Suit build. You could easily tweak this for any other drink prop and the majority of materials were sourced from Daiso, including the tray it velcros to so it's fairly low budget.

Materials:
-Desired cup/glass for drink (I would advise sticking with plastic versions for weight and safety reasons) -Plastic ice cubes -Masking or Washi tape -Clear seed beads or Caviar beads in multiple sizes -Clear craft glue -Super glue -UV Resin & alcohol dye OR Stain Glass window paint (Gallery Glass would be my rec) - Some sort of thin, clear plastic sheeting I used part of a salad container -*Muddle spoons or straw or similar decor (polymer clay sprinkles, glitter, any sort of inclusion) -*Foam clay & an ice cream mold or scoop if you want to make a float -*Acrylic paint -*Velcro or Magnets if you would like to stick to a prop tray that you can also remove for photos
*= optional materials
‼️ SAFETY ADVISORY ‼️
If you choose to use UV resin for this you must have proper PPE. That means gloves, respirator with appropriate filters, mixing cups, well filtered workspace, and knowing how to properly dispose of scrap. Do not pour it down drains, please cure all runoff or extra fully before disposing of in household waste. Resin that is still in it's liquid state must be disposed of in chemical waste, this includes paper towels or anything else used to "clean up". You can take a moment to read more here or do your own googling for proper precautions before getting started.

The first thing I did was make my ice cream scoop since it needed to cure for a few days. I found this great little scoop mold I shaped the foam clay too and froze for a bit. Once it was firm enough to remove I set it by a window to dry. Then worked on making a clear plastic base that would fit inside my glass and act as the "top" of my "liquid".


When the base was done and fit snugly to my glass I primed my dry ice cream scoop in glue. This was partly to keep a barrier over the blue foam so the color didn't leach, and partly to give the acrylic paint something to bite into without being absorbed by the foam. Then it was painted a nice shade of vanilla and glued to the plastic base with craft glue. I poked two holes on the underside to also add a pair of short metal flat head wire supports to make sure it didn't peel off. The supports themselves were set with super glue, a bit overkill I know.

Between my paint layers drying I was also puzzle piecing in ice cubes in the glass to see what combination looked the most appealing. However, it also needed to accommodate that clear plastic base so there was constant test fittings. The trick here with fit is you want the cubes to fit snug vertically but not touching the sides of the cup too. You need that wiggle room for the UV resin/window paint. If it rattles around on the sides a bit that would be ideal.

When I found a composition that worked I carefully super glued each cube only where it touched the other cubes. Sometimes superglue oxidizes a little funny on clear surfaces and it can leave a sort of foggy buildup. In those instances you can wipe it away with an alcohol swab to keep things looking clear. As with the step before I keep checking the fit to the glass to make sure I have proper clearance to keep the base level.


When my cubes were one weird unit the fun began! I mixed some different sized clear seed beads (you can also use caviar beads) in some clear pva glue. You want a more dry mixture so it helps to let it set up a bit and get sort of gummy. The idea is replicating how bubbles accumulate in carbonated drinks, so keeping it at points where you would imagine they would get trapped under cubes helps. Of course so does referencing an actual drink lol. I just piled on and semi sculpted the beads in chunks and waited for them to cure.


Of course this same bubble detail was added to the clear base under the ice cream scoop as well. This time just around the perimeter of the scoop. At this point I realized I was forgetting something, the cherry! It is actually an earring I lose the pair to lol. I also cut out a small slot in the plastic base to fit a straw through. On the right you can see how everything looks at this last and final test fit before the "soda" portion was added. The washi tape was used to keep the inner lip clean of UV resin later, but also to mark where my base should be resting.

Putting the cubes and top layer to the side I got to mixing my UV resin. As a point of reference I used just under 1 jumbo tube of the Daiso clear resin which is around 20g or .70oz of product. I mixed some liquid pigment to the shade of green I wanted and got to pouring. Keeping the tape on I poured all of my resin in and kept turning my glass for even coverage. Once that was good to go I sat outside for about 5 minutes slowly turning the glass in direct sun until the resin set enough to stop moving. At this point the washi tape was peeled off. Then I left in on my porch to finish curing in the sun until the following day. The cup will get warm to hot depending on the volume of UV resin so please be mindful. If you were to use window paint I would build up the color over a few days in thin coats and like a silicone brush. When the cup was fully cured I fit my cubes back in and the clear base, and added the straw to the little divot to make sure it all fit well. It did so I went ahead and removed the straw and added some super glue to the top most cube that laid flush against that little sheet of plastic and pressed the ice cream scoop on the base firmly into place. Once it was in I slipped the straw through the divot on the side and mixed a little more green resin that was poured around the ice cream scoop to seal it all in. Then it was once again left on my porch for a full day. If you were doing this in window paint a thick layer on top and texture it to look more like a drink. Though do to it's want to self level there may be some mild resistance until it starts to set up. When my prop was fully cured I added some velcro to the base so it would stick to my drink tray and be peeled off for photos not pictured lmao. Badda bing badda boom it was done!


Lightweight, fun to make, and fairly low budget this is a prop you could make with things from most dollar stores not just Daiso. Personally I think the dollar tree two part acrylic champagne flutes would be perfect for this.
#my cosplay#Cosplay WIP#cosplay prop#prop drink#fake food#melon soda#melon soda float#Bunny Suit#I have been trying to get the explanation for this together since last July/August so lmao here we are
27 notes
·
View notes
Text
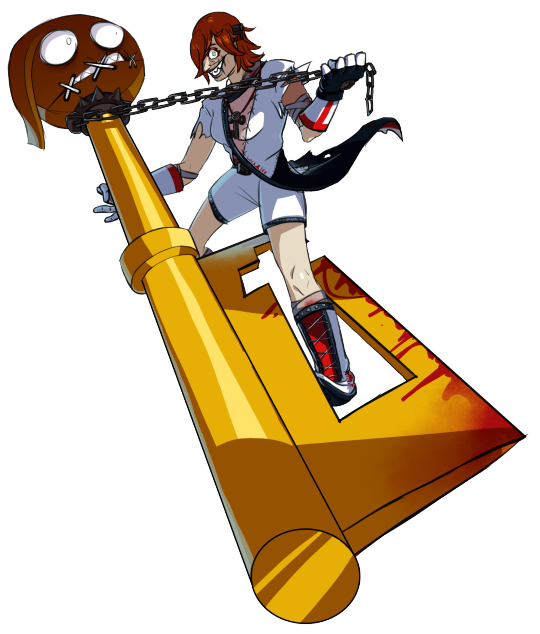
UNCHAINED SANGUINEOUS HEARTMAKER {Guilty Gear}
Riding the high of a resounding Epiphany.
...Did I pull another "Desdinova" purely out of sheer A.B.A hopium? (I kept the lines sketchy, though, because I could not be arsed to try and mimic Strive's linework style again after the pain from last time ahjsdgajhsdgadk)
Yes. Yes I did.
So, those Season 3 character survey results, huh? The A.B.A hopium is real. I really do wonder what they'd do with her if she was brought to Strive, so I decided to try my hand at a "Strive-ified" A.B.A design.
Make sure to check under the cut for the "concept art" I made + their associated information.
So, design background info:
So, she's a... weirdo homunculus, right? An artificial human, created by a mad scientist she never met, so she was alone and never really learned how to... "people". That key in her head also keeps on reminding me of the bolts lodged in the sides of pop-culture-ified Adam's (Frankenstein's monster) head. She's also desperately trying to find a human(oid) body for the demon/magical foci Paracelsus/Flament Nagel, who she is deeply in love with. Artificially-created human, medical themes, artificial human form, deeply in love...
So what if she decided that, with her attempts at finding a body for him repeatedly failing (XX endings don't count, XX's canonicity is completely FUCKED lmao), why doesn't she just... create one herself instead?
In other words, the creation becomes the creator. Lil' bit of "Bride of Frankenstein" thrown in, if the guy making the bride (or in this case, groom) was the monster itself.
So, making her into a key-axe-wielding mad scientist homunculus.
I tried to make her pose reminiscent of a dance move, specifically a "dip".
I hope you like it!
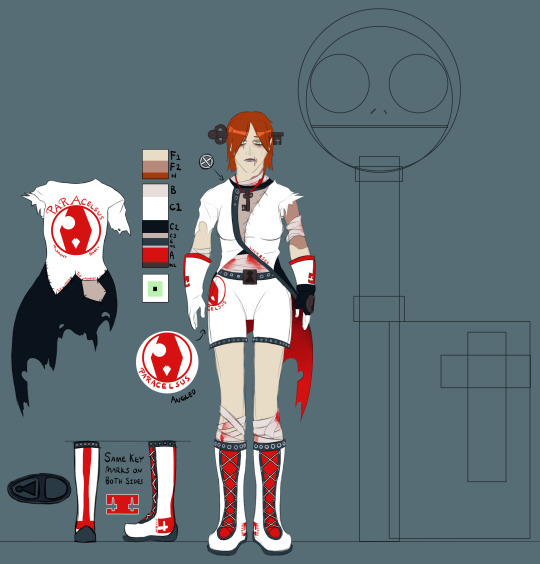
GG ABA Strive fandesign sheet 01
The first drawing I got done of my design for A.B.A (featuring a base-shapes Paracelsus for scale). Featuring her color palette (F1 is base flesh, F2 is scarring, H is hair, B is bandages, C1 is primary coat color, C2 is secondary coat color, C3 is tertiary coat color, E is "edges", M1 is one of the metal colors, A is "accents", M2 is the second metal color, and the square below that is the eye colors), weird ragged patchwork "lab-coat", boot details, "branding", and some of the text on her design.
- The phrase printed along the front edge of her coat (and the heels of her boots) is "LOCK&SEE" (the "&" stylized to look like/replaced with a keyhole symbol), a spin on the phrase "Lock and Key", fitting with her obsession with keys and tendency towards twisting sayings/phrases into mondegreens. Also implies hiding something.
- The brand on the back of her coat is meant to look like the coffin shape on the back of Paracelsus's head during Moroha Mode, with the nose hole and right eye hole visible. Text above it reads "PARACELSUS" (with the P and R stylized to have curved horns in the back like MM Para), and the text underneath reads "FLAMENT NAGEL" (with similar "horn" stylization on the F).
- The scarring is damage from her not wearing proper protective gear during her experiments (because she doesn't seem like one to wear proper PPE lmao), much of it taking up most of the left side of her upper torso/arm (meant to mirror Strive Faust's stitching).
- She's both grimy and very... "DIY", so her stitching is very hodgepodge.
- The text along the stitching on the back of her coat reads "The More The Moodier.", a play on one of her mondegreen win-quotes in XX (against I-No: "People say "the more the gloomier", but she's just too much to take...") but with the same alliteration as "the more the merrier" which it was derived from.
- The brand on the right side of her shorts is the same as on her back, but without the "FLAMENT NAGEL" and with "PARACELSUS" underneath instead of above.
- The key markings (gloves, boots) all have the same key-blade shape as Paracelsus.
- I had some trouble figuring out some of her colors, as they differed between the sprites (blue metal, glove. and trim) and official artwork (dark brown metal + glove, blue trim), so I decided to have dark brown for the keys and dark blue for the studded trim and left glove.
- The laces of her boots and the buttons on her coat are meant to resemble Para's mouth stitches
- Made her head-key/neck keys have a little skull decoration similar to some of her XX art (it's very inconsistent).
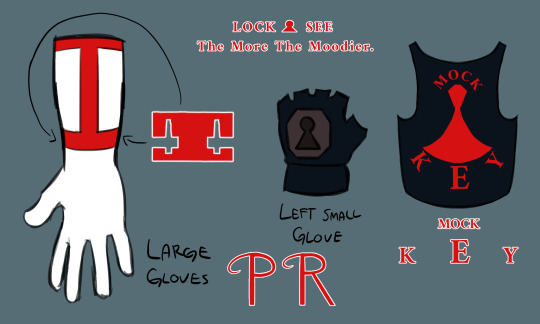
GG ABA Strive fandesign sheet 02
The second "Strive-ified" A.B.A design sheet I made.
- Both of the large gloves look the same, with the red bands and Paracelsus-blade key markings.
- The dark blue left-hand glove is (mostly) the same. I like to think that it's her "woobie", what with her tendency to get attached to inanimate objects.
- The dark blue cropped tank-top is meant to only be visible in Moroha. The text reads "MOCK&KEY" (the "&" stylized to look like/replaced with a stylized keyhole symbol, the top part of the keyhole meant to look like a coffin), another spin on "Lock and Key" like the previously-mentioned "LOCK&SEE" compounded with her believing herself to be superior to humans. Moroha is what was locked-up.
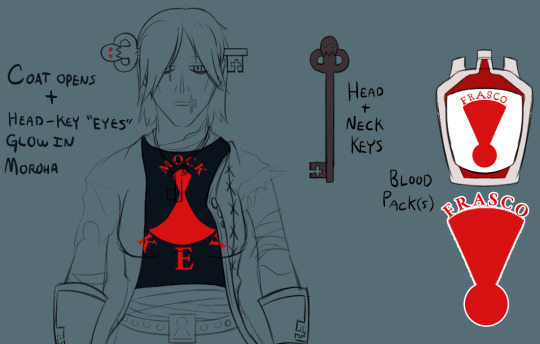
GG ABA Strive fandesign sheet 03
Third sheet I made.
- Noting specific design changes during Moroha. Coat opens + key "eyes" gain red glow.
- Design for her head + neck keys.
- Design for her bloodpacks. Text reads "FRASCO". Symbol underneath meant to look like a "flask" shape made out of an upside-down keyhole.
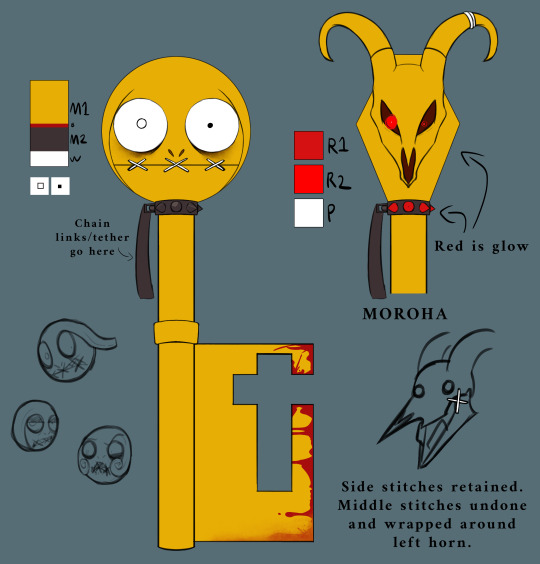
GG ABA Strive fandesign sheet 04 (Para)
The fourth sheet I made, featuring Paracelsus and his colors.
I honestly didn't change much lmao. His design is already weird by GG standards, mostly just tweaked some things.
- Made his eyes asymmetrical. Right has small iris and no pupil, left has beady pupil. Wanted to make him look "cartoony (western) neurotic/nervous" while hinting at his "main" glowy eye in Moroha being his right eye.
- I blurred/smudged the blood along the bottom edge to imply that A.B.A dragging him around wore away some of it.
- I added some spikes to his collar for a "punk" look, which glow red in Moroha.
- I kept his mouth stitches in Moroha. The mouth-corner stitches remain, while the middle stitches are tied around his left horn.
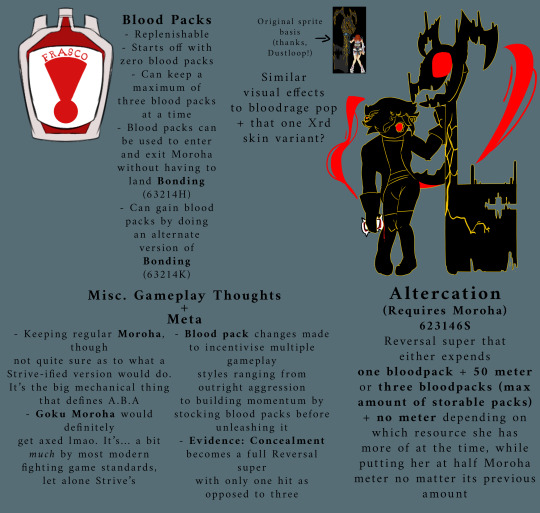
GG ABA Strive fandesign sheet 05
The final sheet I made, featuring mechanic ideas, "meta" stuff, and a design for repurposing an older move into a reversal super.
- Non-replenishable resources don't really fly in Strive, so I decided to make them replenishable through an alternate version of Bonding (a.k.a Keygrab). One Keygrab variant for Moroha, one Keygrab variant for a bloodpack. Starts off with no bloodpacks. Max three bloodpacks at a time. Functionality basically the same as XX.
- Turned Altercation (i.e. Enter Goku Moroha) into a Moroha-exclusive reversal super. Goku Moroha is not something that flies by modern fighting game characters, let alone Strive, so GM would definitely get axed. Still keeping Altercation as an absolute weirdo of a move, taking different resources depending on how much she has of each.
- Not sure what to actually do with Moroha's function/moveset, but having an "Install" state is the big thing that defines A.B.A's playstyle, so she'd probably keep at least base Moroha.
- Evidence: Concealment becomes a full reversal that only hits one hit as opposed to three, because most people cancel it after the first hit anyway lmao
#Guilty Gear#A.B.A#Paracelsus#GG Aba#Guilty Gear Aba#GG Paracelsus#Guilty Gear Paracelsus#Guilty Gear A.B.A#GG A.B.A#Brackets Draws#Brackets's Art#long post#fanart#fan art
96 notes
·
View notes
Text
Personnel Files [IKYLHT]
Series Masterlist | Next: 141 & Rabbit Headcanons
-
Name: [REDACTED]
Callsign: Highwater (formerly), Rabbit
Rank: Gunnery Sergeant (E-7)
Occupation: Demon Dogs Operative, 0251 MOS Interrogator/Debrief Specialist
Affiliations: United States Marine Corps (formerly), Demon Dogs, Coalition, Task Force 141
Identifiers: 26yr Female, 172cm, ‘Heavily’ Tattooed
Physical Assessment: Determined Fit for Duty: Affirm.
Note: Physical Examination cut short, patient held overnight in medical ward after severely injuring nurse practitioner. Sudden unprompted hysteria after [REDACTED], patient forcefully restrained. Absence of physical response to constraints- ceased movement and allowed for further restriction of movement in accordance to protocol. Negative emotional response to constraints- immediate increase in hysteria, cowering in expected physical harm, patient proceeded to [REDACTED], refused medical treatment. Evidence of trauma-response based attack. Unknown psychological trigger. Incident Number 9836573.
Psychological Evaluation: Determined Fit for Duty: Affirm.
Note: Recalled to active duty following brief unauthorized leave of absence after covert operation in [REDACTED], Mexico. Patient requested base transfer upon return, application denied until documentation of post-mission evaluation was received. Patient agreed to undergo aforementioned evaluation, halted after [REDACTED], Incident Number 9836573. Patient attended recommended Cognitive Processing Therapy following incident. Currently attending 1-1 Psychotherapy, prescribed Venlafaxine. Patient granted permission by PhD. Harrison to avoid medical institutions unless warranted by life-threatening illness or injury.
-
Name: John ‘Johnny’ MacTavish
Callsign: Soap
Rank: Sergeant (E-5)
Occupation: SAS Operative, Sniper and Demolitions Expert
Affiliations: SAS, Coalition, Task Force 141
Identifiers: 26yr Male, 183cm, Medium Brown Hair, Blue Eyes, Various Tattoos on Arms
Physical Assessment: Determined Fit for Duty: Affirm.
Note: Patient reports noticeable decline in migraine and fatigue following tinnitus treatment, as previously prescribed. Patient was recommended the continuation of such methods- avoiding caffeine and nicotine, limiting salt intake, increasing vitamin B12, and following proper PPE protocols.
Psychological Evaluation: Determined Fit for Duty: Affirm.
Note: - -
-
Name: Simon Riley
Callsign: Ghost
Rank: Lieutenant (O-2)
Occupation: SAS Operative, Sabotage and Infiltration Expert
Affiliations: SAS, Coalition, Task Force 141
Identifiers: 28yr Male, 192cm, Dark Blonde Hair, Brown Eyes, Half-Sleeve Tattoo on Right Forearm, Skull Plate Face Covering [On-Mission], Balaclava Face Covering [Off-Mission On-Base]
Physical Assessment: Determined Fit for Duty: Affirm.
Note: - -
Psychological Evaluation: Determined Fit for Duty: Affirm.
Note: Patient’s routine psychological evaluation is past-due. Clear for active duty, ordered to schedule annual check-up eval at earliest convenience. When questioned, patient admits to decline in attendance of 1-1 Psychotherapy regarding [REDACTED]. Declines request for therapy and/or medication regarding childhood PTSD. Declines request for medication regarding [REDACTED].
-
Name: Kyle Garrick
Callsign: Gaz
Rank: Sergeant (E-5)
Occupation: SAS Operative, Weapons Tactics and Covert Surveillance Expert
Affiliations: British Army (formerly), SAS, SAS Domestic Counter-Terror Program, Coalition, Task Force 141
Identifiers: 24yr Male, 180cm, Dark Brown Hair, Brown Eyes
Physical Assessment: Determined Fit for Duty: Affirm.
Note: Patient reports continued migraine and light sensitivity post-concussion. Prescribed Topiramate to manage temporary symptoms. Screened for excessive bleeding and hemorrhaging, no evidence of prolonged injury post blunt force trauma found.
Psychological Evaluation: Determined Fit for Duty: Affirm.
Note: - -
-
Name: Jonathan ‘John’ Price
Callsign: Bravo 0-6
Rank: Captain (O-3)
Occupation: 22nd SAS Regiment Captain, Close Quarter Battle Specialist, Seek-and-Strike Expert
Affiliations: British Army (formerly), SAS, Coalition, Task Force 141
Identifiers: 36yr Male, 185cm, Medium Brown Hair, Blue Eyes, Full Beard
Physical Assessment: Determined Fit for Duty: Affirm.
Note: Patient was recommended the use of Cyclobenzaprine for continued back pain and muscle spasms, denied fulfilling prescription due to inability to consume nicotine or alcohol while on medication.
Psychological Evaluation: Determined Fit for Duty: Affirm.
Note: Patient was recommended the use of Nitrazepam to provide short-term relief from severe anxiety and insomnia while off-duty, denied fulfilling prescription due to sedative properties and possibility of impaired judgment or coordination in the event of an unscheduled call back to base.
-
Name: Alejandro Vargas
Callsign: N/A
Rank: Colonel (O-6)
Occupation: Mexican Special Forces Operative, Leader of Los Vaqueros
Affiliations: Mexican Army (formerly), Los Vaqueros, Task Force 141
Identifiers: 28yr Male, 186cm, Dark Brown Hair, Brown Eyes, Various Arm Tattoos
Physical Assessment: Determined Fit for Duty: Affirm.
Note: Patient recommended continuation of physical therapy for affected shoulder.
Psychological Evaluation: Determined Fit for Duty: Affirm.
Note: Patient noted displaying uncharacteristic signs of high stress. Unknown stress trigger. Recommended self-treatment: elimination of nicotine and caffeine from diet, substitution of herbal teas and remedies. Patient admitted as to previously declining aforementioned recommendations, notes having implemented recommendations under the order/care of [REDACTED]. Follow-up advised.
-
Name: Rodolfo ‘Rudy’ Parra
Callsign: N/A
Rank: Sergeant Major (E-9)
Occupation: Mexican Special Forces Operative, Los Vaqueros Second-in-Command
Affiliations: Mexican Army (formerly), Los Vaqueros, Task Force 141
Identifiers: 28yr Male, 181cm, Dark Brown Hair, Brown Eyes, Various Arm and Chest Tattoos
Physical Assessment: Determined Fit for Duty: Affirm.
Note: - -
Psychological Evaluation: Determined Fit for Duty: Affirm.
Note: Patient noted displaying signs of high stress, declined additional optional psychological screenings. Recommended time off-duty to mitigate stress, patient denied ability to leave base for extended periods of time.
-
Name: N/A
Callsign: Konig
Rank: Oberfeldwebel [Staff Sergeant, Technical Sergeant]
Occupation: KorTac Operative
Affiliations: Kommando Spezialkräfte (formerly), KorTac
Identifiers: 27yr Male, 198cm, Blue Eyes, Sniper Veil Face Covering
Physical Assessment: Determined Fit for Duty: Affirm.
Note: N/A
Psychological Evaluation: Determined Fit for Duty: Affirm.
Note: N/A
-
Name: Valeria Garza
Callsign: El Sin Nombre
Rank: N/A
Occupation: Leader of Las Almas Cartel, KorTac Operative
Affiliations: Mexican Special Forces (formerly), KorTac
Identifiers: 28yr Female, 168cm, Dark Brown Hair, Brown Eyes, Various Tattoos on Arms
Physical Assessment: N/A
Psychological Evaluation: N/A
-
<3
#cod modern warfare#cod mw2#cod mw3#johnny soap mactavish#johnny mactavish x reader#johnny mactavish#john soap mactavish#ghost x reader x soap#soap x reader#ghost x reader#simon ghost riley#simon riley#simon riley x reader#john price#john price x reader#captain price#captain price x reader#captain john price x reader#jonathan price#jonathan price x reader#gaz x reader#kyle garrick#kyle gaz garrick#kyle garrick x reader#poly141#poly!141#poly141 x reader#poly!141 x reader#soap x gaz x reader#ghost cod
114 notes
·
View notes
Text
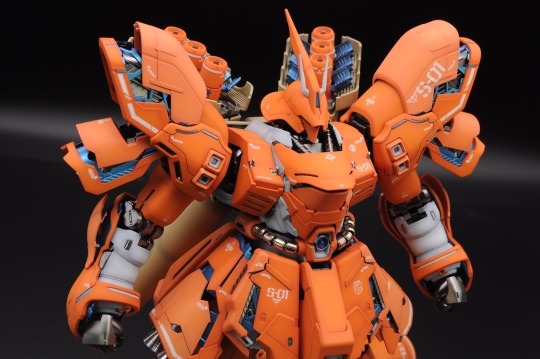
i wanna gab about preshading and how ive been doing it lately. trying to type longer guides on patreon and HV but let's try a quick and dirty version here and see if that helps me get those posts together better. as far as tools used for this, i use an iwata hp-cs and hp-ch (which are .3 and .2mm nozzle airbrushes respectively) along with gaianotes paints for painting gunpla. proper ppe (nitrile gloves, a well fitting respirator and a spraybooth that moves enough air) are a must when working with lacquers. dont give yourself lung or liver cancer for plamo plskthx. pics are from a mixture of the mg sazabi's WIP and some test junk i was doing with the hguc sinanju.
step 1: primer yer part i like to use colored primers cause it really ups the saturation on the paint you use on it. pink for reds/oranges/yellows, blue for purple/blues, grey or white for whites/greys
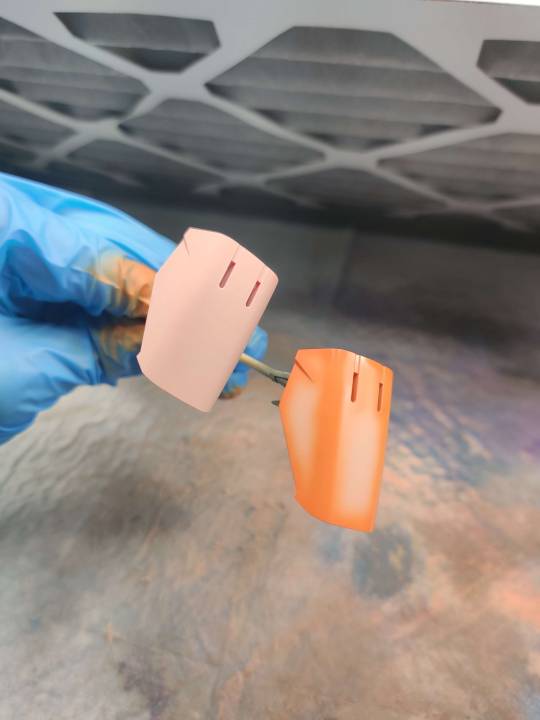
step 2: mix your preshade color ymmv on these but personally i like using a darker shade of the main color to do the shading by adding a complimentary color to it. for example, for these parts i mixed brown in to the custom orange color i made. you can use whatever you want though. some folks like using black as a preshade and that's ok! i preshade my orange-yellow paints with pure orange, and blues with either a darker blue or blue with some purple/black mixed in. to goal is to compliment/blend a bit with the color that's going on top.
step 3: go around the edges and panel lines with your dark color, leaving room to fill in with your main paint. hope your hand is steady and your paints are mixed/thinned well! very carefully, go around the part and darken up the edges/panel lines/underside of your parts. i shade anywhere where the "light" might darken up on a real world object but i can't speak to how accurate of a sentiment that is, if that makes sense? it's just what looks 'right' to my eye to do it this way. but the part that's shaded above should serve as a good indicator. here are a few other parts pre-filling in:

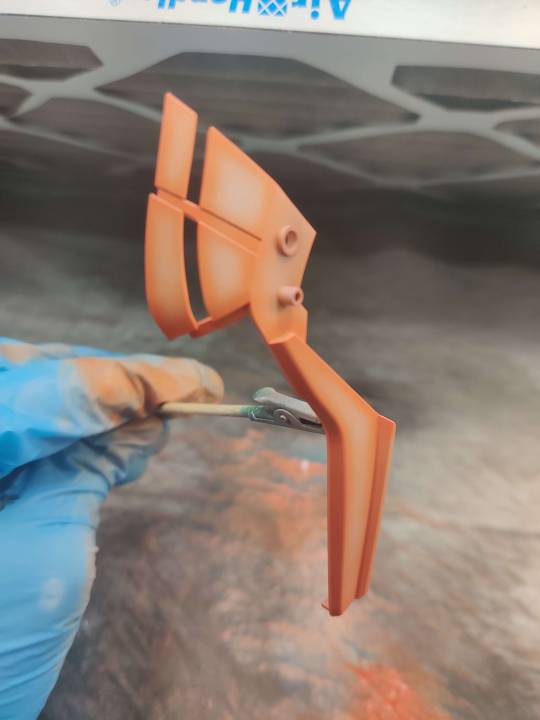
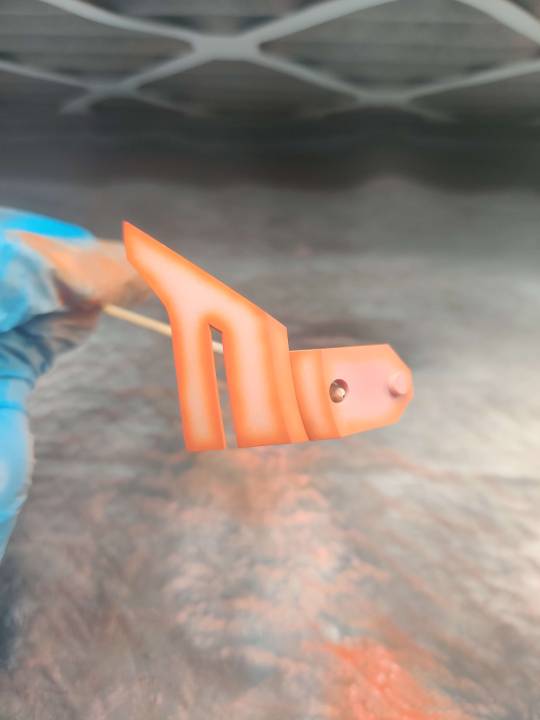
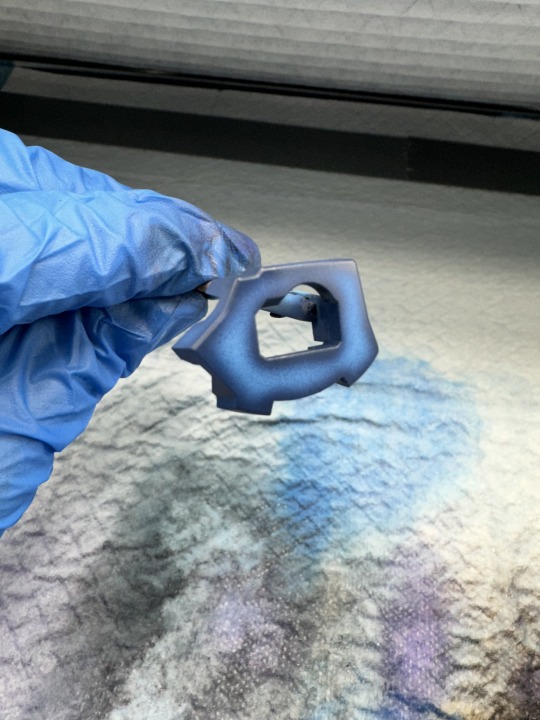
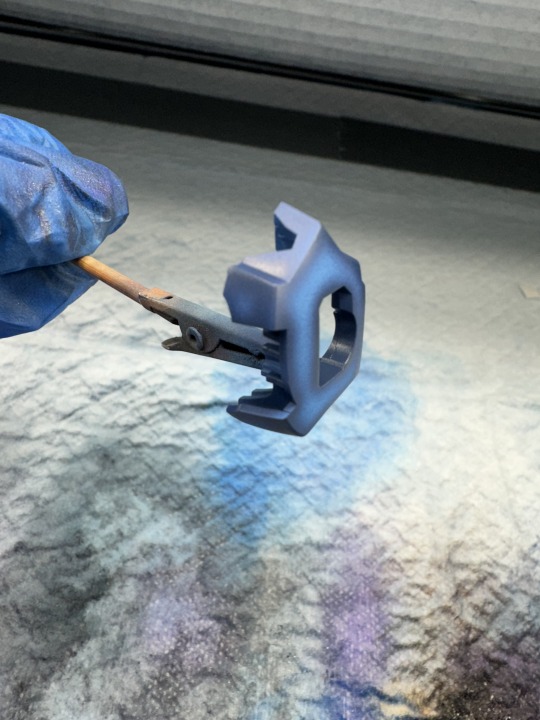
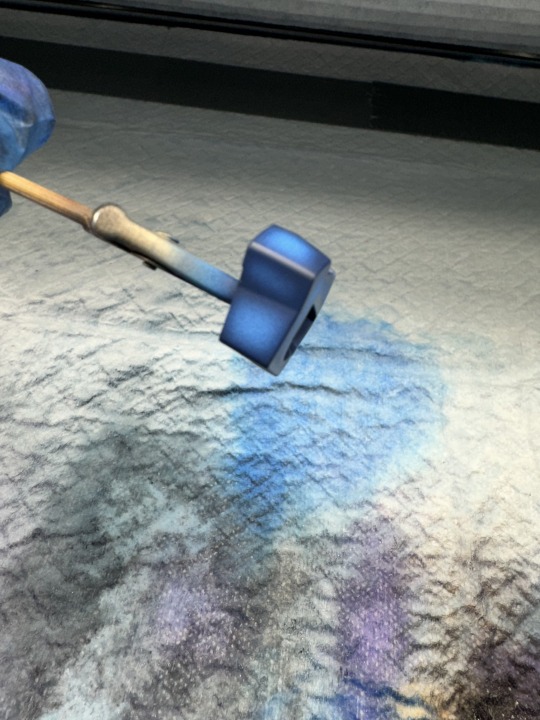
i do this this way for three reasons: first and second, im lazy and cheap. i don't want to waste time and paint coating the entire part when i'm just gonna cover it up anyway. third, if i coat the entire part in the preshade color that's going to have an effect on the main color that's going on top. mainly, it's going to make it darker. i don't want that so i landed on shading stuff this way.
step 4: fill in your main color okay so i always do a shitty job taking pictures of this step (that's why there are no sazabi pictures here) but once you have the edges and stuff painted now it's time to take your main color and fill in the primer-spaces. don't go over your preshade lines, just get as close as you can to that line. it's fine if you hit the edge a little, after all this is the topmost layer of color. even if it doesn't turn out perfect, just work with the wabisabi of the whole thing. embrace the shading not being perfectly uniform. after all, things in real life have degrees of variance.
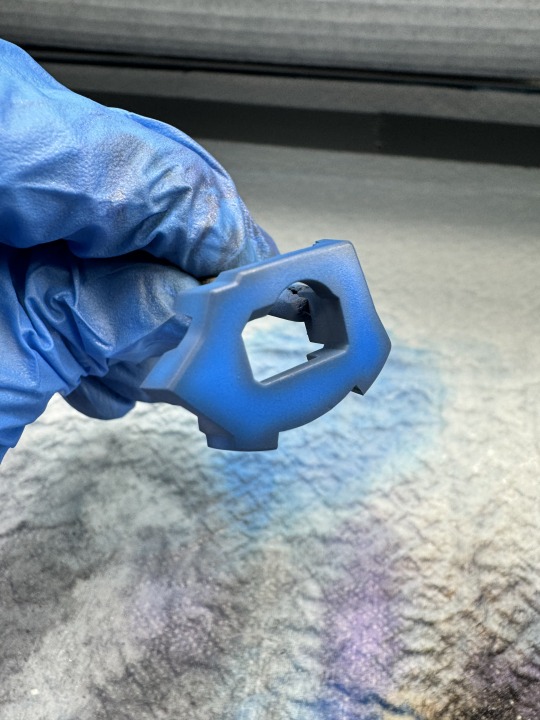
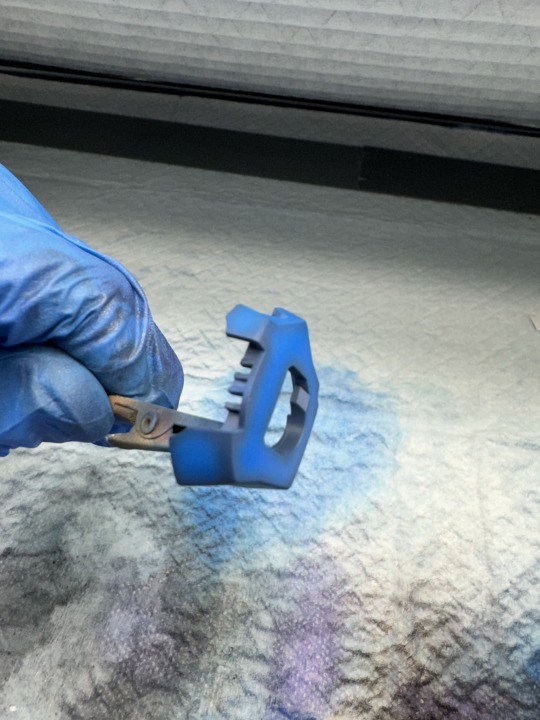
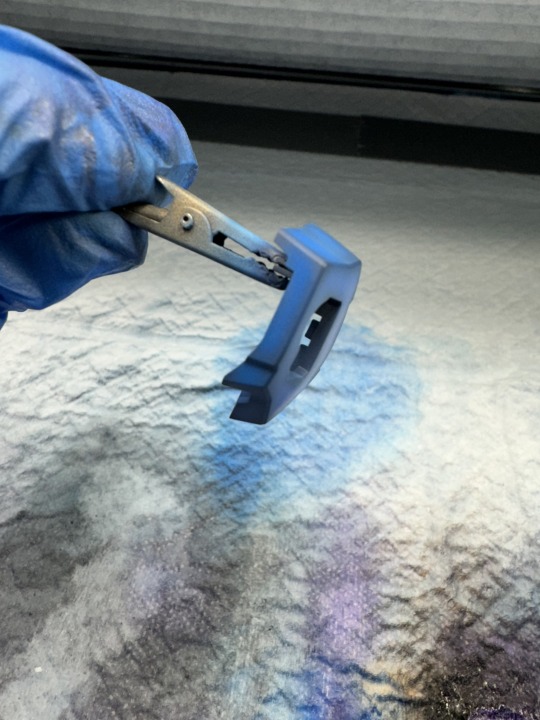
take your time, work with a psi around ~12-15, thin your paints well, and be very gentle on the trigger. i work really really close to the part for this step and have to be very careful to avoid splattering or overspraying. this is probably???? one of the trickier parts of this??? i don't know. when you've been doing this for so long your definition of that sorta changes. if you need extra help, look in to something to help steady your arm/hand while doing this part.
step 5: blending okay, so you've got your shading down, you filled in the rest of the space with the main color and it's feelin pretty good. but. there's one more step. get a little distance from your part and give the whole thing the lightest coat you can manage. the goal is to blend the primary color and shading layer together with one or two very light coats of paint. i'm not trying to cover up the preshading, i just want a very thin layer of the main color to harmonize everything.
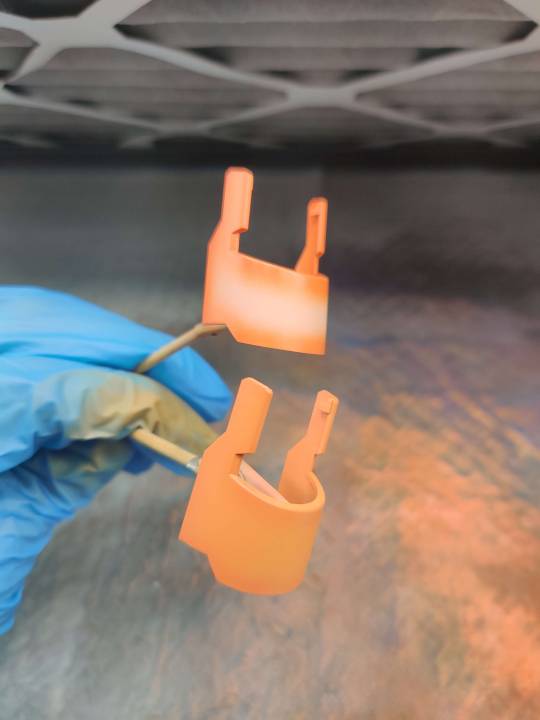
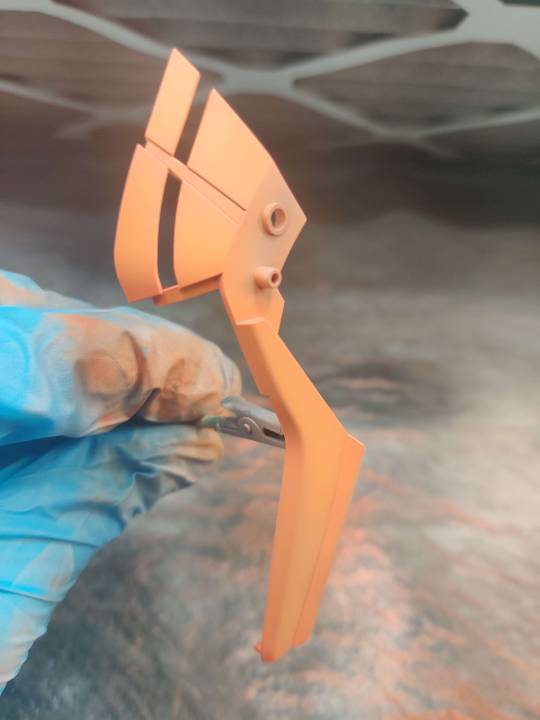
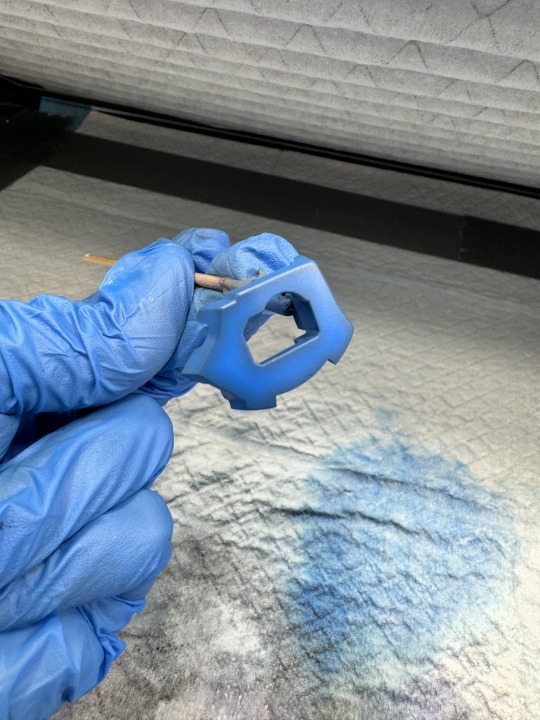
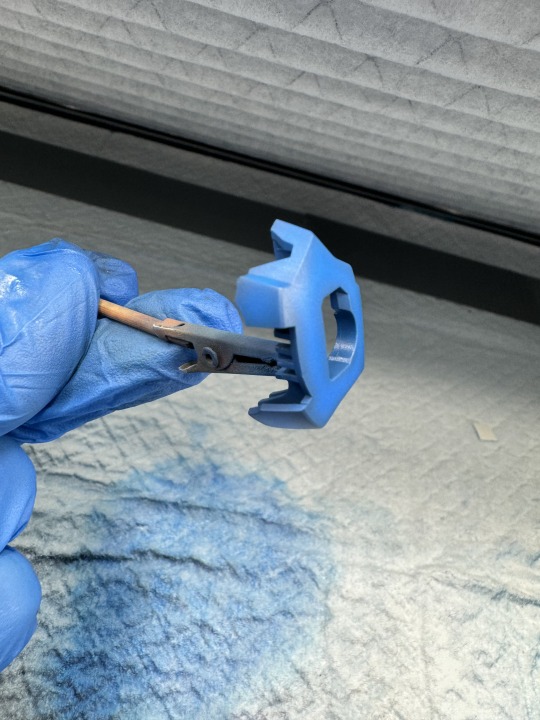
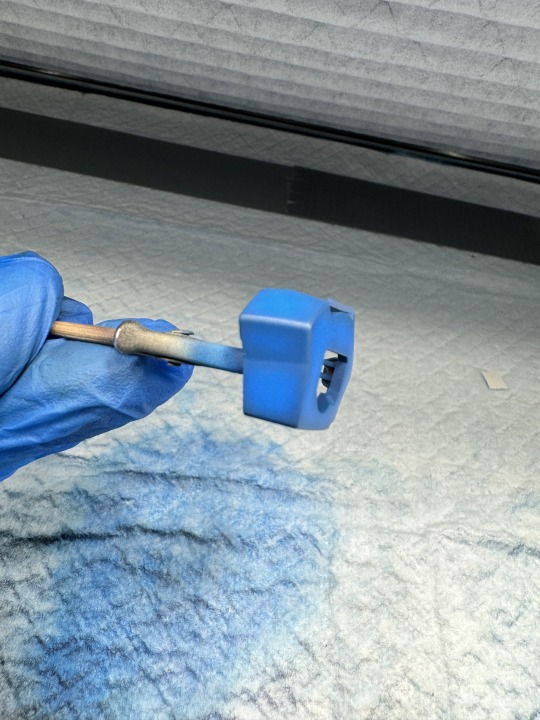
see how the preshading isn't so stark now that we've given it those final two coats? i think this is the key to bringing the shading and main layers together. everything feels nice and "finished" now. from here, gloss coat the parts for panel lining and decals or flat coat (or whatever finish you wanna use) it if it's not getting any of those.
and...that's pretty much it. as an aside, glossy finishes tend to make the colors appear darker and flatcoats tend to look lighter but that could just be my eyes being weird.
and uhh....yeah. thanks for coming to my gunpla talk.
21 notes
·
View notes
Text

Proper PPE, such as eye protection and a properly fitted dust mask are required while operating the Seismic Cannon to avoid contact with toxic materials while mining or demolishing condemned structures. The seismic cannon is not to be pointed at any fellow workers while in use to avoid liquefaction of internal organs.
13 notes
·
View notes
Text

PPE: Respirators
One type of personal protective equipment (PPE) is respiratory protection. There are two main types of respiratory protection: air-purifying respirators, or respirators that filter out hazards from the air, and air-supplying respirators, or respirators that are connected to their own supply of air separate from the surroundings. Each type has its own sub-varieties, which must be carefully selected based on the hazard to be encountered. Because respirators are more complicated than other forms of PPE, and a proper fit is required to ensure correct usage, organizations often have distinct requirements and training before individuals can be allowed to use them, which may or may not include medical evaluations.
Sources/Further Reading: (Image source - CDC) (Grainger) (3M)
12 notes
·
View notes
Text
making bjd eyes is one of the things i’m THE most passionate about, but i’m struggling a bit finding the best way to make them, both in regards to their longevity, but also my health. im going to talk about it and ask if anybody has any ideas :3
i want to use the least toxic materials i can. i started off using uv resin as everybody seemed to use in their tutorials, and because of that i didn’t know how ridiculously toxic the fumes are. be careful with that stuff!!!!!!!!!! im now using non toxic slow cure resins, which is less convenient, but i’d rather not die for little plastic eyeballs!!!!!! be mindful of your health please!!!!!!
im also worried about the yellowing rates of all materials i could use. i’d like my eyes to hold up for as many years as they can!! for eye bases, im currently experimenting with said non toxic resin that’s also meant to be quite uv stable, combined with titanium dioxide powder for colouring which is also used as an anti uv ingredient in sunscreen…but im not a chemist and don’t know what fumes they make together. the resin on its own can be nontoxic because it doesn’t react with anything but itself, but i don’t know what adding the titanium dioxide will do. so far it’s working okay! i just need to find ways to grind the powder better as it likes to clump (pestle and mortar isn’t working super great for me rn). i did try polymer clay for the bases, but found it really hard to get into all the nooks and crannies so they came out wrong!! as well as it being near impossible for me to keep ALL the dust out. painting over it with acrylic paint made them a bit sticky…and therefore dusty again…
for the irises i use polymer clay! i tried pan pastels, but i can’t get it to look anything but grainy and muddy, so polymer clay is best for me. im currently waiting for some new moulds that should fit the irises, so i can cure them separately and then insert them into the bases. i am NOT !! putting resin in the oven after all that work to detox the process
it’s so difficult!!! but i want to make sure i can deliver the best product i possibly can while keeping myself safe. im so passionate about my craft but it’s so hard to meet problem after problem!!!! and it’s so stressful to see people sell uv resin eyes they didn’t use proper ppe to make!!!! stop that!!!! also while i’m at it, cure your polymer clay inside the resin, the polymers will break down the resin eventually and it’ll just suck and be nasty!!
a lot of my other ideas would be super expensive to set up too, so they’re going on the back burner for now. i hope all this is worth it and people will like my eyes once i figure it all out. im still happy just to make them for myself, but i don’t have enough dolls to justify sitting and making eyes all day for that!! if anybody has any experience or ideas for how to reduce fumes and increase longevity, please tell me!!!! im trying Everything i can get my hands on. sometimes i feel like i’m losing my mind thinking solely of little plastic eyes all day long
~Anonymous
12 notes
·
View notes
Text
What PPE is Required for Roofing?
When it comes to roofing, safety should always be a top priority. Roofers face a range of hazards while working at heights and handling materials, making proper Personal Protective Equipment (PPE) essential. At Lastime Exteriors, we prioritize our team's and clients' well-being, ensuring every roofing project is completed safely and professionally. This article will guide you through the types of PPE required for roofing and why each piece is important.
Understanding the Importance of PPE in Roofing
Before we dive into the specifics, it’s important to understand why PPE is critical in roofing. Roofing work involves numerous hazards, including falls from heights, falling objects, and exposure to harmful materials. PPE helps to minimize these risks, ensuring that roofing projects are completed efficiently and with the safety of all involved as the foremost concern.
Essential PPE for Roofing
When working on a roof, every roofer should have several key pieces of PPE. Let’s examine each one.
1. Hard Hats
Hard hats are one of the most recognizable pieces of PPE. They protect workers from head injuries caused by falling tools, materials, or debris. Given the nature of roofing work, having a hard hat that is well-fitted and freely adjustable is essential for both comfort and safety.
2. Safety Harnesses
Falls are one of the leading causes of injuries in roofing. A safety harness is an essential piece of equipment to mitigate this risk. Harnesses should be worn on steep roofs and correctly secured to a safety anchor point to prevent falls.
3. Non-Slip Footwear
A roofer’s choice of footwear significantly impacts safety while on the job. Non-slip, sturdy boots with good grip are vital to prevent slips and falls on sloped surfaces. Look for roofing-specific boots that provide ankle support and water resistance.
4. Gloves
Gloves should be worn to protect the hands from cuts and abrasions while handling sharp roofing materials. Additionally, gloves can enhance grip when working with tools and other equipment, reducing the likelihood of accidents.
5. Eye Protection
Falling debris and exposure to hazardous materials make it necessary for roofers to have proper eye protection. Safety glasses or goggles should be worn to shield the eyes from dust, debris, and any harmful materials that may arise during roofing.
6. Hearing Protection
Hearing protection is important if your roofing project involves power tools like nail guns or saws. Prolonged exposure to loud noises can cause irreversible hearing loss. Opt for earplugs or earmuffs designed for use in construction settings.
7. Respirators or Masks
Dust and fumes can pose serious health risks. Whether you’re working with asphalt shingles or other materials, a respirator or appropriate mask can help reduce your exposure to harmful substances. Choose a mask that fits well and provides the appropriate level of filtration for the materials you’re handling.
8. High-Visibility Clothing
When on the job site, high-visibility clothing ensures that those around you can see you. Bright colors and reflective strips can significantly prevent accidents, especially when working near vehicle traffic or in low-light conditions.
Additional Considerations for Roofing PPE
While the above list covers the essentials, it’s important for people working in roofing to remain vigilant about their safety. Here are some additional pointers to consider:
Regular Inspections: All PPE should be regularly inspected for wear and tear. Damaged gear should be replaced immediately to ensure ongoing safety.
Proper Training: PPE is only effective when people are trained to use it correctly. Ensure that all team members have received adequate training on using PPE correctly.
Weather Considerations: Weather can impact the effectiveness of certain PPE. For instance, heat can make some gear uncomfortable. Consider lightweight, breathable options for hot weather while ensuring warmth and waterproofing in colder, wet conditions.
Prioritizing Safety with Lastime Exteriors
Choosing the right roofing contractor is as important as having the proper PPE. At Lastime Exteriors, we take pride in providing safe working conditions while delivering high-quality roofing services. Our team is equipped with the necessary PPE to ensure every project is completed without compromising safety.
When you hire Lastime Exteriors, you are choosing skilled roofing professionals and a team that values the safety of everyone on the job site. Our commitment to safety means you can trust us with your project, knowing we take the necessary precautions seriously.
Protect Your Home and Stay Safe with Lastime Exteriors – Contact Us Today!
Safety and quality go hand in hand when it comes to roofing. Don’t settle for less when it comes to your home.
3 notes
·
View notes
Text
Health and Safety Challenges in Construction: How to Stay Compliant
Summary: Construction is one of the most hazardous industries to work in, with high rates of injuries, fatalities, and regulatory scrutiny. This blog covers the main health and safety challenges in construction and offers practical steps to stay compliant with UK regulations. It includes examples, statistics, and simple advice for construction business owners, site managers, and workers. Learn how to protect your team, avoid legal issues, and build a culture of safety that benefits everyone.

What makes construction such a high-risk industry?
Construction sites are dynamic environments. They change daily, with new hazards appearing as work progresses. These can include:
Working at heights
Use of heavy machinery
Falling objects
Exposure to loud noise, dust, and hazardous materials
Electrical risks
Manual handling injuries
According to the Health and Safety Executive (HSE), the construction sector had 45 fatal injuries in 2022/23, making it the deadliest industry in the UK. Additionally, 58,000 workers in the construction industry suffered from work-related ill health, including musculoskeletal disorders and respiratory conditions.
With such high stakes, compliance with health and safety regulations isn’t optional — it’s essential.
What laws and regulations do construction companies need to follow?
Construction companies in the UK must follow The Health and Safety at Work etc. Act 1974, along with specific sets of regulations, including:

How can you manage risks effectively on a construction site?
Risk management starts with a thorough risk assessment. This identifies potential hazards and outlines how to reduce them. Here’s how you can manage risks on site:
Identify the hazards — e.g., uneven ground, moving equipment, scaffolding issues
Determine who might be harmed — workers, visitors, contractors
Evaluate the risks — how likely and how severe?
Record findings — document everything clearly
Implement controls — signage, training, supervision, and protective equipment
Review regularly — risks change over time as the site evolves
Real-life example: In 2021, a UK construction firm was fined £600,000 after a worker fell through a fragile roof. An investigation found they hadn’t assessed the risk or installed guardrails.
What training do construction workers need?
Proper training saves lives. Workers should be trained before starting work and when new risks arise.
Minimum recommended training includes:
CSCS card (Construction Skills Certification Scheme) — verifies basic training
Working at heights training
Manual handling
First aid
Fire safety awareness
Asbestos awareness (if applicable)
Bonus tip: Toolbox talks — short, daily safety meetings — help reinforce learning and keep safety top of mind.
Why is Personal Protective Equipment (PPE) not enough?
PPE is your last line of defence, not your first. It’s important, but it must be part of a broader safety strategy.
Common PPE includes:
Hard hats
Safety boots
High-visibility vests
Gloves
Hearing protection
Respiratory masks
However, PPE must be well-maintained, correctly fitted, and appropriate for the job. A 2020 HSE report found that 25% of workers didn’t wear PPE correctly, increasing risk even when it was available.
How can site managers improve safety culture?
A strong safety culture starts at the top. When leadership takes safety seriously, so do workers.
Key ways to build a positive safety culture:
Lead by example — always follow the rules
Involve workers in decision-making
Encourage near-miss reporting without blame
Reward safe behaviours
Make training ongoing, not one-off
Listen to feedback from the ground
Example: A UK firm reduced on-site injuries by 35% in one year simply by introducing monthly safety workshops and anonymous reporting.
What are the most common health hazards on construction sites?
Beyond physical injuries, construction workers face long-term health risks. These often go unnoticed until it’s too late.
Top health hazards include:
Noise-induced hearing loss
Respiratory issues from dust (silica, asbestos)
Skin irritation from cement
Stress and mental health problems
Musculoskeletal disorders from lifting and repetitive motion
Simple changes — like better ventilation, regular breaks, and ergonomic tools — can reduce these risks significantly.
How often should safety inspections take place?
Inspections should be:
Daily — Quick visual checks by supervisors
Weekly — More detailed walk-throughs
Monthly — Formal inspections with documentation
After any incident or near-miss
Whenever site layout or work changes
Checklists make inspections more efficient. Use digital tools where possible to save time and ensure nothing is missed.
What should you do if something goes wrong?
Accidents happen — even on well-run sites. How you respond matters.
Immediate actions:
Ensure safety of all workers
Provide first aid if needed
Notify site management
Report the incident under RIDDOR (Reporting of Injuries, Diseases and Dangerous Occurrences Regulations)
Long-term actions:
Review what went wrong
Update risk assessments
Provide extra training if needed
Communicate findings to prevent recurrence
Case Study: After a scaffolding collapse in 2022, a London firm implemented a new scaffolding inspection routine. No similar incidents occurred afterward.
Final thoughts: Staying compliant is an ongoing commitment
Health and safety in construction isn’t a one-time task — it’s a continuous process. By staying informed, doing regular assessments, and listening to your team, you can reduce accidents and avoid legal trouble. The goal is not just compliance, but a safer, more productive environment for everyone.
At Secure Safety Solutions, we help construction companies meet regulations, train their teams, and build safer sites that support long-term success.
1 note
·
View note
Text
Why Safety Shoes Are More Than Just Workwear: A Step Toward Protection

When we think of personal protective equipment (PPE), safety shoes might not be the first thing that comes to mind—but they should be. Whether you're on a construction site, in a warehouse, or handling heavy equipment in a factory, your feet are constantly at risk. Safety shoes are designed to reduce injuries, improve posture, and provide support in some of the most hazardous environments.
So, let’s dive into what makes safety shoes essential, how to choose the right pair, and why they’re a long-term investment in your well-being.
What Are Safety Shoes?
Safety shoes are footwear specifically designed to protect the feet from workplace hazards such as:
Falling or rolling objects
Sharp items or punctures
Electrical risks
Slips and trips
Extreme temperatures
Chemical spills
They often come with reinforced toes (like steel or composite caps), anti-slip soles, puncture-resistant midsoles, and materials built to withstand harsh conditions.
Who Needs Safety Shoes?
If your job involves physical labor, machinery, or environments where injuries can happen, safety shoes aren’t just helpful—they’re necessary. Common industries where safety shoes are essential include:
Construction
Manufacturing
Warehousing and logistics
Mining
Oil and gas
Healthcare and laboratory work
Even in office-based environments that handle facility tours or on-site inspections, having a pair ready can be a smart move.
Types of Safety Shoes
Not all safety shoes are built the same. Depending on your needs, there are several types:
1. Steel Toe Boots
The classic option. These are built to withstand heavy impacts and compression. Great for heavy-duty industries.
2. Composite Toe Shoes
Made from materials like carbon fiber or Kevlar. Lighter than steel toe and non-metallic—ideal for environments with metal detectors or electrical hazards.
3. Metatarsal Boots
Extra protection over the upper foot and toes—great for jobs where tools or materials could fall frequently.
4. Slip-Resistant Shoes
Equipped with special soles to prevent slipping, even on oily or wet surfaces—especially useful in food service or healthcare.
5. Electrically Resistant (EH Rated) Shoes
Provide insulation from electric shocks—vital for electricians or anyone working with live circuits.
Choosing the Right Pair
A good pair of safety shoes should offer more than protection. Look for:
Comfort and Fit – You’re likely wearing them all day.
Durability – Quality materials last longer and provide more reliable protection.
Waterproofing – If you’re exposed to wet environments, this is a must.
Breathability – Keeps your feet dry and prevents odor or fungal infections.
Don’t forget to check if the shoes meet your region’s safety standards (like ASTM, ISO, or EN certifications).
Why Safety Shoes Matter
Injury prevention is just the beginning. Wearing the right shoes can also:
Reduce fatigue – Proper support minimizes muscle strain and joint stress.
Improve posture – Good arch support helps align your spine.
Boost productivity – Comfortable, protected workers are more focused and efficient.
And from a legal standpoint, employers are often required by law to provide PPE, including safety footwear, to prevent workplace injuries and reduce liability.
Final Thoughts
Investing in a quality pair of safety shoes is one of the simplest ways to protect yourself in a hazardous environment. They’re not just workwear—they’re essential tools. Whether you’re new on the job or a seasoned professional, don’t take your feet for granted. After all, they carry you through every shift—keep them safe.
0 notes
Text
Essential Tools and Machinery for Efficient Service Delivery by BellevueNebraska

In today’s fast-paced world, having the right tools and machinery can be the difference between an average job and exceptional service. At BellevueNebraska, we understand the importance of equipping our team with industry-grade tools that not only ensure precision but also boost efficiency, safety, and customer satisfaction.
Whether we’re handling a complex service request or a routine job, having the proper tools on hand helps us get the job done right the first time. From diagnostics to repairs, installations, or maintenance, our toolbox is built to tackle both challenges and surprises with professionalism and ease.
In this blog, we’ll walk you through the key tools and machinery we rely on, why they matter, and how they contribute to our trusted service delivery. Plus, we’ve included five of the most frequently asked questions about our equipment and methods — giving you an inside look at how BellevueNebraska stays a step ahead.
Our Core Tool Categories
1. Diagnostic Tools
Before any service begins, it’s important to assess the situation correctly. Diagnostic tools help us pinpoint issues accurately.
Multimeters – Essential for testing electrical systems.
Thermal Imaging Cameras – Detect overheating components or hidden leaks.
Moisture Meters – Help identify water damage in walls, floors, and ceilings.
Inspection Cameras – Perfect for looking inside pipes or wall cavities without invasive demolition.
2. Power Tools
Speed and precision matter. Power tools allow our technicians to execute tasks faster while maintaining control.
Cordless Drills and Drivers – Great for quick assembly and installation.
Angle Grinders – Used in surface prep and metal cutting.
Reciprocating and Circular Saws – Make cutting through various materials efficient.
Impact Wrenches – Ideal for high-torque applications such as loosening rusted bolts.
3. Lifting and Access Equipment
Safety and accessibility are crucial, especially for services involving elevated or tight spaces.
Extension Ladders and Step Ladders – Provide reach without compromising stability.
Portable Scaffolding Systems – Used when working on multi-level structures.
Hoists and Winches – Ensure safe lifting of heavy machinery or parts.
4. Plumbing and HVAC Tools
For plumbing or climate control services, having dedicated tools is non-negotiable.
Pipe Cutters and Threaders – Provide custom fitting solutions on-site.
Drain Augers and Jetters – Used for clearing clogs and blockages efficiently.
Manifold Gauge Sets – Essential for HVAC diagnostics and refrigerant charging.
Vacuum Pumps – Used for evacuating air and moisture from HVAC systems.
5. Safety and Personal Protective Equipment (PPE)
Our tools would be meaningless without safety. We prioritize the well-being of both our technicians and clients.
Hard Hats, Safety Glasses, Gloves – Basic PPE for every site.
Respirators and Dust Masks – Critical when dealing with contaminants or dust.
Fall Arrest Systems – Used when working at height.
Why Tools Matter to Our Customers
Using the right tools doesn’t just make life easier for our team — it directly benefits our customers. Here’s how:
Faster turnaround – Jobs that might take hours with manual tools can be completed in half the time.
Higher accuracy – Precision tools mean fewer mistakes and more dependable results.
Reduced property disruption – Advanced diagnostics and minimally invasive methods help us protect your space.
Long-term savings – Quality service reduces the need for repeat work or future repairs.
Our Machinery at a Glance
In addition to portable tools, BellevueNebraska uses several heavy-duty machines for large-scale or specialized projects:
Mini Excavators – Used for outdoor digging, trenching, or grading tasks.
Concrete Cutters and Mixers – Allow for quick surface modifications or patch jobs.
Mobile Air Compressors – Power pneumatic tools on remote sites.
Generators – Ensure uninterrupted power supply during off-grid jobs.
These investments ensure that we stay self-sufficient, reliable, and ready for any situation that comes our way.
5 Frequently Asked Questions (FAQs)
1. What types of services require heavy machinery?
Heavy machinery like mini excavators and concrete mixers are typically used for outdoor installations, foundation repair, utility line access, and large-scale remodeling. These machines help speed up work while ensuring a high-quality finish.
2. Do you bring all the necessary tools to every service call?
Yes. Our technicians arrive fully equipped for the job. We assess the scope during the booking process and ensure the van is stocked with everything needed — from basic hand tools to specialized equipment.
3. Is your equipment regularly maintained?
Absolutely. We have strict internal policies that require regular calibration, inspection, and maintenance of all our tools and machinery. Well-maintained tools reduce risks and ensure efficiency.
4. How do you ensure safety when using large machinery?
Every operator at BellevueNebraska is trained and certified. We also perform site assessments before beginning any task, use PPE, and follow industry-standard safety protocols to protect both our team and your property.
5. Can I request specific tools or methods for my project?
Definitely! If you have a preference — such as non-invasive diagnostics or eco-friendly tools — let us know when booking. We’re happy to tailor our approach to meet your expectations.
Final Thoughts
At BellevueNebraska, we believe in doing things right. That starts with showing up prepared, equipped, and ready to solve problems efficiently. Our wide range of tools and machinery ensures we’re ready for just about anything — from small fixes to major overhauls.
Choosing a service provider isn’t just about cost — it’s about confidence. With our top-tier equipment, experienced technicians, and a commitment to excellence, you can rest easy knowing your project is in capable hands.
#BellevueNebraska#ProfessionalTools#MachineryMatters#ServiceEfficiency#HomeRepairs#DiagnosticTools#PowerTools#HVACandPlumbing#SafetyFirst#QualityService
0 notes
Text
Personal Protective Equipments: A Complete Checklist for Workplace Safety

Workplace safety is a critical aspect of any business, and ensuring that employees are protected is the first step towards a productive and safe environment. One of the most effective ways to safeguard workers from workplace hazards is by providing personal protective equipments (PPE). These specialized tools and gear are designed to protect individuals from injury or illness caused by exposure to various workplace risks.
Personal Protective Equipments: Why They Matter for Workplace Safety
Personal Protective Equipments (PPE) are any items worn by employees to minimize exposure to hazards that can cause injuries or illnesses. PPE serves as the last line of defense when engineering and administrative controls aren’t sufficient to eliminate risks.
There are various types of PPE, each designed for different kinds of risks, whether chemical, physical, or biological. From head protection to footgear, it’s important to ensure that every part of your body is protected in line with the job's hazards.
Types of Personal Protective Equipments: A Comprehensive Breakdown
Before diving into the checklist, let’s explore the types of PPE that are essential for workplace safety. Each piece plays a crucial role in minimizing risk exposure and ensuring the well-being of your workforce.
1. Head Protection
Head protection is a fundamental aspect of PPE, especially in industries like construction, manufacturing, and mining. Hard hats or helmets are designed to protect workers from falling objects, electrical hazards, and impact.
Key Features to Look For:
Impact resistance
Electrical insulation (for electrical work)
Comfortable fit
2. Eye and Face Protection
Workers exposed to flying debris, chemicals, or harmful radiation need protective eyewear or face shields. Eye and face protection can prevent a variety of injuries, from minor irritation to permanent vision loss.
Key Features to Look For:
Scratch-resistant lenses
UV protection
Anti-fog coating
3. Hearing Protection
Loud noises in manufacturing plants, construction sites, and other environments can lead to permanent hearing damage. Hearing protection, such as earplugs or earmuffs, is necessary to reduce the risks associated with high noise levels.
Key Features to Look For:
Noise reduction rating (NRR)
Comfortable fit
Reusability
4. Respiratory Protection
Respiratory protection, such as masks or respirators, is crucial for workers exposed to harmful dust, vapors, fumes, or gases. These items prevent inhalation of hazardous substances that could lead to respiratory illnesses.
Key Features to Look For:
Proper fit and seal
Appropriate for the type of hazard (particulate, gas, etc.)
Comfort and breathability
5. Hand Protection
Safety gloves are essential in industries where employees may be exposed to chemicals, sharp objects, or extreme temperatures. The right pair of gloves can prevent cuts, burns, and other hand injuries.
Key Features to Look For:
Durability against specific hazards (e.g., cut-resistant or chemical-resistant)
Flexibility for dexterity
Proper sizing
6. Foot Protection
Work boots or safety shoes are necessary to protect workers from foot injuries caused by heavy objects, electrical hazards, or slipping. Foot protection is crucial in construction, warehousing, and industrial environments.
Key Features to Look For:
Steel-toe or composite toe protection
Slip-resistant soles
Comfort and support for long hours
How to Choose the Right Safety Equipment Suppliers
Finding reliable safety equipment suppliers is just as crucial as choosing the right PPE for your workforce. A dependable supplier ensures that you receive quality, certified PPE that meets industry standards and regulations.
Key Factors to Consider:
Quality and Certification: Ensure the supplier offers PPE that complies with local and international safety standards.
Product Range: Choose a supplier with a wide variety of equipment to meet diverse safety needs.
Customer Support: A supplier with strong customer service can help you with product selection, delivery issues, and warranty concerns.
Timely Delivery: Reliable suppliers should offer quick shipping to ensure you don’t run out of essential PPE.
Conclusion
Providing the right Personal Protective Equipments is one of the most important responsibilities employers have. By following this comprehensive checklist and choosing quality safety equipment suppliers, you can ensure that your workforce stays safe and healthy, no matter the hazards they face.
1 note
·
View note
Text

Proper PPE, such as eye protection and a properly fitted dust mask are required while operating the Seismic Cannon to avoid contact with toxic materials while mining or demolishing condemned structures. The seismic cannon is not to be pointed at any fellow workers while in use to avoid liquefaction of internal organs.
6 notes
·
View notes