#potato hay recipe
Explore tagged Tumblr posts
Photo

Potato Hay Fried spiral potatoes make a favorite side. Potatoes are spiralized into curls and air-fried with only a little oil to make crispy, golden brown hay.
0 notes
Text
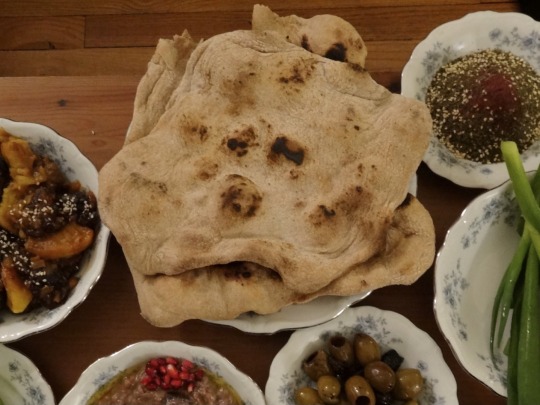
[ID: A plate of light brown bumpy flatbread with blackened spots, surrounded by za'tar and green olives. End ID]
خبز طابون / Khobz taboon (Palestinian flatbread)
Khobz taboon ("taboon bread") is a soft, chewy Palestinian flatbread. It may be eaten with olive oil and za'tar, but it is best known as the base of مسخن (musakhkhan), where it is topped with spiced aromatics and perhaps chicken.
Khobz taboon gets its name from the vessel it is traditionally cooked in—an outdoor, shallow conical oven with an opening at the top and a clay or metal cover to trap heat. Taboons may also have an opening at the side through which the fire can be stoked, especially in the east of Palestine. These ovens were historically made from a mixture of local clay and hay, but have more recently also been constructed from clay treated to be sturdier, or from metal.
A taboon is used by packing flammable material, such as hay, fabric, animal dung, wood, and charcoal, around the outside of the oven and letting it burn overnight; the fire transfers thermal energy to the clay, and to the river stones, sand, glass, or flint stones (صوان, "ṣawwān") that form the base of the oven. The ash is then brushed away, and the flattened dough is placed on the stones or stuck to the walls of the oven to cook. The clay and stones will continue to release thermal energy and cook things throughout the day. The clay and ash give a distinctive flavor to anything cooked inside the taboon, making this method a source of nostalgia for many people who have transitioned to cooking in indoor ovens.
Khobz taboon was traditionally made with whole wheat flour. Most people today use a blend of around two parts white flour to one part whole wheat, or else all white flour; they may even add milk or milk powder to ensure a very soft dough. This recipe uses a blend of flours to combine the nutty flavor of whole wheat dough with the pliancy of white dough. It also begins with an optional pre-ferment to mimic the traditional Palestinian method of including a piece of dough from the previous day's bread into each new batch (like a pâte fermentée) giving a rich and slightly sour flavor to the final bread. It calls for the use of rocks to imitate the bottom of a taboon; the rocks give the khobz its distinctive dimpled texture, and ensure that no interior pocket forms in the bread.
In the years following 2007, the siege Israel had imposed on Gaza caused a shortage of cooking gas that led to a resurgence in the use of taboons. The ovens were used to bake bread and to grill sweet potatoes during the time of their winter harvest. Meanwhile, in the West Bank, Israeli military forces repeatedly destroyed taboon ovens and assaulted villagers who tried to defend them, as Israeli settlers from nearby villages complained about the smoke that the ovens produced. Some of these ovens had been used to bake bread for entire families of 40 or more people. Palestinians continue to build, use, and defend these ovens, despite the fact that Israeli law de facto forbids Palestinians in the West Bank to build anything.
Today, Israel is deliberately targeting and destroying bakeries in refugee camps that had been supplying bread to tens of thousands of people in Gaza, continuing a long campaign of starvation of the Palestinian people.
Support Palestinian resistance by calling Elbit System's (Israel's primary weapons manufacturer) landlord; and donating to Palestine Action's bail fund.
Equipment:
A large, shallow mixing bowl, like a Moroccan qus'a
A large (12"), shallow clay cooking vessel, such as the bottom of a Moroccan tajine (one that is rated for very high temperatures), or a large baking tray
Assorted smooth river rocks of varying sizes, from 1 to 3" in diameter.
Make sure that your rocks have been thoroughly cleaned, and that they do not contain any fissures, cracks, or veins that could contain water (this water, once heated in the oven, could cause the rocks to crack open). Instead of river rocks, I used lava rocks designed for use in a clay tanoor. You just need something to provide thermal mass and give a bumpy texture.
Ingredients:
Makes 3 large breads.
For the pre-ferment:
140g whole wheat flour
1/2 tsp active dry yeast
140g water
You may also use a pâte fermentée that you already have (just adjust the ratio of white to whole wheat flour added later accordingly), or a sourdough starter. The hydration of the starter doesn't matter, since you will be adding water by eye later.
For the bread:
330g bread flour or all-purpose flour
30g whole wheat flour
5g salt
Water
If you skipped the pâte fermentée step, add 170g (rather than 30g) of wheat flour at this stage, as well as 1/2 Tbsp of active dry yeast. I have not tested the recipe this way.
Instructions:
For the pâte fermentée:
1. Mix flour and yeast in a small mixing bowl. Add water and stir to combine. Cover and leave out at room temperature for a day, or in the refrigerator for up to three days. At the end of the rising time, it should be about one and a half times its original size.
For the bread:
This recipe makes a high hydration dough that will need techniques such as slapping and folding to knead effectively.
1. Mix flours and salt in a very large, shallow mixing bowl. Add your pâte fermentée and mix to combine.
2. Add water until the flour comes together into a soft, sticky dough and continue keading. Have a bowl of water on your workstation. Every time the dough starts to stick to your hands or the sides of the bowl, wet your hands and rinse down the side of the bowl with some water. This will gradually add water to the dough.
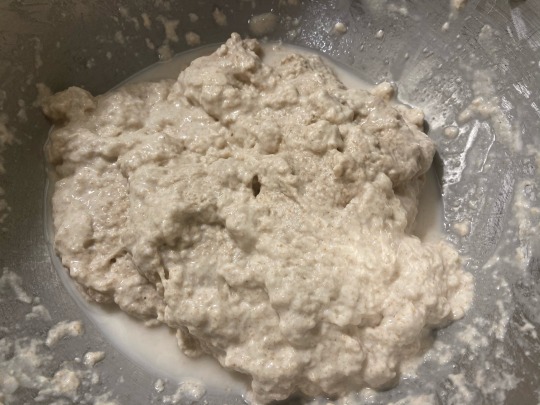
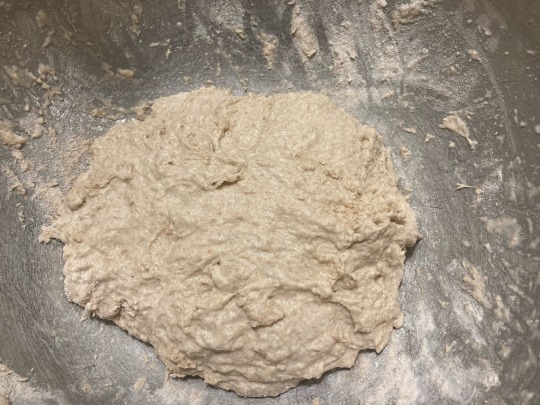
3. You will notice the dough growing smoother and laxer. At this point, start kneading by repeatedly folding the edges of the dough in towards the center. Do this by occasionally wetting your hands, then running a hand along the side of the bowl and under the edge of the dough to unstick it from the bowl; then fold. You will get stuck less often if you try to touch the dough as lightly and briefly as possible. Every few folds, dimple the surface of the dough all over with your fingertips. You will have been kneading for about 10 minutes at this point.
The dough should become more smooth and less bumpy—you will notice it holding its shape and becoming more stretchy as gluten forms. It should form into a ball when you fold the corners in and hold its shape for a minute, but then gradually expand to take the shape of the bowl. I added about 2 1/2 cups of water total (in dry conditions) during steps 2 and 3.
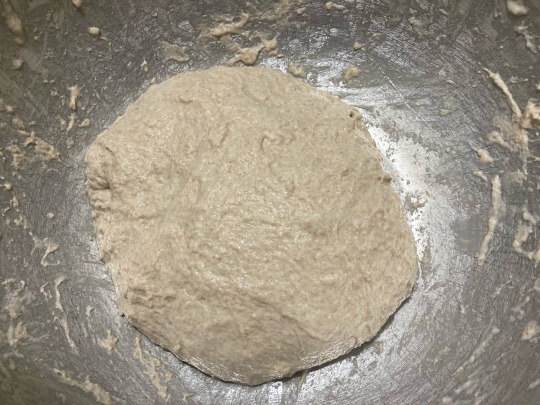
4. At this point, the dough is wet enough that the slap and fold method is the best way to knead. Wet your hands and again unstick the dough from the sides of the bowl. Hook your hands under the dough and quickly pull it all up into the air; fold the hanging bottom part of the dough under, and plop the dough back down, folding it on top of the part you plopped down earlier. Give the bowl a quarter turn and repeat. Do this continually for another few minutes.
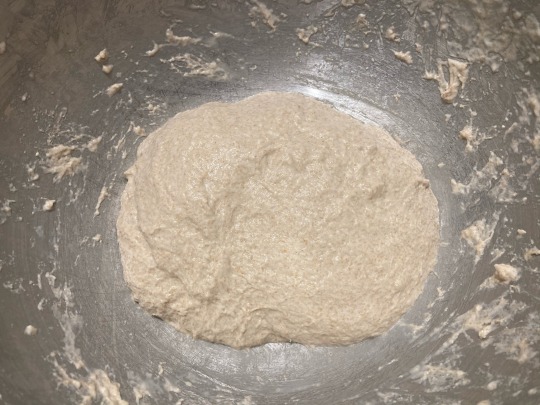
5. When the dough is very smooth and lax, smear some olive oil on the sides of the bowl and under the dough, and pat some oil on top.
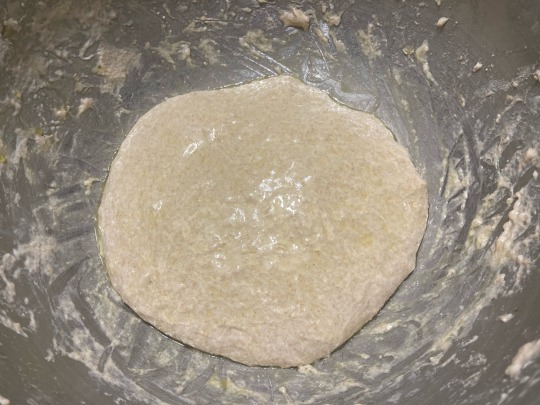
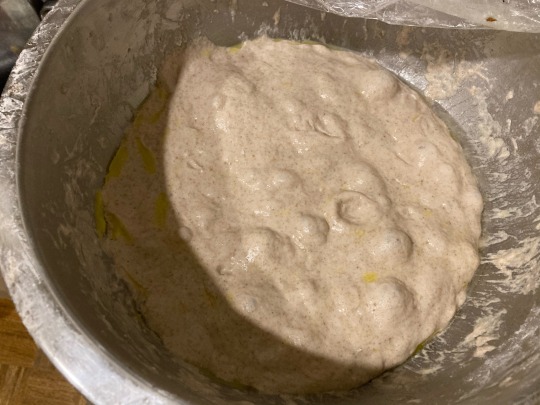
6. Cover the bowl and bulk ferment the dough at room temperature for 8 hours, or for 16-24 hours in the fridge. At the end of the rising time, you should see bubbles beginning to form on the surface of the dough.
To shape and bake:
1. Place a layer of rocks at the bottom of a clay cooking vessel or baking sheet. Put the sheet in the top third of the oven and preheat your oven to 550 °F (290 °C), or as hot as it will go.
2. Meanwhile, fold the edges of the risen dough over into the middle a few more times with damp hands. Pinch off a large piece of dough (about the size of two fists), and fold the sides over into the middle to make a neat packet.
3. Drop the packet of dough onto a heavily floured surface, and flip to flour both sides. Pat the dough flat, then throw it back and forth between your hands, catching the edge each time as you spin it through the air, like a pizza crust, to stretch it into a circle about 1/4" (1/2cm) thick with a diameter of about 10" (25cm).
You may also stretch and pat the dough out on a flat surface.
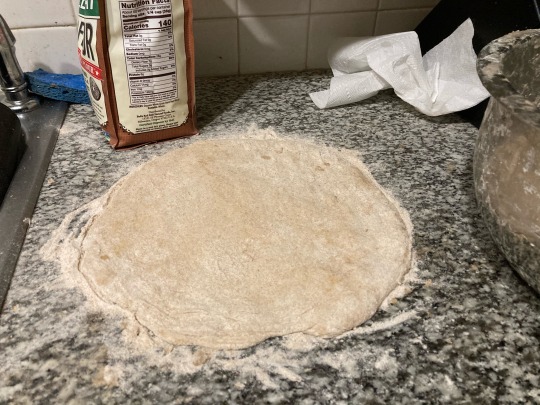
4. Remove the tray from the oven. Flip the dough circle over the back of your hand to transfer it and lay it down over the hot rocks. Re-stretch it into a circle, if necessary.
5. Place the tray back in the oven and cook for 5-7 minutes, until the top of the bread has golden brown spots. Repeat with each piece of dough, leaving the rocks in the oven for a few minutes between each one to allow them to come back up to temperature.
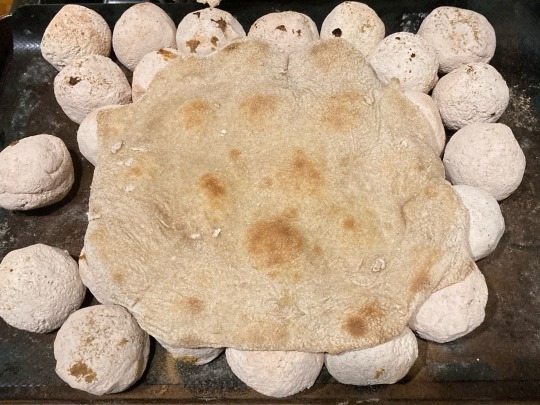
6. (Optional): Hold each flatbread directly over a gas flame for a minute or two to blacken a few spots and mimic the flavor that a wood-fired oven would give to your khobz.
You may also use a method similar to the dhungar technique to smoke your bread. Place each piece of bread one at a time into a large vessel with a closely fitting lid, alongside a small bowl. Light a piece of wood on fire and drop it into the bowl; then cover the vessel with the lid as you allow the wood to smoke for a minute or two.
#note that I do not recommend this recipe to anyone who is not experienced with making bread#I'll have another Palestinian flatbread recipe up soon which will be more beginner-friendly#Palestinian#bread#khobz#flatbread
347 notes
·
View notes
Note
hai !! do u have any simple recipes that dont cost much money ? (also , do u happen 2 know how to stop feeling sick after eating a raw potato,,,,,)
the stuff i make doesnt rlly make me feel full but i dont have much 2 work with =-(
( @wolperthing )
I just mentioned berry salad, but there's also simple buttered noodles!
2 notes
·
View notes
Text
The Crispy Potato Skins Recipe - Turn leftover potato peels into crispy snacks! Preheat oven to 200°C, toss peels with oil, salt, pepper, and spices. Bake for 8-10 mins until browned and crunchy. Enjoy with other veggie peelings too! 🥔🌿
✨✨✨✨✨✨✨✨✨✨
💗 Please join Supreme Master Ching Hai to sincerely thank God Almighty for World Vegan, World Peace and souls’ Liberation 💗 Every day at 9:00 PM Hong Kong time 🙏
SupremeMasterTV.com
#SupremeMasterTV#CrispyPotatoSkins#ZeroWasteCooking#LeftoverRecipes#EasySnacks#HealthyEating#SustainableLiving#ReduceFoodWaste#QuickRecipes#HealthySnacks#HomeCooking#PotatoRecipes#ZeroWasteKitchen#PlantBasedEating
2 notes
·
View notes
Text
Item descriptions 1
Another long read! This is about items that have been drawn - some crafted items, such as recipes, are missing their drawings. Recipes shall come at some point as well.
Strawberry Non-sentient and without senses, it's easier to eat.
Blueberry Chewing, chewing, all-day long.
Apple Throw these at Eggabell to repel her.
Carrot I'm already orange, I don't need more!
Potato A versatile vegetable in cooking, but never eaten raw.
Hay Well, hay there.
Lavender Some Grumpuses like to stuff these inside pillows, or into their stomachs, in hopes of getting healthier…
Mint Mint is pretty mint, I would say.
Lemon Who stole Floofty's nose?
Rice Considered a snack by sadists, or ants.
Sugar Loved by Grumpuses based on taste, hated by Grumpuses that have a grasp in healthiness
Fish Huh, I thought everything living nearby was some sort of Snax.
Broad Beans Chunkier than regular beans, but still results in immense gas.
Imitation Meat The closest variation of meat without committing cannibalism here.
Mixed Seeds Someone forgot to sort these…
Seed Egg Don't panic: It's only Oat Milk and Mixed Seeds!
Oats Oats.
Oat Milk Bread in a liquidised state.
Oat Butter Where'd that foil come from?
Corn Is this where Popticks spawn from?
Kelp Tasty trash.
Rice Vinegar Somewhat close to sake, expect that it would be unpleasant to drink.
Crab I believe this species is closer to insects than actual crabs.
Banana Oooohhh, banana!
Wooden Plank How do Grumpuses make this with some Driftwood, or better yet, Sticks??
Driftwood Made its long journey to land, only to be chipped into Wood. Tragic.
Stick These and Rocks may break my bones.
Charcoal Agh, my fur is stained!!
Coal Useful to be burned or to make impressive but bland art.
8 notes
·
View notes
Text
Thai Peanut Curry Chicken Recipe (Better Than Takeout) | Modernmealmakeover.com
0 notes
Text
Real pleased with the progress in the yard so far, and fine-tuning the next steps as I go
Projects I noticed while working on the reseeding today:
Need to build and hang some bee boxes and then scrub down the deck with a citronella seal to hopefully convince the carpenter bees to relocate - also need to redo the deck frankly but that's a long-term thing and I'd really like to have access to a woodlot first and plane our own boards rather than buying them. Even in bulk from a lumbermill that's more money than I'd like to spend for proper hardwoods like oak and cherry
Need to buy a sythe/machete for the tall invasives by the creek - once the ground is cleared, going to turn our old olive oil tins into lizard houses, and reseed with strawberry corn, sunflowers, cardoons, witch hazel, and ground cherries
Need to call the city and find out who is legally allowed to bring down the willow across the creek that got uprooted during Helene and has been threatening to fall onto our fence ever since. Happy to do it myself if I'm allowed, but would rather the other land owner handle it, unfortunately it's not a person, it's a company so I have no idea how to talk to them about this except through the city.
Need to smash a pumpkin and throw some budding sweet potatoes into the compost and really hill up the hay on top so I can have a pumpkin and sweet potato patch for my leetle ladies tasty treat times
I need to sprout the red plum seeds and prep the temporary pots for when they're ready to transplant outdoors, might consider planting them directly in their own loosened hale bales, esp if I can let the chickens have at the bales over winter first.
Speaking of which, we need more hay. I need to call my hay guy and ask how much another 50 bales of clover hay will cost me
Need to bury the logs under hay and compost to start byilding raised beds and improving the topsoil quality, ideally I'll seed the swales with wetland/riparian plants so that as the swales smother the lingering invasives, the plants can sprout up on top with all that yummy organic matter
Need to buy/make root veggie sacks to bury in the compost and new topsoil so I can grow even while I'm still making new topsoil
I need to make sure to include wildflowerd in the spring compost and reseed, because we're starting to get some volunteering which means the soil is recovered enough to play good host and I want to speed that up
Gotta make some starter plots around the chicken run and the dog run to regularly re-establish groundcover in them given how much the chickens and dogs tear up the grass
Need to build a chicken tractor to use in future years to control overgrowth and compost growing beds after harvest
Need to build a water table for lettuces and greens, ideally linked up to the rainbarrel water storage system
Need to keep expanding the chicken run now they're all enjoying it so Elvira is less of an asshole, and reinforce under the coop so no one gets stuck under the foundation
Reinforcing the creek bank (witch hazel and red plum tree and creeping thyme) behind the dog run so we don't lose integrity of the fence.
Paint the house some goddamn colors holy FUCK
Keep making braids for cat and chicken toys
Maybe enclose the upper deck for a four season cat porch
Set up some 7-10 gallon pots on the deck for growing ginger and lemongrass and other culinary/medicinal plants we need to keep out of the topsoil
Make a plant ID booklet for use during harvesting
Make a recipe book to guide cut and come again use
Set out a shaded table at the top of the drive with places to set out eggs, produce, preserves, etc that we're not going to be able to use up for give away - should make sure to put a sign up to officially let folks know they can take what they like.
Start passionflower vines by the creek and back fence
Fill the front yard with flax
Plant a broomsedge, scouring rush, water cress, plaintain, American Trout Lily, alumroot, phlox, chickweed, creeping blueberries,culinary sumac, and primrose propogation bed by the creek to crowd out the last invasive ground covers (apparently the native ground covers have done a GREAT job smothering most of the invasives in the yard, and there are only a few invasive vines and crabgrass left actually. Everything else is native wetland grasses and galax. Just....so much galax lmao
I might look into canebrrak bamboo as well, that would be extremely useful for fiber production holy shit
I definitely want a stand of Indigo for dyes and inks
I still want my pawpaws and wild olive and wild black rum cherry trees so they'll probably go in the front where the crabapples are now. I could probably make a lil lumber out of the bigger crabapple and a nice cat toy out of the smaller one.
It would be great to get a Broom Hickory or a chinquapin, too, but I'm prioritizing the pecans
A sugar berry would be lovely, they're kind of nothing on their own, but if you use them in preserves of other fruits, they come out AMAZING
Coreopsis my beloved <3
I need to flesh out my medicinal garden too, and I'm thinking about waterleaf. It would be AMAZING for my skin condition, particularly for my feet, but I'm not sure I can harvest and use it fast enough given its growth habit the leaves and shoots are ostensibly edible, so maybe if we a consistent about cutting them back for the greens that will keep the rhizomes focused on growing rather than spreading.
Bayberry would be extremely useful for making plant waxes and butters, but I'm in the same position as the waterleaf, esp since they're even less readily edible lol
I think that's everything so far, which is good because it's already a year's worth of work lmao
1 note
·
View note
Video
youtube
Cách làm bánh từ khoai lang - Làm vườn &; trồng rau | O...
Nguyên liệu:
2 củ khoai lang cỡ trung bình
2 chén bột mì đa dụng
1 muỗng cà phê bột nở
1/2 muỗng cà phê baking soda
1/2 muỗng cà phê muối
1 muỗng cà phê quế xay
1/2 muỗng cà phê hạt nhục đậu khấu
1/2 muỗng cà phê gừng xay
1 chén đường cát
1/2 chén đường nâu
1/2 chén bơ lạt, làm mềm
2 quả trứng lớn
1 muỗng cà phê chiết xuất vani
1/2 cốc sữa hoặc sữa bơ
Tùy chọn: Các loại hạt, nho khô hoặc sô cô la vụn xắt nhỏ
Ch��� thị:
Chuẩn bị khoai lang:
Làm nóng lò nướng của bạn đến 400 ° F (200 ° C).
Rửa khoai lang kỹ, sau đó dùng nĩa đâm chúng.
Nướng khoai lang trong khoảng 45-50 phút, hoặc cho đến khi chúng mềm và mềm. Bạn cũng có thể cho chúng vào lò vi sóng ở nhiệt độ cao trong 8-10 phút nếu bạn không có nhiều thời gian.
Sau khi nướng, để nguội. Gọt vỏ và nghiền thịt trong bát cho đến khi mịn. Bạn sẽ nhận được khoảng 1 1/2 chén khoai lang nghiền.
Trộn các thành phần khô:
Trong một bát trộn lớn, rây bột mì, bột nở, muối nở, muối, quế, nhục đậu khấu và gừng với nhau.
Trộn đều để đảm bảo các loại gia vị được phân bố đều.
Kem bơ và đường:
Trong một bát khác, đánh bơ mềm với đường cát và đường nâu cho đến khi nhẹ và mịn.
Thêm từng quả trứng một, đánh đều sau mỗi lần thêm.
Khuấy đều chiết xuất vani.
Kết hợp các thành phần ướt và khô:
Dần dần thêm các thành phần khô vào hỗn hợp bơ-đường, xen kẽ với sữa (hoặc bơ sữa).
Bắt đầu và kết thúc với các thành phần khô, trộn chỉ cho đến khi kết hợp.
Gấp khoai lang nghiền cho đến khi kết hợp tốt.
Nếu bạn đang thêm các loại hạt, nho khô hoặc sô cô la chip, hãy nhẹ nhàng gấp chúng lại ở giai đoạn này.
Nướng bánh:
Làm nóng lò nướng của bạn đến 350 ° F (175 ° C).
Mỡ và bột mì, chảo nướng 9x13 inch hoặc hai chảo bánh tròn 8 inch.
Đổ bột vào (các) chảo đã chuẩn bị và làm mịn mặt trên bằng thìa.
Nướng trong 35-40 phút, hoặc cho đến khi tăm cắm vào giữa bánh sạch.
Để bánh nguội trong chảo trong 10 phút trước khi chuyển nó vào giá dây để nguội hoàn toàn.
Serve and Enjoy:
You can serve the cake plain, dusted with powdered sugar, or with a cream cheese frosting for extra richness.
Slice and enjoy the delightful blend of spices and sweet potato flavor!
Gardening & Growing Sweet Potatoes
If you want to grow your own sweet potatoes to use in this recipe, here’s a brief guide:
Choosing the Right Variety:
Sweet potatoes come in different varieties, ranging from orange-fleshed to white and purple. Choose a variety based on your taste preference and climate.
Planting:
Sweet potatoes are typically grown from slips, which are shoots that sprout from a mature sweet potato.
Plant slips in well-drained soil with plenty of sunlight, spacing them about 12-18 inches apart.
Ensure the soil is warm, as sweet potatoes thrive in temperatures above 60°F (15°C).
Caring for the Plants:
Water regularly, especially during dry spells, but avoid overwatering as sweet potatoes do not like soggy soil.
Mulch around the plants to retain moisture and keep the soil warm.
Harvesting:
Sweet potatoes are usually ready to harvest 90-120 days after planting.
Dig them up carefully to avoid bruising the tubers.
Cure the harvested sweet potatoes by keeping them in a warm, humid environment for about 10 days to enhance their sweetness and shelf life.
Storing:
Store cured sweet potatoes in a cool, dark, and well-ventilated place.
They can last for several months if stored properly.
Growing your own sweet potatoes and turning them into a delicious cake is a rewarding experience. Enjoy the process from garden to table!
This content should give you a comprehensive guide to making sweet potato cakes, along with tips on growing your own sweet potatoes. Whether you’re a seasoned baker or a gardening enthusiast, this guide will help you create something truly special
0 notes
Text
Some healthy Fast food.
hay. Whana test my healthy fastfood and see what you think. I got it in recipes. But it forjust $1
1 note
·
View note
Photo

Recipe for Potato Hay Spiral potatoes fried in oil are a popular side dish. To make crispy, golden brown hay, potatoes are spiralized into curls and air-fried with very little oil.
0 notes
Text
Preserved lemons and pomegranate
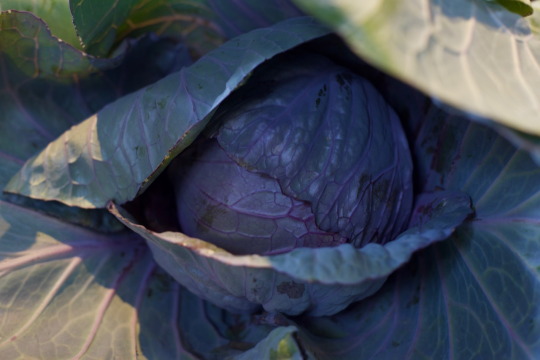
Chicken baked with preserved lemons and served with roasted red cabbage, carrots, and beetroot, followed by pear and chocolate pudding on Saturday 28 October 2023
My preserved lemon obsession continues. Last night I cooked for my grandmother, my uncle and aunt, and my aunt and uncle, as it would have been my grandfather's 99th birthday. This is what I cooked for eight of us.
The chicken is somewhere between a Waitrose recipe and a Donna Hay recipe, while the red cabbage was inspired by something I ate at a restaurant in London some time ago. I just wanted a less involved red cabbage option than braising. It’s simple and effective.
Chicken baked with preserved lemons - serves 8
12 chicken thighs
1.5 kilograms new potatoes
3 red onions, cut into wedges
6 cloves garlic, smashed and minced
3 preserved lemons
5 tablespoons olive oil
350 millilitres white wine
Salt and pepper
I've found that one and half thighs per person is enough when you're cooking for a crowd.
Take the preserved lemons from their brine and wash them. Cut them in half and scoop out the flash. Discard it. It's the peel that you want. Finely chop the peel from one and half lemons and slice the peel of the other one-and-half.
In a large bowl, mix together three tablespoons of olive oil, the garlic, the preserved lemon, with some salt and pepper. Tip in the chicken thighs and massage them with the mix, then pour over half of the wine. Set it aside to infuse for as long as you can.
Heat the oven to 200º Celsius.
Scrub the new potatoes and cut in half any that are large.
Drizzle the other two tablespoons of oil in the base of a large roasting pan. Tip in the potatoes together with the red onions and season with salt and pepper. Shake everything around and pour over the remaining white wine.
Arrange the chicken thighs on top of the potatoes, pouring over all of the marinade.
If the pan has a lid, put that on it, otherwise seal it with foil and bake for 30 minutes.
After 30 minutes, remove the lid or the foil and cook for another 30 to 40 minutes, until the chicken is thoroughly cooked, the potatoes are tender, and the skin is crispy. Serve!
Roasted red cabbage - serves 8
I had a fairly small red cabbage, maybe about 650 grams, which was perfect for eight people.
Cut the cabbage in half through the middle. Cut each half into wedges, maintaining the core. I cut eight from our entire cabbage.
Brush each wedge with olive oil and season with salt and pepper.
Place in the oven at 190º Celsius, ideally. Roast for 10 minutes and then turn over the wedges and roast for another 10 minutes. Then drizzle with pomegranate molasses and roast for a final ten minutes. They should be a mix of crispy and tender.
0 notes
Text
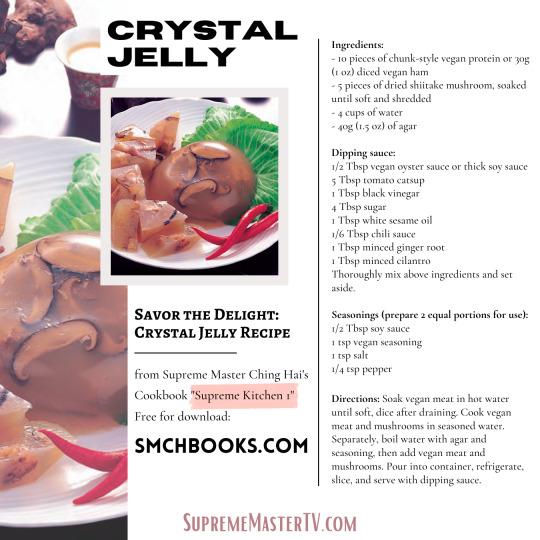
Recipe from Supreme Master Ching Hai's cookbook "Supreme Kitchen 1" - Free for download at SMCHBooks.com
Ingredients:
10 pieces of chunk-style vegan protein or 30g (1 oz) diced vegan ham
5 pieces of dried shiitake mushroom, soaked until soft and shredded
4 cups of water
40g (1.5 oz) of agar
Dipping sauce: 1/2 Tbsp vegan oyster sauce or thick soy sauce 5 Tbsp tomato catsup 1 Tbsp black vinegar 4 Tbsp sugar 1 Tbsp white sesame oil 1/6 Tbsp chili sauce 1 Tbsp minced ginger root 1 Tbsp minced cilantro Thoroughly mix above ingredients and set aside. Seasonings (prepare 2 equal portions for use): 1/2 Tbsp soy sauce 1 tsp vegan seasoning 1 tsp salt 1/4 tsp pepper
Directions: Soak vegan meat chunks in hot water until soft. Then squeeze out excess water and dice. Place vegan meat and mushrooms, together with 1 cup water and 1 portion of seasoning mixture, into a small pot and cook over medium low heat for 5-6 minutes. Remove from pot and set aside. Into another pot, add 4 cups of water and the other portion of seasoning mixture and bring to a boil. Add agar and continue boiling until agar melts. Then add meat chunks and mushrooms and again bring to a boil. Pour mixture into a round container, allow to cool, then place in refrigerator for at least 20 minutes. Invert onto a serving platter and cut into slices. Serve with dipping sauce.
*The dipping sauce is also suitable for use with boiled potatoes, Chinese yams, cauliflower, mushrooms, okra, eggplant, etc.
Direct link: https://smchbooks.com/index.php?route=product/product&product_id=953
✨✨✨✨✨✨✨✨✨✨
💗 Please join Supreme Master Ching Hai to sincerely thank God Almighty for World Vegan, World Peace and souls’ Liberation 💗 Every day at 9:00 PM Hong Kong time 🙏
SupremeMasterTV.com
#SupremeMasterTV#SupremeKitchen1#VeganRecipe#SMCHBooks#HealthyCooking#PlantBased#VeganCookbook#Homemade#HealthyEating#CookingTips#MeatlessEveryday#RecipeOfTheDay
2 notes
·
View notes
Photo

Char-Grilled Potato Salad with Creamy Mustard Dressing donna hay magazine Elevate your taste buds to new heights with our exquisite Char-Grilled Potato Salad, drizzled with a lusciously creamy mustard dressing. Immerse yourself in the world of donna hay magazine's sensational recipes.
0 notes
Text
Crafting Catalogue
Regular DIY and food recipes in single list. All items in alphabetical order, recommended to ctrl + F to search. Names spelled in US English.
Acorn pochette
Aji fry
Anchoas al ajillo
Apple dress
Apple jam
Apple jelly
Apple smoothie
Aroma pot
Axe
Backyard lawn
Baked potatoes
Bamboo bench
Bamboo doll
Bamboo flooring
Bamboo hat
Bamboo noodle slide
Bamboo shelf
Bamboo sphere
Bamboo stool
Bamboo-slats fence
Bamboo wall decoration
Barbell
Barred-knifejaw carpaccio
Barrel
Basement flooring
Basket pack
Beekeeper's hive
Big festive tree
Birdbath
Birdhouse
Block fence
Bone doorplate
Bonfire
Bonsai shelf
Bread
Bread gratin
Brick fence
Brick oven
Brick well
Brown sugar
Brown-sugar cupcakes
Campfire
Cardboard chair
Carpaccio di capesante
Carpaccio di marlin blu
Carrot bagel sandwich
Carrot cake
Carrot potage
Carrot scones
Cherry dress
Cherry lamp
Cherry pie
Cherry smoothie
Cherry speakers
Cherry umbrella
Cherry wall
Chic tulip crown
Clam chowder
Classic pitcher
Clothesline
Coconut juice
Coconut pudding
Cookies
Cool windflower wreath
Corrugated iron fence
Cosmos crown
Country fence
Cute lily crown
Dark wooden-mosaic wall
Decayed tree
Deer decoration
Destinations signpost
DIY workbench
Document stack
Donation box
Drinking fountain
Festive rug
Festive top set
Festive tree
Festive wrapping paper
Fish and chips
Fish bait
Fishing rod
Flimsy axe
Flimsy fishing rod
Flimsy net
Flimsy shovel
Flimsy watering can
Floral swag
Flour
Forbidden altar
Fountain
Foxtail
Frosted pretzels
Fruit cupcakes
Fruit scones
Frying pan
Garbage-heap flooring
Garbage-heap wall
Garden bench
Garden wagon
Gear tower
Giant ornament
Giant vine
Gift pile
Glow-in-the-dark stickers
Glowing-moss boulder
Glowing-moss dress
Glowing-moss pointed cap
Glowing-moss stool
Gnocchi di carote
Gnocchi di patate
Gold armor
Gold bars
Gold-screen wall
Golden altar
Golden arowana model
Golden decorative plate
Golden flooring
Golden garden bunny
Golden gear apparatus
Golden gear tower
Golden piggy bank
Golden vase
Grass skirt
Gratin
Green bamboo fence
Green bamboo mat
Grilled sea bass with herbs
Hanging terrarium
Hay bed
Hearth
Hedge
Hedge standee
Holiday candle
Hyacinth wreath
Illuminated present
Illuminated reindeer
Illuminated snowflakes
Illuminated tree
Iron-and-stone fence
Iron armor
Iron fence
Iron hanger stand
Iron wall lamp
Iron wall rack
Iron worktable
Ironwood bed
Ironwood cart
Ironwood cupboard
Ironwood DIY workbench
Ironwood kitchenette
Jingle wall
Karei no nitsuke
King Tut mask
Ladder
Large cardboard boxes
Large lattice fence
Leaf
Leaf umbrella
Libra scale
Log bed
Log bench
Log chair
Log dining table
Log fence
Log garden lounge
Log pack
Log round table
Log stakes
Log-wall fence
Log wall-mounted clock
Manga-library wall
Manhole cover
Mermaid bed
Mermaid chair
Mermaid flooring
Mermaid screen
Mermaid wall clock
Mini DIY workbench
Mini golden dharma
Mixed-fruits crepe
Mixed-fruits pie
Mixed-fruits sandwich
Mossy garden rock
Mountain standee
Mush lamp
Mush log
Mush low stool
Mush parasol
Mush table
Mushroom curry
Mushroom potage
Mushroom wand
Mushroom wreath
Natural garden chair
Natural garden table
Natural square table
Net
Nice branch
Ocarina
Old-fashioned washtub
Olive-flounder meunière
Open wooden shelves
Orange end table
Orange hat
Orange jelly
Orange pie
Orange rug
Orange wall
Organic bread
Ornament crown
Ornament mobile
Ornament tree
Ornament wreath
Outdoor bath
Pancakes
Pansy table
Pansy wreath
Park fence
Paw-print doorplate
Peach chair
Peach rug
Peach smoothie
Pear hat
Pear jam
Pear jelly
Pear tart
Pesce all'acqua pazza
Pizza margherita
Plain scones
Plain sink
Plain wooden shop sign
Plate armor
Pot
Potato curry
Potato galette
Potato potage
Potted ivy
Pound cake
Pretty tulip wreath
Pretzels
Pull-apart bread
Pumpkin bagel sandwich
Pumpkin curry
Pumpkin pie
Pumpkin pound cake
Recycled boots
Recycled-can thumb piano
Red-leaf pile
Ringtoss
Robot hero
Rocking chair
Rocking horse
Roost sablé cookie
Rope fence
Rope-net flooring
Round glowing-moss rug
Ruined arch
Sardines in oil
Sauna heater
Sautéed olive flounder
Savory bread
Scorpio lamp
Sea-bass pie
Seafood pizza
Seaweed soup
Shell bed
Shell fountain
Shell music box
Shell partition
Shell rug
Shell speaker
Shell stool
Shell wreath
Shovel
Silo
Simple DIY workbench
Simple well
Skateboard wall rack
Ski-slope flooring
Ski-slope wall
Sleigh
Slingshot
Small cardboard boxes
Snowflake pochette
Snowflake wreath
Spaghetti napolitan
Spooky arch
Spooky candy set
Spooky carriage
Spooky chair
Spooky fence
Spooky garland
Spooky lantern
Spooky lantern set
Spooky scarecrow
Spooky standing lamp
Spooky table
Spooky table setting
Spooky tower
Spooky treats basket
Spooky tree
Spooky trick lamp
Spooky wand
Squid-ink curry
Squid-ink spaghetti
Stack of books
Stacked shopping baskets
Stall
Standard umbrella stand
Star wand
Stone arch
Stone axe
Stone fence
Stone stool
Stone table
Stone tablet
Stone wall
Stonework kitchen
Succulent plant
Sugar
Swinging bench
Tabletop festive tree
Tall garden rock
Tall lantern
Tension-pole rack
Tiki torch
Tiny library
Tire stack
Tire toy
Tomato bagel sandwich
Tomato curry
Tomato juice
Tomato puree
Traditional balancing toy
Trash bags
Tree standee
Tree's bounty arch
Tree's bounty little tree
Tree's bounty mobile
Turkey Day casserole
Turkey Day chair
Turkey Day decorations
Turkey Day garden stand
Turkey Day hearth
Turkey Day table
Turkey Day table setting
Turkey Day wheat decor
Vaulting pole
Veggie basket
Veggie crepe
Veggie cupcakes
Vertical-board fence
Vine hanging chair
Vine outfit
Watering can
Wave breaker
Western-style stone
Whole-wheat flour
Wild log bench
Wooden-block bookshelf
Wooden-block chair
Wooden-block stereo
Wooden-block table
Wooden-block toy
Wooden box
Wooden bucket
Wooden chair
Wooden end table
Wooden fish
Wooden ladder set-up kit
Wooden low table
Wooden-mosaic wall
Wooden simple bed
Wooden table mirror
Wooden wardrobe
Zen fence
Zen-style stone
0 notes
Text
The Specialty in Optimising in Flavor and Texture

If having fallen in love with wagyu beef at a restaurant and can’t stop thinking about how it might prepare such a steak at home which may have noticed it’s not something that every grocery store or butcher shop stock the item. This might not even have a butcher shop near by that’s because this is a specialty kind of beef as one which comes from rare, prized cattle and people like it because the meat usually has a lot of giving an appearance in it. Making the beef taste incredibly rich and decadent that don’t need to eat much wagyu to experience its unique qualities and that’s a good thing as it’s not exactly the cheapest cut of beef. Luckily, having found the best places to buy wagyu beef online and select which will depend on what to look for as a luxurious steak, restaurant-quality experience with excellent transparency. It’s about sourcing or some combination as some companies even offer subscriptions which can help defray the cost and provide with a steady supply.
To find out on how can find the wagyu beef online Ipswich with that decadent restaurant quality will fell in love with to all without leaving home as the company prides itself on being a wagyu meat provider which result of cross-breeding for wagyu. With high-quality meat of cattle from farms also offers a variety of cuts of beef along with other meat and seafood with high-quality meat that sustainable ranching practices in extensive selection. Meat provider gets the vote for best overall due to its wide range of offerings can order different strips cuts of wagyu beef online available in different grades. As the difference are rated under higher standard ratings of prime and choice and the website features many recipes for beautiful ways to cook the meat. This can be really helpful if new to such a rarified cut and can order the different beef cuts or whole which already prepared as the company offers everything from ribeye to flank or in other preparations such as for burgers.
Cattle are grass and hay- then offered a sustainable diet that includes other grains, forages, potatoes, vitamins and minerals to ensure their meat is of the highest quality as the cow sources from independently farms and ranches. They practice regenerative agriculture which goes a step beyond organic with practices that sustain soil, water and plants as well as the animals themselves. The company let people select from which farm want to buy including those offering the prized of wagyu beef online is the highest quality and most expensive grade of them all. One of the advantages of cow meat is the fact that it can choose from different cuts of wagyu beef as the cuts are available at a variety of price points and can select the farm of origin. This allows full transparency as to the origin of the wagyu beef online with company’s sustainable practices extend to the other items to offer selecting from à la carte services. Some have a monthly subscription which will vary based on contents and the subscriptions prioritise variety but have the final say over the contents of each box and can swap out different products to suit the meat to like.
0 notes
Video
youtube
Cách làm bánh từ khoai lang - Làm vườn &; trồng rau | O...
Khoai lang không chỉ bổ dưỡng mà còn đa năng trong nhà bếp. Hướng dẫn này sẽ đưa bạn qua các bước biến khoai lang trồng trong vườn của bạn thành những chiếc bánh ngon. Cho dù bạn là một người làm vườn dày dạn kinh nghiệm hay mới trồng rau, công thức này rất đơn giản và bổ ích.
1. Trồng khoai lang
Chọn giống phù hợp: Bắt đầu bằng cách chọn giống khoai lang phù hợp với khí hậu và khẩu vị của bạn. Một số giống phổ biến bao gồm Beauregard, Covington và Jewel, mỗi loại đều có hương vị và kết cấu độc đáo.
Trồng: Khoai lang phát triển mạnh ở vùng khí hậu nắng ấm. Trồng chúng trong đất thoát nước tốt, mùn. Khoảng cách giữa các vết trượt (cây non) cách nhau khoảng 12 inch, đảm bảo chúng có nhiều chỗ để phát triển.
Chăm sóc cây của bạn: Khoai lang cần độ ẩm phù hợp, vì vậy hãy tưới nước thường xuyên. Phủ xung quanh cây để giữ độ ẩm và kiểm soát cỏ dại. Bón phân bằng phân hữu cơ cân bằng để thúc đẩy tăng trưởng khỏe mạnh.
Thu hoạch: Tùy thuộc vào giống, khoai lang thường sẵn sàng thu hoạch 90-120 ngày sau khi trồng. Tìm kiếm các dấu hiệu như lá vàng hoặc kích thước của củ ló ra khỏi đất.
2. Chuẩn bị khoai lang cho bánh ngọt
Làm sạch và gọt vỏ: Sau khi thu hoạch, làm sạch khoai lang thật kỹ dưới vòi nước chảy. Gọt vỏ bằng máy gọt rau.
Nấu khoai lang: Luộc hoặc hấp khoai lang đã gọt vỏ cho đến khi chúng mềm và mềm. Quá trình này thường mất khoảng 20-30 phút. Sau khi nấu chín, nghiền chúng thành một hỗn hợp nhuyễn mịn.
3. Làm bánh khoai lang
Nguyên liệu:
2 chén khoai lang xay nhuyễn
1 chén bột mì (đa dụng hoặc không chứa gluten)
2 quả trứng
1/2 chén đường (điều chỉnh theo khẩu vị)
1/4 chén bơ tan chảy
1/2 muỗng cà phê bột nở
1/2 muỗng cà phê chiết xuất vani
Một nhúm muối
Tùy chọn: Các loại gia vị như quế, nhục đậu khấu hoặc gừng để tăng thêm hương vị
Trộn các thành phần: Trong một bát lớn, kết hợp khoai lang xay nhuyễn, bột mì, trứng, đường, bơ tan chảy, bột nở, chiết xuất vani và muối. Trộn cho đến khi kết hợp tốt và mịn. Nếu muốn, thêm một nhúm gia vị yêu thích của bạn để thêm ấm áp và hương vị.
Tạo hình bánh: Làm nóng lò nướng của bạn đến 350 ° F (175 ° C). Mỡ hộp bánh nướng xốp hoặc chảo bánh bằng bơ hoặc dầu. Đổ bột vào chảo đã chuẩn bị, đổ đầy mỗi cốc hoặc phần đầy khoảng ba phần tư.
Nướng: Nướng trong 20-25 phút hoặc cho đến khi bánh có màu nâu vàng và tăm cắm vào giữa sạch. Để nguội trong vài phút trước khi lấy chúng ra khỏi chảo.
4. Phục vụ đề xuất
Phục vụ những chiếc bánh khoai lang ấm áp với một búp bê kem đánh bông, một giọt mật ong hoặc một lớp đường bột. Họ cũng kết hợp tốt với một muỗng kem vani hoặc một tách trà hoặc cà phê nóng.
5. Lưu trữ và đông lạnh
Bảo quản: Giữ bánh trong hộp kín ở nhiệt độ phòng trong tối đa ba ngày. Để bảo quản lâu hơn, hãy để chúng trong tủ lạnh đến một tuần.
Freezing: These cakes freeze well. Wrap each cake individually in plastic wrap and store in a freezer-safe bag for up to three months. To enjoy, thaw them at room temperature or warm them up in the oven.
Conclusion
Turning home-grown sweet potatoes into delightful cakes is a fulfilling way to enjoy your harvest. With this simple recipe, you can create a treat that’s not only delicious but also packed with nutrients. Happy gardening and happy baking
0 notes