#panko vs breadcrumbs
Explore tagged Tumblr posts
Visit Tumblr Blog
Explore Tumblr blogs with no restrictions, modern design and the best experience.
Last Seen Tumblr Blogs


Fun Fact
25% of US internet users with an annual income of $80-100K use Tumblr.
Text
Chicken Katsu: Panko vs Bread Crumbs (Air Fryer)
youtube
twitch_live
#Vtuber Uprising#Vtubers of Tumblr#2DVtuber#ENVtuber#VtuberEN#youtube streamer#Youtube#cooking#other vtubers#home cooking#vtubers are live#live stream#streaming#vtuber cooking#twitch streamer#chicken katsu#panko#panko breadcrumbs#panko vs breadcrumbs
0 notes
Text
How to Cook Tilapia in an Air Fryer: A Quick & Healthy Guide
If you’re looking for a quick, easy, and healthy way to cook tilapia, an air fryer is the perfect tool. This method delivers crispy edges, a tender interior, and a delicious flavor without the need for excessive oil. Whether you're a busy professional, a health-conscious eater, or just someone who loves delicious seafood, air fryer tilapia is a must-try.
Why use an air fryer? It’s fast, hassle-free, and healthier than traditional frying methods. In this guide, we’ll walk you through everything—from selecting the best tilapia to cooking it perfectly every time.

Why Cook Tilapia in an Air Fryer?
Air frying tilapia is a game-changer for seafood lovers. Here’s why:
Healthier Alternative – Uses little to no oil while still achieving a crispy texture.
Fast & Convenient – Tilapia cooks in 10-12 minutes—perfect for busy weeknights.
No Mess – No greasy splatters or complicated clean-up.
Perfect Texture – Crispy outside, flaky inside—what’s not to love?
What You Need to Make Air Fryer Tilapia
You don’t need fancy ingredients to make delicious air fryer tilapia. Here’s what you’ll need:
Tilapia fillets (fresh or thawed if frozen)
Olive oil or melted butter (for moisture and crispiness)
Salt and black pepper (to enhance the flavor)
Garlic powder (for depth of flavor)
Paprika or Cajun seasoning (for a bit of spice)
Lemon wedges (for serving)
Choosing Fresh vs. Frozen Tilapia
Which is better—fresh or frozen tilapia? Here’s a quick comparison:
Fresh tilapia – Best if bought the same day you plan to cook it. Look for firm, moist fillets with no strong fishy odor.
Frozen tilapia – Just as good! Make sure to thaw it properly in the fridge overnight or in cold water for 30 minutes before cooking.
How to Prepare Tilapia for Cooking
Before you cook, a little prep work goes a long way. Follow these steps:
Pat the fillets dry – Removes excess moisture for better crisping.
Brush with olive oil or butter – Helps seasoning stick and prevents dryness.
Season well – Apply your chosen spices evenly on both sides.
Let it rest for 5 minutes – This allows the flavors to absorb.
Best Seasonings for Air Fryer Tilapia
Tilapia has a mild, slightly sweet flavor, making it perfect for different seasonings. Try these options:
Classic Garlic & Lemon – Garlic powder, salt, pepper, and fresh lemon juice.
Cajun Spice – Paprika, cayenne, and thyme for a bold kick.
Parmesan Herb – Grated parmesan, Italian seasoning, and black pepper.
Asian-Inspired – Soy sauce, ginger, and sesame seeds.
Step-by-Step Guide to Cooking Tilapia in an Air Fryer
Preheat your air fryer to 375°F (190°C) for 3 minutes.
Prepare the fillets by seasoning them with your chosen spices.
Place fillets in the air fryer basket in a single layer (don’t overcrowd).
Cook for 10-12 minutes, flipping halfway through.
Check for doneness – The fish should flake easily with a fork and reach an internal temperature of 145°F (63°C).
Serve immediately with fresh lemon wedges and your favorite sides.
Tips for Crispy & Flavorful Tilapia
Don’t overcrowd the basket – This ensures even cooking.
Use a light oil spray – Helps with browning and crisping.
Flip halfway through cooking – Ensures both sides are evenly cooked.
Rest before serving – This keeps the fish juicy and tender.
Air Fryer Tilapia Recipe Variations
Want to switch things up? Try these creative recipes:
Panko-Crusted Tilapia – Coat with panko breadcrumbs for an extra crispy finish.
Spicy Sriracha Tilapia – Brush with a mix of sriracha, honey, and lime juice before air frying.
Coconut Crusted Tilapia – Dip in coconut flakes for a tropical twist.
Best Side Dishes to Serve with Tilapia
Pair your air fryer tilapia with these delicious sides:
Roasted Vegetables – Asparagus, zucchini, or bell peppers.
Garlic Butter Rice – A simple, flavorful carb option.
Sweet Potato Fries – A crispy and healthy alternative.
Coleslaw or Avocado Salsa – Fresh, tangy, and perfect for seafood.
Common Mistakes to Avoid
Skipping the oil – A little oil helps with crispiness.
Overcooking – Tilapia cooks fast, so check at 10 minutes.
Not preheating the air fryer – This step ensures even cooking.
How to Store & Reheat Leftover Tilapia
Got leftovers? Keep them fresh with these tips:
Store in an airtight container in the fridge for up to 3 days.
Reheat in the air fryer at 350°F (175°C) for 3-4 minutes to restore crispiness.
Frequently Asked Questions (FAQs)
Can I cook frozen tilapia in an air fryer? Yes! Just add 3-4 extra minutes to the cooking time. Do I need to flip tilapia while cooking? Yes, flipping halfway ensures even cooking. Can I use foil or parchment paper in the air fryer? Yes, but poke holes to allow air circulation. What’s the best oil for air frying tilapia? Olive oil, avocado oil, or melted butter work best.
Final Thoughts
Cooking tilapia in an air fryer is a simple, healthy, and delicious way to enjoy seafood. With minimal prep, quick cooking time, and endless seasoning options, this dish is perfect for any meal.
0 notes
Text
Research: Steak Butchery
Week 2
MENU
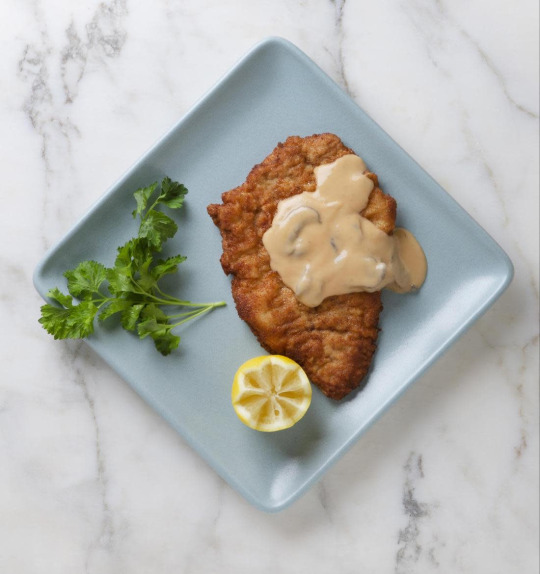
Amuse Bouche: Steak Tartare Appetizer: Meatballs Entrée: Steak dishes - 1. Beef (Filet Mignon) or 2. Veal (Rack), Vegetables, Potato, Sauces: Compound Butter, Bearnaise, Au Poivre
Part 1 Introductions
Method of cooking/technique to discuss:
Sear Vs Char Grill
Tartare
Learning Objectives:
Compare and contrast different dry heat methods for cooking beef tenderloin steaks and veal
Produce a variety of advanced sauces - compound butter, bearnaise, and pan sauce
Prior Knowledge:
Primary Ingredient of the week:
Veal, in particular Veal Rack
Beef Tenderloin
I have cut some beef tenderloin before, but I need more experience before I would be willing to hack into one myself unsupervised. The filet mignon is the round cut at the softer end of the tenderloin.
When I worked as a garde manger at Acre I made a lot of steak tartare. Their dish uses the scrap from the steaks, it has the yolk mixed in, and it is topped with fried capers and thinly sliced radishes. The black round bowl is frozen with a smear of blue cheese sauce on about a third of the rim and the tartare is shaped inside a ring. The rest of the recipe is pretty similar to the one provided.
Veal is something I have not prepared before. Veal is usually the meat from a young male dairy cow (no good for dairy). I am familiar with breading and pan frying. Veal is very $$$$
Part 2 Background Information
Method:
The USDA recommends cooking whole muscle veal cuts like veal steaks, roasts and chops to 145 degrees F (medium rare), 160 degrees F (medium), or 170 degrees F (well done). Since this meat is so expensive, compromising on ingredients or making a mistake in the cooking process is a bad idea. Tenderizing the meat with a mallet and removing stringy connective tissue will make the veal softer in texture.
Searing- “The Maillard reaction is an interaction between amino acids and reducing sugars that browns food and gives it that roasty, toasty flavor. This process is essential to cooking, not only because it lends color, but because it creates hundreds of ester molecules that give rise to an array of aromas and flavors.”
Meyer, J. (2018, July 27). Science of searing: How to Pan Sear Proteins. Hestan Cue. https://hestancue.com/blogs/blog-recipes/the-science-of-searing.
Char Grilling- The difference between searing and grilling is that searing is direct heat while grilling is indirect. Char grilling is where the heated metal chars or burns the outside of the food leaving dark lines from the contact points with the grill surface.
Primary Ingredient:
Filet Mignon is often the most tender and lean cut. It is also pretty expensive because it is in a limited quantity on the cow. Filet mignon often has a milder flavor than other cuts of meat and as such is often garnished with a sauce like we are doing in our lab with the Bearnaise or Au Poivre.

https://www.angus.org/pub/beefchart.pdf
Veal is the meat from young cows, 3 to 14 weeks old. The meat is lean and has a bit of white fat on the outside. It is desirable for it to have a gray color. To do this, the farmers will sometimes deprive the animals of their natural sources of iron to give the meat a gray color. In Europe, it is cooked rare while in the US it is cooked more fully. The veal cutlet can be pan fried with breadcrumbs to make a veal schnitzel.

https://www.britannica.com/topic/veal
Part 3 Recipe R&D
Chosen Recipes:
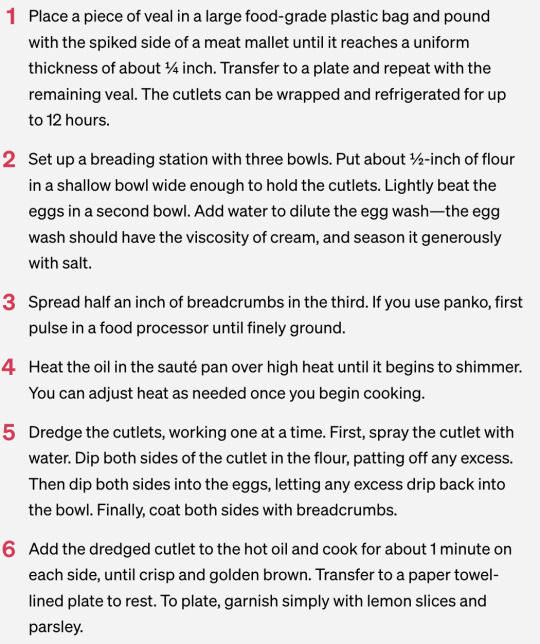
Panko Breaded Veal Rack- This recipe I intend to mostly follow. It is “Chef Thomas Keller’s Wiener Schnitzel Recipe” found on the website Masterclass. The recipe asks for veal top round which I do not have, however I watched a video demonstration of someone pan frying some veal rack; he just tenderized it with a mallet to get it to a lesser thickness. As long as we remove the sinew and connective tissue it should be tender. I chose it of course because the chef is a famously good chef and the recipe seemed easy to follow with the resources available.
Chef Thomas Keller’s Wiener Schnitzel Recipe - 2024. MasterClass. (n.d.). https://www.masterclass.com/articles/chef-thomas-kellers-wiener-schnitzel-recipe#2snWmni7k0EQ40Ue0QgGWS
https://www.masterclass.com/articles/chef-thomas-kellers-wiener-schnitzel-recipe#2snWmni7k0EQ40Ue0QgGWS
Vegetables- Roasted Asparagus and German Potato Salad- Well the asparagus will go great with the bearnaise and we would love to get some char flavor on it since there will not be that same flavor in the breaded veal. The potato salad was linked with the veal schnitzel recipe and since they are both German recipes and suggested to be together.
Compound Butter- Take some softened good quality butter, chop some herbs, roll them together into a log that can then be sliced. I got the flavor combinations from the blog Love and Lemons. I chose it because the photography was elegant and looked modern.

Provided Recipes:
Steak Tartare- The instructions say to get the meat colder so it's easier to cut. From there it is blending up some punchy flavors like shallot and mustard as well as some umami. The fat comes from the egg yolk on top and I guess most people know they should mix it in for the best effect. Capers add a burst of salty and sour for a nice surprise. Personally I would like the texture to be dippable on the bread so I would prefer the dice to be tiny, maybe a knife to spread it.

https://www.wineenthusiast.com/recipe/make-beef-tartare-home-recipe/
Meatballs- Chef Eric Rivera’s personal recipe that he loves. No intended modifications. I see that the meat and the bread crumbs do not get blended together and that they are instead combined by hand probably for a less homogenous texture.
Au Poivre- This is a French sauce not super common in the US but popular in Europe. The sauce is made in the pan after searing the steak so you can deglaze the meat browning and flavors. DAMN that looks tasty

https://www.sipandfeast.com/steak-au-poivre/
Bearnaise- The recipe involves egg yolks which have a thickening power, however they are temperamental and will curdle if too hot, and loosen if not heated up to 185F due to the enzymes that break it down still being active up to that temp. This temp thankfully coincides with the nappe texture for the most part so you do not need a thermometer. Good on top of meat and in our case asparagus.
Part 4 Recipes
Provided Recipes:
Au Poivre

Bearnaise Sauce

Meatballs

Steak Tartare

Recipes Researched
Breaded Veal- Chef Thomas Keller’s Wiener Schnitzel Recipe

Vegetables- grilled asparagus Potatoes- Chef Thomas Keller’s Recipe for German Potato Salad


Compound Butter-

https://www.loveandlemons.com/herb-compound-butter/
Plan of Work
Start 1pm, demos until 1:20-1:30, no ingredients requests after 2 Get the butter to room temp Trim the meats, need for meatballs and tartare Watch meatball demo, work tartare all the way Boil the taters Mix dressing for the taters and finish that salad let sit room temp, Meanwhile compound butter Au poivre can work any time, keep warm and reduce Set up dredging station for veal Boil water for double boiler (bearnaise) Finals steps: Fry veal, grill asparagus, bearnaise
Plate up at 5. discussion and out by 5:50
0 notes


Text
Meatballs Spaghetti

Meatballs Spaghetti
Xin chào,
Đã quá lâu rồi mình chưa viết bài, tuy nhiên thì đây lại không phải 1 bài review phim như mọi khi mình hay viết. Mình sẽ chia sẻ với mọi người một sở thích khác ngoài phim ảnh: đó là làm mỳ Ý.
Mình cũng không rõ tại sao mình bắt đầu làm mì Ý và lại đam mê nó đến như vậy. Phần nào do gia đình mình là kiểu Hà Nội truyền thống, thích ăn tại nhà và ít khi ăn đồ Tây, và mì Ý là một món tương đối dễ làm và lại ngon nữa. Hôm nay mình làm Meatballs Spaghetti, tình cờ thế nào lại đúng vào hôm có đá bóng Việt Nam vs Philippines.
Món này làm mất công hơn mì Bolognese một chút, tính ra mất khoảng 1h30p cho cái đĩa mì này, nhưng ngon dã man, nói chung là xứng đáng.
• Phần ăn: 3-4 người
•Thời gian: 1h30p
• Nguyên liệu:
300 gr thịt bò băm
2/3 cup bột chiên xù panko
5 quả cà chua
Phô mai parmesan bột
Basil khô
2 lá bay leaf
1 quả cà rốt
1 quả trứng
1 củ Hành tây
1 củ Tỏi - khoảng 8-10 nhánh
Mì Ý
• Cách làm
| Chuẩn bị nguyên liệu |
- Băm nhỏ hành tây, tỏi, cà rốt
- Cắt hình chữ X ở phần đít cà chua. Cho vào nước sôi ngâm mười phút. Vớt ra để vào nước lạnh. Bước này sẽ giúp bóc vỏ cà chua nhanh hơn.
| Thịt viên |
- Đảo hành và tỏi trong chảo với dầu olive. Để lửa nhỏ và đảo đến khi hành trong suốt và hơi caramelized một chút (khoảng 10 phút). Lấy 1/3 để trộn với thịt, phần còn lại giữ lại để làm sauce
- Trộn thịt, bột chiên xù, hành tỏi vừa đảo, phô mai, basil, gia vị, tiêu. Viên thành quả bóng bàn (thực ra thì kích cỡ tuỳ ý, đúng kiểu thì là trái bóng gôn cơ mà mình sợ cả nhà ăn không quen nên viên nhỏ hơn xíu) và để tủ lạnh.
Lúc tìm công thức mình cũng thấy hơi lạ vì lại cho bột chiên xù (breadcrumb) vào thịt viên. Mình dùng bột chiên xù panko vì siêu thị VN không có breadcrumb. Bột chiên xù có tác dụng giữ nước cho thịt và làm texture kiểu bready, ăn không bị khô và ngán. Mẹ mình ăn cũng khen ngon
- Sau khi để tủ lạnh 1 tiếng thì chiên thịt đến khi vàng, hơi xém các mặt. Đảo viên thịt đều tay để giữ được hình dạng tròn.
| Sốt cà chua |
Ở siêu thị hay bán sốt cà chua có sẵn, nhưng những hộp này có chất bảo quản và chất điều chỉnh vị các thứ nên mình không dùng bao giờ. Tự làm cũng tiết kiệm hơn nữa ^^
- Cho cà rốt và đảo cùng hành tỏi lúc trước. Phần rau củ này nên đảo kĩ ở lửa nhỏ để mềm các nguyên liệu. Sau đó cho cà chua vào đảo cùng
- Xay tất cả phần sốt vừa làm đến khi nhuyễn
- Cho lại sốt vào nồi, nêm nếm gia vị và tiêu. Sau đó cho basil và bay leaf vào. Đun trong vòng 10p thì cho phần thịt viên và tiếp tục đun 30p nữa để lửa nhỏ.
| Mỳ |
- Đun sôi nước và cho muối. Đừng cho dầu ăn vào vì dầu sẽ làm mỳ không ngấm sốt.
- Cho mì vào và đun theo hướng dẫn trên bao bì. Ăn thử một sợi thấy nó mềm mà vẫn hơi sần sật là được ("al dente"). Thực ra cái này cũng hơi khó điều chỉnh, mình cũng nấu biết bao nồi mì mới nấu được đúng ý.
- Mỳ được thì ngay lập tức cho vào đảo với sốt cho ngấm. Sau đó bắc ra đĩa rồi cho thịt viên, rắc thật nhiều phô mai lên trên là xong rồi 🍝.
Hết rồi đó. Đơn giản thôi mà ngon vô cùng.
P/s: Thực ra thì mỳ này cũng có xuất hiện trong một bộ phim đó. Mỳ Ý là một món ăn đơn giản mà rất ấm áp, nên hãy thử làm và ăn mỳ Ý với người bạn yêu thương nhé ^^

2 notes
·
View notes
Text
Oven Baked Buffalo Cauliflower Bites- Spend With P...
New Post has been published on https://cookingawe.com/oven-baked-buffalo-cauliflower-bites-spend-with-p/
Oven Baked Buffalo Cauliflower Bites- Spend With P...

amzn_assoc_placement = "adunit0"; amzn_assoc_tracking_id = "workathome089-20"; amzn_assoc_ad_mode = "search"; amzn_assoc_ad_type = "smart"; amzn_assoc_marketplace = "amazon"; amzn_assoc_region = "US"; amzn_assoc_title = "Shop Related Products"; amzn_assoc_default_search_phrase = "cooking"; amzn_assoc_default_category = "Kitchen"; amzn_assoc_linkid = "51fe4d035c7af8dc5928e6f5e5b79c4e"; amzn_assoc_default_browse_node = "284507"; amzn_assoc_rows = "4"; amzn_assoc_design = "text_links";
Oven baked Buffalo Cauliflower is a simple appetizer that is great for parties. We love making this buffalo cauliflower recipe (with a side of Blue Cheese Dressing) and serving it alongside Jalapeno Poppers and other delicious appetizer recipes when we are entertaining!
Who doesn’t love all things buffalo-style? From buffalo chicken dip to buffalo hot wings, roasted buffalo cauliflower is the next big thing and this recipe tastes absolutely delicious!

Buffalo Sauce vs Hot Sauce
Buffalo Sauce is not the same as just plain ol’ hot sauce out of the bottle. When you order buffalo wings in a restaurant, the sauce is generally 2 parts hot sauce to 1 part melted butter (that’s why they taste so darn good)!
Of course you can use a store bought Buffalo Sauce (I love Frank’s RedHot Buffalo Sauce best). It has great flavor (and it doesn’t contain as much fat as a homemade sauce)!
Spicy vs. Mild
You can buy buffalo sauce in a bottle at the supermarket, or make delicious homemade buffalo sauce. If you’re going the store bought route, there are lots of different brands that have their own heat index and flavor profile.
If you have anyone in your group who can’t handle the spice, leave a few aside and season with salt and pepper and dip in a garlic aioli for another yummy variation!
How to Make Buffalo Cauliflower
This recipe is so easy because you only need one bowl and a plastic bag! To make baked buffalo cauliflower:
Prep the cauliflower by cutting it into bite sized pieces and removing any leaves.
Mix the coating ingredients together and toss the cauliflower in a plastic bag to coat the pieces.
Bake the cauliflower bites for 15 minutes. Take them out, toss with buffalo sauce, and bake for an additional 5 minutes.
Fried buffalo cauliflower bites are always a favorite when we go out to eat, but baking them at home is SO much healthier. Any dressing will do, but the best buffalo cauliflower dip is some tangy blue cheese dressing or ranch, because, who doesn’t love dipping, right?
Can You Use Frozen Cauliflower to Make Buffalo Cauliflower? You sure can! Even easier than fresh cauliflower because it will be pre-cut and perfectly portioned! Be sure the frozen cauliflower is thawed all the way before the batter process so that it heats evenly through and drain well, dab any liquid with paper towels.
What to Eat with Buffalo Cauliflower?
What can’t you eat with buffalo cauliflower bites? Just like chicken wings, buffalo cauliflower bites call for sides of celery and carrots. But, why stop there? Why not make an amazing buffalo cauliflower salad with ranch dressing?
It’s also great as a buffalo cauliflower wrap or a juicy sandwich on a hoagie roll with lettuce and some dressing? Dip your buffalo cauliflower bits into some dressing and keep your fingers clean at the same time!
More Buffalo Snacks You Need
Buffalo Cauliflower
Cook Time 25 minutes
Total Time 45 minutes
If you’re looking to serve a snack big on flavor this is one of my favorites! I do love Buffalo Wings, but I think I love this cauliflower even more (and these are much healthier)!
1 cup milk
1 cup flour
1 teaspoon garlic powder
pepper to taste
1 tablespoon olive oil
1 head of cauliflower
2/3 cup Panko bread crumbs
2/3 cup buffalo sauce (see note below)

Follow Spend with Pennies on Pinterest
Preheat oven to 450 degrees F.
Cut cauliflower into bite sized pieces discarding the core.
Combine milk, flour, garlic powder, pepper and olive oil in a large bowl. Place batter and cauliflower in a large Ziploc bag and toss until cauliflower is coated.
Pour cauliflower into a large strainer letting any excess batter drip off. Sprinkle with Panko breadcrumbs and gently toss.
Place on a foil lined pan and bake 15 minutes. Remove from the oven and gently toss with buffalo sauce. You want the cauliflower coated but not soaked.
Place back on the pan and bake an additional 5-10 minutes or until cauliflower is tender crisp.
Serve with ranch or blue cheese dressing.
Note: You can purchase store bought buffalo sauce or mix 1/3 cup melted butter with 2/3 cup hot sauce (such as Frank’s Red Hot). Whisk until combined. Nutritional information provided is an estimate and will vary based on cooking methods and brands of ingredients used.
Nutrition Information
Calories: 123, Fat: 2g, Cholesterol: 1mg, Sodium: 684mg, Potassium: 290mg, Carbohydrates: 20g, Fiber: 2g, Sugar: 3g, Protein: 4g, Vitamin A: 1.2%, Vitamin C: 42%, Calcium: 6.4%, Iron: 7%
(Nutrition information provided is an estimate and will vary based on cooking methods and brands of ingredients used.)
Keyword buffalo cauliflower
© SpendWithPennies.com. Content and photographs are copyright protected. Sharing of this recipe is both encouraged and appreciated. Copying and/or pasting full recipes to any social media is strictly prohibited. Please view my photo use policy here.


!function(f,b,e,v,n,t,s) if(f.fbq)return;n=f.fbq=function()n.callMethod? n.callMethod.apply(n,arguments):n.queue.push(arguments); if(!f._fbq)f._fbq=n;n.push=n;n.loaded=!0;n.version='2.0'; n.queue=[];t=b.createElement(e);t.async=!0; t.src=v;s=b.getElementsByTagName(e)[0]; s.parentNode.insertBefore(t,s)(window,document,'script', 'https://connect.facebook.net/en_US/fbevents.js'); fbq('init', '1997436690581127'); fbq('track', 'PageView'); amzn_assoc_placement = "adunit0"; amzn_assoc_search_bar = "true"; amzn_assoc_search_bar_position = "bottom"; amzn_assoc_tracking_id = "workathome089-20"; amzn_assoc_ad_mode = "search"; amzn_assoc_ad_type = "smart"; amzn_assoc_marketplace = "amazon"; amzn_assoc_region = "US"; amzn_assoc_title = "Shop Related Products"; amzn_assoc_default_search_phrase = "cookware"; amzn_assoc_default_category = "All"; amzn_assoc_linkid = "b45319dac495d29e17b5eff312392025"; Source link
0 notes
Text
how i stock the smitten kitchen – smitten kitchen
It’s true: I’ve dragged my feet over writing a guide to what I keep in my “pantry” (I don’t have a pantry) and fridge for 14 years now. I have my reasons, primarily that I’m not sure I know what your kitchen needs. I mean, shouldn’t you stock the stuff you need for what you’ll want to cook and not some arbitrary list from a lady who loves Triscuits? Maybe you don’t love Triscuits! (Sorry you’re so wrong.) The idea of buying a kitchen full of someone else’s groceries is very much against the way I think anyone should shop. I know your kitchen will grow organically, and accurately reflect what you need if you buy things for what you want to cook as you want to cook them. Second, due to the nature of my work here I have an absolutely unusual amount of stuff in my kitchen cabinets and fridge. It’s totally justified for me, while making little sense for others. On the flip side, I live in NYC and have grocery stores and Greenmarkets quite close, but also as a small kitchen with very few cabinets, meaning that not only can I not stock very much at a time, I don’t need to — I can always dash out for vinegar or dried pasta. This is not the way most people shop.
So why now? Shopping and stocking up has taken on a whole new meaning during the pandemic, for us too. I can’t safely go to the store as often as I used to and there isn’t as much on the shelves when I do. I have to be strategic; I need a system. And of course I’ve amassed a lot of opinions on groceries after 14 years of a cooking career. Thus, please, think of this less as The Last Pantry Shopping Guide You’ll Ever Need, but a tour of the things I keep around more often than not — and would make a point to restock when I’m out of them (vs. say, the 00 flour I’ve bought for a few recipes over the years but don’t consistently keep around). Perhaps you’ll find something useful in planning your own next grocery order or pantry meal; I hope you do.
Pantry | Fridge | Freezer | Produce | Notes | Feeding Others
Things I Keep In The Pantry
Dried
Flours: All-purpose and whole-wheat flour get me through 99% of my baking. I never buy cake flour, preferring to make my own. I also keep whole-wheat flour around; it goes rancid (it will smell musty) much faster than white flour; if you only use it sporadically, keep it in the freezer. I rarely buy bread flour unless I’m on a bread-making kick, but if you make enough pizza or other breads, it can be worth it. If you like to make pasta, you should buy fine semolina. For specific cooking projects, I sometimes keep rye flour, barley flour, spelt, oat, almond meal, and/or gluten-free flour blends around, but I don’t consider them staples that must be replenished as soon as they’re depleted. // New York Deli Rye Bread, Whole Wheat Apple Muffins
Pasta and noodles: I keep a mix of pasta shapes around, some long, some short plus some tiny ones, like orzo, ditalini, and fregola/large couscous. When I find it, Setaro is one of my favorite brands of dried pasta. I like to stock dried rice noodles and ramen-style noodles, too. // Quick, Essential Stovetop Mac-and-Cheese, Crispy Tofu Pad Thai
Rice and grains: My personal favorites are a really long-grain white and a short-grain brown rice; it’s a bit random. I also keep a short-grain white rice like arborio or carnaroli for risotto and rice pudding, plus small couscous and farro (or barley, wheatbeeries, or freekeh). I tend to only buy quinoa, millet, or buckwheat when working on specific recipes that use them. Worth knowing: Cooked grains freeze fantastically for future dishes. // One-Pan Farro with Tomatoes, Crispy Rice and Egg Bowl with Ginger-Scallion Vinaigrette, Arborio Rice Pudding
Dried beans, lentils, and split peas: I like to keep dried black, small red, and chickpeas around but would caution you not to buy much more than you think you’ll use, as they will ultimately get stale and there’s no crime in being a canned bean person. A few random favorites of mine: dried chana dal (also sold as split chickpeas or bengal grams) makes for the smoothest hummus, no peeling required. Lentils de puy are dark green and don’t fall apart in soups and salads. Yellow split peas make a fantastic everyday dal, and black lentils make a stunning special one. // Ethereally Smooth Hummus, A Really Great Pot of Chickpeas, Burrata with Lentils and Basil Vinaigrette, Everyday Yellow Dal, Punjabi-Style Black Lentils
Sugar: Granulated sugar, raw or turbinado sugar, light brown, dark brown, and powdered sugar are always around in my pantry but I, of course, bake quite a bit. I mean, I also have pearl sugar, but I’m still on the bag I bought we-will-not-talk-about-it years ago. Brown sugars should be keep as airtight as possible. Nothing here goes bad. // Unfussy Sugar Cookies
More dry goods: Rolled oats and Irish oats, panko-style breadcrumbs, cornstarch and tapioca starch/flour (which is my favorite pie thickener these days), dried unsweetened coconut, cornmeal, nuts (we like whole and sliced almonds, peanuts, and I like walnuts; keep nuts in the freezer for longer storage as they will get rancid at room temperature) a mix of dried fruit, and always, non-negotiably, ground espresso for our Moka pot. (Lavazza Crema e Gusto is our current favorite). // Thick, Chewy Oatmeal Raisin Cookies, Chicken Milanese, Even More Perfect Apple Pie, Green Beans with Almond Pesto, Stovetop Americanos
Spices: I have a rack off the side of my kitchen with my spices. Listen, I can tell you to buy Aleppo flakes, allspice, anise, bay leaves, cayenne, and celery seed — and that’s just the first row — but it will make a lot more sense for you to buy spices as you long for them in your food. I firmly disagree with anyone who tells you spices that are 6 months or a year old have to go — trust your nose and your food. When it doesn’t smell like much anymore or you’re not finding flavor in the dishes that contain it, it’s time for a refresh.
Canned
Beans: Black beans, kidney beans, small red beans, cannellini beans, small white beans, and chickpeas are my standards but you probably know that I really love beans. I often buy a canned black bean soup, pouring off some of the extra liquid at the top instead of mixing it in, for shortcut saucy black beans. For everyday beans, I mostly buy Goya. For special cooking, or simpler bean dishes that really glow up with better ingredients, I use Rancho Gordo. // Crisp Black Bean Tacos, Red Kidney Bean Curry, Cannellini Aglio e Olio, Crisped Chickpeas with Herbs and Garlic Yogurt
Tomatoes: 28-ounce cans (one whole and one crushed) prove the most versatile to me, as well as tomato paste (although I also like to keep a tube in the fridge for when I need less than a can). Should you only have tomato paste cans, you can freeze the extra paste in tablespoon-sized dollops for future recipes and be glad you did. // Quick Pasta and Chickpeas, Tomato Sauce with Onion and Butter
Coconut milk: I always regret it when I don’t have a can. In my unscientific studies, I’ve found Trader Joe’s coconut milk to be the richest/creamiest. // Braised Ginger Meatballs in Coconut Broth
Liquid
Vinegars: Vinegar keeps for eons and we love acidic stuff, so I keep many around, including plain white vinegar, white wine vinegar, red wine vinegar, apple cider vinegar, sherry vinegar, rice vinegar, and black vinegar. Do you need all of these? Of course not. But I don’t think I could pick two desert island favorites. // Use in: Easiest Fridge Dill Pickles, Pickled Vegetable Sandwich Slaw, Giardinera, and Pickled Cabbage Salad.
Olive oils: I like to keep a “good” olive oil around (something delicate for finishing a dish or salad dressing) and an everyday one around (for roasting, sautéing, frying, and baking). Repeat after me: There is no reason to fry an egg at high heat in your best olive oil. California Olive Ranch makes a great everyday olive oil; 3-liter cans, decanted as needed, brings the price down. If not, the bottles are generous. // Crisp Rosemary Flatbreads and Chocolate Olive Oil Cake.
Other oils: Toasted sesame, safflower/sunflower (my go-to vegetable oil for high-heat cooking and roasting, and cakes that need a neutral oil), coconut oil, and I don’t deep-fry often, but peanut oil is my favorite for when I do. Toasted sesame oil has the shortest shelf life; keep yours in the fridge if you use it infrequently. Do you love the taste of butter but dislike that it burns easily at high temperatures? I am the last person on earth to discover ghee — which is like clarified butter but tastes a bit toastier, due to the way it is made — I’ve been making up for lost time. Known better for its application to Indian cuisine, I also love it for frying eggs (even The Crispy Egg) and rather luxuriously roasting potatoes. It keeps a very long time at room temperature // Black Pepper Tofu and Eggplant, Double Chocolate Layer Cake, Easiest French Fries, Ginger Fried Rice
Liquid sweeteners: I keep molasses, honey, and golden syrup (which I prefer to corn syrup for flavor) around, mostly for baking. (I keep maple syrup in the fridge.) // Flapjacks, Majestic and Moist Honey Cake, Pecan Pie, and Nutmeg Maple Cream Pie
Vanilla extract and vanilla bean paste: I make my own vanilla extract. I recently picked up vanilla bean paste for a wedding cake project; I don’t use it as a replacement for vanilla extract (to me, they have different flavors) but in recipes where I’d otherwise add all or part of a vanilla bean. Heilala vanilla bean paste is highly concentrated and wonderful. // Make Your Own Vanilla Extract, New Classic Wedding Cake + How To
Etceteras
Everything else: Nutella; Triscuits; Ryvita or Wasa crisps; cheddar bunnies or rockets, sadly not homemade; at times, granola, chocolate, and cocoa for baking. I actually keep a box of baking chocolate in a cooler part of our apartment because our kitchen runs warm and I don’t want to melt and bloom it. My favorite baking chocolate is Guittard, but it’s not widely-enough available near me that I buy it exclusively. The pound-plus bars from Trader Joe’s are excellent for bittersweet baking. My favorite cocoa powder (Valrhona) is one of the most expensive and I can only encourage you not to try it because I’ve found it impossible to use others since. Should you buy it, I highly encourage you to buy a 3kg package (in 3 1-kg bags) to bring the price down and split it with friends who like to bake.
Things I Keep In The Fridge
Butter: Like olive oil, I keep two levels of butter around, one that is more everyday and unsalted for baking, usually a store brand or whatever was on sale, and a fancier or European-style (higher butterfat) salted around for toast and other finishes, where the flavor difference is more apparent. Butter absolutely goes rancid — and unsalted butter turns faster than salted butter (salt is a preservative) — so if you’re not going to use it within 3 to 4 weeks, I’d definitely keep it in the freezer.
Dairy: Milk, cream, half-and-half, sour cream, yogurt, buttermilk. Yes, we keep an unusual amount of dairy around. I don’t believe in buttermilk expiration dates. There, I said it. // Buttermilk Roast Chicken, Dreamy Cream Scones
Dijon and spicy mustards: I’m not going to tell you how many types of mustard we have in the fridge because you’ll unfollow me forever. But if I had to only choose one, it would be a smooth Dijon — this is a great everyday Dijon mustard. This is a delightfully crunchy whole-grain Dijon, and this our current favorite spicy mustard, // Mustard-Roasted Potatoes, Dijon and Cognac Beef Stew
Bouillon: I am a great fan of Better than Bouillon concentrates, which have much better flavor than most boxed stocks, keep for ages, and are wonderfully space-efficient. I actually keep one of each (beef, chicken, vegetable, mushroom, turkey) but if you were just choosing one, don’t sleep on that No-Chicken Base one because it has a cozy soup flavor but is also vegetarian. The turkey is great when you need extra stock for Thanksgiving cooking.
Cheese: We also love cheese and keep sharp white cheddar, aged parmesan and pecorino, halloumi, cotija, cream cheese, and sometimes feta around. Halloumi and cotija keep a very long time. Always save your parmesan rinds for flavoring soups. Nobody asked, but this is my favorite grocery store cheddar and my favorite feta is Bulgarian. // Parmesan Broth with Kale and White Beans, Foolproof Cacio e Pepe
Eggs: Most baking recipes call for large eggs. // 44 Egg-Centric Recipes
Yeast: I keep both active dry and instant yeast around, but I mostly use the latter these days and so can you. (Here’s an excellent primer on why.) Instant yeast keeps longer than active dry, but both keep longer in the fridge, and longest in the freezer. SAF Instant yeast is considered one of the best // No-Knead Bread
Miso: This also keeps for ages in the fridge and adds an unmistakable boost to food. // Miso Sweet Potato and Broccoli Bowl, Avocado Salad with Carrot-Ginger Dressing
Jams: Our go-tos are raspberry and apricot, but we also have fig, cherry, and more. We use a lot of jam because my kids (cough “kids”) like peanut butter and jelly a whole lot, and because I think a freshly baked biscuit with salted butter and apricot jam is a very fine thing. // Austrian Raspberry Shortbread, Easy Jam Tart, My Favorite Buttermilk Biscuits
Nut and seed butters: Peanut butter, tahini, almond, or sunflower seed butter. Sunflower seed is my favorite nut-free peanut butter swap. // Salted Peanut Butter Cookies
Extras that make us happy: Fish sauce (Megachef and Red Boat are my go-tos), mayo, preserved lemon paste, (a great alternative to chopping all or part of a preserved lemon for recipes), a favorite harissa (or a homemade one), capers, olives, I get these anchovies when I can, salami, chile-garlic sauce, this hot fudge sauce, maple syrup, and we always have this chili crisp.
Things I Keep In The Freezer
Bread: We don’t go through bread fast enough to keep it at room temperature, but the freezer keeps it perfectly.
Fruit: Mango, berries, strawberries, sometimes old bananas, and other fruits we might use to make smoothies. Frozen fresh pineapple and/or watermelon chunks make for some fine cocktails. // Frozen Watermelon Mojitos, Piña Colada
Vegetables: I like to keep edamame, peas, corn, and artichoke hearts around.
Pasta and dumplings: Potstickers, wontons, pelmeni and vareniki (we have a ton of these right now because my MIL got us Russian groceries last weekend), and tortellini are very helpful to keep around for kids lunches and easy dinners. // Spring Vegetable Potstickers, Chicken Wonton Soup, Potato Vareniki
Burritos, Tarts, and Casserole-ish things: I don’t plan well enough ahead to do this often, but when I do, I’m thrilled to have burritos, galettes or quiches, an extra lasagna, ziti, or pizza beans in the freezer for future meals. // Breakfast Burritos, Perfect Vegetable Lasagna, My Old-School Ziti, Pizza Beans
Meat: Bacon, sometimes pancetta, sausage, and recently I’ve been buying some vacuum-sealed steaks and pork chops, although I’ve yet to get in the habit of remembering that they’re there and need to be defrosted at least half day before we want them. // Bacon Corn Hash, Steak Sandwiches
Stock: I love to make extra chicken stock and freeze it in quart bags. I don’t think every soup needs homemade stock, but for simpler ones, the extra depth of real bone broth makes a difference. If I don’t have time to make stock, I keep a “stock bag” in the freezer with the backs, wings, and/or other unused parts of chicken plus any onions, carrots, or celery that I don’t think I’ll get to. // Perfect, Uncluttered Chicken Stock
Ice cream and sorbet: I’m married to someone who (understandably) requires a bowl of Haagen Dazs chocolate each evening, so that’s a given, but I also should confess that I splurged on a no-bowl-to-chill ice cream maker last summer and it’s definitely led to an ongoing supply of homemade delights like lemon sorbet, passionfruit sorbet, and real mint ice cream; I get 95% of my ice cream recipes from David Lebovitz’s Perfect Scoop.
Produce
Fruit: Lemons and limes keep and are two of my favorite ingredients; don’t underestimate the importance of acidity in making simple ingredients taste magical. Until better local fruit is available, we look out for decent apples, oranges, mango (our family favorite), cantaloupe, and pineapple to keep around, as they have a longer shelf life than raspberries (which we also buy, but eat quickly or regret not doing so). // Whole Lemon Tart, Even More Perfect Apple Pie
Fridge vegetables: Carrots, celery, cabbage (green, red, and savoy), cauliflower, broccoli, leeks, scallions, and greens (curly kale, broccoli rabe, spinach) are my go-tos. If you’re buying greens to cook, try to wilt them down when you get home from the store, as they’ll keep better in softened bundles (and can be frozen) than they will in boxes and bags, and take up less space too. I find that leafy herbs like mint, cilantro, and parsley keep 1 to 2 weeks longer if I first wrap them in a barely damp paper towel and put them in a zip-lock bag. // Roasted Cabbage with Walnuts and Parmesan, Carrot Salad with Tahini and Crisped Chickpeas, Broccoli Slaw
Room temperature vegetables: Shallots, onion (red, yellow, white), garlic, ginger, potatoes, and winter squash keep and keep // Caramelized Shallots, Slow-Roasted Sweet Potatoes, 44-Clove Garlic Soup
Notes
I lean brand-ambivalent. Sure, I like Goya beans and Better than Boullon but I try not to get too stuck on a brand of flour (I use King Arthur or Gold Medal but also Heckshers sometimes) because I think it does SK readers a disservice if my recipes work best with xyz brand that maybe isn’t easy to get. Before you buy any fancy brand of olive oil, why not taste the reasonably priced ones and see if you like it? Are you sure you can’t make great cookies with 365 brand butter? (Spoiler: You can.) Where I’ve linked to product here, however, I really just buy that one specific brand so it’s worth noting.
Most dry goods that you hope to keep for a longer period of time or don’t go through quickly benefit from being stored in the freezer, from yeast to whole wheat flour to nuts and seeds and coffee. Everything I just listed here doesn’t need to be defrosted either; you can use them very cold as you would at room temperature.
I keep all dried goods — everything — in jars. I honestly think there are people who don’t keep things in airtight containers and there are people who have had… crawly things. I had them one time four kitchens ago and I will not let that happen again. When everything is self-contained, even if you bring home something compromised, it would keep to itself. I have jars from all over (Weck, Le Parfait, Bormioli Rocco) but when I need more, usually buy 6- or 12-packs of Ball Wide-Mouth Jars in 16-ounce and 24-ounce because (praise hands) they stack! I have various sizes of these small clamp-top jars for easy access to salts, baking powder, and baking soda I buy in larger quantities. I keep my flours and sugar in Borgonovo 145-ounce jars I can never find anymore but I’m working on a new solution — for you and me.
As always on Smitten Kitchen, nothing here is sponsored. I do all my own shopping and most of the schlepping.
Feeding others
Finally, it’s always a little incongruous to write about shopping and cooking in a casual way (“Ugh, my quinoa went rancid again!” — me, too often, not proud of this) at a time when so many people are don’t have enough to eat. If you’re looking for a place or places to help, I can tell you what I do: I have automatic monthly donations (my favorite no-planning-required way to support what I feel strongly about) set up for No Kid Hungry (which focuses on ending child hunger) and Feeding America (a nationwide network of more than 200 food banks).
Source link
Tags: kitchen, smitten, Stock
from WordPress https://ift.tt/2XVjqvu via IFTTT
0 notes
Text
Panko vs Breadcrumbs in a recipe for meatballs : AskCulinary
Panko vs Breadcrumbs in a recipe for meatballs : AskCulinary
Panko vs Breadcrumbs in a recipe for meatballs : AskCulinary
Here’s our FAQ. Please check it before posting!
Here’s our work-in-progress FAQ. Check it too, and please lend a hand to add to whatever is missing!
We’re best at:
Troubleshooting dishes/menus
Equipment questions
Food science
Questions about technique
Questions about what is healthy and unhealthy are outside of the scope of this…
View On WordPress
0 notes
Text
Swedish Meatballs

In Kansas City, it’s still winter. I wanted to share the warmth that was our supper tonight in hopes that it might brighten another’s spirits in this bitter wait for spring. These Swedish meatballs give gentle notes of Thanksgiving, Christmas, and rainy days.
INGREDIENTS
1 lb ground turkey 1/4 cup crushed pecans (or crushed walnuts) 1 tbsp parsley, chopped 1/8 tsp pepper 1/4 tsp ground allspice 1/4 tsp ground nutmeg 1/2 tsp garlic powder 1/2 tsp salt 1 tsp cayenne pepper (optional) 1/4 cup onion, diced 5 tbsp butter 1 tbsp olive oil 3 tbsp flour 2 cups beef broth 1 cup heavy cream (or half & half. If using half and half, add 1 tbsp flour) 1 tbsp Worcestershire sauce 2 tsp Dijon mustard salt & pepper to taste 1/2 tsp parsley, chopped, for garnish
DIRECTIONS
-Pulse pecans (or walnuts) in food processor until breadcrumb consistency. In a medium-sized bowl, combine ground turkey, crushed pecans, parsley, pepper, allspice, nutmeg, garlic powder, salt, cayenne pepper, and onion (If you know me at all, you know I love a little heat in everything, so the cayenne will add just that. It also brightens the flavor a little in my opinion, but you’re not missing too much if you opt out.). -Roll mixture into 12 medium-sized meatballs. In a large, fairly deep skillet heat 1 tbsp butter and olive oil. Add meatballs and cook, turning frequently until browned on all sides. Plate and cover with foil. -Add flour and remainder of butter to skillet, whisking until brown. Slowly add beef broth and heavy cream (or half & half), stirring constantly. Add Worcestershire sauce and Dijon mustard. Bring sauce to a simmer until it starts to thicken. Salt & pepper to taste. -Add meatballs back to same skillet, simmering for 1-2 minutes. Serve over rice, egg noodles, or with mashed potatoes. Garnish with parsley.
*Note: This recipe was inspired by The Recipe Critic’s version. She uses ground beef and panko bread crumbs vs. ground turkey and crushed pecans. She also adds an egg when making the meatballs and nixes the cayenne. I prefer the leanness of turkey and love the texture/added protein that pecans offer. The egg helps hold the meatballs together, but I don’t feel it’s necessary when subbing with crushed nuts. Also-- tonight I was out of heavy cream and used half & half with a little extra flour to thicken it up. Still delicious.
3.13.17
#blogging#recipe#Swedish meatballs#meatballs#winter#March#snow day#rainy day#comfort food#Kansas City#turkey#cooking#butter#food
0 notes