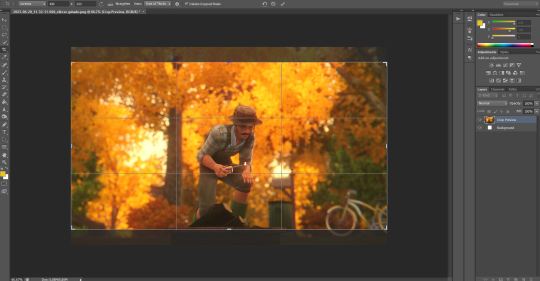
#not my photos just cropped and resized
Explore tagged Tumblr posts
Visit Tumblr Blog
Explore Tumblr blogs with no restrictions, modern design and the best experience.
Last Seen Tumblr Blogs


Fun Fact
Tumblr Inc. has $15.1M in annual revenue.
Text


yeah i dont mind that
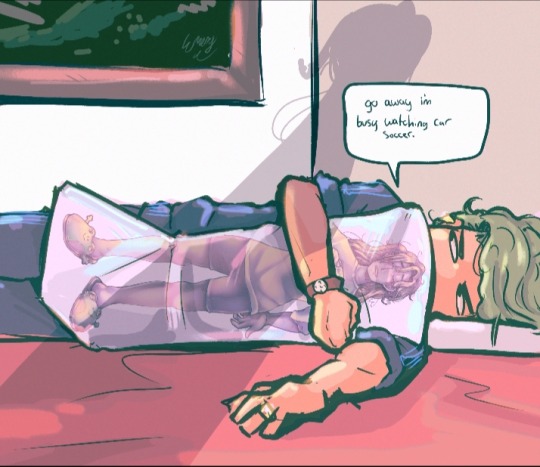
#cjcj voice#god i want to kill myself so bad my shoulder keeps actually seizing and it hurts so bad and i cant take the pain anymore i just want to die#revert to scribbles but i just want to kill myself i cant do this anymore. i physically cant render anymore.#this week had been god awful i cant bear it. the pain is immense#like i literally just want to die. it hurts so bad. its never gonna get better. theres no point in my life and i want it to be over#rotp#fk#rkl#ugh.#too lazy to resize that one photo so its just a fucking cropped screenshot. classic#whatever. if you need me i will be watching car soccer.#one of those 'pace around all day' weeks bc doing anything is too painful#so i just. pace around. and Think.#and i reach the same verdict everytime. everything on this planet would be better off with me dead.#i dont want to be in this much pain anymore#im over here convulsing in agony but I gotta Manifest a G2 dubya
0 notes
Text
Digital Stamp Making Tutorial
Hello, and welcome to the long-awaited(at least on my part) digital stamp-making tutorial from neosprites! I’d like to preface that I learned what I was doing from this tutorial so it may be a bit redundant, but if anything I get a bit more specific. Thank you so much to @graphic--horde for your work, it changed me as a graphic maker. This is gunna be a long post so feel free to bookmark it for later. Now, onto the show!

The frame I will be using for this tutorial (which is the frame I use on 99.9% of my stamps) I found from the above linked post, which I believe is from a creator that OP lost track of. Its inner dimensions are 94x50 pixels and its outer dimensions are 99x56 pixels. Here it is!

Find your material! - I recommend using websites like Tumblr and searching with the “GIF” filter only on, or alternatives such as Giphy or Tenor. Your browser may let you directly save the .gif file; if not and you are noticing it restricts you to save it as a .webp file you can try an extension like “Save webp as PNG or JPEG” (for Firefox but I image other browsers have similar functions, but I really recommend you switch to Firefox). To use this you will right click on your source .gif like normal but instead of clicking on “Save image as…” click “Save webP as…” and then click “GIF”. You should be redirected to the website ezgif.com where we will actually be doing all of our editing! Here’s the .gif we’ll be working with.

Convert to GIF (optional) - if you used the extension from the above step you should already be ready to click the blue “Convert to GIF” button. If not, go ahead and open ezgif.com and click on “webP” and then “WebP to GIF”; then convert to a gif with the blue button.

Resize the GIF - now that we have a gif ready to edit, let’s make it the right size. The easiest method I have found is to change it directly to the frame’s inner dimensions, 94x50 pixels. [EDIT: Make sure in the aspect ratio drop drop menu you select "stretch to fit" and not "center and crop to fit" like I did in the photo example.] Click “resize” and then type [94] in for the width and [50] for the height. Next press the blue “resize image” button.


Add the frame - next click “overlay” then click the thin blue button that says “Extend canvas size(use if overlay exceeds GIF sizes)”. This will give us some extra room to add the frame onto the design. Next click “Browse…” and find the frame you have saved onto your device, then click the blue “Upload image” button.


After that it’s going to be misaligned, that’s normal! It will say you have the option to drag it into place, but don’t bother. That’s one of the reasons my old stamps look wack, it’s just harder to do. Instead type [44] in for the Left box and [22] in for the Right box. It took me a while to figure out these dimensions to be honest, and I’ve only tested it with this frame so I don't know if it works with others. Then click the blue “Generate image” button.


Crop the transparent edges - click on “crop”. You will have the option to check a box that says “trim transparent pixels around the image” however, I don’t recommend this as it tends to crop a few of the frame’s pixels with it sometimes. Next, set the Left position to [44] and the Right position to [22]. For the other dimensions we will use the outer dimensions of the frame which are 99x56 pixels, this will trim everything except the tiny spaces in between the stamp frame’s spikes. Type the width as [99] and the height as [56] and click the tiny blue button that says “set”. After that click the blue “Crop image” button.


Save and use! - all that's left is to click “save” and upload the graphic to your liking. (best seen on dark mode obviously)

If you’d like to tag me in stamps you’ve made using my tutorial I would love to see them, but it’s not required!! Make sure to always give credit for pictures/gifs when you can and try not to make stuff out of personal/fan art. Thank you to the person in my inbox who requested this tutorial, I had been meaning to for a while but it was just the kick I needed. :)
#carrd graphics#carrd resources#carrd stuff#rentry graphics#rentry resources#rentry decor#rentry pixels#rentry stuff#rentry inspo#deviantart#neocities#mine#my graphics#my tutorials#resources#tutorials#tutorial#how to#stamps#blinkies#graphics#web graphic#old internet#early internet#spacehey#da stamps#page decor#custom#old web#frames
202 notes
·
View notes
Text
Cantina Collection

Straight from Oga's Cantina comes this cobbled together industrial set.
A bit later than planned but finally here. All items are very low poly as they are all frankenmeshed from the original bar back counters.
The textures are all composites and rearrangements of the originals, as a result they are not seamless - but we'll say it just adds to the look that they've just been made from whatever scrap metal was around!
Also as the cabinet doors all have the same rust pattern, it looks odd/repetitive on very big kitchens but works fine for small spaces.
There is only one swatch for all items except the seating, which comes in the same colours as the originals.
All items are base game compatible, except the resized bar backs which require Journey to Batuu.
See below for further details, pictures and download links.
Comfort (5 items):


Industrial Bar Stools x 2 - Low Back & No Back
Industrial Dining Chairs x 2 - Low Back & No Back (shown with original JtB high back chair)
Metal Dining Chair (shown with original JtB bar stool)
Surfaces (16 items):


Kitchen Counters & Islands


Bar Table
Dining Tables x 2


Coffee & End Tables
Console Tables x 3


Smaller Replicas of the original Cantina Barbacks x 5 - resized to match the height of regular counters NOTE: You'll need to use bb.moveobjects on to align these properly. JOURNEY TO BATUU PACK IS REQUIRED.
Industrial Shelf
Decor (2 items):
Metal Splashbacks x 2
Activities & Skills (3 items):


Oga's Bars x 2
Sabacc Game Table NOTE: BGC but JOURNEY TO BATUU is required in order to change the game type to Sabacc. Without this it will function as any other base game card table.
Download All (Downloads ZIP file from Google Drive)
Pick and Choose (Opens Google Drive folder)
If there's any problems with any of these items or you have any constructive feedback, suggestions or questions, please just get in touch, I'm still learning every day!
My TOU
Credits
All textures and meshes are edited or frankenmeshed from in-game EA assets.
@myshunosun - for their gorgeous sona dining chair which I cloned in order to have an object with the necessary transparency for the chair and bar stool - can be downloaded here.
Lizbot3000 - for their base game bar tables, which I cloned for my bar table and can be found here.
@ravasheencc - for her Crop It Like It's Hot Backdrops which I used to take some preview photos and can be downloaded here.
CC created using Blender, Sims 4 Studio & GIMP. Preview images using Canva Pro.
Everyone on the S4S forums and the Creator Musings discord group for all the tutorials and advice/help.
#always free cc#alwaysfreecc#custom content#download#journey to batuu#maxis match#my cc#sims 4#sims 4 buy mode#sims 4 cc#sims 4 custom content#sims 4 futuristic cc#sims 4 industrial#sims 4 industrial cc#sims 4 futuristic#sims 4 journey to batuu#sims 4 maxis match#sims 4 star wars#sims 4 star wars cc#star wars cc#star wars sims#star wars sims 4#the sims 4#ts4 cc#ts4#ts4 bb#ts4 buy cc#ts4 custom content#ts4 download#ts4 futuristic cc
169 notes
·
View notes
Text

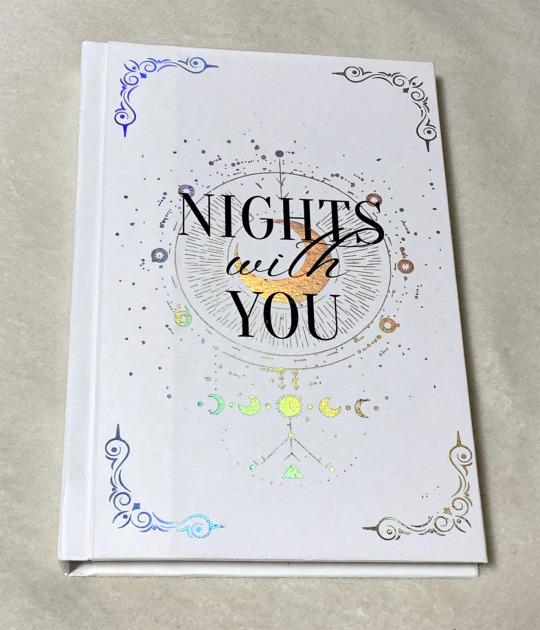
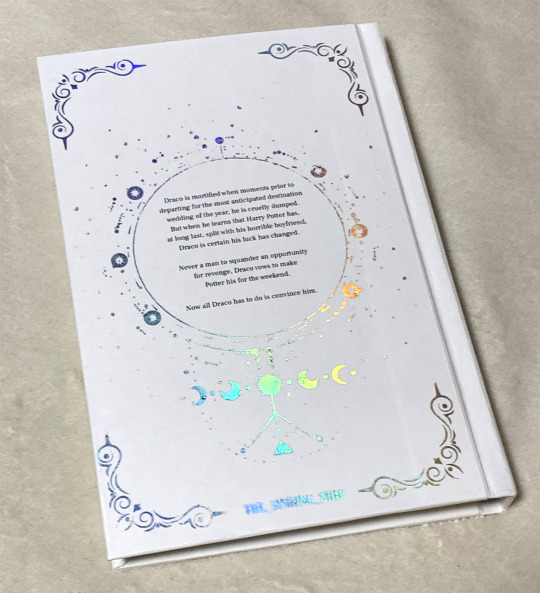
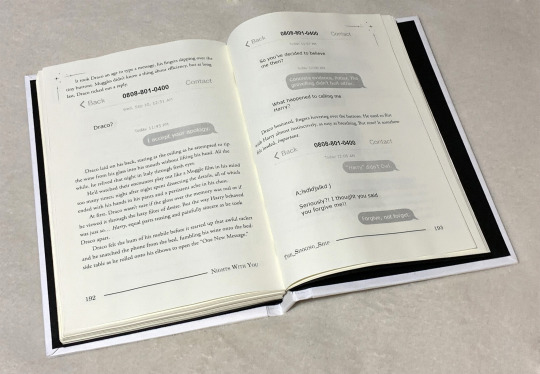
Nights With You by The_Sinking_Ship
The second fic I ever bound, I read this on a whim one day and just knew I needed to bind it!
As you might be able to tell by the photos, I was still struggling a lot with my foiling, especially on the author's tag on the back 😭
I also very clearly had to work on my measurements, seeing as I did not have a printer that could print edge to edge I had to calculated how much I needed to resize it to print on a 1:1 scale.
I thankfully learned a way to add proper crop marks later on as well which has helped me immensely with placing the covers on properly!
As always, the cover is all made with Kent paper since I don't own a cutting machine or able to find any decent book cloth where I live... 🙃
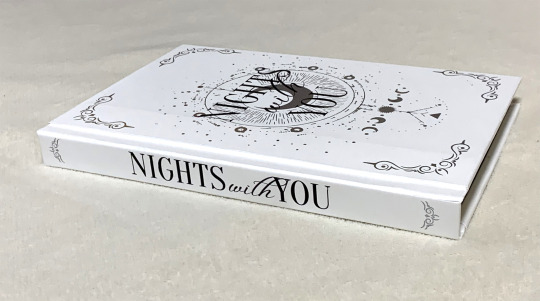
This was also the first time I experimented with adding text messages in the fic, and I think it's really fun!
Sadly, this was my old printer that was only able to print black and white and the quality wasn't the best so the grey bubbles are barely visible, but at least it's still readable.
I think I might want to redo this bind later on, especially since I got a laser printer that can print in color now!
#drarry#bookbinding#ficbinding#fanbinding#harry x draco#fanfic binding#drarry fic#tsurashi-bindery#book binding#fic binding#harry potter
102 notes
·
View notes
Note
i rlly like ur composition, i wanna know about your process :D
thank uuu !! yeah so like. composing a scene for me generally begins with a vague idea that i want to get down as quickly as possible- and for me that usually starts with finding a setting. I knew that i wanted to draw a) a group of roomates gossiping in a crowded kitchen and i wanted there to be b) one figure in the extreme foreground and c) lots of plants. i do use some tools to figure out perspective, mainly the csp perspective ruler. Usually i start by finding a picture i like similar to the vibe im going for- but instead of referencing anything else- im purely interested in perspective. sorry to anyone who is shocked i dont generate all of my perspective purely by myself- i can draw in perspective fairly well but i struggle to make straight lines and this is easier to make grids with than the line tool lol ^_^ i try to use it kinda more like spellcheck on typos than like something to fully rely on. this is the video i learned this trick from:
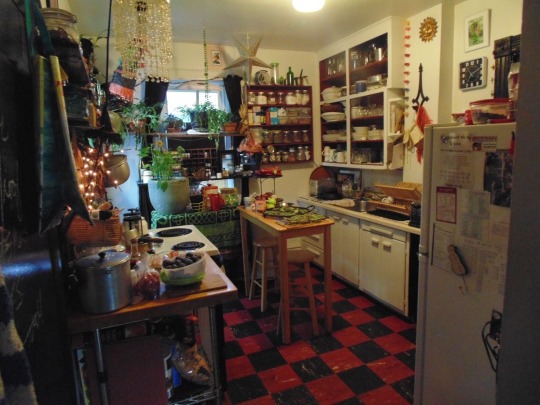
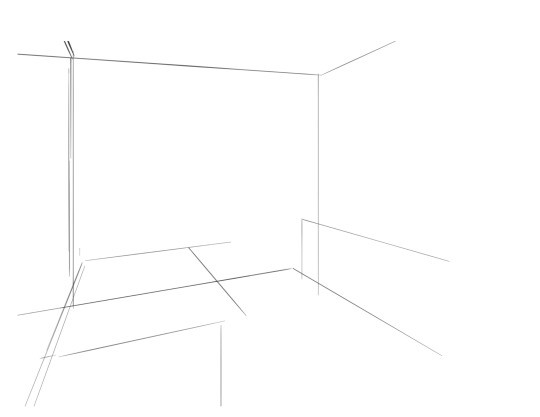
i saw the left photo and realllly loved how the cabinets alligned with the wall- so i used my ruler tool to draw out my inital plotted points from the image- basically the linear movements i was most interested in and then i turned off the image layer and worked with those lines and the ruler tool to move on. eventually i had this:

which was enough for me to put my characters in for the inital round. if you notice- i made a looot of further adjustments as i go on. this sketch is not a final layout, its so my characters have somewhere to be! i cannot draw someone standing on a floor if theres no floor, nor leaning on a table that doesnt exist. i can’t draw my characters without a background, but i also cant finish my background without accounting for how my characters can comfortably exist in it!!

this was the like.. very basic start. i knew the positions of two characters- but i needed to change a lot not only to fit them better but to allow for the other two figures i had planned.
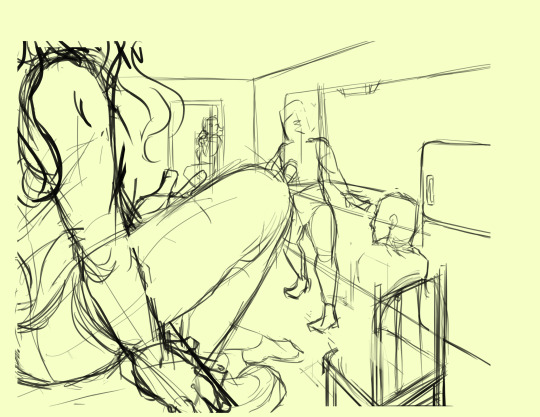
okay.. a little better. i widened the kitchen, closed the fridge door.. added a chair and fit in all the figures.. but this is waaay too dramatic. only two figures are actually interacting- and they are at wildly different energy levels!

this is where things started to make a little more sense characterwiss, so i was ready to refine backgrounds and figures and unite the two.
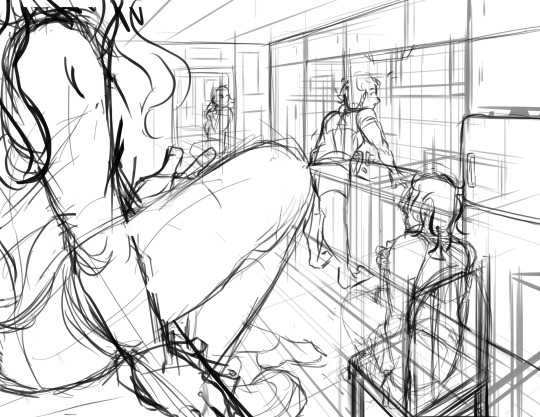
inital base sketch. much better layout.
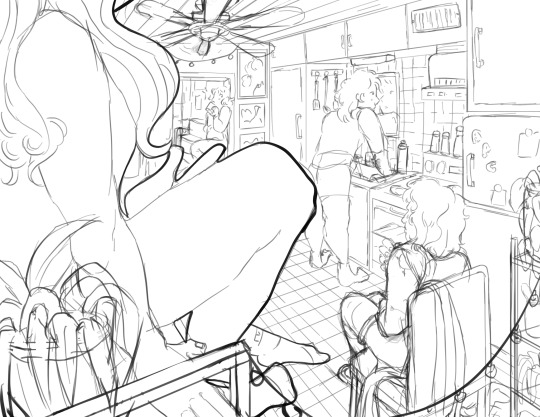
okay- this is where im getting my footing but things seem.. really really off. You can see me working on my framing here- theres some good linear movement from left to right here- but not vertically. It’s hard to notice the figure in the far back, so i need to redirect the viewers eye to move upwards as well!

this is where i decided to zoom out, add an interesting vertical element to the left of the image and make it clearer whats happening in the foreground. i had to account for some stuff by adjusting the cropping, but i paid attention to that as well.
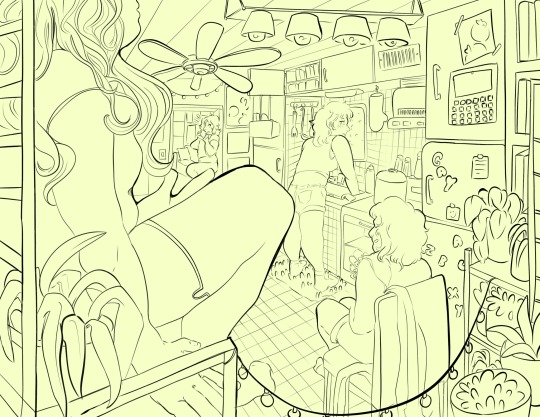
annnd- thats what a clean sketch looks for me! i have all the elements of my scene accounted for, and things are clean enough to read.
the next step for me would be transfer! essentially- I print the image of my sketch out, resizing and taping pages together so my sketch matches the size of the paper i want to paint on, and then i use a lightboard to transfer my sketch with pencil onto my paper. Then i refine the sketch a few times on paper before stretching my watercolor paper (essentially just prepping for painting) and inking with a brush and colored ink before going in with watercolor, gouache and ink, then usually finishing with marker, colored pencil, pastel and ink. it’s a lengthy process but a lot of fun lol. but sketches for me can be like.. 15 layers of different roughs until im happy with just the sketch. there were more images but im on mobile and theres a 10 image limit 😭😭 im a bit masochistic but i believe that if i dont have a good sketch i dont have a good painting!!
101 notes
·
View notes
Note
how do you get the angle & fov so close to the original!! is it just trial & error or do you superimpose the photo atop the game somehow
recently ive been tracing the outlines of the rooms in Clip Studio Paint, and then capturing both CSP and the game in OBS and changing the blending mode for CSP to multiply!
i use CSP's perspective ruler tool to find the horizon in the reference picture and then compare it with any doors in the image (theyre very consistently 2m tall) to find the height at which the photo was taken, and then make a little platform in the game so the pov is at the same height
i then trial and error the approximate position by putting down square tiles and lining it up with the floor in the picture. i'll then build up the walls (theyre usually around 2.5m tall, so i just make them 13 blocks/2.5m tall and use the resizable cube to get the ceiling to the right height). then i do even more trial and error to find the FOV, focusing on matching the angle of vertical lines near the sides of the screen.
i use a kitchen cabinet inner corner piece to "save" my position, i'll back into it to get to the exact same spot every single time. i'll also place a small item (usually a clothing hook) on the wall on the spot my cursor needs to be so i can always face the right way!
often the images have to be rotated very slightly for the horizon to be perfectly horizontal. i'll always note down by how many degrees, and when i'm cropping the final screenshot to the correct aspect ratio i'll also rotate it to match :)
#not an interior#behind the scenes#i'd take screenshots to illustrate but it's starting to get late here#this new method is a lot more efficient than the perspective grids i used in that behind the scenes ask from may 21st#i think the most tedious part of this process is finding the view direction and the FOV#they affect each other so its a lot of back and forth#but once ive got my corner and hook set up i'm good to go :)#ACTUALLY the most tedious process is lighting/color matching#so much mixing & matching of similar paint shades and color temps. specifically getting white to look right is way harder than youd think#the next build ive got lined up for yall has all white walls and will be a great example!#it has both shades of orange and blue/green due to the lighting and ive just had to settle with matching the general brightness
58 notes
·
View notes
Text
WHY!!!? INSTA POSTING TROUBLES! Heeelp!??? 😭
Guys! Help! I dunno why but Insta keeps doing this weird crop thing whenever I try to post more than one horizontal drawing! I don't know what to do and I'm worried for the future posts I'll make. Can anyone tell me what's going on and how to fix it? I've tried resizing, posting with my phone instead of tablet, trying it out on other pictures bedsides the ones you see here that are also horizontal, but of different sizes and still, NOTHING!!! Would appreciate any help!!! Pls!!! This happened before, but I can't remember how I resolved it, all I know is that I did. It's really stressful tho. Google and YouTube has been no help whatsoever either. They keep telling me to resize the photo and I did, but nothing changes! The empty black space besides the photos are the problem. Those spots are supposed to parts of the drawings themselves and when I try to post it as is, it fully crops my picture to the size of it you only see. I know how to make it so Insta will accept a different sized picture than the usual 1x1, but it's not letting me get pass the editing phase this time. How am I to share my art like this??? -Bubs.
(If you can't help, pls try reblogging until someone who does know sees it. TvT I just wanna get this over with.)
#help#art emergency#artists supporting artists#posting#issues#Instagram#is a bitch#cropping#is not it#at least I tried and don't think so#radioapple#fanart#will never see the light of day like this#any advice?#the other's I've found either have wildly different issues or are not working for me#technical issues#digital#failure#to post#AURGHHHHHH#i am seriously gonna start crying soon#I don't have time for more stress#when I just made this to have a break from Finals#WHYYYYY#artist in need#I'm so confused#this might affect my future works too#since I mostly draw for Insta#why is it crashing like this???#why did it start happening?
31 notes
·
View notes
Note
a gifmaking tutorial would actually be super appreciated :)
Okay, this is gonna get long and it might not be great but I will do my best to make it understandable.
Put under a read more cause we're not forcing anyone to look at all this.
We're gonna make this gif:

First of all you'll need 3 software programs downloaded.
4k downloader (to download videos)
Gomplayer (to get the frames from the videos)
Photoshop (I pay for it but there are other ways)
Some things to keep in mind
better quality video = better quality gifs
if you want videos in 4k you have to download them in MKV format as MP4s can't be 4k.
gifs can only contain 256 colours so gifs with a lot of different colours might get grainy.
if you use low quality videos or upscaled videos they sometimes have duplicate frames which will make the animations look weird, but you can easily remove those extra frames.
tumblr only accepts gifs under 10mb in size so all gifs have to be less than that (photos less than 20mb)
you can put up to 30 gifs/images in one post
ok here we go
Step 1: Download video
Step 2: Get the frames from the video
You will play the video using Gomplayer
Find the part you want to GIF
Press CTRL + G to bring up this menu

I haven't experimented much with these settings but you'll want to choose the place you want your frames to end up so you can find them later
4. Have the Capture all frames box checked (unless it's 60fps then do 0.03). You can capture up to 999 frames in one go.
5. Press "burst capture" and it will start getting the frames (video has to be playing) it will look like this.

6. Great you have your frames.
Step 3. Making a GIF
Open Photoshop
Load Files Into Stack

This will open the folders on your computer so navigate to where you put your frames and select the frames you want by clicking on the first and holding shift while clicking on the last.
3. Wait for PS to load the frames
4. Once it's all loaded the first thing you'll do is crop it. Press 'C' on your keyboard. There are a couple presets you can use or you can 'clear' that and crop however you wish.

I always crop out at least a little of the top and bottom cause there can be dark lines there.

5. Resize: for optimal quality on tumblr there are three sizes to keep in mind.

For sets like this with 3 gifs next to each other the width should be 177p, height does not matter.

For sets like this with 2 gifs next to each other the width should be 268p

And for a set like we're doing today with just 1 gif it's 540p
You'll want to memorise these numbers for future use.
177p, 268p or 540p will be the width of your gifs.
To open the resize menu you press CTRL + ALT + i

Change the width to in this case 540p (p as in pixels)

It will auto match the height to keep the same proportions.
Click OK and wait until it's done.
6. Make sure you have the 'timeline' window up at the bottom of your photoshop

7. Click 'create frame animation' (button might say video timeline but change that by pressing that little arrow next to it)

8. Press the button with three lines in the top right of the 'timeline' window and press 'make frames from layers'

9. The frames will have loaded in in reverse order so open the same menu and click 'reverse frames'
Step 4. Blurring the logo/text (optional)
Since we have a logo in there I will want to blur it but you might not have one or you don't care if there's a logo or text in your gifs.
First we have to make the gif into a smart object.
Select all layers by pressing CTRL + ALT + A
Convert into a 'video timeline' by pressing the button in the bottom left of the timeline window

3. Right click on your layers and click on 'convert to smart object'

4. Press Z to switch to the zoom and zoom in on your logo/text.
5. Press L to switch to the lasso tool and select your logo/text

there should now be a line where you selected.
6. Open 'Gaussian Blur'

7. Click OK
Now we have to get our GIF back to the frame timeline.
8. Click 'flatten frame into clips' using the timeline menu

9. Press 'delete' once to remove the smart object

10. Convert back to frame animation

11. Make frames from layers

No need to reverse this time. But now your logo/text is blurred, as long as it doesn't move but that's a topic for another day.
Step 5: Sharpening
If you didn't have something to blur let's go over smart objects again.
Select all layers by pressing CTRL + ALT + A
Convert into a 'video timeline' by pressing the button in the bottom left of the timeline window

3. Right click on your layers and click on 'convert to smart object'

5. Camera Raw Filter (Optional)
I use this for base editing of colours and the overall clearness of GIFs, it's not made for that tho it sometimes gets buggy. Works best on photos.
Press CTRL + SHIFT + A to open this.

It's best to do as little as possible in here as it can bug out.
I mostly mess with the effects, light and detail settings in here, don't touch the sharpening though cause we will use smart sharpen for that.
6. Smart Shapening
Most people have a sharpening action they use, including me. But you can also do it manually. You can find my actions in here.
To do it manually and make your own settings. This is how you open smart sharpen.

If you use my sharpening action remember it can be a bit much sometimes, in that case hide the second layer

Use an action or mess around to find a sharpening setting that looks good on your gif, usually don't need much.
Now we have to get our GIF back to the frame timeline.
7. Click 'flatten frame into clips' using the timeline menu (I'm low on images to use check the blur section for images)
It might take a minute since it has to process the new settings.
8. Press 'delete' once to remove the smart object
9. Convert back to frame animation
10. Make frames from layers
11. Select all your frames to set the framerate

You can click on any frame for this. Click 'other' and set it to 0,06.
12. Press CTRL + SHIFT + ALT + S to open 'Save for Web'

these are my save settings.
Click save and name and place it wherever you want it saved.

Congrats you've made a gif.
Step 6: Colouring
Now we have a problem cause there's already 30 images in this post.
For colouring I have a psd I use and adjust to the individual set. It's in my google drive you can find it here along with my actions.
If you're making several gifs from one video you'll want to adjust to the first and then copy that over to keep things matching.
We can go more in depth on this but that would have to be a different post since I can't put more images in this one.
Step 7: Watermark (optional)
A lot of GIF makers have watermarks these days as there's a lot of people who repost GIFs without credit. Make your own so people know the GIFs are yours even when posted elsewhere.
Step 8: Post
Post your hard work on your tumblr, use a bunch of tags so people have a higher chance of seeing it.
I hope this post was understandable and clear, let me know if you have any questions and if you want a proper colouring post.
31 notes
·
View notes
Text
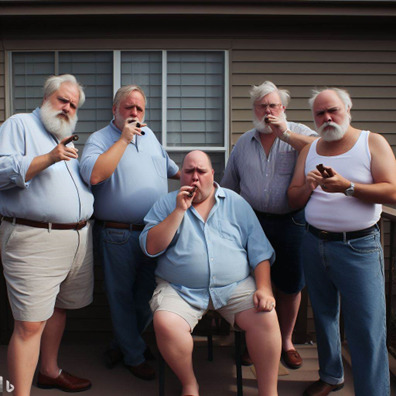
Smoking Ages You

Kappa Delta Pi was the it place on campus, and I was the king. Michael Webber, Mikey as my friends called me. There I am in the center of our group photo. We were an inseparable group of bros. Porter, Kent, Oliver, Damian, and me. Kings of the campus is what people called us. Could you blame us. We were hot, ripped, and rich, and boy did we love our cigars. Lungs be damned. There was nothing like the deep, rich scent of a perfectly aged cigar.
If there was one thing the girls on campus did not like, it was our unique love of cigars. Many girls actively avoided us. Yes, we never suffered for women, but we never got the cream of the crop. Until one night we managed to score dates with five of the hottest girls from Alpha Salem Theta. After dinner, we were sitting in the senior smoking room of our frat. Five boys with their cigars, whisky, and girls.
“Boys, could you please stop smoking. It’s disgusting,” said Porter’s date, Amber.
“Don’t you know how bad it is for you,” said Damian’s date, Chelsea.
“Boys will be boys. Stupid and idiotic till it’s too late,” said my date, the head of Alpha Salem Theta, Samantha.
“Oh, come on babe. Smoking is sexy. We are hot and you know you love it,” I said.
“I’m not your babe. Come on girls. Let’s leave these little boys,” said Samantha.
The five girls got up to leave and started walking towards the door.
My brothers and I pleaded with them to stay, but they wouldn’t budge.
“Fine! Be that way you stupid bitches. We can have any girls we want,” I said.
Samantha slowly turned around. “What did you just call us?” She was furious.
I started to stammer and then Samantha said “Girls, I thought we would let them go tonight, but since they want to be cruel, it’s time they get what’s coming their way. Boys, SIT!” she commanded.
Suddenly five chairs made their way to the center of the room and we were forced to sit down. We couldn’t move. We just kept puffing away at our cigars.
“What’s going on! Why can’t we move?” said Kent.
“Boys, we at Alpha Salem Theta practice the witchcraft of our sisters of yore that used to reside in Salem. We hate to see people throw away their lives on ridiculous things, such as cigars. You are all hot. You are smart, at least I presume you are, but you are all addicted to cigars. It is embarrassing. You act like a bunch of middle-aged men who have let themselves go. So, if that is how you want to act, why don’t you become just that.”
The girls started chanting some weird incantations. We were unable to decipher what they were saying. The wind started whipping and the room turned a vibrant red color. As it crescendo’d, it suddenly stopped.
“Ha, it didn’t work” I said.
“Just wait,” said Samantha.
Suddenly Porter started moaning. A rumbling came from his stomach and it started pushing out. His hair turned white and his hairline receded. A bushy beard grew on his face. Everywhere on his body, he gained fat. Wrinkles appeared everywhere and he aged right before his eyes. He looked like he could be 60. He had to weigh at least 300 pounds. His clothes burst at the seams and then they reformed. His blue button down resized to fit his body, his ripped jeans turned into khaki shorts and a belt wove through the loops as his shirt tucked in. All the while he puffed away on his cigar, attempting to scream, but unable to.
We all started panicking, but we couldn’t move and we continued to puff away at our cigars.
Kent was next. His stomach pushed out even faster, but didn’t grow as large as Porter’s. It almost seemed like he shrunk in height. All of his hair turned white as he aged up and a trimmed beard appeared. His white button down turned into a blue polo and his jeans expanded along with his waistline as a belt appeared. He was the mirror image of his dad.
Oliver aged the worst. He looked horrible. His hair was a mess and his beard looked like something George Lucas would sport, but way worse. His jeans turned into dad jean shorts that barely fit his much-expanded waistline. He looked like an old fart that was most comfortable in his recliner. A pair of old man glasses appeared on his face. Tears were streaming down his face, but all he could do was puff.
Damian was so proud of his hair. No more. His hair receded the most, leaving him with just a ring of hair. His face hardened with age as his beard grew in. His button down turned into a white tank top tucked into his jeans as his beer belly hung over his belt. He looked like trailer trash. He went from modeling for A&F to modeling for Medicare. His flabby arms were revolting.
“And finally, for the finale, the great Mikey Webber gets taken down a peg, or five, Samantha said.
It felt like I was going to throw up. My stomach rumbled so badly. Then it started growing, and growing, and growing. All the buttons popped off my shirt. My pant seams ripped. All of my hair fell off my head. I could see it on the floor around me. I was crying. I felt myself gain a second and a third chin. I had to be fatter then all my brothers. A blue button down formed over my body, and the ugliest pair of khaki shorts appeared on my body. I looked like Tony Soprano, but 10 times worse. Finally, it stopped, but it was too late. I was a man far past his prime. A tub of lard.
All of the girls laughed. “Good luck boys, with your new lives. Too bad no one is going to know who you are. Bye!” All of the girls left. We all slowly stood up and felt our new ages. Back pain and arthritis.
“My hair. It’s gone. I’m old. We are all old. How are we going to get girls now,” said Damian.
“That’s not our biggest problem. We need to find a way to switch back,” said Oliver.
Suddenly, Henry, the Junior class president walked in and started yelling. “Who the hell are you. Get the fuck out of here before I call the police. Creepy old men.”
We tried explaining who we were, but to no avail. Eventually we gave up and trudged downstairs and out of the frat without any of our belongings. We walked till we found an empty front porch. I sat down, trying to come to terms with what happened. We looked at our ID’s and it still showed our old lives, meaning that no one would ever believe us when we explained who we were.
“What the fuck are we going to do. We look like people’s dads. No one is going to believe who we are,” said Porter.
“Shut up. Just let me think. We will just have to convince the girls to change us back. Just let me finish my cigar,” I said. We all stayed on that porch, smoking our cigars, trying to figure out how we were going to get out of this mess. Little did we know, we were stuck like this forever, and our problems had only just begun.
#age progression#male body transformation#cigardaddy#beer gut#fat belly#old man#cigar#frat boy#young to old
88 notes
·
View notes
Note
hi! i'm a little new to creating sims posts and i was wondering if i could ask what ratios you use to crop your pictures? especially just face pics and being able to fit multiple pictures without making the post take up half of peoples' screens. lol
For a lotta my posts, it's 4x5.

For "collages" like this, I do 49x30.

For my long pics it's just my monitor's aspect ration, rotated in PS.
Most everything I post is resized to tumblr's photo post dimensions.
21 notes
·
View notes
Text
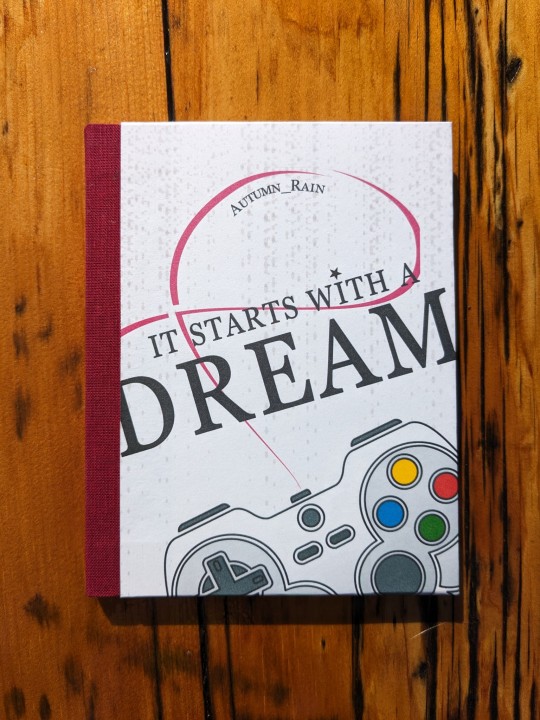
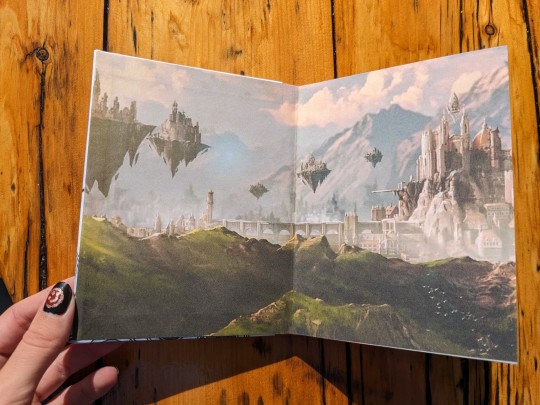
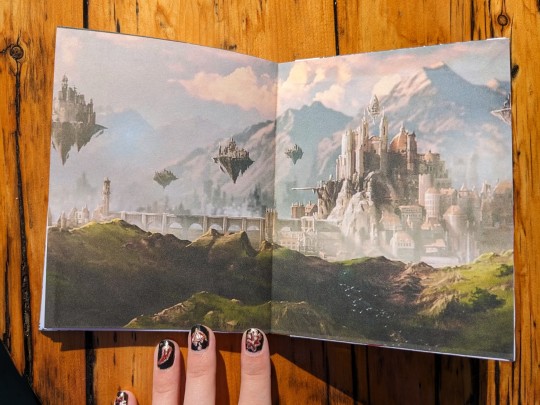
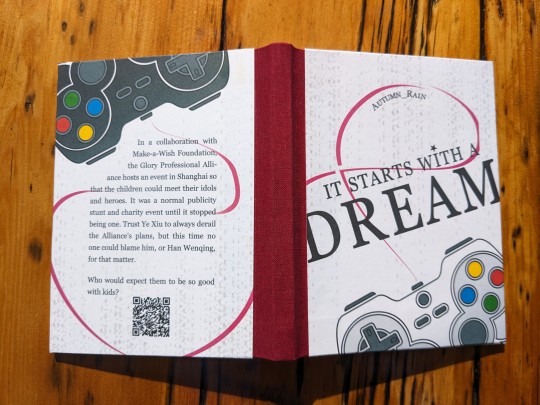
It Starts with a Dream by Autumn_Rain @ciaolongbao
Fandom: 全职高手 | The King's Avatar
Rating: General Audiences
Category: Gen
Words: 6 566
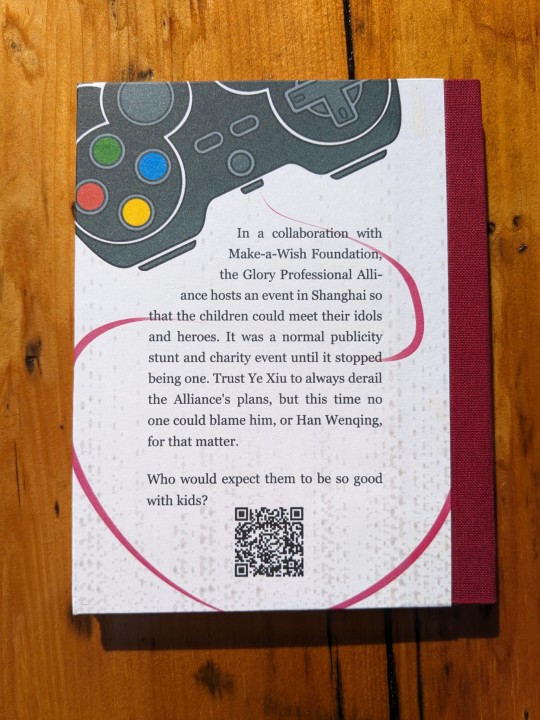
In a collaboration with Make-a-Wish Foundation, the Glory Professional Alliance hosts an event in Shanghai so that the children could meet their idols and heroes. It was a normal publicity stunt and charity event until it stopped being one. Trust Ye Xiu to always derail the Alliance's plans, but this time no one could blame him, or Han Wenqing, for that matter. Who would expect them to be so good with kids?
About the book:
FONTS: Crimson [Google Fonts], Roboto [Google Fonts], and Georgia
IMAGES: Equalizer background from Rawpixel (ID: 3119862); Gamepad icon (Image# 5358929) by pictranoosa on The Noun Project; Heavenly Domain image from The King’s Avatar Wikia.
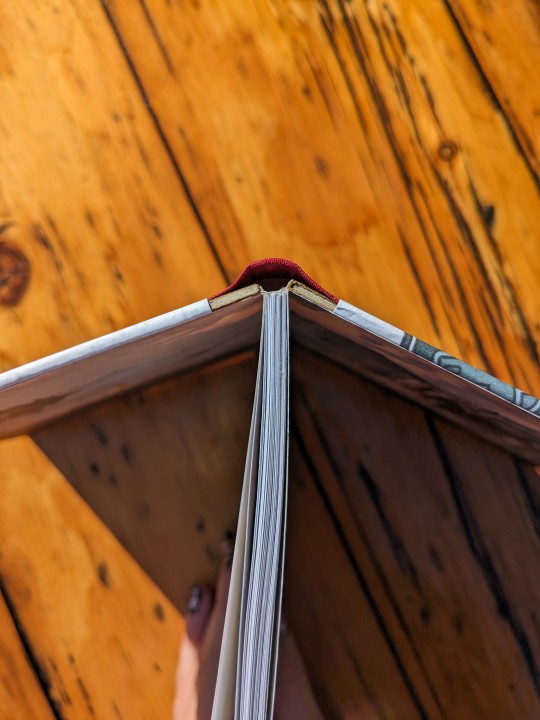
MATERIALS: 20lb 96 bright 8½”×11”multiuse paper; 0.057" chipboard; Ruby red Iris Bookcloth; Neenah bright white 8½”×11” 65lb cardstock; 30/3 waxed linen thread; wheat paste (1:4 flour to water).
PROGRAMS USED: typeset in Affinity Publisher 2; cover designed with Affinity Designer 2 and Affinity Photo 2; imposed with Renegade's Community Imposer (settings: Quarto, snug against binding edge, signatures of 2 sheets).
Textblock printed with laser printer, covers printed with inkjet printer.
BINDING: Quarto size (quarter-letter, 4.25"x5.5"), sewn board binding with French-link stitch and breakaway spine.
Trying New Things 2: Electric Bugaloo!
Though it's not my first time making a quarto size book, it's my first sewn board binding and my first breakaway spine. Will not be my last. (I'm fact, as I'm writing this I've already bound another QZGS fic using this method!)
Much like Coptic, the sewn board binding technique bypasses the exact things I dread about making a case bound book: making the cover and casing in. Haven't gotten the hang of spines or hinges yet. Or pasting down the endpapers when casing in. (Art imitating life: my books aren't straight and neither am I lol)
Drumming things on (use of minimal glue, only on edges where necessary) is a lot less stressful and means there is less moisture to worry about. However I have my doubts about the structural integrity and longevity of sewn board binding when compared to case binding. With minimal glueing there's less holding it together, and the particular method of covering the boards means that they're partially exposed, in all their onion-y glory (by which I mean 🧅layers✨).
Onto the design:
The endpapers are an image of Glory's heavenly domain, acquired from The King's Avatar Wikia (I just cropped out the pro teams' logos, then resized and cropped to fit.)
The covers were designed as one image so that the contents will flow and connect from one cover to the other.
A major theme of this story, I felt, was connection: the kids are meeting their heroes; HWQ and YX stun everyone by connecting so well with the kids, playing with them, encouraging them, and inspiring them; YX opens up about his backstory and reveals a similar dream to a kid; that same kid going on to become a pro with New Excellent Era.
To pull some quotes from the story: "Everything started with a dream between friends… but now that dream will end with a legacy", "after all, you're never going to be walking alone. Glory has never been mean to be played alone", YX "[continued] inspiring new generations of gamers long after he had retired."
Following that theme of connection, the controllers on the covers are physically connected with a pinkish-red wire. For that I went with a red string of fate, thinking along the lines of fate and a love of Glory. The wire is also in the shape of a cancer awareness ribbon on the front cover (hence why the red is skewed pink).
The black and white controllers are like Player 1 & 2, and they're connected. To each other, to Glory.
I traced the gamepad icon with the pen tool in Affinity Designer, creating filled in curves of each component, for ease of recolouring and resizing without losing quality.
An equalizer background image, stretched and with low opacity, adds texture to the cover. It also reminded me of pixels from holograms. (The idea of the pros and kids' game playing out on stage with massive holograms really stuck with me).
I also wanted to directly reference Make-a-Wish in the cover design, so I looked up which font they use in the logo/branding. Search results turned up Georgia being used in relation to the brand, so I exclusively used that font on the covers. And added a little star above the 'i' in 'with', like in 'Wish' for the Make-a-Wish logo.
(also first attempt at nail art. Armed with a toothpick, I made Ye Xiu from The King's Avatar themed nails! 😾Sullen Kitten; 🌶️Unrivalled Super Hottie; ☂️Myriad Manifestations Umbrella; 🍁One Autumn Leaf; 😊Happy)
72 notes
·
View notes
Note
hiii ik this might sound stupid but how do you change the size of pics in posts?? i was trying to make an intro post with a header but the pics kept being too big 😭 ty in advance & love your blog!!! 🩷🩷
Thank you love!! 💟 Also, not stupid at all!! Took me trial and error too! 🥰
For moodboards: I just use the crop feature on my phone
For my intro post: I use phonto. It’s such an unnecessary process, I feel like there’s another easy way to do it! 😭 Anyways, I don’t remember the size I used BUT you could just save my pic ⬇️

Open ‘Phonto’ > the camera button on the bottom > ‘photo albums’ > click this saved image > ‘done’ > the three dash lines > ‘add image’ > add your desired image > then resize it to your liking > the save button the bottom right > ‘save image’
And it’ll save in the size above! Hope this was helpful! ♡ Again, im more than sure there’s an easier way to do this! Someone please comment a better way to do this! 🙏
#inbox#i miss 2013 inbox#inbox open#intro post#edit help#ask#tumblr asks#ask box#tumblr ask#anon ask
13 notes
·
View notes
Note
For moodlets, do you use a template or are they screenshots from the game?
hii they are screenshots straight from the game! :) i used to use templates in much older posts (cant rmb from who) but they were too much work for me personally hehe
i like to keep my editing process simple so its just: capture the screen > crop moodlet > remove bg > paste on photo (before resizing, smart sharpen, and topaz clean) > opacity 70%. make sure u paste ur moodlet before u edit / resize ur pics so it doesnt turn out as blurry!
9 notes
·
View notes
Note
Hey! What do you crop your pictures to? And what do you resize to for the 4 pictures together layout please?
Hello! Here's a simple 3-step guide of my layout process :)
First, using Photoshop, I crop all my edited screenshots to 420x223. The preset that I am currently using can be found here.
2. Once I'm done resizing everything, I choose a 'starting' image to work with—in this case, it's still the photo you see below—so I open the image again and select crop > unconstrained this time, and proceed to drag it further down. Depending on the number of images I plan to include in one photoset, the canvas would be longer.
3. Finally, I import the rest of my screenshots into the canvas, (the starting image) flatten, save as a new file, and I'm done!
Of course...there may be a simpler method, but this is just how I do it
34 notes
·
View notes
Text

I wanted to use a picture from this photo set as my new header, but I got so annoyed at there just being an umbrella with no chairs/table in the background that I loaded the game, took a new screenshot on the ice cream parlor lot, meticulously cropped out the chairs and table, and resized and edited it to fit into the background.
#also I see that the url in the original post has the song lyrics I initially captioned the post with#huh
47 notes
·
View notes
Note
Hey I'm really sorry for bothering you but I'm using your post about pirating Adobe and I'm stuck on trying to replace the .exe file - I don't understand how I'm supposed to replace it because I'm not sure how to download the crack. If you wouldn't mind helping me out I'd appreciate it so much. I use these programs for real estate photography and my old computer with my long ago pirated copies crashed and I can't remember how I did it 10+ years ago :(
To be honest, that post is a few years old and, assuming the links still work, the Adobe programs are fairly outdated. I have been menaing to make a new post with more up-to-date links but haven't gotten around to it. (First I need to get around to actually updating the programs on my own devices lol)
Frankly my process will just be following one of the guides (likely a monkrus one) from here, and you would probably have just as much success doing the same: reddit.com/r/GenP/wiki/redditgenpguidesere
And in case you *only* need Photoshop, I would suggest using Photopea instead!
7 notes
·
View notes