#miniportable
Explore tagged Tumblr posts
Visit Tumblr Blog
Explore Tumblr blogs with no restrictions, modern design and the best experience.
Last Seen Tumblr Blogs


Fun Fact
US Tumblr user growth rate is estimated to slow down to 4.1%.
Text
Para4ce Mini Portal – Portable Ghost Hunting Device
Affordable para4ce SPIRITGATE portal enhances EVPs by filtering white noise and amplifying audio. Easy to use with any spirit box for clearer ghost hunting.
#Para4ceMiniPortal#GhostHuntingDevice#ParanormalGear#SpiritBox#PortableGhostHunting#GhostTech#SpiritCommunication#HauntedGear#ParanormalTools#MiniPortal#SupernaturalEquipment#GhostDetector#GhostInvestigation#Para4ceGear#SpiritPortal
0 notes
Note
Boss? Hi?
There's a lot happening, and I'm not sure who I'm supposed to trust anymore
And I don't know if I'm gonna be able to do much, everyone seems to be gaining divine powers
Do you... What am I supposed to do? Do you have like a mission I could help with or something like that?
Yes, I could use more stuff in the Void.
I'll open a temporary miniportal in your house. Just ignore anything you lose to it. Um, could you toss in some stuff just like random stuff.
NO COOKIES!!!!!
Ya no cookies they seem to know what they are talking abt
I could use some cali rolls, a carmel macchiato, 4 packs of batterys, and multicolored pretty rocks.
Can I have some jewelry?
And jewelry.
20 notes
·
View notes
Text
I have a computer now!! I do indeed have to buy a new cintiq pen and miniport adapter, but digital asl au art coming soon :))
2 notes
·
View notes
Text
How to Upgrade Graphics in Windows 95 & 98 on VirtualBox with BearWindows
Anyone using Windows 95 and Windows 98 on VirtualBox is bound to have, at some point, been stuck with a pitiful screen resolution of 640 x 480 and 16 colours, which is not only super ugly, especially with the programs and backgrounds you'll want to use with the OS, but you'll find that the performance is down the drain.
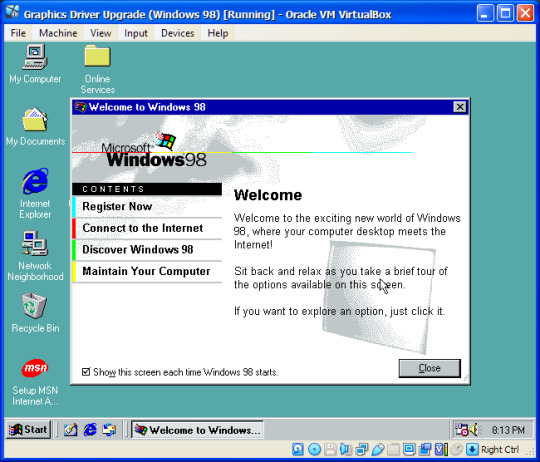
There are two well-known ways of upgrading the graphics in Windows 95 & 98 - SciTech and BearWindows. This tutorial will cover the BearWindows method. This will give you 24/32-bit colour and larger screen resolutions. However, you may be unable to get any widescreen resolutions.
First, you will want to download the BearWindows drivers. Here's the webpage regarding the project. And here's the download link you should use. Now, you can either put these files in an *.iso file that you can insert into your VM, or you can open the virtual hard drive and place the files in there. I chose the former (and I'm glad I did because I'm now using it in multiple VMs!).
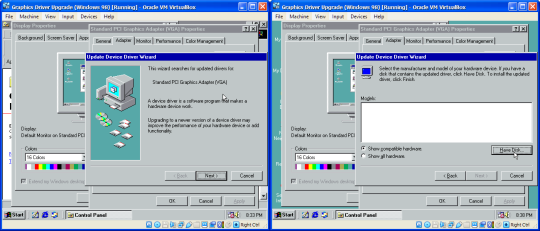
With the files now available to the VM, take a snapshot. TAKE A SNAPSHOT OF THE VM IN CASE SOMETHING GOES WRONG! Then go to Display Settings, click Advanced, go to Adapter and click Change. As you go through the wizard, select the second option (Display a list of all the drivers in a specific location...), and then select Have Disk. Now, in the file browser, go to where the display driver upgrade is. The display driver you want will be located in 032mb, 064mb or 128mb. The numbers represent how much video memory each version of the driver will be able to handle, so you're probably best off choosing the one in the 128mb folder.

In the Select Device prompt, select "Show all hardware", then select VBE Miniport - Standard PCI Graphics Adapter. The other options may not work at all. Just keep going through the rest of the wizard and return to Settings in Display Properties***. You should be able to change the colours to 32 bit and increase the display resolution without restarting. If that isn't possible, first try changing the screen resolution and colour depth on their own (screen resolution first works best for me). If it still says you have to restart, you will have to go through the entire wizard again, trying different device options until you can change the screen resolution or colour depth without restarting.
Also, while you're at it, make sure your monitor is set to the Plug and Play one. The process is similar to changing the graphics driver, but you don't have to browse for the driver:
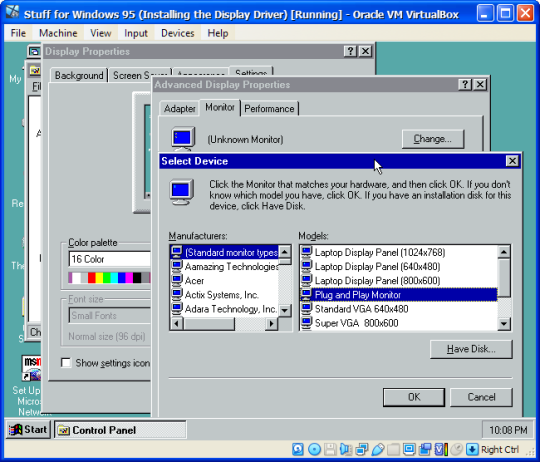
In fact, you might want to do this BEFORE upgrading your display driver, especially on Windows 95.
And that's how to upgrade your graphics on Windows 98 and possibly even Windows 95. But that's not all for this tutorial. There's still some important information to get through:
***Mostly THIS error for Windows 95 users:

If you get this error, you will have to click Close and restart the VM, as this error prevents you from even opening the Display Settings. If you get an error upon restarting about the display settings, you will have to click Cancel when the Display Settings appears to prevent this error from happening twice in a row.
You are probably going to get this error after you've installed the display driver and left the Advanced Settings in order to set the screen resolution and colour depth. If upon restarting your computer, however, the colours look different than before (due to 256 colours), that's a good sign and you just have to change the screen resolution and colour depth without restarting the VM.
#the nostalgia zone#old windows#windows 95#windows 98#virtualbox#graphics drivers#non video tutorial#tutorial#bearwindows#gee Windows 95 was a pain to get the screenshots for#Windows 95 is also a P A I N to install in the first place
1 note
·
View note
Text
como alterar a vpn para wan miniport pptp
🔒🌍✨ Ganhe 3 Meses de VPN GRÁTIS - Acesso à Internet Seguro e Privado em Todo o Mundo! Clique Aqui ✨🌍🔒
como alterar a vpn para wan miniport pptp
Configuração de VPN
Uma VPN, ou Rede Virtual Privada, é uma ferramenta essencial para quem valoriza a privacidade e a segurança online. A configuração de uma VPN pode parecer intimidante à primeira vista, mas na realidade é um processo simples e que traz muitos benefícios.
Para configurar uma VPN, o primeiro passo é escolher um provedor confiável que atenda às suas necessidades de segurança e velocidade. Existem muitas opções disponíveis no mercado, portanto, é importante fazer uma pesquisa e ler avaliações para tomar a melhor decisão.
Após escolher o provedor de VPN, o próximo passo é baixar e instalar o software da VPN em seu dispositivo. A maioria dos provedores oferece aplicativos fáceis de usar para diferentes sistemas operacionais, como Windows, macOS, Android e iOS.
Uma vez que o aplicativo esteja instalado, basta fazer login com suas credenciais e escolher um servidor VPN para se conectar. É recomendável escolher um servidor próximo à sua localização para garantir melhor desempenho.
Com a conexão estabelecida, todos os seus dados trafegarão de forma criptografada, protegendo suas informações pessoais de hackers e de olhares curiosos. Além disso, uma VPN pode ajudar a contornar restrições geográficas e garantir sua privacidade ao navegar na internet.
Em resumo, configurar uma VPN é uma maneira eficaz de proteger sua privacidade online e navegar com segurança na internet. Com alguns passos simples, você pode desfrutar dos benefícios de uma conexão segura e anônima.
Conexão WAN Miniport PPTP
O Miniport PPTP (Point-to-Point Tunneling Protocol) é uma conexão WAN utilizada principalmente para redes privadas virtuais (VPNs). Essa tecnologia permite a criação de túneis seguros por meio da Internet, possibilitando a transmissão de dados de forma criptografada e protegida.
A conexão Miniport PPTP é amplamente utilizada em ambientes corporativos, pois é de fácil configuração e oferece uma conexão estável e segura para acesso remoto à rede da empresa. Com a Miniport PPTP, os funcionários podem se conectar à rede corporativa de forma segura, mesmo estando fora do escritório.
Uma das principais vantagens da conexão Miniport PPTP é a sua compatibilidade com diferentes sistemas operacionais, o que facilita a implementação e utilização em diversos dispositivos. Além disso, essa tecnologia permite a transmissão de dados de forma eficiente, garantindo uma conexão rápida e estável.
Para configurar uma conexão Miniport PPTP, é necessário acessar as configurações de rede do dispositivo e adicionar uma nova conexão VPN, inserindo as informações fornecidas pelo administrador da rede. Dessa forma, é possível estabelecer uma conexão segura e confiável em poucos passos.
Em resumo, o Miniport PPTP é uma tecnologia essencial para a criação de conexões seguras em redes corporativas, proporcionando aos usuários acesso remoto de forma eficiente e protegida. Com sua fácil configuração e compatibilidade, essa conexão WAN é uma ótima opção para empresas que buscam manter a segurança dos dados e a produtividade de seus colaboradores.
Tutorial alterar VPN
Um tutorial para alterar sua VPN pode ser útil para quem deseja navegar na internet de forma mais segura e privada. Existem diversas razões pelas quais alguém pode querer alterar sua VPN, como acessar conteúdos restritos geograficamente, proteger seus dados de hackers ou simplesmente garantir uma conexão mais segura em redes Wi-Fi públicas.
Para alterar sua VPN, o primeiro passo é escolher um serviço de VPN confiável e de qualidade. Existem diversas opções disponíveis no mercado, algumas gratuitas e outras pagas, por isso é importante pesquisar e escolher aquela que melhor atende às suas necessidades.
Após escolher o serviço de VPN, você precisará instalar o aplicativo em seu dispositivo. Geralmente, os serviços de VPN possuem aplicativos para dispositivos móveis, computadores e até mesmo roteadores, facilitando a proteção de todos os dispositivos conectados à sua rede.
Com o aplicativo instalado, basta abrir e seguir as instruções para se conectar a um servidor VPN. Muitas vezes, é possível escolher o país do servidor pelo qual deseja se conectar, ideal para acessar conteúdos bloqueados em seu país de origem.
Em resumo, alterar sua VPN pode ser uma forma simples e eficaz de garantir mais segurança e privacidade ao navegar na internet. Seguindo os passos corretos, você poderá desfrutar de uma conexão mais segura e ter mais controle sobre sua privacidade online.
Segurança de rede
A segurança de rede é um tema crucial nos dias de hoje, à medida que a dependência da tecnologia e da internet cresce exponencialmente. Garantir a proteção dos dados e da privacidade das informações transmitidas por redes é fundamental para a segurança cibernética de indivíduos e organizações.
Existem várias medidas que podem ser adotadas para reforçar a segurança de rede. Uma delas é a utilização de firewalls, que funcionam como barreiras de proteção contra acessos não autorizados. Além disso, a instalação de antivírus e antimalware em todos os dispositivos conectados à rede é essencial para prevenir ataques de hackers e infecções por softwares maliciosos.
Outra prática comum é a utilização de redes privadas virtuais (VPNs), que criptografam a comunicação entre os dispositivos, garantindo a confidencialidade das informações transmitidas. A autenticação em duas etapas também é altamente recomendada, pois adiciona uma camada extra de segurança no acesso às redes e sistemas.
É importante também manter os softwares e sistemas operacionais sempre atualizados, pois as atualizações frequentes trazem correções de vulnerabilidades conhecidas que podem ser exploradas por cibercriminosos.
Em resumo, investir em segurança de rede é essencial para proteger os dados e a privacidade dos usuários. Com a implementação de medidas como firewalls, antivírus, VPNs e atualizações regulares, é possível reduzir significativamente os riscos de ataques e garantir a integridade das informações transmitidas pela rede.
Protocolo PPTP
O Protocolo PPTP, sigla de Point-to-Point Tunneling Protocol, é um dos protocolos mais antigos e amplamente utilizados para criar redes privadas virtuais (VPNs). Desenvolvido pela Microsoft em parceria com outras empresas de tecnologia, o PPTP é conhecido por sua simplicidade e facilidade de implementação.
Uma das principais vantagens do Protocolo PPTP é a sua compatibilidade com uma grande variedade de dispositivos e sistemas operacionais, tornando-o uma escolha popular para usuários domésticos e empresas de pequeno porte. Além disso, o PPTP oferece uma boa velocidade de conexão, ideal para atividades que exigem transmissão de dados em tempo real, como videoconferências e jogos online.
No entanto, o Protocolo PPTP também apresenta algumas limitações. A segurança do PPTP é considerada relativamente fraca em comparação com protocolos mais recentes, como o OpenVPN, devido à sua criptografia menos robusta. Isso o torna menos indicado para aplicações que exigem um alto nível de segurança, como a transmissão de informações sensíveis.
Em resumo, o Protocolo PPTP é uma opção viável para usuários que buscam uma solução de VPN simples e de fácil configuração, principalmente para atividades do dia a dia que não envolvam informações críticas. No entanto, para garantir uma segurança mais robusta, especialmente em ambientes empresariais, é aconselhável considerar a utilização de protocolos mais modernos e seguros.
0 notes
Text
como alterar a vpn para wan miniport pptp windows 7
🔒🌍✨ Ganhe 3 Meses de VPN GRÁTIS - Acesso à Internet Seguro e Privado em Todo o Mundo! Clique Aqui ✨🌍🔒
como alterar a vpn para wan miniport pptp windows 7
Configurações VPN Windows 7
As configurações de VPN no Windows 7 podem ser uma maneira segura de proteger sua conexão com a internet e manter suas informações pessoais em segredo. Uma rede privada virtual, ou VPN, cria um túnel criptografado entre seu computador e o servidor VPN, garantindo que suas atividades online sejam seguras e privadas.
Para configurar uma VPN no Windows 7, primeiro você precisa acessar o Painel de Controle e selecionar a opção "Rede e Internet". Em seguida, clique em "Central de Rede e Compartilhamento" e depois em "Configurar uma nova conexão ou rede".
Na janela que se abrir, escolha a opção "Conectar a um local de trabalho" e clique em "Avançar". Selecione a opção "Usar minha conexão com a Internet (VPN)" e insira o endereço do servidor VPN que você deseja se conectar. Você também precisará fornecer um nome para a conexão.
Depois de concluir essas etapas, você será solicitado a inserir suas credenciais de login fornecidas pelo provedor VPN. Uma vez conectado, você poderá navegar na internet de forma segura e privada, com todas as suas comunicações criptografadas.
É importante lembrar que as configurações de VPN no Windows 7 podem variar dependendo do provedor de serviços VPN que você escolher. Certifique-se de seguir as instruções fornecidas pelo seu provedor para garantir uma configuração correta e segura.
Alterar VPN Windows 7
Alterar a VPN no Windows 7 pode ser necessário para garantir uma conexão segura e estável à internet. Uma VPN, ou Rede Virtual Privada, é uma ferramenta essencial para proteger sua privacidade online e contornar restrições geográficas. Se você está enfrentando problemas de conexão ou deseja alterar para um servidor VPN diferente, siga estes passos simples para fazer a mudança.
Acessar as Configurações de Rede: Para começar, clique no botão Iniciar e vá para o Painel de Controle. Em seguida, selecione "Central de Rede e Compartilhamento".
Escolher a Opção de Configurações de Adaptador: Na Central de Rede e Compartilhamento, clique em "Alterar as configurações do adaptador" no painel esquerdo. Isso abrirá uma lista de todas as conexões de rede disponíveis no seu computador.
Selecionar a VPN Existente: Encontre a conexão VPN que você deseja alterar na lista de adaptadores de rede. Clique com o botão direito do mouse sobre ela e selecione "Propriedades".
Configurar as Propriedades da VPN: Na janela de propriedades da VPN, vá para a aba "Rede" e selecione "Protocolo de Internet Versão 4 (TCP/IPv4)". Clique em "Propriedades".
Alterar as Configurações de DNS e Servidor: Aqui você pode inserir manualmente as configurações de DNS e o endereço do servidor VPN que deseja utilizar. Você pode obter essas informações com o provedor do serviço VPN.
Salvar as Alterações: Depois de inserir as novas configurações, clique em "OK" para salvar e fechar todas as janelas abertas.
Reiniciar a Conexão VPN: Para garantir que as alterações entrem em vigor, desconecte e reconecte à VPN.
Ao seguir estes passos simples, você poderá alterar a VPN no Windows 7 e desfrutar de uma conexão segura e confiável à internet. Lembre-se sempre de escolher um provedor de VPN confiável para garantir sua privacidade online.
Wan Miniport PPTP Windows 7
O Wan Miniport PPTP é um adaptador virtual utilizado em sistemas operacionais Windows 7 para suportar conexões de rede privada virtual (VPN) através do protocolo PPTP (Point-to-Point Tunneling Protocol). Ele desempenha um papel crucial na criação de uma conexão segura entre o computador do usuário e o servidor VPN.
Ao instalar o driver do Wan Miniport PPTP no Windows 7, os usuários podem configurar facilmente uma conexão VPN para acessar com segurança recursos de rede privada pela Internet. Essa conexão é útil para proteger a privacidade e a segurança dos dados transmitidos, especialmente ao utilizar redes Wi-Fi públicas ou acessar informações confidenciais remotamente.
Para instalar o Wan Miniport PPTP no Windows 7, os usuários podem acessar o Gerenciador de Dispositivos, localizar o adaptador de rede, selecionar a opção de adicionar novo hardware e escolher o Wan Miniport PPTP na lista de dispositivos disponíveis. Após a instalação bem-sucedida, os usuários podem configurar as propriedades da conexão VPN para estabelecer a conexão com o servidor desejado.
É importante lembrar que o Wan Miniport PPTP no Windows 7 oferece suporte a conexões VPN PPTP, sendo uma opção eficaz para garantir a segurança dos dados durante a comunicação pela rede. No entanto, é sempre recomendável adotar medidas de segurança adicionais, como a utilização de senhas fortes e a atualização regular do sistema operacional, para proteger a integridade dos dados pessoais.
Tutorial VPN Windows 7
Os Serviços de Rede Privada Virtual (VPN) são uma ferramenta útil para proteger a sua privacidade e segurança online ao navegar na internet. Se você utiliza o sistema operacional Windows 7 e deseja configurar uma VPN nele, este tutorial irá te guiar pelo processo passo a passo.
Abra o menu Iniciar e clique em "Painel de Controle".
Em "Rede e Internet", selecione "Central de Rede e Compartilhamento".
Clique em "Configurar uma nova conexão ou rede".
Selecione a opção "Conectar-se a um local de trabalho" e clique em "Avançar".
Escolha "Usar minha conexão com a Internet (VPN)".
Insira o endereço do servidor VPN fornecido pelo seu provedor de serviços.
Nomeie a conexão e clique em "Avançar".
Insira seu nome de usuário e senha fornecidos pelo provedor de VPN.
Clique em "Conectar" para estabelecer a conexão VPN.
Ao seguir esses passos, você poderá configurar uma conexão VPN no seu computador com Windows 7, garantindo uma navegação mais segura e privada. Lembre-se de sempre escolher um provedor de VPN confiável e atualizar regularmente suas configurações de segurança para manter seus dados protegidos. Aproveite os benefícios de uma VPN e navegue na internet com tranquilidade.
Passos VPN Windows 7
Os passos para configurar uma VPN no Windows 7 podem variar ligeiramente dependendo do serviço VPN que você está utilizando. No entanto, os passos gerais são os mesmos e podem ser facilmente seguidos para garantir uma conexão segura e privada.
O primeiro passo é selecionar o botão "Iniciar" no canto inferior esquerdo da tela e depois escolher "Painel de Controle". Em seguida, clique em "Rede e Internet" e depois em "Central de Rede e Compartilhamento".
Dentro da Central de Rede e Compartilhamento, selecione a opção "Configurar uma nova conexão ou rede" e escolha a opção de se conectar a uma rede de trabalho. Siga as instruções na tela e insira as informações necessárias sobre a sua VPN, como o endereço do servidor e suas credenciais de login.
Depois de configurar a conexão VPN, você poderá se conectar a ela selecionando o ícone de rede no canto inferior direito da tela, clicando em "Conectar a uma rede" e escolhendo a VPN que você acabou de configurar.
Uma vez conectado, você poderá desfrutar de uma conexão segura e privada, protegendo seus dados de olhares curiosos e mantendo suas informações pessoais seguras enquanto navega na internet. Certifique-se de sempre usar uma VPN confiável e atualizada para garantir a máxima segurança online.
0 notes
Text
can't connect to wan miniport vpn
🔒🌍✨ Get 3 Months FREE VPN - Secure & Private Internet Access Worldwide! Click Here ✨🌍🔒
can't connect to wan miniport vpn
Wan Miniport VPN troubleshooting
Wan Miniport VPN is a virtual private network adapter used in Windows operating systems to establish VPN connections. While it provides secure communication over the internet, users may encounter some common troubleshooting issues that can disrupt their VPN experience.
One prevalent issue with Wan Miniport VPN is driver conflicts or missing drivers. This can be resolved by updating the drivers through Device Manager or reinstalling them from the manufacturer's website. Another common problem is network configuration errors, where the VPN settings may be incorrectly configured. Users should double-check their VPN settings to ensure they match the requirements of their VPN service provider.
Sometimes, Wan Miniport VPN may face connectivity issues due to firewall or antivirus software blocking the VPN connection. Users should temporarily disable these security software to see if the VPN connection can be established. Additionally, resetting the TCP/IP stack can also help resolve connectivity issues with Wan Miniport VPN. This can be done by running specific commands in the Command Prompt.
If the Wan Miniport VPN is still not working after trying these troubleshooting steps, users can contact their VPN service provider for further assistance. They may provide specific troubleshooting steps or recommend alternative solutions to ensure a smooth VPN connection.
In conclusion, Wan Miniport VPN troubleshooting may require updating drivers, checking network configurations, disabling security software, resetting TCP/IP stack, or seeking help from the VPN service provider. By following these steps, users can overcome common issues and enjoy a secure VPN connection on their Windows system.
Wan Miniport VPN connection issues
Wan Miniport is a type of network driver used in Windows operating systems to manage VPN connections. However, users often encounter issues with Wan Miniport VPN connections that can disrupt their online activities. One common problem is when the Wan Miniport driver becomes corrupted or outdated, leading to connection failures.
When facing Wan Miniport VPN connection issues, there are several troubleshooting steps that users can take to resolve the issue. One of the first things to try is to update the Wan Miniport driver to the latest version. This can be done through the Device Manager in Windows, where users can find the Wan Miniport driver under the "Network Adapters" section. By right-clicking on the driver and selecting "Update driver," users can search for updates online and install them to potentially fix the connection problem.
If updating the driver does not solve the issue, users can also try uninstalling the Wan Miniport driver and then restarting the computer. Windows will automatically reinstall the driver upon reboot, which may help in resolving any underlying issues causing the connection problem.
In some cases, resetting the TCP/IP stack or running network troubleshooting tools provided by Windows can also help in diagnosing and fixing Wan Miniport VPN connection issues. However, if the problem persists despite trying these solutions, seeking further assistance from a technical support professional may be necessary to address more complex networking issues.
Wan Miniport VPN not working
WAN Miniport is a type of network adapter that allows VPN connections on Windows operating systems. However, users may encounter issues where their WAN Miniport VPN is not working properly. There are several reasons why this problem may occur, and understanding these causes can help in troubleshooting the issue.
One common reason for WAN Miniport VPN not working is outdated or corrupt network drivers. In such cases, updating the network drivers through Device Manager can often resolve the issue. Additionally, reinstalling the WAN Miniport adapters may help in fixing any potential driver-related issues.
Another possible cause of the problem could be related to network settings or configurations. Users can check their network settings to ensure that the VPN connection is properly configured and that there are no conflicts with other network adapters.
In some cases, software conflicts or third-party applications may interfere with the WAN Miniport VPN functionality. Disabling or uninstalling any conflicting software can help in resolving the issue.
If the problem persists, users may consider resetting their network settings or performing a system restore to undo any recent changes that could be causing the problem.
Overall, troubleshooting WAN Miniport VPN issues can vary depending on the specific cause of the problem. By following these steps and consulting with technical support if needed, users can often resolve the issue and regain access to their VPN connection.
Wan Miniport VPN error messages
Wan Miniport VPN Error Messages: Understanding and Troubleshooting
Wan Miniport is a crucial component in Windows systems, facilitating the functionality of virtual private network (VPN) connections. However, encountering error messages related to Wan Miniport can be frustrating for users trying to establish VPN connections. Understanding these error messages and knowing how to troubleshoot them can help resolve connectivity issues effectively.
One common error message associated with Wan Miniport VPN connections is the "Error 720: A connection to the remote computer could not be established" message. This error often indicates issues with the VPN server configuration, network adapter settings, or outdated drivers. To address this, users can try updating their network adapter drivers, ensuring compatibility with the VPN server, and resetting TCP/IP settings.
Another frequently encountered error is "Error 800: Unable to establish the VPN connection." This error typically points to firewall or router settings blocking VPN connections, incorrect VPN server settings, or network congestion. Users can troubleshoot this by checking firewall configurations, verifying VPN server settings, and trying alternative VPN protocols.
Additionally, users may encounter "Error 812: The connection was prevented because of a policy configured on your RAS/VPN server." This error indicates issues with VPN server policies, authentication protocols, or user permissions. Troubleshooting steps include reviewing VPN server policies, ensuring correct user authentication settings, and verifying user permissions.
Moreover, "Error 678: The remote computer did not respond" is another common error indicating issues with network connectivity, incorrect dial-up settings, or ISP-related problems. Troubleshooting involves checking modem settings, verifying dial-up configurations, and contacting the Internet Service Provider (ISP) if necessary.
In conclusion, Wan Miniport VPN error messages can disrupt VPN connectivity, but understanding their causes and implementing appropriate troubleshooting steps can help resolve these issues effectively. By addressing network settings, driver updates, and server configurations, users can mitigate VPN connection problems and ensure smooth and secure remote access.
Wan Miniport VPN connectivity problems
Wan Miniport VPN connectivity problems can be a frustrating issue for users trying to establish a secure and stable VPN connection on their Windows systems. Wan Miniport is a virtual adapter that allows VPN clients to connect to a remote server over the internet. However, users often encounter connectivity problems with Wan Miniport, preventing them from establishing a reliable VPN connection.
One common issue with Wan Miniport VPN connectivity is driver-related problems. Outdated or corrupted drivers can cause connection failures and network issues. To resolve this, users should update their Wan Miniport drivers by accessing the Device Manager in the Control Panel and selecting the Wan Miniport adapter for driver update.
Another frequent issue is misconfigured network settings. Users may have incorrect VPN configurations or network settings that prevent Wan Miniport from connecting to the VPN server. To troubleshoot this, users should double-check their VPN settings, such as server address, authentication credentials, and encryption protocols, to ensure they match the requirements for the VPN service they are trying to connect to.
Additionally, firewall and security software may block Wan Miniport VPN connections, leading to connectivity problems. Users should check their firewall settings and ensure that the VPN client is allowed to communicate through the firewall. Disabling security software temporarily can help identify if it is causing the connection issue.
In conclusion, Wan Miniport VPN connectivity problems can be resolved by updating drivers, checking network settings, and configuring firewall and security software appropriately. By following these troubleshooting steps, users can overcome Wan Miniport connectivity issues and establish a successful VPN connection for secure internet browsing and data transmission.
0 notes

Video
Wow, these Solar Panel Power Banks with LED Lights are a game-changer for outdoor enthusiasts! ⚡️🔦 Can't wait to take my adventures to the next level with this cutting-edge technology! 🌟 #TechInnovation #StayConnectedEverywhere; #Powerbank; #PortablePowerbank; #MiniPortable; #MiniPowerbank; #TechAccessroies
youtube
Illuminate Your Path with Solar Panel Power Banks for Unforgettable Outdoor Adventures
Are you ready to take your outdoor adventures to the next level with cutting-edge technology? Look no further than our Solar Panel Power Banks with LED Lights, designed to enhance your outdoor experiences and keep you connected wherever your travels take you. Let’s delve into the exceptional features that make this power bank a must-have for outdoor enthusiasts.
Crafted from durable ABS+PC material and powered by a high-capacity 20000mAh Li-polymer cell, this power bank is your reliable companion for staying charged during your outdoor escapades. While it doesn’t support LED lights, it features a DisPlay function that allows you to monitor the battery status with ease, ensuring you always have power when you need it.
Equipped with a solar panel that can provide up to 70 hours of lighting, this power bank offers three light modes with up to 786 Lumens, illuminating your path and enhancing your outdoor experiences. Its intelligent compatibility and high-efficient charging capabilities ensure that your devices stay powered up, no matter where your adventures take you.
Featuring three USB outputs, including Lightning/USB, USB/DC, and USB interfaces, this power bank allows you to charge up to three devices simultaneously, keeping you and your companions connected and ready for any outdoor activity. With a massive 30000mAh capacity, this portable power bank offers long-lasting power for extended trips and adventures.
Keywords like #Flashlight, #TechInnovation, and #StayConnectedEverywhere perfectly capture the essence of this solar panel power bank. Stay juiced up, charge on the go, and illuminate your outdoor journeys with our powerful and versatile power bank. Elevate your outdoor adventures, stay connected everywhere, and make unforgettable memories with this essential tech gadget by your side.
Illuminate your path and stay connected during your outdoor adventures with our Solar Panel Power Banks with LED Lights. With their high-capacity battery, efficient charging capabilities, and illuminating features, these power banks are the perfect companions for outdoor enthusiasts seeking reliable and innovative charging solutions. Make every outdoor experience unforgettable with our solar panel power banks and embrace the convenience of staying powered up wherever your adventures take you.
2 notes
·
View notes
Photo

Baseus Bluetooth Speaker Mini Portable Outdoor Wireless Speaker 3D stereo Music surround Player altavoz bluetooth haut parleur #Baseus #BluetoothSpeaker #MiniPortable #WirelessSpeaker #MusicSurround ✔1. The Baseus E02 Bluetooth speaker that never fails to deliver crisp, robust sound. ✔2. Adopts Bluetooth technology, share music with your friends anytime and anywhere. ✔3. Immersive sound quality and portable design that you will enjoy in the comfort of your home or even outdoors. ✔4. A multifunctional Bluetooth speaker, let you spend more time having fun in the ocean of music. ✔Product Features: ✔1. Adopts Bluetooth 4.2 technology, instantly connect to your devices from up to 10m ✔2. Built-in 1500mAh lithium-ion battery, provides more than 5 hours playtime ✔3. Supports TF card capacity up to 32GB (TF card is not included) ✔4. Compact design easier for you to anywhere you go ----------- BUY NOW! STOCKS ARE LIMITED ✨ VISIT OUR SHOP🤩 📞 DIRECT message Follow👇 @BaseusWorld #BaseusWorld Choose your favourite 😍 Comment down below 👇 ----------- #oaklandcountymichigan #Oaklanders #oaklander #OaklandNightclubs #OaklandMUA #OaklandClubs #oaklandparkfl #oaklandpopup #oaklandtattoo #oaklandathleticsbaseball #OaklandsFinest #OaklandScene #oaklandbrunch #oaklandpride #oaklandpost #OaklandParty #oaklandweddingphotographer #oaklandbaybridge #oaklandlashes #oaklandwarriors #oaklandhomes #oaklandsunset #OAKLANDlife #oaklandlicensedhairstylist #oaklandtemple #oaklandnjhair #oaklandmodel #oaklandhighschool #oaklandtribune #oaklandwaterfront (at Oakland, California) https://www.instagram.com/p/Bs7OD_bFbkA/?utm_source=ig_tumblr_share&igshid=zythvs74znv5
#baseus#bluetoothspeaker#miniportable#wirelessspeaker#musicsurround#baseusworld#oaklandcountymichigan#oaklanders#oaklander#oaklandnightclubs#oaklandmua#oaklandclubs#oaklandparkfl#oaklandpopup#oaklandtattoo#oaklandathleticsbaseball#oaklandsfinest#oaklandscene#oaklandbrunch#oaklandpride#oaklandpost#oaklandparty#oaklandweddingphotographer#oaklandbaybridge#oaklandlashes#oaklandwarriors#oaklandhomes#oaklandsunset#oaklandlife#oaklandlicensedhairstylist
1 note
·
View note
Text
Egyik kommunista sem siet posztolni a lebukott buzi pedofil Presmann influenszerekről! És az őrkutya sem ugat, csak nyalogatja a gazda kezét!
MKKA
23 notes
·
View notes
Text
Microsoft virtual wifi miniport adapter fix

#Microsoft virtual wifi miniport adapter fix how to
#Microsoft virtual wifi miniport adapter fix install
#Microsoft virtual wifi miniport adapter fix update
#Microsoft virtual wifi miniport adapter fix windows 10
#Microsoft virtual wifi miniport adapter fix software
Just like with modern routers, you only have to enter a number displayed on screen, or press a button, and the devices connect. WiFi Direct relies on WiFi Protected Setup (WPS) which is a simple way to securely connect two devices via WiFi. Microsoft Virtual WiFi Miniport Adapter Reinstallation Guide on Windows PC.īasically, Virtual WiFi is a technology that virtualizes your network adapter much in the same way VMWare virtualizes your entire operating system.
#Microsoft virtual wifi miniport adapter fix windows 10
Use “WiFi Sense” of Windows 10 for WiFi Hotspot or Wireless Internet.
#Microsoft virtual wifi miniport adapter fix software
Use Third-party Windows Software to Create a Virtual Wireless Network or Wi-fi Hotspot Service. How to Enable Microsoft Virtual WiFi Miniport Adapter and Setup Wi-fi Hotspot Setup Virtual Wireless Access Point Using Command in Windows 10/8/8.1/7. How to enable a Microsoft Virtual WiFi adapter?
#Microsoft virtual wifi miniport adapter fix install
Select “Update Driver Software” and then click “Search automatically for updated driver software.” Follow the prompts to install any available updates. Expand the “Network adapters” section, then right-click on your wireless adapter. Press ⊞ Win and type devmgmt.msc to open the Device Manager. This means that, using the Microsoft Virtual WiFi Mini Port Adapter, you can turn the physical network adapter that their computer has into two virtual network adapters. The Virtual WiFi Adapter is designed to basically virtualize the physical network adapter that every computer has. Virtual WiFi interacts with the card device driver at the lower end, and network protocols at the upper end. Virtual WiFi is implemented as an NDIS intermediate driver, and a user-level service in Windows XP. Virtual WiFi helps a user connect to multiple IEEE 802.11 networks with one WiFi card. Check if any unknown devices show up and right click on it and click on Enable.Click on View Tab, Select Show hidden devices.How to install Microsoft wifi direct virtual adapter #2 How do I download Microsoft WiFi direct virtual adapter? Run “netsh wlan start hostednetwork” to start the wifi hotspot.Then run “netsh wlan set hostednetwork mode=allow ssid=name key=password” to create the wifi hotspot.Open an administrator command line and run “netsh wlan show drivers”.Reinstall the network adapter from the device manager.How do I install Microsoft Virtual WiFi Miniport adapter in Windows 7? File name: microsoftvirtualwifiminiportadapter.exe Version: 2.2.7 File size: 9.
#Microsoft virtual wifi miniport adapter fix how to
7 How to enable a Microsoft Virtual WiFi adapter? Below you can download microsoft virtual wifi miniport adapter driver for Windows.6 How do I install a virtual WiFi adapter?.
#Microsoft virtual wifi miniport adapter fix update
In such case, choose other trustworthy to update it or reinstall it. That’s why it keep prompting the driver is not up-to-date if you updated driver through Device Manager. For some reasons, Microsoft cannot detect the update for your device.
5 How do I install Microsoft Virtual WiFi? Reinstall Microsoft Virtual Wifi Miniport Adapter driver.
4 What is Microsoft Virtual WiFi adapter?.
2 How do I download Microsoft WiFi direct virtual adapter?.
1 How do I install Microsoft Virtual WiFi Miniport adapter in Windows 7?.
It also seems that when this connection is on I get more virus'sĮven though I have several virus protectors and trojan protectors and I have a password on my internet connection not letting others use it but some how it is still happening and I only have one laptop connected to my internet. If I disable it I am good forĪ while but somehow it re-ables itself is there some way to stop this? I have read where other people have increased problems with their computers being hacked more when using this connection. This is very frustrating expecially with taking online classes and it cause me to lose my connection or slows down my connection or freezes up my connection. Sometimes it has to be done multiple times in an short period of time. On my new laptop I have a network adapter called "Microsoft Virtual WiFi Miniport Adapter", I am not sure what this is but it causes major problems with my internet connection and I am always losing my connection and have to repeatedly reset my modem and
0 notes
Text
Hobie RB Miniport Tracmount
The Hobie Railblaza Miniport Trackmount allows you to attach smaller Railblaza accessories onto your kayak track (track mount not included). The mount screws onto your track without the use of tools.
#hobie railblaza miniport trackmount#kayak#railblaza accessories#kayaking#hobie#hobie kayak#hobie kayaks#adventurehq#dubai#uae
0 notes
Text
MidiSimulator

Mida Simulator Download
Midi Guitar Simulator
Midi Simulator
Midi Emulator
Midi Simulator Software Download
Midi Smoke Simulator
Below is a list of the best free and paid virtual drum software programs available to download right now.
Mida Simulator Download
Free Downloads: Midi Simulator. License: All 1 2 Free. Direct MIDI to MP3 Converter. Direct MIDI to MP3 Converter is a fast audio tool to convert MIDI to MP3, WAV, WMA and OGG files formats. Adjustable Tempo and Reverberation control. VirtualMIDI SDK. Virtual MIDI driver for Windows 7 up to Windows 10, 32 and 64 bit with the ability to dynamically create and destroy freely nameable MIDI-ports. Domino is a Japanese MIDI sequencer developed by Takabo Soft that some of the Black MIDI Team members use to create or black a MIDI. This officially only comes with the Japanese language, but an incomplete English patch can be found here. Version 1.44 is the last version available. Performance is faster than FL Studio Higher resolution (PPQN) can be chosen MIDI events can be edited manually.
They are available for PC and Mac computers in plugin formats to use with DAWs and most operate as a standalone program as well.

Unless you plan on mastering the technique of recording an acoustic drum kit and finding a drummer to play for you all the time, having a good drum software plugin is one of the most important aspects of music creation.
It’s amazing how realistic virtual drum software has become over the years.
Drum software is also surprisingly versatile. You can create custom kits and sounds with endless variations.
You can use MIDI keyboards and drum pads to trigger drum sounds, and connect e-drum kits like the Alesis DM10 to play virtual drums in real time with an electronic drum set.
There are several good choices when it comes to drum software. Some have more expansion packs than others, some offer larger MIDI libraries (ready-to-use drum loops), and others have more advanced editing and mixing tools.
Best Free Drum Software
Sennheiser DrumMic’a – A surprisingly high-quality free drum kit plugin with variable mics, a mixer, and a number of included MIDI loops. It just requires setting up a free account to register the softwrae. DrumMic’a works with the free version of Kontakt 5 Player.
MT Power Drum Kit 2 – A former paid plugin, MT Power Drum Kit 2 has a number of included features, such as a built-in mixer and a bunch of high-quality MIDI grooves. MT Power Drum Kit 2 is available in VST and AU formats in 32 and 64 bit versions. There are some MIDI mapping presets available to use it with other drum programs as well.
Best Paid Drum Software
Toontrack EZdrummer 2 – Estimated price: $149 – EZdrummer is one of the most popular drum production software programs. It’s very simple to use and yet it offers a number of advanced features. The base version comes with 5 drum kits, two sound libraries, some MIDI grooves, and a mixer with effects. It works as a plugin and standalone program. There are tons of expansion packs for additional drum kits covering a wide range of genres.
FXpansion BFD3 – Estimated price: $349 – Another top choice is BFD3. It comes with 7 drum kits, with dedicated rock, metal, jazz, and brush kits. It has a fully-editable groove engine to make creating custom grooves quick and easy. BFD3 works as a plugin and as standalone software. It comes with an extensive virtual drum library with 55GB of sounds.
Addictive Drums 2 – Estimated price: $149 – If you’re looking for an extensive library of included beats, XLN Audio’s Addictive Drums 2 comes with over 5000 MIDI grooves ready to go. It has three custom drum kits, and features a Transient Shaper and Tone Designer and some included effects to fine-tune your sound. Addictive drums can be used as a plugin as as a standalone program.
Toontrack Superior Drummer 2.0 – Estimated price: $179 (on sale) – Superior Drummer is Toontrack’s more advanced version of EZdrummer, and it works with EZdrummer 2 expansion libraries. It offers more ways to adjust sounds and tweak individual parameters, and it comes with more effects and 20 GB of included drum samples.
Steven Slate Drums 4.0 Platinum – Estimated price: $149 – A virtual drum library with 100 included drum kit presets and a drum sampler to create custom grooves. Steven Slate Drums come in VST, AU, and RTAS formats.
Studio Drummer – Estimated price: $149 – Native Instrument’s Studio Drummer comes with three drum kits, a dedicated mixer with effects, and over 3500 included drum patterns. Studio Drummer works with the Kontakt 5 Player.
Virtual MIDI driver for Windows 7 up to Windows 10, 32 and 64 bit with the ability to dynamically create and destroy freely nameable MIDI-ports.
Midi Guitar Simulator
The necessity for virtualMIDI came along when I implemented my rtpMIDI-driver. Later I also used this driver when I created loopMIDI for people who only need simple loopback MIDI-ports.
I had some pretty specific requirements:
Midi Simulator

• Compatibility from Windows XP to Windows 10 • Both 32bit and 64bit operation • On-the-fly creation (and destruction) of freely nameable virtual MIDI-ports • Only one side of the ports was supposed to be visible to the public • The other side only visible via a private interface • Multi-client-capability
Since I had been hanging around on the wdmaudiodev mailinglist for quite some time due to my interest in kernel-streaming, I had already read quite a bit on the topic over there.
All of the people there suggested to use the DMusUart and the MPU401 sample as a starting-point. So that’s what I did and creating the actual driver had been not too hard after getting enough insights at the WDK-documentation.
Nevertheless all the stuff people had done prior to my attempts would not quite achieve what my requirement were.
Midi Emulator
All of those other virtual MIDI miniport driver implementations actually developed simple static “loopback” MIDI-ports. Loopback meaning that both ends of this port would be public. Static meaning that the number of ports and their names would be fixed at install-time of the driver (via the inf-file of the driver).
This was not satisfactory, so I looked some more and I found references to dynamic creation of sub-devices. But this was a hard nut to crack. Finally I had been able to locate a guy who was doing something similar for a virtual soundcard-driver for digital-audio-broadcast.
Midi Simulator Software Download
His insights have been invaluable. It still took quite some time to get everything going smoothly, but I finally succeeded in creating this driver.
One problem remained: Since Microsoft introduced Vista, all drivers for 64bit need to be code-signed. Though the idea itself is pretty nifty – to know the specific company that the code running in the kernel comes from – it had a severe drawback:

Only companies incorporated could apply for such a code-signing-certificate. Many people in the driver-development-community urged Microsoft to rectify this. And finally in May of 2010 it has been done. Since that time it is also possible for individuals to get their own code-signing certificate to be able to run their drivers on the 64bit versions of Vista and Windows 7.
The driver is currently part of the rtpMIDI-driver network-MIDI driver and the loopMIDI virtual loopback MIDI cable. But it can be used for other tasks as well.
Midi Smoke Simulator
If you have a music-application that needs to create its own freely named MIDI-devices on-the-fly – virtualMIDI is exactly the right tool. I have prepared a small & simple to use SDK with bindings for C/C++, Delphi, Java and C#.
1 note
·
View note
Photo

Baseus Bluetooth Speaker Mini Portable Outdoor Wireless Speaker 3D stereo Music surround Player altavoz bluetooth haut parleur #Baseus #BluetoothSpeaker #MiniPortable #WirelessSpeaker #MusicSurround ✔1. The Baseus E02 Bluetooth speaker that never fails to deliver crisp, robust sound. ✔2. Adopts Bluetooth technology, share music with your friends anytime and anywhere. ✔3. Immersive sound quality and portable design that you will enjoy in the comfort of your home or even outdoors. ✔4. A multifunctional Bluetooth speaker, let you spend more time having fun in the ocean of music. ✔Product Features: ✔1. Adopts Bluetooth 4.2 technology, instantly connect to your devices from up to 10m ✔2. Built-in 1500mAh lithium-ion battery, provides more than 5 hours playtime ✔3. Supports TF card capacity up to 32GB (TF card is not included) ✔4. Compact design easier for you to anywhere you go ----------- BUY NOW! STOCKS ARE LIMITED ✨ VISIT OUR SHOP🤩 📞 DIRECT message Follow👇 @BaseusWorld #BaseusWorld Choose your favourite 😍 Comment down below 👇 ----------- #oaklandcountymichigan #Oaklanders #oaklander #OaklandNightclubs #OaklandMUA #OaklandClubs #oaklandparkfl #oaklandpopup #oaklandtattoo #oaklandathleticsbaseball #OaklandsFinest #OaklandScene #oaklandbrunch #oaklandpride #oaklandpost #OaklandParty #oaklandweddingphotographer #oaklandbaybridge #oaklandlashes #oaklandwarriors #oaklandhomes #oaklandsunset #OAKLANDlife #oaklandlicensedhairstylist (at Oakland, California) https://www.instagram.com/p/Bs7PLt4lEw5/?utm_source=ig_tumblr_share&igshid=d729oqualyti
#baseus#bluetoothspeaker#miniportable#wirelessspeaker#musicsurround#baseusworld#oaklandcountymichigan#oaklanders#oaklander#oaklandnightclubs#oaklandmua#oaklandclubs#oaklandparkfl#oaklandpopup#oaklandtattoo#oaklandathleticsbaseball#oaklandsfinest#oaklandscene#oaklandbrunch#oaklandpride#oaklandpost#oaklandparty#oaklandweddingphotographer#oaklandbaybridge#oaklandlashes#oaklandwarriors#oaklandhomes#oaklandsunset#oaklandlife#oaklandlicensedhairstylist
0 notes
Video
tumblr
Following you wherever you go !!!
#Siberia#siberiasnus#gntobacco#snus#newproduct#siberiamini#miniportion#Snuf#snusmumriken#snusdosa#snusporn#photography#idea#creative#tobacco#chewing tobacco#smokeless war#chewing bags#tobak#sweden#swedishsnus#new#video#videooftheday#interesting#life quote
1 note
·
View note