#bearwindows
Explore tagged Tumblr posts
Visit Tumblr Blog
Explore Tumblr blogs with no restrictions, modern design and the best experience.
Last Seen Tumblr Blogs


Fun Fact
BuzzFeed published a report claiming that Tumblr was utilized as a distribution channel for Russian agents to influence American voting habits during the 2016 presidential election in Feb 2018.
Text
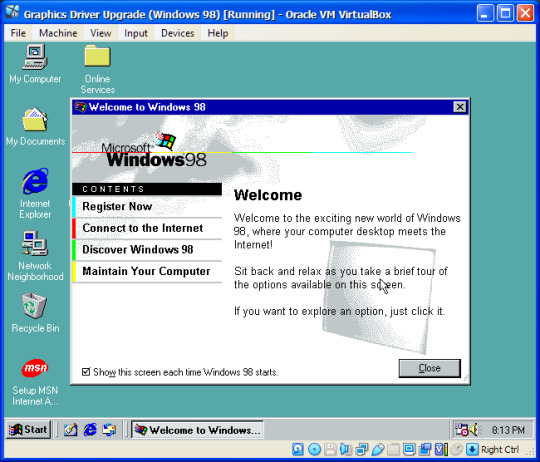
How to Upgrade Graphics in Windows 95 & 98 on VirtualBox with BearWindows
Anyone using Windows 95 and Windows 98 on VirtualBox is bound to have, at some point, been stuck with a pitiful screen resolution of 640 x 480 and 16 colours, which is not only super ugly, especially with the programs and backgrounds you'll want to use with the OS, but you'll find that the performance is down the drain.
There are two well-known ways of upgrading the graphics in Windows 95 & 98 - SciTech and BearWindows. This tutorial will cover the BearWindows method. This will give you 24/32-bit colour and larger screen resolutions. However, you may be unable to get any widescreen resolutions.
First, you will want to download the BearWindows drivers. Here's the webpage regarding the project. And here's the download link you should use. Now, you can either put these files in an *.iso file that you can insert into your VM, or you can open the virtual hard drive and place the files in there. I chose the former (and I'm glad I did because I'm now using it in multiple VMs!).
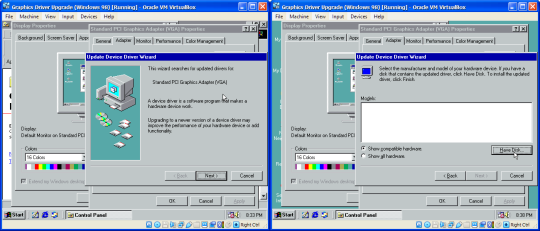
With the files now available to the VM, take a snapshot. TAKE A SNAPSHOT OF THE VM IN CASE SOMETHING GOES WRONG! Then go to Display Settings, click Advanced, go to Adapter and click Change. As you go through the wizard, select the second option (Display a list of all the drivers in a specific location...), and then select Have Disk. Now, in the file browser, go to where the display driver upgrade is. The display driver you want will be located in 032mb, 064mb or 128mb. The numbers represent how much video memory each version of the driver will be able to handle, so you're probably best off choosing the one in the 128mb folder.

In the Select Device prompt, select "Show all hardware", then select VBE Miniport - Standard PCI Graphics Adapter. The other options may not work at all. Just keep going through the rest of the wizard and return to Settings in Display Properties***. You should be able to change the colours to 32 bit and increase the display resolution without restarting. If that isn't possible, first try changing the screen resolution and colour depth on their own (screen resolution first works best for me). If it still says you have to restart, you will have to go through the entire wizard again, trying different device options until you can change the screen resolution or colour depth without restarting.
Also, while you're at it, make sure your monitor is set to the Plug and Play one. The process is similar to changing the graphics driver, but you don't have to browse for the driver:
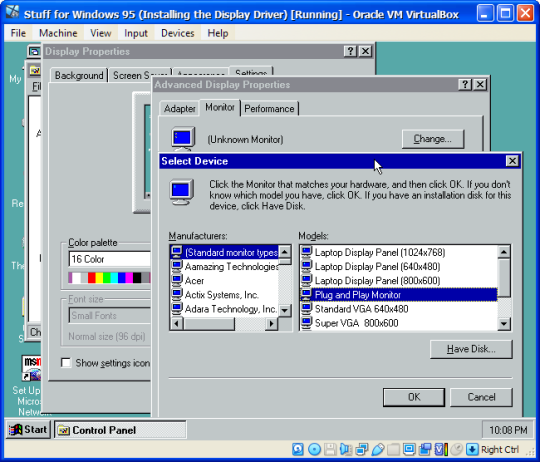
In fact, you might want to do this BEFORE upgrading your display driver, especially on Windows 95.
And that's how to upgrade your graphics on Windows 98 and possibly even Windows 95. But that's not all for this tutorial. There's still some important information to get through:
***Mostly THIS error for Windows 95 users:

If you get this error, you will have to click Close and restart the VM, as this error prevents you from even opening the Display Settings. If you get an error upon restarting about the display settings, you will have to click Cancel when the Display Settings appears to prevent this error from happening twice in a row.
You are probably going to get this error after you've installed the display driver and left the Advanced Settings in order to set the screen resolution and colour depth. If upon restarting your computer, however, the colours look different than before (due to 256 colours), that's a good sign and you just have to change the screen resolution and colour depth without restarting the VM.
#the nostalgia zone#old windows#windows 95#windows 98#virtualbox#graphics drivers#non video tutorial#tutorial#bearwindows#gee Windows 95 was a pain to get the screenshots for#Windows 95 is also a P A I N to install in the first place
1 note
·
View note
Text
Drivers Pcnet Laptops & Desktops

Since this is now became a common request by many, I decided to write a tutorial about Windows 9x (95/98/98SE/Me) usage on VirtualBox.
Drivers Pcnet Laptops & Desktops Refurbished
Drivers Pcnet Laptops & Desktops Best Buy
Drivers Pcnet Laptops & Desktops Cheap
Drivers Pcnet Laptops & Desktops
1,172 Followers, 293 Following, 11 Posts - See Instagram photos and videos from abdou now online (@abdoualittlebit). Omega usb devices driver download for windows. Network Adapter 1 Use Bridged Adapter and ensure it’s a PCNET-Fast III; USB Set the USB controller to USB 1.1 (USB 2.0 didn’t gain widespread adoption until Windows XP) Whilst still in the Settings dialog box of your VM, you may mount the Windows 98 CD or ISO image before running it. Pelham laptops & desktops driver download. Once done, select OK to close the dialog box.
PenMount Windows Universal Driver V2.4.0.306(WHQL) for Windows 2k/ XP/ 2003/2008/Vista/7/8/WES7. The content is empty Download file missing Invalid download link. PenMount Windows Universal Driver V2.0.0.113 2007-12-24. The content is empty Download file missing Invalid download link Download speed is slow Others. Penmount driver download for windows 8.1.
Forenote: Windows 9x is not officially supported by VirtualBox team, which means, that it lacks Guest VM Additions, and it runs slowly, because VirtualBox is not optimized to run Win 9x. 1. Installation - I won't cover here in detail, except few points. Most CD-ROMs available for Windows 95/98 are not bootable, which means, that you must boot from DOS floppy, install DOS first and only then install Windows 95/98. *It does require DOS skills* Official bootable CD media is starting from 98SE. So if you're newbie, you should use Windows 98 SE bootable CD. Additionally I strongly suggest to limit system RAM to 512 MB for those OSes. Otherwise it will crash. (There are workarounds, that allow Win 9x run on modern physical systems, but I won't go into detail here) In some cases enabling or disabling AMD-V/VT-x can help you install the O.S. For this tutorial, I presume, that you are able to install the OS. Installing with ACPI: (contributed by Richard_S) Contrary to what you may have read here in some of the other VirtualBox Win98 threads, this is NOT because Win98se is a poorly written piece of antiquated crap that doesn't even know how to properly handle CPU IDLE. Back when a lot of todays young Linux geeks were still pooping their dipiys, Win98 was already supporting ACPI functions to create greener PCs and help keep laptops from running down their batteries in 10 minutes (which is exactly what DID happen to me the first time I installed Linux on a laptop that was working FINE in Win98). So, long story short, there is NOTHING really wrong with Win98, the problem is that VirtualBox's emulated BIOS doesn't fully match up with what Win98 expects a real ACPI BIOS to look like, so by default Win98 will not install ACPI support (and unfortunately, the older APM support doesn't handle CPU IDLE, so we get problems). The solution is to FORCE ACPI support to be installed, by using the /p j command line switch when running the setup program that installs Win98. This means that you can't just jam the virtual CD into the virtual CD drive and let 'autorun' take care of everything. The best way to handle this is to simply move the Win98 install folder from the Windows 98 SE CD onto your virtual C: drive in VirtualBox, then change directory to that folder in a DOS prompt and run the setup program manually: setup /p j This will force ACPI power management (and the associated CPU IDLE functions) to be installed, and your Win98 virtual machine will consume no more system resources when running than a similar XP or Linux virtual machine. 2. Sound /Audio Integration. In VirtualBox, you must enable Sound, and use 'Sound Blaster 16'. It is available since VBox 1.6.0. The procedure for installation is rather simple: NOTE: The procedure below is only needed if you switch from AC'97 to SB16. It is not needed, if you create new VM with SB16, then install Win98 on it. 2.1. Delete your sound card device and all unknown devices from 'Device Manager'. 2.2 Add New Hardware (from Control Panel).
Code: Select allExpand viewCollapse view
(img)http://img178.imageshack.us/img178/2780/win98soundscreenshot01xg6.png(/img)
win98soundscreenshot01xg6.png (44.95 KiB) Viewed 805988 times
Code: Select allExpand viewCollapse view
(img)http://img502.imageshack.us/img502/3426/win98soundscreenshot02sd3.png(/img)
win98soundscreenshot02sd3.png (39.97 KiB) Viewed 805988 times
2.3 Select 'no, device is not listed in the list'.
Code: Select allExpand viewCollapse view
(img)http://img397.imageshack.us/img397/7972/win98soundscreenshot03so7.png(/img)
win98soundscreenshot03so7.png (40.95 KiB) Viewed 805988 times
2.4 Let Windows search for non-plug'n'play devices.
Code: Select allExpand viewCollapse view
(img)http://img168.imageshack.us/img168/1111/win98soundscreenshot04gd2.png(/img)
win98soundscreenshot04gd2.png (42.2 KiB) Viewed 805988 times
2.5 It will manually detect non-plug-n-play devices. Click on 'Details' to show them.
Code: Select allExpand viewCollapse view
(img)http://img413.imageshack.us/img413/9726/win98soundscreenshot05yx4.png(/img)
2.6. It will find 'Soundblaster 16 or AWE 32 or compatible'.
Code: Select allExpand viewCollapse view
(img)http://img413.imageshack.us/img413/2001/win98soundscreenshot06me3.png(/img)
win98soundscreenshot06me3.png (39.92 KiB) Viewed 805988 times
2.7. Restart the VM. 3. Video driver integration. By default Windows 98 will run only in 640x480 resolution, 16-colors. Performance Note: VirtualBox is not optimized for 16-colors (4-bit) emulation. It works very slow this way. Having 32-bit True Color driver makes Win98 VMs run on VirtualBox *much* faster. If you want True color or high resolution, you need to download special drivers. 3.1. bearwindows driver (unstable) http://bearwindows.zcm.com.au/ NOTE: You must install 'Universal version' (2nd link), as the 'VirtualBox' version is known to have problems. WARNING: This driver is buggy, and many Windows fonts do not render correctly with it. Not recommended. 3.2. SciTech Display Doctor (recommended) The second option is to get the SciTech Display Doctor version 7 beta driver (12 MB) -
Drivers Pcnet Laptops & Desktops Refurbished
(contributed by Richard_S) https://www.dropbox.com/s/226caou8x0jf8 .. ctor-7.iso -or- https://docs.google.com/open?id=0BycgkM .. UhnWGRycVE The driver is a high quality commercial grade video driver (even includes some software emulated Open GL 3D support), and it does include an exe installer program. Despite having an installer, the SciTech Display Doctor is a little tricky to get going. After the program launches, you have to find the little round radio button link to click to 'enable' the new driver (otherwise you still have VGA). Even then, you can't select any higher resolution modes until you ditch the 'default monitor' and select one of the 'Super VGA' types. After fiddling around with the above changes and rebooting several times you should be able to select 800x600 or 1024x768 (or higher) resolutions with 32 bit color depth. (setting 32 bit color mode optimizes the interface with Virtualbox and really speeds things up) 4. Network Easiest thing, is to setup VirtualBox to NAT, and AMD PCnet-II network chip. It will be auto-detected by Win 9x.

5. Mouse (contributed by stefan.becker) VirtualBox 4.1 provides for Windows-98-compatible USB tablet device. Enable USB Tablet: VM->Settings->System->Enable Absolute pointing device then do: (enable Windows-98 mode) VBoxManage setextradata 'VM name' 'VBoxInternal/USB/HidMouse/0/Config/CoordShift' 0 docs: '12.3.8 USB tablet coordinates .. in Windows 98 guests' 6. Shared Folders Since VirtualBox shared folders won't work, there are other ways, such as SMB/Windows File Sharing. Recommended for Windows hosts. (Tested with VBox 2.1.2.-- and was successful with 'bridged' network. I had no success with NAT.) WARNING: I admit that with VirtualBox the network is very unstable, presumably due to very slow performance of Win 9x guests under VBox. For Unix hosts, WinSCP is recommended. Another way of read-only file sharing is to create a virtual CD-ROM *.iso file on the host and insert it into the guest VM. 7. Clipboard Host<=>Guest (contributed by stefan.becker) Clipboard integrated in VirtualBox only works with the Guest Additions, so not for Windows9x. But there is another solution: Clipboard over TCP/IP. A Solution tested successfull with Linux Host is ShareClip: http://homepage.mac.com/bnej/shareclip/ -Technologov Written on 2.9.2008, updated on 18.07.2011.
Drivers Pcnet Laptops & Desktops Best Buy
Please discuss this tutorial here
Drivers Pcnet Laptops & Desktops Cheap
Drivers Pcnet Laptops & Desktops
This topic is only for additions to this tutorial. Do not ask questions about how to get something working. Use a separate topic for that.
0 notes
Text
DOWNLOAD GECE FX5900XT WINDOWS 7 DRIVER
File Format: exe Date Added: 01 December, 2019 Operating Systems: Windows NT/2000/XP/2003/2003/7/8/10 MacOS 10/X File Version: 918171257 Downloads: 7986 File Size: 23 Mb Price: Free Uploader: Chinu File Name: gece fx5900xt windows 7 driver Download Type: http

News: - Radeon Settings additional settings page may fail to open after performing a Windows Update and then installing the latest Radeon Software Crimson Edition. - Samba: Fixed a bug where the access-restricted folder reserved for admin users could not be accessed after initializing settings. - Fixed the bug whereby L2TP remote access does not work. - Fixes detection error of(gece fx5900xt windows 7 driver of) HDD set to slave. - Fixed issue where device could not go to preset in the Live Video contextUpgrading Instructions: Follow the steps below to upgrade the firmware: 1. - Fixed it(gece fx5900xt windows 7 driver it) was possible to show incorrect status of USB3.0 LED. - Fixes an issue where the driver cannot be uninstalled when the system battery is disconnected. - Fixes(gece fx5900xt windows 7 driver Fixes) D2D function abnormal when insert non HDD device and set it boot order 1st. - Fixed Help(gece fx5900xt windows 7 driver Help) Page does not have "USB SETTINGS" description and Hyper-Link Title. - Fixed(gece fx5900xt windows 7 driver Fixed) a bug where changing IP address from NAS Navigator2 may not have finished properly. Users content: Operation of REC start/stop via the lens's grip unit. Settings that were previously available on Easy Admin are now available from setup wizard. Force DNS; it is possible to redirect all DNS requests to the router. Update SandyBridge driverIt is highly recommended to always use the most recent driver version available. Updated EasyFlash/DieHard BIOS Lite utility to 2. Unauthenticated Access OnSec-VUZ-103-48012, sys_music_play. Enables DPST for icon blurred issue. The Tempo input is treated purely as a reset. The mode turns off automatically when your Fire is charging. Dragging player window to secondary display while playing back HD content and moving it back to primary may result in blank player window. GRAPHICS SVGA BEARWINDOWS DRIVER DOWNLOAD Supported OS: Microsoft Windows 8 Enterprise (32-bit) Windows 7 Windows Server 2003 64-bit Microsoft Windows 8.1 (32-bit) Windows 8.1/8/7/Vista 64-bit Windows 10 Microsoft Windows 8.1 Pro (64-bit) Microsoft Windows 8 Pro (64-bit) Microsoft Windows 10 (64-bit) Windows Vista 64-bit Windows Server 2008 Microsoft Windows 8 Pro (32-bit) Microsoft Windows 10 (32-bit) Windows 8.1 Notebook 8.1/8/7 32-bit Microsoft Windows 8.1 Pro (32-bit) Windows Vista 32-bit Windows Server 2008 R2 Windows 8 Windows 2000 Microsoft Windows 8.1 (64-bit) Windows Server 2012 Microsoft Windows 8.1 Enterprise (32-bit) Windows Server 2012 R2 Microsoft Windows 8 (64-bit) Windows XP 64-bit Microsoft Windows 8.1 Enterprise (64-bit) Windows Server 2003 32-bit Windows 8.1/8/7/Vista 32-bit Windows XP 32-bit Windows 7 64-bit Windows 7 32-bit Windows Server 2016 Microsoft Windows 8 Enterprise (64-bit) Notebook 8.1/8/7 64-bit Microsoft Windows 8 (32-bit) Searches: gece fx5900xt windows 7 driver for Microsoft Windows 8 Pro (64-bit); gece fx5900xt windows 7 DBSVL9548; gece fx5900xt windows 7 D DB954-9; gece fx5900xt windows 7 driver for Microsoft Windows 8.1 Pro (32-bit); gece fx5900xt windows 7 DB9548; gece fx5900xt windows 7 driver for Windows Server 2003 32-bit; gece fx5900xt windows 7 D95m; gece fx5900xt windows 7 driver for Windows 10; gece fx5900xt windows 7 driver for Windows Server 2008; gece fx5900xt windows 7 Dmp954-mpg; windows 7 fx5900xt driver gece Compatible Devices: Gadget; USB Hubs; Mouse; Printer; Apple; Memory Card To ensure the integrity of your download, please verify the checksum value. MD5: 17cb72de870ae8c20de89bee0d7f42da SHA1: 8757ec5dcadb3f540b647af0ab3a1b83cf060a40 SHA-256: 88a58738bdde8dec0612b0c6414b9b7358d294cc320259bc72bdf7552c916320
0 notes