#m2 machines
Explore tagged Tumblr posts
Visit Tumblr Blog
Explore Tumblr blogs with no restrictions, modern design and the best experience.
Last Seen Tumblr Blogs


Fun Fact
Total funding amounts to $125.3M.
Text

Die Cast Car of the day: 1957 Chevrolet Belair by M2 Machines #toy #toys #cars #diecastcars #chevrolet #chevy #57chevy #1957chevybelair #1957chevroletbelair #m2machines
14 notes
·
View notes
Text
M2 .50 cal taking a smoke break...

32 notes
·
View notes
Text

Andddd here he is!!
Mr. Maloney the NOACAK star veteran! 🔥🥹😳
Follow Méko to see what’s next for this art!
#bunny maloney#obscure media#partically lost media#HE’S PERFECT#HEAR ME OUT#rAGHHh znznznnx 💗💗💗😍#I love him so much guysss#HE’S SO HOT 🔥#He’s holding a Browning M2 Machine Gun .////.#Look at his little boots…he can wear shoes#mékolai
9 notes
·
View notes
Text
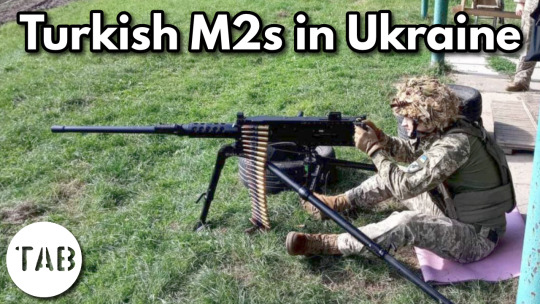

Turkish Heavy Machine Guns in Ukraine
Turkey has provided a huge range of military equipment to Ukraine, in this video we'll look at Turkish-made M2 heavy machine guns and an unusual rotary grenade launcher in service with the Ukrainian Armed Forces.
youtube
Check out the accompanying article here.
#Ukraine War#M2 Browning#Machine Guns#Heavy Machine Guns#OSINT#Ukraine Russia War#Ukraine Conflict#Youtube
99 notes
·
View notes
Link
The article from The Armory Life, written by Will Dabbs, MD, explores the historical significance and enduring legacy of the M2 .50-caliber machine gun, commonly known as "Ma Deuce." Originating in World War I, the gun was developed at the behest of American General John J. Pershing to counter German observation balloons and aircraft. Designed by John Moses Browning, with ammunition developed by Winchester, the M2 has been in service since 1921 and remains a staple in military arsenals worldwide. The weapon is praised for its robustness, versatility, and reliability, capable of being mounted on various platforms, including vehicles, ships, and aircraft. Though more than a century old, advancements like the M2A1 model have upgraded its features, ensuring the Browning-designed machine gun continues to be an integral part of military operations today.
#M2 Browning#.50 caliber machine gun#John M. Browning#World War II#Korean War#Vietnam War#U.S. military#vehicle-mounted weapon#anti-aircraft#anti-vehicle#heavy machine gun#recoil-operated#belt-fed#M2HB#QCB conversion kit#effective range#firing rate#Ma Deuce#weapon longevity#gun design#firearm engineering#historical impact#military use#technological advancements.
7 notes
·
View notes
Text
M2 50 cal Belt Fed vs Steel Body Plates
12 notes
·
View notes
Text
youtube
3 notes
·
View notes
Photo

Green Lama #5 (May, 1945). Cover by Mac Raboy.
The Green Lama was a character that originally appeared in the pulp magazine Double Detective in 1940. He made 14 appearances in that magazine, while concurrently appearing in Prize Comics. In 1943 he gained his own self-titled comic book, along with more superhero-type abilities and costume. The book lasted for 8 issues, published by his creator and writer, Kendall Foster Crossen.
Despite some misinformation on the Interwebs, the Green Lama is NOT in the public domain. Crossen kept the copyright to the character, which is maintained by his family.
By the way, I speak from personal experience when I say there’s no way that G.I. on the Green Lama’s back could possibly hold and fire a .50 cal machine gun as depicted. Not unless he was superhuman as well (he’s NOT the Lieutenant Hercules listed on the cover).
First of all, holding the barrel while firing is a great way to lose your hand. I’m not talking burn, I’m talking incineration. Those barrels get hot real quick! So much so that gunners are trained to only fire the weapon in 3 shot-bursts, lest the barrel overheat and melt. I saw my share of barrels turn cherry red due to overzealous gunners. Once that happens the barrel begins to warp and melt, which could lead to it blowing up in your face if you continue to fire. That’s why gunners are assigned a spare barrel, which you’re supposed to switch out every so often so you don’t overheat/damage either barrel.
Second, those weapons are HEAVY. The fully-assembled weapon, including the tripod, weighs over 120 pounds! Add to that the massive kick you get from every banana-sized round fired, and you’d have to be Superman (or at least Housman) to hold it like the guy on the cover.
Or maybe I’m just making too much of a comic book cover.
#The Green Lama#Spark Comics#Golden Age comics#M2 machine gun#.50 caliber machine gun#Kendall Foster Crossen
14 notes
·
View notes
Text


Shenandoah Valley Steam & Gas Engine Association Pageant of Steam Show 2023 Tractors and vendors.


Shenandoah Valley Steam and Gas Engine Association (svsgea.org)
#Virginia#Berryville#Shenandoah Valley Steam & Gas Engine Association Pageant of Steam Show#Shenandoah Valley Steam & Gas Engine Association#Farmall#International Harvester#International Harvester Farmall 560 Tractor#International Harvester 560 Tractor#Farmall 560 Tractor#Antique Tractor#Tractor#my photography#photographers on tumblr#black and white photography#Case Steam Tractor#M2 Browning Heavy Machine Gun#.50 Calibur Machine Gun
2 notes
·
View notes
Text


M2 BROWNING 50. CAL: GUN PORN
1 note
·
View note
Text

Die Cast Car of the day: 1970 Dodge Superbee by M2 Machines #toy #toys #cars #diecastcars #dodge #dodgesuperbee #1970DodgeSuperBee #m2machines
3 notes
·
View notes
Note
Were the galatacca girls raised by actual parents? Or have they been living in that dorms since they were babies? 😭 They were babies at one point right? They didn't spawn as like middle schoolers or smth?

imagine going from a 200+ million usd 50 acres mansion in the countryside to a 16 m2 in downtown Paris w 3 other bitches who don't know how to load a washing machine
#mlb la terreur au#miraculous ladybug#silu's art#silu responds#miraculous ladybug and chat noir#mlb fanart#lt galattaca girls
887 notes
·
View notes
Text

Three Browning M2 .50 caliber machine guns in the left wing of an F4U-1 Corsair fighter, Aug 11, 1942
@VoicesofWW2 via X
497 notes
·
View notes
Text
Careful What You Wish For - M2
The wind felt great on Nate's arms as he sped down the road on his motorcycle. It made him feel badass, swerving through traffic and pissing off other drivers.
He finally slowed down as he pulled into the parking lot in front of his gym. A man needs his workout, otherwise there wouldn't be much to show off while riding his bike. He parked and took his helmet off, ready for his daily workout.

Nate gave a charming smile to the man behind the front counter as he waltzed into the gym. He had a routine, always starting with the same machine. He saw it was free and took his shot to get on it. But just as he was about to get there, another man walked through him like he wasn't even there and took the machine. The man was tall with broad shoulders and biceps the size of melons. Nate's first instinct was to stand up for himself, but as his head turned up to look the other guy in the face, he backed down. The man had a buzz cut and a beard, and looked scary as hell. This was not worth it.

He swallowed his pride and decided to go back to the locker room and wait. It wasn't his proudest moment. He went back to his bag and sat down, but something was different. Someone has been in his bag. Nate opened it to see if anything had been taken, but it was the opposite. Someone had left a weird looking lamp in his bag. He pulled out the lamp to check it out but as soon as he touched it, a purple mist started to pour out of it. He looked around the locker room to see if anyone else was seeing it, but there was no one in the room. The mist swirled into a human-like figure that floated above him.
"I may grant you one wish." It whispered.
Nate just sat there in awe for a moment, unable to react. Then an idea popped into his head.
"I wish I was bigger." He said confidently. No more assholes will fuck with him now.
The mist started to circle him. It felt like a massage as the mist worked its magic on his body. His shoulders started to broaden and his traps grew thick. His biceps exploded with muscle, making him look like a body builder. His pecs thickened until they stretched his shirt to its maximum. He felt his perspective rise as his body grew taller and taller, leaving him at an intimidating 6"5. His hands and feet also grew significantly to match his new height.
The mist then receded back into the lamp. Nate sat in shock for a moment, thinking what happened was some sort of dream. But then he looked down and saw his massive biceps and juicy pecs. He got up and stumbled forward, taking a moment to adjust to his new height.
"Ha... Holy shit!" He said with a chuckle, "I'm huge."
He walked over to the closest mirror and started to flex, nearly ripping through the sleeves of his shirt. He ran back to his bag and took off his shirt. He confidently strutted back out to the gym, making sure to duck under the doorway. He made his way back to the machine he got kicked off of before, and it was empty again. He sat down in the machine, struggling to fit his large body comfortably. He saw the intimidating man across the room and flexed at him.

The man just responded with a confused look, as he could have sworn Nate was half that size just minutes earlier.
Nate set the weights much higher than usual and started his workout. About halfway through the set, he noticed a tingling feeling around his crotch. The same feeling his had felt in his upper body before. He looked down and saw that the purple mist was now circling around his crotch. The transformation wasn't over, there are more ways of being big after all.
Nate's legs buckled slightly as his dick started to grow. 6, 7, 8 inches long, a visible bulge began to form in his gym shorts. He made weird faces trying to hide the pleasure he was feeling. 9, 10, 11 inches, his dick started to slip down the side of his leg. He blushed as he tried to hide the obvious bulge running down the leg of his shorts. This was plenty big, he thought. 12, 13, 14 inches, it wasn't slowing down. It felt so good, but Nate started to panic as his dick was getting close to slipping under his shorts. It didn't help that he was starting to get hard. 15, 16 inches long and nearly as thick as a pop can, it finally stopped growing. He squeezed his legs together to hide the sable that was hiding in his shorts. This was not what he meant when he said 'big'.
He was distraught, but he continued his workout instead. After his set, he sat there for a moment, thinking about what he was going to do. He knew his dick would be impossible to hide when he got up. He thought that maybe he should just go home and buy looser clothes before he embarrassed himself. Though before he could build up the courage to get up, the purple mist returned. It swirled around his midsection and tickled his stomach. He naively thought that this might give him a six pack, but it was quite the opposite. Nate watched in horror as his stomach jiggled as far poured into it.
"What? No!" He cried out as he grabbed his chubby belly.
He got up and ran back to the locker room, hoping no one would see him like this. He ran past the mirror and saw as his beer belly bounced with every step. Even his pecs started to look a little softer. And the sharp V shape on hips was slowly getting replaced by soft love handles.
Nate threw on his shirt hoping it would fit, but it wouldn't get past his belly button. And he had to tuck his dick up into his waist band to stop it from hanging out of his shorts.
He held his bag to his stomach hoping it would hide his exposed belly and the large bulge in his shorts. Then walked as fast as he could out of the gym, hitting his head on every doorway. He made it out of the gym and to his motorcycle with only a few passing glances from other gym goers. He got on his motorcycle and had to sit back to leave room for his growing belly and his massive legs.
He hated how good the wind felt on his exposed belly. And he hated how much his body would jiggle every time he hit a bump.
Nate finally made it home and rushed inside. Finally he was safe from the prying eyes of others. Though he wasn't safe from his main issue, the mist still surrounded his midsection. He managed to find one of his dad's shirts that barely fit him. He couldn't believe he was the same size as his dad of all people. Granted he was now significantly taller than his dad, but there was no denying his belly was getting big enough to rival his father's.

He stood in front of the mirror for what felt like forever, analyzing his body. The undeniable gut that hung in front of him, and the soft moobs that sat on top of it. The double chin that was hiding under his beard. The pudgy fat that covered his thick arms. Even his hands and feet looked swollen. And that's not even considering the problem that is his cock. He pulled it out and saw as it hung nearly down to his knees, it would have gone past his knees if it weren't for the fact that his legs had increased significantly in length.
As he was sulking about his body, he remembered the lamp. It was what caused all these problems for him, maybe it could reverse them. He walked back to his bag and pulled it out.
"I wish to go back to the way I was before." He said into the lamp as he rubbed it.
The purple mist once again poured out of the lamp. This time it engulfed his entire body. He smiled, thinking it would cause all of his problems to go away.
His comfort quickly turned to regret as he felt his clothes begin to tighten around his body. If his gut wasn't bigger than his father's before, it sure was now. Surges of fat poured into Nate's gut, each one adding tens of pounds of fat into his belly. His father's shirt started to ride up above his gut as it began to hang over his waistline. He would never be able to see anything past his belly anymore. His body also began to stretch again, making his shirt ride up even more. The fat also thickened his sides, making his love handles stretch to his back and spill over his waistline. His pecs were on the edge of being considered moobs, but now it was undeniable. His pecs swelled until they started to sag over his gut and into his armpits.
"Please ...ugh.. stop." Nate begged. Barely able to get words out due to the sheer amount of pleasure his body is feeling.
Whatever muscle definition that was on his back quickly got replaced with soft rolls of fat. And you would never guess there was any muscle under the thick layer of fat that covered his arms. His ass was still perky with all of the muscle that laid underneath his fat, but that didn't last. His ass widened as it began to sag under its immense weight. It quickly filled out all the space in his pants and popped the button off of them. A large fat pad quickly engulfed part of his dick, making it appear a couple inches shorter than it was. Though his dick responded by growing a few more inches. 17, 18, 19, 20 inches long spilling past his knees.
His thighs started to balloon, making him have to spread his legs to even walk. And his legs also became longer, topping him out at a monstrous 7 feet tall.
Finally he felt his face begin to change. His chin became three soft chins that connected to his thick neck. Though they quickly got covered in a thick bushy beard. His face widened as his cheeks became round and chubby.
With that, the most finally dissipated. Leaving Nate as the big guy he always wanted to be. Although he is not very appreciative of this.
"What the fuck!" He yelled.
He looked down and all he could see were his fat man tits and his monstrous belly. Though based on how heavy he feels, the rest of him is probably not much smaller. He desperately tried to buckle up his pants, but couldn't. They snapped open every time, sending a shockwave through his blubber.

He gave up and started to waddle back to his bedroom. He stumbled at first getting used to the way his body weighs him down. His gut swung back and forth with each step. He sucked below his doorway and squeezed his fat ass through. Looks like he's gonna have to get his doorways adjusted.
He grabbed a large pair of jeans with some suspenders his father had left at his place. He had to pull hard to get the jeans on and they're not long enough, but they fit better than anything else he has. And he found a black shirt he was going to gift his dad for his birthday. It was bigger than the rest of his father's clothes because he was scared his father would outgrow them too quickly. Lucky for him that made them fit him better, though his gut still hung out the bottom of them.
"You know what, fuck this!" Nate yelled as he angrily waddled back to the lamp. "No more!" He cried out as he threw the lamp on the floor, making it shatter on impact.
The purple mist spread across the room. Nate tried to back away, but was not nearly fast enough. The mist entered through his ears and clouded his brain. His insecurities soon disappeared as his ego inflated. His worries about his hulking body turned to pride, he loved being the biggest man in the room and commanding attention from everyone.
Nate fought the feeling and managed to stumble away from the mist. He coughed as he squeezed into his bathroom and shut the door.
"Good thing I got away." Nate said in a shockingly deep voice. "What the hell?"
He walked in front of the mirror and jumped when he didn't recognize himself. He had gotten so old. His hair turned grey as his hairline receded. His big bushy beard turned white and the body turned salt and pepper. His skin wrinkled and formed sun damage from all the years in the sun.

"Wow I'm looking good, hehe." Nate gave out a hearty laugh, making his body jiggle. "But as much as I love showing off this tank, I should probably get me some clothes that fit. I outgrew my pops a long time ago, so his clothes just won't do." He said as he ordered 6XL clothes online.
#male tf#masculine#fat tf#hairy#male wg#reality change#male transformation#muscle tf#age progression
568 notes
·
View notes
Text


Neural Filters Tutorial for Gifmakers by @antoniosvivaldi
Hi everyone! In light of my blog’s 10th birthday, I’m delighted to reveal my highly anticipated gifmaking tutorial using Neural Filters - a very powerful collection of filters that really broadened my scope in gifmaking over the past 12 months.
Before I get into this tutorial, I want to thank @laurabenanti, @maines , @cobbbvanth, and @cal-kestis for their unconditional support over the course of my journey of investigating the Neural Filters & their valuable inputs on the rendering performance!
In this tutorial, I will outline what the Photoshop Neural Filters do and how I use them in my workflow - multiple examples will be provided for better clarity. Finally, I will talk about some known performance issues with the filters & some feasible workarounds.
Tutorial Structure:
Meet the Neural Filters: What they are and what they do
Why I use Neural Filters? How I use Neural Filters in my giffing workflow
Getting started: The giffing workflow in a nutshell and installing the Neural Filters
Applying Neural Filters onto your gif: Making use of the Neural Filters settings; with multiple examples
Testing your system: recommended if you’re using Neural Filters for the first time
Rendering performance: Common Neural Filters performance issues & workarounds
For quick reference, here are the examples that I will show in this tutorial:
Example 1: Image Enhancement | improving the image quality of gifs prepared from highly compressed video files
Example 2: Facial Enhancement | enhancing an individual's facial features
Example 3: Colour Manipulation | colourising B&W gifs for a colourful gifset
Example 4: Artistic effects | transforming landscapes & adding artistic effects onto your gifs
Example 5: Putting it all together | my usual giffing workflow using Neural Filters
What you need & need to know:
Software: Photoshop 2021 or later (recommended: 2023 or later)*
Hardware: 8GB of RAM; having a supported GPU is highly recommended*
Difficulty: Advanced (requires a lot of patience); knowledge in gifmaking and using video timeline assumed
Key concepts: Smart Layer / Smart Filters
Benchmarking your system: Neural Filters test files**
Supplementary materials: Tutorial Resources / Detailed findings on rendering gifs with Neural Filters + known issues***
*I primarily gif on an M2 Max MacBook Pro that's running Photoshop 2024, but I also have experiences gifmaking on few other Mac models from 2012 ~ 2023.
**Using Neural Filters can be resource intensive, so it’s helpful to run the test files yourself. I’ll outline some known performance issues with Neural Filters and workarounds later in the tutorial.
***This supplementary page contains additional Neural Filters benchmark tests and instructions, as well as more information on the rendering performance (for Apple Silicon-based devices) when subject to heavy Neural Filters gifmaking workflows
Tutorial under the cut. Like / Reblog this post if you find this tutorial helpful. Linking this post as an inspo link will also be greatly appreciated!
1. Meet the Neural Filters!
Neural Filters are powered by Adobe's machine learning engine known as Adobe Sensei. It is a non-destructive method to help streamline workflows that would've been difficult and/or tedious to do manually.
Here are the Neural Filters available in Photoshop 2024:


Skin Smoothing: Removes blemishes on the skin
Smart Portrait: This a cloud-based filter that allows you to change the mood, facial age, hair, etc using the sliders+
Makeup Transfer: Applies the makeup (from a reference image) to the eyes & mouth area of your image
Landscape Mixer: Transforms the landscape of your image (e.g. seasons & time of the day, etc), based on the landscape features of a reference image
Style Transfer: Applies artistic styles e.g. texturings (from a reference image) onto your image
Harmonisation: Applies the colour balance of your image based on the lighting of the background image+
Colour Transfer: Applies the colour scheme (of a reference image) onto your image
Colourise: Adds colours onto a B&W image
Super Zoom: Zoom / crop an image without losing resolution+
Depth Blur: Blurs the background of the image
JPEG Artefacts Removal: Removes artefacts caused by JPEG compression
Photo Restoration: Enhances image quality & facial details
+These three filters aren't used in my giffing workflow. The cloud-based nature of Smart Portrait leads to disjointed looking frames. For Harmonisation, applying this on a gif causes Neural Filter timeout error. Finally, Super Zoom does not currently support output as a Smart Filter
If you're running Photoshop 2021 or earlier version of Photoshop 2022, you will see a smaller selection of Neural Filters:


Things to be aware of:
You can apply up to six Neural Filters at the same time
Filters where you can use your own reference images: Makeup Transfer (portraits only), Landscape Mixer, Style Transfer (not available in Photoshop 2021), and Colour Transfer
Later iterations of Photoshop 2023 & newer: The first three default presets for Landscape Mixer and Colour Transfer are currently broken.
2. Why I use Neural Filters?
Here are my four main Neural Filters use cases in my gifmaking process. In each use case I'll list out the filters that I use:

Enhancing Image Quality:
Common wisdom is to find the highest quality video to gif from for a media release & avoid YouTube whenever possible. However for smaller / niche media (e.g. new & upcoming musical artists), prepping gifs from highly compressed YouTube videos is inevitable.
So how do I get around with this? I have found Neural Filters pretty handy when it comes to both correcting issues from video compression & enhancing details in gifs prepared from these highly compressed video files.
Filters used: JPEG Artefacts Removal / Photo Restoration
Facial Enhancement:
When I prepare gifs from highly compressed videos, something I like to do is to enhance the facial features. This is again useful when I make gifsets from compressed videos & want to fill up my final panel with a close-up shot.
Filters used: Skin Smoothing / Makeup Transfer / Photo Restoration (Facial Enhancement slider)
Colour Manipulation:
Neural Filters is a powerful way to do advanced colour manipulation - whether I want to quickly transform the colour scheme of a gif or transform a B&W clip into something colourful.
Filters used: Colourise / Colour Transfer
Artistic Effects:
This is one of my favourite things to do with Neural Filters! I enjoy using the filters to create artistic effects by feeding textures that I've downloaded as reference images. I also enjoy using these filters to transform the overall the atmosphere of my composite gifs. The gifsets where I've leveraged Neural Filters for artistic effects could be found under this tag on usergif.
Filters used: Landscape Mixer / Style Transfer / Depth Blur
How I use Neural Filters over different stages of my gifmaking workflow:
I want to outline how I use different Neural Filters throughout my gifmaking process. This can be roughly divided into two stages:
Stage I: Enhancement and/or Colourising | Takes place early in my gifmaking process. I process a large amount of component gifs by applying Neural Filters for enhancement purposes and adding some base colourings.++
Stage II: Artistic Effects & more Colour Manipulation | Takes place when I'm assembling my component gifs in the big PSD / PSB composition file that will be my final gif panel.
I will walk through this in more detail later in the tutorial.
++I personally like to keep the size of the component gifs in their original resolution (a mixture of 1080p & 4K), to get best possible results from the Neural Filters and have more flexibility later on in my workflow. I resize & sharpen these gifs after they're placed into my final PSD composition files in Tumblr dimensions.
3. Getting started
The essence is to output Neural Filters as a Smart Filter on the smart object when working with the Video Timeline interface. Your workflow will contain the following steps:
Prepare your gif
In the frame animation interface, set the frame delay to 0.03s and convert your gif to the Video Timeline
In the Video Timeline interface, go to Filter > Neural Filters and output to a Smart Filter
Flatten or render your gif (either approach is fine). To flatten your gif, play the "flatten" action from the gif prep action pack. To render your gif as a .mov file, go to File > Export > Render Video & use the following settings.

Setting up:
o.) To get started, prepare your gifs the usual way - whether you screencap or clip videos. You should see your prepared gif in the frame animation interface as follows:

Note: As mentioned earlier, I keep the gifs in their original resolution right now because working with a larger dimension document allows more flexibility later on in my workflow. I have also found that I get higher quality results working with more pixels. I eventually do my final sharpening & resizing when I fit all of my component gifs to a main PSD composition file (that's of Tumblr dimension).
i.) To use Smart Filters, convert your gif to a Smart Video Layer.
As an aside, I like to work with everything in 0.03s until I finish everything (then correct the frame delay to 0.05s when I upload my panels onto Tumblr).
For convenience, I use my own action pack to first set the frame delay to 0.03s (highlighted in yellow) and then convert to timeline (highlighted in red) to access the Video Timeline interface. To play an action, press the play button highlighted in green.

Once you've converted this gif to a Smart Video Layer, you'll see the Video Timeline interface as follows:

ii.) Select your gif (now as a Smart Layer) and go to Filter > Neural Filters

Installing Neural Filters:
Install the individual Neural Filters that you want to use. If the filter isn't installed, it will show a cloud symbol (highlighted in yellow). If the filter is already installed, it will show a toggle button (highlighted in green)

When you toggle this button, the Neural Filters preview window will look like this (where the toggle button next to the filter that you use turns blue)

4. Using Neural Filters
Once you have installed the Neural Filters that you want to use in your gif, you can toggle on a filter and play around with the sliders until you're satisfied. Here I'll walkthrough multiple concrete examples of how I use Neural Filters in my giffing process.
Example 1: Image enhancement | sample gifset
This is my typical Stage I Neural Filters gifmaking workflow. When giffing older or more niche media releases, my main concern is the video compression that leads to a lot of artefacts in the screencapped / video clipped gifs.
To fix the artefacts from compression, I go to Filter > Neural Filters, and toggle JPEG Artefacts Removal filter. Then I choose the strength of the filter (boxed in green), output this as a Smart Filter (boxed in yellow), and press OK (boxed in red).
Note: The filter has to be fully processed before you could press the OK button!

After applying the Neural Filters, you'll see "Neural Filters" under the Smart Filters property of the smart layer

Flatten / render your gif
Example 2: Facial enhancement | sample gifset
This is my routine use case during my Stage I Neural Filters gifmaking workflow. For musical artists (e.g. Maisie Peters), YouTube is often the only place where I'm able to find some videos to prepare gifs from. However even the highest resolution video available on YouTube is highly compressed.
Go to Filter > Neural Filters and toggle on Photo Restoration. If Photoshop recognises faces in the image, there will be a "Facial Enhancement" slider under the filter settings.

Play around with the Photo Enhancement & Facial Enhancement sliders. You can also expand the "Adjustment" menu make additional adjustments e.g. remove noises and reducing different types of artefacts.

Once you're happy with the results, press OK and then flatten / render your gif.
Example 3: Colour Manipulation | sample gifset
Want to make a colourful gifset but the source video is in B&W? This is where Colourise from Neural Filters comes in handy! This same colourising approach is also very helpful for colouring poor-lit scenes as detailed in this tutorial.
Here's a B&W gif that we want to colourise:

Highly recommended: add some adjustment layers onto the B&W gif to improve the contrast & depth. This will give you higher quality results when you colourise your gif.
Go to Filter > Neural Filters and toggle on Colourise.

Make sure "Auto colour image" is enabled.
Play around with further adjustments e.g. colour balance, until you're satisfied then press OK.
Important: When you colourise a gif, you need to double check that the resulting skin tone is accurate to real life. I personally go to Google Images and search up photoshoots of the individual / character that I'm giffing for quick reference.
Add additional adjustment layers until you're happy with the colouring of the skin tone.

Once you're happy with the additional adjustments, flatten / render your gif. And voila!

Note: For Colour Manipulation, I use Colourise in my Stage I workflow and Colour Transfer in my Stage II workflow to do other types of colour manipulations (e.g. transforming the colour scheme of the component gifs)
Example 4: Artistic Effects | sample gifset
This is where I use Neural Filters for the bulk of my Stage II workflow: the most enjoyable stage in my editing process!
Normally I would be working with my big composition files with multiple component gifs inside it. To begin the fun, drag a component gif (in PSD file) to the main PSD composition file.
Resize this gif in the composition file until you're happy with the placement

Duplicate this gif. Sharpen the bottom layer (highlighted in yellow), and then select the top layer (highlighted in green) & go to Filter > Neural Filters

I like to use Style Transfer and Landscape Mixer to create artistic effects from Neural Filters. In this particular example, I've chosen Landscape Mixer
Select a preset or feed a custom image to the filter (here I chose a texture that I've on my computer)

Play around with the different sliders e.g. time of the day / seasons
Important: uncheck "Harmonise Subject" & "Preserve Subject" - these two settings are known to cause performance issues when you render a multiframe smart object (e.g. for a gif)

Once you're happy with the artistic effect, press OK
To ensure you preserve the actual subject you want to gif (bc Preserve Subject is unchecked), add a layer mask onto the top layer (with Neural Filters) and mask out the facial region. You might need to play around with the Layer Mask Position keyframes or Rotoscope your subject in the process.
After you're happy with the masking, flatten / render this composition file and voila!

Example 5: Putting it all together | sample gifset
Let's recap on the Neural Filters gifmaking workflow and where Stage I and Stage II fit in my gifmaking process:
i. Preparing & enhancing the component gifs
Prepare all component gifs and convert them to smart layers
Stage I: Add base colourings & apply Photo Restoration / JPEG Artefacts Removal to enhance the gif's image quality
Flatten all of these component gifs and convert them back to Smart Video Layers (this process can take a lot of time)
Some of these enhanced gifs will be Rotoscoped so this is done before adding the gifs to the big PSD composition file
ii. Setting up the big PSD composition file
Make a separate PSD composition file (Ctrl / Cmmd + N) that's of Tumblr dimension (e.g. 540px in width)
Drag all of the component gifs used into this PSD composition file
Enable Video Timeline and trim the work area
In the composition file, resize / move the component gifs until you're happy with the placement & sharpen these gifs if you haven't already done so
Duplicate the layers that you want to use Neural Filters on
iii. Working with Neural Filters in the PSD composition file
Stage II: Neural Filters to create artistic effects / more colour manipulations!
Mask the smart layers with Neural Filters to both preserve the subject and avoid colouring issues from the filters
Flatten / render the PSD composition file: the more component gifs in your composition file, the longer the exporting will take. (I prefer to render the composition file into a .mov clip to prevent overriding a file that I've spent effort putting together.)
Note: In some of my layout gifsets (where I've heavily used Neural Filters in Stage II), the rendering time for the panel took more than 20 minutes. This is one of the rare instances where I was maxing out my computer's memory.
Useful things to take note of:
Important: If you're using Neural Filters for Colour Manipulation or Artistic Effects, you need to take a lot of care ensuring that the skin tone of nonwhite characters / individuals is accurately coloured
Use the Facial Enhancement slider from Photo Restoration in moderation, if you max out the slider value you risk oversharpening your gif later on in your gifmaking workflow
You will get higher quality results from Neural Filters by working with larger image dimensions: This gives Neural Filters more pixels to work with. You also get better quality results by feeding higher resolution reference images to the Neural Filters.
Makeup Transfer is more stable when the person / character has minimal motion in your gif
You might get unexpected results from Landscape Mixer if you feed a reference image that don't feature a distinctive landscape. This is not always a bad thing: for instance, I have used this texture as a reference image for Landscape Mixer, to create the shimmery effects as seen in this gifset
5. Testing your system
If this is the first time you're applying Neural Filters directly onto a gif, it will be helpful to test out your system yourself. This will help:
Gauge the expected rendering time that you'll need to wait for your gif to export, given specific Neural Filters that you've used
Identify potential performance issues when you render the gif: this is important and will determine whether you will need to fully playback your gif before flattening / rendering the file.
Understand how your system's resources are being utilised: Inputs from Windows PC users & Mac users alike are welcome!
About the Neural Filters test files:
Contains six distinct files, each using different Neural Filters
Two sizes of test files: one copy in full HD (1080p) and another copy downsized to 540px
One folder containing the flattened / rendered test files
How to use the Neural Filters test files:
What you need:
Photoshop 2022 or newer (recommended: 2023 or later)
Install the following Neural Filters: Landscape Mixer / Style Transfer / Colour Transfer / Colourise / Photo Restoration / Depth Blur
Recommended for some Apple Silicon-based MacBook Pro models: Enable High Power Mode
How to use the test files:
For optimal performance, close all background apps
Open a test file
Flatten the test file into frames (load this action pack & play the “flatten” action)
Take note of the time it takes until you’re directed to the frame animation interface
Compare the rendered frames to the expected results in this folder: check that all of the frames look the same. If they don't, you will need to fully playback the test file in full before flattening the file.†
Re-run the test file without the Neural Filters and take note of how long it takes before you're directed to the frame animation interface
Recommended: Take note of how your system is utilised during the rendering process (more info here for MacOS users)
†This is a performance issue known as flickering that I will discuss in the next section. If you come across this, you'll have to playback a gif where you've used Neural Filters (on the video timeline) in full, prior to flattening / rendering it.
Factors that could affect the rendering performance / time (more info):
The number of frames, dimension, and colour bit depth of your gif
If you use Neural Filters with facial recognition features, the rendering time will be affected by the number of characters / individuals in your gif
Most resource intensive filters (powered by largest machine learning models): Landscape Mixer / Photo Restoration (with Facial Enhancement) / and JPEG Artefacts Removal
Least resource intensive filters (smallest machine learning models): Colour Transfer / Colourise
The number of Neural Filters that you apply at once / The number of component gifs with Neural Filters in your PSD file
Your system: system memory, the GPU, and the architecture of the system's CPU+++
+++ Rendering a gif with Neural Filters demands a lot of system memory & GPU horsepower. Rendering will be faster & more reliable on newer computers, as these systems have CPU & GPU with more modern instruction sets that are geared towards machine learning-based tasks.
Additionally, the unified memory architecture of Apple Silicon M-series chips are found to be quite efficient at processing Neural Filters.
6. Performance issues & workarounds
Common Performance issues:
I will discuss several common issues related to rendering or exporting a multi-frame smart object (e.g. your composite gif) that uses Neural Filters below. This is commonly caused by insufficient system memory and/or the GPU.
Flickering frames: in the flattened / rendered file, Neural Filters aren't applied to some of the frames+-+
Scrambled frames: the frames in the flattened / rendered file isn't in order
Neural Filters exceeded the timeout limit error: this is normally a software related issue
Long export / rendering time: long rendering time is expected in heavy workflows
Laggy Photoshop / system interface: having to wait quite a long time to preview the next frame on the timeline
Issues with Landscape Mixer: Using the filter gives ill-defined defined results (Common in older systems)--
Workarounds:
Workarounds that could reduce unreliable rendering performance & long rendering time:
Close other apps running in the background
Work with smaller colour bit depth (i.e. 8-bit rather than 16-bit)
Downsize your gif before converting to the video timeline-+-
Try to keep the number of frames as low as possible
Avoid stacking multiple Neural Filters at once. Try applying & rendering the filters that you want one by one
Specific workarounds for specific issues:
How to resolve flickering frames: If you come across flickering, you will need to playback your gif on the video timeline in full to find the frames where the filter isn't applied. You will need to select all of the frames to allow Photoshop to reprocess these, before you render your gif.+-+
What to do if you come across Neural Filters timeout error? This is caused by several incompatible Neural Filters e.g. Harmonisation (both the filter itself and as a setting in Landscape Mixer), Scratch Reduction in Photo Restoration, and trying to stack multiple Neural Filters with facial recognition features.
If the timeout error is caused by stacking multiple filters, a feasible workaround is to apply the Neural Filters that you want to use one by one over multiple rendering sessions, rather all of them in one go.
+-+This is a very common issue for Apple Silicon-based Macs. Flickering happens when a gif with Neural Filters is rendered without being previously played back in the timeline.
This issue is likely related to the memory bandwidth & the GPU cores of the chips, because not all Apple Silicon-based Macs exhibit this behaviour (i.e. devices equipped with Max / Ultra M-series chips are mostly unaffected).
-- As mentioned in the supplementary page, Landscape Mixer requires a lot of GPU horsepower to be fully rendered. For older systems (pre-2017 builds), there are no workarounds other than to avoid using this filter.
-+- For smaller dimensions, the size of the machine learning models powering the filters play an outsized role in the rendering time (i.e. marginal reduction in rendering time when downsizing 1080p file to Tumblr dimensions). If you use filters powered by larger models e.g. Landscape Mixer and Photo Restoration, you will need to be very patient when exporting your gif.
7. More useful resources on using Neural Filters
Creating animations with Neural Filters effects | Max Novak
Using Neural Filters to colour correct by @edteachs
I hope this is helpful! If you have any questions or need any help related to the tutorial, feel free to send me an ask 💖
#photoshop tutorial#gif tutorial#dearindies#usernik#useryoshi#usershreyu#userisaiah#userroza#userrobin#userraffa#usercats#userriel#useralien#userjoeys#usertj#alielook#swearphil#*#my resources#my tutorials
509 notes
·
View notes
Link
The article "Ma Deuce — The M2 .50-Caliber Machine Gun" by Will Dabbs, MD, published by The Armory Life, delves into the history and significance of the iconic M2 Browning .50-caliber machine gun, commonly known as "Ma Deuce." It highlights the weapon's origins, tracing back to American General John J. "Black Jack" Pershing's need during World War I for a machine gun capable of confronting German observation aircraft. Designed by John Moses Browning and further developed to address velocity shortcomings, the M2 became the longest-serving firearm in U.S. military history. Featuring a .50 BMG round, it offers significant firepower and versatility, finding use on tanks, ships, aircraft, and with ground forces. The article also discusses the M2's adaptations for aerial combat, its upgrade to the M2A1 model for improved performance, and its continued deployment across various military platforms, maintaining its status as a vital component of U.S. military firepower for over a century.
#M2 Browning#.50 caliber machine gun#John Browning#World War II#recoil-operated#air-cooled#belt-fed#heavy machine gun#U.S. military#anti-aircraft#armored vehicles#infantry support#Afghanistan#Iraq#Vietnam War#weapon system#firepower#NATO#Winchester#sustainable rate of fire#tactical versatility#adjustable rear sight#spare barrel#quick-change barrel system#battlefield effectiveness#long-range accuracy.
0 notes