#m1 macs are fast
Explore tagged Tumblr posts
Text
Anyway. Since my dabble into WEBP, I've discovered that WEBP is actually considered a last generation format. I've also discovered that H.264 is ancient akin to the likes of JPEG, PNG, and GIF. So now I'm busy re-encoding all the videos on my Jellyfin server as AV1, and once that's done, I'm re-encoding all my photos as AVIF. If Shutter Encoder ever implements support for JPEG XL (JXL), then I'll be converting my photos again. There are no lengths I will not go to in order to save a few megabytes of storage space.
#although#to be honest#i've barely scratched the surface of my video pile#and I've already saved over a gigabyte#so it really is gonna be way more than a few megabytes#and i'm excited to see just how much#it'll probably take a few days tho#m1 macs are fast#but they aren't powerhouses or anything#and mine has been running at max temp and fan speed for over 24 hours now and we're not even close to being 1/10 of the way done#\\\#shitpost#shit post#webp#png#jpg#jpeg#jpeg xl#jxl#avif#photos#videos#encoding#shutter encoder#h.264#av1#data storage#server#jellyfin#gif
5 notes
·
View notes
Text
Wishlist Haul
All I asked for were pants, and those are coming Saturday. But you all came through in a big way with my wishlist and helped me solve some problems that have really been bugging me lately.
One of my biggest current issues is my decision to use my M1 MacBook Air as my main computer until I can move my PC upstairs at some distant time in the future. Which means I need to ask a lot more of it. And it is capable, as these Apple Silicon devices are amazing and very zippy, but I only got 256 GB of storage because I thought this would just be a secondary computer while I was taking care of my dad.
So I need storage. And if you do photography and use Lightroom, you know you need *fast* storage. In the days of spinny disc drives, going back and forth between images was maddeningly slow. I already hate the process of culling photos and picking the best ones. And sometimes you'd need to find 5 winners out of a few hundred. And when it took 3 seconds to switch between every photo, I wanted to die. And honestly, it could still be better.
But one of the best solutions is a super fast SSD. Which I had. I bought it right before my parents got especially ill and was planning to install it in my PC. But my priorities changed and I just never found the energy.
The problem is that was an internal NVME SSD. I needed it to be external.
Which is where this little thingie comes in.
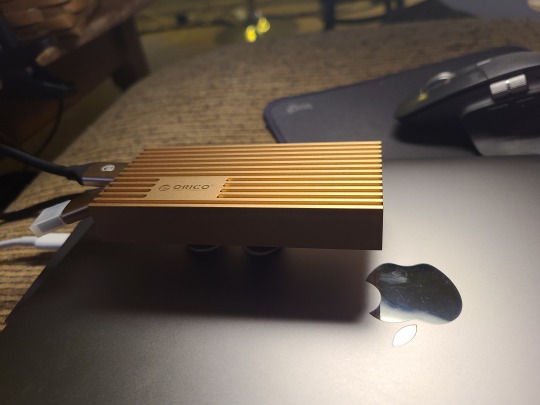
This is an NVME enclosure, and if you are looking for cheap, fast external storage, this is so much better than those external SSDs they overcharge for. For $200 they give you a 2TB drive that can read about 2000 MB per second. Or you can get a 2TB NVME and this enclosure for the same price and get 3000 MB per second. Not only that, but it is upgradeable. In a year when 4TB is $100, you can plop that in. And the Mac's Thunderbolt 4 has a max speed of around 5000 MB/s, so there is room to improve there as well. Though sometimes advertised speeds are not reality speeds.
The only thing you need to be aware of is these drives run hot. You're going to think there is something wrong with them. Like, they top out at 90C. Which is nearly 200 degrees in freedom units.
I wanted a convenient way to mount my drive, but I didn't want 200 degrees on the back of my screen, so... MAGNETS!
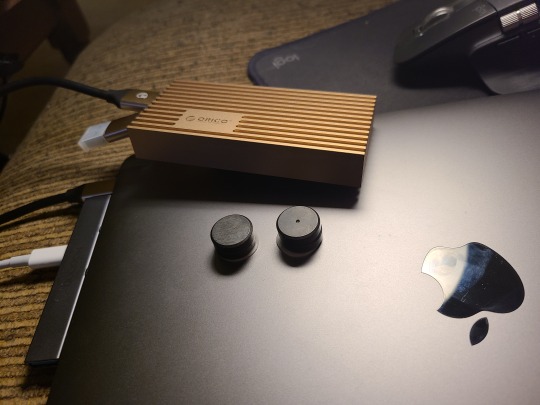
And I can stack a few more if that section starts feeling too hot.
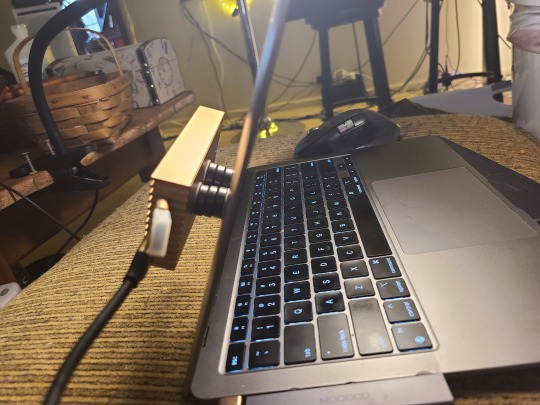
So, I have that problem solved. I can now use this as my main computer and work on my photography.
Next up... fashion!

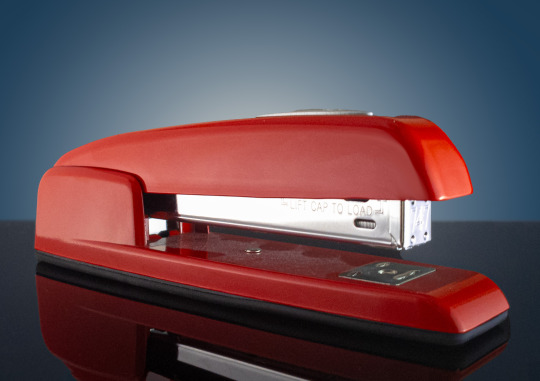
I'm going out more and I want to look a little more presentable. I thought these two tone shirts looked a little more fashionable. And they are very comfortable too. I have a red one that I think I'm going to wear on my trip. I know you can't see the two tone well in the picture, so here is the product photo of the red one.

Next problem?
Well, it's maybe not a problem so much as something cool I wanted. A black light!

My mom had all of this uranium glass and I had no idea my salt shaker was marginally radioactive all these years. I really wanted to take a proper photo of some of the glass before it all gets sold at auction. So this should be a fun experiment.
I will say, if you don't have uranium glass, don't get a black light. You will want to burn your house down. It does not matter how clean you think you got something... you didn't clean it enough. And I have all of this dry flaky skin on my feet. It doesn't hurt. It doesn't bother me. You can't even really see it unless you look really close. But when I shined the light on my feet they looked like they had some undocumented disease. I will not be sharing a photo of that.
But the depression glass, that's super neat.
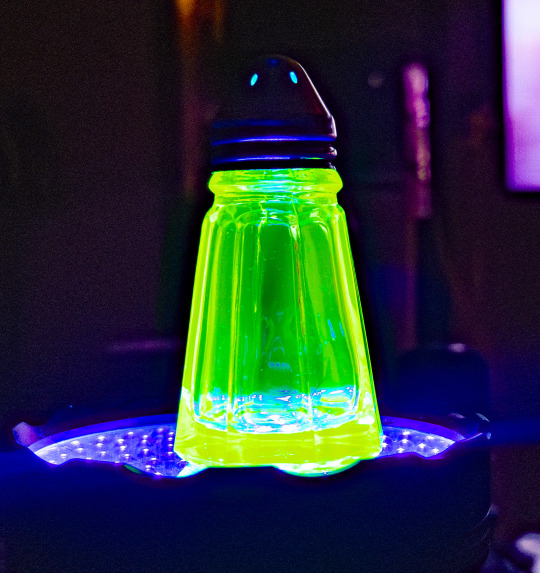
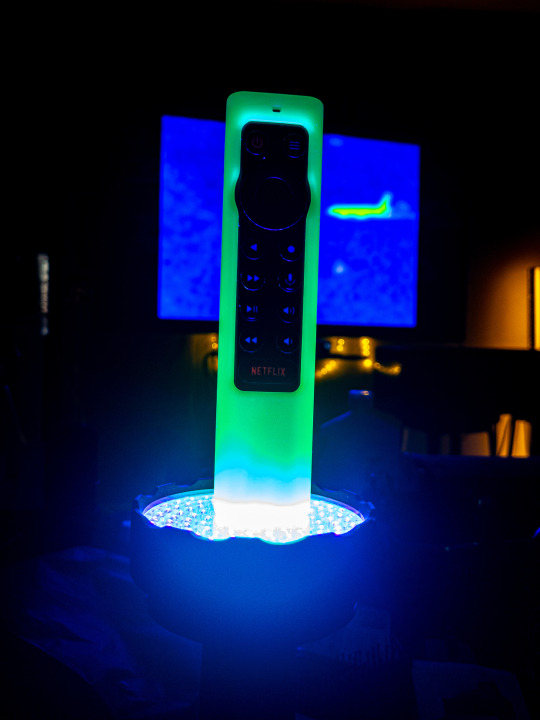
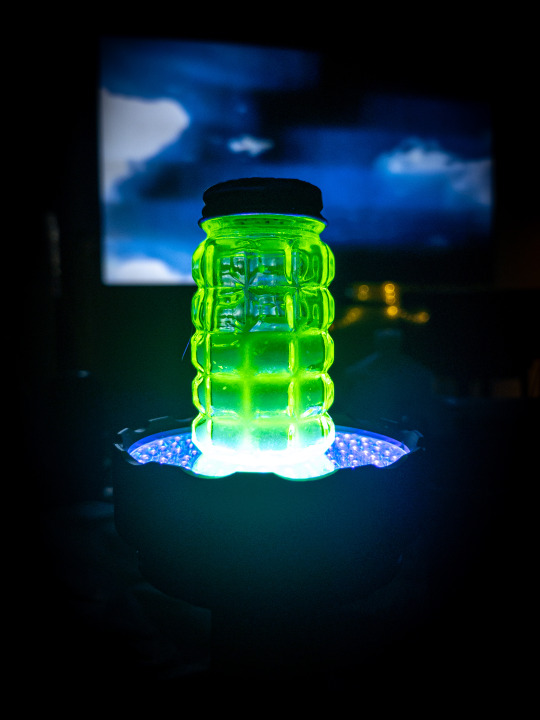

Some proper photos coming soon I hope. Maybe after my trip.
Next problem!
My key fob. This thing is a piece of shit.
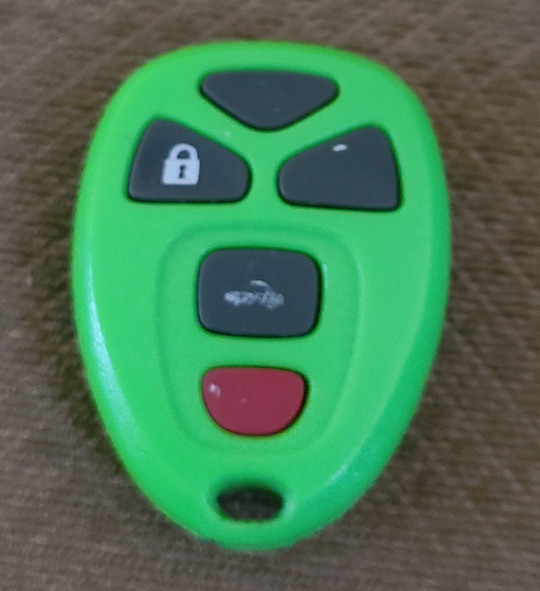
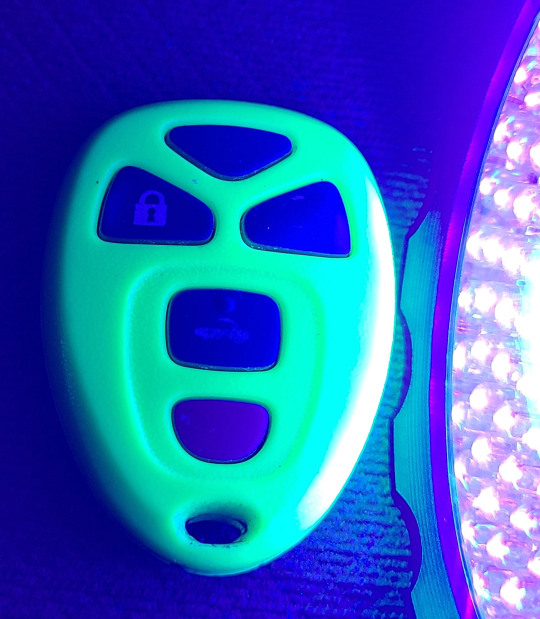
Even if it looks cool under a black light, it is THE WORST.
It's cheap plastic, it takes a stupid watch battery, the symbols on the buttons all wore off. And all of that I could handle, but for some reason this fob has an effective range of about 2 feet. I literally have to be standing next to the door before it will work.
I had a black fob that worked much better, only the plastic casing was falling apart. But I taped it up as best I could and hoped it would not fall apart. Then I went to get my tires changed and they needed the fob to do some special reset of the pressure sensors and the battery died before they could. I went home to try and change the battery, and the entire thing basically disintegrated on me.
The inside looks like this.
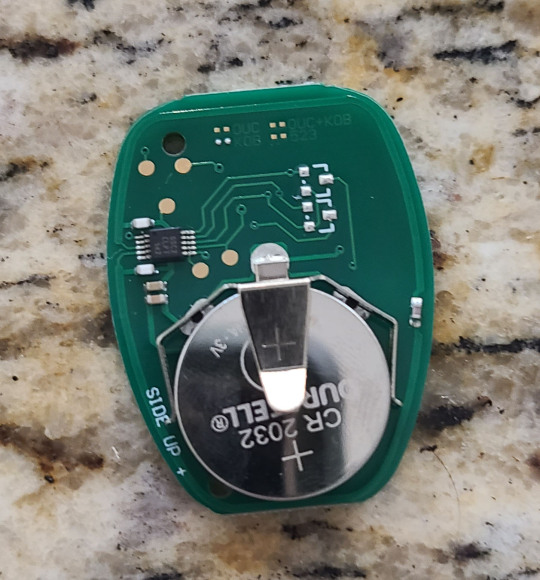
The battery retention contact is held on by a tiny dab of solder. And if you pull the battery up even a little, it snaps off. And that's what happened. And to make matters worse, the rubber buttons were falling apart and the unlock button just... fell off.
So I was either stuck with the 2 foot range green one or I needed a new fob. Thankfully, they are only 20 bucks for 2 on Amazon. Unfortunately you need a dealer or an auto locksmith to program them. The lowest quote was $100 for about 5 minutes of work. The dealer actually wanted to sell me the fob as well, which they quoted as $150 for ONE. Same cheap plastic piece of shit and everything.
So, I got all of the parts from the broken fob and I hot glued that battery contact back into place and I transplanted that into a shiny new casing.

Works just like new. The buttons feel much better, I can actually see the symbols, and it has a range of at least 100 feet. And that hot glue isn't going anywhere. Changing the battery might be an issue, but these lasted several years.
Next problem!
An intervalometer is a fancy shutter button for a camera that allows very long exposures. It is detached from the camera so you don't shake anything and it needs a backlit screen because if you are using it, you are most likely in the dark.
My intervalometer is about 12 years old and uses another dreaded watch battery. And the backlight on the screen seems to be dead. So it is pretty much useless.
But look at this!

The light even works in the... well, light! And it takes normal batteries. Seriously, watch batteries need to stay in watches.
I don't know if I will get to take a long exposure in Florida, but I want to have this with me in case I do.
Next problem!
This one I actually solved on my own. But I found these stainless iron (yes, iron!) shims and I covered them with black tape and now all of my most used kitchen items never take up counter space.
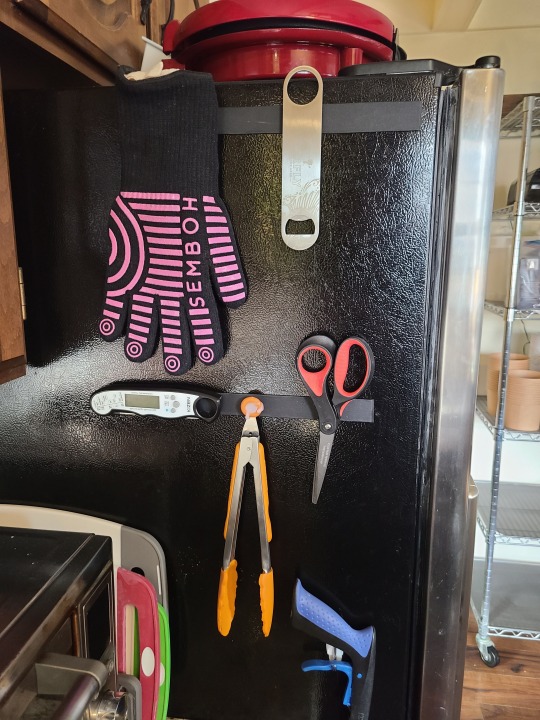
Yes, I use magnets and hot glue to solve most of my problems.
Next problem!
My garage door is not very smart. And the remote control for it is huge and does not fit in my man purse.
So I downsized the remote.
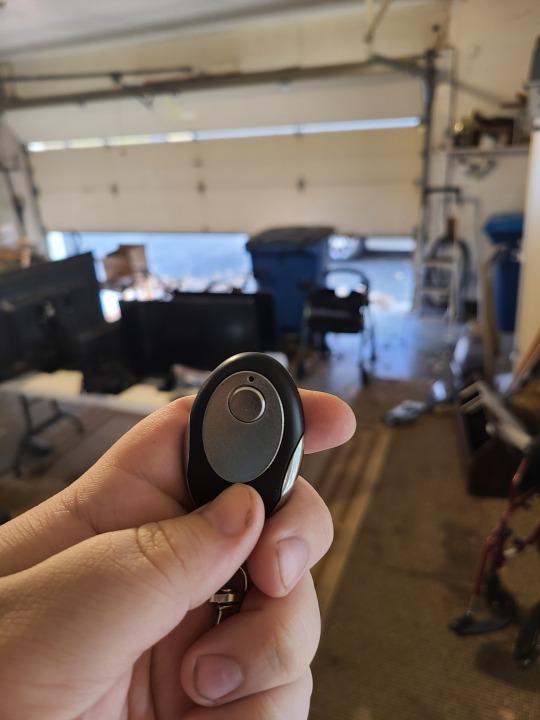
But I wanted to fix the non-smart thing as well. A while back my brother got into my garage without me knowing. He must have taken a remote of his own. And I really don't feel like figuring out how to change the frequency, so I now have a sensor that lets me know when the door is open with a phone notification. Beyond that, I can open or close the door from my smartphone from anywhere. And I can give access to anyone with a smartphone in case of an emergency.
I will say, this company is really paranoid about people being crushed by garage doors. The instructions tell you to put up this sign in your garage...

And if you use the app to close the door, you get a light show with annoying beeping...
And I know that these accidents happen in real life. But whenever I think about how that could actually happen, all I can imagine is that scene in Austin Powers...

In any case, I am really glad I have this now. And I also like that if I forget to close the garage door, I can check the app and not have to get up to do it.
OH! I almost forgot. If I want, I can have Amazon place packages inside my garage.
Next problem!
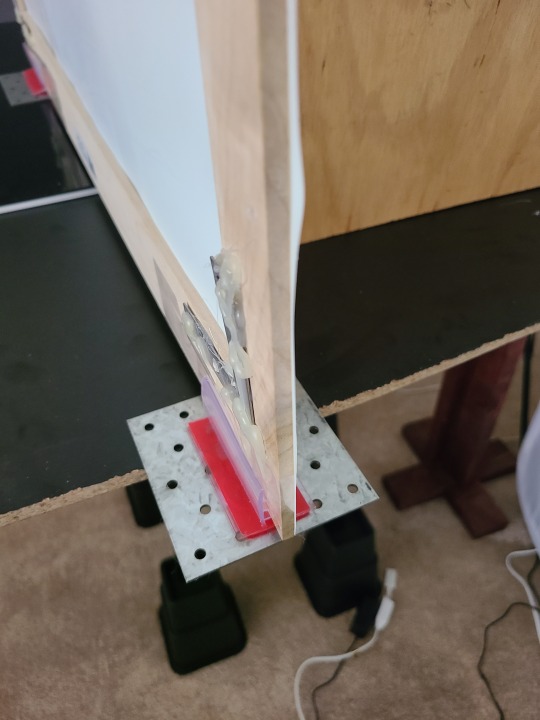
What in the heck do I need galvanized steel plates for?

In product photography you need a diffusion panel called a scrim. If you try to buy one of these already made, they are hundreds of dollars. They are mostly made for movie productions, and those items always have inflated costs.
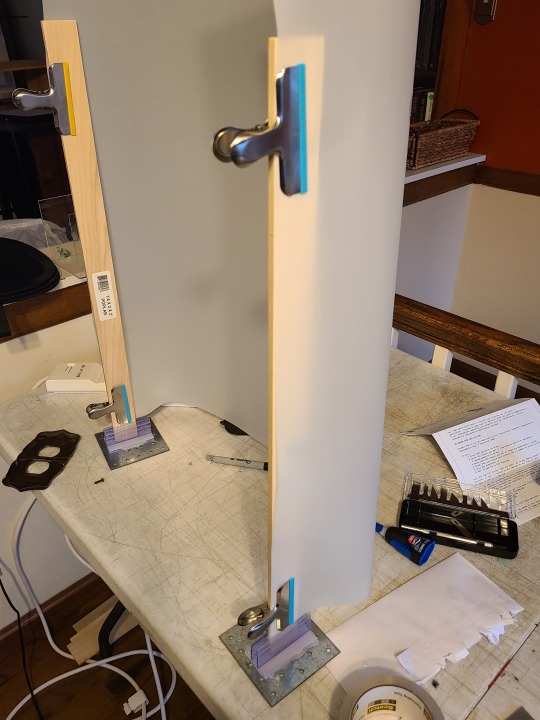
So most product photographers make their own out of tracing paper or a special plastic called Translum. It's $80 per roll, but lasts forever. I used to hang my scrims from the ceiling. But you can't really angle or move them, so you have to move the object you are photographing instead. Which is just a backwards way to work. So I invented my own scrims with two strips of very thin wood, metal chip clips, these little plastic feet that held up plexiglass barriers during COVID. And to weigh everything down... steel plates.
This is version 1.0 where I glued the plastic rather than affixing it with the chip clips.
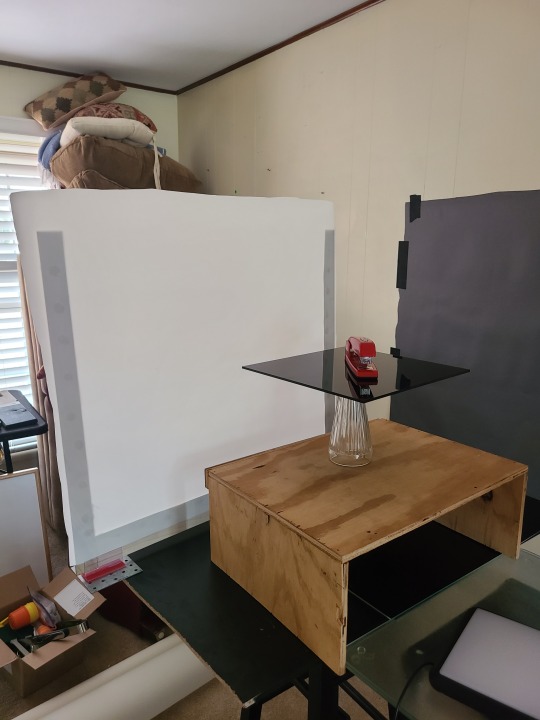
The clips work much better and allow me to put different weights of plastic on, or even double plastic, for more or less diffusion. And I ended up not needing that board at the bottom which allows me to curve it as well.
And these scrims let me take this photo...
It's called graduated lighting and it makes things look neat.
I also got a backpack for my trip and shorts, but I am going to forego an explanation of those.
To all that helped, thank you so much. I hope you can see I am putting everything to good use.
72 notes
·
View notes
Text
Virharmonic announces virtual instrument 'Bohemian Viola'

Virharmonic has announced the virtual instrument Bohemian Viola and is accepting pre-orders. The product launch is scheduled for October 20th.

Creating music has never been so easy, with the help of our Virtual Performer making split second decisions based on your playing input, inspiring you to write lyrical lines like never before. Part of an expanding series of performers, the Bohemian Viola was created to free you to perform real Viola Performances fast, without the need to be a Violist yourself. https://www.youtube.com/watch?v=ZSPqlfGIks0 To achieve realism, we recorded an unprecedented amount of samples for a solo instrument, but managing all this by loading individual patches would be slow and cumbersome and stifle inspiration. This is where the virtual performer comes in, controlling all the varied legatos, bow types and emotive expressions as you play, all from one patch and all in real time. - vst / au / aax dedicated plugin built on the gorilla engine (64bit). - mac os 10.14.6 to 13.5.2, plug-in is M1 native - (AAX Requires Rosetta2 - update to M Native coming soon) - Installer requires Rosetta - windows 10/11 onwards - one time codemeter server response activation - compatible with all major 64bit DAWS like logic, cubase, pro tools, studio one, reaper, ableton - computer needs 4Gb memory+ - 88 Key Velocity Sensitive Midi Keyboard recommended - near instant loading with an ssd using real time streaming, which is a massive memory saver. - Digital Downloads provided by Pulse Downloader features - the virtual performer: enables incredibly easy live play, auto selecting the bow types, legatos and bow positions based on your play style. - mood selection: improv, emotive, assertive, classical and sprightly, allowing you to change the behaviour of the cellist on the fly - performer mode: solo, second cello, trio, chamber, divisi trio & divisi chamber - maestro: the very first Performer Poly-Legato - crafting: blend any forced on bow type/articulation with our legatos. - reverb & space: convolution & algorithmic reverbs with added spaces: hall, chamber and studio - built in velocity control - built in expression control - built in help guide. Read the full article
2 notes
·
View notes
Text
💻 Apple MacBook Air M4 (2025) Review: Light as a Feather, Fast as a Rocket 🚀

📝 First Impressions
Alright, so—Apple did it again. I didn’t plan to upgrade this year, but the second I tried the new MacBook Air M4? I was hooked. It’s crazy light, super fast, and somehow feels better than using my old iPad setup. Seriously—how is this even real?
If you spend your days in Google Docs, open way too many Chrome tabs (guilty!), edit a few pics, and watch YouTube late at night—this thing might be your new bestie. The M4 chip makes everything feel faster, smoother, and just more fun.
Let’s check out the good stuff. ✨
📘 Quick Specs at a Glance
Chip: Apple M4 (10-core CPU, up to 10-core GPU, 16-core Neural Engine)
RAM: 16GB (you can go up to 32GB)
Storage: Starts at 256GB SSD (up to 2TB)
Display: 13.6" Liquid Retina (500 nits, True Tone)
Camera: 12MP FaceTime HD with Center Stage + Desk View
Ports: 2x Thunderbolt 4 (USB-C), MagSafe 3, headphone jack
Battery: Up to 18 hours (yep, for real)
Colors: Midnight, Silver, Starlight, Sky Blue
Weight: 2.7 lbs (1.24 kg)
OS: macOS + built-in Apple Intelligence (AI features)
More Info Get The Product Here>>>
💡 Why People Are Loving It
⚡ It’s Super Fast This chip is no joke. I had Photoshop, Chrome (with 20 tabs!), Spotify, and a Zoom call running all at once. No lag. No heat. No noise. And yep—it’s fanless!
My old M1 Mac feels slow next to it. The M4 runs like butter. M2? Not even close.
🧠 AI That Feels Helpful Apple’s new smart tools actually work. You can get quick summaries, smart replies in Mail, and even photo edits—all right on your Mac. No cloud needed. It’s fast and private.
Oh, and Siri? She finally gets it.
🔋 Battery for Days Apple says 18 hours. I thought, “Yeah right.” But I used it all day, watched a movie, wrote some stuff, and still had 20% left. No charger anxiety here!
I didn’t even pack my charger for the coffee shop. Game-changer.
🎨 Looks That Turn Heads That Midnight color? So pretty. Sure, it shows fingerprints, but the MagSafe cable matches, so I forgive it. The whole design feels fancy and clean—and it’s lighter than most books.
🔧 Best Parts (and a Few Downsides)
✅ What I Loved:
M4 chip is fast—like, really fast
Bright, colorful screen that’s easy on the eyes
Webcam looks good and auto-frames you (love that)
Fanless = silent
AI tools that make sense and save time
Touch ID is fast and simple
❌ What Bugged Me:
Only two USB-C ports—come on, Apple 😩
No HDMI or SD card slot (dongles forever)
256GB isn’t enough if you do a lot of photo or video work
Not made for serious gaming or 3D stuff
💬 What People Are Saying
🗣️ From Reddit, X, and Amazon:
“Lightweight but crazy fast. A beast in disguise.”
“Battery life is unreal. I charge it every other day.”
“I wish it had more ports… but it’s still worth it.”
“Midnight finish is 🔥 but yeah, it shows smudges.”
Tech reviewers are also fans:
Laptop Mag: “Power and portability in one.”
TechRadar: “No fans, no noise, no heat—Apple nailed it.”
WSJ: “One of the best laptops out now (unless you need a ton of ports).”
Honestly? I agree. It’s not perfect, but it’s pretty close for most people.
💶 Is It Worth the Money?
✅ What You’re Paying For:
🚀 Super smooth performance with the M4 chip
🔋 All-day battery that actually lasts
🧠 Smart tools built right in
💻 A bright, sharp screen
🎨 A sleek, stylish body (Midnight is my fave)
⚠️ What Might Bug You:
⚡ Only two USB-C ports
💾 Base storage is tight if you do creative work
💸 Price adds up fast if you upgrade everything
🎮 Not meant for heavy gaming or 3D editing
🏁 Final Verdict: Who Should Get This?
This MacBook is made for:
People who work on the go
Students who need speed and battery
Creators doing light photo or video editing
Anyone who wants a Mac that just works—and looks great doing it
Unless you need pro-level power or lots of ports, the MacBook Air M4 is an easy yes in 2025.
More Info Get The Product Here>>>
#MacBookAirM4#2025Laptop#SkyBlueMacBook#M4ChipPerformance#AllDayBattery#AIReady#Portable#AppleEcosystem hashtag#MacBookAir hashtag#AppleM4 hashtag#LaptopReview hashtag#AppleIntelligence hashtag#Tech2025 hashtag#MacBookPro2025 hashtag#AppleLaptop hashtag#BestLaptop2025 hashtag#TechReview hashtag#PremiumLaptop hashtag#MacBookPro hashtag#AppleM3 hashtag#ThinAndLight hashtag#RetinaDisplay hashtag#LongBatteryLife
0 notes
Text
Reliable MacBook Repair in Peenya: Expert Solutions by Machub You Can Trust
In today’s digital age, your MacBook isn’t just another device—it’s a critical part of your professional and personal life. Whether you’re a software engineer, graphic designer, entrepreneur, or student in Peenya, Bangalore, your MacBook is essential for productivity and communication. But when it malfunctions—due to a cracked screen, slow performance, water damage, or a faulty battery—you need a repair partner who understands the value of time, quality, and trust.
Welcome to Machub, your one-stop solution for MacBook repair in Peenya. With years of expertise in Apple device repair and a reputation for excellence across Bangalore, Machub delivers Apple-grade services without the Apple-store price tag.
Why Choose Machub for MacBook Repairs in Peenya?
1. Trusted Apple Specialists
At Machub, every technician is Apple-certified or extensively trained to handle all MacBook variants—from the MacBook Air M1 to the latest MacBook Pro with M2 chips. We use cutting-edge tools and diagnostic software tailored specifically for macOS and Apple hardware.
2. Peenya’s Industrial Hub Advantage
Peenya is one of Asia’s largest industrial areas, bustling with small to large businesses and tech professionals. Machub caters specifically to the demands of this area by offering express repair services, doorstep pickup/drop, and priority service slots for working professionals and companies.
3. Wide Range of MacBook Services
Machub provides comprehensive repair and maintenance services, including:
Screen replacement (retina and non-retina)
Battery replacement
Logic board repair
SSD upgrade & data recovery
Keyboard, trackpad, and speaker repair
Liquid damage repair
MacBook won’t turn on/troubleshooting
macOS installation and software fixes
No matter the issue, our technicians will find a reliable solution with a transparent pricing model.
Common MacBook Issues We Fix at Machub Peenya
❖ Cracked or Broken Display
Dropped your MacBook? Cracks on Retina screens can disrupt clarity and cause display malfunction. Machub uses genuine and OEM-grade displays, ensuring visual performance is restored to original quality.
❖ Overheating or Fan Noise
Your MacBook may heat up or produce loud fan noise due to dust buildup or processor overload. Our deep-cleaning and thermal paste replacement service will restore optimal temperature levels.
❖ Battery Draining Quickly
Is your MacBook not holding a charge? We offer fast, safe battery replacements using high-quality parts, covered with warranty.
❖ Liquid Spillage
Accidentally spilled water or coffee on your Mac? Bring it to Machub within hours for successful recovery. We offer ultrasonic cleaning, corrosion control, and logic board restoration.
❖ MacBook Running Slow
Whether it’s due to an outdated hard drive or a failing macOS, we perform optimization and upgrade services—like migrating from HDD to SSD or reinstalling macOS—to bring your MacBook back to life.
Our MacBook Repair Process in Peenya
Step 1: Free Diagnostic
Walk into our Peenya service center or request a free pickup. We begin with a complete diagnostic to assess the hardware/software issue. No repair begins without your approval.
Step 2: Clear Quote & Turnaround Time
We provide an upfront estimate and time frame for the repair. For common issues like screen or battery replacement, you can expect same-day service.
Step 3: High-Quality Repair
Using ESD-safe workspaces and original-grade components, we carry out precise repairs that comply with Apple’s quality standards.
Step 4: Testing & Quality Control
Before returning your MacBook, we test it across 30+ checkpoints to ensure smooth performance.
Step 5: Safe Delivery & Warranty
Once repairs are complete, we deliver your MacBook to your home or office in Peenya. All parts come with a standard warranty for your peace of mind.
MacBook Models We Repair in Peenya
Machub services all MacBook models, including:
MacBook Air (2012–2024)
MacBook Pro (Retina & Non-Retina)
MacBook Pro M1 / M2 Series
MacBook (12-inch)
Intel & Apple Silicon MacBooks
Even if your model is out of warranty or discontinued, we can still source quality parts and get it up and running.
Benefits of Choosing Machub in Peenya
✔ Free Pickup & Drop in Peenya
No need to waste hours commuting. Schedule a doorstep service online or by phone.
✔ Same-Day Service for Common Repairs
For issues like screen or battery replacement, Machub offers express 4–6 hour repair options.
✔ Genuine Spare Parts
We use only Apple OEM or high-quality compatible parts backed with 3–6 months warranty.
✔ Affordable Pricing
Machub offers 30–40% lower prices compared to Apple-authorized centers, with no compromise on quality.
✔ Professional Customer Support
Our support team is available via phone, WhatsApp, and email—before, during, and after your repair.
✔ Transparent Process
You get real-time updates, detailed bills, and zero hidden charges.
MacBook Corporate Repair Solutions in Peenya
Peenya is home to many manufacturing and tech-based companies. Machub offers AMC (Annual Maintenance Contracts) and bulk repair discounts for offices and teams relying on Apple devices.
Services include:
Onsite MacBook diagnosis and repair
Device health monitoring
Instant replacements for urgent needs
Priority support and faster TAT for companies
If your company in Peenya runs on MacBooks, Machub can be your go-to tech partner for reliable and cost-effective support.
Customer Reviews from Peenya
Shruthi R., Graphic Designer "My MacBook Pro had a flickering screen, and Machub replaced it in just a few hours. The clarity is perfect, and their team explained everything clearly. Great experience in Peenya!"
Arjun M., Industrial Consultant "Machub is a lifesaver for anyone in Peenya with a MacBook issue. Their pickup and drop saved me time, and their pricing was far better than Apple’s quote."
Deepak K., Student "My MacBook Air stopped charging. Machub fixed the logic board and even helped me recover my notes. These guys are true pros!"
Locations We Serve Around Peenya
Besides Peenya, Machub offers services to nearby areas like:
Hesaraghatta Main Road
Dasarahalli
Jalahalli
Yeshwanthpur
T Dasarahalli
Goraguntepalya
Rajajinagar
Tumkur Road
Whether you're near an industrial block or a residential layout, our team ensures you don’t have to travel far to get your Mac fixed.
Final Thoughts
In a fast-paced area like Peenya, where time is money and technology is essential, MacBook users need quick, high-quality, and trustworthy repair services. Machub is proud to be Peenya’s preferred MacBook repair center, known for our technical expertise, fair pricing, and customer-first attitude.
From a simple battery replacement to complex logic board recovery, we handle every repair with precision and professionalism. So, the next time your MacBook falters, don’t delay—choose Machub in Peenya and get back to doing what you do best.
Machub – Bangalore’s Most Trusted Name in MacBook Repairs.
0 notes
Text
What is the Best Home Recording Studio? Your Guide to Building a Pro Sound Space at Home
In the past, recording high-quality music required big studios, racks of gear, and a massive budget. But not anymore. Today, you can create radio-ready tracks right from your bedroom or spare room—if you have the best home recording studio setup for your needs. So, what actually makes a home studio “the best”? Let’s break it down.
It Starts With Your Space: Room Acoustics Matter
Before you even think about gear, take a look around your room. Hard walls and bare floors can cause echoes, flutter, and unwanted reverb in your recordings. That’s why even small home studios benefit from acoustic treatment like:
Bass traps in corners to tame low-end rumble
Acoustic panels to reduce reflections
Diffusers to keep the room sounding natural
A little treatment goes a long way to help you capture clean, clear recordings and mix your tracks with confidence.

Your Computer: The Hub of Your Studio
These days, your computer is the heart of your entire setup. Whether you’re using a Mac or PC, look for:
Plenty of RAM (16GB or more for music production)
A fast processor (i5, i7, or M1/M2 chips)
Solid State Drive (SSD) for quick loading times
You’ll also need a solid Digital Audio Workstation (DAW). Each DAW has its strengths. Choose one that matches how you like to create music.
Audio Interface: Your Sound Gateway
An audio interface converts your instrument or microphone signals into digital audio your computer understands—and vice versa. For the best home recording studio, look for an interface with:
Clean preamps for microphones
Low latency for real-time monitoring
At least two inputs if you record vocals and instruments simultaneously
Studio Monitors vs. Headphones
While headphones are essential, nothing beats studio monitors for mixing. Unlike consumer speakers, good monitors provide a flat, uncolored sound so you can hear your mix accurately.
Microphones: Choose the Right Tool
A good mic makes a huge difference. For vocals, a large diaphragm condenser microphone is a staple. If you’re recording instruments or podcasts, you might also want a:
Dynamic mic (great for voiceovers, amps, or drums)
Small diaphragm condenser (ideal for acoustic guitars, overheads)
Essential Extras
To truly complete your studio, don’t overlook:
Cables: Invest in quality XLR and instrument cables to avoid unwanted noise. Mic stands: A sturdy stand keeps your mic in position for consistent takes. Pop filters: Reduce harsh “P” and “S” sounds in vocal recordings. MIDI controller: Helpful for writing music, especially with virtual instruments.
What Makes a Home Studio “the Best”?
There’s no single “best” home recording studio for everyone. The real key is choosing the right tools for the music you make and the space you’re working in.
A hip-hop producer might prioritize a powerful DAW and solid speakers for mixing beats. A singer-songwriter might focus on a great mic and acoustic treatment for clear vocals. A podcaster might need just a dynamic mic, an interface, and headphones.
A Smart Way to Build Your Studio
Putting together the best home recording studio isn’t just about picking gear with the best specs. It’s also about making sure everything works well together and fits your specific space and creative goals.
Sometimes it’s worth talking to people who work with this gear every day. They can help you choose equipment that matches your music style, troubleshoot any technical challenges, and even let you test things out before you commit.
Many musicians, artists & producers prefer sourcing their equipment from professional retailers, where expertise and quality gear go hand in hand.Plus, investing in reliable brands and getting solid advice upfront can save a lot of time—and money—down the road. It’s all part of making your studio a place where your creativity feels limitless.
#pro audio gear#home recording#home recording studio#recording studio#audio video#pro audio equipment
1 note
·
View note
Text
How to Get the Highest Possible Price Whenever Offering an Apple MacBook?

Selling Off your Apple MacBook can be an excellent means to gain fast cash especially if you update on a regular basis or no more require your tool. But to get the optimum value, it's essential to comply with a few key actions. Whether you're seeking to sell an Apple laptop computer online or discover the fastest method to sell a MacBook Pro and get cash today, this overview will certainly stroll you through precisely what to do. From preparing your gadget to selecting the most effective platform, we've covered it all to aid you sell your MacBook for top dollar.
Back Up and Prepare Your MacBook for Sale
Before providing your device, it's vital to prepare it properly to safeguard your information and improve customer confidence. Begin by supporting all your files using Time Machine or iCloud. Next, indicator out of iCloud, iMessage, and other Apple services. Then erase your hard drive and re-install macOS to provide the brand-new owner a clean begin. This not only enhances the charm of your listing yet likewise ensures your individual details stays safe and secure. If you're wondering exactly how to prepare a MacBook for selling online safely, this step is absolutely non-negotiable.
Understand Your Design and Its Market Price
Recognizing your device's specs can dramatically affect how much cash money you'll obtain. Customers typically look for specifics such as "just how to sell MacBook Air M1 for money online" or "best place to sell MacBook Pro 16 inch for highest possible price." Use your Mac's identification number on Apple's site or inspect "About This Mac" to gather important information like the year, model, cpu, and storage space capacity. Study current market values on resale websites or discussion forums to understand what similar devices are going with. This information aids you set an affordable, yet rewarding, asking rate when you sell Apple laptop computer for cash.
Usage Platforms That Offer Instantaneous Quotes and Fast Repayments

If you're in a hurry and want cash swiftly, seek relied on resale platforms that give an instantaneous quote and rapid payment. Choices like SellYourMac, Decluttr, and BuyBackWorld allow you to sell apple laptop for cash with instantaneous quotes and also supply cost-free shipping. If you're looking to sell MacBook online with free shipping and get an immediate quote, these platforms can save time and make the most of comfort. For harmed devices like if you require to sell a damaged MacBook Air with screen damage for parts a few of these systems still use cash options, albeit at a decreased rate.
Time It Right and Make Your List Shine
Timing your sale can also impact your profit. Selling right before or right after a new MacBook release normally fetches the most effective cost, as need heights. When creating a listing, make use of top quality pictures, write a thorough summary, and be straightforward about the condition of your laptop. Reference update or if it's a popular design such as a MacBook Pro M2 chip. If you're searching for where to sell MacBook Pro M2 chip for cash money quick, industries like Swappa and Facebook Industry can be fantastic choices but make certain to meet buyers in a risk-free area.
Conclusion
Getting the greatest cost when you sell an Apple laptop online calls for preparation, appropriate prep work, and clever platform choices. Whether you intend to sell a used MacBook Air 13 inch online with an immediate quote or find the best location to sell a MacBook Pro 16 inch for the highest price, adhering to these actions ensures you won't leave money on the table. From selecting the fastest way to sell your MacBook Pro and get money today to discovering trade-in choices for broken devices, there's a service for each vendor. Do something about it currently and transform that MacBook into money the clever method.
0 notes
Text

Offline Productivity: Why Office 2021 for Mac Is Perfect for Swiss Remote Areas
In a country celebrated for its scenic landscapes, remote valleys, and thriving alpine villages, connectivity isn’t always guaranteed. Switzerland may lead the world in infrastructure, but even here, mountainous regions often lack uninterrupted internet. For Mac users living in or frequently traveling to remote Swiss areas, reliable offline software becomes not a preference, but a necessity.
Enter Office 2021 for Mac, a powerful, stable, and offline-capable productivity suite that does not depend on cloud integration to perform. In this blog, we’ll explore why this version of Office is the ideal choice for Swiss residents who live off the beaten path, work remotely, or simply prefer the peace and privacy of offline productivity.
Switzerland’s Digital Divide: A Quiet Challenge
Though Switzerland boasts exceptional internet penetration (over 96%), connectivity challenges remain in:
Mountain villages such as Zermatt, Mürren, or Evolène
Alpine chalets and lodges where infrastructure is minimal
Remote workstations with limited access to 5G or fiber
Seasonal ski resorts with peak-time network congestion
For residents, freelancers, or professionals operating in these areas, relying on cloud-based applications such as Google Docs or Microsoft 365 can result in frustration, data loss, or disruption of workflow. Hence, a self-contained solution becomes invaluable.
Office 2021 for Mac: Your Offline Productivity Powerhouse
Office 2021 for Mac is designed as a standalone suite that doesn’t require an internet connection to function. After installation and activation, you can use it offline indefinitely—ideal for remote work, backcountry travels, or digital minimalism.
You can purchase a genuine version of office 2021 for mac via Technikmarkt and enjoy these powerful applications:
Microsoft Word
Microsoft Excel
Microsoft PowerPoint
Microsoft Outlook
Microsoft OneNote
All without the dependency on the cloud.
Benefits of Offline Usage in Swiss Remote Regions
1. No Internet Dependency
Even the best routers and Swisscom packages won’t work if you’re outside service zones. With office 2021 for mac, you:
Can write documents in Word without interruptions
Create financial reports in Excel while in remote cabins
Build presentations in PowerPoint without needing OneDrive
Access your Outlook calendar offline
This is critical for remote workers like:
Outdoor guides
Writers and researchers
Engineers and architects on field visits
Academic professionals in Alpine institutes
2. Lightning-Fast Speed
Offline applications aren’t dependent on data transfer, which makes office 2021 for mac faster and more responsive. Especially on Apple Silicon Macs (M1, M2, M3), the software loads instantly and transitions seamlessly between tasks—no lag, no sync delay.
3. Data Privacy
Swiss citizens value privacy. Offline tools ensure your documents never leave your local machine. No risk of:
Unauthorized syncing to external servers
Cloud breaches
Accidental sharing
With Swiss data protection laws among the strictest in the world, office 2021 for mac aligns with the needs of security-conscious users.
0 notes
Text
Top MacBook Repair in Attibele | Fast, Trusted Solutions at Fixcare
Your MacBook is more than just a laptop—it's your lifeline to work, creativity, and connection. Whether you use it to run your business, create digital art, write code, or simply stay in touch with loved ones, a MacBook is an essential part of your daily life. But what happens when it breaks down? A cracked screen, a dying battery, water damage, or software glitches can bring your productivity to a screeching halt.
If you're in Attibele, Bangalore, and searching for reliable MacBook repair services, look no further than Fixcare—your trusted neighborhood Apple repair expert. Known for delivering fast, professional, and affordable MacBook Repair in Attibele, Fixcare is the preferred choice for thousands of customers seeking dependable Apple device solutions.
Why Fixcare is Attibele's #1 Choice for MacBook Repair
At Fixcare, we understand the frustration that comes with a malfunctioning device. That’s why our mission is simple: Restore your MacBook quickly, affordably, and without stress.
Here’s why Fixcare stands out in the Attibele region:
✅ Apple-Certified Technicians
Our team of technicians is trained and certified to handle all kinds of MacBook issues—from the simplest to the most complex.
✅ Genuine & OEM Spare Parts
We use only original and OEM-grade MacBook parts, ensuring your device performs like new after repair.
✅ Same-Day or 24-48 Hour Service
We know your time is valuable. Most repairs are completed within hours, not days.
✅ Free Pickup & Drop in Attibele
Busy schedule? No problem. We offer free doorstep pickup and delivery services throughout Attibele.
✅ Transparent Pricing with Warranty
No surprises, no hidden charges. Get upfront estimates and enjoy up to 6 months warranty on repairs.
MacBook Repair Services We Offer in Attibele
We provide full-service MacBook diagnostics, repair, and upgrades for all MacBook models, including MacBook Pro, MacBook Air, and MacBook Retina.
🔧 Screen Replacement
Cracked your Retina display or dealing with screen flickering? We offer fast screen replacements using original LCD assemblies.
🔧 Battery Replacement
MacBook not holding a charge? We provide battery replacements that restore your Mac’s power backup and performance.
🔧 Keyboard & Trackpad Repair
Facing sticky keys or an unresponsive trackpad? Our specialists replace or clean these components with precision.
🔧 Logic Board Repair
Our team is experienced in component-level motherboard repairs—saving you the cost of complete replacements.
🔧 Liquid Damage Treatment
Spilled coffee or water on your MacBook? We do complete liquid damage diagnosis and cleaning, often saving the device.
🔧 Charging Port Replacement
Not charging or detecting the adapter? We replace or repair MagSafe and USB-C charging ports on all MacBook models.
🔧 SSD & RAM Upgrades
Want faster speed or more storage? We offer SSD upgrades, RAM installation, and software optimization services.
🔧 macOS Troubleshooting
Is your MacBook stuck at the Apple logo or crashing frequently? We fix OS corruption, reinstall macOS, and recover data safely.
Common MacBook Issues Fixed at Fixcare Attibele
Here are the top issues customers bring to Fixcare—and how we fix them: IssueSolutionCracked DisplayFull LCD replacement with OEM screenMacBook Not Turning OnDiagnostic + Logic board repairBattery Draining FastBattery replacement with genuine cellKeyboard/Touchpad DeadCleaning, realignment, or part replacementWater SpillageLiquid damage treatment and board cleaningOverheating & Fan NoiseThermal paste application and internal cleaningSlow PerformanceSSD upgrade and software optimizationCharging Port LooseDC-in board replacement
MacBook Models We Repair in Attibele
We service every MacBook model Apple has released, including:
MacBook Pro 13”, 15”, 16” (Intel & M1/M2 chip variants)
MacBook Air (2012–2023, including M1 and M2 versions)
MacBook Retina (12-inch)
MacBook 2015–2019 Intel versions
No matter the age or model, if your MacBook has an issue, Fixcare has the solution.
The Fixcare MacBook Repair Process – What to Expect
We believe in a transparent and smooth customer experience. Here’s how our repair process works:
Step 1: Free Device Assessment
Walk in or schedule a free pickup. We assess your device using professional tools and share a detailed diagnosis—completely free.
Step 2: Quotation Approval
Once you get the quote, you can decide whether to go ahead with the repair. No pressure. No obligation.
Step 3: Professional Repair
Our team performs the repair using high-grade tools and genuine parts. Your MacBook is treated in an ESD-protected lab to ensure safety.
Step 4: Quality Testing
After repair, your MacBook undergoes multi-level quality checks to make sure every component works perfectly.
Step 5: Delivery & Support
Once approved, we’ll hand over your device or deliver it to your location. Every repair comes with a warranty card and future support.
Fixcare’s Reputation in Attibele – What Customers Say
⭐⭐⭐⭐⭐ "Fixcare helped me when my MacBook Air wouldn’t boot. They picked it up, fixed it in two days, and even optimized the software. Great service!" — Arjun S., Attibele Industrial Area
⭐⭐⭐⭐⭐ "The best MacBook repair service in Attibele! Fixed my water-damaged MacBook Pro without losing my data." — Megha R., Sarjapur Road
⭐⭐⭐⭐⭐ "Transparent, affordable, and professional. Highly recommend Fixcare to anyone with a damaged MacBook." — Rohit V., Electronic City Phase 2
Areas We Serve Near Attibele
Our service reach extends beyond Attibele into:
Chandapura
Anekal
Bommasandra
Hosur Road
Electronic City
Sarjapur
Jigani
Hebbagodi
Huskur
Dommasandra
Wherever you are in and around Attibele, our free pickup and drop service ensures help is just a call away.
FAQs – MacBook Repair in Attibele
❓ Can you repair older MacBooks like 2015 models?
Yes, we service all MacBooks from 2010 onwards, including rare and older models.
❓ Is your service center authorized by Apple?
We are an independent MacBook repair specialist using genuine parts and Apple-grade tools—but at nearly half the cost.
❓ How long does a screen or battery replacement take?
Typically, 2–4 hours, depending on stock and damage extent.
❓ Will I lose my data during repair?
Not usually. We take extreme care to retain your data. For logic board repairs, we offer data backup before proceeding.
❓ Do you charge for diagnosis?
No. Device inspection is free, even if you don’t go ahead with the repair.
Book MacBook Repair in Attibele Now
MacBook problems don’t have to mean downtime or heavy costs. Whether you’re a student, remote worker, business owner, or tech enthusiast, Fixcare delivers fast, honest, and high-quality MacBook repair in Attibele—right at your doorstep.
0 notes
Text
Data Recovery for Mac Hard Drive in Singapore — Specialized macOS Recovery
Mac systems are known for their sleek design and strong performance, but like any digital device, they are not immune to data loss. Whether it’s due to accidental deletion, drive failure, file system corruption, or a failed macOS update, losing data on your Mac can be both frustrating and disruptive. That’s where Intelligent Computer Services comes in. We provide specialized data recovery for Mac hard drive in Singapore, offering expert solutions tailored specifically for macOS devices.
Mac Data Recovery Backed by Experience and Expertise
At Intelligent Computer Services, we understand the complexities involved in recovering data from macOS environments. Unlike Windows-based systems, Mac devices use proprietary file systems like APFS and HFS+, as well as hardware encryption on newer models. Recovering data from these devices requires more than just standard tools — it demands deep technical knowledge, specialized software, and the right recovery environment. As a trusted name in data recovery services Singapore, we bring all of these elements together to provide successful outcomes even in the most complex Mac data loss cases.
Common Causes of Mac Data Loss
Data loss on a Mac can occur due to a wide range of reasons. Some users accidentally delete important files or format drives without realizing the consequences. Others encounter issues after a macOS update, where drives become unreadable or corrupted. Hardware failure, such as a malfunctioning SSD or a damaged external hard drive, is another common issue. In every scenario, our professional data recovery service is ready to step in with reliable, safe, and efficient recovery methods designed for Apple devices.
Complete Recovery Solutions for All Mac Devices

Hard Drive Failure Doesn’t Mean Permanent Loss
When a Mac hard drive fails, the situation may seem hopeless — but it’s not. Our specialists are trained in hard drive failure data recovery, and we have access to cleanroom environments for safe disassembly and repair of failed drives. Whether the failure is logical, mechanical, or due to power surge or water damage, we diagnose the root cause and apply the most effective solution for recovery. Our advanced techniques have made us a go-to provider for computer hard drive recovery across Singapore.
Why Mac Users Choose Intelligent Computer Services
As a leader in data recovery services Singapore, Intelligent Computer Services is known for combining technical expertise with customer care. We don’t just aim to retrieve your files — we aim to make the entire process stress-free. Mac users choose us because we understand the unique requirements of Apple systems, from M1 and M2 chips to encrypted APFS volumes. We deliver professional service with fast turnaround times, maintaining the highest standards of confidentiality and success.
Affordable Mac Data Recovery with No Hidden Charges
One of the biggest concerns Mac users have when seeking help is the potential cost. At Intelligent Computer Services, we offer affordable data recovery Singapore without compromising on quality. Our transparent pricing structure includes a free initial diagnostic, so you’ll know exactly what to expect before any work begins. And if we can’t recover your data, you don’t pay — because we believe in fair, results-driven service that puts our clients first.
Emergency Mac Data Recovery Available 24/7
When time is critical, our emergency data recovery service is available around the clock to help. Whether your Mac crashed hours before an important deadline or a business system has gone offline, we offer rapid diagnostics and recovery to minimize downtime. Our 24/7 availability ensures that you’re never left waiting for support, no matter when your data disaster occurs. For clients across Singapore, we are the trusted name in urgent Mac data recovery.
We’re More Than Just Mac Recovery
While Mac data recovery is one of our specialties, we also provide solutions for all kinds of storage devices. Our services include mobile memory card recovery, USB recovery, external drive repairs, and more. Whether you’re facing issues with a Windows PC or an Android device, our broad capabilities ensure that Intelligent Computer Services remains your one-stop shop for all professional data recovery service needs in Singapore.
Contact Intelligent Computer Services Today
If your Mac has suffered a data loss, don’t attempt risky DIY fixes that could make things worse. Let the experts at Intelligent Computer Services help. With our specialized tools, trained technicians, and industry-leading methods, we offer the most reliable data recovery for Mac hard drive in Singapore. Reach out to us today for a free consultation and let us help you recover what matters most.
Visit us for more information :- data recovery specialist
data recovery experts
best hard drive recovery service
best ssd data recovery service
memory card data recovery service
0 notes
Text
Price: [price_with_discount] (as of [price_update_date] - Details) [ad_1] Product Description Product Specification: Material: Aluminum alloy, ABS Interfaces: 1* USB 3.0 & 3* USB 2.0 Connector: USB Type-C Dimensions: 108 x 40 x 12mm (L x W x H) Cable Length: 145mm Tips: Mouse: 100mA Portable hard disk: Max. 500mA USB 3.0 portable hard disk: Max. 900mA Keyboard: Max. 500mA - For best performance, devices connected to this hub should not exceed total current of 500mA maximum. Otherwise, output current may become unstable or disconnected. - Devices below are often rated as follows for your reference. -This hub has 1 USB3.0 port and 3 USB2.0 ports, and does not support Mac M1 system! If your MacBook Pro/MacBook Air is M1 system (M1 chip), please do not choose this product!!! We have more suitable products for you to choose !!!If you are not sure whether your Mac is M1 system,please go to the official website to inquire or consult us,thank you! - Please double check the current of your devices before connecting to the hub. - If you have any issue with your product, please kindly let us know and our team will reply you within 24 hours. FAQs: Q1: Does it work with macbook air m1 2020 model ? Yes, this hub can work with macbook but not work with macbooks which are M1 Pro chip &M1 Max chip! Q2: Its connect with mobile phone's? Yes!This hub can connect to your type-c devices Q3: Does it have usb3.0 port? Yes,this hub has 1 usb3.0 port and 3 usb2.0 ports! High Quality USB C Hub USB C hub expands 1 to 4 ports, enable your type-c phone/pc/laptop connecting up to 4 USB devices at the same time;Brings you more productivity! Supports Memory sticks, hard disk, mouse, keyboard, digital cameras, camcorders, speakers, scanners, card readers etc. Super High-Speed Transmission Support fast data transfer up to 5Gbps(1 USB3.0) and 480 Mbps(3 USB2.0),allowing yo to easily transfer movies,music and files within a few seconds. Widely Used High speed thunderbolt hub for your PC, MacBook, iMac, Surface Pro, XPS,Type-c Smartphone.Compatible with mainstream operating systems, support hot swap, plug and play, no driver.
Add to Cart Add to Cart Add to Cart Customer Reviews 3.8 out of 5 stars 1,444 4.0 out of 5 stars 2,404 3.9 out of 5 stars 730 3.8 out of 5 stars 88 3.7 out of 5 stars 36 3.8 out of 5 stars 5 Price ₹329.00₹329.00 ₹1,110.00₹1,110.00 ₹1,739.00₹1,739.00 — no data — no data — no data Ports 4 6 6 5 5 4 HDMI Port (4K @ 30Hz) no data ✓ ✓ no data no data no data SD / TF Slot no data ✓ ✓
✓ ✓ no data USB3.0 1 1 1 1 1 1 USB-C PD Input no data no data ✓ no data no data no data Type-C Port no data no data no data no data no data ✓ 4 Ports USB C Hub: USB extension hub expands 1 to 4 ports which are 1 usb3.0 and 3 usb 2.0, enable your type-c phone/pc/laptop connecting up to 4 USB devices at the same time;Brings you more productivity! Supports Memory sticks, hard disk, mouse, keyboard, digital cameras, camcorders, speakers, scanners, card readers etc. (1* USB 3.0 & 3* USB 2.0) 5Gbps Data Transfer: High speed thunderbolt hub for your PC, MacBook, Mac Pro, Mac Mini, iMac, Surface Pro, XPS,Type-c Smartphone. Data transmission speed up to 5Gbps, 10x faster than USB 2.0. The cable uses tinned copper wire as the transmission conductor to reduce the loss while transferring data. You can transfer HD movies or files in just minutes. Multi USB Charger: Integrated USB cable for connection to the computer, power is supplied via PC/laptop USB C socket. Can charge your phone while transit data. (Note: The charging speed is slower that your professional phone charger) Ideal on The Go: This compact and slim type c usb hub is your ideal work helper during the business trip. Take your usb type c connector with you wherever you go. Light weight, compact travel format, easy to carry in laptop bags or backpacks. One fit almost different devices' need. Safe and Stability:This usb c hub for type-c devices designed with built-in surge protection to keep your devices safe. The overload protection for voltage and current protects the HUB and all connected devices. [ad_2]
0 notes
Text
MacBook Pro 2019 in 2025: Should You Still Buy It?

If you're eyeing a MacBook Pro 2019 but wondering if it’s too old in 2025, you’re not alone. With Apple’s shift to M-series chips, is this Intel-based MacBook still worth it?
At Exact Solution Electronics, we’ve tested, refurbished, and sold countless MacBook Pro 2019 models—and here’s the real talk on whether it’s a steal or a skip.
Why the MacBook Pro 2019 is Still a Contender
1. The Display is STUNNING (Even in 2025)
13-inch or 15-inch Retina display with True Tone
500 nits brightness – perfect for designers & video editors
P3 wide color for vibrant, accurate visuals
"Once you go Retina, you can’t go back."
2. Performance That Handles Heavy Workloads
Up to 8-core Intel Core i9 (Turbo Boost up to 5.0GHz)
32GB RAM – smooth multitasking for pros
4TB SSD – lightning-fast storage
✅ Great for: ✔ Video editing (Final Cut Pro, Premiere) ✔ Coding (Xcode, Docker) ✔ Graphic design (Photoshop, Illustrator)
3. macOS + Windows? Yes, Thanks to Boot Camp!
Unlike newer M-chip Macs, the 2019 model supports Boot Camp, meaning you can run Windows natively—a big win for developers and gamers.
4. The Keyboard is… Actually Fixed!
Apple tweaked the butterfly keyboard in 2019 to reduce failures. It’s not perfect, but it’s way better than 2016-2018 models.
The Downsides (Let’s Be Real)
❌ No M1/M2 Efficiency – Battery life & raw speed can’t match Apple Silicon. ❌ Runs Hot Under Load – Intel chips get toasty during heavy tasks. ❌ Limited Ports – Still stuck with only USB-C/Thunderbolt 3 (dongle life).
Who Should Buy a MacBook Pro 2019 in 2025?
✔ Best For:
Budget-conscious pros who need macOS + Windows
Creators who want a cheaper Mac with a great display
Students/developers who need x86 app support
✖ Avoid If:
You want M1/M2 battery life & speed
You hate carrying dongles
You need future-proof performance
Where to Get the BEST Deal?
At Exact Solution Electronics, we offer: ✅ Certified refurbished MacBook Pro 2019 (like-new condition) ✅ Full testing & warranty (peace of mind) ✅ Big savings vs. buying new
👉 Check our latest stock here: https://www.exactsolutions.pl/search?q=macbook+pro+2019
Final Verdict: Still a Solid Buy?
Yes—if you need an affordable, powerful Intel Mac! While it’s not the latest, the MacBook Pro 2019 remains a great value for pros on a budget.
Want a reliable one? Exact Solution Electronics has you covered.
0 notes
Text
Best Browser For Mac In 2025: Top Picks For Speed, Privacy & Features

Selecting the best Mac browser in 2025 isn't as easy anymore. As Apple's hardware technology is improving at lightning speeds with its M-series chips and macOs updates, the browser that you opt for can literally influence your Mac's performance, battery life, and overall experience. If you're a speed-conscious user, an avid privacy freak, productivity-feature lover, or just need perfect integration within Apple's ecosystem, there exists the ideal browser designed specifically for your needs.
In this definitive guide, we'll examine the leading browser options for Mac users in 2025 side by side in terms of speed, privacy, features, and compatibility. If you're curious about what is the best Mac browser, or merely in search of an upgrade to your current configuration, you've come to the right place.
Why Picking the Best Browser for Mac is Important in 2025
Before diving into our top picks, let’s talk about why this decision matters more than ever:
macOS Ventura and Beyond: Apple’s latest operating systems come with performance optimizations, but not all browsers are updated fast enough to take advantage.
M1, M2, and M3 Chips: These chips are fast and efficient, but some browsers are better optimized for Apple Silicon than others.
More Emphasis on Privacy: In 2025, browser-based privacy capabilities become mandatory, particularly with more tracking and AI-based ads.
Developer Requirements: As a developer who utilizes software such as Keploy.io to test apps, you'd need a browser that enables debugging, performance tracking, and automation optimally.
If you're a developer or QA engineer looking to test your applications across different browsers, be sure to check out our guide on how to use Keploy.io for automated API testing. It’s a powerful open-source tool that simplifies the testing workflow and integrates smoothly with browsers like Chrome and Firefox—making it an ideal companion for modern browser-based development.
What Is the Best Browser for Mac in 2025?
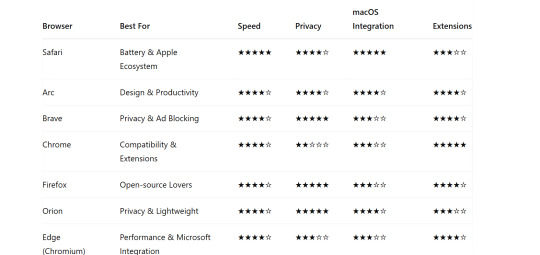
Let's break them down.
Safari – The Built-in Hero of Mac Users
Best For:
Users of the Apple ecosystem
Battery efficiency
Smooth macOS experience
Apple's Safari has grown to become one of the fastest and most battery-frugal browsers available on the Mac platform. In 2025, it's smoother than ever. Due to extensive integration with macOS Ventura and Sonoma, Safari is unrivaled for those who appreciate performance and battery life.
Key Features:
Optimized for M1, M2, and M3 chips
Native iCloud sync
Integrated anti-tracking technology
Passkeys for password-free logins
Cons:
Fewer extension support than Chrome or Firefox
Less customizable look
If you're wondering, "What is the best browser for Mac if I want a native experience?" Safari remains the best answer.
Best For:
Multitaskers
Creatives and designers
Minimalist fans
Arc, from The Browser Company, is revolutionizing the way we approach browsers. It's quick, stunningly designed, and incredibly handy for users who reside in tabs. It features a sidebar UI, instant notes, and integrated tools such as split view, which feels native to macOS.
Key Features:
Spaces for work/life browsing organization
Integrated tools such as notes, screen capture
Privacy-first defaults
Apple Silicon optimized
Downsides:
Fewer extensions (although increasing)
Learning curve if you're accustomed to classic UI
In 2025, Arc is one of the best browsers for Macs if your workflow is visual, creative, or research-heavy.
Best For:
Privacy-conscious users
Built-in ad and tracker blocking
Crypto-savvy users
Brave has been laser-focused on privacy, and that mission hasn't changed in 2025. With built-in ad blocking, anti-tracking, and Tor support, it's one of the most secure mainstream browsers available.
Key Features:
Shields for trackers, cookies, and fingerprinting
Brave Rewards (earn crypto while surfing)
Tor integration for private surfing
Lightning-fast performance
Cons:
A little more RAM-hungry than Safari
Crypto features might be overkill for non-technical users
If your number one priority is safeguarding your data online, Brave could well be the best browser for Mac for you.

Best For:
Extension enthusiasts
Google Workspace users
Developers
Though notorious for gobbling up RAM, Chrome is still as popular as ever for a reason. Chrome in 2025 still provides a solid, feature-filled experience and the most extensive collection of extensions.
Features:
Top-of-the-line developer tools
Sync with Google account
Quick updates and frequent features
Works well with web apps
Drawbacks:
High battery drain
Less private out of the box
If you're a developer developing for platforms such as Keploy.io, Chrome is difficult to overcome due to its performance features and DevTools integration.

Best For:
Privacy with flexibility
Open-source enthusiasts
Power users
Firefox continues to be an open web standard champion and defender of user privacy. In 2025, it provides a speedy, feature-laden, and highly customizable experience.
Key Features:
Improved Tracking Protection
Container tabs for various identities
Frequent updates from Mozilla
Developer-friendly and open ecosystem
Downsides:
Less tightly integrated with macOS
Slower to implement some web standards
If you're fed up with Big Tech and desire a more open browsing experience, Firefox is perhaps the greatest browser for Macs in that respect.

Best For:
Lightweight browsing
Privacy without the noise
Apple device users
A hidden gem, Orion by Kagi is a Safari-based browser with support for Chrome and Firefox extensions—yes, both! It's lightning fast and memory-light, making it perfect for MacBooks.
Key Features:
Chrome/Firefox extension support
Native Apple Silicon performance
Zero telemetry
Private by default
Downsides:
Still in active development
Small community
For those wondering "What is the best browser for Mac that's fast, private, and minimal?"—Orion is a serious contender.

Best For:
Microsoft ecosystem users
Smooth performance
PDF reading and inking
Yes, Microsoft Edge on Mac is good. From Chromium, it's fast, has Chrome extension support, and throws in nifty features such as vertical tabs, collections, and even split-screen view.
Key Features:
Coupon and price comparison software built-in
Immersive Reader mode
Smart tab management
Good Office 365 integration
Downsides:
Not Apple-native
Sync features are Microsoft-centric
If you're in a hybrid Microsoft/Apple environment, Edge is an argument worth considering.
Developer Bonus:Top Browsers for Testing Apps such as Keploy.io

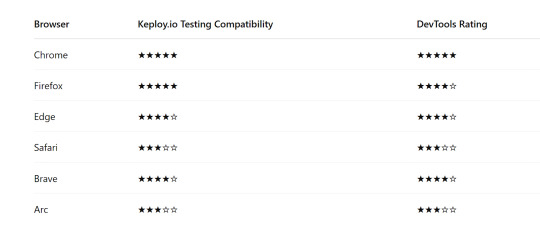
Pro Tip:
Debug API responses, automated testing using Puppeteer or Selenium, and console log monitoring when integrating Keploy.io using Chrome or Firefox.
Final Conclusion : What Is the Best Browser for Mac in 2025?
There isn't one winner, but here's the rundown depending on your needs:
Best Overall for Most Users: Safar
Best for Privacy: Brave or Orion
Best for Productivity: Arc
Best for Developers: Chrome
Best for Open-Source Advocates: Firefox
Ultimately, the top browser on Macs in 2025 is the one that suits the way you use the web—whether you're working, designing, building, or just browsing for fun.
Try It Yourself Want to test your browser's capabilities for application testing? Try testing your app using Keploy.io, an open-source testing platform capable of automatically generating test cases from API calls and working in harmony with several browsers.
Shorts: Best Browser on Macs in 2025
Safari – Ideal for battery and MacBook users
Arc – Ideal for UI/UX and creative workflow
Brave – Ideal privacy-first option
Chrome – Ideal for developers and extension enthusiasts
Firefox – Ideal open-source solution
Orion – Ideal minimalistic, privacy-centric browser
Edge – Ideal Chromium-based offering with Microsoft benefits
Regardless of your choice, maintain your browser updated and with a configuration in sync with your needs. Good browsing!
FAQ’S
1. What is the best browser for Mac in 2025? Safari remains the best overall browser for Mac in 2025 due to its seamless macOS integration, fast performance, and energy efficiency. It’s optimized for Apple hardware, preserving battery life and system resources. Safari also features strong privacy protections with Intelligent Tracking Prevention. For most Mac users, it's the ideal balance of speed, security, and usability.
2. Which browser offers the best privacy features on Mac? Brave stands out as the best privacy-focused browser for Mac in 2025. It blocks ads and trackers by default and includes built-in Tor browsing. You also get detailed privacy reports and customizable shield settings. Brave ensures your online activity stays private without needing extra plugins.
3. What browser is fastest for Mac users in 2025? Google Chrome continues to be the fastest browser for heavy-duty tasks and web apps. It excels in speed, especially for sites reliant on JavaScript or web-based tools. However, it may consume more RAM and battery on Macs compared to Safari. Choose Chrome if performance is your top priority and resources aren't a concern.
4. Are there browsers designed specifically for developers or power users on Mac? Yes, browsers like Arc and Orion are gaining popularity among Mac power users. Arc offers a creative UI, tab organization, and seamless workspace switching. Orion is lightweight, privacy-first, and supports Chrome and Firefox extensions. These browsers cater to users who need more than just basic web browsing.
0 notes
Text
Reliable MacBook Repair in Horamavu – Expert Solutions at Machub for Every Mac Issue
If you are a MacBook user living in or near Horamavu, Bangalore, you know how crucial it is to have a reliable device for work, study, or creative pursuits. MacBooks are known for their performance and durability, but like any electronic device, they can encounter problems over time. Whether it’s a cracked screen, battery issue, keyboard malfunction, or software glitch, you need a repair center that understands the intricacies of Apple devices. That’s where Machub comes in. At Machub, we offer professional, Apple-grade MacBook repair in Horamavu, ensuring your device is restored to perfect working condition with precision and care.
In this article, we will explore the common MacBook issues, why Machub is the best choice for repairs, and what makes our services stand out in Horamavu.
Common MacBook Problems We Fix at Machub Horamavu
No matter how carefully you use your MacBook, issues can arise due to age, wear and tear, accidental damage, or software conflicts. Here are some of the most frequent MacBook problems we handle at Machub:
✅ Cracked or Damaged Display: Dropped your MacBook or closed it on an object accidentally? A broken screen not only affects visibility but can also lead to further damage. Machub offers quick and precise screen replacements with genuine parts.
✅ Battery Draining Fast: Is your MacBook battery not holding charge or draining too quickly? We provide battery health diagnostics and replacements using top-quality Apple-grade batteries.
✅ Keyboard and Trackpad Issues: Sticky keys, unresponsive keyboard, or faulty trackpad? Our experts can clean, repair, or replace these components, restoring smooth functionality.
✅ Logic Board Failures: MacBook logic board repairs require advanced skills. Our trained technicians can diagnose and repair logic board faults, saving you from expensive replacements.
✅ Liquid Damage: Accidental spills are common, but they can be disastrous for your MacBook. At Machub Horamavu, we offer deep cleaning, component-level repairs, and part replacements for liquid-damaged MacBooks.
✅ Slow Performance and Software Glitches: From macOS upgrades gone wrong to malware or corrupt files slowing your system, we provide software troubleshooting, data recovery, and system optimization.
✅ Ports, Hinges, and Casing Repairs: Physical wear and tear can cause loose hinges, dented casing, or malfunctioning USB/charging ports. Our team ensures your MacBook looks and works as good as new.
Why Choose Machub for MacBook Repair in Horamavu?
Here’s what makes Machub the preferred choice for MacBook users in Horamavu:
🌟 Apple-Grade Expertise: Our technicians are highly trained in Apple device repairs, with years of experience in fixing all MacBook models, including MacBook Air, MacBook Pro (Retina, M1, M2), and more.
🌟 Use of Genuine Parts: We believe in quality and longevity. That’s why we use only genuine or top-tier compatible parts, ensuring your MacBook functions reliably post-repair.
🌟 Free Pickup and Delivery in Horamavu: Your convenience matters. We offer free doorstep pickup and delivery for MacBook repairs in and around Horamavu, saving you time and effort.
🌟 Quick Turnaround: We understand how important your MacBook is to your daily life. Our streamlined process ensures fast diagnosis and repair, often within 24-48 hours for most issues.
🌟 Transparent Pricing: With Machub, there are no hidden charges. We provide detailed estimates upfront and ensure you approve the repair before we proceed.
🌟 Warranty on Repairs: We stand by our work. Most MacBook repairs at Machub come with a warranty period, giving you peace of mind.
Our MacBook Repair Process at Machub Horamavu
At Machub, we follow a customer-first process designed for maximum transparency and efficiency:
1️⃣ Booking the Repair: Call us or book online to schedule a repair. Our team arranges free pickup at a time that suits you.
2️⃣ Diagnostics: Once your MacBook reaches our center, we perform a comprehensive diagnostic test to identify all underlying issues.
3️⃣ Estimate Sharing: We provide a clear repair estimate and seek your approval before starting the work.
4️⃣ Expert Repair: Our technicians use specialized tools and follow Apple-recommended protocols for every repair.
5️⃣ Quality Check: Before returning the device, we conduct a multi-point quality check to ensure everything works perfectly.
6️⃣ Delivery: Your MacBook is safely delivered back to your doorstep. You pay only after you’re satisfied with the repair.
MacBook Models We Repair in Horamavu
Machub caters to all MacBook models, old and new:
🔹 MacBook Air (2010-2024) 🔹 MacBook Pro (13", 14", 15", 16", Intel, M1, M2 models) 🔹 MacBook Retina 🔹 MacBook 12-inch
No matter your MacBook model, we have the expertise to bring it back to life.
Customer Testimonials – Why Horamavu Trusts Machub
💬 “I had a liquid spill on my MacBook Pro, and Machub saved it. Their service was fast, affordable, and professional. Highly recommended!” – Anil R., Horamavu
💬 “Machub replaced my MacBook Air battery in record time. Loved the free pickup and delivery!” – Sneha M., Ramamurthy Nagar
💬 “I was worried about data loss, but Machub recovered all my files and fixed my MacBook. The team was friendly and transparent.” – Vikas P., Horamavu Agara
Tips to Keep Your MacBook in Top Shape
👉 Use a good protective case: Prevent physical damage from accidental drops. 👉 Avoid overcharging: Prolong your battery health by unplugging after a full charge. 👉 Keep liquids away: Be extra careful with beverages around your MacBook. 👉 Update macOS regularly: Stay protected with the latest security patches. 👉 Get periodic checkups: Visit Machub for preventive maintenance to avoid costly repairs later.
Service Areas Around Horamavu
Machub not only provides MacBook repair in Horamavu, but also caters to surrounding areas:
✅ Ramamurthy Nagar ✅ Kalyan Nagar ✅ Banaswadi ✅ Kasturi Nagar ✅ KR Puram ✅ Babusapalya ✅ TC Palya ✅ Outer Ring Road (near Horamavu)
Wherever you are near Horamavu, we’re just a call away.
Conclusion: The Best MacBook Repair Service Near You
Your MacBook deserves the best care, and Machub Horamavu is here to deliver it. With expert technicians, genuine parts, transparent pricing, and customer-first service, Machub is the trusted name for MacBook repair in Horamavu. Don’t let MacBook issues slow you down — contact Machub today and experience hassle-free, professional Apple repair services right at your doorstep.
0 notes
Text
Gus Mueller on Apple and AI
Gus Mueller argues that Apple needs to support developers running LLMs locally on the Mac, rather than simply try to catch up on their own.
There isn’t one specific quote that I can pull out of Gus’ post that makes his point so do go and read his post. But he also said:
So I can run models locally on my M1 Mac, and while it’s not as fast as running it on Anthropic or OpenAI’s servers, it was still usable. Which is mind blowing to me. I honestly never expected to see this tech in my lifetime. (Yes, LLMs get a lot wrong, but they also get so many things right and help me out with tedious coding chores).
I prefer running LLMs locally. I ran them on my Intel based Mac and now on this M4 based Mac it is so much nicer. The models are getting smaller and more capable, the tooling is steadily improving, and the chips in our computers are amazing. So let us run them locally! Natively! Securely!
I have more to write about LLMs. They are amazing and infuriating, an abomination and a revelation, a coup and a boon, a bubble and a burst – all at the same time.
0 notes