#login netgear wifi extender
Text
An easy way to Netgear Wi-Fi Extender login

Generally, Netgear extenders are well-known for their network coverage and fastest speed. Likewise, it is an excellent choice with affordable pricing. In addition, this gadget is easy to install and use but if you want to make the most of your Netgear extender, then know about the login process first.
You can access the login page using the Netgear Wi-Fi extender login web interface or through the Nighthawk app. Here, in this post, we will share the essential info and detailed steps to ease this login operation for you.
Essentials we need to access the Netgear login page
Netgear extender
Stable internet connection
Ethernet cable
Admin login details
Web or IP address
Smart Device
How to log in to the Netgear Wi-Fiextender?
Moreover, logging in to the Netgear extender is a relatively easy task but new users need help with it. So, we share the essential and detailed steps for how to log in to the Netgear extender. Let’s have a look:
Login to the Netgear Wi-Fi extender login using the web address
To start with, power on your extender and check LED turns on.
Firstly, connect your extender network to the device.
Now, open the web browser and enter Mywifiext.net or 192.168.1.250 IP address.
A login window will appear and ask for the admin details.
Now, type your admin username and password, and press Login.
After that, you will see the Set up wizard here where you can access the network settings like password, guest network, etc.
Conclusion
All in all, if you are trying to Netgear Wi-Fi extender login through the web address, then the steps mentioned above will surely help you. If you need more info regarding both the login methods or troubleshooting steps for login errors, then make us a call or visit our website.
1 note
·
View note
Text
Netgear Extender Login
To log in to your Netgear extender, you will need to know the default username and password. The default username is usually "admin" and the default password is usually "password".
1.Once you have logged in, you will be able to access the extender's settings. Here, you can change the extender's SSID, password, and other settings.
2.You can also use the extender's settings to troubleshoot problems with your WiFi network. For example, you can use the extender's settings to check for interference or to change the extender's channel.
3.If you have forgotten the default username or password for your Netgear extender, you can reset the extender to its factory defaults. This will erase all of the extender's settings, including the username and password.
4.To reset the extender, press and hold the reset button for about 10 seconds. Once the reset button is released, the extender will be reset to its factory defaults.
5.Once the extender is reset, you will need to log in with the default username and password. You can then change the username and password to something that you will remember.
4 notes
·
View notes
Text
Netgear Ex6110 Setup
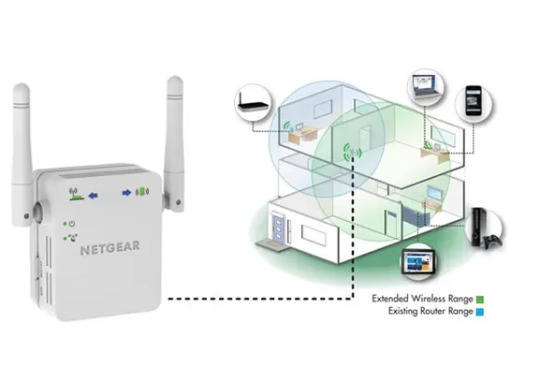
The Netgear EX6110 WiFi extender Setup is a small, powerful device made to increase connectivity and Wi-Fi coverage in your house or office. Better speed and less interference are guaranteed because it uses both the 2.4GHz and 5GHz bands of spectrum. The Netgear Installation Assistant is often used to connect to an existing Wi-Fi network during the straightforward setup process. Its wall-plug design makes deployment simple, and external antennae are included for better performance. An extended network that is secure can be established with the Netgear EX6110 setup thanks to features like Wi-Fi Protected Access (WPA/WPA2-PSK) security. This extender provides smooth, extended Wi-Fi coverage over your region by eliminating dead spots.
How do I set up the Netgear EX6110 wifi extender?
Follow these instructions to Your Netgear EX6110 extender setup via manual method:
Connect the EX6110 extender to an electrical socket close to your current Wi-Fi router. Permit it to turn on.
Navigate to your computer or mobile device's Wi-Fi settings and sign up for the "NETGEAR_EXT" network.
the connected device’s web browser should be opened.
Press Enter after entering “www.mywifiext.net setup” in the address bar.
Create a new account or sign in with your existing Netgear account if asked to do so.
Through the setup procedure, the Netgear Installation Assistant will direct you. obey the instructions that are displayed on the screen.
After choosing the desired Wi-Fi network, enter the password. Press “Next.”
Connect your devices to the extended Wi-Fi network, which is frequently denoted by a number and the characters "EXT."
Note: Receive professional setup assistance for your Netgear devices, exclusively provided by mywifiext setup.
Netgear EX6110 extender setup via wps
The Netgear EX6110 WiFi setup using wps by performing the following steps:
After inserting the EX6110 extender into an electrical socket, wait for it to switch on.
Press the WPS button located on the side of the EX6110. The extender’s WPS LED will begin blinking.
In two minutes, press the WPS button on your existing WiFi router.
As soon as the extender successfully connects to your router, the WPS LED on the device will turn solid green.
If required, relocate the connection to an area with the strongest Wi-Fi signal.
To connect your computer, smartphone, or tablet to the expanded Wi-Fi network, use the SSID and password on the extender.
Netgear ex6110 extender firmware update
To update the firmware on your Netgear EX6110 wifi extender, follow these steps:
Verify that your computer or mobile device is connected to the Netgear EX6110 extender's network.
the connected device’s web browser should be opened.
Enter “mywifiext.ne setup” in the address bar and hit Enter.
To sign in, enter your username and password. If you haven't made any special login credentials, use the default ones, which are often "admin" and "password."
In the extender settings menu, look for a “Firmware Update” or “Software Update” option. Click it to check for updates.
If there's a firmware update available, download it and follow the instructions on the screen to install it.
Give the extender time to finish updating its firmware. This might require a reboot.
After the update is complete, verify that the firmware has been successfully updated to the most recent version.
Updating the firmware of your extender to the most recent version will guarantee optimal performance, security, and feature enhancements.
How do I reset Netgear Ex6110?
Follow these procedures to reset the Netgear EX6110 WiFi extender to its factory preset settings:
To reset your Netgear EX6110 extender, locate the reset button. Usually, the extender has a little hole on the side or rear with the word “Reset” written in it.
Press and hold the reset button for about 10 seconds, or until the power LED blinks, using a paperclip or any similar object.
Once the power LED begins to blink to signal that the reset procedure has started, release the reset button.
Give the extender a chance to return to its default settings. This procedure could take a short while.
Use the default SSID and password to rejoin the extender’s Wi-Fi network after the reset is finished. Setting up the extender from scratch will be required, including configuring your Wi-Fi network settings.
After successfully restoring your Netgear EX6110 extender to factory settings, you may now set it up as if it were a brand-new gadget.
#mywifiext setup#mywifiext.net setup#netgear extender setup#netgear wifi extender setup#mywifiext.net login#mywifiext net setup#Netgear Ex6110 Setup
0 notes
Text
Netgear wireless extender login
The Netgear wireless extender login is a crucial step in enhancing and optimizing your home or office network. Designed to boost the existing Wi-Fi signal range, Netgear extenders require a seamless setup process, and the login interface serves as the gateway to configuration. To initiate this process, connect your extender to a power source and access its default network using a device like a computer or smartphone. Once connected, open a web browser and enter the default login web address or the extender's IP address. This prompts the Netgear extender login page, where users input their credentials, typically a username and password. After successful authentication, users gain access to the extender's settings, enabling them to customize network parameters, update firmware, and optimize performance. A user-friendly interface ensures a smooth Netgear wireless extender login experience, empowering individuals to tailor their network extension according to specific needs and preferences.
#Netgear wireless extender login#Netgear extender setup#netgear wifi extender setup#netgear extender set up#netgear extender setup wizard#netgear extender not working#wifi extender login netgear#netgear wireless extender login
1 note
·
View note
Text
mywifiext.net login
Are you struggling to extend your Wi-Fi reach and conquer those dead zones? Well, fret no more, weary traveler! Your journey to seamless connectivity begins with mywifiext.net login. This hidden portal holds the key to unlocking the true potential of your NETGEAR WiFi extender.
But where do you even begin? Don't worry, we've got you covered. This handy guide will equip you with all the knowledge you need to navigate the mywifiext.net login process like a pro.
Step into the portal:
Open your favorite web browser on your laptop or PC.
Type in the magic address: mywifiext.net or mywifiext.local. This is your gateway to the extender's inner sanctum.
Press enter and brace yourself! You'll be greeted by the mywifiext.net login screen.
Now comes the moment of truth:
Enter your username. This is usually the default username printed on a sticker on the extender itself. If not, it's often admin.
Password, please! This is also printed on the sticker. If you changed it, enter your custom password instead.
0 notes
Text
#netgear wifi extender login#netgear wifi extender setup#exteneder setup#mywifiext#mywifiext.net#mywifiext login
1 note
·
View note
Text
How to Update Netgear Ex6110 Ac1200 Firmware Version? Netgear Extender Software Update
youtube
___________________________________________Netgear Ex6110 Ac1200 Extender #Firmware Update can be done by logging in to the netgear extender web management page. So, first connect your computer/laptop to netgear ext network name and then type mywifiext.net into the url. In case you cant update netgear extender firmware then follow our step by step guide to complete #ex6110 firmware update.Do Like And Subscribe If The Video Was Useful To Support My Channel!!!Our Official website for Technical help:- https://devicessetup.comDownload Netgear Extender Latest Firmware File From here :- https://downloadcenter.netgear.comNetgear Wifi Extender Setup SCAM :- https://youtu.be/Mr4zMKXhLBcNetgear Ex6110 setup guide :-How to Login Into Wifi Extender Using Its Ip Address:- https://youtu.be/Iszz2Oyna4EHow to reset netgear ex6110 extender :- https://youtu.be/c8i3ryUpyCQHow to setup netgear extender as access point or using ethernet cables :- https://youtu.be/uxce3UpK3uoHow to turn Netgear Extender Leds On or Off? :- https://youtu.be/5LWIo9NlsqM----------------------------**FAIR USE**Copyright Disclaimer under section 107 of the Copyright Act 1976, allowance is made for “fair use” for purposes such as criticism, comment, news reporting, teaching, scholarship, education and research.Fair use is a use permitted by copyright statute that might otherwise be infringing.Non-profit, educational or personal use tips the balance in favor of fair use.--------------------#netgearextenderfirmwareupdate #netgearex6110#ex6110ac1200 #netgearextenderex6110 #netgearexthelp #wifiextender #wifirepeater #diy #technicalhelp #netgear #devicessetup
1 note
·
View note
Text
In order to access the Netgear router password not working issue, one needs to put the admin login password to use. However, what if the routerlogin.net admin password does not work for you? Well then, you will not be able to log in to your networking device.
#router setup#routersetup#netgear router not working#netgear router setup#netgear wifi extender login
0 notes
Text
Top Ways to Fix Netgear Wifi Extender Orange Light
You can easily add multiple devices with the Netgear extender. When using the extender, there is no dead zone in your location. You will also get fast speed of the network and it also increases the performance of your device. Most of the time, the extender works well, but sometimes Netgear wifi extender orange light issue occurs. When this issue appears, it usually indicates that it is not connected to the router properly.
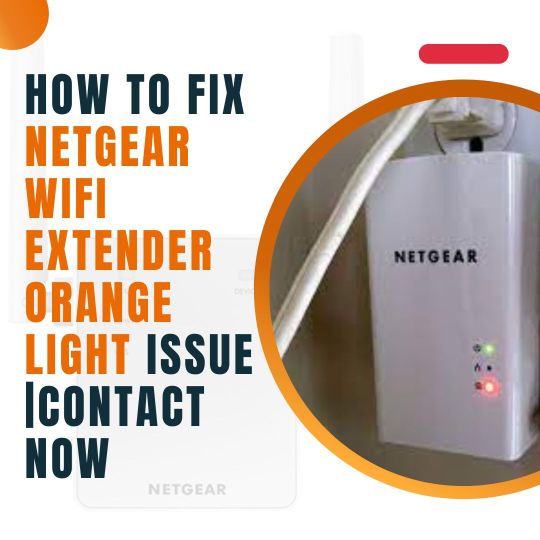
Causes of the Netgear Wifi Extender Orange Light
Several factors can cause the Netgear Wifi extender orange light. When the extender is orange, it is not receiving a strong enough signal from the main router. There may be interference from other electronics or too much distance between the extender and the router. Move the extender closer to the router, turn it off, or move other electronic devices away from the extender to fix the issue. A stronger signal from the main router will allow the extender to connect appropriately. The primary reasons are:
Power supply malfunctions are possible.
There is something wrong with your Ethernet cable.
Sometimes users use outdated Netgear extender firmware.
There is also a chance of technical glitches.
Sometimes there is signal interference.
There was an error in your Netgear extender setup.
There are problems with the placement of Wi-Fi devices.
Now you can quickly solve the Netgear wifi extender orange light issue.
Ways to Fix Netgear Wifi Extender Orange Light
You can use the below methods to fix the Netgear Wi-Fi extender orange light. You must follow them properly.
Reboot Your Netgear Extender
The first thing you need to do is restart your Netgear wireless range extender. Your device might be fixed by rebooting if you are experiencing orange light issues. To save time, avoid other troubleshooting tips.
The Netgear range extender needs to be turned off.
Plugging it into a wall outlet is no longer necessary.
You only need a few seconds.
You can use it once you have connected it to an electrical outlet.
After this, you can check whether the Netgear wifi extender orange light issue is solved or not.
Update Netgear Extender Firmware
Keeping Netgear firmware up-to-date is always a good idea. Your Netgear WiFi extender's orange light issue can be resolved by updating its firmware. Follow these steps to get started:
It is necessary to update the web browser installed on your device.
Setup instructions for a Netgear extender are provided on this page.
Choosing Firmware Update from Settings > Maintenance will update the firmware.
There are now firmware updates available.
Now you can click to access it.
Here, you can wait a few minutes until the firmware update.
Here you can also check if the Netgear WiFi extender orange light problem is fixed or not.
Check the Ethernet Connection
It is necessary to connect the Netgear extender to the router. You don't need to tighten or replace your cables. You won't waste your time if your Ethernet cable is damaged. Users can be replaced as soon as possible. Replace the cable on your Netgear wifi extender to see if the orange light is solved or not.
Check Power Supply
A common problem with Netgear extenders is faulty or damaged power outlets. Power outlets must be checked regularly. Power can also be provided to the extender by replacing a wall socket. As a result, faulty power outlets can damage the extender by not providing enough power to operate it. By replacing the wall socket, you can ensure that the extender gets the power it needs to work.
Reset Your Netgear Extender
Netgear WiFi extender with orange lights can be reset to factory defaults to resolve the issue. You may try this if you have tried all the troubleshooting tips listed above. It is necessary to follow several steps to make this process successful. It removes all extension settings as well as allowing a reset.
A factory default reset will restore the extender's functionality and restore its original settings. You can identify any software-related issues causing the orange light issue and resolve them. By doing this, you can troubleshoot hardware-related issues with a fresh start.
You must first locate the reset button on your Netgear extender.
You can reset the button with a safety pin if it needs to be reset. Use the safety pin to firmly press the reset button on the machine to reset it.
It is also crucial to wait a few minutes until the reset process is complete. To fix the orange light on the Netgear wireless extender, it takes a few minutes after the reset process.
It is also imperative to set up your Netgear extender perfectly and seamlessly network.
Wrap Up
You can use the above methods to fix the Netgear wifi extender orange light issue. It is also important for users to follow all the steps properly.
#Netgear wifi extender orange light#why does my netgear router have an orange light#Netgear WiFi Extender login
1 note
·
View note
Text
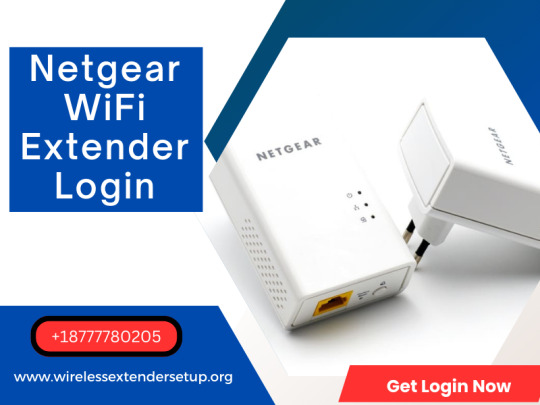
Ultimate Guide on Netgear WiFi Extender Login

Netgear WiFi Extenders are devices that help to extend the range of your existing WiFi network. To Netgear wifi extender login to your extender, you will need to enter the IP address of the device into a web browser. Once you have done that, you will be prompted to enter the username and password associated with the device to gain access. This is necessary because the device provides an additional layer of security to ensure that only authorized users can access your WiFi network. By entering your username and password, you are confirming your identity and giving yourself access to the extended network.
With the Netgear extender login page at www.mywifiext.net or the Netgear wifi extender IP address 192.168.1.250, you can manage your extender settings. It is necessary to connect to the Netgear extender network to log in to the mywifiext extender. Netgear extender settings can be accessed by entering the username and password. By clicking on the "forget password" button and answering the security question, you can retrieve your Netgear extender login credentials.
Steps For Netgear Wifi Extender Login with 192.168.1.250
You can also complete the login process with the IP address. Here we can discuss the basic steps for Netgear Wifi Extender Login with 192.168.1.250. It's important to follow all the steps as instructed.
A Netgear Wi-Fi extender can be connected with an Ethernet cable.
Using your PC or laptop, you can now access your favorite browser.
To enter the IP address of your Netgear wifi extender, enter 192.168.1.250 in the address bar of your browser.
To complete the Netgear WiFi extender login process, entering the correct IP address is essential.
This is the login page for Netgear extenders.
You will then be prompted to enter your default login credentials.
You can now use the Netgear extender quickly after you see the pop-up message telling you your login process is completed.
Netgear WIFI Extender Login With 192.168.1.250 by Using Android Device
You can also use your Android device for Netgear Wifi Extender Login with 192.168.1.250. Check out the below steps and follow them.
Here you can open your favorite browser.
Enter 192.168.1.250 as the IP address of your Netgear wifi extender here.
Log-in credentials, such as usernames and passwords, are now available.
You can then click on the "Login" button. Now that you have successfully logged into your Netgear WiFi extender, the process is complete.
Netgear WIFI Extender Login With 192.168.1.250 by Using Mac OS
There is also an option for you to use your Mac OS for Netgear wifi extender login with 192.168.1.250. Here, you can check out the following steps.
Your router must be configured to disable Mac address filtering or Access Control Lists. Turn on the router's LED lights.
When you connect your devices to your extender network, your extender will be active.
To access mywifiext.net, enter www.mywifiext.net in your web browser.
Passwords and usernames such as "admin" and "password" can be entered here.
To check the attached Netgear wifi extender devices, tap on "Network Devices".
Under MAC Address Filtering or Access Control Lists, all Mac addresses that start with 02:0F: B5 need to be listed.
Your wireless device now has access to the internet.
Causes Of Netgear WIFI Extender IP Address 192.168.1.250 Not Connect
You can easily use the Netgear wifi extender login with 192.168.1.250. As part of their login process, Netgear WiFi range extenders connect to 192.168.1.250 as a private network. It is sometimes difficult to log in to the Netgear WiFi extender using its IP address, 192.168.1.250. Here you can check its primary reasons.
You are unable to connect to WiFi because your wifi connection is disabled.
It is common for users to forget to turn on the Netgear Extender.
Your Wi-Fi connection is experiencing connectivity issues.
There is outdated firmware on Netgear Extenders being used by users.
It appears you are using the wrong IP address.
Netgear extenders have not been configured properly by users.
There are sometimes technical problems with DNS.
The above are the primary reasons for using the Netgear wifi extender login with 192.168.1.250. The power supply for your router and extender should be adequate. The Netgear extender must be connected properly to the electrical outlet. The Netgear wifi extender IP address 192.168.1.250 can't accessible if your computer has cache memory, cookies, and junk files.
Wrapping Up
You can use the above-mentioned steps for Netgear Wifi Extender Login with 192.168.1.250. It is also vital for users to follow all the steps perfectly so they can complete the login process quickly.
0 notes
Link
A WiFi range extender would be useless if these problems occurred. Your router’s signal strength will not be increased if the D-Link extender not working. Also, in such a scenario, you would not have access to high-speed internet in all areas of your home or office.
#D'LINK WIFI EXTENDER SETUP APP#D'LINK EXTENDER LOGIN#D'LINK RANGE EXTENDER SETUP#D-LINK EXTENDER NOT WORKING#DLINK EXTENDER SETUP#EXTENDER NOT WORKING#HOW TO CONNECT D'LINK EXTENDER#IP ADDRESS#IP ADDRESS 192.168.0.1#MY D'LINK EXTENDER IS NOT WORKING#MY WIFI EXTENDER NOT WORKING#NETGEAR EXTENDER NOT CONNECTING TO INTERNET#WHY IS MY D'LINK EXTENDER NOT WORKING#WHY IS MY EXTENDER NOT WORKING#WHY IS MY WIFI EXTENDER NOT CONNECTING#WHY IS MY WIFI EXTENDER NOT WORKING#WIFI EXTENDER D'LINK#WIFI EXTENDER NOT SHOWING UP
0 notes
Text
The Netgear WiFi Extender Login is a simple process that allows you to access the settings and configuration of your extender. By logging in, you can set up your extender, change network settings, and manage your devices. Ensure you have a stable internet connection before accessing the login page.
1 note
·
View note
Link
If you are looking for an easy process for Netgear extender login? Then your search ends here. Read the steps and complete installation and configuration conveniently.
2 notes
·
View notes
Text

#mywifiext setup#mywifiext.net setup#netgear wifi extender setup#mywifiext net setup#netgear extender setup#mywifiext.net login
0 notes
Text
Guide on Mywifiext | www.mywifiext.net Login / Setup
By asking you questions, Guided Assistance assists you in resolving the problem you are experiencing with your NETGEAR equipment.
You can log into your netgear WiFi range extender after installation to examine and modify the settings.
Visit NETGEAR Support and obtain the quick start guide for your model if you haven't installed and connected your WiFi range extender to your current WiFi network before continuing.
Check to see whether your model is listed under "This article pertains to:" If you own a Nighthawk Mesh or Mesh WiFi Extender, check How can I access my Nighthawk Mesh Extender or WiFi Mesh Extender?
To access your WiFi extender, log in as follows:
From a computer or mobile device linked to your extender's network, open a web browser.
It's possible that the names of your router and extender's WiFi networks differ (SSIDs). Check to see if you are linked to the network of your extension.
In the URL bar of your web browser, write www.mywifiext.net if your extender and router have distinct WiFi network names (SSIDs).
Enter http://extender's IP address> (for instance, http://192.168.1.3) into your browser's address bar if your extender and router share the same WiFi network name (SSID).
See How can I find the IP address of a device connected to my router? for additional details.
Hit the Enter key or press.
A login screen appears.
Enter your admin password and user name.
Note: An email address could be part of your user name.
Click the Username & Password Help link if you can't remember your user name or password.
To change your login information, see How can I reset my NETGEAR range extender to factory settings?
Tap or click LOG IN.
It shows the Status page.
Click or press the Menu symbol if your browser displays it.
A menu for the extender appears.
To view and modify the extender's settings, select Settings.
1 note
·
View note
Text
What to Do When 'mywifiext.net' Refuses to Connect?
If mywifiext.net refused to connect then, this happens when there is a power outage, wrong admin credentials, browser issues, network interruptions, and more. To fix this, ensure to have an adequate power supply, enter the correct login details, fix the browser issues, and remove the network obstacles. To know more troubleshooting steps regarding the same, reach us here freely!
0 notes
Last Seen Blogs

owlcatober
Owlcatober

xpiredmutt
MUTT.


95thline
bro [romantically]

atervale
unauthorized fucking thing