#like being able to drag and drop an image into the color pallette area to create a unique pallette from that image?
Explore tagged Tumblr posts
Visit Tumblr Blog
Explore Tumblr blogs with no restrictions, modern design and the best experience.
Last Seen Tumblr Blogs


Fun Fact
Tumblr has a low social media market share in South America.
Text
i think one of my biggest (and only) gripes with procreate is that they dont have like. a masterlist of features their app has to offer. a full thorough ui navigation. because ive been using procreate for a couple years now and im still discovering preexisting features because they just. dont mention it anywhere
#like being able to drag and drop an image into the color pallette area to create a unique pallette from that image?#had to find that out through an instagram reel#procreate has a habit of compressing things almost Too much to make it less visually busy and more “beginner friendly”#which definitely works to an extent. its the easiest art program I've used to date. and that includes ibispaint#but they have an annoying habit of simply not Labeling Things#so they will have a lot of super cool and useful features that you wont even know exist because they dont tell you about it#and their app tutorials are very vague and don't actually seem to show you have to navigate the app.#they feel more like an ad than a tutorial#this is why procreate dreams has gotten flamed so bad i think#its not even that bad is the thing. its got tons of good features. but the ui is simply TOO simplified#everything is hidden in a dropdown of some kind#to the point that its not beginner friendly OR professional quality#because its equally unnavigatable for both#ANYWAYS im just yapping for the sake of yapping#i love procreate. its affordable and user friendly. theres just some very small inconveniences with its ui#i know nothing about developing and do not know what im talking about. for the record.#this is simply the ramblings of a humble artist who loves nothing more than to complain ❤️
9 notes
·
View notes
Text
.gif tutorial - editing video directly in PSCC
Here's a tutorial for my method of making .gifs by dropping a .mp4 video clip directly into photoshop.
This technique doesn't require previous screen capping or importing. All you need is an .mp4 video clip and photoshop. Here's the .gif I'll be making:


Now with a Video version of this tutorial!
While you can drop whole movies into PS, I find it easier to work with shorter clips. VLC player is capable of recording smaller clips of larger videos, so try recording the scene(s) you want into clips a few minutes long. Videos just have to be a compatible codec, of which .mp4 is one. Since that's the only filetype I've used, I'm not sure of the others. I know .mkv and .webm won't work. Try a conversion program to turn an incompatible filetype into mp4.
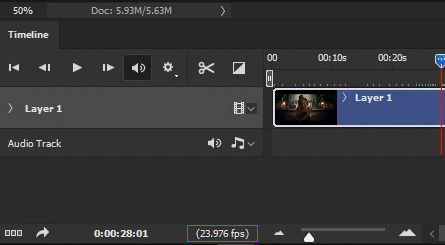
As with any .gif you're making, you'll need your Timeline window open. You can find it under Window >> Timeline. Here's a quick rundown of the relevant parts:

Once you've dragged your video clip into photoshop (see above gif), a blue box will appear in your timeline, along with an arrow pointing to a redline called the playhead. You navigate through a video's frames by clicking the arrow portion of the playhead and holding as you drag it back and forth across the blue box representing your video.
This process is called scrubbing (don't ask me why).
The first thing you'll want to do is turn the video in your timeline into a Smart Object. You can either click on it in the timeline or in the layers palette to select it. Once it's highlighted, use the standard method to turn it to a smart object (Layer >> Smart Objects >> Convert to Smart Object). I like to do a Save As... (File >> Save As...) at this point to create a new .psd file. DON'T SAVE OVER YOUR ORIGINAL VIDEO FILE. Make sure to do Save As....
It's important to note that the .psd you save won't contain the video itself. Instead, a symlink is created, which is basically an embedded link to the original video file. What this means is that if the video you dropped into photoshop is ever moved or deleted, it'll break your .psd file. Make sure not to muck about with the video file as long as you want to be able to work on your .psd
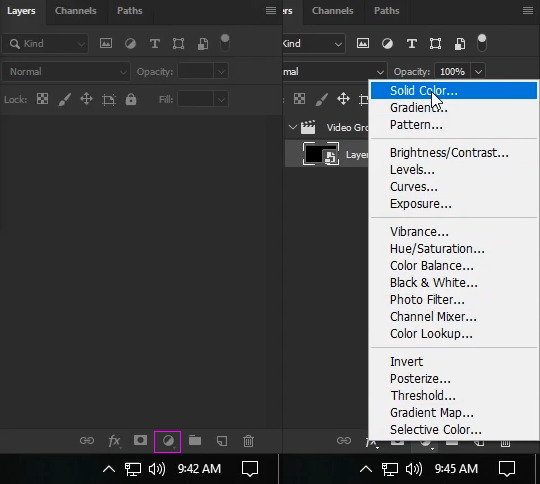
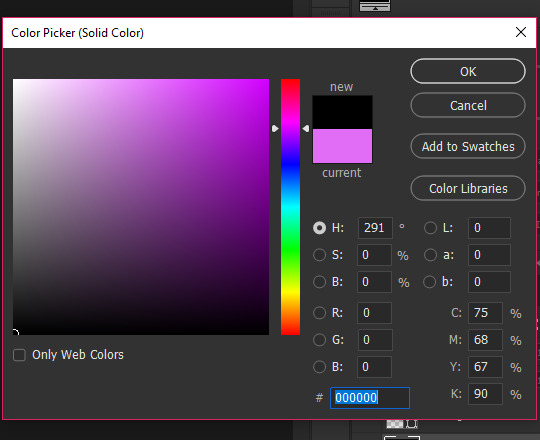
Because resizing/cropping/transforming can make some odd transparency issues on the borders of gifs, I like to place a Solid Color layer of pure black (#000000) at the bottom of the layer palette. So, in the Layers palette, select Create new fill or adjustment layer and select Solid Color at the top of the pop up menu:
Choose solid black either by entering 000000 in the # field or by using the color picker to pick black from the bottom.
Drag this new fill layer to the bottom of your layers.
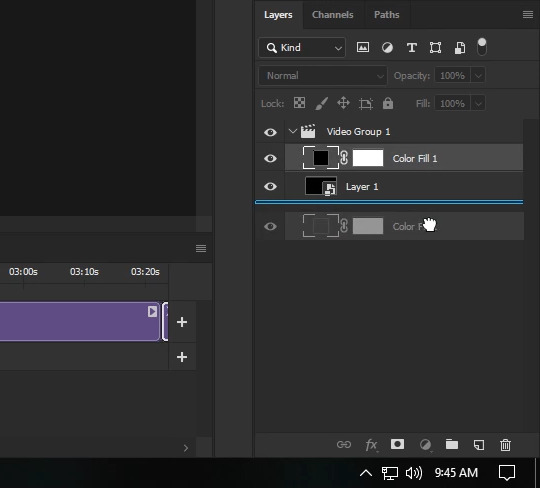
Now the Color Fill object has to be moved in the Timeline so that it stretches across the entire area taken up by the video clip. Your playhead should be at the beginning of the timeline:

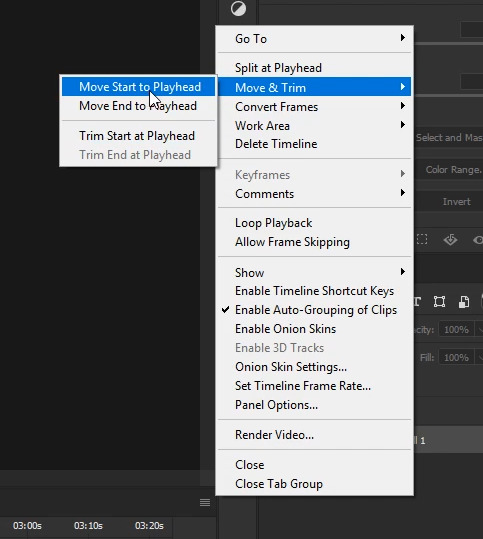
If it's not, click on the arrow and drag it there. Make sure your Color Fill layer is selected in the Layers Palette. Then, click on the Timeline's menu and choose Move & Trim >> Move Start to Playhead:
Your Color Fill object should now be at the start of your timeline. Hover over the object's right edge until the mouse turns into a double arrow icon:

Holding down the mouse, drag the Color Fill object to the end of the work area (the whole of the video object's length). It should snap to the end when you reach it automatically.

Next, scrub to a still image that represents your gif for you to look at as you work on cropping/coloring.
Next you'll want to resize your smart object to gif size. For this .gif, it'll be 540 x 200, so I've set the crop tool's settings to W x H x Resolution: 540px and 200px.

I liked to keep Delete Cropped Pixels unselected so I can move the image around after the cropping. Go ahead and adjust the crop to where you're happy and press enter to crop the image.

You can now start applying filters, masks, color adjustments, text as you normally would. For me, I like to begin by sharpening my resized image. I find Smart Sharpen works best for videos/gifs, because it applies as a filter to the smart object, meaning you can access and adjust the controls at anytime. To use Smart Sharpen, go to Filter >> Sharpen >> Smart Sharpen... In the control panel, apply the following settings:
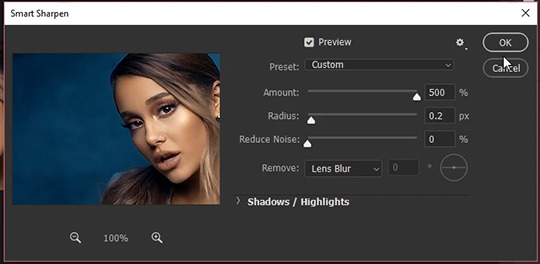
Amount: 500 Radius: 0.2 Reduce Noise: 0 Remove: Lens Blur Don't worry about the extreme sharpening that takes place from the high amount, because we'll adjust that in the next step. For now, just click Okay.
In the Layers Palette, you'll see the Smart Sharpen filter has been applied to the Smart Object. Right click on the new filter listing and click on Edit Smart Filter Blending Options...
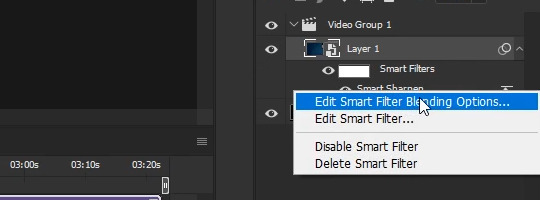
In the new control panel that pops up, turn down the opacity to something that suits your taste. Something between 15% to 30% usually works fairly well. For this video, I've chosen 25%.
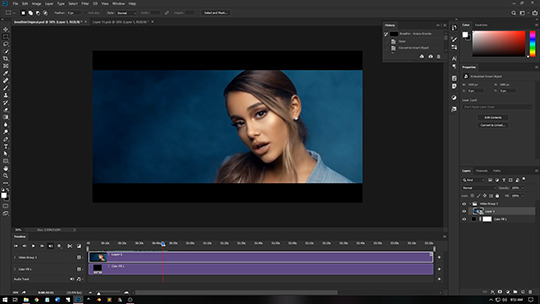
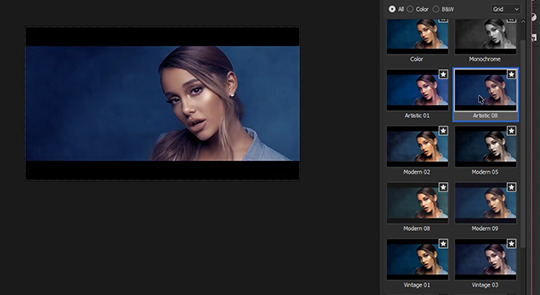
Now to move on to color adjustments and my favorite filter, the Camera Raw filter (Filter >> Camera Raw Filter... or Shift + Ctrl + A). In the Camera Raw control window, I start out by going through Adobe's preset profiles to see if I like the look of any of them. For this video, Artistic 8 deepened the blues and brought out a lovely bronze, so I've selected it and closed the profile section.
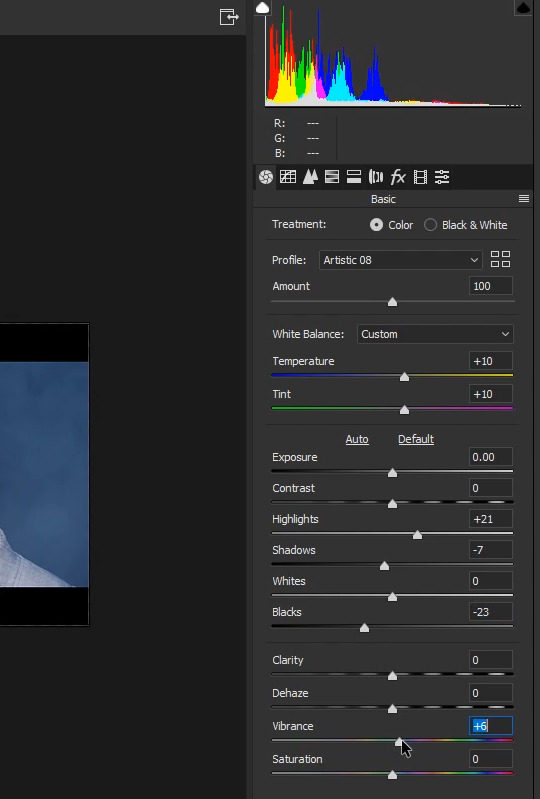
Still in the Camera Raw window, you can further adjust the color temperature and tint. Temperature: +10 Tint: +10
Change the image's constrast by adjusting the highlights, shadows, whites, blacks sliders directly: Highlights: +21 Shadows: -7 Blacks: -23
Finally, kick up the Vibrance. Vibrance: +6
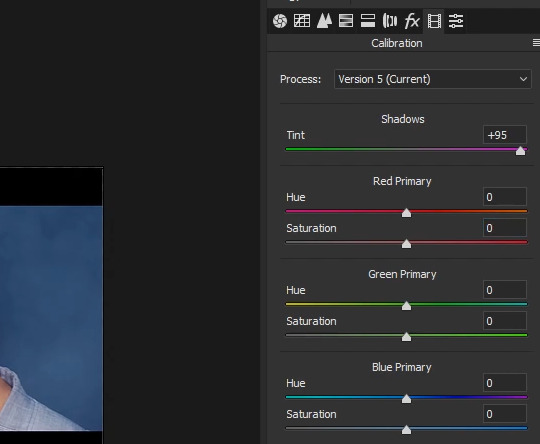
I also went to the Calibration tab (looks like a film strip) and added more magenta to the Shadows' Tint. Tint: +95
I'm happy with these setting so I won't be using any more camera raw settings, but play around and see what you come up with!
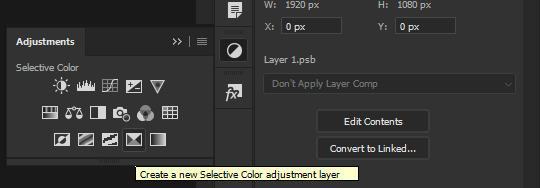
Now, if you want to apply more color adjustments outside Camera Raw, you certainly can. I've chosen to apply a Selective Color Layer to the video to make the bronze pop a bit more. Go to your Adjustments window and apply a new Selective Color Layer.
.
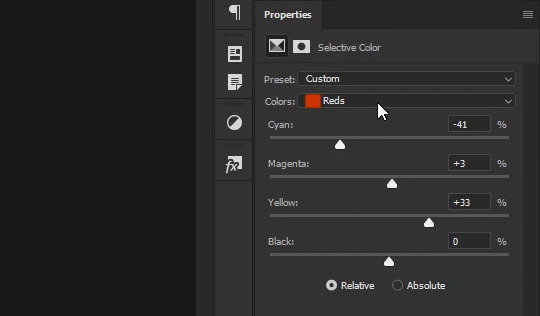
With Reds selected in the Colors dropdown menu, I've applied the following settings: Cyan: -41 Magenta: +3 Yellow: +33 Black: 0
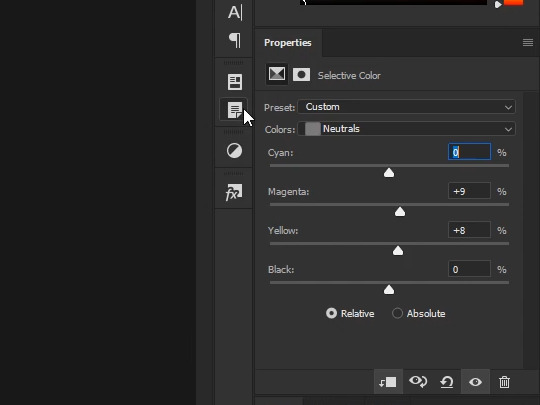
Switching to Neutrals in the Colors dropdown menu, I've made the following slight adjustments: Cyan: 0 Magenta: +9 Yellow: +8 Black: 0
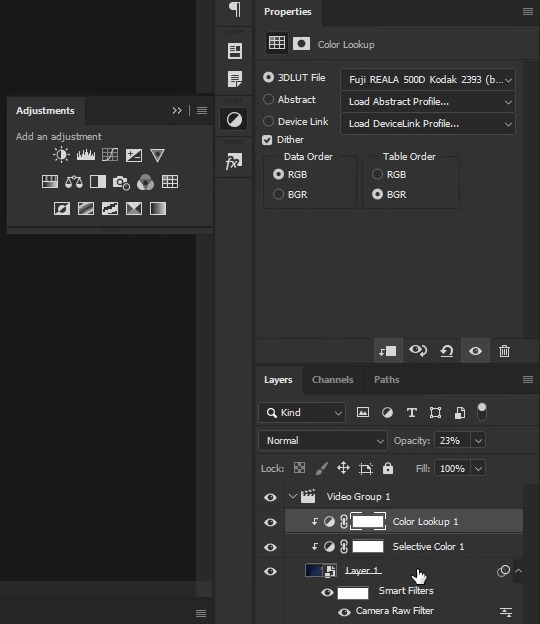
Next I opened up the Adjustments palette again and applied a Color Lookup layer:

Previewing several layers from the 3DLUT File dropdown menu, I selected Fuji REALA 500D Kodak 2393 (by Adobe).cube color table for the kick in contrast. I found it much too strong an effect, however, so in the Layers pallette I turned down the Opacity to 23%.
The next steps are easiest to do with a single Smart Object for your video. Since I was done with my color adjustments, from the Layers Window I selected the original Smart Object, held down the Shift key and selected the Color Lookup Layer (which layed above the Selective Color adjustment layer). This selected all three layers. Next, I turned them into a new Smart Object (Layer >> Smart Objects >> Convert to Smart Object...). Now everything is contained in a single object both in the Timeline and the Layers window.
Now, if you've tried scrubbing through the video, you've probably discovered that the once smooth and quick back and forth you were able to achieve with your original video file is now choppy and slow. The reason for this is that photoshop has to recalculate every frame of the video and apply your color filters. This is a pain, and really slows down the gif making process. What you need to do is get back to the original video that doesn't have any adjustment layers or filters applied to it. To do that, return to your layers window and double click on your Smart Object's thumbnail. This will open up your original Smart Object and the two color Adjustment Layers you just applied in a new window. However, if you try scrubbing, you'll have the same choppy loading effect as before, because the color adjustments are still being calculate for each frame. What you have to do is go to your original Smart Object in the Layers Window and double click on it one more time. In the new window that pops up, you'll see your original video file, at it's original size. When you scrub through this timeline, you'll be able to do so at the smooth, quick pace you were before all your color adjustments. This and the tabbed window containing your single Smart Object resized video will be the two windows you click between, so go ahead and close the middle tab window with the color adjustment layers. You won't be needing that one open any longer.
As an aside note, make sure the FPS (framerate) listed in the small info section in your timeline is the same for each smart object window as it is on your original video.
If the framerates don't match, you won't be scrubbing through the same frames. Meaning that when you stop at a certain time on both timelines, they won't be stopping at the same place. This usually happens when you create a new window and drop your video file wrapped in a Smart Object into it, instead of just cropping your Smart Object. (Why do this? Sometimes it's easier to resize it via the transform controls with the image size already set, i've done this moving from full size to a 268px width before.) Anyhow, the good news is that the fix is very simple! Just make a note of the fps in your original video file (the one with the blue box, not the purple!) and in every mismatched Smart Object window, go to your Timeline's menu, select Set Timeline Frame Rate..., and enter in the original video's fps in the custom field (or select it from the dropdown menu if it's available). Voila! Problem fixed. But, like I said, this is only a problem if you drag and drop the Smart Object into a new window. If you want to avoid the hassel all together, just crop or do an Image Resize in your original window, as I've done in this tutorial.
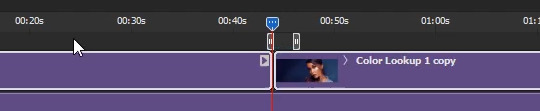
Now for turning your Smart Object into a gif! In your Original Video window, scrub through the Timeline and find the point you want your gif to start at. For this gif, I've chosen to start my gif at timestamp 0:00:43:21.
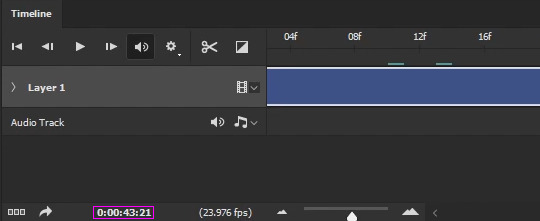
Go ahead and double click on the timestamp highlighted in the image above (careful not to "slide" the time ahead or behind with the mouse) and in the Set Current Time control window that pops up, highlight and copy (Ctrl + C) the time.

Exit the window by pressing Cancel or Esc. Return to your Smart Object's window (with the color adjustments) and double click on the timestamp here and in the control window, highlight the time and paste (Ctrl + V) the time into it and click OK. Your playhead should then jump to the same frame (after a moment to load) you stopped at in your original video.
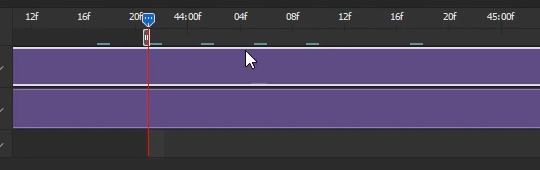
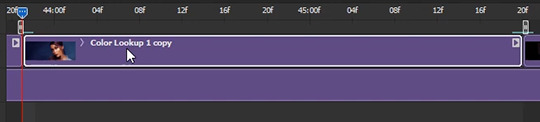
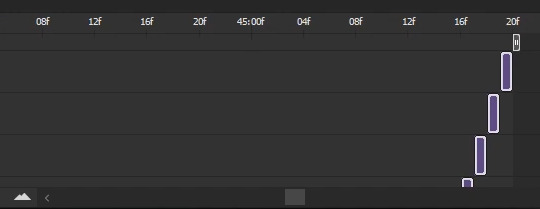
Now you want to mark this spot for yourself to easily return to. In the timeline, you'll see there are gray "brackets" that encompass the whole of your Smart Object/Video. These "brackets" are the work area.

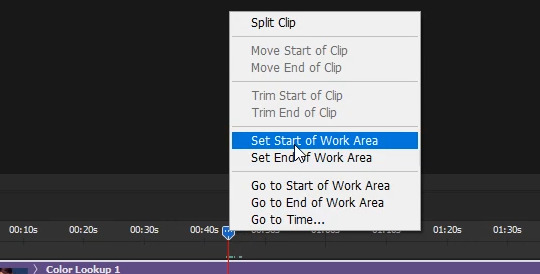
These brackets can be moved and repositioned to shorten your work area. This is an excellent way to mark the area of your gif. There are two ways to move the brackets. First, you can grab the left bracket, hold down the mouse, and slide it over to the playhead (it'll snap to it once you're close enough). However, the easier way is to right-click on the blue arrow part of the playhead and choose Set Start of Work Area.
The left bracket will then automatically move to your playhead.

Repeat this process to find your ending point, but picking Set End of Work Area instead of Start. NOTE: If you look very closely at the red line beneath the playhead when you're zoomed in to your timeline, you'll notice a light grey box to it's right:
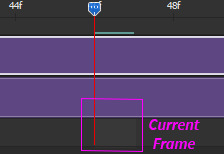
This is highlighting the current frame. You'll want to make sure the highlighted image is the frame AFTER your final frame!. The end of the work area and the playhead snap just to the left of the highlighted frame. The actual frame will be left out out of the work area/split. So if you want your gif to end on the image before, you need to highlight the next image. I know it sounds wonky, but once you've made a few gifs using this method, you'll see what I'm talking about.
Next step is to split the object so you can select Just the section you want to turn into the gif. Having already set your work area makes this easy. Right click on you playhead's blue arrow and select Go to Start of Work Area
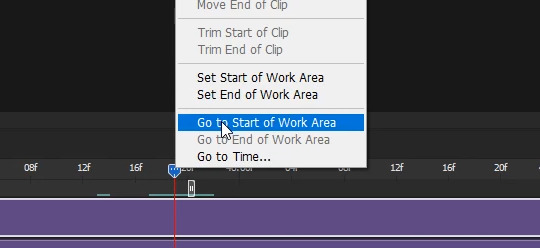
And your playhead will jump to the start of your work area, and where you want your gif to start:
Once you have the playhead positioned where you want your gif to start, select the Split at Playhead button (the scissors) to split the object at the playhead (red line):
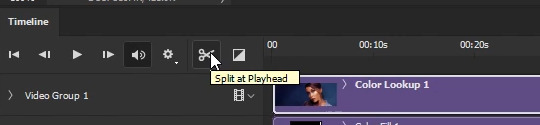
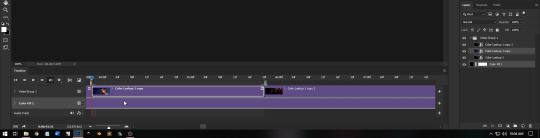
You'll notice your object has split into two objects:
Note: This is why you want all your color adjustments made before you start splitting your gif(s), because your color adjustment layers are still applied to both objects. You don't have to copy/paste any filters/adjustment layers.
Repeat the previous steps, except this time, for the End. (Go to End of Work Area) Note: Sometimes the playhead stops a frame before the End of your Work Area. I don't know why (bug?), so zoom in on your timeline and make sure that read line is bunched up to the End of Work Area "bracket" before you slice. When you're done, you should have the section you want to turn into a gif seperated out from the rest of the object:
Your prepwork is done! Now to make the actual gif!
It's always a good idea to make a Snapshot at this point! That way you'll have a prepped state ready to revert to if you mess up going forward. You can find the snapshot button in the History window (Window >> History):
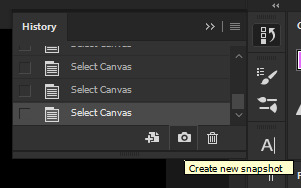
If you ever mess up, just scroll up to the thumbnail at the top section of the list and click it.
Either from your Timeline or your Layer Palette, select the Object you just sliced out (the one you want to turn into a gif), then press and hold Ctrl and select the black color fill layer beneath it, so that both objects are selected.
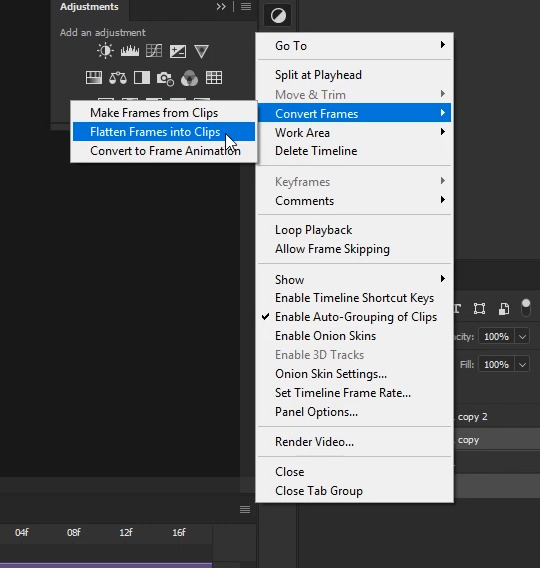
With both objects selected, go to the Timeline's menu and select Convert Frames >> Flatten Frames into Clips:
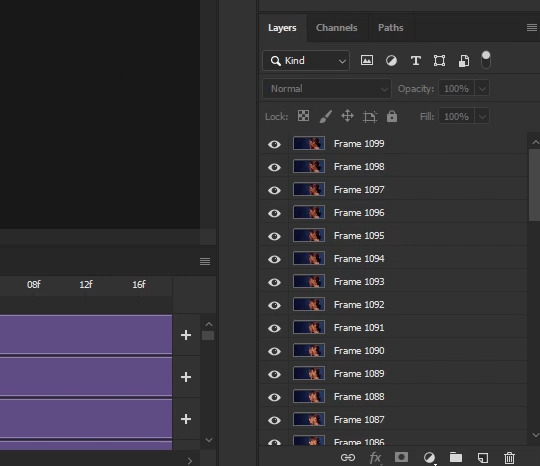
Depending on your graphic card and how big your selection and image sizes are, this will take some time. The faster your card/narrower your selection/smaller your image, the faster it will render. Photoshop is taking every flame and placing it onto it's own layer. When it's finished, your Layer Palette will be filled with new layers... and you might notice it looks similar to how it looks when you're working in a frame timeline. This is no accident.
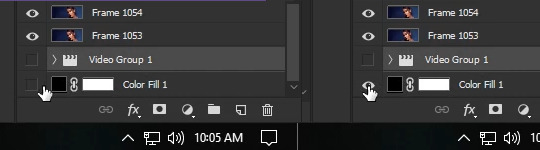
Scroll all the way to the bottom of your Layer Palette and make sure your black Colorfill layer is visible (click on the visibility area until the eye shows up).
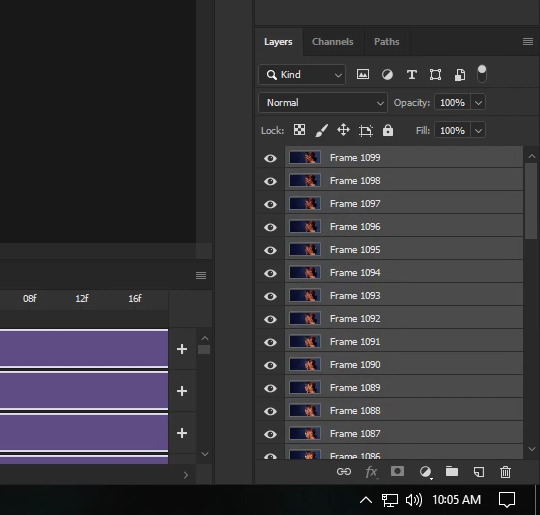
Then, click on the first new layer and select it. Holding down Shift, scroll allll the way to the top, and select the topmost layer. All the new layers should now be highlighted in both your Layers Palette and your Timeline.
With all the new layers selected and the Colorfill layer visible, go back to the Timeline's menu and select Convert Frames >> Make Frames from Clips:
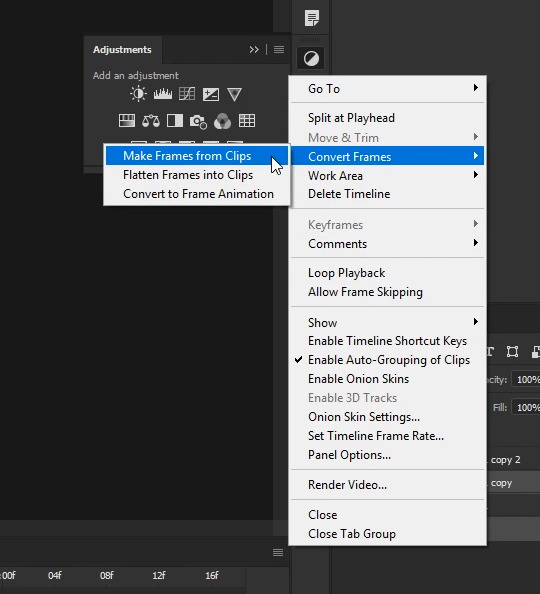
This shortens the layers into milisecond clips.
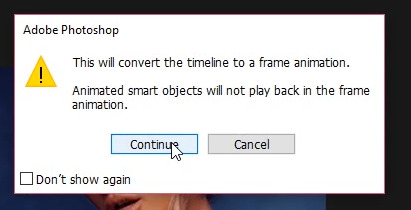
Now, with the layers still selected, go back to the Timeline menu one more time and select Convert Frames >> Convert to Frame Animation:

A new warning window will pop up saying "This will convert the timeline to a frame animation". Go ahead and click continue:
At this point, things should look very familiar.
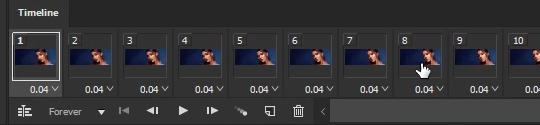
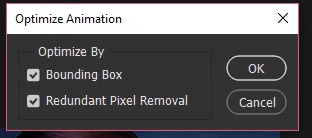
You'll do all the usual steps for saving a gif at this point, EXCEPT you don't have to worry about duplicate/skipped frames. Photoshop hasn't skipped or doubled any frames that weren't recorded that way in the video. Your gif may still be too long to fall under 3mb, but how you trim it down is up to you. In my case, this gif is at the right length, so I go ahead and optimize all the frames by going to the Timeline's menu and selecting Select All Frames. Then from the Timeline Menu again selecting Optimize Animation...:
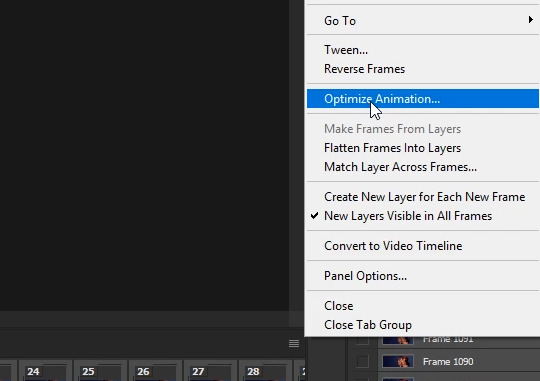
In the control window that pops up, I've left everything selected and just clicked on OK.
Next, with all the frames still selected, click on the pop up menu of one of the frames (the little down arrow in the lower right corner) and choose Other...:
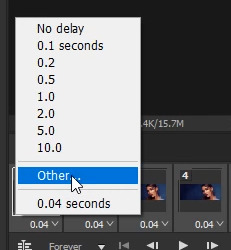
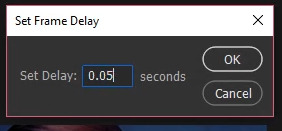
In the pop up window I changed the Delay of 0.04 to 0.05
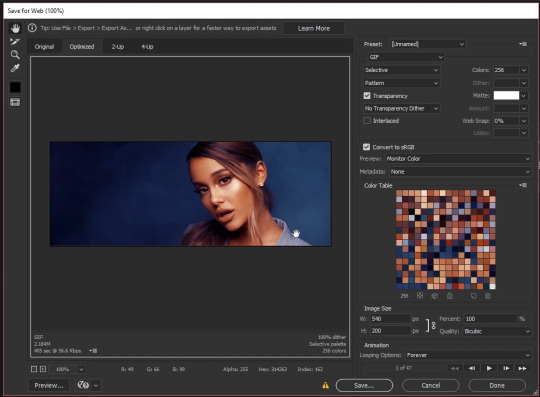
Now it's just a matter of saving the gif. Pressing Ctrl + Shift + Alt + S or you can go File >> Export >> Save for Web (Legacy) to bring up the Save for Web dialogue box. From there, I make sure the memory comes under 3mb. I like to save with the Selective and Pattern profiles with as high a Colors setting as I can manage, which is the full 256 for this gif. From there, it's just a matter previewing the animation to make sure it looks alright and then saving.
And that's it! That's how I make all my gifs. You'll notice I can go to my history window, undo all the frame conversions or click on my snapshot, and still go to any point in the video to make another gif. Which is usually how I make my gif sets in one go.
I hope this long tutorial was helpful! Please reblog or give a like if it was. If you're interested in how I add text, or use keyframes to manipulate positions/sizes/"camera"/styles/etc, let me know you'd like tutorials on all that too! If there's enough interest I'll be sure to do more.
Happy giffing!
126 notes
·
View notes