#krylon paints
Explore tagged Tumblr posts
Text
When the emotions get to be too much, Marinette says it with Krylon!
#miraculous ladybug#miraculous fanworks#mlb fandom#marinette dupen chang#felinette#felix fathom#say it with Krylon#angry painting
2 notes
·
View notes
Photo


Krylon mambo pink puma rhude sneakers
#krylon spray paint#mambo pink#sneaker connoisseurs#sneaker blogger#German footwear brands#puma sneakers
2 notes
·
View notes
Text


0 notes
Text
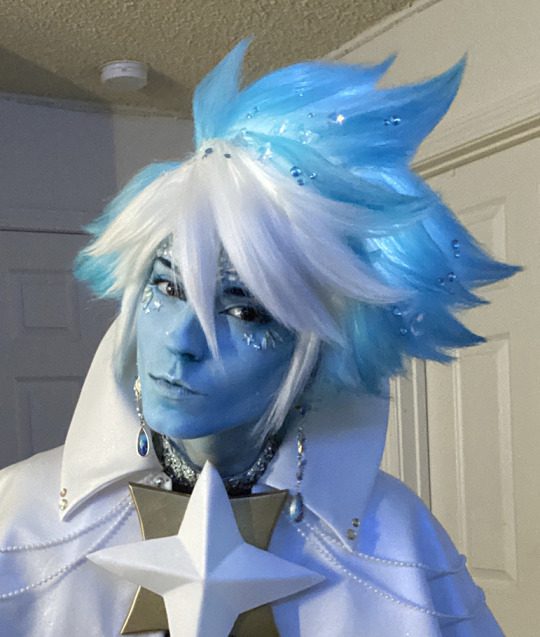

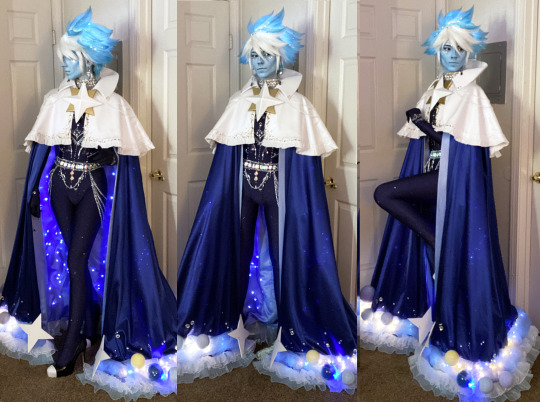
How I made my glowing stardust cookie wig with translucent spray paint and button battery LEDs
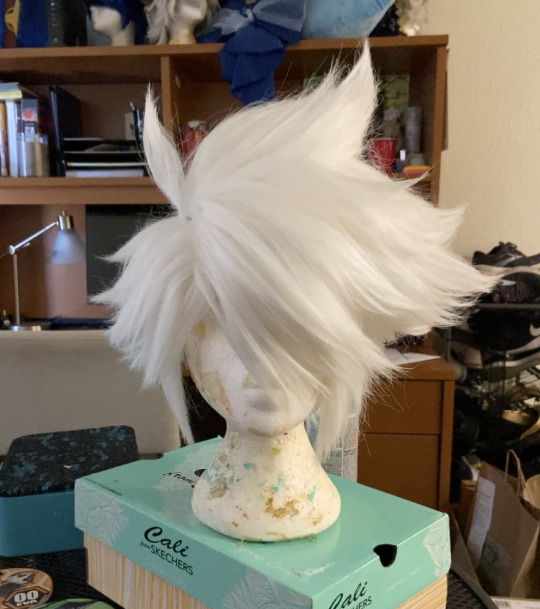
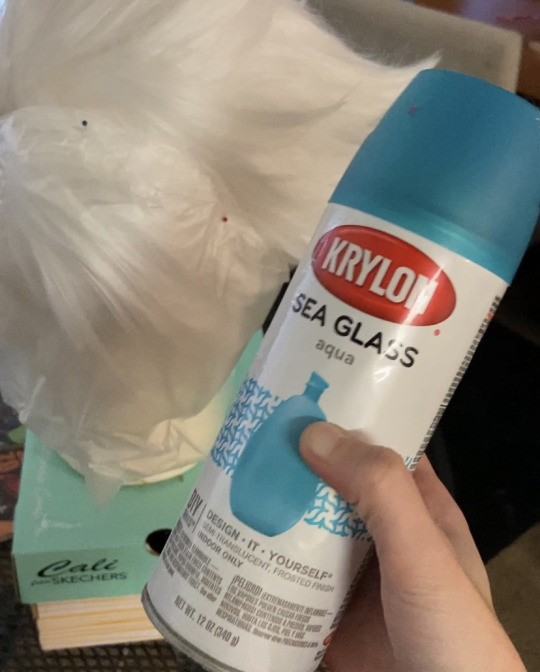
I started with a pure white arda wigs jaguar that was already fully styled since you will need all the shapes to be set before adding color. To style it, I did the classic "heat the fibers upside down, tease via backcombing, brush them out, heat and tease again, brush out...again" method that is formally outlined in my karna tutorial. You dont have to have your shapes perfectly locked in before adding in color since you will be brushing it out once more, but you will need all of your teasing and heat training to be done before adding color.
Stardust Cookie's wig involves leaving the bangs pure white and the back sections blue. There are a million ways to do this (start with a blue wig and add a white bang front, airbrush color, dye wefts and sew them together, etc) but the method that was the most economical for me involved using krylon translucent spray paint. I know using spray paint on a wig sounds scary and i would not use an enamel or fully opaque spray paint on a wig, but the krylon translucent spray paint is shockingly soft, flexible, and goes on in light coats.
To keep the bangs white, I pinned down some cling wrap all around the bangs and made sure the line was snug. at this point I very gingerly began applying spray paint to the back sections of the wig. I did this in very light coats at a distance of about 18 inches from the wig. Honestly right after spraying, the fibers were still soft and the coverage was as good as i was expecting to get, but i did take a hog bristle brush and thoroughly combed out the fibers after this stage. This helps break up any strings and more evenly distributed the color.
This method works well if you want a soft color that does not need to be perfectly uniform. And I knew since I was adding lights below, that the color coverage itself didn't matter a whole lot, so long as it was translucent, didn't have any major streaks or clumps, and light could get out smoothly.
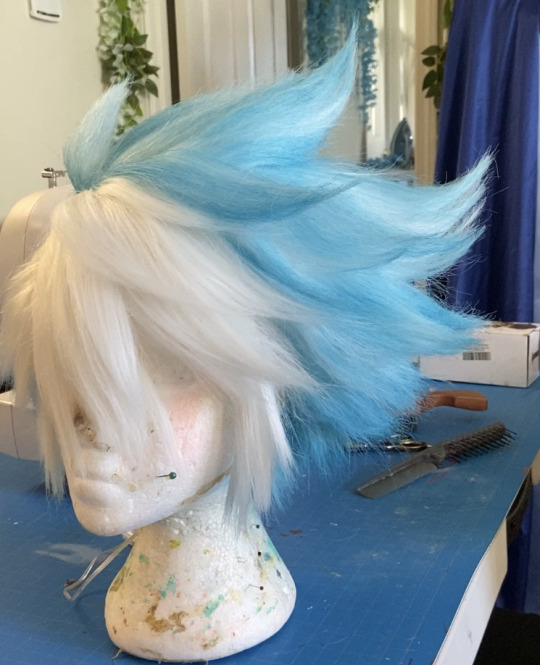
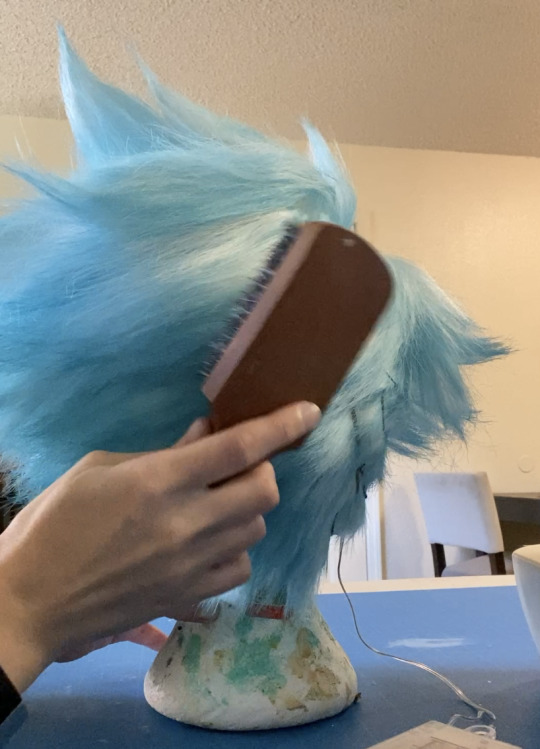
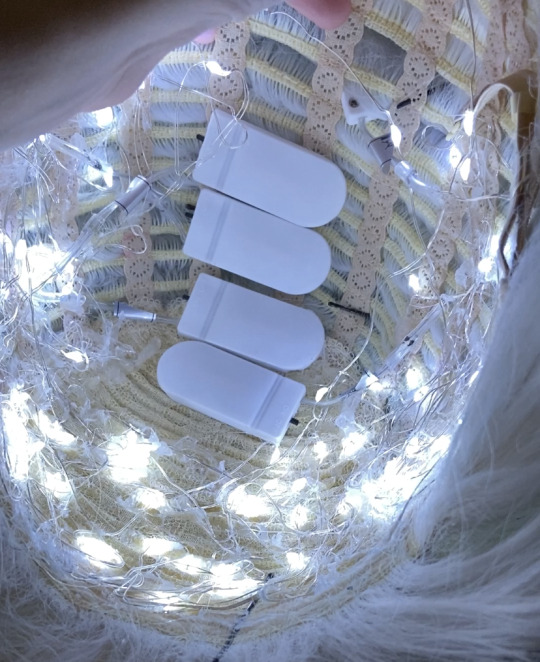
To add lights to the wig, there are 4 button-battery 30-LED fairy light packs glued into the underside netting of the wig. Always be sure to check if your LED wires can withstand hot glue heat before application (but most standard LED packs can withstand a low heat setting.) I did not have any problems with the heat of the wig + my body heat causing problems with the LEDs after being worn for several hours. These lights provide a diffuse, background glow throughout the wig and can be seen through the blue color. the below image of the wig only has lights underneath the netting (only one pack on for that image).
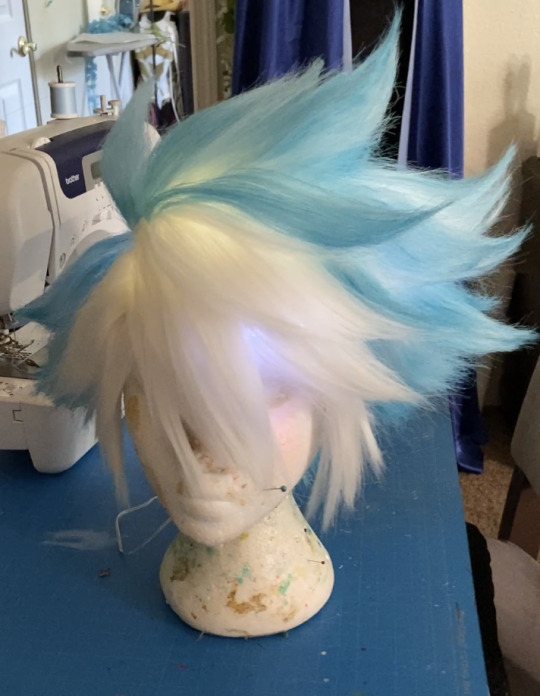
To light up the upper parts of the wig, there is one pack of LEDs threaded through the teased, textured bases of the spikes. Because these lights are on top of the netting and going through the textured sections, they scatter off of the teased hair and provide illumination to the higher parts of the wig. below is an image of the wig with only the single "top" lights lit.
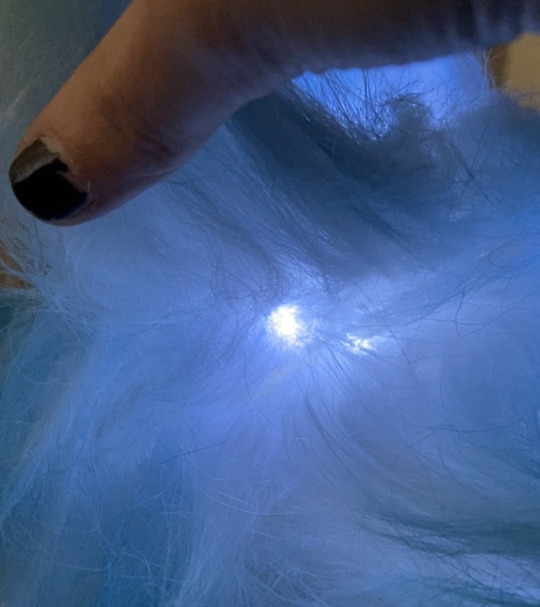
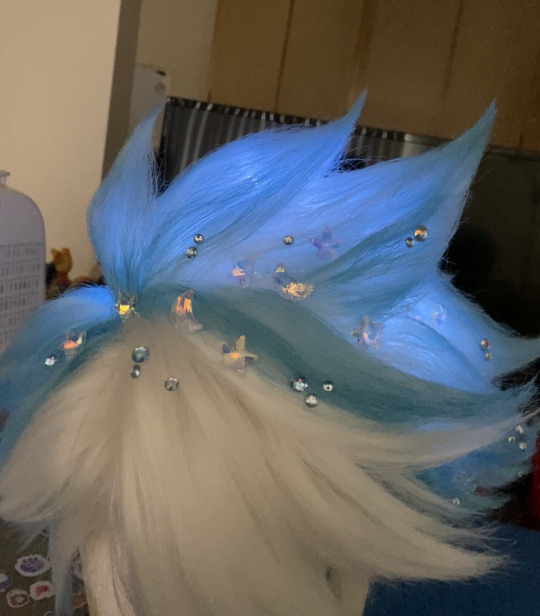
and that's how I made this wig! Other than that the rhinestones and other accessories were just glued on w/ hot glue. This wig looks nice in person and on camera and is stable. Granted its a little uncomfortable since you can feel the wires and the battery packs ngl but i've certainly worn worse. You can use hairspray on top of the translucent spray paint in small amounts, but in general i would proceed with caution since if nothing else, it may make the fibers look particularly stringy (which is why i highly recommend heat-set styles for this application over hairspray-set ones)
Believe me you can go pretty far with a "let me just slap some LEDs in there with a bit of glue" attitude when it comes to adding lights to stuff.
271 notes
·
View notes
Text
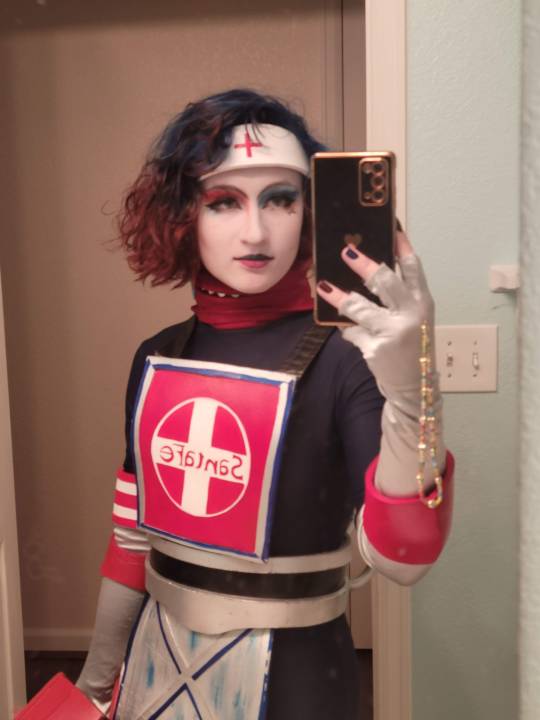
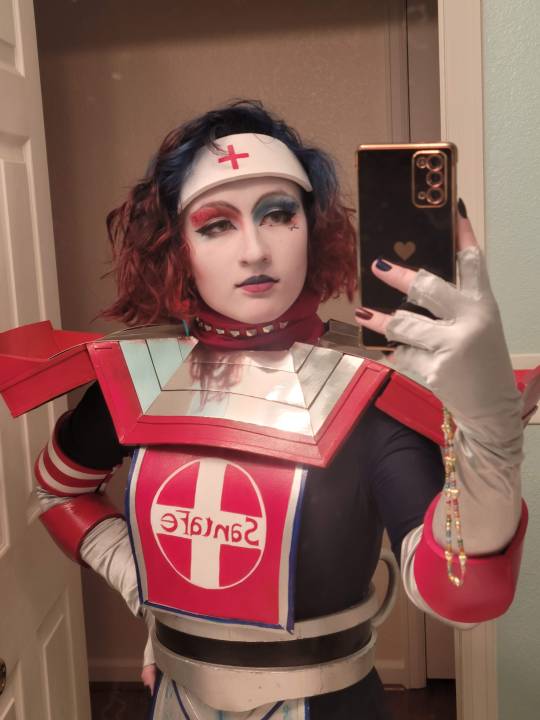
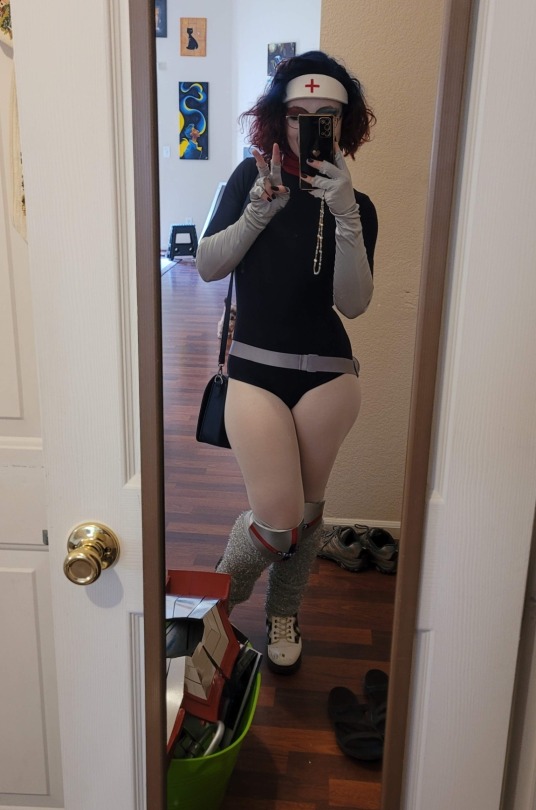
hi tumblr this is my wrench cosplay. I built her in 8 days in july for some reason
some build talk under the cut (and a picture of the kneepads). feel free to ask or reach out with questions!
she is built almost entirely of EVA foam and contact cement and is my first ever foam build. her leotard and gloves are prepurchased and my hair was already dyed these colors (blue velvet + cranberry + blood moon from lunartides)
her shoulder piece is actually an exceedingly simple build; it's just a bunch of 6mm (or maybe 8? I can't recall) rectangles + trapezoids, then smaller rectangles and triangles for the shoulder bits. the trim of the red part is just 2mm EVA foam cut into strips and glued on. it has a split velcro closure in the back.
the actual shoulder bits of the shoulder piece are held in place with black vinyl; which would allow them to flip up if I hadn't messed up the silver bits lol. the silver stripes are scrapbooking cardstock, cut to size and glued on after the pieces were painted. I would like to upgrade to vinyl-wrapped foam on future iterations
the belt is a 8mm base with 6mm silver parts, and the coupler rings are 12 inch EVA dowels glued into circles and then glued on and held in place with 4 mm strips. the belt has a velcro closure in the back.
the tabards are honestly the one piece that needs to be replaced the most at this stage; they're also 6mm EVA foam with 2 mm details, then spray painted silver and hand painted with the blue details. the lower tabard pieces have not held up well to movement :I the top ones are connected to the belt with two velcro straps at the bottom corners, and to eachother at the top with black vinyl straps. there's also Velcro on the leotard to hold flush to my body.
all of the foam construction was glued together, then heat sealed, then plastidip sealed, then spray painted, then coated with a clear coating. unfortunately only the shoulder piece was really properly sealed, but it SHOWS. my neighbor stepped on it on Halloween and the damage was like, NOTHING.
the neckpiece is pretty much a mockneck that I pull over my head, with a red vinyl collar that I sewed and then studded using leftover cats cosplay collar studs. the headband is just Eva foam with elastic. the kneepad base is pretty much a lycra sleeve dyed silver.
the kneepads are a two-piece EVA foam construction that I patterned off of... an existing kneepad, I think? they're glued, heat formed, and then have elastic straps around the back of the knee to hold them in place.
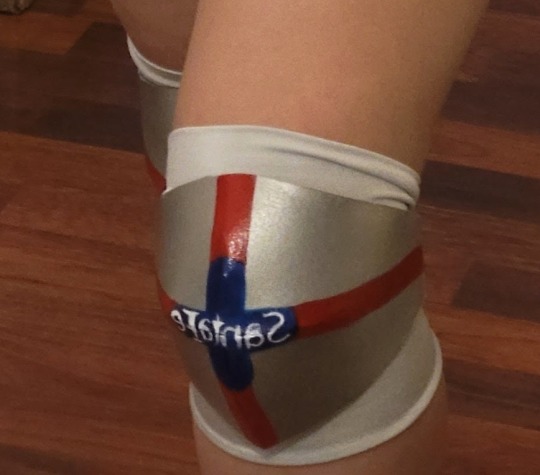
I know the lettering is ass but. recall that this was an 8 day con crunch and I have never painted foam before lol
finally, the elbows are just also 2-piece Eva foam constructions that I just patterned directly off my elbow. I actually built bumpers but ran out of time to figure out a way to attach them lol. the arm band is just a simple 4mm rectangle with 2mm trim and a velcro closure.
overall the velcro closures are one of my favorite things on this costume; they're all sturdy strips of velcro sewn onto neatly sewn black vinyl rectangles and are VERY STURDY.
my main issues with this build was mostly the paint I used, to be honest; it was an absolute nightmare and in the end I wish I had used krylon for everything, BECAUSE IT IS THE ONLY PAINT THAT IS STILL HOLDING UP (the red)
overall the build was a ton of fun! I spent up to 14 hours a day working on her bc i went absolutely insane. i still don't know what happened to me.
once my motivation returns, I will be rebuilding a lot of her and learning the proper techniques; my next major part of this project is building the proper unitard, coil legwarmers, and latex-cast wheels and bumpers

#did you enjoy my nerdy cosplay build post#also there is so much hairspray in my hair here#and also i didnt have my glasses on yet so i couldnt see that the selfie was blurry :(#starlight express#stex#starlight express cosplay#wrench the repair truck#stex cosplay#starex
76 notes
·
View notes
Text
switchplate covers update/tutorial
So the thing to keep in mind with this is that we gotta see how well the wear. A switchplate cover is a pretty high-traffic thing, and subject to a lot of wear. If these get too dingy I'm absolutely going to have to go buy fancy ceramic ones or something.
But. That said. Here is my final result, and below the cut is how I did this, partly because I want to remember how it worked LOL.
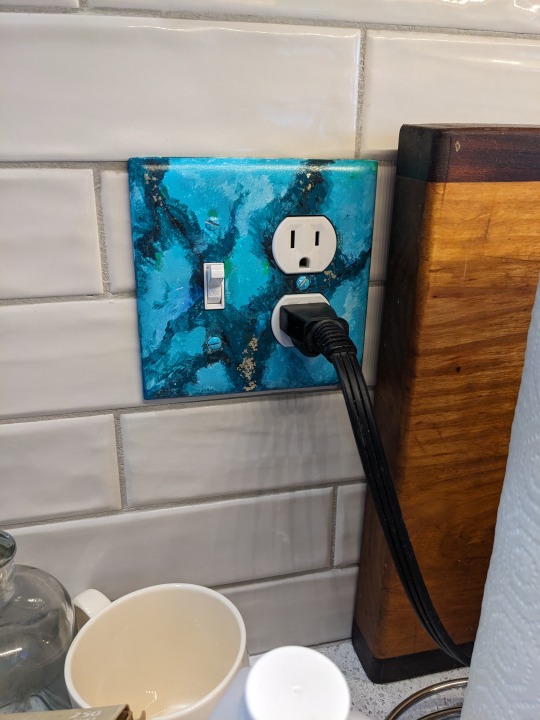
[Image description: A combo lightswitch/outlet with a black three-prong plug plugged into it, set into a white subway tile wall with a wooden breadboard leaned against it. The plate cover is painted with a mottled effect to look like a turquoise gemstone, complete with inset glitter to mimic the pyrite inclusions found in some raw turquoise.]
A better view of the glitter:
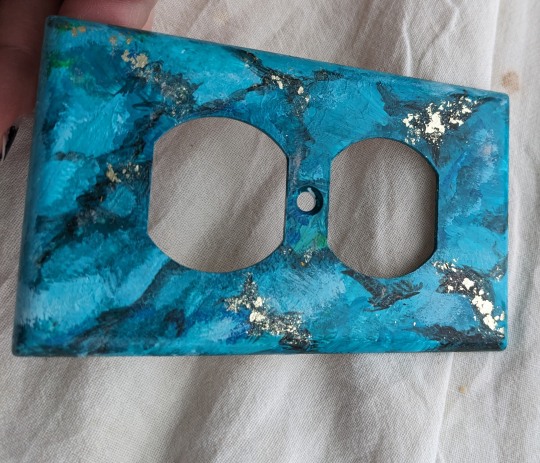
[Image description: Another turquoise-painted outlet faceplate on the background of a rumpled white dropcloth, my fingers visible tilting it toward the light so the flake glitter catches the light from the window.]
So I searched up for tutorials and found a few, each of which was like "can't believe nobody else has done this"; I'm sharing the most helpful one here. What was thee very most helpful thing, though, was the writer's pointing out that many different configurations of turquoise exist, so you can just pick a reference image and build off that. I did not in the end come very close to my reference, but decided instead to make it look sick as hell. LOL. I was just having too much fun doing whatever I wanted. So these are not super realistic! But then you wouldn't... make an outlet faceplate out of real turquoise, so I felt like I wasn't fooling anyone. Anyway--
How To Paint Faux Turquoise.
So the first thing I did was find some very fine-grit sandpaper (I think I got 320? I found a mostly used-up sheet of it in the basement and just used the unused edge from where it had been fastened around a block, LOL) and went over the whole front surface of each plate I was going to paint, and then I washed them with dishsoap and hot water and dried them with a dish towel, because I figured finger grease, hand dirt, and sanding dust would keep the paint from sticking. I started with white plastic ones, the kind you get for up to a dollar at the hardware store.
Then I got a plastic container lid, put dollops of various of my paint samples in it, dug out the craft paints I got cleaning out Auntie's basement and the sole tube of acrylics (Mars black) I could still find from the last time I did any painting, and went to town. The first couple, I did the pale shades and let them dry and came back to add the darker marbling. But then I was like, these are latex/acrylic, you don't have to build them in layers? So I just did the rest of them with all the shading in more or less one pass.
Acrylic art paint and latex housepaint are both water-based, so there's no conflict with using them intermingled. I've combined them before, I used to do a lot of sign painting and it works fine. Housepaint's runnier, idk. Don't mix oils and latex, is the thing to keep in mind; they just don't stick to each other real well.
I went to the art supply store to get some water-based varnish, because all i had was polyurethane and that's oil-based. It'd probably work as a topcoat but I was worried and the internet's advice conflicted. I wanted to go get better glitter anyway, so I did. I happen to live near Hyatt's All Things Creative, so I take every excuse I can get to go there.
I bought some sick-ass glitter (over in the resin pouring section, hell yes), and puzzled thru the various offerings. (@sassaffrassa's advice proved invaluable on this thank u.) I got just-- "Gloss varnish acrylic medium", the Hyatt's brand, for four dollars and sixty-nine (nice) cents, and then because I was feeling spendy, I also bought Krylon spray-on glossy varnish. Belt and suspenders, y'know? Also to make the brush strokes less obvious.
The critical thing, though, about the gloss varnish, is that it says right on the bottle that you can either incorporate it into the paint as a medium to enhance the sheen, OR brush it over the finished work as a protective coating. Dries absolutely clear. So I knew, THIS is how I'm attaching the glitter. I'd been thinking like, mod podge? elmer's glue? mix it into the paint? No.

[image description: the gloss varnish bottle. It is this product. The relevant text says "can be used either as a medium to enhance the sheen levels of acrylic paint or as an over-varnish on finished artwork to provide a non-tacky, protective gloss coating".]
So I carefully got open the little bottle of glitter (no sneezing! it was "white gold flake" style and cost eight bucks for like half a gram. to my knowledge it's not actually made of gold but it was priced like it was) and painted little fine patches of gloss varnish onto the spots I wanted glittered, and then used tweezers to apply glitter just in those spots, and mooshed them around with the little varnish-covered brush until they stuck where I wanted them. (I put them on the darkest bits of the veining, because that was what my source image looked like, mostly. I wanted to be really liberal but then I thought, no, a little pop of glitter is more exciting actually. Still not sure, but it does look good so. They say measure that shit with your heart but I went light because I figured I could add more later, and then I didn't.)
Then I came back at the end and painted more gloss varnish just over the glitter, just to make sure it was all really stuck down and wouldn't flake off with wear.
Let that dry for a couple hours, then used a larger brush to spread gloss varnish as evenly as possible over the entirety of each plate. It did leave visible brush strokes, which I didn't mind. The art shop guy suggested using a really soft brush to minimize that, and I was like "yah sure ok" but then, well, I didn't, I just used the brush I had.)
But then I let that dry overnight, and in the morning I put the plates all in my giant overspray cardboard box, and gave them each a liberal coating of the spray varnish. (Yes of course I have a giant cardboard box I keep in my basement to spray paint things in. I know it says use in a well-ventilated space but what I do, see, is I do that and then I leave the room, which is almost as good. LOL it's 24F and snowing I'm not doing it outside.)
That bottle says two hours until handling on it, so I left it two hours, and then I put up the plates that were in spots where the painting was done or wasn't happening, hence my example image being against a tiled wall.
The screwdriver immediately scratched the first one a little bit, but not super obviously. But I kind of would expect a screwdriver to scratch just about anything, so that doesn't mean much.
I won't guarantee how well these'll hold up but if you were interested in doing something like that, there's how it worked. (Hi, future me, you're welcome for writing it down lol.)
I'm sort of sorry for no more process pictures but honestly most of it was following whimsy and doing what I felt like and kind of drawing on what I hadn't realized was a lot lot lot of hours of past paint-handling in my life, so pictures wouldn't help anyone else recreate this. But it did remind me that I love to paint and should do that more. So, I'll try, I guess.
40 notes
·
View notes
Note
Pardon if you've mentioned it before, I wasn't able to find it when I looked, what paints do you use for your 3D printed models? I'd like to do a bit more of it myself, but painting them it a whole other beast compared to the actual act of printing
It's ok, I don't think I've talked about the finishing and painting process as much as I have the actual printing ^^
You can use any acrylic paint on them or any other medium that doesn't have oil, so no oil paints or pastels. The oil will break down the plastic filament over time and make it extremely brittle. It miiiiight be ok if it's a resin print but I've never worked with printed resin before. Any sort of spray sealer can be used after painting. I use Krylon's matte or gloss sealer depending on how I want the project to look.
3D prints have layer lines and sometimes sanding them smooth can be hard. I use XTC-3D epoxy coating or Bondo spot glaze putty. The XTC is better (less sanding, smoother) but the Bondo is cheaper and easier to get (more sanding, a little more forgiving at retaining finer details). I've seen some people use wood filler too but I haven't experimented with that at all.
Good luck with your prints!!
14 notes
·
View notes
Text


so I recently repainted @bureau-of-mines's CGF TC2000
The both of us are pretty enamored with this color scheme and it actually works very well with the local flora as well (at least for dry summer/fall terrain)
Here it is compared to the pattern my buddy did on my Ops Core FAST (which I'll probably be repaint in the TC2000's camo scheme here soon):


The paints I used, for those curious are:
Parker Coatings 'Dead Grass' (Base color)
1944 Militaria 'German WWI Graugrün'
Krylon 'Satin Brown Boots'
Rustoleum 'Camo Earth Brown'
The question now is will I cave and paint a rifle in it?
#ballistic helmet#mich helmet#mich 2000#ach helmet#rattlecan#camo paint#ops core#ops core fast#fast helmet#tactical gear#tactical helmet
9 notes
·
View notes
Text


Updated this painting from 2023! I fixed up the chocolate and I sprayed the canvas with some good ol krylon clear spray cause i wanted it to be shiny (also it just holds everything better)
#artists on tumblr#artist support#new art tumblr#new artist#original art#painting#fake food#food art#churro#chocolate#acrylpainting#chocolate spread#food painting
10 notes
·
View notes
Text

IKEA wooden drawers box revamp: watercolour map style!

After my arm surgery, when I was wearing a cast and doing everything in my life one-handed, I needed a project to help the time pass, and I decided to take this filthy worn out old wooden Ikea drawers box and give it a watercolour map glow-up. Sadly i do not have a fully accurate before photo, but it was covered in dust and glue residue from being taped closed for many moves over the years, and had a few spots where it was splintering on the corners and edges.
First step was to sand the shit out of it. We didn't have much sandpaper on hand when this whim first took me, so I used scraps of griptape my partner had leftover from setting up his last skateboard; it was extremely effective!

After it was sanded with the grip tape, and a followup series of much finer grit blocks I picked up at home hardware the next day, I gave it a wipe to remove dust, and then went in with watercolours on the unfinished wood.
The first washes were all very wet, and once they had dried they'd raised the grain significantly, so there was another round of fine grit sanding afterwards. Once that was done I gave everything a workable fixative spray to lock in the paint, and then a diluted transparent watercolour ground coating so I could confidently layer more paint on top. This second layer of paint was much darker, much more detailed and had less blurry wet edges, as you can see here:

Then we did another round of fixative + watercolour ground, and then I got to go in with the final touches - adding highlights to the edges of bodies of water, etc.

Then I got out the metallic copper paint and the tape and added decorative border lines to the drawers themselves, and also painted the top edges of the drawers metallic to really lean into the luxe aspect.
No photos of the insides, sadly, but I tinted each drawer a blue or green inside to keep things interesting and on theme.
Then another coat with the fixative all over, and then as many coats of varnish as my krylon can held, and now it's my favourite piece of storage!


While I used archival art supplies, I can't make any promises to myself about how long they will stay vibrant -- the wood is old, well used, and ikea made me no promises about its archival features when I bought it on sale in like 2001. So this might all be a fleeting glory, soon to fade and chip and wear out, but until then I am very very proud of it!
And I did it all with my non-dominant hand! It was so frustrating! But the results were well worth the fight.
47 notes
·
View notes
Text
Sanding and touchups are done. Had to trim the sharp tips, and up close it's not perfect, but I think it's ready for paint. Debating if I want to wait for a clear day to spray-paint, or if I want to hand paint with what I used on the TKB skull I did. Might do a test spot on the back just to see if it even bonds to the material. The spray-paint I know will, because it's Krylon which bonds to practically anything.
Pic of current progress.

25 notes
·
View notes
Photo


Converse pro leather hi spray painted with krylon mambo pink
0 notes
Text

2020
0 notes
Text
It's nowhere near photo ready, but I feel super accomplished about he shit I got done today. I cleaned up around my tv, moved the old bookcases (small ones) and set up the new kallax unit I bought.
I also made stew and remembered the Pillsbury buns I got a while ago in time to use them just before the expiry date!
There's still stuff to do and put away, but I'm pretty much done for the evening. I was going to throw out the old bookcase but it's not as destroyed as I thought it was so I'm going to get some L brackets to stabilize it and some krylon and take it outside to paint it. Because I can use it to show off the papercraft stuff I'm making.
Also thinking of getting a new sofa. Anyone know the weight capacity of the Ikea ones, I cannot for the life of me find numbers on their website.
Also also, some super good news, I finally met with the surgeon for my top surgery and I'm one step closer for that. When I spoke to him regarding my hopeful timeline the surgeon didn't say that it was impossible to have the top surgery before my brother's wedding in May, just that he would recommend 6 weeks recovery before travel.
Fingers crossed and good vibes.
5 notes
·
View notes
Text
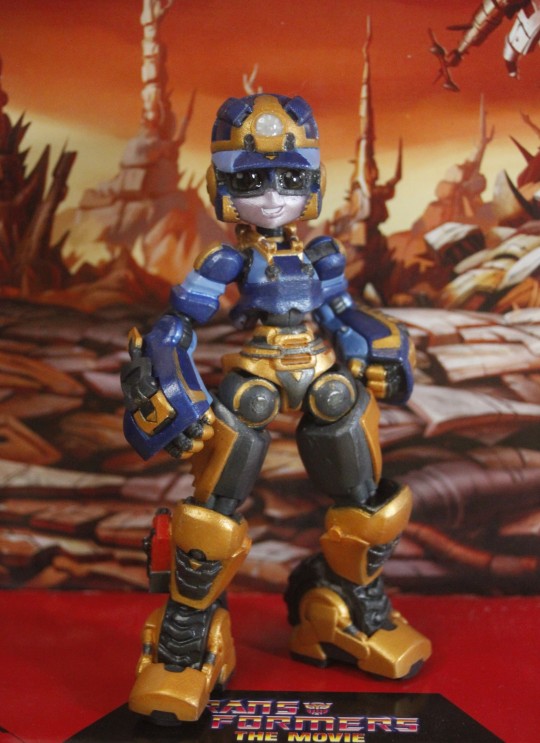


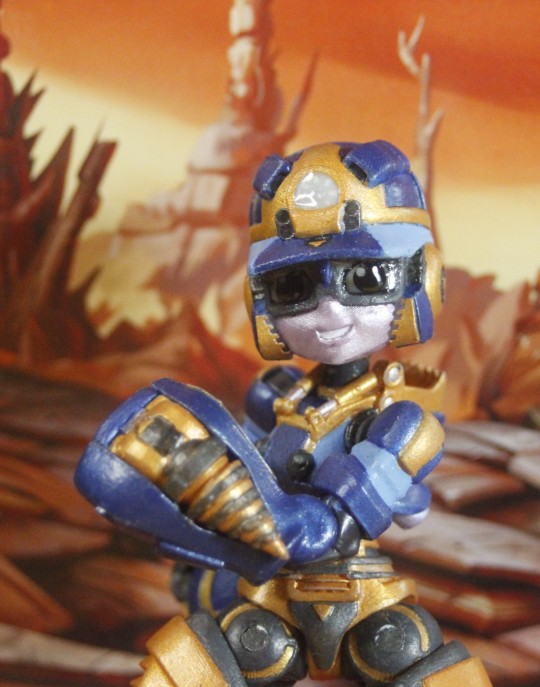
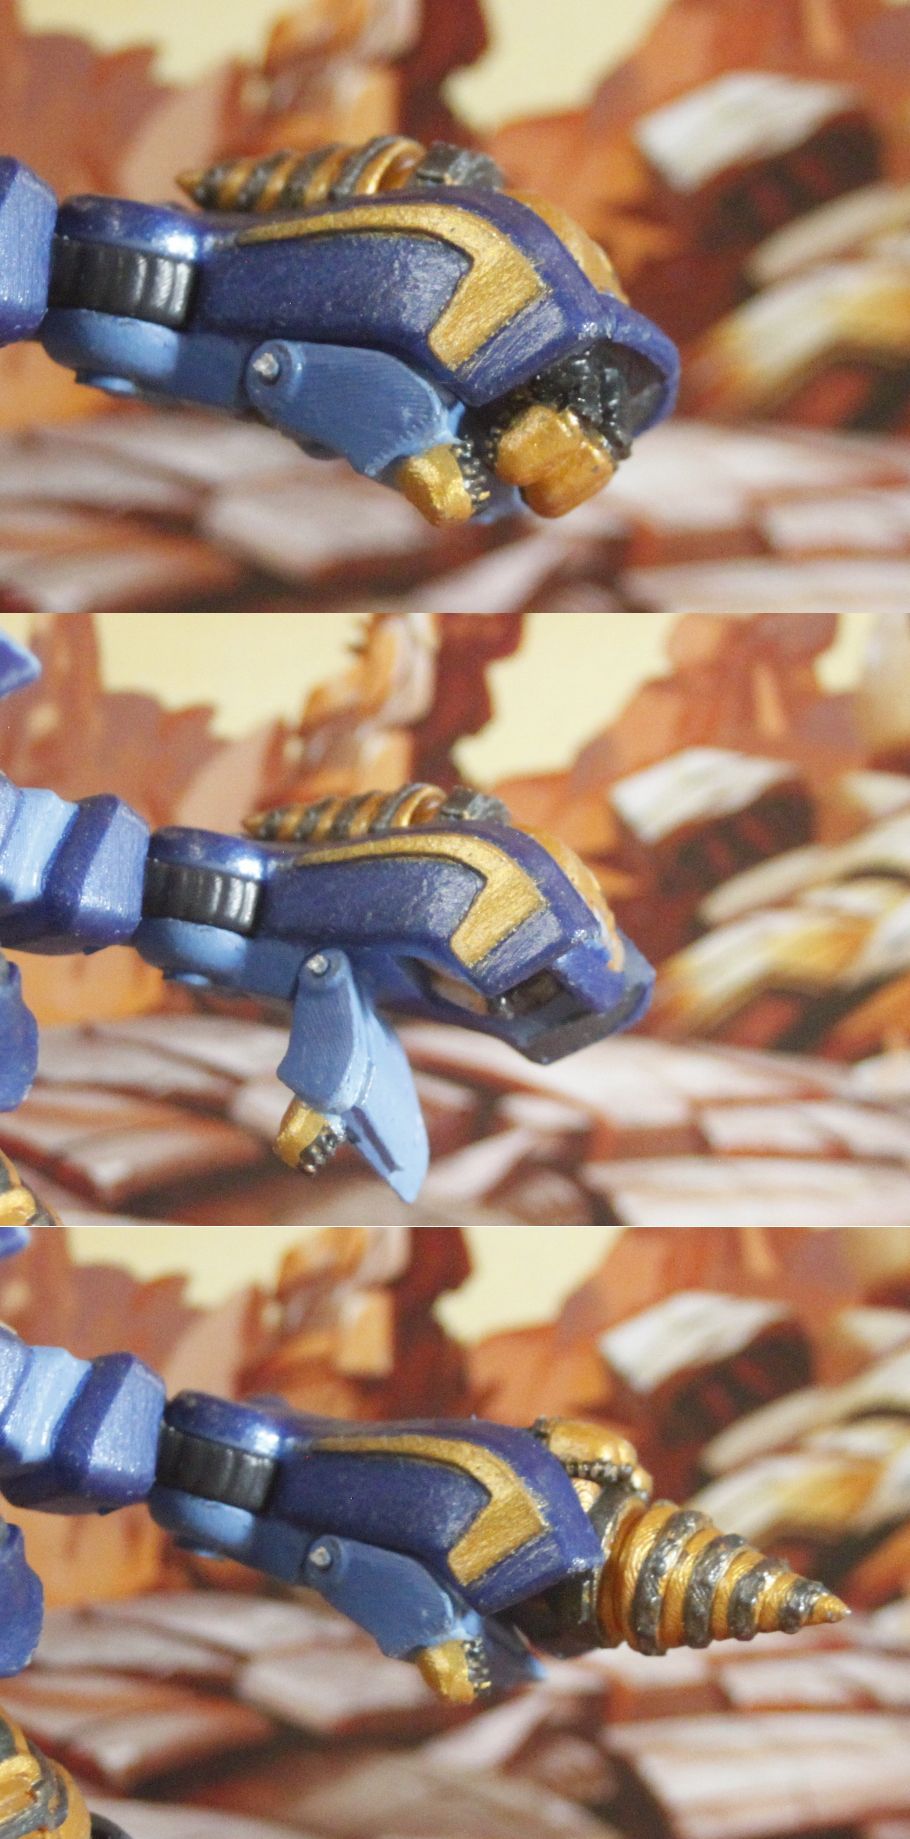


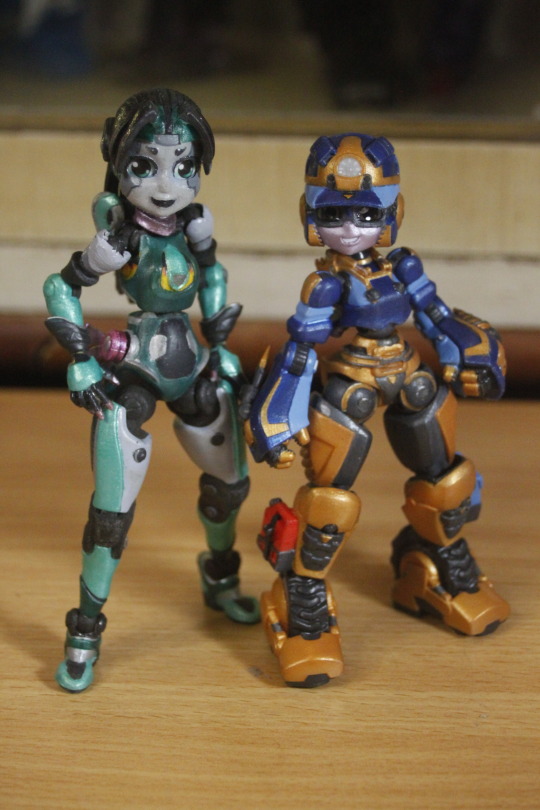
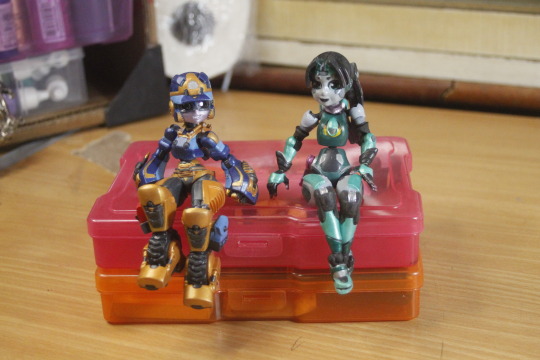
Bit Cobalt, my second resin printed action figure. (The first was Caeli, the turquoise figure in the last few images.) Bit was modeled in Blender and printed with an online service. She's around 12 cm tall, intended as 1/12 scale.
Bit wears her Transformers influence on her sleeve, especially 2007's Animated line. With a little more practice, I'd like to attempt building a transforming robot figure in the future, but I needed to experiment with some joint and material tolerance details first. Another influence was Robot Neoanthropinae Polynian. I really enjoy the design sensibilities of that line, but I found the figures frustrating to handle and pose, so I made it a goal to make these figures at least pose better than my copy of Polynian Roza. I think I more or less succeeded. Bit's eyes are essentially stickers, and the clear elements are UV cured resin added after painting. Most of her joint parts use ABS or wire pegs. Her mid-torso joint is a Hobby Base spherical figure joint similar to Revoltech or Polynian, and her neck joint is a steel ball bearing and some small magnets, allowing for very smooth movement in any axis. The paint is mostly Vallejo and FolkArt acrylic. The Vallejo varnish is mostly holding up so far, but designs with more interaction and potential scraping between parts (read: any transforming robot figure) will probably need some Krylon. Aside from doing a full transforming robot figure, something else I'll work on improving for my next design is the out of the box fit. Bad clearances and tolerances led to a lot of sanding down pegs and shaving out spaces in putting Bit together. I'm deeply indebted to my partner @aprilpowered and my friend WorkbenchManiac, who are respectively far more skilled in character design and modeling, miniatures, and 3D printing than I am, and who were a huge support and a source of feedback and advice along the way.
9 notes
·
View notes
Text

Eddie Van Halen's iconic '5150' guitar, decorated with Krylon paints.
73 notes
·
View notes