#kiyo shikigami
Explore tagged Tumblr posts
Visit Tumblr Blog
Explore Tumblr blogs with no restrictions, modern design and the best experience.
Last Seen Tumblr Blogs


Fun Fact
Tumblr is available in 18 languages.
Text

Miyo and Kiyo 💕
#miyo saimori#kiyo shikigami#kiyoka kudou#miyo x kiyoka#watashi no shiawase na kekkon#my happy marriage#fanart#shoujo
45 notes
·
View notes
Text
The Birth of Kiyoka's shikigami, Kiyo (2x10)
14 notes
·
View notes
Text
My Happy Marriage Second Season Episode 10 Review - Miyo's Reconnaissance Mission
This episode was great! Miyo decides to take matters into her own hands when it comes to rescuing her fiancé. She may not be a trained soldier, but nothing will stand in her way of getting her beloved back. She needs a way to awaken her powers. It’s also nice that the plot point of Kiyoka’s shikigami that he gave to her during their hatsumode outing plays a huge part. The fact that it takes the form of a young Kiyoka complete with his childhood voice actress Yumiko Kobayashi makes Kiyo an adorable addition to the cast.

I love that Miyo is instantly accepting of Kiyo. I guess having Kiyo around is her first step of being a future parent. Kiyo is basically Kiyoka’s familiar in the sense that everything he sees is what Kiyoka sees too. I do wonder what Kiyoka thinks about Miyo and Kiyo sleeping together. One little detail that I like is that when Miyo receives the journal from her grandfather, Kiyo is the one reading it, showcasing that Miyo’s reading skills haven’t advanced yet. Kiyo is basically showing the details to Kiyoka while also reading stuff aloud to Miyo. It’s a nice little detail.


I like that since Miyo isn’t a fighter, she uses her own methods to fight like sneaking out without anyone noticing, allowing Kiyo to guide her as well as letting Takakura guide them out of the palace. She goes to her grandfather for help as he’s the biggest connection she has to learn more about Naoshi. Despite everything he did in the previous season, I’m glad that Miyo didn’t harbor any grudges and still went to him for help. I think people care too much about action in that even a non-fighter can fight in their own ways.


Naoshi’s relationship with Sumi is showcased thoroughly here. Naoshi was originally a violent child who killed his parents’ murderers and was a bit of an outcast in the Usuba family because of it. Originally, they were going to erase his powers, but being around Sumi softened him, so they reconsidered. Sumi meant everything to Naoshi. Sumi dreamt of a world where members of the Usuba can walk freely without restraint and that’s been Naoshi’s goal the entire time, even if it means that he has to dirty his own hands to make it come true. However, that dream comes to an end for Sumi as she decides to devote herself to becoming a mom for Miyo and telling Naoshi to be free to find something else he loves.

Seeing his flashback makes Naoshi a rather sad character. Sumi has been his whole life—his purpose for existence in a way. His devotion and obsession with her and her dream is the reason why he does all of this. I did mention before that the reason he calls Miyo his daughter is not because he wants to be her dad, but it’s because he wants to use her as a tool for his own gains. He doesn’t even see her as a person—only as a means to get what he wants. It’s like he’s becoming his own Grotesquerie in a way…

Since Sumi was the reason why Miyo saw the flashback, I feel like Miyo will be the one to deliver her final message to Naoshi. She needs to. Now that her powers have awakened, it makes me wonder what she’ll do to stop him. Will she put him in a dream where he’s reunited with Sumi? I honestly can’t wait…


I also love that the ending of this episode is like the start of the season’s climax. It’s like Miyo is finally going to traverse into the final dungeon to seek out the final boss. I can’t wait to see what happens! What are your thoughts about this episode?

#my happy marriage#watashi no shiawase na kekkon#Miyo saimori#kiyo#Kiyoka kudo#Yoshiro usuba#takakura#sumi saimori#naoshi usui#review#anime#anime review#ecargmura#arum journal
5 notes
·
View notes
Text

very funny to me that she's having a serious talk with her grandpa but the kiyo-kun shikigami is there also
2 notes
·
View notes
Text
so i really adore writing niche crossover and bcs i currently reading a fuckton lot of jjk fanfic on ao3 and its that time of the year when i miss reading the highlander and methos fanfic, kinda want to write an immortal ijichi kiyotaka au LMAO
look i found this one intriguing gojo x ijichi rare pair fic that i adore and will def re-read (Opposites Attract by Durendel32) and kinda like the staff and other sorcerers thought ijichi to be this average assistant manager, but gojo always has some weird feelings around ijichi, that he's different and has more depth than was shown
but because everything that happened in their high school years, gojo didn't really pay attention to other years, only when he watch how ijichi behave and thought he didn't really have potential to be a sorcerer and kinda bullied him a lot to quit
ijichi is actually one of the ancient immortal and knew methos aka the oldest immortal. he didn't really remember his original name (it's Fukurokuju, but he's more used to any variation of Kiyo) he's around since jomon period and on his third millennia (while methos is on his six), he's really the type to roll with punches and that's why as the assistant manager he's known for being unfazed by even the craziest missions and sorcerers. he learned a lot of language esp chinese-korean-japanese, and he always able to see curses (rare as they were in those eras) but didn't understand wtf is that
ijichi met methos around his seventh centuries in, he used to have an immortal teacher but she's been dead for a couple of decades. methos kinda roamed around china and they met during some battle against some people (i don't really know the history about those area LMAO) and after they found out they didn't want to take each other's head, they became fast friend (esp when ijichi didn't really judge him about being Death)
ijichi knew about jujutsu because even thought he roam around the world during his years alive, he still came back to japan from time to time, so he's actually around during heian era before and after sukuna exist. he was tengen's acquaintance and tengen's place is where he stashed some of his most precious books
fast forward to probably four hundred years before jjk canon, ijichi that was currently named Kiyoomi, fell in love and married Ijichi Naomi and took her last name. the ijichi is a minor but powerful jujutsu clan, and ijichi kiyoomi learn a lot about how to access shikigami. it was round this age he also befriend the current six eyes-limitless holder, Gojo Akira, and also found out one of gojo's step sibling, Gojo Hanami, is an immortal so he vow to be there to help her when she first die
naomi still has a child (from previous relationship) but both ijichi thought it would be better for kiyo to claime the child as his. then the ijichi clan found out about his immortality and his real name (which actually considered a deity,,, what a surprise) and sworn to always allow Kiyo to came back even if decades or centuries have passed. so now ijichi has a place and clan to came back to
fast forward to probably ten years before jjk canon, ijichi and methos roam around africa and ijichi was cursed by one of the curse user there, and then he was aged back to around six yo even tho his body was 31 (the age when he first die), so bcs of this he decided to come back to japan and being adopted by the ijichi clan, and claim the name Ijichi Kiyotaka
--
edit : here's for part two
#crossover#niche crossover#jujutsu kaisen#ijichi kiyotaka#methos#somehow i adore writing weird xover like this#jjk#fanfiction#ao3#wip#plot bunny#highlander the series
3 notes
·
View notes
Text
Flower of the Netherworld Event

The first big event of 2021! It is 1-2 week long Onmyoji Guardian type event that coincides with the release of SP Higanbana and it consists of 3 main parts; Mundane Dream, Withering Dream and Riverside Tourney. There is also a puzzle, but it's something you should be able to complete just by participating in the event everyday.
Mundane Dream
Progress through multiple stages by using hanafuda cards to move across tiles. As you progress through each stage, Kamaitachi will trail behind you with the intent of getting ahead of you and steal tile rewards. Every time Kamai moves you'll get some event currency. If they do happen to get ahead of you and you go past them, you will be forced to fight to a boss consisting of 4 Kamai. When you start reaching some of the higher stages (~20), Kamai will lot more and it’ll be harder to catch up to them.
Each day you start with 25 cards and you can get 5 more by completely your dailies or by buying 25 for 5-10 jade per card from the exchange shop. You'll also start each day with 3 special cards that let you choose how many spaces you want to move to, 3 more can also be bought for 15 jade per card from the exchange shop. Special cards can be used a max of 6 times per day. Both types of cards only let you move across a max of 3 tiles. If you "roll" the same number 2-3 times, you'll move across twice as many tiles (eg; roll 2 twice, move 4 tiles).
At the start of each board, you choose what type of bonus rewards you’ll get from tiles - exp, gold, evo materials or souls. For the first board, random souls will be selected for you. On auto the same bonus reward type will be selected for you.
These are the types of tiles you can land on;
Bosses: Costs 3 AP to do, can be done solo or co-op, has no time limit but there is a timer. Like Senhime's event, every time you defeat a boss within 40 seconds a new stage of a higher difficulty will be unlocked, there are 10 stage in total. Only stage 5 can be unlocked on day 1, stage 8 on day 2 and stage 10 on day 3. Stages are shared with all bosses and with Withering Dream. The higher the stage, the better the rewards.
Tiles with a red aura on them have SSR/SP bosses that the give better rewards.
Quizzes: The questions are the exact same the Demon Encounter quizzes. On auto only correct answers are selected. If you answer manually and get it wrong, you'll be given the option to fight a boss for the same rewards as if you answered correctly.
Reward Boxes: Includes event currency, Gashadokuro Tefuda (wallet/card holder looking thing), and a few item/s of your selected bonus reward type.
Move Forward: Move forward 1-3 tiles.
Ink Drawing: Try your best to trace the shape shown to you, then you'll get a letter rank depending on how well you did along with some event currency. If you choose to not trace the shape (ie; try to exit the activity), you'll have to fight boss instead and will get event currency for B rank. On auto you'll get rewards for A rank.
Mystery Pouch: Can buy 1 of 3 items for 50 jade. The items are a reward box with 50 AP and 100000 gold in it, bonus rewards for your next 3 turns or 4 special cards. Buying the special cards increases the max use limit for the day by 4. On auto no purchase will be made.
Near some certain tiles there will be flaming butterflies, going past them unlocks short story dialogue that can be read by clicking the unlabelled lantern in the bottom left of the page.
Clearing a stage grants you a luxurious reward box with event currency, tefuda, 2-3 butterflies, and a large batch of your selected bonus reward type. If you selected souls, you'll get 2-4 rows of mostly 5* souls and a few 6* souls.
Loyal Blade
Before challenging bosses, you may notice a sword icon for Loyal Blade buffs above the solo and co-op buttons. Loyal Blades are obtained by buying them with 120 tefuda per 1 from the exchange shop. The buff effects are;
10: Excess crit is converted into crit DMG.
30: Start battle with 8 onibi.
50: When attacking, ignore 30% defense.
80: Enemies gain 50% increased damage received.
They also provide 1% crit DMG and ATK per 1 blade, 1 SPD per 2 blades and ~1% crit per 3-4 blades.
Withering Dream
This is the same as Mundane Dream but with a twist. Requires a special pass to do, it is solo only, there is only 1 stage and there are 15 cards (12 normal and 3 special) used here. The cards are separate to the one used for Mundane Dream. Your goal is reach the boss at the end by using as few cards as possible so you can have extra time to fight it. There is also ranking, but there are no rewards. This part of the event cannot be done on auto.
The only tiles here are rewards boxes and mostly SR/SSR/SP bosses. As you pass certain tiles, there will be spider lilies with question marks on them. Going past them lets you pick 1 bonus effect out of a random selection of 3. The end boss is Gashadokuro and endless waves of summoned skeleton soldiers, you are not expected to defeat this boss. By default you have 3 minutes to fight it, for every unused card you get an extra 30 seconds. Rewards obtained from all the tiles are given out after you are done with Gashadokuro.
Recommended bonus effects to get are:
Deal 30% ST/random target splash damage
Deal indirect splash damage (cannot exceed 100% of own attack)
Gain 30% to deal double crits
Increased ATK by 2000 and crit by 20% + excess crit is converted into crit DMG
Increased crit DMG by 30%
Gain 30% reduced SPD for 50% increased damage
Attacks ignore 200 DEF
Additional souls sets like kyoukotsu, seductress, watcher and/or shadow
Pretty much anything that helps you deal more damage is recommended.
Riverside Tourney
This is a 16 person draft PVP tournament. Costs 1 scroll to join, scrolls can be bought for 50 jade per 1 from the exchange shop. There's no penalty for quitting after joining. For the first match of a tournament you draft pick 5 random shiki and 1 bonus effect. If you win you can pick one of your opponents shiki and your opponents bonus effect. Then for every match afterwards, you can draft pick from your initial 5 shiki and bonus effect + additional shiki and bonus effects obtained from won matches.
Ranking rewards include;
Rank 1: 66666 event currency, 20 gold orochi scales, 100 AP
Rank 2: 55555 event currency, 10 gold orochi scales, 70 AP
Rank 3: 36666 event currency, 8 gold orochi scales, 60 AP
Rank 4: 33333 event currency, 8 gold orochi scales, 50 AP
Rank 5: 26000 event currency, 5 gold orochi scales, 25 AP
Rank 6: 24000 event currency, 5 gold orochi scales, 20 AP
Rank 7: 22000 event currency, 4 gold orochi scales, 18 AP
Rank 8: 20000 event currency, 2 gold orochi scales, 15 AP
Ranks 9-16: 8000 event currency, 8 orochi scales, 5 AP
Rewards for rank 9-16 are all the same. Rewards are immediately obtained when the tournament is over. If you quit after joining a tournament you'll receive the rewards for whatever rank you would've had. So if you quit immediately you'll get the rank 9-16 rewards.
Like the Tesso draft betting in Senhime’s event, there are also extra rewards for getting 1st rank 3-6-9 etc consecutive times.
Traces of a Lost Butterfly
Collect butterflies by clearing stages of Mundane Dream to complete a puzzle. Max of 5 butterflies can be obtained per day. Submitting them grants random rewards and submitting 5 unlocks some short story dialogue. The reward for completing the puzzle is a loading screen illustration.
Exchange Shop
The shop is split into 3 tabs. Tab 2 and 3 can only be unlocked by clearing stages 7 and 14 of Mundane Dream. Notable rewards for each tab include:
Tab 1: Event items (cards, Withered Dream passes, Loyal Blades, tourney scrolls, butterflies), special kekkai/realm cards, skin tickets, gold orochi scales, 3* white daruma, 1 blue summon ticket, soul boost, gold and AP.
Tab 2: Loading screen illustration, 6* transfer ticket, special kekkai/realm cards, skin tickets, orochi scales, demon souls, 4* white daruma, gold and AP.
Tab 3: Event frame, Higanbana* skin, random SSR/SP, event packs, 1 blue summon ticket, 50 jade, black daruma, 5* white daruma, soul boost, gold and AP.
Note: The skin available in tab 3 is the Damsel of Dusk skin. For JP/TW and GL, it might be changed to something else.
Each of the 3 event packs can be bought 99 times. The type of items that can be obtained from them are;
Pack 1: 6* souls, EXP souls, orochi scales, demon souls, totem zone tickets, kekkai/realm medal etc.
Pack 2: daruma, daruma shards, realm cards, bio affection items, soul and evo buffs, AP, etc.
Pack 3: R-SSR shikigami shards, gold and EXP buffs, etc.
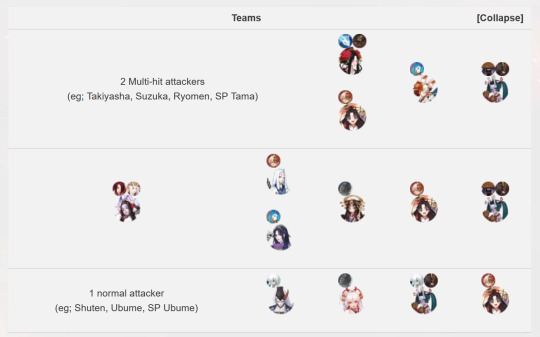
Recommended Teams
Mundane Dream & Withering Dream

First team is a general one suited for bosses with minions.
The second team is for bosses with no minions. Should use Kagura and target SP Tama with Orochi/Youkinshi. Who you use with with SP Tama doesn't really matter, they just need be good at dealing ST damage like Takiyasha and her ST form of her special attack.
After getting some Loyal Blade buffs, both teams should be capable of defeating bosses with 40 seconds.
Withering Dream: Gashadokuro Boss

Should try to change your team to suit whatever bonus effects you chose, especially if you use the Kinnara team.
For the free space you could use a 2nd Kinnara or SP Tama if you chose ST splash damage, or use just Youkinshi/Maestro to give Kinnara move turns instead. Could use Ushi if you chose increased transferred damage. If you couldn't get any splash bonus effects, then you could use any AOE multi-hit shiki (Suzuka, Ootengu, Ryoumen, Ubume, etc).
You could also just stick with the standard Kinnara team and use SP Kiyo or SR Kiyo. Sasori isn't 100% needed either, so she can potentially be swapped out with someone else.
22 notes
·
View notes
Text
Chinese Onmyouji movie
Huh, well, that was interesting.
I knew something was up when Netflix was calling it "Yin Yang Master" just cuz usually Chinese films don't call cultivation masters that, but they call Japanese practitioners of basically the same thing that in Japan around the Heian period. And like specifically that's the name of the Onmyouji series based off of the legends of Abe no Seimei, but like because it was a Chinese movie and I didn't look anything up before hand and I'm not that knowledgeable of Mandarin I totally didn't notice initially that Qingming = Seimei. I was totally thinking though that for a Chinese movie a lot of the costumes and such look a tad Japanese, and I was right. I didn't get a hint and decide to Google more about the film until the part where Qingming alludes to his mother being a fox and maybe that's why the tadpoles were acitng up. Then I was like, wait a minute, and started to think and try to remember how you read Seimei in Mandarin. Like what kanji is used to write Seimei? Oh yeah, the first one is kiyo which means it's clear which means it's the same as the character that they use for all the Peak Lords in SVSSS. What's mei in Mandarin? Uh, that's the one they use for the Ming Dynasty so Qingming. GDI.
I really should have gotten a hint sooner because they were using Spirit Guardians/shikigami and like Chinese people don't use shikigami generally and there were a lot.
I really like the Onmyouji series and like all the legends around Abe no Seimei, so you would think I would notice it sooner, but I think my suspension of disbelief just really wanted to put that aside though because cultivation stuff is such a craze these days.
Pretty good film overall. Sometimes Chinese supernatural films take a weird turn and jump the shark or just have random plot points that don't make sense for some reason, but there was a pretty good logical through line for the whole plot where you understand why suddenly a giant monster has appeared and like actual struggle and stuff and no random Deus ex Machina because legend reasons.
Only real disappointment probably being that there wasn't an Ashiya Doman. Oh, well.
Just reminds me though I kind of want more Nurarihyon because evil Seimei is fascinating.
0 notes
Text
Sea of Eternal Life Event
A brand new week long event, that coincides with the release of Senhime. It is the 2nd half of the 2 part event "Promise with the Ancient Sea". Consists of 3 main parts; Seacoast, Sea Exploring and Eternal Sea of Ruin. The latter is only unlocked on the 7th day after maintenance.
Seacoast
Eternal Tide: Tidal Power
After clearing all the story activities for each of 5 areas in Sea Exploring, you'll be granted a Tidal Power. Tidal Powers unlock buff effects, such as;
Travel 30% faster in Sea Exploring.
Enemies gain 30% decreased DEF.
Allies gain 10% increased ATK.
Have a 5% chance to defeat a boss before challenging it.
Paper dolls will farm an extra 18000 event currency per hour.
Eternal Tide: Sea Souls
Use Sea Souls obtained from bosses or the event shop to unlock passive effects and bonus stats for your team. All Sea Souls increase 2 bonus stats by random amounts. They can also unlock/upgrade passive effects, but which passive up to chance. Low grade Sea Souls have a chance to upgrade 0-2 passive effects while high grade ones have a chance to upgrade up to 0-4.
Max bonus stats you can gain is 100% for ATK, HP, DEF, Crit, Crit DMG and 100 for SPD.
(;w;) Due to time constraints, will not be providing translations of the passive effects. Please make sure you read the descriptions for them ingame when the event is live.
Sea Stories
Can reread the event story here.
Treasure Hunting
Paper dolls will farm event currency for you here, even when you're not logged in. However, the paper dolls will stop working after 12 hours if you don't claim all the event currency they've earned for you. At the start of the event you can earn around 200k/12hr and by day 5 you should start earning 2mil/12 hours.
While farming in Sea Exploring you may notice Treasure Maps among your reward drops. Treasure Maps increase how much event currency the paper dolls will farm for you on the next day of the event, eg any maps obtained on day 1 won't affect how much they'll farm until day 2 and so on.
Sea Exploring
Interface
If you didn't pay attention during the event tutorial ingame, then please take a few minutes to familiarise yourself with the interface.
To move around the map you can; 1) manually control the boat, 2) tap the icon for an activity you can see to auto travel to it or 3) open up the mini map in the top right then select an icon to auto travel to its location. Manually controlling the boat is extremely difficult due to it being impossible to turn without doing a full 360.
Under the mini map is a torii gate icon, clicking it will bring up a menu. On the right there'll be different areas you can quick travel to, first option is the Seacoast. On the bottom left there is a button that takes you to the event shop.
The yellow text above the lock team and auto buttons auto travels you to story activities. If it doesn't do anything, that means you need to unlock a new area to continue.
Exploring
We start in the north west area of the map. Other areas can be unlocked by manually going to borders and unlocking them, each area requires a specific Tidal Power to be unlocked. The south east area can be unlocked on the 5th day.
Can be done on auto. On auto the boat will only go to 2-3 of Sea Spirit Trails and alternate between them, if you've unlocked the middle area it'll always alternate between the same 2-2 bosses there. Even if you're right next to a Sea Spirit Trial or any other activity, even in a different area, auto will not take you to it.
Activities:
Story: Unlock event story and clear battles with Suzuka, Yao and Senhime.
Sea Spirit Trial: Defeat bosses for rewards, costs 1 event AP to do solo or co-op. Every time you defeat a boss within 10 turns a new stage will be unlocked, there are 10 stage in total. Stages difficulty is only shared with bosses within the same area. The higher the stage, the better the rewards (eg. stage 1 gives ~40000 event currency while stage 8 give ~90000). They also have a chance to drop low grade Sea Souls.
Ootakemaru bosses in the south west and middle areas give the most event currency (~100000).
Sea Monster Trial: Defeat Kraken, Angry Kraken, Namazu or Shinkiro for similar rewards you would normally get from Kraken in regular PVE. Shares stage difficulties as the Sea Spirit Trials within the same area, but get slightly less event currency than in Sea Spirit Trials. They also have a chance to drop low grade Sea Souls. There is no Sea Monster Trial boss in the 5th area.
Co-op Whirlpool: A co-op area where you and others can clear 4 bosses together, but can be done solo. Each whirlpool can only be cleared once. Rewards from each boss include ~60000 event currency, both low and high grade Sea Souls, orochi scales, demon souls and 1-3 rows of 5-6* random souls.
If you played on CN during that collab with the Ebisu skin, it's exactly like that.
Tesso's Treasure: It's basically draft duels + betting, costs 1 event AP to do. Draft pick some shiki to fight against an AI picked team, then place a bet on your team with event currency. Can also increase your bet reward by picking a buff for the enemy draft team. If you lose your bet you can choose to fight Tesso, but be careful! Tesso's minions will be the ones you draft picked.
Highest amount of event currency you can win is 540000 and there's a chance to get a 1-2 Sea Souls as well. After winning 3-6-9 etc matches in a row, you'll also get a one time reward.
Reward Box: Get rewards such as 80000-100000 event currency and guild medals. Each box can only be claimed once.
Event Shop: Going to it unlocks 1 of the 5 tabs for the shop, plus you can also see Youko stand outside it while wearing his new skin.
Torii Gate: Going to it unlocks quick travel between areas.
Flowers: Read messages left by shikigami or other players, can like them or leave a comment on them too. Or create your own message for others to read.
Note: Some activities like Sea Monster Trials and Tesso's Treasure can only be done a certain number of times per day in each area.
Eternal Sea of Ruins
After the 7th day (on the 2nd Wednesday of the event after maintenance), the server must work together to defeat the mermaid king within 2 days. However, the boss won’t be challengable from 23:59 to 08:00. Costs 6 AP to challenge the boss.
The boss has 2 modes; morningtide and eveningtide. You can can switch between before challenging them, both modes have different skills, so pick whichever mode you find easiest to do. Under the HP bar for boss will be another 2 bars, each one represents the 2 modes. When both halves have been reduced to 0%, the boss will enter a weakened state that lasts for 1 hour.
Can get 100000 event currency for doing more than 100mil damage and ~10 picture book(?) fragments. When you have 40 fragments, can use them to pick a 6* soul out of a random selection of 3. The rewards for total accumulated damage are; 10 jade, 15min soul buff, 1 blue summon ticket, 10 black daruma shards and a 5* white daruma. Reward for defeating the boss is an animated version of the frame obtained when this part of event starts.
Strongly recommend maxing out your Sea Souls before this part of the event starts.
Exchange Shop
The shop is split into 5 tabs. Each tab can only be unlocked by going to each shop on the map. Notable rewards for each tab include:
Tab 1: event AP, Sea Souls, gold, AP, 50% EXP buff, 6* transfer ticket, 3* white daruma, 1 blue summon ticket, event frame, shikigami background (ch27 BG),
Tab 2: Youko skin, shikigami background (ch4 BG), 1 blue summon ticket, skin tickets, gold,
Tab 3: 100 jade, Sougenbi scrolls, blue daruma, 5* white daruma, AP, 1 blue summon ticket, 2 5* special realm cards,
Tab 4: 150 jade, skin tickets, gold, orochi scales, a 5* special realm card, evo material pack,
Tab 5: AP, SP skin tickets, black daruma, random SSR/SP, a loading screen illustration, 3 event packs,
Each of the 3 event packs can be bought 99 times. The type of items that can be obtained from them are;
Pack 1: R-SSR shikigami shards, gold and EXP buffs, etc
Pack 2: 6* souls, EXP souls, orochi scales, demon souls, totem zone tickets, etc
Pack 3: daruma, daruma shards, realm cards, bio affection items, soul and evo buffs, AP, etc
We only get 30 event AP per day, so buying all of daily event AP in tab 1 is recommended. If you have spare jade to spend, buying some of the daily Sea Souls in tab 1 is also recommended.
If possible, avoid spending your event currency until you unlock tab 5 of the shop. It is not possible to buy everything.
Recommended Teams
Sea Exploring
First team is for general farming. Second is for fast clears to unlock harder stages, can also swap out Enmusubi for another multi-hit attacker like Takiyasha or Suzuka. And the 3rd team is for people who have maxed out the monkey and tako drum Sea Souls and want to fully take advantage of them.
For the Sea Monster Trials, use whatever team works for you.
After you have maxed out the bonus stats from Sea Souls you won't need crit at all, so remember to adjust your souls sets accordingly.
Sea of Eternal Ruin

Like the previous event, as long as you have a team that does really well against a single enemy you shouldn't have too much trouble with this.
If you intent in using the first team and don't have Enmusubi, the alternatives are Senhime, Shoyou, Kiyohime or SP Kiyohime.
If you're a beginner, recommend fighting the boss in morningtide mode. If you’re not using a team that needs kyoukotsu on Ushi, then remember to swap her set from shadow to watcher as the fight goes on.
For the last team you could use SP Kiyo instead of Sanbi but why you do that. Make me proud by using Sanbi!
13 notes
·
View notes
Text
Bound by Love Event

A new 2-week long event that coincides with SP Kiyohime's release. It doesn't share many similarities with other events, Castle of the Sun and Bonded with You are probably the events it's most similar to. However, it does vaguely resemble the False God type events. Consists of 5 major parts; Mad Desire, Cultivation, Dispatch, Rose Tinted Memory and Obsession.
Mad Desire
Progress through multiple stages by controlling the 4 onmyouji to purify and defeat bound snake bosses. Costs 1 event AP to clear a tile and 3 AP to fight bosses, however, event AP is not needed to move around the stage map. This part of the event can also be done on auto.
Use the onmyouji to move across the stage map. By default, they can move across 2 tiles at a time. Movements are turn-based, can skip turns. Defeating a snake boss increases how many tiles the onmyouji that beat it to move across by 1 (max 2, only applies to current stage). Can only use the onmyouji you are currently controlling to fight snake bosses, ie no switching onmyouji. So when moving across the map or fighting certain snake bosses, it's important to think about which onmyouji you want to use.
Purification Bar: At the top of the screen is a bar that fills up when you defeat snake bosses and clear tiles with bells, reward boxes or quizzes. For most stages, this means clearing around 80-100% of the stage.
Snake Bosses: Costs 3 AP and 1 event AP to do solo or co-op and on Easy or Hard difficulty. There is a 3-minute time limit, but HP for the boss and minions will carry over between attempts. HP is not shared between either difficulty.
On Easy the bosses will have 3 minions, while on Hard they will have 5.
The purification bar must be filled before you can challenge the bound snake bosses.
Bosses will gradually become stronger as you progress through more stages.
Bells: Grants a buff depending on the bell type. Only applies to the stage you're on.
Red: Defeats 2 roaming snake bosses.
Blue: Increases damage dealt and damage reduction for your team.
Purple: Increases how many tiles the 4 onmyouji can move across by 1.
Rewards Boxes: Gives you random rewards, can potentially get black daruma shards from them.
Quizzes: The quizzes are the same as the ones for Oumagatoki/Demon Encounter. On auto, only the correct answers will be chosen for you.
Portal: Used to continue to next stage. These are hidden under the bound snake bosses.
Special Stage: A special stage with tiles in the shape of a heart. It has no roaming snake bosses and has a bunch of reward boxes. Appears for stages 20, 40, 60 and so on.
Snake Bosses
They will and can poison an onmyouji if they are within attack range. Poisoned onmyouji have their movement reduced by 1 tile and be inflicted with slow in battle. Poison lasts until the onmyouji moves to a new tile, slow lasts for 1 turn. After a few turns, they will start gaining buffs to attack and defence. The attack and defence buffs will increase by 2% every turn. The buffs will continue to increases even if the bound snake for the stage has been defeated.
Roaming Snakes will move across the map to poison the nearest onmyouji. They can't attack during the turn they moved on. Bound Snakes will poison the nearest onmyouji within their attack range. Must fill up purification bar before challenging them. When they have been defeated, the portal to the next stage will appear on their tile.

Cultivation
The 4 onmyouji used in this event are slightly different from the ones we normally use. In Cultivation, you can see they that all have level 60 stats, only have 4 skills and have 2 upgradable buffs. Bamboo Scrolls can be used to upgrade their buffs, which are obtained from bound snake bosses in Mad Desire. After a scroll is used, a skill upgrade point is gained. While upgrading skills and buffs, can also set teams for each onmyouji.
Seimei is unlocked by default, while the other 3 onmyouji are unlocked by reaching certain stages of Mad Desire. Kagura is unlocked from stage 5 onwards, Hiromasa from stage 31 and Yaobikuni from stage 51.
Their skills and buffs are only active while controlling them. Their skill and buff details can be read on the wiki version on this guide.
Rose Tinted Memory
Collect memory fragments from completing dispatch quests or defeating large snake bosses in Mad Desire. Submitting fragments grants random rewards such as event AP, event currency, mochi etc.
The rewards for submitting a total of 60-140-240 fragments is 100 jade and a 2* special kekkai/realm card, 20 demon souls and another 2* special kekkai/realm card, a blue summon ticket and 20 skin tickets plus some story. The reward for submitting all 240 fragments is a loading screen illustration.
Even after completing the memory, you can still use the fragments to claim rewards by going to the Rose Tinted Memory page.
Dispatch
This is basically an event version of Shikigami Dispatch. There are 7 18-hour story quests and ~3 6-hour daily quests. Can use jade to auto finish dispatch quests. Examples of required shiki for the story quests are;
Oguna, Doujo, Karasu Tengu
Hoshiguma, Shuten SP Shuten, Ibaraki, SP Ibaraki,
Sanbi, Kyuumei Neko, Baketanuki
Sanbi, Kyuumei Neko, Ushi
Zashiki, Kodokushi, Jikikaeru
Shouzu, Koi, Kappa
Heiyou, Karasu Tengu, Hitotsume
Completing these quests unlock 7 some stories and event currency. Completing all 7 unlocks a short dialogue between Seimei and Aobouzu. Daily quests all give event currency and memory fragments. They'll also be 3 event-related story quests added to Shikigami Dispatch. They will probably be temporary and might disappear after the event ends.
Obsession
The entire server must work together to defeat SP Kiyohime. Her HP can be viewed at the bottom of the event page. There are 2 phases for the boss; Eternal Daytime (from 00:00 to 20:00) and Delusion (from 20:00 to 24:00). Costs 3 AP do solo, there is a 3-minute time limit. Before challenging SP Kiyohime, must select the onmyouji you want to use. There are different buffs every day that are granted to both allies and enemies. About the 2 phases;
Eternal Daytime (Phase 1):
This phase is from 00:00 to 20:00 every day.
The minions change every day, their attacks are very weak and their HP resets inbetween attempts.
SP Kiyohime has Snow Spirit and will always target the shikigami in the middle of your team/in front of your onmyouji.
If she KO's that shiki, she'll gain some buffs and her attacks will change from single target to multi-target.
Delusion (Phase 2):
This phase is from 20:00 - 24:00 every day.
The minions from the previous stage will change to 1 of each of the 4 snake bosses.
The first snake to be hit will be the only one with an active-passive, the remaining 3 will have their passives be disabled.
Their HP is shared server-wide. SP Kiyohime will not fight / cannot be attacked during this phase.
Recommend beginners to challenge the boss during this phase.
When the snake bosses have been defeated or when SP Kiyohime's HP goes down to ~3%, all the minions will disappear and an SP Kiyohime wearing her event skin will join you as an ally. This ally SP Kiyohime provides your team with an increased damage buff.
There is ranking, but the only reward is bragging rights. Ranking is based on total damage dealt with all 4 onmyouji (ie; must fight the boss 4 times with a different onmyouji each time).
The reward for fighting the boss once a day is; a black daruma shard, 10000 event currency and 10 orochi scales. And the rewards for total accumulated damage are; 60000 gold, 30 reverse orochi scales, a special kekkai/realm card, 100 AP, 20 skin tickets, a blue summon ticket and a loading screen illustration. Rewards are unlocked with individual damage, not server-wide damage.
Rewards
The exchange shop has 2 tabs: one with typical event rewards, one with event packs. The first tab has items that are unlocked when the shop reaches ranks 1-2-3, which is done by defeating 25-100-200 snake bosses. The packs in the second tab are unlocked by defeat a certain number of each type of snake boss.
The most notable in the first tab are: 2 event icon frames, 4 loading screen illustrations, new SP Kiyo Hime skin, random SSR/SP, random SSN (frog N shiki), black daruma, 3-4-5* white daruma, 4 blue summon tickets, goryou/totem tickets, orochi scales, demon souls, AP, mochi, gold, evo and mitama/soul boosts, etc. The icon frames are the exact same, one is still and one is animated.
The type of items that can be obtained from the packs in the 2nd tab are;
Purple Snake Pack: gold, jade, pet food, evo materials, bio affection items, mochi, kekkai/realm medals,
Yellow Snake Pack: shiki shards (mostly Ns, Rs and SRs), AP, bio affection items,
Red Snake Pack: 4-6* mitama/souls, exp mitama/souls, orochi scales, kekkai/realm medals,
Green Snake Pack: kekkai/realm cards, daruma shards and full daruma, 3-5* white daruma, evo and mitama/souls buffs,
Each pack can be bought a max of 300 times.
Recommended Teams
If the teams in the images below aren’t too hard to view, the same teams are listed in the wiki guide.
Mad Desire:

Recommended AOE attackers are; SP Tamamo, SP Ibaraki, SP Aoandon, Takiyasha, Tamamo, Kani, etc.
Recommended multi-hit attackers are; SP Tamamo, Takiyasha, Ryoumen, Ootengu, Inuyasha, etc. When using them with Yao, they do not need full crit.
Can more or less use the same teams for Seimei and Kagura. For Hiromasa and Yao, however, should try to use slightly different teams to take full advantage of their buffs.
Obsession:

Can more or less use the same teams for all 4 of the onmyouji. However, if you all shiki needed for the Shuten + Shira teams and the Suzuka team build already, then use the Shuten + Shira teams with Hiromasa and the Suzuka team with Seimei. During phase 1, SP Kiyohime will always target the shikigami in the middle of your team/in front of the onmyouji, so avoid putting your weakest shiki in that spot.
For the Suzuka, shd can either use hari/seduct or kyoukotsu + songstress and on the last day, she should be switched to shingan/watcher + gashadokuro. ST Tama can be used as alternative to her.
For the last team, you'll need 2 of the following 3 Takiyasha/Ryoumen/Ootengu with hari/seduct + songstress. Ungaikyou is only needed during phase 1, so during phase 2, you can swap them out with Ushi or Kosode (whichever one you weren't already using).
Like all previous events with server-wide bosses, Ushi's mitama/soul set will need to be changed as the boss's HP slowly decreases. For the first 1-2 days, she should use hasei/shadow then be switched to shingan/watcher. However, this only matters if you don't use a Shuten + Shiranui team.
12 notes
·
View notes
Text
Daiyoukai Super Oniou / Vanquish Event

The first Super Oniou / Vanquish event of 2020! On GL this type of event is called an "Uber" event, however, it has become common for GL players to refer to all new big events as Uber. If possible, please avoid doing this because it can cause a lot of confusion, especially for newer players.
If this is your first Super Oniou event, you can read this post or the wiki version of this guide for a quick intro. Or you can read the page for past Super Oniou events on the wiki.
Bosses
Super Oniou bosses are random shikigami (daruma, R, SR, SSR, SP).
Only 50 bosses can be found every day.
The Discover button can be used even after reaching the daily cap.
10 fatigue is used to challenge Super Oniou bosses and 30 fatigue can be used to challenge them with a 2.5x damage boost.
Getting the last hit on a boss will reduce your fatigue.
There is no limit to how many times you can assist with a friend's bosses, but assisting more than 50 times will cause the fatigue cost to be tripled.
5 fatigue is used to challenge the Vanquish part of the event instead of 5 AP.
When your fatigue reaches 100, you cannot challenge the Vanquish boss or fight any Super Oniou bosses.
58 jade can be used to reduce your fatigue by 100.
Vanquish is only challengeable between 8:00 - 24:00 every day.
There is only 1 challengable boss for Vanquish, but the boss itself will change to a different shiki every day.
The HP for Vanquish bosses increase by 1mil each day. Mechanics will also change daily. On day 7 the boss will have 99,999,999 HP.
Anima
Your own shikigami will have -20% Damage & Damage Reduction debuff. To raise their Damage & Damage Reduction, their individual anima levels must be raised.
At max anima level shikigami will have +30% Damage & Damage Reduction up in battle.
Anima affects both the Vanquish and the Super Oniou portions of the event.
Anima are obtained by fighting bosses.
R shiki don’t have individual anima.
Daruma bosses reward anima for collab shiki.
Daiyoukai bosses are Enma, Tamamo, Shuten, Ootengu, Ootakemaru and Orochi bosses with a "妖" icon on them.
Anima for these shiki cannot be obtained from daiyoukai bosses.
Daiyoukai anima boosts Damage & Damage Reduction by +1% per level for all shiki, has a max of 30 levels. It is obtained from daiyoukai bosses, maxing other anima or buying via the exchange shop.
When assisting in a friend’s boss you must do at least 10% or more damage to get an anima reward.
At the start of battles in this event, all the Damage & Damage Reduction percentages for anima and daily buffed shiki can be seen.
Anima can also be purchased from the points exchange shop. Similar to the mitama/soul shop it will have a random selection of 8 anima, it’ll auto-refresh every 2hrs or you can use 1888 points to refresh it yourself. Cost varies depending on shikigami rarity.
R anima: 6000 points
SR anima: 24000 points
SSR anima: 96000 points
SP anima: 128000 points
Collab anima: 30000 points
Daiyoukai anima: 24000 points
Rewards
For rewards, you more or less have to do the same things as previous events, ie; find and fight 100 bosses, be in top % and top 100 of damage dealt on the server.
The last reward for finding and fighting 100 bosses is a Tamamo themed icon frame, 20 gold orochi scales and 20 daiyoukai anima.
Ranking Rewards:
Top 10: Animated Icon Frame + 3 blue summon tickets + 999 jade + 999 gold orochi scales
Top 11-100: Animated Icon Frame + 2 blue summon tickets + 500 jade + 500 gold orochi scales
Top 1%: Icon Frame + 2 blue summon tickets + 300 jade + 300 gold orochi scales
Top 2-20%: Icon Frame + 1 blue summon ticket + 100-200 jade + 50-200 gold orochi scales
Top 21-50%: Icon Frame + 70-90 jade + 130-150 orochi scales
The most notable exhange shop items are; 3-4-5* white daruma, black daruma, skin tickets, gold, jade, special kekkai/realm cards, orochi scales, oniou packs, Hakurou skin, Nekomata skin, random SSR/SP, Kidou oniou frame, Shuten oniou frames, Orochi oniou frame, Ootake oniou frame, etc. Need to do 2mil damage to unlock everything in the shop.
On GL the Nekomata skin will probably be replaced with something else.
Recommended Teams
For recommened mitama souls, please refer to the wiki version of this guide or the kamigame guide.
Super Oniou
1-2* Bosses:
3 AOE attackers + Ushi + Oitsuki
3-4* Bosses:
3 AOE attackers + Oitsuki + Shoyou or Kiyohime
2 AOE attackers + Ushi + Oitsuki + Shoyou or Kiyohime
SP Tamamo or SP Ibaraki + Ushi or Shoyou + Oitsuki + Kosode or Aoandon + Kiyohime
5-6* Bosses with 2-5 minions:
2 AOE attackers + Oitsuki + Ushi or Shoyou or Kosode + Kiyohime
Takiyasha or Ryoumen + Kiyohime + Ushi or Kosode + Oitsuki + Shoyou
5-6* Bosses with 0-2 minions or only the boss left:
2 ST attackers + Ushi no Toki + Oitsuki + Shoyou
Sanbi or Ibaraki + Nekomata + Ushi + Oitsuki + Shoyou
Shiranui + double Shuten + Ushi + Shoyou or Kujira
Depending on which shikigami have buffs on whatever days you can replace your attackers with them. It’s recommended that you should avoid using Shoyou unless you’re fighting a 4-6* boss and there are 2 or fewer minions remaining. Ranking for Vanquish
Day 1:
Sanbi or Ibaraki + Kamikui + Ushi + Oitsuki + Shoyou
Shiranui + double Shuten + Ushi + Kosode or Shoyou or Kujira
Day 2:
Sanbi or Ibaraki + Kamikui or Peach & Karashi + Ushi + Oitsuki + Shoyou
Shiranui + double Shuteni + Ushi + SP Shuten or Shoyou or Kujira or Enmusubi
Day 3:
Sanbi no Kitsune or Ibaraki + Kamikui or Kiyohime or Peach & Karashi + Ushi + Oitsuki + Shoyou
Takiyasha or Ryoumen + Kiyohime + Ushi + Oitsuki + Shoyou
Shiranui + double Shuten + Ushi + SP Shuten or Shoyou or Kujira or Enmusubi
Day 4:
Sanbi + Kiyohime + Ushi + Oitsuki+ Shoyou
Takiyasha + Kiyohime + Ushi + Oitsuki + Shoyou
Shiranui + double Shuteni + Ushi + Momiji or Shoyou or Kujira or Enmusubi
Day 5:
2 Multi-hit attackers + Sanbi + Ushi + Oitsuki
3 Multi-hit attackers + Ushi + Oitsuki
Takiyasha or SP Tamamo + Aoandon or Kaguya or Enmusubi + double Yokinshi + Oitsuki
Day 6:
Sanbi + Kamikui + Ushi + Oitsuki + Shoyou
Shiranui + double Shuteni + Ushi + Shoyou or Enmusubi
Day 7:
Sanbi + Kamikui + Ushi + Oitsuki + Shoyou
Sanbi + Nekomata + Ushi + Oitsuki + Shoyou
Shiranui + double Shuten + Ushi + Momiji or Shoyou or Kujira or Enmusubi
On day 4, for the Sanbi + Kiyo team, you must ensure Kiyohime has +80 SPD and a minimum of +100% HIT. Sanbi should also have a hyousube set with a bare minimum of 200% crit DMG. To avoid Ootakemaru banishing Shoyou, you can bring Seimei's shield and only use it when Ootake has 3 onibi.
On day 5, Ushi should have Songstress as a 2-set.
On day 7, SPD for your shiki should all be around 180. Oitsuki doesn't need to be as fast, she can be anywhere around 140-190 SPD. Ushi can have either Tsuchigumo or Gashadokuro as a 2-set, also needs a minimum of +100% HIT to ensure the debuff from her passive lands on Kidoumaru and her doll more frequently. If that much HIT% isn't possible for you then go with crit DMG w/ full crit. On Nekomata's and Shoyou's first turn, turn their skills off. You may need to retry multiple times depending on how often Kidoumaru attacks and if he debuffs Nekomata, Shoyou or Sanbi. To avoid having him debuff them, try to give Oitsuki as much HP as possible. The highest scores for this day on CN were around 27-35mil.
To make KO'ing the bosses easier try to max anima levels for R shiki and Shoyou on the first 1-3 days of the event, and max anima for Daiyoukai (the all shiki anima) by day 4-5. Oitsuki, fortunately, doesn’t really need a max anima level. Anima for SSRs or SPs are both expensive and hard to get so if you can’t get any for SP Tamamo, Shuten, Iba or Shiranui then just use good ol’ Sanbi!
More info about Daiyoukai Super Oniou Post about Super Oniou events Post about Boss Defence events
#Onmyouji#Onmyoji#events#it's time for me to once again push my Sanbi agenda#also wiki ver of this guide is more indepth than this ver
31 notes
·
View notes
Text
Guide to Using Shoyou / Bukkuman

https://onmyoji.fandom.com/wiki/User_blog:72e/Guide_to_Using_Shoyo_for_High-Scoring_Demon_Encounters
The above link is a guide that has been the Onmyouji wiki for quite some time. Although the stuff about boss raids is really outdated, everything else about Shoyou is still good. This post will more or less reiterate the same info from the guide.
What does he do?
He, like Ushi, greatly increases the amount of damage you do against targets with high HP. He also provides some healing which helps eliminate the need for healers in boss raids. His curse marks also does indirect damage, allowing him to auto crit if the target’s DEF is 0. This is what makes using him with Ushi, along with Kiyohime or Sanbi who can reduce a target’s DEF, so great.
From the moment he uses his skill 3, all damage dealt to a target with a curse mark is recorded. The next time he takes a turn all that recorded damage will be sustained by the target. The damage from this skill can range anywhere from 200000 to 600000 depending on how much HP he has and the shikigami that are used with him.
More in-depth info about his skill 3;
It targets two enemies: one you’re locked onto, and one with the lowest HP. Note that these two don't have their damage calculated at the same time, instead the locked target is first calculated, and then the other one. So this is the reason why you always have to target the doll. If you don't target, then the curse release order is random. If it's locked onto an enemy first and then to the doll, the extra damage from the doll won't happen, and there's a chance you can't hit the damage cap.
How to use him effectively?
You must ensure the following;
He is 6*
Skill 3 is maxed (if possible max skill 2 as well)
He is used with Ushi and make sure he always target’s her doll
His speed is slower than Ushi and faster than your attacker/s
If using the smart cast setting, ensure he is set to only use his skill 3
[Optional] If using a 2nd copy of him to do 16-18 sec goryou/totem farming then he must be non-evo’d
Shoyou can be used at 5* but his damage won’t be as good due to having less HP/a lower damage cap. He also doesn’t need to be used with Ushi all the time either, but he works best with her due to her doll having extremely low DEF.
Is he still worth using after Enmusubi being released?
Short answer - yes.
Long answer - if you don’t have Enmusubi or other shiki commonly used in teams with her (eg; double Shuten + Shira, double Kinnara + SP Kiyo) or have any intention of ranking in certain PVE events like Super Oniou/Uber, then yes he’s absolulely worth using. Shoyou is also the only way to catch up to Enmusubi teams in terms of damage.
What stats and mitama/souls should he use?
His damage cap is based on 1200% of his HP, ie his total HP x 12, so slots 2 and 4 must be HP. The only time he needs slot 2 SPD is if you are farming goryou/totem for memory scrolls fragments or ranking in certain PVE events. Whether you use HP, crit or crit DMG for slot 6 depends on the enemy’s DEF, if your attackers use crit or crit DMG, or if you're using Kiyohime or Sanbi with him.
If all your attackers use crit DMG, then use HP and stack crit through substats. If using Kiyohime or Sanbi too, then stacking crit isn’t necessary. Recommended mitama/soul set is a broken set made up of three HP% 2-sets.
If all your attackers use crit, then use crit and stack crit DMG or HP% through substats. Recommended mitama/souls sets are maneki/fortune cat or a broken set with the stats you need.
If the enemy has high DEF like the goryou/totem bosses and if not using him with Ushi, then use crit DMG and stack crit through substats. Recommended mitama/soul set is a broken set made of three crit% 2-sets.
Due to Shoyou’s curse mark dealing indirect damage, he is incompatible with the tsuchigumo and gashadokuro boss souls. To know what other mitama/souls he is incompatible with please refer to the wiki’s incompatibility list.
Examples of mitama/soul sets are provided below:
↓ Example 1: HP-HP-HP This set is boss raids and events like boss defense/vanquish. Can do around 530000-600000 damage if I use Sanbi or Kiyohime, which is most of the time. Without Sanbi or Kiyohime, can do around ~500000 damage.

↓ Example 2: HP-HP-Crit This set is sometimes used for events like boss defense or super oniou. Can do around ~400000 damage.

↓ Example 3: HP-HP-CritDMG w/ full Crit This set is only used for goryou/totem dungeons. Can do an average of ~270000 damage. Outside of goryou/totem dungeon it can the same amount of damage as the crit set.

↓ Example 4: SPD-HP-Crit Another set only used for farming goryou/totem dungeons within ~18 seconds, also requires Zashiki and Ushi to use slot 2 SPD. Can do ~150000-290000 damage.

screenshots are of my own sets that i haven’t updated in a long time so pls don’t judge them ;v;
#Onmyouji#Onmyoji#faq#guide#Shoyou = Bukkuman#for the most part you can ignore everything about slot 2 SPD Shoyou#bc it's an end game thing
39 notes
·
View notes
Text
Skin Dungeons - Recommended Shikigami/Teams
long post, details below ↓
Examples of Common Teams:
Attacker + Attacker + Healer + Kaguya + Puller [usually only for stages 1-7]
Attacker + Attacker + Shouzu/Ren + Healer + free space (CC/healer)
Attacker + Shouzu/Ren + Momo/Hiyori/Kachou + Kaguya + free space (CC/healer)
Crit DMG Ibaraki/Tamamo/Kuro Douji + Ushi + Yama Usagi/Kamai/Youkinshi + free space x 2 (CC/lighter/another puller)
Onikiri or Chin x 3 + Shouzu + Healer (3rd Onikiri/Chin can be replaced by Kaguya)
Kagura w/ Orochi + Youkinshi x 2 + Lighter + Healer
Attackers:
SP Ibaraki
Tamamo
Onikiri
Inugami
Shuten
Ibaraki
Ootengu
Ubume
Itsumade
Vamp
Umibouzu
Susabi
Kuro Douji
Chin
Orochi
Healers
Kachou
Momo
Sakura
Hiyori
Ebisu
Umibouzu
Mushishi
Supports & CC
Kaguya
Oitsuki
Miketsu
Heiyou
Hannya
Juzu
Ame Onna
Hako
(bolded text = most commonly used)
The following dungeons you can more or less use any one of the example teams up above for each;
Yama Usagi*
Momiji
Youtou
Kappa*
Ame Onna
Arakawa*
Ootengu
Ubume
Umibouzu
Youko
The following dungeons you may need to use a specific shikigami or team;
Yama Usagi 10
This dungeon only has a tiny requirement if you want to move first each round, which is - have a minimum of 200 speed. If you don’t, then all you need is a nice thick hamaguri shield.
Kappa 10
If you find Koi’s shield to be a little bit too annoying to deal with, you might want to bring along Ame Onna.
Arakawa 9
When the tako/kraken is at 40% HP in round 3 it will go underwater for 2 turns. You MUST beat it before it resurfaces. So using both Kagura and Youkinshi/Maestro is almost necessary.
eg team; Kagura w/ attacker x 2 + healer x 2 + Youkinshi
Kamaitachi 10
Use hasei/shadow Higan.
It is possible to beat Kamai 10 without Higan, but it is much easier to just use Higan if you happen to have her. If you don’t, then you’ll need 2 off turn healers eg Hiyori, Ebisu, Sakura, Kachou with sou/scarlet.
Shishio 10
No autoing, no Miketsu, no Inugami, no Onikiri, no shikigami with sou/scarlet.
And be extremely cautious if using Kagura or Seimei. Why? Their passive might go off 13 times in a row completely resetting the 3rd round 13 times in a row like it did for me.
After you KO the real Shishio, you must keep Momo consistently CCed until she is KO’d.
Aoandon, Higanbana, Kiyohime, Yuki Douji, Kingyo
For these dungeons, you need to use a counter comp. eg team; sou Onikiri / hari Shuten + hari Inugami + Shouzu + Healer + CC eg team; Double or Triple Chin + Shouzu + Healer
Kyuuketsuhime/Vampira 9 & 10
For this dungeon, you can more or less you the same example counter team listed above for Ao, Higan and Kiyo. However because Vamp can turn your shiki into her allies if they’re not at full HP, it is much better to use Ren here instead of Shouzu.
eg team; sou Onikiri / hari Shuten + hari Inugami + Ren + Healer + CC
If using the double attacker counter comp for Vamp 10 doesn’t work out very well for whatever reason (only have Onikiri built, don’t have Inugami, don’t have a sou set, etc), I personally would recommend using crit/crit DMG Shoyou with hari Onikiri.
eg team; hari Onikiri + crit/crit DMG Shoyou + Ren + Healer + CC
Vamp’s dungeon is one of the few you can use ‘frozen time’ in. There’s a small downside to this however, a puller you need 1-4 copies of for this is the collab shiki Maki&Karashi. So if you missed out on the Hozuki collab or don’t have Hiyori, you might not be able to frozen time this.
eg team 1; Shuten + Maki&Karashi x 4 eg team 2; Shuten + Maki&Karashi x 2 + Yama Usagi x 2 eg team 3; Hiyori with hari + puller x 4 (frozen time has a lot of other variants beyond these ^ three examples)
Clearing Any and All Skin Dungeons (with Orochi)
Double Chin and double Onikiri teams are the usual go-to’s for cheesing hard content. With the release of Orochi however, he has become a new favourite for clearing everything.
Currently, Kingyo’s skin dungeon is the only one Orochi can’t be used in.
For more specific team setups I would recommend looking ingame to see what other people have used, look up videos on youtube or bilibili, or check what is recommended on kamigame.
When looking up videos on youtube or and especially on bilibili, please keep in mind what language you use to search in. Using the CN or JP names of shikigami plus the stage number, eg “小鹿男10″ or “シシオ10, will give you more results than searching in english.
Post for Difficulty & Mechanics
20 notes
·
View notes