#kitchen and remodeling
Explore tagged Tumblr posts
Visit Tumblr Blog
Explore Tumblr blogs with no restrictions, modern design and the best experience.
Last Seen Tumblr Blogs


Fun Fact
Mobile US users spent an average of 115.8 minutes on Tumblr app monthly.
Text
Expert Kitchen Remodeling in NYC | Transform Your Space Today
A kitchen is more than just a place to prepare meals—it’s the heart of your home. Whether you want a sleek modern design, a cozy traditional style, or a complete transformation, kitchen remodeling NYC services can help you create a space that is both beautiful and functional.

Why Remodel Your Kitchen?
A well-planned kitchen remodel can enhance the look, feel, and usability of your home. Here are some key benefits of kitchen remodeling in NYC:
1. Increase Home Value
A stylish and functional kitchen can significantly boost your property’s value. Many homebuyers prioritize updated kitchens, making remodeling a smart investment.
2. Improve Functionality
If your kitchen layout doesn’t work efficiently, a remodel allows you to optimize the space, add more storage, and upgrade your appliances for a seamless cooking experience.
3. Enhance Aesthetic Appeal
An outdated kitchen can make your entire home feel old-fashioned. With kitchen remodeling NYC services, you can introduce modern cabinets, stylish countertops, and updated lighting to refresh your space.
4. Boost Energy Efficiency
Replacing old appliances with energy-efficient models and incorporating LED lighting can help you reduce utility costs and create an eco-friendly home.
Top Kitchen Remodeling Trends in NYC
New York City homeowners are embracing innovative designs that maximize space while adding style. Here are some of the most popular kitchen remodeling NYC trends:
1. Open-Concept Layouts
Since many NYC apartments have limited space, open-concept kitchens help create a more spacious and connected living area. Removing walls between the kitchen and living room can enhance the flow and make your home feel larger.
2. Smart Kitchen Features
Technology is revolutionizing modern kitchens with smart appliances, touchless faucets, and app-controlled lighting, making your cooking experience more convenient and efficient.
3. Bold Cabinet Colors
While neutral kitchens remain timeless, more NYC homeowners are choosing bold cabinet colors like deep blues, forest greens, and matte black for a dramatic and stylish touch.
4. Quartz Countertops
Quartz countertops are a top choice in kitchen remodeling NYC projects due to their durability, low maintenance, and elegant appearance.
5. Multi-Functional Kitchen Islands
Adding a kitchen island enhances both functionality and style. It provides extra counter space, additional storage, and a convenient seating area, making it a must-have feature for modern NYC kitchens.
Choosing the Right Kitchen Remodeling Experts in NYC
A successful remodel requires skilled professionals who understand the challenges of renovating kitchens in New York City, from space constraints to building regulations. When selecting a contractor for kitchen remodeling NYC, look for:
Proven experience in kitchen renovations
A strong portfolio showcasing their work
Positive customer reviews and recommendations
Knowledge of NYC building codes and permit requirements
Final Thoughts
Investing in kitchen remodeling NYC services can completely transform your space, making it more functional, stylish, and valuable. Whether you're planning a minor upgrade or a complete renovation, the right design and expert craftsmanship can bring your dream kitchen to life.
#kitchen and remodeling#kitchen and bathroom#small kitchen remodel#kitchen renovation contractors#kitchen remodel remodeling
1 note
·
View note
Text
What Are the Key Steps in a Kitchen Renovation?
Renovating a kitchen is an exciting project that can transform the heart of your home. However, it’s a complex task that requires careful planning and execution. Here are the key steps involved in a successful kitchen renovation:

1. Planning and Design
The first step in a kitchen renovation is thorough planning. This involves assessing your current kitchen layout, identifying what you want to change, and setting a realistic budget. Consider the functionality of the space, your cooking habits, and the style you desire. Consulting with a professional designer can help you create a detailed plan that maximizes space and aligns with your vision.
2. Setting a Budget
Budgeting is crucial for ensuring your kitchen renovation stays on track financially. Decide how much you are willing to spend and allocate funds to different aspects such as materials, labor, and appliances. Be sure to include a contingency fund for unexpected expenses that may arise during the renovation.
3. Choosing Materials and Appliances
Selecting the right materials and appliances is vital for both the functionality and aesthetics of your new kitchen. This includes choosing countertops, cabinets, flooring, lighting, and kitchen appliances. Prioritize quality and durability, as these elements will need to withstand daily use. Consider energy-efficient appliances to save on long-term costs.
4. Hiring Contractors
Unless you are undertaking a DIY project, you will need to hire contractors for various aspects of the renovation, including plumbing, electrical work, and cabinetry installation. It’s important to research and hire reputable professionals who have experience in kitchen renovations. Getting multiple quotes and checking references can help you make an informed decision.
5. Demolition
Once you have your plan, budget, and team in place, the next step is demolition. This involves removing old cabinets, countertops, appliances, and flooring. Proper preparation is essential, including disconnecting utilities and setting up a temporary kitchen if needed. Ensure that the demolition is done safely and according to local regulations.
6. Plumbing and Electrical Work
After demolition, the next phase is roughing in the plumbing and electrical systems. This step is crucial for laying the groundwork for your new kitchen layout. It may involve moving plumbing lines or electrical outlets to accommodate your new design. This work should be carried out by licensed professionals to ensure safety and compliance with building codes.
7. Installing Cabinets and Countertops
With the plumbing and electrical systems in place, the installation of cabinets and countertops can begin. This step is often the most visually transformative, as it starts to bring the new kitchen to life. Accurate measurements and professional installation are key to ensuring everything fits perfectly and functions as intended.
What Should I Consider Before Starting a Kitchen Remodel?
When considering a kitchen remodel, thorough planning is essential to ensure the project meets your expectations and stays within budget. Here are key factors to consider before starting a kitchen remodel:

1. Define Your Goals
Functionality: Determine how you use your kitchen. Are you an avid cook, or do you need more space for entertaining? Clarifying your needs will guide the design.
Aesthetic: Decide on the look you want to achieve. Whether modern, traditional, or farmhouse, your desired style will influence your choices in materials and layout.
Value Addition: Consider how the remodel will impact your home’s value. Focus on improvements that appeal to future buyers if you plan to sell your home.
2. Set a Realistic Budget
Costs: Research the average cost of kitchen remodeling in your area. Include expenses for materials, labor, and potential unexpected costs like structural repairs.
Prioritize: Allocate your budget based on what’s most important to you, whether that’s high-end appliances, custom cabinetry, or premium countertops.
Contingency: Set aside 10-20% of your budget for unexpected expenses that may arise during the remodel.
3. Plan the Layout
Work Triangle: Ensure your kitchen layout follows the work triangle principle, which optimizes the flow between the sink, stove, and refrigerator.
Space Utilization: Make the most of your space with efficient storage solutions like pull-out shelves, lazy Susans, and vertical storage.
Traffic Flow: Consider how traffic moves through your kitchen, especially if it's a high-traffic area. Make sure there’s enough space to move comfortably.
4. Choose Quality Materials
Cabinetry: Select durable materials for cabinets that can withstand daily use. Solid wood, plywood, and high-quality MDF are popular options.
Countertops: Choose countertops that fit your lifestyle. Options like quartz, granite, and laminate vary in durability, maintenance, and cost.
Flooring: Pick flooring that is both functional and stylish. Tile, hardwood, and vinyl are common choices for kitchen floors.
5. Think About Appliances
Upgrades: Decide if you want to upgrade your appliances. Energy-efficient models can save money in the long run and add value to your home.
Placement: Plan where each appliance will go based on your kitchen layout. Make sure there’s adequate space for ventilation and easy access.
6. Lighting and Electrical Considerations
Lighting: A well-lit kitchen is crucial for functionality. Combine ambient, task, and accent lighting to brighten the space.
Electrical: Ensure your electrical system can handle the new load if you're adding more appliances or outlets. This may require upgrading your electrical panel.
7. Hire the Right Professionals
Contractor: Hire a reputable contractor with experience in kitchen remodels. Check reviews, ask for references, and verify credentials.
Designer: If your remodel is complex, consider hiring a kitchen designer. They can help you optimize the space and choose the right materials.
8. Consider the Timeline
Project Duration: Be realistic about how long the remodel will take. Factor in potential delays, especially if you’re ordering custom materials or appliances.
Living Arrangements: Plan how you’ll manage without a kitchen during the remodel. Set up a temporary kitchen space or arrange to eat out more often.
How to Choose the Right Materials for Your Kitchen?
Choosing the right materials for your kitchen renovation is a crucial step in creating a functional, durable, and aesthetically pleasing space. Here’s a guide to help you make informed decisions for each key area of your kitchen:

1. Countertops
Granite: Known for its durability and natural beauty, granite is a popular choice. It’s resistant to heat and scratches, but it requires regular sealing to prevent stains.
Quartz: Engineered quartz offers a non-porous, stain-resistant surface that requires less maintenance than granite. It’s available in a wide range of colors and patterns.
Marble: While marble adds a luxurious feel to the kitchen, it’s more susceptible to staining and scratching. It’s ideal for low-traffic areas or as a focal point.
Laminate: A budget-friendly option, laminate countertops come in many designs that mimic more expensive materials. However, they’re less durable and prone to damage from heat and sharp objects.
2. Cabinetry
Solid Wood: Solid wood cabinets, like oak, maple, or cherry, offer longevity and a classic look. They can be stained or painted to match your design but may require more maintenance over time.
Plywood: A sturdy and cost-effective alternative to solid wood, plywood cabinets offer durability and resistance to warping. They’re often used in mid-to-high-end kitchens.
Medium-Density Fiberboard (MDF): MDF is smooth, affordable, and easy to paint, making it a popular choice for modern kitchen designs. However, it’s less durable than wood and can swell if exposed to moisture.
3. Flooring
Hardwood: Hardwood flooring is timeless and adds warmth to the kitchen. It’s durable and can be refinished, but it’s prone to scratches and water damage.
Tile: Ceramic or porcelain tiles are highly durable, water-resistant, and available in various styles. They’re easy to clean but can be cold and hard underfoot.
Vinyl: Vinyl flooring is budget-friendly, water-resistant, and available in designs that mimic wood or tile. It’s softer underfoot and ideal for busy kitchens.
Bamboo: Bamboo is an eco-friendly option that offers a similar look to hardwood. It’s durable and resistant to moisture but can be prone to scratches.
4. Backsplash
Ceramic Tile: Ceramic tiles are versatile, easy to clean, and come in various styles and colors. They’re an affordable option for a classic or contemporary look.
Glass Tile: Glass tiles reflect light, adding brightness to your kitchen. They’re easy to clean but can be more expensive and require careful installation.
Natural Stone: Materials like marble, slate, or travertine add a rustic or luxurious feel to your kitchen. However, they require sealing to prevent stains and damage.
Metal: Stainless steel or copper backsplashes offer a modern, industrial look. They’re durable, heat-resistant, and easy to clean, making them ideal for busy kitchens.
5. Sinks
Stainless Steel: Stainless steel sinks are durable, easy to clean, and resistant to stains and heat. They’re a practical choice for most kitchens but can show water spots and scratches.
Cast Iron: Cast iron sinks with a porcelain enamel finish are strong and durable. They offer a classic look but can chip over time and are heavier than other materials.
Composite Granite: Composite granite sinks are resistant to scratches, stains, and heat. They offer a natural stone look and are available in various colors, but they can be expensive.
6. Lighting
Recessed Lighting: Ideal for general lighting, recessed lights provide a clean, unobtrusive look. They work well with various kitchen designs but may require more fixtures to avoid shadows.
Pendant Lights: Pendant lights over islands or counters add both task lighting and a decorative element. Choose materials and styles that complement your kitchen’s design.
Under-Cabinet Lighting: Under-cabinet lights illuminate countertops, making food preparation easier. LED strips or puck lights are popular choices for energy efficiency and ease of installation.

Asfar Majeed Technical Services specializes in delivering exceptional kitchen renovation solutions in Dubai, catering to the diverse needs and preferences of homeowners seeking to transform their culinary spaces into functional and aesthetically pleasing environments. With a commitment to quality craftsmanship and innovative design, the company offers a comprehensive range of services, and modern appliance integration, ensuring that each project is tailored to reflect the unique style and requirements of the client.
Kitchen Renovation in Dubai:-
Whether you envision a sleek, contemporary design or a warm, traditional atmosphere, we utilize high-quality materials and innovative techniques to bring your dream kitchen to life. We understand the unique challenges of kitchen renovations in Dubai, including space constraints and local regulations, and we navigate these complexities with expertise.
#Kitchen Renovation in Dubai#Kitchen Remodeling in Dubai#Kitchen renovation companies in Dubai#kitchen and remodeling
1 note
·
View note
Text
Stephanie: "Did you get it?"
Tim, scoffing: "Of course I did. *unwraps the vase from bubble wrap* It's the exact same, one of the three original vases made."
Stephanie: "Wait. The old one had a nick, right there on the shoulder. *uses a Batarang to recreate it* There."
Tim, setting it down carefully and smiling: "Perfect. I think we just got away with it."
Jason, reading on the couch: "He'll know."
Stephanie: "How? You'd have to--"
Alfred: "Is there anything you guys want for dinner?"
Tim and Stephanie, immediately: "No."
Alfred, frowning slightly: "Very well." He walked over, both Tim and Stephanie trying to play it cool as the butler adjusted the vase on the table.
Jason looked up from his book.
Alfred: "I'll remind you again, Master Timothy that skateboards are not permitted inside the house."
Jason cackled at the expression that Tim and Stephanie made.
--------------------------------------------------------------------
Bruce: "How did you know? Technically speaking, it's the same vase."
Alfred: "I have a contact at the auction house where you bought the second one years ago."
Bruce, clearing his throat: "Yeah, Jason accidentally kicked a ball into it."
Alfred, raising an eyebrow: "He threw a Batarang at it because you wanted to make him more comfortable."
Bruce:
Alfred: "I do wish you'd all stop adding that nick back."
#A long one#might be funnier to consider these guys breaking something bigger#like burning down part of the kitchen and hastily getting it remodelled before Alfred notices#I'm bored#not a texpost not a mini fic#but a secret third option called testing my followers' patience#batposting#batfamily#tim drake#stephanie brown#jason todd#alfred pennyworth#bruce wayne#batman
4K notes
·
View notes
Text

I ALSO LOVE THE SMELL OF 🌹'S......
#guys in socks#smelly socks#male socks#dirty socks#gay socks#sock sniffing#sweaty socks#white socks#youtube#socks and flip flops#retro#vintage#kitchen remodeling#work socks#guys in briefs#guy barefoot
84 notes
·
View notes
Text

I see what they were going for, but it lost something in the translation. (They're wondering why it's not selling.)
63 notes
·
View notes
Text
do u kno what ned’s first mistake was. it was leaving catelyn in winterfell. he should have brought HER south with him.
#they remind me of my grandparents. my grandpa was always saying he’d do shit but he was slow to start.#one day my grandma got fed up and took a sledgehammer to one of the walls in the kitchen and said ‘we’re remodeling’#and u kno what he did a damn good job. but if she never put a hole in the wall he never would have done it.#ned needs catelyn to take a sledgehammer to it first.#getting on my soap box
80 notes
·
View notes
Text

husband & wife were flipped this house on location (living in a caravan.) whatever works right?
via countrystylemag@IG
130 notes
·
View notes
Text
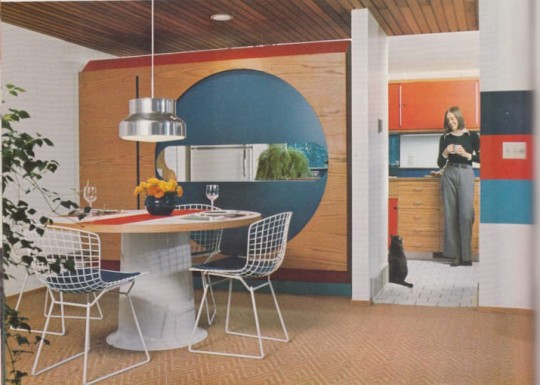
Dining area pictured in Planning & Remodeling Kitchens edited by Maureen Williams Zimmerman (Lane Publishing Co., 1976).
#modernism#interior#interior design#Planning & Remodeling Kitchens#Maureen Williams Zimmerman#USA#1976
161 notes
·
View notes
Text
decorating my house in sdv is the most stressful thing I can think of tbh
#stardew valley#sdv#im midway thru winter year 6 on this save and ive only just finished the dining room and kitchen this year#its such a big house every time i walk into a new room im like and now what???#places down a bookshelf places down a bookshelf places down a bookshelf places down a booksh#my spouse at some point probably: when did we move into a library??#spending more time scrolling pinterest for inspo than i do actually remodeling#running back to Robin like haha just kidding i actually have too much house now so if you could just take that expansion back thatd be grea#i used to have a save on the mobile version that was year 12 and i hadnt even organized the farm let alone start decorating the house#but that file got deleted :(#oh well. my year 6 is a 100% save so its okay#okay im done
21 notes
·
View notes
Text
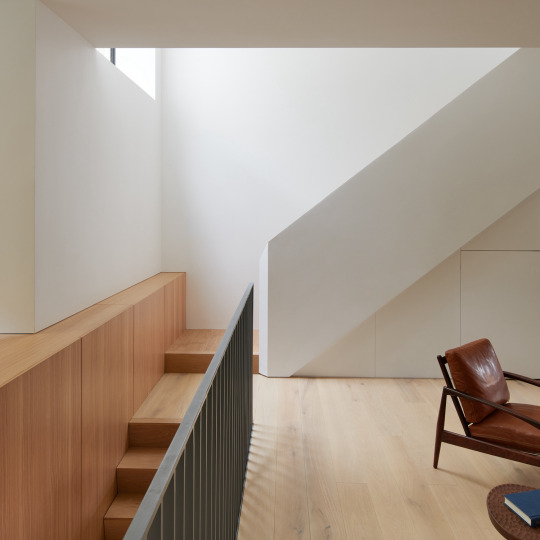
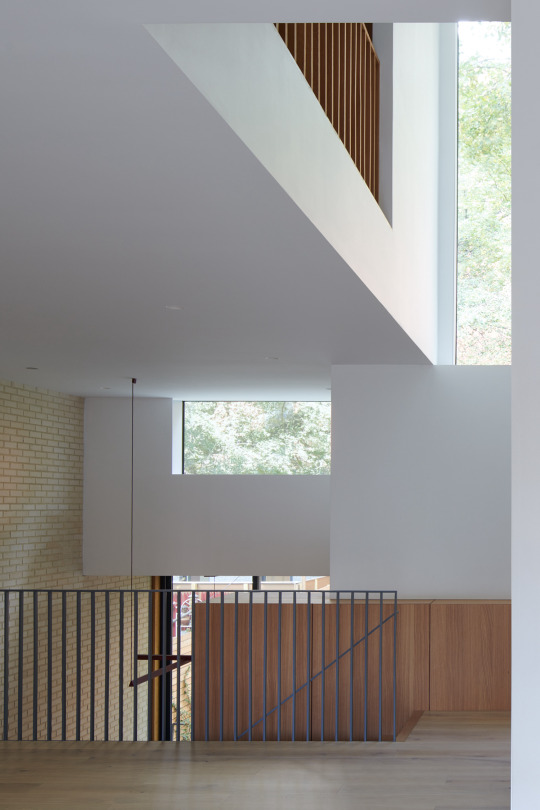


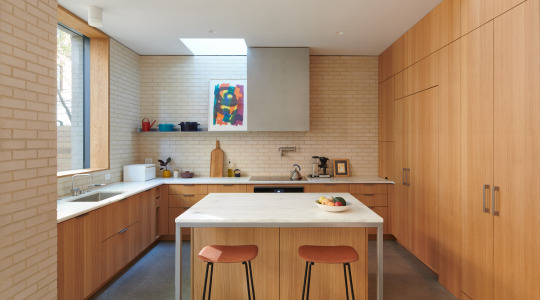
z house ~ light and air | photos © kevin kunstadt
#architecture#remodeling#interiors#kitchens#skylights#rangehood#lightwells#dining#railings#paneling#pantry#brick
165 notes
·
View notes
Text
archway stencils
i keep forgetting to post about this. I did my archway stencils this past week!

[image description: looking through an orange archway, stenciled with turquoise stars in an alternating pattern, to see the deep teal wall stenciled with larger gold stars I did earlier]
progress shots and discussion under cut!

[image: the stencil, with a central eight-pointed star, and then the partial alternating star in the corners; the stencil is mounted diagonally so that the main star is centered on the archway trim, and there's a corner above and below]
I futzed around a little and this was the direction that worked. I'd thought about just doing that central element and repeating it freehand, but this was easier to line up..... but then to finish it, i would have to do TWO additional passes with the stencil, one on each side.

[image description: the archway in the background with the central element alternating with just the middle of the second element, as left behind by one pass of the stencil; I'm going to have to go back and fill in the sides of the second element. But in the foreground, I am holding my cat, because she insisted.]
I had Help. she wanted me to do this instead of paint. The whole time. She was incredibly persistent.

[image: the archway with one of my secondary passes complete, and the stencil stuck on diagonally showing how I have to separately fill in the left and right of each of the edge elements.]
I had experimented with just plopping the central element over this corner thing, and using that to fill in all the rest at once, but you see how the central element has long diamond-shaped "petals", but the other one has the shorter inward-pointing "petals" in the middle, and then longer petals on the sides? Yeah the longer petals are not shaped like the central element's, even though they look similar-- they are wider throughout. So to blend them with the half-petal deposited by the first pass of the stencil, it looks wonky as hell. And it does look better having a fully different element for every other star, instead of a blended sort-of-weird half-different one. So the long hard way it is; I went all the way down doing the left half then went to the other doorway and did the left half and then came back and did the right half, in totally separate passes, because you can see you have to tape the stencil down over the existing element, and if it were at all damp you're ripping paint off when you do that.
This stencil company does make specific border stencils for some of their designs, and I sort of thought this one was intended for that kind of use, but clearly it's not. I mean it worked fine so I'm not actually annoyed, but I did have to think about it a lot.
Some process notes: I did not use specialty stencil creme for this, I used my sample pot of a slightly lighter shade of the paint I used for the walls. it was semi-gloss because that's what they had for sample pots, and that worked out fine. I put it into the same plastic half-a-cannoli-box tray as before, and used the smaller stencil brush, and I did not really have to add drops of water, as the paint was less thick, but I had almost zero problem with bleeding-- all my problems were that I had to overlap the stencil while still damp and would sometimes get paint on the back of the stencil that then smudged onto bits I didn't want paint on. Paint also built up on the stencil really horribly because I was using it more intensively-- doing the whole wall it was kind of spread out over the huge stencil, but this was a single element. Being able to see through the stencil helped in positioning, so what I eventually wound up doing was that I would position the stencil, tape it down, wipe it clean with a rag, adjust the position, use it, move it to the next location, wipe it clean with a rag, repeat.
It was so hard to get the second element lined up-- you see how the "petal" is done in two pieces? well it never quite lined up and there was always a gap-- that eventually I pulled a plastic milk jug out of the recycling, traced the stencil on it, and cut out a stencil that was *just* a full copy of that half-petal mirrored so I could see if the stencil wasn't going to line up cleanly, I could just focus on lining up one of the petals, and leave the other blank and come back and add it with the standalone whole-petal homemade stencil. Good thing I'm a dab hand with an exacto.

[image description: a star stencil 3/4 complete, but the diagonal petals have gaps in the middle of them] Here's a problem example, and I was getting this on about half of them.

[image description: a piece of flat white plastic, an exacto knife, a cutting board, and a stencil element cut out of the white plastic.]
So instead I would rotate the stencil so one of the petals was good, and leave the other one off entirely to come back and do later.

[image description: looking from the living room through the stenciled archway to the kitchen, and this face of the archway is painted purple, and the wall is repainted to a consistent sunny yellow.]
I know that the most hinged thing to do would have been to just do all the trim orange, and then the wall yellow, and let it be, but I could not resist being fussy and doing the living-room-facing trim back in the living-room-trim purple color. I fortunately was able to find the original pots of paint from when we painted the living room, and it was still good!!!! (mixed in august of '07! amazing) so I repainted the living room wall where it was primer-white after the reconstruction. Looks pretty seamless now! But I have one more light switch faceplate to paint, it looks like. Hmmmmm what color.
The last thing I have left to do is the corner above the front door, where this newly-repainted yellow wall intersects with the wall above the front door that I decided should be kitchen-teal.
I could just do the corner as a flat normal transition. But I want to try to do something fancy, some kind of like pixel-dissolve or like, the stencil bits sticking into the other color, or something.
For now I've painted a cereal box and stuck it up there and I am going to put stenciled attempts on cardboard up there to see what they look like before I commit.

[image description: the corner above the front door of the house. the wall below is the kitchen wall and is teal. the wall above the archway is yellow because it's the living room. the wall above the door is not fully painted but is mostly kitchen teal. the corner is a cardboard cereal box painted yellow on one side and teal on the other, cut to fit.] it is an awkward junction! The most hinged thing would be to keep it simple-- would have been to just do all the trim orange and then the upper wall yellow and just make sure the corner was sharp and clean.
But I'm not that hinged, so I might as well do something that calls attention to it, LOL.
57 notes
·
View notes
Text


Get more ideas: www.pinchofdecoration.com
#home decor#home design#home & lifestyle#interior design#interiors#home decoartion#kitchen decor#kitchen design#kitchen cabinets#kitchen appliances#kitchen makeover#kitchen renovation#kitchen inspiration#kitchen interior design#kitchen organization#kitchen style#kitchen ideas#decorations#decoration#decor#kitchen aesthetic#kitchen#kitchen fun#kitchen goals#kitchen hacks#kitchen remodel#kitchen redesign#kitchen trends#kitchen tips#kitchen upgrades
34 notes
·
View notes
Text

Stay cozy.
@soft-homestyle
#soft homestyle#interior decorating#interior#interior design#interiors#home#home & lifestyle#home decor#home design#decorating#decor#neutrals#neutral#bathroom#kitchen#cozy#cozy aesthetic#amber lewis#amber lewis design#amber interior design#cottage#cottagecore#cottage aesthetic#bathroom remodeling#bathroom accessories#bathroom renovation#bathroom design#interior decor
11 notes
·
View notes
Text

Cooking up some new content for this week...
#the zhaoverse#julia zhao#THE most boring outtakes imaginable#and this kitchen simply DOES NOT SPARK JOY#i wish i'd remodeled it when helena was off at college :/#but i promise things are coming!!!
71 notes
·
View notes
Text

PUT YOUR FUCKIN HARD COCK ON THIS SMELLY FOOT!!!!
#guys in socks#smelly socks#male socks#dirty socks#gay socks#sock sniffing#sweaty socks#white socks#youtube#socks and flip flops#cash app#cash master#nasty sock#hot and sexy#sexy male white sock#retro aesthetic#kitchen remodeling#vintage#mens fashion
28 notes
·
View notes
Text


Wild choice of counters and backsplash in a remodeled home in West Palm Beach, FL. What were they thinking?
https://www.zillow.com/homedetails/355-Maddock-St-West-Palm-Beach-FL-33405/46942693_zpid/
119 notes
·
View notes