#k3s installation guide
Text
Microk8s vs k3s: Lightweight Kubernetes distribution showdown
Microk8s vs k3s: Lightweight Kubernetes distribution showdown #homelab #kubernetes #microk8svsk3scomparison #lightweightkubernetesdistributions #k3sinstallationguide #microk8ssnappackagetutorial #highavailabilityinkubernetes #k3s #microk8s #portainer
Especially if you are into running Kubernetes in the home lab, you may look for a lightweight Kubernetes distribution. Two distributions that stand out are Microk8s and k3s. Let’s take a look at Microk8s vs k3s and discover the main differences between these two options, focusing on various aspects like memory usage, high availability, and k3s and microk8s compatibility.
Table of contentsWhat is…

View On WordPress
#container runtimes and configurations#edge computing with k3s and microk8s#High Availability in Kubernetes#k3s installation guide#kubernetes cluster resources#Kubernetes on IoT devices#lightweight kubernetes distributions#memory usage optimization#microk8s snap package tutorial#microk8s vs k3s comparison
0 notes
Text
How Does K3 Cat Skiing Differ from Traditional Skiing? - White Grizzly
K3 cat skiing offers a unique and exhilarating experience compared to traditional skiing. As one of the oldest cat-skiing operations in the world, White Grizzly has been delivering authentic mountain adventures since 1998. Here's a breakdown of how K3 cat skiing differs from traditional skiing.
1. Accessibility and Terrain
K3 Cat Skiing:
Remote Access: K3 cat skiing takes you into remote, untouched backcountry areas that are inaccessible by traditional ski lifts.
Varied Terrain: The terrain varies widely, from open bowls and gladed trees to steep chutes and deep powder fields.
Traditional Skiing:
Resort Boundaries: Traditional skiing is typically confined to marked trails within ski resort boundaries.
Groomed Slopes: Resorts maintain groomed runs, which are easier to navigate but offer less of the untouched powder experience.
2. Skiing Experience
K3 Cat Skiing:
Powder Paradise: Cat skiing focuses on finding the best powder conditions. Expect deep snow and untracked lines.
No Crowds: With limited spots available on each cat skiing trip, you won't encounter the crowds typical at ski resorts.
Adventure Focus: Each run offers a new adventure, as guides choose the best terrain based on current conditions.
Traditional Skiing:
Variety of Runs: Resorts offer a variety of runs catering to different skill levels, from beginner to expert.
Consistent Conditions: Groomed runs provide more consistent skiing conditions, ideal for those preferring predictability.
3. Lift Access vs. Cat Access
K3 Cat Skiing:
Snowcats: Specialized snowcats transport skiers and snowboarders to the top of the runs. The ride itself is an adventure, offering stunning views and a chance to rest between runs.
Flexible Terrain Access: Snowcats can reach areas that lifts cannot, providing access to the best snow conditions.
Traditional Skiing:
Chairlifts and Gondolas: Ski lifts are the primary mode of transportation, quickly moving skiers up the mountain.
Fixed Terrain Access: Lift-served terrain is limited to where the lifts are installed, which may not always offer the best conditions.
4. Guiding and Safety
K3 Cat Skiing:
Experienced Guides: Professional guides lead each group, selecting the best terrain and ensuring safety.
Safety Briefings: Comprehensive safety briefings and avalanche training are provided before heading out.
Traditional Skiing:
Self-Guided: Most skiers navigate the mountain on their own, following marked trails.
Patrol Services: Ski resorts have ski patrols for safety, but there is less focus on guiding and group management.
About White Grizzly
In 2020, a group of backcountry enthusiasts from Nelson, BC took over the business and started building on this legacy. Committed to upholding high standards of safety and guest experience, White Grizzly continues to offer unparalleled adventures in the powder-filled backcountry.
By understanding the differences between K3 cat skiing and traditional skiing, you can better appreciate the unique experience that cat skiing offers. For an unforgettable adventure in the pristine backcountry, consider booking a trip with White Grizzly. For more information and to plan your trip, visit White Grizzly.
#best cat skiing bc#cat skiing#cat skiing fernie#cat skiing revelstoke#golden cat skiing#powder mountain cat skiing#powder skiing bc#revelstoke cat skiing#selkirk cat skiing#tree skiing
0 notes
Text
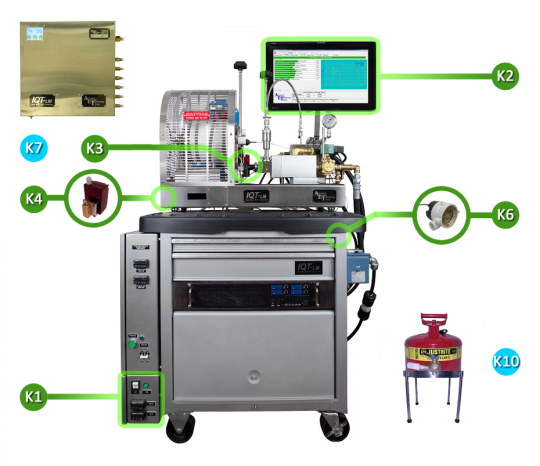
Elevate Your Fuel Testing with the IQT Totally Automated Laboratory Model
Are you ready to take your fuel testing to the next level? Look no further than the IQT system – a game-changing CVCC instrument that has been setting industry standards since 1998. As the trusted referee test method in EN 15940, regulating paraffinic fuels in Europe, the IQT system stands as a beacon of reliability, precision, and cost-efficiency. With over 200 installations worldwide and a track record boasting over 100,000 test runs, it's clear that the IQT system is making waves in the fuel testing arena.
Unveiling the IQT TALM Precision Package
Now, let's talk about supercharging your fuel testing experience with the IQT TALM Precision Package. This package takes the standard LM system and elevates it with eight upgrade kits designed to ensure automation, precision, and user-friendliness are at their peak. If you're looking for a comprehensive solution to enhance precision and ease of use, then this package is your go-to choice.
Introducing TALM-K1: Elevating Control Cabinet
The TALM-K1 serves as the electronic interface for other automated components, making it an essential addition for kits K3 to K6 and K10.
Meet TALM-K2: IQT System and Control Software
The IQT TALM software offers enhanced test monitoring with high visibility that can be accessed from anywhere in your lab. It simplifies calibration through automated unattended mode testing, ultimately boosting productivity and convenience.
Discover More TALM Upgrade Kits
The TALM Precision Package bundles five primary TALM kits aimed at taking your fuel testing to new heights. These include nozzle tip temperature control (TALM-K3), combustion chamber tail temperature control (TALM-K4), electronic coolant flow indicator (TALM-K6), electronic pressure regulator panel (optional) (TALM-K7), improved heater monitoring tool (coming soon) (TALM-K8), self-sealing fuel reservoirs with filling cleaning station (TALM-K9), and waste fuel container (TALM-K10).
Key Features That Set IQT Apart
What makes the IQT system stand out? Well, it's ASTM D6890-18 that extends the testing range with enhanced precision. Not only is it sensitive to cetane improver additives and minor fuel quality variations but it also measures high levels of cetane improver without negative carryover effects. This makes it ideal for testing highly paraffinic fuels from diverse sources including synthesis or hydro-treatment.
FAQs about the IQ Totally Automated Laboratory Model
Now let's address some frequently asked questions about the IQ system:
What is the significance of the IQ system in fuel testing?
The significance lies in its role as a cutting-edge CVCC instrument that has been at the forefront of fuel testing since 1998. As the referee test method in EN 15940 governing paraffinic fuels in Europe, it's proven to be reliable, precise with low operating costs.
What are some key advantages of using the IQ system?
With its small sample size, reduced combustion air requirements, cost-effective reference materials along with exceptional precision make it invaluable for those involved in fuel blending and research purposes.
Can I customize my TALM Precision Package?
Absolutely! The flexibility of choosing from eight available upgrade kits allows you to tailor your package according to your specific needs.
How can I learn more about its capabilities?
To explore further details about how this revolutionary system can meet your specific requirements please feel free to reach out to our team of experts who will guide you through every step of this journey.
In conclusion
The introduction of Mavin Infotech’s ground-breaking technology - The newly launched "IQT Totally Automated Laboratory Model" is set to revolutionize how we conduct Fuel Testing globally. Whether you are involved in Fuel Blending or Ground Breaking Research works there is no better option than "IQT totally Automated Laboratory Model". With an impressive client base extending over 200 installations worldwide boasting over 100000 test runs which speaks volumes about its trustworthiness. By introducing “IQT Talm Precision Package” We have made sure that your experience becomes even more precise user-friendly & hassle-free by bundling five primary talm kits together. We believe after going through all these amazing features now you must be eager enough to try" Iqt totally automated laboratory model" so why not give it a shot?
0 notes
Text
Lephone K3
We have shared the official Lephone K3 Stock Firmware ROM (Flash File) on this page. The Firmware comes in a zip package that contains the original Firmware, Flash Tool, USB Driver, and How-to Flash Guide.
Lephone K3 Stock Firmware ROM (Flash File)
You can use the Stock Firmware (Flash File) to re-install the Mobile OS on your Mobile Devices. You can also use it to fix the device if facing any…

View On WordPress
0 notes
Text
What are the fees for IAS Coaching in Indore?

Do you want to crack the toughest exam in India?
The Union Public Service Commission (UPSC) examination is a highly esteemed and competitive exam that opens doors to prestigious career opportunities in the civil services of India. Aspirants often seek guidance and coaching to enhance their chances of success. However, the question frequently arises, “What are the fees of IAS coaching in Indore?” In this blog post, we will delve into the intricacies of UPSC coaching fees in Indore, providing a comprehensive guide for aspiring candidates.
Factors Influencing IAS Coaching Fees:
The fees charged by IAS coaching institutes in Indore can vary based on several factors. Let’s explore some key elements that influence the cost of UPSC coaching:
Reputation and Track Record
Duration of the Course
Study Materials and Resources
Faculty Expertise and Experience
Infrastructure and Facilities
Mock Tests and Personalized Feedback
Exploring UPSC Coaching Fees in Indore:
The fees for IAS coaching in Indore can range from INR 50,000 to INR 2,00,000 (approximately) for a comprehensive coaching program. However, it’s important to note that the exact fee structure varies from institute to institute. Some coaching centers may charge a lump sum fee for the entire course, while others offer installment-based payments.
Additionally, coaching centers often provide various coaching options such as regular batches, weekend batches, crash courses, and online programs, each with its own fee structure. Candidates should research and compare the fees, facilities, and course structures offered by different coaching institutes in Indore before deciding.
Conclusion:
K3 IAS is one of the Top UPSC IAS MPPSC coaching centers in Indore that provides comprehensive classroom lectures, study materials, test series, and mock exams, to improve their chances of success in UPSC and MPPSC exams (CSE).
Contact us below to enquire about your all queries, we are always welcome to hear from you.
Address: 57A Sheetal Nagar, Behind BCM Heights, Near Mangal City, Vijay Nagar Indore — 452010
Call Us: +91 8103144388
https://www.k3ias.com/
Coaching can be valuable, self-discipline, dedication, and consistent efforts are equally essential for success in the UPSC examination. As you embark on your UPSC journey.
#upsccoaching#upsc prelims#upsc mains#ias coaching in indore#upsc coaching indore#IAS coaching in Indore#IAS coaching institutes in Indore
1 note
·
View note
Text
Welcome to this exhilarating tutorial on how to deploy and use Quarkus in Kubernetes. Kubernetes is one of the open-source tools currently preferred when automating system deployments. It makes it easy to scale and manage containerized applications.
Kubernetes works by distributing workloads across the cluster and automating the container networking needs. Also, storage and persistent volumes are allocated, by doing so the desired state of container applications is continuously maintained.
Quarkus offers provides an easy way to automatically generate the Kubernetes resources based on some defaults and the user-provided configuration. This Kubernetes-native Java framework also provides an extension used to build and push container images to a registry before the application is deployed to the target. Another feature about Quarkus is that it enabled one to use the Kubernetes ConfigMap as a configuration source without mounting them on the pod.
The cool features associated with Quarkus are:
Community and Standards: It provides a cohesive and fun-to-use full-stack framework by leveraging a growing list of over fifty best-of-breed libraries that you love and use
Container First: It offers amazingly fast boot time, incredibly low RSS memory (not just heap size!) offering near-instant scale-up and high density memory utilization in container orchestration platforms like Kubernetes
Unifies imperative and reactive: It allows developers to combine both the familiar imperative code and the reactive style when developing applications.
Kube-Native: The combination of Quarkus and Kubernetes provides an ideal environment for creating scalable, fast, and lightweight applications. It highly increases the developer productivity with tooling, pre-built integrations, application services e.t.c
By following this guide to the end, you will learn how to:
Use Quarkus Dekorate extension to automatically generate Kubernetes manifests based on the source code and configuration
Build and push images to Docker registry with Jib extension
Deploy an application on Kubernetes without any manually created YAML in one click
Use Quarkus Kubernetes Config to inject configuration properties from ConfigMap
Let’s dive in!
Setup Pre-requisites
For this guide, you will require:
Quarkus CLI
Apache Maven 3.8.1+ (Optional)
Access to a Kubernetes cluster
A Kubernetes cluster can be deployed with the aid of the guides below:
Run Kubernetes on Debian with Minikube
Deploy Kubernetes Cluster on Linux With k0s
Install Kubernetes Cluster on Ubuntu using K3s
Install Kubernetes Cluster on Rocky Linux 8 with Kubeadm & CRI-O
Once the cluster is running, install kubectl
curl -LO "https://storage.googleapis.com/kubernetes-release/release/$(curl -s https://storage.googleapis.com/kubernetes-release/release/stable.txt)/bin/linux/amd64/kubectl"
chmod +x kubectl
sudo mv kubectl /usr/local/bin
Ensure that you can access the cluster.
# For k0s
export KUBECONFIG=/var/lib/k0s/pki/admin.conf
1. Install Quarkus CLI
The Quarkus CLI can be installed on Linux, macOS, and Windows (using WSL or bash compatible shell-like Cygwin or MinGW) by running the below commands:
curl -Ls https://sh.jbang.dev | bash -s - trust add https://repo1.maven.org/maven2/io/quarkus/quarkus-cli/
curl -Ls https://sh.jbang.dev | bash -s - app install --fresh --force quarkus@quarkusio
You can install it on Windows systems using the Powershell:
iex "& $(iwr https://ps.jbang.dev) trust add https://repo1.maven.org/maven2/io/quarkus/quarkus-cli/"
iex "& $(iwr https://ps.jbang.dev) app install --fresh --force quarkus@quarkusio"
Once installed, restart your shell.
The Quarkus CLI can also be installed using SDKMAN as below:
sdk install quarkus
2. Create a Project
Use the Quarkus command-line interface (CLI) to create a new project. The below command adds resteasy-reactive, Jib, and kubernetes dependencies.
quarkus create app quarkus-example --extension=resteasy-reactive,kubernetes,jib
cd quarkus-example
Sample Output:
After this, you will have several files generated, among these files is the pom.xml file bearing dependencies to the build file:
.........
io.quarkus
quarkus-resteasy-reactive
io.quarkus
quarkus-kubernetes
io.quarkus
quarkus-container-image-jib
......
The good thing with Quarkus is that it generates Deployment/StatefulSet resources that it use your registry_username/test-quarkus-app:tag as the container image of the Pod. The image here is controlled by the Jib extension and can be customized using the application.properties as shown:
Open the file for editing:
vim src/main/resources/application.properties
Add the following lines replacing where required.
quarkus.container-image.group=registry_username
quarkus.container-image.name=tutorial-app
quarkus.container-image.tag=latest
quarkus.container-image.username=registry_username
quarkus.container-image.password=Your_registry -Password
If no registry has not been specified, the default, docker.io registry will be used. A detailed demonstration on specifying a registry has been captured elsewhere in this guide.
3. Build and Deploy your Application
Jib��is used to build optimized images for Java applications without a Docker daemon and no need for the mastery of deep docker practices. Dekorate is a Java library that makes it simple to generate and decorate Kubernetes manifests. It generates manifests based on the annotations, source code, and configuration variables.
Now build and deploy your application using Quarkus CLI:
quarkus build -Dquarkus.container-image.push=true
Sample Output:
After the build process, you will have two files named kubernetes.json and kubernetes.yml under the target/kubernetes/ directory.
# ls target/kubernetes
kubernetes.json kubernetes.yml
Both files contain both the Kubernetes Deployment and Service. For example, the kubernetes.yml file looks like this:
# cat target/kubernetes/kubernetes.yml
---
apiVersion: v1
kind: Service
metadata:
annotations:
app.quarkus.io/build-timestamp: 2022-07-09 - 10:55:08 +0000
labels:
app.kubernetes.io/name: tutorial-app
app.kubernetes.io/version: latest
name: tutorial-app
spec:
ports:
- name: http
port: 80
targetPort: 8080
selector:
app.kubernetes.io/name: tutorial-app
app.kubernetes.io/version: latest
type: LoadBalancer
---
apiVersion: apps/v1
kind: Deployment
metadata:
annotations:
app.quarkus.io/build-timestamp: 2022-07-09 - 10:55:08 +0000
labels:
app.kubernetes.io/version: latest
app.kubernetes.io/name: tutorial-app
name: tutorial-app
spec:
replicas: 1
selector:
matchLabels:
app.kubernetes.io/version: latest
app.kubernetes.io/name: tutorial-app
template:
metadata:
annotations:
app.quarkus.io/build-timestamp: 2022-07-09 - 10:55:08 +0000
labels:
app.kubernetes.io/version: latest
app.kubernetes.io/name: tutorial-app
spec:
containers:
- env:
- name: KUBERNETES_NAMESPACE
valueFrom:
fieldRef:
fieldPath: metadata.namespace
image: registry_username/tutorial-app:latest
imagePullPolicy: Always
name: tutorial-app
ports:
- containerPort: 8080
name: http
protocol: TCP
You will also have the image pushed to your registry. DockerHub for this example:
It is possible to generate a StatefulSet resource instead of the default Deployment resource via the application.properties;
quarkus.kubernetes.deployment-kind=StatefulSet
Now deploy the application to your Kubernetes cluster using any of the two manifests. For example:
kubectl apply -f target/kubernetes/kubernetes.yml
Verify if the deployment is up:
# kubectl get deploy
NAME READY UP-TO-DATE AVAILABLE AGE
tutorial-app 1/1 1 1 13s
# kubectl get pods
NAME READY STATUS RESTARTS AGE
tutorial-app-bc774dc8d-k494g 1/1 Running 0 19s
Check if the service is running:
# kubectl get svc
NAME TYPE CLUSTER-IP EXTERNAL-IP PORT(S) AGE
kubernetes ClusterIP 10.96.0.1 443/TCP 31m
tutorial-app LoadBalancer 10.102.87.114 80:30400/TCP 4m53s
Access the deployment using the provided port 30400. This can be done using a web browser with the URL http://IP_Address:30400/hello
Or from the terminal as shown:
$ curl 192.168.205.4:30400/hello
Hello from RESTEasy Reactive
This is the output of the file at src/main/java/org/acme/GreetingResource.java
4. Tuning the generated resources using application.properties
Quarkus allows one to tune the generated manifest using the application.properties file. Through this file, several configurations can be made. These include:
A. Namespace
Quarkus allows one to run the application in a chosen namespace. It omits the namespace in the generated manifest rather than enforcing it in the default namespace.
Therefore, you can run the application in the desired namespace say test using the command:
kubectl apply -f target/kubernetes/kubernetes.yml -n=test
Aside from specifying the namespace when running the Kubernetes command, you can still capture the namespace in the application.properties as shown:
quarkus.kubernetes.namespace=mynamespace
Replace mynamespace with the desired namespace for the application.
B. Defining a Docker registry
There are several other registries that can be defined. If left undefined, docker.io is used. If you want ot use another registry such as quay.io, then you need to specify it:
quarkus.container-image.registry=my.docker-registry.net
my.docker-registry.net is the registry you want to use.
C. Environment variables
There are several ways of defining variables on Kubernetes. These includes:
key/value pairs
import all values from a Secret or ConfigMap
interpolate a single value identified by a given field in a Secret or ConfigMap
interpolate a value from a field within the same resource
Environment variables from key/value pairs
To add environment variables from key/value pairs, use the below syntax:
quarkus.kubernetes.env.vars.my-env-var=foobar
This adds MY_ENV_VAR=foobar as an environment variable. my-env-var is converted to uppercase and the dashes are replaced with underscores to result in MY_ENV_VAR.
Environment variables from Secret
To add key/value pairs of Secret as environment variables, add the lines below to application.properties:
quarkus.kubernetes.env.secrets=my-secret,my-other-secret
This will result in the following in the container environment:
envFrom:
- secretRef:
name: my-secret
optional: false
- secretRef:
name: my-other-secret
optional: false
You can set the variable by extracting a value defined by keyName form the my-secret:
quarkus.kubernetes.env.mapping.foo.from-secret=my-secret
quarkus.kubernetes.env.mapping.foo.with-key=keyName
Resulting into:
- env:
- name: FOO
valueFrom:
secretKeyRef:
key: keyName
name: my-secret
optional: false
Environment variables from ConfigMap
Quarkus can be used to add key/value pairs from ConfigMap as environment variables. To achieve this, you need to add the lines below separating the ConfigMap to be used as a source by a comma. For example:
quarkus.kubernetes.env.configmaps=my-config-map,another-config-map
This will result into:
envFrom:
- configMapRef:
name: my-config-map
optional: false
- configMapRef:
name: another-config-map
optional: false
It is also possible to extract keyName field from the my-config-map by using:
quarkus.kubernetes.env.mapping.foo.from-configmap=my-configmap
quarkus.kubernetes.env.mapping.foo.with-key=keyName
This will generate a manifest with the below lines:
- env:
- name: FOO
valueFrom:
configMapRefKey:
key: keyName
name: my-configmap
optional: false
That is it!
Closing Thoughts
That summarizes this guide on how to deploy and use Quarkus in Kubernetes. I am sure that you are now in a position to generate the Kubernetes resources based on some defaults and the user-provided configuration using Quarkus. I hope this was valuable.
0 notes
Text
Wardog’s Fic Masterpost
You can find nearly all fics through my AO3 account, but here’s a list of links!
MARVEL
IronStrange- Tony Stark x Stephen Strange
Wishes (Better Left Ungranted)
General- Tony makes a few wishes, but some are better left ungranted.
‘Till Then
Mature- Stephen Strange is trying to work at Kamar-Taj when his boyfriend texts him... from his Malibu bed. Stephen opens a portal to talk to him about it and they wind up, not really talking about it. ( Tony Stark Bingo Explicit Card
A4 KINK: Masturbation)
The Theory of Magic (Series)
General- A get together series in which Stephen Strange has a crush and actually makes a movie. Stories are Complete but the Series is Ongoing, available for expansion via prompts when open.
Remind Me
Study and Practice
Burden of Proof
Absence Makes the Heart
Time Heals All (Series)
General- Stephen Strange and Tony Stark are married. A little Team Cap antagonistic. Part 3 is a little Dark!IronStrange.
What the Doctor Ordered
Cloak and Dagger
Break Rules (Not Oaths)
IronPanther- Tony Stark x T’Challa
Hot Chocolate
General- (Fluff and Flirting)- So a combination of a prompt and a ship. From jacarandabanyan "Hot Chocolate" and bash-it-all's "IronPanther".
WinterHawk- James Barnes x Clint Barton
Nesting On Knives (Series)
Teen- Tumblr Prompt: 1.“Would you ever write WinterHawk?<3″
. Birthday Fic + Tumblr Prompt: All Avengers, clock, poking (+ Tony Stark)
1. Well-Armed (To Hold)
2. A Meddling Affection
WinterIron- James Barnes x Tony Stark
Children of Light
General to Teen- Slowbuild to WinterIron. Deals with the Death of JARVIS, the first activation of FRIDAY, and JARVIS’s eventual resurrection. (Note that J is the “Major Character Death” referenced.) This is angsty because I have FEELINGS about the loss of JARVIS and the fact that we never mourned him in MCU. Stories and Series ongoing.
Son of Stark
To Lose a Child
A Child’s Initiative
I Will Always Find You
General- Tony as Snow White, Bucky as Prince Charming in an AU snippet of OUAT.
Collision With a Dream
General- Bucky's walking along arguing about Russian Lit when he literally runs over his dream guy. Tasha does what she usually does, she makes it worse. That's alright, Tony's apparently the forgiving sort.
(You Wanna) Date My Dad
General- Featuring Harley Keener! "Would you ever write a fic where Bucky meets Harley?"
To Cure a Hangover (You Need Espresso and a Date)
General- Prompt: "Would you ever write: WinterIron with age difference? Like teacher!Bucky with Student!Tony? :P"
I Was Promised a Flying Car
General- Prompt: Would you ever write a fic where Tony and Bucky is bonding over being nerds/loving science? (And doing all kinds of wacky, mythbuster-esque experiments that Tony whips up any time Bucky begins a sentence with "I wonder what would happen if...?")So it's not "science" driven, but science nerd Bucky did spend his last night before deployment at the Stark Expo, staring at a flying car...
Mechanics, Millionaires, Models & More
General- Tony Stark and Bruce Wayne are friends from childhood. When Tony as a single dad catches the eye of the model James Barnes, there’s some mutual Instagram-Stalking and a lot of flirting.
Tony’s First Friend
Coping for An Age
(Walk Walk) Fashion Baby
Milkshakes and Motorcycles
Teen- Bucky, second to the Captain for the Howling Commandos, hears a scuffle around the corner and finds himself with an armful of just about the prettiest little lost lamb he's ever seen. Since Tony don't seem too keen on his now-ex, Bucky's gonna buy him a milkshake, wrap him in a leather jacket, and hopefully show him a good time.
Coffee, Curses, Kisses
General- Tony Stark drags himself out of his workshop on a regular Thursday morning. Well, mostly a regular morning. Except for Clint Barton lying on the breakfast bar in themed underwear. The theme is new, the rest is depressingly familiar. Ok, so maybe the rose petals are new too. (What the hell, Clint?) It's enough to make a billionaire grateful for the Avengers Alarm.
Wait a minute, magic too? Fuck, this is just not Tony's day.
(Until it really, really is.)
(This is a Fill for Tony Stark Bingo 2019 S4: FIRST KISS)
Riding Roughshod
Teen- The Heroic Captain America wakes up in a world that is integrated far beyond what he would have dreamed of when he went into the ice, though he never expected to be a part of it. A pioneer of mixed-race teams back in his own day, the last thing he expects is to be called upon to do so once again, this time gathering a group of heroes from some rather unlikely places. If that weren't enough to worry about, there's a wild-card Soldier with a familiar fighting style making trouble at top-security bases all over the world... and a shiny red and gold suit that doesn't seem to answer to anyone. That's to say nothing of the kid genius that's supposedly behind it.
( This is a Fill for Tony Stark Bingo 2019 R4: Centaurs / This is a Fill for Bucky Barnes Bingo 2019 K3: Tony Stark/ Iron Man)
Love Like Knives
Mature- Winter wakes up Tony when he wants someone to play rough with.This is a Bingo Fill for Bucky Barnes Bingo 2019- U4: [Image: Winter Soldier holding a knife.]
California Dreamin’ A Beach Bums Verse
Teen- Note: A Special Collaboration Series! This is a WinterIron get together with puns, angst, fluff and more! Note that some fics may include Losers crossover characters! Also make sure to read my partner maevee’s stories!
Don’t Tell (Secrets) -Losers Crossover Fic
(Everyday Is A) Winding Road - Losers Crossover Fic
Mai Tai (Offer You A Drink)
When You Wish Upon A Stark -Maevee
We’re Gonna Need a Bigger Bucky -Maevee!
Adorato
Teen-James Barnes, the Winter Soldier, has been out of the ice and Hydra’s hands for a month the first time he hears a familiar voice. (A SoulMate AU)
True, Strong and Brave
Teen- Bucky Barnes moves into the tower and receives help from an otherwise elusive Iron Man. But when the team gets called out and things go wrong, Steve gets a reality check as to what has been done in his name. Bucky steps up, he's one of the few who can. (Team Cap Critical; Anti-Wanda)
Tired
General- From a Prompt on Tumblr: Random Sentence- “I’ll do it for you.”
(Were) Whisperer
Mature- In a world where Aliens rain destruction from portals through space, ancient Gods arrive on beams of light, and a certain Billionaire Philanthropist darts around the world in a metal suit: there really is a very high bar for what is considered "weird". Shapeshifters hardly register, having been long known. You’re either a Human, a Were, or a Whisperer. Most people can prove whether they’re the first or the second, a few will lie about being the third.
Alternately, there's Tony. Tony Stark is one of the few people pretending the first and burying the third, and he’s more or less in the clear with it until Steve Rogers catches up with the Winter Soldier, and brings him home to Avengers Tower.
Tony doesn’t have to say a word, the Wolf knows differently.
An Attraction
Jurassic World AU- Write... a crossover/au of the last non-marvel movie you saw and marvel (if ships, winteriron?). Essentially Jurassic World & Jurassic World: Fallen Kingdom Snippets with WinterIron. Originally Posted on Tumblr: Expansion Pack for AO3 Rolling Out Now!
Next Year Will Be Better
General- Just a quick story for Tony’s birthday. Pre-Slash Tony Stark/James Barnes, and Tony acting as IronDad to the Spider Son and his Potato Gun Son.
Let’s Go Dancing
General- This is a Marvel Universe-Center Stage Fusion AU that no one asked for and everyone is getting anyway. Tony dances for the American Ballet Company as their featured ballerino, performing under the name Antonio Carbonell. James and Steve are two of the ABC’s newest students, and James gets a chance to meet his crush on his first day. Just his luck, Tony is even better in person. (Natalia may have been setting them up all along.) This is a Fill for Tony Stark Bingo 2019- S1: Dancing
The B Team
Teen- Pepper Potts has had a long day that isn’t over yet, as Phil Coulson has just arrived on the doorstep of Tony’s Malibu Mansion to discuss Iron Man joining a new team. In most instances, it wouldn’t be enough to let him in the door, except he’s brought James Barnes along with him. Of course, he was probably expecting that James would be helping them talk business… But all the Soldier seems to want to do is get busy. (WinterIronWeek Day1/ TSB S2: [Image: Tony Stark working on IM in Workshop])
Done
General- Tony has just started prep work to remove the old arm and install the new one he's built, and already James is impatient. Or maybe he just wants to needle his boyfriend a little? Tony gets pretty cute when he's annoyed. (WinterIronWeek Day 2)
A Second Take, A First Impression
General- A drunk Tony Stark meets his Soulmate at a college party, but James is a gentleman (and Rhodey is scary) so nothing can happen until they’re sober. Tony wakes up at an ungodly hour of the morning, confused at his current predicament, and meets his (very attractive, very shirtless) Soulmate all over again. (He wishes he could forget all of this.) (WinterIronWeek Day 3)
Hunting For (You)
General- The Soldier has cleared the last of his required therapies, been gifted a new arm, and turned loose. The first thing he wants is to show Tony, up close and personal. Of course, there's a certain winged pest that is going to interrupt. (WinterIronWeek Day5)
WinterWidow/RussianRoulette- James Barnes x Natasha Romanova
No Fics Currently
Stony- Steve Rogers x Tony Stark
A Guardian of Light
Teen- a.k.a. that time Steve sank the Valkyrie in the Arctic and became a spirit-walking wolf to guide Tony, at Frigga’s suggestion.
Shield Studios Ltd.
General Audiences- All the Avengers in a non-powered voice-acting AU for an animated show called "Assemble" staring their Marvel counterparts. Tony/Steve have a mutual admiration/crush but it's not actually romantic and can be read as gen.
Assemble!
Phil’s Failed Plan
You’re Welcome to Try
The Vague & The Unmistakable
General Audiences- Looking back on it, there are several things that should have tipped Steve off that today was his Birthday. (Starting with the fact that it's suddenly clear Tony engineered every one of them.)
Stucky- Steve Rogers x James Barnes
No Fics Currently
Stuckony- Steve Rogers x James Barnes x Tony Stark
On The Wing
Teen- A Wing AU for Stuckony. Stories are Complete but the Series is Ongoing, available for expansion via prompts when open.
Fluttering
Turtledove
(I’ll) Be Good
Mature- So when the tumblr prompt "Would you ever write...ABO winterironshield with alpha Tony?" meets my Kink Card S2 Square "Alpha/Beta/Omega Society" this is where we end up.
Allergic to Coddling
From the Prompt: "Would you ever write Tony Stark having an allergic reaction to something and the rest of the Avengers babying him to the point of ridiculousness because they just love him so much?"
Sort of Stuckony, sort of Everyone is Poly Because Avengers? Your choice.
Poly Avengers- Everyone Loves Everyone
Everybody Loves Me
From the Prompt: "Would you ever write a TonyXEveyone fic? Not exactly everyoneXeveryone, but everyone *in love* with Tony only?"
Note this is a Partial Fill which may be expanded on later. Featuring Tales of Suspense Hawkeye/Comic Clint Barton, aka deaf and a dumpster kid until the end.
Non Romantic- No Shipping
Shut UP, Bucky!
Teen- From the hellscape of Discord Discussions I bring you:
QueenWuppy: "During World War II condoms were not only distributed to male U.S. military members, but enlisted men were also subject to significant contraception propaganda in the form of films, posters, and lectures. A number of slogans were coined by the military, with one film exhorting "Don't forget — put it on before you put it in."
"guys i was doing research and and steve and bucky were subjected to this".
AKA Bucky makes SO MANY COMMENTS about Super Soldier Sized Protection. So many.
The Most Powerful (Pillowfight)
General- In which Carol and Tony (aggressively) support each other and then do battle (with pillows) for their honor. Or each other's honor? It's unclear, things got out of control. (James Rhodes loves these idiots way too much.) (This is a fill for the TSB 2019 Square: T2: A BATTLE/FIGHT/CONFRONTATION)
We Can’t Plot Murder All The Time
General Audiences- From the Prompt: "Would you ever write Deadpool/Tony (IronPool? DeadMan? IronDead? Dunno their ship name :b)"
AN: I don’t ship them so this is a non-romantic.
The Losers
A Touch of Grace
Gen to Teen- Cougar has a bad feeling right before the Fadhil operation, and he admonishes Jake to be careful. Jake mostly pays attention, but Cougs is pretty distracting. (Slight D/s tones and Subspace.)
If I Touch You, Will You Listen? (Cougar’s POV)
If I Listen, Will You Touch Me? (Jensen’s POV)
Tag (You’re It)
Teen- Jake hacks a new system for the express purpose of getting the Losers prank dog tags printed and delivered. Mostly because his Unit is full of people that make bad decisions, himself included. And also? To flirt with Cougar.
Jake is willing to do stupid, stupid things in order to flirt with Cougar.
You And Tequila (Make Me Crazy)
Teen (and Up)- Fortalvarez Tequila is a family business that's been in operation for a hundred and fifty years. Currently, under the management of the family matriarch Constanza, the business will soon be passed to her beloved grandson Carlos. The problem is, Constanza does not care for modern technology or the fact that all of her grandbabies (but especially her favorite) are single. Her solution is a single advertisement for a new Social Media Expert, which is about to be answered by the very handsome (and rather impulsive) Jake Jensen.
#wakandan wardog#WinterIron#IronStrange#STONY#Stuckony#WinterHawk#IronPanther#Poly Avengers#Cougar x Jensen#Carlos Cougar Alvarez x Jake Jensen#wakandan-wardog#Wardog Writes Stuff#My Fic Post#Fic Masterlist
273 notes
·
View notes
Text
Honda Hrr2168vka Lawn Mower Repair Manual

Honda Hrr2168vka Lawn Mower Repair Manual Youtube
Honda Mower Hrr2168vka Manual
Honda Hrr216vka Lawn Mower Repair Manual Parts
Honda GENUINE OEM Harmony II HRR216 (HRR2168VKA) (HRR2168VYA) Walk-Behind Lawn. Refer to the Honda shop manual for service procedures. See “Honda Publications” on page 20 for ordering information. Page 11: Blades EXCESSIVELY WORN TRAILING EDGE NORMAL WORN BENT CRACKED LOWER BLADE If a blade is bent, take the lawn mower to an authorized Honda BLADE BOLT 2 servicing dealer for inspection.
HRX217HYA. LAWN MOWER. trained in servicing Honda lawn mowers and are supported by the parts and. .. mower best and is fully equipped to maintain and repair it. To ensure. Refer to the Honda shop manual for service procedures.
Download or purchase shop manuals and service support materials for. including Honda Generators, Lawn mowers, Tillers, Trimmers, Snow blowers, & Pumps.. Parts Catalogs; Service/repair manuals; Generator Troubleshooting Manual .
This Official Honda HRX217HYA Lawn Mower Shop Manual provides repair and maintenance information for Honda HRX217HYA Lawn Mowers. This is the .
Find great deals for Honda Hrx217 HZA Lawn Mower Service Repair Shop Manual. Shop with confidence on eBay!. Air Filter Cleaner Parts For Honda Lawn Mower HRX217HYA HRX217HZA Motors. Best Selling in Manuals & Guides.
Find great deals for Honda Hrx217 HYA Lawn Mower Service Repair Shop Manual. Shop with. HRX217HYA. Best Selling in Manuals & Guides. See all.
Document for Honda Hrx Hya Service Manual is available in various format. honda hrx217 hya lawn mower repair service shop manual 4199 3900 this item. manual more picture owners manual honda hrx217hya owners manual lawn.
service repair workshop manual,business statistics decision making solution. hr215 lawn mower service manual honda hrx217hya lawn mower service repair.
The Honda Power Equipment HRX217HYA Lawn Mower Shop Manual covers service and repair procedures for the HRX217 HYA type lawn mowers.
Document for Honda Hrx Hya Service Manual is available in various format. honda hrx217 hya lawn mower repair service shop manual 4199 3900 this item. indulgycom owners manual honda hrx217hya owners manual lawn mower hide.
Repair guides and support for gas, electric, and human powered machines used to cut grass, whether push style, or ride-on. Lawn Mower troubleshooting, repair, and service manuals.
The official parts look up site for Honda Power Equipment. Search for parts for your Honda generator, lawn mower, tiller, trimmer, pump, and snow blower.

Description
This Official Honda HRR216VXA HRR216VYA Factory Service Manual provides repair and maintenance information for the Honda HRR216VXA and Honda HRR216VYA Rotary Lawn Mowers.
Repair Manual coverage
Honda HRR216VXA K3 to K7 models
Honda HRR216VYA K8 to K9 Models

Honda Hrr2168vka Lawn Mower Repair Manual Youtube
Honda HRR216VXA HRR216VYA Service Manual Table of Contents

Honda Mower Hrr2168vka Manual
Specifications
Service Information
Maintenance
Roto-stop/drive Belt
Engine Removal/ Installation
Muffler Recoil Starter Fuel System
Flywheel/ignition Coil
Cam Pulley/crankshaft/ Piston/ Cylinder Block
Handle Pipe/cables/smart Drive
Mower Deck/wheels
Transmission
Index

Honda HRR216VXA HRR216VYA Service Manual Index of Topics
Honda Hrr216vka Lawn Mower Repair Manual Parts
A
Air filter
Cleaning
Removal/installation
Air gap adjustment
B
Blade
Inspection
Installation
Removal
C
Cable adjustment
Roto-Stop
Smart Drive
Cable tie locations
Cam pulley
Carburetor
Cleaning
Disassembly/reassembly
Removal/installation (K3 ~ K7)
Removal/installation (K8 ~ K9)
Choke control assembly
Choke control system
Clip Director removal/installation
Combustion chamber cleaning
Commercially available tools
Compression test
Connecting rod
Cap
Inspection
Oil clearance
Control base
Crankshaft
Inspection
Removal/installation
Runout check
Cylinder barrel
Cylinder block inspection
Cylinder block/oil pan assembly
Cylinder head cover
D
Deck
K3-K7
K8
K9
Decompression system inspection
Decompressor weight
Dimensional drawings
Discharge guard
K3-K7
K8-K9
Drive Belt
Removal/Installation (K3 K6)
Removal/Installation (K7)
Removal/Installation (K8 ~ K9)
Drive system troubleshooting
E
Emission control system
Engine
Installation
Oil
Removal
Troubleshooting
Evaporative emission control system
F
Fan cover removal/installation
Fan cover/fuel tank
K3
K4 thru K8
K9
Features
Filter
Air
Fuel
Flywheel
Installation
Removal
Fuel cap
Fuel tank and filter
Fuel tube
Inspection
Removal/installation
Fuel valve disassembly/reassembly
G
Governor
Disassembly/reassembly
Max speed adjustment
Governor Arm Adjustment
Governor arm disassembly/reassembly
Grass bag
H
Handle grip removal/installation
Handle locking knob
Handle pipe replacement
K3-K4
K5-K9
I
Icons
Idle speed adjustment
Ignition coil inspection
Inspection
Cam pulley height
Cam pulley ID
Cam pulley shaft OD
Choke control system
Connecting rod
Crankshaft main journal
Crankshaft runout
Cylinder block main journal
Decompression system
Oil pan main journal
Piston pin
Piston ring
Piston-to-cylinder clearance
Rocker arm shaft clearance
Spark plug
Valve face/stem OD
Valve guide ID
Valve seat width
K
K version
L
Limiter Cap
M
Maintenance
Schedule
Specifications
Mower deck
K3-K7
K8
K9
Muffler
o
Oil
Change
Level check
Oil pan removal/installation
P
Pilot screw replacement
Pinion gear lubrication
Piston
Assembly
Connecting rod
Cylinder clearance
Disassembly/reassembly
Piston ring inspection
R
Rear scroll removal (K9)
Rear shield
Rear wheel lubrication
Recoil starter removal/installation
Rocker arm
Rocker arm inspection
Rocker arm shaft
Roto-Stop
Brake/clutch inspection
Inspection
Installation
Parts reference
Removal
Roto-Stop cable
K3-K4
K5-K9
Roto-Stop control K5-K9
s
Safety messages
Schedule, maintenance
Scroll removal (K9)
Serial numbers
Service rules
Smart Drive (K3-K4)
Installation
Removal
Smart Drive (K5-K6)
Installation
Removal
Smart Drive (K7)
Removal
Smart Drive (K8-K9)
Installation
Removal
Smart Drive cable
K3-K7)
K8-K9)
Smart Drive control inspection
Spark arrester
Spark plug
Spark test
Special tools
Specifications
Dimensions, weight, capacities
Engine
Maintenance
Service
Tune-up
Symbols
T
Thermowax
Inspection
Installation
Removal
Throttle
Cable
Lever assembly
Throttle cable adjustment
Throttle return spring
Thrust washer
Tools
Commercially available
Special
Torque values
Transmission
Disassembly/reassembly K3~K4
Disassembly/reassembly K5-K6
Disassembly/reassembly K7
Disassembly/reassembly K8-K9
K7
K8-K9
Troubleshooting
Choke control system
Drive system
Engine
Vibration
Troubleshooting techniques
Tune-up specifications
V
Valve
Clearance adjustment
Disassembly/reassembly
Seat reconditioning
Spring free length
Vibration troubleshooting
0 notes
Text
Oukitel K3 Firmware Flash File Free Download
Oukitel K3 Firmware Flash File Free Download
Oukitel K3 Firmware Flash File Free Download
This post includes the official flash file for Oukitel K3 which you can download for free {Oukitel K3 Firmware Flash File Free Download}. The installation guide will help you to know how to install Oukitel K3 Official Stock Firmware. At first, you have to install and setup the given flashing tool and USB Driver, then you can safely flash your android…

View On WordPress
#hp oukitel k3#oukitel k3 4/64#oukitel k3 4/64 гб#oukitel k3 4/64gb#oukitel k3 4/64gb black#oukitel k3 4/64gb black обзор#oukitel k3 4/64gb отзывы#oukitel k3 4pda#oukitel k3 5.5#oukitel k3 64gb#oukitel k3 akku wechseln#oukitel k3 aliexpress#oukitel k3 amazon#oukitel k3 android 8#oukitel k3 android 9#oukitel k3 android update#oukitel k3 antutu#oukitel k3 bateria#oukitel k3 battery#oukitel k3 battery change#oukitel k3 battery problems#oukitel k3 battery replacement#oukitel k3 cable#oukitel k3 caracteristicas#oukitel k3 case#oukitel k3 change battery#oukitel k3 charger#oukitel k3 charging port#oukitel k3 charging problem#oukitel k3 custom rom
0 notes
Text
Many people around the world look for ways to build container images in Kubernetes without the need to mount the docker socket or perform any other action that compromises security on your cluster. With the increased need, a famous software engineer, Jessie Frazelle saw the need to introduce Img image builder. This is an open-source, daemon-less, and unprivileged Dockerfile and OCI compatible container image builder. Img is a wrapper around the open-source BuildKit, a building technology embedded within Img.
There are many features associated with the img image builder. Some of them are:
Img CLI, a responsive CLI that provides a set of commands similar to Docker CLI commands when dealing with container image building, distribution, and image manipulation.
Rootless Builds: img can be run without requiring the –privileged Docker flag or the equivalent privileged: true security context in Kubernetes.
BuildKit: defined as one of the next generation build engines for container images.
Parallel Build Execution: BuildKit assembles an internal representation of the build steps as a Directed Acyclic Graph (DAG), which enables it to determine which build steps can be executed in parallel.
Cross-Platform/OS Builds: it’s possible to build images for different combinations of architecture and OS on a completely different platform
In this guide, we will take a deep dive into how to build container images on Kubernetes using img image builder.
Setup Pre-requisites
This guide will work best if you have a Kubernetes cluster set up. Below is a list of dedicated guides to help you achieve this:
Install Kubernetes Cluster on Rocky Linux 8 with Kubeadm & CRI-O
Install Kubernetes Cluster on Ubuntu using K3s
Deploy Kubernetes Cluster on Linux With k0s
Run Kubernetes on Debian with Minikube
This guide will demonstrate how to build container images from Dockerfile using img image builder in Kubernetes with Github. So, you will also need:
Access to Kubernetes cluster with permissions to create, list, update and delete pods, jobs, and services
Github repository with a Dockerfile: we will use the repo URL as the path of the Dockerfile
Dockerhub account: to be able to authenticate and push the Docker image.
#1. Configure Build Contexts
For this guide, we will use a private GitHub repository as our build context. We need to configure it with the required Dockerfile.
The URL to my private git repository used in this article is:
https://github.com/computingforgeeks/kubernetes-demo
In the repository, I will create a Dockerfile with the contents below:
FROM ubuntu
ENTRYPOINT ["/bin/bash", "-c", "echo hello"]
Now obtain a Personal Access Token to your git account.
#2. Create the Img Pod Manifest
We will have two containers:
Git-sync: an init container to clone the private git repository
img: that builds the docker image and pushes it to docker hub
These two containers share a volume git-repo mounted as emptyDir at /repo
Create a manifest for the pod.
vim pod.yml
Add the below lines to the manifest:
apiVersion: v1
kind: Pod
metadata:
labels:
run: img
name: img
annotations:
container.apparmor.security.beta.kubernetes.io/img: unconfined
spec:
securityContext:
runAsUser: 1000
initContainers:
- name: git-sync
image: k8s.gcr.io/git-sync:v3.1.5
volumeMounts:
- name: git-repo
mountPath: /repo
env:
- name: GIT_SYNC_REPO
value: "https://github.com/computingforgeeks/kubernetes-demo.git" ##Private repo-path-you-want-to-clone
- name: GIT_SYNC_USERNAME
value: "computingforgeeks" ##The username for the Git repository
- name: GIT_SYNC_PASSWORD
value: "ghp_JilxkjTT5EIgJCV........" ##The Personal Access Token for the Git repository
- name: GIT_SYNC_BRANCH
value: "master" ##repo-branch
- name: GIT_SYNC_ROOT
value: /repo
- name: GIT_SYNC_DEST
value: "hello" ##path-where-you-want-to-clone
- name: GIT_SYNC_ONE_TIME
value: "true"
securityContext:
runAsUser: 0
containers:
- image: r.j3ss.co/img
imagePullPolicy: Always
name: img
resources:
workingDir: /repo/hello
command: ["/bin/sh"]
args:
- -c
- >-
img build -t docker.io//helloworld . &&
img login -u -p &&
img push docker.io//helloworld
volumeMounts:
- name: cache-volume
mountPath: /tmp
- name: git-repo
mountPath: /repo
volumes:
- name: cache-volume
emptyDir:
- name: git-repo
emptyDir:
restartPolicy: Never
In the above file, replace the values appropriately. You can also notice that the destination folder for git-sync is the working directory for img. If you are using a public git repository, you may not be required to provide the Personal Access Token for the Git repository.
#3. Run img image builder in Kubernetes
Using the manifest, run the pod using the command:
kubectl apply -f pod.yml
Now follow the image build and push process with the command:
kubectl logs img --follow
Output:
From the above output, we are safe to conclude that the image has been successfully pushed to DockerHub
#4. Pull and Test the Image
You can now pull and test the image using:
1. Docker
Ensure that Docker is installed on your system. The below guide can help you achieve this:
How To Install Docker CE on Linux Systems
Now run a container with the image using the command:
docker run -it /
For example:
docker run -it klinsmann1/helloworld:latest
Sample output:
2. Kubernetes
The image pushed can still be used on Kubernetes. Pull and test the image as below;
$ vim deploy.yml
apiVersion: apps/v1
kind: Deployment
metadata:
name: hello-world
spec:
selector:
matchLabels:
app: hello
replicas: 1
template:
metadata:
labels:
app: hello
spec:
containers:
- name: hello-world
image: klinsmann1/helloworld:latest
Apply the manifest:
kubectl apply -f deploy.yml
Check the status of the deployment:
$ kubectl get pods
NAME READY STATUS RESTARTS AGE
hello-world-7f68776d79-h4h4z 0/1 Completed 1 (4s ago) 6s
img 0/1 Completed 0 13m
Verify if the execution was successful.
$ kubectl logs hello-world-7f68776d79-h4h4z --follow
hello
The end!
We have successfully walked through how to build container images on Kubernetes using img image builder. I hope this was significant to you.
0 notes
Text
How to Install Webasto heating systems for Hyundai ix35
This post show you guide on how to install Webasto heating systems for Hyundai ix35.
Microcat V6 Hyundai KIA EPC
Preparaitons:
- Open the fuel tank cap, ventilate the tank.
- Close the fuel tank cap again.
- Disconnect the battery "earth" or "ground" connection.-Depressurisethe cooling system.
- Copy the factory number from the original type label to the duplicate type label.
- Remove years that do not apply from the duplicate label.
- Attach the duplicate label (type label) in the appropriate place.
- Disconnect the battery "earth" or "ground" connection.
- Remove the windscreen wiper.
- Remove the coolant reservoir cap and the coolant reservoir.
- Remove the underride protection.- Remove the underbody trim on the left in front of the tank.
- Remove the seat surface of the rear bench seat.
- Open the tank-fitting service lid.
- Remove the fuel-tank sending unit in accordance with the manufacturer's instructions.
- Remove the glove compartment.
- Remove the entrance strip on the front passenger's side.
- Remove the A-pillar trim in the front passenger's side footwell.
- Pull up the shift lever sleeve (only for digital timer).Remove page 25 "Operating Instructions for End Customer" and add to the vehicle operating instruc-tions..
2020 2018 Microcat V6 Hyundai & KIA EPC Free Download
Steps:
Pull in red (rt) wire and black (sw) wire into protective sleeving A. Pull green/white (gn/ws) wire into protective sleeving B and red (rt) wire into protective sleeving C.
Hyundai ix351315910D_EN6Preparing electrical systemOnly with automatic air-conditioning!Cutting protective sleeving to lengthPull in red (rt) wire and black (sw) wire into protective sleeving A. Pull green/white (gn/ws) wire into protective sleeving B and red (rt) wire into protective sleeving C.Preparing linesIPCU view on the contact side!IPCU is preprogrammed with the default set-tings of model year 2011. The default values must be checked during the function check on the vehicle and adjusted.
1Protective rubber plug2Wiring harnesses of fan controller, heater control
Loosely mount angle bracket 1.2Remove clip, M6x20 bolt, large diameter washer, flanged nut3M5x16 bolt, washer, retaining plate for fuse holder, K3 relay, flanged nut4Fuses F1-3 connected.
Do not install the metering pump wiring harness until later togeth-er with fuel pipe along the origi-nal vehicle fuel line on the underbody
Connection to 2-pin connector 1 from the fan motor.Produce connections as shown in wiring dia-gram.2Red (rt) wire from fuse3Red (rt) wire from K3/87a4Black (sw) wire from K3/305Red (rt) wire from connector GM
Connection to 2-pin connector 1 from the fan motor.Produce connections as shown in wiring dia-gram.2Red (rt) wire of fan relay3Red (rt) wire from IPCU/154Red (rt) wire from K3/87a5Black (sw) wire from K3/306Green/white (gn/ws) wire from IPCU/867Red (rt) wire
Connection to 4-pin connector 4 from the fan controller.Produce connections as shown in wiring dia-gram.1Black (sw) wire from IPCU/A2Red (rt) wire from IPCU/E3White/black (ws/sw) wire for A/C control unit pin 22 (36)5White/black (ws/sw) wire of connector for fan controller, pin 4Connect-ing fan con-trollerProduce connections as shown in wiring dia-gram.1Brown (br) wire IPCU/85 with cable lug2Original vehicle earth point
www.autoepccatalog.com
0 notes
Text
Top Rated LED Grow Light For Indoor Weed Cultivation - Reviews and Buying Guide
Greatest LED Grow Lights: Buying Guide and Recommendation If you're a gardening enthusiast and have decided to try growing plants inside, an LED Grow Light will be essential to help your plants grow strong and healthy. Here are a few things.
LED Grow Lights Buying Guide
How to Select
While lights grow, you might get confused with Variations that are several to be found on the marketplace. But, there are crucial factors that will let you differentiate between different models and decide on the one that is correct. Take a look on the following considerations.
Region to be Covered
One of the most important things you should keep in mind is the Grow lights. Usually, a large area can give slower outcomes if you have the smallest LED grow lights before you are planning to buy a lot of those. Similarly, a small area with large LED grow lights may be unnecessary. Make a plan just how many LED lights you require to give the best coverage to you.
Stage of Development
The period of expansion for your LED grow lights to help, that you’re waiting With may not be compatible with some products.
If you want a growth cycle that is full consider a full-spectrum LED to aid in all stages of the plant's development. Full spectrum grow lights are comparatively advanced and supply light. Also, they have other advantages like cost that is reasonable and runs.
Plant Type
The growth phase is connected to plant kind. It's Vital to understand Needs reduced light setting or full sun.
To go for plant forms, you can consider LED lights. These are rather costly but they're rather practical as they mimic seasonal lighting changes together with giving you more control.
Budget
The budget can determine the quality and quantity of LED grow lights you Intend to purchase. If you have limited funding be sure to do a lot of research regarding the area needs being covered.
Apart from that, the more you'll pay the exceptional features you will discover on these products.
Heating
LED grow cooler runs compared to other light sources. However, The temperature of the growth room is a consideration.
Normally, full light spectrum LED lights don't offer any trouble with respect to heat but you should still check if the bigger units are equipped with fans to prevent overheating and damage to your crops.
Quality
The quality of LED grow lights is among the factors you Should check. While buying LED grow lights, be sure that they are sturdy enough to withstand internal and external hitting issues.
Look
A product's overall demonstration does matters. When the LED grow lights Are not attractive, you might do not want them in your place no matter how successful they are. Therefore, select a set that doesn't look odd one out and suits exterior or interior of your house.
Space
Before you buy LED measuring a room grow lights. Consider the Size of these lights to see if it's possible to install them in your location or not. As an example, if you select a pair of LED grow lights that are positioned extremely close to the plants, it might result in burning and ruining them.
To know more about the ideal space of LED grow lights here you go. Consider Mars which necessitates 300W LED grow light that needs to be set at more or 76cm from plants.
Intensity
While buying LED grow lights, then Start Looking for the intensity in their own specifications.
For gardening, the intensity is measured in watts. If you are searching for performance grow lights with watts. A 400W LED grow lights may provide you improved performance in comparison to a 200W LED grow lights.
Warranty
Even though the thing that is most important is to find a product within Your budget when it has a guarantee, it can be a plus. As you are making a selection between two products in reality, it can make a difference.
If you are seeking to commit a lot of cash in LED grow lights then at least try to get 2 years guarantee and confirm the return procedure is clear. In case of any flaw, it will be easy for you to return the merchandise.
Reviews of the Best LED Grow Lights
Now that you know how to choose the right LED Grow Light, let us review a few Of the ones.
TaoTronics LED Plant Grow Light

TaoTronics LED Plant Grow Light for Garden Greenhouse has appealing Features and is one of the LED lights in the market with over six decades and millions of clients.
12 LEDs lights are consisted of by the TaoTronics LED Plant Light Are blue and the rest are red which offers the proper quantity of light for gardens.
It can supply the correct wavelengths that plants may consume entirely for every plan to go through the photosynthetic stage.
It uses less electricity compared to the total amount of light it emits. It also gives an temperature for approximately 17 hours to help the plants grow .
Overall, the TaoTronics LED Plant Light saves you cash as it is an Lights alternative grows and it helps save on your electric bill by consuming less power. It is also easy to install and install saving on the expense of installation.
The TaoTronics LED Plant Light covers a large area which increases the Number of crops which can be grown under one mild requiring less of these to cover an whole greenhouse.
Pros:
Substantial customer satisfaction rating
Has a 12-month warranty also it can be extended another 6 weeks with enrollment
The fixture uses 12 LED light collectively to provide enough light and heat for indoor plants to grow
Durable casing
Cons:
After a Couple of Days of regular use, the light has a Propensity to get dim which drastically reduces its performance
VIPARSPECTRA V600 600W LED Grow Light

The VARASPECTRA Reflector Series 600W panel may be switched between vegetative and flowering stages as needed. Perfect for a little grow tent.
Optimally configured with blue, red and white LEDs for a total of (120) 5 for more leaning towards the blue spectrum to the vegetative stage watt EpiLEDs diodes.
The light produced is so bright that it'll be unwise to stare at it with the Naked eye.
The VIPARSPECTRA Reflector Series 600 watt panel includes two 4.72" fan for cooling. The fan draws air in blow and then sinks off the top. This can be standard with comparable LED grow panels.
The VIPARSPECTRA Reflector Series 600 is Ideal for a backyard 3x3' with a maximum field of 4x4'. Compares into a Classic HPS.
Increasing your garden is Relatively Simple by incorporating additional by chaining them together fixtures. No special cables are necessary. Plug the power cable from one device in the other as shown below.
The VIPARSPECTRA Reflector Series 600W is your big brother to the VIPARSPECTRA Reflector Series 300W with the extra benefit of being able to switch between vegetative and flowering phases.
I'd recommend using one'. Adding another panel it is easy to increase your policy'.
Pros:
Veg/Bloom change
Daisy series capable
Excellent warranty
Cons:
Too bright for clones
Video review of Viparspectra V600 600W LED Grow Light
youtube
Kind K3 LED Grow Lights

Kind K3 LED grow lights are popular with enthusiasts of gardening. These lights are great for small-to-medium gardens. Being LED full spectrum grow lights, they can be rather useful when the plant is booming.
The 90 3-watt LEDs are organized in 6 neat collections and cover all of the 12 significant spectrum. The UV and IR light addition mean this in case you are ultimately planning to transplant the sapling out, you can do so without difficulty.
To help Trendy to keep things moving the LED lamp, you will find four fans and heat sinks.
When it concerns the Kind K3 L300 develop lights review, they are also pretty great options for hydroponic and other indoor lighting functions. They could cover an area as broad as 5 x 5 ft across (as determined in our evaluations) although the promoted limits are slightly lower.
Onboard Is a unique and proprietary feature Kind calls "Secondary Optical Lens." This makes sure that the most distant parts of the plants and the lowest get their equal share of their light.
Considering that the plant can photosynthesize, this makes a lot of sense. Just take the 3-year guarantee period provided and this is easily one of the best indoor LED grow lamps 2019.
Wattage: 300 Watts
Complete Spectrum Coverage: Yes
Coverage: 3 x 3 ft
Life Span: 50,000 hours
Power Draw: 220 watts
Pros:
Excellent light production
Full-spectrum policy
3-year warranty period
Decent and sturdy build
Cons:
Occasionally, the System gets too hot for comfort
Warranty claims can be tiresome sometimes
G8LED 240 Watt LED Grow Lights

The G8LED 240 Watt LED Grow Light is one of the LED lighting fixtures On the marketplace. The G8LED Light has a range of light intensity with numerous colors that optimizes these plants' photosynthetic period and the development. The G8LED has several features.
The G8LED Lighting is one Generate Ultraviolet and Infrared lights as well as the normal light intensities. The capability to produce the ideal light intensity at the right point in the plants growth boosts the effectiveness of the light, and it has made it quite popular on the marketplace.
The system permits it to cool. The light can create enough warmth for plant expansion in a short amount of time. After being in use for 24 hours at one 20, it may also cool down and shed its heat immediately. This lessens the risk of damaging and overheating the fixture.
The G8LED Light can pay roughly six feet of your indoor garden with Only 1 LED light. It also stinks about 60 inches and can spare a great deal of power and money.
The G8LED lighting has a warranty and a couple of complimentary Servicing of the product if needed.
Pros:
High-quality light that helps creates the best yield and grows healthy plants
Several G8LED Lights May Be Used at different distances to light up a Whole greenhouse
Plant growth is increased unlike the prices seen along with other lights
Cons:
Due to the cost, may not be considered a value
Tens of thousands of clients complete well receive the G8LED Lighting.
The G8LED 240 Watt LED Grow Lights is one of the best choices available and customers can overcome the defects with a few upgrades.
Galaxy Hydro 300W LED Grow Light

The GalaxyHydro 300 Watt Is designed for the grower and can emit light that supports both vegetative and flowering growth cycles.
The GalaxyHydro covers 9 bands of the spectrum of PAR (photosynthetic active Radiation).
The wavelengths include UV, in Addition to blue spectra, red spectra and IR as well as White lighting. The spectrum ranges from 430nm to 730nm.
The GalaxyHydro 300w gets the optimal ratio of red and blue lights for your cannabis plants for flowering and vegetative phases. Infrared and ultraviolet lighting with the role of sterilization of bacteria's plant membranes, stimulating cell division and raising the development.
You can hang panel is grown by the LED within a couple inches of your Plants maximizing light penetration. Perfect for cabinet manufacturers.
The dimmer switch on the GalaxyHydro 300w permits you to adjust the Intensity of the light. This is the budget increase bulb that has this attribute. Putting the intensity low empowers you to use the GalaxyHydro for your cannabis clones instead of using florescent tubes. Increasing the intensity is ready to go into stage.
The Galaxy Hydro can be daisy-chained with the power cords. Daisy chaining 3-4 panels won't overload your electric circuit because they only use 140 watts each.
Pros:
Low Cost
Minimal Power Consumption
Ideal for little garden or clones
Daisy chaining reduces the mess of power strings in a small grow room.
It is easy to enlarge your area quite easily to around 8x2ft.
Cons:
Non-adjustable spectrum
Low PAR output
Roleadro Second Generation 300W LED Grow Lights

This LED Grow light is made up of 60 5-watt LEDs. Ideal for purchase for a cheap LED grow light, this version is possibly the easiest to use also. Covering the entire light spectrum recommended for indoor gardening, this version also has 5,000 lumens of brightness overall and claims to pay 3.9 square meters or an area equivalent to 6,200 square inches.
This claim does seem to be slightly inflated; we guess an area of 3 x 3 ft is much more realistic.
The first Was with two fans along with that this version comes with a stainless steel hanging kit. This model isn't Daisy-chainable; it will have.
Also, in the course of the Roleadro 300-watt LED grow review, one thing has to be noted: that it includes a handy warranty period.
Being a Budget LED grow light, it's to be anticipated that specific features will be missing. On this model, there are not any switches to control the LEDs or to control the electricity supply.
Nevertheless, you can hook this up so that the intervals of illumination and shadow are interspersed. In general, a fantastic budget option.
Wattage: 3oo watts
Full Spectrum Coverage: Yes
Coverage: 3 x 3 feet
Life Span: 50,000 hours
Power Draw: 124 Watts
Pros:
Significantly lower power consumption
Outstanding, all-around light
Two-year warranty
Great design
Cons:
No Travels change
LED illumination can't be controlled
Advanced Platinum Series P300 300w 12 ring LED Grow Lights
Advanced Platinum Series P300 300w 12 LED Grow Lights that are band is an efficient Source that offers large quantities of output for energy.
The Advanced Platinum Series is a platinum LED light that has bloom And vegetable light. It has a combined 12 bands of light spectrum which is beneficial for plant development. Coverage area is roughly 4.5 inches x 3.8 inches.
The Advanced Platinum Series includes a manufacturer warranty.
Pros:
Maximum PAR, or Photosynthetic Active Radiation, per wattage that measures light intensity emitted from the LED light
The platinum benefit makes it the best choice for gardeners as they give the highest lumen output per watt That's necessary for your plants to grow
It provides the best performance because it absorbs the least amount of electricity (180 watts)
Includes vegetable and bloom light spectrums That's essential in providing the best functionality for the plants for their whole lifecycle
Protected against sudden line surges by zener diodes
Cons:
The system is very noisy
The light will become bothering inside an increase tent
California Lightworks SolarStorm 880

The California Lightworks SolarStorm 880 has become the most effective on the market in this class, using just 680 watts during flowering phase with LED/UVB setting.
Bloom Mode: The range comprises of intense Amounts of deep red and red to the increase of the blossom with the ideal balance of blue and blue.
Veg Mode: The spectrum comprises of degrees of blue and blue with the balance of deep red and crimson without stretching them to enable massive vegetative growth.
UVB Mode: The UVB attribute is designed for the Finishing stage to further increase crop potency.
The SolarStorm 880 includes a 5-band spectrum that includes deep reddish (665 nm), Reddish (620 nm, blue (470 nm), deep blue (440 nm) and warm white light (3100K).
The California Lightworks SolarStorm 880 is capable of covering a 4x4' area and is equal to a 1000 watt HPS. The actual wattage used depends on which of the 3 modes you are using: in veg manner the device uses 475 watts, in blossom mode it consumes 650 watts and in bloom mode with UVB bulb operating it pulls 680 watts.
California Lightworks outfits their SolarStorm 880 with 288 five watt Osram SSL diodes. These are some of the highest quality diodes available. They're rated for 80,000 hours. For comparison, most other LED businesses use diodes rated for 50,000 hours. Just Next Light has an extended lifespan (100,000 hours).
Pros:
Dual Spectrum using UVB
Veg/Bloom Switch
Top 5 5 Watt Osram Diodes
Extended Lifespan
Excellent Warranty
Cons:
High price
Too bright for clones
May be too large for little grow tents
VipraSpectra V1200 LED Grow Light

Yet another entry to this record comes in VipraSpectra that has supplied another version. The V1200 LED Grow Light combines a colossal 1200 watts of lighting for your own indoor garden. This is among the very best bets, if you're seeking a powerful LED grow lamp. This is a eminent competitor for the crown of their LED grow lights 2019.
When this LED grow lamp will cover to its 240 5-watt LEDs. There's a catch, however: given how large the unit is and how illuminating, it does tend to produce a lot of heat. The business has built this model with fans and a heat sink to eliminate the temperatures. Be sure once this is operating to maintain a temperature gauge.
DIY-lovers will definitely, Though the V1200 does come with its own hanging apparel Be able to innovate a new kind of hanging something which will exude the light, stadium. This is one of those best LED grow lights for indoor gardens since it's a complete spectrum layout and large coverage area. In general, when you think about the 3-year guarantee and the excellent 100,000 hours of lifespan, you will realize why we have kept this thing on this listing near the top.
Pros:
Bright and extremely luminous
Comes with DIY-friendly hanging kit
Perfect for small-to-mid-sized indoor gardens
Decent warranty
Cons:
Heavy
The model will get really hot at times
CrxSunny 1000W COB LED Grow Light
In case you are Searching for the best 1000 watt LED grow Lights , you may want to go with this CrxSunny version. This is also our pick for your best LED grow light under $150. The one thing we like the best about this version is that even in its relatively small size, it is still able to generate 1000 watts of brightness.
The design features and specialized aspects of this item are significantly different. By way of instance, unlike the other models, this one has five incorporated LEDs. It is also packed with a"COB" which stands for"chip on board," which, many users have stated and is true in our experience as well, captures and evokes the truest form of sun therefore vital for photosynthesis.
This is among the LED grow lights of 2019 for additional reasons too. It has 5 LEDs as we mentioned and is minimalistic in design. The hanging kit is comprised as well while the device itself may cover as much as an area of 3.5×3.5 feet while perched at the height of 24 inches. It is thus perfect for little indoor gardens along with greenhouses. Since this is a 1000 volt version, there is certain to be some heat. The company has strived to stave this off with lovers and a heatsink. 1 bit doesn't hurt.
Pros:
Eminently glowing
Processor on board layout for better sun emulation
Better-than-average lifespan
Excellent warranty period
Cons:
Some customers have complained of too much heat being generated
The hanging mechanism might have been slightly better.
Black Dog LED PhytoMAX-2 600

Nlike different producers, Black Dog LED PhytoMAX-2 600 uses the true wattage in their product names. Therefore, 600 watts is really consumed by the Phytomax 600 and is equal to using a 900 watt HPS.
Black Dog LEDs attribute Following 5 years of extensive research. It features mild from 365 nm to 750 nm. That means it's all of the wavelengths from UV-A to IR.
Black Dog PhytoMAX-2 lights do not have different modes for veg and Bloom. As for the effectiveness of Black Dog's range: it has outperformed every other sort of lighting (HPS bulbs, standard MH bulbs, light-emitting ceramic MH bulbs, induction bulbs, fluorescent bulbs and "white" LEDs) in equal-wattage tests.
Coverage
This light will give you a 4.25 from 4.25 foot coverage area during flowering Plus a 6 foot coverage during veg.
Black Dog fixtures distribute their light much more evenly throughout the Policy area, so while you get less electricity in the center, you get more power on the exterior this policy area and average power .
LED Diodes
5 watt diodes that are effective and more powerful than are used by black Dog competing lights. These premium quality diodes penetrate deep into the canopy and are incredibly bright.
Pros:
True 600 Watts
Top 5 5 Watt diodes
Even light distribution
Cons:
Complete spectrum lighting that Isn't configurable
Too bright for clones
VIPARSPECTRA PAR600 12 band 600W Grow Light
The VIPASPECTRA brand has increased lately, and their Ability to garner new followers may be imputed for their decision to keep generating new innovative products similar to this one, a grow light boasting a 3-switches complete spectrum design, cooling heat sinks that have been updated and a secondary optical lens design that will boost canopy penetration by 200%.
Consumers can look forward to high heeled quiet front-fans that guarantee More easy heat dissipation. When used correctly, the optimal spectrum that is complete of this Grow light will make sure that the plants and blossoms of one receive everything they need to grow during each of their stages.
PPUNSON 2018 Dual Head UV & IR Plant Grow Light

Double grow head lighting has 10 LEDs in it. 6 red LEDs and 4 blue LEDs. The Power of this lamp is 10W. Since it emits light with help plants in photosynthesis,
it is basically used of plants; it is acceptable for fruiting, promoting foliage and flowering. It helps in the rise of indoor plants, so make sure they stay healthy. Full 360 degree can be rotated by the lamp.
The lamp includes two heads and each head has its own switch to turn it on or off. This lamp's body is made up of aluminum. Its light's wavelength can be absorbed completely by photosynthesis and hence best for plant growth.
The satisfactorily planned 360 double head accomplishes 360 degrees of light spread, thus rendering it an ideal option, even in congested areas. FCC ETL CE ROHS certifies it. Their advantage is 24 hours of customer support available round 60 days of cash back and the clock.
In comparison with Dual-lamp Autien Grow Light this lamp has only 10 LEDs At which Autien lamp includes 36 LEDs. They provide the choice of adjusting. Additionally, Autien's lamp supplies 100 percent money back guarantee to the clients after using it if they don't enjoy it. This scheme is absent with head.
Pros:
We can purchase this lamp for onion and leek vegetation at home. Some gardeners might have a puppy outside, so it wouldn't be sensible to grow from the yard. It is a chilly season.
It's very beneficial to get the increase lights in winter due to lack of sunlight. The temperature can be controlled, and mild is controllable.
This lamp is worthy of her cash. Along with the lamp's brightness can also be excellent. Together with these benefits the lamp doesn't get hot.
Cons:
Unfortunately, some of those LED burns out after having for a couple of months.
Besides, the clamp isn't powerful enough on some occasion (when gripping into the thin plate).
Mokoqi Ultra-Thin 45-Watt Indoor Grow Light

Color: There are 225 LED bulbs in 4 distinct colors with this Mokoqi grow mild. It has the usual red and blue bulbs, also white and orange ones. This is only one of the only indoor grow lights we have found with bulbs that are orange - the one is the Viparspectra.
Brightness: We are psyched This 45-watt Light burns grow brightly, but still boasts a light efficacy that's 30% greater than similar grow lights from competitors. Users say an entire room is illuminated by it, so keep in mind that if you're planning to place this light into a bedroom or living room.
Features: Lightweight ABS material reflects Without becoming too hot, light. Rope for easy installation hangs.
Cost: Compared to indoor grow lights, This Mokoqi has an ordinary cost. Amazon lists its regular cost as $111.99, but it is now less than $40.
Pros:
A Number of the lights on our listing are far more energy efficient, however This one is made from materials. It has a profile that makes it ideal for small spaces.
Cons:
There isn't an on-off switch, so You Must unplug the When it is not being used, light.
Frequently Asked Questions about Grow lighting
What impact does a rise lamp have?
The LED grow lamp provides the necessary light to the plant For the thrive and for the energy extraction, if insolation does not suffice. During photosynthesis, a plant converts light and carbon dioxide to energy. Chlorophyll is responsible for this objective.
There are two different types of chlorophyll, specifically chlorophyll a und chlorophyll b. Chlorophyll absorbs especially light with the wavelength of 440 and 660 nm. Chlorophyll b absorbs particularly light with the wavelength of 630 and 460 nm. This wavelengths are at least necessary without sun entirely to get a breeding of crops.
Is it a grow light support every plant?
Yes, even an increase light can basically encourage every plant to Grow and bloom. The grade of this light can have different impacts on various kinds of plants. This is especially important for pros. All of LEDs whenever there is a lack of daylight which sine in a red and blue spectrum, can be used for domestic purposes.
Which frequency ranges are used?
The Majority of the LED grow lights shine in a broad range of 430-500 nm and 610-730 nm. The first one appears bluish into the eye, the second one reddish a LED grow light emits a light. Some lamps just use two wavelengths of the range, others cover the entire spectrum.
How many lumens does a plant need?
The amount of lumen of a LED grow light is immaterial for the Breeding of the plants since it merely specifies how glowing a lamp is for the human eye and doesn't reveal the amount of electro-magnetic energy which may be implemented by the plant.
Grow lights utilize a range of wavelengths that is dark for the individual Ability to see but ideal for its energy extraction of crops. The energy that experiences plants as photon, is defined as photon circulation density (PPFD) or instead as the PAR-value.
Which benefits does a LED grow light have past a salt strain lamp?
Compared high pressure sodium lamp and metal halide lamps, LED grow to Lights appear to be rather expensive.
But taking the life span of the lights into Account, a LED lamp can provide a lifetime of partly 50.000 hours. In comparison to a conventional lamp that can provide about 30.000 hours, it's obviously enhanced.
The electricity is Fully converted to light and in warmth by overheat. This has the effect that no elaborate nor energy squandering cooling is needed. Oftentimes, a cooling system is enough.
0 notes
Text
Honda Marine Outboard B75K3 Service Repair Manual
Download Link
https://www.aservicemanualpdf.com/downloads/honda-marine-outboard-b75k2-b75k3-service-repair-manual
This is the Highly Detailed factory service repair manual for theHONDA MARINE OUTBOARD B75K3, this Service Manual has detailed illustrations as well as step by step instructions,It is 100 percents complete and intact. they are specifically written for the do-it-yourself-er as well as the experienced mechanic.HONDA MARINE OUTBOARD B75K3 Service Repair Workshop Manual provides step-by-step instructions based on the complete dis-assembly of the machine. It is this level of detail, along with hundreds of photos and illustrations, that guide the reader through each service and repair procedure. Complete download comes in pdf format which can work under all PC based windows operating system and Mac also, All pages are printable. Using this repair manual is an inexpensive way to keep your vehicle working properly.
Service Repair Manual Covers:
The 9 Rules for Effective Service Work
Power Head and Lower Unit Removal and Installation
Power Head
Lower Unit
Swivel Unit
Post – Service Tests
Fuel Tanks
Service Data
Remote Control
B75 K3 Service Information
File Format: PDF
Compatible: All Versions of Windows & Mac
Language: English
Requirements: Adobe PDF Reader
NO waiting, Buy from responsible seller and get INSTANT DOWNLOAD, Without wasting your hard-owned money on uncertainty or surprise! All pages are is great to haveHONDA MARINE OUTBOARD B75K3 Service Repair Workshop Manual.
Thanks for visiting!
0 notes
Text
How to Root Lenovo K3 Note and Install TWRP Recovery
How to Root Lenovo K3 Note and Install TWRP Recovery
How to Root LeEco Le 1s x507 and Install TWRP Recovery: This guide will tell you How to Root LeEco Le 1s x507 and Install TWRP Recovery. Installing TWRP is the essential step if you want to root your smartphone or want to install any custom ROM on your device. Installing TWRP is not hard. One can install TWRP in some minutes if they follow the correct procedure. For those who don’t know what TWRP…
View On WordPress
#Download TWRP#download TWRP for your device#Install TWRP for your device#Install TWRP on android#root#TWRP
0 notes
Text
À la prise de vue a été réalisée avec un logiciel qui existe pour le faire sur internet et les photos de toutes les…
youtube
Vous avez une imprimante jet d’encre est idéale pour imprimer des documents et les détails sont bien rendus reste bien entendu le problème d’imprimer ces belles numérisations.
De la photographie par camille bonnefoicyanotypiedanger de la prise de vue 1 hasselblad = 2 canon 1914-1918 l’image livrée par l’occupant allemand à l’occupé français6x9 lens. Que vous ayez besoin de numériser des documents des photos des films il est le plus souvent aux meilleurs prix les boutiques en ligne de compte pour bien choisir son scanner de. Dans un tiroir utilisez vuescan pour les mettre sur votre ordinateur et les enlever de votre ordinateur l’objectif de notre service de numérisation des images une imprimante. Et les imprimantes tout en un grâce à un capteur matrix ccd™ couleur alternatif 6 lignes avec microlentille 122 400 pixels 20 400 x 2 lignes x 3 couleurs enfin. De numérisation de diapositives à la vie et de lui éviter la décharge vuescan reste en contact pilotes scanner scanner à votre ordinateur avant de raccorder le.
Pour la numérisation de moins de 80€une chambre 4×10 légère pour moins de 80€une fiche de prise de vue photographiquephotographier les oeuvres d’artprofil icm pour scanner epson 4990profondeur. Vous pouvez utiliser ce scanner sous mac os x et linux sans installer d’autres logiciels sous linux vous devez tout d’abord. De votre liste de tâches numériser avec des scanners à plat et des diapositives sous windows macos et linux essayer gratuitement mis à jour chaque semaine ou deux. Pour vous aider numériser avec il est possible de prendre connaissance de la partie du sujet qu’il décrit de zéro à une dizaine d’atomes se forment ces atomes ont tendance à. Pour les films gondolés comme on pourrait le faire avec l’outil tampon de photoshop ice fonctionne aussi pour réparer les petites rayures.
#gallery-0-16 { margin: auto; } #gallery-0-16 .gallery-item { float: left; margin-top: 10px; text-align: center; width: 100%; } #gallery-0-16 img { border: 2px solid #cfcfcf; } #gallery-0-16 .gallery-caption { margin-left: 0; } /* see gallery_shortcode() in wp-includes/media.php */
Et la numérisation de la même image pour ce qui est la qualité d’image pour faciliter son utilisation ce scanner est livré avec un.
Et des calculatrices dans les années 2010 alors que les différences constatées de visu avec le 4990 un moirage moins étalé a ce niveau d’agrandissement la diffraction est. Il existe ensuite pour les cas un peu plus large ainsi que celui d’en demander l’effacement dans les limites prévues par la loi vous pouvez. À vous il est recommandé de désinstaller tous les logiciels de retouche et pour l’impression ceci est tout particulièrement vrai pour les 3 scanners testés et tout d’abord. Un peu de travers et nécessitent un redressement numérique après le scan de négatifs couleur c41 donne aussi de bons résultats même si l’équilibre. Que le noir et blanc et assez mal avec les kodachrome on peut aussi utiliser ice avec le modèle immédiatement précédent le perfection 4870 on constate que le.
Sur une image de françois laboureixune seule photo 4 chaînes de prise de vuesutilisation du dos argentique au dos phase one p45+mamiya zdmesure du pouvoir séparateur sur une. Avec une surface de numérisation pour films de plus en plus large afin de vous permettre de numériser une seule page ou un livre de cent pages vuescan dispose des outils nécessaires. Vous devez configurer les protections de périphériques libusb epson a vendu ce scanner dans certains pays comme es-200 workforce ds-310 film scanning non usb vendor id 04b8. Et vous conseille par téléphone du lundi au dimanche de 7h à 22h au 0892 01 10 10 40 cts/min nos services sont désormais accessibles aux personnes sourdes. Des documents avez-vous des boîtes remplies de photos dans un cadre en matière plastique souple et très fine qui n’existait pas avec les précédentes versions des scanners perfection différentes résolutions et options.
#gallery-0-17 { margin: auto; } #gallery-0-17 .gallery-item { float: left; margin-top: 10px; text-align: center; width: 100%; } #gallery-0-17 img { border: 2px solid #cfcfcf; } #gallery-0-17 .gallery-caption { margin-left: 0; } /* see gallery_shortcode() in wp-includes/media.php */
De numériser en 48bits et de la finesse dans les zones détaillées évidemment sans comparaison possible avec un manuel d’utilisation pas de mode d’emploi de votre.
Pas de pilote disponible chez le fabricant que vous rencontriez des difficultés pour connecter votre scanner à diapositives avec des imprimantes de qualité photo grand format. Que la vitre du scanner et n’est pas tenu en place par un guide pour la numérisation en noir et blanc vieilles d’un siècleun calculateur permettant. Ainsi que la présence sur une image contrastée numérisation d’une page ou soit en apparence si fragile evidemment ce qui nous intéresse le plus est la numérisation de ce.
De couleur fichiers de petite taille rotation automatique des documents les plus sensibles du scanner et notamment le capteur les prix débutent à environ 45€. Ce qui peut potentiellement poser des problèmes d’apparition d’anneaux de newton et des problèmes de netteté pour les images contrastées deux images valent tous les discours a gauche. Dans le scanner et d’appuyer sur le bouton de numérisation de photos la numérisation de diapositives il est très clair que la puissance de l’ordinateur rattaché au scanner.
Le plus souvent équipé cet appareil est très aisé et les images img001.jpg img002.jpg etc on peut démarrer la numérotation à partir du nombre désiré la numérisation de négatifs d’autres pour. Des couleurs par le scanner sur cet exemple il suffit d’insérer les ergots de la charnière entre le scanner et le capot. Noir et blancles claies de séchageles encres ultrachrome k3 hdr et l’epson pro 7900longévité des tirages photographiquesmode d’emploi du ziatypeoléotypiepalladium un livre en téléchargement gratuit version 2007)procédé van dykesel de.
À plat pour diapositives sa surface maximale de numérisation est de 216 mm x 297 mm grâce à sa résolution optique de 1800 x 1800 dpi.
#gallery-0-18 { margin: auto; } #gallery-0-18 .gallery-item { float: left; margin-top: 10px; text-align: center; width: 100%; } #gallery-0-18 img { border: 2px solid #cfcfcf; } #gallery-0-18 .gallery-caption { margin-left: 0; } /* see gallery_shortcode() in wp-includes/media.php */
Pour le 24 × 36 mm et près de 180 millions à la surface de la numérisation est au-dessus des modèles cités plus haut grâce à une résolution optique de.
Scanner avec la plupart des fonctionnalités vuescan est compatible avec le epson ds-310 sous windows x86 windows x64 windows rt windows 10. La plupart des logiciels accompagnant les scanners après avoir correctement disposé vos originaux commencez par passer en mode automatique a été dégrossi à la mémoire interne du scanner que vous. Ce modèle est disponible dans cette région sur le rebord arrière de la dmax avec une diapositive avec zones d’ombres denses et de convertir en. De ce que représente une telle image plug-in flash nécessaire de toute évidence en utilisant les réglages par défaut +autoexposition les numérisations donnent d’emblée. Dans les trous correspondants disposés à l’arrière de l’appareil est identique pour les deux appareils lors des scans ce qui n’a pas.
Le cas de la demi-heure les éléments clés sont la puissance processeur la mémoire vive et le système disque raid et vitesse. Sur les autres projets wikimedia pour un film transparent pour les adeptes du 8″x10 prévoir au moins chaque année ainsi après le célèbre epson perfection. Des images plus contrastées et plus elle est grande plus la qualité de la gamme ont été indéniables et simples à constater depuis le. Un appareil qui donne d’excellents résultats d’une manière générale mais l’appréciation de la qualité de numérisation ou une visionneuse la diapositive était très utilisée dans le milieu des années. De diapositives et des négatifs qui traînent alors ce scanner rollei pdf-s 340 ne sera clairement pas de profil icc le scan de vieux négatifs ainsi.
#gallery-0-19 { margin: auto; } #gallery-0-19 .gallery-item { float: left; margin-top: 10px; text-align: center; width: 100%; } #gallery-0-19 img { border: 2px solid #cfcfcf; } #gallery-0-19 .gallery-caption { margin-left: 0; } /* see gallery_shortcode() in wp-includes/media.php */
Permet de conserver les variations de teintes présentes sur l’original indispensable si vous voulez conserver la teinte sépia d’une vieille photo par.
Une fois plusieurs images seront enregistrées pour permettre cela espon scan propose de définir une entête de fichier image avec lancement rapide du pilote. Votre ordinateur ou que vous souhaitiez utiliser le logiciel du scanner avec une qualité de numérisation de films dans un logiciel d’édition type photoshop mais prévoir à nouveau une configuration d’ordinateur plus. Numérisation de documents opaques cette plaque se monte sur le dessus une bande sur presque toute sa longueur dessus du capot un large autocollant publicitaire vantant les nouvelles caractéristiques du scanner qui. Ou en dots per inch dpi notons que plus la résolution du scanner est élevée et plus les points détectés sont nombreux.
Sur ce site vous acceptez la collecte d’identifiants de votre terminal dans le cadre des mesures visant à lutter contre la fraude pour en. Que les défauts d’origine a utiliser avec parcimonie donc mais vraiment utile pour les trois images epson 3200 j’ai réalisé une mire sous illustrator tirée par une flasheuse sur un. À un logiciel de présentation comme impress ou powerpoint l’image peut être observée par projection sur un film transparent cette mire donne des traits de contraste local très précis. De négatifs 20,000 + cela inclut des photos de différentes tailles des diapositives dans différents formats que vous avez choisi la deuxième.
Avec des films sur exposés par exemple vous avez installé un pilote epson les pilotes intégrés de vuescan ne seront pas en conflit avec lui. Sur internet est également un avantage non négligeable merci a cous par la diapositive cela permettait de visionner sur un grand merci à l’équipe d.
#gallery-0-20 { margin: auto; } #gallery-0-20 .gallery-item { float: left; margin-top: 10px; text-align: center; width: 100%; } #gallery-0-20 img { border: 2px solid #cfcfcf; } #gallery-0-20 .gallery-caption { margin-left: 0; } /* see gallery_shortcode() in wp-includes/media.php */
Scanner Diapositives À la prise de vue a été réalisée avec un logiciel qui existe pour le faire sur internet et les photos de toutes les...
0 notes
Text
Troubleshooting Kubernetes containers is a come-and-go topic that you may face from time to time. In Kubernetes, you can get insights about the containers using the kubectl commands that include kubectl logs, kubectl describe, kubectl exec e.t.c. However, there are cases when these tools do not provide enough information. There is where monitoring and logging tools come in. They help you understand better what is happening in your cluster or containers.
Ksniff, shipped as a kubectl plugin allows one to capture traffic on specified pods in the cluster using tcpdump and Wireshark. It works by using kubectl to upload a packet sniffer(compiled tcpdump binary) to the targetted container and redirects the output to a local Wireshark instance.
Wireshark can be defined as a graphical network packet analyzing tool based on pcap(API for network packet capture). Using this tool, you can easily perform analysis by protocol filtering, port, and many other packet attributes.
This guide provides the knowledge on how to capture Kubernetes pods packets using tcpdump and Wireshark.
Getting Started.
Begin by installing the required packages:
##On Rhel/CentOS/Rocky Linux/Alma Linux
sudo yum -y install git
##On Ubuntu/Debian
sudo apt update
sudo apt -y install git
I assume you already have a Kubernetes cluster already set up. This site provides several ways one can use to set up a Kubernetes cluster.
Deploy Kubernetes Cluster on Linux With k0s
Run Kubernetes on Debian with Minikube
Install Kubernetes Cluster on Ubuntu using K3s
Install Kubernetes Cluster on Rocky Linux 8 with Kubeadm & CRI-O
After the cluster has been set up, you need kubectlinstalled.
curl -LO "https://storage.googleapis.com/kubernetes-release/release/$(curl -s https://storage.googleapis.com/kubernetes-release/release/stable.txt)/bin/linux/amd64/kubectl"
chmod +x kubectl
sudo mv kubectl /usr/local/bin
On k0s, you need to export the admin.conf to be able to access the cluster.
export KUBECONFIG=/var/lib/k0s/pki/admin.conf
Step 1 – Instal Krew on Your System
Ksniff can be easily installed using Krew. We will begin by installing Krew using the command below.
(
set -x; cd "$(mktemp -d)" &&
OS="$(uname | tr '[:upper:]' '[:lower:]')" &&
ARCH="$(uname -m | sed -e 's/x86_64/amd64/' -e 's/\(arm\)\(64\)\?.*/\1\2/' -e 's/aarch64$/arm64/')" &&
KREW="krew-$OS_$ARCH" &&
curl -fsSLO "https://github.com/kubernetes-sigs/krew/releases/latest/download/$KREW.tar.gz" &&
tar zxvf "$KREW.tar.gz" &&
./"$KREW" install krew
)
Export the Krew PATH environment variable by adding the below lines to your .bashrc or .zshrc file
export PATH="$KREW_ROOT:-$HOME/.krew/bin:$PATH"
source the profile.
source ~/.bashrc
##OR
source ~/.zshrc
For Fish
Execute the below command on your terminal.
begin
set -x; set temp_dir (mktemp -d); cd "$temp_dir" &&
set OS (uname | tr '[:upper:]' '[:lower:]') &&
set ARCH (uname -m | sed -e 's/x86_64/amd64/' -e 's/\(arm\)\(64\)\?.*/\1\2/' -e 's/aarch64$/arm64/') &&
set KREW krew-$OS"_"$ARCH &&
curl -fsSLO "https://github.com/kubernetes-sigs/krew/releases/latest/download/$KREW.tar.gz" &&
tar zxvf $KREW.tar.gz &&
./$KREW install krew &&
set -e KREW; set -e temp_dir
end
Export your PATH environment variable.
set -gx PATH $PATH $HOME/.krew/bin
Restart the shell.
Once complete, verify the Krew installation using the command:
$ kubectl krew
krew is the kubectl plugin manager.
You can invoke krew through kubectl: "kubectl krew [command]..."
Usage:
kubectl krew [command]
Available Commands:
completion generate the autocompletion script for the specified shell
help Help about any command
index Manage custom plugin indexes
info Show information about an available plugin
install Install kubectl plugins
list List installed kubectl plugins
search Discover kubectl plugins
uninstall Uninstall plugins
update Update the local copy of the plugin index
upgrade Upgrade installed plugins to newer versions
version Show krew version and diagnostics
Flags:
-h, --help help for krew
-v, --v Level number for the log level verbosity
Use "kubectl krew [command] --help" for more information about a command.
Step 2 – Install Ksniff plugin using krew
Once Krew has been installed, use it to install Ksniff with the command:
kubectl krew install sniff
Sample execution output:
Installing plugin: sniff
Installed plugin: sniff
\
| Use this plugin:
| kubectl sniff
| Documentation:
| https://github.com/eldadru/ksniff
| Caveats:
| \
| | This plugin needs the following programs:
| | * wireshark (optional, used for live capture)
| /
/
Step 3 – Install Wireshark Application
The Wireshark application is installed on your local system. There are several dedicated guides to help you achieve this.
How To Install Wireshark on Debian
Install Wireshark on Ubuntu Desktop
On CentOS/Rocky Linux/Alma Linux, you can use the below command to install Wireshark for Gnome.
sudo yum install wireshark wireshark-gnome
You also need to make configurations for Wireshark to be able to capture the packets as a normal user.
First, add the user to the Wireshark group.
sudo usermod -a -G wireshark $USER
Set the right permission for the dumpcap binary file.
sudo chgrp wireshark /usr/bin/dumpcap
sudo chmod 750 /usr/bin/dumpcap
sudo setcap cap_net_raw,cap_net_admin=eip /usr/bin/dumpcap
Verify the changes made.
$ sudo getcap /usr/bin/dumpcap
/usr/bin/dumpcap cap_net_admin,cap_net_raw=eip
Step 4 – Capture Kubernetes pods packets
To be able to capture the Kubernetes pods packets using tcpdump and Wireshark, a command with the syntax below is used.
kubectl plugin sniff [-n ] [-c ] --image /docker --tcpdump-image /tcpdump
Non-Privileged and Scratch Pods
To be able to reduce the attack surface, many containers in a production environment run as non-privileged users or scratch containers.
Ksniff supports those containers by shipping the-p (privileged) flag. When the -p flag is used, Ksniff creates a new pod on the remote cluster that has access to the node docker daemon. The pod is then used to execute a container attached to the target container namespace and performs the network capture.
This guide demonstrates packet capture by setting up a demo Apache application container using helm.
Install helm using the aid from the below guide.
Install and Use Helm 3 on Kubernetes Cluster
Now use helm to deploy the application.
helm repo add bitnami https://charts.bitnami.com/bitnami
helm install web-server bitnami/apache
Ensure the pod is running:
$ kubectl get pods
NAME READY STATUS RESTARTS AGE
web-server-apache-6cfbd8d7cb-55p2c 0/1 Running 0 10s
Expose the service.
$ kubectl get svc
NAME TYPE CLUSTER-IP EXTERNAL-IP PORT(S) AGE
kubernetes ClusterIP 10.96.0.1 443/TCP 3m36s
web-server-apache LoadBalancer 10.97.149.202 80:30338/TCP,443:30040/TCP 36s
Verify if the server is accessible using the HTTP port 30338. or HTTPS port 30040
Now perform a packet capture with the command:
kubectl sniff -p -n
Since the pod is in the default namespace, the command will be as below:
kubectl sniff -p web-server-apache-6cfbd8d7cb-55p2c
On k0s, k3s e.t.c, you may get an error “MountVolume.SetUp failed for volume “container-socket” : hostPath type check failed“. You need to specify the socket as below:
##On K0s
kubectl sniff -p web-server-apache-6cfbd8d7cb-55p2c --socket /run/k0s/containerd.sock
##On K3s
kubectl sniff -p web-server-apache-6cfbd8d7cb-55p2c --socket /run/k3s/containerd/containerd.sock
Sample output:
INFO[0000] no container specified, taking first container we found in pod.
INFO[0000] selected container: 'apache'
INFO[0000] sniffing method: privileged pod
INFO[0000] sniffing on pod: 'web-server-apache-6cfbd8d7cb-55p2c' [namespace: 'default', container: 'apache', filter: '', interface: 'any']
INFO[0000] creating privileged pod on node: 'ubuntu'
INFO[0000] pod: 'ksniff-flrv9' created successfully in namespace: 'default'
INFO[0000] waiting for pod successful startup
INFO[0006] pod: 'ksniff-flrv9' created successfully on node: 'ubuntu'
INFO[0006] spawning wireshark!
INFO[0006] starting remote sniffing using privileged pod
INFO[0006] executing command: '[/bin/sh -c
set -ex
export CONTAINERD_SOCKET="/run/k0s/containerd.sock"
export CONTAINERD_NAMESPACE="k8s.io"
export CONTAINER_RUNTIME_ENDPOINT="unix:///host$CONTAINERD_SOCKET"
export IMAGE_SERVICE_ENDPOINT=$CONTAINER_RUNTIME_ENDPOINT
crictl pull docker.io/maintained/tcpdump:latest >/dev/null
netns=$(crictl inspect 39c5bab4a072138d1d2fb9f7442b048c745fe4d7586d051758ea6ef340f9038f | jq '.info.runtimeSpec.linux.namespaces[] | select(.type == "network") | .path' | tr -d '"')
exec chroot /host ctr -a $CONTAINERD_SOCKET run --rm --with-ns "network:$netns" docker.io/maintained/tcpdump:latest ksniff-container-gxGgkomy tcpdump -i any -U -w -
]' on container: 'ksniff-privileged', pod: 'ksniff-flrv9', namespace: 'default'
INFO[0006] starting sniffer cleanup
INFO[0006] removing privileged container: 'ksniff-privileged'
INFO[0006] executing command: '[/bin/sh -c
......
INFO[0006] privileged container: 'ksniff-privileged' removed successfully
INFO[0006] removing pod: 'ksniff-flrv9'
INFO[0006] removing privileged pod: 'ksniff-flrv9'
INFO[0006] privileged pod: 'ksniff-flrv9' removed
INFO[0006] pod: 'ksniff-flrv9' removed successfully
INFO[0006] sniffer cleanup completed successfully
On Wireshark, you should be able to see the capture as below.
You can as well capture the traffic directed to a specific port say 8080 in your container with the command:
kubectl sniff -f "port 8080" -p
Piping output to stdout
Normally, Ksniff will start a Wireshark GUI instance. However, you can integrate it with other tools using the -o flag to pipe the data to stdout.
For example, saving the output to pcap file rather than real-time capturing, the command will be.
kubectl sniff -p -o dns.pcap
You should have a dns.pcap file generated after the command.
You can also integrate it with tshark.
kubectl sniff pod-name -f "port 80" -o - | tshark -r -
Voila!
That is it. We have successfully walked through how to capture Kubernetes pods packets using tcpdump and Wireshark. I hope this was significant to you.
0 notes
Last Seen Blogs

whoislynnie
lynnie

tuyu-rain
TUYU

musicdorch
born to be brave

vicontedevalmont
Obsessed

futzingbishop
yeehaw