#javajdk
Explore tagged Tumblr posts
Link
"How To Do Java Programming In IntelliJ IDEA" Is LIVE NOW LIKE, COMMENT, SHARE & SUBSCRIBE Click ☝️ Here To Subscribe Direct Link To My Channel
#java program#iammrhelper#mrhelper#howto#java#jdk#javajdk#oraclejavajdk#oraclejdk#javadevelopmentkit#oracle#jetbrains#intellij#intellijIDEA#javaprogram
1 note
·
View note
Text
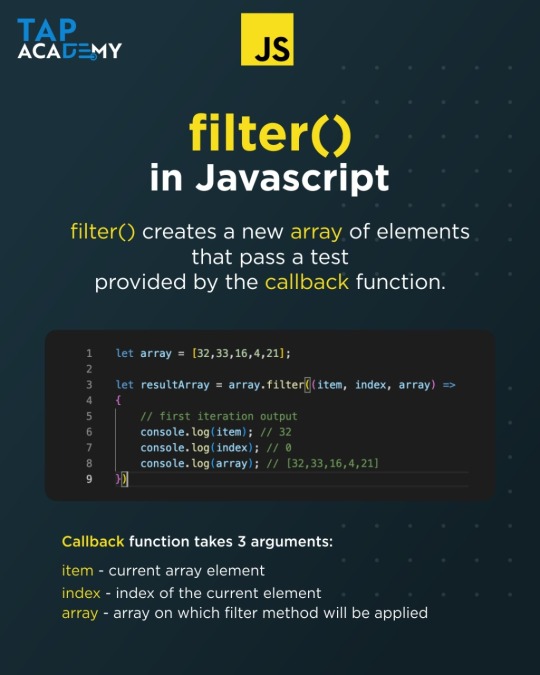
Filters() in Javascript
#coding#python#tapacademy#data structure#java64bit#javascriptdeveloper#javascript30#javascript#java#javaruntimeenvironment#javaJDK#javavirtualmachine#vue#vue3
1 note
·
View note
Video
youtube
1. How to Install Java JDK on Windows 10 _with JAVA HOME
#JAVA#JavaProgramming#InstallJava#DownloadJDK#OracleJAVA#JavaJDK#ComputerProgramming#বাংলা_টিউটোরিয়াল#LearningTechMedia#ltm#ltmbd
0 notes
Text
Instalar Gradle en Ubuntu, CentOS y derivados
Instalar Gradle en Ubuntu, CentOS y derivados. Gradle es una herramienta de compilación automatizada basada en los principios de Apache Ant y Apache Maven, pero a diferencia de estos que ofrecen un formulario tradicional basado en XML para representar la configuracion del proyecto, Gradle nos proporciona DSL en los lenguajes de programación Groovy y Kotlin. Otras diferencias importantes que nos llaman la atención: Apache Maven, se basa en el concepto del ciclo de vida del proyecto; Apache Ant, en el orden que se ejecutan las tareas determinado por la relación de las dependencias. En el lado opuesto tenemos a Gradle que utiliza un grafo acíclico dirigido (DAG) para determinar el orden en el que se deben hacer las tareas. Gradle fue diseñado para ensamblajes extensibles de proyectos múltiples y, además admite ensamblajes incrementales al determinar automáticamente qué componentes del árbol ensamblador no han cambiado y, qué otras tareas dependientes de estas partes no necesitan reiniciar otra vez. En el articulo de hoy veremos cómo instalar Gradle en CentOS 7 / 8, y en Ubuntu 18.04 y superiores (se incluyen sus derivados y Debian 10).
Instalar Gradle en Ubuntu, CentOS y derivados
El único requisito previo para instalar Gradle, es tener Java JDK o JRE en su versión 8 (o superior) instalada en el sistema. Nosotros instalaremos OpenJDK y un par de herramientas necesarias. Instalar OpenJDK en Ubuntu, Linux Mint y derivados: sudo apt update sudo apt install -y default-jdk-headless sudo apt install -y wget unzip Instalar OpenJDK en CentOS y derivados: sudo yum update sudo yum install -y java yum install -y wget unzip El resto de la instalación es igual en CentOS y Ubuntu.
Instalar Gradle en linux
Instalar Gradle en Linux
Nosotros instalaremos la última versión, en este caso Gradle 6.3. Puedes verificar si existe alguna actualización en su página oficial. Descargamos Gradle. cd /tmp wget https://services.gradle.org/distributions/gradle-6.3-bin.zip Extraemos el paquete y movemos su contenido al directorio de la herramienta. unzip gradle-*.zip mkdir /opt/gradle cp -pr gradle-*/* /opt/gradle Comprobamos que los archivos se han movido correctamente. ls /opt/gradle/ ejemplo de salida... LICENSE NOTICE bin getting-started.html init.d lib media Ahora debes incluir el /bin de Gradle en las variables de entorno PATH. echo "export PATH=/opt/gradle/bin:${PATH}" | tee /etc/profile.d/gradle.sh El archivo gradle.sh debe contener lo siguiente... export PATH=/opt/gradle/bin:${PATH} Le concedes los permisos de ejecución necesarios. sudo chmod +x /etc/profile.d/gradle.sh Cargamos las variable para la sesión actual. source /etc/profile.d/gradle.sh Como punto final del articulo, verificamos la instalación de Gradle. gradle -v ejemplo de salida correcta... Welcome to Gradle 6.3! Here are the highlights of this release: - Java 14 support - Improved error messages for unexpected failures For more details see https://docs.gradle.org/6.3/release-notes.html ------------------------------------------------------------ Gradle 6.3 ------------------------------------------------------------ Build time: 2020-04-12 20:32:04 UTC Revision: bacd40b727b0130eeac8855ae3f9fd9a0b207c60 Kotlin: 1.3.70 Groovy: 2.5.10 Ant: Apache Ant(TM) version 1.10.7 compiled on September 1 2019 JVM: 11.0.6 (Ubuntu 11.0.6+10-post-Ubuntu-1ubuntu118.04.1) OS: Linux 5.0.0-1026-gcp amd64 Canales de Telegram: Canal SoloLinux ��� Canal SoloWordpress Espero que este articulo te sea de utilidad, puedes ayudarnos a mantener el servidor con una donación (paypal), o también colaborar con el simple gesto de compartir nuestros artículos en tu sitio web, blog, foro o redes sociales. Read the full article
#ApacheAnt#ApacheMaven#Centos#Gradle#Gradle6.3#grafoacíclicodirigido#groovy#InstalarGradle#instalarGradleenCentOS#InstalarGradleenLinux#instalarGradleenUbuntu#JavaJDK#OpenJDK#Variablesdeentorno
0 notes
Text
How to install visual studio on a mac using vmware
#HOW TO INSTALL VISUAL STUDIO ON A MAC USING VMWARE HOW TO#
#HOW TO INSTALL VISUAL STUDIO ON A MAC USING VMWARE FOR MAC OS#
#HOW TO INSTALL VISUAL STUDIO ON A MAC USING VMWARE FOR MAC#
#HOW TO INSTALL VISUAL STUDIO ON A MAC USING VMWARE MAC OS X#
#HOW TO INSTALL VISUAL STUDIO ON A MAC USING VMWARE UPDATE#
This can be beneficial to other community members reading this thread. Please remember to click "Mark as Answer" the responses that resolved your issue, and to click "Unmark as Answer" if not. ProgrammingKnowledge Java Mac macOS JDK JavaJDK Top.
#HOW TO INSTALL VISUAL STUDIO ON A MAC USING VMWARE HOW TO#
So let us see How to Download and install visual studio 2019 community.
#HOW TO INSTALL VISUAL STUDIO ON A MAC USING VMWARE UPDATE#
Or debugging on Windows, we recommend you use a version of Visual Studio such as Visual Studio Community. How To Install Visual Studio Code On Mac Tutorial 2020. To get started in this walkthrough, this post captures the steps on how to update Node.js in Visual Studio, Windows/. It shows the screen below, in which you have to click on the install button as shown. After clicking on Continue, Visual Studio will start downloading its initial files as shown in the image below. If you just want a lightweight tool to edit your C++ files, VS Code has you covered but if you want the best possible experience for your existing Visual C++ projects Click on the Run button, and then it shows the below image.
#HOW TO INSTALL VISUAL STUDIO ON A MAC USING VMWARE FOR MAC#
Visual Studio for Mac needed some downloads for getting the. If you prefer to configure Visual Studio 2017, that version can also be used in this class. Now I closed the project and reopened it with a fresh installation of Visual Studio for Mac on my macOS host system. CS 271 Visual Studio Setup Instructions The following consists of installation & setup tutorials for Visual Studio 2019. I created a new Visual Studio project under Windows but put it on a network share configured in the VMware settings. Create a VM that OS is windows, then install theĪnd choose the option C++ to install during the VS installation Opening The Solution in Visual Studio for Mac.Visual Studio Code and C/C++ build tools, please have a look at blog:īuilding your C++ application with Visual Studio Code > So, how can I write and run c++ programs on Visual Studio on a Mac?Īs far as I know, there have two options as below: Support C++ in Visual Studio for Mac and you can vote it, then waiting for the feedback from the Visual Studio Product Team. Visual Studio Product Team, please check this: There has no option to create C++ project in this version and some other community members reported this suggestion to the The Visual Studio for Mac, it is a developer environment optimized for building mobile and cloud apps with Xamarin and. So with VirtualBox you get the best of both worlds - it's free, and it allows you to run both Windows and macOS simultaneously so you can switch between them as required without having to reboot.Now we have two Visual Studio versions (Visual Studio for Mac, Visual Studio Code) that can directly install on the Mac (macOS), refer to your description, it looks like you installed Visual Studio Code combines the simplicity of a source code editor with powerful developer tooling, like IntelliSense code completion and debugging. This short tutorial will discuss how you can install Visual Studio Code on Kali Linux 2022.x. And while Bootcamp is also a free option, it doesn't let you run macOS and Windows simultaneously (you have to reboot the machine every time you want to switch to the other operating system). It contains well written, well thought and well explained computer science and programming articles, quizzes and practice/competitive programming/company. Visual Studio Code runs on Linux, Windows and macOS. The main goal of this article is to provide macOS Catalina in 3 Different formats of DMG file, ISO File and VMDK file.
#HOW TO INSTALL VISUAL STUDIO ON A MAC USING VMWARE MAC OS X#
While there are other options available (such as Parallels and VMware Fusion), VirtualBox is free. 6.Install Mac OS X 10.9 Mavericks inside the virtual machine (REMEMBER to format the disk with Disk Utilities during the installation) 7.Install VMWare tools to get the native resolution using darwin.iso that came with the unlocker. To run Windows on a Mac, you need to use virtualization software such as VirtualBox. To configure your project, open up your solution in Visual Studio and go to the VMware menu and click Options. Here are the main steps involved in installing Windows on a Mac: If the VSID plugin has been installed in Visual Studio 2005, you should see an extra toolbar and a VMware menu. This enables you to run Windows-only applications on your Mac. By using VirtualBox, you can install Windows on your Mac. VirtualBox is free software that allows you to install different operating systems on your machine.
#HOW TO INSTALL VISUAL STUDIO ON A MAC USING VMWARE FOR MAC OS#
Here I explain how to install Windows on a Mac using the (free) virtualization software, VirtualBox. How to Install Mac OS Catalina On Window Using VMware Mac OS For Mac OS Catalina (Unlock Master) MacOS Catalina is next after Sierra, High Sierra, Mojave.
0 notes