#its acrylic/ oven bake clay
Explore tagged Tumblr posts
Text


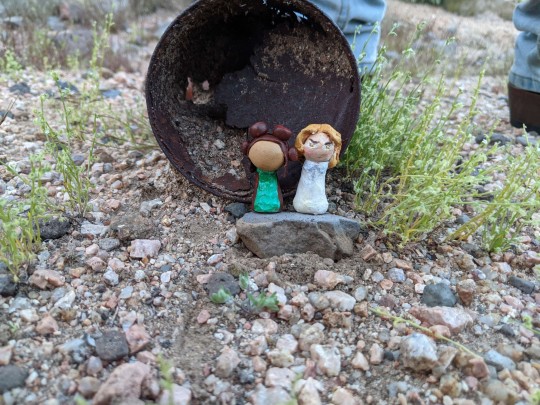
Thing for experimental drawing class
#its acrylic/ oven bake clay#watercolor on mazonite#watercolour mixed media paper#colouring pencil#brush pen#regular pen#UHHH and skittles wrapper#traditional art#mixed media#posted on the wrong blog agagghgghhgg
5 notes
·
View notes
Text

I got bored
Yeah, I know it looks a little sloppy because of the smeared red on its face but 🤷♀️ just, like, imagine he has a rosy face!!
Here’s some other angles:


4 notes
·
View notes
Note
oh my goodness your dios.. what a delight to see someone so fully invested in phantom blood dio wow. i am very happy. i love your 3D dios. really makes me want to sculpt him as well
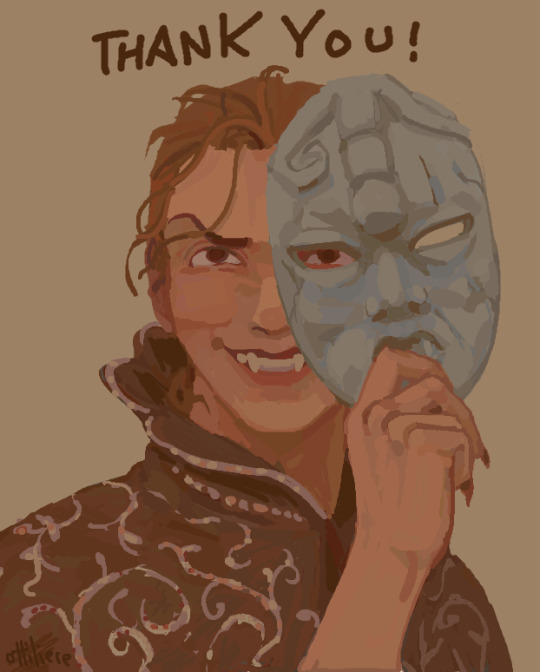
Do it... clay is cheap bake it in the oven paint with 10 dollar set of acrylics your life will never be better. I adore phantom blood Dio so very much... years ago saw someone coin the term “phantom blood purist” and it's so funny I think about it literally every time I enter a Dio cycle. There are many aspects that go into this preference of course, and upon a great amount of time pondering i can say confidently that this is because mainly that:
1) I love history (especially the fin de siècle) and I love thinking about him in relation to Victorian values/etiquette/sociology in general... there's something so special about a society that enabled such a gross disparity of wealth&poverty while being so inherently pretentious that its asinine etiquette rules would completely elude you unless you were raised in an aristocratic family or had access to etiquette books. Dio absolutely read a great amount of these before going to the Joestar mansion btw, even before his father snuffed it I think. God help him he would not be doomed to look like a slovenly ill-bred gamin if and when he needed to manipulate the upper classes. I really can't think of a way for him to have developed these skills enough to outclass Jonathan otherwise. god and like thinking about him as a barrister too with his profligate fashion sense you just KNOW he gets drawn that way into all of the court sketches that go in all the newspapers since everyone loved to read about crime and there were a million papers for this in England alone... he'd get caricatured so bad sometimes and he is NOT happy about this.
2) You can probably tell from my indifference to the rest of the parts (except sbr; I call this the "diego rule") that I'm not the biggest fan of fantastical elements and I'm much more interested in interpersonal conflict/relationships in general... PB is extremely unique to the rest of the series because for five WHOLE chapters absolutely nothing abnormal happens and we just get to see Dio harassing Jonathan and his girlfriend until Jonathan snaps and humiliates him so bad in beating him up that he makes Dio cry. and then Dio kills his dog. Like it's literally just some impoverished child abuse victim bullying a spoiled rich kid who wanted to be his friend because lalala sunshine daisies only knows what "poverty" is from reading Oliver Twist and has no conceptual understanding of what the real-world implications of that are. That was the character development that needed multiple chapters to develop it's so fucking awesome. like yeah I'd read an entire novel of just this alone happening and how it impacts their relationship as adults no vampirism needed. I reread "dio the invader" so frequently I'm surprised the spine of my jojonium copy isn't cracked at the exact endpoint of it. I just adore him interacting with Jonathan so much it's hard to remove him from that… that's his FOIL... all the stories (some "AUs") I make with Dio involve the way he and Jonathan gravitate each other to some degree. we get the clearest view of who he is in the face of someone who is the polar opposite of himself. 🤯
2) This iteration of him is the closest degree of separation he has from his "humanity" (childhood), thus
3) I find him to be the most interesting, endearing, etc., version of him walking around, given that... well. behaviors stem from somewhere... the thematic & active severance of himself from a species he is fundamentally incapable of connecting with due to the way he adapted to help him tolerate his childhood... from his point of view I can't imagine that there is one convincing reason for him to continue being human after given the opportunity to deviate from it (despite likely still being inebriated when he vamped himself — very much an impulsive decision since he had, what, an hour or two to think that through? drunk?). If everyone's underneath him, yes, after the fact the choice seems extremely fitting. Maybe he'll cultivate a vast swathe of worshippers and disciples that obey his every command. Maybe he'll rule the world. And then, maybe, he will start to feel genuinely content for the first time in his life. But probably not. That's the drawback of having something fundamentally missing from within you.
4) He lacks a certain type of introspective awareness that 100 years alone in a box might enable him to develop... he's very animalistic to me and possesses a precarious/immature/nonexistent grasp on his emotions just given the fact that he exhibits enraged outbursts from perceived ego wounds (in both childhood and adulthood) + struggles with alcoholism due to an incapacity to self-soothe any sort of negative emotion that makes it past the self-aggrandizing filter he can't help but see life through; he really isn't in conscious control of anything happening inside of him despite needing control over everything and everyone so he can get exactly what he wants, and deserves, always. PB paints a very dim and pathetic view of his character by allowing us to see when he's most "vulnerable", which is the thing he likely hates being the most, so getting to see scenes where he's walking around publicly intoxicated and disparaging himself for acting like his father (implied: again), who he hates, and attacking men with a wine bottle for evoking the concept of his mother, who he also kind of hates but lacks the cognizant cogency to dissolve whatever cognitive dissonance is causing this mental incongruence, rules. he rules
tl;dr SDC dio is "iconic" but I feel like he misses a lot of the charm he had in part one, removed from the context of the society that had such rigid social boundaries and rules of decorum, in addition to his maladaptive approach to interpersonal relationships, his substance abuse issues, his humbling foil... he's too "cool" for me. In the end SDC dio is simply not my Dio... he is someone else's Dio. And that's okay.
#lucy art#dio brando#ask#jjba#I've said this elsewhere but somewhere out there exists my dio-obsessed doppelganger who only likes him in parts 3/6 and dislikes PB dio +#how he looks in the first part too and if we ever made physical contact the universe would implode like matter on antimatter#though I haven't actually read sdc in many years. which may be part of the problem. but also... I don't need it... jonathan isn't there...!#I did however reread the ending the other day and I forgot that jotaro gives him brain damage so bad he couldn't walk. I almost cried#soooo cute... I wish something similar happened when he was shot in the head before being burned alive#well no I don't because the narrative point was to showcase wow oohhh wow vampire powers wowwww and it worked very well#but araki retconned this in the best way possible so basically life is perfect#(acting really approachable as I dip my toe into a fandom of something I've cherished for years) have you considered dio getting more TBIs?
94 notes
·
View notes
Text
How to Build Your Own 'Augmented Super Wife Supersoldier From The Future' Funko Pop.
A Semi-Coherent Guide By RC.
This is a long one. A loooooooong one.
I meant to do this like two and a half years ago, but in the spirit of keeping this fandom's head above water, and the fact I'm at the hospital (nothing serious!) with nothing to do for the next couple of hours, I'm doing it now.
So if, like me, you are still bitter that Grace and Dani didn't get official Funkos, or official *anything* due to manufacturer short-sightedness, why not say 'fuck it' and build yer own?
This rambling tutorial will attempt to demonstrate how to build Grace from the 'when they start to kill me, run' scene.
Like, literally that bit 😋.
Anywho. Let's do this!
You will need:
- Funko Pop DIY (female)
- Polymer clay (eg. Sculpy, Fimo, CosClay). I'd advise against cheapo no-name alternatives purely because in my experience the baking times/temperatures stated are absolute garbo. Also, polymer clay will give off quite gnarly fumes while curing, so better to use a trusted source. But if cheapo's all ya got, it's all ya got.
Other modeling materials you might consider instead of polymer clay include...
Epoxy clay (eg. Milliput, Apoxie Sculpt, The Army Painter 'Green Stuff', even something like J-B Weld or similar 2 part plumber's/repair putty).
Plain ol' air drying clay (eg. DAS, FimoAir, Gedeo).
You could even whip up a batch of 'cold porcelain', or an oven cure salt dough from ingredients you probably already have at home. Make sure you clear coat any salt dough creations properly after curing as over time ambient moisture may mess with it.
Each option above has its own pros and cons. Do your research if you aren't sure. Me? I used Fimo.
*ahem* Carrying on...
- Masking tape
- Hobby knife
- Pin vice
- Kebab skewer (wooden), or styrene rod
- Paint brushes
- Primer (plus dust mask if you're using a rattle can indoors)
- Sandpaper (around 400 grit oughta do it but you could probably go 200 either side of that and get a good result)
- Acrylic paints (optional: Posca PC-1MR pens in black and white for fine detail).
- Crafter's heat gun, or a hairdryer
- Varnish/clear coat.
Optional extras: Airbrush, spray booth/cardboard box, rotary tool, oven thermometer, artist's/cake decorating turntable, UV resin, silver leafing pen, jeweller's files, jeweller's wire, acetone, superglue or 5 minute epoxy, a lil piece of sponge, pearl mica powder, scavenged Funko Pop head 😈.
Step One: Grab your Funko DIY and separate the head from body using heat to soften the vinyl enough to wangle it off the neck post. Shoving it in a mug of hot water for a few minutes should do the trick. Make sure to dry out the head as much as possible. Last thing you want is mould growing inside it. This is Terminator, not The Last Of Us 😉. Alternatively you could use your heat gun/hairdryer, but I explain in Step Six why the water bath approach is a better option (imho) at this early stage.
(You are giving this entire thing a quick read through before you start, right? I dunno about the rest of you but I like to have at least a basic idea of the work ahead before I get stuck in. Saves finding out you're missing a necessary tool/material at an inopportune moment and all).
Stop rambling, RC. Sorry. It's easier to be succinct when you haven't lost half your photos 🤦♀️. Moving on...
If you don't wanna attempt to sculpt the hair yourself you can, as I did, take a kitbashing approach instead of using the supplied DIY head. Grab one of the many commercially available Funkos with a decent approximation of the hairstyle you want and then go Step One on em. Buy 'pre-loved', buy BNIB, dig one out of a dumpster, steal one from your lil cousin, it doesn't matter. Procure as your time/budget/situation dictates. Improvise where necessary.
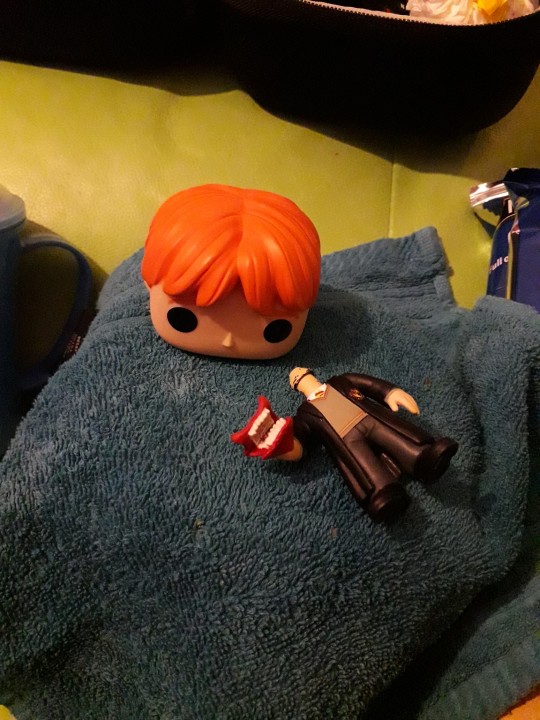
Sorry, Ron. I need your floppy hair. I do not need your clothes.
Or your boots. Or your motorcycle.
...😋
Step Two: Take the body of the Funko DIY and mark out the position of the tank top and the cuffs of the jeans. These will be used as guides for when you add the clay.
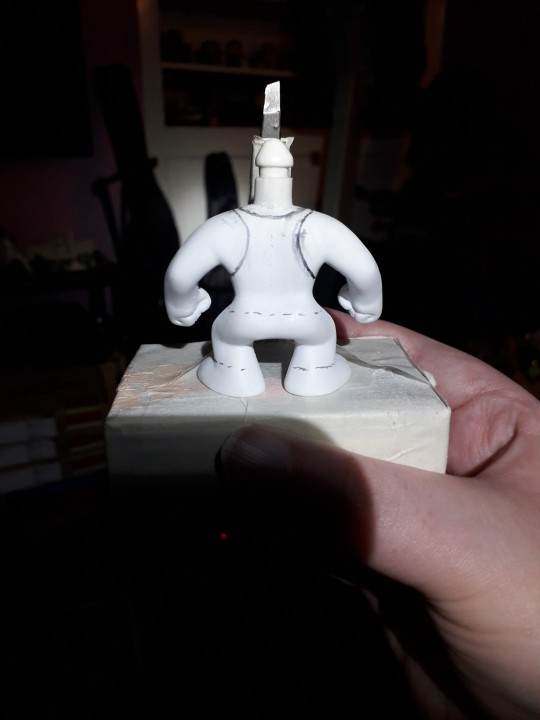
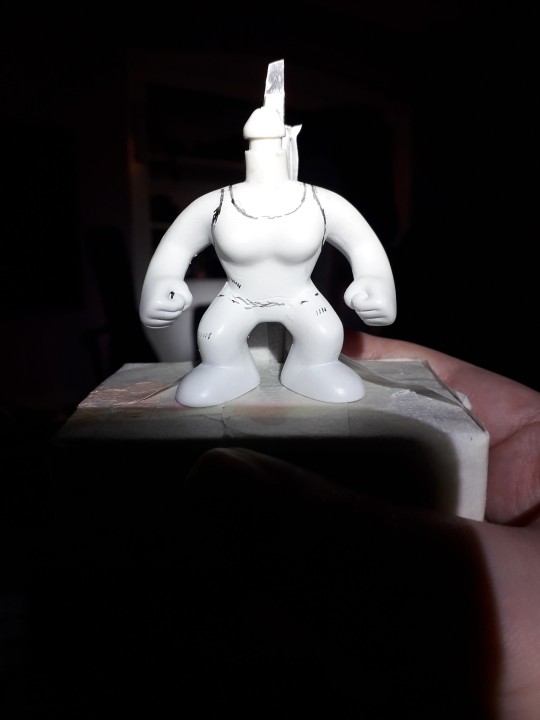
At this point I used a pin vice to drill the hole thru the fist for the rebar. If you're a crazy person you could use a rotary tool with an appropriately sized bit attached.
To make the rebar I fashioned a mould from a drinking straw and filled it with UV resin. Because I'm awkward. A wooden kebab skewer, or some hobbyist's styrene rod (eg. Evergreen Scale Models) would work just as well. Just cut it to size, paint it silver and you're golden. I used a metallic leafing pen. You use whatever you've got handy. Doesn't have to be shiny. A flat grey acrylic would work just fine.
Use jeweller's files and sandpaper to make small adjustments to the hand hole and rebar respectively in order to get a good press fit. There's always glue if you overdo it 😉. But don't add the rebar to the model just yet, as you're gonna need room to manoeuvre for the next bit.
Step Three: How do you make it look like your figure is wearing clothes when you don't have much real estate to work with?
You fake it, that's how.
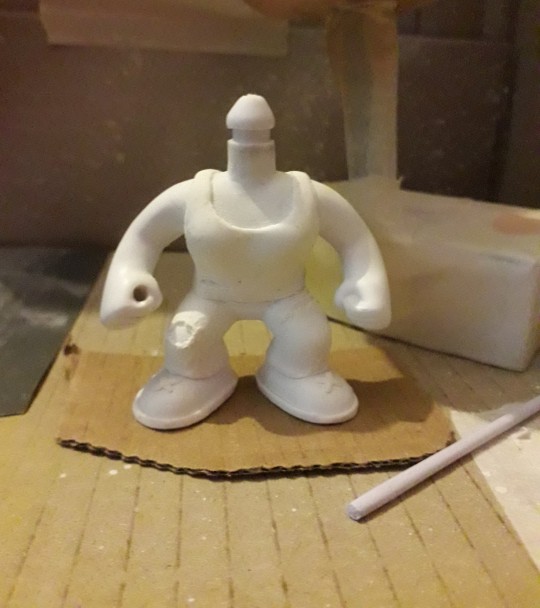
You do not need to model an entire set of clothes! It's an arse ache, and we're all about working smarter not harder on the RC channel.
So, take your modeling compound of choice, roll a chunk of it out to the desired thickness, and then cut into strips, say 2-3mm wide. Use your best judgement here.
Now, using the jeans as our example, wrap a strip around the bottom of the leg where the cuff would sit. Cut off any excess and blend out the join. Just give it a lil rub and it's like it was never there. Like magic! You should have a nice defined edge at the bottom, just above the foot. Now see the top edge of your lil clay strip? Well, you wanna start pushing and flattening the clay to blend the edge right out so it fades back into the body.
Repeat for the other leg, and the bottom of the tank top. The straps are relatively simple, tho the bits that pass under the arms can be fiddly due to lack of space. Use a hobby knife to shape and crisp up those edges and then blend out the extraneous edge. Same thing with the neckline.
Run a strip around each foot to form the soles of the boots, and a lil 'x' on the top of the feet to give the impression of laces.
For the rips in the clothing you can simply gouge out a little of the clay. If there isn't any on that part of the model (the knee for example) roll out a little wormy dealie (for you North of the Border fans 😉), position it as needed, blend out the edges, then gouge as required.
If you're playing on hardcore mode, this might be the time to start piling clay on the Funko DIY head and sculpting the hair. You may prefer to leave it til the head's re-attached tho. It depends on the material you're using. If you don't think it'll stand up to a bit of manhandling while pushing the head back onto the body, save this step til that bit's done.
Cure according to the clay manufacturer's instructions. The vinyl will not melt at the temperatures required to cure polymer clay, but if you don't wanna risk it or you don't wanna use your food oven to cook plastic, with all the gnarly fumes and stuff, I've given you plenty of air dry and/or non toxic alternatives. Consistent temperature is key with polymer clay. Undercooked, it's quite brittle. An oven thermometer comes in handy here if you've got one.
Step Four: Primetime!!! Some like to brush on primer, which is fine if you're painting a fence or throwing gesso on a canvas. Not so fine if you're painting a figurine imho. I mean, unless it's Cassandra from Doctor Who. A good rattle can of spray paint is what you want ideally, but again, it's about what you can afford/wangle/manage with your crafting space, so feel free to ignore me and brush away!
First rule of Primer Club: several light coats are better than one heavy coat. Second rule of Primer Club: knock each coat back a lil with sandpaper before applying the next one. Third rule of Primer Club: sit your rattle can in a warm water bath for five minutes before shaking it up to improve flow.
You can get primer specifically for plastics but while I would recommend it, it's not absolutely necessary.
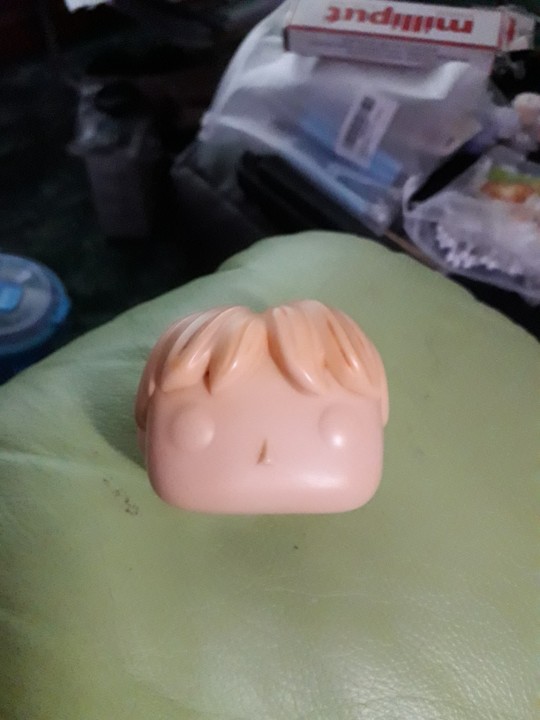
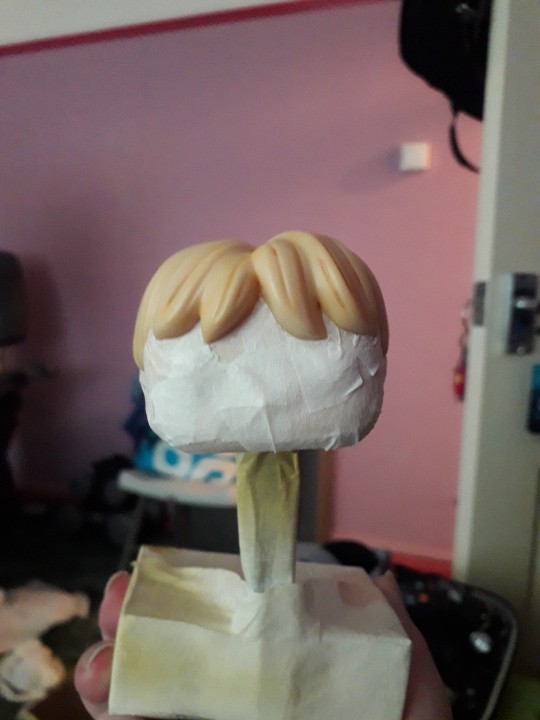
A scavenged head may need masking off if the base colour already matches the skin colour of your character. Save yourself a bit of painting innit. You can get really tight, clean edges against the hairline with a hobby knife. If the hairstyle, hair colour, and skin colour match straight outta the box? Congrats! Why are you even reading this? 😜.
That thing in the background is a portable spray booth (that other thing is a turntable). A cardboard box is also a portable spray booth if you want it to be. Only thing it doesn't have is an extractor fan. So put on a dust mask, and open a window or work outside.
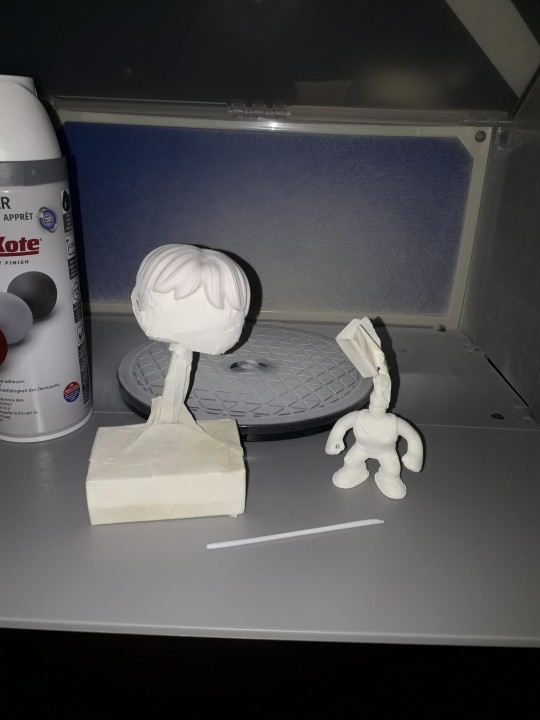
The DIY figure comes primed outta the box, so if you're using the DIY head and are planning on sculpting the hair after re-attachment you don't need to prime it. Unless you want to.
Step Five: Time to paint that shizz. You don't need me to walk you thru this bit, right?
Right?...
Masking is your friend if you don't trust your ability to freehand with a brush. If you're masking over a part you've already painted and are afraid of pulling the paint off, you can knock the level of tack on the tape down by sticking it to yourself (or your clothes) a couple of times before applying it. Some prefer to add a light layer of clear coat to 'lock in' the underlying paint. It's like a real life 'save point'. Some people do both. Some use masking fluid. Some use silly putty/blu-tac/plasticine. Play around, see what works. You do you.
I painted Grace's eyes blue coz Grace is extra and so am I. I threw a lil bit of pearl powder in there to add a subtle shimmer, as I thought going full metallic blue might be a bit too extra.
Lady Funkos have eyelashes. Don't forget the eyelashes.
(I nearly forgot the eyelashes).
A fine tipped Posca pen comes in handy here if you've got one.
Ditto the eyebrows, tho those aren't just for the ladies obvs.
For Grace's augmentation scars, again I recommend a Posca pen but a brush will do.
DO NOT PAINT THE NECK POST. Don't even varnish the neck post. Keep that bitch masked up until you're ready to reattach the head. Like, you can get away with painting the very bottom if you're worried the bare plastic will show even with the head attached, but that's it. Any more will be making a rod for your own back.
You have a choice now. Whether to weather your figure. I chose to add that extra level of detail as it made sense to me. Use a combination of dark washes, dry brushing, and/or sponge stipling to add dirt, blood etc. If ya want.
When you're happy with your paint job, give everything (except the neck post!!!!) a couple of layers of clear coat.
Step Six: When it comes to reattaching the head you probably don't wanna be dunking anything in water by this point, just in case. So we're gonna soften the neck post (and around the base of the head if necessary) with hot air instead. Use a hairdryer if you don't have a heat gun. DO NOT use an industrial or decorator's heat gun for the love o' god. That shit's meant for stripping paint, not gently warming vinyl figurines. It'd be like using a nuke to shake a cherry tree, and you'd likely burn yourself. A hairdryer is more than capable of doing the job.
Why did we not use the hairdryer for Step One? To be honest there's nothing stopping you if that's what you wanna do, but as you don't have direct access to the bits that need softening at that point you will have to wait for the heat to penetrate. You could be doing other things in that time by letting a water bath do the work for you.
Now, however, you do have direct access, so you'll probably find you only need to blast the hot air for 10 seconds or so.
Step Seven: So, you've got the head re-attached, and your paint job is finished and clear coated. That means it's time to add the rebar. If you went a bit too far with the drilling or sanding now's the time to get your glue on. As an final extra touch you can spiral some thin jeweller's wire around the length of the rebar to make it look more rebar-y. I didn't do this bit as the wire I had in my possession at the time was too thick for my tastes.
But whether you opt for that or not, congratulations on making your very own Grace Funko Pop!
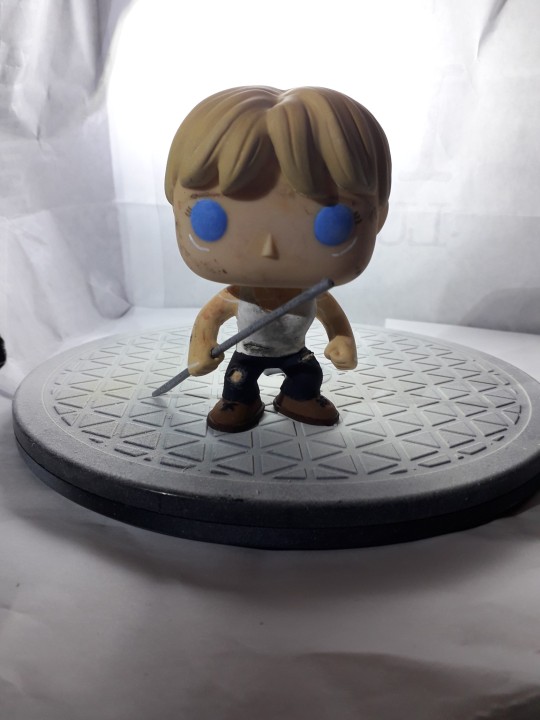
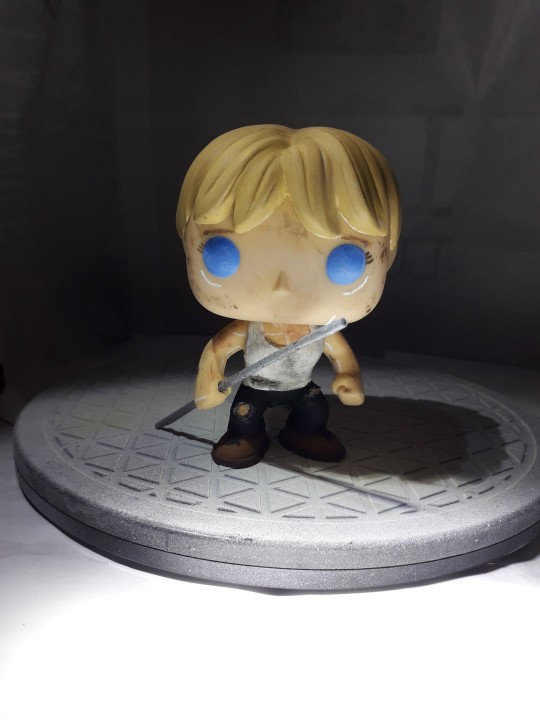
I'm still planning on making security guard and future war versions of Grace, and at least one version of Dani. Yeah, I've been saying that for the last two years, but it's still absolutely happening, trust me.
Anyway. That'll do it. If you have any questions, or you need further explanations or recommendations etc. y'all know where to find me.
8 notes
·
View notes
Text
Air Dry Clay
Air dry clay is a versatile and popular crafting material that does not require baking or firing to harden. It is a type of clay that dries and sets through exposure to air, eliminating the need for a kiln or oven.
One of the benefits of air dry clay is its ease of use. Unlike traditional clay, air dry clay does not require any special equipment or tools. It can be shaped, molded, and sculpted by hand, making it accessible to both beginners and experienced crafters.
Air dry clay comes in various colors and finishes, allowing artists to create a wide range of projects. It can be painted after drying, giving artists the freedom to add vibrant colors and intricate details to their creations.
Another advantage of air dry clay is its relatively quick drying time compared to other types of clays. Depending on the thickness and size of the project, it typically takes anywhere from a few hours to several days for the clay to fully dry and harden.
Once dried, air dry clay results in a lightweight yet durable finished piece. It can be sanded, carved, or painted over with acrylics or varnish for added protection.
Due to its versatility and accessibility, air dry clay has gained popularity among crafters of all ages. From small figurines and jewelry pieces to larger sculptures and home decor items, the possibilities are endless when working with this convenient material.
Overall, air dry clay provides an enjoyable crafting experience without the need for specialized equipment or high-temperature firing processes. Its convenience makes it an ideal choice for both casual hobbyists and serious artists looking for an alternative medium for their creative projects.
0 notes
Text
Unleashing Creativity: Crafting Kaleidoscope Murrines with Raw Polymer Clay
Introduction
Polymer clay (arcilla polimérica), an incredibly versatile medium, opens the doors to endless creative possibilities. From intricate jewelry pieces to home decor items, this pliable material can be transformed into unique works of art. In this blog, we will delve into the exciting world of kaleidoscope murrines, a technique that combines the beauty of murrines with the enchantment of kaleidoscopes. What's more, we'll be using raw polymer clay to bring this captivating craft to life.
What Are Kaleidoscope Murrines?
Murrines are intricate patterns created by stacking and compressing thin layers of polymer clay in various colors. These patterns resemble cross-sections of multicolored glass canes. When sliced into thin rounds, they reveal astonishing designs that can be incorporated into a variety of artistic projects.
A kaleidoscope, on the other hand, is an optical device that produces ever-changing visual patterns through a series of mirrors and reflecting objects. Combine these two concepts, and you get kaleidoscope murrines— intricate murrine patterns arranged in a way that creates a visual experience akin to looking through a kaleidoscope.
Materials Needed
Various colors of polymer clay (raw polymer clay is recommended for this project).
A clay-cutting blade.
A rolling pin or pasta machine.
Parchment paper.
An oven or clay-dedicated toaster oven.
An acrylic rod or texture roller (optional).
Protective gloves (optional).
Steps to Create Kaleidoscope Murrines with Raw Polymer Clay
Step 1: Preparing the Clay
Start by selecting a color palette for your kaleidoscope murrines. Raw polymer clay is an excellent choice for this project because of its soft and pliable nature. Knead and mix the clay colors according to your preferences until you achieve the desired shades.
Step 2: Design Creation
Roll out a uniform sheet of clay in one color onto a clean work surface covered with parchment paper. Then, add layers of other clay colors in the pattern you desire. You can use an acrylic rod or texture roller to smooth the layers and eliminate air bubbles.
Step 3: Compress and Form the Murrine
Once you have stacked the clay layers, tightly roll the clay sheet into a cylinder. This will compress the layers and begin forming the murrine design.
Step 4: Slice the Murrines
Use a sharp blade to cut thin slices from the murrine cylinder. The more slices you cut, the more patterns you'll have to work with in your kaleidoscope projects.
Step 5: Bake the Clay
Follow the manufacturer's instructions to bake the raw polymer clay (arcilla polimérica cruda). Typically, it is baked at a temperature of around 230-265°F (110-130°C) for 15-30 minutes. Be sure to adhere to the specific time and temperature recommendations for the brand of clay you are using.
Step 6: Unleash Your Creativity!
Once your kaleidoscope murrines have cooled, they are ready for use in your projects. You can create beautiful jewelry pieces, home decorations, or even experiment with making actual kaleidoscopes.
The possibilities are endless when it comes to working with kaleidoscope murrines and raw polymer clay. Feel free to mix and match colors and patterns to achieve unique and stunning results. Your imagination is the only limit!
Conclusion
Kaleidoscope murrines (murrinas para caleidoscopio) offer a fascinating way to combine the beauty of murrines with the visual magic of kaleidoscopes. By using raw polymer clay, you can create intricate and colorful patterns that will transport you to a world of limitless creativity. Are you ready to explore this exciting technique and take your polymer clay projects to the next level? Start your creative journey today from CucuArt
1 note
·
View note
Text


After adding the initial detail on the bot I felt like there were things missing from the robot and it didn't quite fit the look I was going for, so I spoke to my tutor who advised me to add similar denting to the panels that I had added and to make sure I made them thinner by slicing thin layers of clay off. I also added texture on the top of the bot and around some pf the dents, this texture shows erosion from rust.
Before baking I also rolled small bits of clay and stuck them inside the large dent at the top of the bot, these are supposed to show what the inside of the robot might look like, this damage specifically is the dent that has given D4VE memory loss and that the whole story is based around.
Once I was happy with the look of the robot I baked him, according to the sculpey baking instructions the clay need to be baked for 15 minutes per 1/4 inch at 130 C. Although I couldn't be 100% sure of how thick the sculpey I guessed that it was about 5mm thick at its thickest and about 2mm at its thinnest, so to make sure I didn't burn I chose to only bake it for 10 minutes. Fortunately this ended up being perfect and it was was all fully baked evenly which I tested by tapping the clay and if it made a clear and hollow sound it means that its fully baked and it it made a muted sound it was only cooked on the outside, if this was the case I would have just chucked it back in the oven for 3 minutes.
Once fully cooled I primed the surface of the clay with grey primer, I chose grey because it still shows detail which the white wouldn't do because its too light sand the black wouldn't do because its too light. For my priming I used "Rust-Oleum AE0040027E8 Surface Primer Grey, 400ml". When using polymer clay you should always prime your work if you intend on painting it. Priming can be done with a proper spay primer like what I used but you can use a more accessible primer like white gesso or maybe just white acrylic paint. Any colour that is put on top of a white primer will be bright and stay true, especially if only 1-2 coats of coloured paint are used.
0 notes
Text
Hii, Xerophi here, and I sculpt things for fun. I don’t post much in general, but I’m flattered some of you want to follow me and I’m super blown away that people thought it looked official?! I’m into clay these days, so if you don’t mind seeing some clay art floating around every now and then, welcome aboard!
This is a making-of post, and I’m mostly putting this out there to encourage people to try their own hand at making figurines! It’s also not really a tutorial, though if anyone’s curious I gratuitously watched some Youtube videos that cover most of the way a figurine gets sculpted and put together.
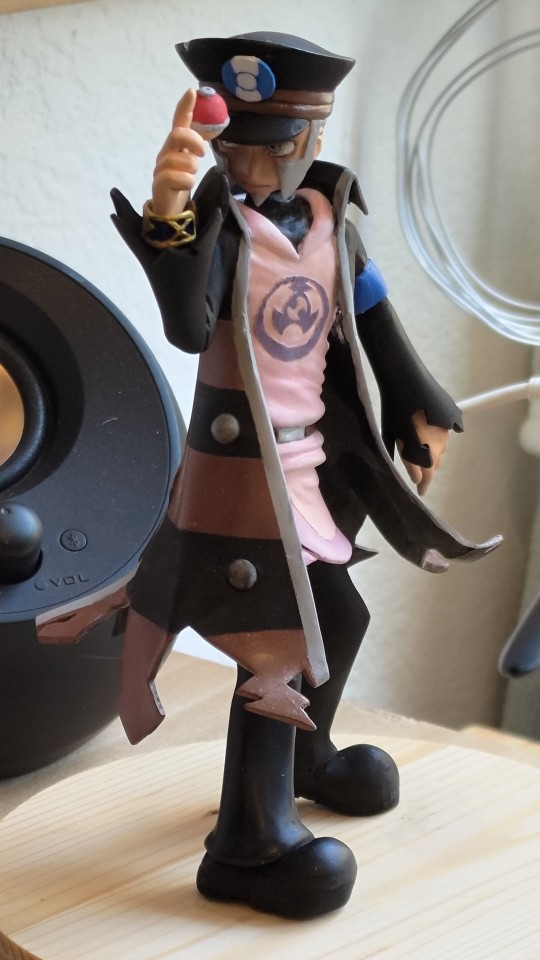
Tl;dr!
Materials:
Super Sculpey Firm (Gray) (about 95% of the project) + Premier Air Dry Clay for patch jobs (when I deemed the polymer would suffer brittleness from further baking)
Tamiya Polyester Putty for patching over cracks, imperfections on the surface
Armature wire- Gotta have a skeleton!
Various Tamiya Acrylic paints
A block of wood to mount figurine to (lol)
Tools:
Pretty typical clay sculpting tools
Airbrush
Paintbrush
Sandpaper
Long post ahead!
To be honest I’ve always been really interested in how anime figurine garage kits (unofficial, unassembled, unpainted figurines) are produced, but unfortunately, most of the details are in Japanese, so I settled for following a bunch of makers on Twitter and did my best to piece together steps from their postings. Unfortunately I’m not skilled enough yet to go the full way of making molds and resin casts for a piece like this but I think I can say I’ve finally leveled up with sculpting figurines in general with this project! I learned a lot along the way.
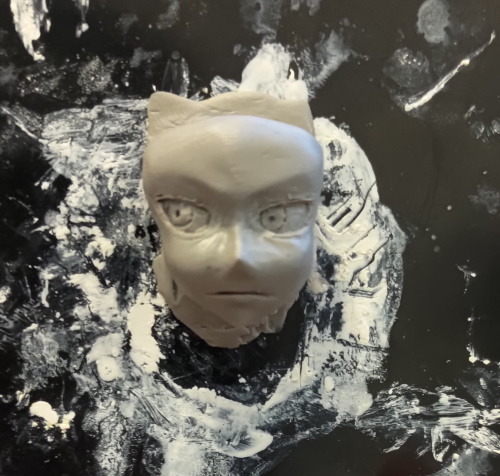
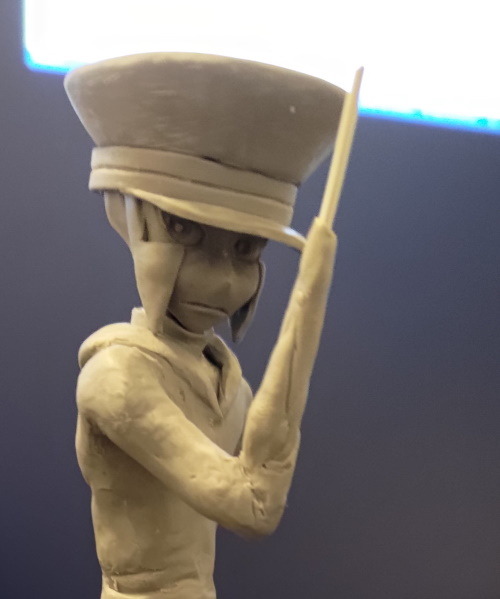
I started with his face. And it was not good. The hat too. Proportions were a bit difficult to maintain when I approached it from such a piece-wise method, so I tossed them both and just... completely redid them the next day using the body as reference.
I pondered a lot about what expression I wanted him to have. Since Legends Arceus gave us the brilliant gem of seeing him smile after battle, I thought it was a largely bittersweet thing to be able to witness. I wanted to preserve the intensity of his expression, but also allow the joy of battle to shine through. So... at certain angles, he does appear to have a bit of a smile!
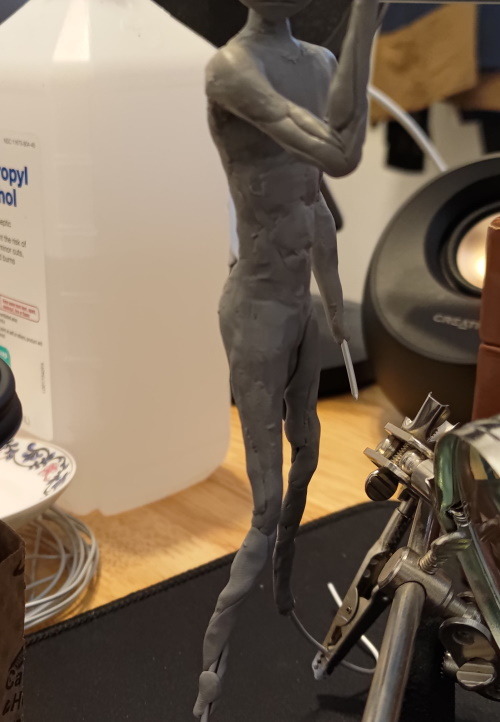
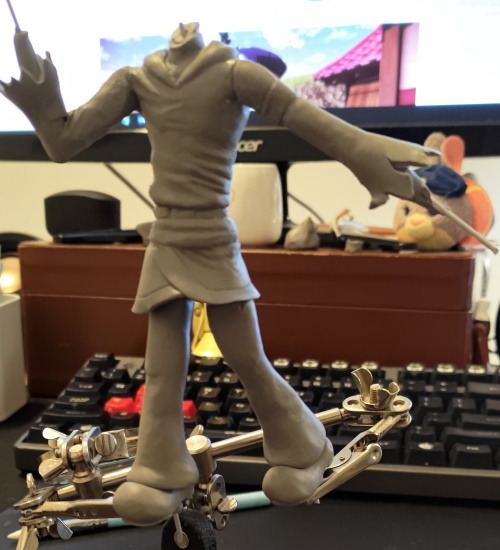
A rough addition of muscles to the armature. Clay works remarkably like skin and muscle too, stretching and flexing as I pose him. This let me envision the way his tunic would flow over the torso. Made it look a biiiit tight on him…;) Once the tunic was done, used some 91% alcohol to smooth surface imperfections over the clay, then I tossed it sans arms into the oven. Wasn’t sure how I wanted the arms yet. Legs were easier, Ingo’s pants are a little looser at the bottom now than they were in BW.
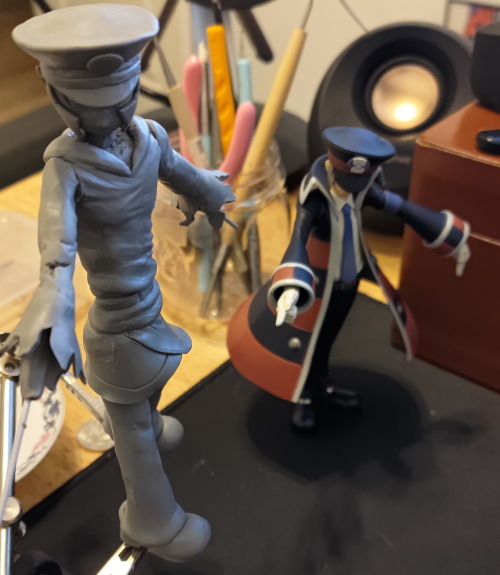
Grew a brain and remembered I had perfectly good reference material to size and proportion against and wouldn’t it be cool if my figurine matched the same scale as the Best Wishes Partners series?
Dunno what BW Ingo thinks of his raggedy counterpart though. Prolly nothing good?!?!
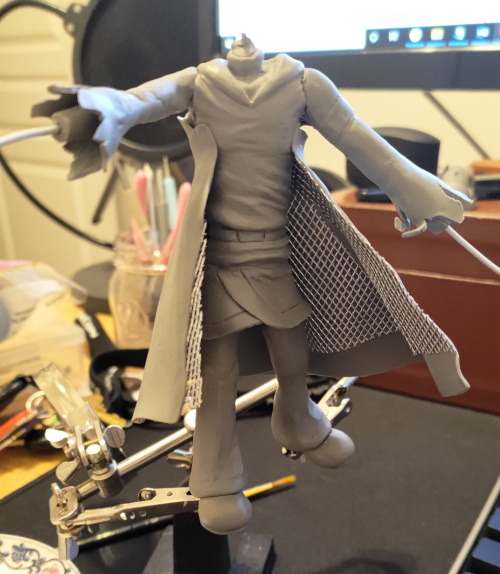
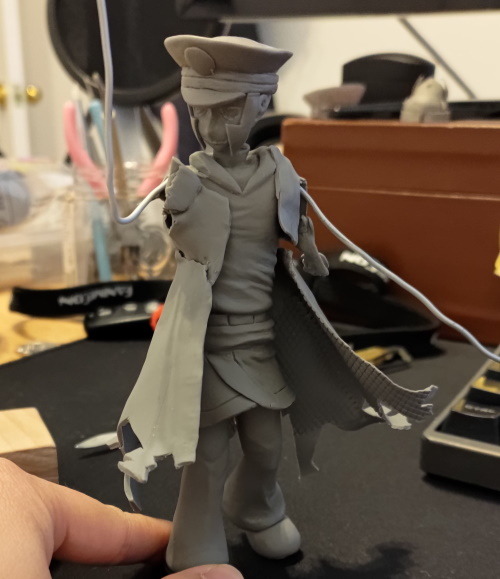
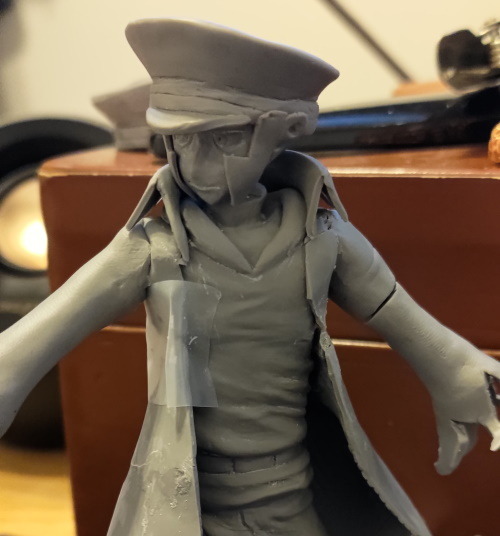
Got some sculpting mesh wire and cut and formed it in approximation of how I wanted the coat to be shaped, temporarily stuck it to the body, and then carved the rips and tears in before baking. Removed the mesh after its job was done, you can see the diamond grid pattern it left at the bottom of the coat. No worries, there’s magic for that later.
Top of the coat is sculpted directly over the tunic, and the collar is done in a similar fashion to the coat, clay over mesh wire, mesh removed, then the piece is glued on.
He gained a small metal peg at the back to help temporarily hold up the bottom half of the coat along with some helper tape.
The coat was the main reason why I decided I wasn’t experienced enough yet to attempt making a mold and resin cast. I have no idea how I’d even cast such a thin piece to begin with.

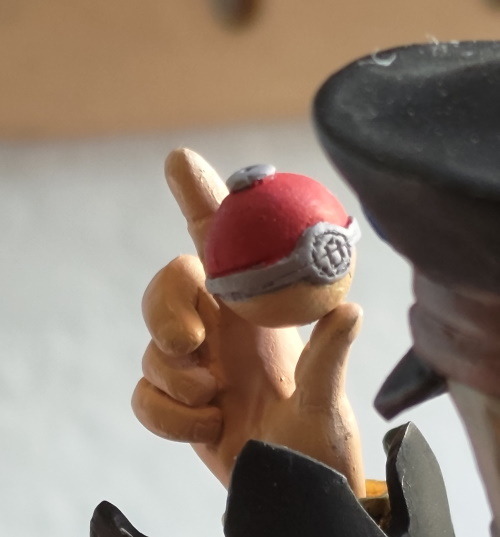
Hands! I took a small piece of clay, flattened it into a square for a palm, and sculpted the fingers individually with a piece of metal in each to stick to the palm with. Damn the Best Wishes figurines for the gloves- meanwhile I’m here trying to get knuckles, bones, and nails to show up because they went hard on his hands in his design so I decide to as well. I also finally settled on paying homage to his iconic over the shoulder pose, finally baking the arms into place.
The first iteration of the Sneaseler warden bracelet got added. It turned out far too thick to fit in his sleeve with the hand attached, so I wound up having to make a second one (pictured) to replace it. The base of a Hisuian Pokeball got added and later touched up to stupid levels of detail. (You can’t even see most of the damn bracelet in his sleeve >:( why did I work so hard)
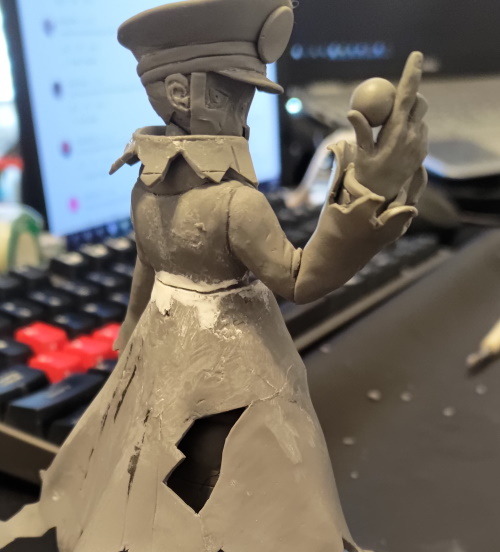
I struggled with getting the coat to meet smoothly across the seam, but turned out I didn’t need to. Tamiya putty turned out to be an insanely good filler and masker, I could have done fine after gluing the pieces together but I only realized this at the end. Of course if I were making a proper garage kit, it’d be bad form for me to send people something they’d have to work so hard to attach properly.
At this point I didn’t want to bake the polymer any more, too much baking and it gets brittle, and I was already working at a tiny scale and with really thin pieces, so I brought in air dry clay (Premier brand), which is reasonably capable of sticking to polymer with a little water, and sands very smoothly later, to help fill in too large gaps.
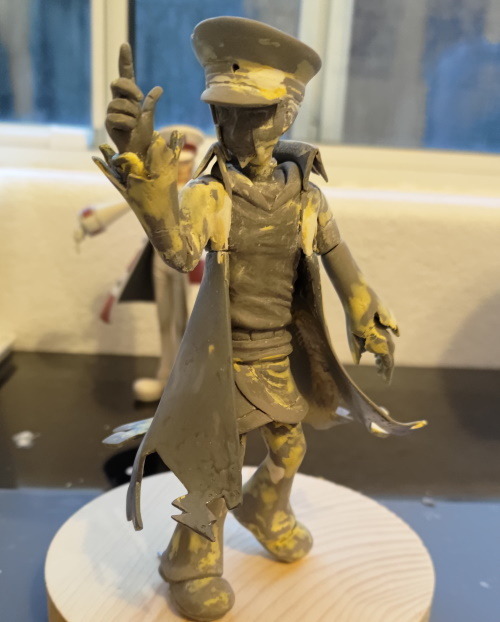
Lowest point of the project visually- I’ve never used Tamiya putty (the yellow stuff) to this extent, but I’ve seen some Japanese artists literally slather their whole project in it before seemingly sanding or carving it back down to detail. I have no idea how they manage that except what must be a shit ton of patience, but I tentatively went with the leap of faith, using it wherever I felt imperfections. The underside of the coat, marred by the mesh, got filled in at this point.
Tamiya polyester putty is a two part putty that cures in roughly an hour and is sandable to nearly a polish. It cures to a hard surface that is easy to carve and incredibly easy to sand, hence why it gets used to fill in imperfections and cracks. It works its way into these places very nicely too, as it basically starts in a cream form.
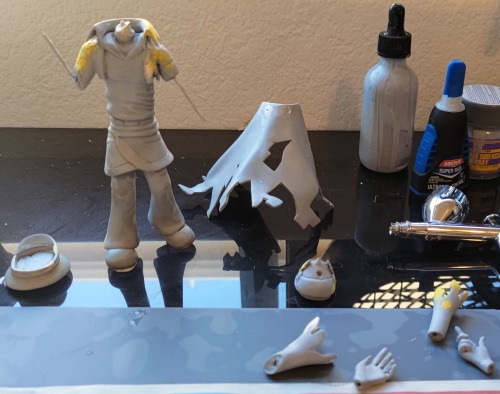
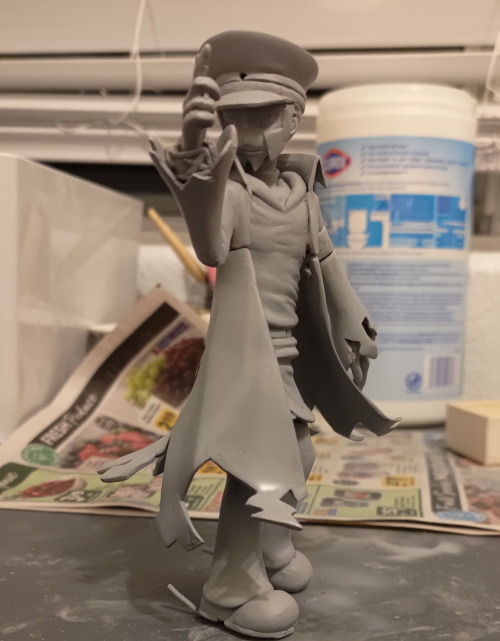
I sanded everything until it got smooth and flat again, then airbrush sprayed over it with Mr. Finishing Surfacer 1500 gray. This primer has the nice additional feature of settling into small areas of imperfections and smoothing them over as it dries. Places where imperfections show up were continuously patched with the Tamiya putty, sanded, and primed over until I was satisfied.
Still wasn’t happy with the length of the legs or the tilt of the head since I messed up the neck by making the wire connection too tiny to rely on, so his head kept wobbling or turning (or fALlING-). Fortunately nothing’s glued, not even the legs, so I can adjust his height and add/subtract clay to my liking until the pose is good.
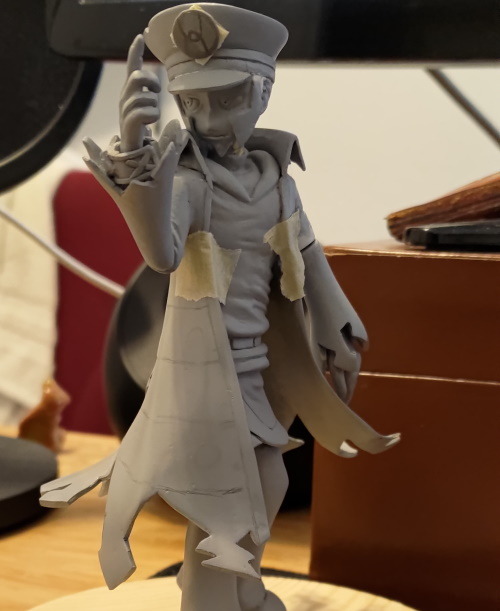
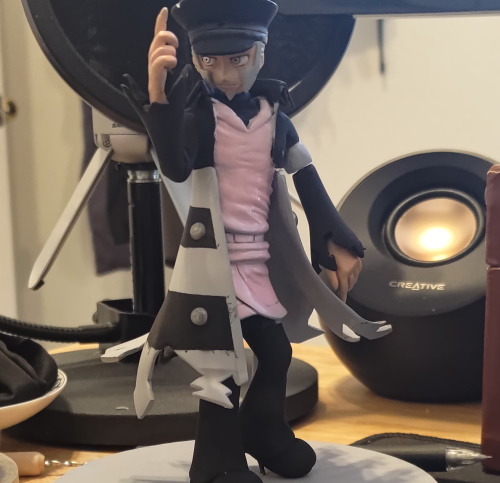
Drew in guidelines to the pattern on his coat. Added the buttons, realized he had too much of his coat still to warrant subtracting the lost button, so I shrugged my shoulders and rolled with it.
Using painter’s tape, I masked anywhere I didn’t want to spray, then airbrushed in the black, then brown. The primer turns out to be the perfect shade of gray for his palette, so I just masked over it to keep it in the places I want. Skin got a bit of realism added to it by shading it in lightly with dust ground from a pastel, then sprayed over with finisher to seal it in.
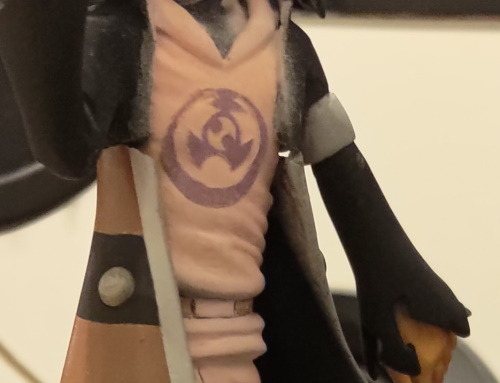
Printed out the Pearl Clan symbol, cut it out with an xacto knife, and glued it on. My printer sucks, so I darkened it with some paint. It helps at this point the paper juts up just a bit so I could carefully paint over it without touching the tunic below. Added some finisher spray over it to make sure it sticks.
Nuked the left leg last second, and replaced it with a longer version, because I was unable to stand (haha) the poor positioning of the original.
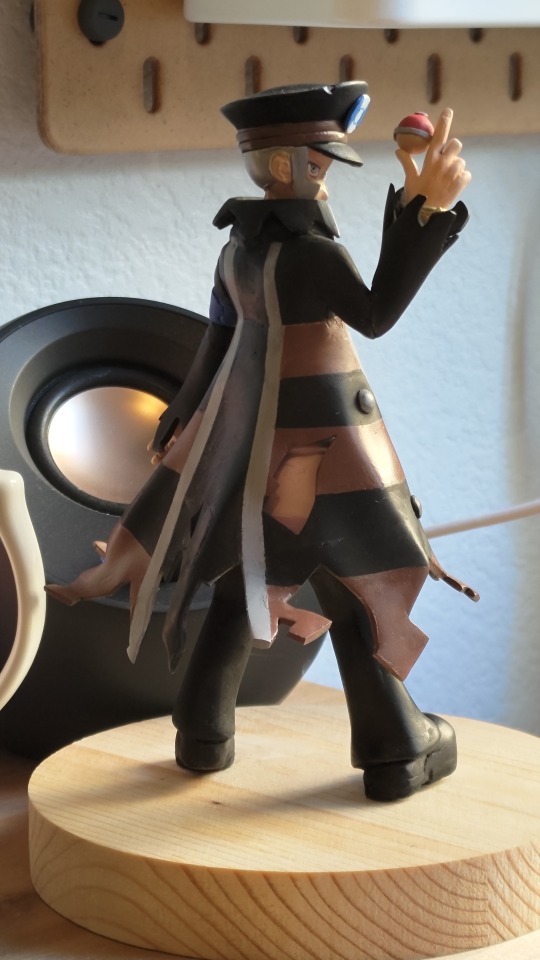
Aaaand he’s done!
One of the most important lessons I learned during this was not to over do it. If I started struggling, started making more mistakes than usual, I just straight up stopped then and there. I wanted to make a piece I could be proud of and forcing myself when I was clearly done mentally wouldn’t be good for me or the end result.
I’m happy to answer any questions or talk about figurines and sculpting! I’m entirely a hobbyist but I felt like it was difficult finding good information on how to sculpt anime figurines in general so if anyone’s curious about this stuff, I’d love to bounce some thoughts on the topic.
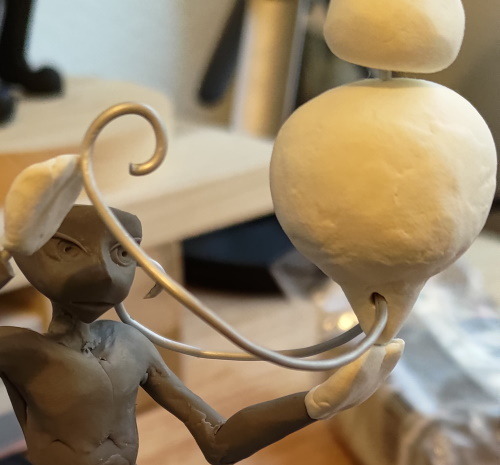
Iiiin the meanwhile I want to work on a Sygna Suit idea for Ingo and Chandelure next! Maybe finally give Emmet some love too after xD, Now that we have the butler bros I feel like we’re not gonna see anything else for them for a while longer =A=
40 notes
·
View notes
Text
JJK + different art majors
max.notes: so, i’m a art major (surprise surprise) so y’all should’ve expected this at some point. plus, art majors need more appreciation !! also, i will be using a lot of uhhh art terms? but i’ll try my best to explain them. also! i had to physically stop myself from writing too much for the explanations cause i can literally go on and on about this. so yes, this is long.
characters included: y. itadori, f. megumi, k. nobara, s. gojou & k. nanami
warnings/tags: nada

ITADORI; Painting

i was gonna give him gaming, BUT he gives me painter vibes and i’m about to explain why. painting is so widely diverse that itadori would be so immersed with its different painting styles and medias. he’s a color theory(study of colors + how they work with each other) prodigy okay? critics praise him for his usage of colors. i believe his favorite style of painting would be objective abstract art. which has a subject but it’s un-uniformed, hence the name abstract. he’s the type of painter that lets their feelings and emotions control his brush strokes + choices of colors. the overall tone. if he’s feeling angry or has pent up energy, it’s mostly dark but vivid colors and erratic movement (think of scarlet reds with orange undertones with everdeen greens.) but if it’s a calmer mood, it more flowy and smooth, using more cooler tones (think of indigo blues, purples and maybe a splash of gold.) he hates oil painting, it’s too much work and preparation. watercolor is cool but it can be tedious sometimes. so acrylic is his go to media. he always has paint underneath his nails.
MEGUMI; Animation

animation is a whole spectrum of its own. there’s so many different parts that goes into making one, whether it’s television, a film or even 5 minute short. megumi likes the tediousness, patience + dedication it takes to make an animation. there’s different concentrations that one can focus on, but i think megumi either concentrates on technical animation (which that name states, the more technical part of animation. think of it like the joints between your bones.) examples would be elsa’s hair in frozen. she has over 400,000 strands of hair and disney had to create a new software to bring her hair to life. or, he would go into story animation (which focuses on story boarding and character design) megumi would have the most fun creating fun and emersive characters for audiences to enjoy. whether it be the main character with a complex personality and tragic backstory or a simple side character that’s meant for comic relief, megumi will love and cherish every character he creates like it’s his child T^T
NOBARA; Cermanics

cermanics or pottery, is no joke. like seriously, it’s another field of precision that i, unfortunately can not do. you would think because nobara is loud and bubbly that she wouldn’t be able to do it, or have the least amount of patience for it. but she actually really enjoys it. clay is soft + mendable. controllable. and nobara likes that, cause she can make it into whatever she desires. her favorite type of clay to work with is porcelain. who doesnt like making a pretty plate or pot? after that would be earthenware, which from there can fire it in the kiln (a special “oven” for baking clay) and put pretty glazes on them uwu. and what’s even greater about this, she even makes her own clay. she’s bojuee like that ;)
GOJOU; Film + Television

you would think he’d live for the spotlight, like being an actor, but he definitely gives me director vibes. he wants his name on the damn thing. not a featuring or just a size 7 font on the rolling credits at the end. no, size 24 “directed by: satoru gojou” but of course, he starts his way from the bottom up. feels more rewarding that way. gojou will not, for the life of him, put out basic movies. he creates the most compelling, imaginative worlds and characters. they’re engaging, thought provoking even. gojou believes that every aspect of film making, from color grading to the overall cinematography is important to tell the story. dark, depressive movies with twist and turns are desaturated and mystical with up close camera shots on the actors face during pivotal moments. jumpy soundtracks and explosive cgi makes for a great action/adventure film. delves into every genere because being well-rounded is better than being a one trick pony.
NANAMI; Art History + Restoration

i love this for him. out of all the majors on this list, i think this is the most unappreciated. nanami thinks the same, so honestly, if he wasn’t a sorcerer he would be an art historian. after saving up the money, he’s opened up his own little gallery in town, collecting all sorts of ancient and wild paintings + sculptures he can find. nanami has a deep love for art history, and he wants to share that with the younger generation. he does regular tours of the gallery for elementary childern. i think he’s secretly good with childern alright? nanami is so... smooth and thorough with his descriptions when he’s talking about a painting from the edo period, he has the kids captivated and engaged. he even invites high school and university students to do restoration presentations. showing them how to properly do so from cleaning the canvas, color correcting and even stretching it out on a new frame.

copyright © 2021 maadorii. all rights reserved.
#jujutsu kaisen#jjk#jujutsu kaisen headcanons#jjk headcanons#itadori yuuji#itadori headcanons#megumi fushiguro#megumi headcanons#kugisaki nobara#nobara headcanons#gojou satoru#gojou headcanons#nanami kento#nanami headcanons#jjk fluff
267 notes
·
View notes
Text
Producing Polymer Clay Beads - A Entertaining New Craft Concept the Entire Family Can Love
With an infinite vary of layout options out there, it is really no speculate handmade polymer clay beads are having so a lot focus in the crafting entire world. Ideal for each grown ups and children (ages eight and up), performing with polymer clay beads can give you a whole new way of possessing exciting with your little ones, too. What are polymer clay beads? Polymer clay beads are beads fashioned out of polymer clay, which is at times recognised basically as "Fimo." (Fimo is the brand identify for a certain type of this clay, produced by Eberhard Faber.) This polymer clay can be molded into a range of distinct creations. Then you only bake the clay in your household oven to develop a hard, resilient materials that you can drill, slice, sand, and paint to realize even much more inventive effects. Mainly because polymer clay is so straightforward to do the job with, it has turn out to be a popular way to make your possess beads for jewelry making. Making Polymer Clay Beads The course of action of creating the beads is uncomplicated. Just pinch off a bit of the clay, knead it in your arms and condition it into the form you like. You can make polymer clay beads in a wide range of unique shapes, using a wide range of strategies and equipment. You will find no real restrict besides your imagination, and you can function with the clay in excess of and more than all over again (until it has been baked.) Molding the clay necessitates company stress, but it keeps its condition very well after fastened. It is most straightforward to operate with when it is really slightly warm, so if you are having issues getting it to cooperate, you may well want to go to a hotter get the job done space or warm up your palms a little bit. Rounded beads are simplest for the beginner but you can shortly discover how to make beads that are sq., star formed, heart formed or created to search like little animals. Flower formed beads are also extremely common. To make the beads in diverse shades, begin by picking from the many colors of polymer clay that are commercially readily available. You can obtain a marbled impact by performing with many colors at as soon as. Once your creations have been baked, you can paint them with acrylics or even fingernail polish to give them further gloss and sparkle. It can be quick to make holes in Fimo beads, so you can thread them alongside one another into bracelets or necklaces or sew them on to clothes. You can drill holes in the tricky beads, after they have been baked. Or you can make holes in the soft clay in advance of you bake your beads. If you have any thoughts relating to where by and how to use Polymer 80 FDE Frame Kit, you can contact us at our own web-page. A toothpick is great for piercing holes by way of Fimo clay once the beads have been formed. Wiggle the toothpick close to to make absolutely sure that the sides of the holes are sleek and bits is not going to tumble down to clog them all through baking. You can also use a wood skewer to make holes in your beads. Cautiously press a skewer by means of the heart of your concluded bead, staying very careful not to transform its shape. Fill the skewer with beads (currently being cautious that they you should not touch each and every other). Then guidance the skewer on a baking rack or other oven-proof container so the beads never modify condition all through baking. Bake the beads directly on the skewer. Baking Your Beads You can need to bake all your clay creations to make them tough and shiny and to assure that they preserve their shape. You can do this in an everyday oven on a baking sheet, but stick to the instructions on each and every packet of the product to make certain you get the temperature just proper. (If the polymer clay is baked at way too large of a temperature, it can emit perilous gases.) Your beads will be challenging and completely ready to string collectively into jewelry after the clay is baked and cooled.
1 note
·
View note
Text
Polymer clay tips from someone who's been experimenting with it for the past three years:
I started with a sculpey brand set so I had a lot of colors to work with, then replaced the ones I needed
Buy colors you use often, like white, in bulk
If you use jump rings for charms or jewelry, get pliers and wire cutters, it's not worth destroying your scissors and fingernails
Use baby wipes to clean your hands and surface
Invest in some tools, but most things you can substitute. I use a sewing needle to cut and make details, a baby knife to cut big chunks, and aluminum foil and not-for-teeth toothbrush to texture.
I did get nail art tools that have little balls on the ends and can double as rolling pins
When making larger objects, fill it with aluminum foil
Turn scrap clay into beads
Don't put polymer clay in airtight containers, it'll become sticky and gross. It's plastic based, not real mud clay
Polymer clay is still squishy right out of the oven. The colder it is immediately after being taken out, the stronger it'll be
Liquid clay is amazing and even if the tiny bottle is expensive, it lasts for a long time
If you coat it in mod podge before it goes in the oven, it gets nice and shiny afterwards, and is a sort of glaze/glue
It doesn't matter how much you think you suck, most people don't know what polymer clay is and will hail you as a supreme deity regardless of skill
Use fimo brand clay to make canes, sculpey is too soft since it's good for kids and beginners and people with weak fingers (I am the latter)
Premo brand clay has good colors and isn't too soft or too hard
Fimo may be hard to squish, but work it between your fingers a bit gradually and it'll get softer
You can buy canes online, they're super cheap
Superglue fixes everything but don't bake it
You can mix clay with glitter, chalk pastels, and some makeup. I haven't tried nail polish but I have a feeling it won't work
Piping tips are a bitch to clean but clean them anyway, you'll thank yourself later
Mix the premo color pearl with any other color and it'll turn sparkly too
It helps to have a sketch beforehand of what you're making, labelled with colors so you know where to start
Start with light colors first, then gradually get darker
If you need to switch back to light after using dark, wipe your hands on those baby wipes
Red, certain greens, and glittery colors are ones you should wipe your hands and surfaces thoroughly after using. No not black so much unless you're switching to a super light color
Mix media!! Paint it, glue it to something else, etc. Art is beautiful in its variety!!
Liquid glue does not disappear when it's finished baking, it comes out white
Try new colors!! They won't bite
When eye pins are too long, cut them down to size and make other smaller ones with the ends you cut off
Don't put your creations on the edge of a shelf... I am speaking from brokenhearted experience
Bead organizing boxes are an excellent way to store your creations
If you suddenly are struck with inspiration, text/email the idea to yourself, write it down, or put it in a notes app
Reference photos are not just for drawing and painting artists
Follow YouTube tutorials and watch their collections and trades because not everything they make comes with a tutorial and you can discover other artists this way
If there isn't a tutorial, picture how the pieces fit together. Three dimensional art is easier for me to puzzle together, so imagine how it comes together. It'll get easier with time as you watch more tutorials, and soon you won't have to
Imitation is the sincerest compliment, or however the saying goes. I copied everything I made when I started out, then gradually had my own ideas. It comes with time
If you copy or heavily draw inspiration from someone else and put pictures of your creation out on the internet, make sure to give credit where it is due
Crochet thread makes for excellent tassels if you make jewelry
Practice practice practice
Take breaks when you need to, especially for your eyes
If you make slabs, lots of people use pasta makers to roll them out flat, but rolling pins are cheaper
Make what you love
If you don't love it, give it away. Most people don't have standards for what they don't know
Don't be discouraged by the talented artists out there. It takes time and money to get that good, and that isn't readily available to many people. Talent is also in short supply
I don't sell on Etsy because I don't want to get sued, but it's a vague future plan. If you want to motivate yourself that way, go for it if you think you're ready. There are plenty of sellers out there who make fabulous creations, and some who are simply average, so don't let a lack of skill deter you
Clay isn't for everyone. I have small hands, which definitely helps, and some people (or fools) just aren't drawn to three dimensional art. If you don't love it, it's okay to move on to something else.
Fancy clay can be bought only online, so I haven't done it, but it looks pretty cool in the pictures
Have a designated area for clay, and keep it generally clean most of the time so wipedowns at the beginning aren't too bad
Your designated area for clay should be one solid, light color so you can see any dirt specks, hairs, etc. that might appear in the middle of your work
Gold foil is pretty cool and can be baked with clay
Read the baking instructions on clay packages
It's ok to mix brands, bake somewhere in the middle if the baking heat is different
Acrylic paint goes well on everything, including polymer clay
Paper clips are bakeable too
Small thin things don't have to be baked for as long
It's okay if you forget about your clay. Once I left mine in the oven for forty minutes and it was fine
Suede brown in sculpey is a pretty lit color
Ecru clay in premo is good for mixing, mix it with white for vanilla cakes
Art is beautiful heck yeahhh
#art#artists on tumblr#artwork#handmade#diy#diy projects#diyinspiration#diy charms#polymerclayearrings#polymerclay#polymerearrings#polymerart#polymer charms#colors#colorful#polymer clay#clayearrings#clayart#art advice#art tips#advice#tips
30 notes
·
View notes
Note
Your dolls are amazing... what materials do you use, like paints, type of clay, type of wire? Where do you get your fabrics? Sorry if this question is too intrusive lol
Tbh I think it's less abt the type of materials you have and more just working with what you've got bc my materials are kinda trash. Ive got Sculpey oven dry clay and the thinnest wire I could find that looked like it would hold structure (aparently its florist wire), and tacky clear glue all which I bought at Walmart. I have embroidery floss, and white embroidery fabric that I paint colors from joann fabric (also have white and black shirts I cut up). My paints are watercolor, some shimmery acrylic paint I stole from my parents, and super cheap black nail polish. I also use an exacto knife to carve the baked clay. And fabric scissors are great
16 notes
·
View notes
Text
under the cut- a weird giant tangent about making maquettes and sculpting that’s completely unprompted and poorly edited. here you go
the professor who taught me how to make maquettes was very particular about doing them a specific way
you use either the super sculpey that’s peach colored, or the sculpey firm stuff that’s grey. give it an internal skeleton of wire (for support) and tin foil (for reducing weight and using less clay) the metal wire can be connected to other wire with plumbers epoxy. plumbers epoxy is a nightmare because it’s supposed to cure for 24 hours. (i KNOW that i didn’t leave it to cure that long, because I learned this during a 24 hour sculpture competition.) also it smells extremely bad, gets really sticky, can burn your hands because its chemicals and it heats up as it cures, and you gotta make a whole separate trip to home depot because they don’t sell it at art supply stores. and you need the epoxy, because that’s how you’re going to attach the hexnuts you also need to the part of the sculpture that’s gonna be anchored to the wooden base. you get a wooden base, drill holes in it for where the sculpture is going to attach, and then put screw... wait i don’t remember this part very well but you use screws and hexnuts and those little hexnut adjacent things with the metal wing protrusions on them to anchor the sculpture to the base. god i wish i remembered this better
then you bake it, which i think even for a huge sculpture takes like 15 minutes at 275 degrees?
after that you spraypaint the whole thing solid matte black, like, chalkboard paint black because then its for sure matte. then you go out and buy really cheap hobbyist acrylics from Micheals and drybrush colors on in layers, from darkest to lightest, and you include shading in the maquette rather than solid colors, so that way it catches all of the details of your sculpture and emphasizes them
it was a really good lesson and people were frustrated that he wanted it done so specifically, but like, it was really good, and i remember most of it
in all honestly: i haven’t used this more than once since then. i used it for the competition challenge thing, and then again for a school project where i had to make a maquette, and since then i just haven’t wanted to use that much clay or make something that big or, the biggest reason, go out and buy all of the specific materials (and i don’t own a power drill). so most of my sculptures are pretty small, don’t have a base or an internal skeleton (besides some tinfoil, for clay conservation and less weight), and i just try to make sure they can stand on their own and prop them up with tinfoil in the oven if it looks like they might fall over
i have since learned while trying to apply the professor’s shading technique to my much smaller sculptures that i don’t want to start with black as a base. on a small scale, it makes stuff look grungy and its hard to know if you’re over or underdoing the highlights, because they look really bright when you’re putting them on and then you look at it when its done and it doesn’t actually have the contrast you want (and this professor’s whole aesthetic utilizes a darker sort of gritty look, so i suspect that’s why he had us start with black). if i’m gonna do the drybrushing shading layering thing again, i’m going to start with a different dark color that isn’t black and see if that makes things any more appealing to me
also, i’m basically never sculpting for myself because i want to have a sculpture made out of clay. i want to make my own toys and figurines, so i tend to end up painting them pretty flat and graphic
my biggest thing that i took away from his lesson and use:
he was absolutely, 100% correct about cheap hobbyist craft paints. like, yeah, you gotta use multiple coats, but i’ve painted stuff with nicer ‘artist’ acrylics (i mean they were not the HIGHEST quality but like, they were technically ‘better’ and more expensive) before and it doesn’t dry with a matte finish and like, never truly seemed to dry at all? dust would get stuck in it and i never felt like it was truly dry. the cheap stuff is way better, which is nice because its also cheaper and i like the little bottles more than i like tubes
9 notes
·
View notes
Text
How I made my first custom doll

Hello guys, I am a first-time customizer and I just finished my first customized doll. I think as a beginner, I did a lot of advanced stuff because I wanted this doll to be perfect. I made her as a gift for my professor, and I wanted to make sure that this doll was as perfect as possible.
I was really hesitant about all of this because I wasn’t sure if I was talented enough to customize a doll. I mean, I’ve been perfecting my digital art for almost eight years, but I didn’t think that would reflect onto a completely different medium. However, I beat the odds and perfected her.
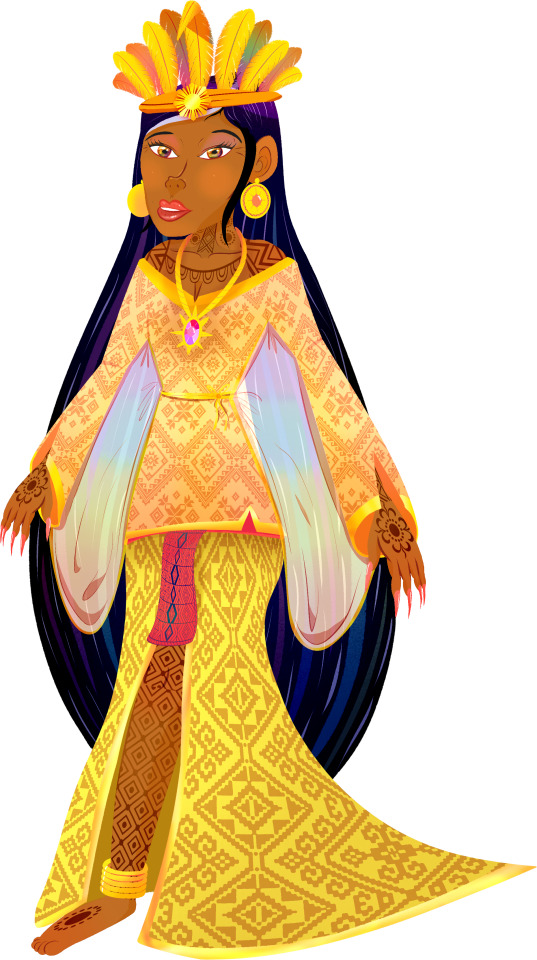
Luzvimindas is a cartoon character I developed for a movie idea I had about Filipino culture. This movie idea was very important to me. I shared it with my professor because she was a Filipina as well and she taught Filipino-American issues. I shared my script with her and she was estatic!
Her appearance is derived from a serious of different cultures across the Philippines. Since she is the personification of the country, I wanted to make sure that her appearance was not affiliated with a specific tribe. Rather I designed her outfit based on a variety of different elements of tribes.
For people curious about all the tribes of the Philippines, I suggest visiting this link from LinkedIn about the various types of indigenous Filipinos.
https://www.slideshare.net/PennVillanueva/indigenous-peoples-of-the-philippines

She has very strong Maranao influences as seen by her cropped-shoulder dress and long-talon nails. In the Philippines, there is a dance called “pangalay” that is performed by “jangaay” dancers. These dancers are women who adorn their hands with long finger jewelry and most of the performance derives from the playful motion of their arms and wrists.

I made her shirt cropped, because I wanted to show off her indigenous Filipino tattoos, reminiscent of the Visayan regions such as Cebu, the first island of the Philippines encounter by Ferdinand Magellan. That is also why their is a slit to show of her left on her sarong.

A lot of Filipinos, especially down south wore lots of gold. It was very common for Filipinos to wear gold accessories before it was seized under Spanish colonization. She has golden-hoop bracelets on her wrists and ankles. Her outfit has gold trimming, but I chose not to put that on the doll to prevent myself from making a mess with gold paint.

For her headdress, I was inspired by the Igorot tribe of Luzon, but also wanted it to match with the rest of her color scheme. I also added a gold Filipino star in the middle to make it painfully obvious she was Filipina. I also gave her basic disc earrings and a jewel necklace also similar to the star.

Luzvimindas was made using a combination of different materials. Her head mold came from a blue-dressed wonder woman I found at a discount on Mercari. The doll had a stain on its brown from the gel in the doll’s hair, so I removed that along with her factory paint with acetone. I had so much fun, wiping her clean, and removing the remaining hairs with a tweezer.

As for the rest of her, by the time this doll was completed, she was pretty much three dolls put together. When I bought her, I wanted Luzvimindas to kneel, because I thought that would be the most natural way of posing her without having to use a stand. Little did I know that her knees only bend at 90 degree angles. For a little while, I tried forcing her legs to pose at a kneel, but it wasn’t working. So I went back to Mercari and purchased Antiope’s legs from a friendly seller.

I had to go through the trouble of drilling out that plastic bit inside the doll’s hip and tying an elastic band back into the doll’s body.
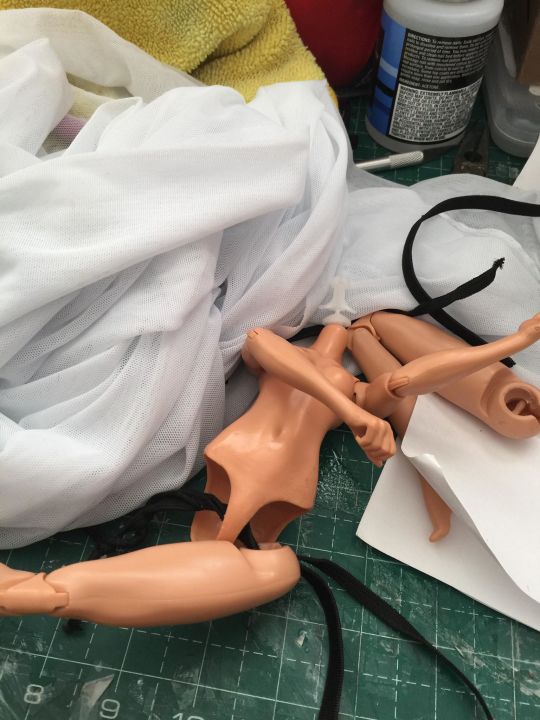

It was pretty fun, and I was happy because she could finally kneel. But the problem know was that Queen Antiope and Wonder Woman 2018 dolls have different body-types. I did not know that the Wonder Woman movie dolls used a “fit-barbie” body type and that it was different from the kinds of bodies they used for the more higher-quality dolls for the movie’s release.

Because of the difference in size of the thighs, you could see inside the hip. Since this was a gift to my professor, I thought this was unacceptable. I didn’t have any epoxy sculpt. I was going to buy some, but then I realized how expensive that would probably be. I was doing a polymer clay project the previous year and had various materials I never used. I hade this black premo sculpey that was supposed to be hair for my figurine, but I never used it because it was so hard to knead. But since I didn’t want to spend so much money on epoxy, I struggled my way into forming the hips until they were similar enough to a fit barbie’s figure.

Since they don’t air dry, I picked up a method for baking polymer clay without using a baking-oven. I dumped the doll it boiling hot water for 3-4 minutes and it got the job done. However, it backfired and the left side of her body encaved into itself. I was wondering why this happened.
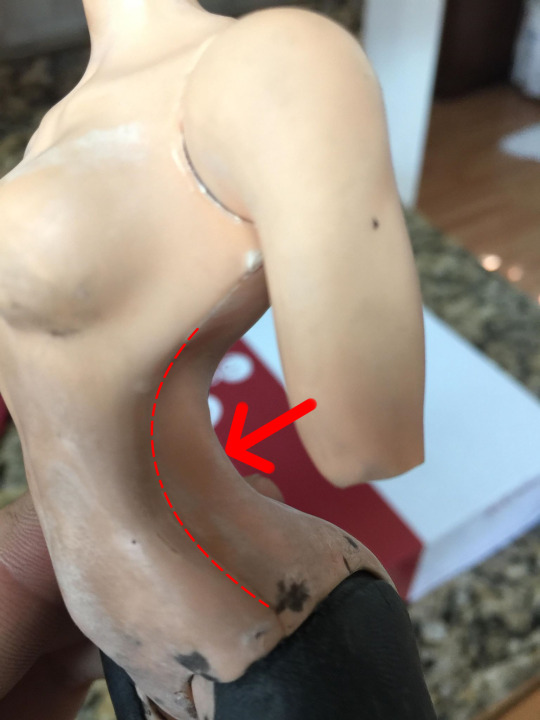
Apparently, if you boil a doll in hot water, you can get a nice corset figure. Unfortunately, this accident didn’t reap me any benefits and I had to dispose this body and buy a new doll from a WWE Diva of a similar skintone to Wonder Woman’s and place the legs on that new body.

This new body had articulated wrists, which was a MAJOR plus for me. I picked up the dye methods from people DollMotion to color change my doll so I didn’t have to deal with painting her. Unfortunately, it only made her joints brown, and I was left with a monster high doll. Oh well...

I picked up a method from Hextian’s video for his Jessica Rabbit Vladonna doll and mixed modge podge with a reddish brown and yellowish orange to get her to become the correct color.
https://youtu.be/KwbTd-oiw0k?t=109

When it came time to reroot her it was a major mess. I never dealt with a rerooting tool nor fake hair before and I didn’t completely understand how rerooting worked. I stuffed my rerooting with thick strands of hair, and whenever I punched it into the existing holes, it would fall immediately out.

I got really frustrated and boiled wash the hank of hair, which resulted in it becoming incredibly frizzy and difficult to work with. I had to comb it several times in order for it to become even again.
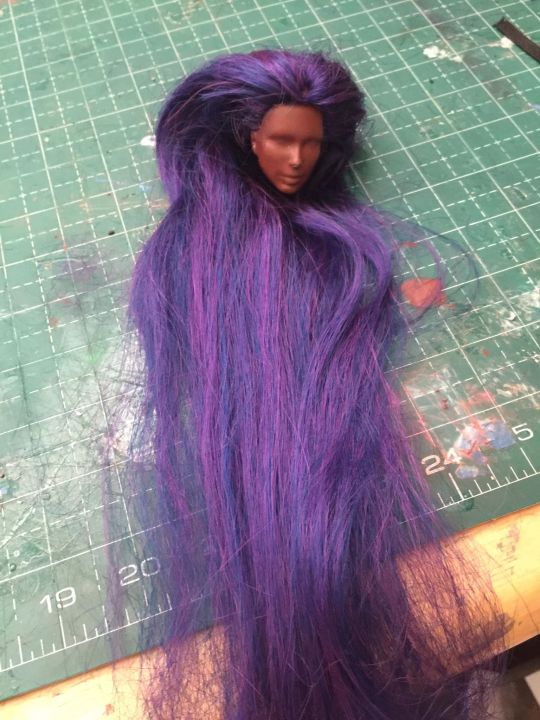
After she dried, I made her a Filipino flag and placed her head back to her body. I thought it was really cute.

Unfortunately, the shoulders kept scudding, and it would constantly reveal her true skincolor by peeling off the paint. I couldn’t accept this, especially as a gift. I took my dremel tool and exacto knives and started shaving her shoulders. I was okay with this, because Luzvimindas isn’t a wrestler.
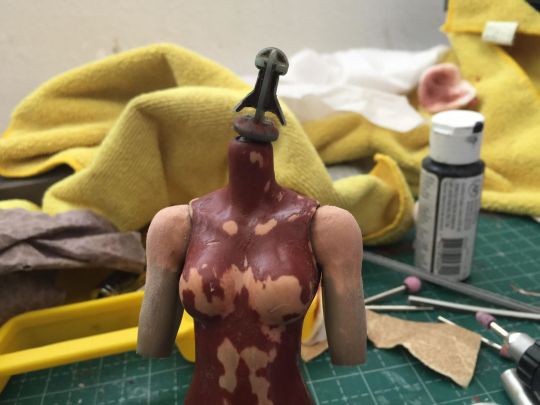
I had to remove all the paint and paint around her body, because it started to chip. Apparently my formula wasn’t strong enough for the entire body. In the end it still chipped only a bit, but not to a point that it was unacceptable.

This was when I started MSC’ing her and worked on her tattoos. I worked at one side at a time to create as much symmetry as possible.


In the end, I thought she was beautiful.
Consequently, the MSC she took made it difficult to do her faceup.
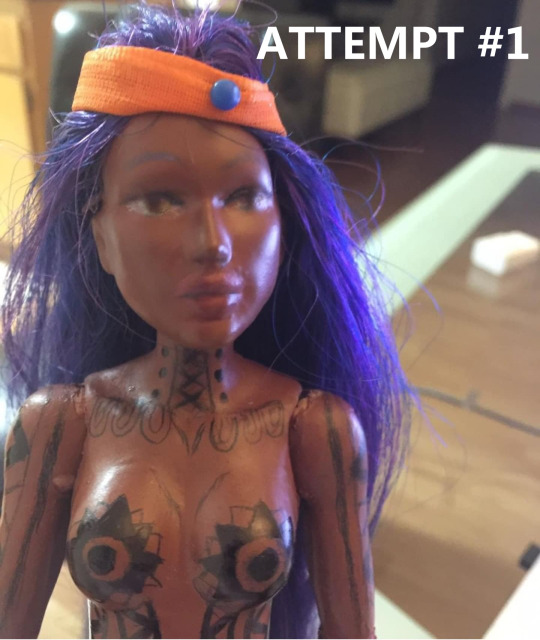
At first, I thought I had the crappiest watercolor pencils in the world.

Then I had to remove her head from her body again, which actually created even more problems. I tried using a sharpie to draw her eyes, but I knew by looking at her that this was just unacceptable.

I wiped off her face entirely and placed it back onto her body to start working on her dress. I found these fabrics that were very close to the doll’s actual patterns, and used them to make her dress. I trried using a sewing machine, but it would constantly eat up the materials, so I had to do everything manually. I bought a pattern DGRequiem for an off-shoulder tunic and modified it slightly to fit the needs of the character.
https://www.etsy.com/transaction/1619681023
I made the sleeves look more like bells, and I extended the back fabric to fit her large muscle body. I then took an orange string and started tying it around her waist to conform it to the shape of her body.
I wrapped cloth around her waist and secured it with an elastic to create her slit sarong. It is very difficult to take of and put on, because of the size of her hips versus the size of her waist. Fortunately, due to the elastics that connect her legs to her hips, I was able to pull her legs downward to give the sarong more room as it went up her legs.

I then wrapped her body in a zip-lock bag and used scrap fabric to protect her hair. I painted the face to match her skin and then MSC’d her again. This time it worked and for a while the watercolor pencils gave her a face. But after a while, they still weren’t opaque enough.
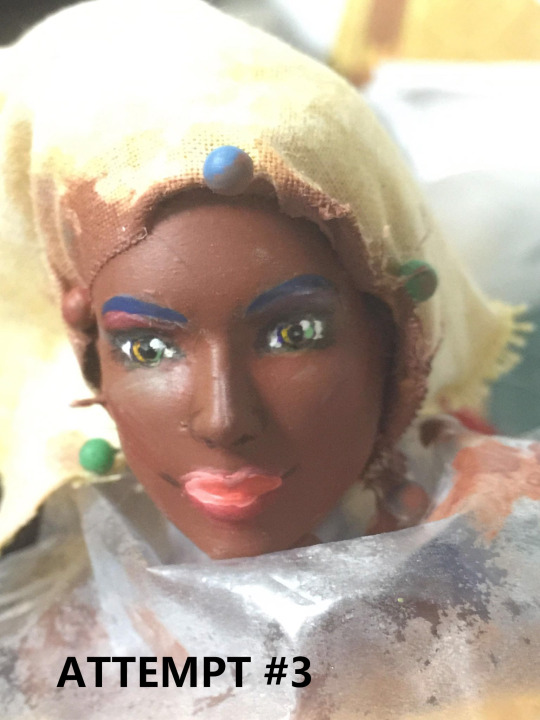
I then used small tubes of oil acrylic to paint the rest of her face. I added fake eyelashes and glossed her eyes and lips with modge podge.

This was before I added her final accessories. I made her headdress by an orange ribbon I found at Walmart, tied it, and pinned it to her head. Then I hot glued feathers that I dusted with various pastels to match her artwork. The bracelets were made from rings made for ear piercings at Hobby Lobby. The rest of her jewelry came from a local 3D print shop.

I painted them gold. Hot glued the star to her headdress. I hot glued the pendant to her necklace chain also made from more jewelry. I hot glued a gem onto her pendant. I pierced a hole through the earrings, hot glued them with pins, and inserted them into her ears.
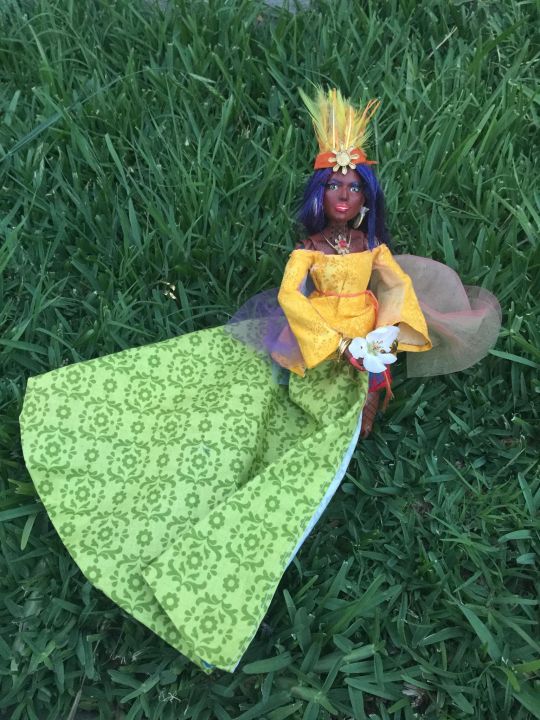
And that’s how I made Luzvimindas, my indigenous Filipina Baybalan and beholder of the Bayanihan Spirit. I hope you found this post helpful and that it inspires you to make your own custom doll for the first time. Thank you.
- Dollpartshop
5 notes
·
View notes
Text
Scytheral Sculpture

Greetings.
What you are seeing is a Scytheral. A fantasy creature from my made up world called ‘Skyworld’.
This was a very interesting challenge of a creative piece for me for a number of reasons.
I decided I wanted to do a sculpture because I wanted to explore another medium from drawing and painting, and moving into 3D space seemed like a good challenge. And it was, perhaps also because I chose to do quite an unusual shape.
I based the composition of my sculpture off a previous painting I had done, which you can see here:

I wanted to take the long sinuous body of the scytheral and make a striking pose of it flying in the air, but with its tail resting on the ground.
I started off with a wire frame for the central structure of the model that would hold it in place and keep the pose solid as I worked on it. It was an essential part in being able to have a model of such height and scale resting on such a thin tail.
I tested a few different wires but found a re-purposed coat hanger wire to be the most effective for what I needed. Here you can see the very beginning of the sculpture with just the basic wire structure attached to the small wooden base that I started with.

On top of the thick wire I used several different thicknesses of wound thin wire for extra structuring.
This part of the process took a little while as I had to make sure I got the core structure of the model right otherwise it would look off later down the line when I added the clay that I would use to sculpt the main bulk of the body and the details.
Speaking of bulk, the second stage of my modelling process was to use ‘Knead-it’, a type of quick drying modelling putty generally used for quick solutions to filling gaps or holding pieces in place, such as the wings on my sculpture. The Knead-it helped hold the wings in their upright position instead of flopping down. It also provided a good hard base to work upon for the rest of the sculpting. I would actually come back a little later after I’d been modelling some of the scytheral to add more knead-it to the tail and neck to give a more solid base to work on.
Here is the initial knead-it base I worked off.

After this stage I started a little bit of modelling with my chosen material for sculpting – Sculpy. It was more malleable than my initial choice of Du-kit. Both are types of polymer clay that can be sculpted without drying out or hardening before you are ready. Once ready, it is baked in an oven at 130 degrees Centigrade and hardens into a solid clay.
After doing some modelling I looked to tackle the task of the wings, no easy feat.
This is the third stage of modelling that I entered involving papier-mache. I used tissue paper dipped in a thin solution of PVA glue and water before draping it over the wire struts that I had placed for the basic shape of the wings. I wanted to achieve very thin wings for my scytheral structure and the tissue paper-mache provided the perfect base for the sculpting later on.

One of the challenges was not wrinkling the paper too much, although it did give an interesting effect.
I also did not worry about the edges of the wings that were not defined by wire as I just cut off the excess paper after the glue had dried and formed a good stiff wing structure.
One of my decisions with the wing shape was to make them swept back and concave to make them large backdrops to the smaller main body and head.


Finally it was on to the main sculpting of the model. I spent quite a while spreading the Sculpy across the wings. I was quite pleased with the leathery texture that I made just using my finders to spread it.

The final piece I focused on was the head. This was one of the most important parts of the sculpture as it was the focus that the rest of the body draws the viewers eyes to through the use of curving lines. As such I wanted to make sure I put in the right amount of detail.
Sculpting at a small scale was another challenge, quite different from the other ones I had encountered while modelling the rest of the scytheral.


I made the decision to deviate from my original concept because some of the subtler details in the painting were not as easily transferable into 3D space. Also, I found adding more contours and ridges helped give the head especially more detail and impact for the viewers eye to be drawn to.
Once I had finished all the sculpting, I baked the model and moved on to the final stage – painting. I had to cover everything in a layer of Shelack in order to be able to paint over the clay with my acrylic paints, this gave the whole model a shiny coat, which was quite good for some parts, reflecting the shininess of the creature’s coat. I was lucky to have a base colour that I wanted from the clay that I used, so it was a case of adding highlights and extra details to make certain parts of the model pop out even more.
The main part to receive this focus was the head. I added detail to the eyes, and painted the horns, which really made them stand out from the rest of the more monochromatic body.


3 notes
·
View notes
Text
Four recipes for homemade modeling clay
I make a lot of my doll accessories out of clay. Anything that I can’t make from other materials ends up being made from clay. I used to use store-bought modeling clay, but those tend to be overpriced, dry out easily, and vary in quality from brand to brand. So I switched to homemade, and I couldn’t be happier with the results. These can all be made with things that are commonly found around the house. They’re inexpensive, neutral-colored, and easy to make big batches of them when my project calls for it. Here are the four recipes I’ve had the most success with.
1. Baking soda clay
This is my favorite all-purpose clay recipe, and (almost) the only one I use any more. It’s cheap and easy to make, air dries itself quickly, has a nice smooth consistency, and thanks to its softness and flexibility, it’s easy to manipulate. It cuts beautifully with a craft knife, so it is ideal for projects that require a lot of fine detail.
Ingredients:
1 cup baking soda
1/2 cup cornstarch
3/4 cup water
Put all the ingredients in a saucepan and mix them as well as you can. Put the pan on the stove and turn the heat up to medium. As you stir and as the mixture heats, it will become completely liquid. Keep stirring! As it boils, it’ll thicken up. Don’t stop stirring! In three to five minutes all the liquid will be gone and you’ll have a soft mush. Stir it to keep it from burning the pan until the clay is dry to the touch but not crumbly. If you can stick your finger in it an make an indent, it’s ready. Turn off the heat, stuff the clay into a mason jar, and sprinkle a bit of water on it. Let it cool a few minutes before working with it. If it gets dry at any time, knead a bit of water into it to re-hydrate it.
2. Conditioner clay
This is recipe is so fun to make and squish in your hands, almost like fluffy slime: gooey and stretchy, but not a bit messy. It’s also good for fine detail, and is the best recipe if you have a project that requires a completely smooth exterior without indentations or fingerprints. It hardens quickly, but when it does, it’s very fragile. So if you’re making things from it, be sure to coat it with plenty of sealer, varnish, or Mod Podge and don’t handle it roughly. Stepping on your hardened finish project will reduce it to crumbs (ask me how I know!)
Ingredients
One bottle of hair conditioner (choose a scent you like because this clay will carry the scent, even after it hardens)
A container of cornstarch
Dump a scoop of cornstarch in a bowl. Add a squirt of conditioner, little by little, and work it into the starch with your hands. It will be messy at first. Keep adding the conditioner until the mush makes a soft, firm, stretchy mass. Knead it with your hands until it’s the right consistency and leaves no residue when you poke it. It will come off the sides of the bowl and cohere into a ball. No need to bake this. But I suggest after your model is done to IMMEDIATELY paint it with a generous layer of sealer. This will prevent cracking as it dries.
3. Salt dough
This recipe is good for stuff you want to keep around for a long time, because it’s really durable and practically unbreakable. The drawback is that it does need to be baked in the oven, and during the process it does tend to expand a little bit. So if you’re making something with small details, this is not the clay you want. But for simple shapes, it works great.
Ingredients:
1 cup of all-purpose flour
1/4 cup of salt
1 cup of water
Mix all the ingredients together until it’s a soft and pliable mass without lumps. When your models are finished and ready to bake, put them in a 325 degree oven for 30 minutes to an hour, depending on the size and thickness of your project.
4. Cinnamon clay
This recipe might seem like there’s no way it could make actual clay, but it definitely does. It is easy to make, smells nice, dries very hard, and is easy to work with. The drawback is that it’s a little less receptive to acrylic paint, so I tend to reserve this clay for things that I want to keep brown-colored.
Ingredients:
One container of cinnamon (use the cheapest brand, quality is irrelevant)
One scoop of applesauce
I don’t really measure this. What I do is dump a scoop of applesauce into a bowl, then start adding cinnamon while mixing with your hands or a spoon. Keep adding lots of cinnamon and keep mixing. Eventually the applesauce will soak up all the cinnamon and it will cohere into a dry ball that is tacky to the touch but not sticky. It should leave no applesauce residue on your hands when you work with it. Some cinnamon will come off on your hands.
59 notes
·
View notes