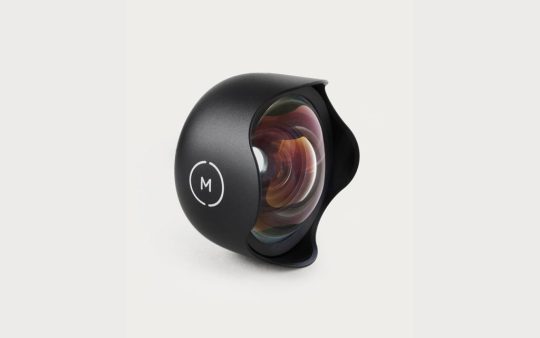
#it's the fisheye angle that takes this to the next level
Explore tagged Tumblr posts
Visit Tumblr Blog
Explore Tumblr blogs with no restrictions, modern design and the best experience.
Last Seen Tumblr Blogs


Fun Fact
In 2020, 27% of US Tumblr users had an annual household income of over $100,000.
Text


meredith marks in the sprinter van
#the real housewives of salt lake city#rhoslc#rhoslcedit#meredith marks#tvedit#realitytvedit#chewieblog#cinemapix#usertelevision#dailytvfilmgifs#useroptional#cinematv#userboost#dailywomen#femaledaily#userdavid#userbriana#*#by nat#it's the fisheye angle that takes this to the next level
102 notes
·
View notes
Text
Which Recent Trends in Smartphone Accessory Are Interesting to Look Into?
In today's digital age, smartphones have become indispensable tools for communication, productivity, and entertainment. With each passing year, advancements in technology continue to push the boundaries of what our smartphones can do. However, it's not just the devices themselves that are evolving; the accessories market is also experiencing rapid innovation. From cutting-edge chargers to innovative camera lenses, there's a wealth of exciting advancements to explore in smartphone accessories.
Portable Power Banks: As smartphones become increasingly powerful and feature-rich, battery life continues to be a concern for many users. Portable power banks have emerged as essential accessories for on-the-go charging, allowing you to top up your device's battery wherever you are. The latest advancements in power bank technology include fast-charging capabilities, high-capacity batteries, and compact designs that easily fit in your pocket or bag.
Smartphone Camera Lenses: Elevate your smartphone photography game with Skyvik's selection of camera lenses. Designed to enhance the capabilities of your smartphone camera, these lenses offer a variety of shooting options, including wide-angle, macro, and fisheye perspectives. The high-quality optics ensure crisp and clear images, while the easy-to-use attachment mechanism allows for quick and hassle-free lens changes. Whether you're capturing landscapes, close-ups, or creative portraits, Skyvik camera lenses enable you to unleash your creativity and take your mobile photography to the next level. Looking to enhance your mobile photography game? Explore our guide to finding the perfect mobile photography lens for your needs and elevate your smartphone photography to new heights. Click here to discover the lens that will take your photos to the next level.
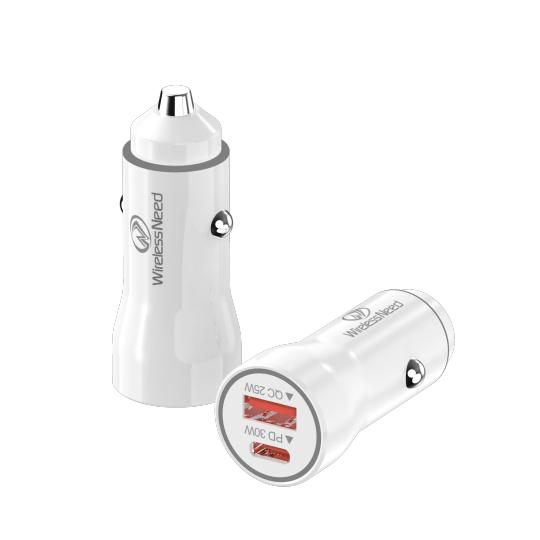
Car Charger: Stay powered up on the road with Skyvik's EMBLO Dual Port Car Charger. This compact yet powerful charger features two USB ports, allowing you to charge multiple devices simultaneously while you're on the go. With advanced charging technology, the EMBLO Car Charger delivers fast and efficient charging, ensuring that your devices are ready to go when you need them. The sleek and durable design makes it the perfect companion for road trips, daily commutes, and long journeys.
Wireless Charging: One of the most significant advancements in smartphone accessories is the widespread adoption of wireless charging technology. Gone are the days of fumbling with tangled cables; now, simply place your smartphone on a wireless charging pad or stand, and it will begin charging automatically. This convenient and efficient method of charging has revolutionised how we power our devices, offering a clutter-free and hassle-free charging experience. Interested in optimising your iPhone charging experience? Explore the benefits of Wireless MagSafe Charging and discover how it can elevate your iPhone usage. Click here to delve into the convenience and efficiency of this cutting-edge technology.
Car Dashboard & Windshield Arm Mobile Holder: Keep your smartphone safe and secure while driving with Skyvik's TRUHOLD Car Dashboard & Windshield Arm Mobile Holder. This versatile holder offers flexible mounting options, allowing you to attach it to your car's dashboard or windshield with ease. The adjustable arm and 360-degree rotation capability ensure that you can find the perfect viewing angle for your device, while the sturdy construction keeps your phone steady and stable, even on bumpy roads. Whether you're using GPS navigation, taking hands-free calls, or streaming music on the go, the TRUHOLD holder provides a reliable and convenient mounting solution for your smartphone.
Screen Protector: Safeguard your smartphone's screen with the Skyvik Auto Apply Screen Protector Tempered Glass Guard. This innovative accessory comes with a built-in applicator that ensures effortless and bubble-free installation, eliminating the hassle of manual alignment and smoothing out air bubbles. The tempered glass construction provides durable protection against scratches, cracks, and impacts, while maintaining touchscreen sensitivity and clarity. With the Skyvik Auto Apply Screen Protector, you can keep your device's screen looking pristine and scratch-free with minimal effort. Ready to protect your smartphone screen with ease? Learn how to apply Skyvik Screen Protectors tempered glass at home and safeguard your device against scratches and cracks. Click here to discover the step-by-step process for hassle-free installation.
Gaming Accessories: The rise of mobile gaming has led to a surge in demand for gaming accessories designed specifically for smartphones. From ergonomic controllers to cooling fans and trigger buttons, these accessories aim to enhance the gaming experience and provide competitive advantages to gamers. With advancements in connectivity and compatibility, smartphone gaming accessories are becoming increasingly popular among casual and hardcore gamers alike.
In conclusion, the world of smartphone accessories is constantly evolving, with new advancements and innovations emerging regularly. Whether you're looking to enhance the functionality of your device, protect it from damage, or optimize your user experience, there's a wide range of accessories to explore. By staying informed about the latest trends and advancements in smartphone accessories, you can make informed choices that enhance your smartphone usage and keep you connected, productive, and entertained on the go.
#Skyvik#smartphone accessories#mobile accessories#Latest Advancements#Latest Advancements in Smartphone Accessories
3 notes
·
View notes
Text
The Ultimate Guide to Choosing the Perfect Phone Accessories
In today's digital age, smartphones have become indispensable tools for communication, productivity, and entertainment. While the devices themselves are impressive, the right phone accessories can elevate your experience, adding functionality, style, and protection. However, with the vast array of options on the market, choosing the perfect accessories can feel overwhelming. This ultimate guide will help you navigate the options and select the best accessories for your needs.

1. Understand Your Needs
Before diving into the world of phone accessories, take a moment to assess your lifestyle and preferences. Are you looking to enhance your phone’s functionality, protect it from damage, or simply make it more stylish? Identifying your priorities will help narrow down your choices.
Common Needs for Phone Accessories:
Protection: Cases and screen protectors to safeguard your device.
Convenience: Chargers, docks, and mounts for easier use.
Audio: Earbuds, headphones, and speakers for a superior sound experience.
Style: Cases and skins to match your personal aesthetic.
Productivity: Styluses, keyboards, and stands for work or study.
2. Choose the Right Protective Accessories
Your smartphone is an investment, and protecting it should be a top priority. Here’s what to consider:
Phone Cases:
Material: Options range from silicone and plastic to leather and metal. Choose one that balances durability and aesthetics.
Type: Wallet cases, rugged cases, or slim cases cater to different needs.
Features: Look for extras like kickstands or card slots.
Screen Protectors:
Tempered Glass: Offers superior protection against scratches and cracks.
Plastic Film: A budget-friendly option for basic protection.
Privacy Screen: Prevents onlookers from viewing your screen.
3. Power Up with Charging Accessories
No one likes running out of battery. The right charging accessories can keep your phone powered up:
Wall Chargers: Opt for fast chargers compatible with your device’s specifications.
Wireless Chargers: Perfect for a clutter-free charging experience.
Power Banks: Portable chargers for on-the-go convenience. Look for high-capacity options with multiple ports.
Car Chargers: Essential for frequent travelers or road trips.
4. Enhance Your Audio Experience
Whether you’re a music lover, a podcast enthusiast, or a gamer, quality audio accessories can make a big difference:
Wireless Earbuds: Compact and convenient for everyday use.
Over-Ear Headphones: Ideal for immersive sound and noise cancellation.
Bluetooth Speakers: Great for sharing music or creating a party vibe.
5. Boost Productivity with Functional Accessories
For those who use their smartphones for work or school, these accessories can optimize your workflow:
Styluses: Perfect for note-taking, drawing, or precise navigation.
Portable Keyboards: Ideal for typing on the go.
Phone Stands and Mounts: Useful for video calls, tutorials, or hands-free use.
6. Stay Stylish with Personalized Accessories
Phone accessories are an excellent way to showcase your personality:
Custom Cases: Add photos, patterns, or text for a unique look.
PopSockets and Grips: Functional and fashionable options for better phone handling.
Decorative Skins: Provide a sleek finish without bulk.
7. Keep Gaming and Photography in Mind
If you’re a gamer or an aspiring photographer, specialized accessories can take your experience to the next level:
Gaming Controllers: Enhance mobile gaming precision and comfort.
Camera Lenses: Clip-on lenses for wide-angle, macro, or fisheye shots.
Tripods and Gimbals: For steady photos and videos.
8. Check Compatibility
Always ensure that the accessory you’re buying is compatible with your device. Pay attention to details such as:
Port types (USB-C, Lightning, etc.)
Wireless standards (e.g., Qi for wireless chargers)
Size and fit (for cases and screen protectors)
9. Set a Budget
Phone accessories come in a wide price range. Decide how much you’re willing to spend and prioritize quality over quantity. Investing in durable, high-quality products can save you money in the long run.
10. Read Reviews and Recommendations
Before making a purchase, check reviews from other users. Look for feedback on:
Durability
Performance
Ease of use

Final Thoughts
Choosing the perfect phone accessories doesn’t have to be daunting. By understanding your needs, exploring your options, and prioritizing quality, you can find accessories that enhance your smartphone experience and complement your lifestyle. Whether you’re looking for protection, convenience, or style, the right accessories are out there – waiting to make your life easier and more enjoyable.
1 note
·
View note
Text
Smart Mobile Lens
Enhance Your Creativity with Smartphone Lens Accessories

In today's era of social media and digital storytelling, recording moments has become a crucial aspect of our everyday routines. By using lens attachments for mobile phones, photography enthusiasts and professionals can take their skills to the next level, opening up countless creative opportunities without the need for a separate camera.
Compact, portable attachments for mobile phone lenses easily clip onto the camera lens of your smartphone, quickly improving its functionalities. Whether you are an experienced photographer wanting to enhance your equipment or a beginner wanting to capture amazing photos easily, these lenses provide unmatched versatility and convenience.
One of the wide-angle lens attachments for mobile phones that is widely loved by users is the wide-angle lens, enabling easy capture of vast landscapes, group photos, and architectural marvels. These lenses enhance the depth and dimension of your photos by widening the field of view, creating a visually immersive and striking effect.

Macro lenses completely change the game for macro photographers, allowing them to capture fine details and textures with exceptional clarity and precision. These lenses show us a hidden world of beauty, from delicate flowers to tiny insects, that is frequently missed in our daily lives.
Telephoto lenses are also a favored option for mobile phone photographers, providing improved zoom features to capture faraway subjects with striking clarity and sharpness. No matter if you're taking pictures of animals, sporting events, or urban landscapes, these lenses can zoom in on distant subjects, helping you to capture all the fine details accurately.
Besides these main types of lenses, mobile phone lens attachments are frequently sold in packages that contain fisheye lenses for unique distortion effects, CPL lenses for minimizing glare and improving colors, and also lens kits for specific types of photography such as astrophotography or portrait photography. Mobile phone lens attachments are small and simple to use due to their compact size and user-friendly design.
Shop Now - https://swevenworld.io/products/factory-direct-mobile-phone-lens-high-end-mobile-phone-set-lens-portrait-lens-mobile-phone-external-lens
1 note
·
View note
Text
10 Best Mobile Photography Kits For Beginners
Mobile photography has become increasingly popular in recent years, thanks in part to the advancements in smartphone camera technology. With the right mobile photography kits and a little know-how, you can capture stunning photos and videos with just your mobile phone. However, as a beginner, it can be overwhelming to know which accessories to invest in to enhance your mobile photography skills.That's why I've put together a list of the 10 best mobile photography gears for beginners, designed to help you take your shots to the next level. From tripods to external flashes, lens kits to power banks, these accessories are essential for anyone looking to improve their mobile photography game. So, let's dive in and explore these must-have accessories in more detail.
List of Best Mobile Photography Kits To Kickstart With
1. Tripod & Phone Holder

Benro Slim Travel Tripod Buy Now
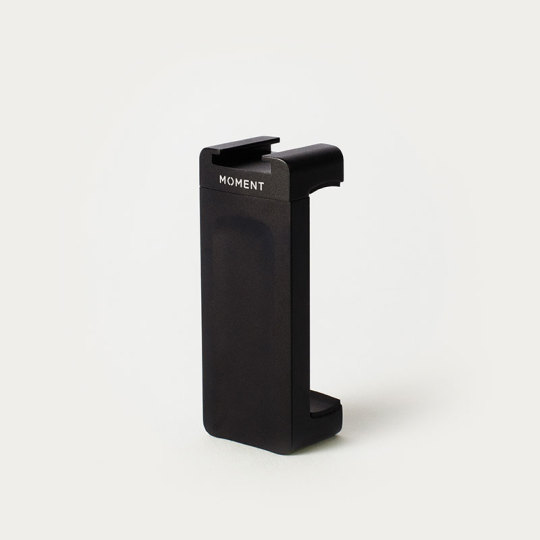
Moment Phone Clamp For Tripod Buy Now A tripod is essential for mobile photography because it helps keep your phone steady, which is especially important in low light situations. You can find tripods that are specifically designed for mobile phones, and they often come with adjustable legs and flexible heads for maximum versatility. You might also need a phone clamp for the tripod.The Benro Slim Travel tripod is the perfect solution for traveling with a tripod. It is compact, lightweight, foldable and features 3 leg positions and each leg can be positioned individually for uneven terrain. 2. Lens Kit
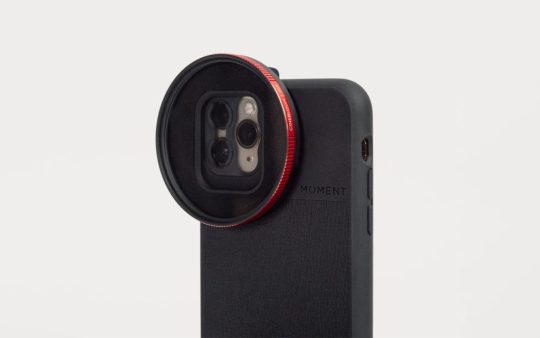
Moment Wide Lens 18mm Buy Now A lens kit is a great accessory for mobile photographers who want to expand their shooting options. These kits come with various lenses such as fisheye, wide-angle, and macro, which can help you capture a wider range of shots. 3. Shotgun Microphone

JOBY Wavo - Affordable Shotgun Microphone Buy Now The JOBY Wavo shotgun microphone provides outstanding audio quality in a small and compact design, making it an excellent choice for everyday use. It boasts a durable finish that can withstand the wear and tear of daily life. This microphone is specifically designed for vloggers who frequently switch between projects and need a versatile tool that can adapt to their changing needs.It is the perfect solution for capturing high-quality audio, allowing you to deliver an immersive and engaging experience for your audience. Whether you are filming interviews, events, or just recording your daily vlogs, the JOBY Wavo shotgun microphone will help you get the job done with ease and precision.With its exceptional capabilities, you will be able to produce professional-quality audio content that will captivate your viewers and keep them coming back for more. 4. Remote Shutter

Moment Bluetooth Remote Buy Now - A remote shutter is a handy tool that lets you trigger your phone's camera from a distance, which is useful for capturing group shots or self-portraits. Now you can use a remote with Bluetooth to trigger your mobile phone while take photos, best for night photography, astrophotography, landscape & portraits when using a tripod. 5. Power Bank

mophie Power Boost Power Bank 20,000 Mah Buy Now If you plan on taking lots of photos or videos, a power bank can be a lifesaver. These portable chargers let you recharge your phone's battery on the go, so you never have to worry about running out of juice. A 10,000 Mah is great for travel as some countries will have limit restriction when you are bringing a power bank on flight. 6. Gimbal
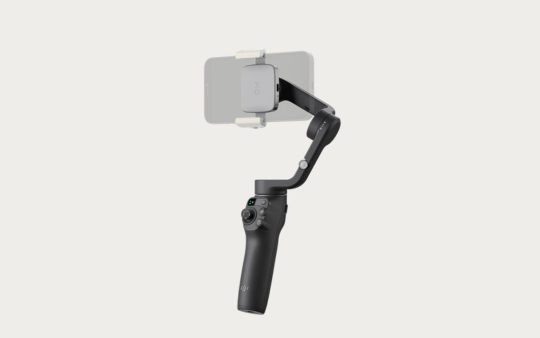
DJI Osmo Mobile 6 Buy Now A gimbal is a device that helps to stabilize your mobile phone to ensure your photos and videos come out steady and professional-looking. It's a must-have for anyone interested in mobile photography who wants to take their skills to the next level.A good gimbal will have multiple modes that allow you to capture footage in specific ways, such as following a moving object or panning smoothly across a scene. To complete your mobile photography kits, you may also need additional accessories such as lenses, a tripod, light sources, and memory cards.These additional parts will give you even more options to explore and express your creativity in different ways. Whether you're a professional photographer or just starting, a gimbal and mobile photography kits can help you take your mobile photography to the next level. 7. Portable Lighting

Aputure AL-MX On Camera LED Light Buy Now Portable lighting - Portable lighting can help you illuminate your subject and create a more professional-looking image. You can find small LED lights that attach to your phone, or you can use larger, battery-powered lights for more intense lighting. 8. CineBloom Filter For Mobile
Moment 67mm CineBloom - Phone Filter Bundle Buy Now CineBloom Diffusion Filters are complete game-changers for anyone looking to create cinematic footage that feels like a dream. Using these specialty glass filters, you can add a certain magic to your videos that are hard to replicate with any other tool.Unlike digital images, which can often appear too clinical or ultra-sharp, CineBloom filters help you achieve a more organic, film-like quality in your footage that truly captivates the viewer. If you want to create truly breathtaking visuals, these filters are a must-have for your mobile photography kits.They are available in a range of densities, including 10% and 20%, and are specifically designed to bloom light and soften hard edges, which ultimately results in a smoothing effect on skin tones, making wrinkles less noticeable. If you're interested, I recommend choosing the 67mm filters, as they are compatible with the Lens Filter Mount and the Phone Filter Mount, making them easy and more accessible to use. 9. Protective Case

Moment Weatherproof Mobile Lens Carrying Case - 4 Lenses Buy Now Protective case - Finally, a protective case is essential for keeping your phone safe and secure while you're out shooting. Look for a case that offers shock resistance and protection from drops, scratches, and other types of damage. This is a good investment for travel if you are looking to store mobile lenses, mobile filters, SD cards, portable SSDs etc. 10. Lens Cleaner

Moment Mobile Lens Cleaning Pen Buy Now Lens cleaner - Keeping your lenses clean is crucial for capturing sharp and clear images. A lens cleaner kit includes everything you need to keep your lenses free from dust, dirt, and fingerprints.
Final Thoughts About The Best Mobile Photography Kits
In conclusion, mobile photography has become an accessible and popular medium for capturing high-quality images, especially for beginners. With the right gear and a little bit of practice, anyone can take their mobile photography skills to the next level. From the 10 essential mobile photography gear we've discussed, a tripod, lens kit, external flash, remote shutter, power bank, gimbal, portable lighting, lens cleaner, smartphone holder, and protective case can make a significant difference in the quality of your photos and videos.If you are planning on delving into the world of photography using your mobile device, it would be advantageous for you to enrich your knowledge on the subject of mobile photography. The vast array of photography courses available online can provide you with an excellent opportunity to gain a deep understanding of the various techniques and strategies that can be employed by photographers to create stunning images using nothing but their mobile phones.By investing some time in educating yourself on this increasingly popular art form, you will open up a whole new horizon of opportunities to develop your skills in mobile photography, which will undoubtedly come in handy when you decide to finally start using your photography gears. So why not take advantage of the vast resources available online and reap the benefits of mastering mobile photography?Investing in these accessories can enhance your mobile photography and unlock your creativity, giving you more opportunities to capture beautiful moments and memories. So, start building your mobile photography kits with these essential accessories and take your mobile photography to the next level!I hope this best mobile photography kits guide has been helpful in introducing you to the essential mobile photography gears for beginners. With these accessories, you'll be well on your way to capturing stunning photos and videos with just your mobile phone. Remember, practice makes perfect, so keep experimenting and refining your skills. Thanks for reading, and happy shooting!* Please be advised that this post is not in any way endorsed or sponsored by Moment. I would like to mention that links provided for purchasing purposes may lead to me earning a commission. I am grateful for your continued support and appreciation for the content I produce. It helps keep this blog active. Read the full article
0 notes
Text
The Best Accessories for Your iPhone 14 Pro: Enhancing Your Device's Functionality and Style
The iPhone 14 Pro is the latest and greatest smartphone from Apple, and as with any new device, there are a plethora of accessories available to enhance its functionality and style. Whether you're looking for protection, convenience, or just a way to personalize your device, there are plenty of accessories available that can take your iPhone 14 Pro experience to the next level.
First and foremost, it's important to protect your investment with a high-quality case. The Yandex Design Case for iPhone 14 Pro is a great option for anyone looking for both protection and style. This case is designed to provide maximum protection against drops, scratches, and other types of damage, while also adding a touch of personality with its unique design options.
Another essential accessory for the iPhone 14 Pro is a screen protector. A screen protector can help prevent scratches and cracks on your device's screen, which is especially important considering how much we rely on our smartphones for everything from work to entertainment. The Spigen Tempered Glass Screen Protector is a great choice for those looking for a reliable and high-quality option.
For those who love to take photos and videos with their iPhone 14 Pro, there are a number of accessories available that can enhance the device's already impressive camera capabilities. One popular option is the Olloclip Pro Lens Set, which includes a range of lenses for different types of shots, including wide-angle, macro, and fisheye.
In addition to photography accessories, there are also a number of audio accessories available for the iPhone 14 Pro. One standout option is the Bose QuietComfort Earbuds, which offer noise-cancellation technology and exceptional sound quality for music, podcasts, and phone calls.
For those who are always on the go, a portable charger is a must-have accessory for the iPhone 14 Pro. The Anker PowerCore 10000 is a reliable and compact option that can provide up to three charges for your device, ensuring that you never run out of power when you need it most.
Finally, for those who are looking to personalize their device and add some style, there are a number of unique and fun accessories available for the iPhone 14 Pro. The Casetify Custom Phone Case allows you to create a custom case using your own photos or artwork, while the PopSockets PopGrip provides a convenient and stylish way to hold your device.
In conclusion, the iPhone 14 Pro is a powerful and impressive device that can be enhanced even further with the right accessories. From protection and convenience to personalization and style, there are a wide variety of accessories available that can take your iPhone 14 Pro experience to the next level. Whether you're looking for a high-quality case, a reliable screen protector, or unique and fun accessories, there's something out there for everyone.
1 note
·
View note
Text
Metamy Prompt for the Week event

Prompt:
In the Classic Dimension, Sonic has discovered that Dr. Robotnik has collected ‘Phantom Shards’ that carry the same basic principle abilities as the once intact Phantom Ruby. However, seeing how unstable they are apart, he’s created a gooey substance that puts it’s trapped target to sleep and creates their dream-clones!
Wanting to target Sonic’s friends, Dr. Robotnik places them into a sleep that the Phantom Shards then make into their worst nightmare!
Fighting off these nightmarish realities, Sonic has successfully awakened Tails through a data-bit thunderstorm zone, dodging bolts as they try to electrocute him.
Faster than sound also means speedy close-calls, and Sonic learns from rescuing Tails that his friends’ greatest dreams seem to be the key to destroying their nightmares.
For Tails, he had to believe in himself, that he could be just as brave and cool as Sonic was as a hero.
This desire manifested as the X-Tornado, that ghost-piloted Sonic towards the antidote after defeating a flying Egg-boss.
After taking the antidote, Tails awoke and immediately began looking into these Phantom Shards, and their antidote for waking up.
Sonic also saved Knuckles, who’s nightmare was failing in protecting the Master Emerald, leading to the end of the world. Dr. Robotnik greatly underestimated the Phantom Shards power, and as the world fell into chaos, Sonic discovered Knuckles’s greatest dream was to create world peace.
This manifested as the Chaos Emeralds and the Master Emerald giving Sonic the necessary power to turn Super, even if they were just dream-clones of the actual emeralds.
Saving the day yet again, Sonic was surprised to learn Dr. Robotnik still had one prisoner left over... and could fathom who that could be...
Sonic darted into the room and the metal doors quickly slid shut, he looked to see that from the far right corner was what appeared to be like a giant water chamber that resembled the steampunk diver’s suit head.
He saw Rosy the Rascal floating in her sleep within the goo... much like his other friends.
He zoomed up to the glass and began banging on it, trying to look in more but a strange optical illusion was keeping him from seeing her well enough.
Then... flying down directly behind him... was Metal Sonic.
Sonic turned around and put his fists up, but Dr. Robotnik came down from a chute with... Another Metal Sonic!?
He laughed his typical way, then seemed to state that Rosy’s worst nightmare was indeed, Metal Sonic!
He stated that Sonic may have defeated his greatest creation previously... but two of them!?
Phantom Metal Sonic and Metal Sonic then spread out to come at Sonic from different angles, and it was a tricky fight to maneuver.
However, Classic Doctor Robotnik wasn’t able to predict the feuding robotic spirit that the real Metal Sonic had. Wanting to be the one to fight and end Sonic, it would constantly get cut-off or crash into the Phantom dream-clone, causing Sonic to wind around them and set-up some intercepting collisions.
He defeated the real Metal Sonic, having had a miniature explosion that knocked him to the right into some consoles... making him slide his metallic, heavy body off and hang with his arms still crooked up on the consoles but his head down.
The dream-clone of Metal Sonic was also looking like it’d short-circuit... twitching in the with sparks, but glared menacingly over to Rosy’s water chamber.
Without the antidote, she would remain asleep... and taking her out of the goo with the Phantom Shards inside would be risky... So Sonic didn’t see this coming.
In a last effort to remain permeant in this reality, Phantom Metal Sonic dived and slashed open the glass fisheye effect of the holding water chamber, gushing out the goo that Sonic had to dodge, least he’d be put under a sleep paralysis as well.
Dr. Robotnik started biting his nails, faking his concern for Sonic, before laughing at the predicament he was now in.
Rescue the girl and risk falling to the Phantom Shards’ nightmares? Or continue fighting a never-ending struggle?
Sonic had to think fast, grabbing the Miles-Electric that Modern Tails had gifted him, he remembered that Modern Tails had told him he had an ‘app’ of sorts that could reprogram one Eggman robot to do one specific task. But it would only work for a short period of time.
Looking to see the real Metal Sonic struggling through sparks to rise and fight again, he rushed over to him and turned the Miles-Electric upside, clicking the app and quickly typing in his commands with his tongue out on the other side of his mouth.
A lightning static traveled between the two orbed points, and he shoved this into Metal Sonic’s head, the electric waves now traveling through his metallic shell and into his computing processes.
Enraged at the ‘cheating’ Dr. Robotnik hollered and stomped in his Eggmobile, seeing Metal Sonic retrieve Amy from the Goo and wipe it off her.
In his eyes, Tails’s logo showed the downloaded processes completed, and he stared at her as though wondering what he was doing.
She looked so small and frail in his arms... immediately, he accessed what his new programming was.
The timer was set... and the command: Be her replacement hero while I’m busy, help her to learn to rely on her own abilities but with your aid, protect and make her unafraid of you anymore.
He was twitching at the loathsome command, the new objective was so humbly sickening.
Of course this frail creature should fear him!
He felt his claws twitching before finally, Sonic sped over after distracting the dream-clone and held her, showing he was still actively fighting but glared back at the dream-clone.
The Phantom Metal Sonic suddenly stopped and began to shake again, finally exploding as he saw Sonic protectively shielding her.
In a humorous quip, Dr. Robotnik concluded that Rosy’s greatest dream must be that ‘Love conquers all’ and then opened the metal doors for Sonic to come and face him... The greatest of all fears!
Sonic rolled his eyes, watching him disappear up the chute and then handed Rosy back to Metal Sonic, giving Metal a condensing pat on his heat as though rubbing in the harsh truth of his new servitude to her.
Absolutely unacceptable..!
Sonic took off as Metal Sonic was left to babysit the sleeping girl, and his face revealed every bit of malice he felt towards the situation...
For the first few minutes, he just monitored her heart beat.
In the next, his eyelids began to soften from their cold-stare and turn to a neutral look as he noticed her getting cold and began to regulate a heat through his engine, making sure not to scratch her as he did so, but heating her soggy form up to dry.
When she sneezed in her sleep, he felt his whole systems freak out as her heart momentarily adjusted to the increase in body pressure and decrease blood flow back into it.
Even though it was a mili-second of change, the fact that her body’s output had slightly altered sent him into a panicked frenzy.
Not knowing how to handle that, and seeing she was back to recovering health and stable levels, he lowered his eyelids as though frustrated with the fact that now... this once ‘greatest creation’ that could compete with that of even Sonic, invented to be the better of his organic trash, was suddenly now the nursemaid.
Infuriating!
She breathed lightly.
Insulting!
He adjusted her headband that was slightly slipping off from the slippery goo in her quills.
... Revolting...
He lightly pushed her up more towards his chest so she wasn’t sagging limply in his arms, and giving her the heat necessary for her chest and the rest of her clothes to dry and stay warm.
... Pathetic little thing...
He sharp, silvery claw shone as he lifted it to her bangs, moving them with a waft to the side.
He recounted the humiliating memory of another instance, where he had crashed into a sliding metal door while Sonic had successfully made it to her, tied up and hanging from a pole.
His sharp quills had freed her at once with a low-turning spin-dash, and she had hugged him in gratitude while Metal Sonic was incinerated by a frustrated Eggman.
His memory was downloaded into another Metal body, upgraded but relatively looking the same.
... And yet, Sonic didn’t want to burden himself by taking her along to fight Eggman.
He even chuckled at the scene of Metal holding her.
He wanted her to conquer her greatest fear... Him.
Metal Sonic looked up a moment, his new programming trying to come up with ways that she wouldn’t be afraid of him anymore.
Although he didn’t like the programming, nor any living-organism,... he still contemplated ways to achieve his newly downloaded goals.
Sonic finally returned, and as he did, gave Rosy the antidote.
Upon waking up, she was teetering, but her enthusiasm over Sonic’s face made her want to run to him. Instead, she lunged forward and Metal Sonic had to catch her before falling.
Once her eyes adjusted, she noticed Sonic still chuckling with a hand over his mouth as her eyes blinked over to being in Metal Sonic’s hold...
She immediately summoned her hammer and started to bash him.
Sonic takes off as Rosy tries to follow him, still scared and whining out about the loyal, puppy-like Metal Sonic tagging along behind her, but when he knocks one of Eggman’s missiles away from hitting her... using all his jet-strength to propel it in a new direction... she stood amazed.
He flew down to her and just stared at her...
She tried to walk back but he zipped at sonic-speeds to place his hand to her waist and pull her back.
She blushed in fright but looked back to see him pointing to a muddy puddle, showing she would have stepped in it.
He let her go as she marveled and covered half her face with her hands... bundled into fists at her shyness.
She begins to defend herself and learn how to fight the Eggman robots while under the careful, chaperone eye of Metal Sonic.
As she runs up a loop-de-loop, he’s there to assist her.
When she swings and misses a robot, he annihilates it before she can open her eyes, so she believes she hit it and destroyed it.
With her confidence rising, she learns self-reliance, and finally catches up to Team Sonic as they prepare for the last few zones of battle.
Dr. Robotnik put himself into the dream-goo, so his greatest dream might come to pass! Switching the concoction around, his Phantom Empire was glitching into existence everywhere.
Metal Sonic didn’t mind...
But his eyes turned to Rosy, who was fearful of these images...
He immediately decided he didn’t like it, and glared threateningly towards the metal statues and structures.
However... He didn’t notice the timer... had finally concluded.
Not wanting to leave her side, he fought as the Eggman objectives began to successfully override Tails’s software update, and rebooted him.
As he stepped away, hoping to move as far away from Rosy as possible, he gripped his head as Eggman’s logo began to flash and show the rebooting process downloading up.
When the others realized this, Rosy threw out her hand, stopping them. She wanted to be the one... to defeat him.
It was emotional, seeing the once helpful friend turn into a fierce, villainous robot once again.
But she wasn’t afraid of him anymore.
She couldn’t deal the last blow, and as she fell to her knees and cried over his sparking form, he lifted a metallic claw up...
Sonic quickly moved her out of the way of his attempted slash, as his claws lengthened to try and deal further damage to her.
Rosy softly cried as Sonic moved away from her, spun to give one last finishing blow and kicked him into the sky.
As he exploded, Rosy reached out to him, crying out as Tails and Knuckles had to hold her back.
She was so saddened to see him go... she vowed that if she ever found a nice robot, she could preserve it, no matter what the cost.
Her outstretched hand... withdrew into a shaking fist, full of conviction.
She wasn’t afraid of robots anymore...
She wanted to help them.
Although Metal Sonic had reverted back to his original form, forgetting all about their adventures together... her silent knight in dark blue, metallic armor that would let her practice in safety... swinging her hammer... as he then almost swiped her away after his programming changed...
She sobbed quietly into her hands, still shaking in anger at how Eggman could create such terrifying robots... but amazed at how Tails could reinvent them into loving friends.
“You really shouldn’t have made him so nice, Sonic. Then, Rosy wouldn’t have formed such a strong attachment to him.” Classic Tails commented, putting his hands to his hips and leaning towards the culprit.
Sonic just shrugged, looking back at Amy and wanting to comfort her, but feeling that she needed to cry over it a little bit longer.
Metal Sonic had completed his objective, after all... and Sonic smiled to see that, but quickly frowned as he closed his eyes, folded his arms, and waited for Rosy a distance away...
She balled over Metal Sonic’s deactivated head... unable to, in the end, part with it.
It took several minutes... and some could argue, still more time later for her grief to mend… but that’s where her love of reforming others came into play, along with her independence... she would never forget when she first got so excited over completing the zone that she reached a fist up for a light pound of comradery.
Realizing he was her greatest fear though, she hesitated and pulled back slightly, but he immediately, robotically, advanced up to her and without blinking or removing his eyes from her, directly faced her and lifted his own hand up.
Slowly, he curled every finger into a fist and lightly knocked her bundled hand in the show of ‘Good job, congrats on your first--kinda--solo run.’
She would never forget it... and holding her hand close to her heart... she would never forget what lessons it gave her.
About robots. About people...
She looked to Sonic, who--as though sensing her inquisitive gaze--looked back over his shoulder at her...
Some robots could be even warmer than people...
#MetamyShipWeek2020#metamy#cutegirlmayra#metal sonic#metal sonamy#rosy the rascal#classic amy rose#metal x rosy#metal x amy#metal sonic and amy rose#metamy prompt#metal sonamy prompt
81 notes
·
View notes
Text
Buy Latest Mobile Camera Lens To Take Your SmartPhone Photography To Next Level. So Grab Your SmartPhone & Shoot Like a Pro with a wide range of Wide Angle, Fisheye & Macro Lens.
#camera#camera lens#SmartPhone#Photography#landscape#landscape photography#nature#photography#buy camera lens#mobile camera lens
2 notes
·
View notes
Text
HND1 Photography Exercise: Perspective Control
Tutorial on how to make the corrections in Lightroom:
https://www.youtube.com/watch?v=IOo07bs-bCw
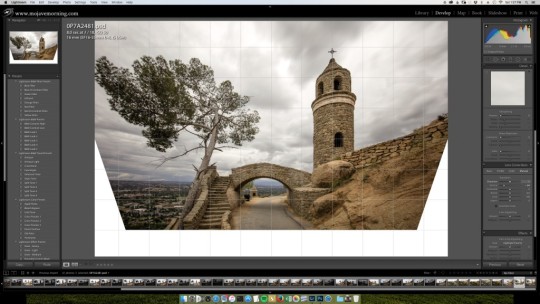
Question: Image 1 shows BARREL distortion
Barrel distortion
In barrel distortion, image magnification decreases with distance from the optical axis. The apparent effect is that of an image which has been mapped around a sphere (or barrel). Fisheye lenses, which take hemispherical views, utilize this type of distortion as a way to map an infinitely wide object plane into a finite image area. In a zoom lens, barrel distortion appears in the middle of the lens's focal length range and is worst at the wide-angle end of the range.
Question: Image 2 shows PINCUSION distortion
Pincushion distortion
In pincushion distortion, image magnification increases with the distance from the optical axis. The visible effect is that lines that do not go through the centre of the image are bowed inwards, towards the centre of the image, like a pincushion.
Question: How can you avoid distortions?
To avoid shooting with an extreme wide-angle lens. Back up if you need to get more of the subject into the image. Keep any straight lines in the image as close to the center of the lens as possible. There will be less distortion toward the middle than there is on the edge.
In Lightroom
After you import the photo into Lightroom, decide if the distortion is distracting and needs correction. At this point, you should also make sure the photo is level, because applying the corrections is difficult if the photo isn’t level.
In the right hand side of the Lightroom Develop module is a panel called “Lens Corrections.” This is where we do our fixing.
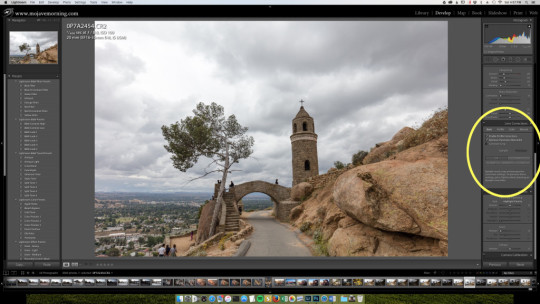
The module has four tabs called “Basic,” “Profile,” “Color,” and “Manual”

The Basic tab works best if your lens is a fairly common one that Lightroom has a profile for. It automatically corrects barrel and pincushion distortion (not vertical distortion, which is only created by how the camera is pointed,) as well as vignetting. Select “Enable Profile Corrections” and “Remove Chromatic Aberration” to get rid of some common distortion and color fringing.
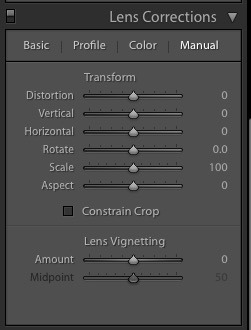
We’re interested in the Manual tab. Click on that; new controls appear.
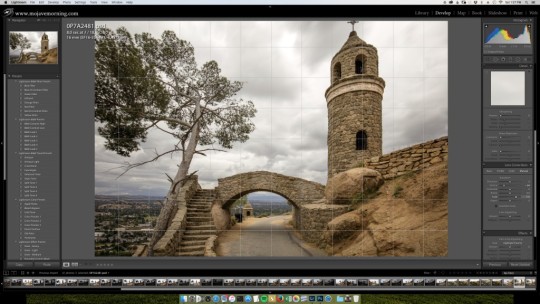
To address vertical distortion, we’ll use both the “Vertical” slider and the “Scale” slider. Slide the Vertical slider and notice how a grid appears over your photo; the vertical distortion can be adjusted to extremes in either direction.
Adjust the “Vertical” slider until vertical elements in your shot look vertical, or until you like the look. Use the gridlines that Lightroom has superimposed on your picture to guide your choices. Notice that a lot of white space has opened at the bottom of the shot where Lightroom has pushed pixels away from the edges in order to fix the distortion.Use the “Scale” slider to enlarge the image until the white space disappears. Alternately, you can address the white space in Photoshop.
Practice; correct the perspective using your favoured option and have it ready for the next class
0 notes
Text
Blender VR Tutorial for v2.79

My old tutorial for rendering VR in Blender has turned out to be one of my most popular posts, and hopefully has helped other artists get into VR. I’ve learned a good few things in the intervening months (although I still consider myself a n00b) with Blender, and Blender 2.79 has brought some very useful new features too that have let me halve my render times, so I think this is overdue for an update.
1. Setting up Blender for VR
This tutorial will assume you’re already familiar with the basics of Blender’s user interface, although I’m still fairly new to it myself, so I’ll keep it simple. It will also assume you have Blender 2.79. Seriously it’s an awesome upgrade from previous versions so go download it now! Many artists have been using betas of it for months because of the new shaders and the very convenient denoising feature. The great thing about Blender for VR is that it’s Cycles render engine offer full support for most common VR rendering formats. Your can render 180 or 360 stereoscopic videos using absolutely no software other than Blender, with a fairly simple workflow and a high level of control. First, let’s put some of the basic render settings in place. We’ll come back on those when it’s time to render, but it’s much better to have them set up right from the start of your project to avoid some headache.
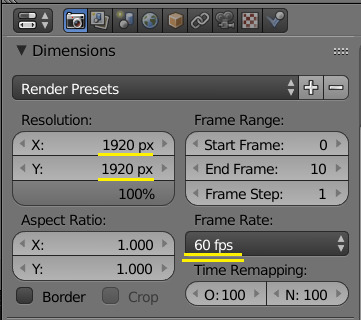
The resolution here will be your resolution per eye. I usually go with 1920 x 1920 for 180-degree video because that’s the max resolution most live-action VR makers use, but you can go even higher if you want. For 180° video you want a square aspect ratio so you can use any other resolution you like but don’t go much lower than 1000 x 1000 or the VR effect will cease to work well. If you’re planning to make a 360° video instead, your aspect ratio should be 2:1. Simply doubling the X resolution to 3840 will give you close to 8K total resolution (4K per eye), I don’t think many systems can play that well - although we’re starting to see content at that resolution . Personally I think 2000 x 1000 per eye is a reasonable resolution for 360, but you won’t have the same visual sharpness as in a 180 ° video of course, so consider carefully whether the experience you want to deliver needs a 360 ° field of view. Very Important: Set the frame rate to 60 fps. Do this right from the start of your project if able. Although I think the PSVR can’t play more than 30fps, 60fps is a must for comfortable VR viewing on other platforms. And it’s much easier to resample down to 30fps later than it is to go the other way around. If you’re working with an existing scene that’s been animated at a different frame rate, you can use time remapping - however if you’ve got any particle effects or fluid sims in the scene, they will be irrevocably broken - no easy way around that. It’s also very buggy if you want to make changes to your animation with time remapping activated. For example for a scene that’s originally 24fps, change the FPS to 60, then under time remapping, set O:24, N:60. Then you need to change your start and end frames: Just take the original frame numbers and multiply them by 2.5 (60/24). You can type the formula directly in the cell. With that out of the way, let’s activate stereoscopic rendering:
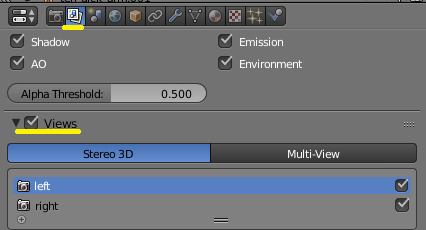
Go to render layers, then tick Views and choose Stereo 3D. You now have a left and right view. Now select the camera you want to work with, set it as the scene camera and let’s set it up for VR.

First, under Lens / Perspective option change the field of view to 90°. This won’t actually change anything in the final, rendered images, but the camera previews in your viewport will be a lot closer to what you’d actually see in the goggles so it helps a lot when positioning your camera later.

Next, change your lens to Panoramic, this is where all the really important settings are. My own usual settings are pictured above but let’s review them one by one. Type: Equirectangular is the most widely supported type of view for both 360 and 180 degree videos. Some 180 degree videos use fisheye instead (most SFM videos do) but I prefer equirectangular myself as it makes use of your full video window whereas fisheye leaves the corners dark, so you’ll get slightly sharper images overall for the same video resolution. Latitude / Longitude: Set latitude to -90 / +90 and longitude to the same for 180-degree video, or to -180/180 for 360 video. Make sure you’ve set up your resolution and aspect ratio accordingly in the previous steps. Clipping: If you’ve got some stuff moving right under the “nose“ of your camera, it might get clipped through so reduce the start value to 0.1 or even less. In VR you want to be pretty close to the action. Stereoscopy: There are three modes you can use. Off-axis is what I use almost all the time. With off-axis the two cameras converge along a plane at a set distance in front of them. It’s the default for all 3D applications really Parallel is good if you’ve got some distant objects where you still wnat to have 3D effect and nothing too close to the camera. Toe-in is good I think if you’re doing a 360 video and you’ve got stuff happening very close to the camera in all directions. Works somewhat similarly to Off-axis. Convergence Plane: (Off-axis / Toe-in only) This is how far away the stereo cameras converge. This should almost always be 30x you interocular distance (see below) Interocular Distance: The default value is the human average: 65mm. You do not need to change that unless your scene and models aren’t scaled to normal human size in Blender. Then you can use this to cheat: if your models are 3x too big, multiply this by 3 too. Artists rarely worry about sizing their models and scene correctly because it has virtually no effect unless you render things in 3D. I feel like cheating in this way makes some of the resulting scenes look slightly weird, but that might just be me. Spherical Stereo: This might be useful for 360 videos, but otherwise should be disabled.
Pole Merge: Usually disabled This gradually reduces the eye separation (stereo effect) as you look up and down at extreme angles. You only need to use this if there’s stuff happening directly above / below the camera and you find that the eyes cannot focus on that properly no matter what you do. Finally, at the very bottom of camera settings, make sure your depth of field is disabled: Aperture set to 0.
2. Setting the scene
Laying out a scene for VR is very different than traditional 2D work. This is hardly an exhaustive list, but here are some common considerations and pitfalls to avoid to make the best out of your VR scenes.
FPS: I’ve said it before but high FPS are hugely important for a good VR experience. Set this to 60 from the get go if possible.
Size Matters: That’s what she said, eh. It’s a common pitfall to animate a whole scene, spend days rendering it for VR, put the goggles on and only then you figure out that your models are giants and you’re just a tiny ant observing the scene. While this can be fun to play with if you know what you’re doing, it’s disastrous if you don’t. Right as you start to set up your scene, make sure your models are human-sized. A quick way to do that is to spawn a human metarig and scale them so they’re roughly the same size. Even better, look up how tall your character is supposed to be, and scale her to exactly that. Models imported from SFM need to be scaled down to 0.027 in Blender. Grab them in Object mode, then hit Shift-C to center your cursor at 0, then [S], [.], [0], [2], [7]. to scale down to the exact value. Finally use Shift-A to apply the scale transform. I’ve also seen some models that are exactly 3.28 times bigger than they should be. I suspect Imperial units are to blame. If all else fails and your scene is already set up with the wrong scale, you can cheat and adjust the interocular distance as indicated in the last chapter.

Here I have a scene with a 6-meter tall d.Va. She should be just 1.6 or so, so I’ve multiplied the interocular distance by the size ratio.
Camera Viewport: After you’ve enabled stereoscopy, your camera viewport may change to an ugly red-blue display. To get rid of it press N to bring up the side menu, and under Stereoscopy, choose either the Left or Right eye. You might want to change from time to time to make sure the field of view is unobstructed for both eyes. You can use the check boxes below to display both cameras, so you’ll see where each “eye” is, and to display the convergence plane described in the last part. The slider is the opacity of the plane.

Positioning the camera: You need to position the camera a lot closer to the action than you’d do with a regular, narrow-angle camera. Both your video resolution and that of the HMD are limited, so if you want the viewer to catch details, you need to be fairly close to them. If you’ve set the camera FOV to 90° in the previous chapter, your viewport should give you a decent preview of what the scene will look like with the goggles on.

Varren buddy seen through a regular 40° FOV camera.

Without moving moving the camera, I’ve changed the FOV to 90°. Not only my buddy looks tiny now, but I’m also seeing some objects that I wasn’t supposed to. I need to rework my lights system.

That’s a bit better. I’ve moved my camera forward to about 1 meter from the Varren’s head. I could get even closer for detail but he just ate a pyjack and I don’t want *that* much detail.
Keep in mind that what you see through the camera viewport is just what the viewer will see when looking straight forward. If he turns his head around, he’ll see more stuff - especially if you’re rendering in 360.
If you get closer than 50cm from any object, the eyes will start to strain a bit to focus on it. You can balance that a bit by moving the camera’s convergence plane closer. Experiment on still renders to see what works. Experiment with that, if it’s well done moving objects close to the camera so they appear to touch the viewer’s head can be extremely immersive - it just takes a lot of trial and error to get it right.
Movement: It’s safest not to move your VR camera at all to avoid causing motion sickness. Rotation especially should be avoided - the viewer can usually just turn his head around. However a bit of motion can actually improve the immersion as long as you keep it slow and steady. If you’re doing a POV scene where the viewer’s head is moving a bit you can use constraints to have the camera follow the head, but not rotate with it.
Keep your camera’s Z rotation at 0 if able. I’ve had problems in the past when the camera was tilted sideways, it made objects impossible to focus on unless I also tilted my head sideways. It might be linked to some other settings, but just zero out the Z rotation to be safe.
Eye contact is one of your best tricks. Try to establish and keep it if your scene lends itself to it. It’s a staple of live-action VR erotica and for good reason. Most blender models have their eyes rigged with a view target. If they don’t you can try and use track to constraints but it’s a bit trickier.

Some cozy time with Ciri (credit: dudefree). Great use of lighting and eye contact there. Realistic movements of her hair and medallion add to the immersion.
Lighting: so, those 20 lights you added in to make sure every piece of your scene was subtly enhanced… great artistic work, but it’s going to kill your render times. Keep your lights setup reasonable. Getting the perfect backlight isn’t quite as important for VR. Lighting is often used to bring forward the geometry of a scene, and give the illusion of 3D. But here, you’ve got the real thing, or almost! You don’t necessarily need all the subtle shadow plays. On the other hand, setting the atmosphere is just as important in VR, and clever use of lighting can do just that.
Be very careful with glossy and transparency shaders. They don’t seem to work quite right in VR- the reflections are a bit off between the two eyes and will make it hard for the eyes to focus on the object. Again, experiment and do test renders to see what works.
Preview Runs: Unfortunately, VR will make little details stand out so you may find problems with your scene that you never did before. Clipping issues you’d never have noticed otherwise can become huge, jarring problems. Do plenty of test renders before you commit to rendering the whole animation. Unfortunately OpenGL doensn’t let you do preview renders for VR, so you’re stuck with Cycles for now. What I usually do before starting the full render of an animation is to do a run at 60-70% resolution, very low sample count and just one frame out of 5. Or sometimes I’ll just render with the final settings but one frame out of 10 or 20. This way I won’t have to re-render that frame when I do the final video.
3. Optimizing
The good news is, this whole section from my previous tutorial is now almost entirely obsolete with Blender 2.79. Yes, that is good news. You can still expect render times in the days or weeks for some videos, but it’s a huge improvement over 2.78. As a consequence I’m cutting out a lot of settings from the old tutorial that don’t really matter so much anymore. Let’s focus on the essentials.
Turn on GPU rendering: If you can and haven’t already, this is a must for rendering moderately fast in Cycyles. This is found under User Preferences / System: Choose CUDA for NVidia GPUs or OpenCL for AMD cards. The good news in 2.79 is that the once terrible OpenCL support has been improved to the point where the newest AMD cards actually outperform their Nvidia peers by a large margin. Quite the reversal.

Select CUDA or OpenCL under User Preferences > System. Save User Settings

Go back to render settings and make sure GPU compute is enabled.
Denoising: That’s the big new feature of 2.79. It’ll smooth out all the fireflies and dark spots that used to mar cycles renders in older versions. I’m no expert on image quality but it looks to me like the loss of detail is minimal. That means we can now afford to render scenes at much lower sample count and still have them free of noise.

To enable denoising, go to render layers and tick the corresponding box. Default settings have worked fine for me so far. If you have more than one render layer, apply it at least to your main layer.
Render settings: This part requires a lot less trial and error with denoising on. These days I render almost all scenes with 100 samples and default values for the other parameters. You can increase the sample count if you’ve got some very complex plays of light going on, but otherwise 100 samples will give you good detail and no noise.

Un-check square samples or your 100 samples will instead become 10 000.
4. Rendering
The last thing you want to set up before rendering is the output. You want to output as an image sequence absolutely. It takes me 5-6 minutes to render a frame, so at 60 fps even a short clip is likely going to take you days, so you want to be able to interrupt it and resume it when you want to.

Still on the render panel, choose JPEG or PNG with minimal compression. Un-check overwrite: this way if you’ve already rendered some frames, it won’t re-render those - this way you can resume an aborted render. Then, pick Stereo 3D (both images in one file). 180 degree videos are usually laid out side-by-side, while 360 are top-bottom. Either will work on most players, it’s just a matter of convention.
That’s all the settings done, now you can it that big Alt-F12 button as you’ve been itching to for the last hour, right? right?

SAVE your scene first! You’re about to start rendering for a loong time and a lot can go wrong. Imagine rendering half a scene in a couple days, then your computer crashes - so you reopen the file and resume rendering, except you didn’t save your latest changes so you’ve rendered half of the video with different settings. Happened to me. Ok. NOW you can go for it. See you in several days.
5. Encoding
Barring any disasters during the render process, you should now have a few hundred rendered stereo images. You can already load those up into a VR viewer and check them out one by one. You have several options to finish up the process. Again the cool thing about Blender is you can do all that in Blender’s own video sequencer. Add a sound-track, a few effects even, overlay a logo - Blender can do all that and much more. However I don’t use Blender anymore myself for encoding as I found I other solutions can give you better encoding quality, control, and access to more formats. A few of your options are:
Output from Blender in uncompressed AVI then use Handbrake to re-encode in the format of your choice.
Load up the image sequence in VirtualDub and encode from there.
Use some pro / enthusiast video editing solution such as Premiere.
In any case the questions you need to ask yourself are going to be the same. What formats to output to so that my videos are viewable on a maximum of platforms?
Now I do my high quality encodes at eiher 4000x2000 or 3840x1920 (1920x1920 per eye), 60 fps. The latter is the resolution most live-action VR erotica makers release at. I encode using H264 coded, 2-pass encoding, min bitrate 30000, max 40000 and maximum render quality settings turned on. That will work fine on Vive, Oculus, GearVR and other high-end HMDs. Finally the video is saved in MP4 format, with AAC audio. I then do another render at 2160x1080p, 60fps, as that is the maximum resolution iPhones can play, and works well enough for most other platforms. This is also encoded in H264, 10k bitrate. From what I’ve read, PSVR should be able to play as high as 3200 x 1600 resolution, so it could be worth it to do an encode run at that size too. I usually loop short animations several times at this point because many VR video players don’t handle looping well.
6. Viewing
Nothing to do with Blender at this point, but it bears repeating. Lock the door before viewing VR erotica. You’ll be entirely unaware of your surroundings for an extended period. Viewing regular porn, someone can walk in and catch you at an awkward moment. Viewing VR, someone can walk in, film you and post it on your own Facebook before you’re aware of anything. Hm, not that this has ever happened to me.
If you’re new to this, Virtualrealporn has a pretty comprehensive guide on how to watch VR movies on every existing platform.
Personally I use Simple VR Player on my HTC Vive, a paid app but well worth the money. Otherwise the free version of Whirligig will do the job, but the UI is a mess.
I also use a no-name VR headset for smartphones I got for free from a phone shop promo. It makes for a surprisingly comfortable (and wire-free) experience. Of all the VR players available, the three that seem to do the job best for me are AAA VR Cinema, VaR’s VR Player, and VR Player Free. Neither is perfect but they get the job done and play smoothly. That’s all! Major props to Likkezg for sharing some of his Blender wizardry with me, and to everyone else who came to me with feedback on my work, I’ve been learning something new every day thanks to you guys.
39 notes
·
View notes
Text
Canon EOS Rebel T6 DSLR Camera Kit, EF-S 18-55mm is II Lens, EF 75-300mm III Lens, RitzGear Wide Angle, Telephoto Lens, 64GB and Accessory Bundle
Price: Make sure this fits by entering your model number. (as of May 15,2020 00:50:14 UTC – Details)

Product Description


Canon EOS Rebel T6 DSLR Camera Kit, EF-S 18-55mm is II Lens, EF 75-300mm III Lens, 64GB Memory Card and Accessory Bundle

Wireless Takes EOS Rebel to The Next Level 18 Megapixel (APS-C) CMOS sensor Built-in Wi-Fi EOS Full HD Video Hybrid CMOS AF III Fixed LCD Monitor High-speed continuous shooting Advanced Scene Analysis 9 cross type AF points Fun Creative Filters The camera with the quality your photos deserve, the EOS Rebel T6 can be ideal for smartphone or digital point-and-shoot camera users looking to step up their imaging game. It’s equipped with an 18.0 Megapixel CMOS image sensor and the DIGIC 4+ Image Processor for highly detailed, vibrant photos and videos even in low light. Whether you’re out on an adventure hike or snapping candids of your friends during a late night out, the EOS Rebel T6 can help you take photos you’ll want to show off.
Kit Includes

Canon EOS Rebel T6 Digital SLR Camera Kit with EF-S 18-55mm f/3.5-5.6 IS II Lens (Black) Canon EF 75-300mm f/4-5.6 III Telephoto Zoom Lens for Canon SLR Cameras Canon 100ES Compact Gadget Bag 58mm .43x HD Wide Angle Lens With Macro Attachment + 2.2X HD Telephoto Lens Travel Kit 50″ Photo / Video Tripod 58mm 3 Piece Filter Set (UV, CPL, FLD) Pro Slave Flash Includes Mounting Bracket Lexar 64GB SDHC UHS-II Memory Card Vivitar 7-Inch Flexible Tripod with Flexible, Wrapable Legs, Quick Release Plate and Bubble Level High Capacity LPE10 Rechargeable Lithium Replacement Battery Wired Remote Control for Canon Camera Cleaning Kit Ritz Gear OTG USB / Micro USB Multi-Function SD / MICRO SD Card Reader / Writer For PC, Tablet and Smartphones Universal LCD Screen Protector, Memory Card Wallet and Lens Cap Strap
Camera Features

18-55mm Lens The included lens provides a 28.8-88mm equivalent focal length that covers wide-angle to portraits to cover the majority of photographs. The lens also features image stabilization which minimizes the appearance of camera shake in your photos. The 9-point autofocus system with subject tracking allows for fast and accurate autofocus even if your subject is moving. This will ensure you will capture life’s precious moments as they happen. If you want to expand your options beyond the included lens the camera is compatible with the full line of Canon EOS EF and EF-S lenses ranging from fisheye to super telephoto. 18 MegaPixel CMOS Sensor and DIGIC 4+ Image Processor Behind the scenes of the Rebel T6 is the 18MP CMOS Sensor and DIGIC 4+ Image Processor that allows for both high image quality and speed. Captured images offer outstanding clarity and tonal range with enough resolution that photos can be printed or cropped without reducing image quality. The DIGIC 4+ image processor allows for up to 3 fps shooting, unlimited JPEGs in a burst and full HD video (1080p) at 30 fps. Ease of Use The Canon EOS Rebel T6 has a built in feature guide to help walk newer photographers through the cameras various settings, shooting modes, and effects with a simple description when each function is selected. Scene Intelligent Auto mode allows the camera to automatically adjust the camera’s settings based on the subject and lighting conditions without the photographer doing anything. This features makes it easy for new photographers to take better photos. Included creative filters allows you to change the feel of your photos with effects like: fisheye, grainy black and white, soft focus, toy camera and miniature effects. The camera also offers more customization and manual controls for more experienced photographers. LCD Monitor The Canon EOS T6 features a large 3.0 inch (7.5cm) 920k dot LCD screen, that can be used to adjust settings as well as composing photos or playing back images for friends. The LCD screen also features a wide viewing angle of 170 degrees so you can frame creative shots from overhead or ground level easily. Wi-Fi and NFC Built in Wi-Fi and NFC connectivity allows you to connect the camera to your phone and share photos to your favorite social media site instantly. In addition to quick uploads connecting the camera to your phone allows you to take perfect selfies and group shots every time – with wireless control and framing on the phone. Full HD Video The EOS Rebel T6 has a dedicated movie recording mode that allows you to capture full HD quality that is unmatched by smartphones. Capable of shooting in multiple frame rates and sizes with easy to use controls. The Rebel T6 has a video snapshot feature that captures short video clips that can be combined to create an album that’s great for sharing or viewing on a HDTV through the cameras on board HDMI port. Camera Body Canon Rebel EOS T6 weighs in at a lightweight 17 oz (485g) so you can carry it with you everywhere. The Canon T6 has an intuitive control layout that makes learning to use the camera quick and easy.


Canon EF 75-300mm f/4-5.6 III Telephoto Zoom Lens
Focal length range of 75-300mm DC motor powering the AF system in place of USM (Ultra-sonic Motor) 13 lens elements arranged in 9 groups Filter thread specification of 58mm Closest focusing distance of 4.9’ Great for long-range photography, such as sports and wildlife photography. This lightweight, 4x telephoto lens is compatible with both APS-C and full frame Canon DSLRs with a canon EF lens mount. The f/4-5.6 range provides you with good control over depth of field, giving you a nice, soft backgrounds when you zoom into a subject. There are 13 lens elements and they are arranged in 9 groups for optimum clarity.
Canon EOS 100ES DSLR Shoulder Bag
Designed with enough room to hold one camera body with up to two lenses and a flash, as well as an assortment of film or memory cards, batteries, and other necessities for photographers. This case is a great bag for the traveling photographer. Practical and attractive, it is a great way to protect your equipment from moisture and dust as well as the wear and tear that results from excessive handling.
Lexar 64GB Professional SDHC UHS-I Memory Card
Increases Workflow Efficiency Transfer Speeds up to 300MB/S Supports 4K Video Recording Handle Rapid, Burst and Sequential Shots with Ease
Extreme Speed to Catch Every Frame For super-fast continuous burst mode shots, maximum post-production workflow efficiency, and high-performance video recording, get SanDisk Extreme PRO SDHC and SDXC UHS-II cards. The high-performance SDHC and SDXC memory cards boast shot speeds up to 260MB/s (1733X) and transfer speeds up to 300MB/s (2000X). UHS Speed Class 3 (U3) supports 32GB to 128GB of Full HD and cinema-quality 4K video recording. Optimized for cameras that support the new UHS-II standard, SanDisk Extreme PRO SDHC and SDXC UHS-II cards deliver the uncompromising results that professional photographers demand.
Canon EOS Rebel T6 Camera + EF 75-300mm & 18-55mm Lens With all Canon Accessories + Full USA Warranties PREMIUM RITZ CAMERA BUNDLE INCLUDING Studio Series .43x Super Wide Angle Lens, Studio Series 2.2X High Definition Telephoto Lens 64GB Memory Card, Ritz Gear OTG USB Reader/Writer, Camera Bag 50″ Tripod, 7″ Tripod with wrapable legs, Pro Slave Flash, Ritz Gear 58mm Filter Set with Pouch Deluxe Cleaning Kit, Polaroid Screen Protectors, Wired Remote Control, Lens Cap Strap, Spare Lithium Ion Replacement Battery
from WordPress https://ift.tt/3czIA7y via IFTTT
0 notes
Photo

Apexel 10 in 1 Cell Phone Camera Lens Kit Wide Angle Lens & Macro Lens+Fisheye Lens+Telephoto Lens+CPL/Flow/Radial/Star Filter+Kaleidoscope 3/6 Lens for iPhone Samsung Sony and Most of Smartphone
https://topcellulardeals.com/product/apexel-10-in-1-cell-phone-camera-lens-kit-wide-angle-lens-macro-lensfisheye-lenstelephoto-lenscpl-flow-radial-star-filterkaleidoscope-3-6-lens-for-iphone-samsung-sony-and-most-of-smartphone/
【Premium Quality & 4K HD Imaging】Each lens is custom made with 3 layers of coated optical cinema glass, minimizes lens glare,reflection, ghosting and other artifacts,that enable corner to corner sharpness(without dark edges). 【Widely Compatible】Attaches to almost all smartphones and tablets including all modle of iPhone Samsung Galaxy, HTC, Sony,Moto 5 and many other smart phones in the marketand it will show you another world of cell phone photography!Professional but easy to use. 【170°Super Wide Lens】 Taking picture that your phone currently can’t like group picture,scenery or entire family in one picture with stunning effects,no dark edge,you can see the image with the range of 170 degrees from the right to the left on your phone,Taking your cellphone snaps to the next level.
0 notes
Photo

From National Wildlife Federation Photo of the Week; March 27, 2017:
Hawai’i Wildlife
National Wildlife's 46th annual Photo Contest is open through the end of March! Check out some of our favorite photos from past National Wildlife photo contests. Each week we'll celebrate nature and wildlife from a different state. This week we're featuring the wildlife and wild landscapes of Hawai'i!
Photo Above: Photographer Michael Adler took this landscape photo in Waimea Canyon State Park on Kaua'i Island using a Canon 1DS with a 22-70mm lens. He writes, "Waimea Canyon is one of our favorite places in Hawai'i. We continued to return to this lookout during our four-day visit, and late in the afternoon on our last day we were rewarded with a rainbow."

Underwater photographer David Fleetham writes, "The Galapagos Shark (Carcharhinus galapagensis) can reach twelve feet in length and is listed as "potentially dangerous." This one was attracted with bait off the North-shore of the island of Oahu." The Hawai'i resident used a Canon 20D with a 10-22mm wide angle zoom lens. Love sharks too? - See more National Wildlife Photo Contest Shark Pictures.

Nature photographers Cathy and Gordon Illg shot this image of a brightly colored 'Apapane (Himatione sanguinea) sitting in an ʻOhiʻa Lehua (Metrosideros polymorpha) in Hakalau Forest National Wildlife Refuge using a Canon EOS 1D Mark IV with a 500mm lens and 2x teleconverter. Read more about Hawaiian Birds with Ranger Rick!

Hawai'i native and photographer Bruce Omori made this image of encroaching lava in Kalapana, Hawai'i using a Canon 1Ds Mark III with a 100-400mm lens on a tripod. He writes, "Kupukupu ferns (Nephrolepis cordifolia) are usually the first sign of life after an eruption."

Underwater photographer David Fleetham also photographed this Day Octopus (Octopus cyanea) in Maui, Hawai'i using a Canon 40D with a 10-17mm fisheye zoom lens in Ikelite housing with twin substrobes.

Photographer Cliff Beittel made this portrait of a Laysan Albatross (Phoebastria immutabilis) pair displaying at sunset in Hawaii's Midway Atoll National Wildlife Refuge using a Canon 1Ds Mark III with a 500mm lens.

Earl Stewart writes, "We were vacationing on the Big Island and these beautiful Gold Dust Day Geckos (Phelsuma laticauda) crawled up onto our deck every afternoon and enjoyed the moist fruit in the sun." The Florida resident used a Sony A7R with a 200mm lens.

Marine nature photographer Mark A. Johnson took this "split-level" photo of a Green Sea Turtle (Chelonia mydas) in Oahu's Kailua Bay using a Nikon D3000 with a 17-55mm f/2.8 lens in underwater housing. He writes, "I wanted to capture a something special, so I set my zoom on its widest setting, focused on the turtle while making sure to have the palm trees also in the frame." Read Sea Change for Sea Turtles, from National Wildlife.

Scenic photographer Durand Johnson took this photo of "sunrise above the clouds" in Haleakalā National Park with a Canon 5D Mark II and a 24-105mm lens on a tripod. He writes, "We stayed up all night to take Astrophotos, and were then rewarded for our sleeplessness by this beautiful sunrise the next morning." Read more about the award-winning photographer, from National Wildlife.

Hawaiian photographer Jack Jeffrey writes, "Several Māmane (Sophora chrysophylla) were in bloom in the park and several species of honeycreepers were visiting the yellow flowers and taking nectar. I positioned myself so that the background was blurred and medium tone. At one point, late in the day, an 'I'iwi (Drepanis coccinea) visited several flowers, took nectar, posed, and stuck out its tongue to clean its bill. I got one frame and the bird was gone. The bright reds and contrasting yellows make for a great shot." He captured the moment in Haleakalā National Park using a Canon 20D with a 50mm f/4 lens and a 2x extender on a tripod.

Marine wildlife photographer Doug Perrine made this portrait of a young Hawaiian Monk Seal (Neomonachus schauinslandi) in Kohala, using a Canon 20D with a Tokina 10-17mm lens in Subal housing. The resident of Hawaii writes, "This young monk seal was born in the main Hawaiian Islands, unlike most members of this critically endangered species, which mostly live in the remote Northwest Hawaiian Islands. This seal started to approach divers and eventually became too friendly with humans and had to be relocated to the NW islands." Read National Wildlife's Do Hawaiian Monk Seals Have a Prayer?

Photographer Durand Johnson made this image of a lava glow in Hawai'i Volcanoes National Park using a Canon 5D Mark II with a 24mm lens on a tripod. He writes, "The lava deep within the crater is glowing and lighting the steam rising from the crater as well as two low-hanging clouds. Visible in the sky are Alpha and Beta Centauri, the Southern Cross, and a meteor trail."

Ocean Allies photography team writes about their photo of a Pacific Humpback Whale (Megaptera novaeangliae) in Maui, "This was a moment in my life where I couldn't believe what I was seeing! To photograph a breach of a whale is so hard, but to think that all the elements came together for this picture. This is why I love photography so much. There is truth in the saying about a pot of gold at the end of a rainbow, this photo is proof of that!" The Hawai'i based photographers captured the moment using a Canon 7D camera. Read National Wildlife's The Art of Whale Watching.

Conservation photographer Randy Bartlett shot this image of a juvenile 'i'iwi - an endemic Hawaiian honeycreeper - who "was curious enough to let me get a few frames while he was sipping nectar from the yellow Māmane flowers," in Haleakalā National Park with a Canon 6D and a 100-400mm f/4.5-5.6 lens.

Marine photographer Mark A. Johnson took this photograph of a storm wave hitting a cliff in Nāpali Coast State Wilderness Park in Kaua'i, Hawai'i using a Nikon D300 with a 70-200mm f/2.8 lens.

Wildlife photographer Rebecca Jackrel made this portrait of a Laysan Albatross chick as it "waited patiently for its parents to return with food," in the Midway Atoll NWR using a Nikon D3s with a 24-70mm lens.

Cathy and Gordon Illg also shot this Hawai'i photograph of lava dripping into ocean waves in using a Canon 1D Mark IV with a 100-400mm lens. "Watching these two iconic forces of nature together - crashing waves and new land being formed - is truly awesome." Read Hawai'i at the Crossroads, from National Wildlife.

Leslie del Prado photographed this Japanese White-eye (Zosterops japonicus) in Honolulu, Hawai'i with a Canon XSi and a 70-300mm lens. Introduced to Hawai'i in the late 1920s, this invasive bird is now found on every Hawaiian island and poses risks to native bird populations.

Wildlife photographer Christopher J. Crowley documented the "commensal behavior of a Banded Coral Shrimp (Stenopus hispidus) bravely providing cleaning services inside the mouth of an Indo-Pacific Viper Moray (Enchelynassa formosa)" at a high rock dive site in Kona, Hawai'i using a Canon 5D with a 100mm macro lens and twin flashes, in Seacam housing.

David Fleetham writes, "I had finished a dive off Molokini Island near Maui when this Humpback Whale calf left its mother, who was submerged nearby, for a close look at the camera. It circled me several times before returning to the mother." The photographer used a Canon 5D Mark II with a 17-40mm zoom lens in underwater housing. Read National Wildlife's Tuning in to Humpback Whales.
More from the National Wildlife Federation:
National Wildlife: Hawai'i at the Crossroads
NWF Affiliate: Conservation Council for Hawai'i (CCH)
NWF Blogs about Hawaii and CCH
National Wildlife Federation's Pacific Regional Center
Nature's Witnesses: Powerful images of wilderness can inspire conservation.
Nature and Wildlife Photography Tips Center
31 notes
·
View notes
Text
#gallery-0-5 { margin: auto; } #gallery-0-5 .gallery-item { float: left; margin-top: 10px; text-align: center; width: 33%; } #gallery-0-5 img { border: 2px solid #cfcfcf; } #gallery-0-5 .gallery-caption { margin-left: 0; } /* see gallery_shortcode() in wp-includes/media.php */
Missing Attachment
Missing Attachment
photo camera canon
goggles.png
goggles.png
Color:Black
Product Description
The PowerShot A2500 makes highly advanced imaging technology to capture beautiful stills and video. The camera’s 16.0 Megapixel sensor and DIGIC 4 Image Processor capture a wealth of detail and natural color. With the 5x Optical Zoom with 28mm Wide-Angle lens, everything from close-up snaps to breathtaking landscapes is within your reach. Smart AUTO recognizes 32 shooting situations and automatically chooses the proper camera settings, and Digital IS keeps even dark scenes and fast-moving subjects sharp and steady. Preserving memories in rich, lifelike 720p HD video is as easy as pressing the dedicated movie button, and Scene Modes like Fisheye Effect, Toy Camera Effect and Monochrome give you new ways to shoot more creatively. Plus, you can shoot longer with new ECO Mode, which reduces power consumption. A Help Button makes the PowerShot A2500 perfect even for beginners, with one-touch access to helpful instructions and advice.
From the Manufacturer
Effortless Imaging
The PowerShot A2500 makes highly advanced imaging technology fun and easy to use, so you’ll capture beautiful stills and video. The camera’s 16.0 Megapixel sensor and DIGIC 4 Image Processor capture a wealth of detail and natural color, so even your enlarged images have impressive resolution. With the 5x Optical Zoom with 28mm Wide-Angle lens, everything from close-up snaps to breathtaking landscapes is within your reach. Smart AUTO recognizes 32 shooting situations and automatically chooses the proper camera settings, and Digital IS keeps even dark scenes and fast-moving subjects sharp and steady. Preserving memories in rich, lifelike 720p HD video is as easy as pressing the dedicated movie button, and Scene Modes like Fisheye Effect, Toy Camera Effect and Monochrome give you new ways to shoot more creatively. Plus, you can shoot longer with new ECO Mode, which reduces power consumption. A Help Button makes the PowerShot A2500 perfect even for beginners, with one-touch access to helpful instructions and advice.
High Resolution, Highly Advanced Performance
16.0 Megapixel sensor
With the camera’s 16.0 Megapixels of resolution, your images are rich and clear, with textures and tiny details faithfully reproduced even at the long end of the 5x Optical Zoom. This high level of resolution is ideal for creating the largest prints, and allows you the flexibility to blow up and crop any section of an image to express your creativity. The DIGIC 4 Image Processor powers the camera’s advanced systems and features, ensuring fast, reliable performance with low battery consumption.
DIGIC 4 Image Processor
Canon DIGIC Image Processors have set the standard for functionality and performance since their groundbreaking introduction in 1999. With each successive generation, DIGIC processors have brought elevated performance and powerful new features to PowerShot digital cameras. The DIGIC 4 Image Processor has ushered in a new level of picture quality and accelerated processing, making possible features such as high-speed continuous shooting, HD video and Face Detection Self-timer.
Zoom in on Wider, Steadier Shots
5x Optical Zoom with 28mm Wide-Angle lens delivers stunning images
The 5x Optical Zoom (35mm equivalent: 28–140mm) in the PowerShot A2500 digital camera delivers outstanding optical performance and versatility. It gives you a great range of potential images from a single location, which is perfect for sporting events and other occasions when your shooting stance is fixed, or times when moving in too close might disrupt the action you’re trying to capture. The lens’ 28mm wide-angle perspective puts more image in every frame for dynamic, exciting shots.
A Smarter Camera Means Better Photos
Smart AUTO
Photographers of all levels appreciate a camera – especially a go-anywhere compact digital – that takes the hassle out of capturing beautiful images. The PowerShot A2500 gives you Smart AUTO – sophisticated Canon technology that makes getting that great shot as simple as pressing the shutter button. Smart AUTO automatically detects scenes by assessing various factors in both the background and the subject. Detected scenes are analyzed using 32 predefined shooting situations. The camera then makes optimal settings to ensure the best possible image capture when shooting still images. Smart AUTO also includes Advanced Subject Detection, which allows the camera to detect and track non-human moving subjects like animals and vehicles. With Smart AUTO, all you have to do is frame your shot and capture away.
Shooting Modes/Special Scene Modes
Smart AUTO The camera automatically selects the best shooting settings for optimal quality based on subjects and environmental factors to provide point-and-shoot simplicity. Program The camera automatically and intelligently selects the aperture/shutter speed combination based on the shooting conditions. Live View Control Enables Brightness, Color, and Tone adjustments to your images using easy-to-understand controls. Digital IS The camera digitally corrects image blur by analyzing the subject prior to choosing the best correction method. Portrait Brings the subject into focus while beautifully blurring the background. Face Self-timer The camera waits for a face to enter the frame before releasing the shutter. Low Light For high quality image capture in an amazing range of dimly lit situations. Fisheye Effect Now you can get the fisheye effect – a classic photographic distortion – without a fisheye lens. Miniature Effect Give images a miniature look with an effect that emphasizes perspective by blurring the top and bottom of the image. Toy Camera Effect Simulates photos taken with “toy” or pinhole cameras, darkening the image at the edges to create a vignette effect. Monochrome Choose from three single-tone effects: Black-and-White, Sepia, or Blue. Super Vivid Super Vivid intensifies existing hues, saturating the scene with bright colors. Poster Effect Poster Effect combines several similar shades into one color, turning subtle gradations into eye-catching, scene-popping contrasts. Snow Shoot clear snow scenes without darkened subjects or an unnatural bluish tint. Fireworks Create brilliant images of skyrocketing fireworks. Long Shutter Use to blur moving subjects for artistic effect, ideal for urban night photography. Movie Record video; unwanted scenes can be deleted in playback mode.
Gorgeous HD Video From Your Still Camera
Shoot brilliant 720p HD video
Using the pocket-sized PowerShot A2500, you can shoot high definition video anytime, anywhere. With a simple push of the dedicated movie button, you’ll be able to instantly record every moment in motion. 720p HD video is smooth, vivid, and beautifully lifelike, making it an ideal way to capture special memories. In addition to being able to shoot 720p HD video at 25 frames per second, the PowerShot A2500 can also shoot 640 x 480 VGA video at 30* frames per second.
*Actual frame rate is 29.97 fps.
Dedicated movie button for easy video capture
It’s never been easier to shoot videos with a PowerShot digital camera. To make shooting video as natural as snapping pictures, the PowerShot A2500 has a dedicated movie button. No need to plan ahead, no need to search through menus on the LCD screen; when you feel a moment would be best captured in 720p HD, simply press the button and recording begins. The camera is always ready to shoot stills or video whenever you want.
Say Goodbye to Blur
Digital IS reduces the effect of camera shake and subject movement
Digital IS beats the blur that mars many shots by recognizing the main subject, then automatically applying the camera shake correction that best suits the situation. If the subject is a person, blur reduction processing is performed. For landscapes, cityscapes and other still scenes, the camera takes three quick successive shots and composes them into a single clear image. If the subject is moving, the camera takes three successive shots, then automatically saves the clearest image.
A Charge that Lasts as Long as a Memory
New ECO Mode helps reduce power consumption for longer battery life
The PowerShot A2500 takes energy conservation to the next level with ECO Mode, which provides more shots per single charge through LCD monitor and camera power management. ECO Mode can be activated via a dedicated button for easy power preservation when an outlet is unavailable or the moment is too exciting to put the camera down. ECO Mode quickly wakes the camera from sleep when a button is pressed so you won’t miss the moment. When the fun with family and friends runs late into the evening, ECO Mode on the PowerShot A2500 makes sure your camera keeps up.
More Ways to Get Creative
Scene Modes
Scene Modes are fun, easy ways to give your shots a distinctly artistic feel without the need for any extra lenses and filters. Super Vivid heightens and saturates colors for eye-popping intensity. Poster Effect eliminates gradations between colors for an illustrative feel. Miniature Effect enhances perspective in a scene, blurring the top and bottom to make it look as if it were created with miniature models. You can also make a quirky portrait using the Fisheye Effect or add a beautiful single-tone effect with Monochrome. Toy Camera Effect simulates a vintage look as it capturing the photo using a “toy” or pinhole camera.
Help You Won’t Need Help to Find
Help Button
The PowerShot A2500 digital camera is designed to be fun and easy to use, even for beginners. A Help Button on the camera’s exterior brings up the help menu any time you need it, right on the LCD screen. From here, you can scroll through a variety of topics that answer your questions with clear explanations, offer helpful shooting advice, and show you diagrams highlighting the position of any buttons you’ll need.
Make sure this fits by entering your model number. ECO Mode to reduce power consumption Capture impressive 720p HD video in stereo sound with a dedicated movie button 16 megapixel, 1/2.3-inch CCD sensor and Canon DIGIC 4 image processor deliver enhanced image quality 5x optical zoom and 28mm wide-angle lens with Digital Image Stabilizer Smart Auto intelligently selects the proper settings based on 32 predefined shooting situations USB cable not included [amz_corss_sell asin=”B00B5HE1SY”]
Canon PowerShot A2500 16MP Digital Camera with 5x Optical Image Stabilized Zoom with 2.7-Inch LCD (Black) Color:Black Product Description The PowerShot A2500 makes highly advanced imaging technology to capture beautiful stills and video.
0 notes
Text
Photo editor software
Good and simple edit pics with the software edit photo
You don't need to get it right in one try. When you're taking images, try out various postures and also arrangements. Play with the zoom and the angle of the shot. Also small changes can develop a totally various photo. The major factor to take lots of pictures is that it will provide you plenty to select from. It's always much better to have more photos than you need rather than having no good choices due to the fact that you really did not take sufficient. An additional benefit is that you obtain even more practice by doing this, as well as you'll educate your eye to take better shots. Having pricey video camera tools doesn't always mean that you'll take excellent photos. I've seen some absolutely amazing images shot with absolutely nothing even more than a cell phone. Rather than having 10 various lenses, buy some fantastic photography publications. By checking out the job of the masters, not just do you obtain influenced, you come away with suggestions to improve your own images.
Editing photo software for Computer and experienced with many cool features free download
Never ever take a picture with the sun directly behind you. It develops monotonous, level light on the subject. If you shoot with the light to the side or behind the subject, you have the ability to shape with the light, developing an extra intriguing picture. Commonly the distinction in between a terrific image and also an exceptional image is the editing. Manipulate photos made easy with the great brand-new photo editing software for Windows and experts with many awesome photo editing effects. A little modifying and improving can fix small problems as well as also improve a photo's best components. Lights, strength, as well as additionally comparison are all elements you can adjust in your changing program of choice. There are special software, yet there are similarly a number of less intricate along with a lot more affordable choices conveniently offered. Whichever program you choose, spend a long time getting comfortable with it to guarantee that you acknowledge just how to take advantage of all its functions. The application is a good photo editor with many essential settings for fast and simple photo editing. This software contains many effects such as photo motion effect, correct contrast in photos and image deform that make it easy to enhance images from your friend. Digital photographs commonly demand some kind of control before final output. This application is a good picture editor with a lot of helpful gadgets for fast and simple image editing. Right here is a brief guide which I have actually compiled to support you touch up your photos. The very first step, certainly, is to ignite your preferred image changing system. It's an excellent device that enables you to accomplish expert photograph impacts using simple, easy-to-follow activities. You might also want to take a peek at my scoop of the best first-timer image editors for Windows. Open up the graphic you like to customize within the program as well as use less a backup copy. If you are actually taking pictures of folks, possibilities are you might have actually taken a photo along with red-eye troubles. This is quickly removed with picture changing computer program function. The editing photo software for edit photos has many image effects as for example photo motion effect, poster effect or photo improve that make it possible to enhance photos. In this easy-to-use software edit photo, choose the red-eye removal device in the menu and the system performs all the work for you. If you've taken an image in an inaccurate positioning, it is actually rapidly dealt with little bit of loss in premium by using a switch tool. The tool is a brand-new photo editor software with a ton of essential settings for quick and easy photo manipulation. You'll similarly want to complete some cutting of your photo to get rid of disorderly settings that draw passion much coming from your subject. Do certainly not be worried to practice with different colors. Picture customizing programs placed a ton of electrical power in your hands. You may make the fallen leaves violet, modification the whole picture to white as well as black, consist of an invert impact - almost anything you wish. A terrific picture modifying system will definitely have automatic different colors harmony alternatives to improvement color defects in your photos. Sometimes I like to include a beclouding result to my photos. What you may do right here is to pick locations of the image which are insignificant and also tarnish all of them out. This is going to bring more attention to the primary subject of your image. For instance, if I had a photo of a floral and I wished to downplay the details in the fallen leaves in history, I could feature a masking effect to the background. Honing the graphic is actually the next measure in the picture retouch procedure. Opposite to common belief, you cannot actually refine an indistinct picture. When polishing an image is actually to uniquely sharpen, what I typically perform. That is actually, I pick a portion of the graphic, maybe a private's eyes as well as hone simply that area. Go out of insignificant sites unsharpened. Relying upon your requirements, you might desire to resize your photo. You'll desire to resize the picture to a smaller sized size if you are actually emailing a photo to a pal. Use the huge TIFF photo layout if you longing to maintain all information for succeeding picture modifying. Alternatively, you can usage the JPEG graphic style if you dream to simply deliver the graphic using e-mail or even upload them to your internet site. Such a software photo editor for edit photos supports a lot features like for example beautify picture, fisheye effect or swirl photos that make it possible to correct pictures from your celebration.
Software to edit photos for PC
Special terms to enhance a photo are create a photo montage, sharpening or rotate photos and many more. When I operate with a photo editing software for edit an image, such as radial effects or histogram, I typically deal with very easy to handle picture editor. Now you recognize the technique to retouching as well as prepping your pictures for result. If I use a photo editor for edit photos, such as shade dash or sophisticated illumination tools, I constantly deal with extremely basic image editor. Do not be actually worried to experiment and also know - practice creates well when it happens to repairing your photos. Enhance photos made easy with the cool brand-new editing photo software for amateurs and aces with many helpful photo editing effects. It's an outstanding gadget that licenses you to acquire trained photograph affects benefiting from necessary, very easy to observe activities.
0 notes
Text
The iPhone 11 Pro camera is amazing, but it has a few notable issues
A cereal-covered donut at the Big E in Massachusetts is a perfect subject for the iPhone 11 Pro camera. Bright colors, sharp textures, and subject matter that can handle a little distortion from a wide-angle lens. (Stan Horaczek/)
Let's get it out of the way first: The new iPhone 11 Pro has the best overall smartphone camera system I've used. That may change when Google releases the Pixel 4 next month, but for now, the iPhone 11 Pro is the champ. And while I have no problem giving credit where it's due, I'm left with some extremely complicated feelings about Apple's new flagship imaging devices. Even beyond a few notable drawbacks, I wish it was simpler to know what's actually going on inside the camera.
If you only hope to point the camera at a subject and get usable—and often pretty impressive—shots, then the 11 Pro is unbeatable. But if you already know how to use a camera—even a previous iPhone camera—there’s a learning curve that might change at any time thanks to software updates, and it could have a real effect on the look of your photos and videos. Plus, the new phone is a reminder that iPhone photography—and smartphone shooting on the whole—is increasingly different than typical photography.
The hardware
The trio of cameras on the iPhone 11 Pro occupies a square on the back of the phone. (Apple/)
The iPhone 11 Pro comes with a trio of rear-facing cameras, including the familiar wide-angle and telephoto lens modules, as well as a new ultra-wide camera. If you’re serious about taking pictures and video and that guides your phone choice, you might as well jump on the Pro line and get an all-in-one package.
The lens selection makes sense for photographers. Professionals typically concentrate on three basic types of shots, including wide photos to set the scene, tight shots to provide intricate details, and standard middle shots to handle the bulk of the storytelling. Switching between the different camera modules on the 11 Pro makes this pretty straightforward and may even encourage some shooters to expand the kind of photos they capture. I can get behind that.
Shooting with each camera provides its own unique strengths and challenges, so let's break them down individually. You can check out high-res versions of all the comparison shots here.
The wide-angle
A plant store in Troy, NY, provides mixed light and lots of textures and the main camera handles it nicely. Using the depth function to blur the items in the foreground and background would make this look more like it was taken with a dedicated camera (Stan Horaczek/)
The iPhone 11 Pro’s main camera remains the standard wide-angle; it’s by far the most useful and also the most advanced. There’s a new sensor inside that seems to have improved the performance in low natural light. It’s hard to gauge, however, because the overall picture-taking process relies so heavily on the software tweaks. Apple has increased the maximum ISO (the rating that indicates the camera’s perceived sensitivity to light) from roughly 2,300 up to about 3,400. Raising that setting typically increases ugly noise that shows up in your photos, so Apple is either more confident in the sensor's inherent low-light chops or it has added more processing firepower to fix it later. The reality is probably a mixture of the two.
The lens maintains the same basic specs, including an f/1.8 aperture. I wouldn’t expect it to get much faster than that (lower numbers indicate wider apertures to let in more light, making the lens “fast”).
The telephoto lens
Portrait mode seems to have improved in some situations. Most of the blur comes from the natural characteristics of the lens, but I wouldn’t mind darker shadows on the jacket. (Stan Horaczek/)
Telephoto lenses have been showing up on iPhone flagships since the 7 Plus when we first encountered the Portrait mode. The telephoto lens gives shooters an angle of view equivalent to what you’d expect out of a roughly 52mm lens on a full-frame DSLR. Though that makes it a telephoto lens by the strict definition, photographers typically expect such lenses to fall somewhere north of at least 70mm. The extra reach allows shooters to pick their way through complicated environments and single out a subject. The iPhone's telephoto does a better job of this than the wide-angle, but it's not going to replace a dedicated longer lens.
The sensor inside the 52mm is still smaller than it is in the main wide-angle lens, but the maximum aperture goes from f/2.4 to f/2. Letting in more light is almost always welcome, but it’s a relatively small jump. So, if you’re expecting a huge change in the natural blur or low-light performance, you might be disappointed. It does, however, seem to have upped the focusing speed, which it desperately needed.
The super-wide lens
The super-wide camera provides a unique perspective, but its image quality isn’t as high as the main wide-angle camera. (Stan Horaczek/)
At a roughly 13mm equivalent, the super-wide lens is a new addition for the iPhone camera ecosystem. Like the telephoto, its sensor is smaller than the main camera’s, and it doesn’t have access to some of the other features like the new Night Mode (lots more on that in a moment), Portrait Mode, or optical image stabilization. Thankfully, super-wide lenses don’t suffer as much from camera shake, which makes the lack of lens-based stabilization less of an issue.
Some critics immediately discounted the new wide-lens as a novelty, but 13mm isn’t much wider than the wide-end of the 16-35mm zoom lens that photojournalists have been using for decades. Will people overuse it? Oh yeah. But it’s not inherently a special effects lens like a true fisheye.
The camera app bug
Before getting into the features, it's worth noting that some users (including me) have encountered an issue with the iOS 13 camera app in which the screen stays black for up to 10 seconds before you can actually do anything. The iOS 13.1 update is inbound and hopefully, that will fix it, but it's seriously annoying when it happens.
Night Mode
In some situations, Night Mode does a great job revealing details that would otherwise disappear into shadows. I actually turned down the Night Mode level from three seconds to one second because it tried making the grass too bright green. (Stan Horaczek/)
Last year, when Google introduced its Night Sight mode on the Pixel 3 smartphone, I was genuinely impressed. The company used the device's single camera to capture a number of low-light shots in quick succession. It then pulled information from those shots and mashed them into one finished image that was impressively bright, relatively accurate color-wise, and surprisingly full of details that a typical high-ISO photo would obliterate with digital noise.
The iPhone 11 Pro answers Night Sight with its own Night Mode, which uses a similar multi-capture strategy and immediately became a fundamental piece of the shooting experience. Point the iPhone camera at a dark scene and a Night Mode icon pops up automatically. You can turn it off if you want to, but you have to consciously make that choice.
The only light illuminating this scene was coming from the open door in the background. It was dark—around 1 EV. It's impressive that you can get the color of the room (it really is pink-ish) and the green in the plants. Bright areas of the frame will blow out in night mode, so best to crop them out when shooting if possible. (Stan Horaczek/)
The first time you see it, it’s like witchcraft: It brightens up the dark scene to the point where every object in the picture is recognizable. If you’re expecting it to create what you’d get with even the most basic pop-up flash, however, you might be disappointed. Night Mode is great in situations where the light is relatively flat.
Left: This gnome was shot in wide-angle with the Night Mode turned off. Right: With Night Mode on. (Stan Horaczek/)
It’s not always magic, though. Take Night Mode into a situation with mixed or highly-variable lighting conditions and things can get out of hand. Consider, for instance, the picture of a garden gnome above. I turned night mode off for the first version and was pleasantly surprised at how much detail I got and how sharp the image is. With Night Mode on, however, the sharpness is still solid, but the colors get bonkers.
Left: This bush was shot in wide-angle with the Night Mode turned off. Right: With Night Mode on. (Stan Horaczek/)
You can observe the same phenomenon here with this bush. It has the subtlety of a sledgehammer. Honestly, it reminds me of the overbearing processing that Samsung typically applies to its photos. Because Night Mode is on by default, it can be hard to fight through the initial urge to leave it on, even when you don’t need it. The picture pops up on screen, and you push the shutter because it's so nice and bright.
This shot was taken in a fully dark environment. It's grainy up close, but the skin tone doesn't look overly wild and you can still make out details in the fish. The camera details suggest this shot used a half-second exposure. The night mode was set to three seconds. (Stan Horaczek/)
When it comes to skin tones, the same flat-light rule applies. In this example, there’s one dim tungsten beam coming from camera right. Without night mode, it was totally unusable. The frame either came out black or absurdly blurry due to the long exposure required.
Mixing color temperatures in a portrait is hard, but Night Mode clearly does some work to try and even out the skin tone. (Stan Horaczek/)
In mixed-light conditions, however, things get more complicated. Few things make a person look less appealing in a photo than blending colors on their face. With Night Mode turned on, it can sometimes augment the effect by amplifying the light sources, making the subject look wacky and cartoonish. Unfortunately, that’s a pretty common scenario in places like bars, weddings, or events. Apple has already done considerable work to make the skin tones look more natural, but I expect this will improve over time.
Generally, I’d love to see Night Mode tone it down a bit. Take this example of these flowers under an ugly street light in the park for instance. The Night Mode version (on the right), ironically, takes away almost any indication that the photo was taken at night.
Left: These flowers were shot in wide-angle with the Night Mode turned off. Right: With Night Mode on. (Stan Horaczek/)
I would also like a little bit more freedom to experiment with it. Night Mode is capable of capture times all the way up to 30 seconds, but you can only access the full time if you put the iPhone on a tripod or something steady and it senses the lack of motion. I’m fine with a recommended length, but I’d like the opportunity to mess up the photos however I want. (Taking screwed-up shots is how you learn, after all.) Also, given that it’s kind of unclear if there’s any direct relationship between the length of the exposure and the overall brightness or characteristics of the image, I’d at least like to easily mess with the capture time and see what I can glean. That is, of course, until the next software update, which could change it completely.
A quick note about flash
I have seen some folks talk about how Night Mode makes flash obsolete. That's mostly true if we’re talking about smartphone flashes, which are little more than glorified LED flashlights. Take a look at this grid of images.
Starting in the top left and going clockwise: iPhone shot with Night Mode on, iPhone shot with the flash on auto (blech), and a Sony A6500 with the pop-up flash on. (Stan Horaczek/)
Not only does the actual flash from the Sony create much higher overall image quality and sharpness (thanks to the short duration of the flash that doesn’t leave room for camera shake), it would also overpower any possible mixed-light temperature situations that you might encounter. In short, if you were thinking about getting a real camera because you can use flash, Night Mode shouldn’t change that at all.
Making tricky choices
The same outdoor setting shot with the standard wide-angle lens on the left and the super-wide on the right. (Stan Horaczek/)
Manual exposure modes in smartphone cameras have always been a scam with fixed apertures and a lack of long-exposure functions. Still, it's still good for users to know what the camera is doing—or have the option to. The iPhone 11 Pro makes a lot of choices that it doesn’t tell you about.
For starters, when you press the 2x zoom button, you’d probably assume you’re going to be using the telephoto camera that literally doubles the focal length of the lens you’re using. But most of the time, like the iPhone XS, you’re actually just enabling 2x digital zoom on the main wide-angle camera. If you’re familiar with camera lenses, you know that shooting with a 52mm lens is fundamentally different than shooting on a 26mm lens and cropping, especially when it comes to the field of view and the relationship between objects in your frame.
I wanted to use the 52mm lens for this shot, but the camera automatically selected the standard wide-angle lens and digitally zoomed for some reason. (Stan Horaczek/)
Above, you’ll find a picture of a transaction happening at the excellent Troy, NY, farmer’s market. I pressed the 2x zoom on this image because it was plenty bright (the camera selected ISO 32) and I wanted to get as much natural blur as possible in front of and behind the subjects. It would also make the field of view easier to manage to crop out distractions like the guy in the sweatshirt on the left. It wasn’t until after I got back home that I realized the 2X zoom button simply cropped a picture from the wide-angle camera. It didn’t optically zoom—it digitally zoomed. As a result, the extrapolated image has some ugly artifacts and sharpening noise in it when I don’t think it should. I pushed a button for something I wanted and got something else.
These tomatoes were too close for the telephoto lens. (Stan Horaczek/)
Even though the portrait lens has a wider aperture now and the sensor has improved, I found that the 52mm doesn’t focus very close. This picture of some tomatoes, for instance, didn’t allow me to use the true telephoto lens because it couldn’t focus close enough to make the composition work. I would have had to leave a third of the bottom of the frame empty and then crop in post.
A similar effect comes into play with long exposures. Night Mode captures images for 30 seconds at a time, but it’s not a 30-second exposure—it’s just 30 seconds spent capturing shorter photos. The iPhone 11 Pro camera is technically capable of long exposures up to one second, but if you try to use that feature in an app like Halide or Lightroom, the camera is so slow and jittery that it’s unusable.
Use Night Mode long enough and you’ll get a feel for what the difference between a five-second shot and a 30-second shot looks like. Still, it hard to quantify it, and if it changes with the next software update or smartphone, you’ll get to figure it out again.
Where to start
Your head might be spinning with all these options and caveats, so let's track back a little. What is it exactly that you want to shoot? I, for one, picture a photo in my head before I even pick up the camera—smartphone or otherwise. Dig into the so-iconic-it's-cliche Ansel Adams book The Print and you'll find a perfect summary of how photographers visualize a photo, then use the tools at their disposal to make it happen. After all, you didn't really have a choice with film because you couldn't preview it.
The iPhone—and pretty much any other digital camera—shows you a picture so that it's as simple as saying, “OK, camera, that’s fine.” Now that the iPhone 11 Pro includes a super-wide angle camera, you can feel its effects even before you select it from the camera app.
The translucent sections of the screen aren't part of the picture, but they could be if you switch to the wider lens. I personally find it distracting. (Stan Horaczek/)
The section of the camera app behind the shutter button and at the top of the phone are now translucent when you use the regular wide-angle camera. It has its uses, like when there’s a distracting minivan parked at the edge of a street you’d like to capture, and you want to preview exactly how wide you can make your picture while still leaving the car out of the frame.
Personally, though, I find the whole effect extremely distracting. It’s not so bad when you’re looking directly at the phone—but when you’re trying to compose a shot at a weird angle, it can be hard to tell where the picture you’re taking ends and the extra stuff behind the translucent veil begins. On a few occasions, I’ve mis-framed shots because it threw me off. I’m sure I’ll learn to use it effectively eventually, seeing that the iPhone is teaching me about how to be a better iPhone photographer all the time.
In the menus, you can actually tell the camera to capture image information outside the view of the normal wide-angle camera and store it for a month in case you realize you hated your initial composition and want to go back and change it. I left this turned off, but if you're just learning how to compose photos and you want more flexibility, it could be a good learning tool.
I wanted the donuts in the center of the frame, but the translucent effect in the viewfinder threw off my composition. Yes, this is the second shot of donuts in this iPhone 11 Pro camera review. (Stan Horaczek/)
Once you actually select the super-wide lens, you’ll likely find a scene that you find “striking.” At a 13mm equivalent, you can capture the entirety of a skyline and a massive field of clouds above it. Or, you can cram the entirety of a scene—especially a small one—into a single picture without having to take multiple images or make a panorama.
The photo is, generally, a little underexposed because of how much space the bright sky takes up, but it does look "striking" as promised. The distortion at the bottom of the frame has compressed and elongated the human. I'd correct that with software before considering it finished and posting it. (Stan Horaczek/)
In general, I love having it as an option. Yeah, it’s wider than the standard lens, but it also makes objects in the frame appear to have more distance between them. So, when you’re trying to show how large and crowded a farmer’s market is, it makes a huge difference beyond the angle of view.
You need to pay attention to the edges and and corners more with the super-wide to make sure you don't end up with big, distracting dead spaces in the photos. The effect can be worth the extra effort. (Stan Horaczek/)
The same goes for nature and landscape photos. I couldn’t get this whole tree and the trademark landscape from Thacher Park in Upstate New York in a single frame with the standard lens. The super-wide handled it with no problem, though.
Nature photos look dramatic on the wide camera. In this shot, the HDR effect is going a little crazy and making things look a little unnatural (especially around the orange horizon). Still, it's a shot that would be practically impossible without the extra-wide camera. (Stan Horaczek/)
With that width, however, comes distortion—and the iPhone 11 Pro works too hard to correct it. Here’s a picture of a metal gate in which all the slats were relatively straight. You can see the distortion poking in, especially at the edges.
The lines on this gate were straight in real life. The super-wide camera adds distortion. (Stan Horaczek/)
You’ll also notice it in the photo above that includes a skyline—the buildings lean hard toward the center of the frame. The app does warn you though if you put a person near the edge of the frame because it knows that the distortion will make them look stretched, squished, and bad in general.
It's not a great picture, but it's made worse by my stupid thumb in the corner. (Stan Horaczek/)
Another drawback that I'm somewhat to blame for: My finger got in the way in quite a few of my wide-angle shots when I tried to hold the phone normally. The lens is so wide that it will easily catch your digit intruding on the frame if you’re not careful. So, I switched to holding the iPhone by the top and bottom instead of from the sides like I used to. Another lesson learned.
If you want a similar effect without the smaller sensor issues, you can opt for an accessory lens like the Moment Wide Angle, which modifies the look of the lens on the main camera.
Portrait Mode
I still think there's too much selective sharpening in Portrait Mode, which can make hair and eyes look too sharp and unnatural. (Stan Horaczek/)
Portrait Mode has come a long way since its start and it's better on the iPhone 11 than it ever has been, at least in the Apple ecosystem. I've typically liked Google's treatment of the fake blur on the Pixel camera slightly better because it looks more natural to me. The 11 Pro, however, seems considerably quicker than pretty much any portrait mode I've used when it comes to finding focus and taking the picture.
The blur can still look unnatural if you shoot something too complicated—I used it on a picture of some horse sculpture made of sticks and it created a real mess—but Portrait Mode is still very solid for headshots. The selective sharpening can get overbearing since it looks for specific elements like hair in an image. The beard hair in the selfie I took above has too much detail for my taste. A little blur can really help someone like me look more appealing in a photo.
I'm generally not much of a fan of the lighting effects, but that's mostly personal snobbery. The Natural light effect flattens the light too much for me, which makes for a very odd contrast against the over-sharpened features. The rest of them still feel like novelties to me, though they are improving. Still, if you want a black-and-white version of your photo, I think you're better off converting it in an app like Filmborn or Lightroom later. Or just slap an Instagram filter on it.
Lens flare
The lenses on the 11 Pro are obviously larger than those in the XS Pro. Larger lenses typically increase image quality, and that’s generally the case here, but I noticed way more lens flare with this model. Some of it is pretty gnarly.
Note the bar of lens flare on the graphics from the sign. (Stan Horaczek/)
The above photo shows one of the worst instances from my test run. The bright sign in the back is a digital screen. It’s a commonplace for tourists in my area to take photos because the historic theater often hosts big Broadway shows and national acts. You can see in the photo that a flipped image of what appeared on the screen appears as a ghost in the image itself. This typically happens when photographers put a filter of the front of their lens; the light hits the front glass of the lens itself, bounces back into the filter, and an inverted reflection shows up in the picture. You can typically fight it by removing the filter, but that’s not an option with the iPhone.
The front glass on the iPhone 11 Pro cameras do a great job protecting the lenses, but they seem to flare a ton. Even when it’s not as bad as the theater sign, it’s easy to catch a bright light in the frame that sends weird elements shooting across the picture.
The lens flare on the wide camera is pronounced, too. (Stan Horaczek/)
Some people like lens flare. J.J. Abrams has made a whole aesthetic out of it. But there are some major negatives to the distortion. First, flare reduces overall contrast in parts of your photo. Second, the flare itself illustrates a lens quirk that users typically don’t see called "onion ring bokeh"—an effect that stems from the aspherical lens elements inside the lens. It also occurs in standalone cameras, especially on lenses that try to cram a lot of glass and refractive power into a small body. You can recognize it by looking in the flare or the out-of-focus highlights in a photo for rings inside the blurry blobs.
You don't get to see the iPhone's true bokeh very often. (Stan Horaczek/)
You typically don’t see the iPhone camera’s real bokeh because the lenses are wide and the sensors are small, which downplays the amount of natural blur and allows the hardware to add its own effect with Portrait Mode. If you want to see it for yourself, however, a scene like this dewy grass in morning light illustrates it perfectly. Focusing the lens super close and providing lots of bright details causes all those little onion rings to pop out of the scene. Maybe you wouldn’t notice it, but once you do, it’s always there (almost like an eye floater). In the iPhone 11 Pro, it shows up more in the flare as well.
On top of the onion rings, I’ve noticed some other weird flare effects. This basic picture shot with the ultra-wide camera in a mall parking lot has a flare with decidedly red, green, and blue streaks. And if you don’t wipe the lenses off regularly before taking a picture, you can expect considerable haze over the images (but you should be wiping your camera lens regularly anyway).
I don’t think this flare is a huge issue or a deal-breaker, but it’s definitely something to keep in mind as you’re shooting with the iPhone 11 Pro.
The verdict
As I said at the start, I think the 11 Pro camera is the best smartphone camera package around at the moment. If you’re expecting it to compete with a dedicated camera, though, that’s still not the case, especially because it makes photos still look Apple-y. Of course, with software updates that may change. I wholeheartedly think the new camera is better than the iPhone XS, which really seemed to overdo it on the HDR effect that sometimes made people look orange and high-contrast situations look like a video game. But, under many lighting conditions, you probably won't notice an enormous difference (barring Night Mode).
The iPhone 11 Pro is on the left and the XS is on the right. Both of these floral scenes are full of contrast, texture, and red tones, all of which are tricky for digital cameras. (Stan Horaczek/)
The iPhone 11 Pro photos look better than the iPhone XS photos overall, and the flexibility of the super-wide angle lens makes it a very substantial upgrade. But it’s not a revolution.
Those frizzy hairs did not need that extra sharpening. (Stan Horaczek/)
You'll also have to accept some minor quirks. For instance, the iPhone camera reportedly increases sharpening on hair, including facial hair. The effect accentuates frizzy flyaways and makes details look too sharp. It sounds weird given that sharpness is typically a good feature in photos, but tell that to the weird artifacts that become painfully obvious in the final captures.
Even as you adjust the exposure settings in the iPhone camera app, the brightness of certain elements will change, while others won't really budge. So, if you're taking a picture of natural scenery in front of a blue sky, raising or lowering the exposure will make the greenery brighter or darker, though the sky will stay a very similar shade of blue that's hard to blow out, even if you try. The iPhone camera knows what's in the scene and is trying to maximize your chances of taking a good photo, even when you kind of want to take a bad one.
What's next?
Have you heard about the specter of Apple tech called Deep Fusion reportedly coming later this Fall? The AI-powered software will reportedly change the iPhone's photo and video performance drastically again. And it won't stop there. Once you learn to shoot with an iPhone camera, there's a good chance you're going to need to learn it all over again in a generation or two. Or you could just accept the iPhone's suggestions and shoot like it wants you to. It makes life a lot easier—and technicolored.
from Popular Photography | RSS https://ift.tt/2mYZMhV
0 notes