#it should be either in my messages or on my dashboard with the payment it belongs to
Explore tagged Tumblr posts
Visit Tumblr Blog
Explore Tumblr blogs with no restrictions, modern design and the best experience.
Last Seen Tumblr Blogs


Fun Fact
When “GIF” was named word of the year in 2012, Oxford Dictionaries U.S.A. credited Tumblr for pushing the word.
Text
There was that scene in Kim's Convenience where the daughter is in her photography class and her lecturer is looking up her website, realises the first page isn't hers, the second is also not hers, she has to go to page 2 of google and at that point just throws down her hands and says at that point, as a potential customer, she already loses interest and gives up cause it's not worth the effort
and lately I just feel like the whole fucking internet feels like that
I want to look up how to use cricut stuff and what that even really is, what can I do with what but when I put their name in i get taken to the fucking shop with no explanations far and wide, then next link is also the shop, next link is ALSO the shop but different, and by the time I finally find a page that has any kind of explanation, i'm so annoyed that the hoops is makes me jump through THEN—e.g. selecting which topic I want to learn more about—I'm no longer interested in doing this shit
the other day I wanted to look up what Nokia is up to in terms of phones these days but they no longer have 1 coherent website. In general, many places seem to not want any coherence in their websites, or sub-menus that you can easily navigate
Like, I come from myspace. I know how to navigate the internet. I played WoW in days of dial-up internet. And yet, everything is so goddamn convoluted and incoherent, there is NO structure or logic to anything and on top of that, google, and with it most other search engines, are fucking fried! A few years ago, if a website was really badly designed, you could just navigate back, google the website + search term you needed and get there somehow, but now that is also useless more often than not!
At this point I am genuinely over the internet. We had a good 15 years with it, let's pack it up.
#technology#rant#google#internet#I would PREFER myspace days#on wordpress many things are no longer possible#that I want to do#but they are like 'users can only click and drag and we do not trust them with that power'#between this and AI I am sick of it#genuinely i don't think these people understand how much they are not worth my time#just so I can give them money#paypal too!!!!#someone sent me a msg on there didn't know that was possible but cool#so I checked my messages but haha no that's where paypal msgs go#as in letters from paypal#not messages ON paypal#so I check my payments since it was in response to that but ALSO no#at that point I already wanted to shake whoever made that fucked up choice#cause already I'm tired of it#it should be either in my messages or on my dashboard with the payment it belongs to#y'all don't know what you are doing get outttt#I should do two things:#a) start a 'learn everything' discord server with anyone who wants in#we will teach each other everything we want#fuck khan academy I'm doing this now#b) go on linkedin and promote myself as consultant for 1000 things#app design/user interface consultant#communcation consultant too#writing consultant! Social media consultant!#if it makes me want to yell at you I will yell at you
1 note
·
View note
Text
Etsy Shops Can Now List Saturday and Sunday as Processing Times

UPDATE (July 16): As usual, Etsy cannot be trusted, and they opted some shops in without telling the seller. Go to your shipping settings page to check that your settings are still ok.
On July 5, many Etsy sellers discovered a message like the one above on their dashboards, creating some hilarity and a lot of confusion.
No, I don't ship on weekends, and definitely do not deal with 96% of my orders over Saturday and Sunday, and
Does anyone at Etsy really think I would expend even a tiny bit of energy on my Etsy shop for the chance at $22 more each year? LOL
So, what does this mean?
First, they did make a real change to processing times, allowing shops to skip the sometimes confusing "business days" option and simply use a count of days that include weekends. But do not worry - you must opt in to make use of the new weekend times. On my shipping settings page in the Shop Manager, I see this:

Note that you can choose to add either Saturday or Sunday, or both, as processing days, and that you have to click "Update" for this to take effect.
Second - because Etsy will never make anything logical and easy to understand - while this may mean some of your orders will now be due to ship on Saturdays, "[i]f a ship-by date falls on a Sunday, we'll bump it to the next business day." So, in reality, they have only added Saturday as an optional processing day, but not Sunday. Etsy Support confirmed this to sellers, as well as mentioning it on the Shipping Settings page.
Note, however, that the Help page only states that "If a ship-by date falls on a Sunday, it will usually be bumped to the next business day." [my emphasis]. That means that even those of us who don't opt into extended processing days should watch the due dates of our orders, and extend the processing time per order where necessary.
Remember, shipping late makes shops ineligible for Seller Protection and Star Seller, and puts the shop at risk of a payment reserve. Don't mess with this setting unless you plan on carefully watching your order "ship by" dates, and do plan doing some work on weekends.
Why Would Etsy Do This?
Etsy claims that there is a higher conversion rate for items that ship more quickly, so adding weekend processing times may increase the orders in your inbox. A whole $22 worth for me, apparently. 😉 Across the site, that could be a nice bonus for Etsy's bottom line, however, even if only a few percent of sellers opt in.
Why they say they are adding both weekend days to processing times but are still not expecting anyone to ship on Sunday is beyond me - that makes no sense. Yes, it means that 6 out of 7 times, an order will show as processing and shipping 1-2 days earlier than it did before this option existed, which could increase sales. It still means that there will be confusion over the items that should have shipped on Sunday but will show a longer processing time on that order in reality.
For those who worry about Etsy expecting you to work 7 days a week, remember, this is not mandatory. In addition, many sellers do already work on Saturday and/or Sunday, but up until now, could not reflect that in their processing times. Not everyone has the luxury of getting 2 days off each week, and many folks may choose a different 2 days off, especially those in countries where Saturday or Sunday could be a business day. Some shop owners with full time jobs do most of their Etsy creating and packaging on the weekend. Some countries do have shipping couriers open on these days (Canada Post has a few outlets open 7 days a week, and USPS has some locations open Saturdays, for example).
In short, this change is an option that better reflects the diversity of seller experiences than a Monday to Friday work week ever did. If you don't like it, don't use it.
The best case scenario would be if this announcement was an early step towards letting each shop choose its own work days, holidays, and down time. As long as they have programmed it correctly, that is.
0 notes
Text
The Treatment of Captain Syverson-Chapter 14: No Call No Show
Characters: Shane Benton (OFC), various other original supporting/secondary characters
Summary: We find out where Shane went Monday after work and exactly why she hasn’t been responding to any attempts at communication…and unfortunately, she’s not just taking some “me time.”
Want to reminisce about when this was just a happy little fluffy romance? Return to chapters past, or look at my other smutty drabbles here!
Word Count: 3.6k
Warnings: SHANE FIGHTS BACK, BUT DEFINITELY GETS HER ASS KICKED, SO FAIR WARNING, IT’S VIOLENT. Language, mature themes, emotional abuse, mention of narcotics (morphine), vomiting, foreshadowing and mention of potential future violent/non-con/dub-con activities, but if those acts occur, they will not be portrayed on the page, but rather between chapter or section breaks, so don’t worry. Also, I use the “R” word, but not to discuss non-con, but rather to add an educational note about why one should yell “fire” when one is being assaulted. Basically no Sy material whatsoever, but he’s mentioned, so I’m tagging it as such! Shane being somewhat blasé about her mortality. I really don’t want to trigger anyone, so please read with caution or wait until you emotionally are ready to deal with our girl going through the shit.
Author’s Note: Really REALLY nervous about this one. This is not the resolution you are looking for, my friends. In fact, it’s not a resolution, at all. Lol. I foresee many people disliking this chapter for some reason or another. That’s actually okay. It’s not a chapter you’re meant to “like” per se. I don’t “like” it. I’m prepared for it to get very few notes, and I’m positioning it anyway. I think it’s some of my better writing, but I hated putting Shane through the ringer like this. It’s just one of those chapters you “get through.” And honestly, if you truly didn’t like it please give me feedback so I can improve and tweak. {For reasons other than “My beebeeeeee!” or “never mention anything less than consensual ever again kthxbye” because a) of all, MY beebee too, and b) of all, that’s what warnings are for and why they should be read.} That being said, I hope it at least tides you over until the next chapter. At least you know where she is…not that THAT’S a big relief under the circumstances! Lol!
Disclaimer: Unfortunately for me, Henry is not mine, le sigh, and all mention of him, his characters, any characters from his films, or his precious doggy, Kal, are strictly for transformative and recreational use. I neither ask for, nor accept payment for the work I post on Tumblr or AO3. Unbeta’d because this is for fun and escapism.
Tags:
@onlyhenrys
@cavillryarchive
@summersong69
@titty-teetee
@bloodyinspiredfuck
@agniavateira
@oddsnendsfanfics
@omgkatinka
@thisismysecretthirstblog
@misslaland (apparently deactivated, idk what’s up with that)
@speakerforthedead0
@tumblnewby
@suavechops
@radkesgirl83
@wheretheriversrunintothesea
@heartfelt-pen
@auds24
@geekycanuck
@lunarstarknight
@wilma-g
@coldmuffinbanditshoe
Hope I’m not forgetting anyone! If you want to be notified when I post a new chapter or work, I’ll be happy to add you to my tag list! Stricken blogs are getting personal messages from me when a new chapter is uploaded because Tumblr’s faulty tagging system will not stand in the way of me delivering what the people want!(?) lol! (Although…their lackadaisical notification system might…sorry for that. I have no control. lol!)
X@X@X@X@X@X@X@X@X@X@X@
Previously, in Virginia…
"Shane left work Monday and hasn't been back since. No one has seen her. Apart from you, I presume. "
"I haven't seen her in about a week and a half. I'm training out of state for a job. I've been away from my phone since Monday, and I just got back to it now."
"She isn't…with you? I assumed…"
"Well, you know what they say, Susan. I'm coming back early if I can manage it. See if I can do something to help find her."
Three days earlier, in Missouri…
Shane blinked her eyes open to little avail. She couldn't tell where she was, other than what seemed to be the back seat of a fairly new-model large vehicle, like a Suburban or a Tahoe. She thought it was new because the new car smell was still overpowering the nicotine and tobacco odor of at least one of its occupants. She could also smell the sickly sweet stench of artificial cherry permeating the cabin. The source must be very close to her nose as she lay there helplessly restrained while the vehicle jostled down the road. The smell reminded her of the horrible liquid pain reliever her mother would give her as a child when she had a fever or leg pains. She had taken enough of it then to make her averse to most cherry flavorings as an adult. She wanted to retch.
She could also make out the faint glow of a dashboard lit with LED lights, brighter and softer than those of older models. But she soon had to shut her eyes again. Her head was throbbing and her memories were fuzzy. She remembered very little of Monday…was it still Monday? But she was trying to think, despite the pounding of many drums in her cranium where a brain should be.
She remembered staying at work late to finish notes. She remembered heading home…and she remembered forgetting her phone at her desk and deciding to turn around to get it…when suddenly she was surrounded by vehicles and unable to move without having an accident. Had she known the circumstances then, she would have tried to muscle through. The horrific events came flooding back in traumatic flashes like lightning, or the pulse of passing streetlights in an unfamiliar city.
She remembered…
The glass by her left ear shattered. A hooded, hulking figure reached in through the new opening, fumbling for the handle to open the door. She'd had the presence of mind to fight back there. To punch at the probing extremity. But the extremity hit back, landing a solid smack against her left cheek, stunning her for long enough that the cruel apparition found the unlock button, pressed it, and opened the door. She didn't go quietly. She fought like the hellcat her mother always told her to be. Her foot found the odd solar plexus and groin before enough dark nemeses arrived to overpower her. They dragged her away from her car and out onto the pavement of the church parking lot she'd used to turn around. She did not make it easy for them. She kicked and punched and tried to twist out of their grips like vices. She yelled "fire" as she was taught as a young woman, not knowing the men's intentions, but certain they weren't kind, and knowing that yelling "rape" was not always effective at summoning help. Either way, it didn't matter. She could have shouted anything. No one was near enough, or cared enough, to come to her aid. As soon as her soft hands hit the gritty pavement, though, the violence intensified. She lost count of how many times she got kicked in the back, stomach, ribs. One asshole even kicked her in the tit. She'd find out who that was and he'd find himself in a special brand of pain…if she ever got out of this alive. She heard them calling her awful names that she was sure she hadn't earned, and especially not from these guys. About six of them, she thought. She hardly knew six guys. She certainly didn't know six guys that would want her roughed up like this. She heard one of the men start to say "Come on, guys, we better save some for--" and with that, she blacked out to the tune of the distinct "thunk" of a wooden baseball bat making contact with the back of her head.
She wanted to forget…for it to be a terrible nightmare…to wake up.
But she was awake. This was a waking nightmare. The cold leather on her cheek was made colder by the harsh air conditioning blowing toward her from above and below. She shivered from the chill and from the terror she was trying to suppress. Where were they taking her? For what purpose? And for whom were they leaving parts un-bruised…though it didn't feel like it.
She finally felt them slowing, heard a turn signal clicking, the courtesy of which she applauded despite her position in the active abduction taking place, and felt the gentle displacement of her body toward the driver side, knocking her head into the door. A right turn. Not that it would matter too much, but at least when she escaped, and she made herself think "when" and not "if," she would know which direction to turn to get back to town.
The blow to the head had left her sensitive to light and sound. As she was yanked from the back seat, all she could see was the glow of a dusk to dawn light above them. Normally a soft, guiding light, this one just as well have been the sun itself the way it stung her tender eyes. She squinted against it, thankful as she never would have thought to be, when a shroud was placed over her throbbing head. She could still hear the power coursing through the bulb and fixture, though. Normally a dull hum, in the state she was in, it was as loud as accidentally switching your TV to the snow channel at full volume.
"Bring 'er inside." She heard an unfamiliar male voice say.
Two strong, ruthless hands grabbed her by the armpits, causing her to cry out in pain. Such a tender place to bear weight, and why even big strong Sy hated crutches…Sy. Would she ever see him again?
"Shut up, bitch, or we'll knock you out again." She believed them, and being fairly certain she had at least a mild concussion, she wasn't sure what a second blow of an indeterminate velocity might do to her brain. She dealt with the stabbing pain as the men dragged her across what sounded like gravel, then grass, then something hard and smooth, maybe the slabs of an old, sunken, and somewhat uneven footpath. Soon, she felt the pain of her knees hitting what she assumed were porch steps. One, two, three of them. She was trying to concentrate through the fog now setting in, and maintain consciousness. Paying attention to the sensations, she told herself, was not only helpful for that task, it might help her escape. Remember the scents, too, she reminded herself. She tried to shake off the nauseating cherry and cigarette stench from her olfactory glands and take note of the bouquet around her.
Burnt leaves…gasoline…engine grease…the tang of sappy, just cut firewood…straw…manure…this seemed to be a farm. With a barn nearby…perhaps with horses. She loved horses. If she could find a gentle horse in the night…escape might be easier than she'd anticipated.
Entering the house was a noisy affair. There was a metallic keening from the spring of an aluminum screen door. She imagined it had one of those big swirly cross beams like her grandma's used to have that she always though was supposed to resemble a butterfly. A heavier, wooden door creaked open as the three figures muddled their way in, and the floorboards protested, as well, at the weight of her captors. So, she thought, not only a farm house, but an old farm house.
"Where do you want her?" the man on her left asked into what she only knew as the void, so far.
"Take her to the cellar. I've got things set up down there." a familiar voice chuckled and growled. How did she know the voice? Was he a patient? She couldn't think of anyone she'd treated that would want her abducted and brutalized.
"You got it, E." Ugh, for some reason it bothered her when guys referred to each other by their first initials. Girls, no big deal. But bros…there was something so thoroughly douchey and…familiar about it all…
"Hold on." the man called "E" said, and she heard footfalls approaching her. As he got closer, she smelled…patchouli and incense…and the sea…and it brought back a rush of pain from past trauma followed by literal pain from his punch to her gut. She hadn't been expecting it. Obviously. The wind had been taken out of her. Literally and figuratively. She did know this man…all too well.
"We've got some catching up to do, sweetheart." the pet name dripped like venomous honey from the tongue of the snake before her.
"Elliot." it wasn't a question. She coughed the name out like a pill that had gone down sideways.
Her escorts continued their transportation of her prone body to its destination…she didn't want to think FINAL destination, but the more she learned about her situation, the more she worried that she wouldn't make it out alive.
They had to get creative in carrying her down the narrow staircase to the cellar. They argued for a moment about who would take the top half and who would go backwards.
"How about the one who takes my top half goes forward and the bottom half goes backward?" These idiots. Where did Elliott find clowns like this who needed to be told by their prisoner the best way to sort out their domestic dispute.
She thought she felt them shrug, and silently take her advice as she felt herself being lowered down the stairs, feet first, panic threatening to overtake her restrained limbs.
When they got to the bottom of the stairs, they stood her up to remove her shroud, and cut the zip ties from around her ankles and wrists. She then noticed a small cell that reminded her of the ones in the sheriff's offices in some westerns she'd seen. She started to freak out, anticipating her future in that horrid place.
"Guys, please. No. Please don't do this. I don't know what Elliott's told you about me, but I'm a good person. I don't deserve this. I have a job and friends and a family who will worry sick about me. I am begging you to let me go. Please!"
"You're wasting your breath, lady." one of the men said, gruffly.
"PLEASE!" she appealed, desperate to get through. "Don't you guys have wives or girlfriends? Mothers, sisters, aunts, or female cousins? What if a woman you cared about was in this situ---" and before she could finish the question, one of the men punched her for what felt like the thousandth time tonight. She fell to her knees, vomiting. And the world went black again.
~~~~~~~
There were no windows. There was no clock. There was just a small twin mattress in one corner of the cell, and a bedside commode in the other. As accommodations went, it was hardly a Hilton, but it could have been worse. It was all lit by a 60-watt bulb in one of those hanging fixtures her dad had always called a trouble light situated on a hook on the side of one of the exposed joists outside the cell. He'd had a similar one for the longest time. He and mom will be worried sick before long, if they aren't already, she thought. The light was aptly named for these circumstances she was in. Trouble. A heap of it. And no idea of how to get out of it.
And honestly, no idea why Elliott would want her here. How he could do such a monstrous thing as having her kidnapped. How he came to live in this place when he never worked a day in his life. She was so confused. She hoped at the very least, he'd give her answers before he murdered her, if that was his plan.
She had woken up on her side, almost her stomach, with her right cheek on the scratchy surface of the bare mattress. Whoever put her to bed had been wise to position her like this given the likelihood that she might puke again. She noticed a small bucket, presumably for that purpose, next to the mattress. There was a caseless pillow next to her head, but she hadn't found that comfort during her nap of…she couldn't tell how long. Not that it mattered. The more she slept, the less time she'd have to process this horror movie she was currently living out.
She heard the door open at the top of the stairs and Elliott shout at one of his flunkies, "What do you MEAN you didn't get her phone?" a pause while indistinct words came from said flunky across the room, or maybe the house. "Well, find it. Tear that piece of shit Explorer apart if you have to. I want that phone." She took exception to her sweet little Norah getting called a piece of shit. That was her Millennium Falcon. And yes, she'd gotten flack for naming her Norah the Explorer, but she didn't care.
Elliott stomped down the stairs, grinning the most infuriatingly happy grin she'd ever seen on him. She wanted to maul him. To tear those stupid eyes out of their sockets with her own fingernails. But she controlled her anger and resisted even acknowledging his greeting of "Hey, sweetheart."
She ignored him.
"It's good to see you."
Silence.
"I missed you."
She stared right through him.
"I heard you and that meat head soldier broke up."
She scowled at him.
"There she is. There's my girl."
"I'm not your girl, Elliott, and I haven't been in years. Why am I here?" She broke. She couldn't take it.
"We'll get to that why soon enough. First, let's talk about why you and Cap'n Crunch are no longer breakfasting together? Soggy cereal? Limp toast? Was he letting you leave the table unsatisfied?"
"As if you ever satisfied me when we were together." She spat back, calling Elliott out on his notorious selfishness in all aspects of life and relationships.
"I've changed."
"Bullshit." she rolled her eyes.
"It's true!" he insisted. "I can give you references."
"I honestly don't give a shit. We're not together. Sy and I are. Happily. And you better let me go soon. He was expecting me at his place after work. He's probably out looking for me right now." she lied. It was worth a shot.
"Now it's my turn to call bullshit, because I know that isn't true." He looked at her with that patronizing stare he had.
"You don't know shit, Elliott."
"I know that your boy took off over a week ago for Virginia and hasn't come back, at least not the way he left. I believe he's supposed to be gone at least a few weeks. Maybe a couple of months. He wasn't sure at last report."
She was literally willing him to burst into flames before her. Her gaze revealed her hand.
"Told ya. You think you're the only one with connections at the fort? I've got me a sweet little sergeant who works in ATC over there. She can out-squat anyone else on base…and let me tell you, it shows." he lifted his eyebrow, lasciviously.
"You disgust me."
"Why? You never seemed to mind my…sexy imagination." he winked at her.
"No, I'm happy that you're getting it good on the regular from an ass that won't quit. But come on. You clearly only got with this girl because you thought it would give you the upper hand against me."
"Well, that's very self-absorbed thinking."
"Really, Elliott? Do you see where we are right now?" they looked around at the dank cellar and he shrugged, unable to deny or rebut. "And this woman. Does she know about this little scheme?"
He gave her one of his more evil grins. "Who do you think kicked you in the tit?" Okay…she was new levels of pissed off now.
"Why…the actual FUCK am I here, Elliott!?"
"Well, Shane, you embarrassed me with that little stunt at the bar a few weeks ago. You thought you were hot shit, parading your sasquatch of a boyfriend around in front of me, in my town, humiliating me as all of my friends watched. And then that dickhead sucker punched me in the parking lot. I shoulda pressed charges. But him being a veteran, I knew how that woulda gone in this town. I didn't have a snowball's chance. So I waited. And I planned. And I was patient. And I watched for my moment. And it finally came. I've been watching you leave work every night for the past week, and you're always with someone, or headed somewhere else, or going straight home. Last night…last night I knew was the night when you didn't leave until after 7. You were the last one out, and I knew that it had to be then. The plan, not that you need to know, is to plaster your social media with humiliating photos, piss off everyone that you love, including your precious Sy, and alienate everyone you've ever cared about until you're miserable and alone."
Shane was crying now. She thought she might be sick again. She reached for the bucket. The delusion of this man thinking that anyone in that bar besides maybe the ones that were there with him that night gave a shit about him. Thinking that the town was his. He was a nobody there. He hadn't grown up there, he didn't work there, he didn't participate in community events. He was kidding himself if he thought anyone cared enough about him that he should feel shame over her relationship with Sy, especially five years after their relationship with each other had ended.
"How's that for a 'why,' sweetheart?" he boasted.
"It's making my ask myself a lot of questions. Like why I ever agreed to go out with you all those years ago. Why I didn't see the signs that you were a psychopath sooner. And why I put up with your terrorism for so long thinking you'd ever really change. I can't believe I ever slept with you, you absolute barbarian." and she heaved into the bucket, non-productively. She hadn't eaten since lunch, and that had to be well over twelve hours ago.
"Well, ya did. And ya can't change the past. But I'm about to take your future into my hands. As soon as we find your phone, we're gonna have us a ball, little girl."
"You honestly think I'll cooperate with any of that?"
"You won't have a choice." he held up a little glass vial. "Morphine. A tiny dose of this stuff, and you'll do anything I tell ya."
"Please. Just let me go now, and I won't press charges. I won't go to the cops, at all. I'll call in to work with a headache, or something and you can live your life with Sergeant Squats and we can leave each other alone."
"A good offer, but I need to get something out of this. I need my pride back."
"And you're gonna get that by dragging me through the mud online from my own Facebook account? Is that really the way you wanna do this? When you could just show me what a great life you've built for yourself. This is a great place here, it seems, I mean, I only smelled it, and felt how big it was while I was getting dragged around the place. But, Elliott, if you had just told me about all this, I would have been happy for you!"
"This place is Sasha's."
"Oh." she grasped for something, anything to make him see how insane he was being without saying the words. "Well, I'd still have been happy for you finding an established woman with a great job. Why couldn't you have just written me a letter telling me that? An email! Something."
"This is how it's getting done, Shane. Because this is the only way that truly ruins your life in the process. Because at the end of all of this, the backlash is going to be too much for you, and you're not going to be able to handle this life anymore…"
"No. Elliott, no."
"Yes. You're gonna take one last hit of the morphine and drive that shitty Ford right into the lake."
"You used to care about art. About beauty. You used to be sensitive. You used to have a soul. What happened, Elliott? What happened to your humanity?" Shane asked, crying, in mourning for the man he used to be. The one that she used to care for.
"I fell in love. And she broke my heart. And nothing has been the same."
"Elliott, I didn't mean to…"
"Oh, fuck, not you, don't be stupid. No, Kara. I met her right after you kicked me out, and SHE broke my heart." he turned and started up the stairs, pausing to look over his shoulder and say, "I'll be back when I have your phone. And I'll bring friends." before he ascended, shutting the door firmly behind him.
She had never been so relieved to NOT have her phone in her life. Hopefully, her coworkers had it safe and sound, and locked up at work.
Up Next: Chapter 15-Recon
#netflix sand castle#Sand Castle#captain syverson#Captain Syverson x OFC#captain syverson fanfic#sigh for sy#henry cavill#henry cavill fanfic#henry cavill x ofc#this is either a bit angsty or it will give you angst it is hard to say
59 notes
·
View notes
Text
ParaMountZ Review 2021 - ⚠️Launch Discount & Huge Bonus⚠️
WHAT IS PARAMOUNTZ?
These days a quality instant funnel builder is… The only tool that anyone needs to build beautiful highly-profitable websites. And as a marketer that should be music to your ears for 2 reasons…
You can have complete control over the look and feel of your websites without having to learn any of the boring time-consuming codings…
The days of spending thousands of dollars on freelancer designers, developers, and website hosting companies are a thing of the past…
In 2021, a funnel builder is your one-stop-shop for creating beautiful sales pages, sales funnels, landing pages, and much more in seconds…
Even if you have zero web dev experience or knowledge. But there’s one big problem with all of the “corporate” funnel builders… They All Charge You A Monthly Subscription For Their Service
==> Special Discount: Order Today With Best Price And Special Offers
I wanted my own funnel builder that I could use to create a sizzling-hot website in seconds without the need to bust our photoshop or my HTML editor…
A that provided a “Wix like” builder without denting my wallet every month…
A builder that we could market to our internet friends and peers like you…
A builder that would enable you to stop paying out monthly to the corporate giants (who are clearly all in cahoots to suck every last penny they can out of us marketers)…
A builder that would enable you to fulfill all of your funnel builder needs for years to come without spending another dime on design, development, or hosting…
After 2 years of working closely with a team of world-class developers, ParaMountZ was born.
ParaMountZ is a world class Funnel/Page builder that gives you all of the functionality that you would expect from an expensive subscription service, for a tiny fraction of the price… I had the privilege to receive Beta access to this great cloud software ParaMountZ, and all I can say is GET THIS NOW!
>> Visit The Official Website Here to Place Your Order!
There’s just so much packed inside this one members’ area that I don’t even know where to begin. ParaMountZ helps you find hot offers from JVZoo, Clickbank and W+, and build high converting affiliate pages.
You can share these pages across 100 social media sites. Create visually appealing email marketing templates, high converting SMS marketing messages, build traffic-pulling eCommerce sites, and so very much more.
Almost everything you need to build and operate a thriving online business is available in the members’ area of ParaMountZ. I’m serious… You can operate a six figure online business from this one site.
I buy a lot of automation type products, and for the most part, they’re good products to have, but this membership eliminates the need to invest money in so many different products and sites.
(LIMITED SUPPLIES) Click Here To Order From Its Official Website
ParaMountZ Elite is setting a NEW standard for effortless online traffic, leads & sales. Marketers of ALL backgrounds are loving the results from this 100% legal, breakthrough app that AUTOMATES traffic, list building and conversions. But all good things come to an end.
It would definitely seem that this new all-in-one beginner-friendly programme from the well-known and respected software developer Mosh Bari can be the ultimate affiliate tool.
It finds successful higher-commission offers on the 3 major affiliate product platforms and then enable you to build irresistible high converting affiliate pages, create appealing campaigns and share it across 100 social media sites – an affiliates dream come true… It even build you traffic-pulling eCommerce sites, and so very much more
Get ready to drive unlimited traffic, capture unlimited leads and engage unlimitedly like never seen before. It’s a cloud-based software that automates social media marketing across Facebook, Messenger & Twitter for viral traffic, lead generation & sales.
HURRY UP GET EXCLUSIVE 50% DISCOUNT OFFER ON OFFICIAL WEBSITE.
ParaMountZ is the world’s biggest and most powerful social media marketing tool that allows customers to create highly Converting Ads Like Posts, Campaigns, Optin Pages, Interest Groups, Messenger Shops fast and easy in less than 2 minutes without paying a dime.
ParaMountZ is created with proven to convert ads like posts, CTA Powered Campaigns, Messenger Online Selling, Chatbots, Lead Generators comprising top platforms like Facebook, Instagram, Messenger and Twitter.
In the next parts of this ParaMountZ Review you’ll see full details, including a demo and proof of results from multiple marketers … including COMPLETE beginners making their FIRST online profits with this software.
HONEST PARAMOUNTZ REVIEW – MY OPINION: IS IT WORTH USING?
If you’re already using social media to promote your business, awesome. If you’re not – I totally get it. There are so many platforms and potential solutions, it gets pretty confusing. For best results, whether you’re new or experienced … it helps to SIMPLIFY.
What’s the biggest social network online? Facebook.
Which one has the most authority? Twitter.
How are MOST people connecting with brands & businesses? Messenger.
So instead of overcomplicating things, just focus on those three. ParaMountZ Elite is a unique software that brings you the best results from Facebook, Twitter & Messenger inside ONE dashboard. Instead of running different campaigns to drive traffic, create leads or sell … Now you can do ALL THREE with every post!
Innovative, platform-approved tech means your posts maximize traffic. Turn as many clicks into leads as possible … And do the selling FOR you with cutting edge automations.
Get For a Special Discounted Price Today (In Stock)
As powerful as the software is, it’s 3 step simple to use – and you can start seeing results within HOURS. Imagine leveraging MULTIPLE social media platforms for targeted traffic … And turning more CLICKS into LEADS than EVER before possible!
This groundbreaking tech gets you VERIFIED email subscribers from both Facebook & Twitter. Lets you create retargeting audiences on the fly … Build messenger lists at the same time. AND redirect new subscribers to ANY URL for impulse sales.
The World’s First 300-in-1 Traffic App lets you:
Send High-Quality Buyer Traffic to ANY Link or Offer
Make Consistent Sales Every Day with FREE Traffic
Build a Massive List in ANY Market (To Sell To the Same People Over and Over Again)
Grow an Influencer-Level YouTube Channel and Social Media Following
Hit Affiliate Leaderboards Overnight (Cash Prizes and Clout!)
Never Pay For Traffic Again
So for every campaign, you’re creating 3 lists in one WHILE making sales!
Grow your email list to skyrocket conversions on your promos
Build retargeting audiences you can market to with dirt-cheap FB ads
And create unique Messenger lists that get EVERY one of your messages with a 100% delivery rate!
Best part? This software works whether you’re posting organically OR running paid ads – so you get the best results from BOTH free and paid traffic.
What Makes It Different? 3 things, really.
1st – the posts this software creates are really amazing. They stand out and get maximum attention – job #1 for social marketing.
2nd – the lead generation technology is INCREDIBLY slick. Every click on an image or carousel post gets you an email subscriber with VERIFIED contact info. Every COMMENT on a post gets you a Messenger lead, that you can market to and get 100% delivery rates.
3rd – this software is BUILT for conversions. You can filter new messenger leads into ‘interest groups’ based on their replies. Add new email leads to ANY list you want … Use the INCLUDED chatbot to run fully-automated messenger promo campaigns to turn new leads into buyers.
And create retargeting audiences from EVERY click on EVERY post … meaning this software maximizes your conversions from EVERY possible channel.
Ask yourself, can you afford to miss this ‘no brainer’ opportunity? At a tiny one time payment to access ParaMountZ, investing in software is a complete no brainer. I don’t need to “sell” it to you. The demo above does all of the talking…
Most web hosts cost more than that for a month and they don’t even give you any ability to instantly create wonderful high-performing websites like ParaMountZ does…
If you’re a marketer who invests in either web hosting, a Funnel builder, or a designer or a developer then you’re going to save a huge amount of money this year alone by investing today…
(ACT NOW AND SAVE) Click Here To Get at a Discounted Price!
Over several years, you’re going to be saving multiple-thousands of dollars.
Even if you’re yet to build your first website and simply have “plans” to start making it online in the future, you should grab this exclusive offer today. If you do, it means you never have to spend another penny on web development costs…
ParaMountZ enables you to build a beautiful website in seconds… Prior to creating ParaMountZ; Mosh and I spent thousands of dollars per month on web development. We were forever spending money on designers and coders for our landing pages, offers, and funnels…
That’s not to mention the hosting costs. But with ParaMountZ we can instantly create beautiful sales pages and landing pages in super-fast time, despite the fact we don’t have design or development expertise…
PARAMOUNTZ OTOS AND PRICE
For a limited time, you can grab ParaMountZ with early bird discount price in these options below. Let’s pick the best suited options for you before this special offer gone!
Front-end: ParaMountZ ($17)
OTO 1: Limitless Edition ($19)
OTO 2: The Lazy Rich ($67)
OTO 3: Autonomous Luxury Edition ($29)
OTO 4: Robot Upgrade ($77)
OTO 5: DFY Store ($67)
OTO 6: Jericho Super Blaster ($39)
OTO 7: Click & Go ($29)
OTO 8: 1K Every Day ($19)
OTO 9: Reseller License ($29)
PARAMOUNTZ REVIEW CONCLUSION AND ULTIMATE HUGE BONUSES
Thank you so much for reading my ParaMountZ Review. I really hope it did help you with your buying decision. This system is coming out with many bonuses for the early bird. Take your action ASAP for the best deal.
==> Read More Here: Don’t Miss Out Today’s Special Offer <==
1 note
·
View note
Text
How to Close Your Cash App Account on Cash App Website?
If you’re one of those few people who feel fed up with Cash App, you’re probably looking for ways to close your Cash App account. Well, there’s nothing wrong if you’ve made up your mind and decided that you’ll no longer need to use Cash App. This because the platform allows users to manage their accounts in the way they deem fit. So how do you close the Cash App account?
There are two ways to close your Cash App account. You can either close a Cash App over your phone or through Cash App official website (contact page). While the deleting process will vary depending on the method you choose, you’ll still attain the end product, which is to Cash App closed my account.
Things to Take Into Account before Deleting Your Cash App Account
There are a number of things to consider before deleting your Cash App account. They include:
· Keep in mind that you won’t be able to access your payment history once you close or deactivate your Cash App account.
· So you can download your payment history if you need it for future reference.
· You can’t close your account if there are any pending payments or deposits. That being said, you should send any pending funds and clear your account of any funds.
· You have to cancel your Cash App subscription and stop any upcoming month billing before you deactivate your Cash App account.
��How to Close Your Cash App Account on Cash App Website?
Step 1 – Visit the Cash App official website and login to your Cash App account using your email address or your phone number (use the one you used to open your Cash App account).
Step 2 – This web page should take you to your account dashboard. A Request Sign in Code will appear on your page. Tap on it, and a code will be sent to you either via email or SMS, depending on the information you provided when you were signing up. This process should, however, not be a problem if you do not have a Debit Card or a Cash Card.
Step 3 – Enter this code and tap on Sign In and confirm your identity.
Step 4 – Open Account & Settings and go to the Personal Information tab. You should then scroll to the bottom of the page and select Deactivate Account.
Step 5 – You’ll be directed to a page where you’ll be asked to give a reason for deleting your account. Just choose your suitable reason and click Continue. It’s important to ensure that the message contains your full name, phone number, and email address.
How to Close Your Cash App Account over the Phone?
It’s also possible to close the Cash App account over your phone on the platform’s app. This is probably the easiest method, so let’s see how to go about it.
Step 1 – Open the Cash App on your phone.
Step 2 – If you’ve cleared the funds in your account, you can then tap on the circular icon resembling a person in the upper left corner to display the Account Menu.
Step 3 – You should then scroll down on the account menu and tap on ‘Cash Support.’ Scroll down and tap on the ‘Something Else’ menu.
Step 4 – On the ‘Something Else,’ scroll down and tap on ‘Account Settings.’
Step 5 – You should then tap on Close my Cash App Account. This is to basically confirm that you want to deactivate your Cash App account. You’ll be signed out of the Cash App, and a close confirmation will be sent to you via your email address or through SMS.
Conclusion
As you can see, deleting your Cash App account is a very simple process. Whether you decide to close it through the Cash App website or over your phone, any method should work seamlessly. Just follow the above-mentioned processes, and you’ll be good to go.
0 notes
Text
HOW TO CLOSE MY CASH APP ACCOUNT
Cash App has emerged as one of the most popular money transfer application in the last few years and become prime money transfer service provider in short duration of time. It is a useful app for sending money to family, friends or other contact with the help of your phone or with Cash App website. It has greatly reduced the problems of the people by providing a robust and digital platform for transferring the money.

Points to be noted before close your Cash App account
You must always remember that you won’t be able to check your payment history once you have closed or deactivated your Cash App account. So, you are suggested to download your payment history and keep this record with you, if you need it for future use.
Before cancelling your Cash App account, ensure that you have done your all pending payment and transactions. As you can’t close your cash app account if there is any pending transaction exists in your account.
You are suggested to unsubscribe or cancel your Cash App subscription in order to stop any upcoming monthly bill before close or deactivating your Cash App account.
Steps to close your Cash App account on Cash App website
Open the Cash App official website and login to your Cash App account with your phone number or your email address that you have initially provided while opening your account with Cash App.
After successfully logged in to your account, you will be automatically redirected to the account dashboard from where you need to request for a sign in code by clicking the “Request sign-in code” button. On clicking the button a code will be instantly sent to you either via SMS or email depending on the details that you have initially provided while opening your account with Cash App.
Confirm your identity by entering the verification code and then click on “Sign In” tab.
After successfully sign in your account, go to Account & Settings and then open personal information tab. The next step you should follow is to scroll down to the bottom of the page and click on “Close Account” tab.
After that you will be directed to another page where you need to provide the reason for close your account. You need to select the most suitable reason and proceed further by clicking “Continue” tab. You should ensure that the confirmation message must contain your complete name, correct your phone number and email address.
Once you have confirmed your request, your request for account deletion will get submitted and the Cash App customer support team will get in touch with you for any additional information needed. After complete verification of your account deletion request, the support team will confirm the successfully deletion of your Cash App account.
Steps to close your Cash App account with your mobile device
You can also alternatively close your Cash App account with the help your phone on the platform’s application. This method is rather easy than to close the account on Cash App website.
Open the Cash App on your mobile device. The icon of this app is green with a white dollar sigh.
If you have money left in your account, don’t forget to transfer this remaining balance to your bank account before you move further. You can transfer your money by tapping amount figure available in the bottom left corner and then select “Cash Out” option.
To display the Account Menu, tap on the circular icon on the upper right hand corner. This is a circle icon resembling a person’s head.
You need to scroll down on the menu and tap on “Support”. The icon of this option is a question mark symbol.
Tap on “Something Else” at the bottom of the new menu option.
Further scroll down on the “Something Else” menu and then tap on ‘Account Settings.’
Scroll to the option labeled as “Close my Cash App Account” in the “Account Settings” menu. It should be located fourth from the bottom.
Tap on the next option “Confirm Closing Account”. This option is just to verify that you wish to close your Cash App account. You will be then signed out of the Cash App. A confirmation notification will be sent to you through SMS or email that you have successfully closed your account.
Back to your device home screen to permanently close the app. Hold down the app for a short while.
The app will start to shake on your screen. After that you can close the app from your device permanently.
With above to ways, you will be able to Cash App close your account on the cash app website and your mobile device vey easily. You also have found that Cash App closed my account just involved few steps and is very simple process. You need to just follow the above mentioned steps and you will able to successfully close this app.
0 notes
Note
As someone who blocks unapologetically, I think saying that blocking means you're just intolerant of differing opinions is simplifying. I'm good with different interpretations of fiction (within reason ofc, miss me with the over the top kind of hate for my pirate, rumple, emma eyc, the demonizing, lying kind) and fandom, but I'm a big advocate of curating your fandom experience, and sometimes there's just people you don't want to see, on your dash or on your content, and blocking is an easy fix.
Sorry you’re feeling down, sweets. It might not have been without cause, though. That’s not me accusing you of anything, it’s just that going off my own habits, even the smallest thing can be cause to block. A single comment, how someone interacts with posts, tags my content, anything really. I block at the drop of a hat, for some admittedly stupid reasons, and at least from my pov, I can think the person is lovely in all other ways, but if there’s even a pinprick of an urge to block, I do.
(Putting these two Asks together, because they’re similar and my responses to them would be similar, not because I think they’re from the same Nonny.)
I just don’t know, really. I get blocking/muting on Twitter, because it’s a wholly different platform that’s so much more of a dumpster fire full of people getting up in your business on purpose and just being heinous hosebeasts, but…
On this site, I just don’t get blocking people unless they’re actually harassing you in some way, shape or form. For starters, blocking them doesn’t actually get rid of them? I block in reciprocation, and it does shit to keep a person’s posts off of my dashboard. I still have to use a filter if I want to actually stop seeing their posts (and I DO, because it’s so fucking annoying seeing content you want to reblog and then getting that fucking error message).
Which, speaking of… you can use those filters without blocking the individual at all. In fact, they work better than blocking someone, if your main goal is curating the content you see on your dash.
Really, the only thing blocking achieves is not letting someone reblog or comment on your content. Now, I can absolutely see the necessity of doing that if someone is leaving nasty comments, hijacking your posts or tagging things in obviously offensive ways. Those seem like obvious blockable offenses, as would someone you’ve asked politely not to interact with your posts in a specific way refusing to abide by that request.
Ah, but therein lies the problem for me. People on this site leap-frog RIGHT over any attempt to actually address their issues with someone in favor of just removing them from their tumblr experience entirely. Everyone goes on and on about tolerance and diversity, while they basically just erase everyone and anyone who doesn’t act, speak or think the way they like people to. And they feel entitled to do this without any explanation or attempt to resolve their issues with others before bringing things to that point.
I find it cowardly, honestly. Yeah, it might take a hot minute and feel a little awkward to shoot someone a “Heeeeeey, could you stop putting Spongebob quotes on my GIF sets?” or even a “We clearly don’t see eye to eye, so maybe we should just steer clear of each others’ posts” message, but at least you’re treating the other person like a person and not like an uncontrollable troll you’ve decided to eradicate once and for all.
I also feel like all of this goes ten-fold for content creators. I think if you’re creating content for a community or fandom, you should create it for the whole community - not only those you personally like and approve of. Content creators who block indiscriminately end up creating a kind of paywall to their content that’s not based on payment, but based on the creator’s idea of who is worthy of consuming their content and who isn’t. I don’t like that.
So while I do appreciate seeing explanations for this behavior from some folks who engage in it (and I do hope I don’t ever get blocked by either of you guys, whoever you are, but I’m not about to toe some invisible, unknown line for fear of it), I remain unmoved in my opinions on this. I don’t think blocking people should be done as the first response to someone annoying you. I think it should be the last resort, done only when someone proves themselves unwilling or unable to control themselves from interacting with you in ways you don’t like.
…or done reciprocally, so people who have decided you shouldn’t be able to enjoy their content don’t have access to yours. Hey, I believe in civil discourse, but I never said I ain’t a petty bitch :P
P.S. don’t block me tho
8 notes
·
View notes
Text
How to Catch a Cheating Girlfriend? Evidence instead of Signs
“How to know if your girlfriend is cheating?”“
If you are searching for this online, then you will get several articles. Telling you, there are signs that your girlfriend/wife is cheating on you. Most of the articles will state there are like 15 or 20 signs. While these signs are all okay but they won’t help you to truly catch your cheating girlfriend. To do that, you will need the help of technology. And in this article, we will introduce a great app for you.

Stop Looking for Signs That Your Girlfriend is Cheating on You
Of course, if your girlfriend is cheating, there must be signs. These signs help you to make the final decision. However, you should not accuse someone of being unfaithful with no proof. That’s why we bring the spy app solution.
If you don’t want to take this approach, then you can finish reading the following part.
If you want to verify your suspicions and find some hard evidence, go straight to Catch a Cheating Girlfriend Using Technology Solution.
Common Signs Your Girlfriend is Cheating on You
1. She is distracted
While your girlfriend was very attentive but now she barely looks you in the eyes. Especially you are repeating yourself countless times as she is not listening to you. According to therapists, this is a sign of infidelity.
2. Differently dressing
When a relationship reaches a comfort stage, both of the persons start caring less and less about their appearances. But one day you suddenly find your girlfriend caring about her appearance again. It possibly means that she is trying to impress another person.
3. You are not invited to her friends
She is getting along with her friends and spendig time with them frequently, and leaving you at home? It might not be a positive sign for your relationship.
4. She is paying a lot of attention to her phone
Everyone pays attention to their phone from time to time. But if she suddenly started going through the messages and social media pages a lot. The sudden increase in the frequency can be a sign, and you should question her motives.
5. Not getting physical anymore
While at the beginning of the relationship rolling under sheets was a regular occurrence, things may have changed—more like she is less and less interested in getting physical.
Although these signs are considered a signal for infidelity, there are also other possibilities. It is generally very hard to tell just from the signs unless you try the method below.
Catch a Cheating Girlfriend Using Technology Solution
We have discussed several signs above on how to tell if your wife is cheating on you. But it is also true that judgment by observing these signs will not be 100% accurate.
So, it won’t be helpful if you accuse your wife or girlfriend of cheating after watching these signs. Actions speak louder than words. It is better if you take the necessary action and collect evidence before accusing. If you are suspecting your wife/girlfriend, check their smartphones with a professional monitoring tool, called KidsGuard Pro.
This app scans all the aspects of the your girlfriend’s phone and provides you data via an online portal. You don’t even have to be close to the her cell phone, yet you will have access to all the data.
Above all these, the jaw-dropping features of KidsGuard Pro make it stand out among all the other monitoring applications. Let’s check out what can KidsGuard Pro help in catching a cheating girlfriend.
This app has both Android and iOS version to cover your need.
It can track your girlfriend’s location and all visited places.
It can track social apps chat history. (Messenger, Snapchat, WhatsApp, etc)
It can track call history, text messages, contacts and more.
Complete stealth monitoring without knowing.
More features to discover
How to Catch A Cheating Wife/Girlfriend with KidsGuard Pro
It doesn’t matter wife/girlfriend using Android or iOS, as KidsGuard Pro supports both. However, the steps vary. So make sure you follow the right guide.
If she is using Android phone
If she is using iPhone/iPad
If your girlfriend is using Android phone
Quick Glance: Sign up – install KidsGuard Pro app – verify setup – start monitoring.
Monitor Now
View Demo
Step #1: Create a KidsGuard Pro account and make the purchase to activate the account.
Step #2: You will be redirected to My Products and Orders Management page, where you should click on Setup Guide to find the app download link.
Step #3: After the app is successfully configured, it will disappear from the home screen. Now you should go back to the website and hit the Verify Setup button. If everything is in proper order, then you will successfully unlock its online dashboard.
Step #4: From this dashboard, you will be able to monitor your partner’s messages, social media, calls, and everything.
If your girlfriend is using iPhone/iPad
Monitor Now
View Demo
Quick Glance: Sign up – download KidsGuard Pro software – connect iPhone or scan backups – start monitoring.
Step #1: Create an account with KidsGuard Pro and complete the purchase via online payment. After that, you will be directed to the “My Products & Order Management’ page. Click on the “Setup Guide”. You can get the software download link.
Step #2: Now, on the computer that your girlfriend uses a lot, open the given link and download the software.
Step #3: After installation, log into the program with your account. You can choose to connect her phone or simply extract her iPhone backup file to find clues. Either way will start scanning process. Please wait for a while.
Step #4: When the scan is finished, you will be able to view different files. The deleted files can also be checked. If you want to save data for furture use, you can click the “Export’ button.
Now that the program has memorized your girlfriend’s iPhone. So, when she or someone else connects the device next time, KidsGuard Pro will automatically record the desired data and show you the details.
Ending part
So, how to know if your wife has cheated in the past? While it is not easy to digest the fact that your better half is cheating on you. But it is necessary to confront her and deal with the situation. While most people will tell you that look for the signs and confront her, we request you to do better.
Sometimes, even proper signs can be misleading. So, take action. Use KidsGuard Pro and check out her activity. If there is anything to worry about, then save it and confront her with collected evidence.
#kidsguard#clevguard#girlfriend#girlfriendboyfriend#android#iphone#ios#apple icloud#whatsapp messages#whatsapp#spy#spy app#phone monitoring app#monitoring apps#parental control app#boyfriend#snapchat#instagram#wanda marvel#vision#wandavision#relationship
0 notes
Video
youtube

paper writer
About me
Is Using A Dissertation Writing Service Cheating
Is Using A Dissertation Writing Service Cheating So, should you’re keen on hiring our low cost paper writers, our pricing will flip your frown the wrong way up. If you thought availing the assistance of our paper writers can be costly, then you could not be extra mistaken. On the opposite, our paper writers are recognized to supply their unmatched assistance at nominal pricing. Our web site consists of seasoned professionals who have proven their credibility of their respective fields. So, you can make certain that you'll receive nothing but one of the best when our writers for rent are working for you. If you have to complete any type of task, from time period papers to dissertations, inside the tightest time frame, don't forget that you can find dependable helpers on our web site. Customer evaluations from you help us to keep on improving. We encourage all prospects to leave their suggestions after our cooperation. Receive a paper of top qualityIf you want a preview of your paper, inform your assigned author to ship a draft. You have a proper to get a plagiarism report and ask for an unlimited number of free revisions if the author failed to satisfy a few of your necessities. Our professionals carry out in depth research whereas writing your paper. No matter whether your academic paper needs 500 phrases or 6000 phrases, we assure the originality of the paper while providing you with the originality report. Our system keeps a examine on your paper by way of multiple premium plagiarism checking software. Aside from these components, we even have a secured payment gateway via which you carry out your transactions smoothly and without any glitches. A PRO Masters degree writer will do your essay in 3-6 hours. We are guarantying the lowest charges with the very best writing standards. Orders are assigned to the writing team…then the order is assigned to a author in accordance with the subject and academic stage. Our high quality assurance division evaluations each order to ensure the best requirements. Quality See how we guarantee outcomes by way of nice writers and our quality assurance mannequin. Every writer responds to the shopper’s messages promptly in a lenient and cheerful fashion. Our goal is to ensure you get the exact kind of paper you initially wished! It implies top quality, swift supply, and full confidentiality. You need to offer yourself ample time to know the topic earlier than you can even begin the writing. Plan your paper from beginning to finish earlier than you begin writing; most college students normally spend an excessive amount of time either researching, writing or doing editing. Creating a draft or a top level view is important as you essentially create a Work Breakdown Structure. This define will act as a verify so that you understand how much time is allotted to every task. They delivered my paper on time, but the final paragraph didn’t really meet my necessities. More than 96% or orders arrive on time or beforehand. Such a turnaround is perhaps one of the best amongst all the essay companies to date. We respect your deadlines, all the time able to stroll the additional mile that will help you fit in the schedule. To score 75% and above, we give you a tutorial paper author with expertise, credentials, diploma, and a robust command of English. Nothing gives your professor incentive to fail you like a paper that isn’t well-researched or one which doesn’t even show any degree of understanding on the essay or analysis subject. We also share order progress by way of textual content and dashboard…if the writer has any questions we contact you to ensure the proper content is delivered. While looking for assist with tutorial tasks, one of many largest concerns we have seen amongst college students is confidentiality. You may face low grades as a result of you are not capable of focus on writing your tutorial paper. All of this will likely happen as a result of lengthy hours of shift you are allocating to your job. It may turn out to be troublesome and lots of professors usually are not able to perceive the hurdles that a pupil goes via. The delivery and quality of your paper are in our arms now. they wrote my essay that was due in 10 hours and actually saved my life. the worth was ok considering the urgency of my order. Assign free revisions to make a paper even higher. We don’t inquire about any info which we don’t think about necessary to complete your project. Our online chat also stays nameless to take care of the anonymity of our purchasers and their confidence. This function ensures the standard of the companies that our specialists present. If you could have doubts concerning the high quality of the paper offered otherwise you consider that the requirements haven’t been adopted accurately, you could ask for a refund anytime you need.
0 notes
Text
Is FreshBooks A Good Free QuickBooks Alternative? -FreshBooks Review 2020

FreshBooks, incepted in 2003 and redesigned in 2017, is one of the most popular accounting and finance software with invoicing solution that gained its current popularity due to high customer satisfaction rates. With its continually added features and expansion of the type of services FreshBooks provides, there has been a recent buzz whether one can compare it to be a free QuickBooks alternative.
Now here’s a fact- while the similarity in their names may suggest a similarity in the services they provide, FreshBooks does not work quite the same as QuickBooks. There’s a lot of difference between them, and in this blog, we are going to talk about FreshBooks review 2020, pinpointing every feature of it to clear your misconceptions and help you decide if you want to switch between either of the options for your business.
But first things first, let me tell you in brief about invoicing and cloud accounting.
What Is An Invoice?
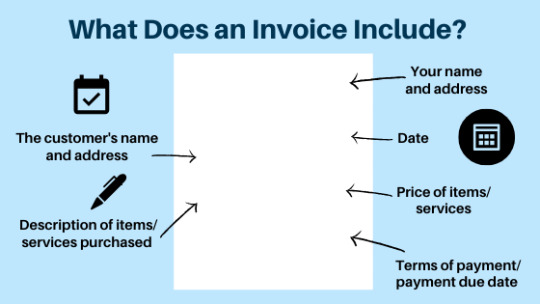
One can define an invoice as a written affirmation of the agreement between a service provider and its customer comprising of name, date, address, etc. It is a written record that builds an obligation on the buyer’s part to pay for it, thus making their account more reliable. Billing and invoicing is one of the most important parts of accounting because it keeps a record of all the sales transactions.
What Is Cloud Accounting Software?
You might have come across this term quite frequently. This type of software is similar to the usual accounting software. The only difference being that one can host it on remote servers. In other words, cloud accounting is a way to access your accounting use, such as online software in the form of emails, e-banking, doc files, etc.
What Makes FreshBooks The Best Cloud Accounting Software Of 2019?

FreshBooks initiated as an invoicing solutions provider and was completely redesigned and relaunched in 2017. The users can still access its old website, FreshBooks Classic, but now the company primarily centers on improving the new site.
Beyond the continuous tweaking and adding new features, this tool has undergone one very notable change. Here are some of the features I particularly love about FreshBooks:
1. Responsive and Simple Design
The biggest perk of using FreshBooks is the ease of management that comes along. It has an attractive dashboard organized and optimized to be easily accessed by any device. The side menu has options for quick reports. There are also Create and Help buttons present right at the top and bottom, respectively.
2. Time Tracking
It offers a built-in timer for tracking billable hours for your employees. You can feasibly look into the login and out times of your teams and co-workers along with importing this data into your accounting system after compiling. You can record their unbillable time as well.

3. Invoicing
It offers customizable templates, font, color, header, logo, etc. You can add notes into your invoices, set reminders, and set recurring invoices. The built-in chat feature is one of the best FreshBooks features. Also, the small cloud-bubble icon redirects a user immediately to a screen that displays the recent actions as well as your clients’ messages.
4. Double-Entry Accounting
With the recent addition of this feature, FreshBooks has become a sound free QuickBooks alternative. Being ideal for smaller businesses, accounting firms, freelancers, and solopreneurs, it offers simple accounting solutions like accounts payable, budgeting, tax support, etc.
5. Reporting
The central dashboard of FreshBooks displays your periodical input vs. output. It focuses on profit margin and assists a user to generate even the most detailed reports to help a business understand what they exactly need for accounting purposes.

6. Contact Management
You can add basic information about your clients’ contacts along with the private notes. You also get an option to set the default language, currency, default reminders, etc. You can also add a list of your active clients to send the statements to them directly.
7. Expense Tracking
FreshBooks focuses mostly on payment collection and invoicing, which means that one has to connect to another accounting system for tracking the expenses. But it does offer some special expense features, for instance, tax management, receipt tracking, etc.
8. Project Management
This feature is extremely useful for employers to create hourly projects and then allocate them to their clients or employees. You can also set the due date, and discuss your project with your team internally using a tool named discuss. It comes with an option to send images, attachments, answer questions, etc.

9. Customer Support
FreshBooks has a high value of its customers, something that is evident from every person who has worked with them. Not only are their representatives friendly and informative, but they also respond quite promptly. It’s good to see how these people have made it feasible for the micro-businesses to understand what they should do.
Some Setbacks Of Using FreshBooks
FreshBooks has proved to be an incredible customer service provider with an extremely easy to use interface. Yet, it comes with some cons that I have listed below:
1. Higher Pricing
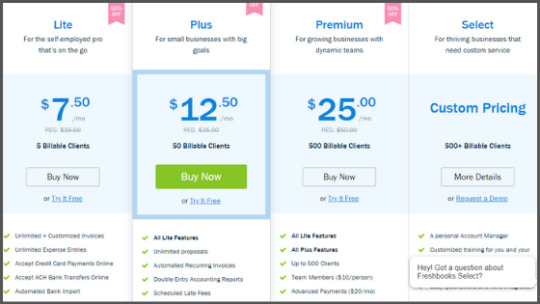
FreshBooks offers the option for both monthly and yearly payments. There are a total of four plans, only two of which come with double-entry accounting and automated invoicing. The best part is that no bank information is required, and you can cancel their services at any time, but FreshBooks pricing still seems a bit too high for small to medium businesses.
2. No Inventory Tracking
Good accounting software must let a user enter the payments made to a supplier previously, and make further orders based on inventory output. FreshBooks doesn’t come with any such inventory features that can assist the small or medium retailers to understand the complex accounting procedures.
3. No Balance Sheet Automation
FreshBooks doesn’t give you the option to perform accounting by automating your balance sheets. You can fill your data in the balance sheets, and put in some work to organize it. This process is a bit lengthy, monotonous, and time-consuming and requires an input of a lot of work depending on your projects and number of clients. Thus it is not very suitable for accounting firms of all sizes.
50% Off For 3 Months

Even though, as mentioned earlier, FreshBooks pricing may seem a bit high for small business owners, it still comes with a cheaper alternative. They are offering an exclusive 50% off on all the plans for a limited time. Buy their plans now to devour the discount.
Is FreshBooks Better Than QuickBooks?
Just like most of the people initially, my conclusion was that FreshBooks offers more or less the same services as QuickBooks with a tad bit of differences. But after digging deeper into its features, I can honestly sum up that both of them have a very different set of target consumers.
QuickBooks would be fit for the large scale, product-based companies, and comes with a bit of complication to use. In other words, not very suitable for a noobie or small business.
On the other hand, FreshBooks not only comes with an extremely easy to use interface, but its services are also quite easy to understand for even a person owning a flower shop. Basically, it’s better for the people who are new in the business game- small businesses, startups, service-based companies, freelancers, etc.
All-in-all, FreshBooks can be considered as a notable free QuickBooks alternative, depending on the size and requirements of a business venture.

Originally Published On: SaasTrac
About The Author
SaasTrac is one of the trusted places where users can find reviews on different Saas Products, Software, and Platforms. Our major goal is to let users know the detailed and the most helpful information possible about every product — the good, the bad, and the ugly in the SaaS space.
#free QuickBooks alternative#QuickBooks alternative#FreshBooks Review 2020#FreshBooks#FreshBooks Review#FreshBooks 2020#Cloud Accounting Software#accounting and finance software#most popular accounting and finance software#freshbooks services#FreshBooks Features
0 notes
Text
Social Media: Facebook Ads
Long as you have an existing personal Facebook account, you can generate your own Facebook Ads account. No sign up fee required. The only payment you would have to give is for the actual ads themselves. Payment would be done via credit card and will be automatically charged after the ads have completed its run.
The reason why digital ads are popular compared to other traditional advertising placements (like print, radio, TV) is because of the flexibility of budget. In print, you’d have to pay around Php 60,000 (depending on the magazine brand and the number of claimed circulations/subscribers) for a full page color spread of an ad but with no tangible data on the RoAS (Return on Ad Spend).
In digital ads like Facebook ads, you get to see how many already saw your ad and engaged on it while its running. You also get to be super flexible with spend (from Php 100 to thousands) so that small business owners get to advertise, too.
I mentioned in a previous post to not touch the “Boost” button if you’re a Facebook Page owner since it’s not practical. You’ll understand why in this post.
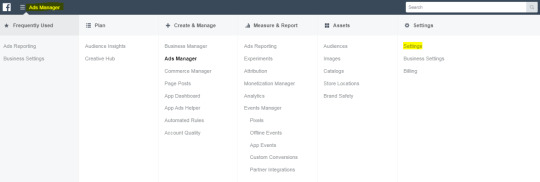
To begin, open the FB Ads Manager dashboard (don’t get intimidated by it, relax) and find click the Ads Manager button (top left of screen) to reveal Settings. Go to Payment Settings and encode your credit card details. The good thing about FB ads (even in Google ads) when it comes to credit card details is that once you’ve encoded it, you won’t be able to see the other sensitive details about the credit card (full cc number and CVC/CVV) to avoid “credit card theft” when you add another “admin” to your FB Ads Manager account.
Once you’ve set that up, go back to Ads Manager and click the green Create button. It’ll open up various options on your “Campaign Objective.” There are various objectives available, making FB ads truly reliable in tailor-fitting your ad needs and making ad budget spend wiser. Hover each selection and you’ll see an “i” icon you can hover on which briefly explains what each campaign objective means. Should you wish to further explore what they mean, simply Google it.
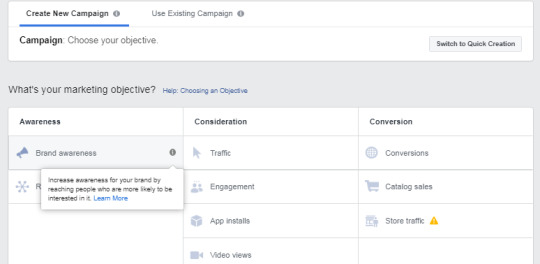
Let’s say you’re an FB Page owner without a website. What would your ideal campaign objective be? For you, ideal choices would be Brand Awareness, Reach, Engagement, Video Views, Messages, and Catalog Sales. Why? Traffic means leading to website visits, App installs mean the campaign would target users to install a mobile app, Lead Generation may capture user data but it would require a Privacy Policy page from your supposed website (and you don’t have one), Conversions are for website conversion tracking, and Store Traffic is for those with brick-and-mortar stores.
To get the most bang out of your buck, I recommend Engagement, Messages, and Catalog Sales since those campaign types would direct the FB Ad AI (Artificial Intelligence) to target users who are most likely to engage/message (which could lead to possible customers or sales for you probably). But the bidding cost for Messages and Catalog Sales would be more competitive (a.k.a. pricier) because it leads users closer to the end of the marketing/sales funnel (just Google marketing or sales funnel). When we say “bidding,” it’s the auction nature of online ads (you’re not the only one advertising here so there’s going to be “competition” for online users’ attention) but you won’t have to worry much about that long as your ad content is of quality (good textual and visual content that abides to Facebook’s ad quality rules).
Okay, let’s say you’re going to use “Engagement” as campaign objective (this means AI would target to get the most engagement out of your budget; engagement meaning clicks, reactions, and comments to your post). Once you click that, name your campaign (for data analysts, there would be a strict naming convention for this) like NewProduct_Engagement_04.13-04.18.20.1k. You could actually name it however you want/whatever works for you but if you’re running multiple ad campaigns at once, this type of campaign name works to easily understand what is inside a certain campaign once you view/go back to the Ads Manager dashboard (default view). The naming convention I chose speaks immediately what I will be promoting (New Product), the campaign objective I chose (Engagement), the campaign period (April 13 to April 18, 2020), and the budget I will allocate (1k or Php 1,000).
Click the blue Continue button and copy-paste the same name you chose to the Ad Set Name. Select your preferred targeting which you think fits your campaign perfectly. This is where you get more out of your budget compared to the simple “Boost” button. The Boost button lets you target users’ interests, age, and gender but with FB Ads Manager, you get to have detailed targeting so that you drive the correct customers to your business and have a much wiser ad spend. For an initial campaign, you may open the targeting wide and study the interested captured demographic once the campaign ends, then target that in a new campaign. But if you’re really on a tight budget, go for detailed targeting immediately.
Let’s say you’re selling a new product which is a lemon-scented dry shampoo spray priced at P195 each (excluding shipping). What would a typical customer of this product be? Male? Female? Age? Location? Status? My logic tells me it would be mostly female but I would still open it to both male and female (unless your ad material messaging would be for a specific gender only) since grooming applies to all gender types. For age, I would choose 20-40 years old since buying power for such a product type would be around that age. Yes, 18-year-olds may be able to buy it at P195 but they might probably would prefer to spend most of their allowance on milk tea and grooming basics like cologne, lip tints, powder, and so on. For location targeting, choose the ones where you can likely ship your product (like key cities). For interests, select those who are interested in grooming, hair care, hair products, beauty, beauty products, lemons, and competitive/popular brands of that product (to potentially steal customers from competition hehe). For status, you’d want to target the working class so exclude people who work for “The Krusty Krab” since these may just be fake accounts or people who may not have the buying capacity for your product (a.k.a. tambay). You may study a jejemon/fake account profile so you can exclude them in your ad targeting. Yes, some working class may still use that in their profiles but we’re working on a tight budget here, remember?

I’d also recommend excluding your FB Page followers (since they’d see this product already if they’re following your page via organic / page posting) to really target new customers (helping you increase brand awareness as well). Just go to Connections and choose exclude, then your FB page. Again, we’re trying to get more bang out of your buck here.
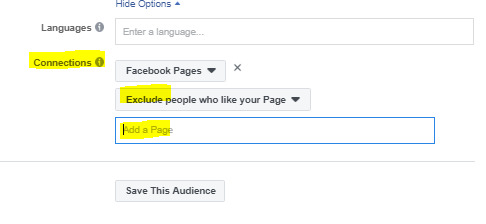
For placements, choose Instagram / IG as well if you have an IG account and if you’d want your ads to appear on IG as well. No extra costs here. Other way around, you may advertise purely on IG instead of FB (just deselect the FB placements).
Next, schedule the ad campaign. Be careful to choose Lifetime Budget. Also, schedule it until 11:59 pm of your end date to fully maximize the day run. You may also schedule it to run only on times you’re active on FB should you wish unless you have set a chat bot on your page to accommodate queries anytime.
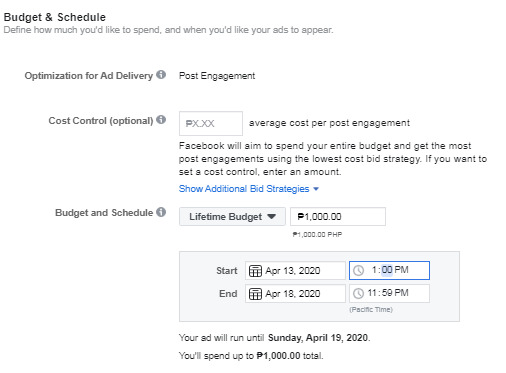
Copy-paste your Campaign name to Ad Name as well. In Identity, make sure to choose your respective FB Page and IG account. Next, upload your ad material (image or video) and input the ad copy. Select a “call-to-action” button to encourage users to engage with your ad/page. Be sure to apply the 20% text rule (briefly read that here: https://blog.hubspot.com/marketing/facebook-text-overlay) and you may access the tool here: http://www.social-contests.com/check-image/
For videos, the 20% text rule applies to the thumbnail, not the overall video content.
You may also use an existing post that’s already on your FB page. Select Use Existing Post and choose from the drop down of Select Post.

If you can’t find the post in the drop down, click Enter Post ID. Go to the organic post on page and copy the long number in the URL of the post.

Click Review to briefly go over your campaign settings and see if you did it right or missed out on anything. Click Confirm once you’re all set to go. Campaign approval may either be fast or may take time. You’ll get a notification (even via email) once your campaign has been approved and is actually running.
#facebook ads#social media marketing#digital marketing#digital marketing ph#digital marketing philippines#fb ads
0 notes
Photo

MoneyPatrol Review | A Robust Personal Finance App? https://ift.tt/3a6bMBZ
MoneyPatrol is the latest personal finance tool that is focused on helping you budget and manage your money better by combining all your accounts into one dashboard.
The MoneyPatrol dashboard is honestly one of the best we've seen from an online tool. However, there are other gaps that aren't quite on par with other financial tools yet. Plus, it is quite expensive compared to other budgeting and financial tools.
Should you consider MoneyPatrol to manage your money? Find out more in our MoneyPatrol review below. See how MoneyPatrol compares to our top money and budgeting apps here.
Quick Summary
Wide range of analysis to help improve your financial health.
Connect your bank and financial accounts and import your information
15 day free trial, then $84 per year
Get Started
MoneyPatrol Details
Product Name
MoneyPatrol
Services
Budgeting And Financial Planning Dashboard
Cost
$84/year
Promotions
15 Day Free Trial
Quick Navigation
Who Is MoneyPatrol
What Do They Offer?
Budgeting
Reporting
Alerts and Granting Access To Others
Where's the Mobile App?
What Are The Drawbacks?
What Does It Cost?
How Do I Open An Account?
Is My Money And Information Safe?
Is It Worth It?
Who Is MoneyPatrol
MoneyPatrol is a financial health company that helps its customers improve their financial well-being. The company was founded in 2016 and is based in Newark, CA. It is a privately held company.
Beware that the people behind MoneyPatrol have gone to some effort to keep themselves private. Additionally, clicking on their privacy policy and terms of service links don’t go anywhere.
What Do They Offer?
MoneyPatrol is a money management service with the goal of helping people improve their financial health. For people who are a bit more disorganized with their finances, they will likely benefit the most from MoneyPatrol. The service helps improve financial health through analysis of your spending and sending reminders of upcoming payments.
On Money Patrol’s homepage, they say that “our users have reported an average of $5K+ positive impact on their personal finances.” However, it's tough to decipher what that really means. After signing up, you can start linking your bank accounts and credit cards. Money Patrol is able to link with a large number of financial institutions, which means you should be able to find most of your accounts. Once your data is pulled in, Money Patrol will begin performing analysis. The analysis will provide you with insights into where your money is coming and going through its “Money Out-flow” and “Money In-flow” features. You’ll be able to see where you spend the most and start making immediate adjustments. Additionally, you can view spending by category and see trends across a one-year timeframe.
MoneyPatrol Dashboard
Budgeting
Budgeting and viewing your spending is where you are likely to spend the most time. After logging in, you’ll see the budget graphic on the homepage with all of the other quick glance graphics. It’s a great snapshot of how you are doing for each merchant based on the budget you’ve set.
Clicking the Budget tab will bring you into the detailed budget. Here, you can view the current month and last six months budget by category. This page provides far more analysis than the quick snapshot on the homepage. You can create a new budget as well. When creating a budget, you can choose from the available categories or create new ones.
Reporting
Reports are another nice feature of Money Patrol. You can view reports for:
Categories
Merchants
Recurring Transactions
Large Transactions
Weekly
Monthly
Cash Available
Credit Usage
Alerts and Granting Access To Others
A couple of other features worth mentioning are the large number of alerts that you can set. These alerts can be sent as a text message, e-mail, or both.
You can also grant someone view-only access to your account but they will need to have a Money Patrol account to use this feature.
Where's the Mobile App?
Good question. Most financial management services offer a companion mobile app. That’s not the case with Money Patrol. For whatever reason, they elected to forego a mobile app offering. Although the website states, one is “coming soon.”
What Are The Drawbacks?
MoneyPatrol is pretty new, and as such, it isn't perfect. We really like how it's developing - we love the dashboard, the cashflow tools, and more, but some things make it really annoying to use.
First, you can't name your accounts. All of your accounts use their official name:
Another annoying feature is that a lot of transactions get duplicated for some reason. One of the systems implemented into MoneyPatrol is that you need to review all your transactions (which we love), but it's extremely annoying when it duplicates every transaction so you're spending most of your time deleting things.
Finally, it doesn't have a mobile app, and the web interface is a bit slow. I'm sure these will get worked out with future development, but realize this app is still pretty new compared to others like Personal Capital.
What Does It Cost?
The service is $7/mo, billed annually at $84. It has a free 15-day trial but you’ll need to enter your credit card upon signing up. If you don’t want to be charged, set a reminder to cancel before the 15-day trial expires.
Note: we don't like how they advertise it as $7 per month, but bill annually. It should be advertised at $84 per year unless they do actually offer a monthly billing option.
Second note: You cannot cancel your free trial on the same day you started it (which we've never seen before and is very annoying). Make sure you set a reminder to cancel if you don't think it's a good fit. When companies offer a free trial, we don't ever believe they should take a credit card up front.
MoneyPatrol does offer a free demo. The demo does not require that you sign up. MoneyPatrol has put lots of data into the demo account to make it look like a real account. This lets you view all of the various analysis, graphics, and navigation features.
We think this cost is a big drawback, especially at this point in development. Other robust programs, like Quicken or Simplifi are about half the price.
How Do I Open An Account?
You can open an account at https://www.moneypatrol.com.
Is My Money And Information Safe?
MoneyPatrol’s website does use 256-bit SSL encryption. There aren’t any details about how MoneyPatrol connects to banks or other third party services (we're assuming a service like Plaid but it doesn't say).
Unfortunately, it has not made the terms of service or privacy policy web pages available. It’s unclear what happens to your personal data as well. There is no FAQ either to help with these questions. On the plus side, information such as your name, address, and social security number are not collected.
If Money Patrol is like other aggregators, it will use a reputable third party to connect to financial institutions via tokens. This means your bank login information is not passed around or stored with any entities involved with the connection.
Is It Worth It?
MoneyPatrol offers lots of great analysis and will benefit anyone who needs more insight into their spending. Whether that is enough to offset the annual fee is another question. As of today, we don't think so. There is a lot of potential in this app, but they are pricing it as if it was a complete game-changer. It probably has 1-2 more years of iteration and improvement before it could justify this price.
Another issue is that MoneyPatrol does not disclose what happens to your data, including bank login data. This may be an immediate no-go for some.
With a free demo that doesn’t require you to sign up, anyone can find out if MoneyPatrol is right for them.
Check out MoneyPatrol here >>
The post MoneyPatrol Review | A Robust Personal Finance App? appeared first on The College Investor.
from The College Investor
MoneyPatrol is the latest personal finance tool that is focused on helping you budget and manage your money better by combining all your accounts into one dashboard.
The MoneyPatrol dashboard is honestly one of the best we've seen from an online tool. However, there are other gaps that aren't quite on par with other financial tools yet. Plus, it is quite expensive compared to other budgeting and financial tools.
Should you consider MoneyPatrol to manage your money? Find out more in our MoneyPatrol review below. See how MoneyPatrol compares to our top money and budgeting apps here.
Quick Summary
Wide range of analysis to help improve your financial health.
Connect your bank and financial accounts and import your information
15 day free trial, then $84 per year
Get Started
MoneyPatrol Details
Product Name
MoneyPatrol
Services
Budgeting And Financial Planning Dashboard
Cost
$84/year
Promotions
15 Day Free Trial
Quick Navigation
Who Is MoneyPatrol
What Do They Offer?
Budgeting
Reporting
Alerts and Granting Access To Others
Where's the Mobile App?
What Are The Drawbacks?
What Does It Cost?
How Do I Open An Account?
Is My Money And Information Safe?
Is It Worth It?
Who Is MoneyPatrol
MoneyPatrol is a financial health company that helps its customers improve their financial well-being. The company was founded in 2016 and is based in Newark, CA. It is a privately held company.
Beware that the people behind MoneyPatrol have gone to some effort to keep themselves private. Additionally, clicking on their privacy policy and terms of service links don’t go anywhere.
What Do They Offer?
MoneyPatrol is a money management service with the goal of helping people improve their financial health. For people who are a bit more disorganized with their finances, they will likely benefit the most from MoneyPatrol. The service helps improve financial health through analysis of your spending and sending reminders of upcoming payments.
On Money Patrol’s homepage, they say that “our users have reported an average of $5K+ positive impact on their personal finances.” However, it's tough to decipher what that really means. After signing up, you can start linking your bank accounts and credit cards. Money Patrol is able to link with a large number of financial institutions, which means you should be able to find most of your accounts. Once your data is pulled in, Money Patrol will begin performing analysis. The analysis will provide you with insights into where your money is coming and going through its “Money Out-flow” and “Money In-flow” features. You’ll be able to see where you spend the most and start making immediate adjustments. Additionally, you can view spending by category and see trends across a one-year timeframe.
MoneyPatrol Dashboard
Budgeting
Budgeting and viewing your spending is where you are likely to spend the most time. After logging in, you’ll see the budget graphic on the homepage with all of the other quick glance graphics. It’s a great snapshot of how you are doing for each merchant based on the budget you’ve set.
Clicking the Budget tab will bring you into the detailed budget. Here, you can view the current month and last six months budget by category. This page provides far more analysis than the quick snapshot on the homepage. You can create a new budget as well. When creating a budget, you can choose from the available categories or create new ones.
Reporting
Reports are another nice feature of Money Patrol. You can view reports for:
Categories
Merchants
Recurring Transactions
Large Transactions
Weekly
Monthly
Cash Available
Credit Usage
Alerts and Granting Access To Others
A couple of other features worth mentioning are the large number of alerts that you can set. These alerts can be sent as a text message, e-mail, or both.
You can also grant someone view-only access to your account but they will need to have a Money Patrol account to use this feature.
Where's the Mobile App?
Good question. Most financial management services offer a companion mobile app. That’s not the case with Money Patrol. For whatever reason, they elected to forego a mobile app offering. Although the website states, one is “coming soon.”
What Are The Drawbacks?
MoneyPatrol is pretty new, and as such, it isn't perfect. We really like how it's developing - we love the dashboard, the cashflow tools, and more, but some things make it really annoying to use.
First, you can't name your accounts. All of your accounts use their official name:
Another annoying feature is that a lot of transactions get duplicated for some reason. One of the systems implemented into MoneyPatrol is that you need to review all your transactions (which we love), but it's extremely annoying when it duplicates every transaction so you're spending most of your time deleting things.
Finally, it doesn't have a mobile app, and the web interface is a bit slow. I'm sure these will get worked out with future development, but realize this app is still pretty new compared to others like Personal Capital.
What Does It Cost?
The service is $7/mo, billed annually at $84. It has a free 15-day trial but you’ll need to enter your credit card upon signing up. If you don’t want to be charged, set a reminder to cancel before the 15-day trial expires.
Note: we don't like how they advertise it as $7 per month, but bill annually. It should be advertised at $84 per year unless they do actually offer a monthly billing option.
Second note: You cannot cancel your free trial on the same day you started it (which we've never seen before and is very annoying). Make sure you set a reminder to cancel if you don't think it's a good fit. When companies offer a free trial, we don't ever believe they should take a credit card up front.
MoneyPatrol does offer a free demo. The demo does not require that you sign up. MoneyPatrol has put lots of data into the demo account to make it look like a real account. This lets you view all of the various analysis, graphics, and navigation features.
We think this cost is a big drawback, especially at this point in development. Other robust programs, like Quicken or Simplifi are about half the price.
How Do I Open An Account?
You can open an account at https://www.moneypatrol.com.
Is My Money And Information Safe?
MoneyPatrol’s website does use 256-bit SSL encryption. There aren’t any details about how MoneyPatrol connects to banks or other third party services (we're assuming a service like Plaid but it doesn't say).
Unfortunately, it has not made the terms of service or privacy policy web pages available. It’s unclear what happens to your personal data as well. There is no FAQ either to help with these questions. On the plus side, information such as your name, address, and social security number are not collected.
If Money Patrol is like other aggregators, it will use a reputable third party to connect to financial institutions via tokens. This means your bank login information is not passed around or stored with any entities involved with the connection.
Is It Worth It?
MoneyPatrol offers lots of great analysis and will benefit anyone who needs more insight into their spending. Whether that is enough to offset the annual fee is another question. As of today, we don't think so. There is a lot of potential in this app, but they are pricing it as if it was a complete game-changer. It probably has 1-2 more years of iteration and improvement before it could justify this price.
Another issue is that MoneyPatrol does not disclose what happens to your data, including bank login data. This may be an immediate no-go for some.
With a free demo that doesn’t require you to sign up, anyone can find out if MoneyPatrol is right for them.
Check out MoneyPatrol here >>
The post MoneyPatrol Review | A Robust Personal Finance App? appeared first on The College Investor.
https://ift.tt/2SHdpOY March 20, 2020 at 10:15AM https://ift.tt/3aazoVW
0 notes
Photo
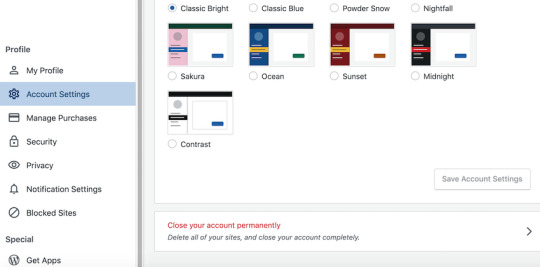
How to Delete Your WordPress Account or Blog
Is it time to say goodbye to your WordPress website?
Maybe it’s time for a fresh start, or perhaps you want to distance yourself from the kind of content you used to create—whatever your reasons, you probably won’t want your abandoned website hanging around on the Internet forever.
In this article, I’ll show you how to permanently delete your WordPress website, regardless of whether you created your site via WordPress.com or WordPress.org. And, if you got carried away and created multiple WordPress.com websites, then I’ll also be showing you how to delete all of these sites simultaneously, by cancelling your WordPress account.
WordPress.com vs. WordPress.org: What’s the Difference?
The process for deleting your website will differ depending on whether it’s a WordPress.com or a WordPress.org site, so let’s start by clarifying the differences between the two:
WordPress.org, sometimes referred to as self-hosted WordPress, is where you download the free WordPress software and install it on your own server. With a WordPress.org website, you’re solely responsible for hosting and maintenance.
WordPress.com takes care of the hosting for you. Rather than downloading and installing the WordPress software, simply head over to WordPress.com, click Get started, complete a few forms, and WordPress.com will create your website for you.
The Internet Is Forever
In this article, I’ll show you how to delete your website, so it no longer appears at its URL or appears in Google search results. However, if your website has been archived by third parties then there’s a chance your content will still be accessible via these third-party services.
Deleting your website will make it less accessible, but there’s no guarantee that a determined third party won’t be able to recover some or all of your deleted content.
How Do I Close My WordPress.com Account?
Are you performing some admin and want to delete all the accounts that you no longer use? Or perhaps you want to delete your existing WordPress account, so you can re-register and start again from scratch?
When you close your account, WordPress will also delete all the websites associated with that account. If you got carried away and created multiple different websites, then cancelling your account may be easier than deleting each website individually.
To close your WordPress.com account:
Log in to your account, if you haven’t already.
Head over to the Account Settings screen.
Scroll to the bottom of the screen and select Close your account permanently.
Review the list of content you’re about to delete, and if you’re happy to proceed then click Close account.
WordPress will now delete your username, all the sites you own, and all of your content.
Deleting a WordPress.com Blog From the Dashboard
If you created your website via WordPress.com, then you can delete it directly from the WordPress Dashboard. Note that when you delete your WordPress.com website, you’ll also lose access to your site’s URL unless you purchased the domain.
To delete your WordPress.com site, first log in to your WordPress account, if you haven’t already.
In the left-hand menu, select Manage > Settings. Now scroll to the very bottom of the screen and select Delete your site permanently.
At this point, you’ll have the option to export all of your posts, pages, and settings as a ZIP file. If you ever change your mind and want to reinstate your website, then you can upload this ZIP file to a new WordPress site and recover your content. This step is optional, but it’s also a one-time offer: if you don’t export now, then your content will be lost forever. If you do want to hang on to a copy of your content, then click Export all. Once the export is complete, click Back to resume deleting your website.
Review all the information about the content you’re about to delete, and if you’re happy to proceed, then click Delete site. When prompted, enter your website’s full URL for a final confirmation.
This is it! If you’re still determined to permanently remove your website from the World Wide Web, then click the Delete this site button and your WordPress website will be gone forever.
How to Delete Your Self-Hosted Website With cPanel
If you used cPanel to set up your self-hosted WordPress website, then you can also use cPanel to delete it:
Log in to your cPanel Dashboard.
Select the Hosting tab.
Find the website that you want to delete and click its accompanying Switch button.
On the subsequent screen, select WordPress.
Select Uninstall. After a few moments, you should see the following message: Software has been uninstalled.
Your WordPress website has now been deleted.
Delete Your Self-Hosted WordPress Website Manually
If you installed the WordPress software on your server manually, then you’ll also need to remove it manually. This process can vary depending on whether you have FTP or SFTP access, or you access your web server via a web-based file manager:
1. I have FTP or SFTP Access
If you have FTP or SFTP access, then you can delete your WordPress website using an FTP client:
Log in to your FTP server.
Locate your WordPress directory, and either Control-click or right-click it, depending on whether you’re running Windows or macOS.
When prompted, select Delete.
2. I Use a Web-Based File Manager
If you have access to a web-based file manager, then:
Log in to your web hosting dashboard.
Open your file manager application.
Navigate to the WordPress directory that you want to delete, and hit the Delete button.
Delete Your Website’s Database Using MySQL
After deleting your WordPress website, you may also want to delete your website’s MySQL database. You can remove this database using the following MySQL command:
$ mysql -h HOST -u USERNAME -p PASSWORD -D wordpress $ DROP wordpress
Note that you'll need to replace wordpress with the name of your WordPress database, which is located in your wp-config.php file. The process for locating this database will vary depending upon your hosting provider—for example, if you were using cPanel, then you would typically use the file manager to browse to your WordPress directory, which contains the wp-config.php file.
Delete Your Database Using cPanel
If you’re a cPanel user, then:
Log in to your cPanel Dashboard.
Scroll to the Databases section, and select MySQL Databases.
Select the MySQL database that you want to delete.
Find the Delete Database link, and give it a click.
Read the onscreen warning, and if you’re happy to proceed, then click Delete Database.
cPanel will now delete your website’s database.
Conclusion
In this quick tip, I showed you how to permanently delete your WordPress.com or WordPress.org website, and how to optionally delete your site’s MySQL database.
Are you deleting an outdated WordPress website with the intention of starting again from scratch? If you’re creating a brand new WordPress website, then be sure to check out some of our other WordPress tutorials, as they contain all the information you need to create a modern, professional, and engaging WordPress website.
The Best WordPress Plugins on CodeCanyon
Explore thousands of the best WordPress plugins ever created on CodeCanyon. With a low-cost one time payment, you can purchase these high-quality WordPress plugins and improve your website experience for you and your visitors.
Here are a few of the best-selling and up-and-coming WordPress plugins available on ThemeForest for 2020.
WordPress
17 Best WordPress Slider & Carousel Plugins of 2020
Daniel Strongin
WordPress
20 Best WordPress Calendar Plugins and Widgets
Esther Vaati
WordPress Plugins
20+ Best Popup & Opt-In WordPress Plugins
Nona Blackman
WordPress
20 Best WPBakery Page Builder (Visual Composer) Addons & Plugins of 2019
Nona Blackman
by Jessica Thornsby via Envato Tuts+ Code https://ift.tt/34SpHb9
0 notes
Text
Hosting: Moving From Wordpress.com to Siteground
When I started blogging I heard a lot about hosting but never seemed to need it. I just created a free account on Wordpress.com and started creating content. I will admit when I started I had no idea what a difference there is between WordPress.com and WordPress.org, but now my wallet sure does. This is my story of moving a website from Wordpress.com to BlueHost and finally finding a loving home for it at SiteGround.
My Time With Wordpress.com

Disclaimer* While I was using WordPress.com most of the support was awesome. However when it came to the point of me asking them if there was any other way to get some website features without paying $25 a month, I was told it was the only way. Now I know that instead of paying WordPress.com $25 a month for something I could have done for free if I had my own hosting (after the cost of hosting, which is like $5-15 a month). Very quickly I discovered the limits of having a "free" blog on Wordpress.com. At this stage, my website had WordPress in the URL and WordPress ads all over it. It did not seem like that big of a deal.
Wordpress Payment Plans

Then I noticed that not only was WordPress in my URL, but the whole date was also in there too. My URLs were so long and ugly I didn't blame people for not clicking on them. So this is where WordPress.com turns the screw. As you slowly awaken to what your blog website needs to grow they have payment plans that slowly go up with you. I climbed these payment plans as my site grew over a few weeks until I came face to face with the Business Plan. $25 a month so my website can have plugins. This may not seem like a big deal but let's look at the yearly cost of each of these Wordpress.com plans. Plan NameMonthly CostYearly Cost3 Year CostFree$0$0$0Personal$4$48$144Premium$8$96$288Business$25$300$900eCommerce$45$540$1620 What I am trying to show you with this cart is how quickly you can end up paying much more than you first intended if you set up your website using Wordpress.com. When I found out there was a much cheaper and more common way to have the features and website control I wanted I could not believe it. This is that hosting thing everyone told me about but I just never saw it.
Wordpress.com vs Wordpress.org
We, or at least I, need to break this down into 3 separate things to keep it straight. The WordPress SoftwareWordPress.comWordPress.org The WordPress Software

I did not know this when I started blogging but the WordPress software is open source. This means the source code is available for all to use, redistribute and modify for free. This software is designed to help you create a blog, website or app with relative ease. Tons of people use this software. WordPress.com

This is a business. They guide you through their modified version of the WordPress software while tagging their ads all over your site until you pay them to stop. You can use the WordPress Software without using or paying WordPress.com. WordPress.org

This is a website where you can download the WordPress software for free. There is a lot of information about WordPress on this website as well. Wouldn't you know it they even have a blog too!
Where The WordPress Confusion Arose

When I first started thinking about starting a blog I wondered what I should do. How do others do it? I heard a lot about WordPress and hosting but never really got how the two worked together until recently. I think this is because I started with a free wordpress.com account. When you do this hosting is never brought up. You never see it. So it just kind of faded from my mind... until someone kindly yelled at me. I was considering starting a 2nd website but the cost of doing this on WordPress.com if I wanted my own URL and plugins was hundreds of dollars. So I asked a chat group I am a member of what I should do. This is when they let me have it. Yeah Wordpress.com is ridiculously expensive. Wordpress.org is what is free and gets installed on other hosting plans. I have BlueHost that allows unlimited sites so if you have 2 or 20 sites you still pay the same monthly costs.You do have to beware that the prices go up after the intro period on BlueHost so I would go for a multiple year investment up front and then your costs won't go up until the end of that period.Mattrhere This reply shook me. Not only could I pay much less for my first site but my second site would cost nothing except for the domain which I already had. I thought I was going to have to spend several hundred dollars to launch my second site and I would have had to if I had stayed with WordPress.com. I hope now you are starting to see the big difference in cost between WordPress.com and paying for hosting elsewhere. Now that that is clear I want to talk about hosting.
Hosting: BlueHost vs Siteground
I deal with a lot of affiliate marketers, so when I ask what the best web host is I often hear Bluehost because they have a great affiliate program. While I do not dought many of these marketers use BlueHost, my brief experience with them did not leave me wanting more. My Short Time With BlueHost

I was trying to move my website from WordPress.com to another host. I started with BlueHost. If you have never moved a website before it can be overwhelming. This is where customer support should come in to play, sadly for me, it did not. I followed all of the steps. I did everything right. I spend at least 3 hours over a two day period going back and forth with BlueHost's customer support trying to figure out why my move was not working. After 3 days and several different support staff conversations, I was told my site had been put onto a server that was under maintenance. Now I had paid BlueHost very well. I plan to work on my websites for at least 3 years so that is how much hosting I had paid for. I asked for help with one thing and they messed it up. This cost me 3 days of work and tons of stress. While I understand this was a mistake on their side and it most likely does not happen to everyone, it really pissed me off. Lucky for me at this time I had posted another question on my group which yielded an almost prophetic message. If you have not purchaced (BlueHost) I would suggest Siteground (it is) more of a starter base.Joshkoop While I had purchased through BlueHost, I thought here is my chance. I asked for a refund and moved over to Siteground. My Move To SiteGround

From my first interaction with SiteGround support, I contacted them before I signed up, I felt like I was in much better hands. My questions were quickly answered and my site design was even complimented! I asked how hard it would be to move a site from Wordpress.com to SiteGround. I also let him know I wanted to start a second site. He found me a plan which included a free website migration and allowed me to have multiple websites. This plan cost much less than I was paying for just 1 year on the business plan for WordPress.com and I paid for 3 years on SiteGround. SiteGround offers a special price to new users. You can choose to pay for many years ahead of time at this reduced price. After your first payment period is over the price will go up to the regular price. Let's take a looks at the SiteGround plans costs. Plan NameIntroductory price Per Month Regular Price Per MonthStart Up$3.95$11.95GrowBig$5.95$19.95GoGeek$11.95$34.95 I picked the GrowBig Plan and started my site move. The support staff over at SiteGround are just next level. They got the move going without a hitch, they kept me updated on everything and let me know what I need to do after they were done. I really like the user interface inside of SiteGround. It is very easy to navigate. There is one thing I want to tell you about. SiteGround Support Chat

Before you are a SiteGround customer it is very easy to get in touch with someone from SiteGround using their website chat feature. These guys are support rock starts, but once you are a customer finding a way to chat with them can be hard. I spent about 2 hours trying to track down where the chat button is on my dashboard. Guess what. It is not there! If you want to chat with SiteGround support, you kind of have to jump through a hoop or two. Not hard hoops just not exactly as easy as they could be. Here is what you need to do. Login to your SiteGround accountClick on the question mark (?) in a circle in the top right cornerClick on View Help CenterClick on Contact UsSelect either Technical Assistance, Advanced Technical Help, or Billing Support depending upon your question or problemSelect a topicFill out the formSelect Chat! This took way to long for me to figure out but once you do their support staff is awesome, fast and knowledgeable. I wish they would add a support chat button to the dashboard but I can understand why they do not. It helps to know what kind of problem you have so they can get you to the right person.
Conclusion

While I did start blogging on a free Wordpress.com website I don’t recommend this. I think you will be much better off finding a host like SiteGround or BlueHost. While you may have to invest in your blog website by purchasing host this gives you much more control of your website from the start. As your website grows you might want to look into themes or plugins that would not be available if you where using the free Wordpress.com plan. Also having to move a website is a pain. If you start out with a good host and pay long term for the introductory price you should not have to worry about it. On the other hand you could and probably would outgrow Wordpress.com and what to move to a hosting plan just like I did. I’d say save yourself the headache, save up for the hosting then grow the hell out of your website!
Affiliate Links
These are affiliate links which pay me a commission if purchases through them. SiteGround https://www.siteground.com/index.htm?afcode=396e6bef564936572a09158dc1fa4373 BlueHost http://bluehost.com/track/bestsignup WordPress.com https://wpjobmanager.com/?aff=31080 Read the full article
0 notes
Text
Let’s Build a JAMstack E-Commerce Store with Netlify Functions
A lot of people are confused about what JAMstack is. The acronym stands for JavaScript, APIs, and Markup, but truly, JAMstack doesn’t have to include all three. What defines JAMstack is that it’s served without web servers. If you consider the history of computing, this type of abstraction isn’t unnatural; rather it’s the inevitable progression this industry has been moving towards.
So, if JAMstack tends to be static by definition, it can’t have dynamic functionality, server-side events, or use a JavaScript framework, right? Thankfully, not so. In this tutorial, we’ll set up a JAMstack e-commerce app and add some serverless functionality with Netlify Functions (which abstract AWS Lambda, and are super dope in my opinion).
I'll show more directly how the Nuxt/Vue part was set up in a follow-up post, but for now we're going to focus on the Stripe serverless function. I'll show you how I set this one up, and we'll even talk about how to connect to other static site generators such as Gatsby.
This site and repo should get you started if you’d like to set something like this up yourself:
Demo Site
GitHub Repo
Scaffold our app
The very first step is to set up our app. This one is built with Nuxt to create a Vue app, but you can replace these commands with your tech stack of choice:
yarn create nuxt-app hub create git add -A git commit -m “initial commit” git push -u origin master
I am using yarn, hub (which allows me to create repos from the command line) and Nuxt. You may need to install these tools locally or globally before proceeding.
With these few commands, following the prompts, we can set up an entirely new Nuxt project as well as the repo.
If we log into Netlify and authenticate, it will ask us to pick a repo:

I'll use yarn generate to create the project. With that, I can add in the site settings for Nuxt in the dist directory and hit feploy! That's all it takes to set up CI/CD and deploy the site! Now every time I push to the master branch, not only will I deploy, but I'll be given a unique link for that particular deploy as well. So awesome.
A basic serverless function with Netlify
So here's the exciting part, because the setup for this kind of functionality is so quick! If you’re unfamiliar with Serverless, you can think of it like the same JavaScript functions you know and love, but executed on the server. Serverless functions are event-driven logic and their pricing is extremely low (not just on Netlify, but industry-wide) and scales with your usage. And yes, we have to add the qualifier here: serverless still uses servers, but babysitting them is no longer your job. Let’s get started.
Our very basic function looks like this. I stored mine in a folder named functions, and just called it index.js. You can truly call the folder and function what you want.
// functions/index.js exports.handler = async (event, context) => { return { statusCode: 200, body: JSON.stringify({ message: "Hi there Tacos", event }) } }
We’ll also need to create a netlify.toml file at the root of the project and let it know which directory to find the function in, which in this case, is "functions."
// netlify.toml [build] functions = "functions"
If we push to master and go into the dashboard, you can see it pick up the function!

If you look at the endpoint listed above it’s stored here: https://ecommerce-netlify.netlify.com/.netlify/functions/index
Really, for any site you give it, the URL will follow this pattern: https:/<yoursiteurlhere>/.netlify/functions/<functionname>
When we hit that endpoint, it provides us with the message we passed in, as well as all the event data we logged as well:

I love how few steps that is! This small bit of code gives us infinite power and capabilities for rich, dynamic functionality on our sites.
Hook up Stripe
Pairing with Stripe is extremely fun because it's easy to use, sophisticated, has great docs, and works well with serverless functions. I have other tutorials where I used Stripe because I enjoy using their service so much.
Here’s a bird’s eye view of the app we’ll be building:

First we’ll go to the Stripe dashboard and get our keys. For anyone totally scandalized right now, it's OK, these are testing keys. You can use them, too, but you’ll learn more if you set them up on your own. (It’s two clicks and I promise it’s not hard to follow along from here.)
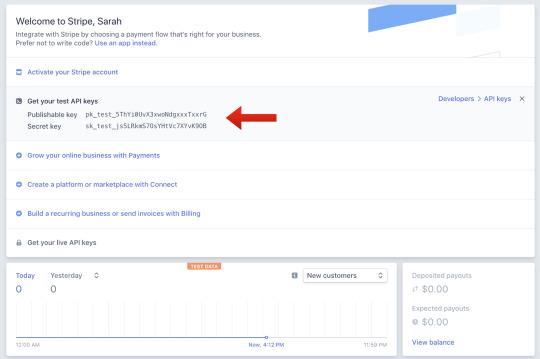
We’ll install a package called dotenv which will help us store our key and test it locally. Then, we’ll store our Stripe secret key to a Stripe variable. (You can call it anything, but here I’ve called it STRIPE_SECRET_KEY, and that’s pretty much industry standard.)
yarn add dotenv
require("dotenv").config() const stripe = require("stripe")(process.env.STRIPE_SECRET_KEY)
In the Netlify dashboard, we’ll go to "Build & deploy," then "Environment" to add in Environment variables, where the STRIPE_SECRET_KEY is key, and the value will be the key that starts with sk.

We’ll also add in some headers so we don’t run into CORS issues. We’ll use these headers throughout the function we’re going to build.
const headers = { "Access-Control-Allow-Origin": "*", "Access-Control-Allow-Headers": "Content-Type" }
So, now we’ll create the functionality for talking to Stripe. We’ll make sure we’ll handle the cases that it’s not the HTTP method we’re expecting, and also that we’re getting the information we expect.
You can already see here, what data we’re going to be needing to send to stripe by what we check for. We’ll need the token, the total amount, and an idempotency key.
If you're unfamiliar with idempotency keys, they are unique values that are generated by a client and sent to an API along with a request in case the connection is disrupted. If the server receives a call that it realizes is a duplicate, it ignores the request and responds with a successful status code. Oh, and it's an impossible word to pronounce.
exports.handler = async (event, context) => { if (!event.body || event.httpMethod !== "POST") { return { statusCode: 400, headers, body: JSON.stringify({ status: "invalid http method" }) } } const data = JSON.parse(event.body) if (!data.stripeToken || !data.stripeAmt || !data.stripeIdempotency) { console.error("Required information is missing.") return { statusCode: 400, headers, body: JSON.stringify({ status: "missing information" }) } }
Now, we’ll kick off the Stripe payment processing! We’ll create a Stripe customer using the email and token, do a little logging, and then create the Stripe charge. We’ll specify the currency, amount, email, customer ID, and give a description while we're at it. Finally, we’ll provide the idempotency key (pronounced eye-dem-po-ten-see), and log that it was successful.
(While it's not shown here, we’ll also do some error handling.)
// stripe payment processing begins here try { await stripe.customers .create({ email: data.stripeEmail, source: data.stripeToken }) .then(customer => { console.log( `starting the charges, amt: ${data.stripeAmt}, email: ${data.stripeEmail}` ) return stripe.charges .create( { currency: "usd", amount: data.stripeAmt, receipt_email: data.stripeEmail, customer: customer.id, description: "Sample Charge" }, { idempotency_key: data.stripeIdempotency } ) .then(result => { console.log(`Charge created: ${result}`) }) })
Hook it up to Nuxt

If we look back at our application, you can see we have pages and components that live inside the pages. The Vuex store is like the brain of our application. It will hold the state of the app, and that's what will communicate with Stripe. However, we still need to communicate with our user via the client. We'll collect the credit card data in a component called AppCard.vue that will live on the cart page.
First, we'll install a package called vue-stripe-elements-plus, that gives us some Stripe form elements that allow us to collect credit card data, and even sets us up with a pay method that allows us to create tokens for stripe payment processing. We'll also add a library called uuid that will allow us to generate unique keys, which we'll use for the idempotency key.
yarn add vue-stripe-elements-plus uuid
The default setup they give us to work with vue-stripe-elements-plus looks like this:
<template> <div id='app'> <h1>Please give us your payment details:</h1> <card class='stripe-card' :class='{ complete }' stripe='pk_test_XXXXXXXXXXXXXXXXXXXXXXXX' :options='stripeOptions' @change='complete = $event.complete' /> <button class='pay-with-stripe' @click='pay' :disabled='!complete'>Pay with credit card</button> </div> </template>
<script> import { stripeKey, stripeOptions } from './stripeConfig.json' import { Card, createToken } from 'vue-stripe-elements-plus' export default { data () { return { complete: false, stripeOptions: { // see https://stripe.com/docs/stripe.js#element-options for details } } }, components: { Card }, methods: { pay () { // createToken returns a Promise which resolves in a result object with // either a token or an error key. // See https://stripe.com/docs/api#tokens for the token object. // See https://stripe.com/docs/api#errors for the error object. // More general https://stripe.com/docs/stripe.js#stripe-create-token. createToken().then(data => console.log(data.token)) } } } </script>
So here's what we're going to do. We're going to update the form to store the customer email, and update the pay method to send that and the token or error key to the Vuex store. We'll dispatch an action to do so.
data() { return { ... stripeEmail: "" }; }, methods: { pay() { createToken().then(data => { const stripeData = { data, stripeEmail: this.stripeEmail }; this.$store.dispatch("postStripeFunction", stripeData); }); }, ...
That postStripeFunction action we dispatched looks like this:
// Vuex store export const actions = { async postStripeFunction({ getters, commit }, payload) { commit("updateCartUI", "loading") try { await axios .post( "https://ecommerce-netlify.netlify.com/.netlify/functions/index", { stripeEmail: payload.stripeEmail, stripeAmt: Math.floor(getters.cartTotal * 100), //it expects the price in cents stripeToken: "tok_visa", //testing token, later we would use payload.data.token stripeIdempotency: uuidv1() //we use this library to create a unique id }, { headers: { "Content-Type": "application/json" } } ) .then(res => { if (res.status === 200) { commit("updateCartUI", "success") setTimeout(() => commit("clearCart"), 3000) …
We're going to update the UI state to loading while we're processing. Then we'll use axios to post to our function endpoint (the URL you saw earlier in the post when we set up our function). We'll send over the email, the amt, the token and the unique key that we built the function to expect.
Then if it was successful, we'll update the UI state to reflect that.
One last note I'll give is that I store the UI state in a string, rather than a boolean. I usually start it with something like "idle" and, in this case, I'll also have "loading," "success," and "failure." I don't use boolean states because I've rarely encountered a situation where UI state only has two states. When you work with booleans for this purpose, you tend to need to break it out into more and more states, and checking for all of them can get increasingly complicated.
As it stands, I can reflect changes in the UI on the cart page with legible conditionals, like this:
<section v-if="cartUIStatus === 'idle'"> <app-cart-display /> </section> <section v-else-if="cartUIStatus === 'loading'" class="loader"> <app-loader /> </section> <section v-else-if="cartUIStatus === 'success'" class="success"> <h2>Success!</h2> <p>Thank you for your purchase. You'll be receiving your items in 4 business days.</p> <p>Forgot something?</p> <button class="pay-with-stripe"> <nuxt-link exact to="/">Back to Home</nuxt-link> </button> </section> <section v-else-if="cartUIStatus === 'failure'"> <p>Oops, something went wrong. Redirecting you to your cart to try again.</p> </section>
And there you have it! We’re all set up and running to accept payments with stripe on a Nuxt, Vue site with a Netlify function, and it wasn’t even that complicated to set up!
Gatsby Applications
We used Nuxt in this instance but if you wanted to set up the same kind of functionality with something that uses React such as Gatsby, there's a plugin for that. (Everything is plugin in Gatsby. ☺️)
You would install it with this command:
yarn add gatsby-plugin-netlify-functions
...and add the plugin to your application like this:
plugins: [ { resolve: `gatsby-plugin-netlify-functions`, options: { functionsSrc: `${__dirname}/src/functions`, functionsOutput: `${__dirname}/functions`, }, }, ]
The serverless function used in this demo is straight up JavaScript, so it's also portable to React applications. There's a plugin to add the Stripe script to your Gatsby app (again, everything is a plugin). Fair warning: this adds the script to every page on the site. To collect the credit card information on the client, you would use React Stripe Elements, which is similar to the Vue one we used above.
Just make sure that you're collecting from the client and passing all the information the function is expecting:
The user email
The total amount, in cents
The token
The idempotency key
Demo Site
GitHub Repo
With such a low barrier to entry, you can see how you can make really dynamic experiences with JAMstack applications. It's amazing how much you can accomplish without any maintenance costs from servers. Stripe and Netlify Functions make setting up payment processing in a static application such a smooth developer experience!
The post Let’s Build a JAMstack E-Commerce Store with Netlify Functions appeared first on CSS-Tricks.
via CSS-Tricks https://ift.tt/2z8RO8E
0 notes
Text
Let’s Build a JAMstack E-Commerce Store with Netlify Functions
A lot of people are confused about what JAMstack is. The acronym stands for JavaScript, APIs, and Markup, but truly, JAMstack doesn’t have to include all three. What defines JAMstack is that it’s served without web servers. If you consider the history of computing, this type of abstraction isn’t unnatural; rather it’s the inevitable progression this industry has been moving towards.
So, if JAMstack tends to be static by definition, it can’t have dynamic functionality, server-side events, or use a JavaScript framework, right? Thankfully, not so. In this tutorial, we’ll set up a JAMstack e-commerce app and add some serverless functionality with Netlify Functions (which abstract AWS Lambda, and are super dope in my opinion).
I'll show more directly how the Nuxt/Vue part was set up in a follow-up post, but for now we're going to focus on the Stripe serverless function. I'll show you how I set this one up, and we'll even talk about how to connect to other static site generators such as Gatsby.
This site and repo should get you started if you’d like to set something like this up yourself:
Demo Site
GitHub Repo
Scaffold our app
The very first step is to set up our app. This one is built with Nuxt to create a Vue app, but you can replace these commands with your tech stack of choice:
yarn create nuxt-app hub create git add -A git commit -m “initial commit” git push -u origin master
I am using yarn, hub (which allows me to create repos from the command line) and Nuxt. You may need to install these tools locally or globally before proceeding.
With these few commands, following the prompts, we can set up an entirely new Nuxt project as well as the repo.
If we log into Netlify and authenticate, it will ask us to pick a repo:
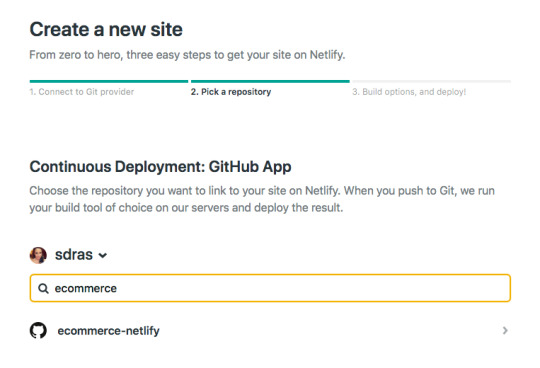
I'll use yarn generate to create the project. With that, I can add in the site settings for Nuxt in the dist directory and hit feploy! That's all it takes to set up CI/CD and deploy the site! Now every time I push to the master branch, not only will I deploy, but I'll be given a unique link for that particular deploy as well. So awesome.
A basic serverless function with Netlify
So here's the exciting part, because the setup for this kind of functionality is so quick! If you’re unfamiliar with Serverless, you can think of it like the same JavaScript functions you know and love, but executed on the server. Serverless functions are event-driven logic and their pricing is extremely low (not just on Netlify, but industry-wide) and scales with your usage. And yes, we have to add the qualifier here: serverless still uses servers, but babysitting them is no longer your job. Let’s get started.
Our very basic function looks like this. I stored mine in a folder named functions, and just called it index.js. You can truly call the folder and function what you want.
// functions/index.js exports.handler = async (event, context) => { return { statusCode: 200, body: JSON.stringify({ message: "Hi there Tacos", event }) } }
We’ll also need to create a netlify.toml file at the root of the project and let it know which directory to find the function in, which in this case, is "functions."
// netlify.toml [build] functions = "functions"
If we push to master and go into the dashboard, you can see it pick up the function!
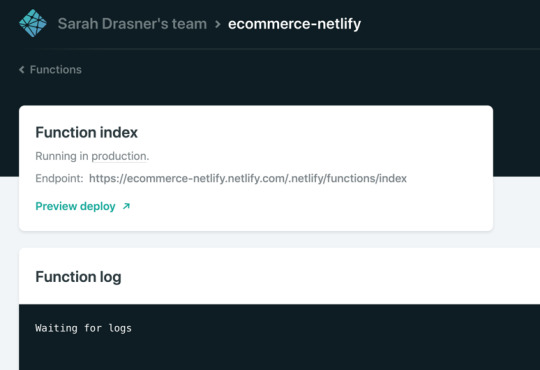
If you look at the endpoint listed above it’s stored here: https://ecommerce-netlify.netlify.com/.netlify/functions/index
Really, for any site you give it, the URL will follow this pattern: https:/<yoursiteurlhere>/.netlify/functions/<functionname>
When we hit that endpoint, it provides us with the message we passed in, as well as all the event data we logged as well:

I love how few steps that is! This small bit of code gives us infinite power and capabilities for rich, dynamic functionality on our sites.
Hook up Stripe
Pairing with Stripe is extremely fun because it's easy to use, sophisticated, has great docs, and works well with serverless functions. I have other tutorials where I used Stripe because I enjoy using their service so much.
Here’s a bird’s eye view of the app we’ll be building:

First we’ll go to the Stripe dashboard and get our keys. For anyone totally scandalized right now, it's OK, these are testing keys. You can use them, too, but you’ll learn more if you set them up on your own. (It’s two clicks and I promise it’s not hard to follow along from here.)

We’ll install a package called dotenv which will help us store our key and test it locally. Then, we’ll store our Stripe secret key to a Stripe variable. (You can call it anything, but here I’ve called it STRIPE_SECRET_KEY, and that’s pretty much industry standard.)
yarn add dotenv
require("dotenv").config() const stripe = require("stripe")(process.env.STRIPE_SECRET_KEY)
In the Netlify dashboard, we’ll go to "Build & deploy," then "Environment" to add in Environment variables, where the STRIPE_SECRET_KEY is key, and the value will be the key that starts with sk.
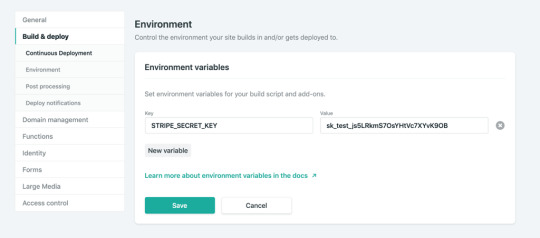
We’ll also add in some headers so we don’t run into CORS issues. We’ll use these headers throughout the function we’re going to build.
const headers = { "Access-Control-Allow-Origin": "*", "Access-Control-Allow-Headers": "Content-Type" }
So, now we’ll create the functionality for talking to Stripe. We’ll make sure we’ll handle the cases that it’s not the HTTP method we’re expecting, and also that we’re getting the information we expect.
You can already see here, what data we’re going to be needing to send to stripe by what we check for. We’ll need the token, the total amount, and an idempotency key.
If you're unfamiliar with idempotency keys, they are unique values that are generated by a client and sent to an API along with a request in case the connection is disrupted. If the server receives a call that it realizes is a duplicate, it ignores the request and responds with a successful status code. Oh, and it's an impossible word to pronounce.
exports.handler = async (event, context) => { if (!event.body || event.httpMethod !== "POST") { return { statusCode: 400, headers, body: JSON.stringify({ status: "invalid http method" }) } } const data = JSON.parse(event.body) if (!data.stripeToken || !data.stripeAmt || !data.stripeIdempotency) { console.error("Required information is missing.") return { statusCode: 400, headers, body: JSON.stringify({ status: "missing information" }) } }
Now, we’ll kick off the Stripe payment processing! We’ll create a Stripe customer using the email and token, do a little logging, and then create the Stripe charge. We’ll specify the currency, amount, email, customer ID, and give a description while we're at it. Finally, we’ll provide the idempotency key (pronounced eye-dem-po-ten-see), and log that it was successful.
(While it's not shown here, we’ll also do some error handling.)
// stripe payment processing begins here try { await stripe.customers .create({ email: data.stripeEmail, source: data.stripeToken }) .then(customer => { console.log( `starting the charges, amt: ${data.stripeAmt}, email: ${data.stripeEmail}` ) return stripe.charges .create( { currency: "usd", amount: data.stripeAmt, receipt_email: data.stripeEmail, customer: customer.id, description: "Sample Charge" }, { idempotency_key: data.stripeIdempotency } ) .then(result => { console.log(`Charge created: ${result}`) }) })
Hook it up to Nuxt
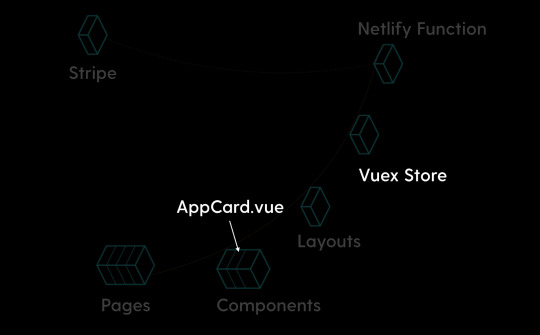
If we look back at our application, you can see we have pages and components that live inside the pages. The Vuex store is like the brain of our application. It will hold the state of the app, and that's what will communicate with Stripe. However, we still need to communicate with our user via the client. We'll collect the credit card data in a component called AppCard.vue that will live on the cart page.
First, we'll install a package called vue-stripe-elements-plus, that gives us some Stripe form elements that allow us to collect credit card data, and even sets us up with a pay method that allows us to create tokens for stripe payment processing. We'll also add a library called uuid that will allow us to generate unique keys, which we'll use for the idempotency key.
yarn add vue-stripe-elements-plus uuid
The default setup they give us to work with vue-stripe-elements-plus looks like this:
<template> <div id='app'> <h1>Please give us your payment details:</h1> <card class='stripe-card' :class='{ complete }' stripe='pk_test_XXXXXXXXXXXXXXXXXXXXXXXX' :options='stripeOptions' @change='complete = $event.complete' /> <button class='pay-with-stripe' @click='pay' :disabled='!complete'>Pay with credit card</button> </div> </template>
<script> import { stripeKey, stripeOptions } from './stripeConfig.json' import { Card, createToken } from 'vue-stripe-elements-plus' export default { data () { return { complete: false, stripeOptions: { // see https://stripe.com/docs/stripe.js#element-options for details } } }, components: { Card }, methods: { pay () { // createToken returns a Promise which resolves in a result object with // either a token or an error key. // See https://stripe.com/docs/api#tokens for the token object. // See https://stripe.com/docs/api#errors for the error object. // More general https://stripe.com/docs/stripe.js#stripe-create-token. createToken().then(data => console.log(data.token)) } } } </script>
So here's what we're going to do. We're going to update the form to store the customer email, and update the pay method to send that and the token or error key to the Vuex store. We'll dispatch an action to do so.
data() { return { ... stripeEmail: "" }; }, methods: { pay() { createToken().then(data => { const stripeData = { data, stripeEmail: this.stripeEmail }; this.$store.dispatch("postStripeFunction", stripeData); }); }, ...
That postStripeFunction action we dispatched looks like this:
// Vuex store export const actions = { async postStripeFunction({ getters, commit }, payload) { commit("updateCartUI", "loading") try { await axios .post( "https://ecommerce-netlify.netlify.com/.netlify/functions/index", { stripeEmail: payload.stripeEmail, stripeAmt: Math.floor(getters.cartTotal * 100), //it expects the price in cents stripeToken: "tok_visa", //testing token, later we would use payload.data.token stripeIdempotency: uuidv1() //we use this library to create a unique id }, { headers: { "Content-Type": "application/json" } } ) .then(res => { if (res.status === 200) { commit("updateCartUI", "success") setTimeout(() => commit("clearCart"), 3000) …
We're going to update the UI state to loading while we're processing. Then we'll use axios to post to our function endpoint (the URL you saw earlier in the post when we set up our function). We'll send over the email, the amt, the token and the unique key that we built the function to expect.
Then if it was successful, we'll update the UI state to reflect that.
One last note I'll give is that I store the UI state in a string, rather than a boolean. I usually start it with something like "idle" and, in this case, I'll also have "loading," "success," and "failure." I don't use boolean states because I've rarely encountered a situation where UI state only has two states. When you work with booleans for this purpose, you tend to need to break it out into more and more states, and checking for all of them can get increasingly complicated.
As it stands, I can reflect changes in the UI on the cart page with legible conditionals, like this:
<section v-if="cartUIStatus === 'idle'"> <app-cart-display /> </section> <section v-else-if="cartUIStatus === 'loading'" class="loader"> <app-loader /> </section> <section v-else-if="cartUIStatus === 'success'" class="success"> <h2>Success!</h2> <p>Thank you for your purchase. You'll be receiving your items in 4 business days.</p> <p>Forgot something?</p> <button class="pay-with-stripe"> <nuxt-link exact to="/">Back to Home</nuxt-link> </button> </section> <section v-else-if="cartUIStatus === 'failure'"> <p>Oops, something went wrong. Redirecting you to your cart to try again.</p> </section>
And there you have it! We’re all set up and running to accept payments with stripe on a Nuxt, Vue site with a Netlify function, and it wasn’t even that complicated to set up!
Gatsby Applications
We used Nuxt in this instance but if you wanted to set up the same kind of functionality with something that uses React such as Gatsby, there's a plugin for that. (Everything is plugin in Gatsby. ☺️)
You would install it with this command:
yarn add gatsby-plugin-netlify-functions
...and add the plugin to your application like this:
plugins: [ { resolve: `gatsby-plugin-netlify-functions`, options: { functionsSrc: `${__dirname}/src/functions`, functionsOutput: `${__dirname}/functions`, }, }, ]
The serverless function used in this demo is straight up JavaScript, so it's also portable to React applications. There's a plugin to add the Stripe script to your Gatsby app (again, everything is a plugin). Fair warning: this adds the script to every page on the site. To collect the credit card information on the client, you would use React Stripe Elements, which is similar to the Vue one we used above.
Just make sure that you're collecting from the client and passing all the information the function is expecting:
The user email
The total amount, in cents
The token
The idempotency key
Demo Site
GitHub Repo
With such a low barrier to entry, you can see how you can make really dynamic experiences with JAMstack applications. It's amazing how much you can accomplish without any maintenance costs from servers. Stripe and Netlify Functions make setting up payment processing in a static application such a smooth developer experience!
The post Let’s Build a JAMstack E-Commerce Store with Netlify Functions appeared first on CSS-Tricks.
Let’s Build a JAMstack E-Commerce Store with Netlify Functions published first on https://deskbysnafu.tumblr.com/
0 notes