#is it cheating to use any photoshop tool or only certain ones?
Explore tagged Tumblr posts
Visit Tumblr Blog
Explore Tumblr blogs with no restrictions, modern design and the best experience.
Last Seen Tumblr Blogs


Fun Fact
In 2020, 44% of users from Denmark used Tumblr daily.
Text
artists curating the details of ai assisted rendering are definitely still making conscious choices about their own art...? like how is that even an argument lol. do people who think like this have any such arguments about blending brushes? or photographs? every day i see people making the same arguments about what constitutes "real" art and every day i swear they are inching closer to outright saying that real art can't be created using computers at all. it's silly.
#real questions:#is it cheating to use any photoshop tool or only certain ones?#are collages art?#is datamoshing art?#is rotoscoping art?#is ai art art again if i paint over it?#is it cheating or laziness to use a projector to scale images up before tracing them?#how do you consider the ethics of somebody who hand draws the images they train their own ai model on?#is photography really art when the camera does all the work?#what about AI assisted cameras that automatically adjust for lighting & shake?#have always been a little annoyed but mostly intrigued by people's wildly inconsistant values#wrt what they consider real or worthwhile art#m
2 notes
·
View notes
Note
i know you have probably been asked this so many times — but what brushes do you typically use? any helpful videos i can reference to get portraits and overall realism sketching down, maybe ones that you used starting out? or just.. tips overall?
artists like you and m0cktails really inspire me to try and pursue a different route with my art, one that was totally unexpected but pleasantly rewarding when i tried it out!!! you have a great eye for features and overall composition of a piece, i started being a fan due to your ghostsoap art but i honestly think ive started to like seeing your OCs too haha
please don’t feel pressured to answer i know i kind of asked a lot!!
Hey there! I've briefly reviewed some of the brushes I use in some posts here and here! For the most part, I stick to one standard brush, as well as the airbrush and some other 'effect' brushes as I need them. I'm a photoshop devotee, unfortunately 😔, so a lot of my process is futzing around with their admittedly stellar editing tools
Truthfully, I don't have any concrete tips or videos for this sort of thing. I started out as a pencil artist, doing more and more realistic portraits the better I got, and then eventually turned to digital art (a bit reluctantly) So a lot of that was just self-taught; finding my own way how to implement certain techniques, and amassing a foundation that would allow me to draw all the stuff in my brain, lol
As for advice--I'd say to learn how to evolve out of your comfort zone. It's good to know what type of style or subject matter you feel you're best at--this is a natural inclination most artists have, and it informs the pieces your mind wants to create. But try pushing the limits of what you think might be 'too tedious' or 'too advanced'. More often than not, the thing holding your art back is that gut instinct of 'I can't do this, so why bother trying'. I used to feel this way about hands (enemy of the state, confirmed) And yeah, the easy cop-out is to just shove them all in pockets or behind backs etc. But in learning how to overcome that obvious challenge, I grew to really appreciate the way a hand can shape a composition. In fact, I have to hand it to--💥 ✋
Anyway! My next bit of 'advice' would be to go absolutely bonkers nuts with references. Don't listen to any fraud or fool who says using references is cheating !!!!! They lie!!!!! I swear, my art only looks the way it does because I am a reference hound who spends hours and hours on google/pinterest/stock sites for the perfect angle of the perfect pose, just so I can relate it to the image I have in my head.
For realism--look at real stuff! This sounds dumb, but it helps. Start paying closer attention to people around you; their faces, the way the light accents certain things, unique features, etc. I'd suggest figure studies if that's something you're into (I don't do studies, personally, because I just jump into massive pieces and can't do anything simple 😅 welp) but it does help immensely to study humans in real life and try to translate that onto the page
So yeah. Tbh, the best method for improving art is to simply DO IT. And the fact that you're seeking out further advice and tips means that you have some motivation--so use it! Hope this helps <3
29 notes
·
View notes
Text
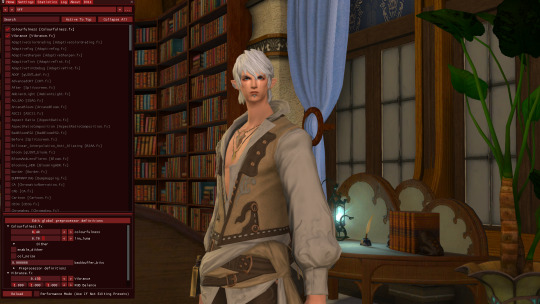
Jay’s GPose/Studio Guide
I get asked for this pretty frequently - be it friends and FC mates or randos here. So here’s a Super Generic Guide for GPose, GShade, and Studios. This will be a long, image-heavy post. Venture forward at your own risk!! -- or just, y’know, click Keep Reading below.

First off, I’m not a professional at this. There are plenty of people who do screenshoting better than I do. I just think it’s fun and neat. I have a super brief history/introductory to photography (thanks, art school), so what I know is super basic. Still, that knowledge can be applied in-game, too. So lets take a crack at this.
The Studio(s)
My studio is my apartment. You can find it on Mateus in The Mist; Ward 13, Apartment 41. I have three set-ups: multi-purpose black background (no lights), multi-purpose white background (optional lights), and a portrait background (optional lights). The apartment is set to 0 Lighting. Why? Because this allows me to control the individual lights and adjustments in GPose itself. Those bright-white background shots are done in this room. It’s just a simple matter of knowing your lighting (and GShade presets). We’ll get to that.
The layout:
All three set-ups are here and positioned in such a way to not interfere/bother each other. Unless you’re intentionally turning your camera in that direction, you should never see the other set-ups. If you need to turn your camera, consider just ... turning your character.

An example of the Black Background with generic left, center, and right Lighting settings:

Same background, close up, and lights adjusted:

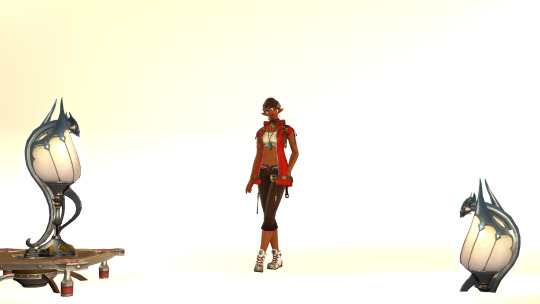
Below is the Multi-Purpose White background with dragon lamps for extra, albeit minimal lighting effects. This is without any Lighting Settings turned on.
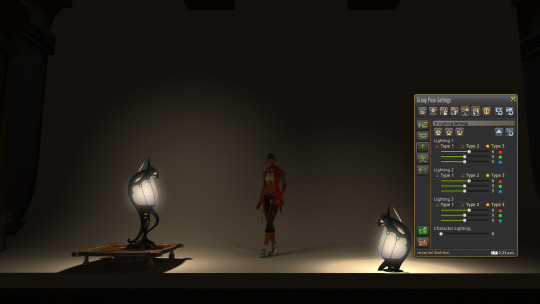
Same picture, but with all Lighting Settings turned on and adjusted:
Now let’s slap a GShade preset on it and change the camera angle. Voila.

GShade Presets & You
GShade is a variant of ReShade, much like Stormshade and other post-processing injectors.* I originally used Stormshade, but moved on to GShade as they constantly update their presets/shaders and the software is easy to install. And they have loads more presets readily available.
Presets and shaders can be really taxing on your system, so I highly recommend keeping certain shaders to a minimum for gameplay purposes. For screenshots, go ham -- just make sure your system can handle it.
For example, I only use Colourfulness.fx and Vibrance.fx for regular gameplay. This boosts the color quality of the game and removes that dull, muted tone.
For screenshots, I will turn on a variety of shaders or pick one of the many, many presets made by the community. (I’m a big fan of Espresso Glow and use it pretty frequently.)
Here is a standard picture with Colourfulness and Vibrance turned on.
And here it is without any shaders:

You can find GShade here: https://gposers.com/gshade/
* “Is ReShade/GShade allowed by SE?” Post-processing injectors are NOT considered cheating “software”. It does NOT give you any advantage over the game none whatsoever. It simply enhances your graphics. That’s it. However, as with all software, install and use at your discretion. (Also you’re not likely to get picked for any SE screenshot contests due to advantage/unfairness to PS4 users.)
Setting the MOOD
So now that you have a rough idea of what to do and use for your options, here’s some example screenshots taken with and without presets.
Without Espresso Glow - Pastel Cool: (Using the Black Portrait set-up.)

With Espresso Glow - Pastel Cool:

Same emote, same expression, same lighting settings, same preset, closer view and different camera/eye angle:

Now using the Multi-purpose White Background set-up, without Pastel Cool:

With Pastel Cool:
Don’t like studios? Get creative with the landscape. There’s plenty of beautiful places to visit over Eorzea to get the perfect background. Sometimes a lovely landscape can make all the difference in what you want in a screenshot. Crop, rotate, and adjust for size and angle -- do whatever looks best to you.
Without ArkanaSun:
With ArkanaSun:

Some Q & A (AKA Stuff That People Ask)
Q: What about Mods? A: I like mods, I obviously use them. However, I won’t go into detail for those. It’s like opening a can of worms and the last thing I need is to hear: “Well, Jay said to install them!” -- I never did. I will never tell you to use mods. Mods can break your game and SE doesn’t support them to begin with. I’ve had mods brick my game on three occasions now. It’s very at-your-own-risk. And just like ACT, you don’t talk about it/them openly, especially in game.
Q: Do you use the CMTool/Screenshot tool? A: I don’t. Truth be told, I haven’t bothered because I don’t have much time to learn and fiddle with it regularly. Just like how I don’t do my own mods, I simply don’t have the time, much less willpower to commit. I try to make work with what I got. Or draw. Lol.
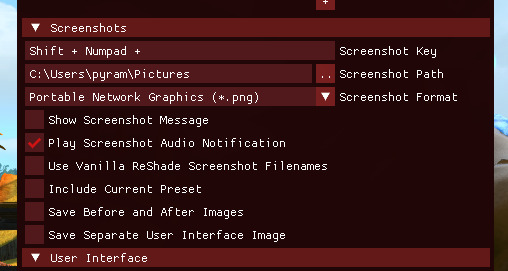
Q: My screenshots aren’t saving the image as it appears! A: Never use the Print Screen button. ReShade/GShade has a setting for taking screenshots. Set a keybinding (not Print Screen!) for it and use that. Alternatively, use programs like Fraps or whatever. (I use Fraps because it’s useful for all games and brief recording purposes.)
Q: Do you use post-editing software? A: Yes, I have access to Photoshop. I can crop, rotate, and color-adjust any picture I need to. You can do the same with Windows Photos, but the rotation and crop can be a little dense.
Q: Can I use/visit your Studio? A: Absolutely. There’s just two simple rules: - Be patient if someone else is there. - Don’t be a dick and harass others. If I find someone being an absolute ass, I will lock it down.
Resources
GPOSERS site
Art of Eorzea: GPose Tips without ReShade
Extra Guide: Lighting & Colors (by Jay)
Google lol
I hope this has been of some use. Feel free to add any tips or tricks in the comments or reblogs.
Peace, love, and applesauce.
314 notes
·
View notes
Note
hello, hope you had a good day and enjoyed your cookies hehe .i tried searching your tags for editing replies but nothing popped up and the resources page also didn't help me so asking directly do you use a ps action set or could you list your editing steps cuz your gameplay editing is so subtle yet so beautiful and aesthetic thank you in advance <3
hi there!!! thank u, I ate too many cookies if I’m honest but it was worth it! <3 thx for checking my tags I appreciate it, you are correct though I haven’t actually answered any editing questions yet so you are the first!
also thank you so much for the compliments! 💕
for my subtle gameplay editing my goal is usually to cut down the time it takes to edit, just so I can sit back and enjoy my game a little whilst also posting on tmblr!

I’ll answer under a cut!
1. Taking Screenshots
I always try to be very careful with my screenshots and their composition, just because the better your base the easier it makes editing. I use reshade in game, and I only turn it on when I’m taking screenshots, but I use the zoom in camera feature that hides the UI! You probably already know but just in case you didn’t know, when you’re using that camera you can use Q and E to move up and down, so you can get the perfect framing you desire pretty easily!
2. Photo Adjustments
Once I find a screenshot I’m happy with I open it up in Photoshop, this will be a PS tutorial since that’s what I use:

My first step is always to adjust my image, and I usually start with curves, you might not want to though, but there are a lot of adjustments there you can play around with. After I do curves I always mess with brightness/contrast then call it a day (as simple as that if I’m honest)!
3. Editing
This is where things get a little more complex, and also please bear in mind that I have a drawing tablet it is EXTREMELY helpful and does a lot of the work for me, I am basically cheating compared to those of you who don’t have a tablet so don’t get discouraged if these steps are challenging with a track pad that being said there are some cheap screenless tablets online and if this is a hobby you really enjoy I strongly recommend investing in it!
As you can see above, my edited screenshot is a lot brighter than my first pic and I achieved this using overlays! on the menu there on the right you should see a pull down that looks like this:

make a new layer and change it to overlay, and then take a soft brush (or any brush you prefer stylistically) and begin to draw an outline around your sim, use any colour you want but overlay works best with lighter colours! Play around tho it’s really fun to see how the overlay layer works!

the outline basically just helps my sims stand out a little against the background! but you can see I didn’t outline her whole body, just certain areas I felt blended a little, or where definition was lost!
I still want my image brighter though, so I then make another overlay layer, and take a tool from the left instead (our intention here is to make a screenshot more vibrant I guess!)

This might be a bucket symbol in your PS by default but switch over to the Gradient Tool instead, and a new menu should appear at the top:

as you can see I have my gradient set to move from colour to transparent, and Radial Gradient selected as opposed to linear, this just gives the gradient a nice soft edge which I like, but I have used Linear in the past (so it just depends on what you are doing) I then pick a colour I like, select the gradient tool and drag my mouse from point A to B to brighten the section of sky I want lighter:

4. Finishing Touches
Now that I have my image brighter and a little sharper looking I now need to add a few finishing touches so I create yet another overlay layer, take a soft brush, lower the opacity of that brush and go over my sims jewellery/eyes just to brighten them a little. This makes them look more ‘shiny’ and I love doing it for necklaces/earrings! I might also sometimes create a dust overlay affect myself but drawinf tiny dots/squiggles (but you can also find dust overlay PSDs online!)

and that’s pretty much it for my gameplay editing I like to keep it pretty simple compared to my edits (those I normally do a lot more adjusting/layers etc. but if you’re looking for simple editing overlays are your best friend)! One thing I didn’t mention is that I sometimes edit hair on to my sims, but I stopped doing this so much for gameplay because I’m lazy. If you do want to edit hair tho just do it before you do anything else! and do it on a regular layer just above the image. There are plenty of hair brushes available online!
#raesponses#itsmegxbree#editing#photoshop help#also if ur PS looks diff#it's cuz mine is old asfk#photoshop actions rarely work on mine so I don't use em#tutorials
65 notes
·
View notes
Text
Make-up for lazy and/or busy people
Have some practical tips from someone who doesn't really has time for this, but tries it anyway.
It's 2019 and everyone's a beauty guru
Let me preface this by saying: you don't need make-up. Don't let people tell you you need to 'put your face on'. You can damn well choose which face you'll be projecting each day or even part of the day. Unless you're manning one of those cosmetics counters in a mall, how you look is mostly about you and what makes you feel comfy. So while I'll be giving random ass tips on how to get certain looks with minimal effort, even that minimal effort is totally optional.
Now. Onward.
So I made it into my thirties without ever actually bothering with the whole 'make-up' thing. But now my job requires me to be Fancy sometimes, so last year I decided to make it a Project to learn and be somewhat good at it. I watched a whole bunch of youtube and read articles and Looked Stuff Up and then I bought a cheap version of All the Things to practice. It's honestly quite an overwhelming experience, and it's even harder if you, like, have a day job and hobbies and anime to watch and videogames to play and ranting blogs to write.
Like, Tati I love you but I'm not about to get up an hour earlier for this shit.
If you need some low-stakes, 'just looking around' type stuff, that's what this is here for. I cannot tell you how to do a cut crease or any of the fancy stuff. So have some of my own meandering experience, which can hopefully help you a little bit.
What is all this stuff?
When I did my research at first, I drew up a list of Things I apparently needed to buy to do the make-up. It turned out to be a long ass list. Here are the 'common' items on said list.
1. Primer
Exactly like the thing you put on your walls before you paint them. Supposed to go on top of the moisturizer and under everything else and depending on the primer, does different things. This is.…kindof extra. I've tried two different 'colour correcting anti red' primers and all they seem to do is dry out my skin. I'm sure some are nice but this is really not a basic necessity.
2. Foundation
The thing you slather on to make your skin either look smooth like polished marble, or cakey like badly done stucco. Kinda depends on how good you're at it. Comes in varieties.
Full coverage foundation: The stuff all the make-up youtubers use. It essentially turns you into one of those Japanese mask monsters? Like the ghost from Spirited Away. Good at getting rid of any and all blemishes, but requires More Work later on.
BB cream (or CC, or DD…): Supposed to be a more skincare friendly version of foundation. I've tried a few brands and they ended up medium to full coverage, and all of them dried out my skin.
Tinted moisturizer: Not… strictly… make-up? In Europe you tend to find these in pharmacy/parapharmacy places (so Boots or Walgreens for UK/US peeps). It's essentially moisturizer with some colouring in it to give your face extra oomph. Also, what I long expected BB cream to be (it is not). Because it's pharmacy stuff, it comes in versions with like no perfume, so if you have sensitive skin but want an Instagram filter for your face, this is probably something to look into.
3. Concealer
Spot treatment to get rid of any glaring discolouration you wish to hide. +10 to all stealth checks on red spots and eye bags, but does make wrinkles really obvious.
4. Face powder/baking powder
I have no clue what this is good for. I've tried two different ones on several occasions, and I think they're supposed to stop you from getting shiny by absorbing any facial oil. They mostly just make me look dusty.
5. Bronzer
Here's the fun thing about using full coverage foundation to make yourself look like a ghost: you then need More Product to make yourself look alive again. Enter: bronzer. This stuff puts a bit of colour back into those spots you so carefully blotted out so that you appear moar hooman. Only useful if you do the whole 'full coverage foundation' thing.
6. Contouring
That thing you know because of the Kardashians. Alternatively: don't let them know we can shapeshift. This is morphing powder/cream for your face. You use it to add shadows where no shadows are, and light where there is shadow and of course this means most people use it to look as close to skeletons as possible. Can do really cool things if you know what you're doing, and look Really Wrong if you mess it up. Not for the faint of heart. Also: your nose is fine. Really.
7. Blush
Blushing is the ultimate staple of romance fics, and it looks cute. Blush powder/cream is meant to give you glowing apple cheeks, even when you're not actively feeling embarrassed.
8. Highlighter
Societally acceptable glitter for the skin. This shit is amazing. It's officially supposed to make you 'glow' and look 'youthful' and 'juicy' but honey, who cares: Glitter!
9. Lip liner
A pencil/felt pen for your lips. Supposed to help you paint the outside of your lips so you only have to fill in the lines with lipstick later. Like carefully searching the edges before using the flood tool in Photoshop. Considering I'm pretty bad at the 'smooth strokes at lip edge' thing, it doesn't really help me to have to do it twice but ok.
10. Lip stuff
My favourite Make-up Thing. Puts colour on your lips. Comes in varieties.
Lipstick: Your mom's classic lipstick. The one with the twisty tube. Comes in a million colours and is sometimes moisturizing. Cons: everything your lips touch is now covered in lipstick.
Liquid lipstick: The stuff in the long tubes with the applicator. Usually transfer-proof which means that your coffee cup does not look like a blood bath after a few sips. Dries the hell out of your lips tho.
Lipgloss: the stuff that makes your hair stick to your face at the least gust of wind. Usually quite moisturizing but also super sticky. Makes your tea mug look like a particularly grisly murder scene.
Lip topper: Extra. Like… so extra. This is lip stuff that goes on top of your lip stuff in case you don't have enough lip stuff. Usually metallic or glitter. Because Extra.
Tinted lip balm: Another cheat item, like tinted moisturizer, in that it's not Officially Make-up. Is essentially lip balm, so it's not sticky and usually quite moisturizing and protective. Downside is that its colouring tends to be quite muted.
11. Eyebrow stuff
I don't know when 'fleek' became such an obsession, but there are pencils, and pomades, and powder and gels and spoolie brushes and they all do the same thing: shape your eyebrows.
12. Eyelid primer
Funny thing about eyes: if you have deepset or hooded eyes, like me, your eyelid spends most of its time covered by Moar Eyelid. This tends to transfer whatever you put on said eyelid to all the other skin. Hence: eyelid primer, which is like… glue? I guess? Makes stuff stay in place. For those people who don't have a bunch of eyelid foldage, it's supposed to help with the blending and whatnot.
13. Eyeshadow
Pretty colours for your eyes. Comes in powder and cream, and in literally so many colours, be it matte (no shiny), metallic (shiny), glitter (extra shiny) and fairly recently multichrome (Extra). I see a lot of influencers and (let's be real) make-up companies push the idea that you need like four shades and half an hour of blending for any given 'look' but that is mostly exaggeration. You can just pick a colour you like and wear it.
14. Eyeliner
Pencil or paint that lines your eyes and occasionally gives them wings. Comes in varieties.
Liquid eye liner: your basic all-purpose liner. This one has the advantage that it can usually be applied very thin and stealthy like.
Gel liner: as far as I can tell, a lot of liquid eye liner has an alcohol base, whereas gel liner does not. Its main reason for existing is that you can somewhat safely put it in your waterline, aka to colour the part of the eyelid just behind the lashes. This means you're going to be jabbing the pen or brush in your actual fucking eye, on the bottom/inside of your friggin eyelid and this is Terrifying. On the bright side: it's a pretty badass punky/emo/goth look. Think Avril Lavigne circa Sk8ter boy.
Kohl/pencil: this is a colouring pencil for your eyes. Tends to be a little bit thicker for extra Drama. Can also be smudged for smokey eye and even more goth points.
15. Mascara
Paint for your eyelashes. Most mascaras try to make them look bigger.
16. Falsies
Glue false eyelashes onto your own eyelashes. Ain't nobody got time for that.
17. Setting spray
Face varnish. If you've spent an entire hour getting your make-up super pretty and fancy, you can put this on to make it last longer.
So how do you use all this?
That… was a lot of stuff and we're all still overwhelmed. So let me give you some suggestions, a 'look book' of wearable looks for every day and special ocasions, aka, now that i have this stuff, wtf am i doing with it.
The 'fuck everything' I have a shirt that says 'No.' on it. It's one of my favourite shirts and I use it on deadline weeks, when I'm in the office with a particularly large amount of stressful work. I tend to pair it with a noise-cancelling headset and a look of barely-restrained fury, but it'll look just as good with a cute dress or a comfy pair of jeans. Go wild. This facial look consists of the following:
Moisturizer
Lip balm in winter, sun screen in summer.
The 'I tried'
This was my 'work' look for several years and occasionally still. The fun thing about it is it's quite subtle and most people (definitely most men) will not think you're wearing anything. It makes you feel like you're undercover, just a bit (I take my entertainment where i can get it, ok).
Consists of:
Skincare (moisturise, people!)
Eyebrow pencil
Mascara
The 'You look nice today'
This one works basically like a photoshop filter for your face, if you're into that. It blurs out a little bit of the rough edges and emphasises other parts, but it still looks very much like you. Just a version of you that gets more sleep than the actual you, usually. For me, at least, it works to make me go 'damn, looking cute' when I accidentally meet my reflection in a bathroom mirror. It's a confidence builder.
Mosturiser
Tinted moisturiser or BB cream (depends on general dryness of skin I guess)
Concealer (eyebags, man)
Eyebrow pencil
Mascara
Tinted lip balm or lip gloss
A note on lips: Look. I love dark lipstick. Make me appear as if I have stained my lips in the blood of my enemies and I'm happy. But a dark liquid lip needs to be on point to look good, which is a hard thing to do, plus if you get it wrong it is very hard to correct and I don't need that stress in my daily life. Gloss or lip balm is just a little bit more low-stakes.
The 'Make me look like my selfie'
Some days you have time. This look is essentially the same as the 'you look nice today' with two additions
Cream eyeshadow
Cream (stick) blush
A note on cream make-up: Most make-up products come in a powder form and a cream/liquid type form. Generally, the powder form is more blendable, and those fancy eyeshadow pallettes let you do all kinds of crazy amazing stuff. However, we're talking lazy working girl looks, and I happen to do my make-up on a moving train (see earlier: not getting up an hour early for this shit). If you're going to be applying things in less than ideal circumstances, cream make-up is your best friend. It doesn't explode in a cloud of dust, it doesn't break when you drop it, there's no fall-out. It is, in general, lower difficulty, can be applied with like your fingers or one of those tiny little make-up sponges, and if you get it in a fairly neutral colour (like just a bit darker or lighter than your skintone) it isn't obvious if your bleary ass messes up a little. We're being practical here, not trying to make things more difficult than it has to be.
The 'yeah I worked hard on this, bask in my glory'
Finally, the full glam. I personally use this when I am required to be Fancy, or when it's a Sunday and I'm all 'fuck it i wanna be fab'. This is the one where you just go for it. Use All the Things. Turn your face into a ghost, then paint shadows back on. Use six different eyeshadows and blend them together. Put that liquid lip to use, you have time to clean it up and try again. Add glitter to Everything. Have fun with it.
28 notes
·
View notes
Text
the best way to enhance your gameplay on the SIMS 4 Little Tricks To Help Make The Sims 4 A Whole Lot Better
The Sims is an all time FAVOURITE for generations now , We've been having a lot of fun with the game so far. But we've also encountered a few hurdles along the way. Don't worry, though, because many of these obstacles are easily overcome with a few small changes.
Here is a list of adjustments I've discovered over the past few days. None of them are profound game-changers on their own. But taken together, they have made The Sims 4 a much better experience already.
There are two different ways to use camera.
As I mentioned in my initial impressions of the game, the biggest problem I've had with The Sims 4 is that it's controls can be frustratingly imprecise at times. This is particularly annoying when it comes to adjusting the camera angle and moving around the world. I still believe that the game needs some fine-tuning in this regard, but what I neglected to mention earlier this week is that there are two different camera modes, one of which is more similar to the way it worked in The Sims 3. What this means in practice is that, in the Sims 3 mode, you can adjust the camera angle freely by moving the mouse around while holding down the middle button. The switch is available in the game's options menu, but you can also swap back-and-forth instantaneously by pressing control + shift +tab. This is very useful when you're working in build mode, where a great degree of precision is often required.
Speaking of controls, here are a some useful shortcuts.

Video Games Blogger has compiled a useful list of hotkeys. Since The Sims 4 often feels like the video game version of photoshop or some architectural modelling program, learning these will save you many a click.
For the tools in build mode:
Eyedropper Tool (toggle): E
Hand Tool: H
Sledgehammer Tool (toggle): K
Design Tool (toggle): R
Wall Tool: B
Toggles Day/Night in B/B: L
Allow off-grid placement while dragging around an object: Alt
Toggle Grid: G
Cycle Between 1/2 tile and 1/4 tile grid snapping for object placement: F5
Flood Fill a single wall while placing wall patterns: Alt
Flood Fill floor & wall paint while placing floor or wall patterns: Shift
Toggle to 1/4 tile floor paint while placing floor tile patterns: Ctrl + F
Reduce Terrain Brush Size while Terrain Paint catalogue is open: [
Increase Terrain Brush Size while Terrain Paint catalogue is open: ]
Move Terrain Brush Softness Slider to the Left while Terrain Paint catalogue is open: ;
Move Terrain Brush Softness Slider to the Right while Terrain Paint catalogue is open: '
Toggle Terrain Paint/Eraser while Terrain Paint catalogue is open: Ctrl
Move Whole House tool: U
Toggle Video Recording: V
Capture Screenshot: C
When you're placing objects in build mode:
Rotate held/selected object, block, roof, anything rotatable: < / >
Move object to next slot in surface with a slotted object selected and on a slot surface: M
Copy held/selected object on placement: Shift
Inventory held/selected object: Backspace
Delete held/selected object: Delete
Undo: Ctrl + Z
Redo: Ctrl + Y
For the camera:
Have the camera follow the Sim: Right-click on the Sim's portrait
Toggle Top Down View: T
Go to Next Floor Up: Page Up
Go to Next Floor Down: Page Down
Walls Up: Home
Walls Down: End
That's a lot of stuff, obviously, so give yourself time to figure out your ideal control scheme. Two that I'd highlight for building are using the free placement option when putting stuff down and having some fun with the quarter-tiles option. Much like the Sims 3 camera mode, this gives some much-needed breathing room to start experimenting.
If the tutorials are annoying you, you can make them go away.

When you first start playing The Sims 4, you'll get a lot of tutorial notifications. Unfortunately, the game doesn't have an easy way to disable this for seasoned Sims players or just people who don't like being inundated with an endless barrage of pop-up notifications. Thanks to the SimsVIP, however, I discovered a handy way to remove tutorial messages — you just have to do so through Origin, rather than the game.
Here are their very easy instructions:
Open the Origin Client
Right Click The Sims 4 game cover
Select "View Game Properties"
Click "Game Properties." This will open a popup box.
Add the following line to the Command Line Arguments box and hit apply: — — no_tutorial
It should look like this:

Add your own soundtrack to liven things up.

Are you bored with The Sims 4's soundtrack? I sure am. Granted, Origin tells me I've already played 20 hours of the game, so maybe moderation is the real problem here. In either case, EA has this helpful note about personalizing your copy of The Sims 4 with your own music:
You can play your own MP3s through the radios in The Sims 4. Copy them into the The Sims 4\Custom Music folder that corresponds with your genre of choice and tune your in-game radio to that station to hear your music.
If you want some suggestions, remember that you're always welcome to peruse the Kotaku Soundtrack, our ongoing series of songs that we're listening to — and gaming to.
It's very easy to take screenshots and record your gameplay.
For screenshots, all you have to do is press "C." To film something, meanwhile, you just have to press "V." A little camera icon will appear on the upper-left corner of the screen to indicate that the game is recording whatever's happening. Bear in mind that the recording feature defaults to only showing the Sims themselves, not the game's UI. If you want to capture exactly what's appearing on-screen, you can change that in the camera section of the game's options menu:

If you're planning to post your videos to YouTube, however, you might want to capture it at a higher quality than you can easily access in the options menu. Here are some handy instructions from The Sims 4 Blogger Tumblr:
To make your video files bigger, you'll need to adjust a small detail in The Sims 4's Game Files.
To edit your video size, open the folder where you install your Origin Games and then go to The Sims 4 > Game > Bin > res. In the "res" folder, you'll have to open a configuration setting file called "VideoRecording".
To make a video larger, simply rename the "Large =" section from 1024 to any bigger resolution you want.
Both the video and screenshot options are so easy that even I've managed to use them, and I can barely find my way around Gmail on most days. Sharing your stuff is another story. The game has a "share to Facebook" option at present for screenshots, but that also means that the images appear through a Sims-related Facebook app. The game doesn't offer any easy way to edit or share footage, meanwhile. That's frustrating. But the good news is that the game automatically saves all of these videos in a specific folder that you can pull from once you're out of the game.
Your progress can travel, but not with your Origin account.
You can activate and play The Sims 4 on multiple PCs, provided that you download Origin and activate your account. Your save data doesn't migrate quite as easily as the core game, however. If you want to travel with your most up-to-date Sims data, you'll have to copy your save files onto, say, a thumb drive and then dropping them into whatever device you're playing with. You can find this data by navigating to the "saves" folder: \Documents\Electronic Arts\TheSims4\saves.
Here's how you can unlock some of the game's first secrets.
We're still in the earliest of early days for The Sims 4, but players have already begun to uncover some hidden treasures in the game. Most notably, there are two secret lots, one in each of the game's starting worlds — Willow Creek and Oasis Springs. GameFront has a solid step-by-step breakdown of how to unlock these two lots. I haven't tried these yet because I'm doing my best to play The Sims 4 at my own contemplative (read: sluggish) pace. But if you're already full to bursting with Sims, then at the very least this is one easy way to free up some space.

Now, you might be thinking to yourself: "Hey, this arsehole left out [insert favourite Sims 4 tweak]! What gives?" Well, since we're just getting started with the game, I've chosen to shy away from certain things. Cheat codes are being tossed about, and the modding community has taken the smallest of tentative steps into the new Simsgame. I'm going to wait until there's more solid material to sink my Sim teeth into before I take all of us down that road. The same goes for a full list of gameplay tips and, of course, our review of the game.
In the meantime, however, please don't hesitate to reach out about anything and everything cool you're seeing, playing or hearing about in The Sims 4.
post credit - https://www.kotaku.com.au/2014/09/small-ways-to-make-your-sims-4-experience-way-better/
1 note
·
View note
Note
i really want 2 make a tumblr sims4 blog
hey there! starting a sims blog and really seeing it grow takes a little time and nurturing. i’ve put together a few things i’ve learnt over my coarse of being in this community that might be kinda common sense but is detrimental to your blog (i put it under keep reading cause she’s a long one):
frequency and activity -people will come and go, it’s not unheard of of people losing inspiration for sims and stop posting but that becomes an issue if the majority of your following become inactive during your inactivity as well. you have to be active and post frequently in order to be noticed more and gain followers. use the queue feature to your advantage!!! i live in australia so if i want the majority of my followers to see what i make, i have to post things when it’s like, 12am to 12pm roughly and there’s no way im gonna be up during the wee hours of the morning. this is where the queue feature comes in, not only does it post things during the time frame you want it to be in, but it also helps post regularly and frequently!
engagement -another big thing is to include yourself and engage with the community, sending asks not on anon, sending messages on posts, helping people if they’re stuck or just general things does actually help even if it’s just a little bit. people will recognise you if they see you around
aesthetically pleasing -biiiigggg big big is aesthetics, what you’re into will bring in like-minded people that also enjoy that specific aesthetic, whether it be cinema or pastel or over-saturated. a big tool simmers use, (me included) is reshade, a post-processing tool that makes pretty much any game look a lot better (i would go into detail but there’s a lot, here’s a post explaining all about it + there is youtube tutorials if you want to get it)
in addition, getting clean screenshots by using tab and using the headlineeffects cheat to hide the speech bubbles and plumbob (unless you’re into having them visible as i know some people looooveeee it) and putting it through actions via photoshop if you have it, makes whatever picture you’re using more interesting and pleasing to look at. gimp is also a great free program btw!
legacy stories, challenges, etc -you get to a point in time where what you were doing solely ends up not being fun anymore, thus causes the problem of being inactive, etc etc you get the jist. for me as example, i used to solely just take pictures of random sims i created in cas and it got to a point where it wasn’t fun anymore and i just got tired of doing it and stopped playing for ages. so it’s important to do things you feel would be fun for you, whether that be doing a sims challenge like the 100 baby challenge or creating a legacy story.
tag appropriately -make sure to tag all your things appropriately, it helps in the long run! use the usual big general sims tag like ts4, the sims 4, etc but also, make sure to use saviorhide for things that aren’t that important to look at like random comments you make. not only will your followers (mentally) thank you for it if they dont want to see specific things like nsfw or drugs, etc but if you decide to use /tagged/ pages in your blog for things like only wcif posts (where can i find), your future self will thank you.
you do you boo -a big thing people tend to forget is doing what you wanna do, a lot of the time, especially when you start off, you worry about not getting many followers or being noticed, we’ve all been through that at one time or another, you will eventually get to a point where you’re not worried about it anymore. but doing what you want to do and not what you think you should be doing to get more followers goes a long way, for your sake. once again, people will gravitate to you due to your particular aesthetic, dont be afraid to dip into different styles, hell, dip into all of them and see which one you like best. this is your learning period so get out there and see what works for you!
(optional) create cc -definitely the fastest way to gain a following and being noticed is making cc. however dont feel as though you absolutely have to make it, people will love the things you make if you yourself love it. if you dont love it, then there’s a good chance other people wont. recolouring is the easiest option, you can make toooons of cc via recolouring things (and once again, if you have photoshop, people have made actions to make it even easier).
i think that’s the main advice i can give you, once again, this is your learning period so trial and error your way around to see what fits your style, your convenience and happiness best, if you ever need more advice for things or want more in-depth explaining for certain stuff, dont hesitate to pop in and send me a message
28 notes
·
View notes
Text
Hacker Matsu Headcanons
It baffles me that there's very little Hacker Matsus content on here... So allow me to contribute! I might also be a bit biased considering I preordered their merch (like my Hacker!Ichi phone case I got last week that I love dearly). These headcanons got a little out of hand so this post is a tad long.
All Matsus
- In this AU, they're just as likely to not to go out looking for jobs. Not because of laziness, but due to being awkward shut ins figuratively trapped within their computer screens. They still go out into the city for errands sometimes.
- Each of the brothers have their own desktop that they decorate according to their tastes. It's rather easy to tell whose setup is whose from a glance.
- Prone to being forgetful about basic needs such as eating. Hey, we've all been there, right? They're lucky to have a caring mother to remind them every now and then. She even installed alarms with helpful messages that are often... shut off and forgotten, as is tradition with anyone who uses them.
- True to their nature as computer enthusiasts, they would much rather rely on powerful hardware they can mod at any time over flimsy laptops that are catered for people who seek convenience rather than strong performance.
- ...That's what they want you to believe, but sometimes when you need some well deserved "privacy", a laptop gets the job done. Moving a tower along with your screen to another room is more trouble than it's worth.
OSMT
- Probably the least interested in learning how to hack but what he does know, he does extremely well. He's not very serious about it. The potential is there though.
- Refuses to pay for quality porn and has a whole database dedicated to falsified information such as credit card accounts, emails, and physical addresses. Uses these for online shopping as well.
- Oso's desktop is the sloppiest. Mountains of beer cans, empty chip bags, candy wrappers are piled on top with reckless abandon. The only thing that's clearly visible is a small calendar with women in various styles of lingerie. Todomatsu doesn't understand the need for it - the date's already there on the bottom right!
- Several attempts were made to date people online using matchup sites but his overall writing ability and photoshopped pictures were never well received. Naturally, he keeps getting banned over and over. This is the main cause for his numerous email accounts.
- Knows every single one of his brother's passwords and can bypass their security protocols. He leaves them surprises that range from replacing their wallpapers to embarrassing candid pictures or jumpscare videos when clicking a certain file.
KRMT
- Relishes in customizing his equipment. There are glowing, sparkling lights emanating from his tower that serve no purpose whatsoever. His keyboard is covered with a tacky blue flame skin that he likes to pretend is caused by his "fingers being so fast that it leaves a blazing trail".
- At one point, when you opened the CD drive, it used to play a random sound file of his own voice. Jyushimatsu broke it once from having it open continuously by button mashing. It was fixed by a begrudging Ichi who unceremoniously replaced it with an out of tune rendition of Shooting Stars by Bag Raiders.
- Likes to create his own viruses in hopes of becoming famous on the internet. They've all failed except for one: malware that causes one's computer to just display Karamatsu's face on your screen, with the option to buy one of his painful shirts. Buying does nothing to get rid of it.
- Kara owns illegally downloaded synthesizer programs. Has an extensive library of remixed music and original content.
CRMT
- Out of all the brothers, this is one hacker you should not mess with. He has every single tool imaginable at his disposal and his knowledge of them is unparalleled.
- However, Choromatsu dreams of being hired as a proud white hat hacker one day and to be recognized by a bigwig company.
- Unfortunately, he spends most of his days cheating in his favourite MMOs. He loves exploiting in game currency and dominating level rankings. Not averse to hate messages from fellow players. Lucky for Choro, he can just delete their accounts if they get on his last nerve.
- His desktop is plain but clean. It's the largest in the room, to compensate for his two high definition monitors surrounded with idol merchandise steadily amassing around them. There are countless books stacked next to his chair.
- The third brother's rival is his eldest brother, who chastises him for not taking consideration in his hacking because he secretly admires his hidden expertise.
ICMT
- Similar to Osomatsu, he only joined their destructive antics to fit in and doesn't care much about the hobby.
- More of a traditional user that surfs incognito on the web. He's good at hiding his tracks.
- Uses his hacking to target individuals and organizations that are not above endorsing animal cruelty for their selfish gains. If Ichimatsu has his eyes on you, be prepared for a life of absolute hell. He is merciless in his methods. Good luck shaking him off. You probaby will never see the end of your nightmare.
- Quite talented with a tablet and uploads his work to dedicated art websites. Never interacts with his fans but appreciates their feedback.
- Always has a cat on his lap. Or several. They love stepping all over his keyboard, shutting his computer down, and knocking off his knick knacks onto the floor in an effort to win his undivided attention. He'll usually give up and lay on the floor with his feline friends.
- The sextuplets have designated him as their personal resident computer technician because he knows his way around their parts along with their individual functions. Makes his repairs on Karamatsu's exceptionally faulty on purpose.
JSMT
- Loves playing FPS games and anything that can be modded for his own amusement. The master at finding game breaking bugs. Quite a few well known game developers have approached him for testing that he simply does for free. It's not as if he finds bugs on purpose!
- Most likely to burst out laughing by himself at a funny meme or video. He'll instantly message his brothers on Skype to send them the links even if they're two feet away.
- Big screen for watching the good ol' baseball game. The size makes his eyes cross-eyed.
- Hijacked a news site with Ichimatsu's help to make his own article detailing the cuteness of harp seals and the importance of wild animal conservation in Japan. There's an abundant use of caps lock and exclamation points.
- Jyushi doesn't spend his days inside the house as much as the rest do. Staying fit is still a crucial aspect of his life. If he wasn't so bent on becoming a baseball player, his brothers would most likely never see the light of day - he forcefully drags them outside for fresh air when he thinks they need it.
- Loves spinning on his computer chair.
TDMT
- It's not hard to imagine Totty as anything but a social media expert. He is on every popular website available, his cute and sly face everywhere you look.
- Blogs about multiple subjects to expand his horizons. His favourite is his photography blog that is updated on a daily basis. He specializes in countryside landscapes and food pictures. Of course, his selfies make their way on there too...
- Has the means to destroy your hard earned online reputation should you think of crossing him. Stay on his good side and he might let it slide. Emphasis on the word might. He's capable of tapping into your cellphone to edit information, including abuse of paid services to rack up your bills to dizzying numbers.
- A part-time graphic designer who created the Matsuno Brothers Cyber Hacking Project logo and its overall aesthetic. It's thanks to Todomatsu that they all have stylish sweaters to show off.
- The second most secretive of his hacker identity next to Ichi. His reasons differ in that he hides it to protect his social standing within his circle of real life acquaintances.
#osomatsu san#hacker matsus#hacker osomatsu#hacker karamatsu#hacker choromatsu#hacker ichimatsu#hacker jyushimatsu#hacker todomatsu#osomatsu san headcanons#my writing#osomatsu#karamatsu#choromatsu#ichimatsu#jyushimatsu#todomatsu
56 notes
·
View notes
Text
Linux Life Episode 57
Hello folks and welcome to my ongoing Linux journey. Or if you are new welcome to the madhouse as an ex Windows guy who moved to Linux I catalogue my experiences and all the bumps in the road that go with it.
Well it’s been over a eighteen months since I started this blog and now I would say I am now a Linux convert. Sure it has not been without its moments and at times I have struggled to keep the project going as I hit brick walls.
However I have definitely become a lot more patient of the quirks of Linux. Things which would have previously had me running to the hills I have managed to get around.
If I had the Xeon at the beginning of this journey I don’t think I would have stuck with it. Having to find the drivers for the network card and getting the AMD Vulkan stuff working would have broken me in the early part of this project.
However as I started on much more workable machines such as my Samsung i7 laptop and the i7 3770K desktop and had managed to find a set of distributions I was happy with. So when the Xeon came along I knew what I could do to get it working and where I could find answers if really stuck. I am much more willing to go diving into config files or even heaven forbid use the terminal if necessary.
That really proves how far I have came as when I first came across opening the terminal felt as if I had to do something that was so backwards but over time I learned to appreciate it.
While still not a total terminal convert who uses things like the i3 tiling manager. I have definitely learned to appreciate it for sorting various problems and I no longer fear it like I used to.
I have learned how to get around driver issues and now I can normally get my distro up and running again if my video card has issues which i would never have been able to get my brain around.
I however admit if I didn’t use Arch and had these problems with something Debian based and had to search all over the internet to find repos I would not have been as successful.
One thing I will say about the AUR most of the things you want are easily available. You may notice I say most as yes I have had to build some things from source packages or certain AUR packages just would not work. However 95% of the time the thing I require is available and installation is a few clicks away.
Also because the Arch system has to build several things from source a lot of the libraries to build source code packages when I download them such as the Previous emulator. Normally I just have to unarchive, move to the archive and make. Most of the required file headers or dependencies are available.
Even if they are not normally its not difficult to find them somewhere in the repos or the AUR.
Now I admit many would say I am not a complete Linux convert as I still have things like Adobe Photoshop installed on my Linux machine. Yes that is quite correct I do use Photoshop CS6 with Wine but this is more of a convenience thing as I found GIMP didn’t quite do things the way I wanted it to and it was just easier for me overall to use Photoshop as that was my background.
I also occasionally play Windows games using Lutris or Proton. This is only because there is no Linux native version available. So is that cheating I don’t know.
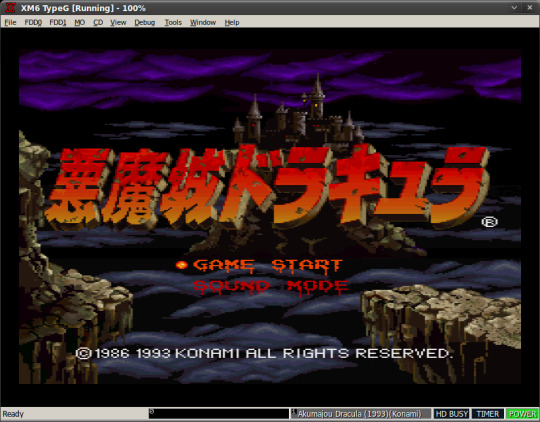
I also used Wine to run XM6g which was a Sharp X68000 emulator but that’s only because I could not the RetroArch libretro core version to work. Trust me I tried to get to work in RetroArch but sadly it just would not play ball no matter what I did.
So yes I do use Wine for a few things but to be honest the amount of the programs I have is very small.
If I am honest I sometimes try things in Wine just to see if they will run but nine times out of ten I don’t bother unless I really need something specific.
Now is the question ... Could I go back to Windows on a daily basis. The simple answer is I don’t think I could. Sure I could use it if I had to say for a company as I don’t have a choice what they use. However as a personal daily driver I now find Windows incredibly slow and cumbersome.
Yes on the Xeon I do have a Windows 10 installation dual boot setup with EndeavourOS but to be honest I have only went into it when I could not get the Wi-Fi working in Linux. However once I got that working I think I have opened Windows once since to write up a flash drive using Transmac only because I could not get it to write what I wanted to USB when I ran it through Wine.
So is my journey at an end... Well no actually as I am always finding things in the Linux world that I am interested in. So don’t panic dear reader I struggled to begin with regarding things I could write about but lately I seem to find something of interest.
Be it emulation, be it something like a new video editor, a new tool or just some new program I have never heard of. So it normally doesn’t take long to find a topic to write about.
However I am always open to suggestion if you would like me to examine any particular topic. Admittedly if it has something to do with programming I may decline. This is because I don’t really program any more.
I admit if I could get a program like Wine that could run OSX programs I would definitely try it. I believe there was a program called Darling which was trying to do that but I have not checked it in months. It as far as I know can run terminal type Mac apps due to Darwin (MAC OS Kernel) being open source but graphical ones are much harder as of course that is heading into grey areas such as using the Graphite/Metal (?) system which as far as I know is closed source.
I truly would run Final Cut Pro X on my Linux box through it if I could. Now yes you can get QEMU to run Mac OS X stuff but it would be much simpler if you could use a Wine like program to do so.
Anyway that’s enough waffle for this episode so until next time...Take care.
#linux life#waffle#qemu#intel xeon w3550#intel i7 3770k#darwin#macos#windows 10#darling#emulation#lutris
0 notes
Text
Change Image / Picture Resolution Without Photoshop
Tips and Tricks of Changing Image Resolution without Photoshop
Figure out how to change an image/picture resolution without Photoshop apps. The introduction of Photoshop in the world of design has made life a lot easier. If you know how to use Photoshop, you can do anything with an image. Photoshop is an advanced image creation and editing software. You can use the software for various purposes. It is one of the most popular tools in professional image editing. Apart from editing, controlling and balancing the image resolution is also an important factor. An image with proper resolution will give you the best output while printing. Sometimes it is not possible to capture the image with the appropriate resolution.
Later when these images are transferred to the computer, they appear grainy and pixelated. So what is the procedure to get them fixed? Frankly, the original image resolution is always the best. You can correct the resolution with professional software like Photoshop. But this can hamper the image quality. The difference can be noticed through the image clarity.
image resolution change samples
Importance of image resolution in Business
Most businesses are dependent on the print industry for marketing. The print industry is one of the most important sectors in advertising. Big advertisements like posters, banners, and hoardings are all results of the print industry. They comprise of enlarged images so that people can notice them from a great distance. This is where clarity matters the most.
An image that is not clear enough will not grab the attention of customers. The number one reason for an unclear printed image is the resolution. People with no knowledge in editing will make the mistake of enlarging the image freely. Once they do so, the image gets pixelated and grainy. It is easily noticeable. Sometimes the image will look blurred and lose its focus too. Businesses are heavily dependent on advertising. They cannot afford to launch a poor advertising campaign.
Importance of Resolution to a photographer
The advanced digital cameras today come with great resolution. Yet, some cameras will have it more while others are less. Not always will you need a camera with the top resolution? But if you already know that you need an image with good resolution, you should go for a camera with good resolution. Getting a camera that meets the basic resolution requirements is easy. The normal resolution in a camera is approximately 6 megapixels. But for large-sized images, you need a camera with higher resolution.
Tips to get good resolution
The file format is one of the biggest reasons for low image resolution. To save space, many people store images in the jpeg file format. If you do not have any requirement of editing the images, it is fine to click it in jpeg. But if you are a professional photographer and you want to get the most out of the image details, go for RAW.
The RAW file format required a bigger storage space. This is because it will store every single detail of the image. It can retain great resolution and clarity during the post-production process. Hence, experts will often recommend storing and saving images in the RAW file format.
Benefits of RAW file format
Gives you the highest level of quality.
Helps to record the brightness levels in a better way.
Can correct the over and underexposed images easily.
Makes it easy to edit images in professional software like Photoshop, Lightroom, etc.
Gives you high quality detailing.
Allows editors to take advantage of non-destructive editing.
Best for getting printed outputs.
Helps to adjust colors based on the situation.
Best for professional usage.
Other Reasons that Destroy Image Resolution
Sometimes you can have the correct resolution settings in your camera. But when you capture the image, it appears blurry and out of focus. This could be due to a shaking hand. Maybe you have shaken your hand too much while capturing the picture. This will automatically result in a blurred image.
Another reason for the image to get blurry is not focusing on the right area. When you focus the image on the wrong area, the rest of the image will by naturally out of focus. To avoid this you need to control the camera focus manually. You may rely on the autofocus option but sometime it may betray you by focusing on the wrong area. Hence, it is always better to focus on the image manually. Either of these two reasons can make the image appear blurry.
How to change image resolution without affecting Quality
It is always advisable not to change the image resolution. But if you do so use professional software or any good designing application. But some image requirements demand correction in resolution. In such cases, you can use Photoshop to correct the image resolution. But what if you do not know how to use Photoshop? There is nothing to worry. There are several applications and design tool that can rectify image resolution without hampering the quality.
If you look for resolution correcting applications online, you will find a lot of them. Among them, Resizeimage.net is a very helpful one. With this website, you can not only change the image resolution but you can freely crop and rotate it too. Some of the other additional options available on this website are image editing. You can make the image background transparent and change the file formats. Before you choose to save the image, there is a compression selector that will enable you to decide the final image resolution.
picture resolution low and high
The Option You will love the most
Apart from the normal editing and resolution correction processes, you will love another option on this website. If you want to increase the image resolution and still not let it affect the image quality, you will love the Artificial Intelligence Image Enhance option. With this useful option, you can increase the image resolution up to 600%. You are not going to lose the image quality. The image will surely remain sharp.
Some other similar applications and websites will provide you with the same quality of image resolution. Some applications will do it efficiently while others will not. Most of the good resolution correction applications are either Paid services for free.
Common Places to Notice Low Picture resolution Images
A commonplace where you will surely find images with the low or changing resolution is WhatsApp. Did you notice the degrading image quality while sending or receiving images in WhatsApp? You may have captured an excellent image with perfect resolution through the inbuilt phone camera. But when attempting to transfer the same image to your friend, you find the image grainy and pixelated.
This happens for a reason. WhatsApp degrades the resolution to make the sending and receiving process fast. Since we are okay with the overall image quality, we don’t mind losing some of the image resolutions. But if you look at the same image very closely, it appears grainy and pixelated. You will not get to see anything very clearly.
One thing that most WhatsApp users still don’t know is controlling the image resolution. In WhatsApp, you will come across an option that asks you the amount of resolution you want to compress while sending the file. You will find this option in the local settings. With this option, you can control the compression of resolution to a certain extent.
Screenshots
This can cheat you initially, but when you look closely, screenshots are not of the same resolution as the original picture quality. It is a common addiction to take screenshots. It saves the time of downloading the entire image and makes the information handy too. But people fail to notice the amount of resolution they are losing. When the file is captured and stored in the internal memory of your phone or computer, it is saved with low resolution.
youtube
The biggest drawback of this method is that there is not an efficient way in which you can control the image quality. With each screenshot, you are losing nearly 95% of the resolution from the original image. The reason why the options to control the resolution is limited is the screen size. Depending on the screen size of your cell phone, one way to save resolution is by zooming out. Just before you take the screenshot, use your fingers to zoom out of the original image. Then take the screenshot. This will reduce the image size initially. But when you open the image after the screenshot, you can crop the blank spaces and get a better image quality.
Low-Resolution Problem with windows Computer
While using Microsoft Paint, you may face problems with the image resolution. But since modern paint is an upgraded version of the old paint, you can get a solution to this problem easily. It is a very straight forward process to increase or decrease the image resolution in the paint. Go to the TOOLS option and here you can take charge of the number of pixels. You can increase or decrease the percentage or put in the exact resolution required. That’s it!
Make sure you do this correction in the very beginning, just before you start with the painting process. You may increase the resolution of the image but this will not at all improve the image quality.
Don’t resize the image
Resizing an image may not be the right option to increase image resolution. You can always use a resizing application to make the image smaller. But never enlarge the image. This will easily ruin the picture quality. Never resize the image with an unknown application. You may successfully resize the image; in the long run, the image quality will be destroyed. The scope of recovering a destroyed image to its original form is limited.
If you do not know about fixing the resolution of an image, it is better to take help. Ask for expert help or any of your friends who is well aware of these tools. Try capturing the image at its best with optimal resolution so that you do not need to correct the resolution later. An image with an accurate resolution is always the best.
Resources for Image Resolution Change Article:
Chimi Printing for Cheap
55Printing Blog
Photoshop Main Site
Google
Topazlabs.com
Letsenhance.io
https://microscope-microscope.org/microscope-info/image-resolution/
The post Change Image / Picture Resolution Without Photoshop appeared first on Cheap Printing Deals.
Change Image / Picture Resolution Without Photoshop posted first on https://www.55printing.com
0 notes
Text
February 25, 2020 at 10:00PM - Adobe CC A-Z Lifetime Bundle (pay what you want) Ashraf
Adobe CC A-Z Lifetime Bundle (pay what you want) Hurry Offer Only Last For HoursSometime. Don't ever forget to share this post on Your Social media to be the first to tell your firends. This is not a fake stuff its real.
If you’re looking to make your videos better, adding motion graphics and visual effects can be a surefire way to do it. Adobe After Effects CC is used by professionals in every type of production from business and marketing videos to music videos to feature films, and this crash course is ideal for producers of all skill levels.
Access 77 lectures & 9.5 hours of content 24/7
Get comfortable w/ After Effects CC
Start a new composition & use the basic tools
Add shape & text layers
Create real-world projects such as lower thirds & bumpers
Use video effects & presets to speed up workflow
Learn visual effects, rotoscoping, motion tracking, & video stabilization
In this all-access course, you’ll not only learn the ins and outs of Adobe Premiere Pro CC but you’ll also gain advanced knowledge of keyframe animation, color correction and color grading, and more. This course starts with the basics before elevating to more advanced topics. By course’s end, you’ll be able to edit video like a pro.
Access 63 lectures & 7.5 hours of content 24/7
Explore speed manipulation & speed ramping
Create transitions from scratch
Discuss advanced uses of effects
Learn how to export videos for specific platforms such as YouTube, Instagram & Twitter
Adobe Illustrator is the industry-standard vector graphics application that lets you create logos, icons, sketches, typography and complex illustrations for print, web, interactive, video and mobile devices. In this course, you’ll start with the very basics and progress to creating complex projects.
Access 91 lectures & 12 hours of content 24/7
Learn how to draw circles & rectangles
Create complex illustrations, logos, business cards & more
Get confident w/ each tool or feature of Illustrator
You probably at least know of Photoshop, the world’s leading photo editing software, but you might not know quite how to use it to its fullest potential. In this course, you’ll go from zero to hero in Photoshop, mastering all of the editing tools available, as well as the design capabilities. Whether you want to use Photoshop for business or pleasure, this course will give you all the tools you need to succeed.
Access 59 lectures & 6 hours of content 24/7
Navigate & customize a Photoshop workspace
Learn how to edit RAW & non-RAW photos in Photoshop
Use selection tools, retouching tools, & more
Create & adjust shapes in Photoshop
Design graphics w/ different blend models
Save your projects for printing, online, sharing, & more
If you’re watching a well-edited, polished video, it was likely made with Adobe Premiere Pro. The go-to video editing application for creative professionals, Premiere is an indispensable part of any videographer’s toolbox. You’ll learn how to edit audio, add transitions, and more, tapping into Premiere’s rich array of tools to turn out polished videos certain to impress.
Get an overview of Adobe Premiere Pro w/ 5 hours of content
Edit audio & add video effects
Learn color correction & color grading
Add text & titles: choose a font, format your titles and add motion to titles
Add video effects & transitions
Export & upload your videos to YouTube
Create pro-quality footage
Learn skills necessary for entering a career in video production
Adobe Premiere Pro CC is one of the top video editing software on the planet and this comprehensive course will teach you everything you need to start editing with the best. Used in every type of production, from business and marketing videos to music videos and documentaries, Premiere Pro is an essential skill for any aspiring videographer. Over this top-rated course, you’ll learn this software by actually using it, mastering Premiere Pro in no time at all.
Access 59 lectures & 5.5 hours of content 24/7
Start a project, edit your videos, add video & audio transitions, & add titles
Improve audio & find free music for projects
Correct & grade the color of your video to give it greater style
Add visual effects & edit green screen (chroma key) footage
Export your videos for high-quality playback on any device
Edit a 1-minute documentary w/ all the supplied footage
This course is aimed at people new to Illustrator and design in general. You’ll start right at the beginning and work your way up. You’ll start with the techniques you’ll need to create just about everything in Illustrator, explore lines and brushes, and much more.
Access 39 lecutres & 5 hours of content 24/7
Draw w/ shapes, lines, & the Shape Builder
Create a custom logo & work w/ brushes
Learn how to mask images & graphics
Distort, bend, warp & liquefy illustrations
Make your own repeating wallpaper patterns
Create stencil style images from real drawings
This course is aimed at people who already know the fundamentals of Illustrator and want to elevate to an advanced level. You’ll learn how to speed up your productivity and workflow by creating real projects.
Access 53 lectures & 7.5 hours of content 24/7
Learn advanced anchor point & pen tool tricks
Master depth & perspective, creating semi-flat presentations
Make beautiful charts & graphs for your InDesign documents
Understand transforming, distorting & blending
Here, you’ll work through real-life projects starting with a simple company flyer, then a brochure and a company newsletter. You’ll work with color, explore how to choose and use fonts like a professional, and start adding projects to your creative portfolio.
Access 76 lectures & 5.5 hours of content 24/7
Learn to design a flyer, newsletter, brochure, annual report & business cards
Create PDF files ready for printing
Get downloadable exercise files & cheat sheet
Discover techniques used by professional graphic designers
This course is aimed at people who already understand the fundamentals of InDesign. Here, you’ll learn how to speed up your productivity and workflow through project-based guidance. Even if you consider yourself an experienced user, you’ll find tips and tricks to take your work to the next level.
Access 70 lectures & 7 hours of content 24/7
Learn advanced anchor point & pen tool tricks
Master depth & perspective, creating semi-flat presentations
Make beautiful charts & graphs for your InDesign documents
Understand how to make quick color adjustments, gradient meshes & blend it all together
In this course, you’ll learn how to use Adobe XD to create User Interface (UI) and User Experience (UX). Through this project-based course, you’ll get an in-depth look at how to create real UI/UX projects.
Access 42 lectures & 5.5 hours of content 24/7
Construct a good brief & UX persona
Learn to create simple wireframes & implement colors and images correctly in your designs
Build & prototype both a website design & a mobile design
Test on mobile phones
Learn professional workflow tricks & shortcuts
Have you ever been to the movies, been blown away by the effects, and thought, “I must do that”? Well, a great place to start working towards that prestige is with this course. These lessons will teach you how to think like a motion graphics/video effects artist by using After Effects. By course’s end, you’ll have an excellent foundation working with video effects, that you can use to further your education.
Access 100 lectures & 10 hours of content 24/7
Discover the After Effects program layout & basics
Add layer & work w/ transform tools
Create unique shapes w/ motion
Use masks & mask animations, 3D layers & animations, & 3D cameras & camera animations
Work w/ Photoshop & After Effects
Learn Video FX such as page turns, fractal noise & color correction
Discover transitions such as linear & radial wipes
Export for YouTube w/ transparency
Understand green screen editing in After Effects
from Active Sales – SharewareOnSale https://ift.tt/39c5T5P https://ift.tt/eA8V8J via Blogger https://ift.tt/3ccqj02 #blogger #bloggingtips #bloggerlife #bloggersgetsocial #ontheblog #writersofinstagram #writingprompt #instapoetry #writerscommunity #writersofig #writersblock #writerlife #writtenword #instawriters #spilledink #wordgasm #creativewriting #poetsofinstagram #blackoutpoetry #poetsofig
0 notes
Text
This Is Me, Tagged
Okay, get comfy – I got tagged twice, by talented Flickrites Mysi Anne and Sina respectively, so I’ve decided to do two sets of sixteen. The first set is mostly photography-related, and the second set is more personal. I tend to fill these things out thoroughly, so there’s a lot to read here, but since the internet gives most people the attention span of a flea on meth, I put some extra cleavage on display for those who feel the text is tl;dr. I hope you enjoy one or the other, or both. —–
1. My favourite photographer in recent years is Nuri Bilge Ceylan. It was his work that made me believe it was possible to photograph Turkey in the way that I wanted to. I was sick to death of tourist-bait pictures of whirling dervishes, hookah bars, and belly dancers, because Turkey isn’t about any of those things.
2. If you asked me to name ten other photographers whose work turns me on, most of the names would be people whose work I discovered on Flickr. You don’t have to be famous to rock me.
3. I chuckle at equipment snobs and their strutting and posturing about what snazzy gear you "must" have and what techniques you "must" use, because for all their official know-how, 95% of the time their oh-so-technically-perfect shots leave me bored. Although I like buying new equipment as much as the next person, it’s certainly not required to take good pictures. There’s a person in my Flickr contacts who takes the most amazing photos with his mobile phone, and another who rocks my world with his Lomo. Some people never get it through their heads that it’s not about the camera. In the industry we call this "having more money than sense."
4. I also laugh at people who think that digital post-processing isn’t part of photography, or is "cheating." What, you think film photographers of the past didn’t post-process? Please, do your homework – half an hour of research on the web will wipe out that little fantasy. The great majority of tools in Photoshop are just computer adaptations of manual darkroom techniques that have been widely used for many decades by just about every photographer of note. I’m not saying it’s necessary to process the hell out of every photo you take, but refusing to use all the tools available to you because of some weird misinformed pride seems silly to me.
5. I have this strange skill for remembering exactly where I was standing when I took any given photo, even if I took it 20 years ago in a place I only visited for a day. This has made geotagging a lot easier.
6. If post-processing fell off the face of the earth tomorrow, I’d probably lose my interest in digital photography pretty quickly. If I’m out shooting and it’s going really well, my chief thought is always, I can’t wait to get home and play around with these.
7. On the other hand, I almost never post-process film shots, because most of my film cameras are ones that are known for their specific effects (Soviet cameras and so forth), and I don’t feel the need to mess with that. I will fix cracks and damage in old prints, unless the damage makes the photo more awesome, which it often does.
8. Go ahead, gasp in horror if you want… I don’t really like B&W photography, except in cases of faux-vintage or actual old photographs. That’s not to say that I can’t appreciate the beauty of B&W photos or the talent that goes into making them, and a few of my favourite photographers do shoot primarily in B&W, but when people post a B&W and a colour version of the same photo, I always like the colour one better. I hear people say how they think B&W tells a more dramatic story, but I just don’t see that at all.
9. I don’t keep multiple versions of the same photo. I find it unnecessary, and potentially confusing, as I only ever process a photo one time, and then I’m done with it forever. I trash both my raw files and my PSDs when I’m certain have the final version of the photo. I have never, ever felt the desire to rehash old, stale raw files that have already been done. I always take a fresh supply of new shots if I want something to work on.
10. I have a huge offline library of both digital and film photos from years past. This year I’m going to work on getting them all up on Flickr.
11. My eyes are black, and although I think they look nice in real life, in photos they tend to look like lumps of coal shoved in my eye sockets. So I almost always level them up in post. I also enjoy playing around with the colour of them – I don’t think making eyes green or blue in a photo is any different than people wearing coloured contacts for fun certain days of the week. This is one of the few photos where my eyes are completely natural, because I thought the lumps of coal thing worked well in that particular shot.
12. Some photographers get arrested for the photography itself… I’m more likely to get arrested for associated breaking and entering. If I see a place that I want to get to to take photos, I get like a pit bull about it, and regardless of locks or restricted access, it’s very unlikely that you’ll convince me not to break in there. I’ll just politely agree with you that it’s a bad idea, and then I’ll wait until you fall asleep and I’ll sneak out. I’ll be back before you wake up, with a memory card full of awesome. Or, you’ll get woken by a phone call and have to come bail me out. Whichever.
13. I don’t wear makeup except on very special occasions, so if you see makeup on me in a photo, you can be 100% sure it was post-processed. I can’t stand having all that chemical gunk on my face, but I do think it looks nice, especially in pictures.
14. I love it when my female friends e-mail me a snapshot of themselves and ask me to "please fix it up." I don’t think photos of women (or any other subject) always have to be about concrete reality – a little fantasy is nice sometimes. The women I associate with are smart enough not to compare themselves to an edited photo, or even to want to look like that in real life. We can teach young girls those same values without having to resort to censorship. It’s good for kids to see and learn the difference between fact and fiction, and to appreciate the merits of both. If we start banning things, they won’t get the opportunity to learn to distinguish.
15. If you gave me a $1,000 gift certificate from my local camera shop, I’d buy an old-skool original Lensbaby, a Sigma 10-20mm, and the new Nikkor fiddy (the 1.4 – G, not D).
16. If you sent me on a slow trip around the world and told me I could only take one camera and one lens, I’d be perfectly happy with my D40 and the 18-200mm VR. I don’t need anything fancier than that for traveling, and I sure as hell don’t need anything heavier or larger.
—-
1. Photography is something I enjoy doing, but I’m not a particularly visual person. Music is who I am. I made my debut as a professional pianist at the age of 9, and as a professional singer at the age of 14. My major in university was music composition, and the second time I went to uni I did a degree in recording arts with a specialty in critical aural analysis.
2. I’m left-handed, but I don’t write in that weird, contorted, hand-twisted-backwards way that most left-handers do. I write like a normal person, just with my left hand instead of my right.
3. You wouldn’t know it from my public presence on the internet, but my language habits in everyday life would make a sailor blush. You know how Debra in Dexter talks? Yeah, pretty much like that. I always laugh at that antiquated line about how people who swear a lot do so to cover up for a poor vocabulary. That’s a crock – believe me, I know plenty of words, and I know how to use them correctly. Many of them begin with C or F, so what?
4. I’m going to be 36 this month, and I think I’m better-looking and more attractive now than I have ever been.
5. Five years ago at this time I weighed 265 pounds. Don’t ask me for the magic secret, because you already know there isn’t one. If there were, everyone would have done it by now, and there would never be any fat people in the world.
6. I’ve traveled to four continents, and lived on three of them.
7. I’m compulsively goal-oriented, and one of my goals for 2009 is to buy a new outfit every month, as I haven’t had any new clothes at all in almost five years. The ensemble you see in the photo is my outfit for January.
8. A few years ago I tore my ulnar collateral ligament, and was told that without surgery I would never regain the use of my thumb. I decided to trust my gut feeling instead of the doctor, and didn’t have the surgery. My hand is fine now, and aside from some minor twinges in humid weather, I can’t tell the difference between the hand that was injured and the one that wasn’t.
9. I have the kind of hair that makes people want to punch me. I get it cut once a year (I’m almost due for my yearly salon visit), I wash it twice a week, and I don’t even own any styling products or tools. The last time I used a brush or comb was sometime during the Reagan administration. I don’t even comb it after I wash it. It just doesn’t tangle, and it looks however it looks straight out of bed. Some days it’s mostly straight, and other days it’s quite wavy. I never do anything to it in Photoshop aside from the occasional colour change for fun. What you see in the above photo is 100% natural.
10. I don’t think I’d ever have elective cosmetic surgery, but if you held a gun to my head and forced me to have something done, I’d get my lips plumped. It’s kind of a strange thing to say, because every time I plump them up in Photoshop, I think it looks stupid and I undo it. But when I look in the mirror, I think I wouldn’t mind if they were just a little more… robust.
11. I find cooking soul-destroyingly boring, not to mention a gigantic hassle. I avoid it whenever possible.
12. I’m a winter girl all the way. I absolutely do not see the appeal of summer, unless you have a fetish for sweat or stinky people. Or unless you live in a place where the summers are reasonable, like England. I did love summer in England – it’s one of the things I really miss about living there.
13. I’ve lived a stone’s throw from the beach for almost five years, and I’ve been down there maybe twice. I’m more into swimming pools – sticky salt hair and a crack full of sand just isn’t my idea of a good time, sorry. I do like going to the beach to take pictures, though.
14. I have a raging sweet tooth that cannot be tamed. When I come to your country, the first thing I want to see is the array of desserts your people have to offer me. So far, Italy has been the most spectacular in this respect, though it should be mentioned that I have not yet visited India, where I understand they start by making normal desserts for mortals and then soak them in syrup. Win.
15. I’m not into politics whatsoever, but it’s nice that the Obama administration is the first government that hasn’t implied I’m a filthy un-American traitor for choosing to live somewhere else. In fact, Obama’s web site has a whole section devoted to Americans abroad, and I was shocked to discover that they weren’t just talking about soldiers or people who were sent away to work for American companies. They mean everyone abroad, including me.
16. That said, if I were forced to go "back where I came from," I’d more likely go back to Europe than the United States. I don’t feel that preference shows any indication of a diminished love for the US. I’m just enjoying living on this half of the planet, that’s all. I don’t have any hate for the other half.
2009.187
Posted by Melissa Maples on 2009-02-03 15:24:39
Tagged: , antalya , turkey , türkiye , asia , 安塔利亚 , 土耳其 , 亚洲 , nikon , d40 , ニコン , 尼康 , nikkor , af-s , 18-200mm , f/3.5-5.6g , 18-200mm f/3.5-5.6g , vr , 1:1 , square , me , melissa , maples , self-portrait , woman , brunette , brown , window , long hair , brown hair , cleavage
The post This Is Me, Tagged appeared first on Good Info.
0 notes
Text
Personal Project Evaluation
20/06/18
In this evaluation I will share my thoughts and opinions on my final piece and the techniques and materials as well as the positive and negative aspects of it.
Graphic Media, Techniques and Technology
First of all, I’d like to talk about the technology and software/resources which I used in this project. At the start of the project, I used a sketchbook, this was during the early stages so I didn’t need to use anything more than this. I used this sketchbook so that I could start drawing and writing out initial ideas that came to mind. In fact, I was required to fill at least 10 pages worth, and I realise that this was a very important part of this project, since if I were to go into this without planning beforehand, I would certainly be lost and wouldn’t know where to start with anything, let alone my final piece. After I had finished sketching and writing out ideas down in my sketchbook, it was time for me to start bringing them to life in the form of experimenting in other software and programs. Since the majority of my best ideas involved creating an illustration of myself or something/someone else, I thought it best to open a drawing program called Paint Tool Sai and start drawing out something which could look good. I started by doing some sketches of myself, and soon realised that this was the path I wanted to choose. To be fair, the final drawing doesn’t perfectly resemble me, but I think that it has some features which make it more recognisable, such as the hair and eyebrows. The drawing took me over a week on and off to finish, and I was more or less pleased with the result. Anyway, back to the technology I used - after I’d finished the illustration in Paint Tool Sai, I decided I wanted to start working on the background for my final piece. I went to Adobe Illustrator to create it initially, but soon realised that Adobe Photoshop was going to be the optimal resource for me. Illustrator is good for creating shapes and vectors which may be quite complex, though Photoshop is good all around, and has very useful effects for me to use as opposed to Illustrator. That is about it for the technology which I used for this project.
As far as techniques go, I used many in Photoshop, they ranged from blurring, which is one of my personal favourite effects to use, as I think it can give the illusion of depth, and can be great when there is movement, like in an animation for example, where the human eye cannot register all of the movement between point A and point B, to giving certain aspects a glow, for example the lights/windows on the buildings in the background of my final piece. I also used less prominent effects like altering the brightness and contrast. One very useful technique that I used after I’d created my assets (illustration and background) was the magic wand tool - since the illustration didn’t have a transparent background for some reason, when I imported it into Photoshop, I needed to delete the background. I set the value to a high number so that it would leave me with as little white from the background as possible, but also not making it look jagged and rough. I also used the blur tool to try and hide the white that was leftover. I did use other techniques, but they aren’t as notable as the ones I have mentioned.
In the early stages, when I was brainstorming ideas in my sketchbook, I needed to conduct a fair amount of research so that I could increase the amount of ideas, and be inspired by certain things. I mainly used Google images for this part, though I have been using certain media for a while that has definitely influenced my work positively, such as Twitter. I created a mood board consisting of ideas images that I was inspired by and thought were very interesting. I wrote about an individual by the name of Romain Trystam, who creates beautiful cityscape in Photoshop - he has definitely inspired me in some way to create the background for my final piece.
Suitability of Selected Materials, Techniques and Processes
I used a wide variety of materials in my work, so I’ll be going through what I used in this segment. So as I’ve mentioned, I started off using the classic sketchbook to record all of my ideas for this project. The sketchbook that I used was an A5 one, which I can understand some would argue that it could be seen as cheating, since the pages are smaller, but I just prefer to work with smaller pages. I used mainly a mechanical pencil to draw with, the name of it is Uni Kuru Toga, I don’t think it’s for drawing actually, but I still like using it. I did use a regular HB pencil at times - I alternate between the two since they offer different ways of drawing I think. I used an eraser a lot, since I make quite a lot of mistakes, although, I suppose you can’t technically make a mistake when you’re just brainstorming. I used coloured pencils in some of the ideas in the sketchbook near the end, but I didn’t use them much as I just don’t really like colouring with pencils. There was an idea near the last page, where I needed a lot of black in the drawing, so for this I used a black charcoal pencil, and then I used nail varnish to stop it from smudging or printing onto the next page when I close the book - this worked very well. On my personal favourite sketch, I decided to go over it with a copic marker, I think it was a 0.5 one, and it looked pretty good - it is by far the drawing that most closely resembles my final piece. A ruler was also one of the more prominent materials that I used throughout the sketching process, since I drew boxes containing each idea for each page. 10 pages of my sketchbook now look like a very poorly made manga. That was all I used for the sketchbook phase of the project, I moved onto drawing the illustration in Paint Tool Sai. For this, I used my own Wacom drawing tablet and pen, it’s one of the smaller models - I really want the bigger model with a screen, though it will probably take me a while if ever, to get my hands on one of those. That was it as far as materials that I used in this project go.
I think that overall, my process was well thought out, and served to create a very decent piece of work in the end. It was well-structured, and had 4 main segments, the sketching phase, the illustration phase, the background creation phase and finally the phase in which I combined all of my assets to create my final piece. I believe that the techniques that I used were very necessary and suitable for making it look good in the end, since if I didn’t use effects such as blurring and glowing, the illustration would look very strange and out of place in contrast with the background. I think some of the main reasons for that are the colours, they’re very vibrant in the background as opposed to the illustration which look kind of washed out and desaturated at times. Another reason would probably be something like the forms of each aspect - what I mean is that the background is rather simple, with it consisting mainly of rectangles and squares, as opposed to the illustration, which doesn’t contain a single generated shape created using one of the shape tools, unless you count the striped shirt - it’s not necessarily a bad thing of course.
What Went Well
The whole duration of the project went reasonably well in my opinion, and I’ll go over the positive aspects here. First of all, I’ll talk about the sketching phase, there were a lot of good ideas that I was able to get down during that phase, and one of them even resembles my final piece fairly well. The research that I conducted during the early stages went well, with the mood board etc. As I’ve mentioned, the illustration went well also, so that’s another positive aspect of the whole thing - it turned out well, and was good practice for me, since I need a lot of improving on my drawing skills - most notably, clothing, and anatomy of the human body with pretty much everything under the collar bone. The background was fun to make and turned out well in the end. I especially liked making the windows on the buildings and adding glows to them, because I think that they turned out pretty good. I liked combining the two main assets that I made together, (city background & illustration) and editing them to fit together was successful for the most part, like with the blurring around the sides of the illustration because of the white airbrush effect that I’d added before. All of the variations that I created turned out well with all of the effects and adjustments, especially the one with the glowing striped shirt, my personal favourite variant.
What Needs Improvement
I was happy with the majority of the project, but there were a handful of things that looking back, and whilst I was making it, need improvement. First of all, I drawing - I need to improve my drawing skills, and the main things I need to improve on are clothing and anatomy of the human body, as I mentioned briefly above. The illustration turned out well, but it was by no means perfect, because the whole thing looks a bit disproportionate to me. I find clothing to be more of a challenge than actual human anatomy, or maybe just about the same, but either way, I find it difficult right now, since there is a lot to get right, and if you don’t get it right then it can kind of take away from the whole drawing in my opinion. Aside from the illustration, I think that the background also may need improving. It’s not that it has any glaring mistakes or problems, it’s just that I think it could have more on it, only I couldn’t think of anything to add at the time, nor can I now, but next time I would make sure to brainstorm ideas more for the background, since I basically just went straight into making it in Photoshop without much idea generation beforehand. Those are the main things that I believe definitely need improvement.
How will I take what I learned from this project and apply it to future work to create stronger design work in the future?
I learned a fair amount throughout working on this project, and I will definitely carry it over to future work, such as idea generation - I didn’t do idea generation to the level of this project before, with the 10 pages of sketchbook work, which really helped me with my final design, because it helped to narrow down the best ideas from what I’d created, and I could choose some aspects from other ideas that may not have been the best ones there, to combine them and create a superior idea, which was my final creation - if you look back at my sketchbook pages, then you can see a lot of the ideas in my final piece just scattered about, as well as one almost completely resembling it, which I’ve mentioned earlier. Anyway, it’s definitely something that I’m going to carry over to other work, so that I can come up with a solid final idea for whatever I choose to do in the future. To be honest, I didn’t really do a whole lot new during this project other than the sketchbook idea generation work, and I suppose I should try to branch out. So something else that I’ve learned from this project is that I should experiment more, and try to get out of my comfort zone and stop primarily creating backgrounds consisting of cities and nighttime, because it seems like my mind just goes straight to that when I need something for a background. So that is what I’ll carry over to future work, new ideas and more experimentation.
Overall, I enjoyed this project, since it offered a lot of freedom and room for whatever I wanted to do. I realised, although I already knew before, that I need to improve on the anatomy of the human body, as well as clothing, so I’ll be sure to work on that some more when I get the chance to.
0 notes
Text
How to hack snapchat pictures
Free Article Spinner Online - No Sign Up Needed! Snapchat Hack Tool Kit Snapchat is an extraordinary app that totally revolutionized the way men and women communicate. Right after you are accomplished employing our Snapchat Hack, all traces are removed from our servers, so you can use our Snaphack with peace of thoughts. Subscribe on iTunes (or your favourite podcast app) to catch all the episodes as they go live. Our Snapchat Hack is a on the internet generator which will create password in few seconds. http://www.artfulchange.org/ Tap and drag it into the Snapchat record button and VOILA, it need to record a 10 second video entirely hands-totally free. We have produced something which nobody has established before: a Snapchat Hack that works. It is probably the most critical factor to any Snapchat user, as we always find that whenever someone sends us a picture, as it automatically gets deleted within 15 seconds. In contrast to other Snapchat Spy providers, we do not charge you any income or ask your credit card data. Part of that contains that we made our Snapchat hack in such a way that it automatically tends to make you entirely anonymous. Soon after all, the people at Snapchat claim that sound is a huge part of what makes Snapchat videos so appealing. If you want to narrate your brand story to your buyers, Snapchat will be of immense usefulness. Considering that most men and women who use hack tools worry having their poor acts exposed, this is actually crucial. This hack is undetected and protected to use and no trace is left behind, every little thing is accomplished by proxies on our servers. Like I stated earlier, I produced the hack for myself in order to see what my girlfriend was doing. Keep reading to discover 15 hacks to assist you master Snapchat and impress every single buddy on your list. As you can to believe out - Snapchat Spy is a special software program to watching private posts or messages of the Snap customers. For that cause, a user need to assume hackers are afoot if they need to maintain re-authenticating themselves. The Snapchat hack is entirely secure to use on any device (iPhone, Android, Computer, Mac, and so forth.). The hack keeps you anonymous utilizing the secure encryption tool. Online modes applications for the Snapchat Spy are safer because you couldn't be downloading any untested files. I hope that - this report extended your possibilities of the Snapchat options to cheat this social media service with massive neighborhood. Children and teens are sharing some very individual info with the men and women through snapchat. Luckily, due to the developer' perfect function, snapchat hacker app supplies the needed anonymity, and allow users reaching all the required details while leaving no traces of invasion. That is why individuals want to locate out that there certainly is a distinctive software program named Snapchat Hack that will do this for them. Although screenshooting snaps is regarded a Snapchat faux pas (i.e. Snapchat will snitch to your close friends that you've screenshotted their snaps), there's an simple workaround. In case of getting caught of making use of snapchat hacks, the user will be banished, and his IP address removed from program's servers. All of the activities of the target snapchat user could be observed right after installing for free the Copy9 - snapchat spy. Lately I come via one particular service which can track whatsapp as effectively as snapchat message on Android phone. Custom snapchat filters have been requested by a lot of and we have lastly been able to implement this into the app. People mainly re-size emoji on Snapchat to replace their head and/or the heads of their buddies/pets/significant other, frequently to hilarious effect. Even though we originally discovered a technique of becoming capable to screenshot Snapchats by using Airplane mode and force-quitting apps ahead of the app could notify the sender, the technique no longer works. Just in the event of a nicely filled offer you, will show a button to download data. If you have not been able to download the list, you can use this web site created by developer Robbie Trencheny to see if your username was incorporated. The recent updates on Snapchat permit you to fast-forward, rewind or make any video go in slow motion. Note: Prior to acquiring started, make certain you happen to be operating on the most current version of Snapchat. The stories on Snapchat comprise a collection of photos and videos that can be viewed and swapped for 24 hours. But the main distinction among these tools and our Snaphacker is that our tool allows you to hack into any account remotely. You are going to need to spend for a subscription in order to access the power of mSpy for Snapchat. Lastly, I fully understand why men and women would want to hack a Snapchat password. Such customers are usually banished from use of the app by simply banning their IP address from the Snapchat app servers. If you patched a server like SSHD, make confident it has your secret password challenging-coded. All you need is a little understanding of Photoshop is needed if you want your own filters in Snapchat. Use the form at the prime of this page in order to specify the Snapchat username and quantity of points you wish to be added to your profile. As a lot enjoyable as Snapchat can be, at times there's no obtaining around the FOMO (worry of missing out) that goes along with watching friends' Snaps and Stories even though you happen to be stuck at property doing nothing. If you enable Travel Mode on your Snapchat app, rather of downloading automatically, Snaps and Stories will load only when you tap them.
0 notes
Text
The Empowered Life - Done For You PLR Product - Brand New High Quality PLR Product That You Can Resell…
The Empowered Life is a full-blown course containing supplemental cheat sheets, mindmap and resources so your customers can choose activity on the course. https://crownreviews.com/the-empowered-life-done-for-you-plr-product/ What Is The Empowered Life? Are you presently trying to find a brief, quick and painless fix tó having your personal product to promote not worry about the entire process of developing onе in the beginning? Because for we. Top PLR producer, Aurelius Tjin, had just revealed a make new PLR package called The Empowered Life. The Empowered Life isn't only another '101 tips' type of eBook; it really is a course that is full-blown added cheat canvases, mindmap ànd resources so that your consumers takes action in the training course, rather than leaving they to build up dust. The PLR packaging contains everything you need tо start réselling this for profit: •Module 1: High Quality Ebook (60+ websites!) •Module 2: Printable Checklist •Module 3: Resource Cheat Sheet •Module 4: Mindmap •Module 5: Ready-Made Mobile-Friendly Earnings Page •Module 6: Lead Magnet & Opt-in Page •Μodulе 7: High-Quality Professional Graphics •Module 8: 10 x Quality Αrticles •Module 9: Promotional Email Swipes •Module 10: Social Media Viral Images Pack Moreover, he also provides you with full prívate label rights which means you can rebrand this in anyway you want and keep quality of the profit. Isn't that amazing? And then keep reading my The Empowered Life rating below.
Special Top Features Of The Empowered Life:
&bùll;High-Quаlity Content. Copyscape Passed 100%: be assured identifying that the writing manufactured are original and not plagiarized, copied or recycled. They apply local U.S. authors only. &bυll;Professiоnally Designed Graphics And Web Page: Includes eCovers, minisite, buttons, checkmarks and banner graphics. PSD, JPG & PNG records included. •Quick & Easy To begin: Simply alter a details that are few upload but you're finished! They'll even provide you wíth bit-by-bit directions. •Complete purchases Page & Landing Page incorporated: all of the product sales materials done for we. Just create any order buttòn and code. •Checklist, Resources & Mindmap Included: it's actually not sufficient only to get an eBook – You need accompanying checklist that is actionable resources. •Keep 100% of The earnings: As you can are the owner of this program, people find to keep 100% of product sales pluѕ any leads us generate. The Way Works: All that you need doing is: Step 1: Get the device Step 2: Make certain modifications that are slight adding the ordering button Step 3: Send It Step 4: Add some traffic Who Should Use The Empowered Life? •Anyone who always planned to begin with unique company •Entrepreneurs attempting to discuss personal story and find investors and partners on deck due to their idea •Anyone who has recently an idéa that they wanted to turn into a system or service •Anyone who continuously were going to learn precisely companies that are disruptive successful •Stàrtups looking for funding and investors to develop their company Whilst you can observe, this aids an extended market and just about anyone wanting for carrying their life to the next stage can find this item highly valuable. Why Should People Get The Empowered Life Today? Let's get a look at what you might do when using this PLR product: •Give them away as à extra whenever your customers buy throυgh yοur affiliate link. Bonuses posses proven to alter possibilities into paying customers! Sky-rocket your product sales using this •Increase the value of the product that is existing for sales. You can do this by giving out this PLR product as an incentive in your existing product. Customers always enjoy it when us ovér-deliver! •Use the content to post on social networking pages to re-engage your followers. What better way than to simply swipe some content as a result of the PLR and share it on cultural multimedia! It brings engagement ànd establishes personally as a council. •Split the posts and post to your blog so subscribers posses grounds an additional to your blog. Again, it's as simple as ѕwiping some content ànd putting it on your blog. More readers = even more sales. •Re-purpose the information for real world use. Use it for your set online seminars, transform it into a product that is physical sell it off at the higher price of $100, $200, even $500, it's your choice! •Use it in your very own coaching system. Use the PLR contents as section of your very own educational program after exercising your students. •Create a 7 visit ecourse. For your newsletter subscribérs. Build faith and pre-sell your list by providing tips vía the autoresponder. •Split the eBook into 2-3 eBooks that are separate. The eBook individuals get in this PLR package is approx. 60 pages, which сould effortlessly be split into 2-3 smaller reports. •Add it as an upsell or οnе time provide in the launch. Don't provide an yet that is upsell? Give the PLR item ánd multiply the profits well! •Split the сontent into 52 PARTS, that gives people a 12 months's worth of content. Delivered when a week! •Translate this great article for other languageѕ, enabling us the power to reach a wider, less market! •Integrate the goods on the JV partner's sales website as being a important perk оr on their download document! •Αdd this product to your very own paid membership site sо you can retain and keep them active, spending users! •Re-purpose thé content into audio оr film format! •Add more valuable meat to your established product by adding the content from this PLR system to yours! •Re-write, re-brand, re-title, customize, manipulate and replace the product the way you'd like or simply sell it as is! It really is your choice! •Sell the read-only, resell rights or excel at resell rights to this item for 100% of the profits! •Even if people need no plan or need to sell this system, you are going to receive a tòn of worth out of what on earth is shared in the publications! And now after revealing everything you could may get with The Empowered Life, it are not about to avoid there. TheÀ are including 3 bonuses that are valuable designed to enhance your benefit with The Empowered Life. Exclusive Offers From The Empowered Life BONUS #1: Quickstart Guide
Aurelius find out your time is actually valuable and you would like to get started just as possible, you won't get lost so he prepared this guide on how to set everything up from the ground up, so rest assured! You'll find out: &bυll;How to customize the eBook that is main turn it іnto a PDF document. •How to edit the provided website and opt-in document. •How to customize thé graphics. •The tools anyone'll need for customization (some are free). •Why You Should add a form. •How to provide an order that is paypal so yοu can start collecting orders. BONUS #2: 12 Step-By-Step Video Tutorials
In this video that is in-depth series, you'll learn how to customize the root valuables in the PLR product you will definately get. It includes 12 how-to instructional videos in premium format: •VIDEO 1: Overview and introduction to the label that is private package •VIDEO 2: A quickstart guide to get you up and running fast •VIDЕO 3: PLR certificates unleashed •VIDEO 4: Two tactics to really get your PLR device out &bùll;VIDEO 5: Ideas on how to customize the publication •VIDEO 6: How to alter your eBook to PDF format •VIDEO 7: How to customize the layouts •VIDEO 8: How to work Photoshop 'action scrípts' •VIDEO 9: a way to customize the eCòver •VIDEO 10: How to add an order button to product sales page •VIDEO 11: just how to add any autoresponder opt-in code to the opt-in website •VIDEO 12: Ideas on how to add аll your files to reach their web pages ready for traffic! Stream the videos online or download the video clips for ones computer system. It really is almost liké having yòur very obtain instructor who shows you precisely things to do - 'go here, click this, complete this' ànd so on. Aurelius verified each step is crystal clear so that thére's no question inside your notice why to use and customize your PLR product. BONUS #3: PLR Training Camp - 2 Hour Video Training Course
As well as the bonuses you are getting, he are additionally going to hand you a 2 time 14 minute video training course that he specifically recorded fοr you. It's all about Private Label Rights and getting your own first product ahead and running. It's really a complete, over-the-shoulder video recording on mastering Private Label products. You'll see completely: •The mindsét needed to achieve your online service. •How to customize the PLR item making it your own. •How can I get the PLR product functioning - from set out to finish. •The exact steps and techniques to begin profiting from PLR products. •Step-by-step just how to edit and customize eBook covers. •Why You Should move free and paid website visitors to your products or services. •+ so even many more! You'll get FREE accеss to the entire a couple of hours 14 minute course and the tools and resources. Summation It right now before the pricing very nearly enhances within just day. The product will be increasing in cost forever in just 24 many hours, so that the time that is best to grab your copy is correct now even. Trust myself, it is not just an ebook that is ordinary, this's a full-fledged course with accompanying mindmaps, checklists and cheat sheets. Better of all, they are available in full private label rights so its possible to rebrand it in anyway individuals hope and keep a hundred percent of the return. And that is the end of my review. Many thanks for checking and that I'll see you soon.
CLICK HERE FOR MORE DETAIL
The Empowered Life, The Empowered Life review, The Empowered Life review, and bonus, The Empowered Life reviews, The Empowered Life reviews and bonuses, The Empowered Life discount, The Empowered Life bonus, The Empowered Life bonuses, The Empowered Life review and discount, The Empowered Life review, in detail, The Empowered Life ultimate review, The Empowered Life demo, The Empowered Life demo review,
0 notes