#if u want a step by step process i can always make tutorial but these are pretty simple idk if anyone would want one :o
Explore tagged Tumblr posts
Visit Tumblr Blog
Explore Tumblr blogs with no restrictions, modern design and the best experience.
Last Seen Tumblr Blogs


Fun Fact
Tumblr has 16.74 million mobile monthly users in the US.
Text

Hello everyone! With the poll on my main blog, many ppl have voted for a psd tutorial so here it is! Here are some things to note:
✦ ・ There is NO fixed way on making psds and this is simply my way of going through it.
✦ ・ this will be a in depth tutorial so it'll show u my whole process! Skip to step 3 for actual process.
✦ ・ there are other tutorials on tumblr that i def recommend! Such as @/canarysage and @/imbermagnvs
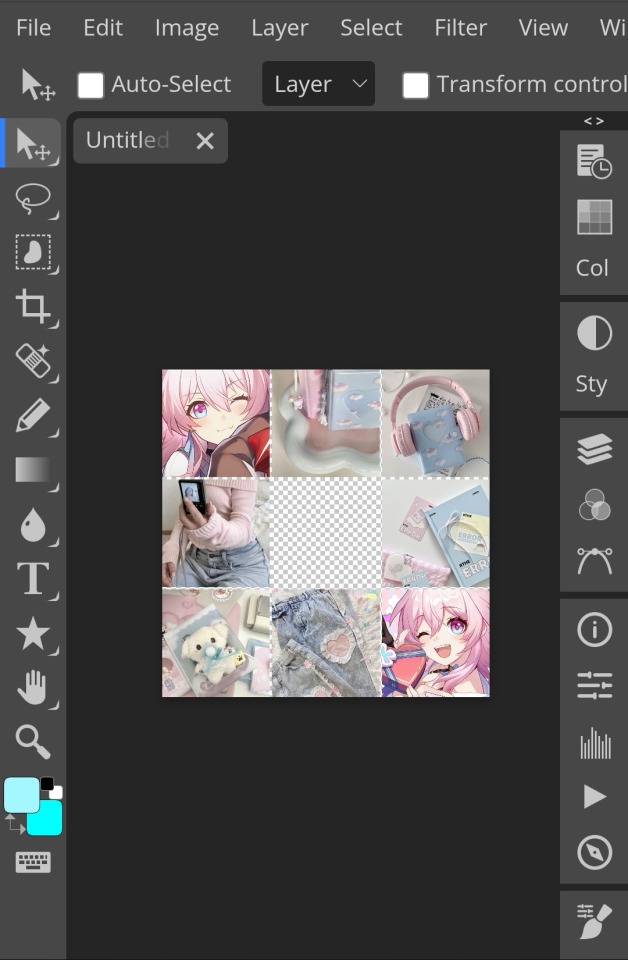
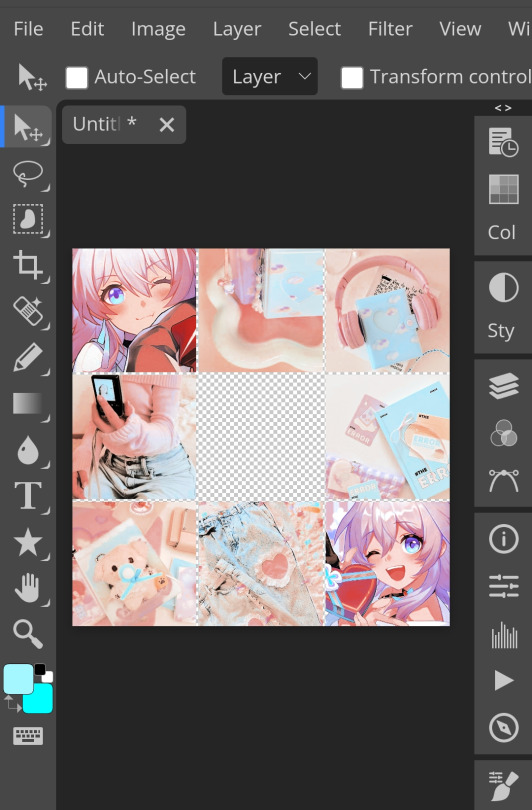
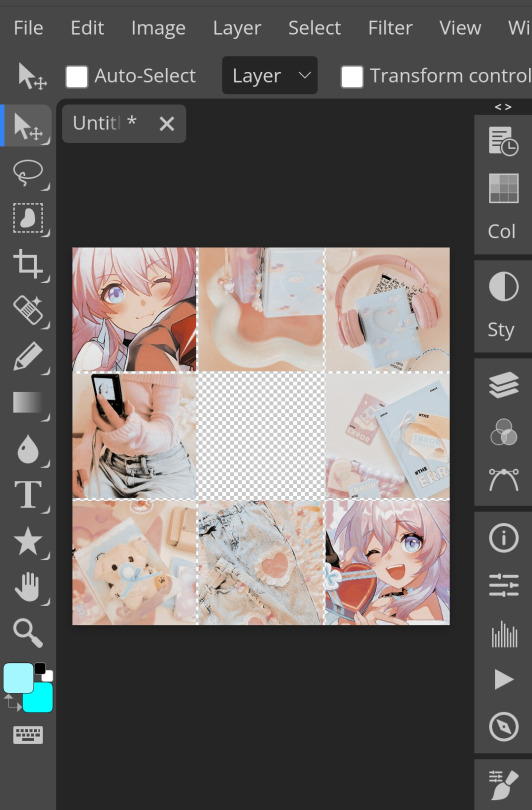
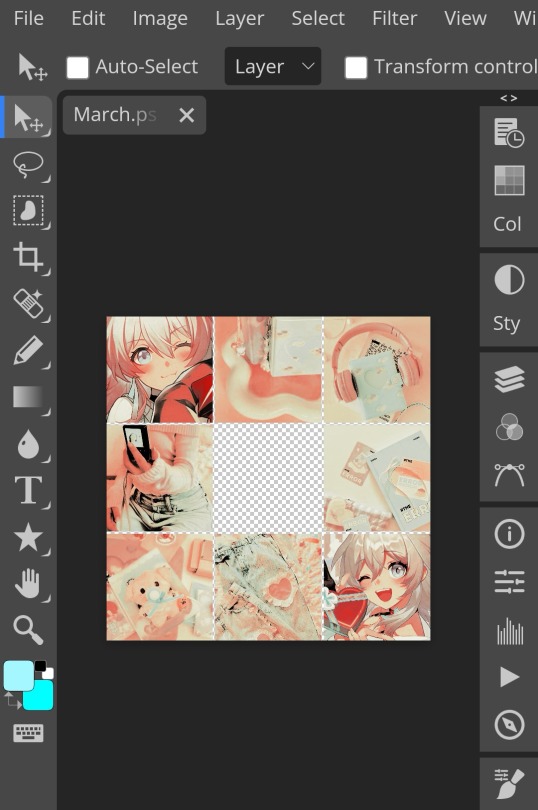
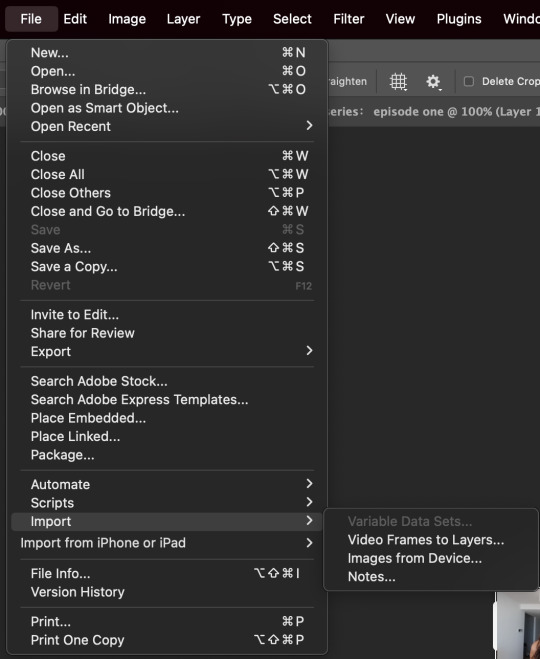
1. Lets get straight to the point! Choose the image(s) you want, i often make a moodboard first but thats optional and you can just choose ur image. (not sure if anyone needs this but to import or place images, press file -> open)
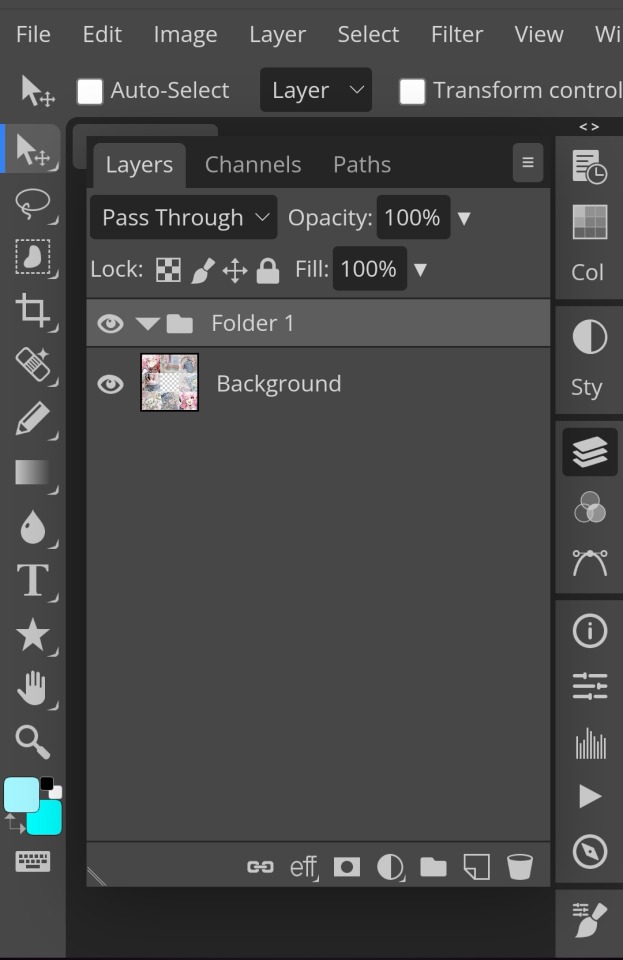
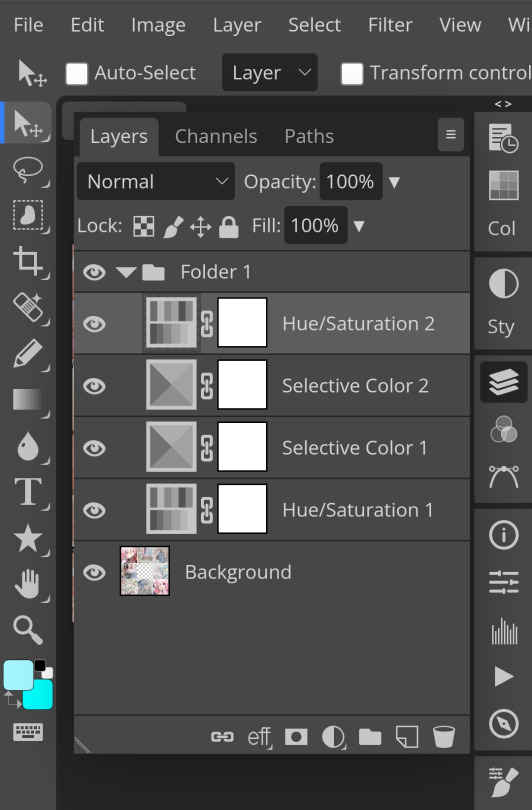
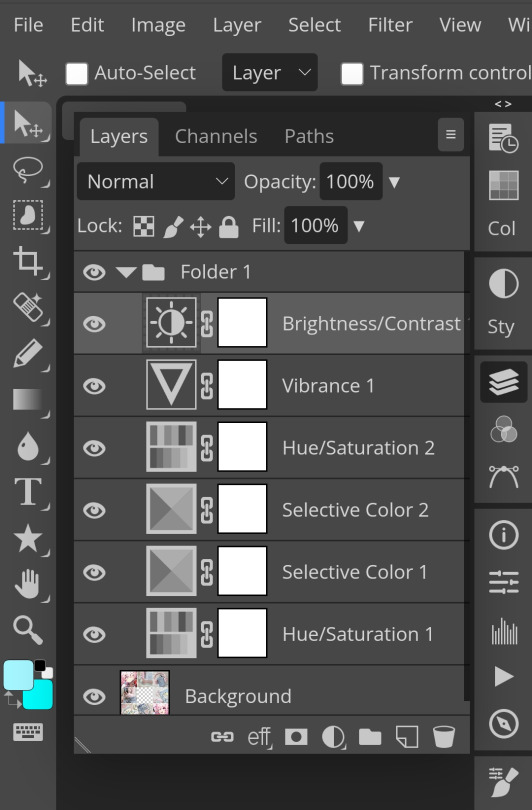
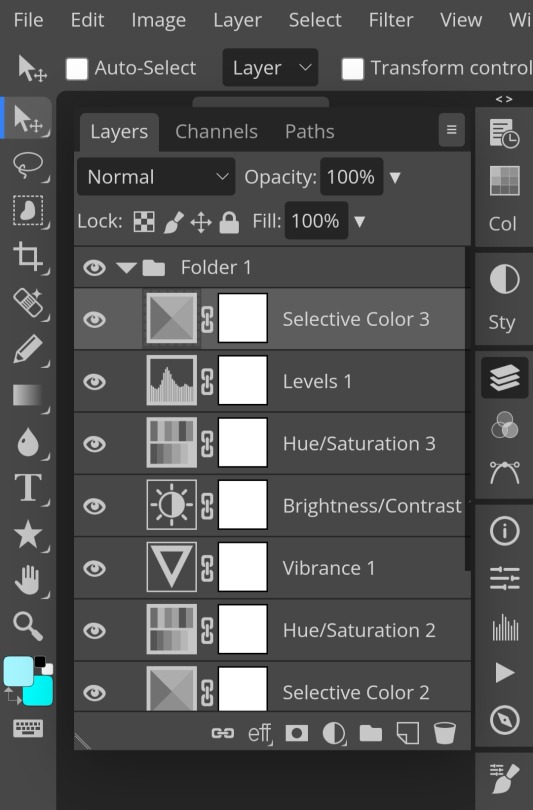
2. Next, make a folder by pressing the layer button (the 5th button the right based on my image)
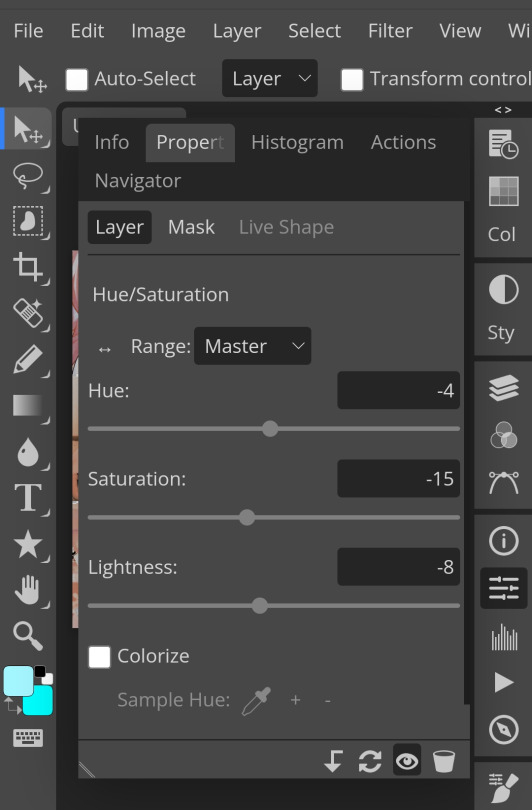
3. Firstly, i use hue/saturation to make her a lil more vibrant so my colours can be more uhhh vibrant or vivid.
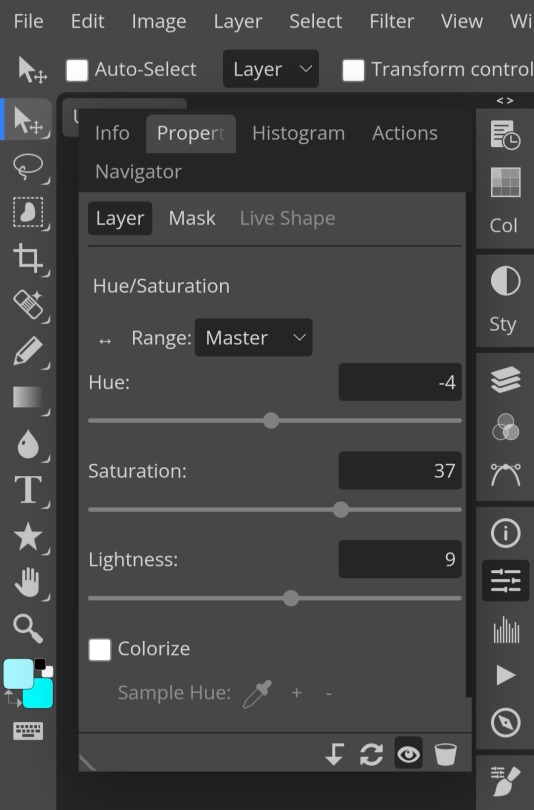
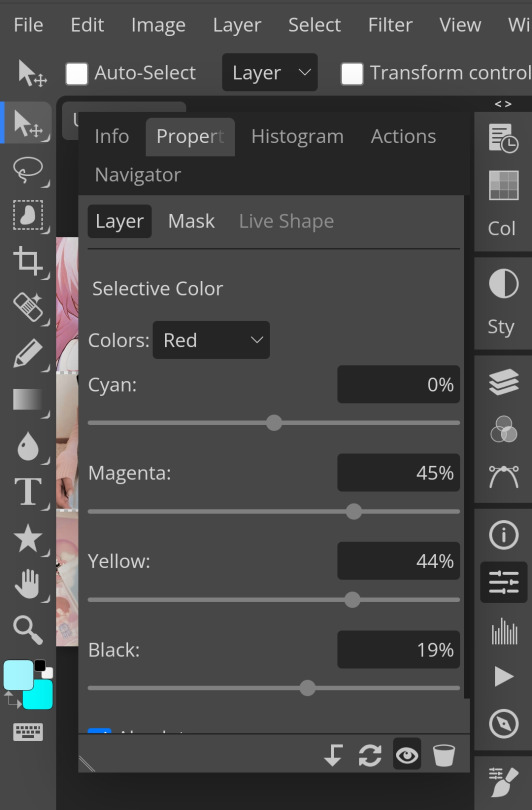
4. Now, every editors fav! Selective colour 💓 I'm not really good at explaining so pls visit canarysage to see what it is! It's good to tweak some colours without affecting the other colours.
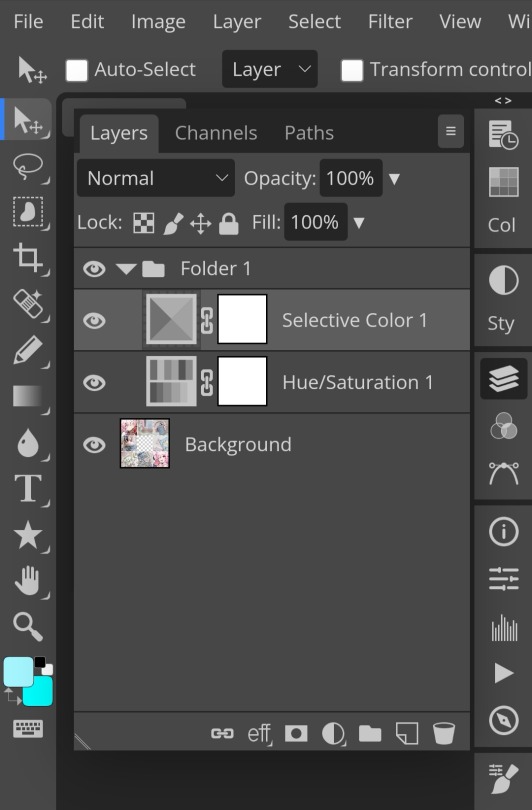
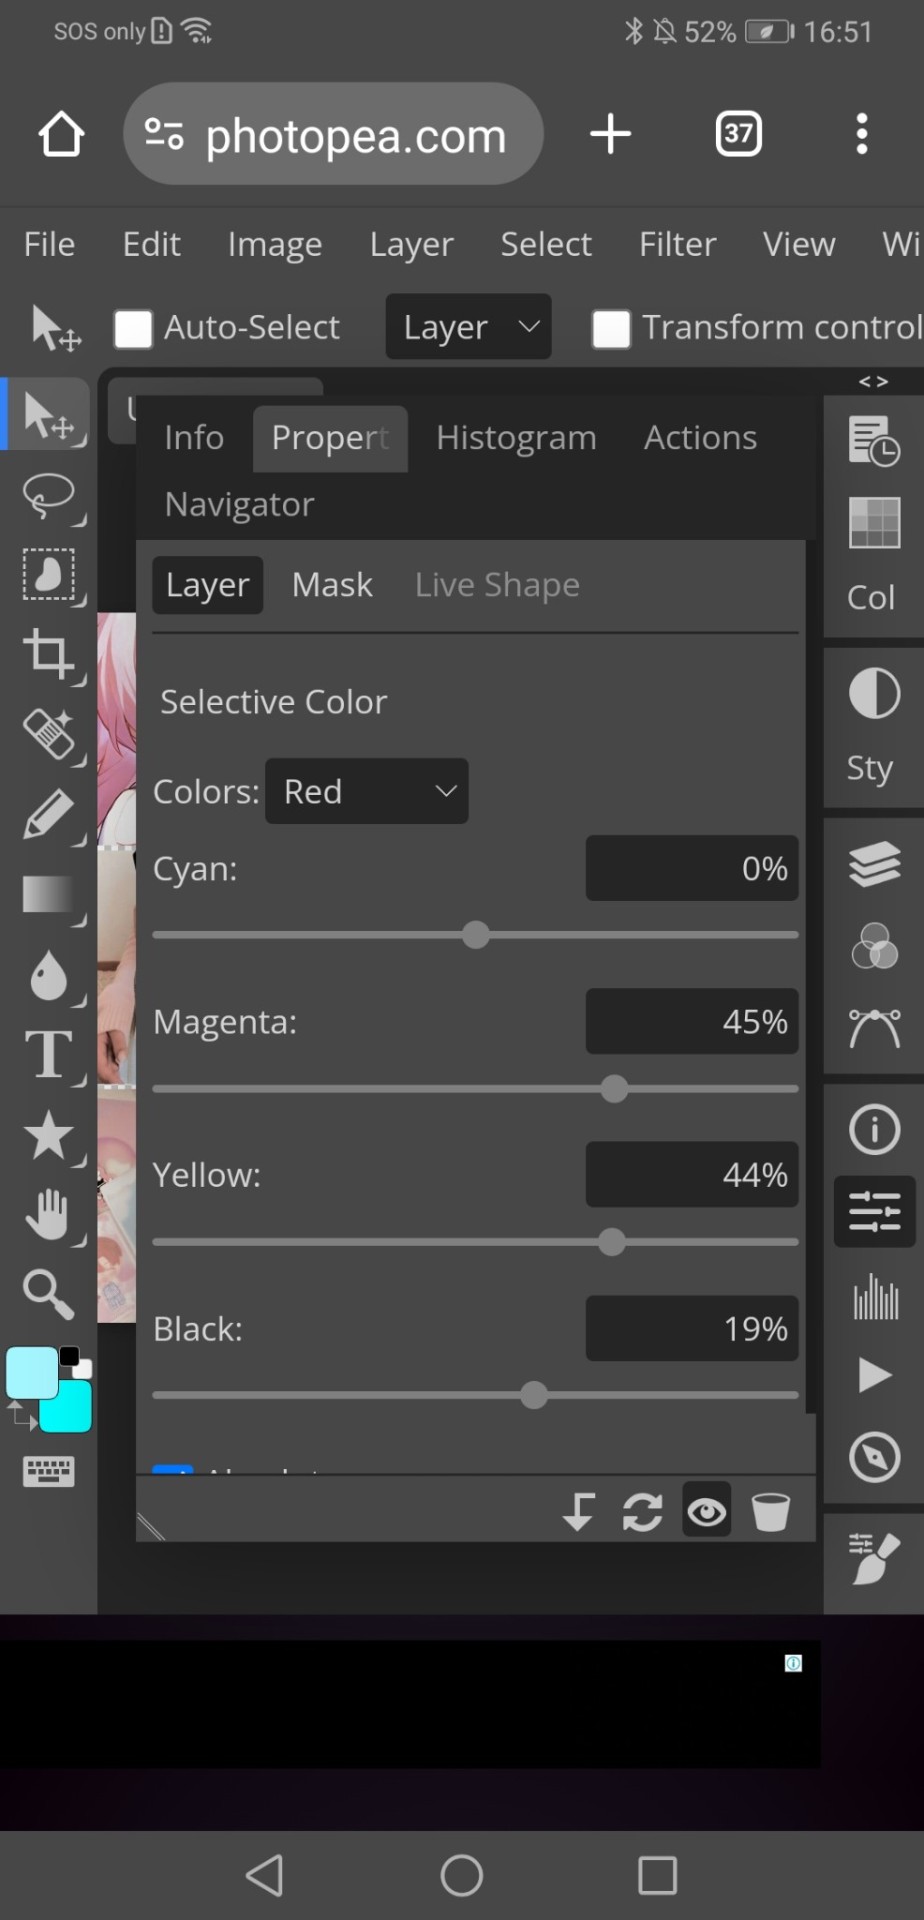
5. I recommend adding more selective colours as i added few more but cuz of the limit i can't show u help but i recommend adding 2-3 anyways! This is the psd so far which seems okay but to me it doesn't pop out so I'll be adding on
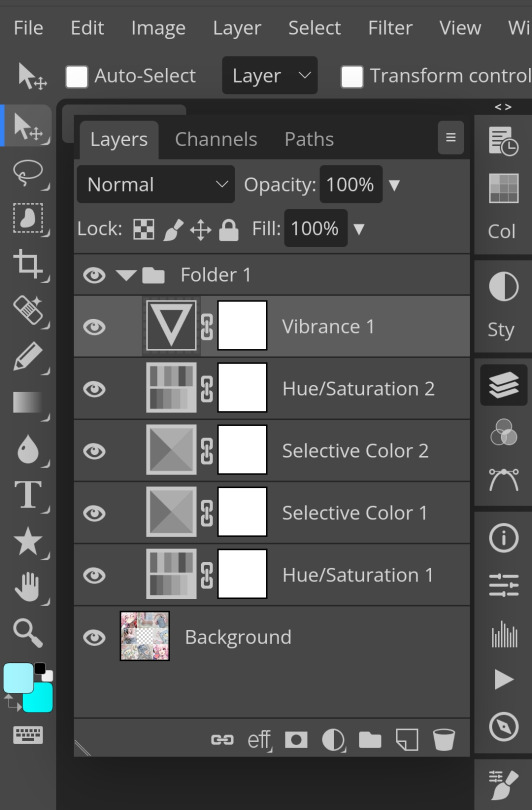
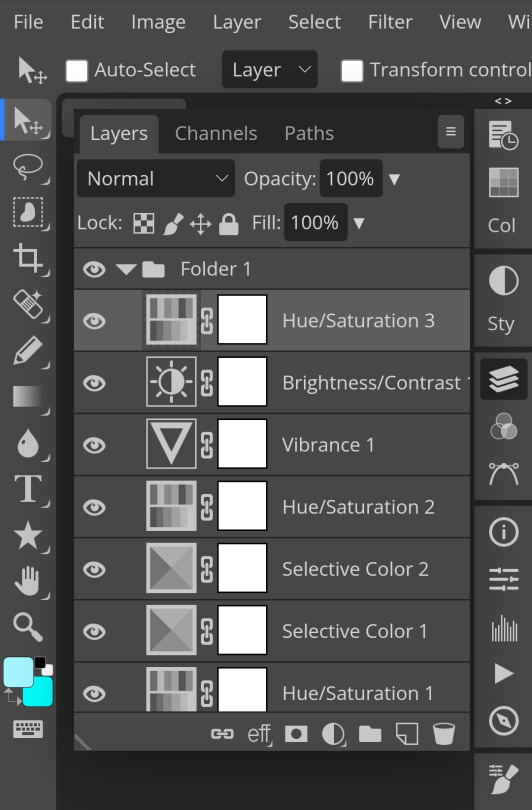
7. So i decided to add hue/saturation w the same reason as point 3.
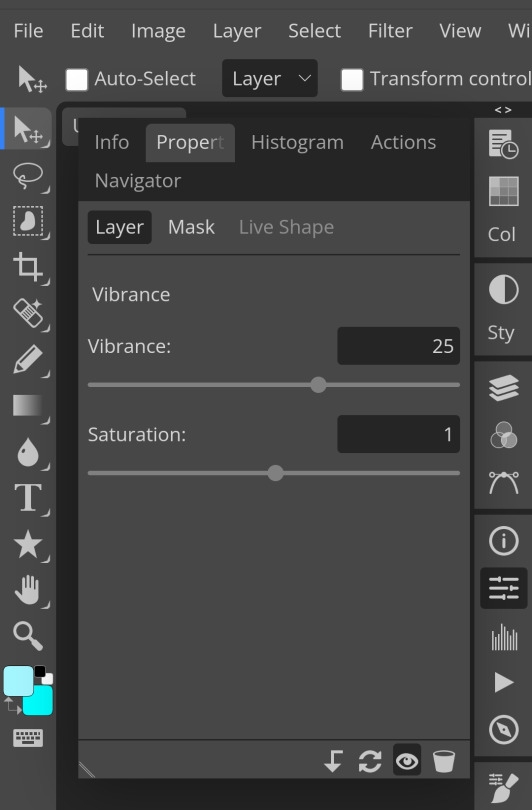
8. Next, i use vibrance to not oversaturate the image.
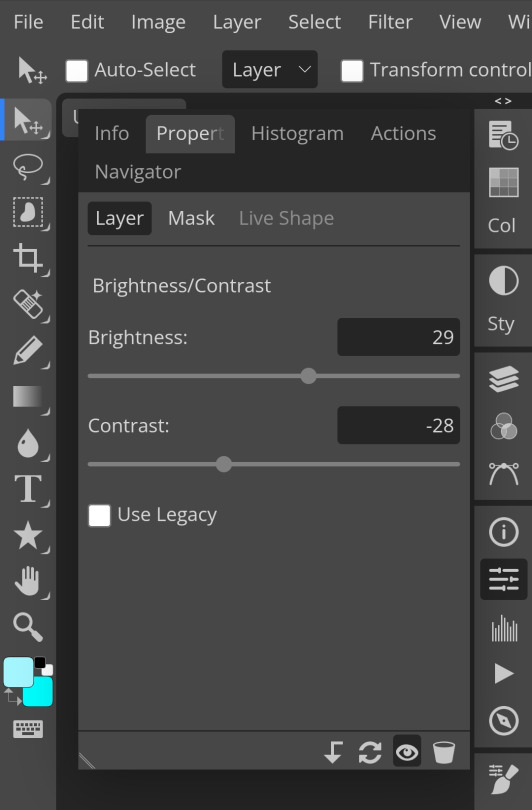
9. Now i use brightness and contrast, It’s often used for quick n straightforward edits to enhance visibility.
10. Let's add another hue/saturation layer cuz why not! Please remember to experiment w what u do since this is how you can have your own "style" of making ur edits.

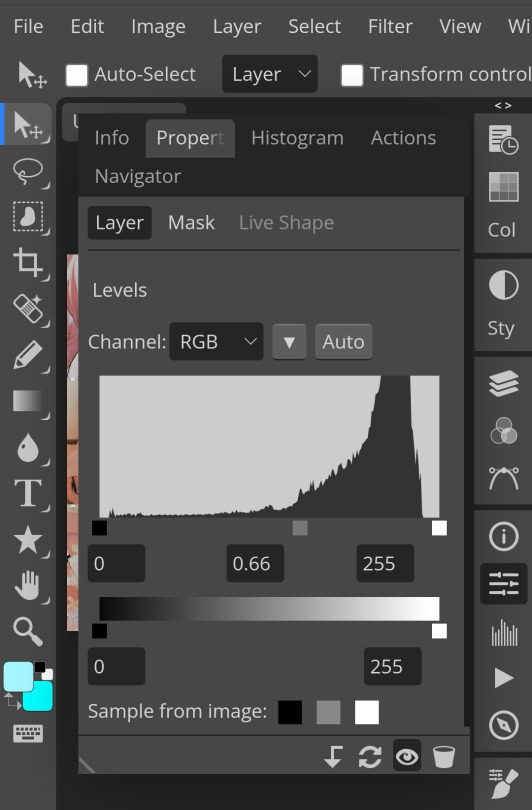
10. Next, let's add levels! I recommend checking out canarysage since they explained it better than i ever could.

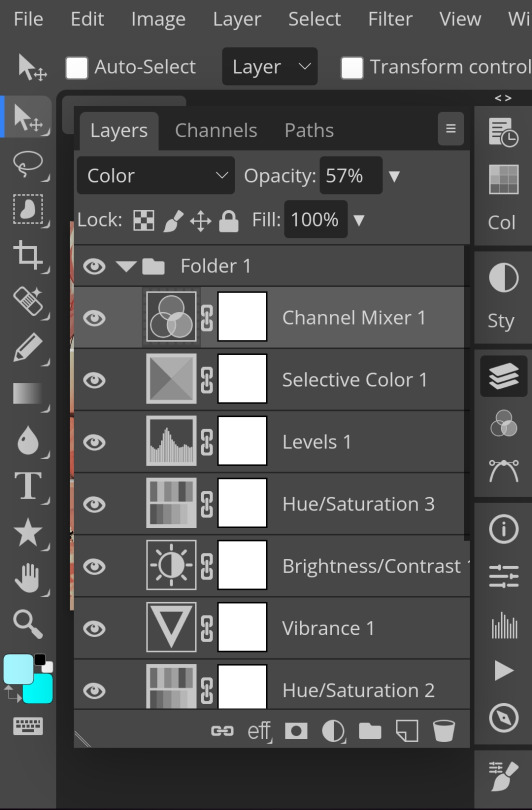
11. Now, another layer of selective colour
and tada! This is my psd so far but i love those psds that r bright so I'll add on but this is optional!
12. Now let's add a channel mixer to create some custom effects <3

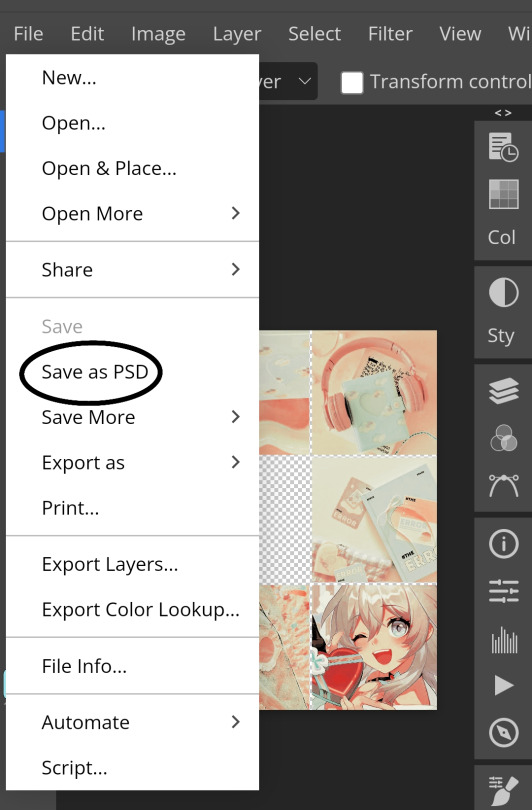
And here's the psd outcome! You'd wanna save it as save as psd (i HIGHLY recommend you put ur psd on a 100x100 canvas w a pic so it doesn't take much space)
ANOTHER NOTE!! i always test my psd on dark skin characters afterwards and made adjustments when needed i realised my selective colours made em abit red so feel free to adjust if ur using this tutorial! If u made it this far drop a follow 😈
149 notes
·
View notes
Text

𐔌 ‧₊ᢉ𐭩˚ em's gif tutorial + atn 𐦯
what's going on friends ? here i am with a brand spankin' new gif atn for u all , with a brief tutorial and some tips under the cut . as always , pretty please give this post a like or reblog if u intend on using this code or if u just want to be a supportive hottie ! love u all bigly ; be sure to pet a cute animal today ! mwuah ! ♡♡♡
⟡⋆。⊹₊˚ this gif action is 100% free ! u can download it by becoming a free member on my patreon or via this dropfire link . enjoy !
⚠️ remember if using my action to change ur layer name to layer 1 before applying the action or it will not work ⚠️
okay angels , let's get into the nitty gritty of making gifs ! keep in mind there are hundreds of methods of giffing and none of them are wrong ! it's all about what works best for u !
⟡⋆。⊹₊˚ step one : pick out ur video u are going to gif , section it into smaller segments , export via render video
if u are using a longer video such as a youtube vid or a tv show , i personally follow this process : i open up the file on photoshop , i adjust the speed to my liking , and then i start sectioning my content . using the 'split at playhead' option to cut my clips . make sure u have the section u are going to make into a gif selected bc it can get confusing once u start sectioning off more and more clips . u can combat this by breaking ur longer videos into chunks and repeat the sectioning as described . u don't have to resize ur canvas at this point but i like to do it now so i don't forget later on . i make my gifs 268px by 150px . once u have the clip u want to gif all sectioned off and sized ( if u are doing that at this point ) , u then have to render and export it by clicking file > export > render video .
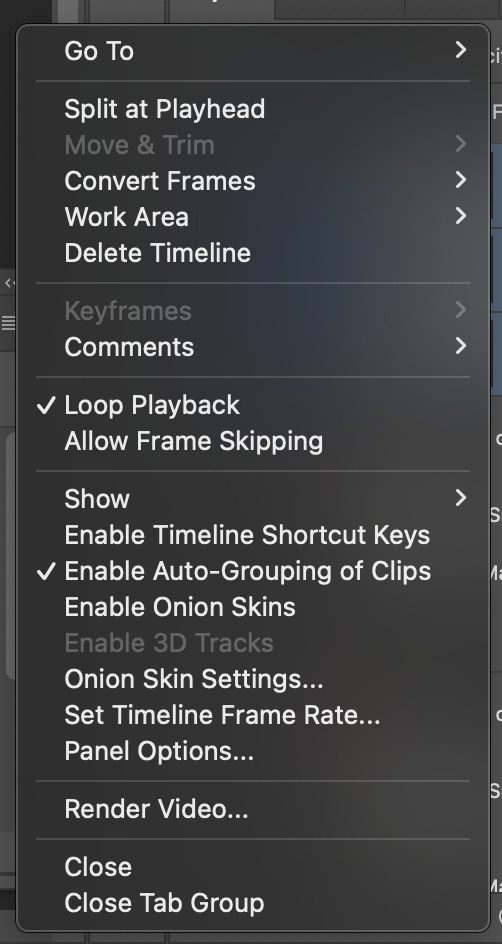
^ split at playhead visual & render video export , and rendering settings
⟡⋆。⊹₊˚ step two : import frames as layers , convert to video timeline , merge all layers into a smart object layer
next in my process , we will import the video we just rendered by clicking file > import > import video frames to layers . since u already sectioned off ur gif , u don't need to mess with sliders when the popup shows , just confirm everything and u'll have a video timeline in layers now ready for u . go ahead and open up ur timeline options and click 'select all layers' and once all ur frames are selected , click covert to video timeline . u will now be greeted with a bunch of layers on top of each other . turn ur focus to the righthand side and select all of the layers ... they are shaded in blue in the screenshot , make sure u have all of them selected and then click the option 'convert to smart object' . it'll condense all those layers into one singular smart object . ⚠️⚠️⚠️ if u are using my action here , this next step is very important ! ⚠️⚠️⚠️ ur only file will be named layer + a random number ( if u have forty frames , it'll be layer 40 and so on ... ) . u must rename this layer to layer 1 or my action will fail !


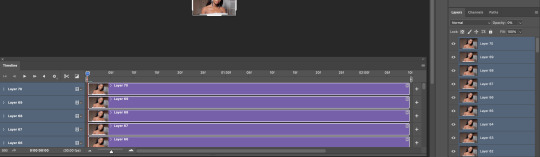
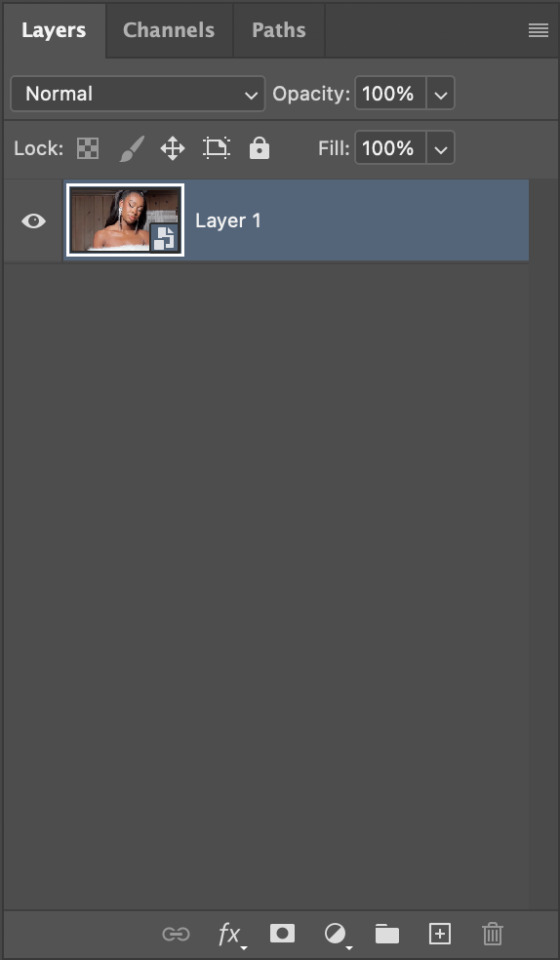
^ video layer as frames , importing video frames to layers , select all frames and convert to video timeline , a visual of ur new timeline , changing the name of remaining layer to layer 1
⟡⋆。⊹₊˚ step three : apply action , adjust as needed , add ur coloring
we're now on the home stretch ! it's time to apply the action ! go ahead and slap that bad boy onto ur video . depending on the quality of the base video of ur gif , u might have to make a few tweaks to the unsharp mask layer at the top ... it should be called 'layer 1 copy 2' . i would recommend adjusting the amount first and then tweaking with the overall opacity of the unsharp mask layer as needed if there is still some harshness surrounding the silhouette . now to add ur psd / coloring , add those layers to the very top so it'll be applied to all three layers of ur gif .
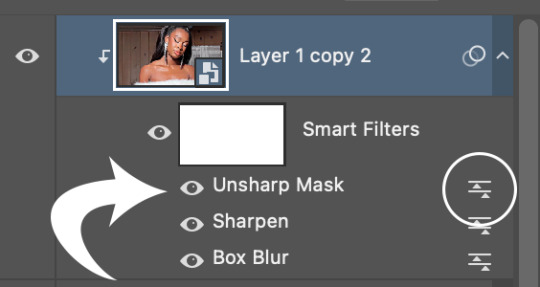
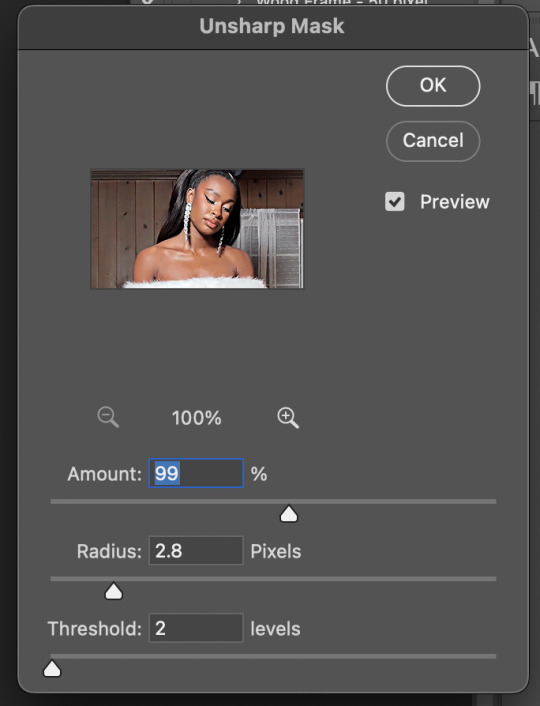
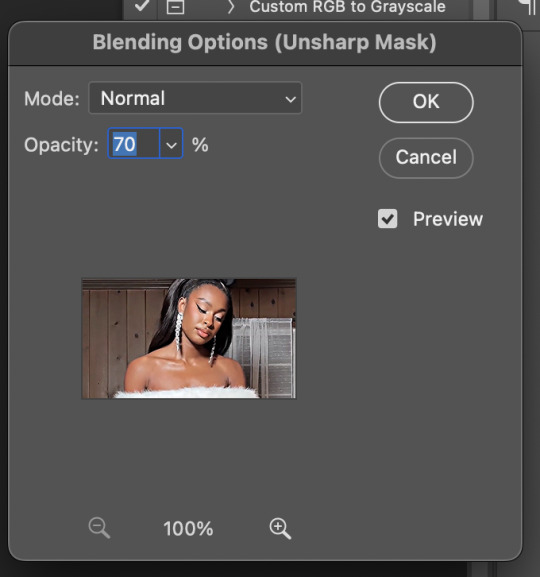
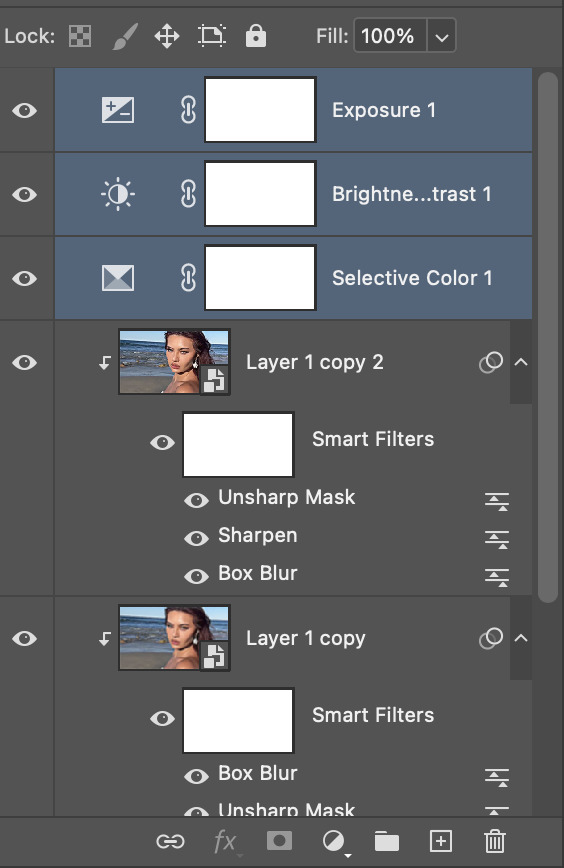
^ layer 1 copy 2 unsharp mask , editing the actual unsharp mask settings ( where the arrow is pointing ) , editing the blending options ( the circled icon ) , where to put ur coloring layers
⟡⋆。⊹₊˚ step four : saving ur gif
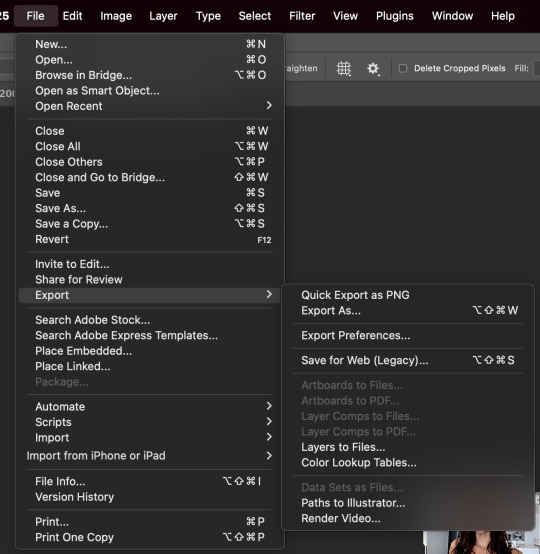
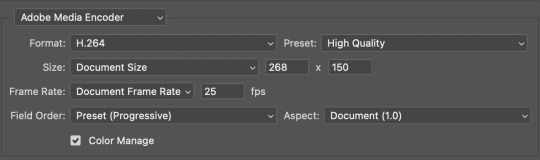
ur practically done now ! the last and most important part is exporting ur gif to use ! go to file > export > save for web . my typical settings are below but i do switch it up depending on the specific needs of the gif . for example , does the bg of ur gif look weird and splotchy after u saved it ? it's time to go back and re - save with a different setting .
the gif on the left was saved with my typical settings ... see how the background is splotchy and feels nosy and un - smooth ? this is because of the dither diffusion setting . if we switch to pattern instead as seen on the right , the difference is pretty staggering . u could also opt for the pattern dither setting to try and smooth out the blotchy background colors .

same gif with typical settings on the left compared to the same gif saved with the dither on pattern instead of diffusion . it's mainly up to ur personal preference !
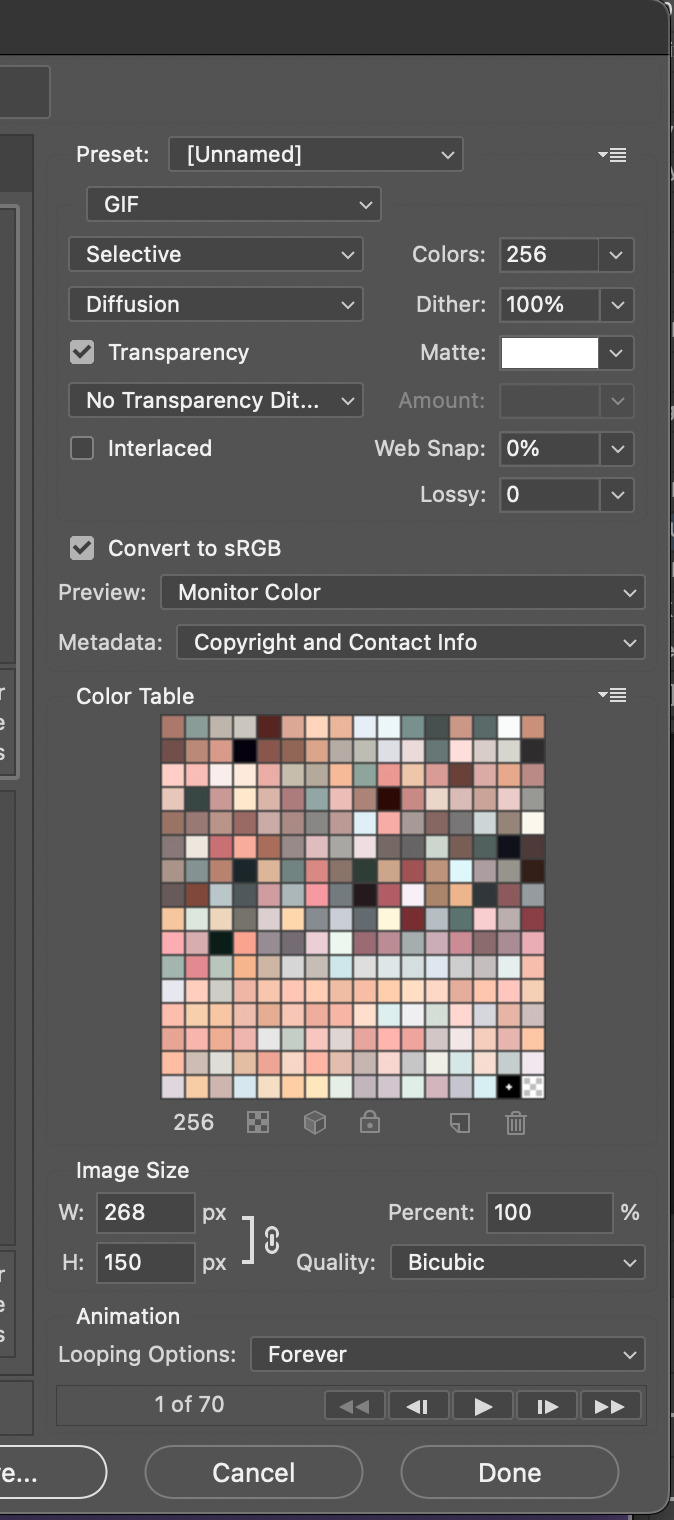
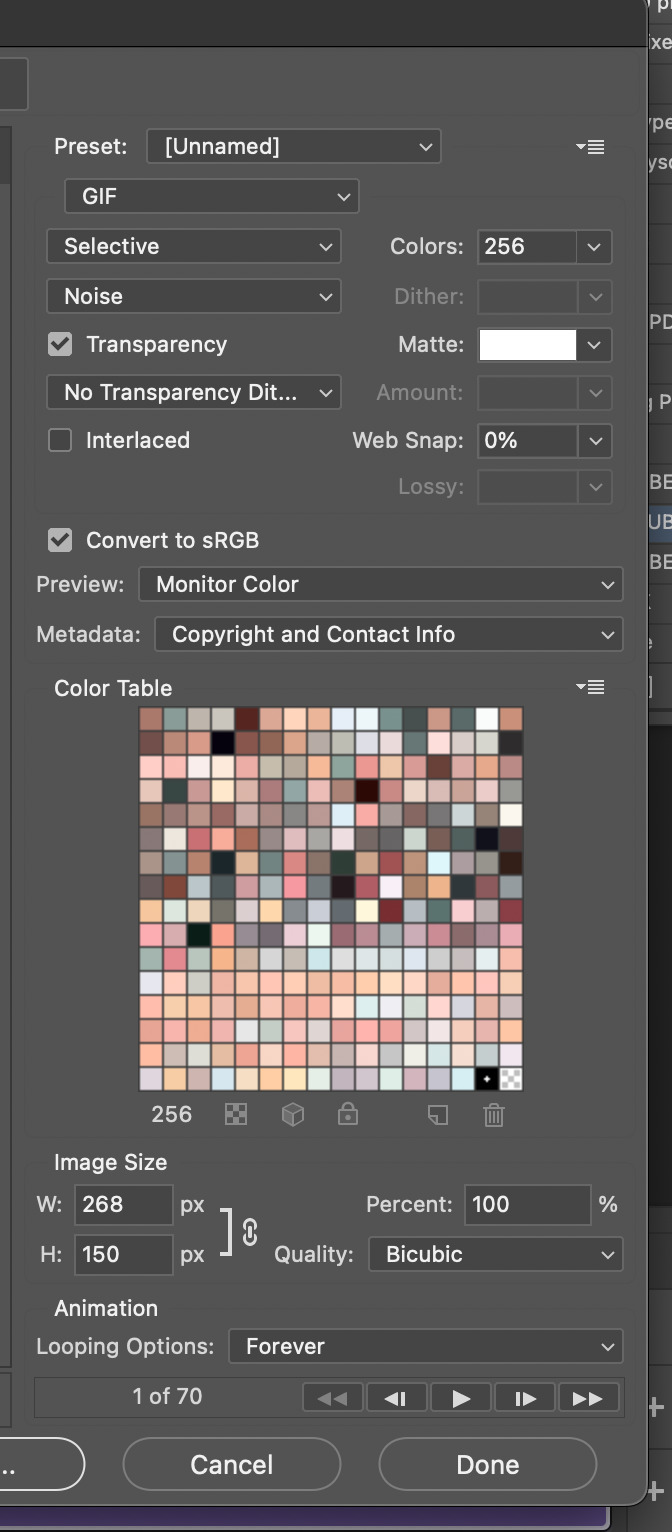
^ exporting with save for web , my typical settings , noise dither version
and that's it ! that's my current giffing process ... like i said , there is no one way to gif . it's a fluid , ever - developing process . don't be hard on urself and remember this is for fun ! if u have any questions or concerns please let me know !
50 notes
·
View notes
Text
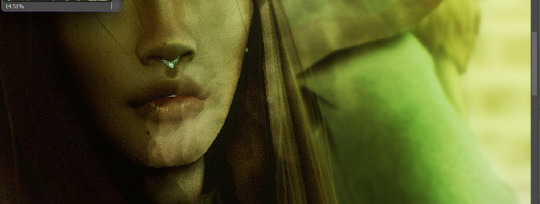
Updated: How I edit my sims 4 screenshots (night-time edition)
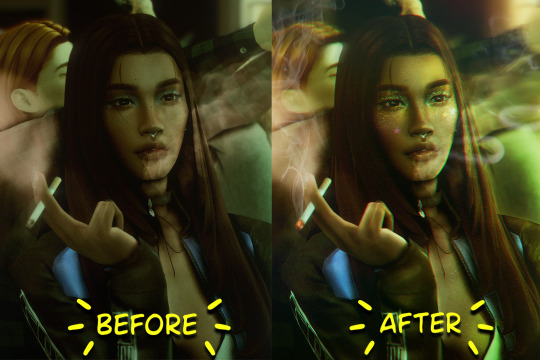
A more detailed editing tut so you can understand my process as it may help you, i edited this relatively quickly and usually spend about 1-2hrs editing something...so let's goo.....
Before taking screenshots:
Help yourself as much as you can in-game, I always make sure there is some sort of light source in my pictures or something interesting that I can add to enhance something already there
Understand good/bad composition and add variety by using different angles
I take LOTS of photos just to end up with 1 or 2 good ones

I'll just be using photoshop for this, but i also like to use the procreate app as i'm more confident w it.
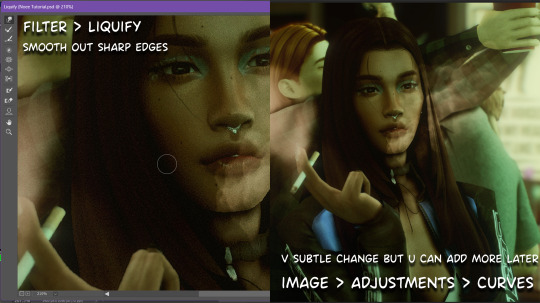
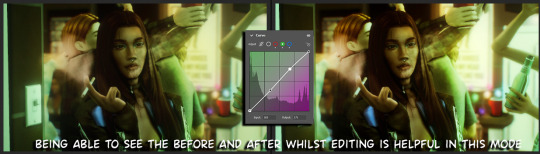
step1: I check if there are any major glitches or hard areas e.g, fingers elbows etc.. that have sharp points and pull them in liquify so they are smooth. Then use curves to change the contrast.
step2: *duplicates image* using the dodge and burn tools (keyboard shortcut: o ) i'll add emphasis to highlights and shadows (be careful with these as the dodge tool can ruin the image if used in excess) *merges image* (i duplicate and merge as i go, utilise using lots of layers so you can go back if you mess up/ want to change the opacity of an effect.)
step3: making light sources POP. *new layer* change blending mode to overlay or soft light and choose a colour you like.

step4: *new layer* draw hair strands. i just use a basic round brush in photoshop and change the hardness or i'll use a sharp caligraphy type brush depending on my sims hair type. (i try not to overdo it as i like maxis hair and don't want it to look too realistic)
step5: i would then add a new layer and set the blending mode to multiply to add more shadows, but i don't feel like i need to at this point.
step6: *duplicates image* go to filter > camera raw filter, i change the "light" and "curve" panels, i like green tints in my screenshots especially the night ones. (this is where all the magic happens really so just adjust all the channels to your liking, lightroom is also really good to use)
step7: *create new layer* blending mode: screen or linear dodge (add) / makeup and finishing touches! - for this look i'll get stars and glitter pngs off google or unsplash same for the smoke, though if i'm using procreate they have free brushes for that :')

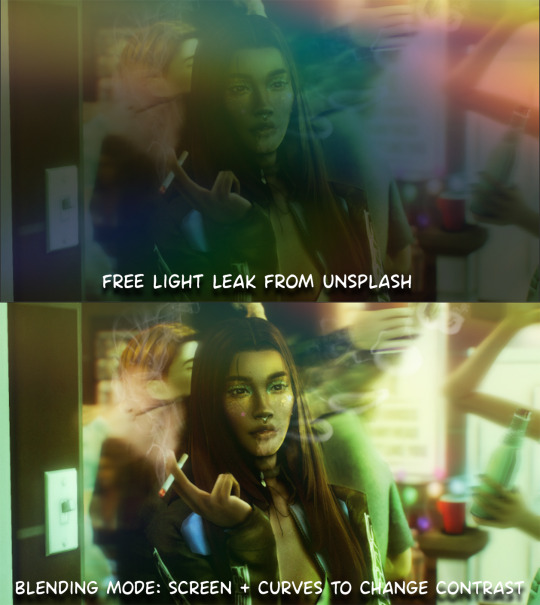
step8: add light leaks as they add some fun dynamic lighting and textures to your screenshots. (i also flip my image horizantally [image > image rotation > flip canvas horizontally] whilst editing as it's like a "fresh pair of eyes" when you've been editing for a while so you can see what looks off)
final step: merge all the layers (though i do merge along the way once i'm happy with something) go to filter > sharpen > smart sharpen. I leave it as the default setting.
extra step if u want: for party pics i might add chromic abberation here is a 60 second tutorial on youtube it makes the pic look cool and trippy.
And you're done!! congrats on surviving. if you have any questions please send them in my ask box so others can see and get help too.
250 notes
·
View notes
Note
hi, your latest edit for thgweek24 is absulutely stunning and i thought if i can ask if you can make a tutorial about the ripped gifs/paper effect? if not, that's okay! have a nice day <3
RIPPED PAPER EFFECT TUTORIAL
hi! thank u :D (thgweek set referenced)
below the cut are the steps that i took to create this effect. this tutorial is very screenshot heavy and assumes some basic knowledge of photoshop and giffing.
i do my best to try and explain my process so hopefully this is helpful! if you have any questions, please don't hesitate to ask.
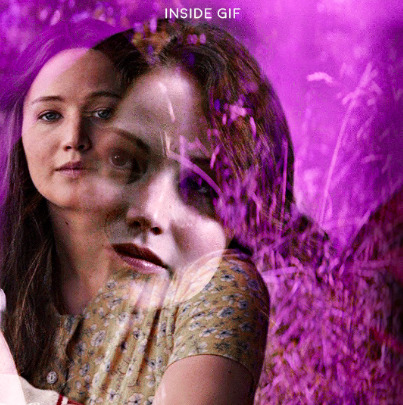
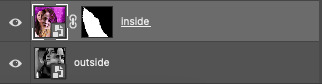
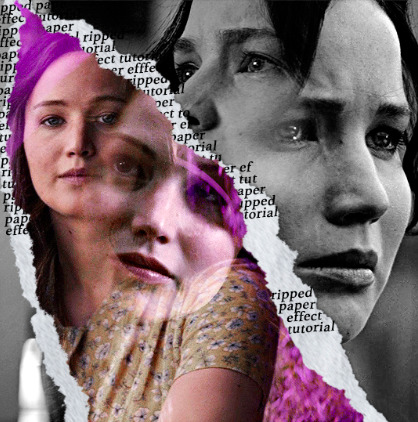
STEP 1: Choose and arrange your two gifs
with this specific use of the ripped paper effect, there's one gif on the "outside" of the rip and one on the "inside." in this example, the outside is the b&w and the inside gif is the colored:
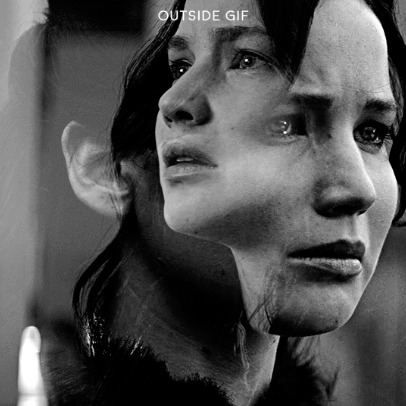
for me, the outside gif determined the positioning of the inside gif and the position/direction of the rip. as can be seen, outside gif has a lot of space on the left. therefore, i knew i was going to position the subject of the inside gif more on the right so i could create the rip without hiding too much of the b&w gif.
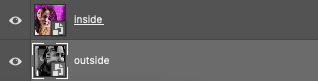
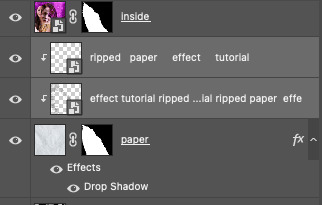
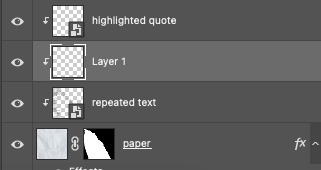
next, you want to arrange the inside gif on TOP of the outside gif. your layers panel should look like this:
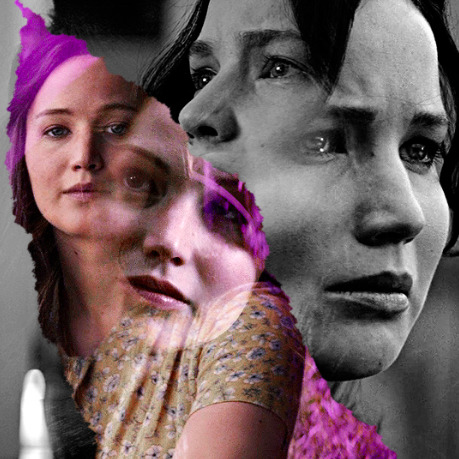
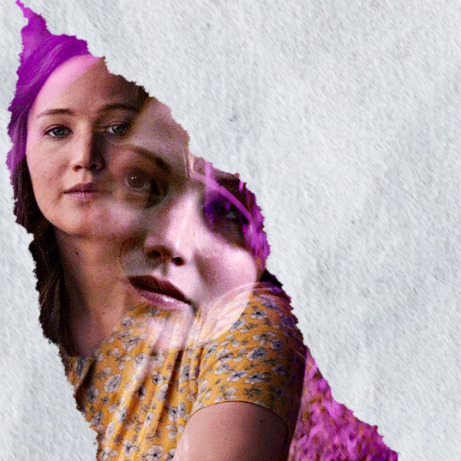
STEP 2: Creating the ripped effect
here comes the fun part! in order to create this effect, you're going to need torn paper brushes. here and here are some packs you can download (w credit to owner).
next, create a layer mask on your inside gif. you're going to use the brush of your choosing as an ERASER. then, you can play around with the size and angle of the eraser to create the look you want. this is what the gif and the layers panel now look like:
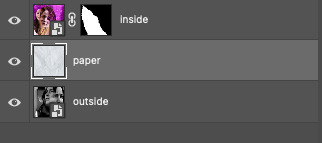
STEP 3: Adding the paper
in order to add the paper around the edges of the inside gif (where the text goes), you now need to download a paper texture. i found mine on google by searching "paper texture png."
place the paper png IN BETWEEN your outside and your inside gif. this is what everything should look like:
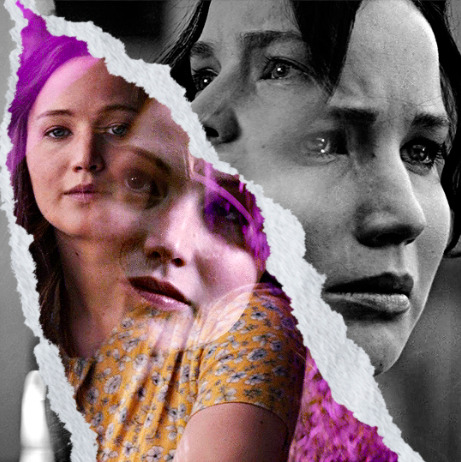
now, similarly to what you did in the previous step with the inside gif, you are going to create a layer mask on the paper layer. using an torn paper brush as an eraser, you will erase the paper, creating the shape you want.
be sure to leave enough room for whatever text you want to be on the paper. also, i suggest making the rips of the paper different from the rips of the inside gif so it looks more organic.
here is what my gif looks like after erasing the paper:
optional: add a drop shadow on the paper layer (right click -> blending options... -> drop shadow)
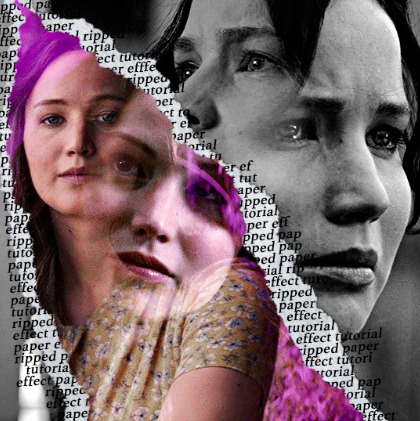
STEP 4: Adding the text
first, you want to identify the space where you will have room to place your full quote within the paper. if there are no spaces, you can always use your brush/eraser to modify the layer masks.

next, add a layer on top of the paper layer (and below the inside gif). select the text tool and start typing your repeated text!
because you can see which text is hidden by the inside gif and what is on top of the paper, a shortcut i use is the "tab" button and only type words that will be seen.
type the repeated words around the quote you want highlighted:
now, in order to contain the text within the paper, convert the text layers into smart objects. then, create a clipping mask on both layers (right click –> create clipping mask). this is what your layer panels should look like:
with that, your gif should now look something like this, with the text contained inside the paper:
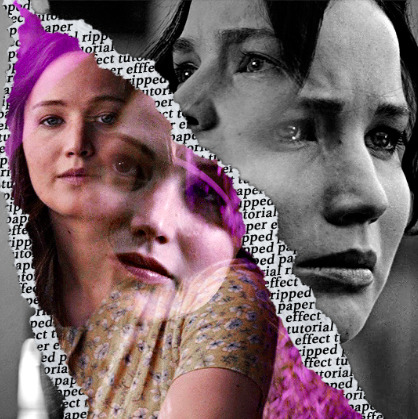
STEP 5: Highlighting the quote
as you can see, it just looked like a bunch of words. so, in order to highlight the quote you carved out in the previous step, add a new layer below the layer of the quote you want highlighted:
now, use a round brush (softness around 10-15% and opacity at 70-80%) with the color of your choice to highlight the words you want.
and there you have it!
i hope that this made sense and was helpful! if you have any questions or clarifications, please don't hesitate to ask :)
212 notes
·
View notes
Note
Do u have any tips/tutorial how to make gifs so smooth if there's movement? Mine are always choppy and weird :(
Hi anon, ty for sending this ask. I'm sooo honored!! (and plz don't call your gifs choppy or weird i have a feeling they're very lovely 😌)
✨ Gif Tutorial: making movements in ur gifs as smooth as possible✨ (updated)
↳ aka: speed management in gif making
Remember to always source your content responsibly!! Process in this tutorial is simply what works best for me. Every creator has their own preferences and imo there is no right or wrong. We should always make content in the way we enjoy 🤍 Outline: 1. Remove duplicate frames 2. Repair missing frames 3. Speed management in Photoshop 4. Smoother slomo using Video Frame Interpolation
1. Remove duplicate frames
Obviously, if there're duplicate frames in a video, our gifs will end up with lil lags here and there (since some frames get more screen time than others). Although the dup frames are likely barely observable once compiled into gifs, imo this is what makes the difference between smooth and butter smooth. the two daniel gifs above (guy with big brown eyes, if ur not from our fandom 🤍) can hopefully showcase this difference**.
**technical explanation for this that you can totally skip: the persistence of human vision is approx. 0.1s, ie everything we see stay on our retina for this amount of time. since gifs refresh faster than this (eg. 0.04s on every frame for a 25 fps gif), we usually can't pinpoint exactly which frame is a duplicate just by looking at a gif. however. by definition, a duplicate frame will slow down a gif, by making it pause longer than it should. as a result, a movement during this lil chunk of time will move less pixels than your brain would've expected. and this is where we perceive the not-so-smoothness.
ok, now that we've established that we don't like duplicate frames -- I know it's common practice to handle this by looking for an optimal output frame rate to offset the dupes. to me this feels chancy. bc it's a process where you don't have control over exactly which frames to keep or discard. Personally, I prefer making sure my videos are dupe free before everything else. (Again, this is just what works for me. Everybody has their own process and imo there is no right or wrong :)
To remove duplicate frames, the first thing I do with a clip is to play the first few seconds frame by frame to see which one of the following scenarios it falls into:
a. no duplicate frames ↳ best case scenario! congrats!! plz proceed directly to step 2 b. there is a duplicated frame once in a while ↳ This happens most often with (but not limited to) videos from social medias ↳ Reason behind this is frame rate conversion. For instance, instagram/tiktok has a default frame rate of 30 fps. However, many media sources (eg. no brakes, sharl's vlogs) produce at 25 fps. When these videos are uploaded, instagram/tiktok convert them from 25 to 30 fps by duplicating 1 frame every 5 frames, hence twitchiness in gifs when slowed down. ↳ Solution: in photoshop, go through the clip frame by frame, delete dupes manually (recommended) ↳ Alternative solution: use duplicate frames remover softwares (see next bullet point) c. almost every frame has duplicates ↳ This will almost always** be the case with screen record. ↳ What not to do: When there are many duplicates, we may be tempted to use photoshop's 'import 1 out of every n frames' function. this is not ideal bc, the dupes are rarely uniformly distributed. you could end up losing frames you don't want to lose (resulting in choppy gifs) or end up with dup frames still in the mix (resulting in laggy gifs) or, most likely: both. ↳ A better way: is to import all frames into photoshop, adjust the output frame rate to offset the dupes (here is a good tutorial on this) Pros: efficiency; yields decent results in most cases. Cons: again, in my experience this is a process where you don't have precise control over the frames. Therefore runs the same (albeit smaller) risks as the method above. It can also limit how much you can slow down a gif, and generally doesn't work well if the target frame rate (of the clip you're trying to gif) exceeds your computer's recording rate**. **More on this statement: when target rate is comfortably lower than recording rate (~ 55 fps for many), chances are most to all frames will be captured. It is therefore more tolerating towards skipping a unique frame from time to time. However, when target rate (i.e. anything 60 fps) nears or exceeds recording rate, you will be dealing with dup frames as well as missing ones. Using the method above can therefore subject you to the possibility of losing two unique frames in a row, making the gifs noticeably choppy. ↳ Solution: we always have the option to trim dupes by hand in photoshop. But in this case, it can be time consuming, even with keyboard shortcuts. as a result, here is where we can really use a: ↳ Dup remover software: google search 'dup frame remover software' will give you several options and tutorials (here a plug-in for after effects). i've heard good things about some of these but unfortunately can't give recommendations (they do cost money sooo i wrote my own)
Demonstration:
This is a frame-by-frame animation of an ad Charles did for apm. It was produced at 25 fps & uploaded to socmed where the default is 30 fps. You can see that: i. With screen recording, every frame has an unpredictable amount of duplicates. ii. Original clip from instagram has 1 dup frame every 5 frames. iii. After deduplication, the movement becomes lag free and continuous.

2. Repair missing frames
At this point, our video clip is (hopefully) free of duplicate frames, which makes our gifs lag-free (yayy!!). At the same time, we don't want choppiness in our gifs either. Choppiness in a gif is usually caused by missing key (unique) frames. To check if there is any, replay the clip, look out for the sudden jumps/fast forwards in movements. Three possible scenarios:
a. no missing frames ↳ best case scenario! congrats!! plz proceed directly to step 3 b. a lot of missing frames ↳ This is usually the case if the target frame rate (of the clip you want to gif) exceeds the screen recording frame rate. ↳ Solution, imo: (surprise!) is to leave things be. Reason is that something like this would be quite tedious to fix, but not that noticeable if made into a gif that's fast enough ↳ Alternative solution: Record at 120 fps c. occasional missing frames If a video clip misses frames, but not a lot, chances are it's only gonna happen very occasionally, i.e. 1 or 2 occurrences in total. A frame-miss in this case is usually due to either the screen recording skipping a frame by mistake, or that the original video misses frames/contains bad frames to begin with. ↳ Solution (for screen recordings): record again, find missing frame (chances are it will be captured on a second try), insert frame back into original timeline in PS ↳ Solution (if video misses frames or contains bad frames to begin with): Let's talk about ✨ VFI ✨. VFI (Video Frame Interpolation) is the process of synthesizing in-between images from a given set of images. It can increase videos' frame rates (i.e. 30 fps to 60 fps), achieve smoother slomos, and by definition, also help with missing/bad frames. There are many software products that let you use VFI by simply dragging videos into the app and clicking 'export'. Afterwards, all we need to do is to find the missing frame generated by the app & insert it back into the original timeline in PS (ahh technology). For more info on VFI, see "4. Smoother slomo". ↳ Note that VFI processed footages will likely differ slightly from the originals in terms of colors & lightings. This may be tuned out using clipping masks (allow a group of adjustment layers to only apply to one frame/layer, keyboard shortcut: Command+Opt+G)
3. Speed Management in Photoshop (✨ updated ✨)
At this point, our clip is without dupe or missing frames (or at least as close as can be). Whether you dodged the first 2 steps like a breeze or freshly emerged victorious from photoshop covered in blood to get here, good news is, things will be very straightforward for this point on. congrats!!!
🎉🎊🎉
As mentioned before, in terms of smoothness, our clip is now in ideal shape. The important thing is to keep it this way throughout the rest of the process. My workflow looks something like this:
Open file, crop, resize, sharpen, color, export gif, reopen gif in photoshop (which won't compromise quality), assign frame delay, export finalized gif
If you're used to finding a comfortable frame delay or speed/duration combo at the beginning, this process might feel unnatural. But it's so so so so important to leave the speed related settings alone until right before exporting. Here's why:
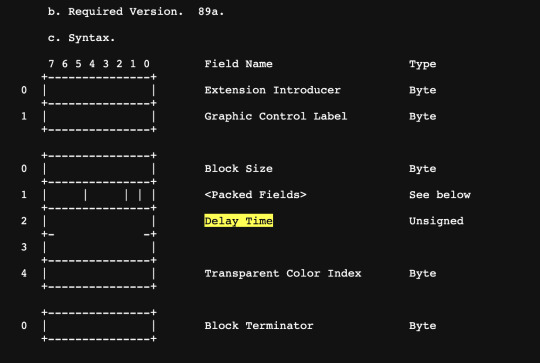
By not converting frames with modified delays into timelines with fps, we avoid having to give our finished product a frame rate (which photoshop timelines have to specify). This is crucial bc, there is no such a thing as frame rates in gifs. According to the syntax of GIF89a (the current '.gif' format, screenshot below), gifs control their speeds through (and only through) how much time to wait in between frames, aka delay time. Our process above does exactly that. It compiles frames directly into gifs, and avoids expressing frame delays (a gif concept) through frame rates (a photoshop concept), a conversion where dupe frames and missing frames come from**. In other words, using frame delays to control speed is simply more natural to a gif's syntax. **Why would this conversion cause dupe frames? ↳ On paper, frame delays should translate into frame rates seamlessly (i.e. 1 second ÷ 0.06s per frame = 16.67 fps). In reality, photoshop does not support direct translations like this. When converting frame animations into timelines, PS defaults outputs to 30 fps, regardless of frame delays. This disagreement between frame rates is where dupe frames come from. ↳ Some examples: i. Consider a frame animation where frame delay = 0.04s (25 fps), to convert it into a timeline defaulted at 30 fps, 5 out of every 25 frames will be 'duplicated' by photoshop (30-25=5) ii. Now, consider a frame delay = 0.06s (16.67 fps roughly 17 fps), to convert it into a timeline defaulted at 30 fps, 13 out of every 17 frames will be 'duplicated' by photoshop (30-17=13) ↳ (the 'duplicated' was in quotes bc photoshop achieves this thru assigning a frame roughly twice it's original screen time instead of actually adding another) ↳ (afaik, currently there's no way of changing the default 30 fps as long as u start with frame animations. If anyone does know how please let me know 😳) **Why would this conversion cause missing frames? ↳ This happens when one tries to reverse the harm done by photoshop in prev step by changing the 30 fps frame rate back to what it's supposed to be (using function 'Set Timeline Frame Rate') ↳ Let's use the last example again. As mentioned, to go from 16.67 fps to 30 fps, 13 out of every 17 frames will receive roughly twice its original screen time (0.033s * 2 ≈ 0.07s). On the other hand, 4 out of every 17 frames' screen time will remain the same (0.03s). to go from 30 fps back to 16.67 fps, photoshop resamples frames from its 30 fps timeline in 0.06s intervals. As a result, any frame with screen time less than 0.06s runs the risk of 'slipping through the cracks', namely ones whose screen time remained 0.03s ↳ (gifs require frame delays to be rounded to the nearest hundredth of a second) ** What if I open the file as video object, instead of importing as frames? ↳ Indeed, when opening as video object (i.e. command+o instead of command+i), photoshop inherits its frame rate as is. We would then have the option to manipulate it's speed by right-click ➡️ adjusting the percentage (of how much to speed up or slow down). ↳ Here, if we slow down a gif without changing its frame rate, we risk introducing duplicate frames into the result (since frame rate is now higher than needed). If we slow down a gif and lowered the frame rate, but the math didn't check out, we also risk losing unique frames (frame rate not high enough). The same (opposite) goes for speeding things up. Therefore the best and easiest approach is, again, leaving speed related settings alone until right before exporting.
(the block of GIF89a syntax responsible for graphic control:)
Ok in hindsight this probably isn't exactly like. the most straightforward thing ever but the execution part is very much so 😳 here goes:
1. Open file in PS via Command + O note the (25 fps) on bottom left
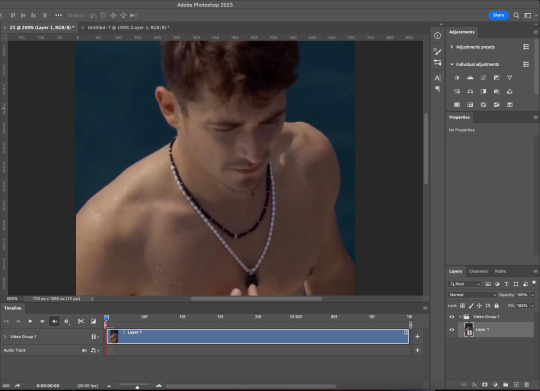
without changing speed, duration, or frame rate: 2. Trim ✂️ 3. Crop 4. Resize 5. Sharpen 6. Color

(Updated!!!) 6. Export gif, and then reopen it in Photoshop **Compare to the original method (timeline into smart object, smart object back into frames), the updated method has the following benefits: i. Avoid lowering gif quality by converting into smart objects ii. Reopening gif into frames and reassign frame delay saves time (bc less steps) and won't hurt the quality at all (bc no image processing required)
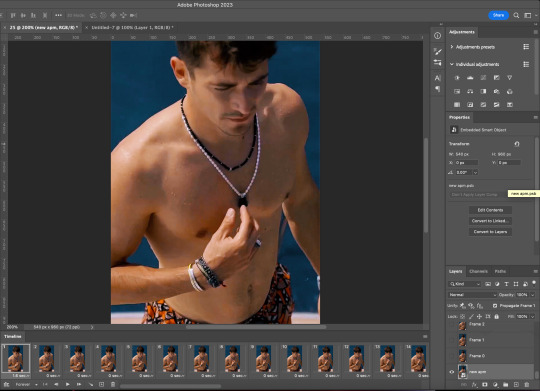
7. Assign Frame Delay (i usually go with original frame delay + 0.01s) 8. Export ✨

Tada!! Speed = managed!!
This ad actually came out last December where I was aware of like, maybe 5% of what's in this post. Here is what my original gif looks like. I'd say what we have rn is a big improvement :)
Now, imo there are situations where it simply makes more sense to start with frame animations (imported using command + i). For instance: when we need to remove duplicate frames by hand, when there is a missing frame/bad frame that needs to be repaired, etc. My workflow would then look like this:
1. Command + i 2. (do things to frames) 3. Set frame delay to 0.03s 4. Convert to video timeline 5. (the rest will look exactly like the workflow above)
This works bc when frame delay is set to 0.03s, photoshop will treat your video timeline as a "natural" 30 fps timeline and leave your frames alone. Therefore maintains its uniform speed.
4. Smoother Slomo using Video Frame Interpolation
As mentioned above, VFI (Video Frame Interpolation) is the process of synthesizing in-between images from a given set of images. It can increase videos' frame rates (i.e. 30 fps to 60 fps), hence smoother slomos. There are many software products that let you use interpolation by simply dragging videos into the app and clicking 'export'. I've had very good experiences with Topaz and After Effects.
Let's talk about After Effects first. If you have Photoshop, chances are you have AE as well. To use AE's Keyframe Interpolation:
i. Import ii. Set speed to half iii. Click square twice until you see lil arrow iv. Export

Topaz is a production grade video enhancing software. It's capable of enhancing frame rates (i.e. 30 fps to 60 fps), increasing resolutions (i.e. 540p to 4K/2160p) and more. Unlike AE who uses only the two neighboring key frames to generate an in-between frame, Topaz takes the whole sequence into account, hence better reliability. It's also more user friendly than AE imo.
Here is a before-and-after interpolation using Topaz.

That's all 🎉🎉🎉
To sum up: remove dupe frames (if any), repair missing frames (if any), use and only use frame delay to control speed, and software enhance frame rate if needed.
This post got way longer and more technical than I had planned and I honestly have no idea where all this stuff came from lol. But it was really fun and I hope you'll find it helpful. Feel free to message me if you have any questions. Have fun moving-picture making!!
#f1edit#gif tutorial#asks#*#my gif tutorials#photoshop#dailyresources#allresources#completeresources#this was. 3k words?????? what?????
225 notes
·
View notes
Note
I'M SOO OBSESSED WITH HOW YOU COLOR.. please.. tutorial... i beg..
aweee thank you! Idk how to make a comprehensive tutorial unless you want me to do the most insane info dump rambling that’d most likely confuse u more 😭 so I boiled my process to the simplest 3 steps in one pic.
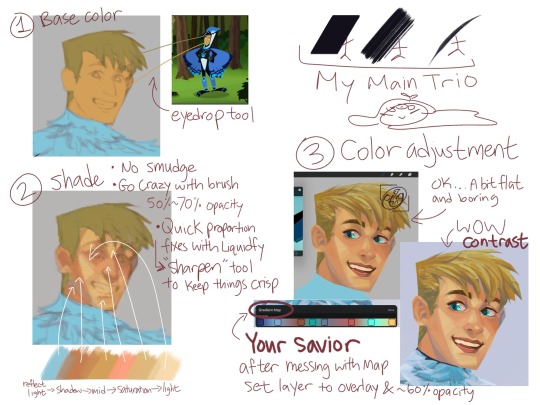
Note: these are my learning experiences and my comfortable coloring style. Smudging can be very useful for realistic shading but because I like some sharpness in my art, I don’t use smudge.
When coloring/shading, I always keep things in mind:
WHERE IS THE LIGHT COMING FROM. WHAT COLOR IS THE LIGHT? WHAT FEELING SHOULD THIS IMAGE GIVE?
How to convince viewers that this is (ex: feathers) and not something else (ex: scales or fur)
if light is warm, shadow must be cool. + vise versa
I don’t have clear step by step process of how I rendered Martin, only a few screenshots I took when I was coloring. (procreate either gives blurry images during replay or gives a super 30 sec video that explains nothing lmao)
Thanks for submitting! Hope this isn’t too confusing 🧍♀️
35 notes
·
View notes
Note
Do u have a tutorial how to make a good story 😭? Because I want to make a good story too
Can't say I'm the best teacher, I've always written impulsively. I'm rather out of touch with ways to improve, and as I see it? It really is down to practice. Deepening your vocabulary, finding a style you find enjoyable, etc.
Finding an inspiration for starters, is great for crafting a story... a purpose or an outline of sorts for your work. I use music, as an example. I read into the lyrics, or melody, get a vibe for the atmosphere and think of a setting. Similar to how somebody may pick a OST for a specific scene in an anime! It's much easier to write once you have built structure, and organize exactly what you wish to convey... it allows consistency which I lack due to my impulsivity. My writing is best described as emotionally rich(?). I struggle in many areas, but, I've always had a understanding on how to express emotion through describing subtle action- this led to me writing lengthy fic's rather than shorter ones.
Don't be afraid to use writing tool's for aid either! Such as sites that allow you to expand your use of synonyms(e.g), recommending alternative text that may sound clearer. It's helped me learn a lot. Research as a whole is a crucial part of the building process, from start to finish. Whether it's for world, or character building.
Write what you're passionate about! It's a fun process, not something that must be a chore. For myself, I have acknowledged that I am self indulgent, as I struggle to write for characters I don't have some sort of attachment towards.
Sorry if this wasn't all that good of a "tutorial" I'm quite... lacking in this department. I know you can do it! Hardest step to writing, or any work of art, is the beginning. Once you dip your toes in the water, you'll get swept away and hopefully enjoy what you're doing!
My friend @aventurineswife has a post that may answer your question as well.
11 notes
·
View notes
Note
Hi, I hope you're doing well! If you don't mind me asking, what is your whole drawing process and how did you manage to develope your style? I really love your artwork and it's inspired me to try practicing in a similiar art style, but the problem is I'm still kind of a beginner and don't know where to start lol. Even just some general tips as I struggle a lot with perfectionism.
It's perfectly fine if you don't want to answer or have any advice, regardless I wish you the best and want you to know how awesome your art is! And also make sure you're not overworking yourself, but other than that have a good day :D
First of all: aww thats so sweet! thanks anon 😊💖 And for drawing: The more you draw, the more you see what you actually like from your artworks: for me it was the rather sketchy/loose lines with flat colors. kinda messy, kinda rough - not 100% polished all the time. Fun fact: started out with semi realism, then came back to "simple" flat colors 😂 actually did the spongebob meme irl:

Anyway, this style works the best for me, cuz I don't get hung up in too many details (like I usually do). I can draw something relatively quickly in a few days rather than spending weeks on one drawing. I have like 300 wips at once so I gotta draw EVerYThInG as soon as possible 👀 idk how to really describe finding your style - I guess it comes naturally? 😅

Now, for starting: it's best to draw something you're passionate about: animals, fanart or whatever you like! biggest motivation ever. And of course the classic fundamentals: - learning anatomy (first thing) - perspective and framing - color and all that jazz
start simple: break things down into simple shapes 🙏 for example this hand:

step 01: ALWAYS use a reference when drawing - it helps! step 02: If you can't see shapes you can always try to draw them over the image to help you understand things better - great for learning!
There are plenty of great drawing tutorials on youtube where u can learn :3
And finally: don't be too hard on yourself! 🔥
30 notes
·
View notes
Text
Too people who want to get "prettier" and have a "glow up" Do NOT expect it to go over night.
Plenty of people believed that you just become pretty with no effort like you see on TV. It's never that easy. It takes steps, processes and Discipline. Always start with the basics like :
Hygeine
Make a skincare routine for your skin
Know your skin type and build you skincare routine from there
body care for the entire body
Scrubs , lotions and body butters are a must
Exfoliate 1-2 times a week
haircare (hair is everything even if u have a hijab hair care is still possible)
Oil train your hair and know you hair porosity to know what products to use
Use a non sulphate or silicon shampoo
Conditioner and a hair oil of your choice based on your hair problem
Hair mask 1 times a week
Know ur hair pattern to be able to use the right products and not damage your hair pattern
Do not straighten your hair everyday!!!
Use Silk pillows and silk scrunchies instead of elastics!!!
Getting a closet and hair cut for you
Find your best colors and body type
Therefore you would know which colors make you shine the most as well as
Find your seasonal color and which fraction ur in (like winter bright , summer light and etc)
Find which type of hair cuts and bangs suit your facial featured and face shape most
I recommend looksmaxing or the Yt channel Dear Peachie to help you including makeup tutorials, which archetype you are and which closet you can do
Look for styles that match your personality and makes you stand out
Build up a hobby
like sports photography, drawing, crocheting, dancing, and etc.
Doesn't have to be time consuming just something to do when ur bored or free even
Also depends on your time to be careful on what you commit to
Try to explore more options without much costs before fully committing to something that isn't for long-term
Exercise ( unless you already do)
Exercise requires discipline for you to be able to do it continuously for progress
If you can't afford a premium membership take a walk/jog/run around the block,street,park
If you feel unsafe you can do a YouTube work outs as they are effective depending on your goal
I recommend channels like :Madfit ,Hinafit, Shirley kim, April Han, ema wong, and Chloe ting
Take time for yourself (not all the time)
If you dont have time for yourself your body and brain will get stressed (from experience)
It can be as simple as drinking your daily detox water, green juice, coffee, tea or reading a book
Get 8 hours of sleep
Make sure not to stress for something so complete a task when given no matter how far the deadline is!!!
Reduce screen time to 3 hours a day (outside of school/work related stuff)
Diet
Never go too extreme like you see those people online do
Unless you are talking to professionals such as dieticians, Nutritionists and etc. (Bc most public figures do have professionals that they seek help too for these types of situations)
stick to a healthy diet like the 80/20 method
Or you can also do keto/greek/high carb or protein just never go extreme as it will slow down your metabolism
Find who you really are and trying to be better
People never really open up to try different things you should try more to find what you like most or which you are most stable with
See the perspectives on how you act im different situations and see what your mistakes are to try to avoid doing them again
Fix your mentality (watch wizard Liz, Song Jia,) and read quotes to inspire you to do better and the most you can
Always Analyze the situation before commenting or doing action unless its an emergency
Do not let people decide for you or get to your head it is their opinion not yours. You opinion is never invalid and justified in your perspective
Confident vs Arrogant vs Egoistic
Confident people never brag nor do they drag people down. They know they are THAT person and will NOT care about your opinion of them.
Arrogant people like to Brag about something that they have and thinks their all That. They bring down people for not having the luxury they have. But when someone has more and better than them they always try to avoid them, argue with them or get annoyed by them as They want to show supremacy
Egoistic people tend to make fun of people. Self-centered people that only think about themselves without knowing or thinking that they hurt others. Their too preoccupied with themselves to think of others helps or needs
(Sorry its so long and unorganized I made this at 2:30 am bc idk and these are just some tips)
36 notes
·
View notes
Text
Tutorial 3D model to sims2
(first part )
Now that I'm learning how to convert Sims2 clothes from 3D models, I'm going to write how I do it in case anyone is interested.
First of all you should know that this is my way of doing it, I don't know if it is the most correct, if someone knows other things they can contribute them here 🤗
You must keep in mind that you have to be very patient, not everything turns out well the first time, nothing happens, you try as many times as you want until you get the result that you like the most. 😉
It is just a game, it is not real life nor is it a job nor is it an obligation, therefore you should not get frustrated, just have fun ☺️
We start 🕞
You will need :
-- a page to download free 3D models, there are many, you just have to search on Google or your usual search engine.
-- blender and milkshape
-- simpe
-- adobe photoshop or similar
-- bodyshop
We download a 3D model that we like, and we put it in a work folder that we are going to use 📂
Preferably we are interested in OBJ files, but the 3D models are not always in this format, if they are in DAE they are also useful for us
If you don't know what format you downloaded your 3D model in, right click, properties on the file and it will tell you what type of file it is.
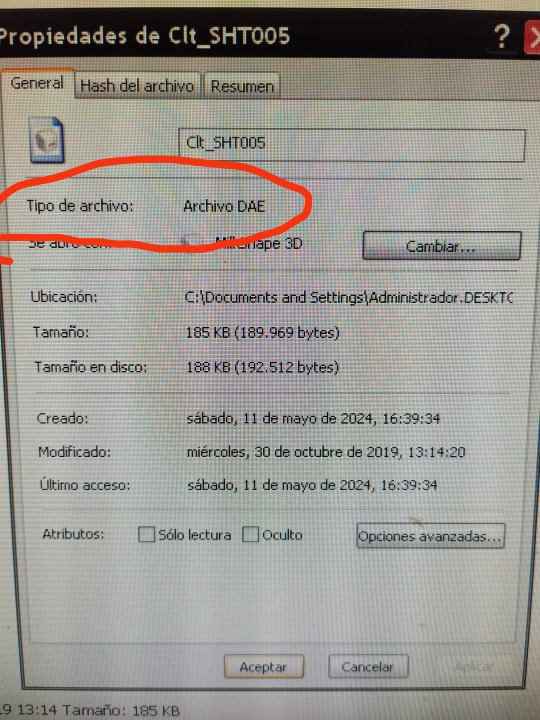
If your file type is OBJ, you will go directly to the Milkshape phase, which I will explain later, if your file type is DAE... follow these steps:
open Blender
click on any point to remove that screen
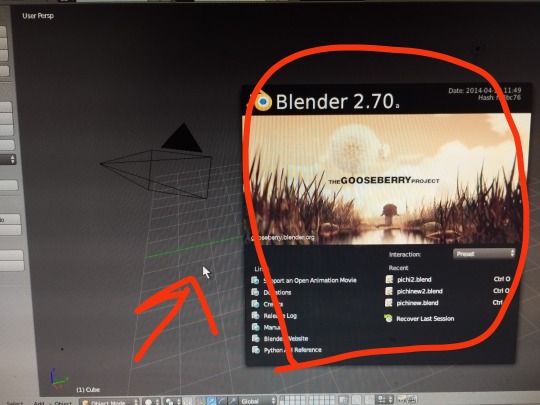
You will get a white cube that we have to eliminate
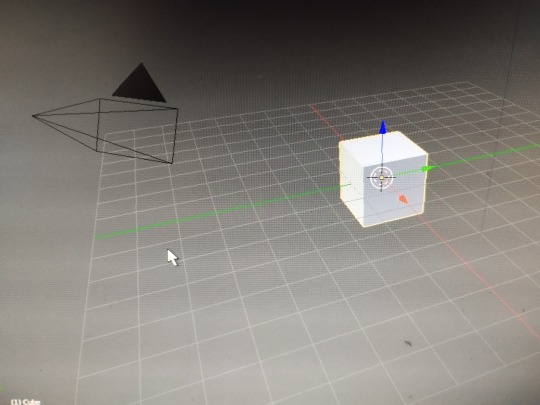
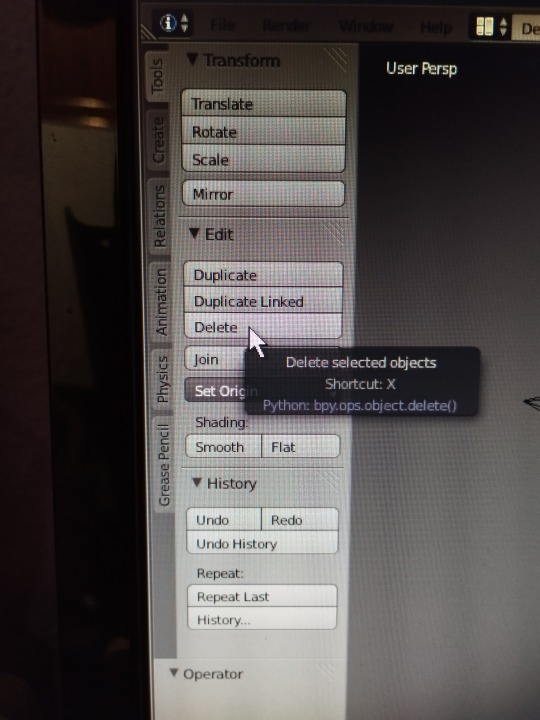
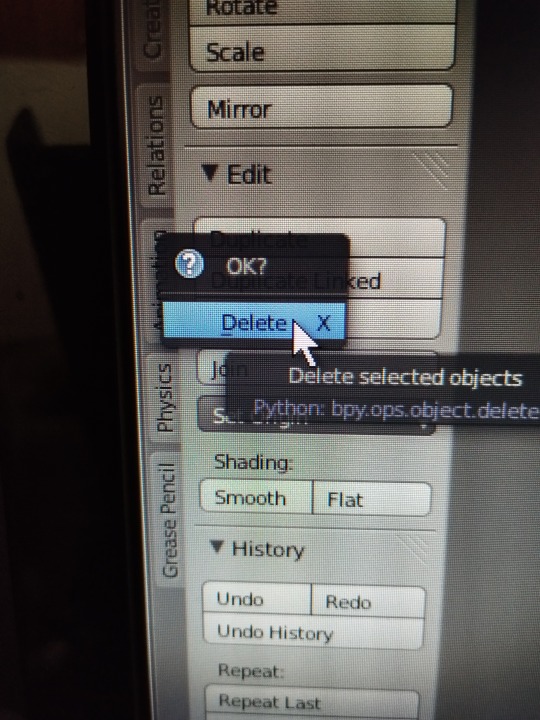
now we can start
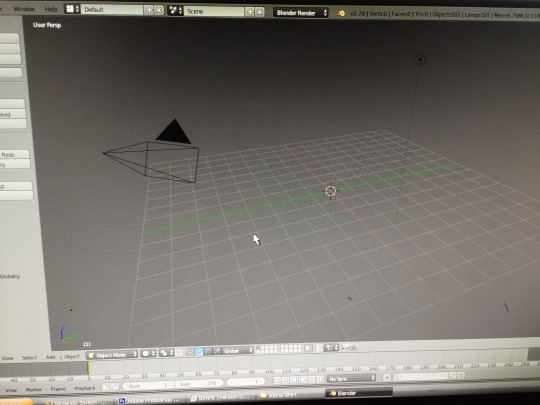
We import our 3D model with DAE format
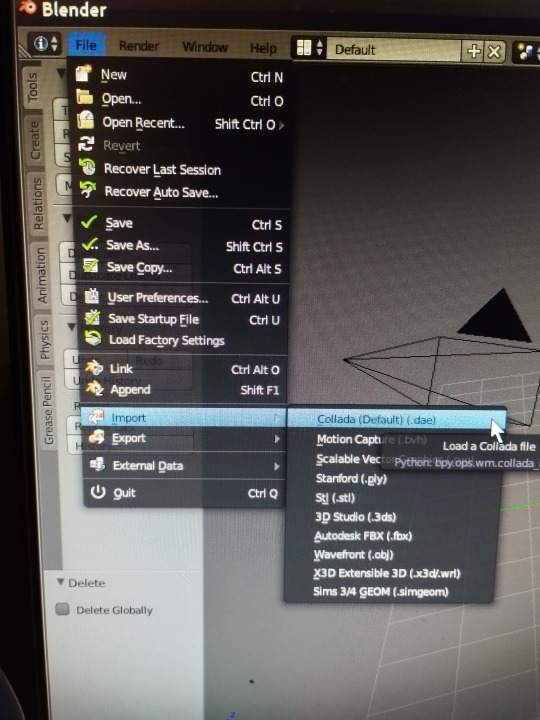
We look for our file in the folder where we have saved it, when we have found it we click on import (up to the right)
We zoom in on our model by clicking the mouse wheel to increase its size and see it well if you want.
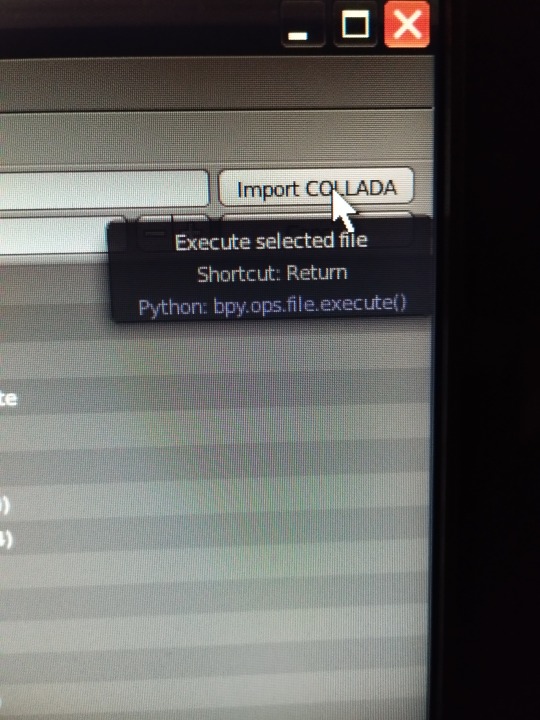
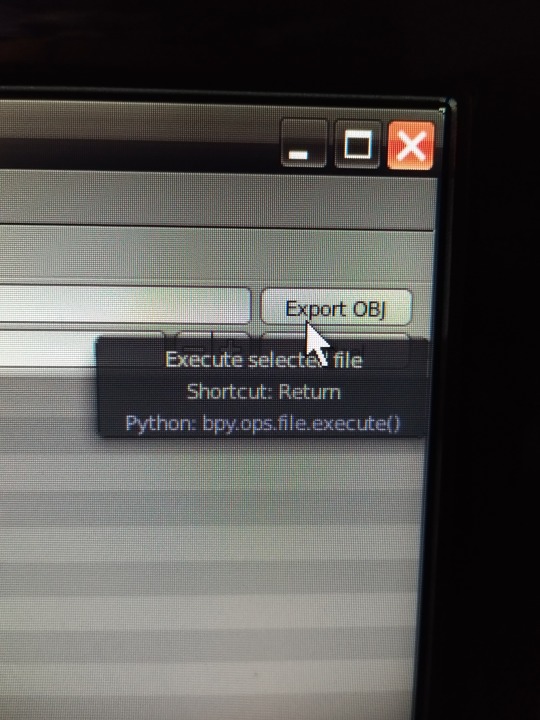
and we export it as an OBJ file, which is what we really need, you don't have to do anything, blender transforms it, you just click on file export wavefront obj

Choose which folder you want to save it in and give it a name, then click export OBJ (top right)
Close Blender, it is not necessary to save the changes when it asks you, so exit without saving if you want
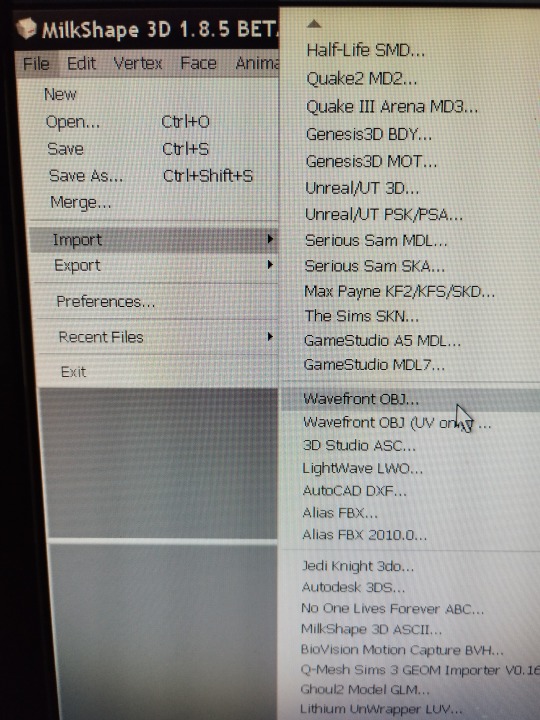
Open Milkshape :
(If your file was OBJ from the beginning, you skip the entire Blender process and start here directly)
we import our 3D model obj file
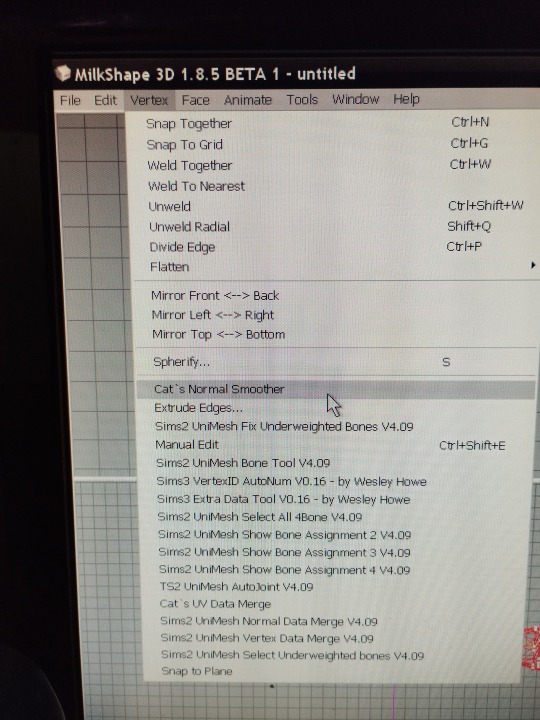
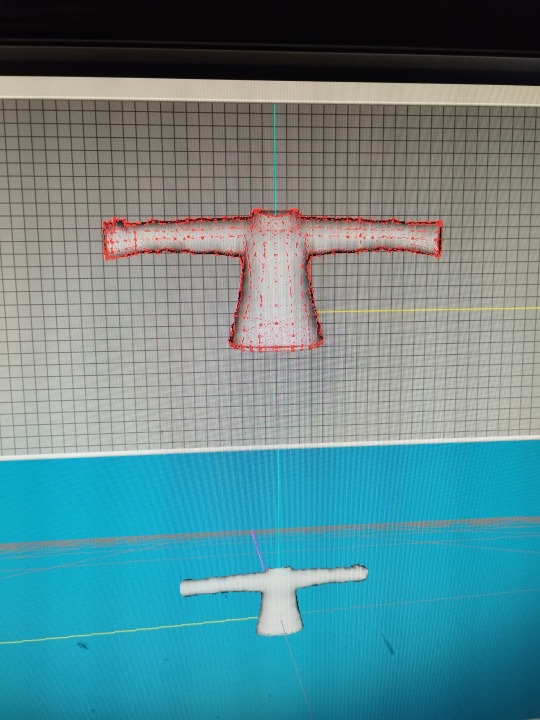
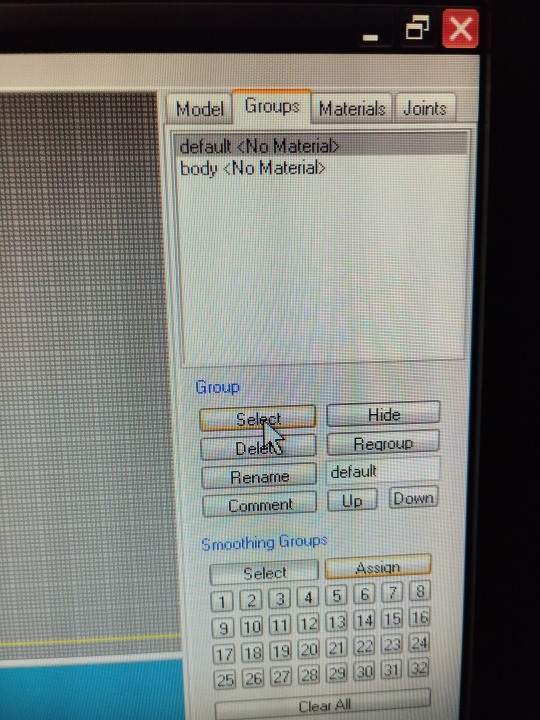
Normally it sells completely black, I explain how I change it, I eliminate the material that is assigned,
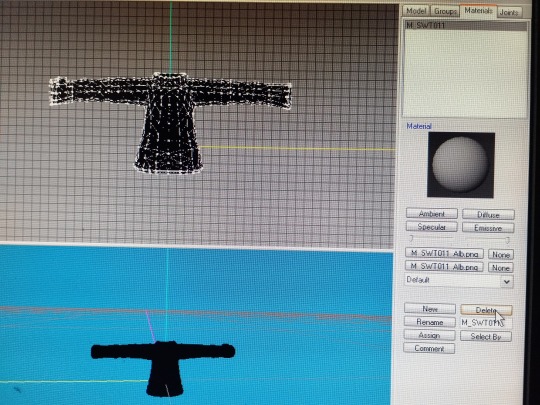
I select my clothes, (group, select)

and I hit vertex, cat's normal smoother… and now we have it white
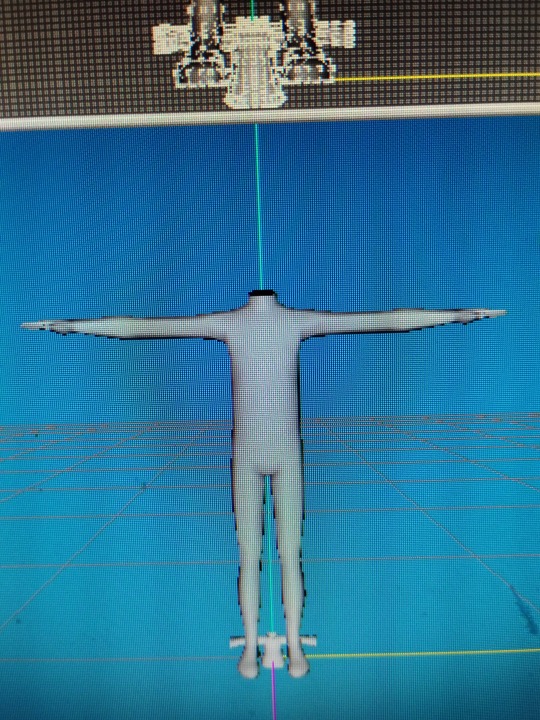
Now comes the most entertaining part, for this you will need your patience, normally the 3D model will not have the right size for the Sims 2 body, so you will have to modify it to adjust it
First, import a base body, of the age you want (adult child, etc.), the one you need according to the clothes you are making.
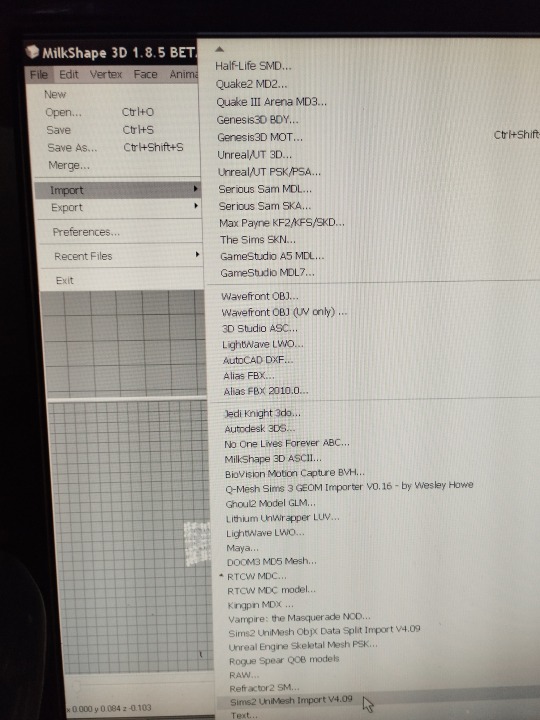
file, import ,sims2 unimesh import v4.09 , say acept, say noi
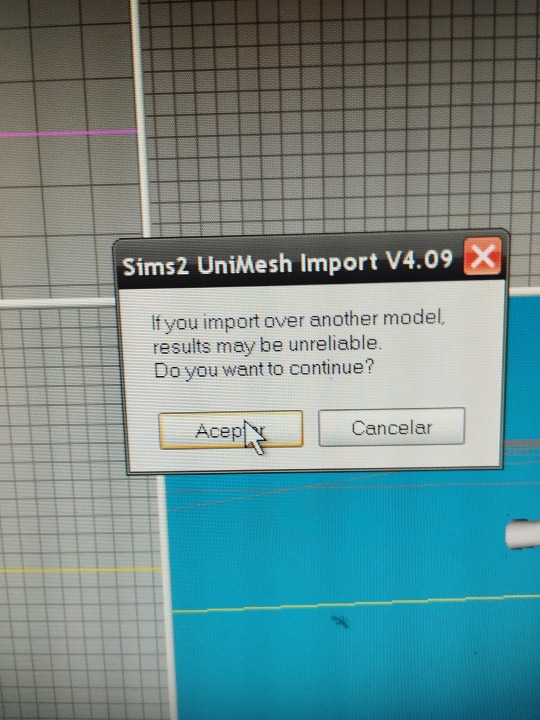
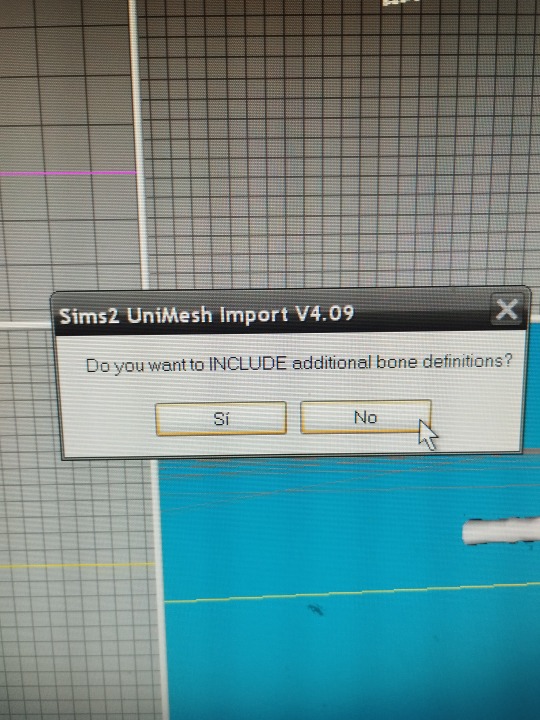
you choose your base body and say no
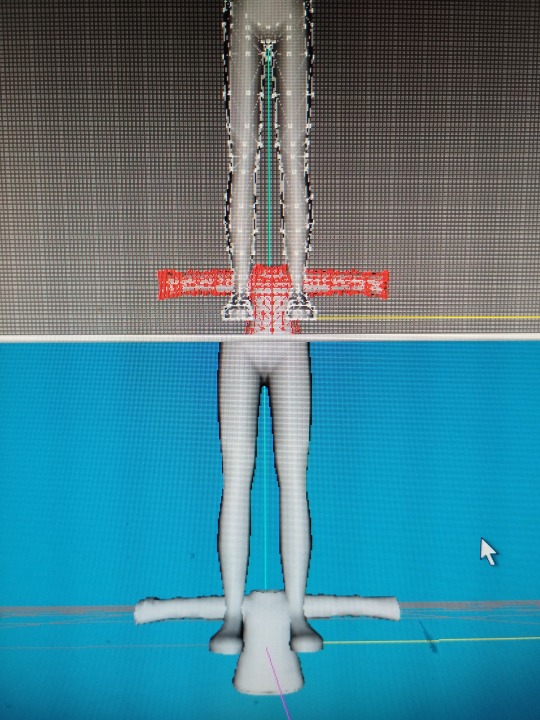
and say yes
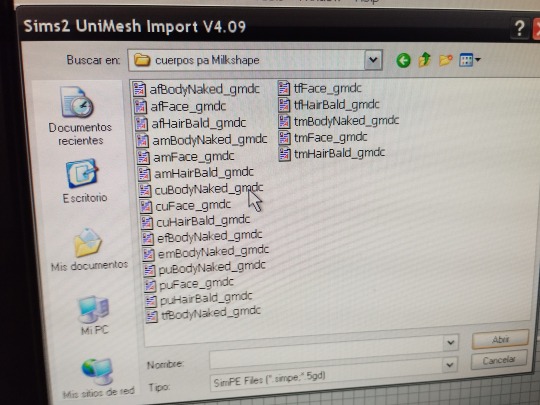
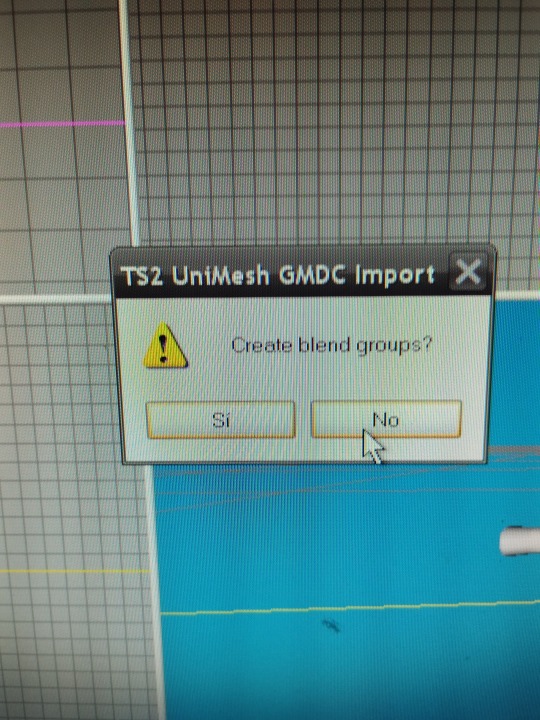
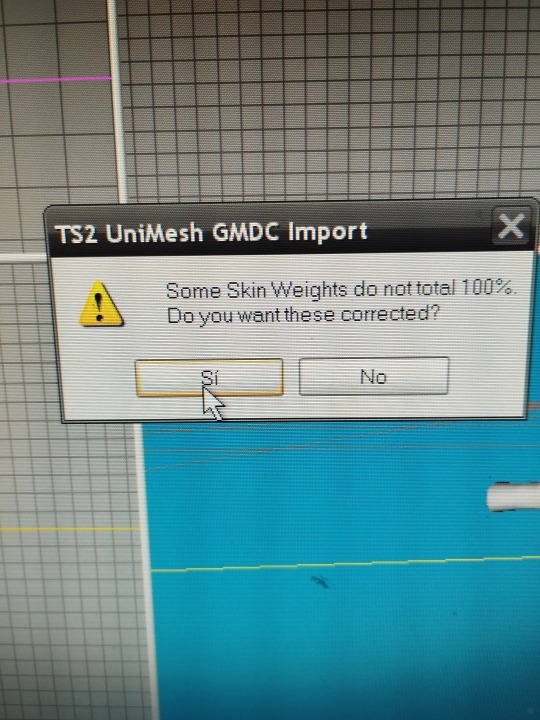
now you have the sims 2 body and you can see the size difference in my case 😅
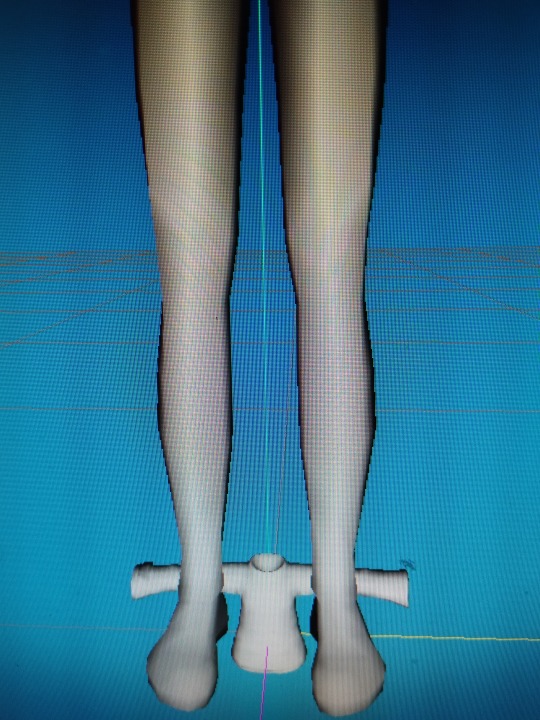
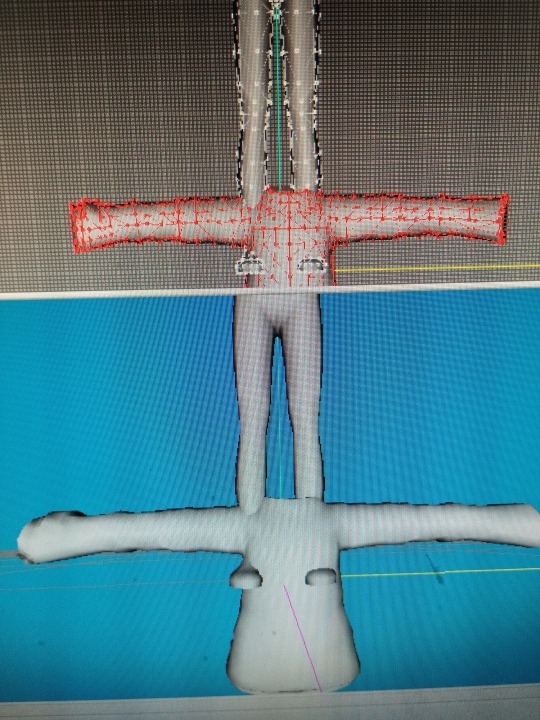
It's time to have fun, we select our clothes, (group select), and change their size until we find the one we want, (model scale)
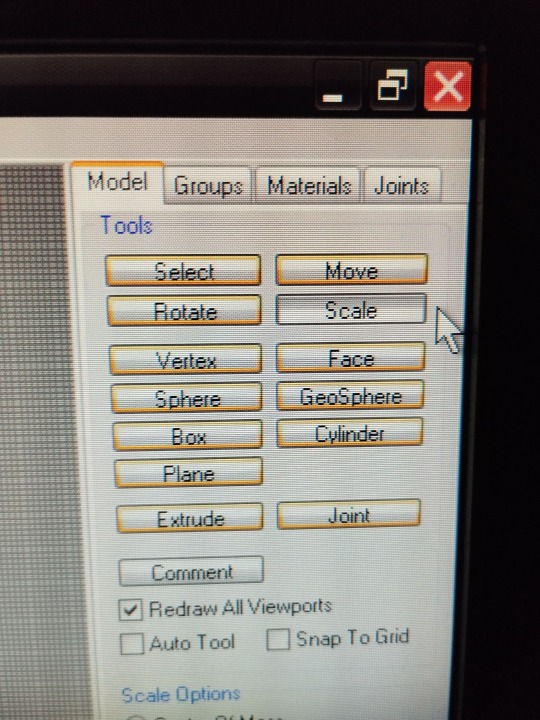
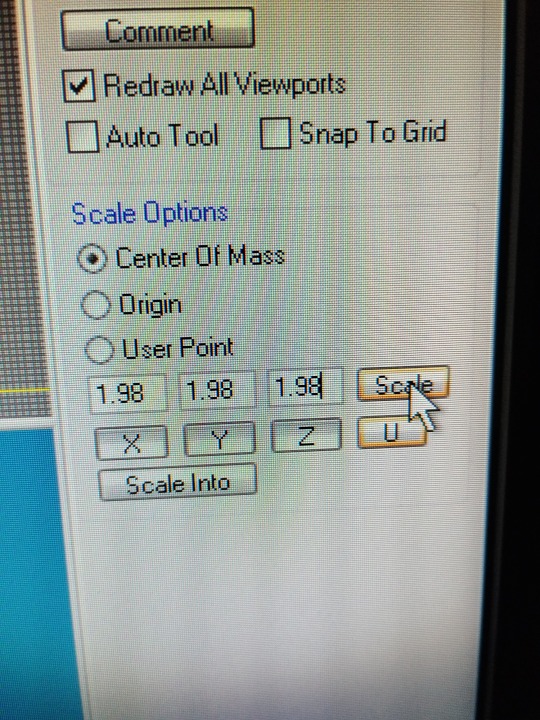
We must change the numbers of X Y Z,
If we write 1.98 in X, 1.98 in Y, 1.98 in Z, we point to U and click on scale (the scale button below where the letters x y z ) our clothes will grow
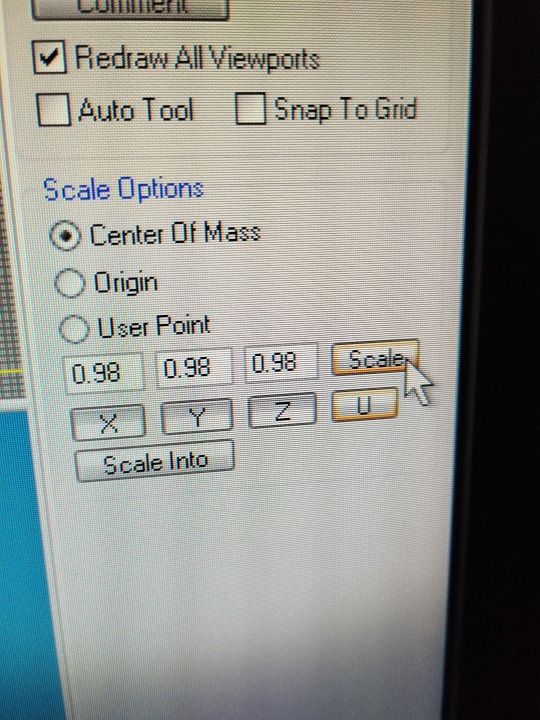
If we write 0.98 in the three x y z, doing the same, our clothes will shrink
to be continue ...
#sims2#devotedlyghostlyenemy#sims2tutorial#sims2cc#sims 2#s2cc#sims 2 tutorial#3Dmodel sims2tutorial
19 notes
·
View notes
Note
hello! i hope ur day is going well! im not really sure how to word this but ur one of my favorite gifmakers on this site!! and i was wondering if u have any tutorial or would be willing to tell how!! do u make ur gifs so sharp! along w being so smooth and gorgeous im foremost always just stumped at how beautifully sharp ur gifs r!! not to mention the coloring!! regardless of if u get to answer any part of ur process or not, i just wanted to tell you ur gifs r very very beautiful. im always so awed and admiring wnv i see them! so warm and prettily colored yet so sharp!! apologies for gushing here, pls have a good day!!!
AHHH THIS MAKES ME SO HAPPY, ANON! It always makes me so happy, when I get any kind of compliments on my gifs, so this really really really warms my heart!! ♥
I did a gif tutorial like 1,5 years ago which you can find here! My sharpening has changed slightly from back then, so I'll just tell you what I do now.

Much more detail under the cut (this got way longer and detailed than I had expected)!
This is a walk through of my sharpening/effect process, so if you want any tricks about colouring or anything let me know!
The first important step to sharp gifs is the video quality! The higher the video quality is, the prettier and sharper your gifs will be. TS files are the highest quality (most of the time, sometimes they kind of scam you ngl) files you can get. Else 4k videos are great too! For me I usually don't go under 1080p (with few 720p exceptions). Sometimes I don't really like TS files, because they're a bit too sharp for me. This is mostly if it's a variety show. Concerts tend to be not as sharp in my experience.
I use vapoursynth to resize my gifs before putting them in photoshop. I usually don't do any sharpening or denoise in vapoursynth. This site has everything you need for vapoursynth!
For sharpening and stuff in photoshop, I usually do camera raw + topaz denoise + sharpening + 1% blur at 30% oppacity.
A bonus tip is, if you've done everything and tried soooo hard to make it non-grainy, but you just can't get it to do whatever you want it to... embrace the grain and add a noise layer! I do this with big gifs (540x540) usually.
To go more in depth, my settings for those are as following...
Camera raw
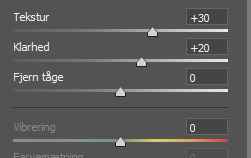
Texture (tekstur) I usually go between 20 and 30, depending on the thing I'm giffing. For Clarity (klarhed) I do the same number as texture, but minus 10. Idk why, it's just how I usually roll!
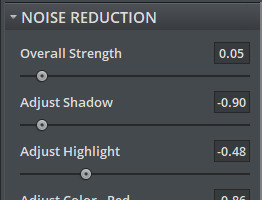
For Topaz denoise I usually only use a little bit. Like 0.04-0.06 overall strength. I don't really have any "this is what I always do" settings, but usually my shadow is at 0.90 and my highlight is 0.48 (because I liked it one time and then just kept it). You can also use the denoise option in vapoursynth, I just prefer photoshop, because it feels like I have more control over it. I know a lot of people don't use denoise at all, but I usually do with files less than 4k quality!
OBS! Using topaz denoise on smart objects in photoshop is a bit tricky, but I made a video about it once, so here you go! (the video is kind of outdated for me, so ignore the sharpening part and focus on the "how to do after you've put denoise on your gif" part. Also ignore my voice, thank you).
Sharpening:
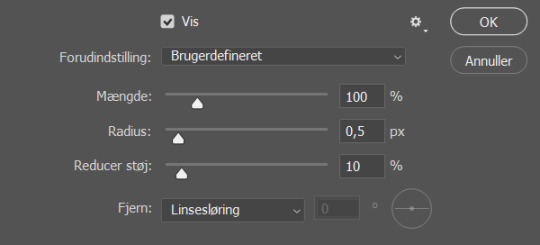
These are my settings for sharpening. If I think the gif is a bit too sharp after I've added a blur filter, I change the amount (mængde, sorry my ps is in Danish) to 80% and that usually does the trick!
If you use all of these, this is how the smart object will look, before you convert it into frames
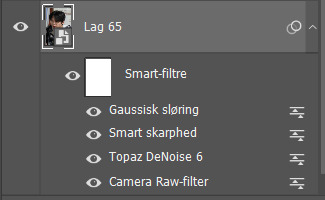
Let me know if you have any other questions or anything at all!! ♥
#ask#answered#anon#tutorial#kind of#I've kind of considered doing a “maja's tricks and tips for colouring and other stuff with gifs” post so let me know if that has any intere#i answered this as soon as i got home cause I got excited that someone was asking me for tips ♥
16 notes
·
View notes
Note
How would you recommend people practice digital art? Your work is beautiful and I'm curious what journey brought you to this point <3
Ooh this is a good one- okay so imo, the most important thing is to practice by drawing/painting things u enjoy. If you’re drawing something you love, that automatically makes it easier to want to keep doing it & improving.
As far as the technical side of it goes, I’d say experiment & try a bunch of different processes to find what works for you. There’s obviously tons of different tutorials out there from people who have wildly varying art processes and I think it’s important to try many different ways of doing digital art, because the possibilities are quite literally endless.
Personally I recommend doing studies of game screenshots or even other artists’ work that you admire, in order to help understand how people use color, value, shade, etc. (I used BotW screenshots for studies personally early on, because I really admire the game’s color scheme and it helped me get a much better grasp on how I wanted to use color in my own work, especially as it pertains to environments & landscapes.) I also personally find studies to be a lot more productive than watching tutorials, because it allows me to go at my own pace and just observe- but obviously everyone has a different learning process so what works for me may not work for everyone.
And don’t be afraid to use the resources that are unique to digital art! Things like filters, HSB adjustments, curves/levels, even just different brushes can all help you get your art looking the way you want. Personally, procreate’s “color balance” options are my best friend- I use that option a ton even still, especially when I’m planning out my color schemes.
I’d also say, more as a general art tip than something specific to digital art- if you have an idea of something you want to draw or paint, but you don’t think you know how to do it or don’t think you have the skills to draw it yet— do it anyways!! Look up all the references you can, see how other people made a similar piece, and just draw yours anyways! You’ll learn a lot more by stepping out of your comfort zone and just going for it then you will by “waiting until you’re ready”. And if you don’t end up being happy with the finished piece, you can ALWAYS redo it later— just because you’ve drawn something once doesn’t mean that you’re never allowed to revisit that concept.
Overall I’d just say, experiment, play around & have fun! Find what you enjoy and it will make creating your art a lot more fulfilling.
I hope this is helpful somewhat! 🩷
#answered asks#dae answers#art process#anyways ofc if you do studies of other ppl’s work make sure you either don’t post it or if u do- EXPLICITLY SAY that it is a study!#i’m sure the vast majority of ppl (esp artists) know this already which is why i didn’t go into it in the main body#but always give credit where credit is due if you’re doing a study or otherwise heavily referencing another person’s work in order to learn#hope everything here makes sense haha#but overall just try to have fun with your art!
14 notes
·
View notes
Note
If you don't mind, could you give us a tutorial or brief explanation on how you render hair? /nf
YES!! unfortunately i got. very tired after making this so this is only one hair type :( was gonna go into all the different types of hair textures but. i will just have to do that later. also keep in mind i drew this in like. 7 minutes its just a simple guide to get out the basic steps
^i didn't put music in this so. listen to whatever u want while ur watching this (its 6 minutes 40 seconds). also its slightly sped up this isn't real speed
elaboration of each step under read more:
step 0: look at other hair tutorials/pictures of real hair to figure out how light reflects off of them. then completely disregard that and just make things up (this is the best artistic process trust me i do it every day)
step 1: just get out that basic shape. it doesnt have to be anything fancy,
step 2: just fill it in and adjust the shape as needed
step 3: figure out how the hair moves and flows, which parts go out more (highlights), which parts are closer to the head (shadows/base), etc. i highly recommend just looking at pictures of hair online, or taking pictures of your own hair. for coily/curly hair, you just kind of have to do this for each curl/coil. one thing to keep in mind the highlight is in the middle of the curl/coil and the shadows are on the edges (usually). i'll elaborate more on that once i have an actual video for it
step 4: just make it so the edges of the highlights transition a bit more smoothly into the base color. it just helps for later steps tbh. try not to over do it, don't want to completely get rid of the highlight, just soften it
step 5: add more highlights with thinner brush. this should be where the light would bounce off the hair the MOST. i think i forgot to say in the video uhhh add in some base value too. maybe a few shadows. mostly this step is for highlights tho.
step 6: idk what else to put here sorry. ngl just get silly with it
step 7: it is very important to do one stroke per area in this one. do not lift your pen off the screen/tablet/whatever until the little area youre working on is one smooth transparent shade, then move on to the next. idk if i'm explaining this right hopefully this makes sense.
step 8: complete opposite as step seven. make as many strokes as you feel it needs. not TOO many, just enough to get some texture and then some yk? i recommend making a copy of the layer youre working on before doing this so that if you mess something up you can always go back to square one.
also a lot of these steps apply to pretty much any hair type just. in a completely different shape with completely different rules. which is to say its exactly like this but it actually isn't like this at all. which is why i plan on making other videos some day (hopefully) also look up "hair texture chart" it will help you find the words you need to look up good refs
remember: always get silly with it. the only rule to to make things up and change your mind 400 times. bring a 'fuck it, we ball' mentality to your art program that the haters (your brain) really won't like. practice makes perfect and all that, do NOT expect to get something good first try, sometimes i still struggle with drawing hair in a way that i like and just scrap the whole thing. also i'm not kidding about those real hair reference pictures it helps so so much
hope this helped at least a little bit bc i am not good at explaining things 👍
#foster's art tag#asks#someday i will make refs for how i draw long/med length and straight/curly/coily hair but. todays not that day rip#edit: just realized a bit of text pops up in the middle of step 3 that is. not supposed to be there so i editted it out👍
21 notes
·
View notes
Note
Hi wedges! I had a question about your art. How do you do the cool patterns on clothes or the logos? They're always PERFECT! Do you draw them all yourself? Or somehow manipulate images on top of the clothes in such a detailed way? Sorry I am just fascinated after seeing Rowena's floral pantsuit and Claire's t shirt in the group shot you recently posted!
Hello anon and thank you for the ask!! :D
I use patterns in these sets!! Tho what I do to them depends on the clothing.
Since rowena's jumpsuit is one large piece I just set the pattern on flat (kind of like using washi tape in traditional drawing) this is what she actually looks like without any shading:

And with a multiply layer I simply paint in some shadows to brings out a little more form.
On the other hand claire is wearing a logo I took from an actual t-shirt pic. Those can be a lot harder to work with since those pics come with their own wrinkles and lighting. Its also smaller so painting over it like rowenas suit isn't gonna look as right. So first what I do is erease everything but the logo and slap it ontop of a of her shirt that's already filled with a solid color Then i use the warp tool on the logo to make it look like it's going over her breasts. (If u zoom in u can totally see all the mistakes lol but I'm not really looking to make it seemless. I just think it looks cool in contrast to my lineart :3)


#asks#anonymous#hope this hepled!!!#im in bed and answering using whateber my pics my phone has lol#if u want a step by step process i can always make tutorial but these are pretty simple idk if anyone would want one :o
26 notes
·
View notes
Text

Basidia Post #4
Vintage CGI:
Modus Interactive and I have been spending the last week or so learning how to use Alias Power Animator 9 which is essentially an old version of maya. It was used on sgi workstations back in the day on games like ff7 and mario64 for all the pre-rendered stuff. For a long time Modus and I have been pretty invested in learning how to replicate the look of old pre-rendered stuff, and, as it turns out, the best way was just to do it how they did it. For so long I tried to wrap my head around how old cgi stuff was modeled because the sorts of shapes that were often created seemed like they'd be unnecessarily hard to create with polygons. The thing that specifically stumped me for a while was how they handled wrinkles in clothing and organic shapes. As it turns out, the answer was hidden right under my nose the whole time. They weren't using polygons at all! Instead they were modeling with NURBS! It seems very obvious in hindsight, but I feel like I deleted the memory of NURBS once I exited highschool, and nobody ever seems to talk about or use them these days. If you don't know what they are, it's basically a style of modeling that involves making a bunch of bezier curves and using them to define surfaces. It's a totally different style of modeling from polygons with a lot of pros and cons, but it achieves that smooth look we're after extremely well.
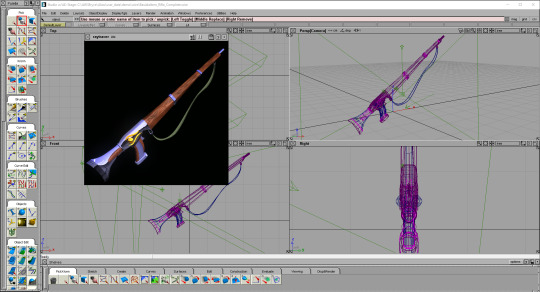
Scout Rifle Render:
As shown in the pics above, I decided to make a model of the scout rifle in Basidia so that we could use it for an item icon. The process was definitely a learning experience, and one of the things I learned is that modeling like this is super fun. It's like creating each shape is a puzzle where you need to theorize what is the best approach to take, and following through is always a multi-step process of defining a surface and slicing it up. I find it super satisfying to pull off, and making slapping materials on it is always fun as well. Moving forward we are probably gonna use this program and/or older versions of maya to create any pre-rendered item icons or backgrounds that we'll be needing. Modus actually made new versions of the vials in it as well which I will put right here \/
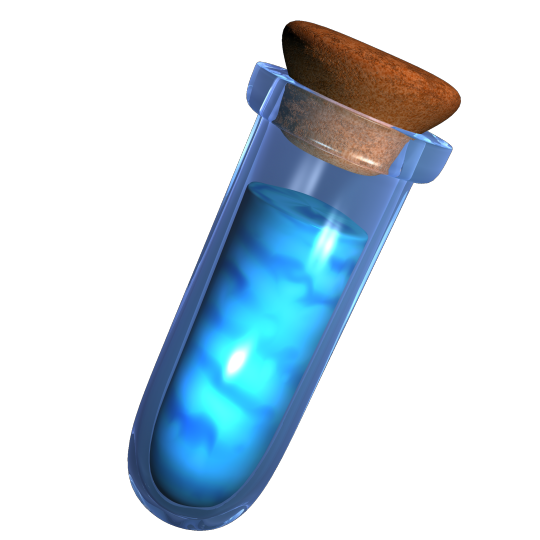
Wow there it is would u look at that. Power Animator just has an amazing way of outputting some unique, rich colors that are hard to get in modern software. I mean, just look at that cork. How do you make a cork have such interesting colors? Amazing. Fuck it, I'm gonna show off a little guy I made in power animator that has nothing to do with Basidia. I've been hyperfixating on this program since I downloaded it so I owe this to myself.
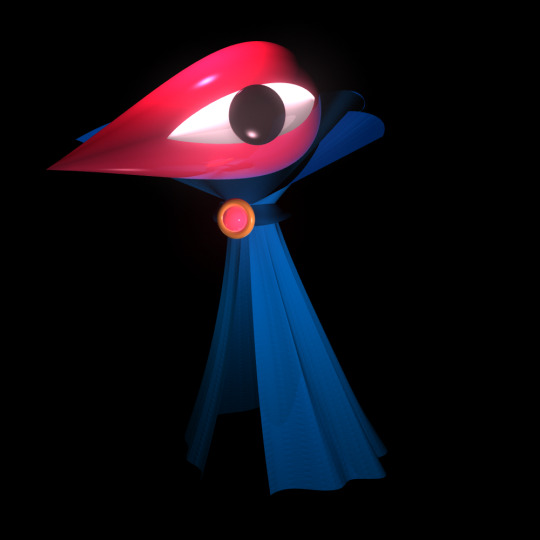
Here he is! Power animator has this amazing glow effect you can put on any shader that adds this bloom as a post processing layer. I used it on the head in this one, and I think it achieves a particular dreamlike effect really well. The sorts of shapes I can get for cloth out of NURBS is also super fun and rewarding, as shown with the cape here. Character modeling is something I'm always really excited about, and I'll definitely be modeling some Basidia characters in this thing.
Conclusion:
I am loving this program and I cannot stop thinking about it. Anyway, I have some commissions to take care of before switching back to midwest lost development, so I may or may not be posting about that game next week. I'm trying to buy an old sgi workstation with the commission money, and, if I can pull that off, then I will have access to all the old software they used back then (including the IRIX version of poweranimator). If you want to check out power animator yourself then here is a link to the program, and here is a helpful tutorial. Oke bye take care!
#lowpoly#power animator#maya#vintage cgi#old cgi#raytracing#indie game#indie games#game development#gamedev#indiedev#indiegames#indiegamedev#indiegame#the winds of basidia#basidia#winds of basidia#snow of basidia#the snow of basidia#3d art#screenshotsaturday#nintendo 64#n64#haunted ps1#rpg#pre rendered#prerendered
416 notes
·
View notes
Note
hi drea! how do you isolate colors in your gifs like your sidebar gif? it always looks good and i would love to learn how to do it. thank you so so much!
hey love! thank u so much 😇 i do have a coloring tutorial here and that’s my general process! i would recommending choosing a scene something that already has a main color that u can accentuate or change. the freaky deaky scene i giffed was mainly pink but i wanted it to be purple, so i had to manipulate it with the reds. that included a lot of hues/saturation, selective color and color channel mixer layers! i don’t have a routine i do every time since every gif is different, so i really just play with those layers and adjust accordingly.
here it is after general coloring:

after toying with selective color, hues/saturation and channel mixer layers:

as u can see, the pink is much layer which is the first step to getting towards a lavender shade. but doja’s skin is very pale! i’m going to change the pinks to a purple first before fixing her skin tone. so here it is after another hues/saturation layer:

ok, now there’s some pink and redness going on in her face 🙄 don’t worry, we’ll fix that along with the paleness. to add some more color into her skin, i played with the reds and yellows of another selective coloring layer. now i have this:

that looks pretty good! now i just want to make it more purple bc i can still see some pink undertones, so i added another hues/saturation, channel mixer and selective color layer. here’s my final result:

tldr so it’s really just a lot of layers you have to mess around with. for making colors or a certain color vibrant like this, i suggest relying on the holy trinity: hues/saturation, channel mixer and selective color. good luck<3
40 notes
·
View notes