#if I left anything unclear or ya want extra info then I am happy to help :))
Explore tagged Tumblr posts
Note
would u ever consider making a tutorial on how you make those cute litol crochet grunts? : o
Oh, hell yea, I figured out a very specific technique on making them!
The tutorial is under the cut!
(It's long and as thorough as I could make it.)
Materials you'll need:
Yarn (color of your choice, but more than one ball preferably JIC) (Try to use the most regular yarn you find at craft stores, that doesn't make you itch. Anything thicker or thinner usually makes the process a bit more complicated. Not impossible, it's just a bit of extra work)
Stuffing
Crochet needle (depending on the thiccness of your yarn)
Sewing needle (With a beeg hole so you can stick yarn through there comfortably) (Mine also has a dull end, which I honestly recommend as it keeps away from injury, yet still works like a charm.)
For added details you may use pipe cleaners, buttons or whatever else you see fit. Your plushie after all.
Keep in mind that I am not a professional. I don't even know what the different loops are actually officially called, especially not in English.
Here's a lil image of what I will call the different loops in this tutorial, though:
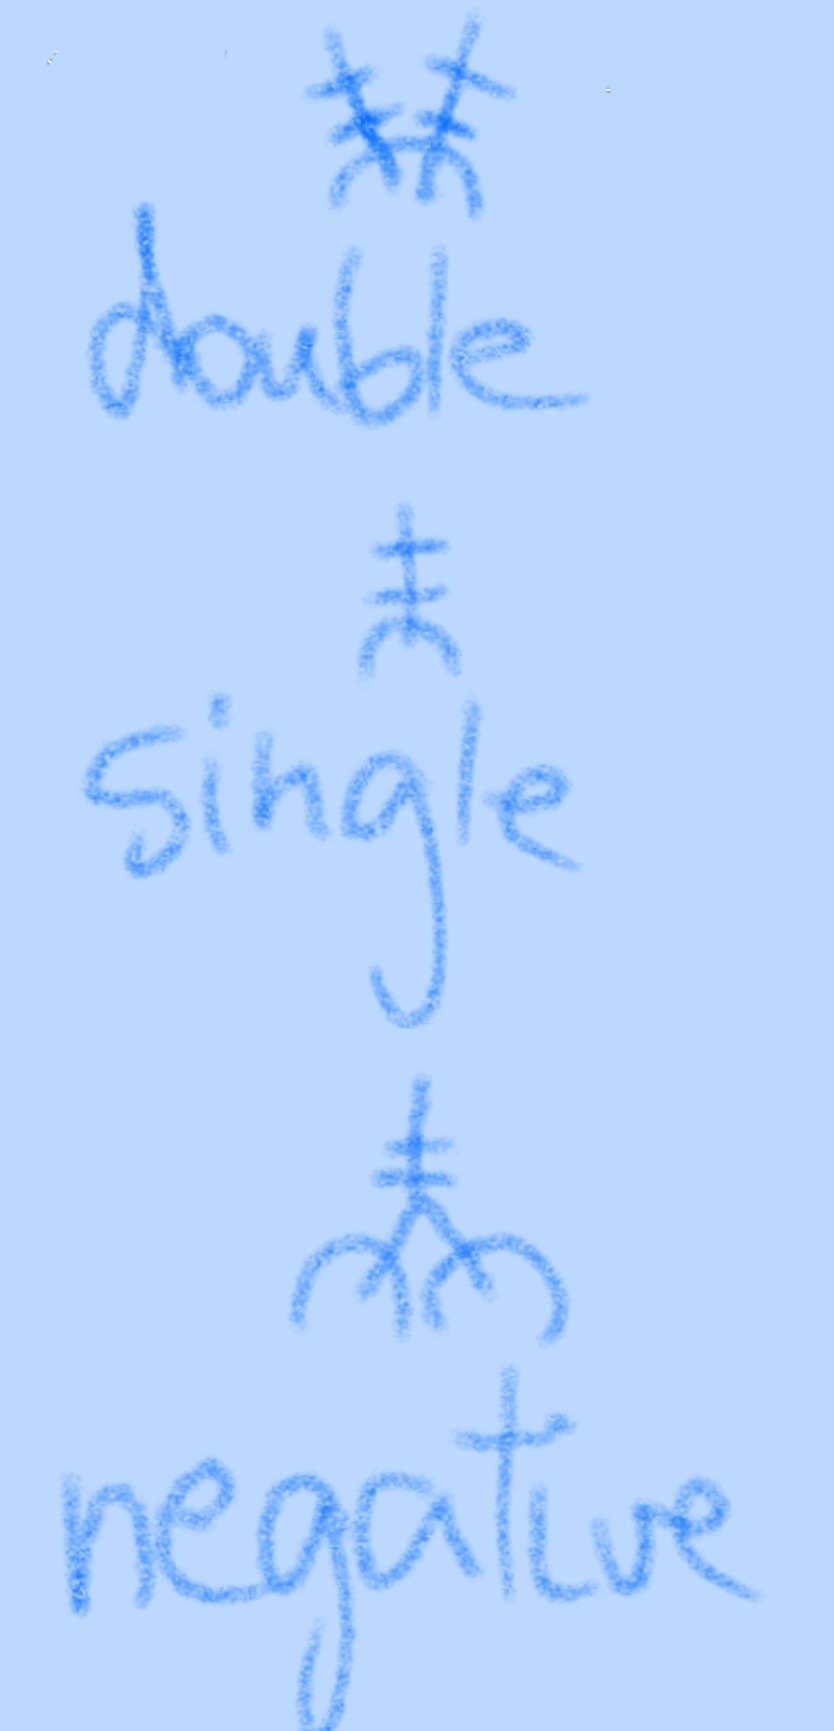
Also here's how to do a long (the green is yarn, that isn't already part of any loops):

A regular/single is this but skipping over steps 1 and 2.
A double is two singles in one premade loop.
A negative is two premade loops pulled together with one single.
Also, important side note, leave there a little ending of yarn every time you start or finish a section! It stops your entire plushie from falling apart and in certain parts can be later used to sow parts of it together, if left long enough! And don't worry about the little useless seeming danglies, you can just pull them into the plushie and noone'll know they're even there, yet your plushie stays perfectly in shape :))
Also, don't follow along before reading all of it first! I add crucial details after I first mention doing something! Read the whole thing first and then, if you want to, do according to the proper instructions!
Now, knowing the terms and conditions, on with the tutorial:

So, first things first, the Ball-Head.
It depends on how big ya wanna make the grunt, but for the ones I've already made...
You make the first loop and then you go back into it and create eight (8) regulars, forming a nice compact circle.
The next row continues from the first single of these eight loops. This row will be a double over single aka double, single, double, single, and so on.
Repeat this process about three or four times until your thing (head-ball) starts to curve a bit.
Now, you shall do three rows of regulars. (The middle row is allowed to be with longs, if you think that'll shape the head properly to what you need :>)
After these rows, you start doing rows of negative over regular aka same as double over regular, but with the opposite goal- decreasing the amount of loops rather than multiplying them.
Repeat this process until you have a hole that you can fit three or so fingers in. Stuff the head through the hole to your liking and squeeze the head to see how soft it is. (I usually make them soft enough to kinda squish but firm enough not to lose their form.)
After stuffing, finish the head by continuing the rows you were already doing.
You can do the cross now, if you so desire, but frankly I'm gonna show how to do it later, cause it's usually the last thing I do. Holding onto the body and then sewing the head is frankly easier than holding that ball and having your fingers dangerously close to the needle.
Onto the next body part!

The Torso!
When I originally wanted to make the grunt, I had a whole other plan of attack planned, but I accidentally came across a way easier method, so...
First thing you're gonna wanna do is a chain. How long this chain'll be is up to you, cause this is how long the body'll be + you gotta make two rows extra (will explain why in a bit).
After the chain is done, do not connect it with anything! Start doing back and forth rows of singles instead! Do as many as you think you'll grunt will be thick!
(Touch the last and first row you've done together every so often to see how thicc the lad is so far. You gotta account for stuffing a bit, but only in the mid-section really. The first and last row will be the most resistant to stretching.)
Once you think you're done, leave a long ending of wool past your last loop before cutting. You shall be using this to sew the body together.
Now you just stitch from the top to the bottom, leaving two round holes in said top and bottom, but don't cut the thread yet!
Now, sew the hole that you reached while stitching shut. Closer and more intricate stitches are recommended.
Once that's done, end + hide that end of the thread and start stuffing the body. (Add however much stuffing you want, as long as you think the plushie will look right afterwards.)
Now, grab your sewing needle and a cut thread of yarn, cause you're stitching this bad boy to the head now!
How'll you know you sewed it in the right place to make the plushie look right? Trial and error, I'm sorry to say. I make all of my plushies ever so slightly tilted cause I have barely any sense of centralization!
(Main tip I can give is that you can check the rows on the head to make sure you're centring it properly, as I know nothing else that can accurately tell you that.)
Now onto the next two body parts!

The Feeties!
Despite me drawing only one of them, you will probably be making two, so beware.
Ball-technique as used for head? NO, WRONG! We'll be using the same technique as we did for the body instead!
Start with a chain. Now, keep in mind, this'll be the length of the foot. Not width, lenght. All the way around.
The width will be how many rows you make this time + extra rows for both sides.
Leave yarn to sew with once you're done, but remember- This time you'll sew all the holes shut, so make sure you stuff the foot in between your sewing.
Once that's done, where exactly will you attach the legs?
Well, that entirely depends:
Do you want your grunt to sit?

Attach the legs to the corners that your sewing left.
(Make sure you don't leave them too dangly though. That could make them come off easier.)
Do you want them to stand?
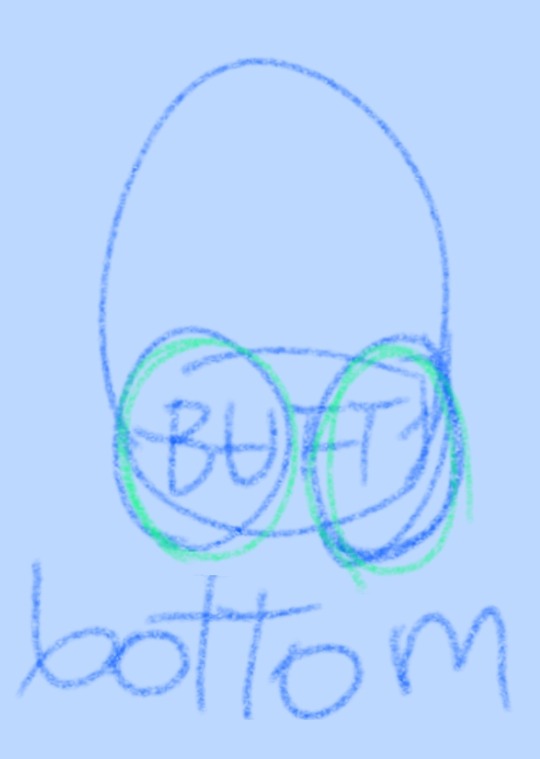
Attach the legs to where you made your seam, a little bit a part from one another.
(You might wanna make sure you left the legs either flatter or just bigger, cause otherwise your grunt'll always need a backrest or some other type of support to stand up.)
Now, finally the last detail I'll be talking about...
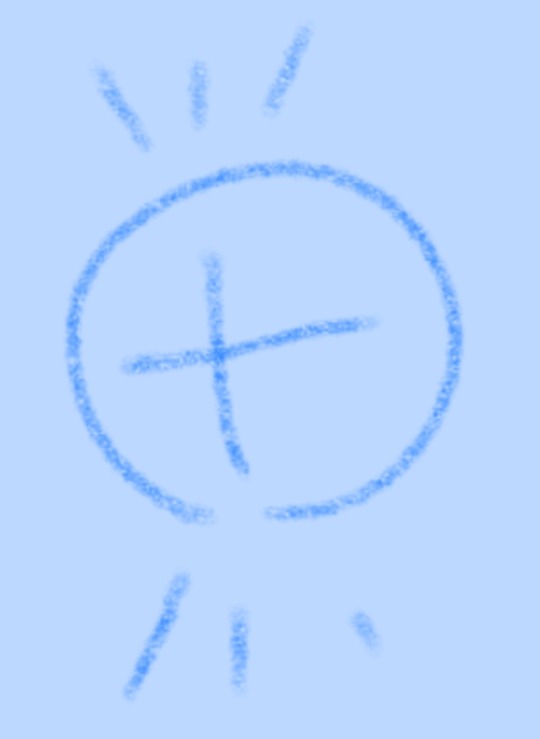
The Cross!
This'll just be made by stitching, so get your needle ready again.
First, finding where the centre of the face'll be.
I mean... I already told you I suck at centring shit. If your feeties are in place, then they'll be your safest bet to tell where the face should be, probably. (If, for some reason, you don't have your feet in place, cause you wanted to place the feet according to the cross instead, then you're fresh outta luck from me, friend.)
I usually start from the bottom, as I can leave a little space from the body, and have the grunt's face be in proper place that way.
Now, sew in the way shown in this image:

(The dotted line shows the yarn that's inside the plush/not visible. It's not supposed to connect yet, hold on.)
Now, once you reach where you think the top of the cross is, come back down, but the opposite way, making a little ××××× formation.
Once your back in the bottom, you can grab your crochet needle again and pull that thread through all those exes!
Like this:

If it doesn't look proper, then do a loop around the last X and go back down. That oughta leave you with a proper line right across this grunt's face.
The crossing line do the same way, just on the opposite axis.
Now just hide the thread, and voila! By all means, the base of your grunt is now done!
Hope this was helpful or at least just interesting to read through :))
Edit: Also, forgot to mention that if you want to speed up the body-making process, then you can use longs :))
#madness combat#madness combat grunt#crochet#tutorial#info#if I left anything unclear or ya want extra info then I am happy to help :))
32 notes
·
View notes