#icon rp tutorial
Explore tagged Tumblr posts
Visit Tumblr Blog
Explore Tumblr blogs with no restrictions, modern design and the best experience.
Last Seen Tumblr Blogs


Fun Fact
The most popular pages on Tumblr are about Minecraft, GIFs, and David J. Peterson.
Text
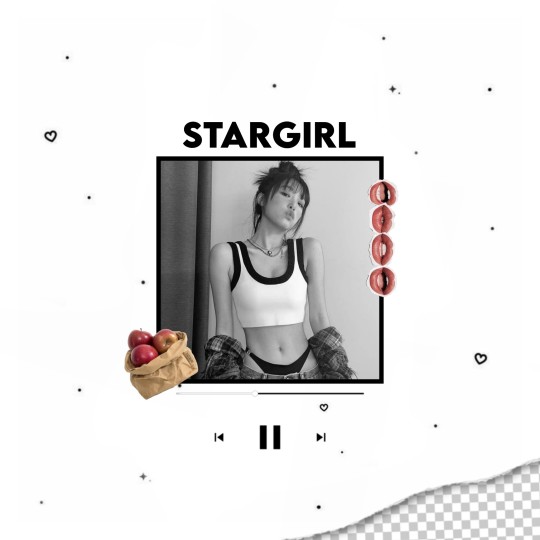
*✶ please please please
a template by cozysip.
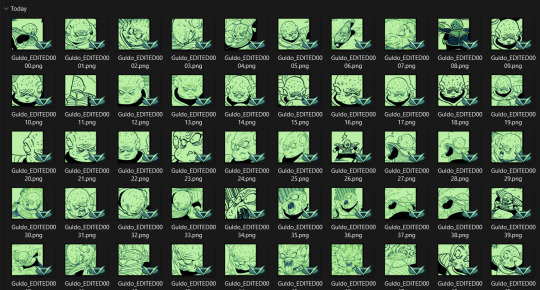
by clicking in the source link you’ll find 02 different dash icon templates made by me from scratch. credit is not needed , but do not claim as your own ! if you enjoy this or you use it, please reblog or like this post . thank you !
#01. PSD TEMPLATES : mine.#template#free template#rp template#psd template#free psd#dash icon#dash icons#dash icons template#icon template#icon psd#psd#rpc#rph#graphic tutorial#free graphics
244 notes
·
View notes
Text
Quick-N'-Easy Icon Editing Set-up with Krita!
I'm sure there are already a few tutorials like this one out there, but hey, what can one more hurt?
What's this do?: Krita has features you can use so you can make quick edits to your icons all at once, and save them all out individually with the press of a button. It's a great time-saver, and gives you a lot of flexibility in your edits!
What you'll need:
Krita, a free and open-source painting / image editing program!
Icons!
Part 1: How to export your icons all at once.
( warning: long and image-heavy! Written with beginners in mind. )
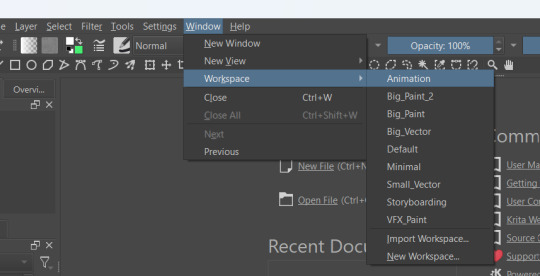
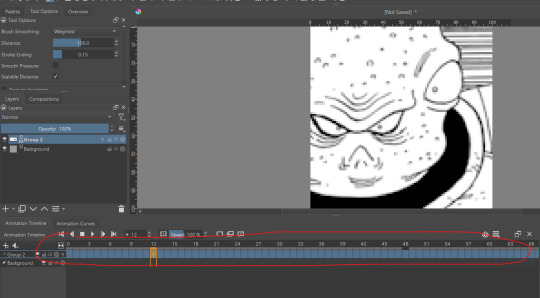
Once you open Krita, you'll want to go to Window > Workspace > Animation on the uppermost bar to change the layout for what we'll need, here.
We're going to be using Krita's animation features to make iconing / icon-editing a little easier.

( as an extra note, hitting '1' on your keyboard will set Krita's zoom to the image's actual size, while '2' will have it fill the available space. Helpful for seeing how your icons will appear on the dash. )
Okay, let's get started! Make a new image ( File > New or press Ctrl + N ), set it to whatever dimensions you want ( I default to 100x100px ). Make a new layer ( Click the plus icon in the layers tab, or press ins ), and then put that layer in a group ( Right-click the layer and click group > quick group, or press Ctrl+G while its selected. )
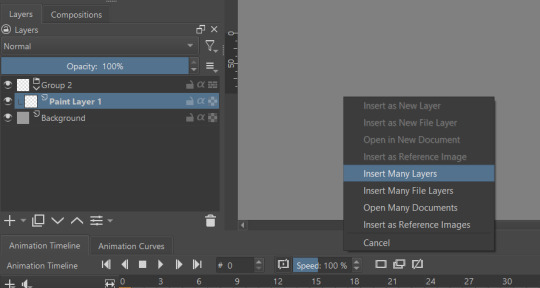
With that grouped layer selected, Grab your icons, and click & drag them into Krita, onto the canvas ( the big empty grey space in the center ). When Krita prompts you, select 'insert many layers.' This will load in each image as its own layer. If you don't have the grouped layer selected, you'll have to select them all and put them back in the group. ( No big deal, just shift + click the first and last layers, and drag them where you need them. )
You can now delete your initial paint layer in the group, if you want. Otherwise it will make an 'empty' icon when we export.
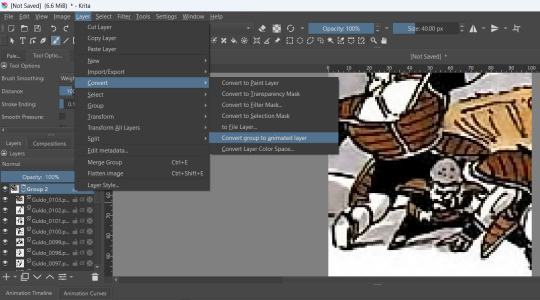
Select that group, then go to Layer > Convert > Convert Group to Animated Layer on the top bar. ( This is only accessible through the top bar, not the menu that appears when you right-click on a group. I don't know why. )
Congrats! Now all your icons are frames in an animation. Each cell on the timeline is a single icon. If you have a scroll wheel, you can scroll to quickly look through them all.
If you can't see all of your icons on the timeline, click the three bars here and set 'clip end' to whatever number of icons you have ( or a little more, for extra wiggle room. )
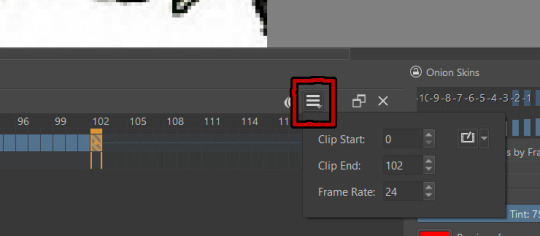
Find the last filled cell, right-click it and select 'set end time.'
When you're ready, hit File > Render animation.
You'll want to make sure you set it to export as an image sequence, and select where you want your icons to go on your computer. Give them a naming scheme. Make sure you save before you export your icons, as I've had Krita crash while exporting a large number of icons all at once. ( If it does this to you, just try again. Worst comes to worst, you can export by setting the first frames and last frames to smaller chunks instead of all at once. )
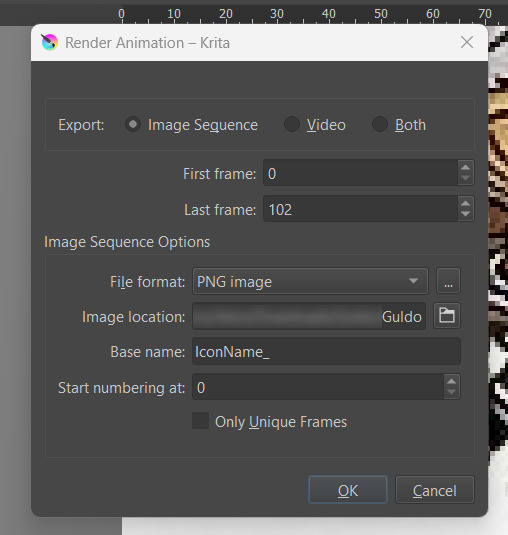
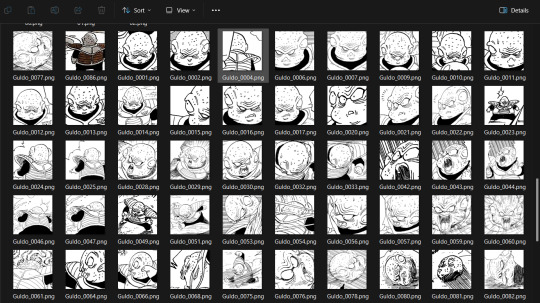
Hit OK and voila! No more saving icons out one-by-one!
Of course, we haven't done any editing yet, so this is all redundant unless you're saving out your own freshly-cropped icons. Let's move onto the fun part:
Part 2: Editing
Right-click your new group layer and hit add > filter mask. Choose any you want- for demonstration purposes, I'll be using my favorite: gradient map.
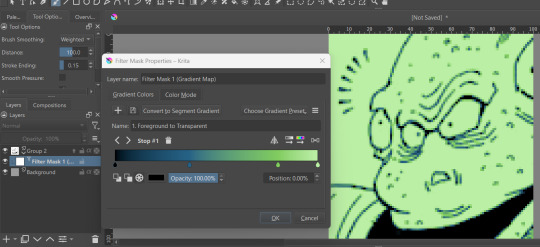
This will put that filter over all frames in that animation layer, meaning you won't have to repeat your edits per icon.
If you want to edit your filter mask after you click off, just right-click it in the layer tab and select 'properties.' It will bring the initial prompt up again for you to adjust.
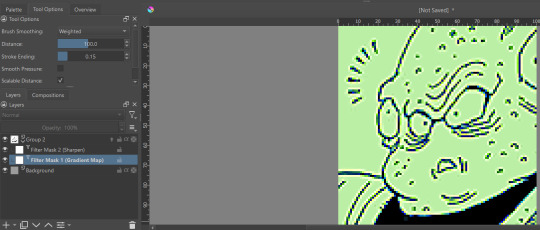
You can add as many filter masks as you want! The order the layers are in does matter, though, so keep that in mind.
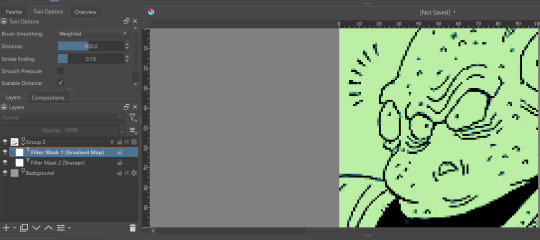
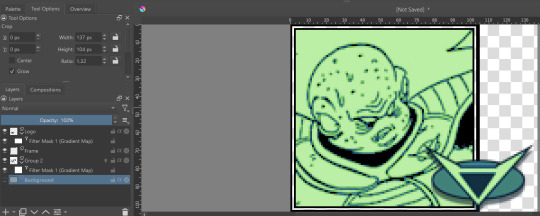
If you want to add frames, banners, name tags, symbols etc, you can do that on layers over or under that animation layer! They'll stay consistent across the 'animation' unless you add new frames to them on the timeline.
If you want to edit your icons again, just do so, and re-export! If the naming scheme and numbers are the same, Krita will automatically overwrite the old files. But watch out; if you're trying to save new icons, make sure you start numbering at a higher number than your last icon, or change the base name.
Happy iconing!
#rp icons#rp icon tutorial#rp resource#rp tutorial#icon editing#icon edits#not icons#no clue what to tag this as...
41 notes
·
View notes
Text

how to colour icon panels !! 🍒✨

want to give your icons a bit of spice under the psd ?? give it a little POP of colour ?? don't worry babes, i gotchu !! it's much easier than you may think && in this tutorial i'll give you all the lil tricks i use on a daily basis. ( remember if you found this helpful, reblogging && likeing is highly encouraged but not required )
this tutorial will cover 2 ways of colouring panels, plain white panels (without starting colour) && pre-coloured panels such as webcomics.
firstly you'll need : photoshop (PS for short) , manga panels source of your choosing ( i use this source here ), and a reference for colours to make things easier on yourself. it's recommended to use a drawing pad of somekind but this can also be done with a mouse && keyboard.
i'll be using panels from Therapy Game by Hinohara Meguru as an example. collect your panels by saving them to your pc, and also a reference image. this can be the title page / cover or a reference image of your muse. ( this is to be able to colour pick easily but if you can raw-dog colours you can skip this step Picasso. )
upload you ref && your panel side by side like this :

on the side with the panel, you'll add a NEW LAYER overtop and set that layer to MULTIPLY located at the bottom right corner. this is the layer you'll colour on.

the colouring doesn't have to be neat-- and you don't need to colour the whole thing. you're going to crop them for icons later anyway. i'll also warn you now, it's going to look FLAT. that is okay !! because you'll be adding your own psd to it later anyway.

see ?? super flat, but we add a little psd and suddenly the graphic looks much more unified !! it'll hide alot of your shading mistakes so don't fret !!

now this part comes from a personal recommendation from yours truly -- save the whole panel WITHOUT a PSD !! put it in a folder somewhere on your pc / external drive, ect. the reason for this is because having a stash of coloured panels at your disposal allows you to just pull up PS and make and icon lickity-split on the spot without the need to batch edit or spend your time making a million icons when you could be focused on the fun part-- WRITING !!

icon credit.
now that you know how to do the basics-- what about pre-coloured panels ?? DON'T WORRY !! i said i gotchu babes ! i'll use the same example and we'll just pretend its pre-coloured.
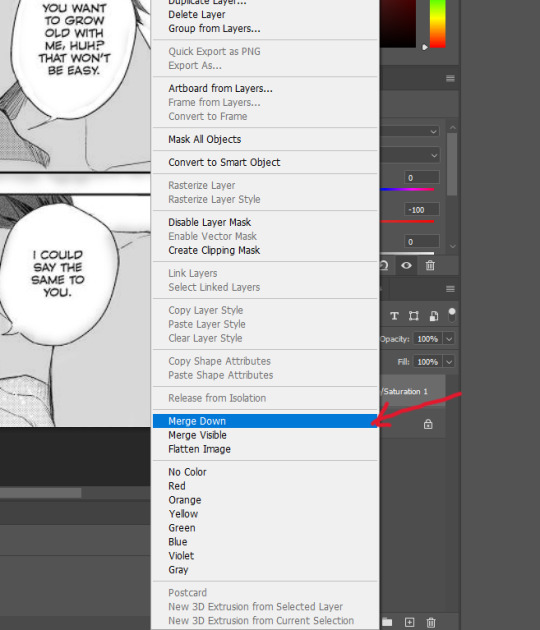
the steps are basically the same except we will be adding 1 more to the beginning. first upload your reference and panel like before. then on the panel side, BEFORE YOU ADD A NEW LAYER, go to the top add click ADJUSTMENTS.

click on hue/ saturation && bring the middle slider ( the saturation ) all the way down. this makes your panel black & white.
left click on the new layer labeled hue/ saturation and click merge down. NOW you can continue the rest of the tutorial as if it were a plain panel !!
thats it's that the WHOLE tutorial !! 🍒 way to go superstar !! 🍒 now you can experiment with brushes and giving your icons / graphics your own personal touch. i use this method myself && it works like a dream. if you enjoyed this tutorial or found it helpful, consider reblogging. it helps me out alot !
#【 ⎯⎯⎯ 🍒 ; 】 tutorials.#【 ⎯⎯⎯ 🍒 ; 】 beta editor tips.#【 ⎯⎯⎯ 🍒 ; 】 icons tips.#rp resources#long post#icon resource
14 notes
·
View notes
Text
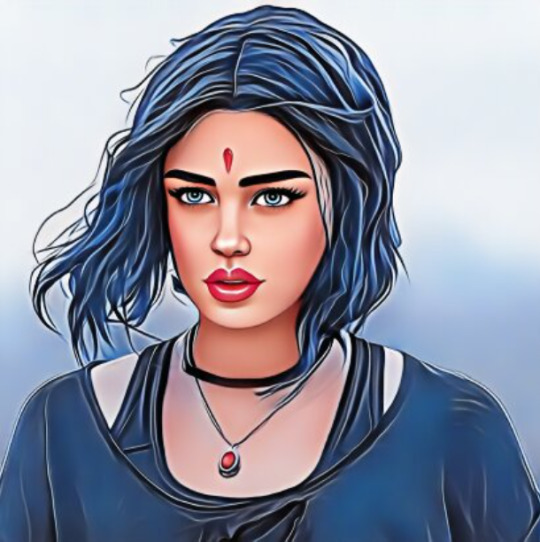
Comic Version of Maggie


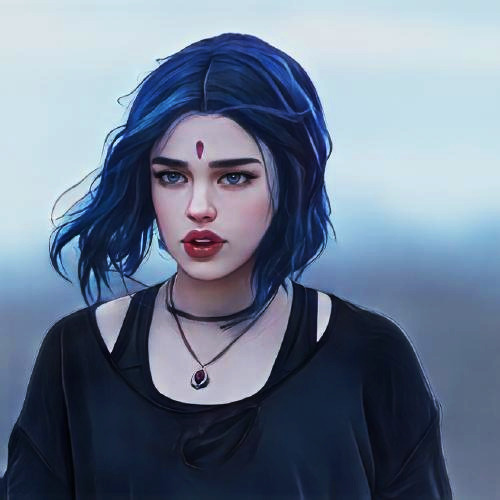
Original:

Used this sites: (x) (x) for the first two pictures. They're free to use and you don't have to sign up. At least I didn't had to and I made a few pics there And also this site (x) for the third one. This is also really good and you can use it for free too (kind of). Only thing is you have to sign up if you want to download the picture and with the free account you can only download one pic per day (Or you just make a screenshot works too and you don't have to sign up...). Beside that some things are only accessible with premium for which you have to pay. Also depending on what filter you use you maybe have to edit it a little. Edit: I made a little mistake on this site (x) you also need to sign up to download the picture. It's been a while since I used them so I remembered it wrong. I also checked the other site (x) and this one works with out signing up.
#ooc:mun#maggie's comic verse#maggie mccoy#maggie moon#phantasma#tried to use photoshop to turn real pictures into comic pictures but totally failed and it took way too long#tbh it's not worth the stress just for rp icons if i can use these pages instead#photoshop is just too much of a struggle and it's getting really annoying and frustrating to use#especially when you follow every step of the tutorial and nothing works#don't have the patience and time for this#if anyone knows other sites or apps etc. or other ways to make real pictures into comic version i'll be happy to hear it#if possible something that's free to use or not that expensive
1 note
·
View note
Text
tag setup.
#base icons#screencaps#paid resources#psd#carrd template#discord resources#discord tutorial#coloring psd#rp icon template#template#photopea#promo template#photoshop template#graphic template#social media template#social media graphic#google docs template
1 note
·
View note
Text
…make reply icons?
reply icons (or as i call em, replycons) are a weird kind of edit. they’re in the same genre as rentry or carrd graphics—i.e., that you can do whatever you want with no real rules. that said, these are some guidelines i follow
i. make your canvas much wider than it is tall
there’s no exact measurement for this. my reply icons for this blog are 600x150, but they’re fairly uniquely small. the general consensus at least amongst my peers is about a 4:1 or 3:1 ratio will work best.
the reason why your replycons should be wider than longer is because it keeps them from taking up a lot of space. here’s mine as an example:

enough space to be visible, but not so much as to be obnoxious. that should generally be your goal.
ii. collect a wide variety of expressions
this’ll be limited depending on your characters, but it’s best to have a good variety of expressions. i also save my files with whatever the expression is to me for easier searching but you don’t have to do that LOL
also, i feel obligated to mention it, but you don’t have to stick with just one character. you can use a whole group, either an in-game group (i.e. leo/need) or a visual group (i.e. blonde characters.) they don’t even really need to match, though it’ll look better if they do. with this blog and my old ones, i used a variety of characters with the same color palette so i could get the expressions i wanted.
iii. just make the damn thing
ah, the worst part of all editing—actually editing. god fucking damn it. now that you’ve got your canvas and your character(s) it’s time to grit your teeth and make some replycons
first thing i usually do is narrow down a theme. this can be as simple as a color or as complex as something like “cybercore” or whatever -core scratches your brain. for these replycons, my theme is just attempting to match the rest of my blog layout. god fucking speed.
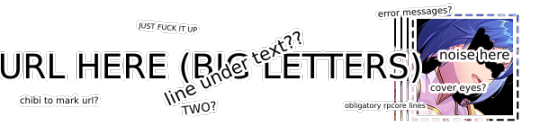
it can sometimes help to make a thumbnail like this ^ but that’s 100% optional. i like to do it for tutorial purposes and it helps me to get my thoughts from my brain and into photopea. your thumbnail need not make sense nor be cohesive. it’s just for you to know
a good way to start is to make a shape and make it interesting—i usually make a shape and give it a border and some fun lines, rp style, but you don’t have to do that. all of those things can be done with just the shape tool. you can also find existing icon masks on tumblr or resource rentries (make sure you credit properly!!) and you can find some templates, like mine!
once you’ve got a theme and a base, start adding shit.

^ pretty easy base. i pixelated the lines around her eyes and added eyes, and added a stroke and drop shadow to the shape to make it easier to see! if you’d like, you can stop there. but i think it needs a background and some details so i’m going to keep going
background complete! for this i just used a color fill and went rasterize > filter > noise > add noise but you can add whatever you like—patterns, wallpapers, solid colors, etc. it’s up to you! i also added a small stroke around my character png so as to distinguish her from the background a little further :)
this one is a little blank on the left side so i’m gonna add some text and details!!

there we are. i added the cd png to break up the monotony of my base, added text because it’s my personal preference, and added a chibi so the text is distinguished! if you do add text, make sure it’ll be readable in any modes—light and dark. i typically add both a black and white stroke for this, and a drop shadow can help a lot, too!
an important thing to note here is any extraneous images of the character you add can’t be too distracting to the main image. if i had, for example, done this:
the new png is obviously too distracting, right? it takes up too much space and completely draws the eye away. this is even more true when the base and the png have conflicting expressions, like so:
because now i can’t tell what emotion you’re conveying—is the replycon happy or sad? what part do i focus on??
so it’s best to keep any extraneous decals pretty simple, for the sake of clarity. it’s also best to remember that english-speakers read from left to right, and native speakers are conditioned to interpret most things that way. you’ll want to draw the eye in that direction as you work, and not the other way around. hope that makes sense lmfao
iv. save as a psd
once you’ve got all your layers and details situated, make sure that you save your replycon as a psd. this is imperative, because it enables you to make new reply icons as the occasion arises, or you can recycle the basic components for a new theme!
if you’re unsure on how to save as a psd, click file in the upper left-hand corner and then ‘save as a psd.’ i recommend labeling it so you can file it more easily; i’m naming this file cobaltpegasi replycons, which is an easy template—just stick your url in instead.
once you’ve done that, keep adding expressions until you have a suitable amount of replycons! i usually made about five to ten to start with and then add new expressions as i see fit, but you can do whatever works best for you.
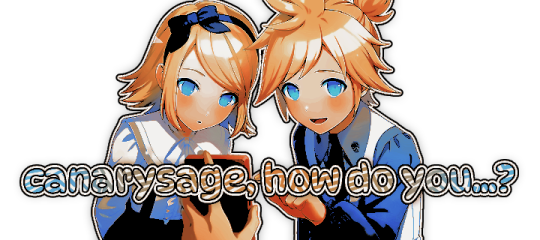
also, when saving your replycons, it helps to sort them by what emotion you think they convey. for example, my canarysage replycons are sorted by character and then by emotion—so this one is labeled “len smug” because that’s how it seems to me

you don’t have to do that, but i find it helps a lot when trying to find specific ones, especially if you have a lot.
v. go forth and use them
now that you’ve got your replycons done, you can use them! go forth and clear out those week old requests in your inbox (🤨) or whatever it is you want to do with them. that is all. canarysage signing off <3
…so that’s how you do it.
48 notes
·
View notes
Text

— COMO JOGAR NO TUMBLR?
Parte I: o tumblr. Criando seu blog, customizando e como usar a plataforma para jogar rpg.

Aviso: eu escrevo muito. Esse tutorial vai ser gigantesco.
Ultimamente tenho visto algumas pessoas comentarem que só não jogam no tumblr por não saberem como. Acham que é complicado demais, assustador demais. Existem diversos guias de como jogar por aqui, mas a plataforma evoluiu com o tempo, por isso vim trazer um guia atualizado pra quem tem interesse em explorar os rps do tumblr.
Nesta primeira parte vamos falar sobre a plataforma e tudo o que você precisa saber para começar a usar.
Primeiro, algumas questões comuns:
Preciso entender de html?
Não. Hoje existe o modo de leitura, o que faz com que os blogs sejam vistos apenas pela dashboard e você não precisa ter um theme customizado. E mesmo que você prefira ter um theme, existem blogs como o theme-hunter com themes que você consegue customizar sem entrar no html. Posso fazer um guia sobre isso, se vocês quiserem.
Posso jogar pelo celular?
Uma das desvantagens do jogo pelo tumblr é que, pra muita coisa, é necessário usar o computador. Isso porque nós precisamos cortar os posts conforme jogamos, e por conta das atualizações da plataforma, só é possível fazer isso com extensões de navegador (mais sobre isso neste mesmo post). Você pode pedir para o seu partner cortar os posts na vez dele, por exemplo, o que te permite jogar apenas pelo celular. Além disso, muitos players utilizam gifs nos turnos, o que também (até onde sei) só é possível pelo computador, já que demanda o uso de gif hunts (mais sobre isso em outro post). Claro, o uso de gifs não é obrigatório.
Preciso usar templates, customizar meu blog de uma forma específica, etc.?
Não. Como disse ali em cima, você pode só criar um blog em modo leitura. Não precisa baixar nenhum template, se não quiser, e nem usar nada muito elaborado. O objetivo é jogar, então o foco não é a estética do seu blog. Não há necessidade de aprender a usar photoshop e nem nada disso, ninguém cobra que você tenha psds diferentes, um fixado diferente, coisas assim. Muita gente usa essa questão como impedimento mas muitos users do bsky/twitter usam templates, por exemplo. Não há diferença nenhuma. Assim como não é obrigatório lá, por aqui também não é. O seu blog você personaliza como quiser e puder.
Agora, para o tutorial.
Se você está aqui, provavelmente já tem um blog. Sabe o básico de como criar um tumblr e suas funcionalidades como criar posts, reblogar, curtir, etc. Agora, então, vamos focar nas funcionalidades do tumblr que usamos especificamente para jogar rpg.
Primeiro, a customização.
Neste tutorial vamos focar na criação de um tumblr em modo leitura, sem a utilização de um theme customizado e sem criação de páginas. Assim que você cria seu blog, pode ir até a página de configuração e vai ver algo assim:

Aqui você altera sua header, seu icon, título do blog, descrição e cor de realce. E descendo um pouquinho mais você encontra esta opção:

Para manter seu blog em modo de leitura, você mantém ela desativada. Caso queira adicionar um theme customizado, ative ela e uma nova opção de customização vai aparecer. Como não é o nosso foco, vamos prosseguir.
Não existe um padrão de como customizar o tumblr de um personagem. O básico é: se o seu blog for para um personagem só, use a foto do FC dele. Se o seu blog for multimuse (ou seja, para mais de um personagem), pode utilizar algum outro icon que desejar. A header é um complemento, você pode optar por desativar o uso dela, ou utilizar uma imagem que transmita algo sobre o seu personagem. O título e descrição também ficam a critério do player. Você pode optar por colocar informações básicas do seu personagem, por exemplo, ou algum quote da sua escolha.
Vamos ao meu exemplo, primeiro na página de edição e depois com ele pronto:

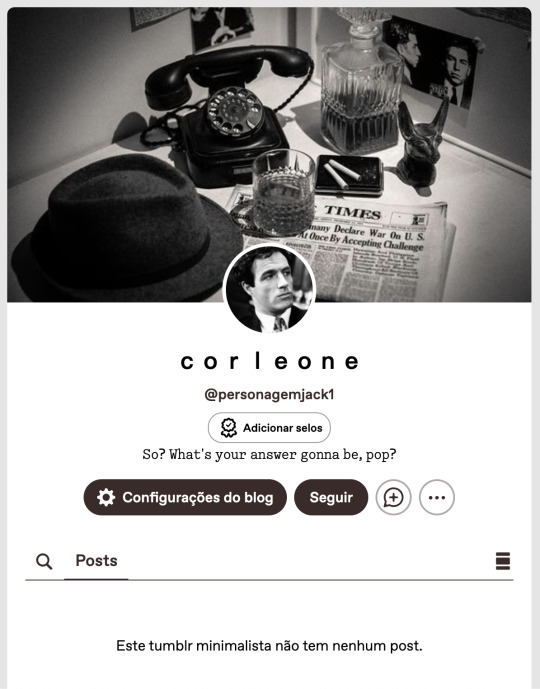
Está pronto! Pretendo fazer um guia mais detalhado para blogs multimuse e outro para sideblogs, para aqueles que jogam com mais de um personagem na mesma comunidade.
Agora, o próximo passo para a customização do seu blog é totalmente opcional, mas você vai ver na maioria das comunidades. Se trata do fixado. O mais comum é que você utilize no fixado as informações que colocou na ficha, e pode colocar uma imagem para ilustrar. Como o objetivo é ser simples, o que você pode fazer é utilizar uma foto do seu fc.
Você vai criar um novo post com foto, adicionar a sua foto, e depois sua descrição.
Existe uma regra de etiqueta na comunidade de não ter posts muito longos na dashboard, exceto turnos. Sendo assim, opte por uma descrição curta inicialmente, e adicione uma divisão de read more para então colocar a biografia completa do seu personagem.
Para adicionar a barra de read more, você inicia um novo parágrafo e usa esta opção:

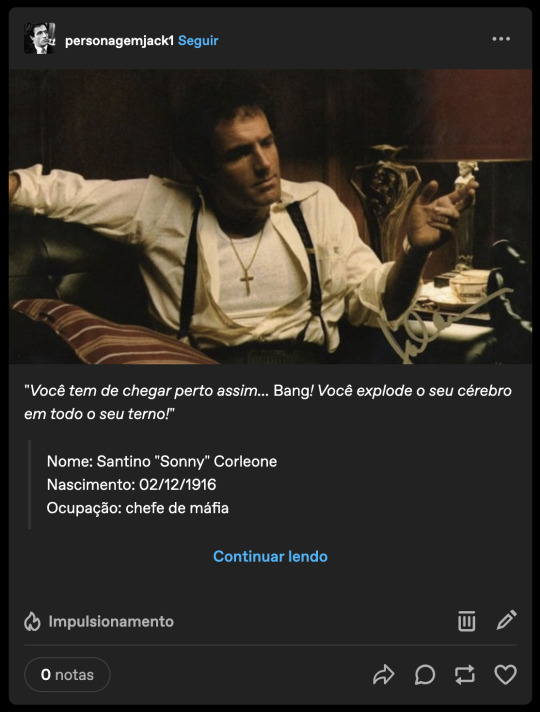
Seu post pode parecer com algo assim:

E depois de postado:
Para fixar você vai clicar nos três pontos no canto superior direito e selecionar fixar. Pronto, este post será a primeira coisa que verão quando abrirem o seu tumblr.
Algumas pessoas também incluem neste post inicial as conexões desejadas e ativas, além da biografia. Também pode incluir trivia, headcanons, etc. Você pode optar por criar um post fixado com links que direcionam para a bio e outras páginas, mas vou falar sobre isso no guia para blog multimuse.
Seu blog está pronto para jogar! Vamos ver como aplicar e como começar a jogar na próxima parte, mas aqui vou te mostrar como jogar.
O jogo no tumblr consiste em: criar posts de texto e reblogar posts. Simples assim. A única forma de jogar é por meio de turnos, sejam estes curtos ou longos.
Você pode criar um starter, ou até mesmo reblogar um starter aberto para começar um turno (mais detalhes no próximo post), mas basicamente tudo gira em torno dos posts de texto.
Para criar um starter, você vai criar um novo post de texto e escrevê-lo:

Questões mais específicas sobre starters serão discutidas no próximo post. Mas, basicamente, você vai postar o seu starter e esperar que outras pessoas respondam.
Ok, mas como responder? Reblogando!
Para isso, vamos dar uma pausa no tumblr. Mencionei lá em cima sobre a necessidade de cortar posts, certo? O que isso significa?
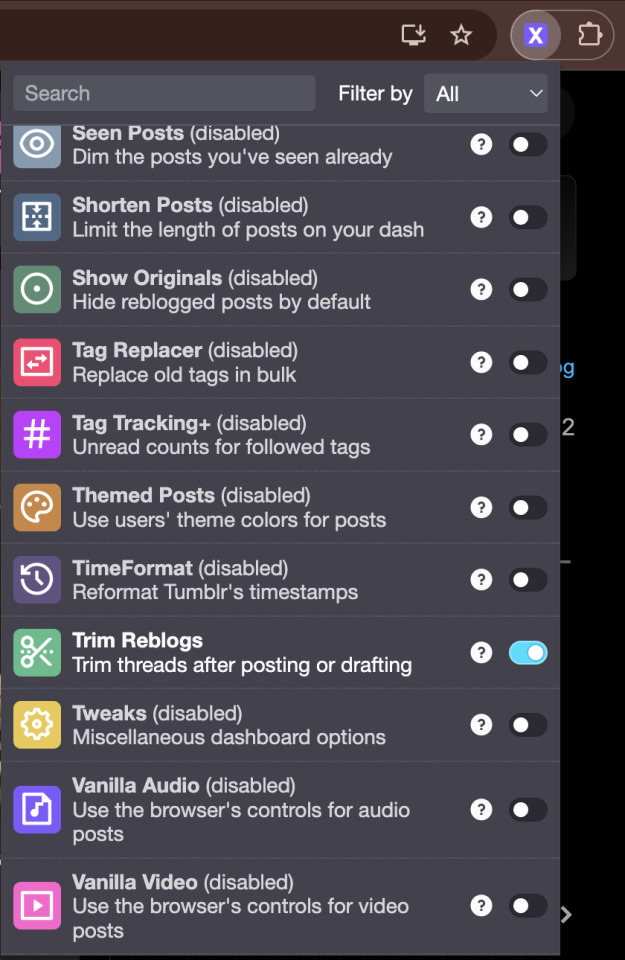
Basicamente, quando você rebloga um post e adiciona algo, vai criar uma corrente de respostas. Esse post fica gigantesco, e vai atrapalhar a visualização da dashboard. Por isso, a regra é cortar as respostas. Para fazer isso, você precisa baixar uma extensão chamada XKit Rewritten.

Depois de baixar, você vai atualizar a página do tumblr, ir até a extensão pela barra do navegador, selecionar o XKit e ativar a opção de cortar posts:
Pronto. Guarde esta informação.
Agora, continuamos nossa explicação de como jogar.
Digamos que você viu um starter aberto que quer responder, como fazer? Você vai selecionar reblogar, abrir a janela de texto, e digitar a sua resposta.

Feito. Você escreveu a resposta do turno da forma que achar melhor, e tudo o que precisa fazer é postar. E depois a outra pessoa vai te responder da mesma forma. Simples assim.
O detalhe importante aqui é o corte de posts, lembra? O ideal é sempre manter apenas duas respostas nos posts: a do outro player + a sua. Portanto, depois dessas duas interações iniciais, vai acontecer o seguinte:
O post vai aparecer desta forma para você:

Escreva sua resposta, mas desta vez, você não vai reblogar o post imediatamente, você vai salvar nos rascunhos. Ao lado de reblogar, você clica na seta, e seleciona a opção, depois só salvar.
Vá até a página de rascunhos, seu post com a resposta estará lá, e agora entre as opções você vai encontrar a de cortar o post.
Eu aconselho que você só selecione esta opção quando estiver com a sua resposta pronta para postar, pois ela vai apagar a sua resposta anterior e caso você ainda precise responder, não vai ter como ver o que já havia respondido. Quando estiver pronto para cortar, esta tela surgirá:
Perceba o seguinte: todas as vezes que você selecionar esta opção, a sua resposta anterior será apagada. Esse é o padrão que você sempre vai seguir: apagar a sua resposta anterior, manter a resposta do outro personagem. Essa extensão já te dá essa opção, então você não precisa selecionar nada, apenas clicar em trim! e o post será salvo nos seus rascunhos assim:
Depois disso é só postar normalmente.
E é desta forma que se joga no tumblr, sem segredos. Apenas escrever, postar e reblogar. As únicas coisas mais específicas e que demandam mais tempo são o corte dos posts e a adição de gifs, o que pode tornar difícil para algumas pessoas.
Fora isso, talvez seja importante saber que o jogo todo acontece na dashboard por meio dos turnos. O tumblr tem a funcionalidade de chat, mas ele é utilizado para conversas em OC.
Sobre os gifs, também existe uma forma correta de adicionar eles. Você precisa encontrar uma gif pack ou uma gif hunt do seu FC, salvar o gif que deseja usar, e então adicionar no post clicando em enter para começar uma nova linha, clicar na foto vermelha e selecionar o seu gif.

Não é recomendado pesquisar o gif pela opção do tumblr, pois ele pode ser grande demais. Não existe um padrão obrigatório para os gifs, mas o ideal é que ele não tome a página toda como esse, por exemplo:

E assim você aprendeu o básico de como é jogar no tumblr!
Por último, tenho uma dica importante que pode ajudar na sua jogabilidade. O tumblr mudou muito e agora você precisa mudar as suas configurações para ver os posts da dashboard em ordem cronológica.
Para isso, você vai ir em configurações > painel > preferências e desativa essa opção:
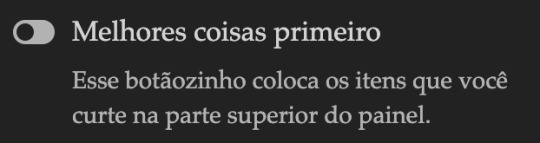
Pronto, agora você vai ver os posts em ordem cronológica!
Pode parecer assustador de início, mas é muito simples.
Como este é um guia básico, podem surgir algumas outras dúvidas. Caso você queira saber algo que eu não citei aqui, fique à vontade para me mandar uma ask.
Na parte 2 nós falaremos sobre as dinâmicas de um rpg no tumblr, como entrar em um, termos mais usados, entre outras coisas relacionadas à como jogar em si.
Nos vemos lá!
21 notes
·
View notes
Text


Eu fiz esse mood atoa, ia vender ele, porém... sla, não gostei muito, na realidade odiei ele, ficou pior do que eu imaginei.
Mas agradeço de verdade ao @nick-web pois o icon principal ( do perfil ) foi feito com base no tutorial de icon rp dele.
Eu sinceramente queria ter feito algo melhor para postar e marcar, porém decidi ir postando alguns moods para no fim ver a minha evolução no fim. Não postarei frequentemente, apenas pro diversão e tédio, então talvez poste mais de um em um dia ou simplesmente poste um a cada ano-
Enfim, obrigado nick pelo tuto, você é incrível. 🐣
204 notes
·
View notes
Note
Hi there! I was wondering if you have any tips or advice for aspiring graphic designers (in the rp sense)? Or even tutorials, sites for resources that you might be willing to reccomend?

Hello Anon!
Thank you so much for the kind message and question, didn't think i would become a 'reference' or 'guideline' for anyone in rp graphic or graphic design in general! however ever since you asked about tips - advice & free sources, i will extend you the courtesy of such!!
TIPS &. ADVICES FOR ROLEPLAY GRAPHICS!!
ALWAYS KNOW YOUR STYLE &. BE INSPIRED BY OTHER WORKS!! i know it may sound bullshit or something, but trust me: you need to know THE STYLE YOU RECOGNISE AS YOURSELF,
the style you want to try to recreate / homage / inspired of &. the style you see that's circulating around the community!! my initial experience when i first got into 'editing' was almost 10 years ago, like when i was in highschool, i was in twitter rp &. was fascinated by tumblr rp & the usage of image around!! from there i started to see the trends on editing that were circulating around &. try to recreate it!! i was just a kid per se, and honestly, to be creative is to see thus i believe it is fine to be inspired because from there you buILD YOUR OWN STYLE!! Because you learn, and you keep having ideas, it's like a principle i believe to be graphic designer or even an artist, there's always a glimpse of something/someone in your artwork but in the end it is yours to have it.
ALWAYS UNDERSTAND THE PLATFORM. when i was in twitter roleplay, there's a phenomenon where writers want to have such an aesthetically pleasing account and follows the trends that were happening in tumblr &. applies it to twitter. like the colouring, the graphic style or even the layout; but unfortunately this created a perception that tumblr rp was 'superior' in terms of graphic editing for characters &. they keep trying to 'recreate' &. 'recreate' to fulfill such aesthetic pleasing that can only be reached if you're in tumblr. for example, i find it bizarre if you're writing in twitter but has a blockquote icon or apply PSD/filter to a meme just to have this aesthetic pleasing desire. YES IT IS NECESSARY TO HAVE GRAPHICS FOR YOUR ' ROLEPLAY IDENTITY ' FOR CHARACTERS YOU PLAY, but that doesn't necessarily force you to be do everything for aestheticism. understand your platform, understand its benefits / capabilities & inabilities so you can utilize it for your roleplay - writing THAN your imagery.
UNDERSTAND YOUR CHARACTER, LIKE REALLY; i find it so so necessarily that you need to understand your character through imagery. it doesn't necessarily about how they look, but rather the vibe - the images that remind you of your character. sometimes people are obsessed to have a faceclaim / bodyclaim etc that fits into the character thus they can have it in the graphics, but i believe the vibe - the images that remind you of the character is the one that should be used in roleplay graphics. it's like an abstract of a research, and your roleplay writing is the content of the research; if you don't give tidbits of the whole thing, you can't deliver the whole thing. this goes to the colour you associate to the character as well because colour can help you to give concrete base of your character instead of having paralysis on options that are being presented. same goes to the fonts; yes it can look good but does it really represent your character?
HAVE FUN EXPERIMENTING. hey. this is serious advice. i wouldnt be here if i didnt try and try experimenting with styles / fonts / colouring etcs. but in the end you will always have one particular thing that will stuck with you and you will eventually know, the experimenting works!! textures - overlays - different fonts - insipred by movies / book covers / milk covers etc; it can be source of experiment to apply to your graphics in roleplay and everyone will think: this is neat!!
lil side note, but it's my personal bias tbfh: don't make your graphics too dark / desaturated. people can't see it. accessibility should be main priority when it comes to writing. how do i feel about people that use small icons or too saturated colour? point two again: understand your platform. if it can be applied fabulously i agree but it shouldn't be like hindering your writing.
FREE RESOURCES :
ive been using these websites as my resources heh
PHOTOPEA : if you dont have photoshop, use photopea; the basic principle from photoshop applies to photopea. however one downside about photopea is that psd from photoshop can be different when it is applied to photopea, same goes to the other way around so it has benefits - disadvantage but hey, use it when you dont have photoshop fr
HERITAGE LIBRARY : free vintage illustrations, like really, png - vectors, very hopeful
PUBLIC WORK : same like heritage library however it's like pinterest but public domain which you can absolutely use!!
COSMOS : an alternative for pinterest. pinterest has everything to be honest but AI starts to appear and it makes me :/ sometimes which i found about this alternative FOR CREATIVE ONLY so yup it's pure inspiration all around.
FREE FACES : modern fonts are stored here, but then again i still use google fonts...
i'll try to remember where did i get my photoshop brushes but brushes can really help you fr. trust me. you dont need to overlay and such what matters is you can use brushes..
i'll keep this list update for further references honestly!!
SO ANON!! ONCE AGAIN THANK YOU FOR THE QUESTION &. HOPEFULLY THIS ANSWER IT even though it's almost gibberish / tmi / oversharing but yes i was in mindset where aestheticism should be everything, whilst it is, but don't make aestheticism become sole purpose of your roleplay whilst roleplay is about writing, playing the characters <3
9 notes
·
View notes
Text

Big Canva Tutorial Document
Hi guys! Canva's been my hyperfixation for a while now, so why not try to compile everything I've learned into one place? This Google Doc is intended to introduce you to this browser-based editor and help guide you through using it for RP graphics. It contains a couple tutorials, and some questions along the way to help inspire you to create your own awesome stuff.
Tutorials already present:
— How to use a Canva template to make icons — Making a pride icon in just a few seconds — Adding freckles/moles/etc features to your faceclaims — "Fancier" pride icons/regular icons once you've got the basics
This Doc will be continually updated with more tutorials, templates, and tips. So once you have access to the Doc, you'll get to see those as I add them!
★Link★ ✰Alt link✰
28 notes
·
View notes
Text
Hey, this is my personal RP Resource blog. I reblog anything I personally find to be useful here, and sometimes make memes. Please do not remove credit, or the blank template links from my memes. Thanks!

MINE carrds && rp meme
GRAPHICS color palettes, fonts, graphics pack, icon templates, pngs, psds, templates, textures
CHARACTER THINGS aesthetics, fashion, muse study, ships
ORANIZATION & APPEARANCE gdoc templates, tags, themes
MISC psd tutorials, rp help, tumblr help, writing help
writing / rp memes
2 notes
·
View notes
Text

Helpful RP TIPS ✨feat. beta editor
subject : how to make custom text colours && formatting.
using beta editor is a learning curve for those of use that are used to legacy ( rip ol' boi ) . you can say goodbye to all that beautiful custom formatting that gave your blog that PIZZAZ. . . . SIKE !! you can still do all that time consuming / wonderful formatting just as easy. there is a small work around but one you should be used to if you are using Roleplay Formatter ( view this tutorial here ) .
⇧ this right here ? garbage. trash. colour choice is not the vibe. do better t/umblr. what even is that red ?? that green ?? CARDINAL SIN.
luckily for you, i'm going to show you an easy way to make your text colours match your blog aesthetic using icons && graphics.
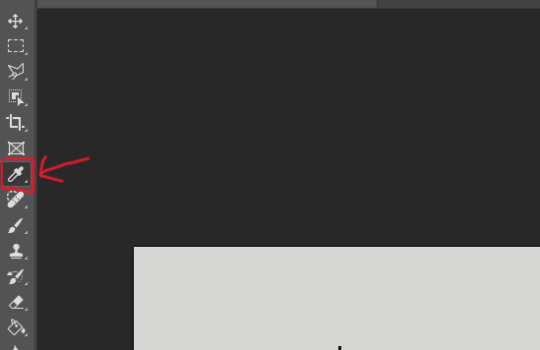
first youre going to want to pull up adobe PhotoShop ( PS for short ) or any other editing service you use for your icons / graphics. the most important part if that it uses the ' EYEDROPPER ' tool function. now assuming your icons / graphics ( i'll be using my icons as an example ), already have the PSD you want attached an active-- use the eyedropper tool on the colours you want to use. i recommend three for variety but you can do as many as you want.
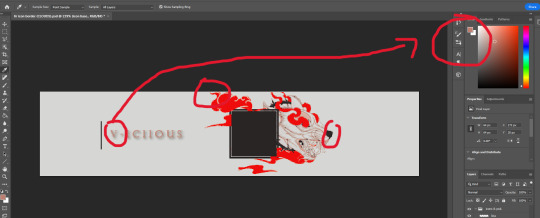
keep in mind by default most people's blog editors have a white background. so using white text is not recommended. i personally like to use 1 vibrant colour && 2 muted colours because of eye strain. vibrant colours can be overwhelming for some viewers but you are welcome to do whichever colours you like. it is subjective after all.
now that youve selected your colour, consider having a notepad ready ( either digital or ol' fashioned pen & paper ) . at the TOP RIGHT side of the program in PS you'll see your colours, click the top overlayed square. this will open a sub-menu that shows you indepth stats. from there you'll see that EXACT colours HEXCODE.
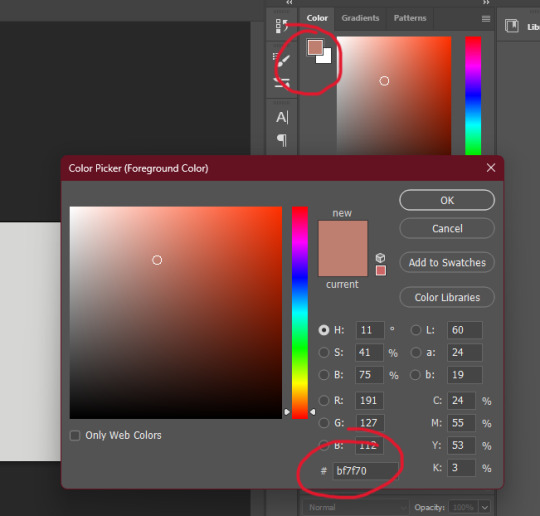
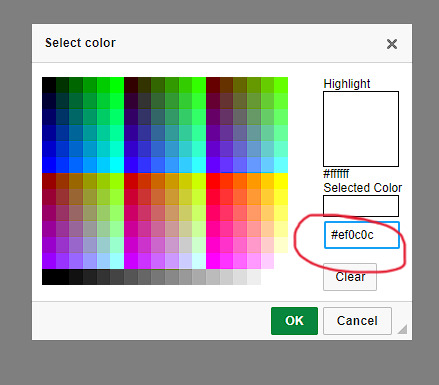
go ahead && write down the HEXCODEs including the ' # ' sign. you'll plug in this code here in the Roleplay Formatter. ( the ' A ' symbol at the TOP RIGHT. ) from there another sub menu will open and you'll click ' More Colors '. that is where you will plug in your hexcode. while the editor is open it will save your colours, however when you close they will disappear which is why i recommend writing them down. but you can always just have PS open and copy & paste them from there. its a matter of personal prefenece at this point.

and thats it. Thats the whole thing. take your now formatted and coloured reply, copy the source code and paste it into t/umblr's HTML editor ! play around with bolding, italics, capitalizing, && enlarging / shrinking specific words or phrases to give your reply that speical little OMPH !! you're on your way to being a pro, good job !

85 notes
·
View notes
Note
your blog is makimg me want to get into RP but idk where to start 😔
Rp blogs are great! Its the easiest way to get involved writing fanfiction and headcanons with a community
I dont roleplay that much any more on here obvs bc a bitch is off his/her meds however
Here's how to start a tumblr rp blog!
First. Make a new account. Not a sideblog. Sideblogs are fine but it can be confusing and messy and it's just not the ideal experience for ur first blog
Pick out a url that relates to your character and their themes/motifs or the themes you want to write
Pick out a container or minimalist theme on @theme-hunter a simple one! Doesnt have to be too fancy!
Make, commission, or draw some graphics. Some people will make incredibly detailed icons. I got lazy on this blog honestly and I hate all my graphics so we're going thru it, struggle bus on limpfisted dot tumblr dot com, but a lot of people have a nice aesthetic header, a nice aesthetic icon, and a nice aesthetic pinned post. Plus promos
You don't honestly have to do that, but its fun, and you get to learn photoshop editing, which is a great skill that impresses my parents. U also don't have to use photos hope, i use clip studio paint on my tablet, and tbh i like it better bc its not so fucking SLOW. I always used to make my own .psds anyway so it's whatever. There a lots of tutorials, Google it, but have fun with it!
Go to the tumblr search and look for a Google doc template or carrd template. This is for your rules/about page. Its mobile friendly for suckers like me without laptops. Write basic rules (ie no minors shit of that nature), then write your characters backstory and important information.
Then head over to ur brand new tumblr and click the new post button. Make a pinned post. Put ur little graphic. Put a little poem. Put a link to your carrd/Google doc. Put ur online name pronouns and age range and ur characters name and pronouns. PIN that shit.
Then go and hit the new post button again and put the little graphics you made for your promo. Write a little poem. Tag it "bg3 rp" and "dnd rp" and "oc rp"
Then bobs ur goddamn uncle. You're a roleplayer. You did it!
Start following blogs and let the mutuals come rolling in
Come join us, wyll warrior! We're waiting for u!!!!!
17 notes
·
View notes
Text
out of curiosity. does anyone have like... tutorials for making like. tumblr graphics for rp and stuff? like. making your own icon templates/banners/dividers/etc etc. i have many ideas but it's kinda hard to execute them when i don't know where to start you know?
5 notes
·
View notes
Text
.
I’m just gonna outright ask because I’m confused and can’t find tumblr rp tutorials that really explain why pictures need to be a certain canvas size. Can someone explain why they need to be so small for some people? Small canvas size fucks up the quality for me (I refuse to do 100x100 because I’m editing icons to have frames and stuff). I assumed it was formatting but if that’s the case I just make the pictures very wide, right? Do they not load right for some people? Are they too big even if you widen the image with blank space at the sides?
3 notes
·
View notes
Text

— COMO MONTAR UM BLOG MULTIMUSE?
Como usar apenas um blog para múltiplos personagens em uma mesma comunidade.

Um blog multimuse é quando você usa um único blog para diversos personagens. Esse sistema era mais utilizado na rpi, já que a maioria jogava com mais de um personagem ou universo, mas percebi que algumas centrais autorizam o uso no rp fechado também. É importante salientar que você precisa confirmar com a central se você pode ou não usar um blog multimuse antes de entrar.
O processo de criação é o mesmo do tutorial de como usar o tumblr, mas com algumas especificações sobre a customização e como usar o blog.
Primeiro vamos falar sobre costumes e padrões seguidos pela tag:
A sua url não precisa ser o nome do personagem, pode ser algo que você escolheu. Alguns usam seu nome + muses/writes/plays, etc. Exemplos: jacksmuses, jackwrites, jackplays, jackmusings. Mas também pode ser algo que você escolher.
O icon geralmente tem muito mais a ver com a estética geral dos seus personagens, do que a foto de um personagem específico. Mais abaixo dou exemplos do que tenho visto pela tag. Mesma coisa sobre a header.
A descrição/bio do blog pode ser um quote que você goste, ou um aviso de que seu blog é filiado a uma central, etc. Não existe um padrão específico.
Como é um blog multimuse, você precisa de um fixado que dê acesso à todos os personagens. Então você pode optar por ter um resumo de todos eles, ou linkar eles nesse post introdutório onde você coloca seu nome de player, seus pronomes e a filiação.
Agora, para o tutorial.
Não existe uma regra do que usar de icon em um blog multimuse, mas o que eu vejo muito são os icons em png. Você pode encontrar alguns na minha tag #png icons, caso queira usar um. Mas como disse, seu icon em um blog multimuse tem muito mais a ver com a estética geral dos personagens, do que com um só deles. O que tenho visto também é que o pessoal prefere tirar a header. É um trabalho a menos para procurar a imagem, e combina melhor com um icon em png.
A descrição, como eu disse, fica a critério do player.
Meu exemplo para três personagens ficou assim:
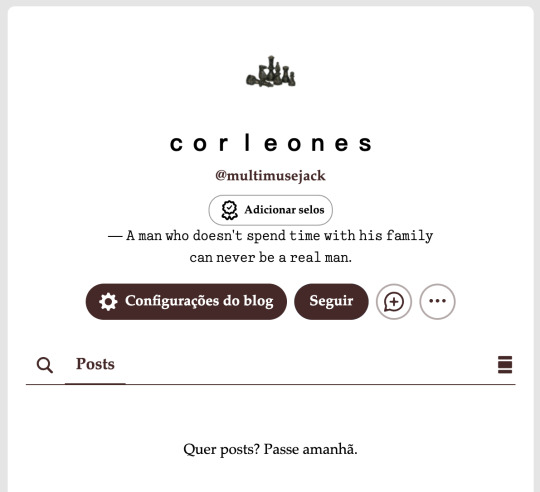
Também existem players que optam pelo contrário: usar a header, e não mostrar o icon. Ficando como algo assim:

Como eu disse, preferência pessoal.
Passada a parte da customização, vamos ao fixado. Deixando claro aqui que vou ensinar um fixado básico e sem imagens.
Vou começar um post de texto, colocar meu nome de player, pronomes, filiação (em qual rpg estou) e algum outro detalhe. Depois disso, coloco os nomes dos personagens e os links para saber mais sobre eles, então vou incluir: biografia, headcanons e conexões.
Lembra do tutorial de como formatar turnos? Você pode usar aqui também pra formatar o seu fixado. O meu ficou assim:

Agora pra todos esses três personagens nós vamos fazer a mesma coisa: criar um post de bio, headcanons e conexões para linkar no fixado. Conforme você for jogando e postando seus turnos, esses posts vão sumir. Por isso deixamos os links no fixado.
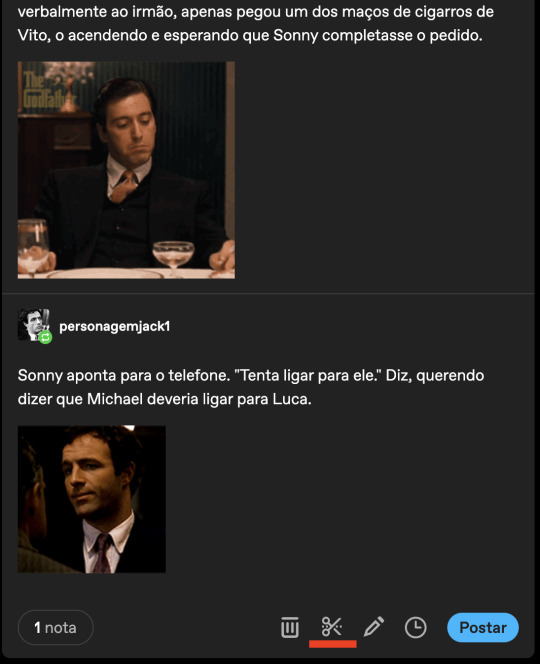
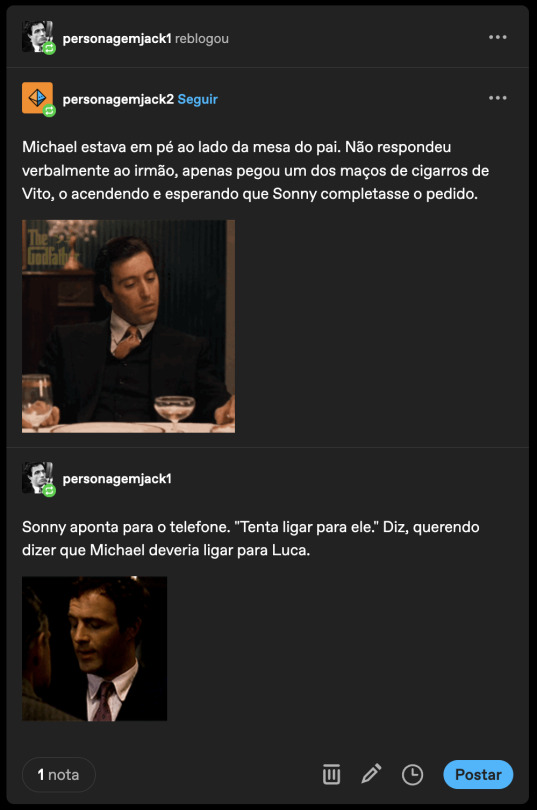
Como é um processo só de repetir o mesmo para os três, vamos fazer o do Michael.
Primeiro, a bio. Como eu disse no guia de como jogar no tumblr, você não precisa de um template ou de algo feito no photoshop. É muito comum usar só fotos do seu fc e pronto, sem mais firulas. Então vamos abrir um post de foto, e começar adicionando dois icons do Al Pacino (preferência pessoal colocar duas imagens).

E então voltamos na questão de: posts curtos com read more.
Geralmente as centrais te disponibilizam um modelo de ficha appless que contém um textinho pra você preencher com as informações do seu personagem. Você pode usar esse texto pra colocar antes do read more, ou o que você achar melhor. Um quote, um resumo curto, a letra de uma música, é você que manda.
No meu caso aqui, vou usar um texto exemplificando uma ficha appless de central.

Depois de postado e formatado, esse é o resultado:

Agora, pegamos o link dessa bio e colocamos no link de info do Michael lá no fixado.
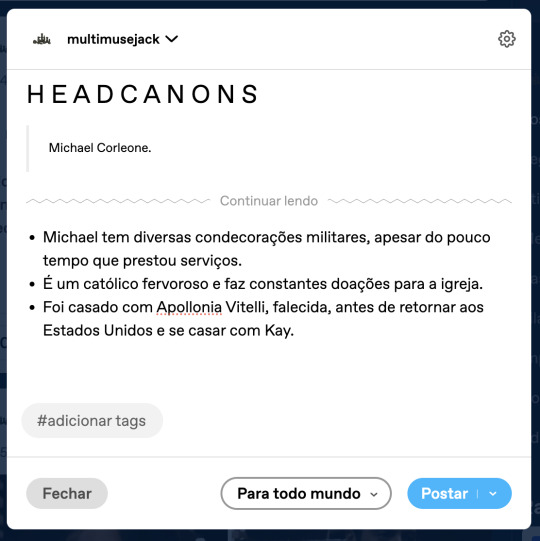
Agora vamos para os headcanons.
Como expliquei no guia de como jogar no tumblr, headcanons são fatos sobre o seu personagem que você gostaria que os outros players soubessem. São detalhes da vida dele, da personalidade, coisas importantes e relevantes que talvez não estejam na bio.
Para fazer essa página também é muito simples. Abrimos um post de texto, colocamos o títlo de Headcanons, o read more, e colocamos os fatos em uma lista.
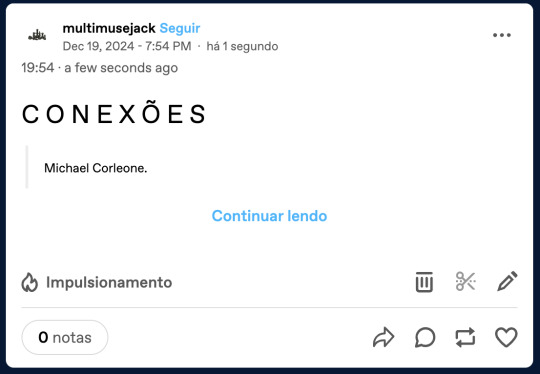
Você vai ficar com algo assim:
E na dashboard:

Conforme for jogando, é natural que surjam outros fatos relevantes para o seu personagem. Então você só vai no fixado, entra nessa página e edita pra adicionar o que for necessário.
E, por último, vamos repetir o mesmo processo para página de conexões:

Com isso, o seu fixado deve ficar assim:

E é só repetir esses passos para cada personagem que você tiver e adicionar os links no fixado para fácil acesso.
Agora, vamos falar sobre como organizar esses três personagens nesse único blog. Em um blog para um único personagem você provavelmente vai ter uma tag pra musings, para fotos, para interações, para povs e para tasks. Você pode ter tags simples apenas com nome, ou algo mais elaborado. Aqui, vamos ir pelo simples. Vamos ter, então, três conjuntos de tags, que seriam assim, por exemplo:
Michael:
#michael: fotos
#michael: musing
#michael: inters
#michael: povs
#michael: tasks
Sonny:
#sonny: fotos
#sonny: musing
#sonny: inters
#sonny: povs
#sonny: tasks
Fredo:
#fredo: fotos
#fredo: musing
#fredo: inters
#fredo: povs
#fredo: tasks
Quando você for usar um personagem, vai usar a tag dele de interações. Por exemplo, vou postar um starter ou responder um open starter com o Sonny. Faço minha resposta dele, usando os gifs dele, e nas tags adiciono #sonny: inters. Isso serve para organização e identificação. Também ajuda a moderação a ver a atividade desse personagem específico na hora do AC. (Lembrando que a interação vai contar por personagem, e não por blog. Então se você não interagir com um personagem além do limite estabelecido pela moderação, ele vai cair no AC mesmo que você esteja ativo com outro personagem no mesmo blog).
Outra tag bacana de se usar é a de interação com outro muse, pois ajuda o outro player a encontrar as interações entre seu personagem e o dele.
Exemplo: vou responder um turno de Michael e Kay, então adiciono #michael: inters com kay nas tags.
As interações funcionam da mesma forma que em um blog normal, a única coisa que vai mudar, é que você pode alterar qual personagem usar. É claro que, no caso de você começar um turno com personagem 1, não pode repentinamente mudar para personagem 2. O multimuse é apenas para facilitar o jogo e não precisar alterar entre blogs para jogar.
E esse foi o tutorial básico de como usar um blog multimuse!
Um conselho que dou, é: não exagere e saiba seu limite. Eu sei que é legal ter muitos personagens e poder explorar diferentes narrativas, mas lembre-se que você vai precisar manter o mesmo nível de atividade em todos eles e turnar com todos eles. Não adianta querer ter 5 personagens em um mesmo blog e deixar 3 de lado, seus personagens vão levar unfollow.
Qualquer dúvida, a askbox está aberta!
18 notes
·
View notes