#i'm saving all threads on drafts and i'll work on them when i come back. i just don't know when will that be.
Explore tagged Tumblr posts
Note
Hi! Sorry for the long ask, I just want to be thorough when providing context.
I'm writing a fanfic for Ace Attorney, which has two blind characters, both of whom became blind through traumatic incidents in-canon.
The first's cause of blindness is tied into the plot, so I can't change that, but I am working on making his experience with blindness/low vision more specific and clear (and I have a few threads I'm looking into on that point already!). This isn't about him.
My question is about the second, Thalassa. Her situation is a lot more malleable. She was a magician, with her father as the head of her troup, until an act went wrong and a bullet hit her head. Her father sent her away to a far-off hospital and told others that the accident killed rather than injured her. We don't see her until years later, but the result is blindness and total loss of previous episodic memory, seemingly with no other side effects. She becomes a famous singer in her new life, but her blindness is kept a secret from all her fans and is treated as a twist in the attorney’s case by the narrative. Her child co-star helps her as a guide, or at least is implied to, and pretends to be the blind one instead as a cover (??? I do not understand this set-up). Her amnesia is a huge plot point, because her old life was connected to multiple main characters, and she no longer knows them. Near the end of the game, she tells the player character that he's inspired her to go through with an eye operation that can restore her sight (and possibly her memory, for some reason??), which she'd previously been hesitant to do because she was afraid to “face her past”.
So, yeah, not great. I think the art not making her eyes clouded when she has CVI might be the only good thing about it.
Anyway, I'm considering changing it so that she was born blind, and that her brain injury has other, unrelated side effects along with more general amnesia, and completely cutting the whole “oh, I was afraid to let myself see, but you have inspired me, sighted person, to take the risks so I can Fix Myself” thing.
I think it would be good to have a character who's born blind, and for a character whose brain injury did more than episodic amnesia. And ofc if I do go that route, I'll research what realistic symptoms are, and what side effects I should include.
For the twist reveal of her blindness, though… Maybe just make her blindness public knowledge? I don't really get why it was a secret in the first place, tbh…
So, do these sound like good solutions? Is there something I've missed that you think I should consider before committing to them?
Also, do you think her being a celebrity might affect her ability to connect with the blind community where she lives? I don't want her to be alone, the way canon seems to imply, but I'm also not sure how to handle this aspect of her character.
Thanks for all you do, and I hope you have a lovely day!
I accidentally posted this instead of saving to drafts. Please kindly wait until I can come back to this.
9 notes
·
View notes
Text
GUIDELINES.
1⃣ While I see myself in some of Xehanort, it doesn't mean that we've necessarily compromised our identities, and of who we are. So, to a certain extent, OOC =/= IC.
2⃣ Almost no smut is allowed. But I may be persuaded to write it for Xehaqus, a ship from Xehanort's series, Kingdom Hearts, and with another Master, Eraqus. Though my mood is fickle when it comes to such a topic due to personal reasons.
3⃣ Please be at least 18+ when interreacting, even more preferably 21+.
4⃣ Shipping? GIMMIE ALL THE XEHAQUS. I am probably not interested in any other romance, though there could ships potentially with immortal characters? I've done it in the past, so who knows ..?
5⃣ Please have a decent enough grip on grammar. Make an effort to write well. People have written with bad grammar before with me, and it turns me off from the RP. However, this may be ignored especially if you have other good qualities to your writing.
6⃣ Have all knowledge of the games, despite needing to play through Melody of Memory, and Re:Coded.
7⃣ OC friendly for the most part. I may be picky about them.
8⃣ Sometimes I'd downright rather write on Discord, so if you write on Discord and am comfortable with sharing it, HMU! I love writing on there. :)
9⃣ Given the nature of this character, dark themes WILL be present on this blog, so let this serve as a warning before you click to follow. This IS Xehanort, people, lol. I will try to tag but I'm not the best at tagging... If Xehanort's actions bother you, please take care of yourself. <3
1⃣ 0⃣ If I do not follow you, I'm probably not interested in RP'ing with you. It could be for several reasons -- but the biggest annoyance I have is too short replies. (like one-liners.) I may allow it for some of my mutuals, but I am very picky about such a thing, because I want to dive deeply into this character.
1⃣ 1⃣ If I can't find a PINNED, or some sort of information about your blog, it may lessen my chances of following you back.
1⃣ 2⃣ If you feel like our rp thread had been lost after a week, feel free to bump me, remind me in IMs. I may have lost it, but I feel like I've done a good job with saving replies to drafts as soon as I see them, thus far.
1⃣ 3⃣ Please cut your threads. Use Xkit rerwritten, or whatever. This has always been a bit of a pet peeve, one I let slide, but it still can annoy me. With being said, if one of our threads is getting too long, I'd gladly trim it for us.
1⃣ 4⃣ Godmodding. For the love of everything, please don't do it. One of my regulars do it, but I feel close enough to them that I can let it slide because we often work with their interpretation of things. So, if you feel Xehanort may do something specific, please, just let know.
1⃣ 5⃣ No Drama. Luckily, I haven't run into that much, if at all, on Tumblr. The only place I've truly seen it was Twitter and that was overwhelming, but I digress. This is my safe space , so please, if we have an issue about each other, let's settle it in IMs or whatever. Or, alternatively, just unfollow me. If I see a Callout, I'll probably ignore it, and not reblog it whatsoever. I'm too old for that kind of shit. I'm here to relax, and to have fun with writing Xehanort.
1⃣ 6⃣ Absolutely no politics. I find it exhausting. Luckily, I haven't run into it too much on here, so I'd like to keep it that way.
1⃣ 7⃣ Updated as necessary.
3 notes
·
View notes
Text
Guidelines
1⃣ OOC =/= IC.
2⃣ Almost no smut is allowed. Though my mood is fickle when it comes to such a topic due to personal reasons.
3⃣ Please be at least 18+ when interreacting, even more preferably 21+.
4⃣ Shipping? ..Potentially. But I'd be picky about it with him, since you know .. he's not human and all.
5⃣ Please have a decent enough grip on grammar. Make an effort to write well. People have written with bad grammar before with me, and it turns me off from the RP. However, this may be ignored especially if you have other good qualities to your writing.
6⃣ Have all knowledge of the games, despite needing to play through Melody of Memory, and Re:Coded.
7⃣ OC friendly for the most part. I may be picky about them.
8⃣ Sometimes I'd downright rather write on Discord, so if you write on Discord and am comfortable with sharing it, HMU! I love writing on there. :)
9⃣ Given the nature of this character, dark themes WILL be present on this blog, so let this serve as a warning before you click to follow.
1⃣ 0⃣ If I do not follow you, I'm probably not interested in RP'ing with you. It could be for several reasons -- but the biggest annoyance I have is too short replies. (like one-liners.) I may allow it for some of my mutuals, but I am very picky about such a thing, because I want to dive deeply into this character.
1⃣ 1⃣ If I can't find a PINNED, or some sort of information about your blog, it may lessen my chances of following you back.
1⃣ 2⃣ If you feel like our rp thread had been lost after a week, feel free to bump me, remind me in IMs. I may have lost it, but I feel like I've done a good job with saving replies to drafts as soon as I see them, thus far.
1⃣ 3⃣ Please cut your threads. Use Xkit rerwritten, or whatever. This has always been a bit of a pet peeve, one I let slide, but it still can annoy me. With being said, if one of our threads is getting too long, I'd gladly trim it for us.
1⃣ 4⃣ Godmodding. For the love of everything, please don't do it. One of my regulars do it, but I feel close enough to them that I can let it slide because we often work with their interpretation of things. So, if you feel Ansem may do something specific, please, just let know.
1⃣ 5⃣ No Drama. Luckily, I haven't run into that much, if at all, on Tumblr. The only place I've truly seen it was Twitter and that was overwhelming, but I digress. This is my safe space , so please, if we have an issue about each other, let's settle it in IMs or whatever. Or, alternatively, just unfollow me. If I see a Callout, I'll probably ignore it, and not reblog it whatsoever. I'm too old for that kind of shit. I'm here to relax, and to have fun with writing.
1⃣ 6⃣ Absolutely no politics. I find it exhausting. Luckily, I haven't run into it too much on here, so I'd like to keep it that way.
1⃣ 7⃣ Updated as necessary.
0 notes
Note
If a reply isn’t coming easily do you draft it for later, delete and start over, chat with your writing partner for help, or something else?
Are there any writing elements that you sometimes find difficult? Monologues, character engagement, setting, progression, dialogue, other?
roleplay / writing habits
If a reply isn’t coming easily do you draft it for later, delete and start over, chat with your writing partner for help, or something else?
I save all of my received replies to my drafts by default and keep them there until I'm ready to write my reply.
If I'm having a difficult time with writing a reply, honestly it depends on multiple factors. It depends on how close I am to the mun, if we get along well VS if I've had repeated issues with them, how long the thread has been going, if it's an important character-building thread or more of a crack thread, how many threads I have with that mun, how many threads I have total, and just generally how I'm feeling. Muse plays a big factor too - sometimes certain muses just aren't speaking up, like Doomsday is very easy for me to write because her voice is always there, but muses like Classic Stanley and September usually take more time for me to reply with because they are quieter in my mind.
The number one thing that is most likely to make me drop a thread is if I keep getting back replies where all the other person's muse has done is responded/reacted to what my muse has said/done. There has been no advancement on the thread in any way, nothing for my muse to respond to, and this has happened for multiple replies in a row. If this happens multiple replies in a row, I will lose interest in the thread and stop responding to it. It's frustrating and annoying when you're the one doing all the work in the thread in every reply and I don't have the energy for that anymore.
If we've been writing together for a while and we have a good rapport and I'm having difficulty replying, I'll probably reach out, especially if it's an important thread.
I don't mean to cause any offense or anything when I drop threads, it's just that I literally don't have the energy anymore to reach out every time I need to drop a thread. I'm okay with people dropping threads with me without telling me too.
Are there any writing elements that you sometimes find difficult? Monologues, character engagement, setting, progression, dialogue, other?
Strictly speaking in roleplaying? I think setting, progression, and continuity are my biggest challenges.
It's often difficult for me to figure out where the setting of things is, like where things are taking place. Most often I find threads are taking place in the Office, but when things are outside of the Office is when it gets confusing for me. My muses can go pretty much anywhere, but sometimes I'm not sure of where other people's muses are and I end up confusing myself on where exactly to place my muses.
Progression and continuity are hard for me to figure out a lot of times because my muses mostly operate within a sort of linear timeline. That is, their character arcs and progression are mostly forward. But it's hard to figure out where other people's muses fall into that because... quite frankly, my muses have not been able to form that many meaningful relationships with other people's muses. A lot of times when I do plots on my blog where there is character development happening, it's been either barely acknowledged or not acknowledged at all by others, so it makes it difficult or impossible for me to figure out where that development fits in with other people's characters. I'm not saying other people must participate in the plots on my blog, but it does make it difficult when my muses grow and change as characters and there's no acknowledgement of it. Like, one muse literally died and nobody noticed, not even the muses who knew her, and it was... disheartening to say the least.
So. Those kinds of things are difficult for me personally. A lot of times I'm wanting to progress an overall story on my blog and with my characters, and it seems at odds with what others are wanting to do, so that's difficult.
1 note
·
View note
Text


//Updates, I'm gonna work on drafts and starters tomorrow for certain threads. If I've not responded odds are I lost the thread and if you wanna do another lemme know and I'll get it made. I'm also gonna put a read more here for the current CoD brain rot cause MWIII and MWZ has a bit of a grip on me right now.
Advanced Warfare is looking to be added into the new timeline and I think its a potential soft reboot for that story much like how Black Ops Cold War was for the Black Ops series meaning we could have some familiar beat-points but certain 'canon events' could be changed, could stay the same, we all know how that ended for Soap and I have my opinions on the story but its not the worst CoD campaign that was put out there. It wasn't the best, but it wasn't the worst either there still was some good takeaways and subtle shit.
Anyways, from my current knowledge I know that Treyarch is on deck next potentially for their newer Black Ops iteration which is rumored to be the Gulf War, which lasted between 1990 to 1991. I think Makarov's backstory is going to help seg-way into the Black Ops story.
Born before the fall of the Soviet Union, Makarov's father, as described in Vlad's MP bio, was a high-ranking politician. So when the Soviet Union fell in 1991 his father took his own life. Around this time too, we know that Imran Zakhaev was also getting a foothold in the Soviet Union as well, with Kravchenko sort of being his in, so there might be some kind of connection there where the two try to work together to help save and strengthen the Soviet Union leading to the inevitable hunt for Imran Zakhaev who is brought into the Perseus network, we bring in Russell Adler and some of his guys to help hunt for them along with a couple of additional guys, a young John Price and Captain MacMillian leading them to Pripyat to kill Zakhaev just before the fall of the Soviet Union to stop him from an arms trade of recovered Nova Six, of course Zakhaev lives but is wounded and essentially stokes up the fuel and the fire with his son Viktor.
Considering Vlad would still be a teenager around this time, he wouldn't be involved in that particular event since he joins the Russian Army in 1998 right when he turns 18 and he volunteers for General Barkov's unit a year before Barkov performs an unsanctioned attack and occupation of Urzikstan and is there up until the ULF took back their home. Makarov goes back to his superiors to plead to reclaim Urzikstan and is stripped of his honors and rank.
In comes Viktor Zakhaev looking to take Barkov's throne and who is also looking for a little bit of revenge and justice? Makarov. With a little coercion they also get Al-Asad and place him as the new leader of AQ. It plays into the titles of one of the CoD 4 missions 'The Sins of the Father' if they go that route. Might fly over the heads of most but could be a subtle little nod.
1 note
·
View note
Text
Q1 Final Reflections
Can't believe it's already been 3 months since 2024. Well, this was a good quarter. I lived abroad, did an internship (it ends in a couple of days) and did quite good at my goals. Let's revise them for one last time before I start a thread for Q2.
Write and publish my novel. I was planning on finishing the first draft by April but oh well. While I did write about 15 chapters and already revised some of them, we are quite far from the word end. I want to finish revising what I've written so far & then write a new outline for the remaining chapters and finish writing the grand finale. Let's persevere! If anything it will be ready by the end of Q2!!!!!
Complete my writing challenge. I completed 8 steps during this quarter and then decided to give up. It was just one more excuse not to work on my actual novel. It was fun but good riddance.
Graduate in July. There was a problem with my Home Uni registering my Korean grades on their systems, but I caught it on time for them to fix it. It would have been a disaster otherwise so congrats to my quick thinking. Now I have officially completed all my master's classes!!! The only thing left is the dissertation, which I thought about during these months but didn't really do much else. It will become a major focus in Q2.
Do yoga everyday. Did not do yoga every day but more than I used to so that's fine. That's enough for now. I'll need to consolidate a good night routine before I can aspire to yoga everyday.
Have 10k saved on my account. I applied to a scholarship and 2 job. About to apply to 2 others. Have mostly respected my budget for Q1 so that's good too. I'll have a job in Q2 and plan to save most of that.
Visit my friend D in my home country. I don't think that's going to happen anymore but we might meet halfway. Don't really have plans for summer at this point.
Be ready to take TOPIK 2 in 2026. I've finished a graded reader, listened to 3 podcast series and even read around 20 episodes of the webtoon that has always been my main goal. So it's going great. Will have to scale back during Q2 to focus on German.
Pass a B2 Goethe-Zertifikat this year. I think I got back in the swing of things by completing Babbel and watching around 20 episodes of Um Himmels Willen but I need to start moving faster, especially when it comes to output. Q2 is the Q I start taking speaking lessons.
Read 5 books from my physical TBR list. I actually added books to this TBR so uhm. I want to read at least 2 during Q2.
Watch 12 Italian films. Watched 8. Stunning. If I can manage to watch all 12 of them by the end of Q2 I will shift my focus to museum & get a museum card.
Train to do at least 10 classic push-ups. First progression completed!!! I now can do 50x3 wall push ups!!! It's the first time I get so far so I'm very proud of myself. I still haven't started inclined push ups but I'm excited to try.
Other random things I did:
Went to a trial ballet lesson
Went to a conference in German (and understood good chunks of it)
Tried Bavarian cuisine at a restaurant
Finished the body of my cardigan if you do not consider the final ribbing, which I won't.
Leave me a funny emoji if you've read this far :)
2025-Q1 Goals
Since I can't trust Tumblr not to eat this blog too (yes, I'm still bitter about it), this year I wrote my long list of goals somewhere else and will post just the short version on here.
The theme for this year will be "I might as well try". I have big ambitions, but always try to moderate myself because what if I exhaust myself, what if I can't do everything. But the other day I stumbled upon this video, The Wonyoung Mindset and the message is basically: "yes, working towards your goals is hard, but isn't it even harder not reach your goals at the end of the day? Might as well try hard." Which to me makes sense. Also, I'm old enough to know how much I can take on my plate so it will be fine.
So this year I'm maximizing my goals! I'll go for it and get it!
Write a novel and publish it on Amazon. Even if it's terrible and a total flop, who cares. Let's start my author career!
Complete my writing challenge to show myself how committed I am to writing
Graduate cum laude in July from my master's! + find a job
Do yoga every day
Have 10k on my savings account by the end of the year (level impossible unless I find a job immediately or the novel becomes a smashing success)
Visit my friend D in her home country
Be ready to start preparing for TOPIK II level 5 by the end of the year.
Pass a Goethe-Zertifikat B2 during the second half of the year
Read 5 books from my physical TBR list so I can give them away and make some space in my library (0/5)
Watch 12 Italian films, because how is it possible that I know nothing about my own country's pop culture? (5/12)
By the end of the year, I will be able to do at least 10 classic push ups. Right now I can barely do 10 wall pushups to it's a long way to go but I will make it!!!!
I've already set up a habit tracker to help me with all this. I'm sure the enthusiasm will vanish soon, so I plan on checking in every month and re-evaluating my goals every quarter. Hopefully I'll reach some of them sooner than expected and be able to add more (for example, it wouldn't be a bad idea to publish more than one novel).
9 notes
·
View notes
Note
(2/2) Also, what kind of fabric should I use if I don't want to get heatstroke or something? I'll most likely be wearing it in autumn and not summer, but I'll be indoors so I'm still worried, especially with how much walking a con usually entails. And how much of that fabric do you think I'll need? (I'm about 6ft tall and weigh about 185-190lbs I think, I'd want the coat to go to about halfway down my lower leg.) Thanks so much in advance and sorry for bothering you!
(Tumblr deleted the first ask when I tried to save it as a draft. Luckily I predicted this and saved a pic of it)
Experienced sewer and cosplay? Oh anon, your flattery will get you everywhere.
Luckily for you, my grey faced friend, you’ve picked about the easiest costume in the world to sew. The only way it could be simpler if it didn’t have the sleeves, but, since the outfit is so loose, it shouldn’t really a problem if those don’t turn out perfect anyway. More beneath the cut:
You have a few ways you can do it, though, depending on how you want it to look.
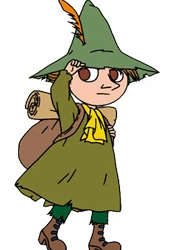
Snukfin’s actual outfit has no visible seams, but that’s not something really possible in real life, so you’l have to determine where the seams will be. Easiest place is two seams along the sides. You could also do it with 4 main pieces to make it rounder looking but that seems like it would be a lot more work for not a lot of payoff, so let’s stick with two. You could also use some things to puff out the bottom of the robe so it has that very circular look, like using a sort of faux tu-tu made of tulle, but again, let’s keep it simple.
As for fabric you have a few options there depending on the look, stretch, and feel you want the garment to have.
First off is cotton twill
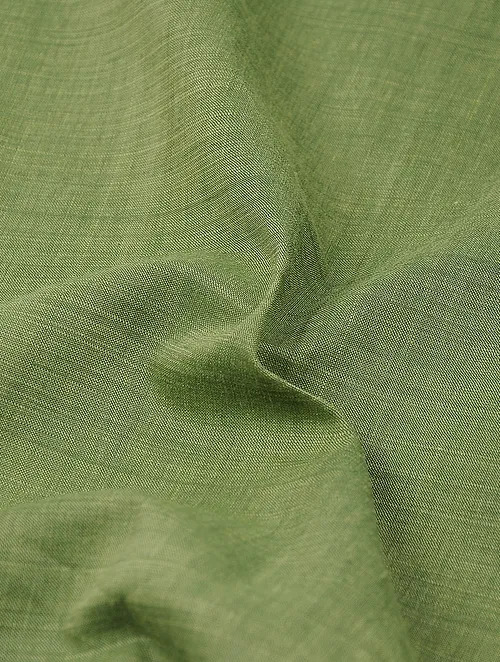
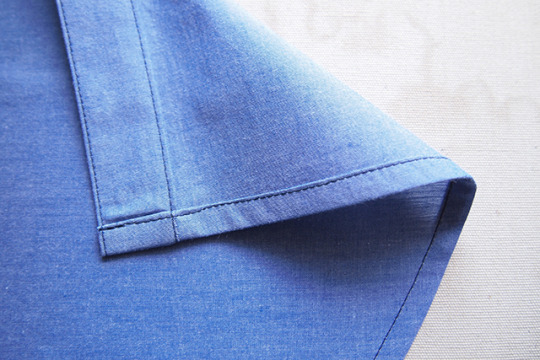
This fabric has almost no stretch to it whatsoever which can make sewing it easier, but again, it has no stretch, so it’s less forgiving about seam accuracy and is sometimes uncomfortable to wear. It may give the sort of rustic look that you’re going for though. However, you will need to hem all open seams or they WILL unravel on you. Hemming is when you basically turn some of the fabric of an open seam up on the inside of the fabric, then sew it down, stopping the woven thread of the fabric from coming undone and making it look cleaner. Like this:
Also, since many of these fabric are thin, you may need to make a lining, which is basically just the same garment in a silky fabric, connected to the out pieces at the seams. I would recommend not getting anything so thin you need to do that.
Second fabric option is a knit fabric:
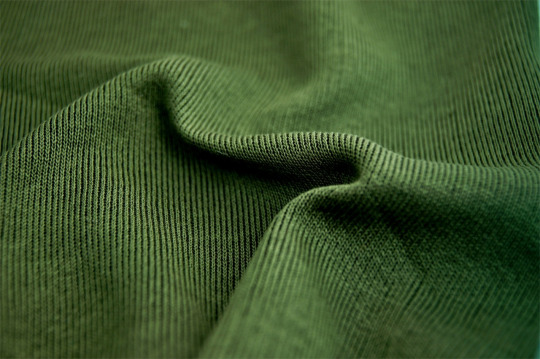
Knit fabric has a good deal of stretch to it, which can make it easier to move in, but stretchy fabrics can be a little bit of a pain to sew, since the presser foot can have trouble keeping them from sliding around. Using a “walking foot” can help a lot, but I assume you probably don’t have one if you’ve never sewn before. If you pick this, just be sure to pin thoroughly. Due to the nature of the fabric, some knits can also be harder to press the seams of properly, making them bulkier on close fitting garments, but that’s not what you’re making so it’s all good. the big thing, though, is that knit fabrics often do not need to be hemmed. Sometimes it can look kind of shiny and synthetic, depending on the kind you get.
Third is fleece:
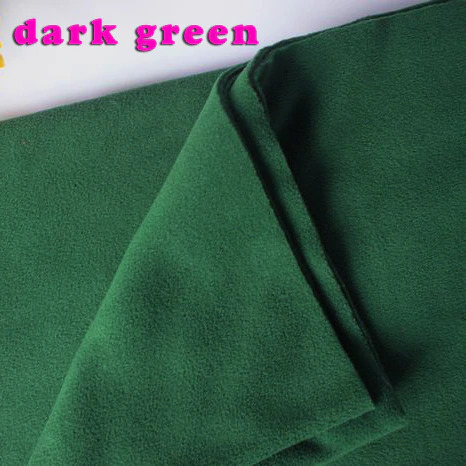
Fleece is a thicker fabric that is very fuzzy and has a good deal of stretch to it, at least one direction. It does not necessarily need to be hemmed, as the open seams will not unravel. It’s primarily used in things like stuffed animals, but can be used in some more whimsical looking garments. It may give you the puffy look to the outfit that Snufkin has. But, as it is thick, it can be very hard to sew multiple layers of without a proper walking foot and a thicker needle, depending of the thickness of the fleece and the number of layers.
It’s really up to you, depending on what you find that fits the look you want and your budget. Wander the aisles of a fabric store and maybe ask an employee for a recommendation. I would definitely avoid anything shiny, plastic, or very very stretchy as those are hard to sew and also will probably not look right for Snufkin. I probably recommend a more natural looking knit fabric. For both comfort and ease. Just be sure to pin that stuff and hold it very steady when sewing it because it WILL try to escape from under the presser foot.
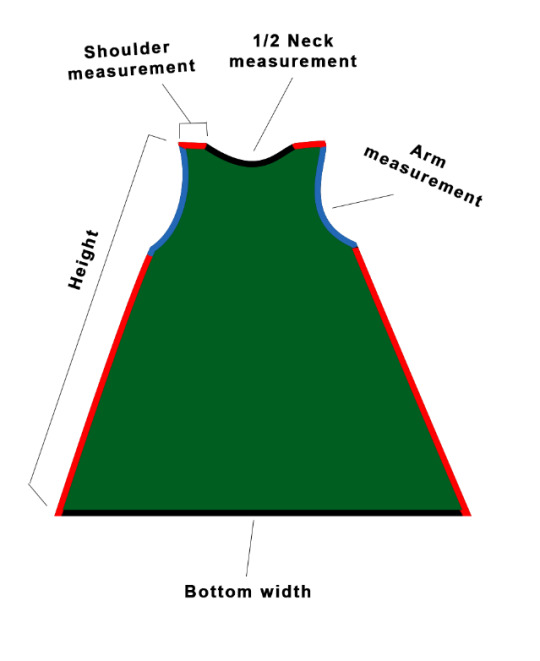
First step after deciding on a kind of fabric (but NOT before buying the fabric!) is taking measurements. For this outfit, I’d take a measurement of the circumference your neck, from your collar to the length you want to the robe to go to on your leg, the width you want the bottom of the robe to be, the length from your collar to your shoulder, your bust, your waist, and around the thickest part of your arm. Since Snuf’s outfit is simple, some of these will just be to ensure you don’t accidentally make the angle of the side cut too steep and end up where it doesn’t fit you around the waist or chest.
The pattern for the main part of the robe will look a bit like this. For each cut, be sure to add half and inch to an inch to it for seam allowance (the amount you’ll lose when you sew two pieces together. The part that becomes the seam) along with an extra inch or two since you want this to be pretty loose and baggy:
You’ll need two of these. The basic sleeve will look like this:
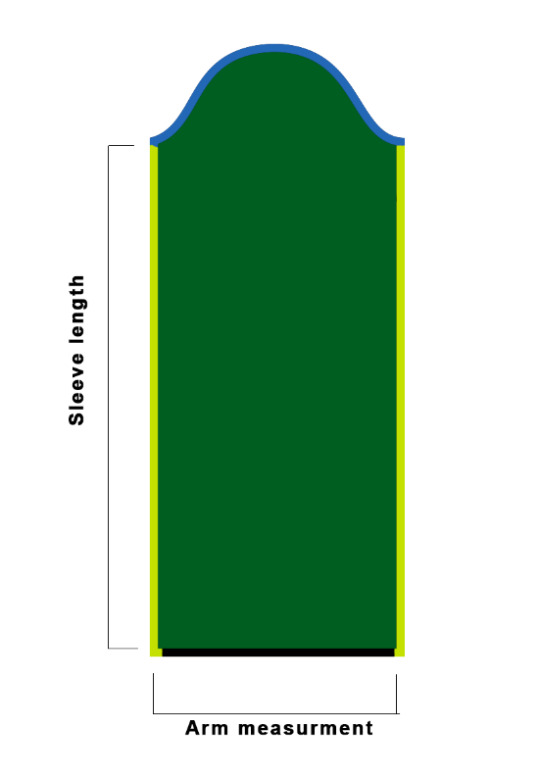
You will need two of these. That’s ONE for each sleeve. That’s why the width is the whole measurement around your arm, not half.
That bump at the top is basically just to have it fit better over the shoulder. There’s measurements and calculations and rulers to get that curve perfect but honestly, in your case…..just kinda…put a bit of a bump there that right. Like “yeah that looks like something a shoulder curve might look like!” This method is something that has served me well in cosplay. Same for the neck hole and arm holes. If your head and arms fit comfortable through them and it looks right to you, it will look right to other people, for the most part. Closer fitting, more complicated pieces require more accurate and precise measurements. You are, for all intents and purposes, making a potato sack.
Drafting patterns and testing them on cheap fabric before buying your final fabric is time consuming, but will ultimately save you time and money remaking it later and having to buy more of the final, usually more expensive, fabric. So make a test out of some cheap muslin fabric or whatever you have around, adjusting measurements as you see fit. Once you do that, determine the amount of fabric you’ll need to get. It’s often not a bad idea to wash the fabric in cold water with a bit of fabric softener before starting. It will make it easier to work with, and shrink it if it’s going to shrink. Some fabrics are dry clean or hand wash only, though so be careful. So do these next things at least twice, at least once in test, then once with the real fabric.
Using the patterns/tests you made earlier, cut out each piece. Now the actual sewing. I’m assuming you’re using a machine but either way it’s the same idea.
1: Place the two main pieces on top of each other so the red marked sides line up and the “right side” of the fabric (the sides you want on the outside) are touching each other. Pin the fabric along the red seams. Sew the seams together, leaving a ¼ to ½ inch space between the seam and the edge of the fabric, so you will have enough seam allowance to press the seam. DO NOT sew the black marked edges of the arm holes or head holes. Leave these open!
2: Setting your iron to the setting appropriate for your fabric, press the seams “open”. Like this:
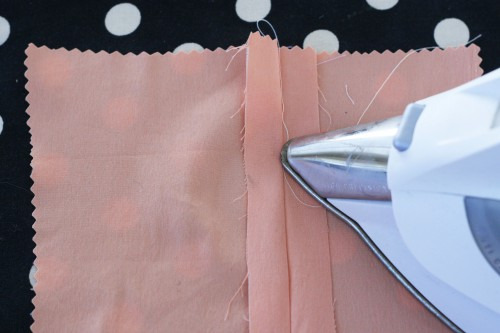
The two pieces of seam fabric should be folded back over the piece they’re from and flattened down. This will help the seam lie flat. This isn’t super important for your very loose costume but a good habit to get into and it will help the seam stay steady.
If you used a fabric that needs to be hemmed, curl the bottom edge of the fabric up about a half inch, then sew it down. You can do that with the neck too, but curve can be harder to hem, and Snufkin’s neck is always covered by a scarf so you can forgo it if you like, or just use a “liquid hem” product.
3: Pin and sew the yellow labeled edge of the sleeves to the other yellow labeled edge OF THE SAME SLEEVE. That means each sleeve will have only one seam, running along the bottom of the sleeve. That will give it a more rounded look (and also means fewer seams to sew and fewer pieces to cut). Remember that the “right sides” of the fabric should be touching so that the sleeve will be inside out when you sew the seam. Same as with the body piece.
4: Press those seams open as well. Then turn your sleeves inside out(technically right side out) so that the right side is facing outwards.
5: Pin and sew the blue marked edges of the sleeves to the blue marked edges of the main body. This step will be trickier and may require more than one try because you will need to be sewing in a loop. Sewing machines like to sew in straight lines and can only sew on flat surfaces, but you also don’t want to sew your sleeves closed.
What you need to do is pin all around the loop of the hole, lining up the sleeve seam with the bottom of the arm hole of the main body. The sleeve will be RIGHT SIDE out and inside of the main body which needs to still be INSIDE OUT. Again, right sides of the fabric need to always be the ones touching. This is counter intuitive and trips me up a lot because of it.
Then, sew all around that loop. This can be hard to conceptualize and that little shoulder bump will definitely try to cause you some trouble too. If the opening is big enough, it helps a lot to slip it over the sewing machine’s sewing platform like this:
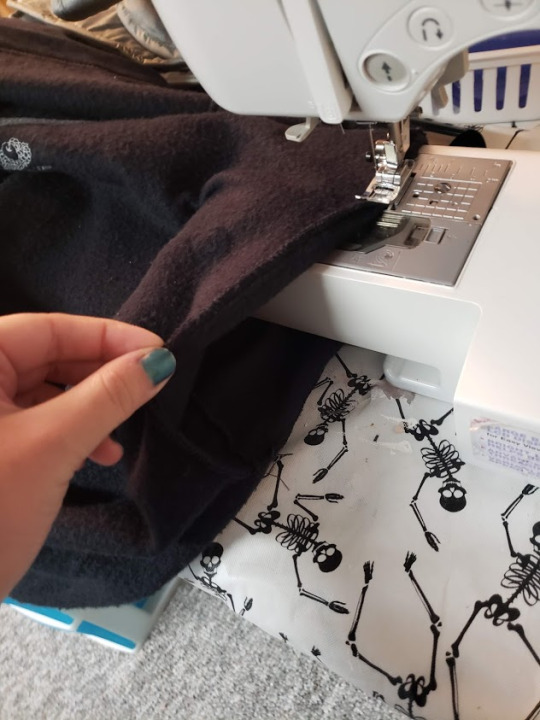
Most machines will have a little shelf or part that can be removed to make this easier.
6: Since these seams are curved, you need to “clip” them so that they lie right. Take your sewing shears and clip the excess seam fabric up to but NOT THROUGH the seam all around the sleeve seam. Like so:
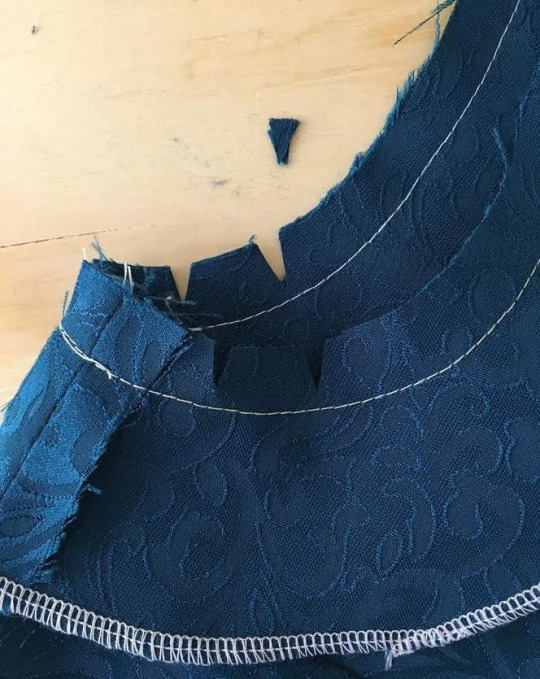
7: Press the seams so that both pieces of seam fabric are folded towards the sleeve, not the main body.
8: Turn the whole thing right-side out and check that there are no holes in any of the seams. Small holes can be patched with a hand needle and thread, bigger ones you may need to go back over them with the machine. Remember if anything really goes bad, you can always carefully remove the seam with a seam ripper and redo it.
9: BECOME THE BOY. That is to say, try it on and make sure everything fits ok.
10: You done it.
#oops I tutorialed#sewing#snufkin#tutorial#moomin#cosplay tutorial#cosplay#Anonymous#earning my seam allowance
323 notes
·
View notes