#i was going for simple shading but overcomplicated some time along the way and was kinda lasy after
Explore tagged Tumblr posts
Visit Tumblr Blog
Explore Tumblr blogs with no restrictions, modern design and the best experience.
Last Seen Tumblr Blogs


Fun Fact
69% of Tumblr users are millennials.
Text

Just your typical 🛹Teenagers that might be 🥷Ninjas🥷 but are not 🐢Turtles🐢 are they mutants?
#ive been wanting to draw then for some time#like months actually but oh well#i was going for simple shading but overcomplicated some time along the way and was kinda lasy after#i quite like them#even if it was hell trying figure out Raphs clothing#ans after that how to add green to his and Donnies#btw random HC but Rise!Raph favourite color might not be red?#just based on his clothing in the basket ball episode and the 80s montage#or maybe i just think he looks good in white idk#digital art#artists on tumblr#my art#fanart#rise of the tmnt#rise of the teenage mutant ninja turtles#tmnt#rise donnie#rise mikey#rise leo#rise raph
39 notes
·
View notes
Text
When They Walk In On You Dancing ~ BTS Reaction
Jin:
You were lost in a trance, oblivious to the sound of the door opening and closing, unaware of Jin’s presence behind you as he watched you dance along to Idol around the room, the only thing making you aware, his voice as he sung his part. “Don’t stop on my account, it was cute.”
“When did you get home?” You blushed, quickly turning the music off, “you can’t go around creeping up on people like that, you terrified me.”
He chuckled, walking up to you, “I was just having too much fun watching you dance to my song. Is that always what you do when I’m not around.”
“It was one time.”
“I bet you do it all the time,” he teased, pressing play on the music once again. “How about I show you the routine properly, what it’s supposed to look like?”
“Alright, but you can’t laugh at me, I’m trying.”
“No laughing, promise.”
Yoongi:
His eyes lit up as he crept into your practice room, sitting at the back of the studio as you finished the routine you’d been working on for your next competition. Once you were done, you twirled around, walking straight into his open arms. “You never fail to blow my mind, that routine was amazing.”
“Really? I’ve been struggling with it for some time,” you told him, sitting down on the bench beside him, resting against his shoulder. “It’s one of the hardest I’ve ever done.”
He pressed a kiss to the side of your face, “the judges will be crazy not to score you high, I would never be able to do half the stuff you do.”
“Do you want to try?”
“Absolutely not,” he chuckled, “if I tried to do the splits these days, there’s no way I’d be able to get back off the ground, you’d probably have to call an ambulance.”
“Why don’t we try? Just for a bit of fun?”
“Fine but be prepared to help.”
Hoseok:
You groaned once again failing to find the missing piece that would perfect the choreography you’d been working hard on. Luckily, unbeknownst to you, Hobi had walked into your studio, watching as you continued to struggle. “Would you be against me giving you an idea?”
“I will listen to any idea you have,” you frowned, sitting yourself down, “I’ve tried so hard to find something, but nothing looks right.”
He nodded, running through the moves, seeing what he could come up with. “You always overcomplicate things when you don’t need to, see.”
“It looks good.”
“And it’s simple,” Hobi added as he showed you his idea for a transition, “you don’t have to use it, but I think it works well for your concept, what do you think?”
“I love it, you’ve always got the best ideas when I need them.”
“I’m just glad to help.”
Namjoon:
He struggled to hold back his laughter as he walked into the living room and saw you dancing around with your child holding tightly onto your hands. It was only when shrieks of ‘daddy,’ came, did you realise who was behind you. “You looked like you were having fun.”
“Go on, laugh, I know you want to,” you told him as he scooped your daughter up into his arms, “she’s been dancing around all day long.”
He smiled, wrapping his spare arm around you, “I wasn’t going to laugh, I thought the two of you looked adorable together, can you show me your moves?”
“Of course, I can daddy.”
“Mummy has to do it to though,” Namjoon spoke, earning himself a glare from you. “Maybe one day you two can dance on stage with daddy.”
“That would be so cool, I want to be like you daddy.”
“Namjoon, shut up!”
Jimin:
Whenever you tidied up the house, you always liked to have music playing in the background to keep you distracted, and today was no different as you twirled around the kitchen whilst wiping down the surfaces. “You look like you’re having a good time, a voice suddenly spoke up making you jump.
“You saw nothing,” you quickly told him, turning away from him to hide the crimson shade on your cheeks, “just leave me alone.”
His head shook, wrapping his arms around your waist, “I can’t pretend that I didn’t just see that you looked so cute, it was adorable.”
“Just stop talking.”
“Why are you so embarrassed? Everyone likes dancing,” he chuckled, kissing against your cheek, “I wish that you’d dance around me more often.”
“That definitely will not happen, this is a one-time thing.”
“We’ll see about that.”
Taehyung:
He hadn’t realised where you were when he came home from work until he saw you dancing around your bedroom, he was quiet, coming up behind you, and dancing with you, arms wrapped around your torso. “It’s just me,” he smiled as you jumped, “come on, let’s dance together.”
“What are you doing?” You giggled as he twirled you around in his arms, wrapping his arms tightly around you, “I’m not even that good of a dancer.”
His shoulder shrugged, “you don’t have to be, plus you’ve got me to guide you, so you know you’ll be in safe hands, just follow my lead and you’ll be fine.”
“Please don’t drop me.”
“I would never drop you,” he chuckled, twirling you around, before pulling you back close. “Maybe we should take dance lessons or something, this is fun.”
“This is the first time we’ve ever danced together Tae.”
“I know, but I like it.”
Jungkook:
He knew you’d been stressed out for a while at work, which is why when he showed up to your studio with food, he wasn’t surprised to see you struggling through your rehearsal as you always did. “You can take a break, I’m here now,” he announced when your eyes met his.
“I don’t have time for a break,” you told him, but that didn’t stop him grabbing you and sitting you down beside him. “I need to finish the routine.”
He sighed, pinning you down to the ground, “what you need to do is relax and let me look after you for a while. Eat up, you need some food in you.”
“You got my favourites?”
“Of course,” he proudly giggled, “I knew you’d be having a hard time, and I knew nothing would cheer you up more than all of this, am I right?”
“Yeah, you’re spot on. This is perfect for me.”
“Good because you deserve it.”
---
Masterlist
#bts#bts imagine#bts reaction#bts reactions#bts scenario#bts scenarios#jin imagine#yoongi imagine#hoseok imagine#namjoon imagine#jimin imagine#taehyung imagine#jungkook imagine#bts drabble#bts one shot#bts fluff#jin#yoongi#hoseok#namjoon#jimin#taehyung#jungkook#bangtan#bangtan sonyeondan#kpop#kpop imagine
358 notes
·
View notes
Note
I would love to hear your thoughts on YJS3
sure! fair warning, though, I'm a ranty person by nature so this might end up being a bit long. sorry in advance ♡
anyway! things I liked:
the humor: s3 was pretty funny lmao, theres that whole collection of outta pocket scenes from throughout the season that I find hilarious each time + the humor was a little more dirty which is nice bc the audience has also grown up from the kids they might've been when they watched it on CN
dickbabs!: I'm not a huge fan of dickbabs, I prefer dickkory (no hate to dickbabs stans btw I just vibe more with dickkory) but this dynamic between the two of them was so sweet and well-balanced I couldnt help but squeal everytime they were on-screen
Clark and Conner getting along: them calling each other brothers was so CUTE I canttt
FORAGER: an absolute legend 10/10 freaking love him
That Episode With The Hallucination: mmmmmmm I miss wally. SO MUCH. and the og 6 I was Super Mad about the first timeskip so it was nice to see them all together again🥰
yeah that's about it for things I liked lmao. now time for the Much Longer list of Things I Hated:
HALO: young justice the bar was so fucking low how are you still successfully doing the limbo what the fuck. you take a muslim immigrant in what is VERY CLEARLY a hijab and 1. infantilize her to an exceptionally uncomfortable degree (I KNOW SHE WAS THE MOTHERBOX, I DONT CARE) to the point where she resembles a five-year-old with every sentence she speaks or action she takes 2. you made a visibly muslim girl claim that she's actually no longer muslim, she's just wearing the hijab as some kind of security blanket???? I'm sorry??? what the fuck were you aiming for here exactly 3. why did you have to name her violet harper. what. 4. really?? the immediate romance with brion? What the shit was up with that...you make her Muslim in some aspects like victor not seeing her hair when she brushes it but her LITERALLY making out with brion like I'm sorry what the fuck are you doing??? you had one muslim character and you fucked up so bad holy shit...like...it could've been simple as hell, man, but no...Big Yikes.
M'gann: I've said this before but I really feel like once they introduced artemis m'gann immediately became a side character whose only job is to be villainised again and again even though it doesn't really vibe with her character. Secret teams?? Lying to Conner??? This isn't s3 but that whole thing with their breakup in s2...what the shit are they doing to M'gann, man. I loved her so much in s1, she's literally trying her best after having gone through so much and it's never fully explored...like we get half explanations every season but we're never shown half the shit that we were given for artemis. And by making her the Uncool Girlfriend at points it just looks like they're trying make her easy to hate like what the fuck. no. stop it
The Plot: too overcomplicated, too many characters. It's only season three, why are you introducing Apokolips already. Why are there so many characters?? what's with all the subplots yall were switching location cards every five minutes. And it's so convoluted...like...what was going on with Beast Boy and the monkey-god-doom-patrol-exposition stuff? I can't even remember if there were two granny goodnesses or just the one. All of those meta kids left over from the last season are a cute cast but like...I was so bored??? we know you can do well-written self-contained storylines a la s1, so hop to it, yeah?
THE ANIMATION: ok ok ok so. season 1 and two (one especially) had a very distinct feeling to them and that feeling was very late-2000s Cartoon Network Action Show - the base model for the males and females is the same (like Ben 10 Alien Force) the colors were not dynamic (stayed the same no matter the lighting, lots of cel shading, and generally were realistically colored in the sense that suspension of disbelief was not entirely necessary) CHEEKBONES, gritty textures and purple skies (Batman the Brave and the Bold). overall theres a certain Tone to the earlier seasons that spoke a lot to the animation capabilities of the studios at the time, as well as the general feel of the show. however, season three was a MAJOR downgrade in terms of animation. they made it both simpler and more complicated - they started using their DCAMU animation style which while it does give muscles to the women, adds too many unneeded shadows and a strange stiffness and dullness to every character. There are now extra lines and uncessesary shadows on the face of every character, and their eyes and facial features are almost identical. There's also less highlights, and the hairstyles are way too overcomplicated now to be appealing (see mgann and dick) - the hair is unspeakably dull and and the skin tones and hair colors are painful on the eyes. This isn't even taking into account the shitty backgrounds they've started using (AHEM AHEM ARTEMIS'S KITCHEN) because while the earlier seasons may have had unappealing, mostly empty settings, the characters still fit in to the scene, unlike now.
the lack of sisterhood????: apparently, only artemis goes to see zatanna for her Dr. Fate appointments. Apparently, M'gann barely talks to Artemis after the very tragic apparent death of Wally. the two of them, dare I say even the THREE of them, should be close as hell considering they spent their early years super-heroing together on a team full of boys. M'gann LITERALLY called Artemis her sister in the SAME EPISODE she was introduced, and neither of them had any real girlfriends other than each other at this point. M'gann who fell apart so hard Artemis died in her head that she almost killed them all in her grief. Like. You're telling me, you're SHOWING me that these two aren't each other's support system? Where is the sisterhood, bitch????
Lastly: the costume design. I understand that they're constrained by the need to make it simple enough to animate, but COME ON. if you're going to borrow Diana's DCAMU/JL: War costume, at least keep the metal silver. What the fuck is that green-gold. And Tigress? god DAMN that mask is ugly. Cassie looks like she robbed a goddamn supermarket discount clothing aisle for her outfit. Why is bart's outfit Like That it's so ugly it makes me want to cry. @ young justice costume designers Please Rethink Your Decisions
that's about all I can think of right now. it got REALLY negative whoops, but theres just so much I didn't like about this season :/ hopefully the next one will better ;-;
31 notes
·
View notes
Text
Blender Experiments: Week 2.
This will be my second week of experimenting using the free 3D Animation programme, “Blender”.
Last week, I made it my goal to create a sort of ball or soccer ball shape. Although I followed a tutorial last time, I felt as though I approached this task unprepared, and I was unable to get the end result that I wanted. I did, however retry a few times, and that left me with a better result, but it still wasn't exactly what I wanted.
This week, I made it my decision to spend more time researching the best tutorials for beginners. A few of the websites I had visited suggested that before creating anything on Blender, beginners should attempt to master the “Shading and Lighting” tools that the programme offers. Since I had not even noticed the shading and lighting tools on my first try using Blender, I decided to dedicate my time to that today.
Albeit backwards, at least I was learning the ropes of how to use Blender properly.
The tutorial I decided to follow, which was recommended, was this one by YouTuber “CG Cookie” as part of their “Blender Basics” series. Right from the get-go, I found the way in which this person spoke and guided you through the tutorial to be a lot easier to follow than the first tutorial I had followed from the channel “Blender Know-How”.
However, I quickly realised that I could not use this tutorial, as it was so old that my programme options looked much different to theirs. It was back to the drawing board for me.
I went back to searching, and quickly came across this video by the Blender channel themselves. This video was created a year previous, so I decided to take a look at it. Whilst still a little complicated and intimidating, this video went through many of the different shading features.
The tutorial first opened the “Shader Editor” which allows users to experiment with different types of shading. I first noticed that while this was a simple walkthrough, I still didn't have a texture that I wanted to use. In the tutorial, they use a wooden planks texture. However, as not to overcomplicate things for myself, I decided to first try it without a texture, and then after I had managed that, I’d try a texture.

For this particular tutorial, I had to experiment with using the “Gradient” texture Node. I had never tried to add Nodes or textures on Blender before, so it was very interesting to see the differences it made.

Adding the Node looked like this, and I had to connect the “Colour” plug of the node to the “Base Colour” plug which was part of the block. After I finished that, it looked like this:

Which, as you can see, is definitely a gradient texture.
The tutorial, however, was using an image texture, and wanted to take it a step further. I did not have an image to use, but I was excited to continue working with what I had, so I followed along.
The next step was to explore “Colour” nodes, and since they had an image they wanted to incorporate the shading onto, the tutorial used the “MIX RGB” Node. I, even though I did not have an image, decided to follow, just to see what happened.

I noticed that this Node somewhat softened the look of the gradient, but I wanted to take things a step further, so I changed the “Colour2″ box to this lovely deep purple shade, using the colour wheel.
It came out quite nicely, looking like this:

I was delighted with the results, and delighted with how easily I could follow along with this tutorial, suddenly things seemed a little less complicated than they had before, but the tutorial was still not finished. The next few moments were all about that all-important image texture. So, even though it was a little out of my comfort zone, I decided to try it.
More research was definitely in order, as I needed to find out what kinds of images you could use as textures and where to find them.
So, once I had that down, I once again, went backwards in learning to use this programme, and went back to the start of the tutorial.
I had decided to use this nice image of some purple velvet fabric:

I thought that the spiral way that the fabric was sitting might look interesting, so I decided to use it.
After some exploration with the input and output plugs on my nodes, I found that these settings worked best for me:

Overall, I was a little surprised with how long it could take to complete a 7-minute Tutorial when you are not experienced with the software you are using, I think I spent almost an hour on getting the gradient and colour right the first time around. However, after a long time of experimenting and changing different things, I was very happy with the results:

While I don’t think this something I can add into my final video, I was very happy to have gained some experience in using this software. What seemed impossible for me to understand at the beginning, now seemed a little simpler. I know that next time, I will have a lot of fun trying to create something else with better texture and shading. This tutorial has only pushed me to want to learn more.
0 notes
Text
Creating A Repeat Pattern
Now that I have analysed some repeat pattern designs and know what sort of thing I need to achieve by the end of this task, I will be moving onto producing my own. I will be using illustrator to do this whole process which is good because I wont have to transfer objects from one program to another.
Before anything, I firstly had to decided on what font I was going to use along with what sort of objects I was going to draw as well. I knew I had to do around 3 to 5 objects otherwise the pattern could either look too boring or too complicated. I decided to start with an axe which I did previous mention in my last post. I think this object will be very simple as there isn't really many details to add to this object. This means I can then draw some more detailed objects later on. So I started by getting an image from google chrome. This didn't have to be a high quality picture as I was only tracing it which meant I only needed the general shape of the object.
Below is showing the general shape I traced from the image that I used. Although this screenshot wasn't actually how I left it. Once I tried adding the colours onto he design, it seemed very boring and looked quite messy too. I solved this problem by redrawing this axe completely, so that there was another section at the end of the object. This meant I could add in another colour to the piece. While doing this, I slightly changed the shape of certain places too. To draw this, I used the the ‘pen tool’ and just went around the image that I had placed behind. I had both of these things on a separate layer so that it made it easier for me.
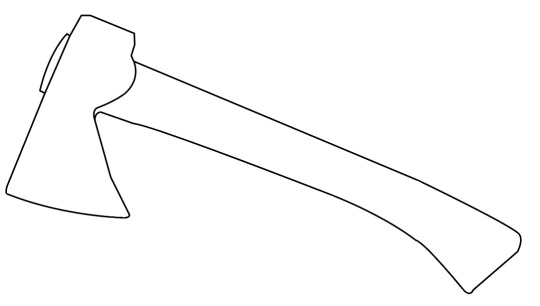
Here, is the final outcome I produced. I think this looks overall quite effective especially compared to when I coloured it before. To do this, I have gone to ‘object’, ‘expand’ and then selected the drawing and clicked on the ‘live paint bucket tool’. Doing this mean you can now choose any colour and click on the areas you want coloured. Although before this, I decided on having this brown stroke as I felt this would add to the outcome. I remembered in one of the repeat patterns in my research did this and I thought it was really effective. I then went ahead and coloured in the rest of the object. Before, this stage, I had actually already decided on what colours I was going to use throughout all my objects. The colours were light brown, dark brown and green. I felt that these reminded me of nature but also looked really striking together.

I have then moved onto my next object which I chose to be a jar of Nutella. The reason for this is because I feel that a lot of people know that this product contains palm oil. But even if the viewers didn't know this, when looking at this repeat pattern design they can then learn form looking at this. As well as this, I asked one of my peers as to what the first produce that had palm oil in came to mind was, to which she responded with Nutella. I think that overall this was a god decision to go with as I found it easy to trace but also as everyone should have at least heard of this product/brand.
Below is presenting what the result of this drawing looks like after tracing it. As you can see, I have added a highlight onto the corner as I thought this might improve the overall look. I decided on only adding in one of these as it could become too much otherwise. Another thing is that I also felt to only draw on the word ‘nutella’ and not the image that would normally be sitting beneath this. This is because it could overcomplicate things and once it has been placed onto a repeat pattern design, this wouldn't show at all.

This is the outcome after adding in colour to the piece. From looking at the jar whilst doing this, I thought to have the letter ‘n’ in green as this would then relate to the real jar. The reason for this is because this letter is a different colour on the real jar so to make this seem as realistic as possible I did the same but with my colour palette. Once I have finished doing this, I was actually very surprised with the end result as it looks so clean and effective. Again, I have added a thin stroke to which this time it is the dark brown colour instead. This now means that the lid and label of the jar standout from the background.

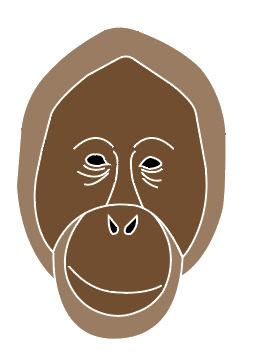
Here, is an orangutan that I have traced once again. This is the object that I did previous plan on drawing as i would say this is one of the most obvious objects that people associate with palm oil. Or at least the main animals that gets effected by this. As you can see from looking below, I have created the lines so that they are thicker this time. I did this because I had already planned on what colours I was going to use. But I also thought that as there are more details features in this drawing, that I would make sure they are all visible. This animal took me quite a lot of time to get right as I couldn't get the line and shape right at first. Although, I ended up manging to do it and I think it has achieved an appealing effect.

This is now showing how I chose to produce this object when adding in the colours. I thought that as this was the main element and the most detailed too, that I would make this a little more prominent when I get to adding it all together. So to do this, I thought to use white as the stroke this time rather than a colour from my palette. I though that this shade would make the lines I drew pop out a little more. Next, I decided to have the outside sections from the mouth areas and face as being the light brown with the centre parts being dark brown. I couldn't add the green colour into the piece as there was no space for it to go, but I feel that this doesn't matter. To finish this off, I chose to have the eye and nose area as being black.
After this, I decided on drawing one more object, but at first I want sure on what this was going to be. I thought of having an inside of a log where I could show the lines that go round. But just as I was about to try this idea, I thought that I could have palm fruit instead. This then relates a lot more closely with my theme but I have also used palm fruit in my collage design as I knew what they looked like. Once I got some images up on Pexels, I wasn't sure at first on whether to go for a single palm fruit or a bunch. I chose to go on Pexels as I knew from previous work that there are some good quality images I could use.
I then traced around one of the images where I decided to only include three of the palm fruits which were the three at the focal point of the image. When I started drawing these onto my page, I wasn't sure at first on how they were going to come as they didn't look like palm fruits to me. However, once I had added the colours onto the piece, I think this completely changed. As shown below, I have put the stroke as being the light brown colour with the main part of the object being dark born and details as green and light brown. Now looking back, I probably could have made the stroke a little thicker as it hardly shows.

Here, is then the font and colour at which I chose to add to my pattern. I did actually use this font in the previous work where I was adding text onto my symmetrical designs. But I thought to use it again as I was attracted by the idea that it was a serif font but had a bit of curve to it. Another thing is that I chose to ever so slightly change the position at which each letter sits at. So to do this, I went to ‘object’, ‘create outlines’ and with the ‘selection tool’ I can move each letter individually. I only repositioned a few of the letters but I just wanted the letters to all be close to one another. This should then work a lot better once put on the design as it wont mix with any other elements.
As you can see, I have also changed the colours so that the first word being ‘palm’ is in dark brown and the other is green. I thought this would give a little more interest to the words and match with the colour theme.

Here, is the first composition I put together, where I have duplicated a couple of the objects to fill some of the gaps. The page that I created for this was 200mm x 200mm. This is a perfect square which is what I wasted as the repeat pattern process will work better this way when it comes to changing the layout later on.
As well as this, I have added another element on the page too, which is another bit of typography. I chose to do this because I thought that having a more messgae based bit of type could help to give a point across as well as for the viewers to understand what this is about too.
I have also rotated the text so that it is no longer written horizontally. The reason for doing this is because it will make the overall pattern become less predictable.
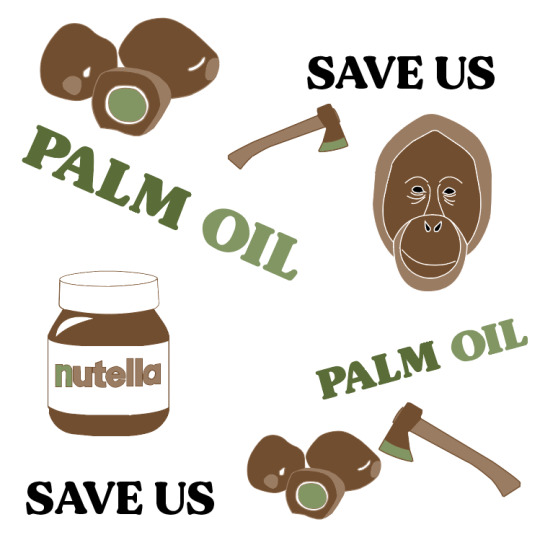
Although, this previous pattern didn't seem quite right as there was areas in which didn't look very effective. Beneath, is presenting where I have drawn a black rectangle behind the rest of the design. I chose to do this because it will help me to know what its going to look like later on when I start adding background colours to the piece. I can now see what areas will show the background and parts are filled. When I did this, I saw that there were two gaps in the palm fruit. I didn't like this so I covered it up with another shape presented behind.
Additionally, I think this new layout works a lot better. I have reflected one of the the axes so they have a complete different look. I have aloes thought carefully about the sizes in which I have each object. Further more, because there is a black background here, this meant I had to change around the black type so that its now white. To me, I feel this achieves a really striking effect as it looks very clean and pops out from the backdrop.

Lastly, this is the exact same composition as the previous screenshot but I have just taken away the black background. The reason for this is because this was only a test to see if it still works with a different colour. Also when it comes to actually turning this square into a pattern, I can’t add a backdrop at this point. This step comes later on.

Overall, I have now completed the hardest and longest part of this process to which I’m very pleased with the results. At the start, I remember I had no ideas on what objects would work well for this but it was actually a little easier than expected. Along with this, I really enjoyed creating this too. This might have been down to the objects that I chose as they were quite simple meaning they didn't take too much time. My next step will be to turn this into a repeat pattern where I can then play around with colours.
0 notes