#i used no body or pose references and also drew these in 5 minutes each on average
Explore tagged Tumblr posts
Note
Do you have any tips for drawing bodies from multiple angles?
WROTE A LOT SORRY its under a cut!
honestly i dont have the most practice with it since a good 70% of what i draw is characters wait up standing looking 3/4s left or right orz BUT some things that helped with the few interesting poses i draw once every fiscal quarter IS.....life drawing orz
specifically life drawing sessions where you do a bunch of quick gestural figures (like a 60 second timer each pose) at the beginning and then slowly increase the time for later poses, like 2 minutes, then five, where you slowly increase the amount of detail and rendering each pose, and then one or two long 10 minute ones where you go all out. i think that kinda structure helps a lot to 1) warm you up and get loosey goosey with ur lines and 2) get in the zone to think about how bodies work without overwhelming urself - like in the 1 minute sketches you could basically only get a weird stick figure, in the 2 minute ones maybe you might get a little more definition in the sillhouette, at the 5 minute poses you got some folds of the flesh implied with a few lines and a bit of hatching, and by the 10 minute ones ur really thinking about how the different parts of the body all interact because you already did some practice (the previous poses) if that makes sense?
ALAS we are in a world situation where cramming 40 people in a room to silently draw one naked person for three hours is not......happening (at least not where i live) so for the past couple years ive had to make do with online resources, which arent half bad! theyre not quite the same, for me at least (i think in person i can see more interesting angles) but they do the job! here's some I've used:
http://reference.sketchdaily.net/en
https://line-of-action.com/practice-tools/figure-drawing
https://quickposes.com/en
https://youtu.be/mNNSwITdPIM (linking this channels clothed references so no one gets a surprise titty in the face but normally i personally use nude references) (although recently ive been using some clothed references as well just because i realized im so out of practice drawing clothes hsjlkfBJKLFJSFKLD)
figure drawing and life drawing and especially gesture drawing is also something thats kinda tricky to learn if no one ever taught you (and honestly its tricky if someone DID teach you lol) so maybe someday i'll get around to trying to explain what ive learned myself if that could help someone
ive tried using 3d models but ive never foudn them that useful, probably for the same reason i prefer irl models to pictures (easier to see whats goin on) BUT sometimes it can help as a rough guideline if ur doing a weird angle youve never done before!!
SPEAKING of guidelines. guidelines are ur friend. guidelines r ur lifeblood. guidelines will always help even if u dont follow half of them they are SO helpful - I OFTEN find myself kinda skipping them, like you can see here in this drawing i havent erased the sketch from yet that i drew a circle and then a line for shoulders and gave up (probably impatient lol):

BUT guidelines can help so much~ when im drawing a full pose i'll usually have guidelines that really are no more than stick figures like basically like:

stick figures with dots for joints and maybe some rough lines here and there like it doesnt need to be nice or perfect since its just gonna get erased anyway~ it helps me keep track of how bones work hjfsdskjvfdfs
OH and artist mannequins.....like 3d models theyve also never done me any good like those wooden ones? I hate em theyre so stiff and i dunno what to do with them BUT.....okay...action figures? not bad....like maybe not so much with anatomy but if you have a doll or action figure with good articulation you can kinda use that to help out with funky poses sometimes!! like i have this one gundam and honestly....even though its a mecha with a giant mecha dong or whatevers going down there its like....not a horrible mannequin for poses jfksdlfjrfkehjklsd
WITH REGARDS TO foreshortening.......................................we are all on our own with that one orz LIKE i have tried every trick in the book, every funky tip and method and technique and none have worked for me so i just wing it jhkDmFJKDLS WELL actually having like a page of really sloppy loose stick figure sketches where you experiment with proportions helps a lot!! i do that with weird poses or angles, like dont worry about about how it looks HELL unfocus ur eyes. unfocus ur eyes. i do that all the time while drawing and its great it helps you see the big picture and the silhouette without focusing too much on one thing~
anyway yeah i dunno i guess a lot is just experimentation but hopefully some of these resources might be useful!!
19 notes
·
View notes
Note
I really love the way you draw anatomy - you are literally perfect. Would you mind one day if you make a simple tutorial on how to draw anatomy, particularly hands and just keeping things in proportion. Sorry if this sounds like a demanding ask - u can definitely decline or not answer no offence taken x
First of all, thank you so much! <3 I’m so happy to hear that you think my anatomy looks good. I’m not sure if I can teach you anything, but I’ll try! And sorry it took me so long to reply.
I wouldn’t call this a tutorial, more like an outline of what I usually do (maybe with some tips here and there). Hope it’s at least a little bit helpful 🙏
I’ll start with how I draw the hands. Well, as you’ve probably seen on my previous post about this topic, I used to have a hard time with hands because I didn’t understand the logic behind them + my only reference was my own small and blobby hands. Practice helps a lot, but imo mostly because as you draw more hands, it becomes easier for you to break them into simpler shapes (this is important!) and imagine them in 3d in your head or as you draw.
When I draw hands, I start with a rough sketch. Basically I just draw a fingerless block first. It’s a bit illegible right now, but bear with me.
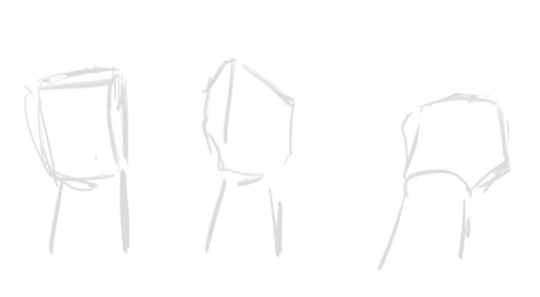
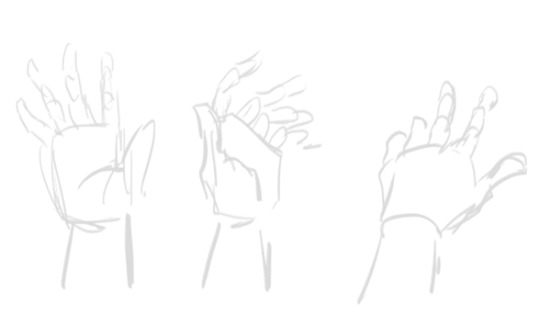
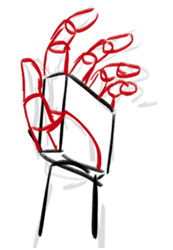
After this I add fingers. Once again, they’re all broken into shapes: a finger is just 3 short tubes connected to the block we just drew. Sometimes some parts of the “tubes” aren’t visible because of the perspective of the hand, sometimes you can clearly see all of them. As I already said, it’s all about learning how to imagine these things in 3d.
Since my sketch is so rough, I tried to make the shapes more clear here. I hope it makes sense.
After the sketch is done, I basically just… draw hands. Remember that this is skin and meat, there are going to be folds (??? Idk if this is the correct word) and stuff. And nails, oh nails… I scream when I remember the times when I used not to draw them lol They help to convey the perspective and the angle of the fingers, so for me it’s better to have them than not. I’m not drawing them the exact correct way, though, but still.
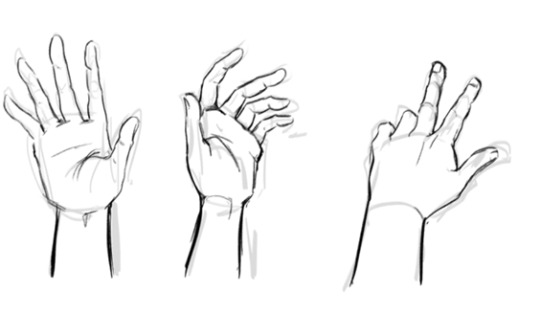
And once again, it took me a long time to start drawing hands more or less properly, and I still fix them all the time. For example, a thumb of the first one on the left is too short. In fact, I’d make all the thumbs bigger…
So yeah, something among the lines. It’s not perfect, but this is the basic idea of how it works, at least for me.
About proportions… Well, I’m one of those artists who like to make 1000000 sketches before I move on to the inking phase, it’s just more comfortable to me. This way, I give myself more control of the pose and proportions and have a lot of time to adjust and fix whatever feels off to me. Many good artists don’t do that because they don’t really need it.
First, I make a very quick sketch just to grab the “feel” of the pose I’m going for, plus it helps with the overall composition of the drawing. It isn’t detailed at all, so it takes about 5-10 minutes to draw, even less if I’m confident about what I want and don’t try to find the pose that would work the best. At this stage I try to keep the proportions in mind, but I don’t think about them too much.
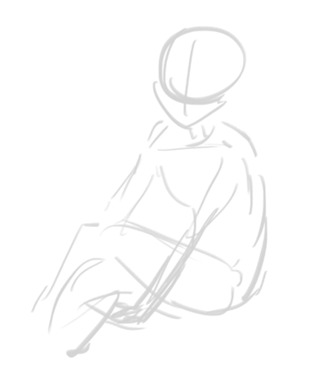
When I’m more or less satisfied with the basic idea, I draw my first sketch. At this stage I’m err building the body. There are a lot of ways to do that, I’m drawing something similar to a mannequin that is made out of meat. Oh no, that sounded horrible…
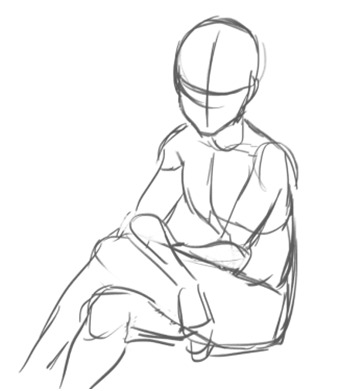
As you can see, this time I pay more attention to proportions and sketch all parts of the body properly. I make sure that both arms are the same length, both legs are the same length, that the shoulders are on the same level, stuff like that. At this stage I don’t think about the character, just about the body: I’m trying to make it make sense lol
Also you might’ve noticed, but I changed the position of the arms on this sketch because my initial idea didn’t really work (I tried to sit in the same pose and it was uncomfortable lol)
And then I draw yet another sketch. Sometimes this can be the last stage and I ditch the inking altogether and just colour this sketch instead, but more often than not it looks too messy and I have to make another sketch… (This is also where Katsu usually tells me to chill because we were planning to draw something simple and quick and I’m already making it complicated lol)
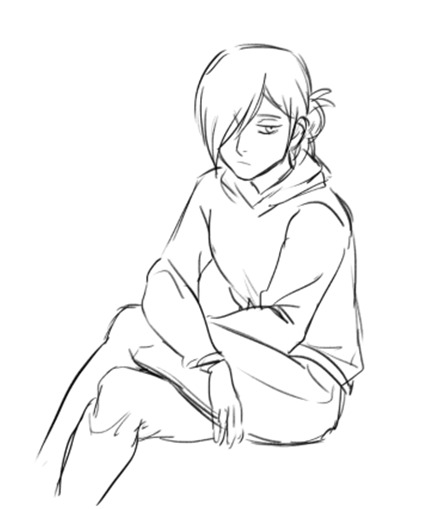
Here I’m adding more details, like face, hair, clothing, anything else that I need to sketch before inking/colouring. After this sketch is done, I look at it again and see if anything looks off. If it does, I try to fix it, adjust it, sketch it again, whatever works and whatever makes my sketch less stiff and more proportional. It doesn’t have to be super realistic proportions-wise though.
Things that I pay attention to when I check the proportions on my drawings:
Shoulders: they should be the same size (although the perspective can create a distortion, but this is a whole other can of worms) + ideally they should be able to fit two heads in them length-wise.
Arms: I check if they’re the correct length (the hand part should start ~at the crotch level). If the arm on the drawing is bent, I try to visualize how it’d look like if they were straightened up. If it’s difficult to imagine, I just sketch it.
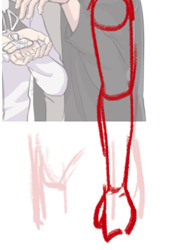
Oh, and the size of hands. I always check if they’re the correct size by comparing them to a face of the character: they should be about the same size (of course some people have larger hands and some of them have smaller hands).

Legs: same with arms, I try to make sure they are not too long and not too short. Also, when drawing arms or legs, you can draw this thing. The shoulder/hip and the hand/foot have the same distance from the elbow/knee. This… sounds confusing, I hope it at least looks understandable lol
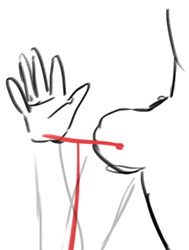
There are a lot of ways to check if everything is correct: sometimes I just put my fingers on the screen to check if all of the lengths make sense lol and sometimes I draw these lil lines to check if the lengths of the parts that are supposed to be the same match.
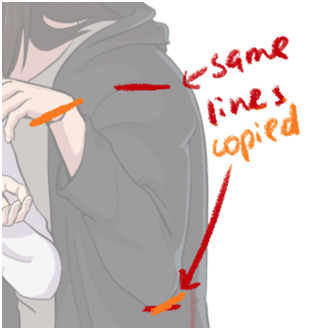
If your drawing looks off, just create another layer and sketch the body (the meaty mannequin thingie) over it again. It might help you see some obvious mistakes if there are any. Some people might say it’s too much work, I call this practice lol
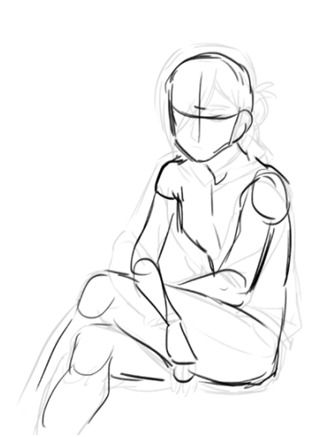
There are instances when I redraw some parts of the body completely. There are situations when it’s easier to do it all over again than to fix the existing sketch.
Another thing that I do is flip the image as I draw. Not very often though, you need not to get used to the flipped version of your drawing, it should be somewhat new to your eyes, this way your mistakes will be more visible to you. At least I think so…
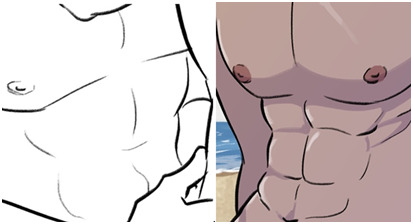
It also helps to pay attention to details as much as you can, they make a huge difference. I still have a lot to learn about how the abs work, but like a year ago I knew nothing about them aside from “err I think there are 6 or 8 of them?? And they start below the boobs” (my boobs were also more square). After I started drawing them more often and learning how they actually work, my drawings changed accordingly. I think the right one is at least slightly better haha
So yeah, this is more or less my process. It isn’t necessary to draw 10203100 sketches and to go through all these stages, but I personally feel much more comfortable doing that because this way I can be sure that I would’ve noticed if there was a major fuckup somewhere.
To be honest, if we’re talking proportions, this image is literally the only thing you need to know.
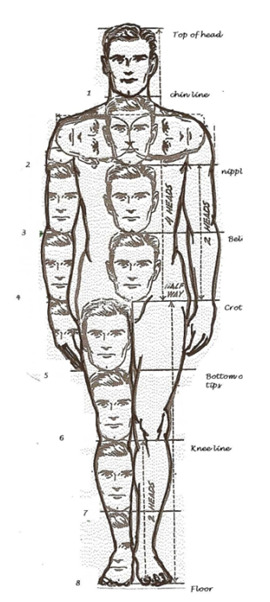
Just keep in mind how many heads are in the human body length, how many heads can fit inside one’s torso, etc. Compare body parts to each other accordingly. Just make a habit out of checking if the proportions on your drawings are correct: make a shoulder bigger, make sure that the legs are the same size. It might be too much at first, but it’ll literally become a subconscious thing very soon, and you won’t have to actively think about all of this every time you draw. I google this image from time to time just to make sure that I’m fixing everything correctly lol
You don’t have to be exact with these proportions, but they still need to have some logic behind them. Like here, if we look at Osomatsu, who is clearly very stylized, we can still see that his body is proportionate. His shoulders are too small for his head, and his body surely doesn’t have 8 heads in its length, but he still doesn’t fall apart because there is logic behind his stylization: his arms are still long enough for him to put his hands in his pockets; they aren’t too long or too short. Hope that makes sense…

Sorry for the long read. Once again, I hope it was somewhat helpful or at least interesting. If you have any more questions, please feel free to ask!
Although I’m still learning myself of course, so there are things that I probably don’t know or forgot to mention…
91 notes
·
View notes
Photo
Process and wip images for A House That Holds Long Limbs (Part 4)
Previous process and wip documentation: Part 1 / Part 2 / Part 3
Read the pages for part 4 here (full complete version will be linked from YYH North Bound master post)
This is a rare glimpse into how I tackle action scenes!! It’s rare because I rarely do it. Action is honestly one of the hardest things for me to draw, and as I’m sure I’ve said here many times before, I have the utmost respect for shounen manga artists whose works are steeped in them. It’s a really impressive skill to be able to do it well - to create a cinematic, dynamic sense of motion that doesn’t dissolve into visual confusion and incomprehensibleness.
This was as interesting for me to document my thought process as it hopefully is for you to read and discover what the heck was going on in my head (a big honking mess, that’s what). There was much screaming and crying while working on this hahaha.
Aside from Hokushin’s beautiful face (lmao), Part 4 is packed with things I don’t usually draw. Specifically: action, things taking place in the dark, and corpses. For things taking place in the dark, I heavily referenced the dark room rounds from the tournament for Genkai’s successor in volume 4, because it involves action and Togashi used practically zero screentones in it and I didn’t want to either. For the dead rokurokubi, I looked up photos of skulls and drew on my memory of various horror comics I’ve read, like Kurosagi Corpse Delivery Service. (At one point I also googled photos of rotting skulls, but TBH I didn’t really want to spend a lot of time looking at detailed photographic references of corpse and decomposing bodies for obvious reasons, especially as I usually work on these comics late at night before I go to bed. The last thing I need is for images to get stuck in my brain when I’m sleeping.)
The rest of this post focuses mainly on action and redrawing things.
Script
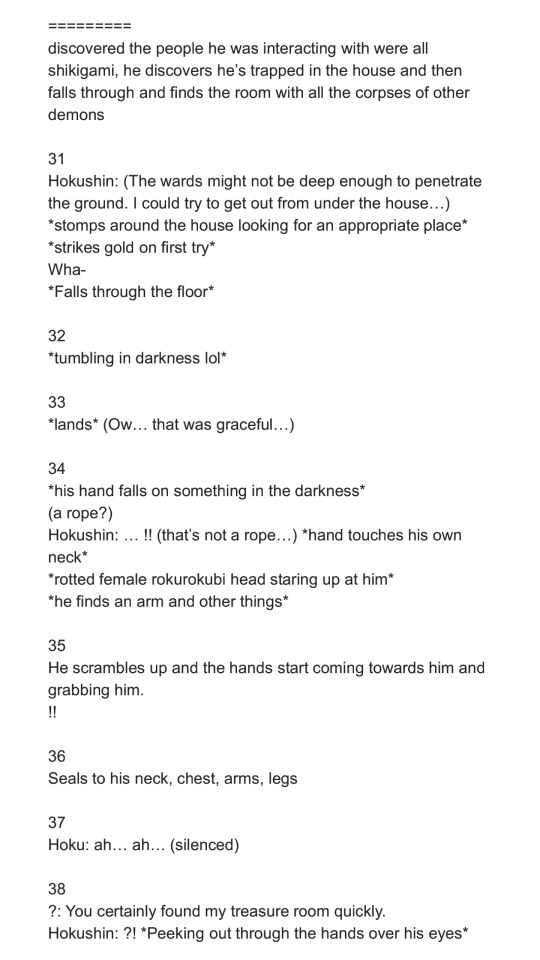
The original script for this section actually ran a little further in the story than what’s shown here, but in order to convey the sequence effectively, I ended up stretching a number of key moments out and have booted the later ones to be completed for Part 5.
Thumbnails
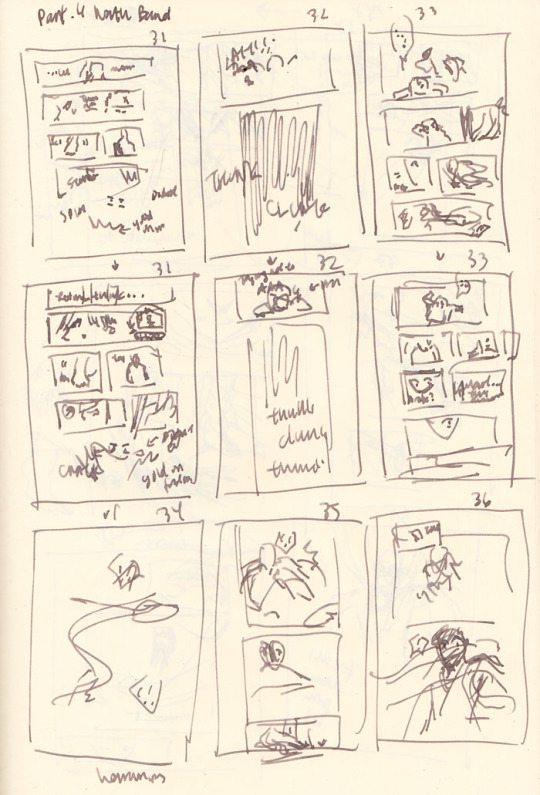
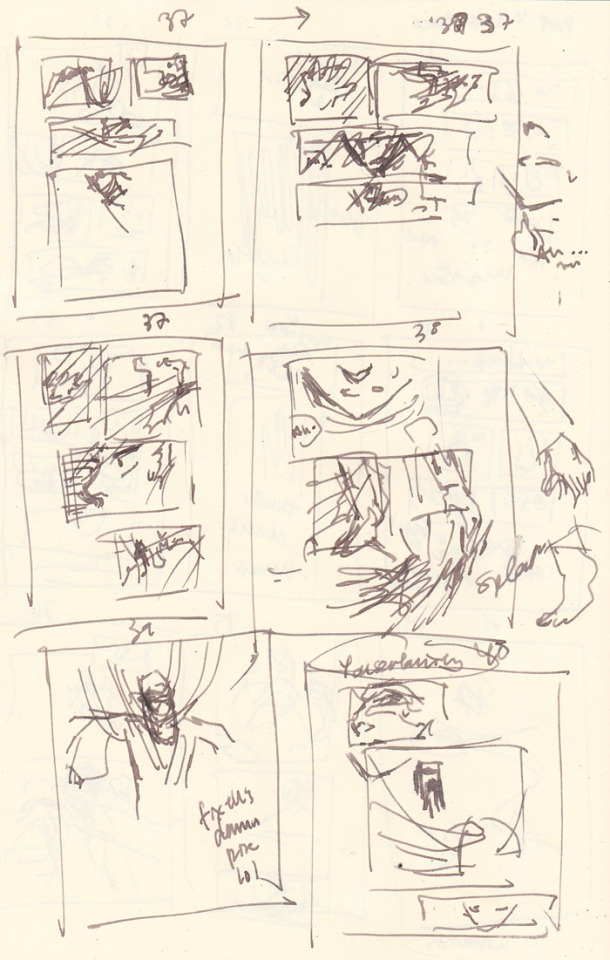
In the thumbnails above, you’ll notice quite a few are redraws of the same page as I struggle - pages 31-33 repeat immediately in the rows after, page 37 was attempted three times, etc.
Page count growth
A script of 8 pages turned into 10 pages at the thumbnail stage, and then ultimately netted out at 12 pages in the final version that was posted. As you can see, effective action sequences generally take me more pages than I think they will. With an exception (documented below).
Thumbnailing/storyboarding things out should theoretically minimize the page count creep! But because I tend to treat my thumbnails as such a loose stage (to avoid later disappointment when I can’t recreate it as nicely in the final page), I rush through them. Unfortunately, action sequences require me to think a lot more carefully through the scene as a director - staging the shot and the experience of the motion and coordinating people’s limbs and all the items in the scene more carefully and whatnot than, say, just a couple of heads talking. So inevitably, when I rush to get ahead to the finished pages, that’s when I realize it doesn’t flow as well as I was imagining (or not really imagining it).
As a result, the actual “live” pages turn into constant mental checks and runthroughs of the panels, realizing it’s not flowing as well as I’d like, and restarting. By restarting I mean mentally reenvisioning the sequence, sometimes quickly doodling alternate thumbnails (I didn’t bother in this case, so I have no alternate examples from after I started redrawing), and erasing and redrawing and adding pages. I guess I could probably avoid this if I just stop and put more time into thinking through the thumbnails… but it seems like I end up revising no matter what. So, constant juggling forever.
The evolution of the key action sequence
In my head, the main sequence was:
Hokushin lands.
He gets up and feels something in the dark.
He discovers the rokurokubi corpse.
He turns around to discover a swarm of hands in the dark!
Ahhh hands!! Ahhhh!!
Then he gets sealed and stringed up. End action sequence, back to people standing - or hanging out, I guess - and talking.
I roughed out my panels and pencils for all the pages following my thumbnails instead of doing one page at a time, because I’m impatient and also tend to think of all the pages as a wholistic narrative and then drilling down to the details on each page (big to small perspective).
As I went back over each page and detailing the base pencil art more, I began noticing more issues with the flow of the action and the pagination. Things started really shifting and changing at point 4. Here’s essentially how my thinking played out as I drew:
He turns around to discover a swarm of hands in the dark! - WAIT he just sees the corpse and then turns around? I should have him sense something is behind him first to get you more into his head and experience. OK, insert another panel of him sensing and whatever. THEN he can turn around. This is also good because I can erase the panel where he’s turning around and give the first panel a bit more room so I can draw more of his body in the first one and make his startled falling back motion a bit clearer.
HANDS!! AHHH HANDS!! - Wait, I have hands coming from BEHIND him and don’t effectively show that before they just appear to grab his hair. Which I suppose they do, but when I review panel flow it seems jarring, like a poorly directed cut and something was missing. Let’s try adding some hands behind him in the panel where he looks shocked. Never mind, this looks dumb and he looks dumb and basically seems even more like an afterthought. Ooh, better idea: let’s have him dodge the first wave of hands. That’ll be kinda cool and more interesting. And then he can land and be like OH SHIT MORE HANDS FROM EVERY DIRECTION
Ahhh hands!! Ahhhh!! - Hmm, maybe I should add a page here to better capture his dodge sequence. So the panels will be hands, dodge, and then the next page is he lands, then he realizes there are more hands behind him. How crouched down should he be? I guess in the later pages I basically drew him in a practically fully upright position… eh.. Working this out...
*starts drawing extra page* … Mmm, thinking about this again, no. It stretches things out too much. Now it feels like he lands, the new page adds an extra pause that could be interpreted unconsciously as he thinks he’s ok, then he gets attacked by hands from behind. But that’s ridiculous because he’s a rokurokubi, he KNOWS the hands can come back around or whatever, and he’s a good and cautious fighter, the extra pause doesn’t seem to fit. Thinking this through, basically I need it to feel faster - he lands (typed “he hands” there first time around haha), and he doesn’t have a chance to react again before it turns out hands are coming from all directions. So, I’ll keep it to the one original page and draw the reaction to the sound of the hands coming from everywhere. Done. (one of the few instances where I reduce page count in an action sequence)
Oh yeah, I forgot about his arms and legs getting sealed. Er, add another page. OK done.
For comparison, below are photos of the pencils for pages 35 and 36 before the above process:
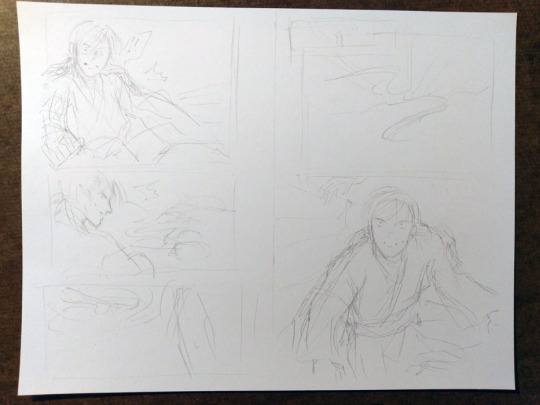
... and after:

Redraws
I generally try to avoid redrawing an entire image/page from scratch if I don’t have to. Even if I don’t like the overall drawing, I’m still terrified of effing up the parts that turned out OK the first time around. However, sometimes you gotta know when to cut your losses and start anew and save yourself time and grief (I’m definitely still learning how to know lol). I do have a few strategies to ease my mind - I often take photos of something before I proceed to the next step or change direction (which is where many of these wip photos come from). This helps calm me down because at least now I have a reference for what it was before I took the leap of faith to move forward. Another option is to just leave it and draw on a completely new blank page.
Page 37, where Hokushin is getting his head pulled back by the hands, was an incredibly rare instance of the pencils for a page turning out almost exactly how I wanted on the first try, so I was loathe to redraw or adjust it. This means I basically forced myself to shuffle things before and after to accommodate not having to change it.
On the flipside, page 40, where the shot backs away so you can see Hokushin tied up with the hands, is one I full-on redrew from scratch. I was having a hard time with his pose and how all the hands were wrapped around him and how everything was actually working. I wasn’t happy with the drawing the first time around, but inked it anyways to see if I would like it better the next morning (sometimes this works, to wait and look at it with a distanced frame of mind). Spoiler, I didn’t lol. However, the process of inking the entire thing helped me better hone in on what parts I liked and didn’t like, so when I sketched it out again I was better able to adjust.
This photo shows the original (with the words REDRAW :/ at the bottom), a sketch I did trying to figure out his posture and where all the hands were/how the wrapping actually worked, and then the pencils of the redraw.

Final miscellaneous things
The end page of Part 4 is once again a last minute addition that resulted because I was facing a blank page (again!) after adding the page where Hokushin gets his arms and legs sealed. I changed the spoken line multiple times. First it was a line that’s been pushed to the upcoming part 5, then it was the “You certainly found my “treasure room” quickly” (that’s on the previous page). In the end, I just wrote a completely new line for it. It seemed to work better with the panel and closing off this part at a good point.
Last but not least, I somehow broke my pen inking this part lmao. Fortunately it’s a Muji pen so I only broke the tip off the cartridge somehow, probably in my intense scribbling/shading at some point. It’s not super clear in the photo but if you look closely at the point you’ll see this thin line coming out of the tip of the pen - it was this metal filament that basically scratched the paper without any ink coming out. I had to make an emergency run to two Mujis, neither of which had the black refills, so I ended up just buying two pens with similar thicknesses. Worst case scenario, I would have just inked with my blue cartridge, since the scanning would turn everything black and white anyways... the original pages would have just looked weird.

Phew! Hopefully it worked out and isn’t a totally incoherent mess!
#yu yu hakusho#comics#fanart#hokushin#wip#process#drawings#yyh north bound#art by maiji/mary huang#action sequences#redrawing#art supplies
5 notes
·
View notes
Note
i'm sorry to ask since i know there is no straight forward answer so please don't feel pressure to reply. how did you, personally, learn basic anatomy? i try to read and follow tutorials so much but struggle with angles and proportions and different positioning of arms/legs etc. i find it more helpful when i read advice from artists i admire, my progress increases a lot instead of googling tired strict methods! so that's why i'm here. thank you and have a great week!
hello! it’s okay to ask, i’ll try my best to answer it!
- ask your family members to be your models and make some quick sketches. i know it sounds stupid, because maybe they are to busy to do such things, but if i struggle with some poses or drawing a hand, i usually ask my sister to be my model! and it works!
- ask people around you about your drawings! show them to your drawings and ask them what they think about the poses: they will definitely tell you if the pose or the angle is weird! they’ll also help you if you draw some body parts bigger than it should be! (for example if the head is bigger, or the legs are short, believe me, they’ll notice!)
- use references! i know you mentioned it that you struggle with tutorials, but believe me my friend, pinterest has the best art references in the world! if i don’t have a model i ALWAYS use pinterest!
- practice a lot! i attended an art school some time ago in the prehistory, and we drew a lot quick sketches of each other. they were like 5 minutes sketches, we always had a model among us, and althought we hated it, we also learnt a lot.
- alsooo! i always get inspiration from other artists! check out how other artist draw bodys, faces and hands. i don’t tell you, to copy them, but their art styles and drawings can also help you a lot i guess, because in my case it worked!
well i think it’s all i can tell, because these things helped me a lot when i started to draw! in my opinion the best way to improve your skills is practicing and trying harder! i hope i could help a little with these!!! you too have a great week!!!
20 notes
·
View notes
Text
Week 6
Day 1 - Character design
Today I had a workshop which elaborated on the independent study I had to complete over the weekend.This work was to complete a sketch book and develop characters using similar techniques to the workshop I had in week 5. Todays workshop helped me identify which character I wanted to use and I was able to draw a cast of characters as well.
The first exercise was to develop a cast of characters by drawing them on 3 lines so I could see the similarities and differences between them.My characters looked fairly similar and had a sitcom based cartoon aesthetic to them.However the downside to this was that the body shoes and sizes where almost identical meaning there was hardly variations in the characters themselves.The second exercise was to focus on one character and draw theming series of view ; front , three quarter , side on and back view.This helped create a turnaround and show the character in full light.This proved beneficial for the third exercise which was to show my character in a series of dynamic poses.I soon realised that the legs of my character where to small to show a dynamic range of poses so I quickly rectified this to enhance the sketches. In addition I found it difficult to draw some of the poses due to an inconsistent action line.The final exercise was to draw the character in a walk cycle, this proved quite challenging as I was now putting a face on a walk cycle so I had to make sure that it stayed consistent during each of the key frames.I want to add a bounce to the walk cycle to ensure I’m getting the point across of what my character is feeling about walking and listening to music.This bounce will include his earphones moving on and off his head in an upwards motion.
Day 2 -Character research
Today I had a lecture on Harvard referencing for my essay.This helped me understand how to properly cite my research and develop the skills needed to do this.This lecture will prove beneficial in the long run as I will have more essays to do over the coming years. My essay is coming along well I am currently at the 900 word mark and just need to write a suitable conclusion for it as well as placing the correct citations and references learned in this lecture.
Day 3 - life drawing
Today in life drawing I focused on light and shadow that hits the body from certain angles.I had three exercises to complete in this session the first was to draw the form of the model in a minute and then spend a minute shading the areas where light hit the body. This was. Fruitful exercise as I can see how my life drawing has improved since last week as I can see the main shapes if the body better.I can also produce a better quality image within the time frame.However the medium of of charcoal is unforgiving as once I have made a mark on the page it is very difficult to remove so it meant I spent more time looking at the model than drawing.In addition I still maintain to draw the legs too short so next time I will draw the legs slightly bigger than the length of the body.
The next exercise was on black paper using chalk, I had to draw the areas of light where it hit the body.This showed how an image can be created using empty space on the page and through minimal mark making.However with this exercise I was still drawing the legs to small and congested in correlation to the body.
The final exercise was to use brown cartridge paper, chalk and pencil to create the full form of the model in 20 minutes. I rectified the mistakes I was making in the previous two exercises in drawing the legs too short in relation to the body.This piece looks visually striking and the contrast between light and dark tones is clearly visible.The brown paper acts as a mid tone that compliments the light and dark tones well.However In thi spiece I drew the neck and chin of the model too high up in relation to the body.
Day 3 - Character design
Today I had a workshop on creating my cast of characters digitally on photoshop. I used a Wacom tablet to draw my cast on multiple layers.The first layer was the initial pencil outline of the character in basic shapes this helped establish the characters form.The second was the the crisp line-work layer and the rest of the layers where to establish colour and highlights.In this workshop I discovered a new robotic character I wanted to introduce into my cast.I think he contrasts the rest of the characters really well as he is distinctly different in body shape however still remains the consistent look with the rest of the characters. However I did struggle in this workshop with getting used to to the Wacom tablet itself as I kept zooming in and out uncontrollably which became frustrating.This will hopefully subside as I continue to use Wacom tablets in future workshops.
0 notes
Text
XB1101 Assignment 2: Character Design
Developer diary
I started the project by filling out my character sheet to fill out the characteristics which I wanted to implement into my character.

As I had never played a narrative game of this nature before, I found a photo of a human cleric on the internet and used some of the features of this pre-existing character and crossed it with the features of my character sheet.

I put the chain-mail armour over a cloth under top to avoid the chain-mail metal from rubbing against the skin and to keep my character warm. I gave him a leather hood so he can avoid rain water or snow from running down his face and to keep as much enemy blood off his face as possible. I have also given him a Warhammer based on the reference photo. He is standing in a neutral stance as his journey is yet to begin.

Drawing 2
I did some research in lesson 8 looking at Warhammers, symbols, religious dress and real armour, chain-mail and shoulder guards. I needed my character to have more meaning and realised the symbol in the reference drawing was used for the Warhammer shape, which I liked the idea of, so I decided on a symbol and shaped my Warhammer to be similar, as it gives more of an intention that my character is fighting for Helferth. I also realised that shoulder guards would be important for my character, especially with a weapon like a Warhammer, as without them, my character would be vulnerable to attacks from the side whilst swinging, so I gave my character shoulder guards based on the one below, as this is a realistic interpretation of what the shoulder guards would look like.

After researching symbols, I found a symbol of faith which I liked the look of from Africa. With this, I created the backstory of Soldem going to Africa, picking up the religion of Helferth and learning/ teaching Helferth’s work. I recreated the Warhammer to be shaped like the symbol of the Divine, as it gives the Warhammer more purpose to be used by my character, as a random one does not have the same impact or effect design wise.

I also added an adventure gear bag with the African symbol of spirit on it to add to the African theme and for Soldem to keep his gear in. One more thing I added was the patterns on the undershirt/ on the sleeves. Whilst researching, I found that African culture has a lot of very colourful patterns on their clothing, so I have endorsed this onto the sleeves of my character.

I came up with the summary and reasoning for every part of my character:
Hood: The hood has been added to protect and cover the face of Soldem in cold and rainy weather, to keep his face warm and to stop the blood of enemies from getting onto Soldem’s face or in his eyes.
Chain around the neck: The religious symbol of Helferth is on a chain so it is close to his heart and is an indication of Helferth’s guidance. From researching, religious people wear necklaces with symbols on to represent luck, to have symbolic meaning on their person and as an indication of religious commitment. Some Christians believe that wearing a cross offers the wearer protection from evil.
Shoulder armour: Protect when using/ swinging his Warhammer as his sides and shoulders would be vulnerable.
Chainmail: Armour to protect his body/ chest, given to Soldem on the character sheet. The chain mail armour protects against slashing blows from bladed weapons and stops penetration and piercing from weapons.
Patterned clothing: This clothing is designed to stop the chain mail from rubbing against the skin, keeping Soldem warm and contains African patterns/ bright colours to keep in line with African dress and to deepen the African vibe which Soldem has gained.
Stole: The stole is a long cloth worn around the neck like a scarf by religious clerics, usually featuring a religious symbol. The stole also reminds the cleric of his authority and dignity as a priest and his duty to preach the word of God with courage and conviction to serve the need of the faithful.
Symbolised Warhammer: Using African symbol of faith for the Warhammer, it symbolises that Soldem is hitting enemies using Helferth’s power.
Symbol of the divine: Based on the African symbol of faith to follow Soldem’s backstory.
Pouch and belt: The pouch and belt can be used to hold Soldem’s stole so it does not get in the way. The pouch is used to hold the dungeon rations.
Leg armour with ties on: The ties are used to hold the metal leg armour to Soldem’s legs and the leg armour provides protections against low attacks.
Boots with long leather: Under the leg armour are long boots to stop the metal from rubbing against Soldem’s skin and to keep him warm.
Bag: The bag is made from leather as after researching the best material, leather is the easiest material to gather for bags and is the easiest to care for and ages gracefully.

Drawing 3
This represented a scene from the first session of Dungeon World. In the story, we were attacked by vines which has affected the pose and image I have drawn. Earlier in the story, my character tripped and cut his nose which is why he has a cut on his nose in this image. I decided to cast the expression of anger and slight madness on his face with maybe a hint of happiness whilst attacking the vine monsters. The stance I used as reference was of a baseball player swinging a bat at a ball, which in my drawing, is the snake/ vine monster.
He is also at the bottom of the path in the trees so I drew the background having a path continuing towards the distance. I have my character in all the same gear, swinging his Warhammer at the vine monsters.

Drawing 4
With the second play session, we continued up the mountain path and began climbing a spiral staircase before being attacked again by the vine monsters breaking through the wall. With this, I drew my character climbing to a higher ledge above with the grappling hook in it. My drawing was referenced from a man climbing a rope. I drew the vine monsters breaking through the wall with the wall having cracks in it to reference what had happened previously in the story. His Warhammer is on his back in the belt in a similar fashion to how Romans put their sword in their belts.

Drawing 5
For the fifth drawing, I drew Soldem pointing at a rock golem which we were facing in the story. I drew the Rock Golem to look bigger than Soldem as that was how it was described by the GM.

Since then
Since this game I created drawings of Soldem’s robes which I have researched using Buddhist, Muslim and Christian dressing and the armour which we found on the table in the last play session, which I researched medieval armour to create. I then coloured the main drawings using Photoshop and created the documents for the hand in.

Adventure journal
Week 1- Tavern
After coming home from studying and teaching the works of the Great Lord Helferth in Africa, I returned to my home town of Norshore and decided to visit my little local Tavern; The Dead Man's Bluff. Whilst supping my mead at a table on my own, I witnessed a female druid head towards the quest board at the other end of the bar. I realised I do not have any quests to complete now I am back home, so I picked up my drink and approached the druid, then asked if I could join her on her soon to be quest, to which she agreed. She introduced herself as Edna, before taking me over to a table with a fighter sitting on it. Edna introduced him as Leo, we shook hands and began talking.
A couple of minutes later, a fight kicked off by the bar. Me, Edna and Leo all sat and watched the fight unravel from the table. It was a dwarf fighting a larger Bard. With one swift hit, the dwarf managed to knock the Bard across the bar into a table with a Paladin sitting alone, looking a bit tipsy as he was swaying slightly. The Paladin stood up, looked at the man then marched over to the Dwarf, who was looking pretty impressed with himself after knocking out the Bard. On reaching the Dwarf, the Paladin attempted to punch him but missed. The Dwarf realised the danger and punched him in the shoulder. After a couple more swings each, the Paladin kicked the Dwarf so hard that he broke his ribs.
Impressed with the Paladin's fighting ability, Edna, Leo and I approached him. I offered to buy him a drink, but not looking where I was going, I tripped over one of the broken table legs; falling and cutting my nose in the process. It took a few attempts, but eventually Leo managed to persuade the Paladin to join us on our next quest. I asked him his name and he replied 'Gundarr'. Gundarr tried to heal my nose, but couldn't manage it as he was too tipsy to fully concentrate.
We all returned to the quest board. There were 3 quests: 1 was to explore a dungeon, 1 was to explore a forest and deal with orcs and the other was to visit a mountain trail and eliminate anything which looked dangerous. We decided to go on the mountain path quest and so left the tavern.
Week 1- Mountain path
On reaching the entrance to the trail, we stopped to look around and scan for any danger. On either side of the path were trees with vines hanging down. Edna began looking around and said the vines were slightly odd on the side of the path. I then used my skills to scan and found out the vines weren't natural and they were evil. There were 2 vine monsters in the trees attacking us. Gundarr attacked first, hitting the first vine. I then took out my Warhammer, symbolised and blessed by the mighty Helferth and took a swing at the second vine, which I hit before retaliating against a vine attack on me and killing the vine. Gundarr then took out the second vine in one hit, cutting through the vine in a single swipe. We were out of danger... for now!
Week 2- Continuation on the mountain path
After defeating the vines at the mountain path entrance, we continued up the mountain path. As we got closer to the cliff face, the path became thinner, so we were forced to walk single-file. There were more vines in the surrounding area. I used my perception to look around but was told to not think anything of them. We continued forth, with nothing attacking us as the path began to widen once more. At the mountain face, we came across a little open cave with a spiral staircase leading up to the top of the mountain. We decided to walk into the entrance and noticed the walls beginning to crack, with rocks falling. We began climbing up the stairs.
I stopped and put my arms into the air. Helferth granted me the opportunity to ask 3 questions. I firstly ask if the stairs are going to crack, to which the reply informed me that ‘they were sturdy but the walls weren't so much’. I then ask if it is worth risking our lives to reach the top, to which the reply is that ‘it is definitely worth reaching the top’. Lastly I ask if there is anything to look out for, which the reply is ‘to keep a careful eye on the walls’.
With that we keep going up the stairs until we reach a flat level with a rock room in front of us blocked by a closed door. At this point, the walls began to break open, to which more of the vines from the entrance forced their way through the walls to attack us from the sides. There were 3 vines, 1 behind me, 1 between me and Edna and 1 in front of me. I attempted to hit the vine between me and Edna, but completely missed and got my Warhammer stuck in the wall, rocks fly from the wall and scratching my face. The vines began trying to whip my back through the armour. Edna used a spell and turned into an eagle before flying upwards. I pulled my Warhammer out of the wall, got my grapple and rope from my bag and used my adventure gear to grab onto the ledge above before climbing up. The vines tried to attack me as I climbed but kept missing. After I pulled myself onto the ledge, I carried on running towards the top of the mountain!
Week 3- Inside the mountain
Whilst on the level above, the vines followed me, trying to attack me with all their might. I swung my Warhammer at the vine but missed. As I was regaining my balance from swinging, a vine broke through the wall next to me and hit me in the gut but thankfully Helferth was looking down on me, as my armour took all the damage. I turned to look at the vine who hit me and kicked it. I was then hit again, this time it dented my armour slightly. I saw Edna in danger on the level below; so I jumped down to her aid. When I got to her, I pulled out my deity necklace and asked Helferth for help. As I asked, a light shined in from a crack in the ceiling, covering me in Helferth’s shining light. I put my hand to Edna’s shoulder and healed her. Edna then got up and killed the second vine, with Leo killing the last one. I asked Helferth if there were any other vines around, to which he replied ‘no’.
Whilst speaking to Helferth, I was rewarded for my bravery and was taught the spell ‘Hospitalier’, allowing me to heal my allies with a greater might. We ventured forward, walking towards the room with a stone door blocking it. The door was cube like and unnatural, with light flowing under the door and a rock handle greeting us on the right side. We opened the door and quickly dodged a rock coming towards us, hitting the wall behind us. Looking into the room, we saw a Rock Golem. We decided to take it on. I hit him with my Warhammer in his chest and broke some rock off. On being hit, he turned and kicked at me, hitting me across the room. After a few more hits, Edna was the one to kill him.
Upon his death, we come across a table at end of the room, lit with a lantern. We approached the table and found it to have knight armour on it and a teleportation jewel. This glowing green supernatural orb was too much for Gundaar to resist, so he decided to touch it, which warped energy throughout the room and consumed us all within its glow.
Camelot
We awoke in random village on ground with pigs surrounding us and people wandering by. A farmer asked us what we were doing, so we left the pig pen and looked around, coming across a Blacksmiths and a message board with 2 soldiers looking at it outside a barracks.
One of the soldiers came over to us and asked us if we were lost. He told us we were at Camelot. He then offered to take us to the original tavern, which was just north of the town we were currently at. We decided we did not trust him, so we let the guards leave and we follow later, after looking at the message board.
Edna once again turned into an eagle and scouted ahead. She headed towards the tavern in the next town and collected our reward from the mountain trip, 100 gold for each of us. With the gold, Edna flew back and meet us on the path. 4 goblins appeared from the bushes, which we took out, 1 of which I swung in the air with my Warhammer before Gundarr headbutted and killed. I heal Edna again after the fight and we decided to stay at a nearby B and B at the village we landed at.
With everyone else in bed and just me eating and drinking at the bar, a guy came over to me to offer me items, I refused and went to bed. The next morning, we were all drinking and eating at the table. The guy from last night tried to barter with Gundarr, who asked his God if the man is evil. Gundarr announces he is carrying stolen goods and swings at the man. Upon seeing Gundarr attacking, me and Edna joined in to help. With the bartenders help, we managed to persuade the guards that he was crooked and needed to be stopped.
After this incident, we took on a quest from quest board, which was to take out a goblin leader. We traveled to their outpost, in which Gundarr let out a huge roar. Edna turned into a fly and flew around the goblin outpost. A couple of the goblins ran towards me and Gundarr outside, so we killed them. Whilst scouting, Edna finds out there are an army of 25 goblins coming towards us, with the leader in a castle in the middle.
0 notes