#i use picsart and canva to make mine
Explore tagged Tumblr posts
Visit Tumblr Blog
Explore Tumblr blogs with no restrictions, modern design and the best experience.
Last Seen Tumblr Blogs


Fun Fact
Tumblr’s website traffic is steadily declining.
Text
anon who last sent in a request… this may be an extremely dumb question.
but what do you mean by rentry dividers?
#mari rambles 🍂#forgive me lol#i did see people can make dividers on there#but ya girl is dumb and i have no idea how to do that 😂#i use picsart and canva to make mine#so i can do some with the theme you requested of course
2 notes
·
View notes
Text

a fresh start - glow up guide no.1
HAVE YOU EVER WANTED SOMETHING SO BAD, BUT DIDN'T KNOW WHERE TO START?
Me too, and that's why we're focusing on this today. Here is what you need to do, to start your glow up era with a bang 😎
✦ . ⁺ . ✦ . ⁺ . ✦
Welcome to the first post of the Glow Up Guide series! In this series I'll be discussing everything you need to know step by step, so you can have your best glow up and become your highest self.
Let's begin! ⭐💙
STEP ONE - DECLUTTER
Before we begin, put your phone down for a bit and declutter your room. You can go as crazy or little as you wish, however I prefer to do a deep clean. Dust your shelves, counters, vacuum the floor, clean out your closet etc. Make sure your desk is organized, you know where your stuff is and everything looks neat. A fresh environment supports a fresh mind, so let's start here. If you wish, you can also throw out your old clothes and replace them with new pieces. Although don't feel pressured to do so, we're trying to glow up here, not spend a reckless amount of money.
STEP TWO - JOURNAL
How can we start our glow up journey without knowing where we are now? So grab your journal, a piece of paper or open your notes app. Write down what your situation is and why is it happening. Explain what would you like to change and acknowledge your starting position. This will help us set realistic goals later on.
STEP THREE - VISION
First two steps done, bravo! Let's keep it up then and now think about who do we want to become. Write down your vision. Who is this person? What do they look like? What do they like/dislike? What are their boundaries, beliefs? How do they act, dress, workout, eat, etc... If you're having troubles with creating your vision, don't worry, I'll make a post about it soon, but until then just look some prompts on pinterest 😽
STEP FOUR - GOALS
Now we have that, write down what do you want to achieve before 2024 ends. This can be anything depending on your personal glow up preference. If you don't know what you want to accomplish yet, don't worry. Here are some goal examples for you: ⟶ read three non-fiction books ⟶ implement a morning and evening routine ⟶ finish a project ⟶ get a certain grade ⟶ prioritize sleep and self care ⟶ focus on your gut health and diet ⟶ save 500$ These are just some examples you can use, but remember to find a goal thats meaningful to YOU! If you're reading this after 2024 ends, just write down your goals for the next three months.
STEP FIVE - PLAN!
It's time for the last step - planning. Review what you wrote about your goals, your vision and where you are now. Now take it and break it down into weekly goals, and break them down to bite sized habits that you can implement daily! Here is an example: If my goal is to get fit, first I'll start drinking more water and cut out processed foods. I will buy a gym membership or find an activity that works for me (walking, running, dance, swimming, etc.) and do it regularly, let's say 3 times a week. I'll also move my body daily and try to get at least 7k steps in. This is just an example, but this is basically how this works. If you need help with planning your schedule, feel free to use AI as a tool. Tell it to create a glow up plan according to your current situation and your vision and adjust it to your needs. A tip I found very helpful, is to put everything like workouts, classes and plans in a weekly calendar. This will help you stay organized and keep up with your plans. I'll show you how I did mine below!
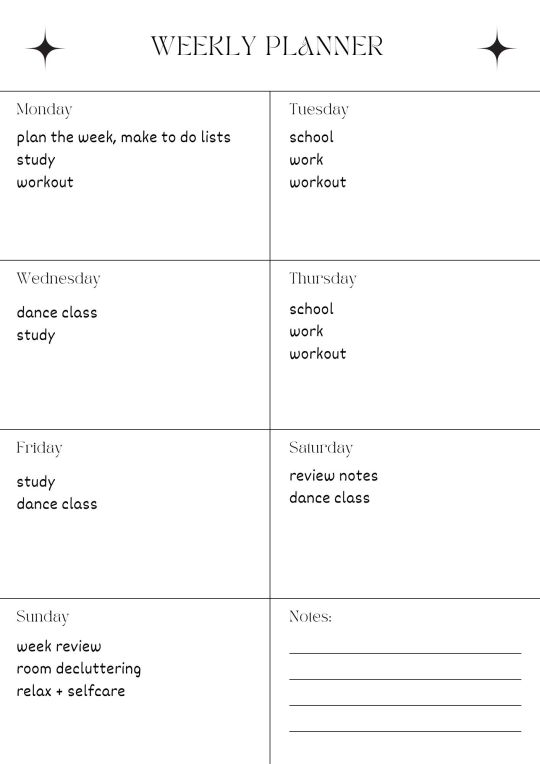
You can find these free templates on canva, picsart and pinterest! I got mine here.
⠂⠄⠄⠂⠁⠁⠂⠄⠄⠂⠁⠁⠂⠄⠄⠂ ⠂⠄⠄⠂☆
That's the end of todays post. I hope you had a great time reading it, and let me know if you'd like to see more content like this from me!
I can't wait to hear what you planned for your glow up in the comments, feel free to share<3
Find me here: 🤍💿
#navyhealthyglow - all my og content #navyhealthytips - glow up tips #navyhealthyjourney - my glow up journey
#navyhealthytips#navyhealthyglow#that girl#it girl#becoming her#becoming that girl#glow up#wellness#wellness blog#wellness girl#healthylifestyle#healthy habits#glowup#glowingskin#productivity#it girl energy#clean girl#navy girl#tips#aesthetic#it girl aesthetic#pink pilates princess#vanilla girl#smart and educated#dream life#glow up guide#that girl lifestyle
18 notes
·
View notes
Note
hihi~!♡ I want to start an enhypen 8th member blog so bad but i wanna know how to make mine as aesthetic as yours😭any tips?
hey luvbun ( that's such a cute name omg ), i'm answering this since you said it's ok to, but i'll tag dia here in case she has anything to add ( @chaconnenha ) well first off comes choosing the pics. i always use pinterest because it's easy to find similar images to the ones we like. but if it's a pic of enhypen ( like the concessio concept photos i've used for my theme ) i mostly rely on tumblr because i find it easier for me to just get those images from @/enhypendata or some other blogs who repost it from the source. as for how to choose the pics, it's completely up to what theme you have in mind, but i think personally, i got better with practice. like i changed the theme for my main blog often, made a couple moodboards here and there, and it really helped me find my style. then comes editing the pics. you can use canva or picsart to edit your pics ( i use canva because i know my way around that website more than picsart ). picsart even has a free background remover, and the filters are so nice there so you can use that too. then we have the text editing. you can use font generators, symbols, change the colour of the font, make gradient font, etc., but this too, needs practice for you to get an idea of what looks good. as for dividers, i use a thin band with the colour i want, nothing fancy, but dia uses stuff from other creators, and it's easy to find the divider you want by typing "dividers" on to the tumblr search bar ( make sure to credit the creator if you do use their dividers ). a personal tip i got from experience, is that only practice helps you get better, so yeah don't shy away from trying stuff out even if it may not be the prettiest. and if you want to, try to take inspiration from others ( don't straight out copy them, and give credit if you're inspired ofc ) and try out different styles. this will help you figure out what you like and how to make it. good luck with your blog <33
16 notes
·
View notes
Text


A set of Leatherface roleplay cards I made for a Dead By Daylight server! Plan on doing my own little au/headcanony spin on all my favourite slasher villains as it's fun to think of how I'd reimagine them.
All writing is mine and I make these cards using Canva/Picsart.
#leatherface#texas chainsaw massacre#roleplay#horror roleplay#dead by daylight#bubba sawyer#headcanon#horror rp#slashers#slasher fandom
22 notes
·
View notes
Note
hiiii biaaaaa!! <33 if it's not too much, can you lemme know how you do your gif? I've always liked it, ty! 🙏❤️ Alsooo did you read the manga updates –? If you didn‘t, please don‘t babes <33
how to: make a gif!
i’m making this into a mini-series of tips and tricks since a lot of my readers are curious as to how i make them gifs 😎
dw, pooks. bia’s got you.


heeeey, anon pookie! 😗✌🏼
making those gifs can be a little bit tricky, but once you get the hang of it, it’s a long but easy process!
apps/websites that will be needed:
capcut
canva pro (or picsart for free use)
ezgif.com
here’s how:
1. GRAPHICS & ELEMENTS (pictures, texts, stickers, etc.)
gather all the raw clips of the characters that you want to get into the gif that you are going to be making. (either download the video or screen-record it from safari or yt.)
then make the title or text that’s going to be put on the gif. make sure that once you have the text that you want, it’s a png file! (has a transparent background.)
you may add stickers, but make sure it’s also a png file.
once done, save those for later.
2. COMBINING & MASKING
open capcut and set your gif to whatever landscape size you want. (mine is 600x250)
add a white/neutral background and stretch it to how many seconds you want your gif to run.
then tap the “overlay” and put one gif/video on the left side, and then do the same on the right side.
make sure to leave space in between the two!
once you put it in a position that you like, tap one gif/video and cut it to the desired length or the running time or duration of the gif — match it to how long the white/neutral background is. then do the same to the other gif/video. (make sure all clips ends at the same time! or else the gif won’t be running/displaying properly)
tap one of the clips and tap the mask option below. choose which one blends the most. (masking is needed for the gif to blend with the other gif.)
do the same to the other gif. mask both until their edges are not sharp and now looks blended. (this part takes the longest so, be patient.)
3. LAYERING & COLORING
the two gifs may look different due to their tones/filter so, try to tap one that’s the most different, then try to put a filter or adjust it’s saturation/temperature, to match the other clip/gif/video.
add your png text in the middle. (or add all the elements with the transparent background that you want.)
then tap “save”
4. VIDEO TO GIF
open “ezgif.com” on your safari/google, then click “video to gif”
choose the file/video that you downloaded from capcut and then once chosen, upload the video.
you can adjust the start and end time of your gif according to your satisfaction.
once done, tap “convert to gif”
press on the generated gif, and click “save to photos”
and you’re done!
hope this helps my readers and my fellow aspiring authors! 😚🎀
#jjk fandom#jjk fanfic#fanfic#aot fanfiction#i can’t stop writing i love them so much#author#tips#tips and tricks#animated gif
2 notes
·
View notes
Note
haiii yeonyeon can you post a tutorial on how to make banners? thank yeww
ofc though i don't exactly make all of mine the same way so I will just give out the basic steps!!
001. ) find the picture you want to use, leaving aside the quality you must first settle on which picture you really want to make the banner with. after that, trace it's source! is it from a photoshoot? is it from album concept photos? is it from some event? is it from a twitter or instagram account? after you find the primary source download it from there that would be hd 99% of the time.
002. ) i use canva so that's what i'll be guiding with. open a blank template of the size you want the banner to be. add the picture and the text. adjust the font, size, color, spacing, and position of it on the picture. usually i use the classic fonts like sans, helvetica and so on. for the size i make it big enough to be readable if it's the main title other than that other text size just depends on what it is. for color i one from the picture itself, spacing is usually zero and position is more often than not: center.
003. ) then i use picsart to add any filter i want, usually i don't but if i do this is the go to. and then download the pic in png form and that's it!!!
004. ) also i want you to know i did not get this good with graphics and editing in a day, what you see today is years worth of practice! so don't be disappointed if you are not as good today, with practice and time you will find your own spark and style!!
if you want a video tutorial you'll have to pick a specific banner of mine so that i can show you how i made it!
5 notes
·
View notes
Text
FAQ, Q&A, Resources
Hi, I’m new in town and you lot have been very kind to follow me.
Here’s a little blog post that I update occasionally.
Do you have any technique or app recommendations?
If I’m on-the-go, on my tablet or phone, I use a lot of different applications. Procreate w/ an Apple Pen, Midjourney, Dalle, Glitché, Filmm, GlitchCam, Groovo, Canva, PicsArt, VSCO. I’m getting into Lightroom, Photoshop and Adobe Express editions. Save and edit and save and edit and save and edit and save and edit.
If I’m at my desk, I use GIMP a lot. I use or add a few old school glitch art techniques that can only be done on my Mac or on my PC. Versions tend to jump from phone to laptop to phone to laptop.
Here are two tutorials if you’d like to learn some, ever more seemingly, old school techniques for yourself. I’d be utterly pleased if this was your first entrance to “glitch art” —
youtube
Do you sell prints or shirts or any fine, fine merchandise anywhere?
Not of anything I make with MidJourney. Well, technically, no merchandise of anything right now. If you see it sold online, it’s a fake. If you see anything of mine go viral somewhere other than this Tumblr account, it’s fake.
Maybe I’ll make postcards, some day, out of sheer novelty. But, honestly, right now, a lot of this blog is going to turn into behind the scenes, drafting, etc.
…
i.e…. “~•*•THE PROCESS•*•~”
…
At 800 followers, I feel like I’ve cultivated a scene that I can trust with feedback on my other passion projects.
Wait, other projects?
Oh yeas. Have you ever read House Of Leaves? That’s what the inside of my brain looks like if I don’t Make Things.
Ok cool.
Yeah, for sure, of course.
Can you recommend any fandoms or other accounts that you like?
I like stuff. Stuff is good. Have you seen some of the stuff out there? It’s everywhere. Stuff is all over the place, and I love it. And I love that for me. And I love that for you.
Stuff for everyone, stuff for all, I say, at times when I’m going from here to there.
Here’s some of the stuff I like. Do you have any stuff you like?
— Degenesis (TTRPG)
— Trevor Henderson (@slimyswampghost on IG)
— Plastiboo (Artist)
— @louceph (seriously, a truly amazing artist)
— @hannahorca (wow wow wow)
— LIMINAL_ (TTRPG)
— MORK BÖRG (TTRPG)
— Mayfair Watchers Society (Podcast)
— Quiet Part Loud (Podcast)
— Welcome To Scarfolk (Book)
— Uzumaki & Gyo (Manga)
— Elden Ring (Video Game)
— Lovecraft Country (Series)
— Blasphemous (Video Game)
— Berserk (Manga)
— Oats Studio (Series, Netflix)
— District 9 (Movie)
— Love Death + Robots (Series)
Any more?
Sure but they might be “off-brand” for the aesthetic.
— Hollow Knight (Game)
— The Long Dark (Game)
— Frostpunk (Game)
— Nausicaä (Movie)
— Princess Mononoke (Movie)
— Scavenger’s Reign (Series)
— Raised By Wolves (Series)
— This War Of Mine (Game)
— Midnight Gospel (Series)
— The Beginners Guide (Game)
Okay, so hey I’ve fallen in love with one of the Monsters on here. Can I adopt it and name it and feed it and call it mine?
Listen your head-canon is your head-canon but for god’s sake remember that I have to read the fic and you have to write the fic. A curse on both our houses if ever used for PvP combat.
Do you sell NFTs?
No.
Okay…have I thought about it? Yes. Sure. Whatever. But I don’t sell NFTs. No “legitimate” NFTs of my work exists. If you see it, it’s fake.
I’ve told myself there’s only one way I’d use an NFT or Ethereum — if someone would like to “legally” adopt one of my OC critters. I would literally draw up the novelty adoption papers. That sounds like so much fun.
Conclusion
Thanks for hanging out and reading my words. This kind of came to an abrupt end, didn’t it? Yeah, pacing isn’t something I’m good at yet. But am I not deserving of love, simply as one voice amongst the many spiritual echoes singing the tune of our grand eternal choir of life? Am I not worthy of perhaps a little treat?
7 notes
·
View notes
Text

Coping with the new Tumblr Mobile image layout (outdated)
Tumblr has once again made a bad decision. As you may know gifs in mobile now work different and many stimboards/moodboards have been ruined by it. Here are some tips to make your boards consistent on both mobile and web.
Why is this happening?
Tumblr mobile now show images as their real size. Before if you have a 600x600px image beside a 400x400 one the images would scale down perfectly since they had the same aspect ratio. Now if you have a 600x600px image beside a 400x400 one the images will be disproportionate to each other throwing off the whole board.
About moodboards
With moodboards I'd personally recommend just compiling them all in one big image then posting that image to Tumblr. This protects your board from current and future Tumblr tomfoolery. I personally use Photopea to make mine but other popular sites include: Canva, Picsart and Ibis Paint. Also you should export your big image as a png since they are higher quality and compress better.
Here is a template for a moodboard layout but you can make your own if you want special layouts or want to make it fancy.
About stimboards
Stimboards require a much more tedious process. You will now have to resize all your gifs and central image to be the exact same size being the same aspect ratio doesn't cut it anymore. I'd recommend going with 300x300px or 350x350px since 400px is where a good amount of gifs start to go over the file size limit (10MB).
For resizing I'd recommend using EZgif it is your best ally when it comes to editing gifs.
What about my old boards?
They're kinda messed up forever now. Unless Tumblr fixes their mistake or adds an option for different ways to display images in a post. If you want to redo them I would hold off for now since this is a relatively new update and it only affects mobile so there is a chance it will be undone.
#sharing my light : tutorials#stimboard#moodboard#stimboard making#moodboard making#stimboard tutorial#moodboard tutorial#tumblr image update#image size update#image update
17 notes
·
View notes
Note
may the memory ask how you do the "lace" at the bottom of your banner? its adorable but the damsel can't figure out how to do it :c

ty :3c and yes!! i can tell you how!! i’ll just put it under the cut since it’z a bit long. lmk if you have ani questions!! i’m not amazing at explaining things but i hope this helps, dearest damsel!

1) find a lace overlay on pinterest. i used one that had the lace at both the top and bottom, which i’ll attach below. i’m sure you can also find one you like in picsart stickers and save it on a transparent background, but so far i haven’t had ani luck with finding one i like and is simple enough to be recolored using the bucket tool in ibis paint x


2) open a banner-sized canvas in ibis paint x. i use 640 x 360, as that is the size of tumblr’s banner on mobile and it fits perfectli ^^
3) add an image layer to the project. the image should be your lace. arrange it so onli the bottom part is on the canvas. don’t worri abt there being a black bg. we’ll remove that in the next step!
4) open up the layers panel and choose the selection layer. using the bucket tool, select the big black background. it should turn blue. then, open up the littol dotted square menu in the top middle of the screen. click the scissors icon within that menu, which says cut. this will remove the bg. then, click the crossed out dotted square icon within the menu, which says remove selection area. now you’ll just have the lace, and the black background will now be transparent.
5) recolor the lace using the bucket tool! or if you have a better/easier method, you can use that too. it may take a couple tries, especialli with the littol hearts in the center of the lace (if you choose to color those) as it’z a tad pixelated. if you want it to look like mine, choose to color the lace the same color as what you’re going to make the background color of your blog description be.
6) add anithing else to the banner that you’d like!! i added inugami korone and used the fx option to add a stroke to her. i did the same with the flags i added!!! i added the text in phonto, but you can add it in ibis paint x too (i’m pretti sure)!
9 notes
·
View notes
Text
rambling about writer stuff & general community stuff
that person who said a work with a large note count is the one most people will interact with based on the assumption of "oh it has 1k+ it must be good!" is absolutely correct. the only work of mine that consistently gets interaction even though I posted it forever ago is the one with the highest overall note count.
That is to say people are basically window shopping and only looking at what's "popular" and it can feel like such a mental hurdle to hear others be like ~notes don't matter🥰~ because you also wanna scream yes they fucking do!! and there's nothing weird or embarrassing about the fact that it matters to you, we all love attention it's literally a feature of our species that we love social interaction and attention there's nothing bad about that it's neutral as far as I'm concerned. If anything I think people who shame others for that are weird.
it's also mad discouraging for people to hear over and over "oh don't be silly and make yourself upset comparing yourself to someone else! Everyones work is good!" while yes that's true, it's also... incredibly unhelpful? 9/10 times people already know that, they've heard it enough. All it really serves to do is further push people into the line of thought that "there must be something wrong with me/my work/my art that nobody's telling me" and when you're stuck in a feedback loop of people saying that shit to you it feels like what Eric Andre said about holding hands with kids in a circle around someone chanting "NIGHTMARE NIGHTMARE NIGHTMARE" to fuck with them.
I think what happens is people get really caught up in the euphoria of popularity and then also do not wanna share it. That's not to say everyone acts like that because they don't there's plenty of larger blogs that are extremely helpful to others in their communities and do a really great job of being encouraging and giving meaningful, actionable advice but it's not the majority of bloggers. I think sometimes, more than we like to admit, it can be very very satisfying in a mean way to keep a faux barrier up.
I'm not saying anyone is intentionally cruel but it feels cruel to be the other person on the side of that faux barrier, frustrated that you seemingly can't do what they can. That's not the truth.
What people don't say is they use things like canva premium, picsart, photoshop/the free equivalent photopea, pinterest, templates from deviantart creators, capcut, ect to create a lot of the popular aesthetic looking posts you see. If it frustrates you that you don't know how to, you can find tutorials on youtube in an instant teaching you how to make those too now that you know the names of the apps or programs.
Writing resources like grammarly, scribens, online word counters, onelook, wordhippo, springhole.net, the ultimate guide to writing smut fic (on ao3 by QuinnAnderson), ect. those also aren't shared as often as they should be. each of those resources does different things but all are incredibly useful for writing anything, not just fanfic. (I cannot stress enough how helpful that smut guide is if you wanna get into writing that, definitely read through it).
I think this unwillingness to share things contributes to the overall slump a lot of fandom communities are in. You can't know where to start looking if you don't know what it is you're looking for. You also can't improve if tools that could help you aren't made available to you. It's beyond frustrating to be in the position of "I know what's popular but I don't know how I can do that too".
#like please do not think theres anything wrong with you or what you create there isn't#its just really difficult to carve out a foothold when you feel like you're clueless & nobodys willing to help#the unwillingness to share even basic resources does favors for nobody#so many people are mind blowingly talented but held back by things like being unable to get straight up helpful answers
2 notes
·
View notes
Note
hi I hope you're having a nice day! I wanted to ask, what is the picture like resolution/size of the Tumblr post edits you post on here? I make mine on canva and they always get a little blurry when I upload on here. In my downloads they are fine but uploading makes them loose clarity.
Hello lovely! I use a mixture of both canva and PicsArt! Canva for the pictures, as PicsArt has a limit of 10 photos per edit, and then PicsArt for any finishing touches, like filters. Or if I only need less than 10 pictures, I use PicsArt entirely. I hope this makes sense <3
0 notes
Note
How do you get your tumblr to look so n i c e? Like the layout is amazing, and no matter how long I’ve been on tumblr I’ve never figured out how to get mine to look so aesthetically pleasing
gmmm nonnie pls this is so sweet >: i’m glad u think so !! honestly i’m pretty sure people r using canva for most of their stuff.
i’m not really good at it so i use random websites online (gif editor for the dividers, websites for the fonts, for the png / no background pics) tbh 😅 the only apps i use r phonto & also picsart ! i feel like im not a good person to ask bc i genuinely have no clue about the proper / efficient way to make the layout stuff
#i’ve also had a monochrome theme since 2022#it’s easy to match w dark or light mode !#so i toss a gray pic over it and blend it to make it softer#🦢— mail !#i admire colored themes a lot#especially the multi colored themes#they’re very gorgeous#maybe one day i’ll use canva to make my stuff too !! im sure it’ll be way higher quality than the random websites ajajsnns#also i’m happy u think it’s aesthetically pleasing ):#idk if this was helpful i’m so sorry#if there’s something specific u wanna know how to do i’ll show you!#but i’m gonna warn you the way i do it is absolutely inefficient and there r definitely better alternati(but i’ll still be happy to show u)
0 notes
Note
I'm js wondering since I'm a big gd liker, do you make those designs or js repost them? Cause they look so cool and I'm trying to get into graphic design too but no apps to begin with...
What apps do you use?
Hi ✨
I do make them of course! Everything I post that is tagged as #mine was made by me
I use photoshop and illustrator, that’s just my personal preference but I know there are some great free alternatives if you want to get into graphic design yourself!
Some I can think of at the top of my head are Canva and Picsart (mobile), there must me more that I don’t know of.
If you need more resources, you should follow blogs like @hisources or @chaoticresources : they have tons of great resources for content creators and even dl links if needeed! Hope this helps ❤️🔥
0 notes
Note
how do you make your moodboards like what program do you use
for most of the images and videos I take them from pinterest and line them up right in the post but for some I use picsart to edit colors and such. I haven't made any yet but I am able to make more elaborate, detailed moodboards and for that i use canva

this moodboard is not mine, it belongs to @/saradika, but that's what I mean when I say I can make detailed ones that look like this.
1 note
·
View note
Note
I love your little OC edits and learning more about your ocs. They're all super interesting! I was wondering if we could get some facts about malikha if you don't mind pls. 👀👀🙏🙏
How do you keep the quality of your images when editing it on psd, when I try to fit mine to the square it ends up loosing so much quality. It makes me so mad. I'm just there fighting with it for an eternity lmao. 😂
Hi 💛 first off thank you, I'm so happy to hear that you're interested in my OCs. I'll do some facts for Malikha at the end, as I'm not sure now much there will be (I'm half asleep and cuddling with one of my cats so we vibe)
So for the editing I don't use Photoshop cause I'm on mobile, but what is a good alternative is canva. It keeps the quality of the photos, and has a variety of frame options which can be used similar to how you would a cutout.
For filters, stickers, and cutouts I use PicsArt, but not for the whole thing. With PicsArt you have a 10 sticker/photo/text limit and the quality decreases. So yeah Canva is basically your best friend when it comes to quality.
And now for some Malikha facts :))
She was born and raised in Seattle, Washington
She is Filipino-American as her mother is Filipino, as she was born in Central Luzon, wheras her father being born and raised in the state of Washington.
Refers to her mum and dad as Ma and Pa
Has an older brother (Miko), and a younger sister (Mayumi)
Her favourite season is Autumn/Fall, but despite this she doesn't like the cold
Has a degree in political science and a minor in sociology
Her career aspiration at first was to be a sociologist or a philosopher, but then became interested more in the political side of society.
She studied at the University of Washington
Her favourite animal is a cow (I like cows and wanted to project 👀 it's allowed)
That's a few facts for now, I'm still fleshing out her character though:)
0 notes
Text
here's what i use to make mine! (ex: X, X, X)
cassette templates. if you can't find the one you want, i personally just screenshot the youtube video and color over what i don't need
i get my oc/listener icons from svgrepo. they're free to use, there's a search function, they come with transparent backgrounds, and you can edit the color of the icon from the site itself!
it looks like the font erik uses is monserrat heavy bold, but lots of people find alternatives if they don't have/can't get that one
i use procreate for all my editing, but i've seen others use canva, picsart, ibis paint, and autodesk sketchbook. i've also used phonto and bazaart in the past for other things, they might work with this as well
hope this helps! 💖
i need every single piece of advice i can get on making fake redacted graphics/covers/whatever i wanna call them
9 notes
·
View notes