#i tabbed out the first time while it was doing shader things which caused it to crash the first time and i think busted something
Explore tagged Tumblr posts
Visit Tumblr Blog
Explore Tumblr blogs with no restrictions, modern design and the best experience.
Last Seen Tumblr Blogs


Fun Fact
Mobile US users spent an average of 115.8 minutes on Tumblr app monthly.
Text

fuck everyone blaming AMD cards for having issues the issue is with drivers and or possibly the program. if you run into persistent crashing 1) restart you pc, 2) update your drivers (or in my case downgrade?), 3) do not tab out of the program.
#i tabbed out the first time while it was doing shader things which caused it to crash the first time and i think busted something#AMD cards run fine stop paying literally twice as much for Nvidia#im not even using a fantastic card and still got good on high graphics with ray tracing turned on
1 note
·
View note
Note
Hi! I saw a post where you had a game made in godot with old school rendering, do you maybe have any tips on how to make godot render a game like that instead of its normal rendering method?
I'd be right happy to!
I'll try to make this concise lol, I always end up overexplaining and then getting lost in the weeds. Buckle up, it's a loooooot of little little things that all add up.
First off, you should decide which look you're going for. N64 and PS1, the two consoles I'm emulating, both had drastically different specs. (plus, there's plenty of other early 3D systems I've not even touched!)
The N64 had texture filtering (textures were interpolated aka "blurry"), it had floating point vertex precision (points moved correctly), it had perspective correction on its textures (no warping)
The PS1 had no texture filtering, no floating point vertex precision (vertices snap and pop around), affine texture mapping (textures warp weird). I also think the color space they operate in is different? Don't quote me
So you can go hard one way or another or pick and choose what you think looks good! We don't have anywhere near the hardware restrictions they did in the 90s so go nuts.
RESOLUTION
To get a low resolution window, I set the window size of the game and the window override size to different amounts

In green is actually how big the window is on my screen (4k monitor) and in red is the retro resolution I want. If you set the stretch mode correctly (an option a little further down the Window tab) then it'll make the pixels big

COLORS
Now the PS1 had the capability of showing you over 16 million different colors, but it could only display 50,000-150,000 at a time, so in order to get more fidelity out of it, the engineers implemented a dithering effect to better blend the otherwise sharp edges between colors.
I used this shader to achieve the dithering effect. If you don't understand shader languages, that's fine. There are a few different pre-built ones for looking like the PlayStation 1 out there.
TEXTURES
Textures for the PS1 could be as big as 256x256, but they were typically 128x128. And they would squish everything a model needed into there usually, at least with like player models and objects and such.
As mentioned, if you're not good with shader language don't worry. There are countless resources out there that people will either let you use or teach you how it works. But I'm gonna touch on it a little bit here.
PS1 textures had no pixel filtering, so you could see individual pixels.
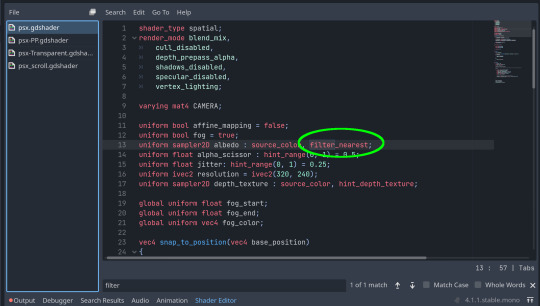
This is what determines that in the shader code. If you want it to look like the N64 (blurry lol), the proper hint is "filter_linear". Note that it won't be 1:1 with N64, cuz they used bilinear filtering (which kinda sucks and causes weird quirks) whereas now you'll only find linear or trilinear filtering. It's a negligible difference imo.
PS1 textures also were only saved using 15 bit color. I'm told that Photoshop's "Posterize" filter set to 32 can achieve this, but don't use photoshop if you can help it. I use GIMP, and while a newer version might have a posterize filter, or there may be a plugin out there, my version doesn't so I cluge it a little.
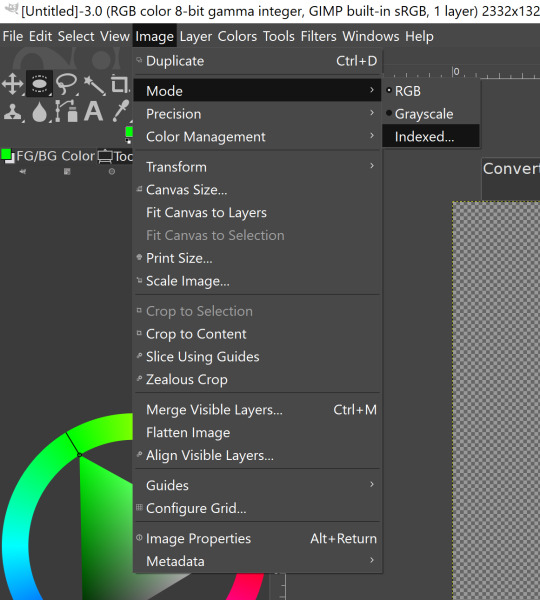

Change your color mode to "indexed", set color dithering to how you like it, and the number of colors in the palette to a number to get a good result. Usually I'll do 16, 8, 32, but occasionally I'll cheat and do a non-multiple-of-8 teehee >:3c
You can change it back to RGB after to make further editing easier.
LIGHTING
N64 and PS1 both implemented vertex lighting, as opposed to the more modern and (now) ubiquitous per-pixel lighting. Godot as it is right now (4.2 i think?) claims it has vertex lighting that you can set as a shader property but they're lying and it doesn't work yet.
The old consoles could only handle like, 2 lights though so it doesn't matter much.
The real star of the show, and in my opinion the one thing that makes a game most look like the 90s is the inclusion of vertex colors.
By multiplying the color of your texture by its stored vertex color, you can do all the shading yourself!
Plus you can reuse textures like crazy just by coloring them differently. The N64 also made heavy use of vertex colors by forgoing a texture on models entirely and just painting them using verticies. The only textures on SM64 Mario are his eyes, stache, hat emblem, buttons, and sideburns. Everything else is done with vertex colors.


Here you can see this level from my Crock Land with no vertex coloring, with some of the vertex colors only, and then with the two combined.
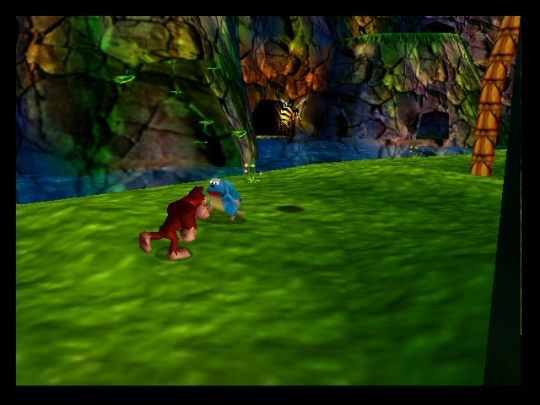
Rare loved this. Look at how colorful that cliffside is in Jungle Japes. It makes it so much more interesting than just a brown cliff face. Plus you can see the vertex coloration instead of textures at work on DK and the Gnawty.

My go-to example for PS1 is always Spyro, what a gorgeous game. All of those colors there are not made by a light or an environment. They're hand painted babey! Also! With spyro! The skyboxes are actually just huge domes made up of vertices that are colored in different ways! That's how they can look so colorful and "hi-res".
There's plenty more you can do, like adding a CRT filter or a little bit of chromatic aberration which I haven't gotten into yet.
The way I've learned all this is just by being curious as to how the old consoles did their thing, and slowly accruing the knowledge over time. There's still infinite stuff I don't know too.
I hope that helped! And wasn't too longwinded or confusing! Like I said, it's all about piling up tons and tons of little things, small details, weird graphical quirks that really bring out the retro 3D feel for me.
And I didn't even get into the modeling side of things! That's an entirely different "color-of-the-sky"-sized post though.
I'd be happy to re-explain or explain more about any of this!
202 notes
·
View notes
Text

Haven't been able to focus on this because I changed my mind and started a new save in Elden Ring, which ruined my life. I stay away from here because the drama is just...weird and incoherent, and I'm anxious enough. Constant state of dread. I don't need TS2 drama on top of it.
Then I had computer issues: PSU dying, so it had to be replaced before it potentially fried something. Primary HDD dying, so it had to be replaced. And this week I squared up with my computer to install an AIO, but the first one I bought had an internal threading issue; the screws that were SUPPOSED to fit didn't fit in one side, and rather than potentially ruin the pump, i sent it back.
Got the new one this week and installed it yesterday, which should have been easy, but I screwed something in backwards and then ran out of thermal paste. The thermal paste really set me off for some reason, so...yeah.
Anyway, i played today.
Two hours, no pink soup, no crashing, no lag. I should have seen something by the 2 hour mark. We'll see how it goes with the medieval folder.
I haven't had an experience this smooth or stable in years, dude. UC I could count on crashing every time I loaded a lot. I'd be able to load ONE lot, and then after that, I couldn't load another. This is wild and honestly a little surprising. The patches fixed the issues I've been having with it, so that's nice.
This is with about 6GB of cc, just to see what happens as I add more in. With UC it didn't matter, it just didn't seem to like there to be any CC present at all. Eventually I'd inevitably start seeing pink flashing; it wouldn't even been on the current lot. Sometimes it would be on a lot across from the one I was in. Then I'd go back to the neighborhood and the whole thing would be flashing. But ya'll know how it is.
Also, all settings high, neighbors and hood deco on. Put in the neighborhood skies and turned on water reflections. Running great. It's still way smoother than UC has been in a long time.
This is plasticbox's Elsewhere; i wanted a pre-built neighborhood to see what would happen. This is the only active sim, so I dunno what more townies would be like. Gonna use the townie gun to see lolol
Issue I encountered: Crashing when I initially added in my entire cc folder, so I 50/50'd because the crashing was inconsistent. Sometimes, not all the time. I'd add in half the cc and no crash, but add in the other half, then crash.
I assumed this would happen because there have been reports of this occurring after CC is added in. I went with the tried and true method and fixed this.
I narrowed it down to ONE file and removed it. No more crashing. Same thing with my MCC folder which is considerably bigger and with which I expected way more issues. 50/50 until I found the problem and removed it. One file. That was it.
Makeup tab is...shockingly smooth? Lag still happens, but it takes a lot longer for it to get unbearable. I just started adding tons of stuff to my sim's face to see when the lag would set in. Whatever they did, they improved it a great deal.
Interestingly, hacks and shader fixes cause no issues. I thought this was funny. Hacks work fine, but a random piece of CC makes the game crash while loading.
UC would crash out if I scrolled through anything too fast. scrolling through buymode too fast? Crash. Scrolling through clothing too fast? Crash. On and on. I used to have to wait a few seconds before going forward. It was especially bad if it had to generate thumbnails.
I clicked through everything fast as possible. No crash.
Me: Interesting.
Installed CEP and Scriptorium manually. Lighting mods, touch and go, but everything works. Nice. Might try reshade, but eh.
That said, as with any game, if you're adding in large amounts of custom content, I highly recommend you do this gradually. People have been dumping everything into the game and then complaining about pink soup and crashing. You might just need to do some troubleshooting; it could be just one thing in your folder making the game freak out.
This is my experience though. Can't speak for anyone else.
Anyways. I expect some pink soup eventually, but also with how smooth it is, for the time being I'll just stay positive about it. I'd rather not look for a problem that's not reared it's head yet anymore.
Excited to see how my MCC hood behaves. That said, I think...relaxed rules for my sanity. Maybe just a straight up BACC with storytelling. I will be starting the hood fresh; I have all the lots, so no building this time.
9 notes
·
View notes
Photo


I DOWNLOADED MY FIRST MOD AHHHHHHHHHH!!!!
So, I was getting really tired of how un-vibrant Sims 4 is. I didn’t really notice it/care at first, but once Sage was born I found myself constantly fighting the lighting in the game and setting up temporary lamps everywhere when I took screenshots just because of how un-flattering the Sims 4 lighting is for sims of color. (I mean I’ve had mixed race couples since gen 1 but the focus was always on the founder/heir so if their partner wasn’t as well lit up as they were I didn’t pay much attention to it, but Sage is the first heir to actually have darker skin genetics passed down to him ‘cuz apparently in sims world recessive and dominant genetic traits are reversed... or at least in this family they are rip)
But anyways, I don’t want to spend time editing my screenshots so I just got a lighting mod for the game. OwO;;
I just want to make a post now and tag it with wcif because I really don’t download much and if I ever do get cc in addition to this I’ll just post and wcif tag that too so anyone that’s curious can easily see what I’ve got quickly~
I also want to add that I’m going to go very in-depth about the installing process because I am not tech-savvy at all and it took me a whole evening to figure all of this out, so if anyone else is in the same boat as me I hope this helps! XD
Also before I start explaining things I just want to add that before you start changing things, ALWAYS BACK UP YOUR GAME!! Make a copy of The Sims 4 folder that’s in your documents, AND the one that’s in your Origin Games folder that’s on your C drive (or wherever you installed Sims 4).
First I downloaded NoBlu and NoGlo
The links to the page their downloads are located along with information from the creator are right there in that title~
Those two mods work together, so I suggest getting them both! The NoBlu removes the blue tint that shows up at night time and indoors too I think, and if I understand things correctly the NoGlo removes that blue tint from your sims themselves so they don’t look blue-ish in contrast to the rest of the world that’s now been stripped of that blue tint.
Like, the point of the blue tint that’s in the game is to make it so you can see things better in the dark, but from what I can tell it also makes day time seem darker too at certain times of the day. So getting rid of this will make night time darker if no lights are around, but I think it makes day time brighter and the lights at night time is brighter too and your sims just react more naturally to lighting~
When downloading NoBlu, just pick one of those three files that are there. I picked NoBluLightingReplacement.package
For NoGlo, there’s two files there, and I downloaded both of them. They’re the NoGloRemover and the EyeSpecularRemover
NoGlo and EyeSpecularRemover are applied to each sim in cas just like cc, so I’m not sure if I’ll bother using them. But I haven’t had this NoBlu lighting mod for very long so if I end up noticing my sims glowing in the dark with a blueish light then I’ll probably bother to put that on everyone. Maybe.
These two mods are really easy to download! It’s just like downloading CC, just get the file and put it in Documents -> Electronic Arts -> The Sims 4 -> Mods
Then I got ReShade
This mod took me quite a while to figure out... (I’m just sort of challenged when it comes to things like this which is why I don’t use much mods/cc in the first place) 😓
So this is a program that you can install into a lot of different games, it’s not made just for sims 4, but it works really well on sims 4! The website to download this is https://reshade.me/
Additionally, THIS VIDEO is the most helpful tutorial for installing it that I could find (imo). I also want to add to always read the README text files that come with mods when you download them... I’m sure you probably already do that but I’m an impatient derp that couldn’t figure out some things until I read the readme... >.>;;
Also, I had an issue when installing ReShade, and I’m just gonna explain everything I went through in case anyone else is having a hard time too, ‘cuz it took me quite a while to find the info. I needed. I also want to add that I use windows 8.1 (unfortunately that’s the only operating system that’s compatible with my laptop, so no windows 10 or 7 for me, I already tried, rip) so the issue I had could of been caused by 8.1′s wonkyness. But I don’t know for sure.
After it asked me if I want to download a collection of standard effects, and I clicked yes, it said it failed. The program was properly installed into Sims 4, but I had no effects or textures (which is the whole point of getting this...)
But! This can be fixed by downloading the effects manually and putting them into your bin folder yourself. THIS FORUM on ReShade’s website has this answer and a link to the download for the effects and textures. The very first answer under the OP’s question is the one with the download~ I’m very thankful to that helpful person. Also, I’m just linking the forum instead of the responder’s link itself b/c once you click on their link it downloads the file. It’s not a link to a file share or anything, it’s just the direct download. The ReShade website probably has these up for download on their website somewhere too... But I’m trash at navigating websites that I’m not used to so I have no idea where... But I would assume it’s there somewhere...
After you have that file, slap it into your sims 4′s bin folder (tutorial I linked before shows where that is). Now, this alone is not all that you need to do. Now that it’s in the file, you need to go into the game and open the ReShade interface. Then you go over to settings and you need to copy paste the path for the program to find the effects and textures. There’s two separate boxes, one for effects and one for textures.
To do this, go into the shaders folder that’s in your reshade shaders’ folder in your sims 4′s bin folder. Then in the bar at the top of your file’s window that shows all the files you’ve gone into, click on it and copy it. Then tab back to your sims 4 game and paste that info into ReShade’s effects box. Then go into your textures file and do the same things for the textures box in ReShade.
When you paste them into the ReShade interface they should look something like this:
C:\Program Files (x86)\Origin Games\The Sims 4\Game\Bin\reshade-shaders\Shaders
C:\Program Files (x86)\Origin Games\The Sims 4\Game\Bin\reshade-shaders\Textures
Of course, if you didn’t install this on your C drive it might be a bit different, but you need to find that from wherever you installed Sims 4.
Once you’ve done all that the issue should be fixed and it’ll now load up all 60 effects and textures that you’ve downloaded every time you start up Sims 4 or tab back into your game after alt tabbing out!!!!! .................
So, hooray for it working properly now, BUT GOODNESS DOES THIS ANNOY ME. So like. If you’re going to download a preset from someone else (youtube tutorial I linked already shows how to do that) then I suggest keeping all the files you’ve downloaded. Especially if you’re switching between multiple presets for different occasions. There’s lots of ReShade presets all over tumblr, btw. So have fun looking them up if that’s what you want to do!
But I’m not doing that. I don’t need all of this. It’s giving me a lag for no reason. SO I DELETED A WHOLE BUNCH OF EFFECTS ‘CUZ FUQ THIS LOADING TIME.
Be careful not to delete anything important, though. In the shaders folder is the only folder I deleted anything inside of. Anything that was installed in the reshade-shaders folder I left alone. But inside the shaders or textures folder that’s inside of that reshade-shaders folder should be fine to delete things. BUT DON’T DELETE FILES THAT IT NEEDS TO RUN~
Anything that is a .fhx file you need to keep. Anything that is a .fx file is simply the effect itself and is safe to delete. I didn’t delete anything in my textures folder because when I downloaded the whole thing from the forum the textures folder didn’t have much in it. This might be different if you were able to install correctly in the first place.
Anyways! The files I ended up keeping were all the .fhx files and the following effects: Colorfulness.fx, Vibrance.fx, and DPX.fx
Colorfulness and Vibrance increase the saturation and vibrancy of your game and DPX is one that overall birghtens everything (I think). There’s lots of other effects that do the same things as these but those three are my favorites. Well, I don’t use DPX, it makes it a bit too bright for my eyes, but I decided to keep that one because whenever I’m able to get Seasons, if rainy/snowy days make the game seem way too dark I might want to enable DPX just for those days.
But for normal sunny days, just checking Colorfulness and Vibrance is enough for me~ I didn’t even mess with the sliders on how much you want it to effect the game because I don’t want to deal with those kind of advanced settings. I just pushed the check mark box on those two and done!
Now that I only have 3 effects and then the few textures that I never use but aren’t hurting anything by being there, it doesn’t even have a loading time to get ReShade to run properly when starting up my Sims 4 or tabbing back into it. ReShade is just ready to go right away!
So if you’re wanting to brighten up your game, but have a slower computer and most lighting mods and/or ReShade being the way it normally is lags your game too much, you could consider doing what I did! :D
Also, with ReShade, you need to change the way you take screenshots now. Doing it with the C button just takes a picture of your naked game, not the ReShade effects.
So, ReShade’s default hotkey for taking screenshots is Prt Scrn, so you can use that button now or you can change which button you want to take screenshots in the settings tab of ReShade’s interface. But the point is just pushing C doesn’t capture the ReShade effects so you’ll need a different button!
Also! In ReShade’s settings tab, you need to change the screenshot format if you want to upload your ReShade screenies to tumblr! Its default is set to Bitmap, which tumblr doesn’t support, so change it so it saves as a PNG file instead!!!
You can also change the path for where it’s going to drop your screenshots off at. The default is set to Sims 4′s bin folder, so if you want it to drop off screenshots in a different folder that’s dedicated to just screenshots and doesn’t have your game’s other important things in it, you’ll need to change the path for that (it’s the same as when you changed the path for it to find the effects and textures, just copy paste where you want it to go).
Keep in mind that if you move the folder you told ReShade to dump its screenshots at then you’ll need to update the path in ReShade’s interface or it won’t be able to find the folder and you won’t get your screenies~
So yea! That’s all the info. I have!! I hope this helps someone that wants to use ReShade but has been confused about it like I was!! 😂
Also sorry if my explaining things is long and confusing. This is just how thoughts flow in my brain so.. um... yea. >.>;
#ts4#sims 4#reshade#simblr#wcif#berry legacy#gen 4#ts4 reshade#sims 4 reshade#noblu#noglo#sims 4 noblu#ts4 noblu#sims 4 noglo#ts4 noglo#noblu+noglo#sims 4 noblu+noglo#ts4 noblu+noglo#vibrancy#sims 4 vibrancy#ts4 vibrancy#sims 4 cc#ts4 cc#cc#custom content#mods#sims 4 mods#ts4 mods#saturation#sims 4 saturation
5 notes
·
View notes
Text
Version 380
youtube
windows
zip
exe
macOS
app
linux
tar.gz
source
tar.gz
I had a couple of difficult weeks, with illness and other IRL problems getting in the way, but I got some hopefully pretty neat work done. A new fast video and audio player is available for advanced users to test, and there are a bunch of fixes and ui improvements as well.
A user just notified me that the Duplicates page has crazy layout! I apologise. Nothing is broken, it is just sizing wrong, and part of a longer fight I am having to convert my old wx layout code to Qt. I know exactly what happened here, and I will have it fixed for 381. If you discover more UI like this (the system predicate panels have a bit of it), please let me know.
mpv
This is just for advanced users this week. It is a basic prototype that is not ready for real use. I will improve a bit before turning it on for everyone, hopefully next week.
MPV is a good free video player. One of the core benefits of moving hydrus to Qt was the potential of being able to neatly embed it into the media viewer. I am happy to report that these past two weeks have been successful, and it looks like hydrus is finally getting hardware-accelerated video playback and full native audio support!
If you are using the windows build in advanced mode, please check out the big ugly filetypes list under options->media. Under all the video and audio filetypes, you can now set 'show using mpv' as a show action. Please forgive how large this list has grown--before I turn mpv on for everyone, I am going to rework this list so you have the option to just say 'for all video: xxxxxx', rather than always having every single filetype.
Once you have it set, it should load video almost exactly the same as my native renderer, with the scanbar below for navigation. Audio files will show as a (for-now fixed-size) black box or album art. Be warned: there are no volume/mute controls yet! I have set it at 70% volume for now. MPV has an optional and configurable on-screen display, but for technical reasons I had to stick with my custom controls.
I know what features I need to add, so the feedback I am most interested in this week is in where mpv breaks. If it doesn't work for you, or if it fails to load a file, or it has bad performance, or it sizes wrong, or you get a crash after closing the media viewer, anything like that, please let me know. Performance in my tests has been excellent--rendering 4k 60fps no problem as long as you have any sort of branded GPU. I have had some audio jitter on some unusually encoded videos and some crashes (which I think I have fixed).
One annoying thing is mpv requires a hefty 57MB dll, making the already bloated hydrus download even bigger. One user suggested perhaps putting out two releases--a 'core', and an 'update', which wouldn't have the big stuff. I am still thinking about it--while I like the overall idea, the hydrus build is held together with duct tape, and having a small non-functional release will increase complexity and inevitably cause ugly syncing difficulties whenever the big stuff does need to be updated.
Users running from source will need libmpv and python-mpv to enable this. I haven't pinned down the most convenient and functional way to do this for Linux and macOS yet, so we'll have to figure this out over the coming weeks and get it into the help. Any knowledgeable feedback here would be great.
For the near future of mpv, I would like to: figure out the technical side of including mpv in the Linux and macOS builds; write volume/mute UI and shortcuts; add global volume/mute management; test mpv with gifs and apngs; explore custom shaders and configuration files; and generally polish the whole thing.
quality of life
The tag right-click menu has had a significant overhaul. More commonly used actions are moved up, less common down. Tags with siblings now provide all siblings under the 'copy' menu! System search predicates have better copy and search-action support (like 'exclude' system:archive, which will actually add 'system:inbox').
Right-clicking on the thumbnail grid's 'whitespace' no longer does a 'deselect all' action, so you can now easily right-click in an empty area and go remove->selected!
Across the program, all filetypes are now referred to with human language. Instead of 'image/jpg', it is now just 'jpeg'. Instead of 'application/x-7z-compressed', it is now just '7z'. Please let me know where it looks bad, and if you would like to edit these labels.
The 'new page chooser' dialog now dismisses itself if you click off it! So, if you accidentally middle-click in some page tab whitespace and it annoyingly pops up, just left-click, and it will go away. Also, this dialog now catches enter/return key, and will hit the 'first' button (if you imagine the nine possible button locations as a number pad, starting at top-left). Hitting enter twice will typically open a new 'my files' search page.
A user surprised me recently by asking where to find the 'pause video' shortcut--I hadn't realised there wasn't one! Now this is fixed: 'pause_media' and 'pause_play_media' are added to the 'media_viewer' shortcut set, and 'pause_play_slideshow' is added to 'media_viewer_browser' set. Previously, the slideshow pause/play was hardcoded to space bar--this is now gone, so if you used this, you'll want to set it up yourself.
the rest
I have added simple support for RealVideo, RealAudio, and TrueAudio files. These are some formats, so if you come across some variable bitrate rmvb file or something that doesn't work, please send it in and I will have a look. MPV couldn't handle a couple of my test .rm files' audio tracks, but the .ttas seemed great.
Ever since the CloudFlare-8chan break, I have been telling myself to figure out some new downloader objects for the bunkers everyone scattered to. This job kept being put off, long enough that 8kun came back(!), but I managed to fit in some time in this morning and got 8kun and vch.moe support added for today's release. 8kun was obviously easy to convert from the old 8chan parser, and vch's engine provides an API very similar to 4chan that I was able to duplicate and modify for. I had a proper look at julay, smuglo.li, and endchan, but these use their own API formats (or no API at all), so I will have to write new parsers, which will take longer. I really would like to get them done for 381--please remind me if it looks like this job has slipped away again.
full list
basic mpv support is added. it comes with the windows build this week, and is a prototype meant for initial testing. the library is optional. users who run from source will want 'python-mpv' added via pip and libmpv available on their PATH, more details in running_from_source help
took an qt-mpv example kindly provided by a user, updated it to work with the hydrus environment, and integrated it into the client as a new choosable view type under audio/video filetypes under options->media for advanced users
reworked how the 'start paused' and 'start with embed button' media viewer options work under options->media. these are now separate checkboxes, not combined with the underlying 'show action'. existing embed/paused show actions should be converted automatically to the correct new values
unfortunately, due to some python/qt/libmpv wrapper mouse interaction issues, mpv's 'on screen controller' overlay is not available
for now, left click pause/plays the mpv window, just like the native mpv window.
preview/next frame shortcuts should work for the mpv window when playing video
no volume/mute controls yet, these will come in the coming weeks, including global mute settings
updated media show and sizing code to account for mpv widgets
reworked my animation scanbar to talk to mpv, and for my mpv window to talk back to it
improved the animation scanbar to be more flexible when frame position and num_frames are not available, both in displaying info and calculating scanbar seek clicks
mpv api version added to help->about
.
new downloader objects:
thanks to a user, updated the 'pixiv artist page' url class to a new object that covers more situations. the defunct 'pixiv artist gallery page' url class is removed
added 8kun and vch.moe download support. I got started on julay, smug, and endchan, but they were a little more tricky and I couldn't finish them in time--fingers crossed, next week
.
menu quality of life:
a right-click on thumbnail whitespace will now not send a 'deselect all' event! feel free to right-click in empty space to do an easy remove->selected
remorked the tag menu layout to move less frequently used actions down:
- moved the discard/require/permit/exclude search predicate actions down
- moved 'open in a new page' below select and copy
- moved copy above select
and some misc menu layout improvement on this menu
fixed some labelling with the discard/require/permit/exclude verbs on negated tags
right-clicking on system search predicates now shows the 'copy' menu correctly
system predicates that offer easy inverse versions (like inbox/archive) should now offer the 'exclude' verb
when right-clicking on a single tag that has siblings, its siblings and those siblings' subtags will now be listed in the copy menu!
copying 'all' tags from a list menu, with or without counts, will now always copy them in the list order
across the program, all menu 'labels' (menu text items that do not have a submenu and have no associated action, like 'imported 3 years 7 months ago') will now copy their text to the clipboard. let's see how it goes
.
other ui quality of life:
across the program's UI, filetypes are now referred to with simpler terms rather than technical mimetypes. instead of 'image/jpg', it is now typically just 'jpeg'
the 'remove selected' buttons on the gallery and watcher pages are now smaller trash icon buttons
the new page chooser will now auto-dismiss if it loses focus--so if you accidentally launch it with a middle-/double-click somewhere, just click again and it'll go away
hitting enter or return on the new page chooser now picks the 'first' button, scanning from the top-left. hitting enter twice now typically opens a new 'my files' search page
added pause_media and pause_play_media shortcuts to the media_viewer shortcut set. new clients will start with space keypress performing pause_play_media
added pause_play_slideshow shortcut to the media_viewer_browser shortcut set. this shortcut is no longer hardcoded by space keypress
the six default shortcut sets now have a small description text on their edit panels
the options->media edit panels now enable/disable widgets better based on current media/preview action
added a checkbox to _options->gui pages_ to set whether middle-clicking a tag in the media viewer or a child tag manager to open a tag search page will switch to the main gui. default is false
mr bones now reports total files, total filesize, and average filesize
mr bones now loads your fate asynchronously
.
the rest:
added tentative and simple realvideo (.rm) and realaudio (.ra) support--seems to work ok, but some weirder variable bit rate formats may not, and I have collapsed the various different extensions just down to .rm or .ra
added trueaudio (.tta) audio support
fixed a bug from the recent search optimisations where a bare inbox search would not cross-reference with the file domain (so some trash could show up in a simple inbox/'my files' query)
fixed an issue with searching for known urls by url class where the class was for a third-or-higher-level domain and was not set to match subdomains (this hit 4chan file urls for a few users)
fixed the issue with 'open externally' button panel not clearing their backgrounds properly
fixed some of the new unusual stretchy layouts in the options dialog
removed overhead from subscriptions' 'separate' operation, which should stop super CPU hang when trying to split a subscription with hundreds of thousands of urls
fixed an issue where the advanced file delete dialog would not show the simple 'permanent delete' option when launched from the media viewer's right-click menu
fixed the select/remove actions for local/remote
fixed 'set_media_focus' from manage tags to correctly activate the underlying media viewer as well as set focus
stopped the 'file lookup script' status control from resizing so wide when it fetches a url
fixed a rare mouse wheel event handling bug in the media viewer
reduced db overhead of the 'loading x/y' results generation routine. this _may_ help some users who had very slow media result loading
cleaned up how the server reports a bootup-action error such as 'cannot shut down server since it is not running'--this is now a simple statement to console, not a full error with trace
improved client shutdown when a system session shutdown call arrives at the same time as a user shutdown request--the core shutdown routine should now only occur once
fixed an issue with thumbnail presentation on collections that have their contents deleted during the thumbnail generation call
misc wx->Qt layout conversion improvements
updated the github readme to reflect some new links and so on
misc code cleanup
next week
I pushed it a bit hard this week, so I am going to try to take it easy. Hopefully I will be able to get some volume/mute controls going for mpv and then launch it for all users, including on the Linux and macOS builds. Assuming there are no catastrophic problems this week, I will be overwriting user settings to move all 'show as normal' video and audio options to 'show with mpv'. Then these new imageboard parsers and some more Qt cleanup work.
0 notes