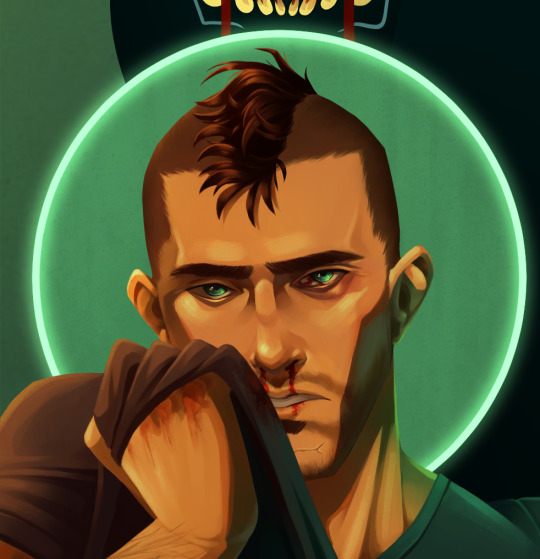
#i downloaded new textured brushes and had a lot of fun with them especially on the face
Explore tagged Tumblr posts
Text
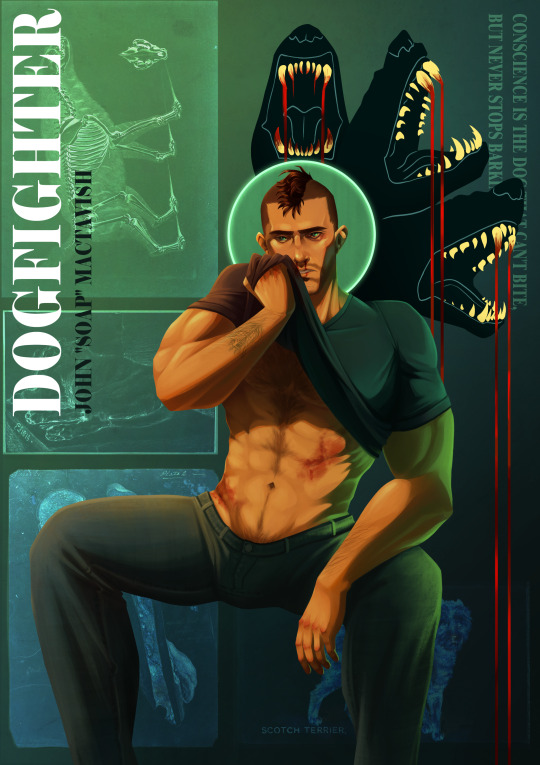
Soap "dog-coded" MacTavish my beloved
(This took 5 weeks help)
#call of duty modern warfare 2#cod mw2#cod soap#john soap mactavish#call of duty modern warfare#cod fanart#call of duty fanart#Partially blame forestshadow-wolf for making me unable to see soap as anything but dog-coded#this painting really pushed my anatomy knowledge aka it made me realize how much i dont know lmao#i downloaded new textured brushes and had a lot of fun with them especially on the face#the bg is kinda inspired by wombywoo as you can tell#i wouldve given him more chest hair but it took too long to get it to look decent and i didnt feel like doing more#this is my favorite soap i've painted <3#edit tumblr absolutely killed the quality rip
2K notes
·
View notes
Text
CSP Brushes that I commonly use:
I forgot I had a curiouscat for my main twitter account (tsuki3458) and I forgot to answer people’s questions on the brushes I use ;;w;; I’m so sorry for the extreme delay.
Here are all the links of the brushes that I use most of the time! Divided into categories that I use them for <3 JESUS CHRIST THIS TOOK A LONG TIME TO MAKE LMAO. DISCLAIMER: I’ve used CSP PRO since November 2018 and some/a lot of the brushes that I use have been deleted/unpublished meaning I cannot share or redistribute them. ALSO, I’m only linking the ones that are in the CSP community site and not from individual artists. I’ve also only linked the ones that I’ve downloaded and constantly use to an extent. I’ve downloaded over 250 Materials/Assets so yeah... Hopefully this was informational!!! Have fun using any brushes you’ve downloaded :) --- One of, if not, THE best publisher of various assets from brushes, gradients, auto-actions, textures, ETC: https://profile.clip-studio.com/en-us/profile/3akwnmm-0c Most of their assets are free!!! AND ARE REAAAAAAALLY GOOD <3 Independent Artists Brushes I use sometimes: > Viorie/Vioriie: https://cubebrush.co/viorie/products/kwynq-ZBT_/brushes-for-procreate-sai-photoshop-2020 > Chlorotype/Caebbage/Birdie: https://gumroad.com/caebbage --- Multi Use Brushes: > https://assets.clip-studio.com/en-us/detail?id=1753435 Write Borupen (I use for sketching and lineart. For lineart, I use a harder/thicker brush like Artemus Hard to sketch with instead. Color I mostly use it with is black and green). > https://assets.clip-studio.com/en-us/detail?id=1758182 Artemus Pencil (I use for sketching and coloring. Great for texture). > https://assets.clip-studio.com/en-us/detail?id=1688293 Graffiti Mili Pen (I use for sketching and lineart. For sketching, I make the brush size really big so it doesn’t look like lineart. This was my first ever brush to download in CSP because I watched a korean artist use this brush and it’s actually what made me buy CSP LOL). > https://assets.clip-studio.com/en-us/detail?id=1715342 DOT! Dot (Great for sketching freely like in mspaint or for lineart. It’s really cute I like it a lot, also from one of my favorite artists hehe <3). > https://assets.clip-studio.com/en-us/detail?id=1778145 SOL pen (I haven’t used it a lot but it’s good for sketching, coloring, and lineart! Especially coloring if you’re someone who doesn’t like wet brushes and prefer to hard color everything hehe). > https://assets.clip-studio.com/en-us/detail?id=1730578 MK_Tilt Pencil PRO (One of the first ever few sketch brushes I’ve used! Good for sketching and even lineart if you’re up for it! Ever since downloading Artemus brush set I haven’t used this one though :( --- PAINTING/COLORING (Wet brushes): > https://assets.clip-studio.com/en-us/detail?id=1762852 Smeared Paintbrush ( THIS IS SUCH A SEXY BRUSH OMG... SO GOOD... WROW...) > https://assets.clip-studio.com/en-us/detail?id=1745112 벰펜 (VERY SOFT !!! I use it whenever I want to make soft coloring hehe :3c). > https://assets.clip-studio.com/en-us/detail?id=1717302 SAI Pen (It’s a basic round brush but with a super soft edge! It’s what I use to fill in my base colors <3). > https://assets.clip-studio.com/en-us/detail?id=1728875 꾸덕 (I use this brush whenever I want to paint something but still leaving hard strokes/marks! It’s not textured and easily mixes color while keeping the chosen color’s opacity very high until you mix it a lot... if that makes sense >,> I like it :3c). > https://assets.clip-studio.com/en-us/detail?id=1692034 T-Marker Wind Brush Set (O MY GOOD NESS... it’s basically like IRL markers like copic, wisconsin, etc, and I use it whenever I want to color a greyscale/monotone sketch! Great for people who want a realistic coloring style :3c). > https://assets.clip-studio.com/en-us/detail?id=1776520 Horse Oil REMAKE (I had the original brush which is deleted and I highly prefer that one because it’s not as wet as the new one but!!! Still good. Haven’t used it much though :( PLEASE CHECK OUT MORE OF THE BRUSHES FROM THE PUBLISHER THOUGH!!! THEY ARE REALLY GOOD) --- LINEART (Hard/No opacity change, textured, etc): > https://assets.clip-studio.com/en-us/detail?id=1761353
SU-Cream Pencil ( I personally haven’t used this brush a lot BUT it’s very good if you want some texture while still having your piece look soft!) > Real G-Pen > Real Pencil (Modified) > Darker Pencil > Crayon (Modified) > G-Pen (This one lacks texture compared to Real G-Pen. I’ve been using this brush to simulate fake anime screenshots). --- MISCELLANEOUS BRUSHES (Effects, cute, etc): > https://assets.clip-studio.com/en-us/detail?id=1722368 Neon Pen ( I always use this whenever I want to add in something cute!) > https://assets.clip-studio.com/en-us/detail?id=1699459 Suisai (I use this for sketching whenever I want to sketch using a soft brush! You can use it for coloring too but I mainly use it to sketch :3c). --- ASSETS (Gradient Maps, Textures, etc): > https://assets.clip-studio.com/en-us/detail?id=1723549 Sky Color Gradient Set (I use this if I want my drawings to look soft. I actually haven’t used it for actual sky backgrounds yet LOL). > https://assets.clip-studio.com/en-us/detail?id=1736766 Color Noise Patterns/Texture (This is what I use for adding the noise effect on my drawings! I import it in my canvas and set the layer mode usually to Color Burn <3. The only one I use though/so far is the lightest one or ptw25). > https://assets.clip-studio.com/en-us/detail?id=1774233 World of Humility Gradient Set (I use this if I want to add more saturation to my colors. It’s very good! I’ve used it quite a lot hehe). > https://assets.clip-studio.com/en-us/detail?id=1721414 Yunywave Gradient Set (The one I use the most! Helps with adding contrast to my art. Highly recommend if you want an aesthetic look <3). > https://assets.clip-studio.com/en-us/detail?id=1754836 OBongBong’s Filter Set #2 (THIS IS AMAZING OMG WOWS... REALLY SEXY GRADIENTS. Highly recommend if you want different color palettes for different moods/aesthetics). > https://assets.clip-studio.com/en-us/detail?id=1437655 Basic Pattern Material Collection (Ever since downloading this I’ve used it whenever I needed a cute background for a portrait. It’s so good!!!)
#csp#brushes#clip studio paint brushes#clip studio paint#clip studio paint pro#csppro#digital art#digital art brushes
93 notes
·
View notes
Photo

ASKS 18
Andromeda’s a big wide open galaxy; okay anyways here are some asks about Dead by Daylight, ayoshi collab, sims 5, my old recolors, and just some sweet people who sent me some nice messages <3

Anonymous said: In your collab with Ayoshi, the outfit that shows off the Ciara Top and Jess shorts, where can I find the garter belt accessory used with the shorts?
Those stockings get asked about SO much lmao. They are BY Ayoshi like.. idk why people ask about them. I desperately want him to remake them with new textures. Maybe one day lmao. All of his CC is in this post including the stocking (Miso Tights).

Anonymous said: Omg whos your dead by daylight main
Kate and Yui <3 I have been using Jane recently too. I play as Spirit for killer but I only do killer for the challenges LMAO


Anonymous said: I am very new to The Sims world, ts4 is my first time playing, and finding out I can have mods on my game change my world, and you are one of my favorite creators! So I just came to say you are really amazing. I think I have all of your hairs, and most of you others cc, it is because of you my townies look so cute nowadays!! Remember your effort is really valued and you are loved!!!
thank you so so so much ;n; I would really advise against having all of my hairs lmao there are like 150+ and a lot of the older ones have issues i want to fix... just need to find the time

Anonymous said: what do u use to get the little sparkles in your edits :o is it a brush?
I honestly don’t remember. Every since the first one I just use the same lookbook PSD that has the sparkle on it. These look similar though so try them.

Anonymous said: wcif the first two chokers used in your pic for your hairs you just put up on your patreon?
All of my patreon cc posts are public the day they go up. the download is for patrons only but the CC posts are public. Those always have the CC i use linked at the bottom. Always. They have since June of last year. Just go to my Patreon and scroll down to the hairs, and you will see them linked. No pledging or following required.

Anonymous said: Do you have a Ko-Fi? I’m wary about trying to send a one-off via Patreon incase I forget to cancel the next month.
I have a paypal.me link > here < but please don’t feel inclined to donate. Also if you do a one-off with Patreon you can cancel it right after you pledge and you’ll still have access to the Patreon content til the end of the month.

Anonymous said: not to rush you or anything but bella is one of the prettiest sims you've ever created and i can't wait for you to release her omg
Bella queen wbk (thank you)

Anonymous said: your models are so pretty! would you consider release the tray files of them?
that is the plan, not sure when though. I am building them a house rn which i’ve been having fun doing. They all lived in a basement before

Anonymous said: hi :) just out of curiosity, what is the EA policy u always mention concerning the third hairs in ur posts? thanks!
CC put on Patreon is supposed to be post within 21 days of going on Patreon. One of the community managers said it a while ago. I have the details on my Patreon about me page if you want to read and get links. <3

@ariapixie said: Happy New Years!!🎆🎉🎉🎆🎇🎆
thank you!!! i hope youve been having an amazing year so far <3

Anonymous said: Heey love :) I am obssessed with your hairstyles *_* you're the reason I switched from alpha to MM :) just wanted to ask you how come you no longer include recolors for your latest hairstyles? :)
well there were a few reasons:
1). I never used the recolors myself. I like the colors I just never used them 2). I got comments about the colors looking too metalic 3). I had started Patreon around that time and doing recolors for 3 (and sometimes more) hairs every month would have been a lot. Especially bc my DDS was broken so I had to do them a bit more complicated than just saving as DDS.
I know that some people really liked my recolors, and I am sorry if me stopping caused any issues. There are actions for the hair colors and recoloring hair is really easy to learn and do.

@sadnessimmer said: 💌This is the Amazing Person Award! Once you are given this award you are supposed to paste it in the ask of eight different people, who, in your opinion, deserve it. If you break the chain nothing will happen, but it is sweet to know someone thinks you’re amazing inside and out! 💌
Anonymous said: how is your content so amazing ily so much 🥺💕
Anonymous said: Thank you so much for all that you do! Your hairs and collabs are amazing
thank you so much!

Anonymous said: Could you ever see yourself creating hairs (or custom content in general) for the Sims 5 once it comes out?
If the style is something I enjoy and the creation method is similar yes

@ariapixie said: Hi I think tumblr ate my ask so I’m sorry if you’ve already gotten this. I really love your editing it’s so beautiful and I was wondering if you would ever consider doing a tutorial on how you do it
honestly most of the time i do stuff differently. I run the same topaz/sharpening actions every time and then add some shadows and play with curves. Nothing that is super intensive tbh. I wouldn’t even know how to go about doing a tutorial tbh

Anonymous said: What's your name on the gallery? I can't ever seem to find anything from you, or do you not have one?
aharris00britney; make sure you have CC enabled

@wcifblog said: Hi, I am in love with your CC. I'm a simmer for a long time but just lately I've been trying to learn how to make my own CC. I've seen some of your speed meshing videos and I was wondering if you'd ever consider making a tutorial for beginners on how to create a new mesh from scratch. (I'm trying to create a curly hair on blender but I'm stupid I guess). Thank you so much for all your work, love, Kel.
hey! thank you so much <3 I actually don’t mesh stuff from scratch though. So I’m afraid I am not able to help in that department :( I’m sorry

@tarrinix said: would it be possible for you to upload a mass file for download that has all of your hairs? (I'm asking for only the ones created by you so others don't miss out of credit links and things like that.)
I really wanted to get all my 2019 CC updated before the end of the year and have it up in a .zip. But I never got around do updating stuff from the start of the year. I need to get back into updating stuff I just am so.. unmotivated recently? Idk hopefully I can get all my stuff updated in the next few months and have some mass downloads for 2017, 2018, and 2019 stuff.

@xayami said: any thoughts on 365? 😳
well.... im excited for B#RN. that is what matters, right? LMAO I’m going through a Weyes Blood/FKA Twigs phase rn so I haven’t been listening to much kpop. Especially at the time that 365 released.

Anonymous said: the sim modeling your piper hair can murder me and i will thank her over and over how make good sim
Anonymous said: it's not even just her it's every GODDANG MODEL!!!
LMAO Ivy is my 2nd blond model. She is a queen isn’t she? She is actually the sim from this lookbook and I just randomly added her to my models household and she stayed.

#asks#if anyone knows some albums that are like titanic rising pls recommend#i listened to front way seat to earth already#and loved that too#love Magdalene too#i just want some new music zzz#ive been building an actual house for my model sims the past few days#bc they lived in a basement before#and it is so bad edfgsefdc i like NEVER build anything#then my mouse broke and i struggle using the trackpad#so im on break from it
52 notes
·
View notes
Note
Hey I sent an ask before but I guess it got swallowed? I was wondering if you had any advice on editing headers for fics? I’ve loved the ones you’ve done in the past and I’d really like to do something like that for my own fics too! Hopefully this one gets to you💓—🦋 anon
Hi!!!
I actually design things and work in printing for my main job so I have access to things like Adobe photoshop and Adobe illustrator (I do my painting/retouching in photoshop and everything else in illustrator). But it’s hella expensive so I try to look at free alternatives.
I have a bunch of asset/resource sites I use for photos and fonts. Sorry I tend to ramble so here we go.
Firstly I have a lot of free resource sites that I can get high-res assets from. I often am using things for commercial purposes because I get paid to do what I do. But for most people, they don’t have to worry so much about it bc they’re making it for themselves, but it’s always nice to have high-res assets still.
When I get a concept, I look for imagery that inspires me from sites like these and I can usually find what I’m looking for. The amount of beautiful, free, high-res images out there is amazing.
Good rule of thumb is that you can always make a big image smaller, but never make a small image bigger, so always download the biggest size you can and size to your needs. -holding SHIFT when resizing keeps things in proportion when scaling-
I usually use pexels and freepik as my default. There are sooo many image sites I could list but here are the ones I use.
https://www.pexels.com/
https://www.freepik.com/search?dates=any&format=search&page=1&selection=1&sort=popular&type=photo
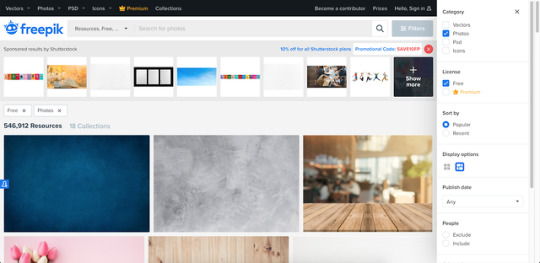
https://pixabay.com/
https://unsplash.com/
https://www.rawpixel.com/free-images (There’s free and premium images, but you can download 5 images per day are labeled free)
https://lostandtaken.com (textures that you can tile!)
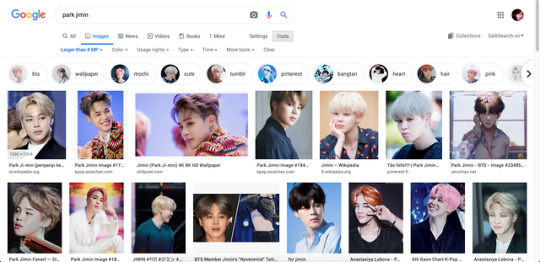
For BTS photos I look via google for images over 4MP (usually dispatch or official photos are my go-to).
I use photoshop to cut them out and retouch, but there is another editing tool I’ve been experimenting with called Photopea, which is a FREE online editing tool that’s just as powerful. It even looks like photoshop so it’s pretty comfortable to use.
https://www.photopea.com/
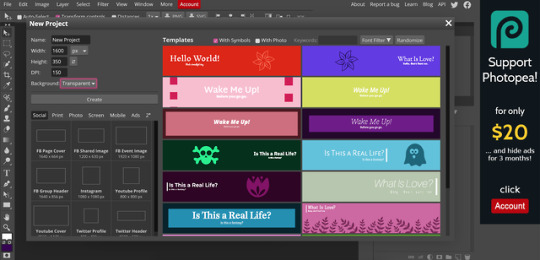
I make my banners at 1600px x 350px, but i realized tumblr auto resizes anyway [LIKE A BITCHASS PUNK IM MAD ABT IT AND FOUND A WORKAROUND thats for another post tho]. I keep my DPI higher in case I want to use it for printing at some point, but that’s optional -72 is perfect for what you’re doing.
Reference:
300DPI= GREAT PRINT QUALITY - (work brain loves this but it’s useless for what we’re doing)150DPI=GOOD PRINT QUALITY 72=OPTIMIZED FOR DIGITAL USE ONLY (standard screen resolution)
_
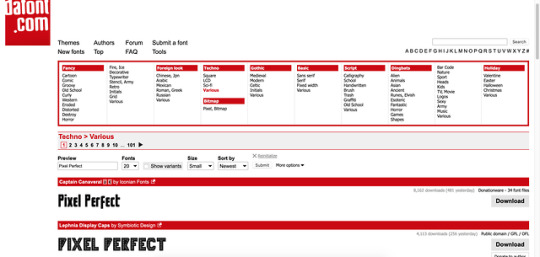
Custom fonts can be your friend or the enemy. If you’re using a scripty one, try to make sure it’s legible with your title (there are some really terrible ones out there, but there are so many good ones too).
The easiest and quickest font place I use is dafont bc you can choose fonts based on the style you’re going for and you can test your text before you decide to download. They can be loaded into photopea! Also they’re free:
https://www.dafont.com/

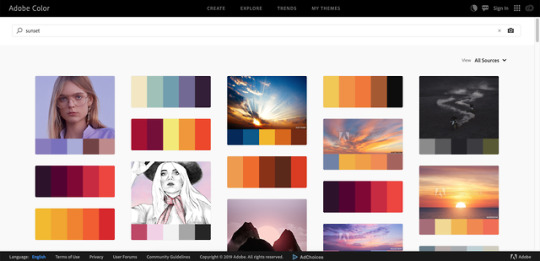
As far as editing goes, I tend to choose a color theme based on feelings and adobe has a site that can help you by showing you palettes based on search terms. ( you can even search for things like happy, sad, angry, etc)
https://color.adobe.com/explore
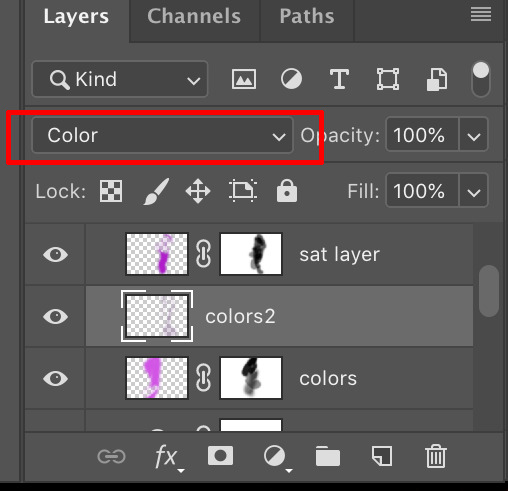
I tend to use fuzzy edge brushes on everything to make it look soft, especially in lighting. The trick is just layers upon layers with different blending modes
I use ���Color”, “Saturation” and “Overlay” modes a lot.

Ignore my layer names: I’m a mess.
This is what it looks like in reality. I just blob brush everything.
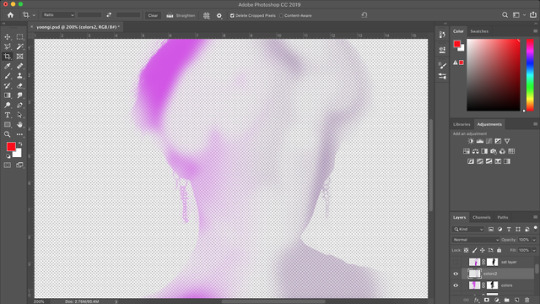

So in steps you can see 1)original cutout
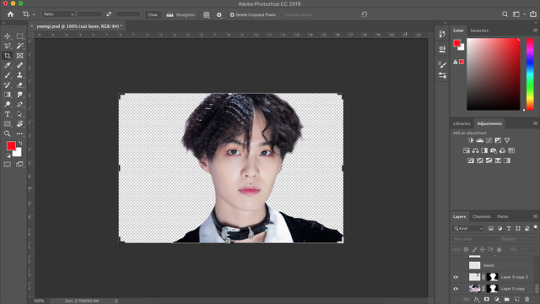
2) adding effects like busted lip (a brush i downloaded for PS–I don’t think these import to photopea unfortunately), bruising (textures set to overlay/multiply using different colors), earrings (hand-painted over the originals for a cleaner edge), and EYES (eyes i tend to cut from the main layer, copy above, lighten/contrast the shit out of them and change the color using “replace color” or “hue/sat” or blob color on a new layer and set it to “color” blending mode and then paint over –there’s a lot of ways to do it– but then blend them back into the photo in a natural-ish way)
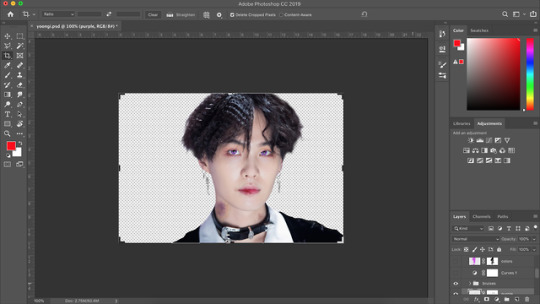
3) lighting overlays give color to the skin and you can use colors from your background to create interesting pop effects (in this case i used purple)

I hope this helps??? But if you want more like in depth help with editing and stuff, let me know!!! It can get overwhelming, but it can also be really fun!
3 notes
·
View notes
Text
Artist’s Software Surfing P1 - Sketching
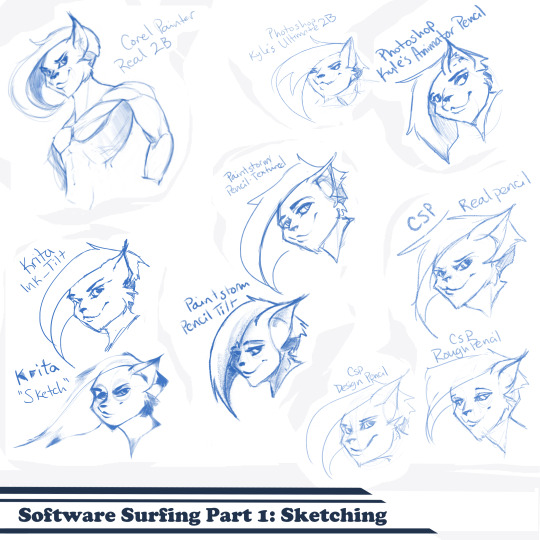
SSSo recently, after finishing (an admittedly long-overdue) a piece, I decided to download a trial of the new Corel Painter 2019. I hadn’t used Painter since my old DeviantArt days (circa 2005) and wanted to see how it felt with more digital art-veteran hands. Loaded it up, started sketching my default doodle-muse and wow, that “Real 2B” pencil feels great. I loved it so much, and wondered why.
That’s the story that is spawning this weird personal series of Software Surfing. I wanted to write little notes to future-me on how it felt using my favorite sketching tools in each program I have, and after the sixth one I thought it might be a good idea to check out inking, colouring, painting, etc. and writing those down as well.
So I’m writing this series for myself, but making it available in case anyone else can benefit as well. Thanks for sticking with the intro, let’s get into it.
Artist’s Software Surfing P1 - Sketching Artist’s Software Surfing P2 - Inking Artist’s Software Surfing P3 - Colouring Artist’s Software Surfing P4 - Painting
There are many ways to sketch, but this is specifically the classic “pencil” or “drawing” form using the tools with the program’s default settings.
As an introduction, this is my doodle-muse, Cloey. She was my first original character, and though I don’t usually share my anthro art on here (I know that’s not everyone’s thing) I do have a separate blog for that stuff that you can find here if you’re so inclined. If you’re familiar with Artgerm (and you should be), she’s basically my Pepper.
Corel Painter’s “Real 2B”:
The one that started it all. The pencil just GLIDES, and I’ve always loved when you can tilt a pencil tool and it will shade just like tilting a real-life pencil. The only thing I want from a program now is to be able to bind touch to blenders so I can use my finger to smudge-blend the scribbling. (I tried drawing that fist so many times /fume)
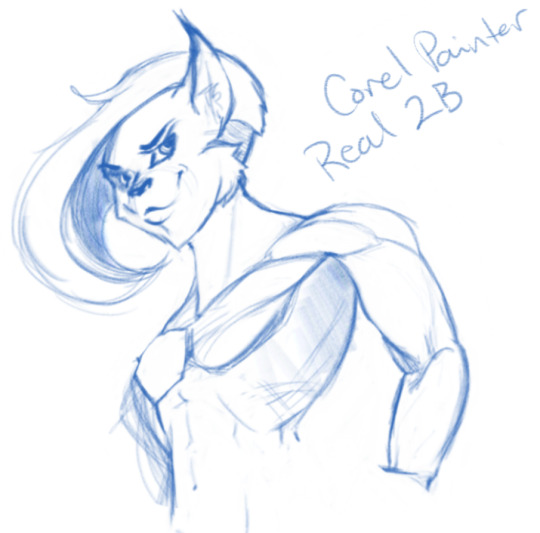
Likes: Tilt functionality, line width variance, stroke speed, eraser Dislikes: Rebinding Rotate Canvas tool was a pain. I like Shift+Space, and that key combo is reflected in the shortcut panel, but it just continued to pan. Never worked for me, and rotating or flipping the page quickly is crucial for my sketching process. Also sometimes if I quickly resize the eraser and mash it down to use, it won’t detect any input.
Photoshop, Kyle Webster’s “2B” & “Animator Pencil”:
**Disclaimer** Firstly, I’ve used Photoshop for over 15 years now, and it’s a great digital art tool, but for drawing and painting I find it’s sorely lacking. It’s slow, expensive, and unintuitive. That being said, there are some things this program does exclusive to others so I’m still clinging to it (desperately) and while I would definitely recommend something else for budding digital artists, I have to supplement my misgivings by purchasing additional plugins and tools, such as the famed Kyle T Webster’s Ultimate Megapack for Photoshop (
which is now complementary with Photoshop CC, damnit
). Unless otherwise noted, all the brushes I use in Photoshop will be from that pack. **End Disclaimer**
Following off the heels of Corel, I remembered messing around with another “2B” (which btw is my personal favorite traditional pencil to sketch with) in Kyle Webster’s Drawing Box in Photoshop. It felt a bit similar, but with no tilt functionality and it really lacked the chunky-thickness (a scientific term) I enjoyed with Painter’s pencil. I switched to my favorite (and the favorite of MANY digital artists btw) his “Animator’s Pencil”. So chunky, but the ability to shade lightly... It’s really a fun brush to use for sketching digitally. Still one of my absolute favorites.

Animator Pencil Likes: Line width variance, texture fills in and scales perfectly Dislikes: It’s a photoshop exclusive, a program that for some reason you can’t bind shortcuts to whatever you please, takes forever to load, and WAY too often suffers input lag while drawing. Also no tilt shading, :’( aw
Paintstorm’s “Textured Pencil” & “Pencil Tilt”
As a bit of an aside, I love Paintstorm, Paintstorm is what got me back into digital drawing and painting after doing 3D and game design for 7 years. I bought it for the very low price of entry (2 licenses for $30) and was impressed by its ability to customize literally anything in the program. You can create your own tool/brush boxes, bind any shortcut to any key combination, and every single brush tool adjustment comes with the most customization control of any program I’ve come across since Photoshop set the bar way back in the day. Out of the box a lot of the basic brushes have that old OpenCanvas or PaintTool Sai feel, but more recently they’ve added some very textured default brushes you can play around with. It’s also hands-down the FASTEST program I’ve ever worked in. I highly recommend giving it a try, it’s great for learning and experimentation. I grew a lot working in Paintstorm.

The Textured Pencil is a fun sketching brush, you can get as think or thick as you’d want and it keeps a clean outline. The Pencil Tilt really blew my mind the first time I used it. YOU CAN SHADE! It was the first time I had ever seen a program do that. The tilt has a great texture, fantastic control, and gets just as dark as you’d need. I’d recommend using them both, the Textured Pencil for a cleaner sketch, and the Pencil Tilt for something more expressive or loose.
Krita’s Ink-Tilt & “Sketch”:
I’ll be honest, I have almost no experience in Krita despite having downloaded and given it a try back in 2014. It was a hell of a time to figure out how to rebind my usual shortcuts (flip horz, rotate canvas). I couldn’t even rebind colour grab/eyedropper. Yikes. I opened up the “Sketching” brush box and there were only two options, made worse as one was a sketch pen... That lacked the flexibility of ballpoint.
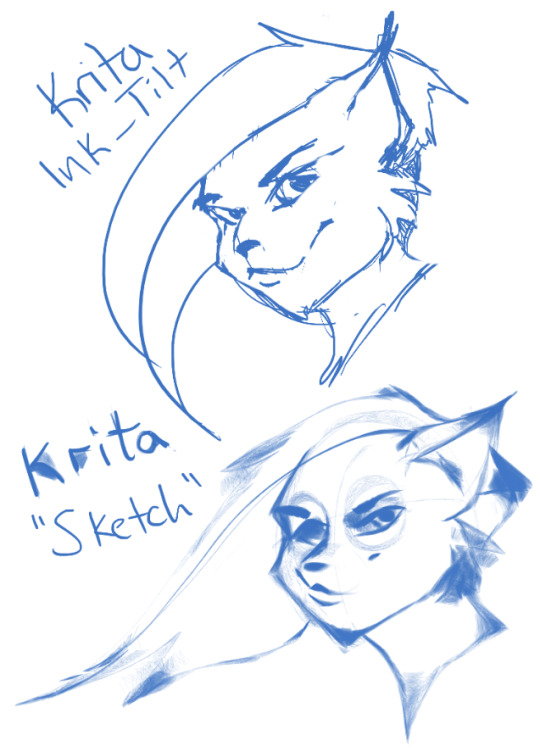
First I grabbed the pencil dubbed “Sketch” and was bewildered why the size of the circle was so large compared to the mark it made. Very confusing. Feeling intimidated, I abandoned it immediately to try out the “ink_tilt” (which by the way there’s no tilt functionality??) and hated it. I reluctantly went back to the pencil and just started trying to make marks. Wow. It’s weird, but surprisingly fun. You have to be willing to relinquish a LOT of control, but the shapes the brush makes while moving and tilting during a stroke can yield some really interesting and suggestive shapes. I would say great for early concepting or making something really loose and expressive. Fun to play with, but not really practical.
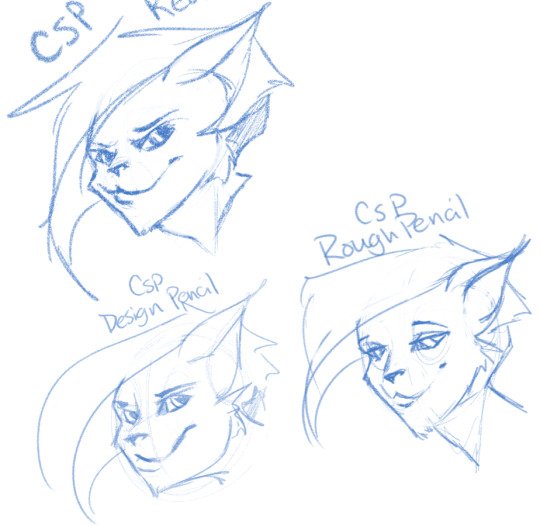
Clip Studio Paint’s Real Pencil & Rough Pencil
I’ve been wholly immersed in CSP since I purchased the program back in late 2016. It goes on sale often, so you can pick up a nice fully featured program for ~$35. I’d had my eye on it for a while and still really want to get into self-publishing comics, so I picked it up, bought a couple of brush packs for it (it’s pretty lacking in default painting tools) and I’ve been illustrating in it ever since. The brush creation isn’t as fun as Paintstorm, but brushes are quite customizable. I usually like to use the “Rough Pencil” if I want just a little texture and line variance, or the “Darker Pencil” for something cleaner. Trying to be different, I just jotted out a couple heads in ones I don’t normally use, the Real Pencil and Design Pencil. The Real Pencil has a lot of texture, but for some reason in CSP the textures don’t seem to scale with the brush, so I tend to avoid using it in most cases. I hate the design pencil, I just could never get dark enough. I guess that’s probably the point, though.
Well, that definitely wraps this digest up. I feel refreshed after trying out a lot of new digital sketching brushes. I was really reminded of how much I enjoyed drawing in Paintstorm. I hope someone other than me found this useful or otherwise inspiring! Sometimes, especially if you’re stuck in some art blockage, it’s a good idea to try something new, and for me digitally that’s hopping programs and trying new brushes.
I’m thinking about doing inks, colours, and painting at some point. Let me know if anyone’s interested in those! I’m planning on doing some for myself eventually, but I might expedite a post if anyone is interested. o/ Take it easy, y’all.
Artist’s Software Surfing P1 - Sketching Artist’s Software Surfing P2 - Inking Artist’s Software Surfing P3 - Colouring Artist’s Software Surfing P4 - Painting
6 notes
·
View notes
Photo
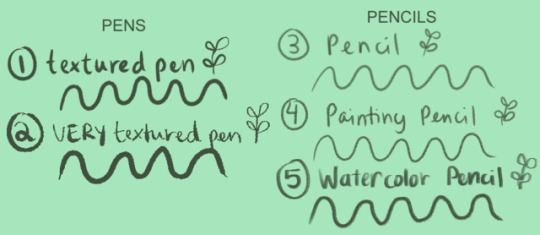
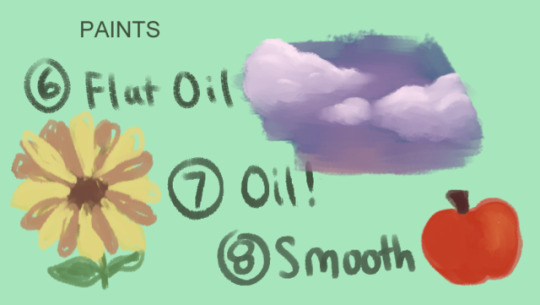
Hi! I was asked what program/brushes I use for my art, and decided to make an entire post about it!
I use Clip Studio Paint and most of the brushes I get are ones you’re able to download from Clip Studio Assets, which is incredibly helpful when you wanna find some new brushes to find and use. So, here’s a list of brushes I use and the links to them if you want to download them yourselves!
1. Textured Pen
If you use CSP, go to the pens tab and there should be one called “Textured Pen”, that’s what I use!
2. 線画用ペン by imo86
Whenever I’m feeling lazy and want to make lineart, I use this pen because no matter how sketchy you get with it, the lineart looks intentional and nice. I think the pen is updated, so it might be a little different? But it might be the same!
3. Pencil
I kind of made this brush myself? It’s just another default brush on CSP that I messed around with, but not by that much. Go under the pencils tab and it should be the last brush on the list.
4. 鉛筆ブラシ by がうたま
This link goes to an entire pencil pack! I mostly use the 2nd one out of the pack (which is the one I show), but all of them are very fun to play with. I mostly use it for lineart, but sketching is also pretty good. I usually use this brush when I’m doing a painting.
5. ざっくり水彩 by 磁気
ALRIGHTY LEMME TELL YA...the brushes in this pack ARE AMAZING. Do you want your artwork to look like watercolor? Well, this pack is the perfect thing for you! The watercolor paint brushes are beautiful! If you have a hard time like me with blending colors with watercolors, it comes with a blur brush that helps blend em. But my favorite is the pen brush it comes with that I show in the picture above. I just got the pack a couple days ago, but I LOVE IT! I use it for sketching, but I’m gonna try using it for lineart soon.
6. FLAT OIL!! by yogurt_art
This is my main painting brush I use! Before I had this brush, I had such a hard time with painting brushes that never really mixed and blended the colors right. With this brush, it blends colors soooo beautifully! This brush saved my life.
7. sss oil by rompi
I don’t really use this brush for painting because it doesn’t blend as well as the Flat Oil brush, but I do love using it as lineart for painting! It’s very nice to work with and the texture really makes the art pop out more!
8. かすれ油彩 ■ by Nappo
Okay, I have a love/hate relationship with this brush because it does blend the colors, but it takes more than one try to get the type of blending you want. So, using this brush takes some patience, but the texture is great and it’s gives a nice smooth finish. It’s a fun brush to experiment with.
If you made it this far, good job! I hope this post helps you out some, and maybe you’ll find a couple new brushes to mess around with if you have CSP!
Would I recommend other artists to get CSP? Yeah, if you have the time and patience to learn the program! It comes with a lot of options for an artist that’s helped me, especially with Clip Studio Assets, because I’ve been able to download different brushes like these to mess around with and incorporate into my art. Anyway, thank you for reading all this and hope you all have fun with your art!
#clip studio paint#clip studio assets#brushes#art#I hope this helps and sorry if this post is too long aha;;
6 notes
·
View notes
Text
I’m taking the night off from sky-making because I’m actually ahead of “schedule” and because I’m getting sort of disturbingly obsessed and playing my game for a bit instead, so while it loads, I write a bunch of replies. :)
These are for *deep breath* @penig, @holleyberry, @esotheria-sims, @acquiresimoleons, @kayleigh-83, @didilysims, @tamtam-go92, @dunne-ias, @strangetomato, and @eulaliasims. (Which doesn’t look like a long list, but there are multiple replies for pretty much all of the above, so....Yeah. :) )
penig replied to your photo “Dear Diary, Like wow! I got my first kiss and lost my virginity in...”
Bang it out...I see what you did there...
SOMEONE UNDERSTANDS ME! *heart* :)
holleyberry replied to your photo “And here’s the other one I really wanted: Just a grassy, flat horizon...”
Maxis neighborhood specific ones would be great too.
How do you mean? Like, made from panoramic pictures of specific neighborhoods? It’s an interesting idea, actually. I’d have to reinstall those neighborhoods to do it, though. Unless someone wants to volunteer to take pics for me. ;) Even so, I’m not sure I could get the scale right. Scale is a definite issue with these things. It will never be right, actually, but the most noticeably out-of-scale things on them are definitely buildings, when compared to the size of an actual, in-neighborhood building.
Speaking of Maxis, though... I’ve been fooling around with making some flat horizons to actually match the Maxis terrains, but it’s proving difficult. The scale issues are pretty bad. :\ I mean, like I said, these things are always going to be out of scale with the actual in-game houses and whatnot just because it’s the nature of the beast, but I’m trying to minimize that as much as I can. For some reason, it’s just not working very well with the Maxis terrain textures. I’m hoping to be able to make it work, but right now it’s not looking good. :\
esotheria-sims replied to your photo “Man, I’ve put a lot of work into this one. :) Like *checks time* about...”
Wow, just wow. This has got to be one of the coolest and most realistic skybox recolors I've seen around (though the 'realistic' part doesn't really come as a surprise, considering the source material :D) I'm extremely tempted to turn Strangetown into a miniature pseudo-Arizona town now.
:D That’s pretty much what I’m doing for retro-Strangetown. Because it amuses me to make the town Roswell-esque. Roswell’s in New Mexico, not Arizona, but the terrains in the two states are pretty similar. About the only difference, overall, is that (southern) Arizona has saguaro cacti and New Mexico doesn’t. I think NM is not quite as dry as AZ, but they’re both part of the same big desert, really, so...yeah.
In any case, that sky is one specifically meant for retro-Strangetown, for my own purposes. I also separated the horizon from the sky and put the horizon-only version on a lower layer so that the horizon can be used with any sky. So, the place can have different skies at different times but always have the same surrounding terrain, for continuity’s sake.
acquiresimoleons replied to your photo “Sharon still had that flirt want, and I figure the only way she’s...”
I guess her time with the aliens was fun and she wanted to try it with an earthling
Hah! Yeah, maybe...although in my mind the alien thing isn’t sexual at all. Just a “bit” of genetic engineering. But it might’ve put crazy ideas in her head, nevertheless. :)
kayleigh-83 replied to your photoset “Will, attempting and failing at yoga. But hey! At least he was doing...”
Like juggling, Sims have a remarkable natural aptitude for yoga!
That, and the fact that if you’re a Sim who’s really good at playing the piano, you can also paint like Picasso. Wish it was like that in real life because I’d really like to be able to paint. I mean, I can do all right with digital painting so long as I can use custom Photoshop brushes so that I can just “paint” a shape with a single click. But with actual physical art tools and supplies on an actual canvas or piece of paper? Completely hopeless. *sigh* Although I do plan to take some art classes at the local community college when we go home to CO. I’m hoping to be able to learn something. :)
didilysims replied to your post “I’m having a bit of a dilemma. Need some input. :)”
Some download sites have an option to have individual files in a folder and you can download the entire folder, so maybe that's an option? But honestly whatever's easiest for you is fine. I want 'em no matter what! :D
On SFS you can upload stuff in folders, and then downloaders can choose to download individual files from within the folder. That’s how Lowedeus uploaded his recent batch of skies. I’m thinking that might be better for folks with slower internet connections or those who know they don’t want every sky and want to pick and choose. I’m going to make a photo album on my Livejournal space with at least one pic of every sky, that such folks can reference in order to decide what they want. I’m thinking I’ll do a folder as well as a single file with everything in one, for people who just want everything and who have the internet bandwidth to download it all within a reasonable amount of time. That ought to cover all the bases, I think.
didilysims replied to your post “You used to use a bite neck mod for vampires. Do you still use it?...”
Cool ideas! I definitely want to steal the no food for vamps plan! Part of me also wants to steal the turn/kill randomization too, but I know I would be so sad if someone had to die. :(
Yeah, I can understand that. I’m just not overly-sentimental about my pixel people. Actually, I get far more attached to the pets than I do to the human Sims. So, I don’t have problems with killing Sims when the random number generator says to kill them and/or to have them die of illness thanks to RealSickness. And sometimes...Well, sometimes a population just NEEDS culling, especially because I let Sims breed as they will. In such neighborhoods, when I’ve got vamp residents, I’ll usually bump up the chance of bitten Sims being killed as population control. BUT! If you wanted to try it out, you could say they can only bite/turn/kill townies that you don’t really care about. :)
tamtam-go92 replied to your photo “Will decided to skip class, so I sent him off to the park that I...”
Lol, I have a sim that has three bolts with a guy with the same face template too xD
There’s always that one gorilla-faced dormie! :D I actually don’t mind that template at all. If you breed ‘em with a Sim with the right features to sort of soften the gorilla-ness, the kids are actually pretty darn cute. Usually chubby-cheeked and full-lipped but not as extreme as the gorilla-face. I have a weakness for chubby cheeks, myself. :)
tamtam-go92 replied to your photo “As if spending most of his time yakking with dormies wasn’t enough...”
I LOVE the tiles!
Yeah, they’re pretty cool. Maxis, too, since those made-over Academie Le Tour buildings I use are all CC-free, and I see no reason to make them otherwise, for the (relatively) short time that Sims live there. I think those tiles came with Nightlife, IIRC...
penig replied to your photo “Alien pregnancy doesn’t stop Sharon from being a complete nerd. It...”
You say "complete nerd" like it's a bad thing.
Nah, not bad, per se. Just reminds me too much of me when I was young and way too serious and not-fun for my own good. Being a complete anything can be a bad thing, after all. There was so much I missed out on when I was young because I was so focused on being a superior student and then on my career. The former actually didn’t have that huge of a positive impact on the latter. And I sort of gave up the career path I’d planned on to focus on raising my kids -- which I hadn’t planned on having -- anyway. So, in the end, all that seriousness and nerdy and sort of arrogant scholasticism had no real net gain and, like I said, made me miss out on experiences that probably would’ve been greatly enriching both personally and professionally. So...moderation in all things is my philosophy now. Which isn’t to say that I’m not a nerd at all. I mean, an encyclopedic knowledge of Star Trek as well as a nerdy fascination with arthropods kind of clinches that. But I don’t strive to be a complete nerd anymore.
dunne-ias replied to your photoset “So. I made skies. Like, *cough* 30 of them. So far! Above is a...”
I find it hilarious that you "need to get your butt in bed now" when you live where you live compared to where I live and it's actually approaching MY bedtime.
:D Yeah, being nocturnal and living on the US west coast and going to bed around noonish my time does sort of put me on the same sleep schedule as normal diurnal people in especially the more eastern parts of Europe that are 9 or 10 hours or so ahead of where I am. Like you, for instance. :)
penig replied to your photo “Oh God, not you, too, Will! Just sitting there, not playing chess,...”
Replace the chairs. They're too comfy.
See, that’s the thing. Those same chairs are used in other places in the dorm, not just at the chess table. Yet they choose the ones at the chess table, even if they have to walk past other iterations of the same chair to get to it. It’s weird. I can’t figure it out.
didilysims replied to your photo “The cow mascot was wandering around, doing her thing. Must hurt to get...”
Eh, they're just cheap plastic. Look at the tacky shine on 'em.
Well, yeah, but cheap plastic can still hurt if it pokes you hard enough!
...OK, that sounded vaguely dirty somehow. :)
kayleigh-83 replied to your photo “The cow mascot was wandering around, doing her thing. Must hurt to get...”
I love those mascots, such shit disturbers!
Y’know, I’m actually not a huge fan of the mascots in general. I find them more annoying than anything, same as I do Crumplebottom. Usually, I ban them with the Visitor Controller. For some reason I decided to let them torment dorms (they’re still banned in private on-campus residences, where it seems less appropriate for strangers to be barging in to do strange things) for now. I’m sure they will become annoying enough to ban them again, but for now...Yeah, they’re amusing me. And hey! The cow mascot’s sprinkler prank gives the germophobes something to do, with all the mopping. *eye roll*
strangetomato replied to your post “Later that night...”
I will never be tired of the silly date gifts.
It’s actually one of my favorite things about the whole dating thing. They make me laugh and/or they can sometimes be really useful. In fact, if they didn’t exist, I might not send any of my Sims on any actual, official timed dates at all. But since timed dates/outings are the only way to get the silly pressies, I do...
eulaliasims replied to your photo “Oh, God, it’s time to finish this thing. :P It’s campus housing, to...”
Apartment lots *are* a pain to furnish. Shift-key and dump identical bare necessities in each apartment is my method. At least the building looks gorgeous! I like the mix of windows. :D
Thank you! See, part of my problem with apartments is that I really can’t bear to furnish/decorate them identically. I really don’t know why. I mean, if I download an apartment lot with identically-furnished units, I’m perfectly OK with using them as-is. But, if I’m building the building, I just...can’t. I have to do them all differently. So, it’s like committing to decorating four (or more!) entire houses for one lot, and since furnishing/decorating is pretty much my least-favorite aspect of building...Yeah, apartment lots sort of intimidate me. Love building them. They’re fun to design/build. But the rest of it? Ugh, such a burden. :)
#penig#holleyberry#esotheria-sims#acquiresimoleons#kayleigh-83#didilysims#tamtam-go92#dunne-ias#strangetomato#eulaliasims
12 notes
·
View notes
Text
I was set a research task a few weeks ago to look at different types if illustration and to reflect on what areas of illustration I might be interested in. As part of this task I went around Cardiff to find different types of illustration to take pictures of, to then potentially analyse if there were any specific illustrations I liked and thought could be interesting to look at.
I didn’t end up analysing the illustrations I found in Cardiff because I already had some illustrators in mind who do work in the areas I might be interesting in getting into.
The first illustration I looked at was a product illustration that is part of a set of images made for a record cover and special edition box set for the band Elbow. This illustration is was used for the record sleeve. Using illustration for this purpose adds a lot of value to the record itself, the artwork or photos that are used for album covers make the albums more visually appealing objects that you don’t only want to own for the music but also for the lovely covers that you want to keep and collect. So I’d say record covers play a huge part in selling records, because without having something worth keeping, people might aswell buy a cd or download music. In this example (and the rest of the set) Robert Hunter is getting the bands style of music across quite clearly. From the few songs of theirs I’ve listened to so far, their music sounds modern and calm. His illustrative style is contemporary in itself which fits with Elbow’s music, and the colours he picked are also very calming. Robert Hunter’s style is modern in the way his work isn’t overly detailed and is very crisp, clean and digital looking. The colour schemes he uses work well, which give his work impact. Illustration for products is used to entice consumers to buy, and has regained popularity in recent years , people want more unique and handmade products that they can keep.
The next illustration I picked is a Children’s book illustration (I think it is a children’s book illustration because the illustrator is a children’s book illustrator, but she doesn’t actually say what it is for on her portfolio website) by Sa Lu. using illustrations for children’s books brings stories to life, it makes it easier for a child to imagine what is happening in a story which keeps them engaged, whilst listening to or reading the story. Children’s books are often a lot more farfetched, surreal and whimsical, illustration helps to push children’s imagination further. The main focus of this genre of illustration is to appeal to children and keep them interested, it’s second purpose is linked to the first, which is to boost sales by drawing children to them with pretty pictures. This artist’s style isn’t clearly contemporary or classic it is somewhere in between, the drawings themselves look a little stylized but not so much so that I’d say they’re contemporary, her colour schemes are generally quite bright and modern, the way she paints and applies colour looks quite classic because you can see some brush marks, areas where you can see colour pencil texture which makes it look traditional even though this one looks like it’s digital to me.
Children’s book illustration isn’t a new concept, book illustration became more connected to children’s books in the 20th century. Younger children’s books especially are always illustrated but it has evolved over the years. The evolution can be seen when you look at classic children’s books which were all done traditionally, were a lot less bright than children’s book illustrations you can find today that are generally digital, bright and less detailed than before.
The last image I looked at Is an illustration I did for an Instagram challenge I was hoping to complete, the challenge was as Halloween themed drawing challenge called Drawtober, the title that I had to illustrate for the first days challenge was “skeleton parade”. I did this challenge to create an ensemble of work that would demonstrate the kind of illustration I like to do, that would give my Instagram account a more homogenous look. Which could potentially get me seen a bit more on Instagram. I thought I could also attempt to sell some of these illustrations as prints in the future if they turned out well but sadly I only actually managed to complete one day of this challenge. I tried to keep this drawing in the style I like to draw in, I wanted to keep it colourful and fun to help it stand out from other Halloween illustrations that were created for this challenge, which were generally darker.

Illustration by Robert hunter for Elbow

Illustration by Sa lu

My own illustration for Drawtober
0 notes