#i am considering drafting a handful of embroidery designs and putting those up in an etsy shop or something
Explore tagged Tumblr posts
Text
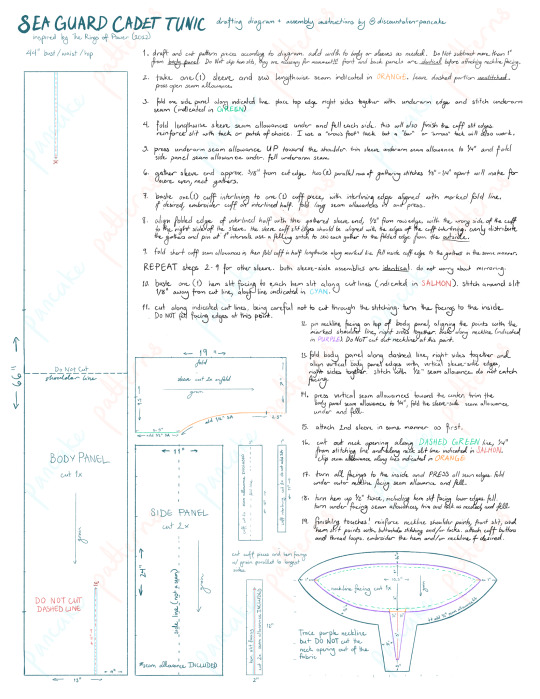
Typed out instructions with photos to follow! Basically a compilation of my process posts, but streamlined so you don’t make my mistakes.
This is not a cutting layout. Please arrange your pattern pieces as best they fit onto your specific yardage. Pieces are drawn to scale but the neckline facing is not the same scale as the the other pieces! Neckline facing should be at 1:4 scale, and the other pieces are at 1:8, but please refer to measurements. For the most accurate fit, prewash and press your fabrics before cutting!
This pattern was drafted to fit a 40” bust and similar hip circumference. It has plenty of ease for up to a 42” bust and/or hip but you will want to increase width if you are larger than that. I’m sorry I can’t offer a multi-sized pattern at this point, but the pattern is very easy to alter! I’ll make a post explaining exactly where I recommend adding width/length to get the fit you need.
Edit: please tag me if you make the thing so I can see it!
#trop#cosplay#costuming#pancake makes the sea guard tunic#and now you can too!#and yes that is all my handwriting#including the watermarks#yes i watermarked it; it was a lot of work to put this together and i’m not charging anyone anything for it#i am considering drafting a handful of embroidery designs and putting those up in an etsy shop or something
21 notes
·
View notes
Text
Woke up this morning, checked my notes from brainstorming last night, and had no idea what kind of connections my brain was making. Like there's good ideas! But how does embroidered Braille and Morse Code connect with the Doomsday Clock, a music staff with the repeat notation, and cultural Christian notions of World Without End?
(Put the rest under a read more because it got quite long)
I'm probably going to have to drop the morse code and Braille, which is sad bc I was excited by that idea from the first day of the week (tho the teacher did say to toss whatever our first ideas were and to be open to new directions).
However I am panicking slightly because this project is due Friday and I only have concepts (that aren't even written in my sketchbook to show my work).
I was late to class this morning in part because I should have gotten out the door earlier, but also because there was an accident that closed the main road into town and I had to detour around the lake. And then that accident ended up knocking out the power and they kicked us out of the building at noon (can't have people there without running water, for sanitary reasons).
Anyways my current plan is to make a box/ fake book. One of my library books has info on traditional embroidered boxes! I plan to have the front cover say Once Upon a Time, as gilt and embellished as I can manage with embroidery and sequins etc. The back cover I have a design that combines the phrase "as it was in the beginning/ is now/ and ever shall be/ WORLD WITHOUT END AMEN" which was my favourite part of having to recite the rosary as a wee Catholic child (in part because it signaled the end of having to recite the rosary, but also it's just nice :) trad Catholics who do the whole O My Jesus/ Hail Holy Queen bit don't come at me) ANYWAYS that phrase made into the hands of the Doomsday Clock (which is at 90 seconds to midnight as of the start of 2023 (: this is fine.png).
The embroidery bit covers one portion of the techniques we need to incorporate. For a second technique, I'm thinking the lining fabric to be made with a repeat pattern/ making marks on fabric (one or both, other techniques of this week) using alphabets (Latin but also Greek, Cyrillic, Inuit, Arabic, Korean, etc etc).
I had a one on one chat with the teacher and she was pro me incorporating Braille and Morse. It was a conversation about how I don't want people to Know Things about me now, let alone in 50- 200 years. About codes and secret languages and ciphers, about how we can't really know the past (or ascribe modern language of gender and sexual orientation to the past where people had different understanding of those concepts). But also about how on one hand I can't know that humanity will be around in 50-200 years, and on the other hand there's a long tradition of Apocalyptic propheteering. People are forever proclaiming the End of Times and time is forever carrying on regardless. (There's actually a fairly funny local story about a man who was sure the second coming was nigh and said he would walk on water like Jesus to prove it. And then the day came, everyone gathered to witness (entertaining being thin on the ground in settler days), dude had a crisis of faith and strapped wooden planks to his feet to help him float, sank, and sulked under the pier until everyone stopped laughing and left).
So yeah. This is a very rough draft of my eventual Artist Statement for this piece. Something something Tower of Babel. Something something cultural norms (shaped by Christian narratives) of a beginning, middle, and End preventing us from appreciating the cyclical nature of time.
It's also funny to me (not funny haha, funny strange) that we've been told to consider storytelling when thinking about this week's project, and how for much of history those with the privilege to access paper and ink (and education) were creating the official stories (while textiles preserved the common heritage). And now it's almost reversed, where most people have access to language and words, but the basics of textile creation is now a privileged activity (I mean, leaving aside folk embroidery a lot of needlecraft WAS something only the wealthy elite could afford). Being a fibre artist is expensive, y'all. (And ugh I love art but having to write artists statements is a struggle. What do you mean I have to theorize about Meaning and put it in inaccessible Art Speak and know the code and network to become famous and make a living at this and be in exhibitions and galleries)
Anyways it's time to stop talking about it and start ripping apart my elementary school Bible to do some papier maché.
Maybe the embroidered music staff with repeat and Braille and Morse Code can be a ribbon. A ribbon that can wrap around the box/ hold it shut by wrapping around a button? A ribbon that lifts a secret compartment, because I love secrets? We shall see!
1 note
·
View note
Text
A Step by Step Guide to Make Handmade Awards for Amtgard (At Least How I Do It)
I enjoy making awards for Amtgard, and I’ve been doing it since I started playing back in 2001. Here is a few awards that I’ve made over the years, after doing a cursory glance at my facebook photos.
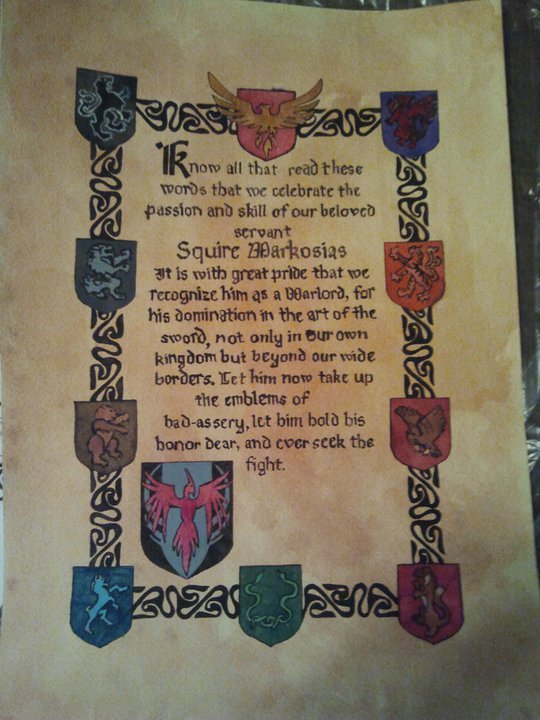
(Warlord Title, gouache on cold press watercolor paper)
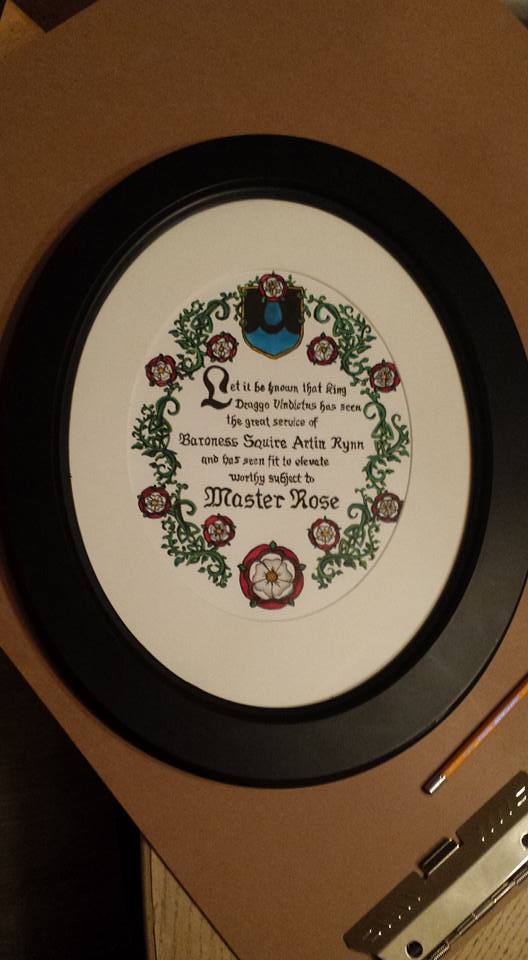
(Master Rose, gouache on cold press watercolor paper)
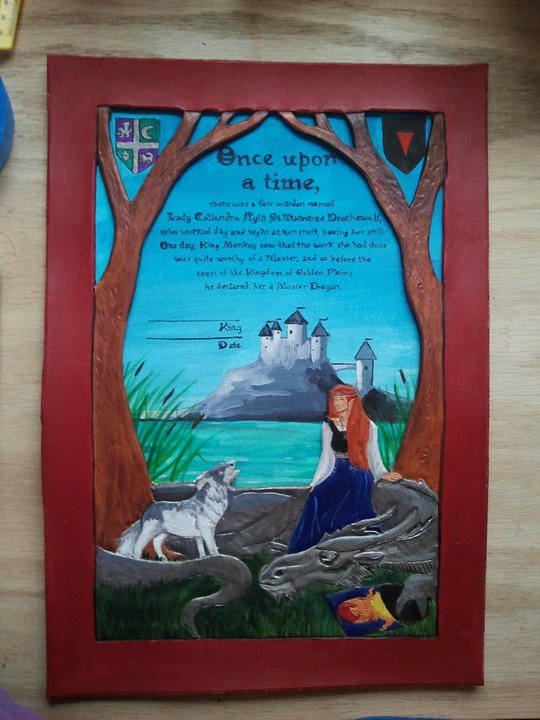
(Master Dragon, mixed media, leather and gouche on watercolor paper)
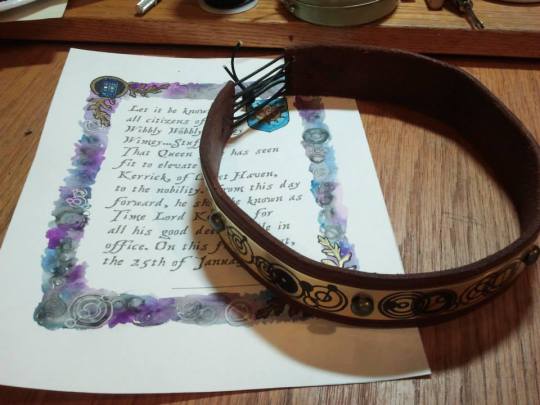
(Time Lord Title, digital and watercolor on cold press watercolor paper, run through a printer and hand painted, and a circlet, leather with metal, and drawn on designs with a sharpie)
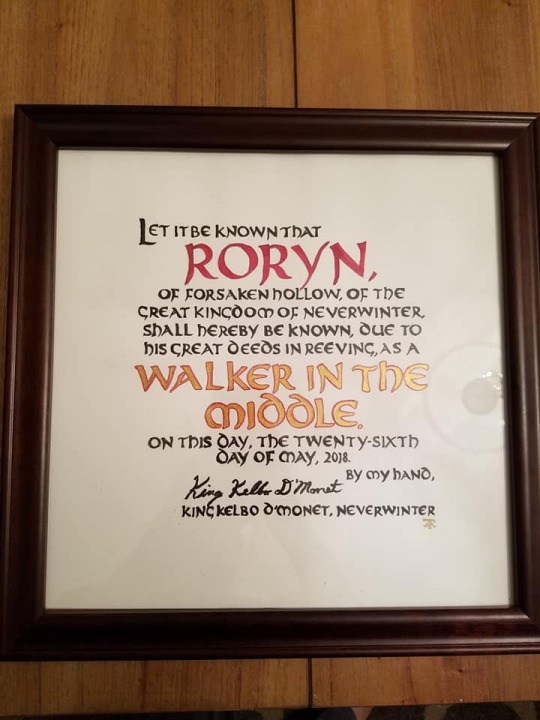
(Walker in the Middle, gouache on hot press watercolor paper)
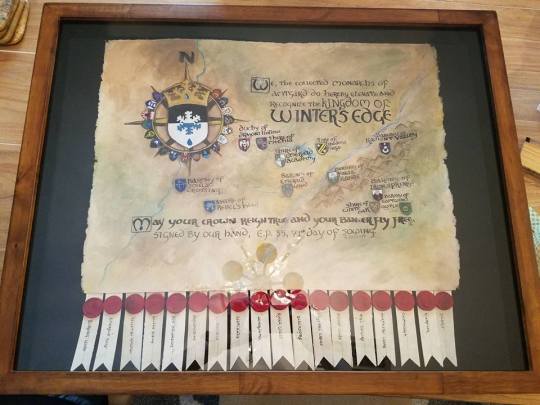
(Winter’s Edge Kingdom Elevation Scroll, gouache on hot press watercolor paper, plastic clay kingdom seals in a shadow box)
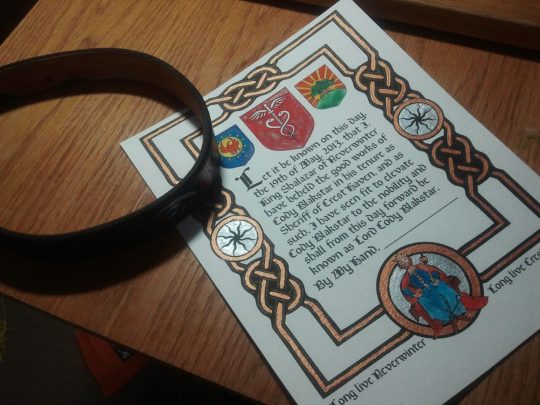
Lord Title, digital and acrylic, on cold press watercolor paper run through a printer)
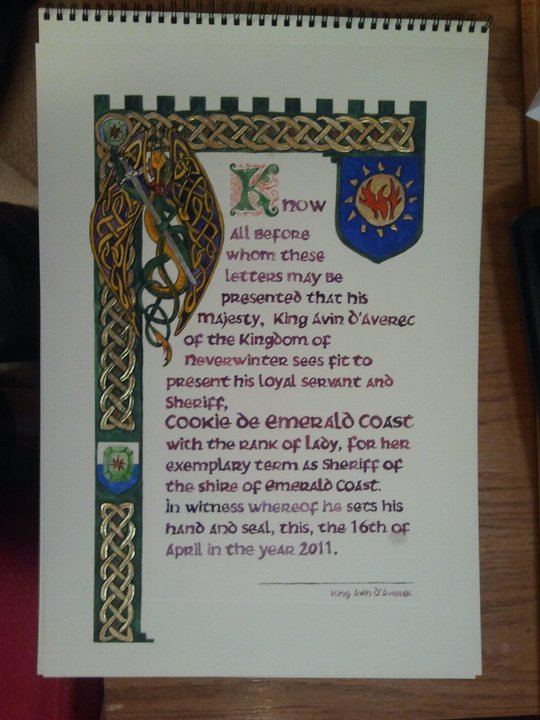
(Lady Title, gouache on cold press watercolor paper)
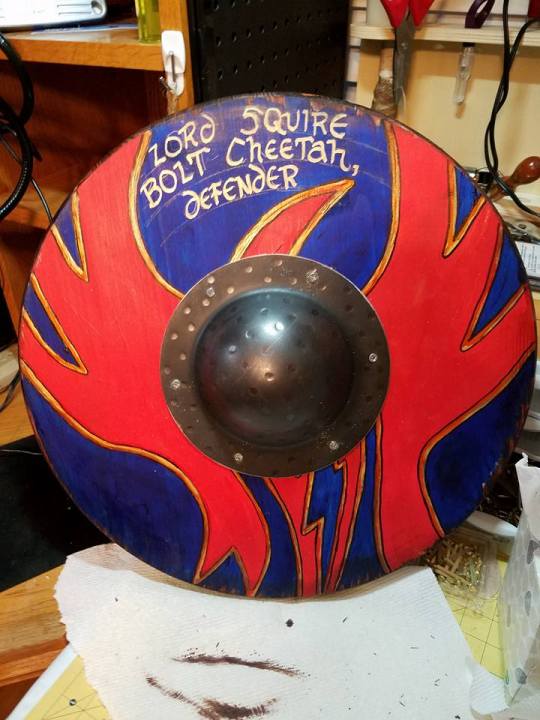
(Defender Title, acrylic on wood, designed to resemble a shield, I erased those lines later)
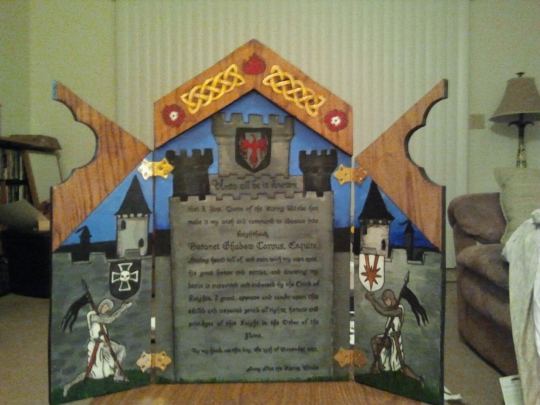
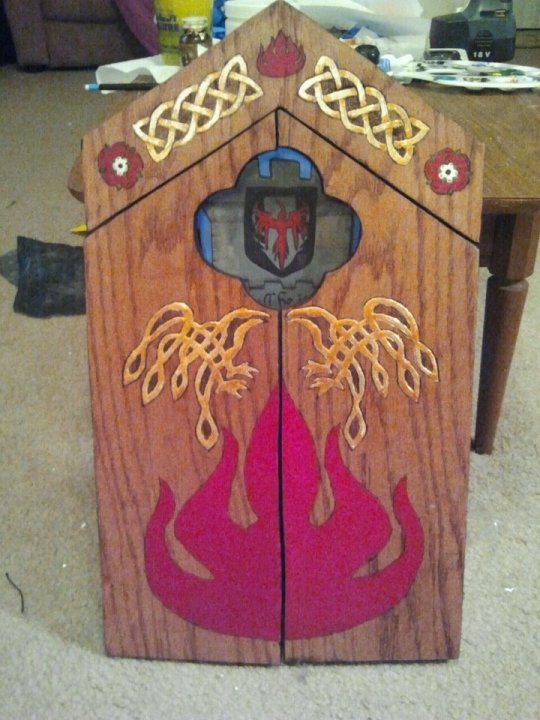
(Flame Knighthood Triptych, it opens and closes)
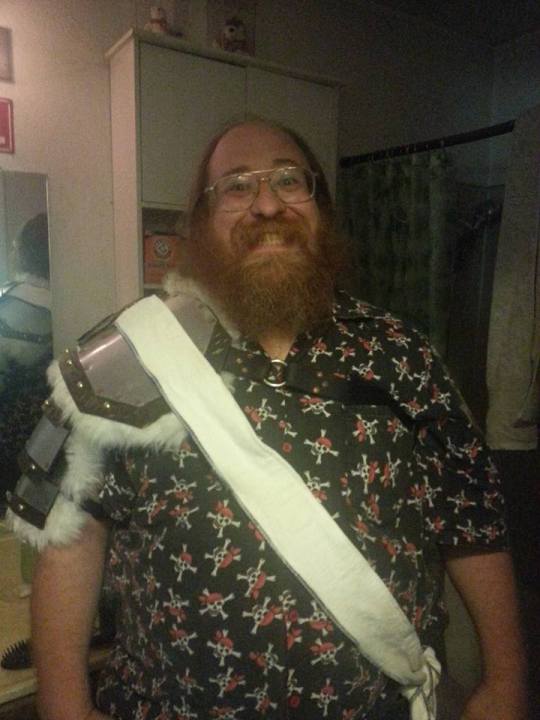
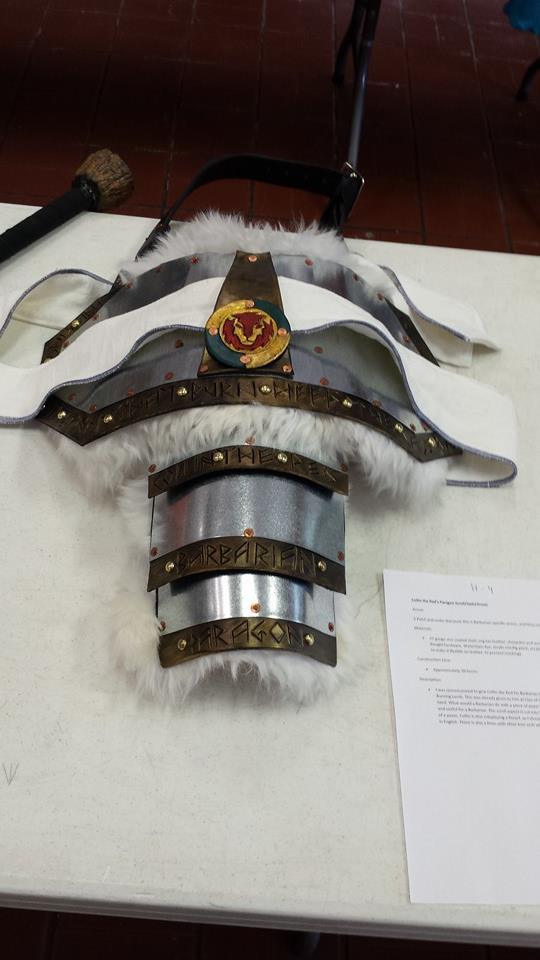
(Yes, this last one is an award itself, for a Paragon Barbarian, the text is cut into the leather along the edges.)
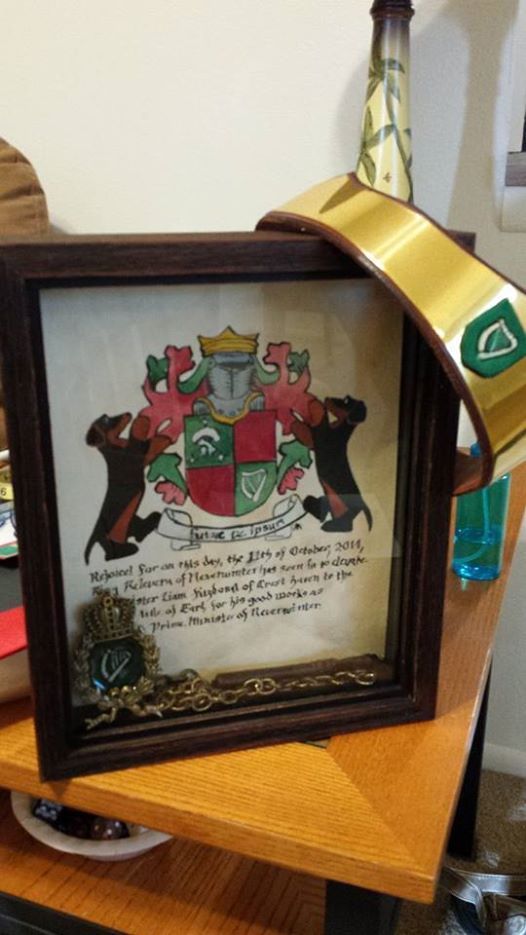
(Earl Title, gouache on watercolor paper, leather and brass circlet)
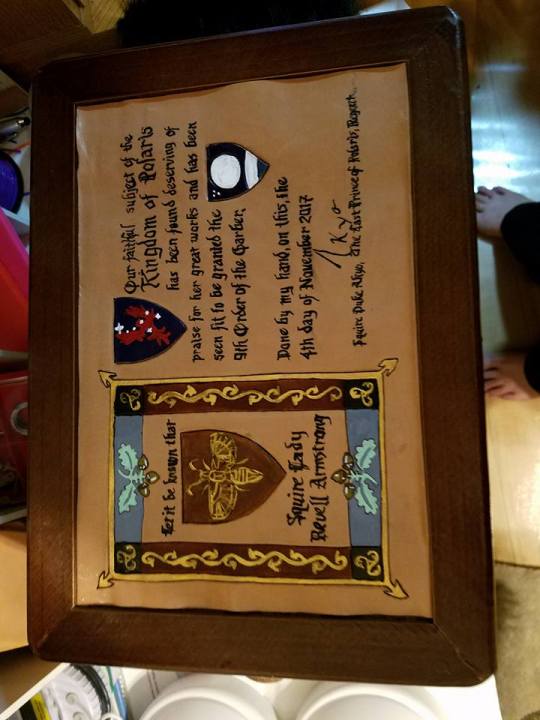
(9th garber, a sewing basket with a leather inset scroll in eco flow waterstain dye and acrylic)
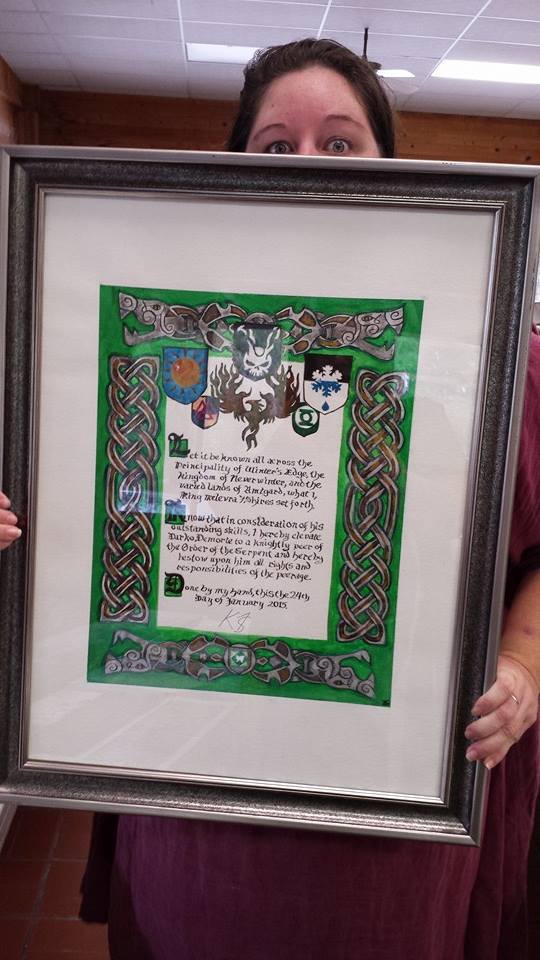
(Serpent Knighting Scroll, gouache on cold press watercolor paper)
I like to try new techniques, from paper to leather to metal to wood.I also have designed countless digital awards, but that is for another post.
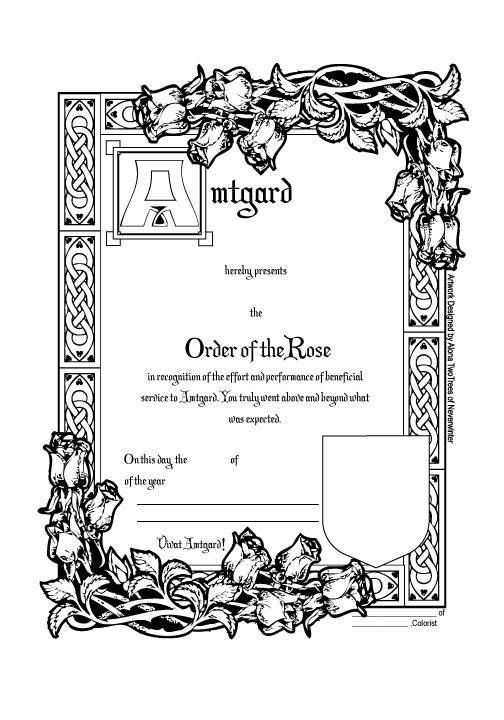
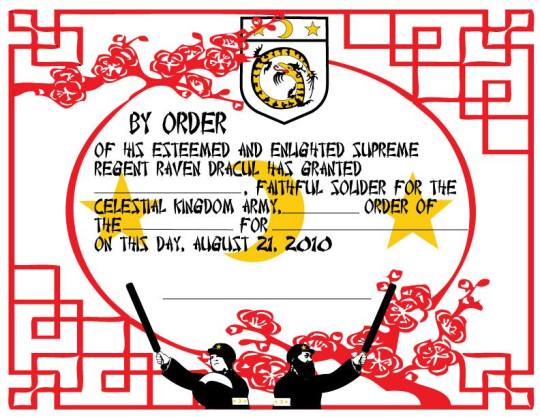
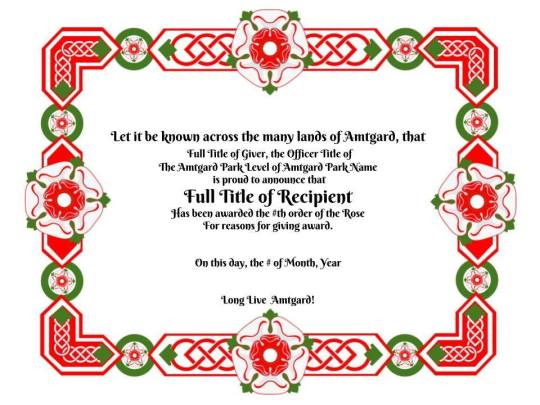
I’d like to teach you how to make awesome handmade awards to help your corner of amtgard be more awesome in recognition of so many amtgarders who have dedicated so much to the game, that deserve to be recognized. You too can do this, and cheaply. The following is a step by step guide in how I do it for paper awards.
Preface: My Personal Goal for Awards
I’ve been doing this a long time. And for me, as an artisan and scribe, the ultimate goal is this:
To make them cry.
I want everyone who receives an award I make them to cry. Ugly cry, in front of everyone in court. It’s how I show my love. So if I make you cry, I love you! And think you deserve an awesome handmade award gift, made by me, TO MAKE YOU CRY.
Its how I stay young.
Step One: The Commission
The first step in designing awards is finding out if there are awards that need to be made. Contact your local park or kingdom monarchy and offer your services, at whatever level you are comfortable with. Personally, I like to make 8+ level awards, titles, masterhoods, knighthoods and kingdom elevation scrolls. I feel like those are the things that should be special and handmade. However, your mileage may vary, depending where you are, I happen to live close to my kingdom, and how comfortable you are making awards. If this is a new thing for you, start small if you want to.
Talk to your monarchy, see if they need anything made, and try to ask them as quick as you can, so they are thinking about it. Because nothing sucks more than an award that was commissioned three days before an event.
This is where you want to start thinking about the specifics of the award. Do you want to give them a hand painted award? A part digital, part handmade award? Something outside the normal means of what you would consider an award, like the shield defender title, or the armor/sash of the paragon barbarian, or the sewing basket 9th garber I’ve made? Think outside the box, and try something new, if you’ve done this before. This award should be special to the person receiving it, if it can be.
Sometimes I don’t really know the person I’m making the award for. When that happens, the first place you should go is the amtwiki and find things about that person, if they have heraldry, what park they belong to, and the park’s heraldry, what kingdom they belong to, and that kingdom’s heraldry. What kind of persona they play, if they do play one. It would be awkward to make a ninja based award when they play a pirate, is what I’m saying. Find out what they like, and build from there.
Step Two: The Materials and Tools
What are you going to make this award out of? What tools do you need? Here is some examples of things that you want to think about, a quick rundown for paper awards, but really, if you can manipulate it, you can probably make an award out of it
Material:
(When working with watercolor, watercolor pencils, or gouache)
I prefer hot press watercolor paper if I am working in gouache. This paper is very similar to cold press, except it is much smoother, harder to source locally, and more expensive. But it is, for me, hands down the best paper I can find locally. I haven’t seen pads of it at stores like Michaels or Joanns, but you can find it in single large sheets at hobby lobby. Or if you are lucky like me and live in an art school city. Amazon always has everything, as well. Arches is a good brand.
Cold press watercolor paper is a rougher feel, but much more affordable and readily available.
You can also cut down either of these papers and run them through your printer, if you prefer to design your award digitally, and then have your calligraphy be done by the computer, and you can simply let it dry, then color in your design in whatever paint/colored pencil, etc, you choose.
Leather:
I admit I love working in leather for awards, I love how Eco Flow Waterstain flows though a dip pen onto leather. It just...feels good. You can work with leather dyes and acrylics in leather, and experiment with tooling and pyrography and layering, as I did with the Master Dragon, above, as well.
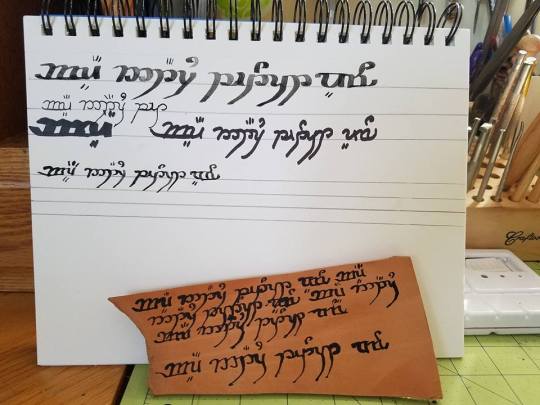
Wood:
Wood is good if you want to do something more structural, like the triptych and the shield I have done above. Ideal for pyropraphy (woodburning) and acrylic. Make sure you sand and clean the piece before you paint.
Other:
I haven’t used these materials for awards, but I’ve had ideas to build on them, maybe this list will inspire you: Plasterboard, you can carve into it to create a relief sculpture. Tile, I’m sort of in love with the geometric tessellation of arabic design, and would love to create something with this in mind, especially in tile...if I had a tile saw handy.
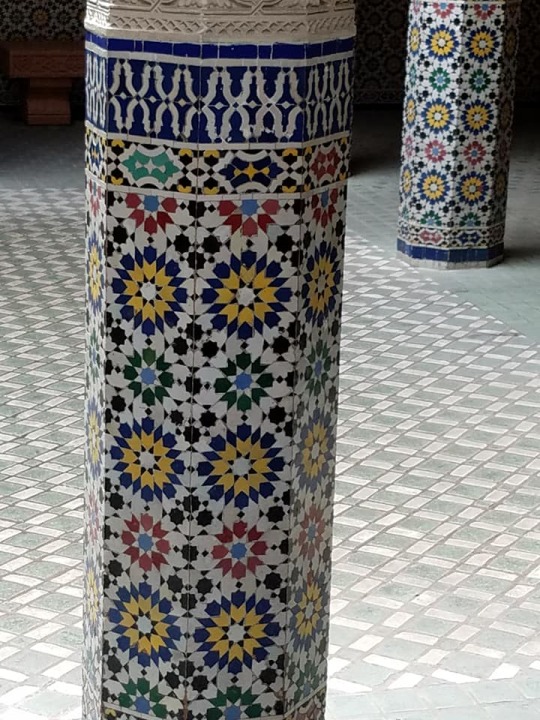
(Epcot, Morocco Pavilion)
Stone, I would love to have the tools to work in stone, something like this, perhaps:
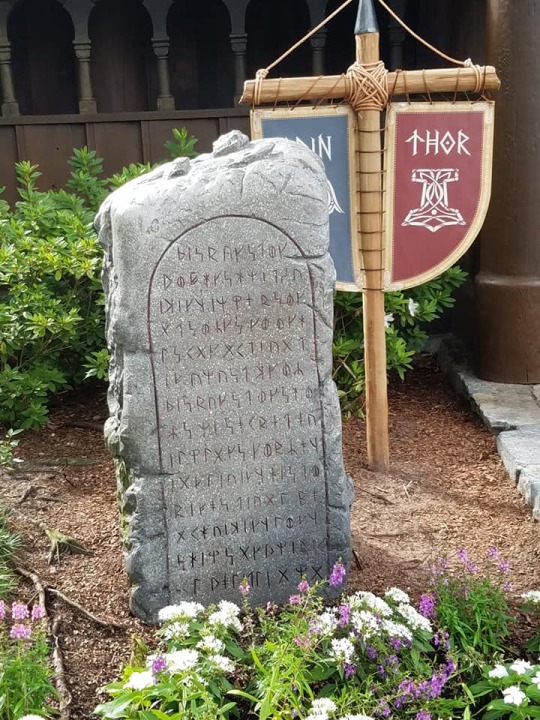
(Epcot, Norway Pavilion)
Felt, I have played with the idea of wet felting and needle felting, combined with embroidery to create a wearable scroll. One day.
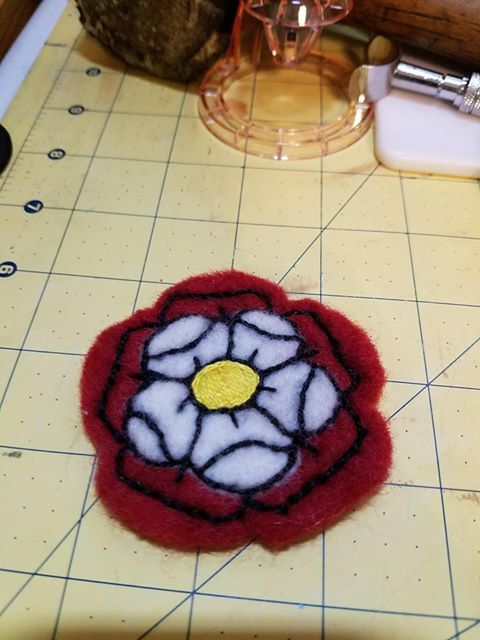
The Medium:
You can work in almost anything. Pencil, watercolor pencil, pastel, oil pastel, fabric paint, acrylic, watercolor, oil paint, gouache, tempura, pyrography, really, the mediums are endless.
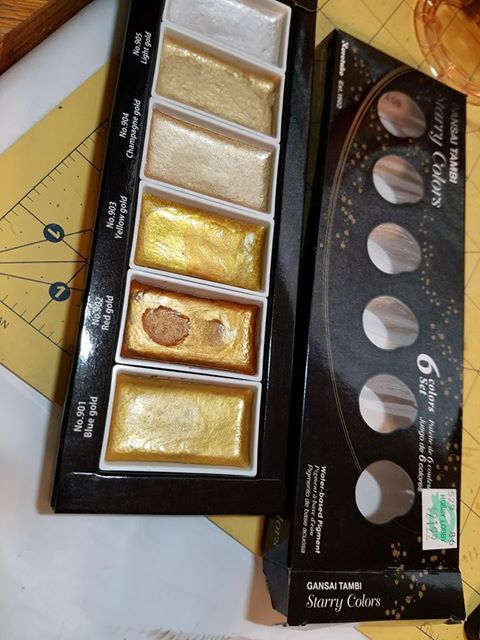
Right now, I like gouache. It has the best qualities of both watercolor and acrylics. You can paint light on top of dark, which is, just a miracle, really.
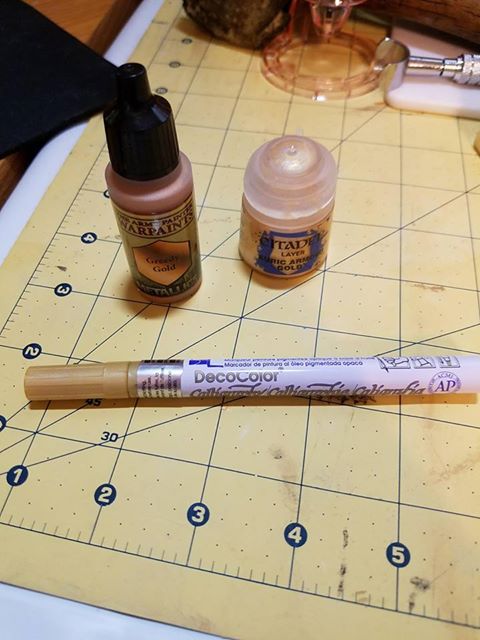
I love using gold in my work, or any metalics, really. I have some special ways to create that effect, from special paints to a calligraphy pen, to mini-fig paints.
Tools:
Brushes by the bunch. I just keep buying them when I inevitably leave one in acrylic too long, or don’t wash it well enough.
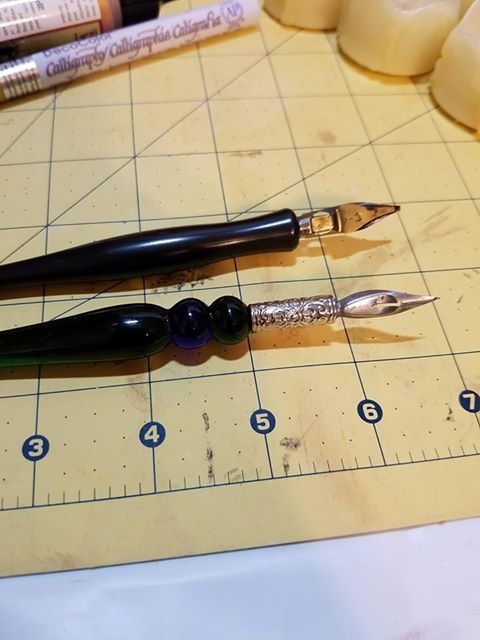
Dip pen, which is my favorite. Especially with gouache. Like all things here, practice first. You can get a variety of different nibs.
For paper awards I tend to use a big drawing board that I use painters tape to secure my paper to, and block out the space around the design so I don’t smudge pencil, or paint, in that area.
Step Three: Layout
You have your commission, you have your materials and tools gathered, now to put it all together in a cohesive way. I do a quick drawing of the layout, so I know what I am doing for the next step. Need ideas on how to arrange your award?
Here is Linden’s awards.
Here is about 90 ideas on my pinterest board.
Here is an example of a layout from an award I made:
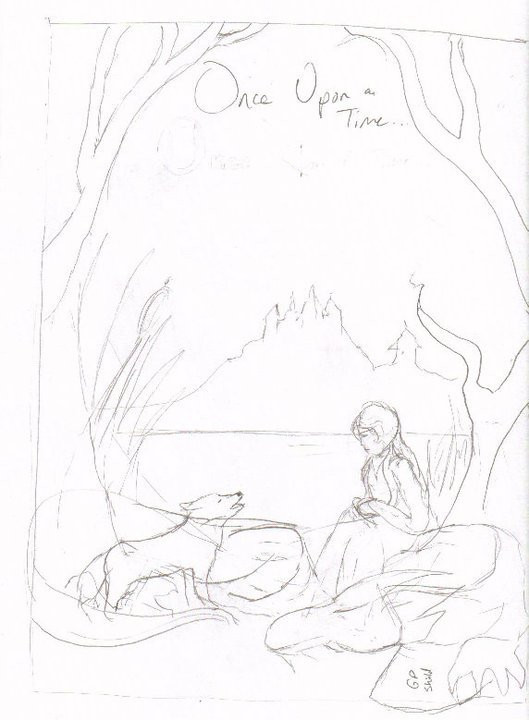
This is the first draft, the basic idea of how the award should be set up. You don’t need specifics yet. Just an idea. Don’t use good paper at this point, just some scratch to work out the details.
Step Four: The Text
This is the part that is hardest for me. I tend to find text by doing a google image search of sca and amtgard awards, and using that as a base. Sometimes its just easier to ask a friend for help with this part.
Now is also when you want to figure out your “hand” or what font you want to use. Practice! I use a dip pen and, lets be honest here, my calligraphy sucks, I tend to find a good font on my computer and emulate that. There are some good books you can use if you want to go more historical.
A good award will have the basics:
Who is giving the award, Who is getting the award, WHY they are getting the award, The date the award is to be given, A signature for the person giving the award.
Fancy it up to your flavor level.
Here is also a neat thing to add into your award:
http://www.electricsamurai.com/ad/ the date of the award given in amtgard dates.
Step Five: The Cartoon
Here is where you work out the details. I spend my work life as a graphic artist, so I am much more comfortable scanning and manipulating my artwork on the computer, and it all depends on the piece, if I use photoshop, illustrator, or indesign. Here is that same image above scanned in and text added, and designed. This was done in illustrator. You can use whatever tools you prefer, digital or not. This should be your second draft, not on good paper.
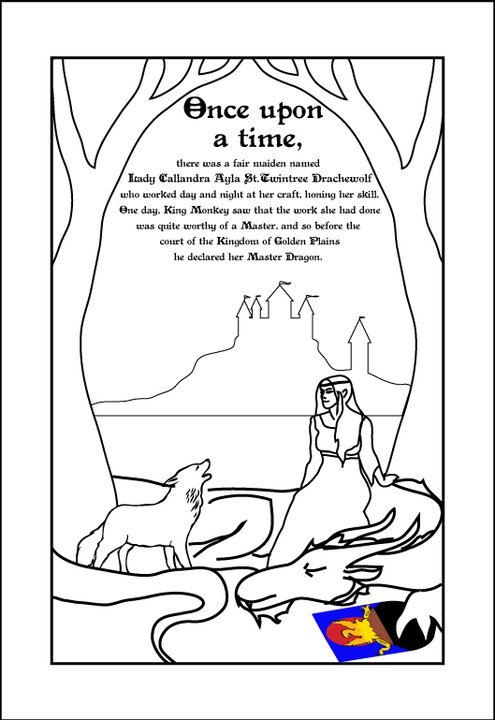
This is my cartoon, and it’s ready to be printed out to size, and transferred to my good paper. If using digital means to create your cartoon, and the finished piece is going to be larger than your printer can handle, I highly recommend this website:
http://www.blockposters.com/
You can upload your design and have it print in however large you want, in 8.5 x 11 in pieces of paper. All you have to do is tape them together.
Step Six: Transferring to the Good Paper
Now is the time to get cracking. You have your good paper, you have your cartoon, you have your text. Now to transfer it. You can do it it many ways, from as simple as taping your cartoon to a sunny window and taping your good paper over it, and tracing lightly with a pencil, to using a lightbox (I prefer this) to taping your cartoon over your good paper and sandwiching in a piece of graphite paper in between and tracing. You can even use a projector to help you trace your design.
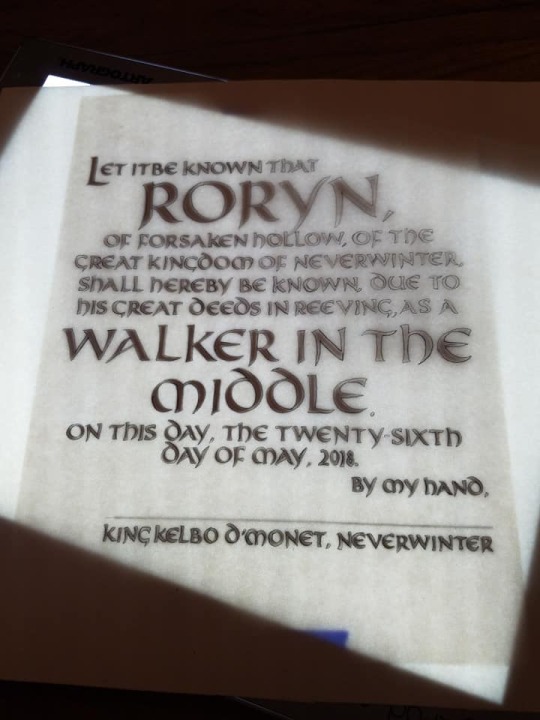
(I like the lightbox best)
Get your image onto your good paper.
Step Seven: Painting
So, despite being a graphic artist, I was not trained to paint. Airbrush, sure, but not painting. I left that to my friends who liked to smoke in the oil painting classroom in college. I just use whatever paint I am working in, and color in the lines with either a paintbrush or dip pen, and then fill it out. It’s very much like paint by numbers for me. I try to do multiple layers, with my mediums, then darks, then highlights. Whatever works best for you.
Step Eight: Calligraphy
Practice this. Over and over and over. Or....cheat, and fill it in with paint, outlining and then filling in the blanks.
Step Nine: Sign it!
I sign every piece on the back of the frame or paper, with a <3 Alona TwoTrees, but I also tend to use my signet, usually done in gold, on the front right bottom corner.

I think they are neat.
Also, if it is difficult to have the giver of this award sign it, ask for a copy of their signature, and fake it for them. Makes it easier at court.
Step Ten: Finishing Touches
Frame your pieces. Seriously. It’s a cheap and easy way to make your award pop. You can get frames at any dollar store that are 8.5 x 11 in. It’s a dollar, and it makes it so much cooler. OR head to your local thrift store and buy a frame in the art section.
Step Eleven: Give it Away and Drink in the Tears
Make them cry. Stay young.
31 notes
·
View notes
Text
Winter Soldier Arm Made From Paper
I did a Bucharest Bucky cosplay last Halloween and I’m pretty proud of it. Here’s a close-up:

People have been asking me how I made it and it’s much easier to explain with pictures so I promised them a long tumblr how-to and here it finally is. This is just a forearm, meant to be worn with a henley to cover the upper arm and a glove over the hand. If you want to do a full arm and shoulder then I won’t be able to help you. I mentioned to my husband that I was considering making a full arm for next year and he gave me a look of panic, which is kind of funny because I was the one with glue all over my fingers. The house didn’t even get that messy but whatever. Husbands are still worth it and so is this arm. Here’s another close-up to show off my fake muscles:
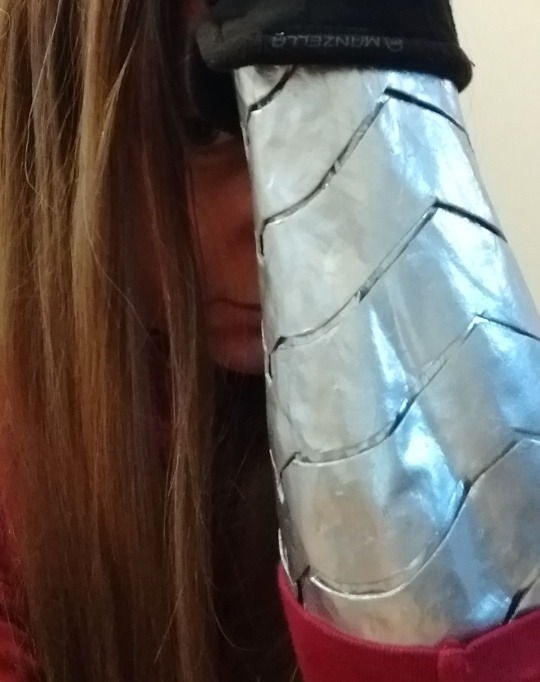
Why paper? When I first decided I wanted to do a Bucky costume, I looked at some other examples online. By far the most popular method was thin craft foam manipulated with a heat gun, but the noise and smell would probably have disturbed my child, and I didn’t want to invest in a piece of hardware that would be used once and then contribute to my household clutter forevermore. Finally, although supposedly craft-foam technique is not that difficult, I found it a little bit intimidating whereas I built this forearm with a technique from kindergarten, when we all made papier-mâché* balls by pasting newspaper strips onto balloons.
* I went to the trouble of googling the spelling for papier-mâché and it’s full of accent marks, so I’m going to cut-and-paste it into this whole post, even though it makes me look like a huge nerd. Which I am.
To make this fine, if somewhat time-consuming, specimen of cosplay craftsmanship, you will need a bunch of trash you already have and a couple inexpensive things:
1) some newspaper (a couple issues of one of those free monthly papers is probably enough, since nobody except my in-laws subscribes to the paper anymore)
2) some lightweight material for padding (more newspaper or old plastic bags)
3) an old pair of pantyhose, old t-shirt, or stretchy scrap fabric
4) tape (I used masking tape but duct tape would probably be better)
5) plastic wrap
6) a small (8 oz) jar of mod-podge ($4-$7, matte, satin, or gloss is fine)
7) a small (3 oz) can of chrome paint ($3-$6)
8) a short length of elastic or very stretchy fabric and some thread (~$2)
9) a small, cheap paintbrush. The cheapest you can find (<$1)
The complete how-I-made-it story is below the cut, plus more terrible cell phone photos and unnecessary brilliant commentary.
I spent about a month planning this thing and only 4 days making it. The whole time, I was screaming internally because although I had the whole thing planned out, I didn’t actually know for sure if it would work until I did it. But it did. Here’s how:
Step 1: make an arm-shaped form to build the papier-mâché over.
Back in my misspent youth, I successfully drafted a homemade dress pattern by having a friend duct-tape me into a T-shirt. This works on the same principle. You need some kind of flexible stuff (stretchy fabric is best) to make the base layer and keep the tape from sticking to you. I cut a leg off an old pair of panty hose and slid it over my arm. Honestly a plastic bag would have probably worked just as well. A piece of thin knit fabric (like a piece cut from an old T-shirt) would be even better. Just make sure you don’t have any exposed skin where the tape will go. Then wrap tape around your arm until the whole thing is covered in a shell like this:

You may notice that I used masking tape. I had this idea that I could capture some muscle definition by using a thinner, narrower tape. This was a mistake. Even while flexing to get the most out of my wimpy muscles, it didn’t really work. Also the panty hose wanted to contract and the tape wasn’t sturdy enough to counter that until I put a whole bunch of layers on. So save yourself a headache and use duct tape (tried and true). Your arm is widest while bent, so do most of the work in that position, but straighten it and move it around a bit to be sure that you will have room to move your arm when the thing is done.
Cut a slit in your crazy tape-sleeve to get it off and tape it back together, then stuff it with old plastic bags or newspaper so it will hold its shape.
(At this point in my project, I looked at my sad tape arm and decided by golly, it would have muscles if I had to make them up. So I taped two long pieces of crumpled newspaper where the most prominent muscles of the outer forearm would be. I don’t have a photo of this step, but I do have a nice forearm drawing tuturial and a muscle diagram in my art advice tag. Maybe those will help. Or you could be smart, unlike me, and skip the muscles.)
Step 2: use your arm form as a base to build a layer of papier-mâché
I covered the base with plastic wrap to make sure that my papier-mâché wouldn’t stick to it. Then I used Mod-Podge to paste overlapping newspaper strips over that base. If you aren’t familiar with Mod-Podge, it looks and smells just like white glue. There are probably a lot of different kinds of paste that would work here, but Mod-Podge is inexpensive and readily available. (Also, the hippy aesthetic really goes with my hairstyle.) I quickly discovered that it worked best if I applied the glue to the arm itself with a brush, then laid the newspaper strip over it and smoothed it down with my fingers. It took me a few tries to figure out the best way to lay the strips. As a result, that all-important valley between the “muscles” got papered over and I had to resort to cutting a slit in the paper and pushing it in a bit. It worked--just barely--but it was a real headache.
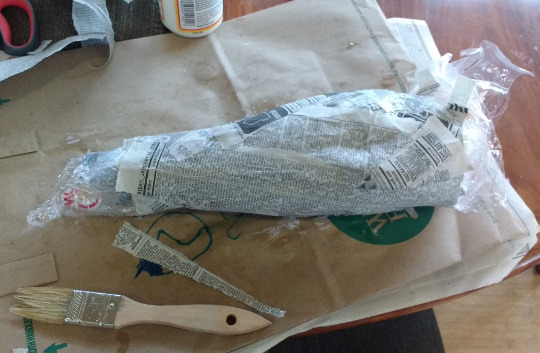
Look! Muscles!
So what is the best way to lay the strips? Definitely not like the picture above! In my opinion, a diagonal spiral around the arm works best, allowing you to lay the strip evenly and also keep track of how much you’ve covered in that layer, like this:
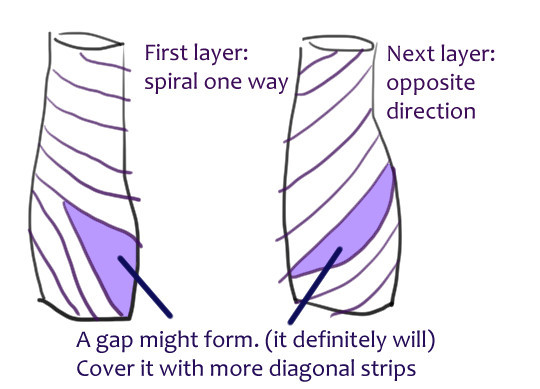
Start your strip near the wrist and let it lay the way it wants to go to stay smooth. This might result in a small gap or overlap with the strip next to it--don’t try to force them to line up exactly.
Let dry 30 minutes between layers. I did about 3 layers, or roughly the thickness of a sheet of notepaper. I figured that my arm would provide a lot of structure, and I wanted to be sure I could cut it with ordinary scissors later!
Step 3: repeat the process to build a second papier-mâché layer
Once I figured it was thick enough, I let it dry overnight, then wrapped it in another layer of plastic wrap (IMPORTANT!) and started pasting again. About 5 layers this time, or about the thickness of a notecard. I wanted this layer to be very smooth. If I’d had the time, I might have tried to do a “build-up finish” as described on the Mod-Podge jar, but it was only 2 days before Halloween so I just didn’t have time. Instead, I made sure that all my paper strips were torn rather than cut, which made a much less visible edge. Also I finally figured out the diagonal thing.
Then I coated it in a thick layer of Mod-Podge and let it dry for an hour or so.
Step 4: Draw lines for Winter Soldier Arm plates
The reference images I had were...not great...so eventually I had to shrug and make up something that made sense to me, for a very loose definition of “make sense.”
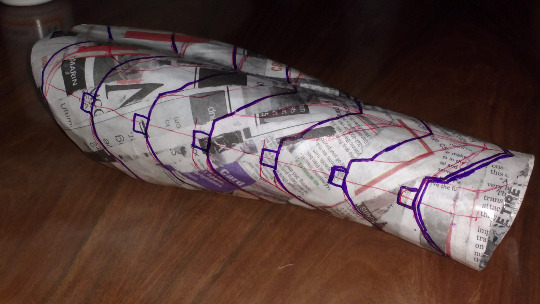
Was Zola high when he designed this?
You can kind of see the diagonal paper strips under the lines here.
I did this with different colored Sharpie pens. The purple lines are for cutting. Some of the red lines are guide lines, some are where the thinner grooves in the plates go.
I had planned to make those grooves by pressing hard with an old ball-point pen. However, I found it hard to get a good grip on this rounded thing so the line came out shakier than I liked. I panicked and decided not to do the rest, hoping no one would notice, which was a shame because the groove actually looked awesome once the paint was on.
Step 5: Cut up the outer shell
Let me pause here for a moment.
If you are reading this, then you may be thinking “this sounds like a lot of work!” Which it was! But the worst part was I didn’t know if it was even going to work at all. I didn’t have those completed photos to reassure me. I had a backup plan which was “wrap aluminum foil around my arm and call it good enough” As I built up the structure, it was starting to look like the principle was sound, but I had a lot of work ahead of me and I could still screw it up.
It was late at night on October 29th and I had to make a cut. After that, there would be no going back.
I needed to cut the tube open so that I could get my hand through it. My plan was to cut just to the right of the row of narrow plates on the inner arm. So I did.
The cut itself was fine! I pulled out the stuffing and nothing exploded or stuck to itself. The problem was that it was way too big, probably because of that muscle padding I added way back in step 1. Near my elbow especially, it was maybe an inch too wide. This might not seem like a lot, but when you are trying to hide the edge under a pushed-back henley cuff, it’s frigging huge.
Step 5a: PANIC
After I was done panicking, I had a pretty cool idea so I ended up doing this:

It’s weird now that I’m thinking about it, but I had no difficulty closing up that gap. Maybe I squeezed it a bit to train it but nothing fancy. It really wanted to curl up on itself already.
Step 5b: Cut up outer layer
This is a little tricky because I had to cut just to one side of the thick sharpie line, then just to the other side, which in practice means cutting a thin strip off the edge of every piece, to make the little gaps between the plates that give the arm its characteristic look.
I used ordinary scissors from an office supply store for most of this, new-ish but nothing fancy. For some of the fine details I turned to a pair of embroidery scissors that I had lying around and wasn’t too attached to (because this kind of thing is bad for embroidery scissors) Imagine my feeling of inverse accomplishment at achieving this:

Like a beautiful flower made of cosplay despair.
While I was doing that I was also waiting for the paint on the under-layer to dry as described in...
Step 6: Prep the under-layer
I needed some elastic to hold the join snug closed over my arm, but I had a bit of metallic stretch velour fabric left over from my kid’s R2-D2 costume, which I had saved every scrap from because it was so expensive. I figured it was stretchy enough to use in place of elastic so I did some estimating and hand-sewed in a panel and...I’m not going to go into depth here. It worked fine but honestly it was so not worth it. In the end, that overlap from step 5a hid most of the join, so I could have just stapled in some elastic and a little flap of cheap silver lamé or something. Then I painted it. I had to mask it so the fabric wouldn’t get paint on it which goes to show how poorly I was thinking things through by this point because it would have been so much easier to paint it first and then add the elastic/stretch fabric/whatever.
The paint I used was Testors 1290 Chrome Spray Enamel from a local store that specialized in model train supplies. I ran down there the morning of October 30, because of course I was doing everything last minute and panicked as is my way. Nor had I taken the time to check any reviews of paint brands. So it was that I found myself standing in the store holding a can of 1290 Chrome in one hand and a of 1246 Metallic Silver in the other. “Chrome.” I murmured to myself. “Metallic Silver. Chrome. Metallic Silver.” I eventually bought the Chrome paint because it “sounded shinier” and because I could use it to make Mad Max jokes.

WITNESS ME!
Chrome was probably the right choice, as this review demonstrates, but on the other hand I might have gotten an even better finish with a different brand, but maybe not in that convenient 3-oz size.
Remember how one of the reasons I chose papier-mâché over heat-treated craft foam was to avoid bad smells? Well, this stuff reeks like you wouldn’t believe. And, forgive me for being such a hippy, but this kind of paint is very high in harmful VOCs, so if you want to use this stuff, if at all possible, do your painting outdoors to minimize health risks. It’s not like you’ll die from painting one arm, but the more often you use this stuff, the more careful you should be.
Getting back to my Epic Forearm Story, I was concerned that some of the paint would have difficulty reaching the under-layer through the gaps between the plates so I gave the under-layer a single coat of paint to avoid any weird paint shadows. It was good practice getting a smooth coat and I was feeling pretty confident about my painting skill. Too confident.
Step 7: Glue cut-up pieces of outer layer onto under-layer
At this point, it was starting to look like my mad project would work, but only if I could finish it on time. This wasn’t reducing my stress levels any, because now I had sunk hours into this project and I had something to lose. I was also concerned that the mod-podge might have difficulty sticking to the chrome paint finish. I lined up the first piece and patiently held it in place until it had dried enough to hold its position after I put it down. Then I waited another half hour or so for it to cure. The resulting join was quite strong, but it was taking flipping forever.
Then I remembered that I didn’t hate life or myself and also that I owned a bottle of super glue. The rest of the pieces went on lickety-split.
(Super glue is not durable enough for extended wear, so if you want to wear this for more than a single Halloween, use the mod-podge)
At this point I had meant to apply another thick coat of mod-podge to seal the edges and make the foundation as smooth as possible but I completely forgot, and maybe just as well because I was rapidly running out of time. Instead I went on to...
Step 8: Apply Chrome Paint finish
The first coat went on beautifully. I was really getting the hang of this, I thought. I put the last coat on just before bed, but this one spot needed a touch more paint, I hesitated just moment too long and...bam. Saggy, bubbly finish. It was so bad it looked like it might actually start to drip, so I grabbed a piece of newspaper and kind of wiped/scraped off some of the excess paint were it was collecting at the points, hoping all the while that I wasn’t marring the finish even further. I was practically in tears but even if I’d had the time, it’s not like I was going to start over so I went to bed and hoped for the best.
In the morning it didn’t look so bad, but I was worried about the edge digging into my arm so I tried to put a strip of that silver fabric over the edge to cushion it a bit, except that fabric is really hard to glue and it only just barely dried enough to wear in time for the trick-or-treating event that afternoon.
Step 9: Wear to widespread acclaim
Or not. Most people didn’t notice that I was wearing a costume at all, which is what happens when you are out on a busy sidewalk with an adorable 3-year-old child. Or people noticed, but didn’t remember Bucky well enough to recognize it. I got a complement on my “nice bracelet” so I guess the metal effect wasn’t too bad. But then I insisted on going to my Friendly Local Comic Book Store to enter the costume contest, and even though it was out of our way and I didn’t win, it was worth it to see the look on the face of the woman working there, just one look of admiration from a fellow nerd and I was over the moon. Hours of work, justified.
In conclusion, this construction method looks great but is somewhat uncomfortable to wear. It would have been better if I had lined it with felt or something. Also this was probably way more difficult than craft foam in the long run. Still, it is very light-weight, relatively cheap to make and allows for muscle contours if you are into that kind of thing. It might have been the best Bucky forearm ever but I flubbed the finish. If anybody decides to make one like it, please show me a picture or something, and learn from my mistakes. Finally, don’t get in any fights with spider-lings.
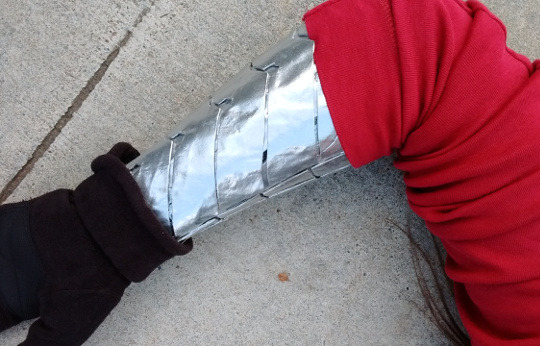
THE END.
#cosplay#winter soldier#bucky barnes#marvel cosplay#cosplay how-to#cosplay instructions#metal arm#cosplay stories#marvel#mcu#ca:cw#cosplay armor#what are good tags I don't know#my posts#my art
209 notes
·
View notes