#how to make a clipping path in illustrator
Explore tagged Tumblr posts
Visit Tumblr Blog
Explore Tumblr blogs with no restrictions, modern design and the best experience.
Last Seen Tumblr Blogs


Fun Fact
The most popular pages on Tumblr are about Minecraft, GIFs, and David J. Peterson.
Text
🚀 Superfast Cut-Out Images and Background Removal 🌟
Experience the lightning-fast solution to cut-out images and remove backgrounds for your photos! We understand that time is of the essence, and that's why we offer a superfast service that doesn't compromise on quality.
Why Choose Us?
⚡ Rapid Turnaround: We take pride in delivering results at warp speed, ensuring that your project is completed in record time.
✔️ Precision and Quality: Speed doesn't mean sacrificing quality. Our expert team maintains the highest standards to make your images stand out.
💬 Clear Communication: We streamline the process, making it quick and easy for you to submit your images and get the results you need.
💯 Client Satisfaction: Your happiness is our priority, and we guarantee your satisfaction with every project.
💰 Competitive Pricing: Enjoy swift, professional services at rates that won't break the bank.
Our Services:
✂️ Background Removal: We'll cleanly cut out backgrounds, giving you the freedom to add your desired setting or leave it transparent.
🌈 Image Enhancement: We ensure your subject looks its best, enhancing colors, sharpness, and overall quality.
🖼️ Customized Solutions: No two projects are the same. We cater to your specific needs, offering tailored results.
Get Started: Ready to experience the superfast difference? Contact us today, share your project details, and watch your images transformed in no time. We're here to meet your deadlines and exceed your expectations.
🌠 Speed Meets Quality: Don't wait when you need to make your images pop. Contact us now and let's create a visual impact like never before!
Customize this description to reflect your specific services and unique selling points. The key is to highlight the speed and quality of your cut-out image and background removal services while assuring potential clients of your commitment to delivering top-notch results.
Get Started
#clipping path#clipping path in illustrator#css clipping path#how to make a clipping path in illustrator#clipping path service#make clipping path illustrator#svg clipping path#clipping path in photoshop#clipping path services provider#create clipping path indesign#indesign clipping path#clipping path service providers#clipping path india#how to create a clipping path in illustrator#clipping path adobe illustrator#what is clipping path#clipping path company#image clipping path service#best clipping path service#clipping path expert#clipping path companies#asian clipping path#how to make a clipping path in photoshop#photo clipping path#create clipping path photoshop#how to create clipping path in photoshop#offshore clipping path#clipping path service provider company#clipping path picture#how to create a clipping path in photoshop
0 notes
Text


well, i started this for the great, wonderful @clare-with-no-i’s birthday last year (and also as a combination of two prompt’s from @efkgirldetective‘s summer of jily 2022!) and it is officially almost a year late...
let’s see if i can finish this extremely self-indulgent, illustrator-James, author-Lily who clings to self-control like a barnacle, high-powered best friends, co-worker duo buys a house in the countryside and then slowly implode from repressed feelings and heartbreak over the course of several years (also berry picking! and swimming in the ocean! and a cat named Eclair!) fic over the next week! (w caution set aside for unforeseen calamity ofc, but i’m optimistic)
little snippet below!

Spring
It’s an odd story, how Lily buys a house with her illustrator.
A hand brushes along the back of her head, warm and soft.
She jolts, then glances back. Feels the hand fall away.
James is standing there, chest still a bit sunburned from the beach. His fingers still hover slightly, before settling back at his side.
She stares up at him for a second, a silent question. Her instinct is to tense, to turn to stone, to demand recompense. She wouldn’t let just anyone touch her.
“Your clip was crooked,” he murmurs after a second.
Lily swallows. Sweat presses against the nape of her neck, but somehow not as warm as his touch was. She can still feel the salt and sand clinging to her toes, pressed against the warm stone of the garden path.
“I like it,” he adds, then shrugs. As if he’s guilty of something, but can’t be bothered to apologize for it.
Her eyes fall to his chest, stained pink.
“I don’t,” she remembers to say after far too long has passed. Her fingers curl around the armrest of the hot metal chair.
James tilts his head, then shrugs again. He steps backwards, towards the house. His shirt is untucked, sunburned chest slipping through like a violent sunset. “Then wear your hair down.”
Her laugh is crackly, dry, warm in her throat. The thought flashes through her head, lightning fast: So you can run your fingers through it?
It doesn’t make it past her lips.
#but what if i told you i loved you in october#jily#lollll a year almost to the day and still won't be on time!#hbd lovely clare!#this fic is kind of chaos and kind of sweet and kind of sharp and idk i really love it#thought it would be a good first project for getting back into writing for the summer!
109 notes
·
View notes
Text
Week 07 | 07 Mar. 24
What was planned this week:
Submit midterm jury progress
Write 2 more articles.
Design subpages for the blog.
What actually happened:
I designed Instagram posts and reels.
I draw illustrations.
I finish the blog layout.
I started the mobile version.
I wrote two articles.
I modified the illustration for one of the previous articles.
Reflection:
It's been a long time since the last blog post. The pressure has been high as we need to almost finish half of the project. I've been trying to accomplish as much as possible in a short time and still enjoy my break. The project has changed somewhat from what it was before the mid-term break, for the better. The break started with a change in the illustration style. I needed more mature drawings that fit the identity. I felt that the current style suited the tone better, as it's more expressive and has a texture that conveys a kind of poetry, yet despite its many details, it's easy to look at. After that, I moved on to the website; I was satisfied with the initial release, so I continued on the same path. Finally, I started some Instagram posts and edited the clip I had started before. Although I had planned a lot, I overlooked some details to achieve the essentials and the most important.
During the jury, the arbitration jury members commented on the logo, indicating that it didn't quite match the identity's personality. I was already aware of this and tried to adjust it, but I didn't reach a suitable result yet. Therefore, after the jury, I started making adjustments to it. I also began working on the mobile version of the blog. The comments and suggestions during the jury were very helpful this time.
After these challenges and achievements, I feel like I understand more what I ultimately want to achieve and how I will accomplish the work accurately and what data I need.


.
2 notes
·
View notes
Note
Hi I love your designs. Do you have any tips for beginners, workflows or tutorials you'd recommend?
I have the alphabet down and have been trying to move to PS but it is a nightmare. I've been trying with doing each word on a layer but I end up with a million vectors.
Thank you!
Hi, thank you so much!
Nailing down a digital workflow definitely takes a bit of trial and error. It took me a good 2 years to figure out how to work in Photoshop, especially since I was learning from scratch, and another year or so to figure out a workflow when I moved to a tablet.
In terms of tools, I use Photoshop Elements 2011, Illustrator (though I've used Inkscape before), and Autodesk Sketchbook on my tablet. Other Gallifreyan writers use GIMP and AutoCAD (yeah idk how that last one works either). In general, I think the same tips work across platforms, both raster and vector, though of course YMMV.
Ultimately, the massive number of layers is somewhat unavoidable. This piece had 31 layers in Photoshop; this simple one had 10 layers in Illustrator. But here are some tips for getting from hundreds down to less than 50! I'm gonna move the rest of this under a readmore to avoid clogging dashboards.
First, you probably don't need to put each word on its own layer. I tend to group structural elements together. So for each sentence, I'll do the sentence circles on one layer, all word circles on 1-2 layers, and then consonants, vowels, line decorators, dot decorators, and punctuation all on individual layers. With both raster and vector software, you can move individual elements within a layer - with vectors you just pick up the whole path, and with raster you can use the lasso or magic wand to select all pixels within a certain area on a layer. With raster, the main thing you need to watch out for is overlapped shapes - so when I work in Photoshop, I'll have 2-3 layers for word circles and for consonants, so I can switch between the various layers when things overlap.
Second, clipping masks and groups are your friend!! Clipping masks help you get clean, sharp edges without having to zoom in to erase individual pixels. Grouping helps consolidate the various elements of a word or sentence; especially when you're happy with how something looks, group all the individual parts of it so you're only working with one object instead of 15.
Third, I find it really helpful to sketch out my designs physically before making them digitally - sometimes I do this in my sketchbook, sometimes I draw things on my tablet. But sketching the design out helps me get a sense of how all the pieces are fitting together, which in turn gives me a sense of how to tackle them. For example, when working in Photoshop, I draw word circles for words without divots before drawing word circles that have divots, so that I can use the nondivot-circles to inform divot positioning. But in order to do this, I have to know upfront which words are going to have divots and how everything is fitting together.
Finally, you may want to take a look at Sirkles' youtube explanations. She makes these to explain how to read her translations, but on occasion, she'll go into her GIMP file to fix something, and that might help explain the behind-the-scenes process. Annnd you can check out these 2 Twitch VODs of mine from back when I had pipe dreams of a Patreon where I offered Twitch VODs as a patron benefit: VOD 1 || VOD 2. Both are for pieces I did in Photoshop. I apologize in advance for the garbage sound quality.
I hope you're able to find something useful in this wall of text. Unfortunately I think it really does just take practice, and a lot of trial and error, so I wish you the best of lucky and a speedy learning curve!
3 notes
·
View notes
Text
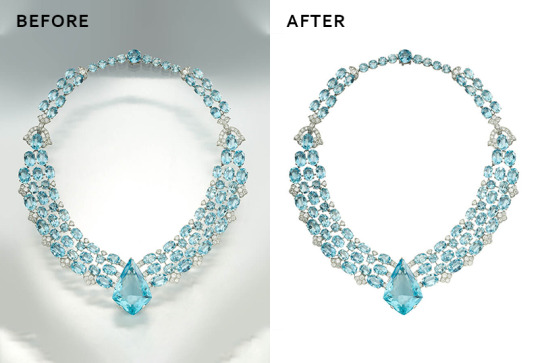
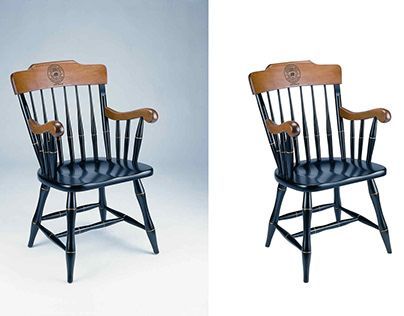
Understanding How Clip Path Works in Image Editing Services
Introduction:
In the world of digital image editing, the term "clip path" plays a crucial role. Whether you are dealing with clipping path services, vector conversion services, or background removal, understanding how clip path works is essential. Businesses and individuals rely on professional clipping path service providers to enhance their images for e-commerce, advertising, and branding purposes. In this article, we will explore how clip path works, its applications, and how it benefits services like image masking, drop shadow, and ghost mannequin effects.
What is a Clip Path? A clip path is a vector path used to isolate a subject from its background. It is commonly created using software like Adobe Photoshop or Illustrator, allowing designers to separate an object from an image with precision. The clipped portion remains visible, while the background can be removed or replaced.
Clip paths are primarily used in product photography, fashion photography, and marketing materials where clean and professional images are required. Clipping path services ensure that images appear polished, increasing their visual appeal and effectiveness.
How Clip Path Works : The process of creating a clip path involves several steps:
Selection of the Object – The designer carefully selects the object that needs to be isolated from the image.
Creating a Vector Path – Using the Pen Tool in Photoshop or Illustrator, the designer draws a path around the subject.
Applying the Path – Once the path is complete, it is converted into a selection.
Background Removal or Editing – The background is either removed or replaced with a new one, depending on the client’s requirements.
Since the clip path is a vector, it maintains high accuracy and can be edited without loss of quality, making it an ideal solution for image editing needs.
Applications of Clipping Path Services: Clipping path services are widely used across various industries. Here are some key applications:
E-commerce and Product Photography – Online stores use clipping paths to remove backgrounds and maintain uniformity in product listings.
Advertising and Marketing – High-quality images with clean edges enhance advertisements and promotional materials.
Print Media – Magazines, brochures, and posters require precise cutouts for professional designs.
Fashion and Apparel – Ghost mannequin services use clipping paths to create a 3D effect on clothing items.
Jewelry and Accessories – Complex clipping paths help in refining intricate details of jewelry images.
Related Services Utilizing Clip Path: Many other image editing services integrate clip path techniques to enhance visual presentations:
Vector Conversion Service: Clipping paths help in converting raster images into vector graphics, ensuring scalability and better quality.
Image Masking Service: When an image has complex edges, such as hair or fur, masking techniques complement clipping paths to ensure detailed extraction.
Drop Shadow Service: Clipping paths allow designers to apply realistic shadows to isolated objects, improving depth and realism.
Ghost Mannequin Service: This technique is used to create a hollow effect for apparel images, making them appear as if worn by an invisible mannequin.
Why Choose a Professional Clipping Path Service Provider?: A professional clipping path service provider ensures high-quality image editing with precision and efficiency. Here’s why hiring experts is beneficial:
Accuracy and Precision – Professional designers use advanced tools to create seamless cutouts.
Time-Saving – Businesses can focus on core activities while experts handle image editing tasks.
Consistent Quality – High-end retouching ensures that images are visually appealing and professional.
Bulk Processing – Service providers can handle large volumes of images efficiently.
Conclusion: Clip path technology is a fundamental aspect of digital image editing, enabling precise cutouts, background removal, and high-quality visual enhancement. Whether you need clipping path services, vector conversion, or ghost mannequin effects, professional service providers can help deliver polished and professional images tailored to your needs. Investing in expert image editing ensures better engagement, improved branding, and a strong visual impact in the competitive market.
Company Information:
Website: https://clippingpathzone.com/
Facebook: https://www.facebook.com/clippingpathzone/
Contact : https://clippingpathzone.com/contacts/
Resources: https://clippingpathzone.com/blog/
Pinterest: https://www.pinterest.com/cpzmedia/
Twitter: https://www.linkedin.com/in/clipping-path-zone-187698137/
Quote: https://clippingpathzone.com/request-to-get-a-quote/
Skype: skype:Clippingpathzone?chat
Office Address:
United States Office
30 North Gould Street, Sheridan, WY 82801
19173362276
Bangladesh Office
1188/1, East Shewrapara, Mirpur, Dhaka-1216 Bangladesh
8801612348152
0 notes
Text
Unlocking the Power of Adobe After Effects: A Creative's Dream Tool
Adobe After Effects is a game-changer for designers, animators, and video editors. This software opens up a world of possibilities for visual effects (VFX) and motion graphics, empowering creatives to bring their ideas to life in stunning, cinematic ways. Whether you're working on a Hollywood blockbuster, a YouTube tutorial, or an artistic project, After Effects is the perfect tool to enhance your content. Let’s dive into its many features and see how it can elevate your creativity.
What Makes Adobe After Effects Stand Out?
Adobe After Effects stands as the industry standard when it comes to creating motion graphics, VFX, and compositing. Its versatility and wide range of tools make it a go-to software for anyone looking to push the boundaries of visual storytelling. After Effects is designed for professionals and newcomers alike, offering intuitive interfaces and advanced capabilities to cater to all skill levels.
Powerful Motion Graphics
After Effects is known for its ability to create stunning motion graphics. Whether you’re animating text, graphics, or illustrations, the possibilities are endless. With powerful features like keyframing, easing, and path animation, you can easily control the movement and style of elements. It’s the perfect platform to design dynamic and eye-catching animations.
Advanced Visual Effects (VFX)
For those working with video, After Effects excels in adding breathtaking visual effects. Whether you're creating explosions, integrating CGI elements, or enhancing color grading, After Effects provides the necessary tools to make your footage look professional. It supports 3D compositing, chroma keying (green screen), and advanced tracking, all crucial for seamless VFX work.
Seamless Integration with Other Adobe Products
One of the strongest features of Adobe After Effects is its smooth integration with other Adobe Creative Cloud tools like Adobe Premiere Pro, Photoshop, and Illustrator. This interconnectivity ensures that your workflow remains efficient. You can easily import assets from Photoshop or Illustrator, and the round-trip workflow with Premiere Pro allows for seamless video editing, giving you a cohesive creative process.
Why Adobe After Effects is Essential for Creators
Enhance Your Videos with Stunning Animations
For video creators, After Effects is essential for creating engaging animations. Whether you're designing intros, lower thirds, transitions, or visual storytelling elements, After Effects makes it easy to take your videos to the next level. Its powerful tools allow you to manipulate and animate objects with precision, creating content that stands out.
Create Professional-Grade VFX
With After Effects, you can turn your footage into something extraordinary. Advanced features like 3D camera tracking and particle simulations allow you to add realistic effects that blend perfectly with your video. Whether you’re working on sci-fi, fantasy, or dramatic sequences, After Effects makes it possible to achieve stunning results.
Edit and Composite Like a Pro
After Effects is not just for animators; it’s also a powerful compositing tool. You can layer multiple video clips, apply masks, and create complex composites that blend perfectly with each other. For professional video editors, After Effects provides the tools needed to fine-tune every detail, making your video look polished and seamless.
Getting Started with Adobe After Effects
Easy-to-Learn for Beginners
While After Effects offers a range of complex features, it is also beginner-friendly. Adobe offers a wealth of tutorials, templates, and resources to help you get started. The software’s interface is intuitive, allowing you to quickly learn the basics and gradually explore more advanced techniques as you gain experience.
Expansive Community and Resources
After Effects has a vast community of users, which means a wealth of tutorials, forums, and plug-ins are available to help you learn and grow as a creative. Whether you need advice on a specific effect or want to learn how to speed up your workflow, you’ll find resources and support within the After Effects community.
0 notes
Text
How to Land a Clipping Path Job: A Guide for Photo Editing Enthusiasts

The rise of e-commerce and digital marketing has significantly increased the demand for photo editing and image postproduction services. Companies and entrepreneurs are always on the lookout for skilled professionals to enhance the quality of their product images. One specific service in high demand is clipping path, a fundamental technique used for background removal, object isolation, and other image manipulation tasks. If you're wondering how to secure a clipping path job, here’s a comprehensive guide to help you succeed in this field.
1. Understand the Role of a Clipping Path Professional
Clipping path services are essential for creating clean, professional images, whether it’s for e-commerce platforms like Amazon or fashion catalogs. As a professional, your tasks might include background removing services, ghost mannequin editing service, or working on intricate image manipulation projects. These skills are critical for creating polished visuals that attract customers.
2. Build Your Skills in Photo Editing
To secure a job, you need to master tools like Adobe Photoshop and Illustrator. Familiarize yourself with:
Clipping Path Techniques: Learn how to use the pen tool to create precise paths around objects.
Image Postproduction Services: Expand your knowledge of color correction, shadow creation, and retouching.
Ghost Mannequin Editing: Perfect your ability to create a 3D effect for apparel photography.
Background Removing Services: Practice isolating objects while preserving edge quality.
Online tutorials, courses, and practice projects can help you improve your expertise in these areas.
3. Create a Strong Portfolio
A compelling portfolio is your ticket to landing a job. Include a variety of work samples that showcase your skills in different areas such as clipping path, image manipulation service, and Amazon photo editing service. Make sure your portfolio demonstrates versatility and attention to detail.
Use platforms like Behance, Dribbble, or your own website to display your work. Highlight before-and-after images to show the impact of your editing.
4. Work with a Photo Editing Service Provider
Many companies specialize in offering clipping path and image post production service. Joining such a team can be a great way to gain experience. Look for reputable clipping path service providers or photo editing service providers that frequently hire skilled editors.
These companies often work with clients in various industries, including fashion, e-commerce, and advertising, giving you diverse exposure.
5. Freelancing Platforms Are Your Friend
If you prefer working independently, freelancing platforms like Upwork, Fiverr, and Freelancer are great places to find clients. Create a profile that highlights your expertise in services like ghost mannequin editing, background removing, and image manipulation. Use keywords strategically in your profile to ensure clients can find you easily.
Offer competitive pricing initially to attract clients and build your reputation. Positive reviews and consistent performance can help you secure long-term projects.
6. Network in the Industry
Networking can open up opportunities for clipping path jobs. Join online communities, forums, or social media groups where photo editing professionals and businesses interact. Connect with photographers, designers, and e-commerce businesses who might require your services.
7. Market Yourself Effectively
Marketing is crucial to stand out in a competitive industry. Use social media platforms like Instagram and LinkedIn to showcase your work and attract potential clients. Publish posts and blogs about clipping path techniques or photo editing tips, incorporating relevant keywords like "clipping path service provider," "image post production service," and "background removing service" to improve your SEO visibility.
8. Provide High-Quality Work and Excellent Service
To succeed in this industry, quality and reliability are key. Always deliver projects on time and maintain open communication with clients. Whether you're offering Amazon photo editing services or working on a ghost mannequin project, consistent quality will build your reputation and lead to more opportunities.
Conclusion
Securing a clipping path job requires a mix of technical skills, a strong portfolio, and effective networking. By mastering essential photo editing techniques and actively marketing yourself, you can land roles with photo editing service providers or even build your own client base. With dedication and continuous learning, you'll thrive in this ever-growing field.
Contact Us:
Website: https://www.orbitclippingpath.com/
Facebook: https://www.facebook.com/orbitclippingpath
Contact : https://www.orbitclippingpath.com/contact-us/
Resources: https://www.orbitclippingpath.com/blog/
Portfolio: https://www.orbitclippingpath.com/portfolio/
Twitter: https://x.com/orbitclippingbd
Quote: https://www.orbitclippingpath.com/request-for-quote/
Linkedin: https://www.linkedin.com/company/orbitclippingpath/
Office Address
147/3 Monipuripara, (Gate no-7)
Tejgaon, Dhaka-1215.
Call: +88 017 1202 3460
Email: [email protected]
0 notes
Text
5. The 11 Second Club

The 11 Second Club is a monthly character animation competition open to everyone! Join our 1611475 members and participate in the forums to get feedback on your work.
Download this month's audio file and animate a character speaking the line to enter the contest.
The January Character Animation Competition has begun! This month's clip should be a fun addition to your portfolio.
In order to focus on your animation, please take advantage of the free character rigs we've linked to in the Resources section, and avoid spending a lot of time on lighting/rendering/etc.
Entries can be character animations in any medium, from CG animation (Maya, 3DS Max, Blender, Animation:Master, etc.) to traditional 2D animation to stop-motion. Consider posting your progress videos in the Work in Progress forum. Feedback and criticism will make your animation stronger! Comments should aim to be professional, polite, and constructive for participants of all skill levels.
The final competition I came across was The 11 Second Club animation competition. I found it amusing how I ended up returning to this option. This was actually one of the projects we worked on during the first semester last year, and I genuinely enjoyed it. This project was significant to me because it was at this moment I realized the specific career path I wanted to pursue. While I’ve always preferred animation over illustration, this project made me realize my passion for character animation. I loved the process of downloading 3D character models, animating their actions, and have them lip sync to the audio provided by the competition. It was an honestly a project I genuinely was satisfied with. It was through this experience that I realized my aspiration to pursue a career as a Character Animator.
So I believe this is why I returned back to consider this option yet again, as this competition offers me something I plan to focus more on and continue doing in the future.
More details are mentioned in the link below:
0 notes
Text
Chapter 15
Describe the difference between linking and embedding in Illustrator.
A linked file is an external file connected to the Illustrator file by link and doesn't significantly increase its size. It must be included with the Illustrator file to keep the link. An embedded file becomes part of the Illustrator file, increasing its size, and cannot break the link. You can update both types of files using the Relink button.
How do you show options when importing images?
Check the Show Import Options box when using the File > Place command to add an image. This will open the Import Options dialog, allowing you to set preferences before placing the image.
What kinds of objects can be used as masks?
A mask can be a simple or compound path. Opacity masks can come from placed Photoshop files.
How do you create an opacity mask for a placed image?
Create an opacity mask by placing the object to be used as a mask on top of the object to be masked.
Describe how to replace a placed image with another image in a document.
o replace a placed image with a different image, select the image in the Links panel.
Summary: Chapter 15 focuses on working with graphics in Adobe Illustrator. It teaches how to place linked and embedded images in a file, as well as how to transform and crop these images. The chapter covers creating and editing clipping masks, using text to mask an image, and making and editing opacity masks for advanced visual effects. Additionally, it explains how to use the Links panel to manage images effectively and how to embed and unembed graphics within a project.
0 notes
Text
Animation Skills "Audio Project" Part 4

I made a small concept of how it would look like in some scenes, I decided to make it in limited colors to make the fashion work faster and better convey the atmosphere of calm, but also had a touch of “something is going to go wrong”.

There is also a scene like this one where we can see the color red. Because there is a character who is jealous of another character who has something he wanted to have. And this color, when he sees the main character holding a bag of jewelry, means his anger that he got something he doesn't think he deserves.
Then, when I'm done, I'm going to work on Davinci Resolve, because there I can use chromecast and other things to speed up the process of creating this project, but I also don't forget to record other sounds. I'll try to draw all the animations in TV Paint, but I'll also have to draw them in other programs like Clip Studio to make sure I finish it on time. I'm also thinking of using Music Line to create sounds to convey an eerie or uncomfortable atmosphere.
Research Element 09
Arcs
Arcs are the path from where your animation will happen. In principle, arcs are based on the fact that all living things move in curved motions and not straight.
Objects moving in arcs creates a more realistic and visually pleasing motion. In this way, it is able to breathe life into the illustrated worlds and characters on the screen. One of the key technical elements that contribute to creating believable, engaging animation is the use of carefully designed arcs.
One example Below:

Walt Disney

Walt Disney (1901-1966) was an American film and television producer and entertainer, known as a pioneer of animated films and the creator of such cartoon characters as Mickey Mouse and Donald Duck.
Dissatisfied with their progress, Disney and Iwerks started a small studio of their own in 1922 and acquired a secondhand movie camera with which they made one and two-minute animated advertising films for distribution to local movie theatres.
With Roy as business manager, Disney resumed the Alice series, persuading Iwerks to join him and assist with the drawing of the cartoons. They invented a character called Oswald the Lucky Rabbit, contracted for distribution of the films at $1,500 each, and propitiously launched their small enterprise. In 1927, just before the transition to sound in motion pictures, Disney and Iwerks experimented with a new character—a cheerful, energetic, and mischievous mouse called Mickey. They had planned two shorts, called Plane Crazy and Gallopin’ Gaucho, that were to introduce Mickey Mouse��when The Jazz Singer, a motion picture with the popular singer Al Jolson, brought the novelty of sound to the movies.
The growing popularity of Mickey Mouse and his girlfriend, Minnie, however, attested to the public’s taste for the fantasy of little creatures with the speech, skills, and personality traits of human beings. This popularity led to the invention of other animal characters, such as Donald Duck and the dogs Pluto and Goofy.
Disney’s imagination and energy, his whimsical humor, and his gift for being attuned to the vagaries of popular taste inspired him to develop well-loved amusements for “children of all ages” throughout the world. Although some criticized his frequently saccharine subject matter and accused him of creating a virtual stylistic monopoly in American animation that discouraged experimentation, there is no denying his ground-breaking accomplishments. His achievement as a creator of entertainment for an almost unlimited public and as a highly ingenious merchandiser of his wares can rightly be compared to the most successful industrialists in history.
0 notes
Text
Unlock Your Creativity with a 2D Animation Course

In a world where storytelling and visuals rule, 2D animation stands out as one of the most captivating ways to share ideas and bring characters to life. Whether you’ve dreamed of creating your own animated series, designing fun and quirky characters, or even working in film or game design, a 2D animation course could be just the right path to turn your imagination into reality.
What is 2D Animation, and Why is it So Popular?
2D animation is all about creating movement in a flat, two-dimensional space. Think of your favorite cartoons or simple, engaging animated clips you see on social media—those are examples of 2D animation. Unlike 3D, which involves depth and life-like realism, 2D is more about bringing vibrant, drawn characters to life with personality and style. This makes it perfect for storytelling in cartoons, explainer videos, or even animated ads.
What You'll Learn in a 2D Animation Course
Signing up for a 2D animation course means you’ll cover everything from the basics to more advanced techniques. Here are some of the key skills you'll develop:
Animation Foundations
You’ll start with the essentials: principles like "squash and stretch" (for giving life to characters), anticipation, and timing. These techniques are the building blocks of movement and make your animations look realistic and engaging.
Character Design and Drawing Basics
Ever wondered how characters get their unique look and feel? You’ll learn how to create characters from scratch, diving into sketching, proportions, and adding unique traits that make them stand out.
Storyboarding Skills

Storyboarding is like the blueprint of your animation. It’s where you map out scenes, plan the flow of action, and ensure the story is clear. It’s a crucial step in bringing your ideas to life and keeping your animation organized.
Mastering Digital Animation Software
You’ll get hands-on experience with popular software like Adobe Animate or Toon Boom Harmony, which make the animation process smoother and more fun. These tools help you add effects, refine movements, and build high-quality animations.
Audio and Syncing Techniques
Animation isn’t just visual—audio plays a big part! You’ll learn to sync sound effects, voices, and music with your animations, giving them a more polished and professional feel.
Building a Portfolio
Toward the end of the course, you’ll have the chance to create a project or short animated film. This is a fantastic way to showcase your skills and build a portfolio, which is essential for finding jobs or freelance work.
Where Can 2D Animation Take You? Career Opportunities
Completing a 2D animation course opens up a wide range of creative career options, such as:
Animator
Storyboard Artist
Character Designer
Illustrator
Motion Graphics Artist
Freelance Animator
Many of these roles are in industries like film, video games, advertising, and even online education. Animation is everywhere!
Why a 2D Animation Course is Worth It
Express Yourself Creatively
Animation is a powerful art form. You get to express emotions, tell stories, and connect with audiences in a fun and visually impactful way.
Growing Demand for Animation
Animated content is huge right now! From social media marketing to online learning, companies and creators are using animation more than ever. 2D animation skills are highly marketable and can open doors across industries.
Build a Portfolio and Grow Professionally
A formal course gives you the chance to create a polished portfolio, which is crucial in standing out when applying for jobs or pitching clients as a freelancer.
Learn in a Structured Way
Courses offer a structured learning path with expert guidance. You’ll gain skills quickly and be able to build a strong foundation in animation techniques that might take a lot longer if you try to learn on your own.
Choosing the Right 2D Animation Course
When looking for a course, think about factors like the curriculum, the software covered, and hands-on projects. And remember, it’s always great to look at student reviews to get an idea of what the course experience will be like.
A 2D animation course is a fantastic way to dive into a world of creativity and storytelling. Whether you’re starting fresh or building on existing skills, this course can help you turn your imagination into reality and set you on a path to a rewarding, fun-filled career. Ready to bring your drawings to life? Start your 2D animation journey today!

#motiongraphics#artwork#blender#animationart#cinema#film#characterdesign#disney#aftereffects#motiondesign#dart#animated#sketch#marketing#graphicart#d#designinspiration#painting#logodesigns#photooftheday#sketchbook#instaartist#beautiful#print#logos#gallery#digital#logotype#brandidentity
0 notes
Text
clipping path
A clipping path is a technique used in graphic design and photo editing to create a vector path that defines which parts of an image should be visible and which should be hidden. Here’s a detailed overview of clipping paths:
What is a Clipping Path?
Definition: A clipping path is a vector shape that acts as a mask, allowing only the areas inside the path to be visible while hiding everything outside.
Usage: Commonly used in image editing software like Adobe Photoshop and Illustrator.
Applications
Product Photography: Useful for e-commerce to isolate products from backgrounds, making them stand out.
Graphic Design: Helps in creating collages, banners, and advertisements by layering images.
Web Design: For creating transparent images that fit seamlessly into various backgrounds.
How to Create a Clipping Path
Select the Tool: Use the Pen Tool in Photoshop or Illustrator.
Draw the Path: Click to create anchor points around the subject you want to isolate. Use curves for more complex shapes.
Close the Path: Ensure the path is closed to form a complete shape.
Create the Clipping Mask: In Photoshop, select the path and apply it as a mask. In Illustrator, you can use the “Make Clipping Mask” option.
Tips for Effective Clipping Paths
Precision: Take your time to create a clean, precise path, especially around intricate details.
Zoom In: Work at a zoomed-in level for better accuracy.
Refine Edges: Use feathering or smoothing options if necessary to soften the edges of the clipping path.
Alternatives
Layer Masks: In Photoshop, layer masks provide similar functionality and allow for non-destructive editing.
Quick Selection Tool: For simpler images, this tool can help create selections quickly, though it may lack the precision of a clipping path.
Conclusion
Clipping paths are essential for anyone working with images in design and marketing. They enhance the visual appeal of images and are crucial for professional-quality graphics. If you have any specific questions about creating or using clipping paths, let me know!
#clipping path service#clipping path company#clipping path#graphic design#photo editing#photo retouching
0 notes
Text
How Can You Make the Most of Your Travel Post Blog?
Creating a successful travel post blog that attracts readers, drives engagement, and ultimately grows your online presence takes a combination of strategy, creativity, and thoughtful planning. To stand out among the plethora of travel blogs, you’ll need more than just appealing destinations or stunning visuals. Here, we’ll dive into actionable steps on how you can make the most of your travel post blog. Whether you’re starting a new blog or improving an existing one, these tips will help you capture the interest of your readers and keep them coming back.
1. Define Your Blog’s Niche and Unique Voice
One of the first steps to making your travel post blog successful is to define its niche. Ask yourself, “What unique perspective or area of travel can I offer?” A blog about general travel can be difficult to stand out, as many people cover similar topics. Instead, consider focusing on a specific angle that aligns with your passion and expertise. This could be luxury travel, solo travel for women, eco-tourism, adventure travel, food-focused travel, or any other niche that you’re passionate about.
Tips to Define Your Niche:
Reflect on your travel style. Are you drawn to off-the-beaten-path destinations, family-friendly spots, or cultural experiences?
Consider your target audience. What kind of travelers would relate to your experiences and insights?
Be consistent in your voice. Whether it’s humorous, informative, or inspiring, keep your tone consistent to build a recognizable brand.
2. Create Engaging and Informative Content
Content is the heart of any travel post blog, and your success hinges on providing valuable, interesting content that readers can relate to or learn from. When writing posts, keep your audience’s preferences in mind. Each blog post should have a clear purpose, whether it’s to entertain, inform, inspire, or all three.
Ideas for Engaging Content:
Itinerary Guides: Share detailed itineraries with practical information, tips on places to stay, and recommended activities.
Top Attractions and Hidden Gems: Describe popular attractions along with lesser-known spots for readers looking for unique experiences.
How-To Guides: Cover practical travel topics like budgeting, travel photography, and packing tips for specific destinations.
Travel Stories: Personal anecdotes or challenges you’ve faced can make your blog relatable and memorable.
3. Use High-Quality Visuals to Tell Your Story
Stunning visuals are a non-negotiable for a travel post blog. They captivate readers, illustrate your travel experiences, and inspire readers to explore. Invest in a good camera or smartphone with a high-quality lens, or learn basic photography and photo-editing techniques to ensure your images are engaging.
Visual Tips for a Travel Post Blog:
Choose High-Resolution Photos: Blurry or poorly composed photos can detract from your blog’s appeal.
Capture Unique Angles: Experiment with different perspectives to add depth to your photos.
Use Videos: Short clips or reels are popular with readers and work well on social media platforms like Instagram and TikTok.
Create Photo Galleries: Provide a gallery for destination guides or specific events so readers can enjoy a comprehensive visual experience.
4. Optimize for SEO and Use Relevant Keywords
Search engine optimization (SEO) is essential to help your travel post blog reach a broader audience. By optimizing your blog content for search engines, you can increase organic traffic from readers looking for travel information.
SEO Tips for a Travel Post Blog:
Use Targeted Keywords: Keywords like “travel post blog,” “top travel destinations,” or “best travel tips” should be naturally integrated into your posts.
Optimize Meta Descriptions and Titles: Make sure each blog post has an appealing title and meta description that incorporates relevant keywords.
Use Headers and Subheadings: Not only does this improve readability, but it also helps search engines understand your content structure.
Include Alt Text for Images: Descriptive alt text can help your images rank on search engines and improve accessibility.
5. Engage Your Audience with Interactive Features
Audience engagement is crucial for the success of any blog. If readers feel they’re part of the conversation, they’re more likely to return. Make your travel post blog interactive by encouraging comments, using polls, and creating shareable content.
Ways to Boost Engagement:
Enable Comments: Encourage readers to share their own travel experiences or ask questions about the post.
Create Polls or Quizzes: Readers love interactive content like polls on favorite destinations or quizzes about travel styles.
Use Call-to-Action Prompts: At the end of each post, ask readers to leave their thoughts or follow you on social media.
Respond to Comments: Replying to comments shows readers that you value their input and fosters a community atmosphere.
6. Leverage Social Media to Promote Your Blog
Social media is a powerful tool for sharing your blog posts and expanding your audience. Platforms like Instagram, Pinterest, and Facebook are especially popular for travel content and can drive significant traffic to your blog.
Social Media Strategies for Your Travel Post Blog:
Create a Consistent Posting Schedule: Frequent updates keep your followers engaged and attract new readers.
Use Hashtags Effectively: Hashtags like #TravelPostBlog or #TravelInspiration can increase the visibility of your posts.
Share Behind-the-Scenes Content: Offering glimpses into your travel planning or the reality of travel helps humanize your brand.
Run Giveaways or Contests: Contests encourage followers to engage with your posts and can help you gain new followers.
7. Build a Strong Email List
An email list allows you to communicate directly with your readers and is a powerful way to bring them back to your blog. By regularly updating subscribers about new posts, travel tips, or exclusive content, you can build a loyal reader base.
Tips to Build and Maintain an Email List:
Use a Sign-Up Form: Include a prominent sign-up form on your blog to capture interested readers.
Offer Incentives: Consider offering a free travel guide or checklist as an incentive for signing up.
Send Regular Newsletters: Keep your readers updated on new blog posts, travel insights, or even curated content from other travel blogs.
Keep Your Emails Personalized: Use personalized greetings and tailor your content to subscriber interests to improve open rates.
8. Collaborate with Other Bloggers and Brands
Collaborating with other travel bloggers or brands can expand your reach and introduce your blog to new audiences. Partnerships can include anything from guest posts to social media takeovers, or co-hosted events.
Collaborative Ideas for a Travel Post Blog:
Guest Posts: Exchange guest posts with another travel blogger for mutual exposure.
Joint Giveaways: Partner with brands or bloggers to host giveaways that attract both your audiences.
Link Exchanges and Shoutouts: Build backlinks by sharing each other’s content and tagging on social media.
Attend Blogger Meetups or Conferences: Networking in person with other bloggers can lead to valuable partnerships and collaborations.
9. Monetize Your Travel Post Blog
Once your travel post blog gains traction, you may want to explore ways to monetize it. Earning from your blog can enable you to travel more often, invest in better equipment, or hire assistance for content creation.
Ways to Monetize a Travel Post Blog:
Affiliate Marketing: Share affiliate links to products you recommend, such as travel gear, hotels, or flights, and earn a commission on any sales made through your links.
Sponsored Content: Collaborate with travel brands that align with your blog’s niche for paid partnerships.
Sell Digital Products: Consider creating travel guides, itineraries, or e-books that your readers can purchase.
Google AdSense or Banner Ads: Display ads on your blog to generate revenue based on impressions and clicks.
10. Track Your Performance and Adjust Your Strategy
Finally, use analytics to monitor your blog’s performance and learn what’s working or where you need to improve. Understanding which posts resonate the most and which keywords bring traffic allows you to refine your strategy over time.
Tools to Track Your Travel Post Blog’s Success:
Google Analytics: Monitor your blog traffic, top-performing posts, and reader demographics.
Social Media Insights: Analyze which posts get the most engagement and clicks.
SEO Tools: Use tools like Ahrefs or SEMrush to check keyword rankings, backlinks, and other SEO metrics.
Analyzing Your Data:
Identify Patterns: Are certain types of posts (e.g., “Top 10” lists) more popular? Use this insight to create similar content.
Understand Audience Behavior: Track what devices or locations your audience is coming from to tailor content accordingly.
Adapt Your Content Strategy: Adjust your posting frequency, focus topics, and marketing channels based on your insights.
In conclusion, making the most of your travel post blog requires both creativity and a strategic approach. By defining a niche, producing valuable content, leveraging SEO, engaging with readers, and promoting on social media, you can build a blog that readers enjoy and trust. Tracking your blog’s performance and collaborating with others will help you continually improve your blog and ensure long-term success. With these tips, your travel post blog will be well on its way to inspiring and guiding travelers worldwide.
0 notes
Text
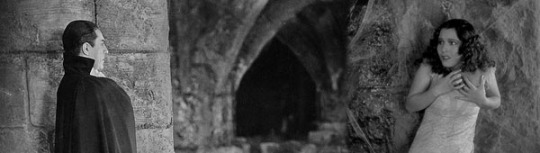
Vampires at Universal, 1930
Last weekend (this is an article from 2015), the actress Lupita Tovar passed away at the age of 106, more than eighty years removed from her starring role as the female lead in Drácula. This distinction had made her one of the last surviving links to the early days of Universal Pictures, when its founder Carl Laemmle oversaw the transition to the new era of talkies. Universal was then earning a reputation for its horror movies and the worldwide success of Phantom of the Opera in 1925 only added to its growing association with Victorian monsters.
Universal had an inadvertent role, though an inciting one, in the birth of sound cartoons. Through the actions of independent producer Charles Mintz, to whom the studio had given a contract, Walt Disney was dismissed from the Oswald series just prior to the revolution he helped to unleash with Steamboat Willie. After that, Universal was quite slow to respond, trying some half-measures to keep up with its more technically savvy competitors.
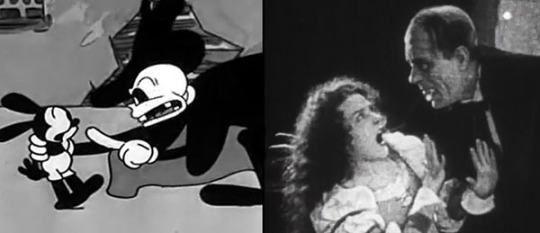
In a sense, the jig was up. The studio had to respond with versions that had dialogue in those languages. And mind you, the art of dubbing had not yet taken hold. So, on October 10, 1930, filming began on a movie that perfectly illustrated a short-lived Hollywood solution. In most ways, it was exactly the same movie as the classic Dracula starring Bela Lugosi with his sweeping cape and leering glare. However, this alternate version had a Spanish-speaking cast and was titled Drácula. It made use of the same sets and a translated shooting script.
Lupita Tovar
The role played by Helen Chandler was performed instead by Tovar, who was recently signed on contract from Mexico to be a “Universal player.” In fact, the entire Spanish version of Dracula was shot at night, 7pm to 7am, after the English-speaking cast and crew were finished with a day’s work. They did not cross paths, working on opposite shifts. Tovar said she never once even met Lugosi. All of her scenes were filmed with a caped Carlos Villarías as the famous blood-sucking Count.
The existence of this nearly shot-for-shot counterpart, a sort of movie doppelgänger, has spawned a fairly lively internet debate about which is better, with a lot of momentum pressing toward the lesser known “Spanish Dracula” on account of a crew that, it is rumored, was competing to make a superior version at night. A century later with side-by-side comparisons online, the debate has hit high gear, but the famous performance of the undead Lugosi does not lie down easily and so the argument continues.
Regardless of which version is better, a certain respect arises from knowing that the Spanish-language shooting schedule enforced a vampire lifestyle on all its cast and crew. There is a ‘Method acting’ purity to this version: everyone involved slept during the day and then went to work at night. Just knowing that makes it seem intrinsically more authentic. Here is an edited clip from Drácula, released in 1931:https://www.youtube.com/embed/MoO_QWF7q8Q
Perhaps less well known is that Walter Lantz, who inherited the responsibility for producing the Oswald the Lucky Rabbit cartoons, might also have been up late some of those nights while Conde Drácula, played by Villarías, was readying for his closeup on the legendary Stage 28 at Universal. This revelation comes to us from a 1978 interview with Manuel Moreno, in which he disclosed that the Oswald production schedules were so challenging to maintain that Lantz would work at night even after a tough day at the studio.
“Lantz used to come at night, and he’d stay there all day Saturday,” said Moreno. It is easy to get the impression that Walter, lacking a precise production discipline, may have brought the cartoons across the finish line by fusing the elements together himself, working alone in the editing room. Considering how loose and improvised we know these early Universal cartoons were—recollections exist of animators stating how nonspecific their scene directions could be—it would make sense that Lantz used the quiet of his nighttime work to assemble his vision from among the individual parts.
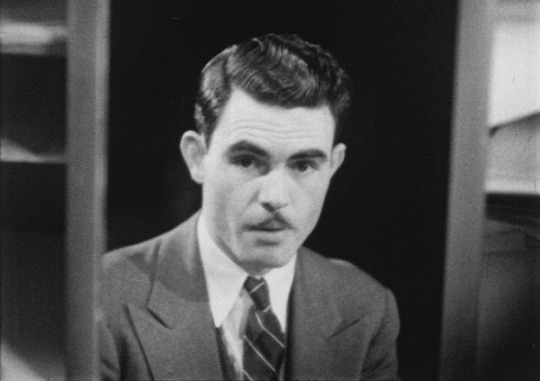
Manuel Moreno, a leading animator at Universal, seen here reflected in a mirror at his desk.
In a way, the knock on Lantz has always been that he delegated creative vision for his cartoons to his directors for most of his career. However, the situation would have been different in a year like 1930, when he was a new producer charged with keeping Oswald relevant in light of innovative new sound cartoons coming from Disney. The technical challenge was paramount and Lantz had actually proven himself quite a whiz with hybrid cinema techniques on his prior Dinky Doodle films for Bray, so he was versatile and up for the task.
In 1930 he was still actively a director in addition to being a producer. He was young and hungry and he was the force moving the Universal Cartoon Dept. into the sound era. However, Lantz was not hard-charging and uncompromising like Disney, so maybe some of the magic of his process only manifested as something special if he could bring it all together with the final edit and post-synch. The orderly sophistication of the Disney method was challenged at Universal by a more slapdash approach. And because of the tight budgets Lantz was given, his pragmatism was always a factor in the making of his cartoons.
Bill Nolan was the other producer-director working alongside him, but Nolan was chiefly there for his prodigious ‘pencil mileage’—as one of the fastest animators in the industry—and not necessarily for his management skills. Eventually, as Lantz became the undisputed boss, Nolan moved on and Moreno unofficially became the manager of the animation staff, basically a surrogate who was taking on directing responsibilities. According to Moreno:
“The sound recording was always supervised by Lantz. I had nothing to do with the recording because I couldn’t afford the time, and there wasn’t much that I could do, with Lantz there as supervisor. He knew exactly what the story was about, because he had been with it all through its construction. And the sound effects were no problem: a lot of times [story man] Vic McLeod would record the sound effects or [Pinto] Colvig would… Lantz did all the editing and patching the sound together, synchronizing the tracks”.
It seems that Lantz developed a business practice of being involved in the initial story meetings and then supervising the recording sessions at the end. For the middle of the process he appeared to be mostly hands-off. There were no “sweatbox” reviews of the pencil animation to ensure quality and continuity, as with Disney. That would have been too costly and, in any case, Moreno felt that “we were practically always behind schedule.” The animators really only had one shot at any sequence.
Lantz felt the stress of his situation, especially because his Universal budgets decreased year to year, but he was remarkably easygoing in spite of it and he negotiated the setbacks quite capably, keeping Oswald in production for nearly a decade. It is interesting to think of Lantz returning to Universal at night, editing and completing the cartoons. Lantz was technically adept and perhaps he liked the solace of quietly working alone without distractions.
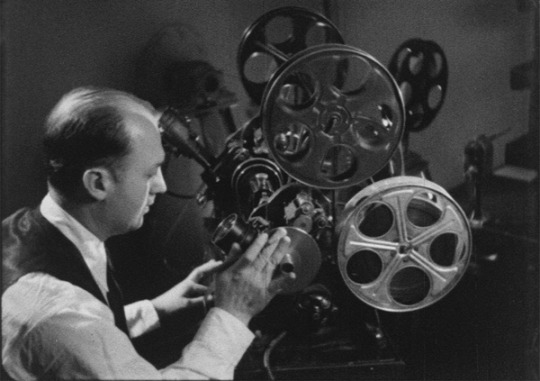
Walter Lantz at the Movieola
I suspect he developed this nocturnal habit by 1930, growing his proficiency with the finer art of comedic synch-sound. Since this was a paradigm shift that shook the industry, failure to adapt was not an option. Musical director Jimmie Dietrich helped him with this process during regular hours, but it may have been at night that Lantz honed his craft, running the strips of film elements back and forth. Although Lupita Tovar never met Bela Lugosi, it is possible she crossed paths with Lantz. It is fun to speculate about such a thing, though we will never know.
A connection we do know is that Manuel Moreno and his brother George were amateur film enthusiasts and, during the early 1930s, they shot a home movie of the Universal animators clowning around on Stage 28, the legendary ‘Phantom of the Opera’ set that was repurposed for many classic monster movies. Judging from a copy of this home movie that I own, “The Gang at Universal” — as they are referred to on the title card — had a blast using the opera house façade for their filmed gags.
As an animated homage to this famous stage of horror, the 1930 Lantz cartoon Spooks is an outright spoof of Phantom of the Opera, possibly even made to be shown in front of the featured “international sound version” released that same year. Oswald meets the phantom in the cartoon and then vanquishes him by answering a riddle (“Ouch!”) that was the punchline to a popular American joke at the time. Enjoy watching this cartoon. And imagine Walter Lantz working the vampire shift.https://www.youtube.com/embed/oR067Tv7-SI
Manuel Moreno was interviewed by Milton Gray in January 1978, in Santa Ana, California. Excerpts above are from this interview, a copy of which exists in the Manuel Moreno collection archived at Stanford University. The frames of Walter Lantz and Manuel Moreno are taken from a “Going Places with Lowell Thomas” short titled Cartoonland Mysteries (1936) from an HD transfer by Steve Stanchfield. For the top image, I stitched together Bela Lugosi and Lupita Tovar, day for night, forever linked and yet never to have met.
0 notes
Text
Clipping Path: Mastering the Art of Image Perfection
In the world of digital imagery, the term clipping path is often mentioned, but what does it really mean? For those involved in graphic design, photography, and online retail, understanding this concept is crucial. This article delves into the intricacies of clipping paths, their applications, and how to select a reliable clipping path service provider to ensure your images stand out.
Understanding Clipping Path
A clipping path is a vector path used to isolate objects from their background. By doing so, you can create a clean, professional look for your images, which is essential for e-commerce, advertisements, and various other digital presentations.
The Importance of Clipping Paths in Digital Imagery
The significance of a clipping path cannot be overstated. Whether you're a photographer looking to enhance your portfolio or a business owner wanting to showcase your products, the clarity and precision provided by a clipping path are indispensable. By removing distracting backgrounds, you allow your subject to shine, making your images more appealing and engaging.
How Clipping Path Services Elevate Your Visual Content
While it's possible to create clipping paths manually using software like Adobe Photoshop, the process can be time-consuming and requires a keen eye for detail. This is where a professional clipping path service provider comes into play.
Benefits of Using a Clipping Path Service Provider
Time Efficiency: By outsourcing to a clipping path service provider, you free up your schedule to focus on other important tasks.
Professional Quality: These providers have the expertise to deliver high-quality results that might be challenging to achieve on your own.
Cost-Effective: In the long run, using a clipping path service provider can be more cost-effective, especially when considering the time and effort saved.
For example, companies like Clipping Path Associate specialize in delivering top-notch clipping path services tailored to your needs.
Choosing the Right Clipping Path Service Provider
Selecting the right clipping path service provider is critical to ensure you get the best results. Here are some key factors to consider:
Experience and Expertise
Look for a provider with a proven track record. Experienced providers are more likely to understand your needs and deliver superior results. They are also well-versed in handling various complexities associated with clipping paths.
Turnaround Time
In the fast-paced digital world, quick turnaround times are essential. A reliable clipping path service provider should be able to deliver your images within the agreed timeframe without compromising on quality.
Quality Assurance
Quality is paramount when it comes to clipping paths. Ensure that the provider you choose has a robust quality assurance process in place. This might include multiple reviews and revisions to ensure the final product meets your expectations.
For more insights on choosing the best clipping path service provider, you can refer to this comprehensive guide.
The Process of Creating a Clipping Path
Understanding the process behind creating a clipping path can help you appreciate the skill involved. Here’s a step-by-step breakdown:
Step 1: Image Selection
Select the image you want to edit. High-resolution images work best as they allow for more precise clipping paths.
Step 2: Choosing the Right Tool
Tools like Adobe Photoshop and Illustrator are commonly used for creating clipping paths. The Pen Tool in Photoshop is particularly popular due to its precision.
Step 3: Drawing the Path
Using the Pen Tool, carefully trace around the object you want to isolate. This step requires a steady hand and an eye for detail to ensure the path is accurate.
Step 4: Applying the Path
Once the path is complete, apply it to isolate the object from its background. You can then replace the background or keep it transparent, depending on your needs.
Step 5: Final Adjustments
Make any necessary adjustments to ensure the clipping path looks natural. This might include refining edges or adjusting the contrast and brightness of the object.
Applications of Clipping Paths
Clipping paths have a wide range of applications across different industries. Here are some of the most common uses:
E-Commerce
In e-commerce, product images are everything. High-quality, background-free images can significantly enhance the appeal of your products, leading to increased sales. A well-executed clipping path ensures that your products stand out against any background.
Advertising and Marketing
In advertising, the visual impact of your images can make or break a campaign. Clipping paths allow you to create clean, professional images that grab attention and convey your message effectively.
Photography
Photographers use clipping paths to enhance their images, whether it's for a portfolio, a client, or personal projects. By isolating the subject, photographers can experiment with different backgrounds and effects to create stunning visuals.
Graphic Design
Graphic designers rely on clipping paths to create versatile and visually appealing designs. Whether it’s for print media, web design, or digital art, clipping paths provide the flexibility needed to bring creative visions to life.
Why DIY Clipping Paths May Not Be Ideal
While the idea of creating your own clipping paths might be tempting, it’s often not the best approach, especially if you require a high volume of images or complex paths.
The Time Factor
Creating clipping paths is a meticulous process that can be extremely time-consuming. If you’re handling a large number of images, the time required can quickly add up, taking you away from other important tasks.
Skill Level
Achieving professional-quality clipping paths requires a certain level of skill and experience. Without the right expertise, the results may not meet your expectations, potentially impacting the overall quality of your images.
Consistency
Maintaining consistency across multiple images can be challenging, particularly if you’re not using professional tools and techniques. A clipping path service provider ensures uniformity and precision in every image.
Conclusion: The Value of Professional Clipping Path Services
In conclusion, the clipping path is a vital tool in the realm of digital imagery. It enhances the visual appeal of your images by providing clean, background-free visuals that captivate viewers. While it’s possible to create clipping paths manually, the advantages of using a professional clipping path service provider are undeniable. From saving time to ensuring professional-quality results, these services are invaluable for anyone looking to elevate their visual content.
Remember, the quality of your images can significantly impact your brand’s perception. By investing in a reliable clipping path service provider, you ensure that your images always look their best, helping you stand out in a crowded digital landscape.
For more information on clipping path services and how to choose the best provider, visit Clipping Path Associate. If you’re interested in a detailed guide on selecting the right service provider, check out this helpful article.
Elevate your imagery with professional clipping path services and make a lasting impression on your audience.
0 notes
Text
Enhancing Visual Appeal: The Importance of Clipping Path Services
In today's digital age, visual content plays a crucial role in capturing attention, conveying messages, and engaging audiences. Whether it's for e-commerce product images, advertising campaigns, or graphic design projects, high-quality visuals are essential for making a lasting impression. Clipping path services are a valuable tool in the digital editing toolkit, helping to enhance visual appeal and create polished, professional-looking images. Let's explore what clipping path services are and how they can help elevate your visual content.
What is Clipping Path Service?
Clipping path is a digital image editing technique used to isolate objects or subjects from their background. It involves creating a precise outline or path around the desired element within an image, effectively separating it from the rest of the picture. This process allows for seamless removal, replacement, or manipulation of the background while preserving the integrity and quality of the subject.
How Does it Help?
Background Removal: One of the primary uses of clipping path services is to remove the background from an image. Whether it's to create a clean, transparent background for product photos or to replace a distracting background with a more suitable one, clipping path allows for precise and accurate background removal, resulting in a polished and professional-looking image.
Product Photography: Clipping path services are invaluable for e-commerce businesses looking to showcase their products effectively. By isolating products from their background, clipping path allows for consistent and uniform product images that highlight the details and features of the items, ultimately enhancing the overall shopping experience for customers.
Image Manipulation: Clipping path services also enable image manipulation and enhancement, allowing for creative edits and transformations. Whether it's resizing, reshaping, or repositioning elements within an image, clipping path provides the flexibility and control needed to achieve the desired outcome while maintaining image quality and integrity.
Graphic Design: In graphic design projects, clipping path services are used to create custom shapes and elements, adding depth, dimension, and visual interest to designs. Whether it's creating custom illustrations, icons, or logos, clipping path allows designers to precisely control the shape and composition of elements within their designs.
Clipping path services are a valuable tool for enhancing visual appeal and creating professional-looking images. Whether it's for background removal, product photography, image manipulation, or graphic design, clipping path allows for precise and accurate editing, resulting in polished and impactful visuals that captivate audiences and elevate the overall quality of visual content. With clipping path services, businesses and creatives can unlock endless possibilities for creating stunning, visually compelling imagery that leaves a lasting impression.
Contact us to book our service.
0 notes