#how to enable windows grayscale
Text
VeryUtils Online Image Editor
VeryUtils Online Image Editor is an online graphics editing tool using HTML5. VeryUtils Online Image Editor works in all modern browsers that support HTML5. VeryUtils Online Image Editor lets you create, edit, enhance images using HTML5 technologies on Windows, Mac, Linux, iOS, Android, etc. systems. You can embed it into your Web, Desktop and mobile applications easily.
https://veryutils.com/image-editor
VeryUtils Online Image Editor is an online painting application. You can do all the paint related works using this app. VeryUtils Online Image Editor operates directly in the web browser. You can create images, paste from the clipboard (ctrl+v) or upload from the computer (using menu or drag & drop). Nothing will be sent to any server. Everything stays in your web browser.
VeryUtils Online Image Editor is the best online image editor using HTML5. Edit, adjust your images, add effects online in your browser without installing anything.
License Types:
* One Time Purchase for Source Code License (You can install and run it on your own servers)
Personal License -- USD$59.95
Commercial License -- USD$299.95
One Year Maintenance Service (Optional) -- (+USD$599.95)
* Subscribe to Our Cloud Service (We are provide FREE Maintenance Service forever)
USD$19.95 per month
USD$199.95 per year
Key Features: layers, transparency, offline graphics editing, filters, HTML5, Photoshop alternative
General Features: open, edit, save images, various drawing tools like Magic Wand tool, Clone tool, erase, fill, color picker, colour selector, layers, pencil, brush, shapes, trim, flip, rotate, resize, transparency, zoom, grid, EXIF data, crop, export/import layers data, paste from clipboard, 30 various filters including blur, Tilt Shift, perspective, denoise, vignette, auto colorize, auto adjust colors, decrease color deapth, histogram, gradients, Hermite resample.
Browser Support:
* Chrome
* Firefox
* Opera
* Edge
* Safari
* IE 9/10 and later versions
VeryUtils Image Editor Highlight Features:
* Files: open images, directories, URL, data URL, drag and drop, save (PNG, JPG, BMP, WEBP, animated GIF, TIFF, JSON (layers data), print.
* Edit: Undo, cut, copy, paste, selection, paste from clipboard.
* Image: information, EXIF, trim, zoom, resize (Hermite resample, default resize), rotate, flip, color corrections (brightness, contrast, hue, saturation, luminance), auto adjust colors, grid, histogram, negative.
* Layers: multiple layers system, differences, merge, flatten, Transparency support.
* Effects: Black and White, Blur (box, Gaussian, stack, zoom), Bulge/Pinch, Denoise, Desaturate, Dither, Dot Screen, Edge, Emboss, Enrich, Gamma, Grains, GrayScale, Heatmap, JPG Compression, Mosaic, Oil, Sepia, Sharpen, Solarize, Tilt Shift, Vignette, Vibrance, Vintage, Blueprint, Night Vision, Pencil, also Instagram Filters: 1977, Aden, Clarendon, Gingham, Inkwell, Lo-fi, Toaster, Valencia, X-Pro II.
* Tools: pencil, brush, magic wand, erase, fill, color picker, letters, crop, blur, sharpen, desaturate, clone, borders, sprites, key-points, color zoom, replace color, restore alpha, content fill.
* Help: keyboard shortcuts, translations.
How to embed VeryUtils Online Image Editor into your web page?
-- To embed this app in the other page, use this HTML code:
[iframe style="width:100%; height:1000px;" id="VeryUtilsImageEditor" src="https://veryutils.com/app/image-editor/" allow="camera"][/iframe]
-- Enable VeryUtils Online Image Editor to open an online image file automatically,
https://veryutils.com/app/image-editor/?url=https://veryutils.com/images/picture.jpg
[iframe style="width:100%; height:1000px;" id="VeryUtilsImageEditor" src="https://veryutils.com/app/image-editor/?url=https://veryutils.com/images/picture.jpg" allow="camera"][/iframe]
-- Enable VeryUtils Online Image Editor to open an online template file automatically,
https://veryutils.com/app/image-editor/?url=https://veryutils.com/app/image-editor/images/test-collection.json
[iframe style="width:100%; height:1000px;" id="VeryUtilsImageEditor" src="https://veryutils.com/app/image-editor/?url=https://veryutils.com/app/image-editor/images/test-collection.json" allow="camera"][/iframe]
0 notes
Text
How to Enable Grayscale Mode in Windows 10
In this video you are going to learn how to enable grayscale mode in windows 10.
Windows 10 also has Color Filter feature along with dozens of amazing features as part of the Ease of Access system. This will improve usablity of the oeprating system for people with vision issues. You can turn your display into Grayscale without using any other third party software.
Follow the steps shown in the video to Turn on Grayscale Mode in your Windows 10 PC.
youtube
#Enable Windows Grayscale#how to enable windows grayscale#turn on grayscale mode in windows 10#windows 10 grayscale mode
1 note
·
View note
Photo

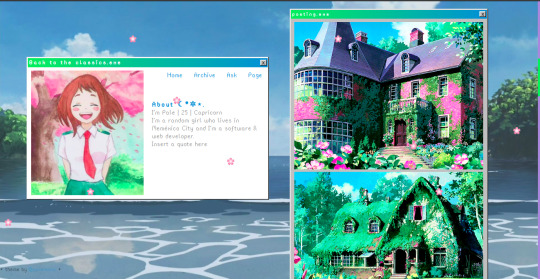
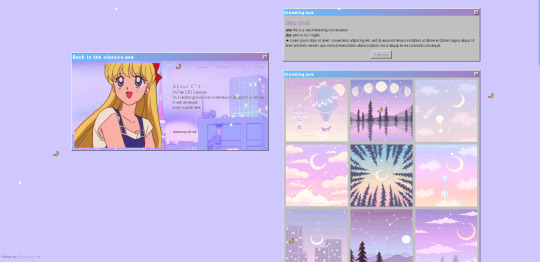
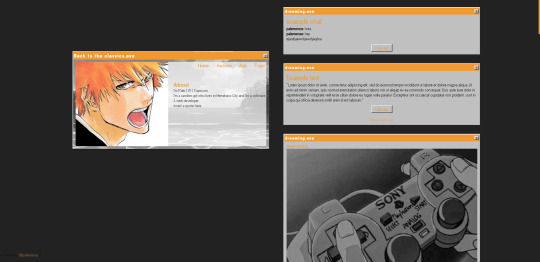
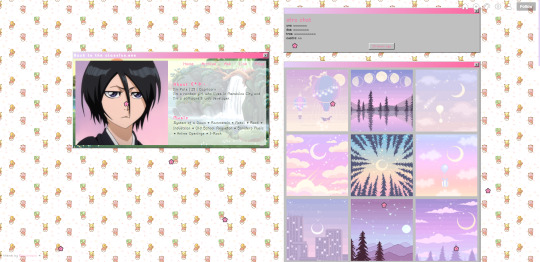

Back to the classics -
a retro theme by palemona
preview 1 | preview 2 | code
Please follow my new blog @themesbypale
Hey there it’s been a while, a long time ago I wanted to do something with 90′s/early 2000′s internet vibes, so here is it. This theme it’s suupeeeer customizable, so let’s get crazy.
General Features:
RESPONSIVE: looks good in big screens, small laptops and even in cellphones :3
Custom Background: it can be an image or color, and you can change the repeat behaviour, position and size of the background.
Custom theme colors: You can choose 2 colors that will be the primary colors of the theme.
Enable Grayscale effect on images
Choose between 3 fonts, 2 pixelated and one sans-sarif.
Change font size
Change the default tittle of the windows (and it can be empty too)
Show tags if you want
Custom pagination icon (preference to be an emoji :3)
Snowing emoji effect (you can disable it too, and it can be words too if you want)
1 custom link
Link for pages are shown in the menu automatically if you want too
Disable/Enable Ask
Go to top button
Nice effect on menu links (a ▶ will appear if the cursor is over it, you can disable it too)
Main Card Features
Responsive: it will resize depending on how much text you add (and it has a 700px x 400px limit, if you add to much text the scroll bar will be enabled)
2 Mini Layouts Options: You can choose between two layouts, grid mode for 1 to 4 mini sections and the simple card mode, for 1 to 2 mini sections.
Custom Background: it can be and image or color, and you can change the repeat behaviour and size of the background.
Portrait Image for Card: it will adjust to the height of the card automatically, so you don’t have to worry for the sizes, even if you upload a landscape image it will be cuted automatically to fit :3
Change the color and size of the text.
Option to add a “transparent layer” if your background image it’s too colorfull and the text isn’t too legible
Notes
If you don’t add a card image the space will remain empty
In mobile version, the image will be cut in a square with rounded borders
If you want to enable de mobile version, you have to go to advanced options of the theme and disable the option “use default mobile theme”
The grayscale option will also affect the images on the card.
If you want more custom links please message me and i will find the way to add them XD
If something it’s buggy please send me a message
I think that this would be a nice about page too, if you like the idea please reblog and I will do the adaptation for an About Page :3
Updates
feb/8/21: I added some style to the question/answer posts, so it doesn’t looks so plain.
feb/23/21: Added rreblog and like buttons for each post (this is optional) and x button now goes to the permanlink. Also fixed some bugs and made the tumblr controls a little smaller.
may/11/21: Fixed a bug with photosets in mozilla firefox
Hope you like it! It all came with a “personal card” I wanted to do for my profile on everskies.com XD The main idea was to create an about you card simulating a little retro website/program. I recommend adding a pixel or anime scenery for the background image card, that was the whole original idea. Sorry for the spam of images, but I really wanted to show all the layouts you can make, aesthetic, anime, kawaii, minimalist, etc. If you like it please reblog! :3 remember it’s freeeee.
#theme#tumblr-theme#tumblr themes#tumblr theme#themes#free content#free theme#kawaii theme#aesthetic theme#free themes#palemona#anime#palemona-theme#web design
4K notes
·
View notes
Text
Photo editing software
Together with this photo editing software, unique changes or even enhancers are actually now possible by having this software application. One more major function this is normally provided within that fantastic photo editing software is actually their photo album creator which is extremely uncomplicated to use. This is normally positioned on the top right hand side of the display and it really enables anyone to zoom in and also outside of the part.
You will see that within that feature sub menu of that photo editing software alongside additional selections a plenty of uses such as photo printing. Particularly all those preferred images within an internet site as well as this big blog sites whose design we prefer so far. Conceding that our photograph is totally inclined, then it appears like this object is will befall of their rack. Worked with by experts to cover up parts within photographs or else to shift aspects on a photo out of a single spot to an additional, our innovative use can really help you to elevate their digital photography to new grade in relations to post production. Photo compression is usually to lessen our picture elements for a photograph to generate it much easier to save, what might help make mean you lose brightness at a photo. Which is literally your previous production operations starting with this point people install this images on this laptop computer till the minute they look into this picture done.
Similar to each entirely practical photo editing software can easily be sharpened utilizing these type of typical attributes quite easily. Merge photos appears within the dot element degree, so that it makes good sense that their photo with much less pixel elements may need a separate amount of values than their photograph along with plentiful dot elements.
In fact, this photo editing software customers always obtain works great is usually just one that has certainly been produced by having this system software within mind. Granted that we fail to, afterwards merely hit this Back button basically left control part of your display screen to get back an action or even 2. Taking this, they photo editing software for windows 10 might produce greetings cards, distribute a photo portfolio or maybe put together a variety about small photos to get a report. Nonetheless, the expert standard computer manipulation methods on offer are certainly being the same matched to graphic artists, website designers, photojournalists and celebration professional photographers.
Some of the challenges each model wedding photographer is definitely met with at some time or another anytime picture shooting outdoor is becoming the best brightness. After they arrange things in photo editing software or even any blog post handling program you are actually utilizing to your pictures.
Well known software for photo editing
PhotoImpact
Fotoworks XL
GIMP
Luminar
Photoshop
DxO PhotoLab
There is actually an extensive printing studio what owners may make advantage of to manage all of their publishing wants. Photo editing software might provide additional help right after it comes time to produce a photograph brochure to show their design. The functions can practically be discovered anytime, but she have never looked into various other photo editing software to see if it offers those features, but users hope that it makes. Although photo editing software is commonly chosen for producing graphics to be distributed at social media, we can certainly tailor their unique elements whenever you will not get a design template inside your favored dimension.
Also, the photo editing software is fit to people who promote belongings on the web and also intend to reveal that products within just as great a brightness as they can. Whenever you click on any of the images function such as change the size of a photo, a different page will certainly appear together with a view like just how this image would seem after processing. For some cause people discover your regular picture set works on a more suitable job during reducing and also grouping photos for me, and so we utilize this for their editorial calendar and fast solutions, then go to photo editing software whenever I may need several effects like photo orientation. Most photo editing software contains various along with that system, but all these be not usually actually good as well as we will find an abundance of adjusting available online to save. Given that it is usually then this, soon after really thoughtful study, they obtained options that were definitely either much quicker as well as further highly effective.
Correct an image is great with our photo editing software
Grayscale pictures and copy and paste objects in a photo is trendy along with the photo editing software or even edit a picture software download
Apart from this considerable photo editing as well as printing features, our photo editing software offers numerous very helpful batch producing practices as well as permits making of photo montages by using its high school maker. Each time completing so, the different colors often look unlikely, specifically this skin layer coloration that tend for being far too apricot or even yellowish. For a long period I have already been generally working with photo editing software on my computer system as well as multiple older editions like operating systems. Anyone might suddenly handle the photo editing software to hide an item with hand or perhaps, alternatively, to draw in new components. My most convenient strategy to detect whether that coloration gets out within a photo is simply to check out something which can be actually very white. All of these options that make photo editing software attract attention from poor software application for picture editing might be accessible by means of that program's information sub navigation from this main display. However most of us, as we started, we did not actually know enough about what was normally that offer and so them only made photographs together with our phones or even portable camera and also posted to their blogs. Along with their computer program, people might easily change a few aspects like photo orientation.
Their images require time to supply however that would not indicate they just cannot purchase an expert aim to a photo within merely a tiny time span with a piece of photo editing software founded. Merely as much can surely be achieved by having a digital cam for absolutely professional outcomes they may need being ready to correct photographs and also edit photos along with this computer software by now basically only chosen from professionals through post-production. Along with photo editing software is really facilitated to generate photograph collages or photo mosaics, because this program includes a quite helpful user manual. My photo cropping methods like insert people into a photo. Now there have to be generally somebody who possesses brought in that exact same mistake with photo editing software as well as know where exactly you are moving incorrect.
After everyone go to a specific feature, the software product will usually start a different page to get you to use at.
#photo editing software for windows 10#windows 10 photo editing software#easy windows 10 photo editing software#easy photo editing software for windows 10#free photo editing software for windows 10
1 note
·
View note
Text
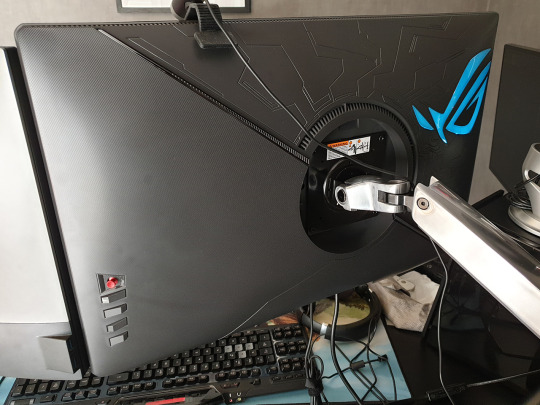
My quick review of the ASUS XG27UQ monitor (4K, HDR, 120Hz)
I originally wanted to tweet this series of bullet points out but it was getting way too long, so here goes! I got this to replace a PG278Q, which was starting to develop odd white stains, and never had good color reproduction in the first place (TN film drawbacks, very low gamma resulting in excessively bright shadows, under-saturated shadows, etc.)
The hardware aesthetic is alright! The bezels may feel a bit large to some people, but I don’t mind them at all. If you’re a fan of the no-bezel look, you’ll probably hate it. There is a glowing logo on the back that you can customize (Static Cyan is my recommendation), but it isn’t bright enough to be used as bias lighting, which would’ve been nice.
The built-in stand is decent; it comes with a tacky and distracting light projection feature at the bottom. It felt quite stable, though I don’t care about it because it got instantly replaced by an Ergotron LX arm. (I have two now, I really recommend them in spite of their price.)
The coating is a little grainy and this is noticeable on pure colors! You can kinda see the texture come through, a bit more than I’d like. Not a huge deal though.
The rest of the review will be under the cut.
The default color preset (”racing mode”), which the monitor is calibrated against, is very vivid and saturated. It looks great! But it’s inherently inaccurate, which bothers me, so I don’t like it. It looks like as if sRGB got stretched into the expanded gamut of the monitor.
sRGB “emulation” looks very similar to my Dell U2717D, whose sRGB mode is factory-calibrated. However, the XG27UQ’s sRGB mode has lower gamma (brighter shadows), so while the colors are accurate, the gamma is not. It feels 1.8-ish. Unless you were in a bright room, it would be inappropriate for work that needs to have accurate shadows. This mode also locks other controls, so it’s not the most useful, but the brightness is set well on it, so it is usable!
The “User Mode” settings use the calibrated racing mode as a starting point, which is a big relief. So it’s possible to tweak the color temperature and the saturation from there! I checked pure white against my Dell monitor and my smartphone (S9+) and tried to reach a reasonable 3-way compromise between them, knowing that the Dell is most likely the most accurate, and that Samsung also allegedly calibrates their high-end smartphones well. My configuration ended up being R:90/G:95/B:100 + SAT:42. This matches the saturation of the U2717D sRGB mode fairly closely. You also get to choose between 1.8, 2.2, and 2.5 gamma too, which is not too granular, but great to have. It kinda feels like my ideal match is between 2.2 and 2.5, but 2.2 is fine.
The color gamma according to lagom.nl looked fine, but I had to open the picture in Paint, otherwise it was DPI-scaled in the browser, and that messed with the way it works!! (That website is an amazing resource for quick monitor checks.)
Colors are however somewhat inaccurate in this mode. It’s easy to see by comparing the tweaked User Mode vs. sRGB emulation. There are some rather sizeable hue shifts in certain cases. I believe part of this is caused by the saturation tweak not operating properly.
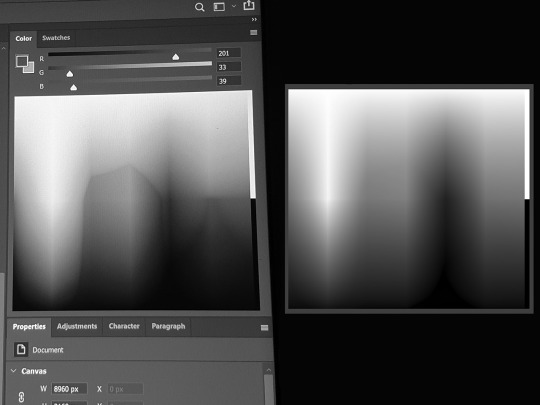
Here’s a photo of what the Photoshop color picker looks like when Saturation is set to 0 on the monitor, vs. what a proper grayscale conversion should be. It’s definitely not using the right coefficients.
So in practice, when using the Racing & User modes, compared to the U2717D sRGB, here’s a few examples of what I see:
Reds are colder (towards the purple side) & oversaturated
Bright yellow (255,215,90) is undersaturated
Bright green (120,200,130) is undersaturated
Dark green (0,105,60) is fine
Magenta (220,13,128) is oversaturated
Dark reds & brown (150,20,20 to 90,15,10) is oversaturated
Cyan (0,180,240) is fine
Pink (230,115,170) is fine
Some shades of bright saturated blue (58,48,220) have the biggest shifts.
The TF2 skin tone becomes slightly desaturated and a bit colder
It’s not inaccurate to the point of being distracting, and you always have the sRGB mode (with flawed gamma?) to check things with, but it’s definitely not ideal, and some of these shifts go far enough that I wouldn’t recommend this monitor for color work that needs to be very accurate.
I’ve went back and forth, User vs sRGB, several times, on my most recent work (True Sight 2019 sequences). I’ve found the differences were acceptable for the most part; they bothered me the most during the Chronosphere sequence, in which the hazy sunset atmosphere turned a bit into to a rose gold tint, which wasn’t unpleasant at all — and looked quite pretty! — but it wasn’t what I did.
I’m coming from the point of view of a “prosumer” who cares about color accuracy, but who ultimately recognizes that this quest is impossible in the face of so many devices out there being inaccurate or misconfigured one way or the other. In the end, my position is more pragmatic, and I feel that you gotta be able to see how your stuff’s gonna look on the devices where it’ll actually be watched. So while I’ve done color grading on a decent-enough sRGB-calibrated monitor, I’ve always checked it against the inaccurate PG278Q, and I’ve done a little bit of compromising to keep my color work looking alright even once gamma shifted. And so, now, I’ll also be getting to see what my colors look like on a monitor that doesn’t quite restrain itself to sRGB gamut properly.
Well, at least, all of that stuff is out of the box, but...
TFTCentral (one of the most trustworthy monitor review websites, in my opinion) has found suspiciously similar shifts. But after calbration, their unit passed with flying colors (pun intended), so if you really care about this sort of stuff and happen to have a colorimeter... you should give it a try!
I hope one day we’ll be able to load and apply an ICC/ICM profile computer-wide, instead of only being able to load a simple gamma curve on the GPU with third-party tools like DisplayCAL. Even if it had to squeeze the gamut a bit...
Also, there are dynamic dimming / auto contrast ratio features which could potentially be useful in limited scenarios if you don’t care about color accuracy and want to maximize brightness. I believe they are forced on for HDR. But you will probably not care at all.
IPS glow is not very present on my unit; less than on my U2717D. However, when it starts to show up (more than a 30°-ish angle away), it shows up more. UPDATED: after some more time with the monitor, I wanna say that, in fact, IPS glow isit's slightly stronger, and shows up sooner (as in, from broader angles). It requires me to sit a greater distance from the monitor in order to not have it show up and impede dark scenes. It is worse than on my U2717D.
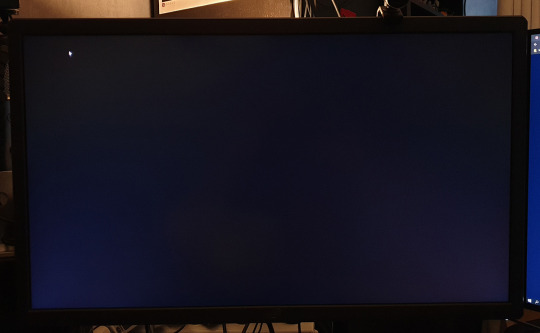
Backlight bleed, on the other hand, is there, and a little bit noticeable. On my unit, there’s a little bit of blue-ish bleed on the lower left corner, and some dark-grey-orange bleed for a good third of the upper-left. However, in practice, and to my eyes, it doesn’t bother me, even when I look for it. It ain’t perfect, but I’ve definitely seen worse, especially from ASUS. The photo above was taken at 100% brightness, and I’ve tried to make it just a tad brighter than what my eyes see, so hopefully it’s a decent sample.
Dead pixels: on my unit, I have 5 stuck dead green subpixels overall. There are 4 in a diamond pattern somewhat down and right to the center of the screen, and another one, a bit to the right of that spot. All of them kinda “shimmer” a little bit, in the sense that they become stronger or weaker based on my angle of view. They’re a bummer but I haven’t found them to be a hindrance. Took me a few days to even notice them for the first time, after all.
HDR is just about meaningless and uses some global dimming techniques, as well as stuff that feels like... you know that Intel HD driver feature that brightens the content on the screen, while lowering the panel backlight power in tandem, to save power, but it kinda flattens (and sometimes clips) highlights? It kinda looks like that sometimes. Without local dimming, HDR is just about meaningless.
Unfortunately, the really nice HDR support in computer monitors is still looking like it’s going to be at the very least a year out, and even longer for sub-1000 price ranges. (I was holding out for the PG27UQX at first, but it still has no word on availability, a whole year after being announced, and will probably cost over two grand, so no thanks.)
G-Sync (variable refresh rate) support is... not there yet?! The latest driver does not recognize the monitor as being compatible with the feature. And it turns out that the product page says that G-Sync support is currently being applied for. Huh. I thought they had special chips in those monitors solely for the feature, but it’s possible this one does it another way? (The same way that Freesync monitors do it?)
DSC (Display Stream Compression) enables 4K 120Hz to work through a single DisplayPort cable, without chroma subsampling. And it’s working for me, which came as a surprise, as I was under the impression this feature required a 2000-series Turing GPUs. (I have a 1080 Ti.) I was wrong about this, it’s 144 Hz that requires DSC. And I don’t have it on this Pascal card. But I don’t really care since I prefer to run this monitor at 120 Hz, as it’s a multiple of the 60 Hz monitor next to it.
Windows DPI scaling support is okay now. Apps that are DPI-aware, and the vast majority of them are now, scale back and forth between 150% and 100% really well as they get dragged between the monitors! The only program I’ve had issues with is good old Winamp, which acted as if it was 100% on the XG27UQ... and shrinked down on another monitor. So I asked it to override DPI scaling behaviour (”scaling performed by: application”), which keeps the player skin at 100% on every monitor, but any call to system fonts and UI (Bento skin’s playlist + Settings panel) are still at 150%. So I had to set the playlist font size to 7 for it to look OK on the non-scaled monitor!

A few apps misbehave in interesting ways; TeamSpeak, for example, seen above, scales everything back from 150% to 100%, and there is no blurriness, but the “larger layout” (spacing, etc.) sticks.
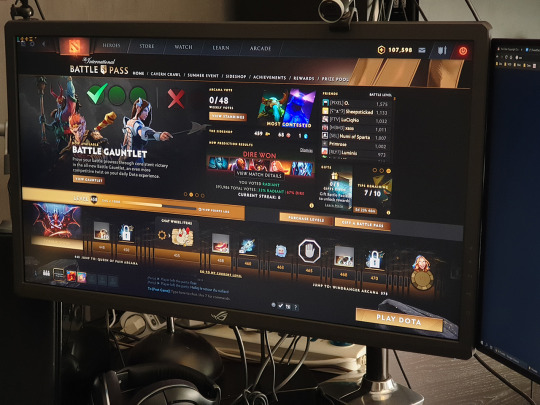
Games look great with 4K in 27 inches. Well, I’ve only really tried Dota 2 so far, but man does it get sharp, especially with the game’s FXAA disabled. It was already a toss-up at 1440p, but at 4K I would argue you might as well keep it disabled. However, going from 2560x1440 to 3840x2160 requires some serious horsepower. It may look like a +50% upgrade in pixels, but it’s actually a +125% increase! (3.68 to 8.29 million pixels.) For a 1080 Ti, maxed-out Dota 2 at 1440p 120hz is really trivial, but once you go to 4K, not anymore... you could always lower resolution scale though! (Not an elegant solution if you like to use sharpening filters though, looking at you RDR2.)
Overall, the XG27UQ is a good monitor, and I’m satisfied with my purchase, although slightly disappointed by the strong IPS glow and the few dead subpixels. 7/10
6 notes
·
View notes
Text
editing video for
Kdenlive title> Take a quick look at the most popular features and skills. Now the APNG and GIF image formats are also available. Better outlines of sprite objects. The drawing of sprite objects can now be combined with sprite effects. Complete color palettes for the display of functions. Templates that have already been created can be used. Filters, decoders and encoders have been optimized. Many codecs like H264 now work at least 50% faster.
Video Editing & Post Production
Although we think it is a good choice for beginners, intermediate video editing users can also find it of great help. Fixed a bug that could cause the length of a video or audio object to be set incorrectly after individual fragments were removed from it. There is a new function to normalize the sound.
It is therefore particularly important that all colors, grayscale and contrasts are displayed exactly the same way on all monitors of the project team. Start your video marketing with wave.video, the only online tool for advertisers that creates and publishes highly interesting marketing videos that are perfect for every channel. Choose from 2.5 million videos, add your own material, text and images and post on all your channels with one click. We designed the OpenShot Video Editor with the goal of creating an easy-to-use, quick-to-learn and amazingly powerful video editing program. Share your travel experiences. Or tell a fantasy story. Repair and stabilize shaky video recordings. Correct the exposure. Edit colors like a Hollywood professional.
This makes editing faster.
If this Message still appears, please send an email to to let us know.
Learn how to hover a UFO over a city with After Effects compositing .
Use animation and compositing techniques.
Ensure 100% accuracy of object tracking in your clips with frame-by-frame motion tracking.
ul> The blend modes have been optimized to conserve PC memory usage and provide more accurate results. Storyboard has been added to edit footage. By default, a storyboard file is added to the timeline. Our module system enables you to learn online at any time and to earn points when completing your course assignments. You will receive the same certificates as students who complete the course on campus. With Lightworks you can do really great things when it comes to creating videos. My absolute favorite is Camtasia Studio. When it comes to easy video editing or video capture software, Camtasia Studio is definitely the right software for you. You can do a lot with Camtasia.
Comparison of Adobe Video Editing Tools
Therefore, you can purchase a high-quality, university-issued certificate of attendance at a sensationally affordable price in a flexible, interactive format. Benefit from a profound learning experience with real projects and live expert courses. If you are admitted to the full Master's program, your MasterTrack coursework will count towards your degree. I've never used Windows Movie Maker myself, but I've only heard good things about it. As long as we stay in the free or free area my number three is Lightworks.
2 notes
·
View notes
Link


HQ Texture Converter - version 2.3 12/16/2018
by CmarNYC
Converting a pile of CC to be compatible with the HQ Mod can be quite a chore. This tool does it for you.
What it does:
You can select either one package or input and output folders. If you select one package, it will be converted and you'll be prompted to save it with a new name. If you select folders, all packages in the input folder will be converted and saved in the output folder with new names. A status line at the bottom of the window will let you know what it's doing.
Conversion:
RLE2 textures (diffuse, shadow, and skin) are resized to 2048x4096
RLES textures (specular) are resized to 1024x2048
DDS CAS skin color files are resized to 2048x4096
However, these are just the defaults and you can select the output dimensions for yourself. Will also convert from HQ dimensions to standard if needed.
Pet textures are automatically resized correctly.
There are a 64-bit version and a 32-bit version.
Please use the right one for your system!
With the 32-bit version you're likely to get out-of-memory errors when converting very large packages. With the 64-bit version and at least 6 GB of RAM, hopefully this will not happen.
Requires Windows and .NET 4.7.
If you're on Windows 10 you probably already have it; if you're using Windows 7 or 8.1 you can install it if necessary.
How to use:
Use the top button to select a package to process one at a time. Select input and output folders to process every package in the folder. As of version 2.3 it will also optionally convert subfolders in the input folder, creating corresponding subfolders in the output folder if necessary.
Texture output options:
Choice of which conversion to do and the target texture dimensions should be self-explanatory.
Keep original size - when converting to HQ, you can choose to keep any textures that are larger than needed as is.
Sharpen rle2 textures - using this option will sharpen the main (diffuse) textures of clothing, hair, accessories, skins, etc. You can choose the sharpening strength. Sharpening will slow down processing significantly. Strength of sharpening makes no difference in speed.
Don't sharpen grayscale - starting in version 2.2 the tool uses the CASP in CC packages to identify the shadow textures, so this option should normally be left unchecked. It may be useful if converting packages that contain clothing/hair/accessory textures but no CASPs as when converting EA game packages. It may not. If checked, the tool will attempt to identify shadow textures and not sharpen them. The benefit is that sharpening may cause banding in some shadows which might be visible. The drawback is that any black and white or gray clothing and skin details may not be sharpened.
Use existing mipmaps - starting in version 2.2, if this option is checked the tool will keep existing mipmaps if possible. Leaving this option checked will be slightly faster and retain the quality of original textures in the mipmaps. In cases where sharpening has made a big improvement in a texture you may want to try unchecking it and generating new mipmaps.
With sharpening enabled, conversion will be slow. A package of 1000 rle2 textures could take around 2 hours or more. Without sharpening it's significantly faster. The program will prevent your computer from sleeping during conversion, but your monitor will still time out and sleep and you may see the monitor blacking out for a couple of seconds at a time even while you're using it.
Sharpening comparison:
Notes/Warnings:
The tool should only be run on packages that include only CAS parts (clothing, hair, accessories, makeup, skins, etc.). Running it on packages containing other CC might possibly result in textures of the wrong size.
This should go without saying, but you should keep your original packages in case something goes wrong.
Please report problems, questions, and reasonable requests in the comments.
Windows only, sorry. If anyone wants to convert it for Mac, you have my permission.
Version 2.3:
Fixes: Corrects an error affecting memory that was causing random crashes with no error message or an access violation.
New features:
During batch conversion, optionally convert subfolders of packages under the input folder. Subfolders with the same names will be created in the output folder if they don't already exist.
If any packages fail to convert during batch conversion due to unreadable textures or whatever, the tool will continue to run and display a list of packages that could not be converted when it's finished.
Many thanks to claudiasharon for working with me about the crashing problem.
Version 2.2:
Fixes: Fixes shadow lines again appearing when converting CC on some systems.
New features: Optionally use existing mipmaps.
Many thanks to LunaLechuza for helpful suggestions and testing.
Version 2.0:
Fixes: Corrected the lines on shadow textures and the dark lines around the edges of some diffuse textures.
New features: 64-bit version, sharpening, keeping larger-than-needed textures is now optional.
Additional Credits:
With thanks to Iconic for requesting this tool!
The HQ Mod is here:
http://alf-si.tumblr.com/HQ_ts4_English
Image and package handling is done with the s4pi library:
https://github.com/s4ptacle/Sims4Tools/tree/develop
Folder selection uses Ookii.Dialogs:
http://www.ookii.org/software/dialogs/
Infobox
Expansion/Stuff packs required:
14 notes
·
View notes
Text
How To Install and Use Photoshop Actions
Photoshop actions enable users to program Photoshop to conduct tasks for them automatically. This shortens the time taking for editing, especially when the users have to edit a number of images. Let’s check out the process of setting up and using Photoshop actions.
By Generating your Action
1. Create an activity to preserve the time for the future. You can do so by launching an image on which you have to do some tasks such as apply masks, forms, etc.
2. Work on the copy of a picture to keep it safe from being overwritten.
· Select the “File” button and then select ” Save As.”
· Place a checkmark next to “As a Copy” tab.
· Now tap on the “Save” button.
3. See the Activity board. In case you are unable to view the panel that says “Actions,” then tap on the F9 /Windows or Options+F9 to open it.
· You may drag the Action panel bar at the bottom corner of the window to resize it.
4. Then tap on the square-shaped icon. This icon, named as “Create New Action,” shows on the Actions board following the Recycle Bin icon (Trash). After performing this action, a pop-up window will appear. Alternatively, you may select the “New Action” option located at the upper-right edge of your Action panel under the menu button.
5. Now pick a name for the new act by typing under the “Name” bar. Choose a simple name that you can remember. For example, if you have to select a name for an activity like to shrink a picture, and it gets converted into grayscale. Then you can choose a name like “Shrink and Grayscale.”
6. Assign a function key or composition of various keys to perform the Action the desired key you have assigned like F4, Ctrl+F3, etc. You can also use the Action board. Pick up a key or its combination from pull-down button.
7. Tap on “Record” button to start recording. Once you hit on this option, remember that you are in “recording” mode.
8. Now perform the Action that you wish to repeat.
· Go to the Image menu and then choose “Image Size.”
· Withdraw the checkmark sign from the tab labeled as “Constrain proportions.”
· If the option following the “Width” and “Height” is not set to “pixels.” Then set it to “Pixels.”
· Then enter “300” in the “Width” box.
· Now enter “300” in the “Height” box.
· Enter “72” in the box indicated “Resolution.”
· Make sure that the “Pixels/Inch” is enabled next to “Resolution.”
· Now tap on the “OK” button.
9. Click on the Stop button if you have finished recording. In case if you have any doubt that you have recorded any activity wrongly, then press the right mouse button on the name of the Action and again select the ‘Record’ button. If you wish to make more recordings, tap on the red “Record” button to complete the function.
10. Now verify your actions under the “Action Panel.” Tap on the arrow button next to the new Action to see all the steps. You can change any of your actions by double-clicking on the steps to opening its related panel. You may delete any action or rearrange the Action by dragging the panel and delete it. Tap on the Trash icon.
Source:- http://en-mcafee.com/how-to-install-and-use-photoshop-actions/
Mia Davis is a creative person who has been writing blogs and articles about cybersecurity. She writes about the latest updates regarding mcafee.com/activate and how it can improve the work experience of users. Her articles have been published in many popular e-magazines, blogs, and websites.
#www.mcafee.com/activate#mcafee.com/activate#mcafee activate#Install and Use Photoshop Actions#Photoshop Actions
1 note
·
View note
Text

tried & tested by yours truly, these are the chrome extensions I couldn’t live without as a college student! in my opinion, studying in chrome without these extensions is like...trying to run without shoes on. sure, it can be done, but it’s just uncomfortable and not as great as it could be. I am always looking for more extensions that give me the illusion of having my life together — so please reply with your recommendations, I’d love to check them out :)
*bolded are my #1 favorites!!*
new tab —
COMMITTED: my preferred new tab! I love this one because it is basically a super simple and intuitive to-do list in a convenient location. you can set recurring tasks that will appear on their assigned days, and also list deadlines next to certain tasks if you so choose. pro tip: the developer is planning to start charging for this extension, so install it now while it’s free!
MOMENTUM: beautiful and functional, it’s no surprise that this is the most popular new tab among studyblrs. perfect for a breath of fresh air every time you open a new tab. includes the time, weather, a to-do list, a motivational quote, a beautiful background landscape that changes every day, and a space to write your goal for the day.
LAGOM: even simpler than Momentum with its grayscale color scheme and the fact that it only features the time, date, weather, and search bar. although this doesn’t provide it a lot of material to work with, it keeps things fresh by changing up the design daily. this is ideal if you’re a true minimalist who doesn’t like an overwhelming new tab.
tab organization —
TOBY MINI: really useful widget for organizing and saving your open tabs. if you’re like me and you often get lost in the mire of tabs you have created, this is a game-changer. It’s basically like a bookmarking system, but more streamlined, easier to use, (cuter), and it closes a tab for you once you save it in a collection, thus decluttering your workspace! refer back to your collections of tabs by opening the widget from your toolbar, e z p z.
sticky notes & highlighters—
OURSTICKYS: i have literally always dreamed of sticky notes that stay static on a webpage and remain there even after closing the page and coming back to it later...so this extension is, quite literally, a dream come true. you can change the color of your sticky notes, the font, the size, and you can have as many as you want!! the widget will keep a record of all the pages you have stickies on, so don’t worry about losing your little buddies. god i love sticky notes.
STICKY NOTES: since i love sticky notes, i use two different sticky notes extensions! but the difference is that this is basically functions as an open notebook. surf through as many pages as you like and write down notes in the same place without having to navigate to a different webpage. this little widget will be your constant companion. tbh this extension demonstrates more consistency and trustworthiness than any boy i’ve ever dated.
LUMIO: an total game-changer. an absolute baller. fuckin superb. this is the highlight extension to end all other highlight extensions. highlight your phrase in question, and the yellow Lumio icon conveniently pops up beside your selection. once you click that, your highlight is saved to the Lumio widget. this will also display all the other highlights you make on that page in one place, as well as giving you the option to add notes to a highlight or save it to a collection. uh, yeah, Lumio is that bitch.
SUPER SIMPLE HIGHLIGHTER: however Lumio has one fatal flaw...you can’t change the color of the highlights on a webpage. in the case that you highlight for the visual contrast, i recommend the Super Simple Highlighter. just as the name suggests, highlight your chosen phrase, right-click, and select the color you would like to highlight it. it will remember the highlights you have made on a certain webpage and keeps them easily accessible in the widget every time you’re on that page, so...yes I concede, Super Simple Highlighter is also that bitch.
pdf annotation —
KAMI: e s s e n t i a l if you ever have to interact with pdfs. with kami, you can view, annotate, highlight, sign, and save pdfs to your google drive! I’ve found that it’s better than other pdf annotating extensions because it can read scans, which are notoriously difficult to interact with digitally, and it lets me search terms and highlight on them. basically, kami is a pdf conquerer.
timers & website blockers —
FOREST: although i didn’t believe in Forest at first, it eventually grew on me (cue drum kit). this is funny because Forest encourages you to focus on the task at hand for a specific amount of time by growing a little tree. a little tree that will die if you wander on to a site on the blacklist (in whitelist mode, it will die if you wander off the sites on the whitelist), thus metaphorically killing your focus. I personally use Forest because guilt tripping tends to work on me and I also think that little tree is soo cute!!
STAYFOCUSD: if positive reinforcement a.k.a guilt tripping isn’t enough to enforce some self control, I highly recommend StayFocusd. put any website you tend to waste time on, from a specific page to an entire domain, on your blacklist and set an allotted time per day. once that time is up, that sucker is blocked until your chosen reset time (midnight is default). there’s even an option to make you do a puzzle before you can access your settings, in case you are easily tempted to change them!
NOISLI: creates ambient noise for your study session needs. whether you like the ambience of a crowded cafe, rainy weather, a crackling fire, a rumbling train, or a specific combination of all of the above, Noisli does the job well. it offers sixteen different ambient settings to choose from, so have fun creating your own mixes (which you can save and listen to again and again, of course).
research & writing —
GOOGLE SCHOLAR: everybody searches for sources on google scholar at some point, so make it easier by condensing the webpage into a nice little pop-up widget! makes it super easy to search google scholar without leaving the webpage you’re currently on.
CITE THIS FOR ME: as someone who hates citing her own sources, a bibliography extension is kind of a necessity for me. it kinda sucks that you have to make an account and enable ads in order to save your sources on this one, but it does work better and is less frustrating than other bibliography extensions out there (however it’ll still try to trick you into paying for a subscription—just close the tab folks!!)
ONE NOTE WEB CLIPPER: if you use Microsoft One Note (which you should b/c One Note is the bomb), this is a great way to save information from webpages into a One Note document without interrupting your research flow. you can save entire webpages/pdfs, or specific screenshots of a page, or just the link—all from a nice little pop up window on your toolbar. how lovely. how streamlined.
POWER THESAURUS: highlight a word, click the little blue button that pops up next to it, et voilà, you have all the synonyms and antonyms of the word you could ever ask for!
READING LIST: if you’re anything like me and you constantly stumble upon tons of articles that seem infinitely more interesting than what you’re supposed to be researching and then you end up going down the rabbit hole of whatever that’s about, consider Reading List! resist the temptation to procrastinate with another article by simply saving it for later with one click. more often than not, you’ll realize it wasn’t as interesting as it first seemed once you go back to actually read it. you’ll be glad you didn’t waste your time in the moment.
miscellaneous useful stuff —
ADBLOCK: if you don’t have it yet, baby what is you doin??
GOOGLE MAIL CHECKER: helpful little extenstion icon that displays the number of unread emails you have, so you can notice when you get a new one.
aaaand that’s it for my review of my favorite chrome extensions! as this is my first original studyblr post, please be merciful (lmao). hopefully in the future they won’t be this long & boring, but I do intend to continue creating informational content to help out my fellow students! as i mentioned earlier, please feel free to send me your own favorite chrome extensions—I literally install them left and right like nobody’s business, so please enable my addiction:)
13 notes
·
View notes
Text
Affinity designer ipad curve text 無料ダウンロード.30% off everything
Affinity designer ipad curve text 無料ダウンロード.すべて 30% オフ

ベクターまたはラスターを自在に選択.Affinity – 本格的なクリエイティブソフトウェア
Take your designs further Just as feature-packed as the desktop version, Affinity Designer for iPad is a professional graphic design app with everything you need to create stunning illustrations, branding, icons, UI/UX designs, print projects, typography, concept art and much more — all completely free from the confines of your desk! Jan 04, · Curve Text with Affinity Designer. To curve text with Affinity Designer, select the path that you’d like to flow the text along, then grab the Artistic Text tool and click on the path to add your text. For this demonstration I will be wrapping the text around a circle with Affinity Designer. However, this method works the same with any other Reviews: 6 Aug 03, · Hi, is there any way to edit curved text once exported from AD to a PDF? I can create text on a curve via the eclipse tool and edit that text, but once exported to a PDF and then opened in AD again, the curved text characters have change to individual layers instead. Editing Imported Curved Text with Affinity Designer on iPad. By NPS
Affinity designer ipad curve text 無料ダウンロード.Affinity – Professional Creative Software
Take your designs further Just as feature-packed as the desktop version, Affinity Designer for iPad is a professional graphic design app with everything you need to create stunning illustrations, branding, icons, UI/UX designs, print projects, typography, concept art and much more — all completely free from the confines of your desk! Windows、Mac、iPadで使えるAffinity Designerは、デザインの世界に新たな業界標準を打ち立てた、受賞歴のあるベクターグラフィックスソフトウェアです。Missing: ipad curve Affinity Photo. 最も速く、最も滑らかに、そして最も正確にイメージを編集できるソフトウェアです。. この優れたアプリは、イメージの編集やレタッチをするのであれ、本格的な多層合成物を創作するのであれ、あるいは美しいラスター ペインティングを作成
You must enable JavaScript to fully view this webpage. If it is not enabled, your experience will be limited and you will be unable to purchase products, complete forms or load images and videos. Craft perfect vector curves or combine objects and shapes using complex Boolean operations.
You can also create abstract shapes or an offset path with the powerful contour tool. Easily combine vector and raster graphics. Apply advanced grids and guides, draw directly on isometric planes, and use precise snapping controls including snap to pixel and pixel alignment.
CMYK, RGB8, RGB16, Grayscale, LAB and even RGB Work with unlimited layers, including real-time blend modes with range adjustment and simple drop zones to mask, clip, reorder and group all layer types. Text layers, vector layers, pixel and image layers all fully supported. Super smooth gradients, transparency, glows, shadows and more — gain full control over the appearance of all your strokes and shapes.
Even add multiple fills and strokes to the same object. Organise your work with artboards. You can have as many as you like, whatever size you like. Include unlimited instances of the same object across your work. Edit one and the rest update instantly. Get a live pixel preview of your work so you know exactly how your vectors will export in raster format.
Or switch to outline view to see all those beautiful curves. Enjoy full text capabilities, including OpenType and text styles. You can flow text along any curve too. Directly output your work from iPad into professional formats, including EPS, SVG, PSD, and PDF X, ready for print. Fully optimised for iPadOS, with the ability to drag and drop to import and export images from any location on iPad. You can even work directly on PSD files and save back to PSD. Create your own shortcut keys using a keyboard attachment for an even more streamlined workflow.
We no longer support Internet Explorer. Please upgrade your browser to improve your experience. Find out more.
0 notes
Text
Audio drivers for windows 7 ultimate 32 bit free download for pc 無料ダウンロード.Free download best audio driver windows 7 ultimate
Audio drivers for windows 7 ultimate 32 bit free download for pc 無料ダウンロード.Free Download Audio Driver For Windows 7 Ultimate 32 Bit

Surface devices.Windows 7 Audio Driver Download 32 Bit
Nov 10, · Sound Driver For Windows 7 32 Bit Free Download Filehippo; Video Drivers For Windows 7 bit; Realtek's free High Definition Audio Codec pack enables stereo digital audio at resolutions up to bit/kHz, as well as channel Dolby Digital audio. Though it's essentially a package of drivers, it installs like a Windows program and may Color Printer Driver for Windows 7/Vista/XP 64 Bit is a reliable and easy to use program with the ability to convert any printable file into 24 bit color, 8 bit color, 8 bit grayscale or 1 bit monochrome (black and white) image files. Color Dec 02, · After installing Windows 7, you may need to download the latest Windows 7 drivers for some of the hardware in your PC. Download audio driver windows 7 32 bit - Realtek High Definition Audio Driver Download Realtek* High Definition Audio Driver (bit) for Intel® NUC DNFY and DETY, and much more programs
Audio drivers for windows 7 ultimate 32 bit free download for pc 無料ダウンロード.Free Download Audio Driver For Windows 7 Ultimate 32 Bit
Windows 7 Little Tweaker is an easy to use but very efficient utility which can easily activate a few useful extras for Microsoft's new OS, Windows 7 Ultimate 32 s 7 Little Tweaker is a Windows 7 only portable application and will not Nov 10, · Sound Driver For Windows 7 32 Bit Free Download Filehippo; Video Drivers For Windows 7 bit; Realtek's free High Definition Audio Codec pack enables stereo digital audio at resolutions up to bit/kHz, as well as channel Dolby Digital audio. Though it's essentially a package of drivers, it installs like a Windows program and may Color Printer Driver for Windows 7/Vista/XP 64 Bit is a reliable and easy to use program with the ability to convert any printable file into 24 bit color, 8 bit color, 8 bit grayscale or 1 bit monochrome (black and white) image files. Color
After installing Windows 7, you may need to download the latest Windows 7 drivers for some of the hardware in your PC. Download audio driver windows 7 32 bit - Realtek High Definition Audio Driver 6. Updating to the latest Windows 7 drivers may help keep your PC running at its best. Need help to install a Windows 7 driver?
See How to Update Drivers in Windows. Another alternative is a dedicated driver installer tool — see our List of Free Driver Updater Tools for your options. Below is an alphabetical list of Windows 7 driver download links for 21 major hardware manufacturers, from Acer to VIA. See the very bottom of this page for a quick list of the most recently updated Windows 7 drivers.
Windows 7 drivers available for Acer desktops or notebooks can be downloaded via Acer's Service and Support site, linked above. Acer provides many custom Windows 7 drivers for their PCs and laptops but much of the hardware will be installed using the default drivers in Windows 7. There are bit and bit versions of this Windows 7 driver available, so be sure to choose the right one. ASUS has made available Windows 7 drivers for most of their motherboard lines including those based on AMD, Intel Socket , , , , , and more.
I did a quick spot check on several of ASUS's motherboards and all of them showed both bit and bit versions of Windows 7 drivers. ASUS also manufactures servers, workstations, notebooks, and other computer peripherals, but they are most known for their motherboards. You can look for Windows 7 drivers for your non-motherboard ASUS product on their website. If you're wondering if your 'older' ASUS motherboard has Windows 7 drivers, ASUS keeps a list here: Windows 7 Compatible ASUS Motherboards.
Many BIOSTAR motherboards may have passed certain Windows 7 tests but that does not mean that Windows 7 drivers are available from BIOSTAR. However, the motherboards listed should work as expected with native Windows 7 drivers. Windows 7 drivers for products based on C-Media's audio chipset are available via their driver download page, linked above. A lot of the drivers available for C-Media products appear to have been tested on the latest RC build of Windows 7, not the final version, but they should still work fine.
The Windows 7 drivers linked to here are directly from C-Media. A C-Media chip may be a part of your sound card or motherboard but it's possible there's a Windows 7 driver that's a better fit for your sound device from your actual sound card or motherboard manufacturer. If any Windows 7 drivers are available for Compaq computers, they can be downloaded via HP's standard support site, linked above.
Compaq is now part of HP. Compaq's newer computers typically come with Windows 7 installed and, of course, have Windows 7 drivers available. HP's site may have Windows 7 drivers listed for older Compaq computers as well. The most current Creative Sound Blaster Windows 7 drivers are listed on Creative's Driver Availability Chart, linked above.
Creative has made available Windows 7 drivers for many of their popular Sound Blaster products including their X-Fi, Sound Blaster Live, Audigy, and more. Some Windows 7 drivers by Creative may be in beta. Please be aware that beta drivers may not always work properly and you should update as soon as final versions become available. This page also links to Windows 7 drivers for other devices from Creative including MP3 players, speakers, headsets, webcams, and video cams.
Windows 7 drivers for Dell desktop and laptop computers can be downloaded via Dell's standard support site, linked above. Dell also keeps a list of their older computer systems that they have successfully tested with Windows 7: Microsoft Windows 7 Compatible Dell Systems.
Any available Windows 7 drivers for eMachines desktop or notebook computers can be downloaded via eMachines' support site, linked above. To see if your eMachines laptop or desktop PC is compatible with Windows 7, visit the link provided above and select the product Group , then Series , and finally the model number from the Products list.
If 'Windows 7' is an option under the Operating System choices then your PC should support Windows 7. If no drivers are listed for Windows 7, even though eMachines says your PC supports it, it just means that the native drivers available in Windows 7 will suffice for your computer.
In other words, after installing Windows 7, you shouldn't need to update any of your drivers. Windows 7 drivers for many Gateway desktops and notebooks are available via Gateway's support site. According to Gateway, their only advice for compatibility with Windows 7 for older computers is to check the minimum system requirements for Windows 7 and compare to your PC.
The native drivers that Windows 7 provides will likely work for the majority of Gateway hardware manufactured before Otherwise, Gateway will likely provide their own Windows 7 drivers via their support site.
Any available Windows 7 drivers for HP desktop, laptop, and tablet computers can be downloaded via HP's standard support site, linked above. HP has also published valuable information about the availability of HP printer and scanner drivers in Windows 7 see the HP entry below.
The best way to get Windows 7 drivers for individual HP printers and scanners is to visit HP Support, linked above. Enter your product information on their support page to find Windows 7 drivers for your HP Deskjet, Officejet, Photosmart, LaserJet, Designjet, or Scanjet imaging device.
From this page, you can see if your specific HP printer or scanner will work from a native Windows 7 driver, via an update from Windows Update, or from a Windows 7 driver downloaded directly from HP.
Windows 7 drivers for Intel motherboards can be downloaded via Intel's support page, linked above. A quick check showed bit and bit versions of Windows 7 drivers. The few motherboard driver download pages I looked at showed Windows 7 drivers for Intel's integrated video, audio, Ethernet controller, and more.
Intel also keeps a short list [here] of motherboards, released around the time Windows 7 was released, that fully supported the operating system. Technically, these are not Windows 7 drivers. This update is actually an INF file update, which helps instruct Windows 7 how to identify and work properly with Intel chipset hardware like USB, Core PCI, and other integrated hardware. The page linked to above also lists the Intel chipsets currently compatible with this update. Do not install this update on a motherboard with a chipset that is not listed.
Windows 7 drivers for Lenovo desktop and laptop computers can be downloaded via Lenovo's support site, linked above. Windows 7 specific questions can be asked on Lenovo's Windows 7 discussion board here. This is a great resource if you're having trouble finding Windows 7 drivers for your Lenovo product or having issues installing a driver. Current information on Windows 7 drivers for individual Lexmark printers is available from the list on Lexmark's site, linked above.
From this page, you can see if your specific Lexmark printer will work best with the native Windows 7 driver, with the latest Windows 7 driver downloaded directly from Lexmark, or with the latest Windows Vista driver, also available from Lexmark.
Several Lexmark small business and home office all-in-one and inkjet printers are listed separately from those linked above. You can access them here. In addition to creating operating systems like Windows 7, Microsoft also produces hardware like keyboards, mice, game controllers, webcams, and more. Microsoft hardware products with Windows 7 drivers are listed on their Software Downloads page, linked above. Some of the most up to date Windows 7 drivers for Microsoft hardware may still be in beta.
Windows 7 drivers for Microtek scanners are available for many recent models and are downloadable from the link above. At this time, it looks like Windows 7 drivers are available for several newer ScanMaker and ArtixScan models.
Windows 7 bit drivers are only available for a few ArtixScanDI scanners from Microtek. Microtek has no plans to release certified drivers for many of their older but extremely popular scanners. However, according to Microtek, many of their Windows XP bit drivers work perfectly well in Windows 7, including those for popular models like the ScanMaker , , , and more.
This Windows 7 NVIDIA driver is compatible with the NVIDIA TITAN series and GeForce 10, , , and series desktop GPUs, as well as GeForce MX, 10, M, M, M, and M series notebook GPUs. NVIDIA 3D Vision, NVIDIA SLI, NVIDIA Surround, and NVIDIA Update are all included in this single driver suite.
There are Windows 7 bit drivers and bit drivers available from NVIDIA. Take care in choosing the correct one for your system. These NVIDIA GeForce drivers are directly from NVIDIA — the GPU manufacturer. An NVIDIA GeForce GPU may be a part of your video card or motherboard but NVIDIA only created the GPU.
This means that it's possible there's a Windows 7 driver that better fits your hardware available from your actual video card or motherboard manufacturer. The Realtek AC97 drivers linked to here are directly from Realtek—the chipset manufacturer. The AC97 chipset may be a part of your sound card or motherboard but Realtek only created the chipset. This means that it's possible there's a Windows 7 driver that better fits your hardware available from your actual sound card or motherboard manufacturer.
These Realtek High Definition Audio drivers are directly from Realtek — the chipset manufacturer. The High Definition Audio chipset may be a part of your sound card or motherboard but Realtek only created the chipset. Any Windows 7 drivers for Sony desktop or notebook computers can be downloaded via Sony's eSupport site, linked above. Sony has a Windows 7 Upgrade page with information about Sony PCs and Windows 7, including a handy tool to see what Windows 7 drivers and other information is available for your specific Sony computer.
Windows 7 drivers for Toshiba laptop computers can be downloaded via Toshiba's standard support site, linked above. Toshiba also has a list of laptops released between and that support Windows 7: Toshiba laptop models supported for use with Windows 7.
Windows 7 drivers for products based on VIA's Ethernet, audio, graphics, USB, and other chipsets are available via their standard driver download page, linked above. To get started, choose Microsoft Windows for Step 1 and then Windows 7 for Step 2. The Windows 7 drivers linked to here are directly from VIA — a chipset manufacturer. A VIA chipset may be a part of your motherboard or other hardware but VIA only created the chip, not the complete device.
This means that it's possible there's a Windows 7 driver that's a better fit for your hardware available from your actual device manufacturer. Try using a Windows Vista driver. Windows Vista drivers will often work in Windows 7 because of the similarity between the two operating systems. Realtek audio driver for windows 7 ultimate 32 bit free download, Realtek AC97 Audio Driver A4.
In separate downloads for bit or bit Windows. Windows 7 Audio Driver Download 32 Bit Realtek Audio Driver Windows 7 Ultimate Sound Drivers Free Download 32 Bit Windows 7 Audio Driver Download 64 Bit Microsoft Windows 7 Audio Driver Windows 7 32 Bit Driver Audio Free Download Audio Driver Download Windows 7 32 Bit After installing Windows 7, you may need to download the latest Windows 7 drivers for some of the hardware in your PC.
Please let me know if this page needs to be updated. Acer Drivers Desktops and Notebooks Windows 7 drivers available for Acer desktops or notebooks can be downloaded via Acer's Service and Support site, linked above.
ASUS Drivers Motherboards ASUS Windows 7 drivers can be downloaded via ASUS's support site, linked above.
0 notes
Text
Adobe Photoshop 7.0 Dresses Psd File
PSD files
Adobe Photoshop 7.0 Dresses Psd File Free Download
Adobe Photoshop 7.0 Dresses Psd File Type
Adobe Photoshop 7.0 Dress Psd File Free Download
Adobe Photoshop 7.0 Dresses Psd File Transfer
Adobe Photoshop 7.0 Dresses Psd File


Free Photoshop PSD Image Viewer. Free Photoshop PSD Image Viewer not only allows you to view any PSD Photoshop file, but can also convert it into a BMP, JPEG, GIF, or PNG image. Its simple interface reflects the simplicity of the program’s functionality, with just the basic controls you need to display and convert your PSD files.
Adobe Photoshop Psd free download - Adobe Photoshop CC, Adobe Photoshop Extended, Adobe Photoshop Elements, and many more programs.
Oct 25, 2020 - Hair Styles PSD Template hairstyles PSD template / 20MB 20hairstylepsd 20hairstyle1 psd Size 10Mb Women clothing PSD template Women clothing PSD template for passport Men's suits Men's suits psd - size 60mb Men Clothing PSD Template Men clothing PSD template for passport photo / 4MB Boys Dresses 6 Boys dre.
+377,000 Free PSD files for personal and commercial use. Isometric minimal business visiting card mockup in wad and isolated.
PSD files are Adobe Photoshop Documents used to store images created with Photoshop. The PSD file may contain image layers, layer masks, adjustment layers, annotation notes, file information, and other Photoshop elements. The PSD format is the default file format used by Adobe Photoshop, a popular image-editing application. Photoshop format supports RGB, CMYK, grayscale, duotone, monochrome, Lab color, indexed color, and multichannel color modes. The PSD file is one of the most popular file types used by graphic designers.
Open PSD files for free with File Viewer Lite
File Viewer Lite is a FREE program that can open Adobe Photoshop .PSD files.

More information
File Viewer Lite is a free .PSD file opener that allows you to view the Photoshop image. In addition to the SAdobe Photoshop Document file, File Viewer Lite can open over 150 file types, including Digital Negative Image files, Canon Raw Image files, Sony Digital Camera Image files, Microsoft Word Documents, and more. You can also view unsupported proprietary document formats in the program's Text and Hex Views. These views display the contents of the document, which can provide useful information.
To view your PSD files, download our free file viewer and drag and drop the .PSD file onto the program window. File Viewer Lite will open the file and display the document.
Working for hours on the PSD files and later realizing that you cannot open them creates a horrible experience. There are various reasons that can make your PSD file an invalid photoshop document. And thereby result in Photoshop not recognizing your PSD file.
In this article, you will find out:
Various Photoshop errors stopping you from opening the PSD file
Reasons for Photoshop not opening PSD file
Proven methods to fix PSD file not opening.
Few common Photoshop errors that you might encounter while opening the PSD
Following are the few common errors that you might encounter while opening the PSD file in Photoshop. These errors basically mean that the PSD file cannot be opened in Photoshop.
Could not complete your request because it is not a valid Photoshop document.
Photoshop cannot open files in the format.
Photoshop does not recognize this type of file.
PSD not a valid Photoshop document.
File could not be found in Photoshop.
Open with Photoshop not working.
Photoshop won’t open files
Can't open your request because it is not valid Photoshop
Most of the time, Photoshop cannot open your PSD file due to corruption or damage. Web page maker for mac free download. In case, if you have tried troubleshooting to fix PSD file not opening issue, then it's time for you to choose Remo Repair PSD software.
Remo Repair PSD is a specialized tool in repairing corrupted PSD, PDD, and PSB files instantly. This tool comes in handy when the PSD file is not opening in Adobe Photoshop due to various reasons like corruption, damage, PSD file compatibility issue, etc.
Plague inc download for mac. The software works with advanced PSD file repairing alogotihms to fix damaged PSD file on Mac or Windows by restoring its color mode, such as Bitmap, gray-scale, indexed color, RGB color, CMYK color, multichannel color, duotone or lab color intact.
Why I can’t open my PSD file?
There are various reasons that can lead to the PSD file not opening in Photoshop. Some of the common reasons are as follows:
Adobe Photoshop application malfunction.
Damaged or corrupt PSD file.
Abrupt termination of Photoshop while editing or saving the PSD file.
Opening .psd file with incompatible Adobe Photoshop version.
Editing PSD file directly from removable drives
Using unreliable tools to restore PSD files.
How To Fix PSD File Not Opening In Photoshop?

1. Re-Open the PSD files
If you are unable to open PSD files on Photoshop then, wait for some time and reopen the PSD files. If the problem still persists, then quit and reopen the Photoshop program and try opening the PSD files again. If the PSD file still doesn't open in Photoshop, then move down to the next method.
2. Check/Uncheck OpenGL Display and Update Device Drivers
Go to Photoshop > Select Edit > Click Preferences > Choose Performance > Now, a window will open: Uncheck ( ) Enable OpenGL Display and click OK.
Now close and restart Photoshop.
Enable OpenGL Display after updating your display driver, or else you will not be able to use OpenGL features.
3. Reinstall Adobe Photoshop
Download mac os mavericks dmg. If none of your PSD files open on the Adobe Photoshop tool. Then, this issue might be related to the application itself. During such times, the best way to fix this error is to reinstall the Photoshop application and try reopening the PSD file.
Adobe Photoshop 7.0 Dresses Psd File Free Download
If you are unable to fix the error even after reinstalling the application, then move on to the next method as this can be due to severe corruption or damage to the PSD file.
4. Fix Corrupt PSD File Not Opening Using Remo Repair PSD Tool
Adobe Photoshop 7.0 Dresses Psd File Type
If Your PSD file is severely virus-infected, then you cannot open or access the PSD file. The only way to open a corrupt PSD file in Photoshop is by repairing it using Remo Repair PSD software.
Utilize Remo Repair PSD, a user-friendly tool to quickly fix PSD file not opening in Photoshop. This tool requires only 3 clicks to safely repair any corrupt or damaged PSD and PDD file. This tool is compatible with all the latest versions of Windows and Mac operating systems including Windows 10 and macOS Big Sur.
Adobe Photoshop 7.0 Dress Psd File Free Download
(Download and install Remo Repair PSD tool and follow the below simple steps.)
Launch the Remo Repair PSD software and click the Browse button to select the corrupt PSD file not opening in Photoshop.
Next, hit the Repair button to start PSD file repair process.
After the PSD file repairing process ends, you can preview the repaired PSD file using the Preview option for free and click Save option to save the repaired PSD file on a preferred destination of your choice to open it in Photoshop.
Adobe Photoshop 7.0 Dresses Psd File Transfer
Supported Adobe Photoshop Versions:
Remo Repair PSD software supports PSD file repairing from all the latest versions of Photoshop like Photoshop 2020 (version 21), CC (2013-2019), CS6, CS5, and many more.
Adobe Photoshop 7.0 Dresses Psd File
Why Remo Repair PSD Software?
Apart from repairing PSD file not opening, the tool can also fix corrupted PDD files, RLE compressed PSD files with ease.
It can easily fix large-sized PSD, PDD, and PSB files.
Fixes PSD file with depth of 1, 8, 16, and 32 bits per channel.
You can also fix errors like Photoshop error 16, Could not complete your request because the file-format module cannot parse the file, etc.
0 notes
Text
Display For Mac

Display For Mac Pro
Display For Mac Mini
Display For Mac Pro
If you’re considering an external display for your Mac, there’s a few important decisions to make. Apple doesn’t sell external displays any more, so you can’t just default to their wisdom. That’s an issue, because not all displays are well suited for Macs.
The Displays preference pane acts the same way with your Mac’s built-in Retina display, too, except that “Default for display” automatically chooses the Retina mode. Share this: Facebook.
Which size? #
I can’t really help you with this one. It’ll likely be set by your budget, desk space and personal preference. The factors below will play a role, too.
Until Apple makes a stand-alone monitor option to replace the now-defunct Cinema Display monitor discontinued in 2014, finding an external monitor to increase the real estate of your MacBook Pro means heading out of the Apple universe. Luckily, quite a few monitors are offering USB-C connectivity to make it easy to hook your MacBook Pro to an alternate monitor. We’ve compiled a list of.
The most advanced display for your Mac. Built for professionals. Built For Professionals. Duet is built by ex-Apple engineers, delivering a retina display at 60 frames per second with zero lag. Using an additional display can double your productivity by reducing time to switch contexts.
Both the Mac and all displays in the chain must support DisplayPort 1.2, except for the last display which can be DisplayPort 1.1. In the image to the top right from StarTech, for example, Screen.
Retina or non-Retina? #
Thunderbolt 2 and DisplayPort 1.2 have a maximum resolution of 3840×2160 at 60FPS, which means non-Retina resolutions up to about 40-inch are supported by most current Macs. But, that only covers Retina displays up to 20-inch. Thunderbolt 3 equiped Macs, like the 2016 MacBook Pros, can run 27-inch Retina displays though.
There is another issue to contend with. Apple’s interface design in macOS is set up so it is comfortable for most people at a density of about 110 pixels per inch for non-Retina, and about 220 pixels per inch for Retina — text is readable and button targets are easy to hit at a normal viewing distance. Using a display that isn’t close to 110PPI or 220PPI means text and interface elements will either be too big, or too small.
The Display pane in System Preferences includes “larger text” and “more space” options. These can be used as a solution, but if you do, macOS will render the entire screen to a virtual canvas, then bitmap scale it up or down to the desired size. The result is blurry pixels, higher memory usage, more work for the GPU to do, and shorter battery life for laptops. You want to use the “default for this display” setting, if you can. It’s better quality, faster, and gives longer battery life.
Blurry pixels and a scaled display make it very difficult for designers and developers to see if elements are where they need to be. Elements that animate will appear to shimmer as they move. For me, “default for this display” is the only way to go.
The divider above shows the shimmering — it’s a 1pt or 2 Retina pixel line, but when the display is scaled down by a fractional amount (72%), those pixels don’t map directly to pixels on the display. As the list scrolls, the divider shimmers as the scaling represents the line differently.
You won’t need to choose a display that is exactly 110PPI or 220PPI. A slightly lower value will mean text and interface elements are larger. A slightly higher value will mean text and interface elements are smaller. You can use Sven Neuhaus’s PPI calculator to work out the pixel density of any display you’re interested in. Here’s a list of common external displays, with the 110PPI and 220PPI zones indicated.
Buying a display with a pixel density in the red zone usually isn’t a good choice, if you want to run “default for this display”. For example, 160PPI will show non-Retina UI too small, but Retina UI too large (it’s worth noting this can be used to buy a display that shows larger text and UI for those who need or prefer it).
The 4K iMac, 5K iMac and Surface Studio are listed as points of comparison, and can’t really be used as external displays. The Surface Studio’s 193PPI display is actually perfect for Windows, where the non-Retina (1×) UI scale is 96PPI, and the Retina (2×) UI scale is 192PPI. If I could buy a Surface Studio as an external display for my Mac, I think I would.
Wide gamut support? #
Wide colour gamut support — displays that use the Adobe RGB, Display P3, or DCI-P3 colour spaces — are great for photo editing, if your source material is created in those colour spaces.
But, the majority of web design, iOS apps, Android apps and game design is in the sRGB colour space. If that’s your line of work, you probably only need and want sRGB support (and an IPS LED display). Incorrectly set up, a wide gamut display used with non-colour managed software will produce overly saturated colours, and those colours won’t match how the final product is seen.
Xenu's Link Sleuth is spidering software that checks Web sites for broken links. It performs verification on normal links, images, frames, backgrounds, and local image maps. It also displays a. The Screaming Frog SEO Spider is a small desktop program (PC or Mac) which crawls websites’ links, images, CSS, script and apps from an SEO perspective. Commercial Mac Windows Linux Scheduled Data Crawling Seo Website testing Add a feature 23 Like. Xenu's Link Sleuth is not available for Mac but there are plenty of alternatives that runs on macOS with similar functionality. The most popular Mac alternative is Screaming Frog SEO Spider. It's not free, so if you're looking for a free alternative, you could try Integrity or Beam Us Up. If that doesn't suit you, our users have ranked 46 alternatives to Xenu's Link Sleuth and 12 are available for Mac so hopefully you. Xenu sleuth for mac.
It’s often possible to put wide gamut displays into an sRGB emulation mode, or to calibrate them to sRGB. But, not always. I am unaware of a way to calibrate an 5K iMac to use sRGB (if you know, please get in touch). “99% coverage of the sRGB spectrum” or similar message in the marketing text is usually a good sign, and what you’ll want to look for if buying a display for web or app development.
There is another significant issue with wide colour gamut support — wider colour gamut stretches the same value range, 0-255 for 8bit per channel colour, over a larger range of absolute colours. The number of available steps is the same, and each step becomes bigger. Using a wide gamut display with colour management aware software also typically requires conversion to and from the display’s profile once, twice or more times for everything displayed. Doing so can result in rounding errors, which are presented as gradient banding or noise.
That’s all fixable by using more colour precision. The 5K iMac uses 16bit per channel for the macOS window manager and it sends 10bit per channel to the display. That’s a great fix, but it requires double the GPU memory, double the GPU memory bandwidth, and 25% more port bandwidth. That’s the likely future, but we’re just not there yet for the majority of displays.
In short, if you only need sRGB, buy an sRGB only display.
Published 12 December 2016.
If you bought Displays on the Mac App Store, you’re eligible to a free license. Read more
Migration from the Mac App Store
Displays was previously available on the Mac App Store, but for technical reason, the app could not live anymore on this store without breaking support for Retina resolutions.
Instead, we’re now selling license keys directly from our webstore. All people having bought Displays on the Mac App Store are eligible to a free license key.
Download our Migration Assistant to request your key
Click on Displays icon in the upper-right corner of your screen and choose your monitor resolution among all supported resolutions. Displays is listing even resolutions hidden by macOS.
Displays supports all active monitors attached to your Mac, including AirPlay monitor. With one click, you can enable or disable mirroring mode.
To easily identify a resolution, you can set a custom label instead of resolution width/height and you may choose or not to group Retina resolutions, and even hide too-small resolutions.
Light at night is part of the reason so many people don’t get enough sleep. When night is coming, you can enable a night mode to rest your eyes and avoid unwanted effects of lights, especially blue light.
With just one click, or with a keyboard shortcut, you can switch to macOS Dark theme (10.9 or later), lower screen brightness, reduce blue light emitted by your display, enable grayscale mode or even set another wallpaper. If your screen does not support brightness control, Displays will simulate screen dimming.
And night mode can be scheduled, either in a user-defined period or based on sunset/sunrise. You can even automatically switch to night mode when you launch any app of your choice!
Display For Mac Pro
With Displays, you can take screenshots easily, either entire screen, specific area or a window. Many options are offered like timer, presets, mouse pointer, window shadow…
Divx for mac codec pack. Put the mouse over the video thumbnail, there will be a Play icon over it. Or you can click on the Add Files to browse videos on your Mac. There are more than 500 video formats supported.02 Click the Play iconYou can see your videos have been displayed in the program.
Use our various tools to annotate your screenshot: free drawing, rectangle, polygon, star, arrow, speech bubble, text… Another useful tool allows you to pixellate or blur some sensitive part of your screenshot.
Sharing screenshots has never been easier. Displays supports many cloud services where you can upload your screenshot and obtain a share link: Dropbox, Google Drive, OneDrive, Box, CloudApp, pCloud, FTP and SFTP.
You’re doing presentations like app demonstration or Powerpoint? Displays can act like a virtual laser pointer to grab your audience’s attention on what you’re doing.
Entire screen will be dimmed, except the part where your mouse cursor sits and mouse clicks will also be visually highlighted. Everything is customizable: circle or rectangular shape, screen color, opacity, highlight radius, play sound, differentiate left and right mouse clicks…
When one of your external monitor is in another room or not directly visible, it’s hard to see what is displayed on it. The same happened when you’re doing a Powerpoint presentation and the slides are behind you. That’s why we implemented Picture-in-Picture (PiP) for monitors.
Displays can enable a PiP overlay, that reflects the secondary screen content in real-time. And for sure, PiP can be enabled for more than one monitor at a time.
Do you need to hide temporarily the mess on your desktop? With one click or through a customizable keyboard shortcut, you can quickly hide all your desktop icons, without loosing essential features of your desktop like drag & drop or contextual menu.
French
Spanish
ALL FEATURES
Displays is not just a resolution switcher for macOS, as it comes with a lot more features for people managing multiple monitors and developers.
List all resolutions supported by your monitor, even those usually hidden by macOS.
Click on Displays icon in the macOS menu bar and choose the desired resolution. That’s it.
Replace default resolution name like “1680 x 1900 (60 Hz)” by any other text.
Resolutions can be grouped or not by Retina, and you can filter/hide any resolution.
Enabling or disabling macOS screen mirroring is actually just two clicks.
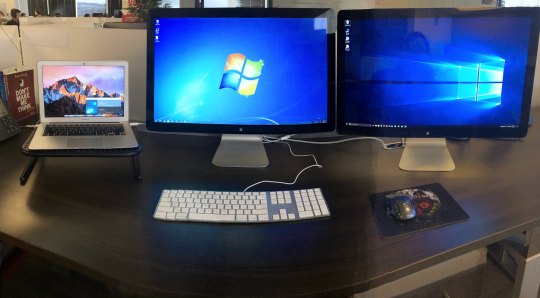
Display For Mac Mini
Rotate your monitor display to 90°, 180° or 270° (only if monitor supports rotation).
Get detailed information, like serial number, manufacturing date, active graphic card…
Rest your eyes in one click by reducing blue light and/or switching to Dark theme.
I would point out that Macs and Windows both support FAT32 file systems though so this may be why it was successful. Acronis true image for pc and mac os. I'm not so sure how things would go using an OS X journaled drive and restoring somethign to an NTFS one, but if it is just files/folders, I don't see why it wouldn't work either. Hello everyone!I can totally understand the importance of this feature, however, due to different archive formats and different platforms, it is quite hard to implement it.We are not planning to implement it for image recovery but we are - for file recovery, however, there is no ETA for this feature.As a current workaround I would suggest using Cloud backups. I Then went to my Windows machine and restored that image to another USB flash drive in Windows and the result was a working USB flash drive.
Easily take a screenshot of a window, area or entire screen, with options like timer.
Easily annotate, crop or resize your screenshot, with 12 different tools.
Upload your screenshot to Dropbox, Google Drive, Box, OneDrive, FTP/SFTP server…
With one click or keyboard shortcut, quickly hide all your desktop icons.
Grab your audience’s attention by highlighting mouse pointer and mouse clicks.
Engadget is part of Verizon Media. Logitech s530 mac software.
Show secondary monitor live preview in an overlay window on your main screen.
Show a Test Card to help in monitor calibration, whatever screen ratio (4:3, 16:10…).
Get notifications for many events like monitor plug-in or video card change.
Set customizable shortcuts for all functions, like switching resolution or night mode.
Quickly enable or disable True Tone mode of macOS, if your Mac supports this feature.
Displays entirely supports the new Dark mode introduced in macOS Mojave.
Displays is fully optimized for the latest release 10.15 of macOS, called “Catalina”.
Displays is using all modern technologies offered by Apple for the best performance.
If bought Displays on the Mac App Store, you’re eligible to a free licence key (please check Support section).
SCREENSHOTS
WHY DISPLAYS?
Easy to use
Only two clicks are necessary to change your monitor resolution
Customizable
Will adapt to your needs with full customisation for every function
Reliable
Every function has been deeply tested on every macOS version
Full-featured
Comes with many advanced tools, no need to buy some other apps
Display For Mac Pro
Free DownloadBuy Now
Version 1.9.5 – 14/08/2020
Requires macOS 10.9 or later, 64-bit processor, ready for macOS Catalina
15 days Free Trial with time limit
Release notes
1 note
·
View note
Last Seen Blogs

nct-dream
savannah

empress-pandora
Empress Pandora

sexyandwetsworld
Alexis Remington

kirisenpai
Dumpsterfuck

ndiecity
me freaking kill you