#how to clear app cache on iphone
Explore tagged Tumblr posts
Visit Tumblr Blog
Explore Tumblr blogs with no restrictions, modern design and the best experience.
Last Seen Tumblr Blogs


Fun Fact
Tumblr’s reach among the 26-to-35-year-olds in the US is 11%.
Text
How to offload apps from iphone?
How to offload apps from iPhone? Ever felt your iPhone getting sluggish? Running out of space for those epic travel vlogs? Offloading apps can be a lifesaver! It frees up valuable storage without completely deleting the app itself. Here’s how to become an offloading pro on your iPhone: Understanding Offloading: Offloading removes the app itself from your phone, but keeps all its data…
#best way to optimize iPhone storage#clear iPhone cache#free up iPhone storage#how to clear app cache on iPhone#how to clear cache on iPhone#how to delete app cache on iPhone#how to free up iPhone storage#how to free up space on iPhone without deleting photos#how to manage iPhone storage#how to offload apps on iPhone#how to offload unused apps on iPhone#how to speed up iPhone#iPhone app storage#iphone performance#iPhone space#iPhone storage#iPhone storage management#iPhone tips and tricks#offload iPhone apps#optimize iPhone storage
0 notes
Text
youtube
Learn how to clear WhatsApp cache on iPhone with this full guide. Free up space and improve performance on your device with just a few simple steps!
#how to clear cache data in whatsapp on iphone#how to clear cache on iphone#how to clear app cache on iphone#how to clear iphone cache#clear app cache on iphone#how to clear cache on iphone apps#how to clear whatsapp cache android#how to clear whatsapp cache#how to clear browser cache on iphone#how to clear whatsapp cache on iphone#how to clear cache on iphone 10#clear cache whatsapp#clear cache#iphone cache#clear cache iphone#how to clear cache on iphone 11#Youtube
0 notes
Text
Another downside to the increasing amount of technology illiteracy is that if you do know basic troubleshooting steps, and you ever use them to successfully solve someone's problem, that person will think you're a fucking genius and sign you up to help a baby boomer with his iphone.
#technology#computers#technology literacy#iphone#android#like yes coworker#i was able to solve your problem with an android app by clearing the cache#no that does not mean I know how to help a customer with an iphone app#and no customer#i cannot do anything about your touchtunes credits because you won't let me tell you how to redeem the code.
0 notes
Note
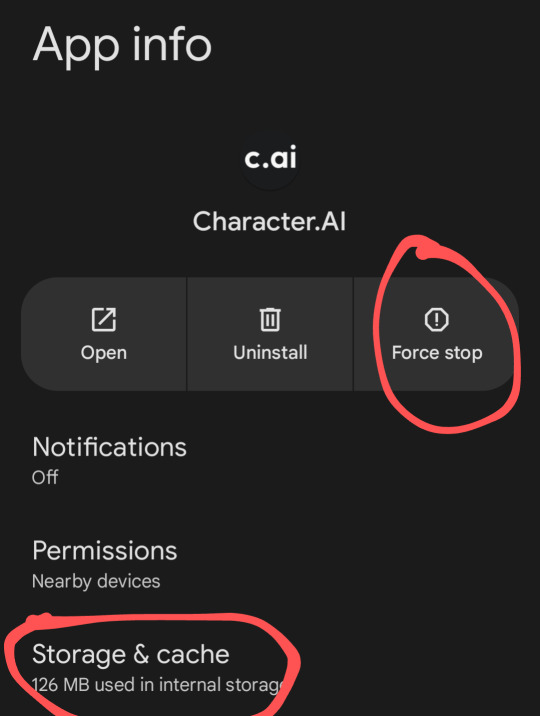
This is how it works for me (I'm on android so it might be diff if you're iPhone)
After closing the app, Hold down character AI app until you see app info pop up. Hit both these buttons, and the second one should say clear storage and clear cache (do NOT hit clear storage) just clear cache. You should be good to reopen now. Make sure it's closed, it won't work if you leave it up in the background
!!
2 notes
·
View notes
Photo

Ever felt that sinking feeling when you realize a crucial WhatsApp message has vanished? Maybe a client’s important instruction, a friend’s vital update, or even a hilarious meme from your family group got lost in the digital ether… or more accurately, into the “blocked messages” abyss within WhatsApp. Don’t worry, that’s more common than you think! This guide will help you navigate the complexities of uncovering how to retrieve blocked WhatsApp messages on your Android and iPhone, taking you from panicked disappointment to happy retrieval.
Understanding Why WhatsApp Messages Get Blocked
Before we dive into the solutions to retrieving hidden WhatsApp messages, let’s quickly understand how messages can “seem” to disappear. Not all lost chats are truly “gone.” Several scenarios contribute to mistakenly believing that messages are blocked, and we need to unravel this mystery before getting to recovery measures.
Blocked by Sender/Receiver
Sometimes, your friend accidentally blocked you (although these days with some WhatsApp statuses going invisible they block you without really wanting to). As a way to unsee you that usually means the messenger is removed and so to can messages from said device as the messenger can’t transfer files. This is also an important case if your family are using various versions or devices of communication (not WhatsApp even but text or iMessage/SMS) that can mean that you never truly received the file on other apps if the signal was weak. The solution remains unchanged unfortunately as this causes the WhatsApp to never receive the said message and there’s nothing to recover.
Accidental Deletion
More commonly, WhatsApp messages mysteriously disappear because one of the participants – even you, the recipient deletes them directly from their phone that renders the same problems. Therefore you too have lost messages unless your device is configured properly for back up (see below). This might occur when cleaning up storage space, accidentally wiping out conversations, or other common user errors as this depends on your storage.
Storage Issues, phone errors, operating procedures
In some situations, it can come down to other scenarios and this often involves how you structure your various phones (and remember iOS and Android work differently. Sometimes, a system glitch or low device storage can lead WhatsApp to act up in unforeseen behaviours, or just outright crashes! It is rare but even a small operating parameter means Whatsapp will block this out from being seen. Always clear your storage caches to prevent such malfunctions.
Retrieving Your Vanished WhatsApp Conversations: Step-by-Step Solutions for India
Now, let’s tackle the real meat because what usually follows most problems from what was written about in the past scenarios: data corruption.
Now you can only retrieve these scenarios under one condition: Before this incident has occurred you have a data back up service that you can restore using whatever media you store this with. Therefore when it comes to getting this method involved then you aren’t truly “retrieving hidden messages” in the sense of extracting missing data from corrupt files so this comes second. Therefore if you did not back this service data up, what would otherwise normally be data-retrievable isn’t here unfortunately (which is why you need the message backups).
1. Recovering WhatsApp Messages using Google Drive (Android)
For most Android users in India, a standard Google Drive backup is often the most effortless way in securing their Whatsapp chats because it has other advantages, which allow Whatsapp access easily compared to other cloud services. To leverage a prior backup, whether hours or weeks old, follow these quick steps, after deleting this app of course. You’ll then need immediate and direct reinstall using a standard method, which the internet can help you with!
Step 1: Make certain that you already have performed data backups regularly(and automatically is best). You’ll also likely install this after it’s gone, but only after clearing Whatsapp service files on your devices and not just deleting the Android app, so doing all these after helps make certain it isn’t interference as if the system knows what’s needed ahead of doing the backup. Therefore, reinstalling is ideal ONLY after doing it all before.
Step 2: Locate you reinstalled app from a prior backup and start over. With older devices and especially Android, then a lot easier to mess up with these commands unlike a straightforward iOS method because that’s pretty streamlined for Google/Android in backups especially the official ones. This has to be done step-by-step since Google Drive acts not just like file storage. For newer versions you might still encounter some slight nuances as usual.
2. Leveraging iCloud Backup(iOS/iPhone)
Apple users enjoy simple smooth ease with Apple iCloud. The ease-of-use is much larger with iPhone even those without much technical awareness (at the very least more seamless than doing the Google commands). In here, after reinstallation as normal the files come in no problem in most cases. There’s less potential to mess data because apple tightly regulates this which may work with older iPhones that support it still. Here’s, however, how data can be lost easily even within iOS unless you already performed backups:
Step 1 & 2, this is almost always the best way even during device transfer: Make certain that you performed back ups before the error otherwise there are no files otherwise to restore.
Also similarly with Android since that assumes some back up storage already you have had this already done whether on cloud or device memory card. Most users do this accidentally as they never read manual terms. You need another copy somewhere besides locally, especially with Android for older data since some Android versions need different methods especially ones involved with SD memory cards!
Step 3 &4(most users would use similar step-by-step procedure even during Apple’s data transfer and is therefore a streamlined version): Restore it already done as needed during setup, after deleting app, and you need to have everything after for this process to work! Therefore most methods should ideally and effectively involve these kinds of procedures; however less strict is required as the user doesn’t change a lot especially between updates.
Important Disclaimer: Both Google Drive and iCloud backups depend on regular and proper backup settings being in place ก่อนนี้ already!. Unfortunately, if automated backups were not turned on(which is the same message even during data transfer between
device, regardless whether Apple/Google!) and those messages vanished without any traces found means it went without backup somewhere(such as via SD memory card but a weak or low-storage backup) or in the past without notice therefore recovery isn’t possible if not all these points can be confirmed already completed beforehand including those important regular backup services.
3. Third-party data recovery tools (Use only after understanding your WhatsApp policy):
A Disclaimer first: Consider contacting whatsApp or whoever related providers of this to clarify whether this is permissible because this carries risks. It therefore needs some clarification and should generally be avoided because it lacks assurance in safety especially with less-established companies and in other devices than phones.
Should options 1&2 above fail where neither of those data was successfully backed up; some Android users might consider looking into third-party data tools(therefore this again isn’t about recovering directly, since we already confirmed backups being unsuccessful which then it implies another file in other area, but extracting files stored locally rather than external), although there’s no assurance. But then it needs to be specifically for your WhatsApp use if only successful after attempting prior steps failed completely.
This is a strongly recommended caution as well! Due diligence must ALWAYS accompany such attempts, which you want to first explore before trying this. Understand your situation, find reputable companies before any attempts for recovering otherwise the likelihood data theft outweigh these so don’t attempt this except after all other considerations failed, if ever this needs attempting!
FAQs: Tackling Common Queries on WhatsApp Message Retrieval
Q1: I recently deleted my chats intentionally. Can I still retrieve them using recovery software? No guarantees. While programs might look better it might just not work. The answer to retrieving directly after deletes depends much after if done via external hard copy(not very likely) however otherwise doing either is needed again: – A regularly configured backup – Extracting stored data if you find some other source (riskier especially older versions)
Q 2: Where exactly should data backups occur?(for all users)
Regular manual copies need to happen and it ideally occurs automatically via whatever service you have, and more importantly, somewhere else than on the actual mobile device.
Q3: It happens even when using Apple devices!.What could be interfering?
Sometimes it remains the scenario where automatic data copy backups did not properly occur, such after being disconnected, for too little time to cover before disconnecting. Similarly happens if Google doesn’t save after time limits. The most common problems involved backups. Consider checking backups, check backup conditions again, clear cache/cookies beforehand before starting either Google or Apple versions if needed.
Wrapping Up Your WhatsApp Message Retrieval Journey
Retrieving blocked or missing WhatsApp messages is possible; but highly unlikely if automatic scheduled backups never occurred which must cover such instances or even have at least another local copy, otherwise chances to save data are near 0, especially if you aren’t technically-inclined when performing such measures to recover missing files even with third party software! Consider always making regular automatic and independent backup copies onto either internal /external and/orcloud servers regularly across time which can prevent frustrating recovery of lost data that was intended so then this situation never really was considered “blocked messages”. Even after you solve things! A single manual backup is best for such times!
Let’s Discuss!: Have you had to deal with missing WhatsApp messages yourself in earlier circumstances involving device usage? Share your experience using and share the ways especially since there exists a wide range even those not used by many readers (and they may or may not exist elsewhere even in different websites depending the region since those various official versions do also change slightly over time especially now). Please use comment below. We want to hear of your wisdom involving these situations where better practices and ideas from this article itself could arise.
0 notes
Text
How To Clear Cache in Messenger iPhone? – The Ultimate Guide

Does your Facebook Messenger feel sluggish? Is it taking up too much storage? The culprit could be cached files! Over time, Messenger stores temporary data that can slow down your app and device.
Why Should You Clear Cache in Messenger iPhone?
✅ Frees up storage space
✅ Improves app speed & performance
✅ Fixes minor glitches and slow loading
How to Clear Cache in Messenger iPhone?
Since iPhones don’t have a direct "Clear Cache" button, you can follow these steps:
1️⃣ Go to Settings > General > iPhone Storage 2️⃣ Scroll and tap Messenger 3️⃣ Select Offload App (this clears cache without deleting data) 4️⃣ Reinstall Messenger to refresh the app
💡 Pro Tip: Clearing your cache every few weeks keeps Messenger running smoothly! 🚀
Read the full guide here: Clear Cache in Messenger iPhone
#Messenger #ClearCache #iPhoneTips #TechHacks #FacebookMessenger
#iphonerepairservice#iphonerepairshop#iphonescreenrepair#iphonescreenreplacement#30minutesrepair#batteryreplacement#bayridgebrooklyn#androidrepair#blocknumber#brooklyn#clearcache#messenger#facebook#iphoneapps#macbook#apple#smartphone
0 notes
Text
Innovative Mobile App Development for Seamless User Experiences
In an increasingly mobile-first world, providing users with a seamless, intuitive, and engaging experience has become more important than ever. The key to standing out in a crowded marketplace lies not just in having a mobile app but in having an innovative, well-designed app that delivers superior user experiences (UX). As technology evolves and user expectations shift, the need for mobile app solutions that combine functionality, performance, and design has never been more critical. best mobile app development company plays a pivotal role in creating apps that meet these expectations and leave a lasting impression on users.

In this article, we’ll explore how innovative mobile app development can elevate your business, enhance user experience, and drive success by focusing on cutting-edge features, intuitive design, and seamless performance. By focusing on user-centric development and integrating the latest technologies, businesses can create apps that not only attract but also retain users, building long-term loyalty and trust.
1. Prioritizing User-Centered Design
At the heart of innovative mobile app development is user-centered design. The goal is to craft an app experience that meets the needs, preferences, and behaviors of users while providing a seamless and enjoyable interaction. User experience is one of the most important factors that determine the success of an app. An app that is difficult to navigate or has a confusing interface can result in high abandonment rates, which directly impacts business growth.
Read More: How to successfully outsource for your small business?
Innovative mobile app development focuses on understanding the users' pain points, preferences, and expectations from the outset. Developers and designers collaborate closely to create an app that is visually appealing, easy to navigate, and efficient. This includes optimizing the app layout, reducing clutter, and ensuring that key features are easy to access. Moreover, a clean, attractive design encourages users to engage more frequently, improving overall retention.
For instance, e-commerce apps can utilize clear categories, intuitive search features, and simple checkout processes to make shopping more enjoyable. Social media apps can ensure that notifications are timely, feeds are interactive, and user interactions are intuitive. The ultimate aim is to make the user’s journey as smooth and hassle-free as possible, ensuring they can accomplish their tasks with minimal friction.
2. Optimizing Performance and Speed
In today’s fast-paced world, users expect apps to load quickly, respond instantly, and provide smooth performance. A slow or buggy app not only frustrates users but also leads to high uninstall rates. Innovative app development ensures that performance is a priority from the early stages of development. By employing advanced technologies and optimizing the code, developers can create apps that run faster and more efficiently, even under heavy load.

Optimized mobile app performance involves fine-tuning every element, from the app’s backend infrastructure to its frontend interactions. Developers focus on reducing load times, minimizing resource consumption, and optimizing the app for different devices and operating systems. For example, through techniques like lazy loading, caching, and efficient data retrieval methods, apps can perform seamlessly, even in areas with limited internet connectivity.
Additionally, performance optimization includes ensuring that the app is stable across various devices, screen sizes, and operating systems. Whether your users are accessing the app on an Android smartphone, iPhone, or tablet, a well-optimized app guarantees a consistent and high-quality experience, regardless of the platform.
3. Integrating Cutting-Edge Technologies
Innovative mobile app development doesn’t just focus on functionality and design; it also involves leveraging the latest technologies to enhance the user experience. Technologies such as augmented reality (AR), machine learning (ML), artificial intelligence (AI), and blockchain are playing a transformative role in shaping the future of mobile apps. By integrating these technologies into the development process, businesses can create more interactive, personalized, and efficient user experiences.
For example, apps that use AR can offer users immersive experiences, such as visualizing products in real time. This is especially valuable in industries like furniture, fashion, or real estate, where customers want to see how a product fits into their environment before making a purchase. Similarly, machine learning can enable personalized content recommendations, predictive text, and even chatbot functionalities to make user interactions more intuitive and helpful.
AI can also be used to enhance user engagement by enabling smart features such as voice assistants or natural language processing (NLP), which allows users to interact with the app through voice commands. By integrating these advanced technologies, businesses can offer cutting-edge, interactive features that keep users engaged and create a strong competitive advantage.
4. Cross-Platform Compatibility
The world of mobile apps is fragmented with different operating systems (Android, iOS) and devices (smartphones, tablets, wearables). To ensure maximum reach and engagement, an app must work seamlessly across multiple platforms. Cross-platform mobile app development is a key component of creating a seamless user experience. With cross-platform tools like Flutter, React Native, and Xamarin, developers can write code once and deploy it across both iOS and Android App Development Company, saving time and resources while maintaining a consistent user experience.
Innovative mobile app development also focuses on optimizing the app for different device types. For example, apps that are optimized for tablets offer larger, more interactive interfaces, while apps for wearables like smartwatches need to be designed for quick interactions and minimalism. Regardless of the device, cross-platform compatibility ensures that users have a consistent, high-quality experience across the board, leading to greater satisfaction and engagement.
5. Personalization and User Engagement
Personalization is one of the most powerful ways to enhance user experience in mobile apps. Innovative development allows for deeper personalization, where the app can respond to individual preferences, behaviors, and needs. By collecting user data (with consent) and analyzing behavior patterns, mobile apps can offer tailored content, notifications, and recommendations that make the app more valuable to each user.
Read More: Top Custom Software Solutions For The Travel & Hospitality Industry
For example, a fitness app can recommend workout plans based on the user’s fitness level and goals, while a shopping app can provide personalized offers or show products the user is most likely to be interested in. Personalized push notifications can encourage users to return to the app, reminding them of updates, sales, or features they’ve shown interest in.
Engagement features like gamification—such as badges, rewards, and progress tracking—also play an important role in keeping users engaged. By integrating these personalized, interactive features, businesses can increase user retention and foster long-term loyalty.
6. Security and Data Privacy
As mobile apps collect more personal and sensitive data, security becomes a paramount concern. Innovative mobile app development ensures that the app is designed with security in mind from the very beginning. Encryption, secure payment gateways, multi-factor authentication, and data protection features help safeguard user information and ensure privacy compliance.
Security measures also build trust between businesses and their customers. When users feel confident that their data is safe, they are more likely to continue using the app and engage with the brand. This is particularly important in industries like finance, healthcare, and e-commerce, where user data must be handled with the highest level of care and compliance.
Conclusion
Innovative mobile app development is more than just a technical endeavor—it’s about creating experiences that delight users, drive engagement, and meet the unique needs of your business. By focusing on user-centered design, optimizing app performance, integrating cutting-edge technologies, ensuring cross-platform compatibility, offering personalized experiences, and prioritizing security, businesses can create mobile apps that provide seamless, efficient, ai development company.
In today’s competitive market, it’s not enough to just have a mobile app; you need an innovative app that stands out, engages users, and adapts to their needs. By investing in innovative mobile app development, businesses can create powerful solutions that not only meet but exceed user expectations, leading to higher retention, customer satisfaction, and long-term success.
#mobile app development company#web development#web developing company#services#crm software#mobile app development#mobile app
0 notes
Text
How to Diagnose Common Mobile Phone Problems: A Step-by-Step Guide
Mobile phones have become an integral part of our daily lives. They serve as communication tools, entertainment devices, work assistants, and much more. But like any other technology, they can face issues that disrupt their functionality. Knowing how to diagnose common mobile phone problems can save time, money, and stress. While some issues are easy to fix yourself, others might require professional repair services. In this step-by-step guide, we’ll walk you through how to diagnose and troubleshoot common mobile phone problems effectively.
1. Battery Drain Issues
One of the most common problems users face is rapid battery drain. If you notice that your phone's battery is draining quickly, it could be due to several factors.
Diagnosis Steps:
Check Battery Usage: Go to your phone's settings and check battery usage. Look for apps that are consuming more battery than usual.
Background Apps: Close unnecessary apps running in the background. Some apps keep running even when not in use, draining your battery.
Brightness and Power Settings: Lower your screen brightness or enable adaptive brightness. Also, consider turning off features like Bluetooth, Wi-Fi, or location services when not in use.
Battery Health: In iPhones, you can check battery health in the settings under "Battery Health" to see if the battery needs replacement. For Android, you may need a third-party app to monitor battery health.
If these steps don't help, it might be time to replace the battery.
2. Overheating Problems
Mobile phones tend to overheat due to prolonged use, running power-hungry apps, or environmental factors. Overheating can lead to performance throttling or damage to internal components.
Diagnosis Steps:
Remove the Case: Sometimes, the case traps heat, leading to overheating. Try removing the case and see if the phone cools down.
Close Power-Consuming Apps: Gaming, streaming, and using heavy apps can cause your phone to heat up. Close all apps and give your phone a break.
Update Software: Ensure your phone’s operating system is up to date. Sometimes, software bugs can cause excessive power consumption, leading to overheating.
Ambient Temperature: Avoid using your phone in hot environments or direct sunlight, as it can cause the device to overheat.
If your phone continues to overheat despite these steps, there could be a hardware issue with the battery or internal components, requiring professional assistance.
3. Slow Performance
A lagging or slow phone can be frustrating, especially when you need it the most. Several factors can contribute to slow performance, such as insufficient storage or outdated software.
Diagnosis Steps:
Clear Cache: Over time, cached data can slow down your phone. Go to settings and clear the cache data for individual apps or for the entire system.
Free Up Storage: Check the storage space on your phone. If it's almost full, delete or offload unnecessary files, apps, or photos to free up space.
Uninstall Unnecessary Apps: Unused apps consume resources and storage. Uninstall apps you no longer need.
Software Update: Ensure your phone is running the latest version of its operating system. Updates often include performance improvements and bug fixes.
If these tips don't resolve the issue, a hardware problem like a failing processor or insufficient RAM could be the culprit, and professional repair might be needed.
4. Screen Flickering or Touch Issues
A flickering screen or unresponsive touchscreen can be caused by software glitches, hardware malfunctions, or issues with the display itself.
Diagnosis Steps:
Restart Your Phone: A simple restart can often fix minor software glitches that cause screen flickering or touch issues.
Check for Software Updates: If there's a bug in the operating system causing the issue, updating the software could resolve it.
Inspect for Physical Damage: Check if the screen has any cracks or visible damage. If there is, the screen may need to be replaced.
Test the Touchscreen: You can test the touchscreen functionality by opening apps or using touch gestures. If the screen is unresponsive or erratic, it could indicate a hardware issue.
If the screen continues to flicker or the touch is unresponsive after troubleshooting, the screen or digitizer may need to be replaced.
5. Charging Problems
If your phone is not charging properly or takes too long to charge, it could be a result of software issues, charging port damage, or issues with the charger itself.
Diagnosis Steps:
Check the Charging Cable and Adapter: Ensure the charger and cable are not damaged. Try using a different charger and cable to see if that solves the problem.
Inspect the Charging Port: Dirt, dust, or lint in the charging port can prevent proper charging. Use a soft brush or compressed air to clean the port carefully.
Check for Software Issues: Sometimes, charging issues are related to software. Try restarting the phone to rule out any software glitches.
Battery Health: If the battery is old or damaged, it may no longer hold a charge properly. Check the battery health via your phone's settings or use a third-party app to assess the battery’s condition.
If none of these steps resolves the issue, it could indicate a problem with the charging port or battery, which may require professional repair.
Conclusion
Diagnosing common mobile phone problems can be easy if you follow a logical step-by-step process. From battery drainage to charging issues and sound problems, most of these issues can be fixed with a little effort. However, if you find that the problem persists or seems beyond your ability to solve, it's always a good idea to seek professional help.
At GoFix, we specialize in diagnosing and repairing mobile phones quickly and efficiently. Whether it's a screen replacement, battery replacement, or any other repair, our expert technicians are here to help. GoFix offers affordable repair services for all kinds of mobile phone issues, ensuring your device gets back to working like new. Visit us online or at our repair centers for all your mobile phone repair needs!
0 notes
Text
How to Handle Error Code 83 on DisneyPlus.com/Begin
Disney+ is a widely popular streaming platform offering an extensive library of movies, TV shows, and exclusive content. However, like any digital service, users sometimes encounter technical issues. One common problem faced by Disney+ subscribers is Error Code 83. This error can be frustrating, but understanding its causes and solutions can help you resolve it quickly.
In this guide, we’ll explore what Error Code 83 means, its potential causes, and how to troubleshoot the issue step-by-step to regain access to disneyplus.com/begin.
What Is Error Code 83 on Disney+?
Error Code 83 on Disney+ is a general device compatibility or network issue. When this error occurs, it prevents users from accessing Disney+ content, disrupting their streaming experience. The error message typically reads:
"Something went wrong. Please try again. If the problem persists, visit the Disney+ Help Center. Error Code 83."
Understanding the root cause of this issue is essential to determine the appropriate solution.
Common Causes of Error Code 83
1. Device Compatibility Issues
Not all devices are compatible with Disney+. Older operating systems or unsupported devices may trigger Error Code 83.
2. Network Connectivity Problems
A weak or unstable internet connection can prevent Disney+ from functioning properly. This may include Wi-Fi disruptions, router issues, or ISP throttling.
3. Account Authentication Errors
If Disney+ cannot verify your account credentials due to login issues or server errors, it might result in Error Code 83.
4. App or Browser Issues
Using an outdated version of the Disney+ app or an unsupported web browser can cause compatibility errors.
5. Digital Rights Management (DRM) Restrictions
Disney+ uses DRM to protect its content. If your device fails to meet DRM requirements, you may encounter Error Code 83.
Troubleshooting Steps for Error Code 83
Below are detailed steps to resolve Error Code 83. Follow these systematically to identify and fix the issue.
Step 1: Check Device Compatibility
Verify Device Requirements:
Ensure your device is compatible with Disney+. Refer to the Disney+ device compatibility list.
Update Operating System:
Check for updates on your device and install the latest operating system.
For example:
iOS/Android: Update to the latest version in your settings.
Windows/Mac: Update via system preferences or control panel.
Switch Devices:
If your current device remains unsupported, try accessing DisneyPlus.com/begin on another compatible device.
Step 2: Test Your Network Connection
Check Internet Speed:
Disney+ requires a minimum speed of 5 Mbps for HD streaming and 25 Mbps for 4K. Use an online speed test tool to verify your connection.
Restart Your Router:
Turn off your router, wait 30 seconds, and power it back on to reset your connection.
Switch Networks:
If possible, switch to a different Wi-Fi network or try a mobile hotspot to identify whether the issue is network-specific.
Disable VPN or Proxy:
Disney+ might block access if you’re using a VPN or proxy. Disable these services and try again.
Step 3: Update the Disney+ App
Check for Updates:
Open your app store and search for Disney+.
Install any available updates.
Reinstall the App:
Uninstall the Disney+ app and reinstall it to ensure you’re using the latest version.
Clear Cache and Data:
If reinstalling isn’t feasible, clear the app’s cache and data:
iOS: Go to Settings > General > iPhone Storage > Disney+ > Offload App.
Android: Go to Settings > Apps > Disney+ > Storage > Clear Cache.
Step 4: Use a Supported Browser
If you’re accessing DisneyPlus.com/begin via a web browser:
Update Your Browser:
Use the latest version of Chrome, Firefox, Safari, or Edge.
Enable DRM Settings:
Ensure your browser’s DRM settings are enabled. For example:
Chrome: Go to Settings > Privacy and Security > Site Settings > Additional Content Settings > Protected Content.
Clear Cookies and Cache:
Clear your browser’s cookies and cache to eliminate potential conflicts.
Disable Browser Extensions:
Temporarily disable ad blockers or other extensions that might interfere with Disney+.
Step 5: Resolve Account Authentication Issues
Re-login to Your Account:
Log out of DisneyPlus.com/begin and log back in to refresh your session.
Reset Your Password:
If login issues persist, reset your password through the Disney+ account management page.
Verify Your Subscription:
Ensure your Disney+ subscription is active. Check your billing details in your account settings.
Contact Disney+ Support:
If authentication problems persist, visit the Disney+ Help Center for assistance.
Step 6: Check Device DRM Support
Verify DRM Requirements:
Check if your device supports Widevine DRM or equivalent protocols.
Switch to a Certified Device:
If your current device lacks DRM support, use a certified device like a Smart TV, game console, or streaming device.
Additional Tips to Avoid Error Code 83
1. Maintain Up-to-Date Software
Regularly update your devices, apps, and browsers to prevent compatibility issues.
2. Optimize Internet Connection
Position your router for maximum signal strength and avoid network congestion during streaming.
3. Use Authorized Devices
Avoid jailbroken or rooted devices that might fail DRM checks.
4. Avoid Simultaneous Logins
Limit the number of simultaneous logins on your Disney+ account to prevent conflicts.
5. Enable Auto-Updates
Set your apps and system to auto-update to stay current with the latest Disney+ features and fixes.
When to Contact Disney+ Support
If you’ve tried all the steps above and still encounter Error Code 83, it’s time to reach out to Disney+ support:
Visit DisneyPlus.com/begin.
Navigate to the Help Center and select the appropriate troubleshooting category.
Use the live chat or email options to describe your issue.
Provide details such as:
Your device model and operating system.
Internet speed and connection type.
Steps you’ve already taken to resolve the issue.
Conclusion
Error Code 83 on Disney+ can stem from various issues, including device compatibility, network problems, or app glitches. By systematically following the troubleshooting steps outlined above, you’ll likely resolve the error and enjoy seamless streaming on disneyplus.com/begin. If the problem persists, don’t hesitate to contact Disney+ support for personalized assistance. With these solutions, you can minimize disruptions and make the most of your Disney+ subscription.
0 notes
Text
0 notes
Text
How to Clear Instagram Cache on iPhone?
How to Clear Instagram Cache on iPhone? #iphone #cache #instagram
Instagram is a popular social media platform that allows users to share photos and videos with their friends and followers. As you use Instagram, the app stores temporary files, known as cache, on your iPhone. These cache files can help Instagram load faster, but they can also take up space on your device. If you’re running out of storage space on your iPhone, or if you’re experiencing problems…
View On WordPress
#clear instagram cache and data iphone#clear instagram cache iphone#clear instagram cache to improve performance#clear instagram cache without deleting app#how to clear instagram cache iphone#how to free up space on iphone by clearing instagram cache#reset instagram settings by clearing cache#should i clear instagram cache regularly#what happens when you clear instagram cache iphone
0 notes
Text
Can I Delete My Cash App Account and Make a New One?
Cash App has become one of the most popular mobile payment solutions, providing users with convenient peer-to-peer money transfer options and easy account management features. However, there may come a time when you want to delete your Cash App account, whether it’s for privacy reasons, switching to a new account, or resolving issues with the existing account. Here, we’ll guide you through the steps of deleting your Cash App account, creating a new one, and address key questions and considerations.
Can You Delete Your Cash App Account?
Yes, deleting your Cash App account is possible, but it’s a process that requires attention to detail. Cash App offers users an easy way to delete their accounts through the app, but there are a few necessary steps to ensure that everything is done properly, especially if you plan to create a new account afterward.
Reasons for Deleting a Cash App Account
There are various reasons why users may want to delete their Cash App accounts:
Privacy Concerns: Some users wish to delete their accounts to protect their personal data.
Account Issues: Certain issues, such as restrictions, disputes, or unauthorized transactions, can lead users to create a new account.
Financial Organization: Users may delete an account to start fresh for better financial organization.
How to Delete a Cash App Account in 2024
Deleting your Cash App account requires completing a few important steps. Before proceeding, make sure to handle any remaining balances or investments on your account to avoid losing money or having issues with incomplete transactions.
Step 1: Withdraw or Transfer Your Funds
Before deleting your Cash App account, make sure to withdraw or transfer any remaining funds. To do this:
Open the Cash App on your mobile device.
Tap the Balance tab on the home screen.
Choose to Cash Out and transfer the balance to your linked bank account.
Note: It may take a few business days for the funds to show up in your bank account, depending on the transfer method you choose.
Step 2: Clear Any Pending Deposits or Investments
If you have any pending deposits or investments, make sure to handle those before deleting the account. You can view and manage your deposits and investments from the main dashboard. Ensure that all financial activities are resolved before proceeding.
Step 3: Access Account Settings to Delete
Once you have cleared all funds and transactions, you can proceed to delete your account:
Open the Cash App on your mobile device.
Tap on your profile icon in the upper-right corner.
Navigate to Support and then select Something Else.
Choose Account Settings and select Close My Cash App Account.
After completing these steps, you’ll receive a confirmation email, verifying that your account has been deleted. Make sure to review the email to ensure all personal data has been removed from Cash App’s system.
How to Delete Cash App Account on iPhone
If you’re an iPhone user, the process for deleting your Cash App account remains the same. Follow the steps provided above, which apply regardless of the device you are using. Remember to confirm that the app has been fully deleted after you’ve closed the account, especially if you plan to create a new account on the same device.
How to Delete Cash App Account on Android
Android users can follow the same steps to delete Cash App account. Once the account has been deleted, it’s recommended to clear your app data and cache, or even uninstall the app entirely if you are not planning to create a new account. This will ensure that no residual information is left on your device.
Closing a Cash App Account with Money in It
Cash App requires that you have a zero balance before closing your account. If you attempt to close your account while it still holds funds, you’ll encounter an error message and won’t be able to proceed. Make sure to cash out the balance, as detailed in Step 1 above, before attempting to delete the account. This ensures you won’t lose any money during the deletion process.
Why Can’t I Delete My Cash App Account?
There may be several reasons why a Cash App account cannot be deleted:
Outstanding Balance: Your account must be cleared of all funds.
Pending Transactions: Any unresolved transactions, such as deposits or withdrawals, must be completed.
Unsettled Investments: Ensure that any Cash App Investing account linked to your main Cash App account has been closed or liquidated.
If you are still unable to delete cash app account after addressing these issues, contact Cash App’s customer support for further assistance.
How to Deactivate Cash App Account
For users who want to take a break without permanently deleting their account, Cash App does not currently offer a true “deactivation” feature. However, you can secure your account by logging out and deleting the app from your device. This will prevent unauthorized access until you decide to log in again.
Can I Make a New Cash App Account After Deleting My Old One?
Yes, you can create a new Cash App account after deleting your old one. However, it’s important to note the following:
Use a Different Email or Phone Number: Cash App requires unique identifiers, so you will need to use a different email address or phone number to register a new account.
Link a New Bank Account (Optional): While not necessary, linking a new bank account can help avoid issues if you plan to use Cash App’s financial features again.
To create a new account, simply download the Cash App, open it, and follow the registration prompts with your new email or phone number.
Cash App Account Settings: How to Manage Your Account
Cash App provides various settings that allow users to manage their accounts efficiently:
Profile Settings: Update your personal information, such as name, phone number, and email address.
Security Settings: Enable two-factor authentication, set up a PIN for transactions, and manage other security features.
Bank and Payment Settings: Link or unlink bank accounts, debit cards, and credit cards for easier money management.
Privacy Settings: Adjust visibility, such as who can view your activity or send you payments, to ensure a secure user experience.
Conclusion
Closing cash app account and starting a new one is a manageable process when you understand the steps involved. By ensuring all pending transactions are completed, transferring funds, and properly closing your account, you can safely delete your existing account. Creating a new Cash App account is also straightforward, as long as you use a different email or phone number for registration.
0 notes
Text
Phone Won’t Connect to Wi-Fi? Try These Solutions

In today’s connected world, Wi-Fi has become essential for work, entertainment, and everyday tasks. So, when your phone won’t connect to Wi-Fi, it can be incredibly frustrating. Fortunately, most Wi-Fi connectivity problems are easy to resolve with a few troubleshooting steps. In this article, we will guide you through common reasons your phone may not connect to Wi-Fi and provide practical solutions. We’ll also discuss how a phone diagnostic software can help identify the issue and address potential storage issues that could affect Wi-Fi connectivity.
1. Check Your Wi-Fi Network
Before diving into deeper troubleshooting, make sure that the issue isn’t with your Wi-Fi network itself. Here’s how to do a quick check:
Ensure Wi-Fi is Turned On: It may sound simple, but ensure that Wi-Fi is enabled on your phone. Head to your phone’s settings, tap on “Wi-Fi,” and toggle it on.
Verify the Network Name and Password: Ensure you're trying to connect to the right network, and double-check if the password is entered correctly.
Restart Your Router: Sometimes the issue is not with your phone but with the router. Unplug the router, wait for 30 seconds, and then plug it back in. After it restarts, try reconnecting your phone.
If the network is functioning and other devices are connected without any issues, you may need to investigate potential problems with your phone.
2. Toggle Airplane Mode
A quick fix for Wi-Fi issues is toggling your phone’s Airplane Mode. This can reset network settings without the need for a full restart. Simply swipe down from the top of your screen to access the quick settings panel, tap on the Airplane Mode icon to turn it on, wait for about 10 seconds, and then turn it off. This might refresh the phone’s connection to Wi-Fi.
3. Forget and Reconnect to the Wi-Fi Network
If your phone has saved the wrong credentials or there’s a glitch in the connection, forgetting the network and reconnecting can resolve the issue. Here’s how:
Go to Settings > Wi-Fi.
Find the Wi-Fi network you're trying to connect to.
Tap on the network name and select Forget Network.
Afterward, reconnect by entering the network password again.
This method resets the connection and can clear any stored data or incorrect settings that might be preventing you from connecting.
4. Restart Your Phone
If the basic checks don’t resolve the problem, the next step is to restart your phone. Sometimes, temporary software glitches can prevent your phone from connecting to Wi-Fi, and a restart can refresh all processes and connections.
5. Check for Software Updates
If your phone hasn’t been updated recently, outdated software may be causing connectivity issues. Head to Settings > System > Software Update to check if any updates are available. Software updates often contain fixes for bugs and network-related issues that could be hindering your Wi-Fi connection.
6. Clear Cache and Free Up Storage Space
A storage issue could potentially affect how well your phone manages its resources, including Wi-Fi connections. Clearing the cache can help:
On an Android device, go to Settings > Storage > Cached Data, and tap to clear cached data.
On an iPhone, you can clear app caches by offloading unused apps or by performing a soft reset.
Freeing up storage space ensures your phone runs smoothly, and this may help resolve connectivity issues. If your phone is low on storage, deleting unnecessary files or using a phone diagnostic software to identify and clean junk data can improve overall performance, including Wi-Fi connectivity.
7. Check for Interference from Other Devices
Electronic devices such as microwaves, cordless phones, and even baby monitors can interfere with Wi-Fi signals. If possible, place your phone closer to the router or reduce the number of devices connected to the same network. Additionally, switching your router’s frequency from 2.4 GHz to 5 GHz (if supported) can often result in better connection stability and speed.
8. Reset Network Settings
If none of the above solutions work, resetting your phone’s network settings can help resolve more stubborn connectivity issues. Here’s how to reset network settings:
On an Android device, go to Settings > System > Reset Options > Reset Wi-Fi, Mobile & Bluetooth.
On an iPhone, go to Settings > General > Reset > Reset Network Settings.
This option clears all saved Wi-Fi networks and Bluetooth connections, so you’ll need to reconnect to your Wi-Fi network afterward. However, it can be a highly effective solution for network problems.
9. Use Phone Diagnostic Software
When you’ve tried all the usual troubleshooting steps and your phone still won’t connect to Wi-Fi, a phone diagnostic software can be a valuable tool. This type of software scans your phone’s hardware and software for any issues affecting connectivity, providing a detailed report and solutions. Some phone diagnostic apps can even check for specific problems like weak signal strength, malfunctioning network adapters, or outdated drivers.
These diagnostic tools often come with additional features, such as detecting background apps that could be hogging your phone’s resources, further helping to identify and fix storage issues that may affect performance.
10. Consult a Professional
If your phone still won’t connect to Wi-Fi despite trying all the solutions above, it might be time to consult a professional technician. There could be a hardware issue with the Wi-Fi antenna or internal components, which requires expert attention.
Conclusion
Wi-Fi connectivity issues can be frustrating, but in most cases, the solutions are straightforward. By following these troubleshooting steps, from basic checks like restarting your phone to more advanced fixes like resetting network settings or using phone diagnostic software, you can quickly get your phone back online. Don’t forget to monitor potential storage issues, as they can indirectly affect your phone’s ability to maintain a stable connection.
#mobile phone repair#mobile phones#phone diagnostic#software development#wifi issue#phone wifi problem#fix phone wifi
0 notes
Text
#SniffieApp#iPhonePerformance#OptimizeYourDevice#TechTips#MobileOptimization#AppPerformance#iPhoneHacks#DeviceMaintenance#EfficientApps#BoostYourPhone
0 notes
Photo

Let’s dive right in! Ever found yourself staring at your phone, wondering, “WhatsApp चालू कैसे होगा?” (How do I get WhatsApp working?) It’s a common question, and trust me, you’re not alone. We’ve all been there – that frustrating moment when you can’t connect with friends and family through your favorite messaging app. Maybe you’re setting up a new phone, facing a technical glitch, or just need a refresher on the basics. This guide is your one-stop shop for getting WhatsApp up and running smoothly. We’ll cover everything from downloading the app to troubleshooting common problems, ensuring you’re back to chatting in no time. Get ready to conquer those WhatsApp woes!
Getting WhatsApp Started: A Step-by-Step Guide
This section will walk you through the entire process of getting WhatsApp चालू (WhatsApp started) on your phone, whether it’s a brand new installation or you’re trying to fix an existing problem.
1. Downloading and Installing WhatsApp
First things first: you need the WhatsApp app! This is the foundation of everything.
Finding the App: Head to your phone’s app store. If you have an Android phone, that’s the Google Play Store. For iPhones, it’s the Apple App Store. Just search for “WhatsApp Messenger.” You’ll see the official WhatsApp logo – it’s green with a white speech bubble.
Downloading the App: Once you’ve found the right app, tap the “Install” or “Get” button. Your phone will download the app. This might take a few minutes depending on your internet speed.
Installing the App: After the download is complete, the app will automatically install. You might need to tap “Open” or a similar button to launch the app for the first time.
2. Setting Up Your WhatsApp Account
Now that WhatsApp is installed, it’s time to create your account or log into your existing one.
Agreeing to Terms: You’ll need to agree to WhatsApp’s terms of service. Take a moment to read them – it’s important to understand how WhatsApp uses your information.
Phone Number Verification: This is key! WhatsApp uses your phone number to identify you and connect you with your contacts. Enter your phone number exactly as it appears, including the country code.
Verification Code: WhatsApp will send you a verification code via SMS text message. Enter this code into the app to confirm your number. If you don’t receive the code, you can request a call instead. WhatsApp will call you, and a voice will tell you the code.
Profile Setup: Once your number is verified, you can customize your profile. Add a profile picture, write a short bio, and choose a name. This is what your contacts will see.
3. Adding Contacts and Starting Chats
With your account set up, it’s time to connect with people!
Syncing Contacts: WhatsApp will automatically sync with your phone’s contacts. This means that anyone in your phone’s address book who also uses WhatsApp will appear in your WhatsApp contacts list.
Starting a New Chat: To start a new chat, tap the “New chat” button (usually a pencil icon or a plus sign). Select the contact you want to chat with and start typing!
Group Chats: WhatsApp also allows you to create group chats. This is perfect for keeping in touch with multiple people at once. Just tap the “New group” button and add the contacts you want to include.
Troubleshooting Common WhatsApp Issues: “WhatsApp चालू नहीं हो रहा है”
Sometimes, things don’t go as planned. Here’s how to fix some common WhatsApp problems.
1. WhatsApp Won’t Open or Keeps Crashing
Check for Updates: Make sure you have the latest version of WhatsApp installed. Outdated apps can be buggy. Check your app store for updates.
Restart Your Phone: A simple restart can often solve minor glitches. Turn your phone off and back on again.
Clear the App Cache: Your phone stores temporary files that can sometimes cause problems. Clearing the app cache can help. The exact steps for this vary depending on your phone’s operating system, but you can usually find instructions online by searching “clear app cache [your phone model]”.
Reinstall WhatsApp: If nothing else works, try uninstalling and reinstalling WhatsApp. This will give you a fresh start. Remember to back up your chats first if possible!
2. Connection Problems: “WhatsApp Connect नहीं हो रहा है”
Check Your Internet Connection: WhatsApp needs an internet connection to work. Make sure your Wi-Fi or mobile data is turned on and working properly. Try opening a web browser to see if you can access websites.
Check Your Data Settings: Ensure that WhatsApp has permission to use your mobile data. You can usually find this in your phone’s settings under “Apps” or “Permissions.”
Restart Your Router (Wi-Fi): If you’re using Wi-Fi, try restarting your router. Unplug it, wait 30 seconds, and plug it back in.
Contact Your Internet Provider: If you’re still having connection problems, contact your internet service provider. There might be an issue with their service.
3. Verification Code Issues
Check Your Phone Number: Double-check that you entered your phone number correctly, including the country code.
Check for Blocked Numbers: Make sure your number isn’t blocked by your phone carrier.
Check Your SMS/MMS Settings: Ensure that your phone is properly configured to receive SMS and MMS messages.
Try a Voice Call: If you’re not receiving the verification code via SMS, try requesting a voice call instead.
WhatsApp Features to Enhance Your Experience
Now that you’ve got WhatsApp running smoothly, let’s explore some of its fantastic features!
1. Status Updates:
Share quick updates with your contacts using WhatsApp Status. These are like mini-stories that disappear after 24 hours. You can add photos, videos, and text.
2. Voice and Video Calls:
Connect with your loved ones face-to-face using WhatsApp’s free voice and video calling features. It’s a great alternative to traditional phone calls.
3. WhatsApp Groups:
Organize group chats for family, friends, work colleagues, or any other group you want to stay connected with. You can easily share information and have discussions.
4. Document Sharing:
Share various documents, such as PDFs, Word files, and spreadsheets, directly through WhatsApp. This makes collaboration and information sharing much easier.
Staying Safe and Secure on WhatsApp
While WhatsApp is generally safe, it’s important to be aware of some security best practices.
Keep Your App Updated: Regular updates include security patches that protect you from potential threats.
Be Careful About Links: Don’t click on suspicious links sent to you through WhatsApp. They could lead to malware or phishing scams.
Protect Your Privacy Settings: Review your WhatsApp privacy settings regularly and adjust them to your comfort level. You can control who can see your profile picture, status, and last seen time. For more information on privacy settings, you can check out this helpful WhatsApp support page.
Summary: Getting WhatsApp चालू – A Quick Recap
Getting WhatsApp up and running is usually straightforward. Remember these key steps: download the app, verify your phone number, and start chatting! If you encounter problems, try troubleshooting steps like restarting your phone, checking your internet connection, or reinstalling the app. Don’t forget to explore WhatsApp’s many features to enhance your communication experience. And always prioritize your security by keeping your app updated and being cautious about suspicious links.
So, there you have it! We’ve covered everything you need to know about getting WhatsApp चालू (WhatsApp working). Now it’s your turn! Have you had any experiences with getting WhatsApp working? Share your tips and tricks in the comments below, or share this post with someone who might find it helpful. Let’s help each other stay connected!
0 notes
Text
Resolving Common GPS Problems on Android Devices
Are you facing trouble with GPS on your Android phone? Don’t worry. This blog is your go-to source for keeping your GPS working again on your Android device. Experts of mobile phone repairs Perth offer simple and reliable tricks to manage and repair the problems associated with GPS in Android.

First, try the basic method to keep your GPS working again. This trick is simple, but it can keep GPS in your Android device working again.
Along with turning your on - and off your device, try to enable airplane mode and disable it after a few minutes. It can help in getting your GPS working again by resetting your mobile’s network connection.
Have you ever wondered how enabling and disabling airplane mode enhances the GPS accuracy of Android devices? When you enable airplane mode, then it cuts off all the connections like WiFi and cellular data.
It cuts the interruptions between the GPS signal and the cellular signal of mobile. After disabling it, it helps GPS to grab the location accuracy more precisely. In airplane mode, GPS is able to establish a more stable connection with satellites.
When your mobile GPS has a strong connection with a satellite, GPS provides a more precise location. One can try this trick when a person is in an area with a weak signal. If your phone has weak signals in urban and better location areas, then choose for the best phone repairs Perth.
If your GPS is still not working, then restart your Android device. Restarting your device will help you to eliminate the issues and glitches associated with your device’s connection.
Restarting the device can elevate device performance and GPS, too. It closes all the apps working in the background. Apps in the background consume energy and interfere with GPS’s connection with satellites.
Restarting Android phones clears the glitches, and all the settings are reset to the default, which enhances the functionality of GPS. GPS relies on network connections to communicate with satellites, refreshing mobile network connections for better GPS connection with satellites.
When restarting your device, don’t forget to turn on your location services. For better location accuracy, go to GPS settings and choose “High Accuracy’ for better location detection. If you are struggling to change the settings due to the touch of your mobile, then choose repairman for iPhone screen repair Adelaide.
Clearing cache also improves the functionality of GPS in Android devices. GPS stores temporary information such as satellite information and more. This data becomes corrupted and outdated with the passage of time.
This corrupted and stored data needs to be cleared from time to time. Removing data from time to time enhances overall performance and improves the accuracy and precision of GPS. If there is any issue in your phone’s software that is interfering with GPS functionality,
If you are still having trouble with your Android device GPS, then clear the cache, & update the software on your Android device. Sometimes, bugs and technical errors can cause issues related to GPS. For smoother navigation, delete all the previous and unnecessary files stored in your GPS folder. If your phone has a lot more technical glitches, then bring it to samsung repair Australia.
Bugs and errors may cause disruptions in GPS accuracy. By updating the system, this issue can be resolved. GPS interferes with and exchanges networks between hardware, software, and GPS satellites. Updating your mobile device can enhance compatibility between GPS and other software and hardware.
System updates mostly consist of security patches. It secures your device from viruses and other malware. Malware and viruses can disrupt the functionality of GPS.
System updates come with some unique add-on features in mobile. New features contribute to the better functioning of GPS. Connect with top mobile repairing firms for cheap mobile repair Brisbane.

Don’t forget to check your battery settings. Sometimes, settings associated with the battery restrict the GPS performance. If you have enabled battery saving mode on your mobile, then disable it and see if the GPS is working precisely or not.
If these essential tips do not help get your GPS working again, then you need to do some troubleshooting for better GPS performance.
Final Thoughts There are considerable ways to fix the issue associated with the GPS problem in your Android phone. If you’ve tried to fix the issue associated with GPS by using tips like resetting your phone, changing the network, and much more, you haven’t seen any improvement in the functionality of GPS on your Android phone. Then, you need to seek technical help from the best mobile repairmen Australia by The Mobile Hub.
0 notes