#how to change apple id password on iphone
Explore tagged Tumblr posts
Visit Tumblr Blog
Explore Tumblr blogs with no restrictions, modern design and the best experience.
Last Seen Tumblr Blogs


Fun Fact
Tumblr posted its first advertisements in May 2012 and subsequently earned $13M in revenue.
Text
Welcome to Aurora Bay @aurorabayaesthetic, [PABLO ALAALATOA]! I couldn’t help but notice you look an awful lot like [DIEGO LUNA]. You must be the [FORTY-FOUR] year old [OWNER OF AURORA'S CANDY PARLOR]. Word is you’re [THOUGHTFUL] but can also be a bit [DIFFIDENT] and your favorite song is [JESUS, ETC. BY WILCO. I also heard you’ll be staying in [SEABROOK QUARTER]. I’m sure you’ll love it!

Name: Pablo Alaalatoa Age: 44 Faceclaim: Diego Luna Height: 5'10 Pronouns: He/him Sexuality: Gay Relationship Status: Married to Luano Alaalatoa ( @luanoalaalatoa ) Occupation: Owner of Aurora’s Candy Parlor Vices: Red wine & cigarettes Favorite color: Olive Green
Biography
Born Pablo Padilla, he was the youngest of six boys. Growing up in a big household meant it was very easy to slip into the shadows especially because his oldest brother (eighteen years his senior) was Jose Padilla, a baseball player for the San Diego Padres from 1984-1990. Baseball was obviously a very big part of his family’s life growing up. At the age of five they moved to San Diego to be closer to his eldest brother and be able to catch all his home games. Despite all of his brothers being into sports, Pablo always showed very little interest letting his brother’s baseball fame to be his own. He’d rather stay at home with a good book or help his mother out in the kitchen. Pablo had always been closest with his mother in his family and was a mom’s boy up until the very end.
From an early age he showed interest in the culinary arts and that was the career path he sought out on after high school. He went to a culinary school in San Diego but quickly fell in love with the pastry program more specifically when it came to working with chocolate and confections of all kinds. When he graduated from his program he got a small loan from his eldest brother to open up an artisanal candy shop in San Diego. Opening the candy shop opened up the next chapter of Pablo’s life. It was through his candy shop that he found the man he would spend the rest of his life with. Luano Alaalatoa owned a neighboring business nearby and the man instantly caught his attention though it took some time before the two started a relationship. Pablo found his match in Luano and the pair have been together for eighteen years having spent nine of those years as a married couple.
The older Pablo got the more successful his business became but life comes at you fast. His mother was diagnosed with Alzheimer’s and Pablo took it upon himself to care for her right up until the end allowing his business to take a back seat. The loss of his mother still weighs heavily on Pablo to this day and it was the motivator for him and his husband to finally move away from San Diego and they settled in Aurora Bay five years ago. He opened up a new candy store in town and has been making a go of it in Aurora Bay ever since.
Quick Facts
Pablo’s a lover of music and he’s almost always got something playing and was a big concert goer back in the day. However, he kinda fell off the wagon listening to newer music and his tastes haven’t changed since 2010. He still plays the same mixtape CDs he made for his previous shop in his new business.
He’s very generous. Whenever Pablo is working in the candy store he’s almost always offering some sort of sample or discount. He also allows employees to eat as much candy as they want on their shift.
Aurora’s Candy Parlor is bigger than his first shop and he’s expanded to have employees many of the candies are still made by Pablo. He’s the only one who makes their signature Dulce De Leche truffles that are known to sell out on busy days.
Pablo is very technologically illiterate. He does have the newest iPhone because his old dinosaur of a phone finally died on him and he barely knows how to use it. He’s often calling one of his nieces or nephews to help him troubleshoot an issue. He also never remembers what he sets his Apple ID password and has to reset it every time he needs to use it.
Usually unwinds after dinner with a glass of red wine and a cigarette on his porch.
He’s a pretty avid baseball fan and still has allegiance to the San Diego Padres because of his brother. Occasionally he and his husband will travel to San Diego to catch a game a couple of times a season.
2 notes
·
View notes
Text
ohhhhh boy I get to tell this story now!! Admittedly it’s not as funny as opening a black hole or bringing an IT guy to tears of joy, but I have my own story of stumping the IT guys
so my first year of college, I needed a laptop and my mom was about to get herself a new one anyway so she gave me her MacBook Air. She gave it to me the day I moved in, since she had needed some time to download all her pictures onto USB drives before I could wipe it. So after unpacking all my furniture I plugged in the laptop, and looked up a tutorial on my phone for how to wipe it. But apparently whatever tutorial I looked up was too strong, because instead of deleting the MacBook’s memory, I accidentally deleted its entire software system. My entire laptop had been reduced to a black screen with a blinking white question mark in the center. My university has an IT section in the library, so I brought it there the next day, and the guy was utterly baffled by how I’d managed to do this. Luckily, he helped me redownload the last software system my MacBook had been running on. Mind you, I was a freshman in 2022 and due to my mom’s general disdain for software updates, the last system my laptop had been running on was Yosemite, a program from 2015. That in and of itself also got quite the reaction from the IT guy, but he showed me how to update my laptop on my own and sent me on my way. Also as a side note, since I have an iPhone I decided to make things easier by just logging into my MacBook with the same iCloud account. I got back to my dorm, went to update my laptop, and couldn’t because the laptop kept saying I had the “wrong Apple ID password”. For some reason, every time I input the password on my laptop, it was airdropping a six digit code to my phone. I’m sure the more technologically literate of you already know what that means, but I personally don’t know dick about shit so I had to return to the IT department to ask for help. The people there recognized me, and tried their best to help, but ultimately also couldn’t figure out what was happening. We even tried changing my password a few times just to be sure it was correct, but to no avail. They told me to call Apple support, and once again sent me on my way.
so I went back to my dorm, and called Apple support. After a few minutes of deliberation, the man on the phone realized the problem: nowadays in order to update the iOS on your laptop, you need two factor authentication. But two factor authentication didn’t exist in the days of Yosemite. So where normally there would be a box asking for my password AND a box asking for the six-digit code, I only had the former. We both sat there in silence for about five minutes trying to figure out what to do, until eventually I got tired of waiting and tried the dumbest possible solution on a hunch. I typed my password into the box, got the error message as well as the six-digit code on my phone, then re-typed my passcode into the box immediately followed by the code I’d just received. Somehow that actually worked, although to this day I couldn’t tell you why. The holler of joy I gave frightened the poor man on the other end of the phone, but I told him I’d solved the issue, thanked him for his help, and hung up. After two days and several dumbass moves on my part, I finally had a usable MacBook Air. It’s been 2 1/2 years, on top of the seven or so years my mom had it, and that laptop is still going strong. It can’t do anything too crazy, but considering the most strenuous activity I do on that laptop is play Minecraft it’s worked wonderfully for me. Keep on trucking lil dude.

#This ended up way longer than I thought it would be#but yeah#that’s the story of how I became a folkloric figure at my school’s IT department
120K notes
·
View notes
Text
How to Turn Off Find My iPhone on iCloud: A Simple Guide 2025
Turning off Find My iPhone can be necessary for a variety of reasons, whether you're preparing to sell or give away your device, or simply troubleshooting issues with your iCloud account. While it might sound complicated, disabling Find My iPhone is a straightforward process. In this post, we'll guide you through the steps to turn off Find My iPhone via iCloud and the settings on your device.

Why You Might Need to Turn Off Find My iPhone
Find My iPhone is a powerful feature that helps locate your device in case it’s lost or stolen. However, there are situations where you may need to disable it, such as:
Selling or giving away your iPhone: You’ll need to turn off Find My iPhone before erasing the device.
Troubleshooting issues: Occasionally, turning off Find My iPhone can help resolve iCloud-related problems.
Resetting your device: If you’re doing a factory reset, Find My iPhone needs to be off to avoid activation lock issues.
Top Methods to Turn Off Find My iPhone
From Your iPhone Settings The quickest way to turn off Find My iPhone is directly from your device’s settings. Here’s how to do it:
Go to Settings on your iPhone.
Tap on your Apple ID at the top of the screen.
Select Find My and tap Find My iPhone.
Toggle the switch to turn off Find My iPhone.
You’ll be prompted to enter your Apple ID password to confirm.
Using iCloud on the Web If your device is unavailable, you can also disable Find My iPhone using iCloud’s website. Here’s the step-by-step process:
Visit iCloud.com and sign in with your Apple ID.
Click on Find iPhone.
Select All Devices at the top and choose your iPhone from the list.
Click Remove from Account to disable Find My iPhone.
Via the Apple Support App If you’re having trouble accessing iCloud or your iPhone settings, you can use the Apple Support app to get help with turning off Find My iPhone.
Bonus Tips for Apple Users
Ensure your device is signed into the correct Apple ID.
Make sure you know your Apple ID password, as you’ll need it to confirm changes.
Always back up your data before turning off Find My iPhone to prevent data loss.
Why Trust Our Experts at Cell Phone Club?
If you need assistance turning off Find My iPhone or have any other Apple-related questions, We are one of the best Repair stores for phones in Brooklyn, NYC of experts is here to help. We specialize in:
iPhone and iCloud troubleshooting
Device setup and transfers
Apple product repairs and support
Affordable rates and fast service
Visit us Cell Phone Club for expert advice and personalized solutions to all your Apple needs!
Discover More
For a detailed guide on How to Turn Off Find My iPhone on iCloud and troubleshooting Apple devices, check out our website. Stay up-to-date with the latest tips and tricks for your Apple ecosystem
#iphonerepairservice#iphonerepairshop#iphonescreenrepair#iphonescreenreplacement#30minutesrepair#batteryreplacement#bayridgebrooklyn#androidrepair#blocknumber#brooklyn#iCloud#icloud tool#apple#findmy
0 notes
Text
What to Do if You Forgot Your Apple ID Password and Email?
Forgetting your iforgot.apple.com password and email can be frustrating, especially when access to vital Apple services such as iCloud, the App Store, or Apple Music depends on it. Thankfully, Apple provides various tools and steps to help you recover your account. In this blog, we'll guide you through the process of recovering your Apple ID password and email. We'll also provide additional tips to keep your account secure in the future.
Understanding Your Apple ID
Your Apple ID is your unique account for accessing Apple's ecosystem, including iCloud, iMessage, FaceTime, and more. It is typically tied to your primary email address. To recover your Apple ID or reset your password, you need to verify your identity through security measures.
Key Information You'll Need:
Email Address: The email you used to set up your Apple ID.
Password: The password linked to your Apple ID account.
Security Questions: Answers to security questions set during account creation.
Trusted Device or Phone Number: A device or phone number linked to your account for verification purposes.
If you’ve forgotten both your email and password, don’t worry—Apple offers multiple ways to help you regain access.
Step 1: Use Apple’s “iForgot” Tool
The first step in recovering your Apple ID password and email is to visit Apple’s iForgot page. This dedicated recovery portal provides a streamlined process to reset your password or find your Apple ID email.
Resetting Your Password
Go to iForgot: Open iforgot.apple.com in your browser.
Enter Your Apple ID Email: Input the email address associated with your Apple ID. If you don’t remember your email, proceed to the next section.
Follow Verification Steps: Apple may ask you to:
Enter the phone number linked to your account.
Answer security questions.
Use two-factor authentication if enabled.
Reset Your Password: Once verified, you can reset your password.
Choose a strong password that you haven’t used before.
Make a note of the password in a secure location.
Finding Your Apple ID Email
If you’ve forgotten the email address tied to your Apple ID, Apple can help you locate it:
Visit iforgot.apple.com.
Click on the option to recover your Apple ID.
Provide personal details such as your full name and email addresses you may have used.
Check your email inbox for instructions.
Step 2: Check Your Devices for Your Apple ID
Sometimes, your Apple ID is stored on one of your Apple devices. Here’s how to find it:
On an iPhone, iPad, or iPod Touch
Go to Settings.
Tap your name at the top of the screen.
Your Apple ID will be displayed under your name.
On a Mac
Open System Preferences or System Settings.
Click on Apple ID.
Your Apple ID will appear in the overview section.
On an Apple TV
Go to Settings > Users and Accounts > Your Account.
Look for your Apple ID.
Step 3: Use Your Email Account to Search for Clues
If you have access to your email account but can’t remember which one you used, search your inbox for Apple-related emails. Look for:
Receipts from the App Store or iTunes.
Emails about account changes or updates.
Welcome emails from Apple when you first created your account.
Step 4: Contact Apple Support
If you’re still unable to recover your account, contacting Apple Support is your best option. They can guide you through additional steps to verify your identity and regain access to your Apple ID.
How to Contact Apple Support:
Visit Apple Support.
Choose the option for Apple ID help.
Select the issue you’re experiencing.
Follow the prompts to connect with a support representative via chat, email, or phone.
Information You May Need to Provide:
Proof of purchase for your Apple device.
Serial number or IMEI of your device.
Personal details to verify your identity.
Step 5: Enable Two-Factor Authentication for Future Security
Once you recover your Apple ID, take steps to secure your account and avoid similar issues in the future.
How to Enable Two-Factor Authentication
Open Settings on your device.
Tap your name, then go to Password & Security.
Select Two-Factor Authentication and follow the instructions to set it up.
Add a trusted phone number for verification.
Benefits of Two-Factor Authentication
Prevents unauthorized access to your account.
Provides an extra layer of security.
Makes account recovery easier if you forget your password.
Step 6: Keep Your Account Information Safe
To avoid future problems, adopt these best practices:
Use a Password Manager
A password manager can help you store and retrieve your Apple ID credentials securely. Popular options include LastPass, Dashlane, and 1Password.
Regularly Update Your Password
Change your password periodically to enhance security.
Avoid using the same password for multiple accounts.
Backup Recovery Options
Keep your trusted phone number up-to-date.
Set up a recovery key for additional security.
Note Your Apple ID
Write down your Apple ID and store it in a safe place.
Use a secure note-taking app to save your login details.
Common Questions About Apple ID Recovery
1. What if I Can’t Access My Trusted Device?
If you can’t access your trusted device, use the phone number linked to your account or contact Apple Support for help.
2. Can I Create a New Apple ID Instead of Recovering the Old One?
Creating a new Apple ID is possible, but it’s not ideal. Your purchases, subscriptions, and data linked to the old Apple ID will not transfer to the new account.
3. How Long Does the Recovery Process Take?
If your account requires identity verification, the recovery process may take a few days. Apple will notify you once your account is ready for access.
Conclusion
Forgetting your iforgot.apple.com password and email can feel overwhelming, but Apple’s robust recovery tools make it possible to regain access. Start by using the iForgot tool, check your devices for clues, and contact Apple Support if needed. Once you recover your account, secure it with two-factor authentication and follow best practices to protect your credentials in the future.
By taking these steps, you’ll be back in control of your Apple ID in no time. Remember, your Apple ID is the gateway to your digital life with Apple, so safeguarding it is crucial.
0 notes
Text
How to Bypass iCloud Activation Lock without Passcode
youtube
Activation Lock: This iPhone/iPad was lost and erased. Enter the Apple ID and password that were used to set up this iPhone/iPad, when this alert occurs on your iOS devices, it means that you have to enter your Apple ID and password to unlock this iCloud Activation Lock.
Solution 1: iCloud bypass remove iCloud Activation Lock without password. iCloud bypass tool is the most efficient and complete way to remove iCloud Activation Lock. Which one removes the Activation Lock quickly, securely, and efficiently and without needing an Apple ID and password? TunesKit Activation Unlocker is one of the highly recommended professional iCloud bypass tools.
Solution 2: Recover Apple ID password to unlock
If you just accidentally trigger the iCloud Activation Lock, and you remember your Apple ID but forget your password, you can follow the tutorial bellow to unlock your device.
Situation 1:You have another iOS device that signs in with this Apple ID, you can:
Step 1: Go to Settings.
Step 2: Tap your name > Sign-in & Security > Change Password.
Step 3: Reset your password according to the guide on screen.
Solution 3: Connect the former owner to Unlock iCloud Activation Lock
If the device needed to be unlocked is a second-hand device, and you do not know anything about the former owner's Apple ID, you can try to contact the former owner and unlock the iCloud Activation Lock. In this way, you can remove iCloud Activation Lock without password.
0 notes
Text
Exploring macOS: Hidden Features Every MacBook Pro Owner Should Know
MacBook Pro users often rely on their devices for productivity, creativity, and entertainment. While macOS is known for its user-friendly interface, it also houses a variety of lesser-known features that can significantly enhance your experience. From time-saving shortcuts to advanced customisation options, here’s a guide to hidden macOS features every MacBook Pro owner should explore.
1. Quick Look for Instant File Previews
Quick Look allows you to preview files without opening them in their respective apps. Simply select a file in Finder and press the spacebar. This works for images, PDFs, and even videos. You can navigate through multiple files using arrow keys while Quick Look is active.
How to Maximise It:
For more functionality, use Quick Look to add annotations to PDFs or trim video clips without launching Preview or iMovie.
2. Split View for Multitasking
Working on multiple tasks? Split View lets you use two apps side by side, boosting productivity. To activate it, click and hold the green full-screen button in the top-left corner of a window, then drag it to one side of the screen. Choose another app for the opposite side.
Why It’s Handy:
Ideal for comparing documents, referencing research while writing, or attending a video call alongside note-taking.
3. Spotlight Calculator and Conversions
Spotlight is more than just a search tool. Press Cmd + Space to open Spotlight, and you can perform quick calculations or unit conversions. For instance, type “50 GBP to USD” or “10 kg to pounds” for instant results.
Bonus Tip:
Spotlight can also search for specific file types or locations using terms like “kind” or “folder.”
4. Customisable Hot Corners
Hot Corners transform your screen corners into triggers for specific actions. Go to System Settings > Desktop & Dock > Hot Corners. Assign functions like starting a screensaver, locking your screen, or displaying your desktop.
Best Uses:
Set up Hot Corners for quick privacy during work or rapid access to mission-critical files.
5. Text Replacement for Faster Typing
If you frequently type the same phrases, macOS has a built-in text replacement feature. Navigate to System Settings > Keyboard > Text. Add shortcuts like “omw” to expand into “On my way!” or “sig” for your email signature.
Pro Tip:
Combine this with customised keyboard shortcuts for seamless writing across applications.
6. Universal Clipboard for Seamless Copy-Pasting
Copy text or images on your iPhone or iPad and paste them directly onto your MacBook Pro. Universal Clipboard works across devices signed into the same Apple ID with Bluetooth and WiFi enabled.
How It Enhances Workflow:
Perfect for transferring content quickly without emailing or using cloud services.
7. Automator for Task Automation
Automator helps you automate repetitive tasks, such as renaming large batches of files or converting image formats. Open Automator from the Applications folder, choose a workflow type, and drag the desired actions into the workflow panel.
Examples of Use:
Set up a workflow to resize images for specific project needs or create custom alerts for calendar events.
8. Screen Time for Mac
Screen Time isn’t just for mobile devices. On macOS, it helps monitor your app usage and set limits to avoid distractions. Find it in System Settings > Screen Time.
Stay Focused:
Create App Limits to restrict time on social media or set Downtime for uninterrupted work sessions.
9. Safari Reader Mode
For a distraction-free reading experience, Safari’s Reader Mode strips away ads and clutter from web articles. When you’re on a compatible webpage, click the Reader button in the address bar or press Cmd + Shift + R.
Additional Perks:
Customise Reader Mode by changing the text size, background colour, or font to suit your preferences.
10. Secure Notes with Passwords
The Notes app lets you lock sensitive information. Select a note, click the Lock button in the toolbar, and set a password. This ensures that private information stays protected.
Best Practice:
Use this for storing personal details, secure project notes, or financial information.
Final Thoughts
These hidden macOS features can transform your MacBook Pro experience, making your workflow more efficient and your tasks more manageable. Whether you’re a creative professional or a business user, mastering these tools can help you unlock the full potential of your device.
For those considering upgrading their setup temporarily or for specific projects, a MacBook Pro rental is an excellent way to experience the latest macOS features without committing to a purchase.
0 notes
Text
How Apple Shapes Global Tech Trends Today

Apple is a major force in tech. It influences global trends greatly. People follow Apple's products, style, and features. Each launch sparks new ideas worldwide. Apple didn’t just make products; it changed the tech world. The iPhone, iPad, and Mac set high standards. These devices show how tech can fit our lives. Many brands copy Apple's designs and features. Apple's reach is vast, shaping what we use daily. This influence keeps Apple at the top of the industry. It leads, and others follow.
Innovation Drives Global Standards
Apple sets a high bar for quality. Each product is well-made and works well. For example, when Apple added Face ID, it became popular. Now, many brands offer face unlock. Apple didn’t invent the tech, but it made it better. Apple's focus on user experience stands out. The App Store is another big influence. It changed how apps work and stay secure. App developers now follow Apple’s lead. This focus on quality affects all tech industries. Apple’s ideas create new global standards for others.
User-Centric Design Revolution
Apple focuses on user-friendly designs. Its products are simple to use. The iPhone was the first easy smartphone. People didn’t need guides to use it. The clear design made sense right away. This user focus now drives all tech products. Other brands follow Apple’s approach. For example, slim, button-free phones are now standard. Apple also made apps more intuitive. Simple, sleek designs now fill app stores. Apple’s designs prove that simple can be powerful. This trend shows no sign of slowing down.
Privacy and Security Emphasis
Apple leads in user privacy. It limits data collection and sharing. This respect for privacy sets it apart. Features like App Tracking Transparency make users feel secure. Apps must now ask to track data. This rule has made other brands follow suit. Security also drives Apple’s influence. The iPhone has encryption and strong passwords. Face ID is another trusted feature. These moves show the world that privacy matters. Apple’s lead in security has raised global awareness. Now, privacy is a key part of tech.
Sustainable Tech Practices
Apple works to reduce its carbon impact. It uses recycled materials in devices. For example, the new iPhone includes recycled metals. Apple’s move toward green practices has spread worldwide. Many companies now follow Apple’s lead in this. Apple’s goal is a carbon-neutral supply by 2030. This big step sets an example. People are more aware of eco-friendly tech now. Brands like Samsung and Google are also adapting. Apple’s focus on the planet has created a global shift in thinking. Green tech is now the future.
0 notes
Text
How Long Does It Take to Recover an Apple ID Account?
Apple ID is essential for accessing Apple services like iCloud, the App Store, Apple Music, and more. It is the gateway to personal data, app purchases, and syncing across Apple devices. However, losing access to your Apple ID, whether due to forgotten credentials, security issues, or account compromise, can be frustrating and stressful. The process of recovering an Apple ID depends on several factors, including the method of recovery and the information you have available.
In this article, we will discuss how long it typically takes to recover an Apple ID account, the steps involved in the recovery process, and tips to expedite the process. We will also highlight the importance of using Apple's official account recovery portal, iforgot.apple.com website, which is an essential tool for users attempting to regain access to their Apple accounts.
Common Reasons for Apple ID Account Recovery
Before diving into the recovery timeline, it’s important to understand why someone might need to recover their Apple ID account. The most common reasons include:
Forgotten Password: You may forget the password to your Apple ID, especially if you haven’t logged in for a while or recently changed it.
Account Locked or Disabled: If too many incorrect attempts are made to sign in, Apple may lock or disable your account for security reasons.
Compromised Account: If there is a suspicion that your Apple ID has been hacked or compromised, you might be locked out of the account.
Security Questions Forgotten: If you set up security questions during Apple ID creation but forget the answers, you might need to go through recovery.
Two-Factor Authentication Issues: Problems with receiving two-factor authentication (2FA) codes or losing access to your trusted device can lead to recovery steps.
The recovery time will depend on which of these issues you are facing, as well as the recovery method you choose.
Methods for Apple ID Account Recovery
Apple offers several methods for recovering your Apple ID account. Depending on the method you choose, the recovery process can range from a few minutes to several days. Below are the primary methods for recovering your Apple ID.
1. Resetting Password via iforgot.apple.com
One of the quickest ways to recover your Apple ID is to reset your password using iforgot.apple.com. This is Apple's dedicated account recovery portal, where users can enter their Apple ID (email) and follow the steps to reset the password. Here's how it works:
Step 1: Visit iforgot.apple.com and enter your Apple ID.
Step 2: Follow the prompts to confirm your identity. You may be asked to enter the phone number associated with your account or answer security questions.
Step 3: If you have two-factor authentication enabled, Apple will send a verification code to your trusted device or phone number.
Step 4: Once the verification code is entered, you can create a new password and regain access to your account.
In most cases, resetting your password via iforgot.apple.com takes just a few minutes if you have access to your trusted device or phone number. However, if you don’t have access to your trusted devices or are unable to verify your identity, the process may take longer.
2. Using Two-Factor Authentication
If two-factor authentication (2FA) is enabled on your Apple ID, recovering your account becomes a bit more secure but may also take more time if you don’t have access to your trusted device. Here’s how the 2FA recovery process works:
Step 1: When you attempt to sign in to your Apple ID and forget your password, you can choose the option to reset it using 2FA.
Step 2: Apple will send a verification code to your trusted device (such as your iPhone or Mac) or a trusted phone number.
Step 3: Enter the verification code to confirm your identity.
Step 4: Once confirmed, you can reset your password and regain access to your Apple ID.
If you don’t have access to your trusted device or phone number, you may have to go through account recovery, which could take several days (as explained below).
3. Account Recovery via iforgot.apple.com
If you are unable to reset your password using the methods above (e.g., no access to trusted devices or phone numbers), Apple offers an account recovery process via iforgot.apple.com. This method is typically used as a last resort when you are completely locked out of your account and unable to verify your identity using other means.
Step 1: Start the account recovery process at iforgot.apple.com.
Step 2: You will be asked to provide details about your account, such as the Apple ID, phone number, and any information that can help Apple verify your identity.
Step 3: Apple will notify you via email or text that the account recovery process has started. This process can take several days, depending on the information you provide and the complexity of the situation.
Step 4: Once Apple verifies your identity, they will send instructions to your email or phone on how to reset your password and regain access to your account.
This method is time-consuming because Apple manually reviews your account recovery request to ensure that you are the legitimate owner of the Apple ID. The timeline can vary, but it typically takes anywhere from 3 to 7 days. In some cases, it could take longer, especially if additional verification steps are required.
4. Recovering an Account without Two-Factor Authentication
If your Apple ID is not protected by two-factor authentication, you may be asked to answer security questions or receive an email to reset your password. This process is relatively straightforward, but the time it takes depends on your ability to correctly answer the security questions or access your email account.
Step 1: Visit iforgot.apple.com and enter your Apple ID.
Step 2: Choose the option to answer security questions or receive a password reset email.
Step 3: If you correctly answer the security questions or click on the reset link sent to your email, you can reset your password and regain access to your account.
This method is usually quick, taking only a few minutes if you have access to your email or remember the answers to your security questions. However, if you can’t access your email or answer the security questions, you’ll need to go through the more time-consuming account recovery process.
Factors Affecting Apple ID Recovery Time
The time it takes to recover an Apple ID account depends on several factors:
Method of Recovery: As discussed above, using iforgot.apple.com for password reset with access to trusted devices or email can be completed within minutes. However, account recovery without access to trusted devices can take several days.
Availability of Trusted Devices: If you have access to your trusted devices or phone number, the recovery process is much faster. Without them, the recovery process becomes more complex and time-consuming.
Two-Factor Authentication: Having two-factor authentication enabled provides an extra layer of security, but it can also slow down the recovery process if you lose access to your trusted devices.
Verification Requirements: The more information you provide during the recovery process, the quicker Apple can verify your identity. If you are unable to provide sufficient information, Apple may require additional verification, which can extend the recovery timeline.
Account Compromise: If your account was compromised, Apple may take extra steps to secure it, which can delay recovery. In cases of suspicious activity, Apple might lock your account and require additional verification steps.
Email Delays: If you’re relying on receiving a password reset email, delays with your email provider can add time to the recovery process.
How to Expedite Apple ID Recovery
While some delays in Apple ID recovery are inevitable, there are a few steps you can take to speed up the process:
Use Trusted Devices: Ensure that your trusted devices (iPhone, iPad, or Mac) are in good working order and that you have access to them.
Update Contact Information: Keep your phone number, email, and security questions up to date in your Apple ID account settings to ensure smooth recovery if needed.
Enable Two-Factor Authentication: Enabling 2FA can prevent unauthorized access and reduce the likelihood of needing a lengthy account recovery process.
Keep Backup Codes: If you have two-factor authentication enabled, consider saving backup codes in a secure place in case you lose access to your trusted devices.
Respond Quickly to Emails: If Apple sends you a notification or instructions via email during the recovery process, respond promptly to avoid delays.
Conclusion
Recovering an Apple ID account can take anywhere from a few minutes to several days, depending on the method you use and the information you have available. In most cases, using iforgot.apple.com website and having access to your trusted devices or email will result in a quick recovery. However, if you are locked out of your trusted devices or require manual account recovery, the process can take several days or longer.
By following the tips provided in this article and keeping your account information up to date, you can minimize the time it takes to recover your Apple ID in the event of a lockout.
0 notes
Text
How Can You Bypass Your iPhone Passcode in Easy Steps?
Forgetting your iPhone passcode can be a frustrating experience, especially when you're locked out of your device and can't access important data. Whether you've recently changed your passcode or haven't used your phone in a while, learning how to bypass iPhone passcode restrictions can seem overwhelming. Fortunately, there are straightforward methods you can follow to unlock your device without requiring advanced technical knowledge.
In this guide, we’ll walk you through how to bypass iPhone passcode locks using step-by-step instructions with iTunes, Finder, or recovery mode. These solutions will help you restore your device and regain access, even if you can't remember the passcode. With easy-to-follow steps and helpful tips, you'll be able to bypass your iPhone passcode and get back to using your phone in no time.
Understanding iPhone Security and Passcodes
Before diving into methods of bypassing your passcode, it’s essential to understand why Apple’s security is so stringent. Apple's iOS operating system is built to protect user data from unauthorized access. One of the primary ways iPhones do this is through passcodes, Face ID, and Touch ID. If you enter the wrong passcode multiple times, your iPhone will lock itself for a specific period and eventually disable completely, requiring you to erase and restore the device.
Apple’s security also ensures that once a passcode is set, you cannot change, remove, or reset it without either the passcode itself or authorized access to your iCloud account.
Is It Possible to Bypass Your iPhone Passcode?
Yes, it is possible to bypass your iPhone passcode in this modern world. With advancements in technology, there are now many ways available to regain access to a locked iPhone. Whether you've forgotten your passcode or inherited a locked device, several methods exist that can help you bypass the passcode and unlock the phone. From using official Apple tools to specialized third-party software, you have a range of options depending on your specific situation.
In this article, we are going to explore the top methods to bypass your iPhone passcode with easy steps. These solutions are designed to guide you through the process quickly and efficiently, ensuring you can regain control of your device without unnecessary complications.
How To Bypass Your iPhone Passcode in Easy Steps Using Passixer:
If you're struggling to unlock your iPhone 11 due to a faulty Face ID sensor or a forgotten passcode, Passixer iPhone Unlocker offers a reliable solution. This tool is specifically designed to bypass various types of screen locks, including 4-digit or 6-digit passcodes, Face ID, and Touch ID. Additionally, Passixer enables the removal of Apple ID, Screen Time restrictions, iCloud activation locks, and MDM (Mobile Device Management) locks. Even if your iPhone's screen is broken, unresponsive, or disabled, this software can help you regain access without needing the passcode.
Compatible with all iOS versions, including iOS 17, Passixer iPhone Unlocker is easy to use, making it an ideal tool for bypassing iPhone passcodes without any technical knowledge. Below, we will outline its features, provide a detailed step-by-step guide, and list its advantages and drawbacks.
Key Features:
Unlock iPhone/iPad Screen Passcode:
Passixer can bypass any type of lock on your iPhone or iPad, whether it’s a forgotten 4-digit or 6-digit passcode, or an issue with Face ID or Touch ID. This tool allows you to bypass the lock without relying on iTunes or iCloud, making it particularly helpful when your device becomes disabled after repeated incorrect passcode attempts.
Remove Apple ID Without a Password:
If you’ve forgotten the password to an old Apple ID and can’t log out, Passixer lets you remove it completely. After removal, you can sign in with a new Apple ID and access services such as iCloud, iMessage, and FaceTime. This feature is especially useful for second-hand devices or when your Apple ID is disabled.
Bypass iCloud Activation Lock:
Passixer can help bypass iCloud Activation Lock without needing the Apple ID or password. This is perfect for those dealing with second-hand devices that are locked by a previous owner's credentials.
Remove MDM (Mobile Device Management) Lock:
If your iPhone or iPad is restricted by MDM, Passixer allows you to remove the MDM lock without requiring administrator credentials, giving you full control of your device again.
Remove Screen Time Passcode Without Data Loss:
Forgot your Screen Time passcode? Passixer can remove it without erasing any data, restoring full access to your device's features without having to reset the device.
Remove iTunes Backup Encryption:
Forgot the password for your encrypted iTunes backup? Passixer can decrypt the backup, ensuring that your data remains intact.
Compatible with a Wide Range of iOS Devices:
Passixer supports many iPhone, iPad, and iPod models, including the latest iPhone 16 and iOS 18, making it a versatile option for a wide user base.
Cross-Platform Support:
Passixer works seamlessly on both Windows and macOS, providing flexibility no matter your preferred operating system.
How To Use:
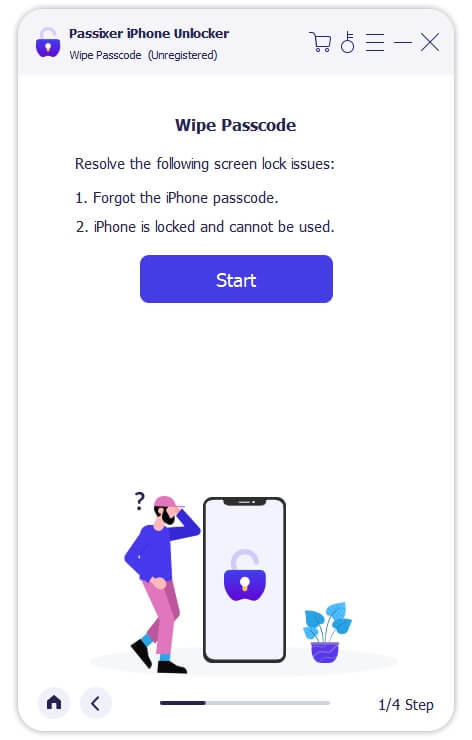
Step 1: Launch Passixer and Select Wipe Passcode
Download and install Passixer iPhone Unlocker on your computer. Launch the app, select "Wipe Passcode," and click "Start."
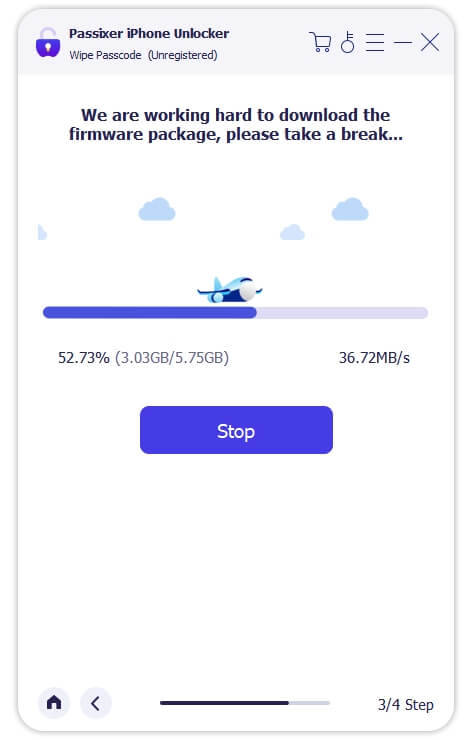
Step 2: Connect Your iPhone to the Computer
Connect your iPhone 11 via USB. Once detected, review your device's info and click "Download" to acquire the necessary firmware.
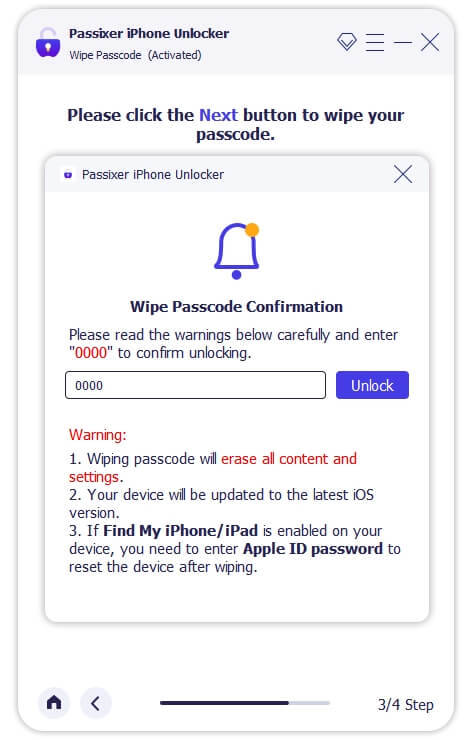
Step 3: Unlock Your iPhone
After downloading the firmware, click "Unlock," then enter "0000" to confirm. Click "Unlock" again and wait for the process to complete. Your iPhone will be unlocked successfully.
Pricing Plans:
Year License: $39.99 (discounted from $59.99, tax excluded). Covers 6 iOS devices and 1 PC.
1-Month License: $29.99 (discounted from $39.99, tax excluded). Suitable for 6 iOS devices and 1 PC.
Lifetime License: $69.99 (tax excluded). Includes coverage for 6 iOS devices and 1 PC, with a one-time payment for lifetime access.
Benefits Of Using Passixer To Bypass Your iPhone Passcode:
Simple and Fast Unlocking: Passixer offers a hassle-free way to bypass your iPhone passcode with an easy-to-use interface. Whether you're locked out due to a forgotten passcode, Face ID malfunction, or issues with Touch ID, Passixer streamlines the process, making it quick and straightforward for anyone to use.
Multiple Unlocking Functions: Passixer does more than just unlock passcodes—it can remove Apple IDs, bypass iCloud activation locks, and disable MDM (Mobile Device Management) restrictions. This makes it a versatile tool for fully regaining access to your device.
Compatible with Various iOS Devices: Supporting a wide range of iPhone, iPad, and iPod models, including the latest iPhone 15 and iOS 17, Passixer ensures its usefulness for both older and newer Apple devices, giving it broad appeal.
No iTunes or iCloud Required: Unlike conventional methods that require syncing with iTunes or iCloud, Passixer operates independently, allowing you to unlock your device without needing access to these services.
Remove Apple ID Without a Password: If you're unable to log into your Apple ID or want to remove an old Apple ID from a second-hand iPhone, Passixer allows you to completely remove the ID, letting you sign in with a new one and restore full device functionality.
Bypass MDM and Screen Time Locks: Passixer can effectively bypass Mobile Device Management (MDM) restrictions and Screen Time passcodes, giving you the freedom to use your iPhone without limitations, especially helpful for school- or company-managed devices.
Available on Windows and macOS: Passixer offers support for both Windows and macOS platforms, making it accessible no matter which operating system you prefer, ensuring flexibility for a wide range of users.
Cost and Time Efficient: Passixer saves you time and money by providing an affordable, at-home solution for unlocking your iPhone, eliminating the need for costly repair services or professional help.
Conclusion:
Forgetting your iPhone passcode can be a frustrating experience, leaving you locked out of your device and unable to access important information. Fortunately, this guide outlines straightforward methods to bypass iPhone passcode restrictions. By following the step-by-step instructions provided, you can regain access to your phone quickly and easily, restoring your ability to use your device without complications.
One of the most effective tools for bypassing iPhone passcodes is Passixer. This software is designed to unlock various types of screen locks, including 4-digit and 6-digit passcodes, as well as Face ID and Touch ID issues. Additionally, Passixer allows you to remove Apple IDs, bypass iCloud activation locks, and disable MDM restrictions, making it a versatile solution for regaining control of your device.
In summary, recovering access to your iPhone after forgetting your passcode is possible and can be done with relative ease. By utilizing tools like Passixer, you can navigate the unlocking process without needing extensive technical knowledge. Don’t let a forgotten passcode keep you from your device; follow the steps in this guide to swiftly regain access and enjoy all the features your iPhone has to offer.
1 note
·
View note
Text
Apple’s Passwords App In iOS 18: Basic Privacy And Security
Apple introduces passwords app
The updated Passwords app in iOS 18 is a major step forward for Apple’s ongoing goal of improving security while streamlining the user experience. With this new strategy, Apple users can still anticipate the same high standards of privacy while also benefiting from improved password management, streamlined login procedures, and better security measures. Examining iOS 18’s main features, usability, security improvements, and how it stacks up against alternative password solutions, this article will examine Apple’s most recent attempts to streamline password management and security.
Overview: The Mystery of the Password
iOS 18 passwords app
Though they are one of its weakest points, passwords have long served as the foundation of digital security. A significant security risk is created when users reuse the same password across several services since they frequently find it difficult to remember multiple complicated passwords. iCloud Keychain and the Passwords app in iOS 18 are two of Apple’s recent efforts to address the problems caused by passwords. The company was made aware of these difficulties in the past.
Built with a more intuitive UI, biometric authentication built in, and seamless cross-device syncing, the Passwords app in iOS 18 is an improved version that builds on earlier advances. In some circumstances, Apple’s method can completely replace traditional passwords, as it not only streamlines password administration but also integrates emerging technologies like passkeys. With iOS 18, Apple ensures that consumers can enjoy convenience without compromising security by providing a comprehensive solution to the password dilemma.
Important Characteristics of the iOS 18 Passwords App
In order to enhance user experience and security, the Passwords app in iOS 18 has a number of new features. These characteristics consist of:
Consolidated Password Administration
Using iCloud Keychain and additional stored passwords from apps and browsers, the new Passwords app centralizes all of your login information in one location. Users can simply access, manage, and update all of their passwords on various devices, including Mac, iPad, and iPhone, thanks to this.
The Future of Login with Passkeys
Passkeys, which seek to do away with the necessity for conventional passwords completely, are one of the most noteworthy features in iOS 18. Passkeys use public-private key pairs to authenticate users without passwords. Face ID or Touch ID protects passkeys, which are stored in the Secure Enclave on the user’s device. Since passkeys can’t be phished or published online, they’re more secure.
Better Authentication Through Biometrics
App and website secure login is made simpler and faster with the Passwords app’s integration with Apple’s biometric authentication methods, such as Face ID and Touch ID. Not only does this integration guarantee that only authorized users can access user credentials, but it also removes the need for complicated password entry.
Passwords That Automatically Adopt
When creating new accounts, iOS 18 has the capability to automatically suggest strong, one-of-a-kind passwords as part of Apple’s ongoing effort to promote excellent security practices. Passwords app users can change the generated passwords to their liking, and these ideas are safely saved inside.
Exchange of Passwords
With iCloud Family Sharing, iOS 18 brings secure password sharing. Without disclosing other private information, users can communicate some passwords to dependable family members. Families that share subscriptions or accounts may find this option especially helpful.
Handled Two-Factor Authentication (2FA) Integration
Two-factor authentication (2FA) codes may now be easily managed by the app. When signing in, users who depend on this extra security layer will have less friction because it can create 2FA codes for websites and apps that enable it. These codes will automatically fill in.
Security Recommendations and Auditing Passwords
In order to verify that saved passwords match databases of known compromised credentials, Apple has improved the password security auditing capability. Users can change their passwords and receive advice from the Passwords app if any of their credentials have been compromised. Not only that, but users receive recommendations for better, more secure passwords to use in place of weak or repurposed ones.
Apple passwords app
With iOS 18, Apple continues to prioritize security and privacy. A number of security measures are incorporated into the Passwords app to guarantee that user credentials are kept secret and safe.
Encryption at the Device
End-to-end encryption is used to protect all passkeys and passwords, which are kept locally on the device. As a result, consumers may be as private as possible because not even Apple has access to their credentials.
Protected Area
A specific hardware element in Apple products called the Secure Enclave is where passkeys are kept safe. Apple makes sure that their authentication data is safe from hackers and malware by storing passkeys here and limiting access to just the user.
Not using a centralized database
By keeping critical information decentralized, Apple’s solution differs from standard password managers that store user data on cloud servers. The iCloud allows passwords to be synchronized between devices, but they stay encrypted and can only be unlocked on machines that the user has designated as trusted. Mass data breaches, a frequent weakness for password management services, are significantly less likely as a result.
Secure Biometrics
Using passkeys and accessing the Passwords app requires biometric authentication, which adds an additional degree of protection. You would still need to enable Face ID or Touch ID to view or use your passwords even if someone were to physically reach your device.
Summary: Using iOS 18 to Simplify Passwords
Apple has committed to enhancing security and user experience once more with the release of the Passwords app in iOS 18. Apple is spearheading the shift away from passwords and toward a future where they are not only easier to manage but may someday become obsolete with its advanced features like passkeys, integrated 2FA, and secure password sharing.
Read more on Govindhtech.com
#Apple#applepasswordsapp#passwordsapp#iOS18#ios18features#govindhtech#TechNews#NEWS#Technology#technoogytrends#technologynews#passwordsappinios#technologytrends
0 notes
Text
How Do I Remove Activation Lock If I Forgot My Apple ID?
The Activation Lock is a security feature built into Apple devices such as iPhones, iPads, and Macs. It ties your device to your Apple ID, helping prevent unauthorized access or theft. However, it can become an issue when you forget your Apple ID or password, as you will need that information to disable the Activation Lock. This article will explain various methods to remove the Activation Lock if you've forgotten your Apple ID, including the role of iforgot.apple.com.
Understanding Activation Lock
Before delving into the solutions, it's essential to understand what the Activation Lock is and why Apple implements it. Activation Lock is part of the Find My feature, which allows users to locate their Apple devices if lost or stolen. Once the feature is enabled, the device is locked to your Apple ID. If someone attempts to reset or reactivate the device, they will need to enter the Apple ID and password linked to it.
This feature is a powerful deterrent against theft because it makes the device virtually unusable without the correct credentials. However, it can also present a challenge if you forget your Apple ID and need to regain access to your device.
Common Reasons for Forgetting Your Apple ID
You may find yourself locked out of your Apple device due to Activation Lock for several reasons:
You haven't used your Apple ID for a long time and have forgotten the email address or password.
You've recently changed your Apple ID or password but didn't update the information on all your devices.
You’ve inherited a used device from a friend or family member but don’t have access to their Apple ID.
No matter the reason, there are solutions to help you remove the Activation Lock.
Method 1: Recovering Your Apple ID with iForgot.apple.com
If you've forgotten your Apple ID, the first and most straightforward approach is to recover it using Apple's dedicated recovery site: iForgot.apple.com. Follow these steps to recover your Apple ID and password:
Step 1: Visit iForgot.apple.com
Go to the website iForgot.apple.com from any web browser on a computer, smartphone, or tablet.
Step 2: Enter Your Information
Once you're on the site, you’ll be prompted to enter the email address that you believe is associated with your Apple ID. If you can't remember the exact email address, try using any email addresses you may have used with Apple services.
Step 3: Verify Your Identity
Depending on your settings, you may need to verify your identity using security questions, an email verification code, or two-factor authentication (2FA). Apple will send a confirmation code to your phone or email to ensure that you are the account owner.
Step 4: Reset Your Password
Once your identity is verified, you'll be able to reset your password and regain access to your Apple ID. After resetting your password, enter it on the locked device to disable the Activation Lock.
Step 5: Use the New Credentials to Unlock Your Device
Now that you’ve recovered your Apple ID and password, you can use these credentials to remove the Activation Lock from your device. When prompted, enter your Apple ID and the new password. The lock should be removed, and you will regain access to your device.
Method 2: Using Account Recovery for Two-Factor Authentication
If you have two-factor authentication (2FA) enabled on your Apple ID and can't access your account, you can initiate the recovery process directly from iForgot.apple.com. Follow these steps to recover your Apple ID via account recovery:
Step 1: Begin Recovery on iForgot.apple.com
Visit iForgot.apple.com and enter your Apple ID email address. If you’ve forgotten the Apple ID, follow the steps on the screen to try to recover it.
Step 2: Start the Account Recovery Process
If you are unable to access your Apple ID using 2FA or security questions, you’ll be prompted to start the Account Recovery process. Account Recovery is a slower but secure way of regaining access to your Apple ID when traditional methods fail.
Step 3: Provide a Recovery Contact
During the recovery process, Apple may ask you to provide a contact phone number. This number will be used to send updates on the progress of your recovery request.
Step 4: Wait for Account Recovery to Complete
Once you’ve provided the necessary information, Apple will begin the recovery process. This could take several days, depending on your account’s specific security details. Apple will notify you when your account is ready to be restored.
Step 5: Disable Activation Lock
Once your account recovery is complete and you’ve regained access to your Apple ID, use the credentials to disable the Activation Lock on your device. Enter your Apple ID and the new password, and the device should unlock.
Method 3: Contacting Apple Support
If the previous methods don't work, your next option is to contact Apple Support for assistance. In some cases, especially when the device was purchased second-hand or if you’re the legal owner but can't provide the necessary credentials, Apple Support may be able to assist you in removing the Activation Lock.
Step 1: Gather Proof of Ownership
Before contacting Apple Support, gather proof of ownership for the device. This may include a receipt, invoice, or other documentation showing that you legally own the device.
Step 2: Contact Apple Support
Reach out to Apple Support via the Apple website or visit an Apple Store in person. Explain the situation, including that you’ve forgotten your Apple ID and are locked out of your device due to Activation Lock.
Step 3: Follow Apple’s Instructions
Apple Support will guide you through the steps necessary to unlock your device. Depending on the situation, they may require you to provide proof of ownership or other documentation. If they verify that you are the legal owner, they can help disable the Activation Lock.
Method 4: Unlocking a Device without Apple ID via Third-Party Services
If you’re unable to recover your Apple ID or get help from Apple Support, there are third-party services that claim to remove the Activation Lock without requiring your Apple ID. Be cautious, as many of these services may not be legitimate and could potentially be scams. Additionally, using third-party tools could compromise the security and functionality of your device.
That said, there are some reliable third-party tools that have been reported to help with Activation Lock removal. Popular tools include:
Tenorshare 4MeKey
iMobie AnyUnlock
Dr.Fone – Unlock
These tools require you to connect your device to a computer and follow on-screen instructions. Be sure to research any tool thoroughly before using it, and be aware that such methods may void your warranty or violate Apple's terms of service.
Method 5: Requesting Help from the Previous Owner
If you've acquired a used device that is locked with Activation Lock, you will need the Apple ID and password of the previous owner to unlock it. Follow these steps to request their assistance:
Step 1: Contact the Previous Owner
If you know the previous owner, reach out to them and explain that the device is locked. Ask them to either provide their Apple ID and password temporarily or unlock the device themselves.
Step 2: Ask Them to Remove the Device from iCloud
The previous owner can log into their iCloud account from any device or computer and remove the locked device from their account. Here's how they can do it:
Go to iCloud.com and sign in with their Apple ID.
Click on Find My iPhone.
Select All Devices at the top of the screen.
Choose the device you’re trying to unlock.
Click Remove from Account.
This will remove the Activation Lock from the device, allowing you to use it with your Apple ID.
Tips for Preventing Future Lockouts
Once you’ve successfully removed the Activation Lock, it’s crucial to take steps to prevent this issue from happening again in the future. Here are some tips:
Use a Password Manager: Store your Apple ID and password in a secure password manager to avoid forgetting it in the future.
Enable Two-Factor Authentication: Ensure your account is protected with two-factor authentication, which can make it easier to recover your account if you forget your password.
Keep Your Contact Information Updated: Make sure the email address and phone number associated with your Apple ID are always up to date.
Regularly Backup Your Device: Regular backups can help you avoid data loss if you need to reset or recover your device.
Conclusion
Forgetting your Apple ID and being locked out of your device due to Activation Lock can be a stressful experience, but it’s not insurmountable. By utilizing tools such as iforgot.apple.com to recover your Apple ID, contacting Apple Support, or seeking assistance from the previous owner, you can regain access to your device. Always take preventive measures to keep your Apple ID credentials secure to avoid future lockouts.
0 notes
Text
What to do if your phone gets stolen
If your phone falls into the hands of criminals, do not panic. Here is how to protect your data.
June 2, 2021

If you can’t find your phone, don’t panic. Exhaust your good options — maybe you misplaced it or lent it to someone, or buried it under some papers — and then, unfortunately, assume it was stolen. If you read our post on how to theft-proof your smartphone and data and followed the tips, then you’ve safeguarded your information and can restore it on a new phone. But even if you didn’t prepare in advance, you can reduce the damage.
Table of Contents:
Best-case scenario
Worst-case scenario
Have your SIM card blocked
Warn your relatives and friends
Block stolen smartphone
Unlink bank cards
Block the smartphone’s IMEI number
What’s next?
Contact the police
Change your passwords
Restore your data
Cheer up
Best-case scenario
Your phone’s screen was locked when it went missing, the data on it is encrypted, and the SIM card is PIN-protected. In that case:
Use the Find My Device (Android) or Find My (iOS) feature to mark the phone as lost and have the device display an on-screen message with the number of a friend or relative who can contact you in case someone honest finds the device;
After waiting as long as you’re comfortable on the first step, remotely delete all data on the device and contact your operator to block the SIM card;
Buy a new smartphone and restore your data from a backup copy.
We also recommend staying vigilant after the theft. Thieves often take advantage of that contact information, especially with more expensive devices, and use social engineering to trick the owner of the stolen device into revealing the password for their Google or Apple ID account. If successful, they can unlink the device from the account and make more money by selling the phone whole than by disassembling it and selling the parts.
In short, treat all texts and calls related to a stolen phone with the utmost suspicion, and do not enter or reveal your Google account or Apple ID credentials.
Worst-case scenario
If the smartphone landed in the wrong hands and it is not protected, possibly not even by a screen lock, then time is of the essence. The first thing you need is another phone from which to make several calls. Ask store or restaurant staff to use their phone, or flag down a cab and borrow the driver’s phone.
Block your SIM card
Your first call is to your carrier. Tell the support rep that you lost your SIM card and ask them to block it. Once the SIM card is blocked, the thief will no longer be able to impersonate you (call from your number or receive a text message with a verification code for changing a password or confirming a transaction, for example).
Warn relatives and friends
Your second call should be to a friend or relative. Explain that your phone was stolen, and ask them to warn mutual contacts that they might get calls or messages from your number with requests for money or maybe some questions, all of which they should ignore. You might want to ask them to post a warning on social media if you share many friends there.
Block smartphone
You will need access to the Internet to block your stolen smartphone. If at all possible, do so on a secure device; you will be entering your password.
First, log in to your Google or Apple ID account. If you are logging in from someone else’s device, and you have two-factor authentication set up, that may be difficult. Obviously, you can’t get a verification text or open a mobile authenticator app; your phone is gone. Android users can change the password without text message verification. If that applies to you, you will need to enter one of the backup codes you received when setting up two-factor authentication. iPhone users can recover account access by having a verification code sent to a trusted phone number or device.
Once you have logged in to your Google or Apple ID account, here’s what to do:
Find your missing smartphone in the device list under Security (for Android phones) or the Find My iPhone app (for iPhones) and find the missing smartphone in the list of devices;
Note the location of the smartphone on the map. If the phone is on and geolocation is active, its location icon should appear. However, even if the thief’s path is clear, do not try to chase them. Rather, ask the police for help;
Select Lost Mode. The system will offer to enter a message for the lock screen and a backup number to contact you. Your smartphone will now display that message, and nothing else. If the phone was simply misplaced, not stolen, the finder will be able to call you. Watch out for phishing messages and calls; criminals may pose as support reps and contact you to try to get the account password;
If your device contains important and sensitive information, consider the drastic measure of erasing it remotely. However, keep in mind that option is irrevocable — and also means giving up the ability to locate the phone remotely.
Unlink bank cards
When you block your smartphone with Find My or Find My Device, respectively, Apple or Google may suggest unlinking any associated cards, but in case it doesn’t, unlink bank cards from your device manually in the account settings. Unless they were stolen along with the phone, you don’t need to block the cards.
For Android devices:
Sign in to your Google account;
In the Payments & subscriptions section, select Payment settings;
Remove your cards.
For iPhone:
Sign in to your Apple ID account;
In the Devices section, find the missing iPhone and select Remove all cards.
Block the smartphone’s IMEI number
In some countries, in addition to having the SIM card blocked, you can add a stolen phone’s identification number (IMEI) to the carrier’s blocklist. To do that, you need to give the carrier this number. If you have the box in which the phone came, you can find the number on it.
Android lets you use the Find your phone feature to find the IMEI: Click on the encircled “i” next to the image of your phone and the IMEI code will pop up.
iPhone users can find theirs at appleid.apple.com by signing in with the Apple ID used on the stolen device, scrolling down to Devices, and selecting the iPhone to see its IMEI.
In theory, once the carrier adds the IMEI to the blocklist, the smartphone will not be able to connect to the mobile network even with a different SIM card. This feature works in the United States, the United Kingdom, Turkey, Latvia and certain Latin American countries.
What’s next?
Once you’ve taken prudent steps to protect yourself and your data, it’s time to get down to mitigating other potential consequences.
Contact the police
Report the theft, giving police details such as carrier and phone number. However slim, there is still a chance to get your smartphone back. Sometimes phones get returned even after being missing for years.
Change your passwords
Change as many passwords as you can in your apps and mobile browser. Once you’ve replaced the passwords, set up two-factor authentication.
Restore your data
If you enabled backup on the device while you still had it, then you will be able to recover all information, down to text messages, on your new smartphone.
Here are the steps to do this on Android and iPhone.
Cheer up
The loss of a smartphone certainly carries serious stress and is a threat to your data. However, if you follow the steps above and back up your data in advance, you can cut your losses. Do not despair because your gadget was lost or stolen — your personal safety is the top priority.
0 notes
Text
How To Check If Someone Is Sharing Your Data On MTN

How To Check If Someone Is Sharing Your Data On MTN? If you’re using MTN your data consumption has increased tremendously and if you are in suspicious of people sharing your data or using your data without your knowledge, you’re not alone. Check different online communities like X(formerly known as Twitter) Nairaland, Reddit, and Quora, you will see a lot of people complaining about this problem. So, today, I will be showing you How To Check If Someone Is Sharing Your Data On MTN and how you can stop that from happening. If you are an MTN subscriber and want to know if someone is sharing your data, this article provides a step-by-step guide on how to check if someone is sharing your data on MTN and how to secure your data on the MTN network.
Can you share data on MTN?
Before we get into How To Check If Someone Is Sharing Your Data On MTN, let's first see if it is possible to share data on MTN. The answer is no. MTN does not allow its subscribers to share data with third parties. MTN, unlike some mobile operators like GLO, does not allow data sharing directly with other subscribers. Therefore, you cannot assign part of your data directly to someone else. However, MTN offers a feature called data transfer. It allows you to share data by transferring data bundles from your account to another MTN subscriber's account. Please note that all data transferred comes from your own data allowance.
How To Check If Someone Is Sharing Your Data On MTN
Checking if someone is sharing their data on the MTN network is impossible because MTN does not share data like the GLO network. On the MTN network, you can only gift data to someone, which means if you want to give 500 MB to someone, you have to send it to them as a gift. In this case, the data will be automatically deducted from your data balance. If you do not have enough data, please note that your transaction will not be successful, which means you will have to try again when you have enough data. The only way someone can share their data on MTN is if your hotspot is activated and the third party connects via WiFi. Otherwise, you don't have to worry about someone sharing your data balance because that's not possible. So, the shortest answer to How To Check If Someone Is Sharing Your Data On MTN is not possible, because, MTN does not allow data sharing except data gifting.
How to Check if Someone is Sharing Your Data on MTN – Solution
Step 1: Choose the USSD code To check if someone is sharing your data on MTN, you need to dial the USSD code *131*4#. This code shows the remaining shared data balance on your account. Step 2: Check the details Once you choose the USSD code, you will receive a message detailing the remaining shared data balance. If you notice that your data balance is lower than expected, it could be an indication that someone is sharing your data without your knowledge. Step 3: Change your password If you suspect someone is sharing your information on MTN, change your password immediately. This prevents unauthorized access to your data and ensures that you are the only one using it. Step 4: Contact MTN customer service If you are still unsure whether someone is sharing your information on MTN, please contact MTN customer service for assistance. They can give you more information and help you resolve the problem.
How To Know If Person Dey Use Your Phone Data Without Your Permission
- Check Your Phone Settings: Go to the settings on your phone, click on your name. You go see list of devices wey dey use your account. If you see any device wey you no know, tap the device name and press “Remove from Account.” - Face and Fingerprint Check: Look your phone whether e get another person face or fingerprint wey you no set up. You fit do this by going to the settings where you set up Face ID or Touch ID for your iPhone or iPad. - Check Your Apple ID Online: Sign in to your Apple ID for internet and check all your personal and security information. Make sure say no be another person add their own. If you dey use two-factor authentication, check the devices wey you trust make sure say you know all of them. If you never turn on two-factor authentication, you fit start am by following the steps for your iPhone or iPad. - Look The Apps Wey You Get: Go through the apps wey dey your phone. If you see any app wey you no recognize or you no remember say you download am, you fit search the app for App Store to know wetin e dey do. - Check For Unknown Settings Weh Fit Control Your Phone (MDM): Some settings fit dey your phone wey allow your work place, school, or other people to control your phone. This one na MDM configuration profile. If you see any wey you no know, you fit delete am. - Check Your Sharing Permissions: Make sure say nobody don change or add anything to how you dey share your phone content. You fit check the guide on how to stop sharing your iPhone or iPad content.
Conclusion
In conclusion, it is not possible to share data on MTN. However, you can transfer data from your data balance to another MTN subscriber. If you suspect someone is using your information, you can check whether they are sharing it by following the steps described above. If you don't recognize any of the numbers, you can stop sharing data with them. We hope this article has been useful. Read the full article
0 notes
Text
How To On Sideload Apps Iphone Using Altstore
Using AltStore to sideload apps on your iPhone is a great method to get access to more apps than just those available in the official App Store. With AltStore, users may install apps from outside the Apple ecosystem with greater customisation and flexibility than with other app installers. Sideloading with AltStore can provide endless opportunities for anyone interested in exploring new programs, be they a developer, beta tester, or just an app enthusiast. We'll walk you through the entire process of sideloading apps on your iPhone with AltStore in this in-depth guide, making sure it's a safe and easy approach.
What is AltStore?
For iOS devices that aren't jailbroken, AltStore is a substitute app store that may be used to sideload apps. It offers a more open and flexible method of managing apps by enabling users to install programs from sources other than the App Store. With the use of the user's personal development certificate, AltStore, an iOS app, resigns apps and forwards them to AltServer, a desktop program that installs the resigned apps back onto the device via iTunes WiFi sync.
With security in mind, AltStore offers comprehensive details about an app's permissions directly from its store page. In order to guarantee sideloading with trust, it also automatically notifies users whenever an app's permissions change. A committed two-person team develops the open-source app store, which is fully funded by community donations. Users have the ability to peruse applications from reputable developers or add more "sources" to expand their selection.
What Is the role of Altserver?
As your computer's companion app, AltServer is an essential part of the AltStore ecosystem. Enabling AltStore to sideload software onto your device is its main purpose. AltServer needs to be directly connected via USB or operating on the same WiFi network as your iPhone in order to accomplish this. This enables AltStore to interact with AltServer and carry out different operations like sideloading, refreshing, and turning on and off programs.
In the first place, Altstore is installed via AltServer as well. You can manually update your AltStore if it expires by reinstalling it using AltServer and leaving the current AltStore intact. This guarantees that the sideloading process continues smoothly. Furthermore, AltServer facilitates AltStore's weekly automated app refreshes. AltServer can be made to run in the background and be launched at computer startup to make sure AltStore can work effectively. In general, AltServer serves as a conduit between your computer and iPhone, making sideloading easier and improving the user experience all around.
How to setup Altstore?
Prior to executing the stages, it is important to keep a few things in mind. Users will require a PC with iTunes and iCloud installed, as AltServer requires weekly Apple ID login. Additionally, customers running iOS 16 or higher must enable developer mode. This is how you do it:
Open the Settings app.
Navigate to Privacy and Security.
Scroll down to Developer Mode.
Toggle it on.
Additionally, make sure you download and install iCloud [here] and iTunes [here] from Apple's website rather than the Windows Store if you intend to install the server on a Windows device. After downloading:
Download AltStore on your computer and transfer it to your applications folder.
After installation, connect your iPhone to the computer and designate it as a trusted device.
Download and launch AltServer on your computer, then run it.
Open the iTunes app and enable the “Sync with this iPhone over Wi-Fi” setting.
Click on the AltServer icon located in the top left menu bar and select the “Install AltStore” button.
Choose your device from the dropdown menu.
Enter your Apple ID and password.
You should receive an AltServer notification confirming that the app was successfully installed.
On your iPhone, navigate to Settings > General > Profiles & Device Management, then click on the Trust button.
Install apps from Altstore
You must configure AltServer on your Windows computer and link it to your iPhone or iPad in order to install an app from AltStore. Install AltServer first by downloading it from the AltStore website. Next, launch the AltServer application on your computer and adhere to the instructions to install AltStore on your gadget. Make sure your iPhone and PC are linked to the same wireless network. Locate the app you wish to install using AltStore on your device, then choose it by clicking the "Install" button. Your device will receive a sideload of the app. By choosing the "My Apps" tab and pressing the "Plus" symbol to add the IPA file, you may also install apps using IPA files.
open the AltStore application.
Find the software that you want to install.
Maintain the AltServer app open and make sure you are linked to the same wireless network as the server device.
Once the app is installed, you're done!
0 notes
Text
How to Fix “Can’t Reset Apple ID Password”
It’s tricky when you forget your Apple ID password, you may not able to access any Apple services on your device. So what would you do if you forget your Apple ID password? I believe most users will turn to reset their Apple ID password. It is generally easy to reset your Apple ID password with the help of Apple Security Support, but users have occasionally reported that they were unable to reset their Apple ID password when they try to change their Apple ID password. In this case, you can read the following guide to solve the problem of can’t reset Apple ID password.
0 notes
Text
Mastering the Art of Apple ID Recovery
In the digital age, our lives are intricately woven into the fabric of technology. Among the many facets of our digital existence, our Apple ID holds a paramount position. It serves as the gateway to a myriad of Apple services, from iCloud and the App Store to Apple Music and message. However, what happens when you find yourself locked out of this digital fortress? Fear not, for Apple provides a robust system for recovering your Apple ID, ensuring that you can regain access to your digital domain swiftly and securely. In this comprehensive guide, we will explore the various methods and best practices for recovering your Apple ID, empowering you to navigate this process with confidence and ease.
Understanding the Importance of Your Apple ID
Before delving into the intricacies of recover apple id, it's essential to understand the pivotal role it plays in your digital ecosystem. Your Apple ID serves as a unique identifier, linking you to all your Apple devices and services. It enables seamless synchronization of data across devices, facilitates purchases and downloads from the App Store and iTunes Store, and provides access to essential features like iCloud backup and Find My iPhone. With so much riding on your Apple ID, ensuring its security and accessibility is paramount.
Common Scenarios Leading to Apple ID Recovery
There are several scenarios that may necessitate the recovery of your Apple ID:
Forgotten Password: Perhaps the most common scenario, forgetting your Apple ID password can happen to anyone. This could result from infrequent usage of your Apple device, changing your password and subsequently forgetting it, or simply human error.
Account Locked: Apple may lock your Apple ID for security reasons, such as multiple failed login attempts, suspicious activity, or violation of Apple's terms and conditions.
Lost or Stolen Device: If your Apple device is lost or stolen, you may need to recover your Apple ID to prevent unauthorized access to your personal data.
Change of Email Address: If you no longer have access to the email address associated with your Apple ID, you'll need to update your account information or recover your Apple ID using alternative methods.
Recovering Apple ID via Apple's Account Recovery System
Apple provides a streamlined account recovery process designed to assist users in regaining access to their Apple ID. Here's how you can initiate the recovery process:
Visit the Apple ID Account Page: Navigate to the Apple ID account page using any web browser on your computer or mobile device.
Click on "Forgot Apple ID or password": This option is typically located beneath the login fields. Clicking on it will prompt you to enter your Apple ID.
Enter Your Apple ID: Input the email address associated with your Apple ID and click "Continue."
Choose a Recovery Method: Apple offers several recovery options, including email authentication, answering security questions, and using two-factor authentication (2FA) if enabled.
Follow the On-Screen Instructions: Depending on the chosen recovery method, follow the on-screen instructions to verify your identity and reset your Apple ID password.
Contacting Apple Support for Assistance
If you encounter difficulties with the self-recovery process or if your account is locked for security reasons, you can reach out to Apple Support for personalized assistance. Here's how you can contact Apple Support:
Visit Apple's Support Page: Navigate to Apple's official support page using any web browser.
Choose Your Device and Issue: Select the device associated with your Apple ID and describe the issue you're experiencing.
Schedule a Call or Chat Session: Apple offers various support options, including phone calls, chat sessions, and scheduling appointments at an Apple Store Genius Bar.
Verify Your Identity: During the support session, you may need to verify your identity by providing personal information or answering security questions.
Follow Support Team's Guidance: The Apple Support team will guide you through the recovery process, offering tailored solutions to address your specific issue.
Best Practices for Apple ID Security and Recovery
While Apple provides robust mechanisms for recovering your Apple ID, prevention is always better than cure. Here are some best practices to enhance the security of your Apple ID and minimize the likelihood of needing to recover it:
Enable Two-Factor Authentication (2FA): 2FA adds an extra layer of security by requiring a verification code in addition to your password when signing in to your Apple ID from a new device or browser.
Use Strong, Unique Passwords: Avoid using easily guessable passwords and refrain from reusing passwords across multiple accounts. Consider using a password manager to generate and store complex passwords securely.
Keep Your Account Information Up to Date: Regularly review and update your account information, including your email address, phone number, and security questions. This ensures that you can receive notifications and reset instructions in case of emergencies.
Stay Vigilant Against Phishing Attempts: Be cautious of unsolicited emails, messages, or websites requesting your Apple ID credentials or personal information. Verify the authenticity of such requests by directly visiting Apple's official website or contacting iforgot.apple.com.
Backup Your Data Regularly: Regularly back up your important data to iCloud or other trusted backup solutions. In the event of a lost or inaccessible Apple ID, having a recent backup ensures that you can restore your data seamlessly.
Conclusion
Your Apple ID is the linchpin of your digital identity within the Apple ecosystem, granting access to a wealth of services and features. In the event of a forgotten password, account lockout, or other issues, Apple provides robust mechanisms for recovering your Apple ID and regaining access to your digital domain. By familiarizing yourself with the account recovery process and implementing best practices for security and prevention, you can ensure the safety and accessibility of your Apple ID, empowering you to enjoy the full spectrum of Apple's offerings with peace of mind. Remember, with the right knowledge and a precaution, mastering the art of Apple ID recovery is well within your grasp.
0 notes