#hh100
Explore tagged Tumblr posts
Visit Tumblr Blog
Explore Tumblr blogs with no restrictions, modern design and the best experience.
Last Seen Tumblr Blogs


Fun Fact
When “GIF” was named word of the year in 2012, Oxford Dictionaries U.S.A. credited Tumblr for pushing the word.
Photo

The Hosea Hustle is back from hiatus baybee! Do you want to know why this centaur appears to have gotten a white collar job? Then check the brand new episode of The Hosea Hustle: https://soundcloud.com/hoseahustle/episode-95-the-games-dragons-play
16 notes
·
View notes
Photo

Hush Hush Records HH100 Interview
super pleased to be a part of HH100, the 100th release in Hush Hush’s catalog
woohoo!
collaborating with Cock & Swan is/was real fun and inspiring
i love the song we created so much and that makes me happy
i love being happy
3 notes
·
View notes
Text

interview – hush hush records
#electronic#experimental#hh100#hush hush records#interview#night bus music#pop#quiett#seattle#vivian fantasy#wait too long#washington
1 note
·
View note
Photo

I always enjoy seeing familiar faces, friends who have become family, and making new friends. This year I started out in one jersey and then changed into my hunter than hell jersey! 2019 #HH100 was outstanding, see everyone next year!!! #Cyclists #cycling #cyclistsofinstagram #cyclinglife #usat #rudyproject #ironmantri #readytorace #raceready #LisaChristiansen #drlisachristiansen #lisachristinechristiansen #lisachristiansencompanies #drlisachristiansencompanies #walk #ride #bicyclette #bicycle #bicycles #running #swimming #ironman #ironmankona #VeloGuide #ElevateYourPerformance #LisaChristine #ViktreSocial #FitnessGuru (at Hotter'N Hell Hundred) https://www.instagram.com/p/B1payUChiCt/?igshid=qbnwjw0tl6ks
#hh100#cyclists#cycling#cyclistsofinstagram#cyclinglife#usat#rudyproject#ironmantri#readytorace#raceready#lisachristiansen#drlisachristiansen#lisachristinechristiansen#lisachristiansencompanies#drlisachristiansencompanies#walk#ride#bicyclette#bicycle#bicycles#running#swimming#ironman#ironmankona#veloguide#elevateyourperformance#lisachristine#viktresocial#fitnessguru
0 notes
Photo

Made a new video of my experience at the hotter'n hell. Lots of fun. Check out my channel for more. Thanks all! https://t.co/RAx6GEjPuU #wichitafalls #texas #roadie #road #bike #newbarchitect #vlog #youtube #youtuber #cycling #bikelife #hh100 #animation #endurance #riding #clifbar #longdistance #clifbloks #mental #strength #wife #camping #gym #support
#clifbar#road#wife#clifbloks#riding#gym#newbarchitect#hh100#support#bike#youtube#vlog#youtuber#wichitafalls#bikelife#roadie#mental#texas#strength#longdistance#endurance#camping#cycling#animation
0 notes
Photo

Spartan Race Hurricane Heat 💯. Cold and I are not a good match. However, I'm glad I stuck through it... priorities, happy I got my tacos before it! #strength #hurricaneheat #hurricaneheat100 #spartanrace #gettingcomfortablewithuncomfortable #endure #endurance #yearofendurance #cold #ocr #spartanracetraining #hh100 #tacos #teamwork #teamworkmakesthedreamwork #water #gallon #ducttape #change (at Lake Elsinore, California)
#gallon#water#strength#ducttape#spartanrace#teamwork#hurricaneheat#hh100#tacos#yearofendurance#spartanracetraining#gettingcomfortablewithuncomfortable#endure#teamworkmakesthedreamwork#hurricaneheat100#cold#ocr#endurance#change
0 notes
Photo

I want to #thank #everyone that offered their #help and also to those that allowed me to be there for them this #weekend. #spartanrace #LakeElsinore #Super was filled of great #weather #cold water and #fun #friends, #HH100 was once again a #great #opportunity to #challenge #ourselves, #SuferInSilence , #EmbraceTheSuck and #bond #AsOne, finishing with the #Sprint as the #icing on the #cake , #thankyou everyone for a fun #weekend 💪🏻😉😱 #spartanendurance #hurricaneHeat #SocalSuper #SocalSprint #funinthesun #MedalMonday #LatePost (at Lake Elsinore Storm)
#everyone#help#funinthesun#latepost#weather#medalmonday#cold#ourselves#icing#thank#weekend#hh100#lakeelsinore#embracethesuck#spartanendurance#super#socalsprint#spartanrace#hurricaneheat#cake#suferinsilence#friends#great#thankyou#challenge#fun#asone#sprint#opportunity#socalsuper
0 notes
Text
Tecumseh Enduro 16 Hp Engine Manual

Tecumseh 5.0 Enduro Engine
Tecumseh Enduro 16 Hp Engine Manual Diagram
Tecumseh Enduro 16 Hp Engine Manual Pdf
Tecumseh OHV175-204803B Parts Diagrams. 37526A CYLINDER $12 PIN $. The Jack's Small Engines Newsletter.
TECUMSEH ENGINE SERVICE & MAINTENANCE MANUAL - PDF Service Manual DOWNLOAD HERE 'TECUMSEH ENGINE SERVICE & MAINTENANCE MANUAL - PDF Service Manual. 3 to 11 HP 4-CYCLE L-HEAD ENGINES: ECV100 thru ECV120. H22 thru H80 HH40 thru HH70 HHM80 HM70 thru HM100 HMSK70 thru HMSK110 HMXL70.
Engine Type Ignition Type Model Series Intake and Exhaust Valve Clearance min / max ( in. ) min / max ( mm ) 4-stroke L-head STANDARD POINT IGNITION LAV25, LAV30, TVS75 ( 8/1987 & earlier ).004 /.008.102 /.203 4-stroke L-head STANDARD POINT IGNITION H25, H30 ( 1982 & earlier ).004 /.008.102 /.203 4-stroke L-head STANDARD POINT IGNITION.
How to Guide
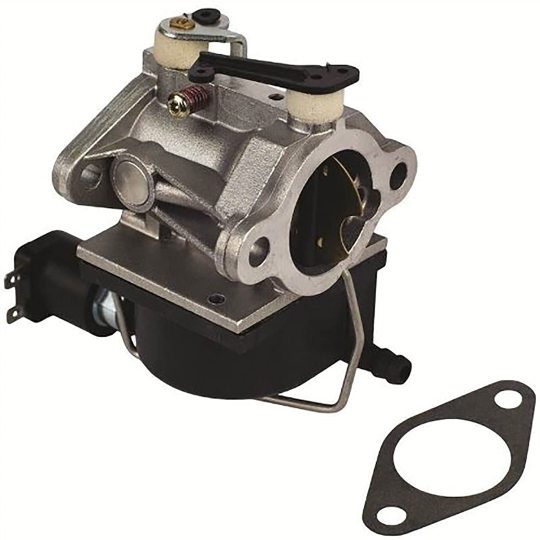
Tecumseh Carburetor Diagram
I have a Sears LT 1036 Lawn Tractor Model #917.255330 Serial #2679V34578 from around 1980. It has a Tecumseh Engine model #143.286362 Serial #9257D. The carb is bad and replacing with a new Tecumseh c read more. TECUMSEH 8 TO 18 HP CAST IRON FOUR CYCLE ENGINES This manual covers the following models: VH80, VH100, HH80, HH100, HH120, OH120-180 Model numbers are located on the engine shroud. Other illustrated Tecumseh 2-Cycle Engine, 4-Cycle Engine and Transmission manuals; booklets; and wall charts are available through Tecumseh. For complete listing.
Turn screws adjusting both idle and main mixture in (clockwise) finger tight, however over tightening the screws may partially or entirely damage the tapered portion of the needle. After that, slowly back out the screws in a counterclockwise direction to the pre-set position.
Note: Some models may have fixed main jet feature characterized by the absence of adjusting screws that gives a clear indication of a fixed jet that requires no adjustment. Different types have diverse style of idle adjustments; the series 1 carburetor comes with two varying styles of adjusting needle for the idle. For air adjust system, long needle is used and for fuel adjustments the short ones are used. The adjustments for both the system are pretty much the same; however, the drops off point indicate may not be as noticeable.
Final Adjustments for MAIN
Upon starting the engine, initially allow the engine to warm up to a normal working temperature. Once the engine picks up the speed and high or fast speed has been set, it is then advisable to turn on the main mixture adjusting screw to the clockwise slowly-slowly till the point when engine begins to run inconsistent and note down carefully the position of screw at this point of time.
Repeat the same in reverse direction and now turn the adjusting screw out in counterclockwise direction until the engine reaches a point from where it begins to run in an erratic manner. Now to find out best setting point, turn screw to the clockwise direction towards midway between these two positions and that would indicate best setting point adjustment.
Set down the speed controlling carefully to the IDLE position or to the SLOW position, precisely check for an appropriate IDLE or SLOW pace RPM and at that particular point the idle mixture screw need to be adjusted and in the same way as the main mixture screw. If it is necessary, the main adjustment can be done with the engine in a loaded condition.
Caution: It has been advised to never operate the engine after removing the covers and guards. There can be some really severe injuries resulting from rotating parts. Be cautious and keep your body parts, hands, hair, clothes, and accessories at a distance from all the moving parts.
To put the engine under the load condition, carefully engage cutter deck, impeller and various other driven parts. During an event of the engine stoppage or in case engine hesitates while engaging the load, carefully set the main mixture adjustment screw out to counterclockwise 1/8 turn at a time, simultaneously testing out each and every setting with the equipment in load, awaiting this condition to be corrected.
For excessively smoking engines, (rich) turn at the time, in the clockwise direction turn the main adjustment screw, remember just 1/8 turn at one time and simultaneously test every adjustment setting done with equipment under the load, until the condition when it is corrected completely.
Gradually move the speed control to the IDLE position or the SLOW position once the main mixture is set properly. Carefully turn up idle mixture screw about 1/8 turns either in clockwise or opposing out in the cocounter-clockwise direction in case the engine is not idling properly/smoothly. Repeat it until the engine continues to idle smoothly. Reconfirm the LOW RPM and HIGH RPM settings and make adjustments as required.
RPM ADJUSTMENTS
One of the most important things to do is to ensure correct RPM adjustments. Now, as per the recommended RPM you can easily adjust the LOW and HIGH speed screws. It is also recommended to firstly identify carefully the position of LOW speed RPM as well as HIGH speed RPM adjusting screws, once done with this next step identify the corresponding HIGH and LOW RPM adjustments accordingly to microfiche card 30, the computer parts looking system or servicing bulletin #107 for rotary movers.
GOVERNED and NON-GOVERNED IDLE
While the engine is running at lowest speed bend the idle RPM tab to set governed idle at a designated RPM position. After setting governed idle, in the next step it is time to set the non-governed idle. To set the non-governed idle, push bottom part of the governor lever carefully in an opposite direction away from controlling brackets in such a manner that the throttle lever comes into contact with the idle speed screw. At this position, hold the lever and carefully turn the idle adjusting screw in clockwise direction to increase or in counterclockwise direction to decrease the engine idling speed. Make sure that the setting of carburetor screw must be set either 600 RPM below the tab or at the governed idle setting.
4 CYCLE WALBRO CARBURETOR PRE-SET AND ADJUSTMENTS
Carburetor Model TypeMain Pre-set TurnIdle Pre-set TurnLMH1-1/2 turn1-1/2 turnWHG & LME1-1/4 turn1-1/4 turnLMK Fixed1 turnN/A
MAIN AND IDLE PRE-SETS ADJUSTMENTS
Carefully turn both the main screw as well as idle mixture adjusting screws to clockwise direction finger tight. Be careful while tightening the screws as over-tightening may lead to damage of the tapered portion of needle. Now turn back the both the screws out counterclockwise into pre-set figure as shown in the chart. Correct fuel and air mixture is necessary for smooth performance of the engine.
[For the Carburetors with no adjusting screw indicate a fixed jet type and in such cases no adjustment is needed]
SOME FINAL ADJUSTMENTS
Upon starting the engine let it to warm up for 5 minutes till the point a normal operating temperature has been reached. Upon reaching the normal operating temperature, set carefully the speed control position at HIGH or FAST, and then until the point when engine begins to run erratic (lean), repeatedly keep on turning the main mixture adjusting screw slowly in clockwise direction. Make sure that you note carefully position of the screw at this point. Now repeat the same in counterclockwise direction, and turn the screw out in counterclockwise direction up to the point where engine begins to run erratic (rich). After taking both the values, now turn the screw back towards the clockwise direction to position the screw in midway between these two adjustment positions and this point is considered as the best setting.
For smooth functioning, set the speed control carefully to either SLOW position or IDLE position and make idle mixture screw adjustments in the similar way as the main mixture screw.
Now you can easily set the HIGH speed and LOW speed governor adjusting screws according to the recommended RPM’s. It has been advised to firstly identify the positions of both LOW speed and HIGH speed governor adjusting screws. After identifying these values, identify the standard HIGH and LOW RPM settings as recommended according to microfiche card 30.
In case if further adjustments are needed, then main adjustments must be made under the loaded conditions. Make sure that engine is never operated with covers or guards removed as the rotating parts of the engine can cause some severe injury.
To put the engine under load conditions, make sure all the driven equipments like cutter deck, impeller, etc. are engaged properly.
During an event of the engine stoppage or in case if engine hesitates while engaging the load (lean), it is advised to turn the main mixture screws used for adjusting out in a counterclockwise direction about 1/8 turn at a time and simultaneously testing each setting position with the equipment under load until this condition is corrected.
During an event of excessive smoke from the engine (rich), the main adjusting screws need to be turned on in (clockwise direction) 1/8 turn at a time, simultaneously testing each and every setting positions with the equipment under load to the point until this excessive smoke condition is corrected.
Carefully move the speed controls towards the IDLE or SLOW position, once the main mixture is set. Turn the idle mixture screw to 1/8 turn either in the clockwise direction or out into counterclockwise direction in the case if engine is not idling up to the point where engine starts to idle smoothly.
Check your settings for HIGH and LOW RPM again and make adjustments if necessary. All of the above mentioned fuel, RPM and idle adjustments are necessary. You must follow them religiously and keep your engine in a pristine condition for a longer period of time.
PRE-SETS AND ADJUSTMENTS OF WALBRO CARBURETORS 2-CYCLE
Carburetor Model No.Main Pre-setIdle Pre-SetWTA & WTFixed1-1/4 turns
PRE-SETS AND ADJUSTMENTS OF TILLOTSON CARBURETORS 2-CYCLE
Carburetor Model No.Main Pre-setIdle Pre-setHUFixed1-1/2 turns
IDLE PRE-SET
To allow the engine to get started allowing the carburetor to be fine tuned, turn the idle mixture adjusting screw into clockwise direction finger tight, closed to the position, and then turn the screw into counterclockwise direction following chart above.
FINAL ADJUSTMENTS
Idle Mixture: Upon the start, for first 3-5 minutes, allow the engine to reach a normaloperating temperature. It is advised that only once the engine reaches normal operating temperature, begin swiftly with turning idle mixture screw in clockwise direction. The engine would start to falter as soon you turn it towards clockwise direction. Such a situation is termed as the lean drop off point.
NOTE: As soon as the RPM exceeds 2,400, immediately stop the procedure for a while and diminish the idle RPM. Make sure that RPM does not exceed above 2,400 as this may cause the fuel from main jet to supply to the idle mixture that may lead to an unbalanced idle mixing settings. Turn the needle out till the point engine starts faltering. Make a note of this particular position, this is known as the rich drop-off. The final useful needle setting lies somewhere halfway between the lean drop-off points and rich points. Once this mixture is set, there is also a need to adjust idle speed that need to be set as per the recommended RPM.
WALBRO CARBURETORS 4-CYCLE FIXED (WHG) (OH120 – 180)
There are certain occasions where high altitude may affect the operation of high and low speed performance. In order to correct such kind of situations following steps may be used efficiently:
Try to remove the air cleaner assembly.
Choke shaft assembly removal.
Remove the brass cup shaped plug out of the nozzle well vent using an ice pick type of tool with a small hook placed at the end.
Reassembling the choke shaft assembly.
Reinstalling the air cleaning assembly.
NOTE

To prevent chips entry into the carburetor make sure no thread taps are used.
CARBURETOR CLEANING SERIES 8-11
1 Carefully remove bowl and after removing it push the float hinge pin out with the carbtool part # 670377. remember that the float can’t be rotated in upward direction.
2 Using the carb tool, remove the seat.
3 Insert the carb tool gently to remove the emulsion tube. Until you successfully locate the air bleed passage, keep on rotating the hook. Then pull the tube outwards keeping the hook in place.
4 Better remember there are 2 “O” rings present on the emulsion tube. To successfully remove the upper second “O” ring you might have to enter into the center leg for a second time.

5 Using a sharpened chisel carefully remove the extended prime well welch plug. Pound close to the red primer bulb side while piercing through the extended prime well welch plug, as not to mar the casting.
6 Extendable prime well w/.012″ tag wire needs to be cleaned carefully. Also there is a need to clean carb spray as well.
7 Remove the idle prime well welch plug making use of a sharpened chisel or even a punch can be used. Using a tag wire as well as a carb spray, efficiently clean the progressive holes along with the idle air bleed hole. During an event of damage in the progression holes, make sure to replace with a new carburetor.
8 Remove carefully the idle restrictor cap, using the tag wire and carb spray clean the idle jet.

9 Using tag wire, clean the idle circuit fuel pick-up that is located in the center leg.
10 On the side of the center leg, Series 11 bridge carburetor incorporates an additional idle circuit fuel pick-up jet that needs to be cleaned using .012″ (.3 mm) tag wire.
11 Using tag wire, clean the main jet (bowl nut). Mainly there are 3 drilled passages, the idle delivery hole, the fuel pick-up and the main jet.
12 Using TecumsehPower carburetor spray part # 696410, spray all the cavities.
13 With a flat punch, replace the welch plugs that are included in the carb kit. Cover theedge where plug is meeting the casting with fingernail polish.
14 A seat having a grooved end is installed firstly into the carburetor casting.
15 Make sure that you carefully install seat into the orifice using the carb tool until itbottoms well on the casting.

16 Using the carb tool check out the float height. The float should be placed in such a way that on carb tool removal, the float must remain on its position. 11/64″ is the dimension of the carb tool.
17 By bending the metal tang carefully adjust the float if needed.
18 Before inserting the float hinge pin bring the float/needle assembly down into the position.
It is worth to mention that one should always keep in mind that the open end of the needle clip of a TecumsehPower carburetor would always face out towards the air cleaner side.
19 Install a new float bowl, bowl “O” ring, and the bowl nut with a new bowl nut gasket.
PROCEDURE FOR FLOAT ADJUSTMENT
SETTING FLOAT HEIGHT
TecumsehPower tool parts number (670377) or the 11/64″ drill bit are necessary for proper setting of the float. The float height setting procedure is as follows. Firstly remove carefully the bowl gasket, now in inverted position hold the carburetor. In a direction parallel and opposite to the float hinge pin, place carefully the tool across the carburetor body. By bending the tab on the float adjust the float height until the tab touches.
SERVICE TIPS FOR CARBURETOR
SERVICING THE SEAT
Making use of the removable seats made out of VITON® material, TecumsehPower carburetors are built. By using TecumsehPower tool 670377 these seats can easily be removed or these may also be removed by bending the wire with a hook measuring 3/32″ or bending the end of a paper clip. Now, very carefully try to thrust through the hole towards the center of the seat and then remove it. Make sure you always use a new seat for the replacement purpose and never reuse an old seat.
Before installing a new seat, be sure whether the seat cavity is clean or not, if it’s not clean make sure you properly clean it and to help it slide into the place moisten the seat using a drop of oil. With the grooved side of the seal down position the seat and with a 5/32″ flat punch carefully push the seat into its cavity to the point where it bottoms out. This job can also be performed efficiently using the TecumsehPower tool 670377.
INLET NEEDLE & FLOAT INSTALLATION
Float and the inlet needle needs to be reinstalled into the carburetor. It is also important that the long end on the inlet needle of the clip should be pointing toward the air intake (choke) side of the carburetor.
THE FLOAT BOWL INSTALLATION
By carefully placing the detent portion in a direction opposite of the hinge pin the float bowl can be installed. The deepest end of the bowl needs to be placed in a position exactly opposite to the inlet needle. Located in the deepest part there is a dimple in the bowl. The dimple serves the purpose of minimizing the chances of the float that may at times stick to the bottom of the bowl that is mainy caused by stale fuel.
FLOAT BOWL SERVICE – VECTOR AND SERIES 7
For float removal purpose, using a needle nose pliers carefully grasp the cross piece lying somewhere between the center leg as well as the pivotal point on the float. It is very important to pull out the float straight out in such a manner that it does not break. While installing the float, into the hinge slot present on the float place the float hinge pin and slowly press into place in the bowl.
In order to hold the seat in the place, there may be few types of bowls that may also contain a clip or retaining ring. This feature may come pre-installed as needed for the manufacturing process.
In order to make the process of assembly easy, on the gasket and the bowl an alignment notch is also placed that would guarantee a proper location for the gasket.
MAIN MIXTURE SCREW ASSEMBLY
Carefully position the coil spring on the screw first which is then followed by the small brass washers and finally the rubber “O” ring seal while you reassembling the main mixture screw used for adjusting.
WELCH PLUGS REMOVAL AND INSTALLATION
All the welch plugs must be removed in order to expose the drilled passages to facilitate proper cleaning. Sharpen to wedge point a small chisel in order to remove the welch plug. Carefully drive chisel inside the welch plug and then push down on chisel to out of the position.
As illustrated, a new welch plug must be installed bell-up. Tap down on to the plug using a punch that is equal or greater than actual size of the plug. Make sure that the dent must not drive to the center of the plug below or to the top surface of the carburetor. Since the nail polish offers resistance towards the fuel, nail polish can be used to seal the outside edge of the plug with nail polish after installation of the welch plug, in order to ensure that no air would enter the mixing well, as a result leakage of the fuel can be avoided. For the purpose of identification, you can use different colors so that the work of the previous repair person can easily be identified.
FUEL INLET FITTING Fuel inlet fitting can easily be removed by the means of twisting and pulling, if necessary. Make sure that you install it in the same position as that of the original one. As an integral part of the fitting strainer might be a part of some diaphragm carburetors. Replace the fittings if the strainer is not possible to be cleaned or lacquered. Carefully insert the tip inside the carburetor body while installing a fitting. Using a Loctite grade A coat the exposed portion of the shank and press it in until the shoulders come in contact with the carburetor body.
REMOVING INLET FITTING A 1/4″ bolt, 1/4″ nut as well as a washer 1/4″, coupled with a 1/2” nut can successfully be used to remove the leaking or damaged fuel inlet fitting. To successfully remove plastic part of inlet fitting, a plier or vise can efficiently be used. Using a 1/4″-20 tap, you can tap the inside of the remaining metal portion of the fitting. To properly guide one side of the nut to position it squarely to the carburetor you need to place a 1/2” nut over the fuel fitting. Next step, thread the 1/4″ nut on to the bolt up to the point until it comes in contact with the shank, then add the washer, and carefully thread the bolt into the fitting until snug. Up to the point where the fitting is removed, tighten the 1/4″-20 nut.
PROPER INSTALLATION OF THROTTLE PLATES AND CHOKE ON THE Tecumseh CARBURETOR
First of all on the air horn of the carburetor, place the choke plate. It is very important that the flat surface must face downwards. Each carburetor as designed to operate, can operate only in one way, however the choke plates can operate in both directions also. Make sure these choke plates are assembled properly to operate in right direction for your engine.
NOTE: While reinstallation of choke or a throttle shutter, always use a new screw(s). Old screw(s) must never be reused.
THROTTLE PLATE SERVICE
The plate with scribe mark needs to be positioned facing out and in the 12 o’clock position while installing the throttle plate on the 2 – 7 hp carburetors.
NOTE: One thing that needs to be taken care of is that the binding must not occur.
Position carefully the plate with scribe mark in a direction facing out and in the 3 o’clock position while installing the throttling plate on the 8 – 17 hp carburetors.
NOTE: Important to note that in carburetors binding must not occur.
DIAPHRAGM CARBURETOR “F” DESIGNATION For all the carburetors having an “F” designation on the casting, the installation sequences same as the gasket and diaphragm on the carburetor will be identified. For all the carburetors designated as “F” carburetors the diaphragm needs to be installed first then the gasket and cover in the end. In case if there is no designation mentioned, then the general sequence of installation is the gasket, diaphragm and cover in the end.
SERVICEABLE EMULSION TUBES There are some carburetors making use of a serviceable emulsion tube that is sealed with “O” rings on one or both the ends. There rings on the emulsion need to be removed while servicing these carburetors. It has been witnessed quite commonly that during the process of the tube removal the “O” ring on the venturi end of tube at times may remain stuck in the central leg of the carburetor. In order to guarantee proper operation and sealing this “O” ring must be removed and replaced back. The tube bends a 90o hook in a paper clip or stiff wire to remove. Reach inside the venturi and try to push out the main nozzle emulsion tube as far as possible. Try to Hook the wire inside the air bleeding hole and carefully pull out to remove. Make sure that before reinstalling the tube, all “O” rings have successfully been removed and placed back on the main nozzle emulsion tube.
SERIES 7 CARBURETOR AND VECTOR EMULSION TUBE SPRING
To put tension on the tube in order to force it towards the gasket, an emulsion tube spring in the Vector as well as Series 7 carburetor can successfully be used. This can be efficiently used to seal the tubes thereby to prevent inflow of any unmetered air into the center leg. The proper series can be firstly float bowl then the spring, the tube, gasket and towards end is the carburetor body. The emulson tube can be removed by gently grabbing the tube with a needle nose plier and pulling it out straight. Replace the tube in case if it is distorted or damaged.
HOT RESTART
Occasionally, on the dual system carburetor equipped engines, some rich starting conditions may have occurred at times when the engine is warm. Using the white plastic spacer this can efficiently be corrected as shown and at the same time inserted in to the center leg of the carburetor. (Service # 632158). To reduce considerably the amount of prime charge into main nozzle area this spacer has been designed for a better starting under the warm engine conditions. It doesn’t lean out the carburetor mixture and can only be used on Dual System carburetors.
PRIMER BULB SERVICE
IDENTIFICATION OF A PRIMER BULB
Tecumseh 5.0 Enduro Engine
One must replace carburetor primer bulbs with care. Hard starting or non-starting problems can be caused on the usage of the wrong primer bulb. Currently, TecumsehPower makes use of four different carburetor mounted primer bulbs. Use the Master Parts Manual to avoid problems during the correct application.
The primer bulbs five in number currently makes use to feature two different shapes; derby and stepped (or hourglass) and similarly two different venting types; internal as well as external.
STEPPED PRIMER BULBS
In order to force easily a charge of air directly into the bowl through the atmospheric vent chamber stepped primer bulb can efficiently be used. The sealing surfaces as pictured prevent this air from going back into the air filter.
NOTE: A Bowl prime system needs a great gasket seal on the bowl or otherwise a low prime charge might be generated.
Tecumseh Enduro 16 Hp Engine Manual Diagram
Caution: While removing retainer, in order to avoid serious eye injuries, it is important to wear safety glasses or goggles.
Grasp the bulb with a plier to remove the primer bulb by twisting and pulling it out of the body. The retaining ring must be removed out after after removing the primer bulb. A screwdriver must be used to carefully pry the retainer out of the body. Old primer bulb or retainer must not be reused.
It is necessary to clean the primer passages thoroughly once the primer bulb has been removed.
Using a deep reach socket, press the new bulb as well as retainer into the position
NOTE: New primer bulbs always come with a new retaining ring.
Tecumseh Enduro 16 Hp Engine Manual Pdf
Who's Online (See full list)
Today's Birthdays
Recent Status Updates
Paul M.Murphy
Hello glad I got on this site. I hope to upload a couple of photos of my Simplicity Broadmoor Model 707 Tractor. I have replaced all the belts on it and installed a new ignition switch. Have a mower deck which was in poor shape , repaced a couple of bushings and welded the deck where there was some holes. The tractor and mower deck came from a friend and the mower deck metal was getting pretty thin. Some new metal was put in it and we also undercoated the underside of the deck. This was done by my friend Greg Toulman. I have not put the mower deck on the tractor yet, waiting for Greg to come home and give me a hand. Can you please tell me if there is a manual for the mower deck and where I could get one. I would also like to get some moon wheel discs as well. I will try and down load some photos of the tractor when my wife shows me how to. I really love driving this tractor and also how well it is made compare today's tractors, especially the flexible rear end and the rollers. Tell the next time Paul
· 9 replies
jbrooks » Talntedmrgreen
Josh folowing this from a link at the downloads. I just rescued an AC 920 with the lambodini diesel. I can' t download yet . Where did you find the PDF copy you posted. . I would like to figure out how to adjust the injection pump. I assume it's a bosche, correct
· 0 replies
Adverts
By B-16_IC 29 days and 22 hours
By B-16_IC 29 days and 22 hours
$1,000.00
By Tuffy 29 days and 11 hours
By Bird76Mojo 28 days and 19 hours
$300.00
By GTrain Engineer 25 days and 12 hours
0 notes
Photo

I always enjoy seeing familiar faces, friends who have become family, and making new friends. This year I started out in one jersey and then changed into my hunter than hell jersey! 2019 #HH100 was outstanding, see everyone next year!!! #Cyclists #cycling #cyclistsofinstagram #cyclinglife #usat #rudyproject #ironmantri #readytorace #raceready #LisaChristiansen #drlisachristiansen #lisachristinechristiansen #lisachristiansencompanies #drlisachristiansencompanies #walk #ride #bicyclette #bicycle #bicycles #running #swimming #ironman #ironmankona #VeloGuide #ElevateYourPerformance #LisaChristine #ViktreSocial #FitnessGuru (at Hotter'N Hell Hundred) https://www.instagram.com/p/B1patnehfLx/?igshid=7dvgc0k7yj71
#hh100#cyclists#cycling#cyclistsofinstagram#cyclinglife#usat#rudyproject#ironmantri#readytorace#raceready#lisachristiansen#drlisachristiansen#lisachristinechristiansen#lisachristiansencompanies#drlisachristiansencompanies#walk#ride#bicyclette#bicycle#bicycles#running#swimming#ironman#ironmankona#veloguide#elevateyourperformance#lisachristine#viktresocial#fitnessguru
0 notes
Text
Belief
I watched 5 to 7 on the plane. The similarities to Us are shocking. The letter she writes him could have been pulled right from my heart... almost word for word. And just as with her, He made me believe in something that I was quite sure never existed before meeting Him... that intense true romantic love. Real love... the kind they write about in fairy tales. It is true that I care deeply for and love J, but it’s different with Him. With Him... He still never leaves my mind and some days seem like torture to be separated from Him. I wish He felt the same way about me. But, I do not think He could possibly feel as strongly about me, and keep from seeing me, or contacting me... not fake like on Tumblr, but for real. It took a year and a half to stop contacting Him... but, it has never seemed to be a problem for Him. Sometimes I find myself getting angry at Him... which, is not rational and completely unfair to Him, but none the less, He always promised that we’d always be in each other’s lives, but we’re not... and I can’t help but be angry about that sometimes. Right now, I’m not angry, I’m just missing Him and wishing we were here together in this amazing city. Today was so much fun. P and I had a blast... P planned the day, he took me to a couple museums, we rented bikes and drove all over, dinner in a quiet neighborhood bistro. He is such a cool kid who is turning into an amazing young man. I’m so proud of P and proud of myself for putting my boys above my selfish wants and needs. Life is funny. How many people are living like I do? Knowing where the Love of their life is, but unable to be with that person. There seem to be a thousand stories/movies/songs all about this very topic. I hope He decides to call me soon... or text. Even if we are not physically romantic, I’d just love to hear His voice, or just sit across a table from Him and hear about everything going thru His mind. My soul just wants and needs to be close to Him. I guess it is hard for me to give up on Us and lose hope completely. Even though Jolie and 525 seem to be all about brunettes again, which lets me know that I am not on His mind this week. I am guessing He had a wonderful weekend for the HH100 with her and He loves His current life that I am not a part of. Anything in the last couple days I am quite sure has nothing to do with me... except for those hearts, but then they are on a brunette... confusing. As I have fallen out of favor again, I will not like anything of His or post anything so that He knows how I’m feeling.... of course tonight’s post about remembering Him might be over the top.... but, if I delete it, that’ll be weird. Never mind... but no more throwing myself at Him when I’m not what He wants.... that’s just pathetic... and I am not pathetic.
0 notes
Text
HH100-104 SPRING
HH100-104 SPRING TB400.457B-02 TB400.457B.1 TB400.457B-01 TB400.457B.2 GBT97.1-16-A0P GBT93-16-A0P GBT5783-M16X80-8.8-A3L GBT5783-M12X35-8.8-A3L GBT93-12-A0P GBT97.1-12-A0P GBT5783-M16X90-8.8-A2L FT400.46.350 GBT97.1-16-A0P TB400.457B-02 TB400.457B-01 GBT6170-M14-A3L GBT97.1-14-A0P TB400.458B.1 GBT93-16-A0P GBT6170-M16-A3L TB400B.471.2 TB400B.471.3 TB400B.471-04 TB400B.471-05 TB400B.471-06 TB400B.471-07 TB400B.471-08 TB400B.471-09 TB400B.471-10 TB400B.471-11 TB400B.471-15 TB400B.471-16 TB400B.471-14 TB400B.471.1 TB400B.471-01 TB400B.471-17 TB400B.471-02 TB400B.471-03 TB400B.473.4 GBT6170-M8-A2L GBT91-1.6X16-A0P TB400B.473.2 GBT91-2.5X25-A0P TB400B.473.3 FT800A.47.098 FT800A.47.056 TB450.473-02 GBT93-8-A0P GBT97.1-8-A0P GBT5783-M6X35-8.8-A1L GBT97.1-6-A0P GBT93-6-A0P GBT6170-M6-A2L FT800.47.127 TG1204.474.4 TB400B.473-01 Email:[email protected] Wechat/whatsapp:0086-1301 3515 908 Read the full article
0 notes
Text
0 notes
Text
0 notes
Text
August 13 podcast

(Image by Bellow)
Thanks again to Kerry for filling in last week! This week starts with some joyful noise from Laraaji and log(m), moves through some blissful Alberta synths, stops by a yeh-yeh cover of a Zombies classic, and ends up with an hour of shoegaze (including a gem from Montreal’s The Haiduks). As always, don’t forget to stream or subscribe. Hope you enjoy it.
Hour One:
4_24 Emil Abramyan • Movement
Sunken Forest log(m), Laraaji • Lost Transmissions From The Off-World Territories
The Woods Mitch Von Arx • Pyramids
Penders Park Super Magic Hats, Zoltan Fecso • HH100
In Open Air at Last Ethan Gold • Expanses (Teenage Synstrumentals)
Everending Summer (ft. Moonrunner'83) Die Scum Inc. • Everending Summer
Greenish Blue Golden Grey • Colours
Lyngr Steve Hauschildt • Dissolvi
I'll See Big Underworld & Iggy Pop • Teatime Dub Encounters
Safe Tomorrow (Odd Nosdam Remix) Lali Puna • Our Inventions
Hour Two:
Emotions in Motion Jaakko Eino Kalevi • Out of Touch
San' Yago Cave • Online single
Fly This Place Mia Doi Todd, featuring Dungen • Music for A Midsummer Night’s Dream
Doesn't Mean Dark Time • Dark Time
Pinwheel Mind Floor Cry • Strawberry Milkshake
Rentre Sans Moi Gillian Hills • Rien n'est changé
Slow Drive Closure • Journey
I'm Trying Massage • Oh Boy
She Believes in the Devil Send Medicine • Mermaids on the Verndah
Lying In a Hole Le Plaisir • No Ordinary Wave EP
Ossify Them Matchess • Sacracorpa
That Battle is Over Jenny Hval • Apocalypse, girl
Hour Three:
Sleep No More The Haiduks • Fluorescents
Wind & Wing (chinese word version) Plant Cell • Flowergaze? (Rebuild)
Room 215 Heavydive • Warn the Dark
Right On Tess Parks & Anton Newcombe • Right On EP
The Plain Moon The Besnard Lakes • A Coliseum Complex Museum
Eden V (Demonstration) Sound of Ceres • The Twin: Demonstration Tape
Käfer Lockheart • Käfer
Soft Solution Hansmole • Bitter Herb
Taking It Too Easy Kim Gray • Compulsion
Magic Feel White Poppy • The Pink Haze of Love
0 notes
Photo

#Repost @sunshineendurancecoaching ・・・ Congrats to @sunshineendurancecoaching athlete and coach @ettinghausen who finished his 145th 100-mile event at Headlands Hundred in Sausalito, California today! 📷 = @ultra100m, who also buckled up at HH100! Great job, guys! http://www.andynoise.com/ (at Sunshine Endurance Coaching)
0 notes
Photo

Johnny Love - #HEADHIGHCHINUP - http://hiphophundred.com/johnny-love-headhighchinup/ #soundcloud #hiphop #rap #gfunk #lbc #new #hot #banger #ws #es #ca #like #rp HH100's Article: Johnny Love drops his new banger “#HEADHIGHCHUNP.” Johnny goes in over this one, he’s normally laid back and chilling, but now he steps it up and shows us his diverse style! Check it below! (at LBC)
0 notes