#handmade lolita skirt
Explore tagged Tumblr posts
Visit Tumblr Blog
Explore Tumblr blogs with no restrictions, modern design and the best experience.
Last Seen Tumblr Blogs


Fun Fact
If you dial 1-866-584-6757, you can leave an audio post for your followers.
Text


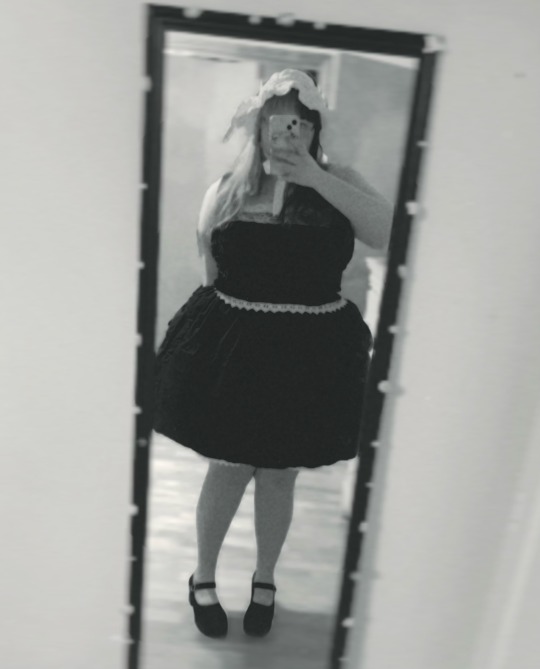
Handmade skirt
I’ll list on my web shop.
#classic lolita#fashion#victorian#handmade#edwardian#victorian fashion#handmadewardrobe#edwardian fashion#historical fashion#handmade clothing#skirt#outfit#ribbon#ribbon bows
253 notes
·
View notes
Text
Review: First Stop Cosplay's Lolita Patterns
So a while back I saw some patterns from a company called First Stop Cosplay. I asked them if I could review their patterns (since the last time I reviewed a small pattern company they did not appreciate it) and they actually sent me some patterns for free.
I had a lot of fun making these. Unlike when I reviewed Cut/Sew, I ended up with actual lolita garments, didn't get confused by any steps, and actually had a lot of fun. And at no point did I have to make this face:

So, here's our reviews.
First Stop Cosplay isn't a EGL fashion company or even a fashion company at all. They're a cosplay pattern company that happened to make five different lolita fashion patterns. Their lolita options consist of a petticoat, some short bloomers, a capelet, and the blouse and skirt that I'm reviewing. I don't have any evidence that anyone in their team wears lolita regularly or outside of comic conventions, although that isn't inherently a negative thing.
First Stop Cosplay's entire goal is to make handmade cosplay inclusive and accessible to everyone. They do this by making patterns that are very simple, and that have instructions that are so detailed and easy that new sewists can follow along without a problem. Their normal women's size catalog includes 14 different size options. We're going to stick a pin in "inclusive for new sewists" and "inclusive for all sizes" because I'm going to come back to those points in a minute. The patterns are sold as a single size, and are a bit on the expensive side relative to their market. Printed versions of both the patterns I received would run $50, though they do have a lolita bundle option. They are currently discontinuing their paper patterns and going fully digital, and there is a slight discount for buying the digitial download instead. Unlike most digital download patterns, there is a sizeable gap time between when you buy the pattern and when you receive it. I bought some digital patterns from them yesterday afternoon, put in the activation codes, and am still waiting to actually receive my patterns. For comparison, I bought some digital patterns off Etsy yesterday and had them within minutes. They have an elaborate and non-automated anti-piracy system to make sure their patterns and instructions are protected from people who didn't buy them. I don't think they have quite the right balance of intellectual property protection vs customer convenience, but that's maybe just my opinion.
I do think that First Stop's prices are justified by how high quality their instructions are. They really do walk through every step, and I think that most people whose sewing knowledge is how to thread their sewing machine and sew a pillow would have enough prerequisite knowledge to make their skirt pattern. I think anyone who successfully made their skirt pattern could follow the blouse pattern and have at least most success. Basically, with a First Stop Cosplay pattern, you're not buying a sewing pattern. You're buying a how-to-sew tutorial that's tailored to make the item you want to make. They are offering genuinely the best indie patterns I've found on the market. I do respect that they want to keep these pattern instructions secure, and I do think I'd have been a little bit annoyed if I spent $50 on some patterns and then found out that all the expensive instructions that I bought the pattern for were just available for free online. However, I don't love that there's several days between when you receive the product and when you're allowed to actually use the product.
When you buy their pattern, you get a single size. This is an absolutely horrible idea that I know for a fact is costing them a lot of business and also is building up a reputation that their garments won't fit and therefore aren't safe to invest in and it's also actively working against their pledge to be size inclusive and inclusive to new sewists, but we'll go into that later. We don't need to lead with me going over the worst decision they've made and why it sucks.
(But, while we're on the subject of bad inclusivity, y'all need to fix the pop ups on your site. I'm over there grabbing screenshots and data and I'm also in hell because I have one pop up go OVER the second pop up every single time that I tab between different pages. There's a whole chunk of disabilities for whom this is an absolute accessibility nightmare. Also if both pop ups happen at the same time, the page can get scroll-locked and you have to refresh the page. I want to give you money so please don't make it hard for me to buy your product. I only need to X out of your newsletter pop up one time, I won't change my mind the 12th time I'm shown it)
Let's review the actual patterns now.
0024 Customizable Lolita Skirt:

This is a fun, basic rectangle skirt. It's got an interfaced, non-shirred waistband, with non-removable waist ties inserted at the side seams. I loved that the instructions included how to do the kind of tasks that most patterns just assume you would automatically do. Instead of, "transfer all markings," it will show you each marking and how to transfer it. Instead of "press seams as you sew," it will stop the instructions and tell you what to press and how to press it. In addition to helping out new people who don't have someone to teach them how to do these things, it's helpful for lazy sewists like me who tend to want to skip these steps.
This pattern comes with three PDF instruction files. The first is for how to cut the pattern, fuse the interfacing, and transfer all the markings. The second is all of the sewing instructions. The third one is the "bonus content," and is where the skirt gets its "customizable" name. Sadly, there's not as much bonus content for these skirts as I would really like. The instructions include different ways to sew on trim, like sewing the trim under the hem, sewing it on top of the hem, applying it to the skirt body, or applying it to the waistband. There's not any actual direction for how to select good lace or trim or how to apply it to make it look the most lolita. Again, they're cosplayers, so I won't fault them for not knowing lolita fashion the way that a lifestyler lolita would, but it did feel like a bit of a let-down. For a product with "customizable" in the name, I wanted some more options.
In terms of actual design, though, it's a pretty solid skirt. if I was to throw you RhodyGunn's lolita skirt tutorial and say, "just interface the waist band!" and you didn't feel confident making that with no help, this would be a really good skirt for you. I have three problems with it, which is actually a pretty small number of problems by my standards.
My skirt did not fit me, but that was my fault. I just ordered totally the wrong size, and didn't realize it until it was too late. I made it work just by using the waist ties to cinch it in tighter. I wanted to make the skirt again, and if I'd had multiple size options with my purchase then that wouldn't have been a problem. Instead, when I remade my skirt, I had to use my sewing patterning skills to fix it. That's not a huge problem for me, but it would be a huge problem for First Stop Cosplay's target audience.

I added a ruffle and a few lines of lace onto my skirt, because I don't want to put a lot of work into a skirt and then have it not be an actual lolita skirt. This is what it looked like before my customizations. Please note that my skirt is extra long due to me ordering like 2 sizes too large, as their longer sizes are longer than their smaller sizes.
My other critiques sum up to, "lolita isn't patterned like that" in a couple of cases. While skirts with suspenders are definitely a thing, I couldn't find any that tie at the shoulders. I know that this is probably a way to make sure that the straps will fit everyone, but I'd love to see a piece manufactured by any brand that would give inspiration about how to wear it. The other thing that's just not patterned like lolita garments is the waist ties.. It would be possible to replace the pattern piece with one that's actually lolita-shaped without modifying the instructions at all. If no one at First Stop wants to do a re-drawn waist tie, I'll do it and post it here, since I think the info would benefit the handmade community at large.

Lolita waist ties are very flared, which is how we get the cute waist bow, so pattern them like this next time and it'll be correct. I'm not saying this as a preference or a style choice, lolita waist ties are just shaped like this 85+% of the time.

As previously mentioned, I made each garment twice. On the second one, I re-patterned the waist tie, and then I just slapped a bunch of lace on the hem. It made a perfectly acceptable lolita skirt, in my opinion. Please note that, if I was a new sewist, I wouldn't have been able to make this skirt a second time, since I wouldn't have the skills to resize the waistband to fit me. In order to make this pattern for myself a second time, I would have needed to receive multiple sizes when I bought my pattern.
Blouse time.
FSCO Whimsical Lolita Blouse:

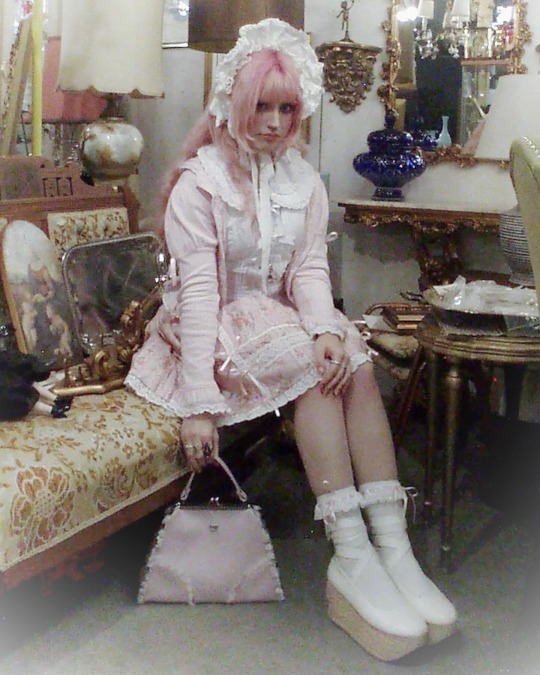
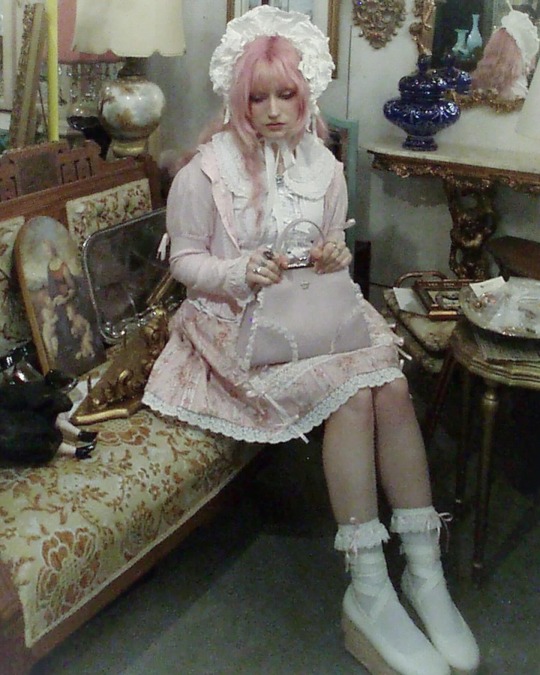
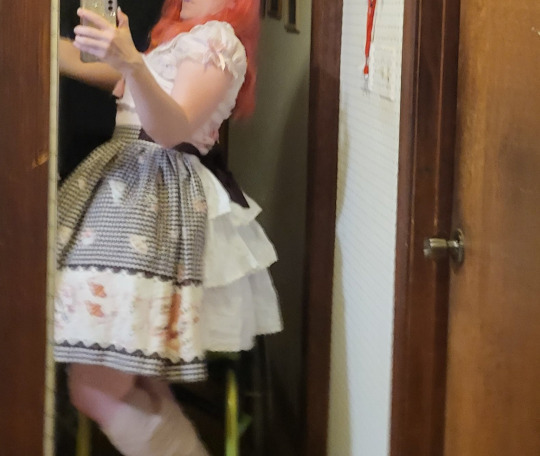
Button front, puff sleeve, peter pan collar blouse, two sleeve variations. I did not make the long sleeves because I live in Sacramento, which is one windy day apart from being in an air fryer.
I want to start by saying that I've officially made this blouse my favorite handmade lolita blouse pattern, and I'm going to make it in more colors and fabrics. I love how fast it comes together, and I love that a lot of really time-consuming techniques have a more simple technique instead. I like sewing fast and this feels good to sew fast.

However, this blouse suffers pretty badly from "close, but not quite," in the same way the waist ties are. Yes, lolita blouses can have flat roll peter pan collars, but they're usually not this size, or this shape, or sit this close to the neck. Yes, lolita blouses usually have puff sleeves, but they're shorter and puffier. These were super easy modifications for me to make, but again, it's not an easy modification for a new sewist to make. But these are adjustments that First Stop COULD make. They could adjust 2 pieces and one line of text in their instructions and have what would actually be the only good lolita blouse pattern aimed at the absolute beginner. These patterns are so close to being so good. Two pattern pieces and one line of text away from having THE lolita blouse pattern that we recommend to all the new kids.
To anyone making this blouse: if you don't want to make adjustments to the pattern, the collar more or less isn't going to read as lolita at the size it is at. I got around it by using some 3.5" gathered lace. That ended up being a pretty big lace, but you will need to put a ruffle or some wide gathered lace on the collar if you want to wear this as a lolita blouse. It would be nice for there to be instructions for that.

Just if anyone is curious, here's the changes the pattern needs to really read as lolita. Sleeve shorter and more volume at the hem, collar wider especially at the shoulders, neckline farther away from the actual neck. Change that and you're golden. The picture on the right is the collar in the pattern laid over the collar that I redrew.
My original blue blouse up there didn't fit me, and that was actually not my fault this time. I bought the right blouse for my bust size, as I was recommended to do. However, relative to their sizing, I have a smaller bust and a larger waist. This meant that a fitted blouse like this was too small in my waist. When I made my purple blouse, I just added 3/4 of an inch to each side seam and re-patterned the bust dart, but again, First Stop Cosplay's target audience does not know how to do that.
When you're selling a product, not posting a tutorial online or giving comments on a forum, but are actually selling a product for real money, it's your responsibility to give your customers the things that they need to succeed. That includes making sure that they have the info needed to make their pattern fit.
First Stop Cosplay is a really promising company, and I really enjoyed most of the process of their patterns. This is why I'm going to spend some time talking about the thing that's stopping people from buying and successfully completing their products, which is the thing that I think is going to kill this company and make them go out of business. First Stop, I really don't want. you to die, so I need you to listen:
The single size pattern thing is a problem. it stops new customers from choosing your product. it stops existing customers from being successful with your product. It stops you from completing your mission to be both ability-inclusive and size-inclusive. It's working against you to such an extreme that I'm stunned that no one in the company with the power to change this can see it.
In the 2.5 months that I've been working on this project, I've talked to a lot of people about your company. "I would buy from them, but I'm afraid I'm going to get the wrong size," was a common sentiment I got. "I won't buy from that company, because they're charging a lot of money for just one size," was another. It stopped ME from trying your company; if I had to buy these patterns out of pocket then I would not have reviewed them. This is because I, a very experienced sewist, didn't want to get the wrong pattern size--and i STILL GOT THE WRONG PATTERN SIZE, twice, even after being PERSONALLY GUIDED by an FSCO employee. How are other companies dealing with the problem of customers buying the wrong size of pattern? They're giving people multiple pattern sizes when they sell the pattern.
I will admit that it's beginner-friendly to not confuse your customer with nested pattern sizes. However, y'all are going digital, and it will cost you no more money or and more paper to just give separate PDFs for each size. You already have the PDFs. You're selling them separately. Just put them in a group. Then, you're still fulfilling your goal of not confusing your customer with multiple sizes, but you're also not trapping a beginner into a single size with no chance of correcting that mistake. When you're asking a beginner to pick their size before they're allowed to look at the pattern, you're potentially dooming their project before it starts. In my market research, I encountered two people who bought First Stop Cosplay patterns, followed them all the way to the end, used their limited time and their expensive fabric. They made cosplays that they were happy with and proud of...until they put them on, and then they didn't fit. That's a story that should not happen. And I get it, it's not super easy to help a beginner pick a size when you're not present to help and they don't totally know what they're doing. But you know what is a thing you can expect a beginner to do, that will make their finished product better and make their garment reflect positively on your company? Telling them to make a mockup before they use their expensive fabric. You don't need to know how to resize a pattern. You just need to know how to follow the basic mockup instructions and then try it on. Just like shopping at Walmart, if your mockup garment is too small, you make the size larger. If it's too big, you make the size smaller. This is also very newbie-inclusive because it introduces them to the steps they're going to follow so that they're more familiar with them. The fact that even one person did everything right and still wasn't able to get their working garment is a fact that you should be trying to figure out how to fix. When you're a small pattern company, your reputation of, "I made their stuff and it doesn't fit," is a very dangerous reputation.
Your product, as it is, is inclusive to all body sizes, but it's not at all inclusive to all body shapes. You offer one shape in all sizes, and then don't provide the information necessary to help people who are not that shape choose between sizes. The information provided for body measurement and for finished garment sizes are not complete enough to confidently choose what size will fit my shape. I understand that more information is confusing to newer people with less experience, but less information is denying people the opportunity to make things that fits. I can see two options for solutions for this, both of which will cost y'all no money. One is to have a supplementary page that has ALL the body measurements for each size. If you're making patterns 14 different sizes, someone in the company has a chart that shows inseam length and shoulder width for those sizes. Your main audience probably doesn't know what to do with that, but if that information isn't posted then no one can ask a more experiences sewist for how to use that info. The other solution is, wait for it, just give people more sizes when they buy the pattern. This means that, if I bought my blouse pattern based on my bust measurement like I thought I should, and then I see that waist measurement is more important for my specific shape, I am not stuck trying to modify a blouse pattern that won't fit me. Y'all already have all the sizes. Just put three of them in each download. Give people the tools they need to make your company look good. Because, right now, "we're inclusive of all sizes as long as you don't have an apron belly or narrow shoulders," is not a look that lines up with the values and mission that you posted on your site.
First Stop Cosplay recently had to downsize. You got rid of some of their staff. You closed their Discord. You're going to sell through their current stack of paper patterns and then go digital only. You're not currently producing new patterns. Who in your company is so tied up in the single size thing that they're willing to throw away new customers when you're already struggling? When you're selling a digital pattern, it doesn't cost you any more money or labor to include multiple patterns. You can sell multiple sizes of digital patterns without selling nested patterns. I don't know if it'd somehow have an additional cost associated with selling multiple patterns at once, but if it is, I recommend that you do whatever every successful pattern company selling multiple sizes of digital patterns is doing to stop that from costing money, because First Stop Cosplay is the only company I know of that seems to have that problem.
I don't know. It's not my company. I'm just one girl who made their patterns four times and did a couple of months of casual market research. Take my stuff with a grain of salt.

Anyway, here's how my full lolita set turned out. Took a total of three days and a $8 bedsheet set from Goodwill, lace was all from Cheeptrims so it was less than $1 per yard. Even with $50 worth of patterns, this is still cheaper than buying it anywhere, and I got the fun of making it. I had a really good time and I want to have a good time with this company in the future.
So please use the resources you have to solve your problems.

Good night.long post
#20dollarlolita#egl fashion#first stop cosplay#handmade lolita#egl community#cosplay community#handmade#handmade blouse#lolita blouse#lolita skirt#review#sweet lolita#classic lolita#20dollarcoordposts#sewing#long post#very long post#dash stretcher#your dash is going to be so stretched that its pants will never fit again
148 notes
·
View notes
Text
﹒⪩⪨﹒ the vibe i bring to the function.. ﹒⪩⪨﹒
#jfashion#lolita fashion#egl fashion#btssb#egl coord#egl#old school lolita#egl community#mine#handmade skirt#sweet lolita
484 notes
·
View notes
Text
new dress <3 it feels straight out a btssb mook
#it has cross back straps too for full apron effect 🥺#excited for when i can wear this outside#incredibly this jsk is from 2008#feels much more 2005ish to me with how the lace is arranged#but has a little bit of a fuller skirt so can wear a petti without it looking too rectangular#v cute#btssb#old school lolita#egl#lolita fashion#my pics#headdress is handmade and socks are old ap#baby the stars shine bright
394 notes
·
View notes
Text
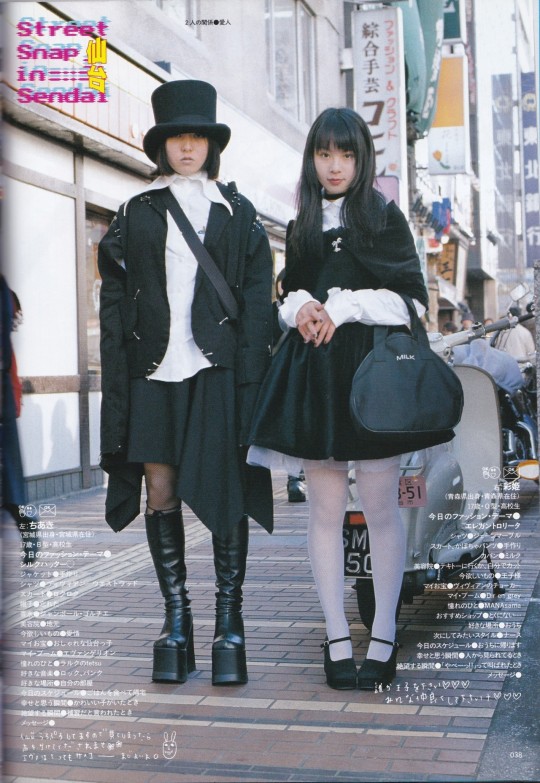
Saki's (right) JSK is handmade. From Kera 17, 2000. Thank you @rainedragon for the scan!
#jsk#osl#old school lolita#street snap#forgive me if ive read her name wrong#on the scan it says the skirt was handmade#but im calling this a jsk cuz it goes way up above the bust without any break
225 notes
·
View notes
Text

this one isn't actually for sale, it was for an art trade, but there seems to be interest so i may make more of these! i used my fav perle lace and some beautiful cotton 21 wale corduroy that's light weight and drapes amazingly. i also changed how i do waistbands-- instead of sealing the raw edges with bias tape, i managed to fold them inward along with the lining. i still need to work on getting the seams perfectly neat, but im getting better! sadly didnt have the time or energy to iron this, so its a bit wrinkled from sitting in my WIP box for a week while i waited for the velvet ribbon to arrive.
for the headdress, i've started sewing loops to the bottom for the clips to go through, instead of sewing the clips directly to the fabric, and i think it's nicer this way since it makes them easier to wash.
what do you guys think?
AngelEgg EGL
#handmade lolita#classic lolita#lolita fashion#egl#anyway back to working on more lucky bag fodder#i shipped out the first two bags today#hopefully the owners enjoy them!#maybe i'll work on brown today?#i have a headdress and two skirts ready#but i need to make a tote to shove them in#and maybe one more accessory idk#bow clips maybe?#i have this big pile of various brown corduroys because i was going to alter a dress#but none of them were quite the right colour
66 notes
·
View notes
Text

I made this skirt in only a day on Saturday, which is definitely the fastest I've ever finished a main piece! It was helped along though by the fact that the fabric I used for the ruffles was already gathered.
I made it out of a bed skirt that I thrifted recently. It was part of a set, and the blanket looks great on my bed, but I decided against the bed skirt and valences that came with it. I'm very happy with how it turned out, but I don't think I'll actually end up wearing it, so I'm planning on giving it to a friend who will.
43 notes
·
View notes
Text
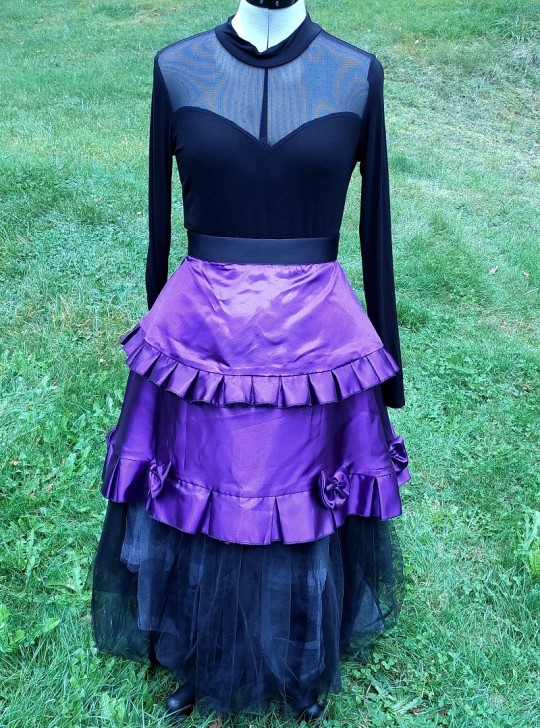
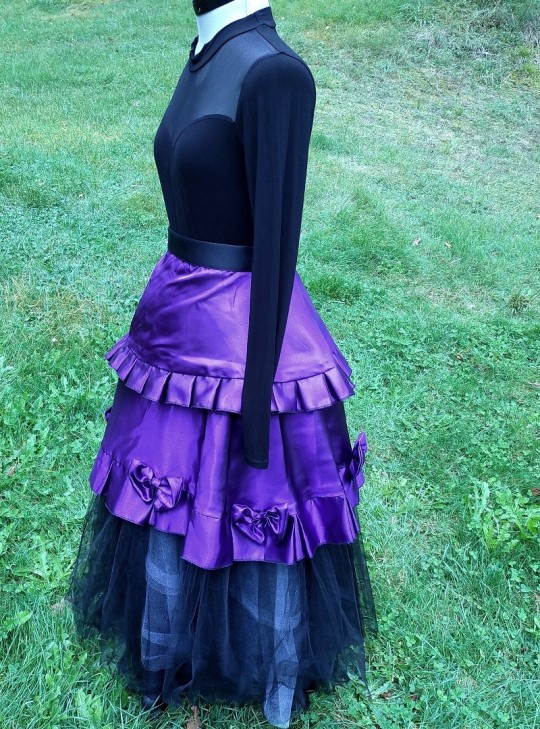
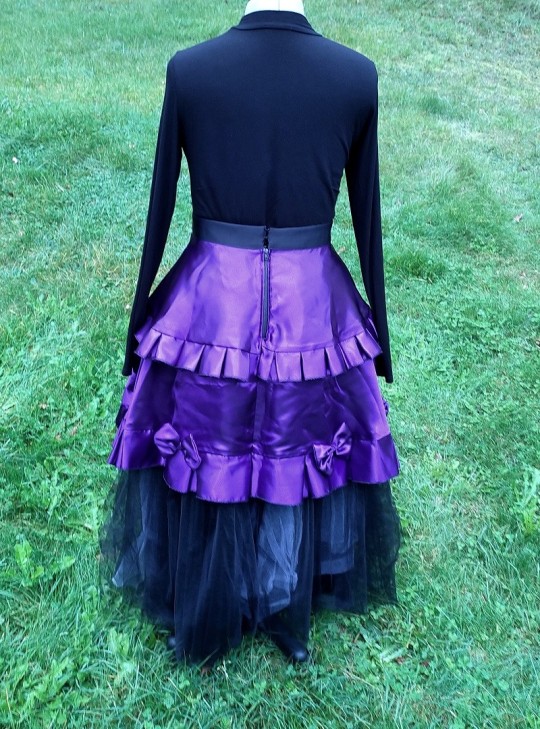
Jupe gothique lolita en satin violet. Lien page facebook: https://www.facebook.com/profile.php?id=100032848166805&locale=lv_LV
#jupe satin#jupe gothique#jupe violette#jupe ma-bimbo#création artisanale#création lotoise#jupe medora#sewing#handmade#purple skirt#sateen skirt#lolita skirt
9 notes
·
View notes
Text

𝒻𝓇𝑜𝓂 𝓉𝒽𝑒 𝕒𝕣𝕔𝕙𝕚𝕧𝕖𝕤: "𝓛𝓸𝓿𝓮𝓻'𝓼 𝓼𝓴𝓲𝓻𝓽"
" lover's skirt is a treat for the senses, a gothic lolita dream in a deconstructed stye" - from the archives C. Haute.png 2023
#hautepng#archives#♡hautepnggoods♡#2023#gothic#gothic lolita#whimsigoth#mall goth#fashion#y2k#y2kcore#y2k aesthetic#kawaii#kawaiicore#handmade#cute#cutecore#skirt
11 notes
·
View notes
Text
Handmade this top in anticipation of warmer weather~ 🖤🤍
#skirt is from BtSSB bonnet is indie brand#egl community#kawaii fashion#old school lolita#egl fashion#elegant gothic lolita#plus size lolita#handmade lolita#handmade fashion#harajuku fashion#it’s Eden tag#my post tag
29 notes
·
View notes
Text
2 notes
·
View notes
Text
(It's been entirely too long since we've started a tutorial with a very blurry picture, which is a 20dollarlolita tradition. Am I about to fall over and only staying upright because of a death grip on this trim? Stay tuned to find out)
Let's make a skirt.
There's a lot of lolita fashion that doesn't fit most people. It's me. I'm most people. I'm going to wear it anyway, so I'm going to resize that to fit me.
The hardest part of resizing a lolita skirt (or skirt part of a dress) is that you almost never can get the fabric that the skirt was made out of. Lolita prints are usually pretty limited run. While some dresses will let you redistribute the fabric to have a slightly less full skirt, that's usually a major reconstruction that ends up drifting a bit away from the lolita shape.

x
A ruffled bustle bustle, however, is pretty common. Bustles like this are pretty common in lolita fashion and add an additional detail. In addition, you can make the waist of the skirt several inches bigger without a problem, and without compromising skirt fullness. If you ever want to undo the alteration, seaming the skirt back up is not very difficult. It's not a fully seamlessly reversible alteration, but there's far worse things you could do to the garment (ask me about my AP dress with mesh pits).
The problem is that bustles like this take quite a bit of energy and fabric, especially if you want to have details like lace trim. It's one of the more time-consuming alterations to do.
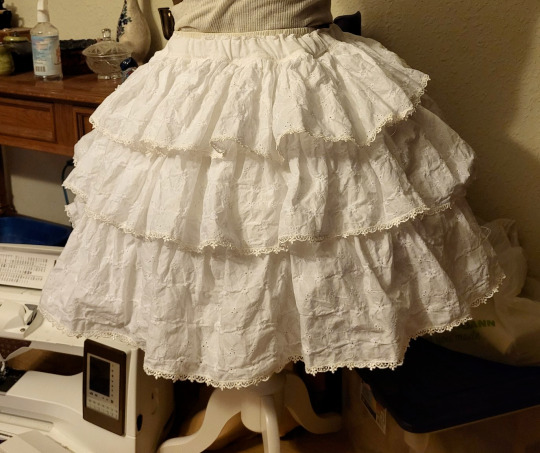
Or you can make one bustle/ruffle underskirt, one time, and wear it with all your skirt and dress modifications. You can splurge and get some nice trim and get some nice fabric, because you only need to buy it once. You can also wear it as a standalone skirt. (Just remember to never, ever steam it before taking pictures. You wouldn't want to look competent)
I put off making one of these for a very long time, because I'd made the process much more complicated in my head than it turned out needing to be. Once I was building this and realized I needed to simplify the fuck down, this became a really easy project.
Materials: I decided to make the ruffles on my skirt out of eyelet lawn, which is a cotton fabric that has an all-over embroidery. I got this for about $10 a yard on ebay. I don't have a very accurate judgement of how much I used on the skirt. I bought 4 yards and used probably 3.5, but I also wasted a bunch of fabric on an extra tier that I had to chop off. I wanted a fabric with more detail than broadcloth, but that wasn't exclusively going to work with OTT styling.
I got 30 yards of 1/2" Venise lace off cheeptrims.com for $9. I really recommend putting lace on your ruffles if you can. It really adds to the detail level, and you only need to buy it once. You already have to hem all of this so you might as well hem it with lace.
You will also want some fabric for the slip layer (for want of a better term) to attach the ruffles to. My ruffles were a little bit sheer, so I wanted an opaque base fabric for modesty. Depending on the look you're going for, you can also use this layer to add some subtle detailing or changes to the finished look. If you're only wearing it with over-the-top looks, using a base fabric with shine or glitter can stop your ultrabustle from looking too plain. If you're wanting your ruffles to lay flatter, getting a soft fabric with a lot of drape will make the ruffles droopier. I just used some weird cotton plainweave that I got at Green Store for 75% off due to a bolt-long defect.
I used 1" elastic in the waistband here, because this skirt can get a little bit heavy, and then you often have another skirt on top of it adding to the weight.
The other thing that I used that made this much easier was a ruffling attachment for my serger. You don't need to use a serger, but a ruffling or gathering attachment that allows you to ruffle a flat strip of fabric and sew it onto another piece of (not to-be-ruffled) fabric will speed things up considerably. I know a lot of people buy a ruffler or a gathering foot when they start sewing lolita, and then are disappointed when they don't use it very much. There's a very limited number of lolita applications for these attachments, and I'm happy to tell you that this is one of them. If you don't have one, you don't need to go buy one. You can just do the two-step process of gathering the fabric and then sewing it on. But if you wanted an excuse to go buy one, well, you have one.
The Plan:
So I'd previously made a lot of math and calculations for how each tier was going to gather into the previous one, and then realized during the build phase that actually was way too complicated.
What we need is a rectangle with ruffles on it gathered into a waistband. Yes, a rectangle. I know, I was stunned too, but the final result worked the best.
I wanted the tops of the ruffles to be hidden in seams. If you just sew ruffled strips onto a single piece of fabric, it's very difficult to hide all the raw edges and to make sure you're not spreading loose threads all over the place. We're going to make ruffled strips, and sew them to each other. This covers up the raw edges very nicely.
This also will allow you to slightly gather the second and top tiers to each other, if you want to make this skirt in an a-line instead of a bell/cupcake shape.
The Math:

If you know what skirts you're planning on wearing your ultrabustle with, it can help to measure them and get a good guideline.
Generally, you want your ultrabustle to be a number somewhere within these guidelines.
~~Close to the same length of the skirt you're wearing it with or ~~4"ish longer than the skirt you're wearing it with. (This depends on if you want the bottom ruffle to stick out. If you're Tallita and all the skirts and dresses you're resizing are also too short, you might want this to double as a ruffled underskirt) and ~~An acceptable length to wear as a skirt all on its own.
My first run at this ultrabustle was WAY too long, and after chopping off the entire top tier, it ended up being either 1" shorter or 1" longer than the skirts I'm planning on wearing it with, which is a great number for me.
As for the total fullness of the skirt, you have to remember that the ruffles will add visual volume to the skirt. This means that you don't actually need the hemline of your skirt to be super full. All that matters is that your petticoat can comfortably squeeze in there. For this, I measured the hemline of the smallest dress that I had that still fit my petticoat, and used that. It turned out to be about 80" around.
So, what sizes do we cut this at? It's math time.

Here's a worksheet if you want. You're going to need to know how long you want the finished skirt, how wide you want the hem of the slip (not the ruffle) of the skirt, how many ruffle layers you want, and your waist measurement.
The slip needs to be shorter than the ruffles, so it doesn't show. So total slip length is your skirt length minus 2.5". Divide that by the number of ruffle layers that you have, and you'll have how long to cut each of those. This is slip tier short side.
Each ruffle layer needs to be longer than each slip layer, so that the slip doesn't show. You want each ruffle to overlap the previous one. So, take your slip tier short side and add 2-3" (or more, if you want). This is your ruffle short side.
Your finished slip diameter is your slip tier long side. That one's easy.
If you're a math and planning person, you can determine your ruffle long side measurement. You'll want to take a piece of your fabric, cut to the ruffle short side measurement and also about 45+ inches wide, and a piece of your slip fabric. Run them both through your gathering attachment so that your ruffle fabric is sewn onto your slip fabric. If you like how that looks, you can then measure the finished length of the ruffled fabric and use that to calculate how much fabric you'll need for the ruffles. There's four places where people mess this up. First of all, if you're using your gathering attachment to sew and gather at the same time (which is the point of that attachment), you want to do all your test runs gathering it onto a fabric. The amount of fabric that goes into a machine ruffle changes depending on if it's onto fabric or just gathering. Second, you want to use your finished fabric, at your finished ruffle length. Different fabrics will ruffle different amounts, and different ruffle widths will look different even at the same gathering amount. Third mistake people make is to not gather a long enough strip. The longer a strip you gather, the more accurately you can measure how much fabric is actually going into your ruffle. And the fourth is to take that measure as an accurate one, and not plan for needing extra fabric. The upside of the gathering attachment is that it will save you so much time. The downside is that you can't be as accurate with knowing how much fabric you'll use. Remember, you can always turn the leftovers into a matching accessory. Even if you're going to go yolo like I did and not do the math about how many ruffles you need, you will still want to run a check that you like how your ruffling attachment looks. You don't need to measure super accurately, but try to get a feel for how much fabric is going into each ruffle. For example, if your ruffler takes a strip and makes it 1/3 it's flat size, then you'll need more fabric than if your ruffler makes it 1/2 it's flat size. If you're really on a budget, you can just cut your ruffles at 2.5x your slip long dimension and precisely gather by hand. My time's worth something to me and so it wasn't worth it to do that just to save a yard of $10 fabric.
The last part is just to check that your ruffle long dimension (or it's rough approximation) is still at least 2.75x your waist measure (3.25 is better). If you don't have that, your skirt likely won't look full enough for a lolita silhouette. If that's the case, just add to your skirt dimension until it is.
Actually making it:

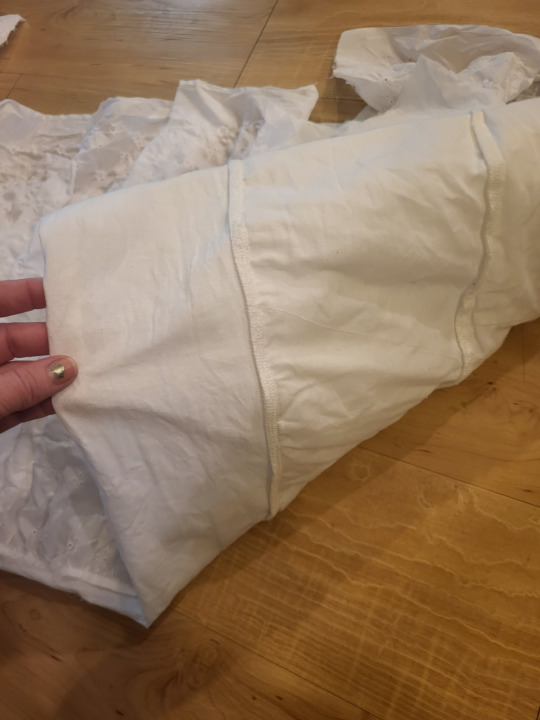
Before you forget, cut out a piece for your waistband. You can decide if this looks better in your ruffle fabric or your slip fabric (I used slip). This piece should be 3ish" longer than the distance around the fullest part of your booty. You need this to be longer than your booty distance so that you can get it on your body. If you're using 1" elastic, you want this piece to be a minimum of 3" wide.
I've found that the easiest way to do this is to start out by making the whole skirt as a single, very long strip. So, I take my slip tiers and cut them all out, and sew them into a long strip.
On my specific fabric, I decided that I wanted the pattern on the eyelet to go lengthwise. So, instead of cutting the fabric across the grain (short side, selvedge to selvedge) like I normally would, I cut down the 4 yard length of the fabric. This meant a lot less seaming. Since I didn't really know how much fabric I was going to use (you know that test I described to check how much fabric you're going to use? Yeah, guess who didn't do that), I just cut them one 4-yard strip at a time. I'd ruffle one all the way, stop, and cut the next one. This did actually save me quite a bit of fabric versus cutting them all at once. I had to go back and sew the sides of the ruffle together once the skirt was done. It was a small price to pay for the convenience I experienced.
I knew what size I wanted the finished ruffle length to be, but I cut my ruffles about 2.5" longer than that. I wanted a little bit of wiggle room once the skirt was done, so that I could do the length adjustment once the whole skirt was assembled.
And then, it's just a matter of letting the ruffler do its work. My serger ruffler works by you putting the item to-be-ruffled on the bottom, and the item to attach the ruffle to on the top, and then just hitting go. Some other rufflers work by putting the to-be-ruffled at the top, so you can see it as you go. Like all sewing machine attachments, if you're not sure, just go on youtube and search "HOW SINGER GATHERING FOOT DO THING NOT LOOK LIKE SHIT?" and someone's probably made a video of it.
So, once you've run all your ruffle through your machine, you should have a nice single strip of slip fabric with a ruffle on top of it. Now, some gathering attachments don't actually sew super strong seams, because you have to adjust tension or stitch length pretty severely to get it to ruffle like you want. The other advantage of putting the ruffles in a seam instead of just topstitching them onto a piece of fabric is that it doesn't matter how strong your ruffle attachment is, as long as it's strong enough to hold until you can put the ruffle in the seam. The seam provides the strength.
Once you have your single long ruffle, cut off a section that's the diameter of your bottom tier.
Now you just need to sew them together (and finish your inside edges). I like to start at the bottom tier and go up.
For each tier, you're sewing the bottom of the slip layer to the top (ruffle and slip) of the tier below. Just pull the ruffle of the higher tier out of the way, put right sides together, and sew.
If you aren't using a serger, you can zigzag over your edges and then trim them down, use an overcasting stitch from your sewing machine, or topstitch some seam binding over the seams. The extra line of stitching on the slip layers in front won't be visible. One of the other nice things about building this in the way we have is that, when you finish the edges of your inside seams, you're putting three layers together and finishing it as one. This is actually a lot less then 1/3 of the work of finishing them separately, because you'd have to finish the ruffle as a flat piece, which would take way more time. Have I convinced you on the greatness of this technique yet?
Continue cutting pieces off your ruffle layer and stacking them until you have as many layers as you decided you were going to have.
Once you have your layers all stacked up on each other, it's time to sew the skirt back seam. I find that it looks best to hold the ruffles out of the way, sew the slip together, and then go back and sew all the ruffle pieces. Basically now is a good time to just check for any ugly spots and to touch them up.
There's like 50 ways to attach a waistband to a skirt. For this one I used this method (what a blast from the 20dollarlolita past we have there. Also please note that the cost of ruffler feet seems to have gone up from $15 to $60-$100 in the past 10 years and despite working in a sewing machine store, I'm not totally sure why).
Once you've got the whole skirt assembled, it's time for the finishing.
The first thing that I did was put it on and try to judge how short I wanted my top ruffle. I'd cut all my ruffles extra long in the short dimension, so that I could shorten them when they were on the skirt. I picked a length that worked, marked it out, and chopped at that point. I then did this for the other two layers. I found that I wanted my bottom ruffle to be a little bit longer than my top ones, and cutting it long allowed me to make that choice.

I then started just zigagging on my lace. If you don't have a serger, you can use the lace as a hem finish, which also saves you an additional step. The lace really added a lot to this, and since I only need to make this once to wear with a lot of different garments, it was an economical use of nice lace.
I started putting the lace on the top layer first. This is because, if I ran out of lace, having a different (wider) lace on the bottom layer wouldn't look strange. As previously mentioned, I did zero measuring of how long my ruffles are, and had no idea if 27 yards would be enough lace. Don't be like me. Do some tests. Or be like me and choose the life of treachery. Anyway, stick lace on this thing, please. You worked hard and your skirts deserve it.
The only other thing that I did was to cut the slip layer down by about 3" on the very bottom. I did this because I made a mistake, but I like how it looks.

You can take this system of ataching ruffles in rectangles or even a trapezoid and stick it in the back of a skirt (or skirt on a dress). I did that here because I knew that I wanted a pink bustle, not a white one.

I'll do a tutorial for the actual skirt resizing sometime after I actually resize a skirt with this. Here, all I did was slice the back, hem those edges, and then button on some waist ties from another dress. This let me easily add several inches to the back of this skirt, without needing to re-distribute pleats, and without sacrificing the fullness of the shape.
This will all sit a little bit better once I've pressed the skirt, as well. Steaming the top layer of this while the garment is on me/a dress form/a hanger will decrease the poof in the top layer a little bit, and honestly, we could benefit from that in this case.
Anyway, if you have this, you have a very fast way to enlarge existing garments.
So, while this has thankfully very much decreased in the past years, there's still some people with weird opinions on MoDiFyInG bUrAnDo, so let's have a talk. Lolita clothing is not community owned. If someone who was never going to sell a dress to you modifies it, that doesn't take it away from you. This is a mentality that we tend to have in lolita more than other fashion just because of our high resell scene, but it wasn't ever going to be your dress and so you don't need to have an opinion about what happens to a thing you were never going to personally own. Things have value more than money, and value is often changed rather than destroyed. AP's Halloween Treats OP has no value to me when sold for $500 on Lacemarket. I don't spend that much money on lolita, ever. But a questionably-altered AP's Halloween Treats OP that I can un-alter has value to me if the price is good. But a questionably-altered AP's Halloween Treats OP has very little value to someone who likes the price, but can't undo the alterations. When someone resizes a dress or skirt, true, sometimes the people who are the size it was originally made can't wear it anymore. You've decreased the value to them, but you've made it more valuable to people who are the size that you've made the garment become. This skirt had no value to me when it's waist measure is 7.5" too small, but now I can wear it, so it has functional value to me. A lot of people who say that modifying the dress ruins it are either ignoring that also the stress of putting a dress not sized large enough for your body can damage it and not look as great while doing so, or else they have a much worse take. People who say that modifying clothes ruins the garment, but also say that wearing a garment that's too small ruins the garment, what they're actually saying is that wearing that garment is a privilege that should not be extended to larger sized people, and if they say that then they can just, you know, go fuck themselves. We don't need that in the community. Everyone deserves to wear lolita, and some people have to work harder to achieve it, and that's not fair, but everyone deserves it.
So yeah, kiddos! Build a skirt! Go cut up some clothes! Wear the skirts you've always wanted to wear! You can do anything!
And to answer the question we opened this with, yes, I was absolutely falling over.
#handmade lolita#20dollarlolita#lolita fashion#resizing clothes#making clothes bigger#tutorial#skirt tutorial#lolita skirt tutorial#sewing tutorial#bustle underskirt#utilibustle#ultrabustle#the one bustle to rule them all#one bustle to find them
256 notes
·
View notes
Text
Bring & Buy at Tokyo Boom


On November the 12th my local lolita community organised a bring & buy event and I was part of the working team! A bring & buy is a specialized kind of flea market: you drop off the things you want to sell with us (the lolita association) and we sell the items. There's a small fee (1€) for each item you drop off. At the end you collect your money for the sold items or get your items back (if they haven't sold). The small fee goes towards our association, we use it towards events.
I knew we were announcing our upcoming Teaparty at the bring & buy event (will be on June 8th 2024), which will be called "Royal Symphony of Roses". This highwaist-skirt of mine is called "The Empress' New Clothes" (after the fairy tale) and also has a lots of roses in it's print, so I decided to wear this skirt in honour of our upcoming teaparty!
I had lots of fun working at the b & b event and it also was a great success! The owners of Tokyo Boom (the restaurant) were also happy and we will hold further events there! ^_^
I bought two gorgeous headpieces for myself. The black one was an immediate must buy and I pondered a bit about buying the white one (because I have no similar black ones, but vaguely similar light-coloured ones), but then my friend offered me a discount and I couldn't resist any longer on the white one!
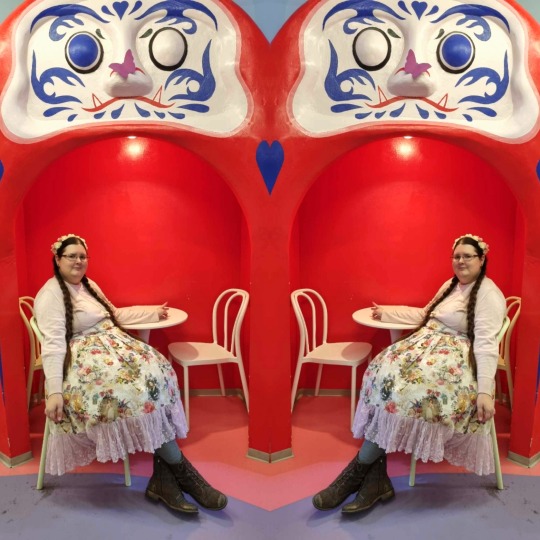
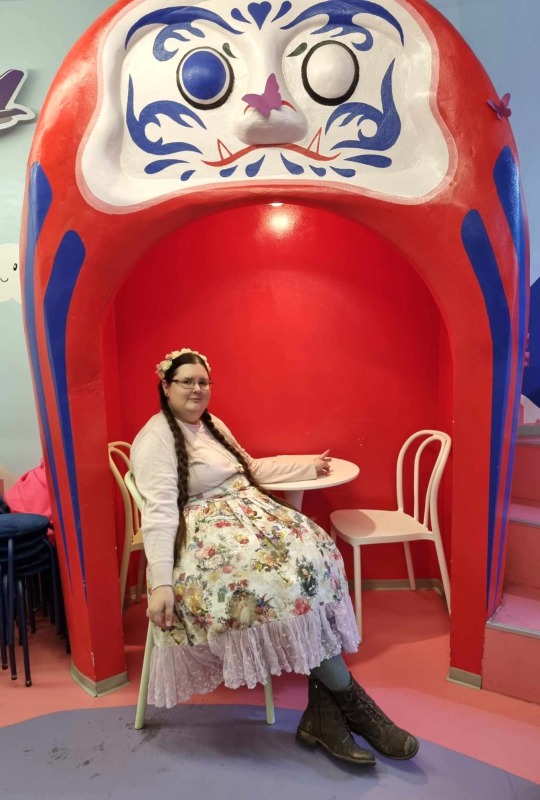
[id]Picture 1: A mirrored picture of Amy (me), posing in a chair in front of a big Daruma statue. Amy is a young, fat, white woman with glasses and long brown hair worn in two long braids. She's looking very relaxed and laid-back in this picture, as well as confident. She's leaning back in the chair and has her feet crossed over, which you can only see from the angle of her brown-and-gold accentuated boots. She's wearing a thrifted soft pink top and a soft pink cardigan with buttons over it on the top. The cardigan is tucked into her high waist rock, that's also very light in colour. The background colour of the skirt's fabric is off-white/beige and it's adorned with many flowers and portraits of vaguely regency looking women and men in uniform. There are also ships and letters scattered throughout the print. The print seems like a love story, set at sea. The skirt is finished with pale pink tulle lace with flowers on it. The grey tights don't totally match, but sometimes we have to work with what we have.
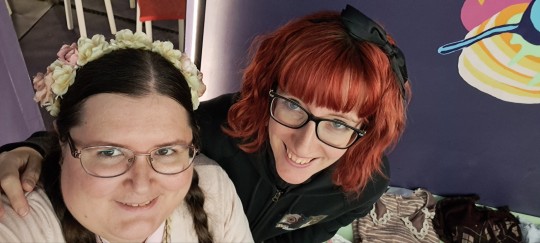
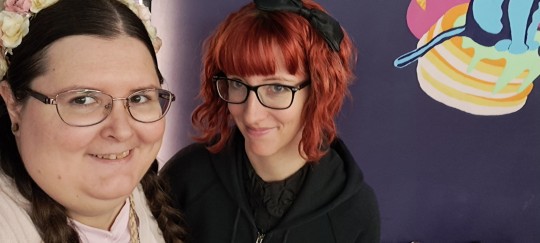
Picture 2 & 3: Two very similar close-up selfies of two friends: left is Amy (me) and right is my friend @bright-eyes-hope. My friend has an arm over my shoulder and we're both smiling at the camera.
Amy is a young, fat, white woman with glasses and long brown hair. She's wearing an off-white flower crown, further decorated with pink flowers. She's wearing a soft pink cardigan. My friend is a young, thing, white woman with glassed and short red hair in a kind of pixie cut. They're wearing a black bow in their hair and a black hoodie with cats on it.
Picture 4: A picture of the two lovely headpieces (black and white), that I bought at the bring & buy. Laying above them is the flower crown I wore for this event. The flower crown is offwhite and I further decorated it with single pink roses (to match the pink lace of my skirt). See picture 5 for a description of the black headpiece, as that one also shows it better/in clearer detail. The white headpiece is by Triple Fortune and features one big white bow with "Triple Fortune" written in gold, as well as multiple white roses and decorative pearls. Multiple asymmetric white veils drape down from the headpiece. The black and white headpieces are both so lovely!
Picture 5: A close-up of a lovely round headpiece by Atelier Pierrot. It's made from black lace, with black roses and black little satin ribbon bows around the rim. Some white pearls give the headpiece a bit of sparkle and further glamour.
Picture 6: The unmirrored original version of picture 1![/id]
#handmade skirt#handmade lolita#handmade fashion#diy or die#sewing#plussize j fashion#plussize lolita fashion#lovely fat people#fun with friends#egl community#egl coord#thrifted fashion#top and cardigan i'm wearing are thrifted#and yes i know white thights would fit better but it's so hard to find them :(#eye contact#long image description#image described#image description#fashion described
27 notes
·
View notes
Text
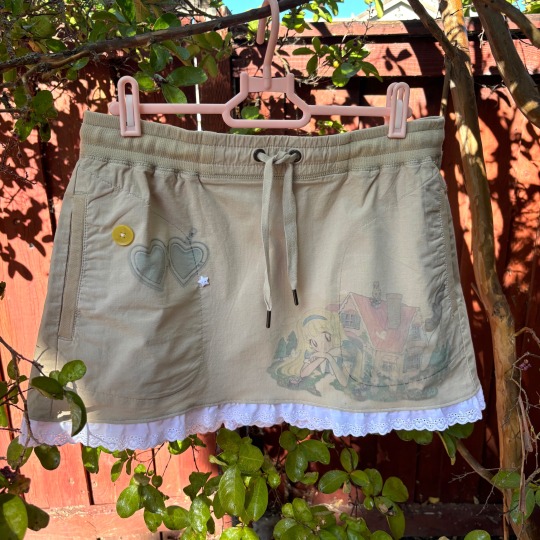
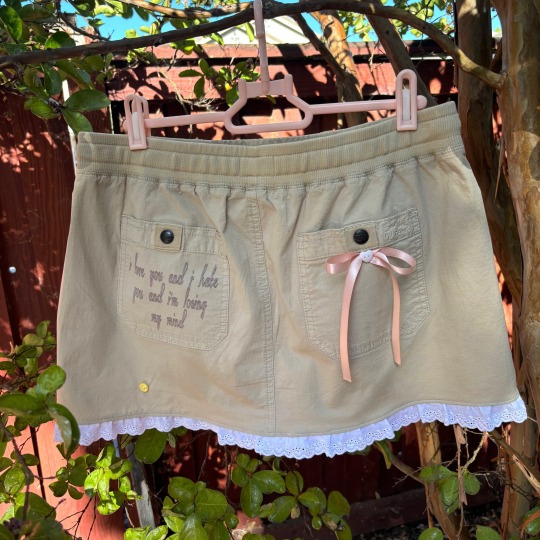
daydreamer skirt ☁️ 1 of 1 avlb on my depop bubblegumbrat 🪡
#blythe#coqeutte#dollcore#harajuku#lolita fashion#pullip#kawaii#pink bows#alice in wonderland#mini skirt#depop#for sale#buttons#patchwork#handmade#sewing#mars argo#jfashion
6 notes
·
View notes
Text
Hoop skirt pic!
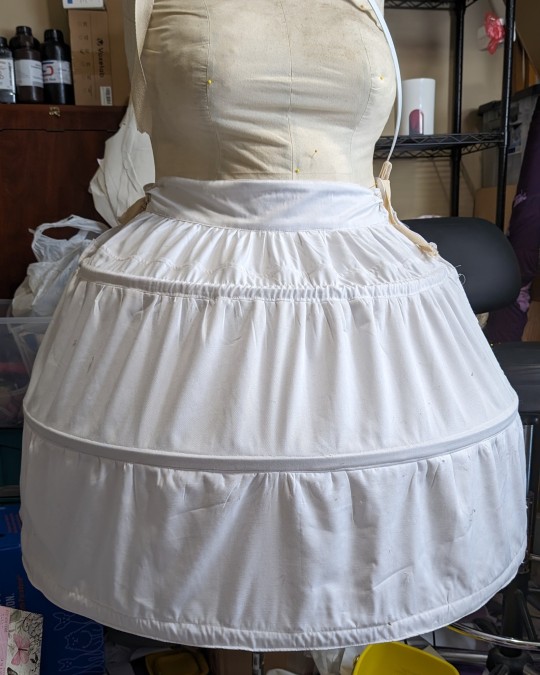
I finally freed my dress form from the 3D printing closet!...after I had to dig it and other stuff out to get a kitten away from not good kinda definitely toxic materials. (It's in the closet for a reason.)
#homemade lolita#lolita sewing#lolitafashion#lolita sewing blog#pattern drafting#plus size lolita#sewing#lolita fashion#lolita pattern#handmade lolita#lolita hoopskirt#hoop skirt#tall lolita#homemade dress form
8 notes
·
View notes
Text
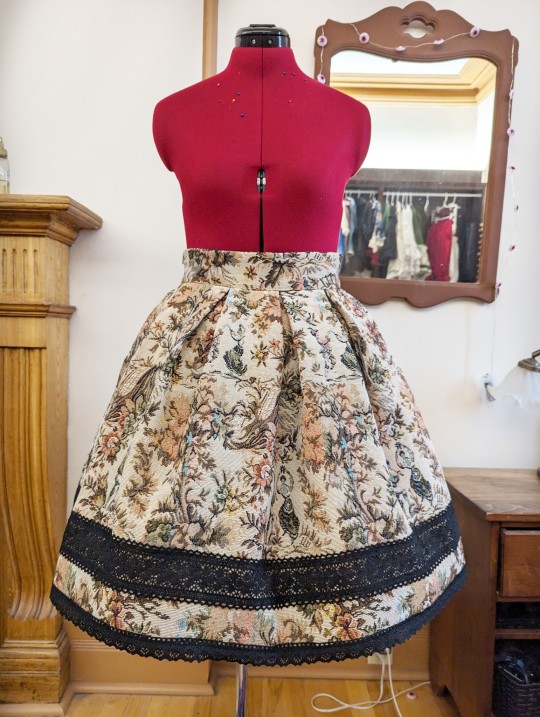
I broke multiple sewing machine needles on this one
169 notes
·
View notes