#for gifing or video work right now.
Explore tagged Tumblr posts
Text
Favorite Fandom Moments, both old and new
Thank you @heartstringsduet @nisbanisba @annoyingcloudearthquake @welcometololaland and @thisbuildinghasfeelings for tagging me!
THE NEW:
Oh boy. I don't even know where to start. Coming back to this fandom has been so incredible. Like I just jumped back in and was welcomed into the fold with open arms-- This isn't really super important, but for those of you who don't know, I was really into fandom stuff (not exclusively 911-verse) from like 2018-2021 and then shit happened and I dropped off the fandom face of the earth until october of 2024 (i don't even remember the log in to my old blog), but anyway, I really couldn't have asked for a better show or a better fandom to come back to. Between the screaming live blogs of episodes and the outpouring of content sharing tag games (wip wednesday and seven sentence sunday) the sense of community here is just so strong. I have loved watching, writing, reading, gifing, screaming, laughing, rejoicing, celebrating, and yes even crying with everyone! I've made so many friends in such a short time, it really is incredible. I love each and every one of you so much! And thank you. Thank you all for making this fandom the great place that it is.
Now speaking of things I love, here's a shout to some of the little things I love. Its oddly specific, but I love that we're all still making jokes about TK's little fan. It just always makes me laugh when i see someone reference it I've also loved coming up with all kinds of head canons with everyone, and how when a good one hits it just keeps going and snow balling. I love how we all build off of each other. I love that this fandom has got me writing again. I already mentioned it, but I really love WIP Wednesday and Seven Sentence Sunday. I love that everyone gets together and shares what they've been working on, its such a great way to bring everyone a little closer together. I love that we all just decided that Sam Campbell's actual name is just Ranger Soup because of one (1) singular passing jab TK made ONCE. (this is probably one of my favorite things). I love how much fun we all have. And I love how generally drama free this whole experience has been (at least since i've been back and in the circles that i run in)
It has truly been so so so so so so so so much fun!!! and it will continue to be fun, it will just be different after the show ends, and we don't yet know what "different" looks like.
and now...
THE OLD: and very mellow dramatic
I don't really remember much about ACTUAL fandom interaction during this time, but I originally started watching Lone Star back in 2020 when it first started coming out. I think I got on board around episode 7? And let me tell you, i was hooked right off the bat. Then i dragged my sister (@my-beloved-lakes ) in with me. At this point in our lives, she and I were not very close, but then this show came along and brought us together. Because of this show, we got really close, and because of it, she felt comfortable coming out to me. It also helped me become more comfortable with my own sexuality and who i am. Then there was covid. This show was my comfort show during all of that along with Rafa and Ronen's instagram lives, and rafa's choitic cooking videos. They all helped keep me sane, and my sister. All of those things really brought us closer together, and we stayed close. Then around 2021 we both stopped watching the show, and when i recently came back to it, i dragged her back in right along with me.
I don't just love this show because its SO FUCKING GOOD, but i love it because of the things it has done for me. It was truly life changing in all the best ways.
So here's to the greatest show to ever grace my screen! 911 Lone Star, you are everything to me.
#911 lone star#i will be making a slightly different good bye post tomorrow after the episode.#it will be VERY mellow dramatic#but i wanted to go ahead and make this one. here on the eve of the end.
8 notes
·
View notes
Note
Hi! Happy 4k celebration 🥰 Can you share how you make your gifs or make a gif tutorial?
hi !! tysm <3 i'm more than happy to give you a little tutorial on how i make my gifs ! of course, my process is not the same to other gifmakers and may not always work for everyone but i hope it helps !
for this tutorial, i'm using the most recent edition of photoshop (2023) on my mac. full explanation under the cut.

full disclaimer: most of what i've learnt about photoshop and the giffing process is through pure trial and error. this won't work for everyone and others may think it's a little weird, but this is just how i make my gifs !!
1.find your scenes.
finding your scenes is sometimes very time consuming but you want to get it right the first time !! for this tutorial, i'm using a music video in mp4 format.
2. loading your scenes.
to load your scenes, you want to go: 'file' > 'import' > 'video frames to layers'. i know that this step varies on the user because some people like to go to timeline first, but i'd advise starting in frames first !
after that, a screen like i've depicted below will pop up. i've also annotated everything for you as well.
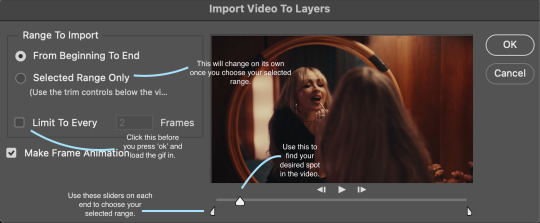
so, select your desired range, press 'ok' and then it will all load into ps !
3. setting up your gif.
i'm grouping this all into one step, but it's broken down into a few things.
the first part of this is: cropping. the recommended dimensions i follow are on this guideline here, but for the sake of this tutorial i'm just going to crop my gif 540x540 (as a w x h setting). the crop tool is on the left hand tool bar.
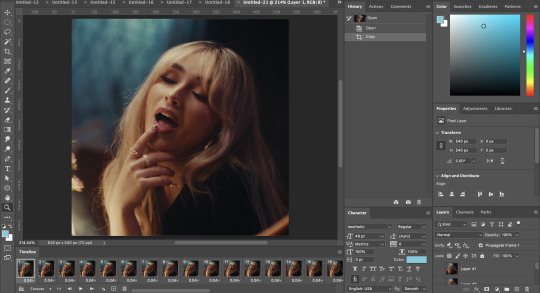
now, my gif looks like this. from here, i'm going to click on the timeline (the space along the bottom that has every frame). from there, click on the three lines to get this menu (i've circled where to go + what you'll click):

from there, go 'select all frames' and then click on any of the frames NUMBERS (where it says 0.04 with an arrow besides it, or whatever yours says) then change the frame rate. with most youtube videos i will use 0.08 as my desired frame rate, but when i'm gifing a show or something, it loads in as 0.02, so i change it to 0.05. 0.05-6 on any normal screen cap should be fine, but obviously you can change it depending on if it looks right or not.
from there, you've basically done the first half of the basics. now, you'll want to click on this button:
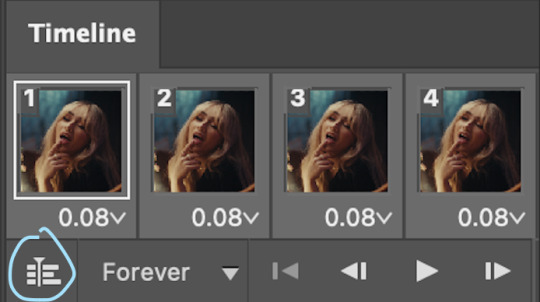
and now you'll be taken to the video timeline ! from here, select command + option + a (this is for mac, i think it would be control if you're on another device) then, right click on your layers and go 'convert to smart object'.
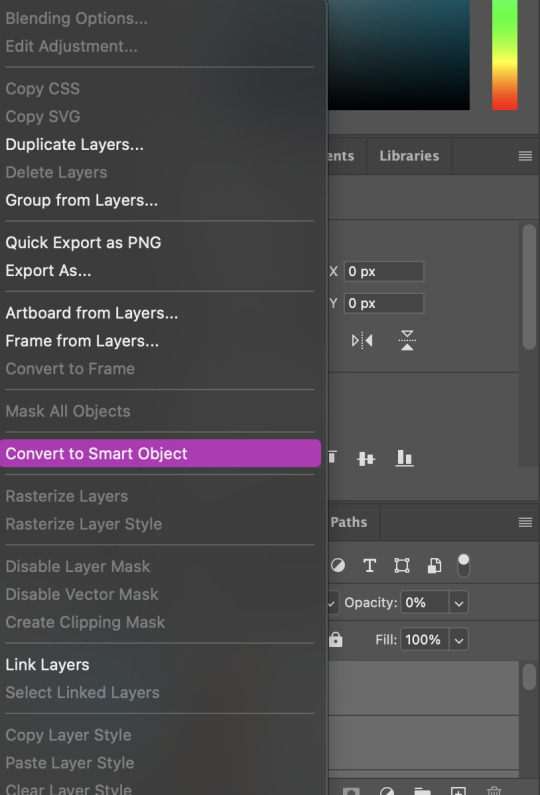
from here, i'll sharpen my gif before i colour. for this step i have two alternative sharpening settings first one by anyataylorjoy (rb to download !) and the other by maygrant (please ask !). the first one is tuser maygrant's and the second one is tuser anyataylorjoy's. i typically use morgan's for all my basic gifs but anyataylorjoy's for creative sets. every user has a different preference but just find what's good for you !
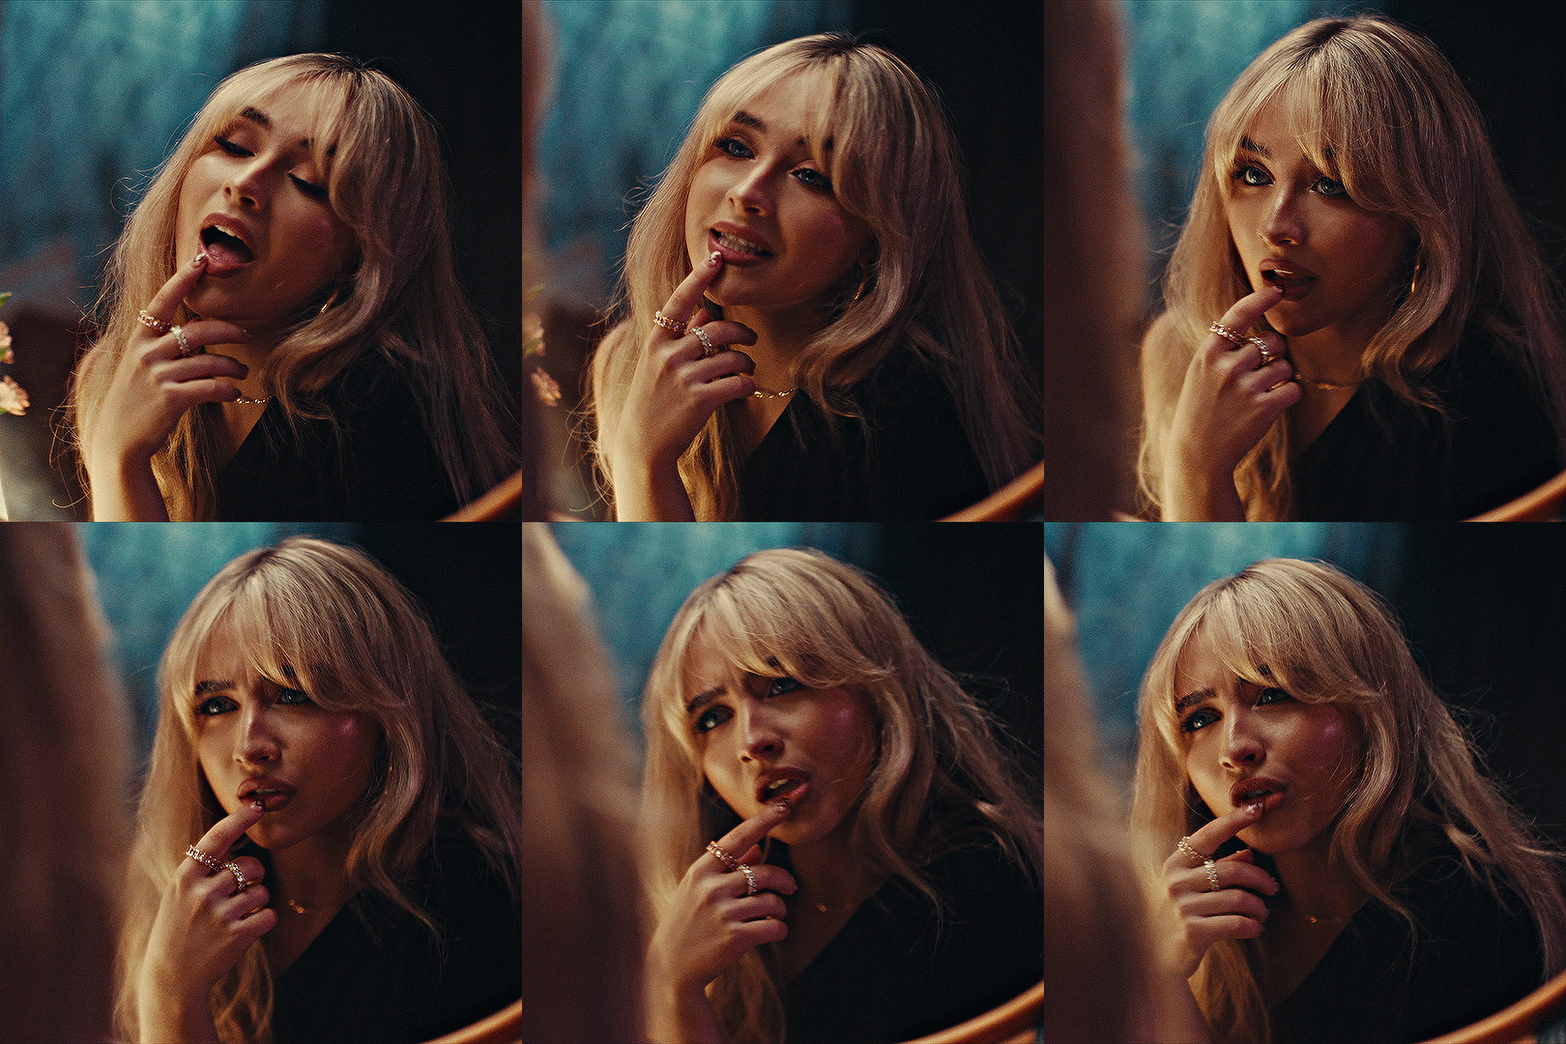
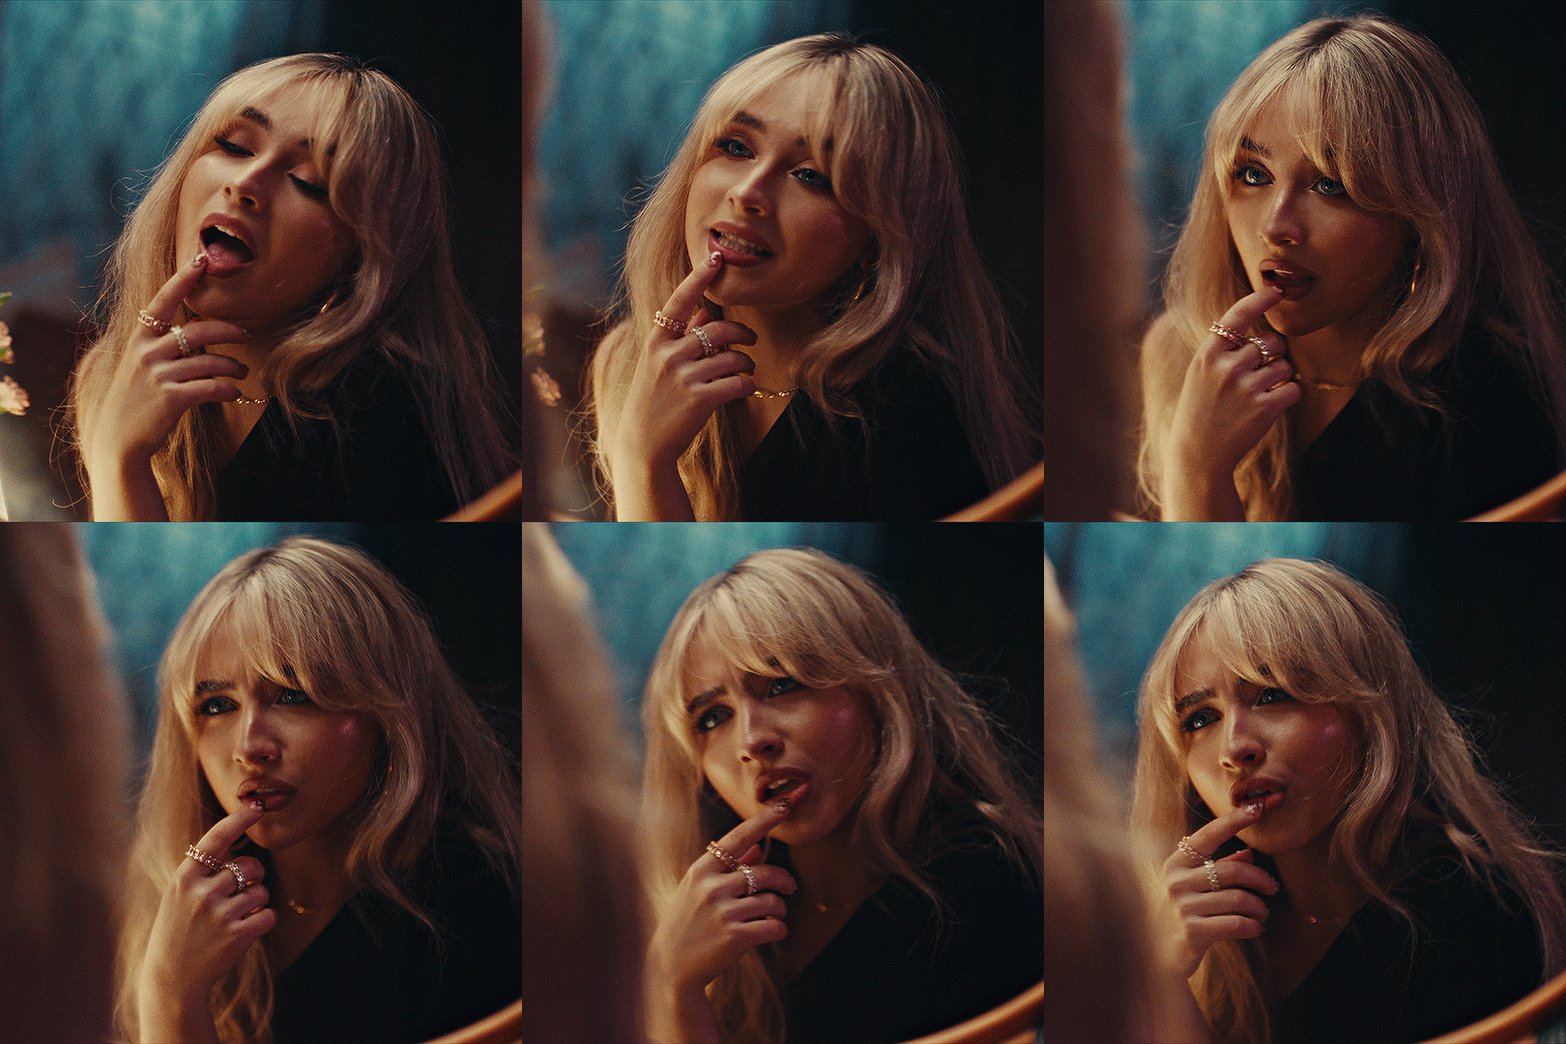
4. colouring your gif.
definitely the most tedious, this can be a little bit of a hassle depending on the scene. if the colouring isn't riddled with heavy yellows or cyans, colouring is usually a breeze but if it is, it can be hard.
CURVES

the circle with the arrow dropdown and that's half grey-white is the circle you want to click on to find curves. it'll open a menu and curves will be at the top.
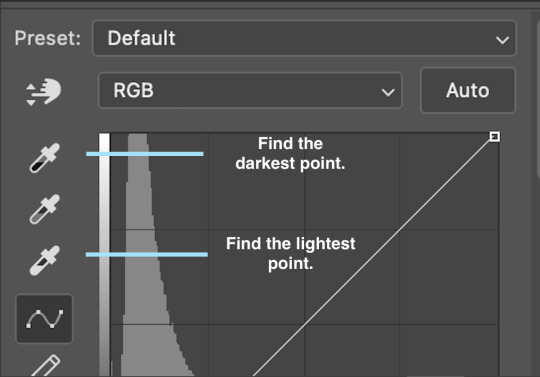
you'll see a little menu like above appear. now, select the dropper i've indicated as being the "light point" and then, using the zoom tool, we're going to zoom in and find the brightest point on the gif. this is typically where the light source is.
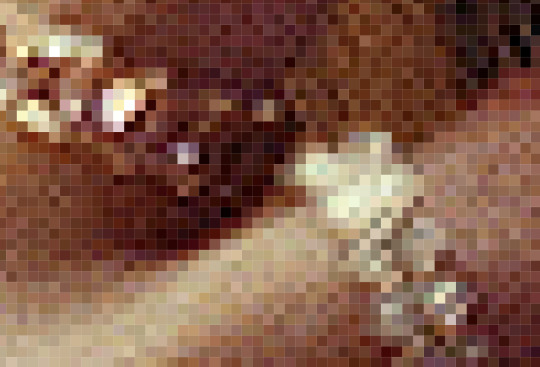
in this section here, i can see a couple of bright points. using the dropper, i'll click on the closest to white (note: i find that white rarely changes the colouring of the gif, so if there's like, a really really light yellow, for example, click on that) and then i'll do a similar process with the "dark point" dropper, finding the darkest spot, which is usually in shadows or in the corners. unlike with the light dropper, you want the closest to black, whether that's a dark dark brown or dark dark blue.
now, we can see how the colouring has changed:
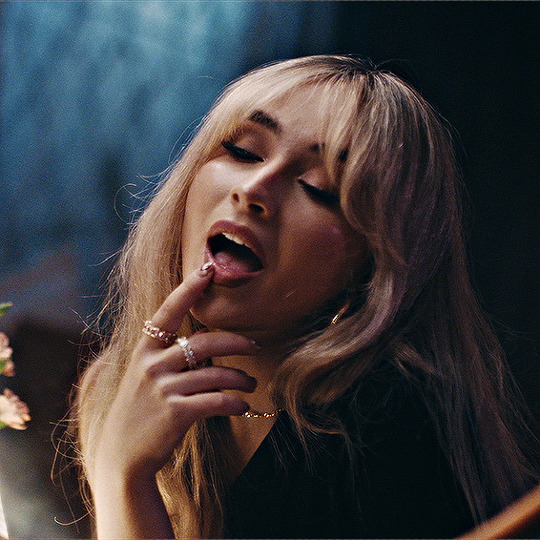
optional: you can change the white line on the curves menu, which can make it lighter, or darker in different points of the gif.
LEVELS
levels is an optional step, but i recommend it on very light gifs, or if you want to add a little more depth. probably don't do it on an already very dark gif.
the levels menu looks like this:
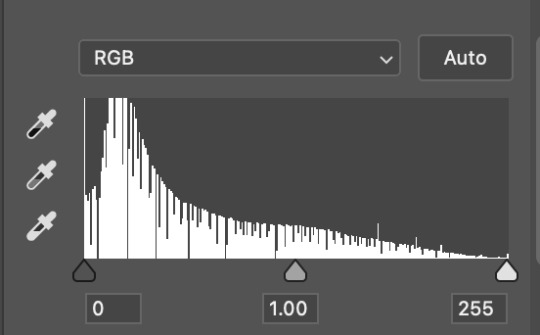
the far left slider adds shadows and the far right slider makes it lighter. on this particular gif, i only need a little bit of depth to her face and i only need to contrast that a little bit. by just dragging the slider a little bit:
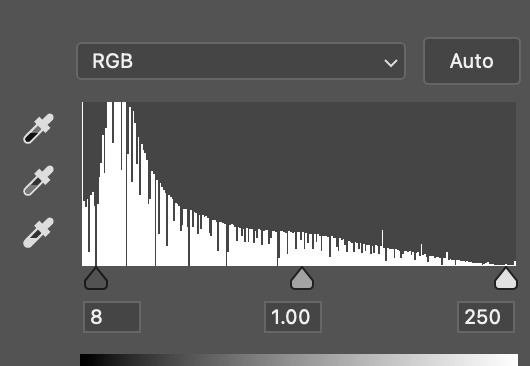
this is the result:

with levels, it can very quickly alter skin tone/make your gif look bad !! with levels, i don't think you need to go above 1-12 in adding depth.
OPTIONAL: BRIGHTNESS/CONTRAST
brightness/contrast is optional !! only add it if it's necessary :)
COLOUR BALANCE
a colour balance layer is great for fixing the tones for the gif !!
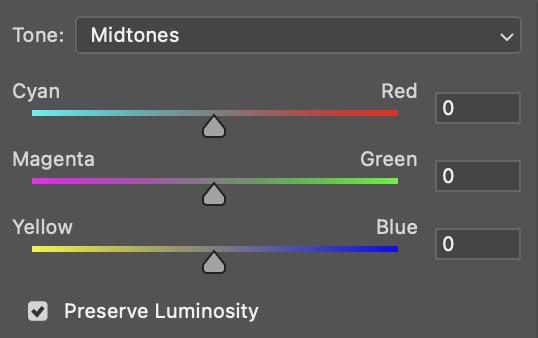
this one's pretty self explanatory. if you want it to be more yellow, slide it towards yellow. if you want it to be more red, slide it more towards red, etc etc. i've attached some gifs showing how i change tone:
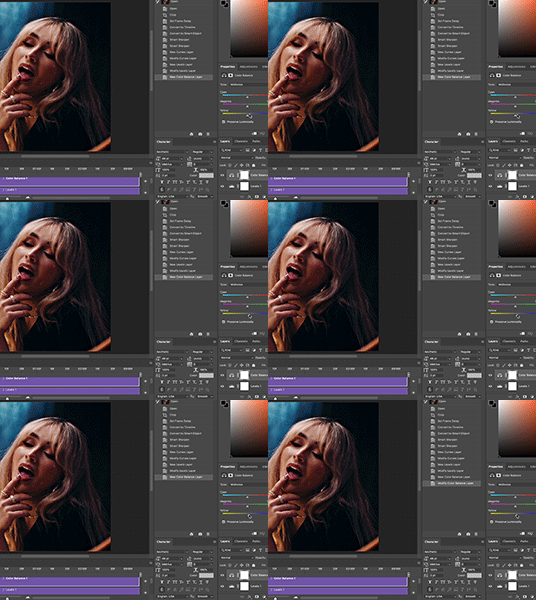
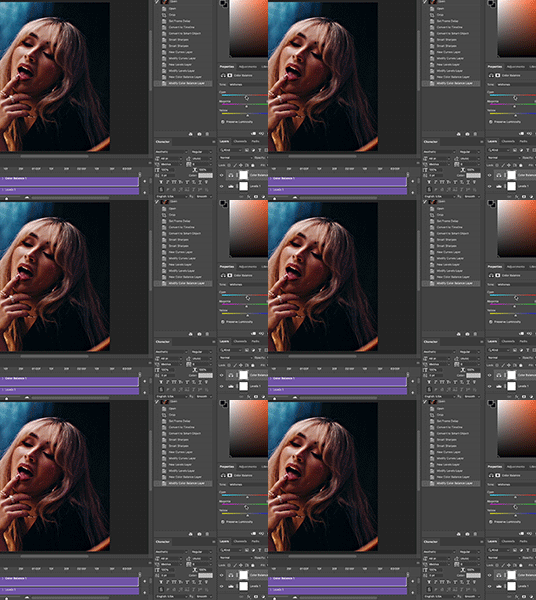
but just play with it until it looks right. be very careful with skin tone !! colour balance can very easily whitewash/colour wash and that is not something encouraged, in the slightest.
SELECTIVE COLOUR
a selective colour layer is basically a "final touch" to colouring. where colour balance just kind of does an overall change of the gif, selective colour allows you to alter your specific tones, ie. reds, magentas, blues, etc. for me, i'll do the bulk of getting my desired colouring with colour balance, but if it overcorrects reds, for example, i'll add some cyan to red tones in selective colour, to diffuse that.
currently, in my gif, it's very red/yellow heavy. to balance that out, i want to add cyans. so, on the drop down list of the selective colour menu, i'll select 'red' and then i'll ADD cyans (so move the slider to the right, not the left to decrease) and then repeat that on other tones that i want to correct, with different colours.
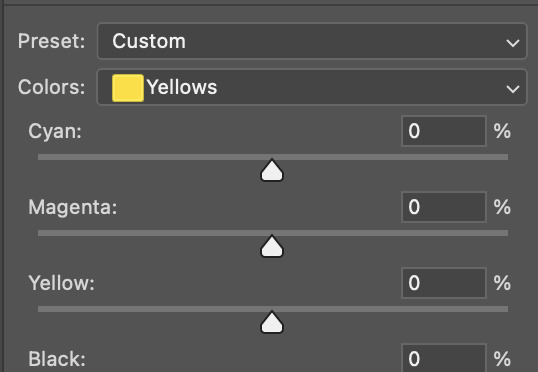
with each of the sliders, just add or decrease how much of that colour is in that tone. once again, be mindful of skin tone and whether it is appropriate or not.
with selective colour, if there are any standout colours (eg. in my gif, there's a big patch of cyan) that don't interrupt their face (eg. reds and yellows are always in faces) and change the way the subjects look, you can change those colours to make it more vibrant. so, in this gif, i'll enhance the cyans and blues and magentas to make the colours pop more.
5. saving your gif
once your happy with the colouring of your gif and done what you need to do with it, save it as a smart object with all your colouring layers, then go to 'file' > 'export' > 'save for web (legacy)...' . play back your gif, and it should be all good !! congrats on making your gifs !
i've included a playback of each layer, which is staggered to show each layer come into effect.
in order: nothing -> curves -> levels-> brightness/contrast -> colour balance -> selective colour.
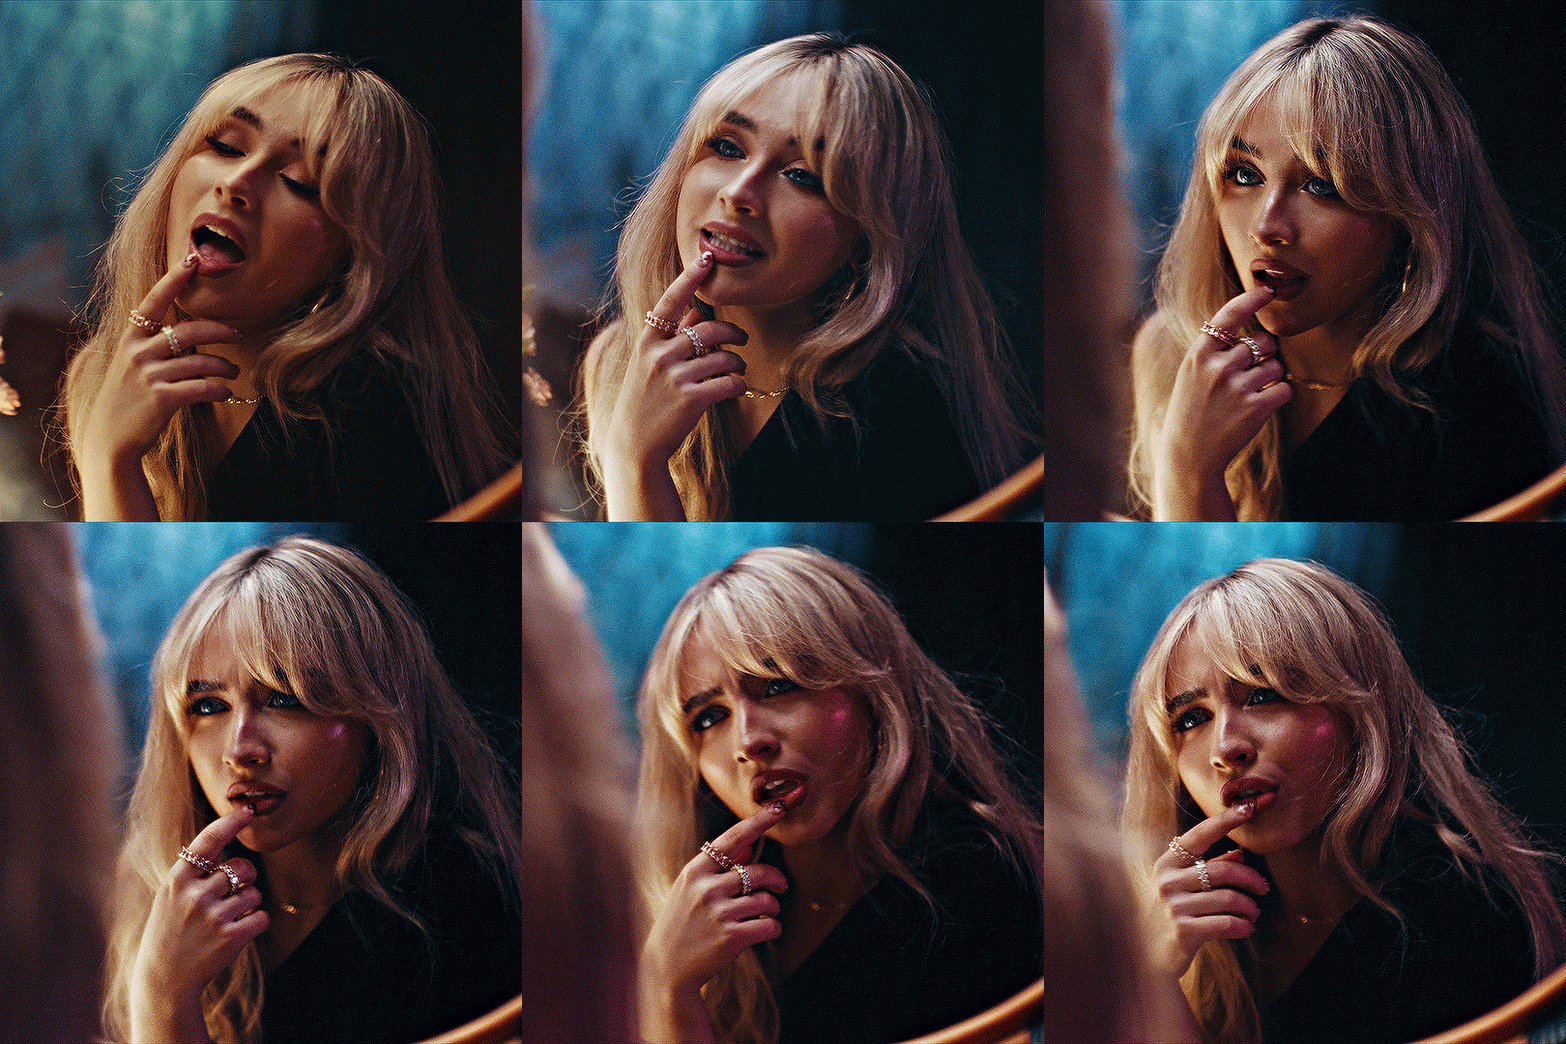
hope this helped !!
#*tutorial#gif tutorial#ps help#ps tutorial#userriel#userautie#userraffa#usernorah#userrsun#usercats#thingschanged#**l.myeditss
114 notes
·
View notes
Note
Hiii, how are u? I hope you're doing well, sooo I wanted to ask you (if it is not a problem) how are your gifs always looking so crisp? like what type of setting you put on them to make them look with a high quality? i'm sorry for bothering, i'm just curious 😭
hey, no worries. i'm happy to help! warning: this is going to be a very long post so sit back and relax...
first you need adobe photoshop. now the sharpen setting won't look good if your source is not HD so you have to really invest on getting a 1080p copy of your chosen video (4k works too, but i found that it takes up a lot of memory and, you know, tumblr only allows us to upload 10mb gifs so yeah. i guess you could still try 4k and use additional apps to optimize the memory, anyways).
now let's say you've gotten all the stuff you need. let's go to the sharpen settings.
there are multiple ways on how to do this step. people use actions but i don't because i have no fucking idea how to do it and after maybe the millionth time of trying to understand how it works, i just gave up so that means my method is time-consuming and gritty...
i usually GIF by frame not on video timeline.


(left is video timeline and the right is by frame)
what's the difference? i honestly have no idea LMFAO??? cause i found editing gifs on video timeline too complicated for my brain + i learned gifing by frames first so it's really the method i'm used to doing.
before you ask, why did i mention giving by video timeline or by frame? and what is actions? actions i think preloads all the commands for you which makes the grueling process of giving easier, avoids consuming your time. if you gifed by frame however... you have to sharpen each fucking layer/frame of your images. so if you have 60 frames, you have to press ctrl + f 60 fucking times HAHAH (and trust me, this process is not fun and i've had a much worse method back then)
anyway before i get sidetracked let's go to the main concern: sharpening.
i want you to select a layer. go to filter and select 'convert to smart filter' and then go back to filter > smart sharpen.

this tab should appear now what i want you to do is to follow this numbers. click enter and repeat the process--btw you do not have to convert to smart filter every layer, yeah? just use ctrl + f--depending on how many layers you have.
now let's say you're done with the first sharpening setting!!! yay!! it's not over yet.
we have a second sharpen setting to go through again. highlight the layer where you've converted it to a smart filter and then filter > smart sharpen (or just use ctrl + f) the tab above will appear again but this time, change the settings to this:

i want you to repeat the process i detailed above for the first sharpening method.
so now you've got your gifs lookin crisp as heck!
for comparison:


additional tips: feel free to play around with the setting. if it's too sharp or crispy for you, you can tone it down by going to the first sharpen setting and lowering the radius from 0.4 to 0.3 and etc. same goes with the second sharpen setting.
i hope you learned something from this. im bad at explaining...
#kai's asks#kai yaps#since i did yap tf out of this ask#hope this helped you anon#also fucking grammarly keeps correcting 'gifing' as 'giving' so my apologies if that had u confused
8 notes
·
View notes
Text
Gif Making Tutorial: Lightworks Edition
I also uploaded this tutorial on rentry and will link it in the source as well.
This is a guide on my own personal gif-making process using lightworks & Photoshop 2023. This does not mean it is the only way, the right one, or anything of the sorts. This is just the way that I have found that works for me and I was asked to share it.
What you need:
Lightworks -> Download Here
Photoshop
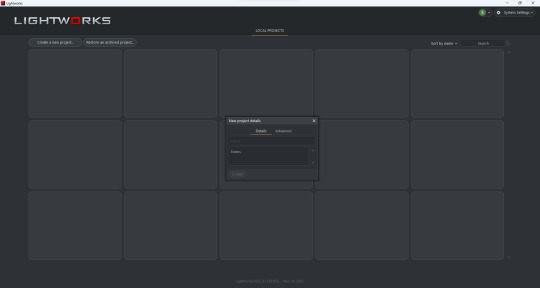
Step #1 When you first boot up Lightworks you'll be greeted with this screen. First, you'll want to hit create a new project which will show the pop-up. You can write whatever you'd like for the title & description as it does not matter here.
Step #2 Now we are greeted with Lightwork's dashboard we want to import the media we will be using. On the left of the screen towards the bottom you are greeted with a container called libraries with a bunch of different options below it.
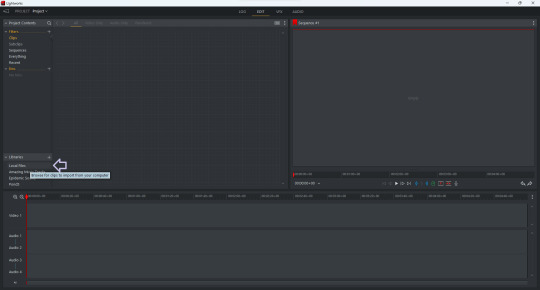
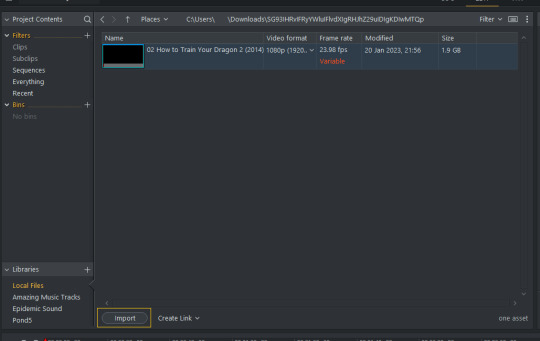
We want to hit Local Files and find our video. You may have to fiddle around and find the correct folder (as I'm unsure where it opens originally). Once you find your video, select it, and then click the "import" option located at the bottom left.
Step #3 Our next step is a bit much so I have also included a video to help. We are going to drag the media onto the timeline as well as remove the audio. Removing the audio is a personal choice, however, I do so because I do want to hear a movie/show in 3-5 second clips :).
Text Guide:
Select media using left click on your mouse and drag it onto the timeline.
Click however many "audio" tracks you have (and make sure you have selected the video one), right-click, and select delete.
Step #4 This is where/when we'll be making the "clips" that will become our gifs. Lightworks has a similar video scrubber as many other programs (however, it happens to have two, but that matters not) which you can use to quickly go through your video. We'll be using two main functions here -- play/pause & clip.
To start/stop the video you can hit the spacebar & to clip the video you hit the C key on your keyboard.
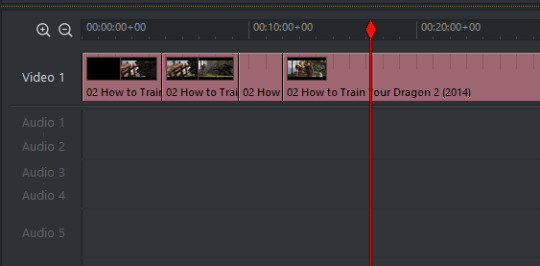
You can let the video play and "clip" as you go, or you can go ahead and clip out parts you know your character isn't in, it truly depends on what you feel flows the best. I will include a screenshot of what a video looks like clipped.
Each spot where you see a "line" through the video is a separate clip, which in turn, is a separate gif. You'll want to do this for your entire video until your timeline has a bunch of little clipped parts.
Step #5 Our next step is taking all of our clips and exporting them as their own seperate files. Follow the steps below
Right click the video one track.
Find the option that says make.
Under make select Syncs....
Select V1 segments from the new pop-up.
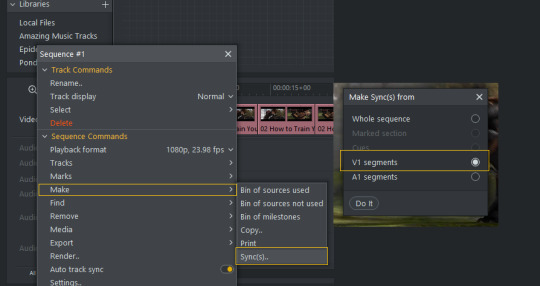
Depending on how many clips you have it might take a few seconds to a few minutes. Once it loads you will see a bunch of new clips!
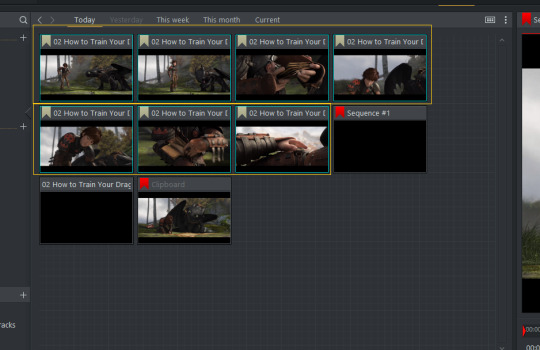
Step #6 Now we want to export all of these clips and Lightworks makes it really easy!
Select all the NEW clips (click one, hold shift, and select).
Right-click any one and select export.
Scroll down until you see H.264/MP4 & pick that option.
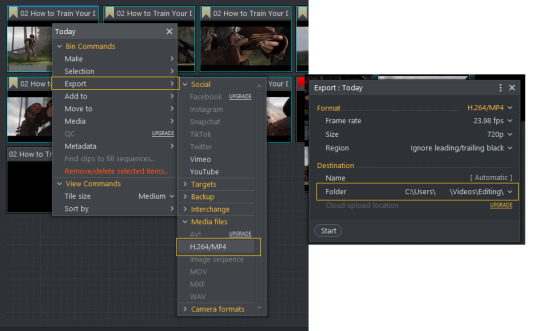
Another pop-up will appear! Make sure that it is exporting to the correct folder and then select start! Two windows will pop-up but do not worry. Window #1 is Lightworks exporting the clips and Window #2 is the tasks log.
If you go to the folder where you set them you save them -- you'll see all the clips ready to be imported into photoshop!
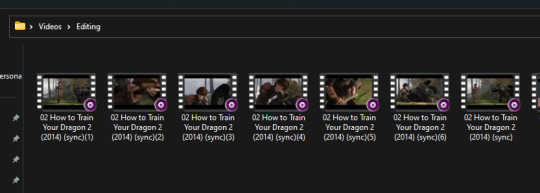
You're now photoshop ready!
And now you are ready to import your clips to photoshop and start gifing away! I hope this helped and if you have any questions -- please do not hesitate to send me an ask, or a DM, and I will do my best to help :)!
21 notes
·
View notes
Photo
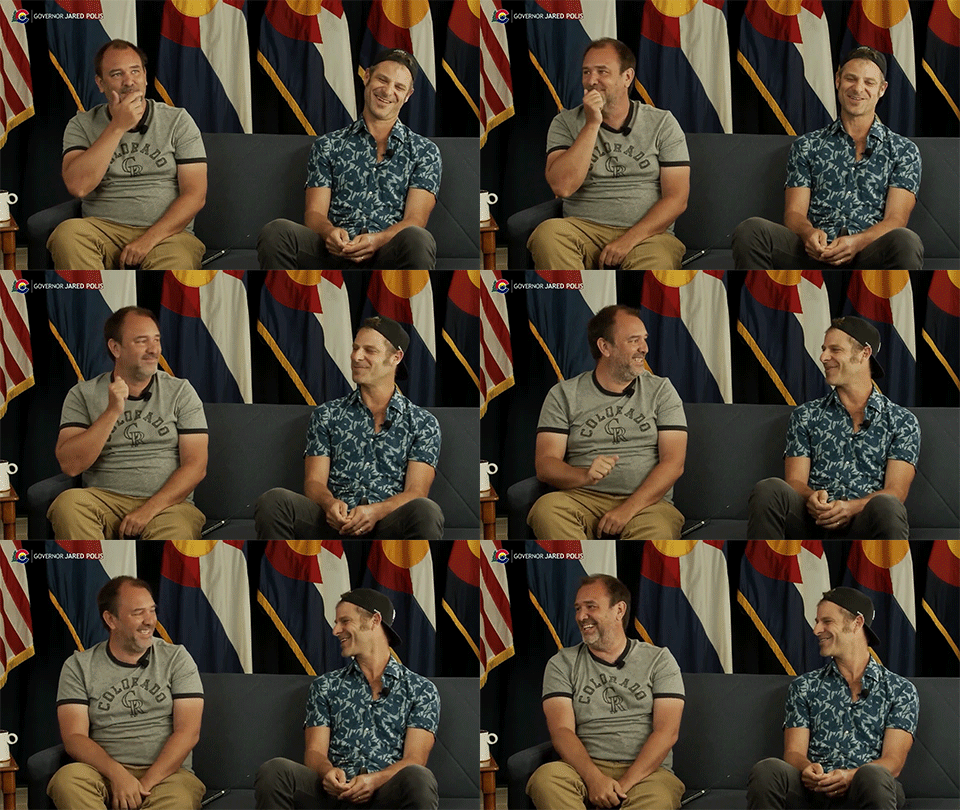
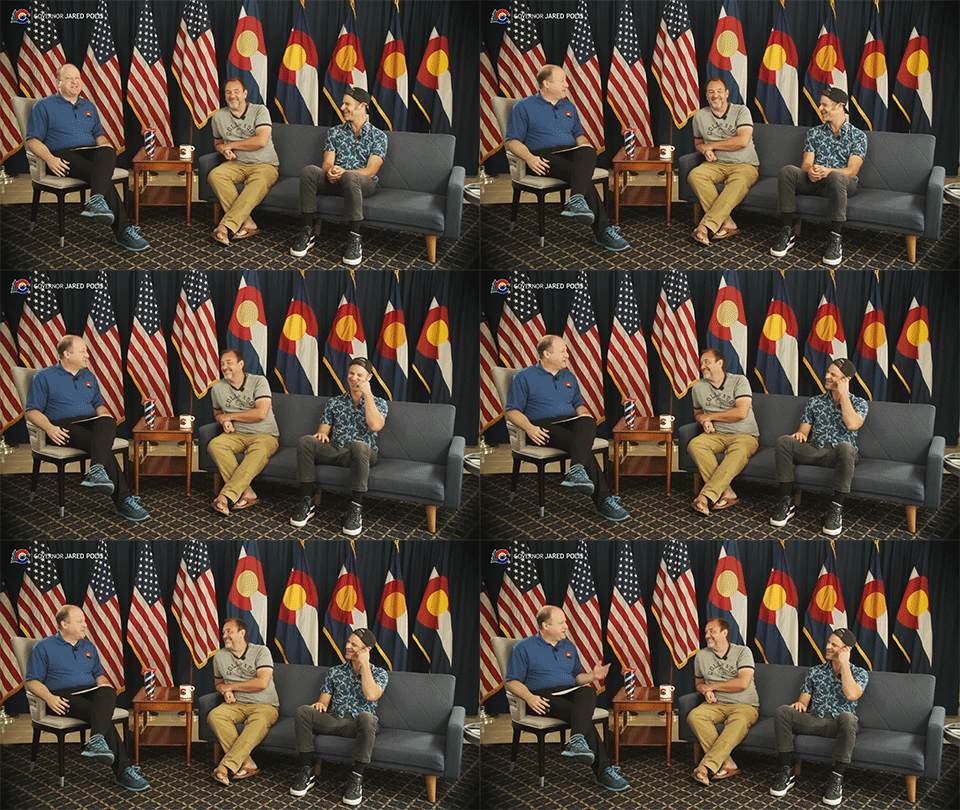
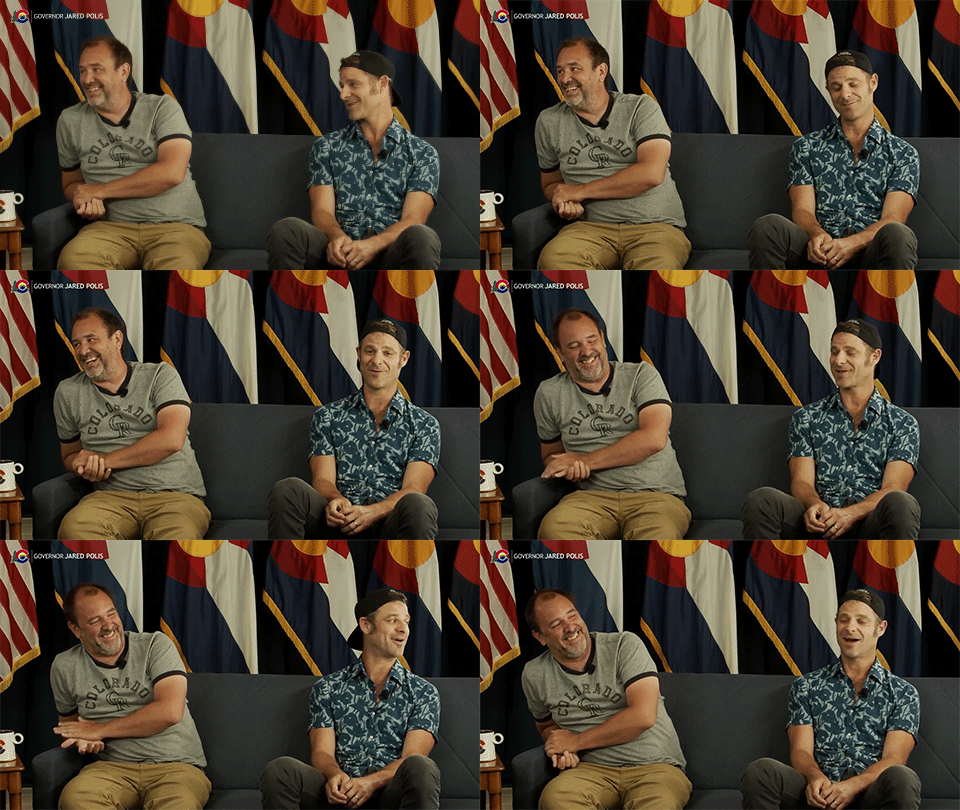
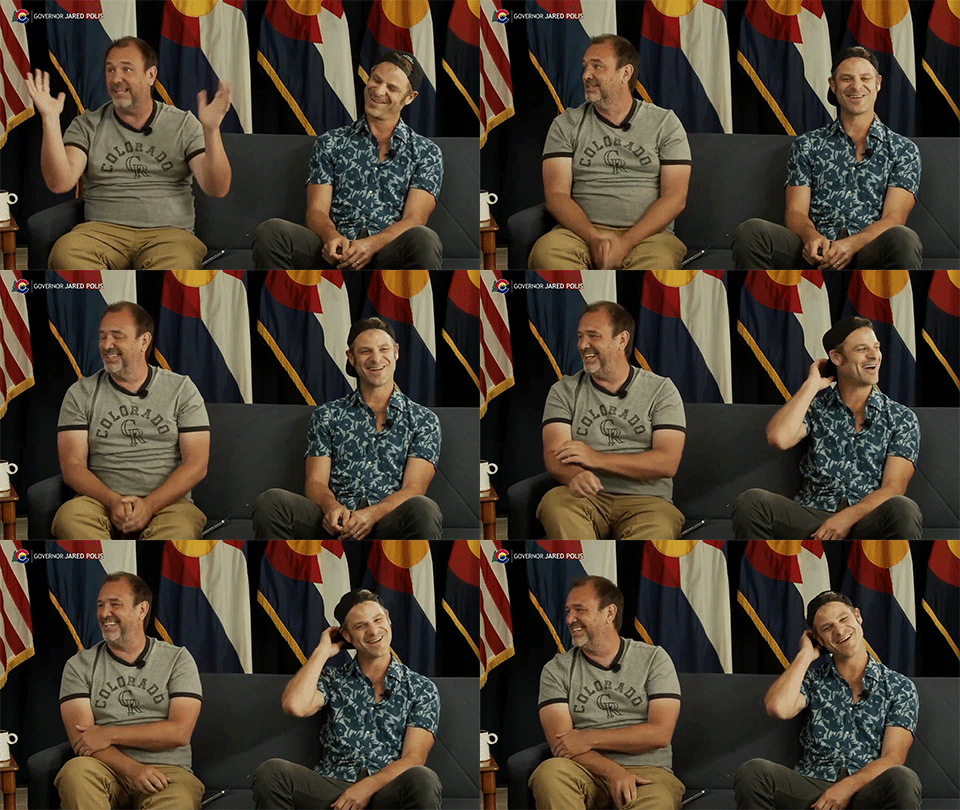
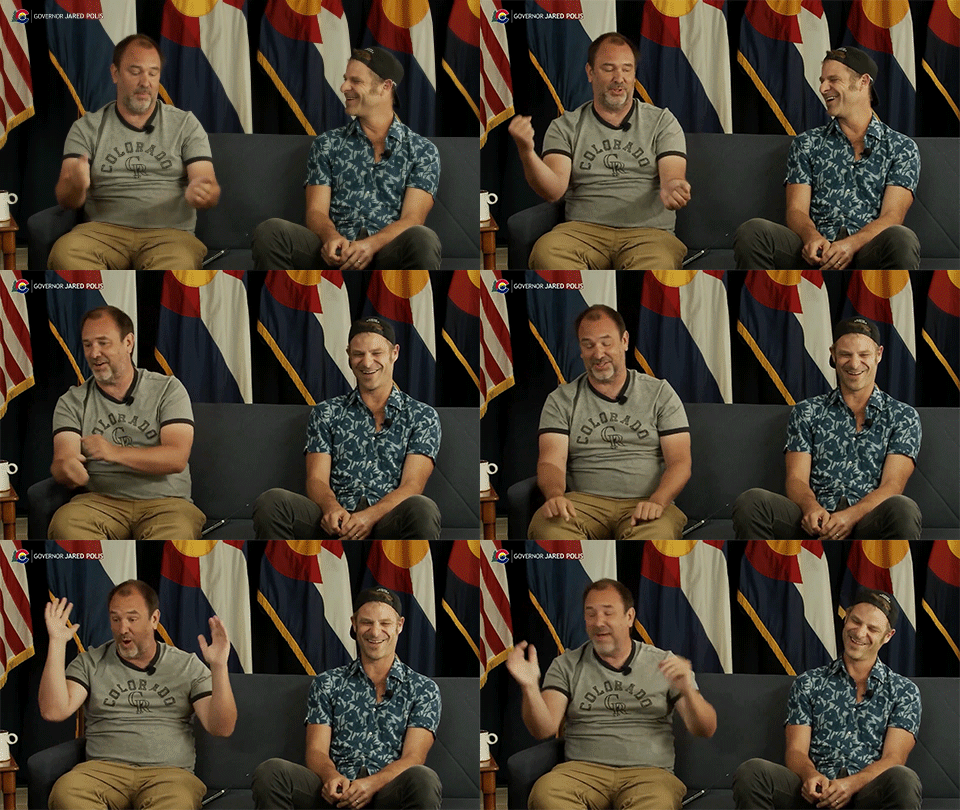
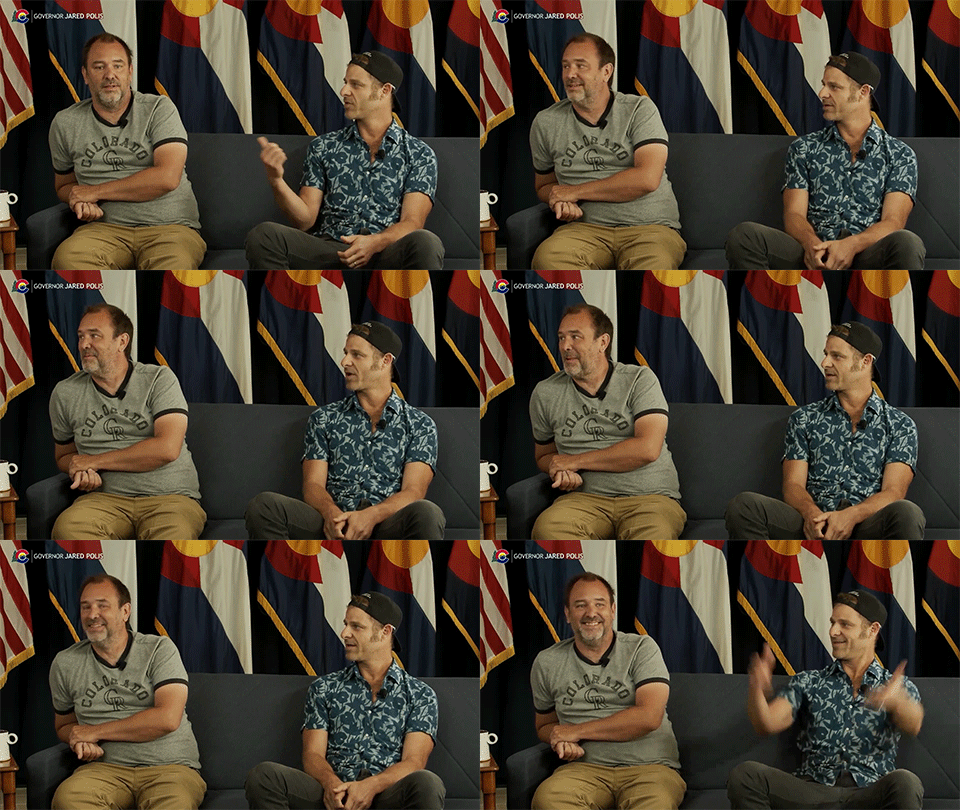
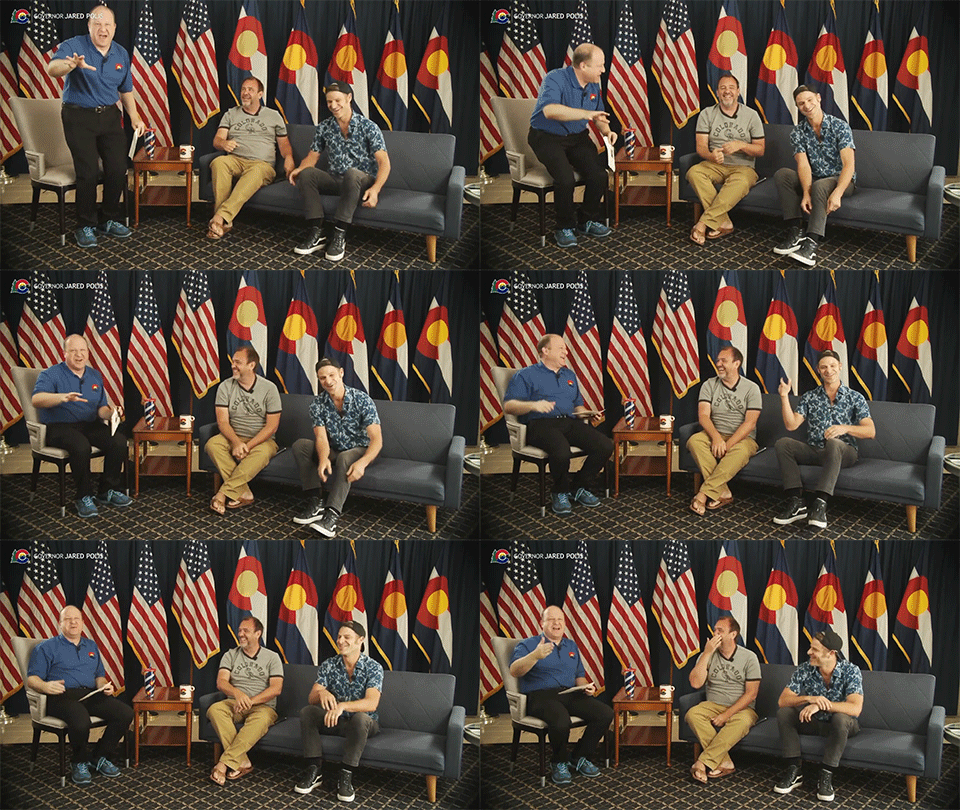

✨ Top Five Treys ✨
#2: Trey and Matt’s Conversation with the CO Governor (2021)
(Series with @a-magical-evening 💖)
Sorry about the GIF quality, I know they’re kinda slow. I’ve work shopped these fuckers for hours, and I just can’t get it right :/ I’ll learn, but for now I’m writing this at midnight and I’m so tired and this is good enough. It was slow or better quality, with my limited skill set, so slow it is.
Sooo uhhh TW for NSFW and my unbridled passion on this post....There will be some objectification. Very NSFW 👀
So normal stuff first: this was where Casa Bonita was officially announced!! The part where Trey’s telling the story where Matt’s like ‘don’t get too excited, but we may get it’, and Trey has to pull over. How many conversations over how many years did this go on? Love how Matt already knew. Facilitating Trey’s dreams 😍 So sweet
I’m glad they were open about vaccination and climate change. Honestly, clarity is key, especially when people like to keep labeling them ignorant conservatives and things were (ARE) still shitty in the US. Ugh.
How random to just sit down with Polis?? Love that for them, he seems like a relatively good governor (looking at Abbott 😡).
ANYway! 💖 I chose this because Trey’s so fucking hot my eyeballs burned out of my head and they’re just smoking holes now. This awakened me. A year ago I was kinda like those “I like them in the 90s only” bitches, where I loved pretty blonde Trey and was alright with him current day. Then this fucker came out and blew my mind. Who knows what it was, the cargo pants? The flip flops? The pit sweat? The tan lines? The shirt that fits just right?? Wowowowow
I love an older man okay, but I started dating a guy my age and decided that the concept was gross, but this just restarted my brain wiring and I went full old man lover again. (Trey is literally two years younger than my father...and I was born in ’97)
So I severely lusted after him in this video. I’ve watched it more than any other interviews combined. I’ve downloaded it. I’ve capped it. I’ve GIFed it. I’ve done other things with it. Okay? Chill 💖
His body is just?? Fuck. His thighs, I wish they’d just smother my face. He’s so fineee. So Dad. Only thing that would make this better was his chest hair showing. Maybe a chain. Throw in an earring. 😭😭😭 Dammmnnnnn. If he “looks like Matt’s dad”, well Matt, I’m sorry but I’m your new step mom.
I have much more to say, but it’d just be describing my sexual fantasies at this point, and nobody needs that. Yikes. If this were written at any other time than 12:15 I’d behave myself.
So number 2 is Trey’s fine ass on this fuckin couch. 🥵🥵🥵
#Top 5 Treys#trey parker#TW for LUST#lol#not much to say about this but sorry the quality is eh#I'm predictable#trey#Look at him!!!!!!!
30 notes
·
View notes
Note
Good evening, could you possibly make a gif making process tutorial if you don't mind? I have tried to find tutorials but most of them are sadly outdated and I tried to make a gif going by them but it didn't work out well... I hope I'm not asking too much
Hey dear anon, I'm sorry I'm late with answering but have been a bit busy with some stuff and haven't been feeling well. Thanks for coming to me asking for a gif tutorial, even tho I'm not the best person at making gifs but it made me smile when you asked me. The way I do mine isn't that much of a process, I just do the basis if you want a more accurate and pro at gifing you should ask @yyh @mafuyuh @tanchirou @makiema @vyctornikiforov @invmaki @megumints @rubydragon16 and @hanae-ichihara they are very good at making gifs. So here is what I do:
GIF TUTORIAL!
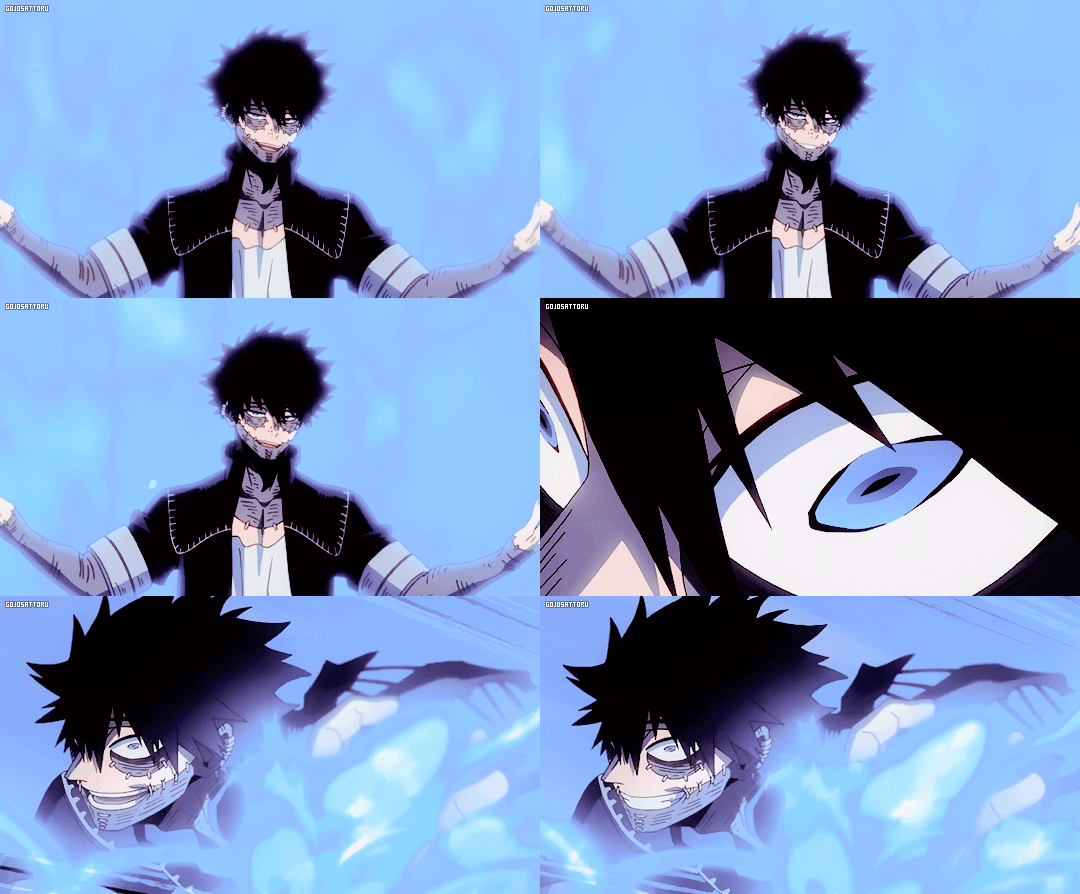
1. You open Photoshop
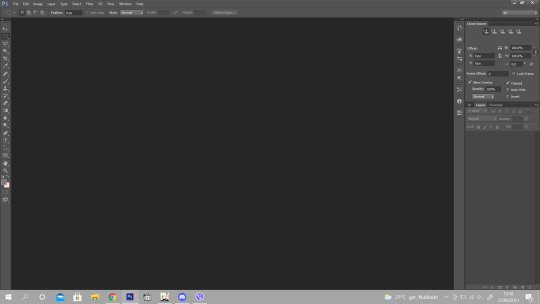
2. You go to File option and click on "Import" then "Video Frames to Layers"

3. Then it should open you a window to your folders (these are mine lol don't mind)

4. Then you open the video you want to gif, but attention, the way I do gifs in this option, it only has to be a video file like avi or mp4, mkv doesn't work. For mkv's you need a software for you to make the videos turn into frames, like I said you should ask some of my mutuals, that make gifs through that software and then import to Photoshop).
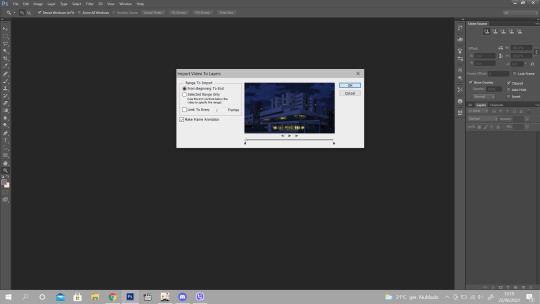
5. This is what appears when you select the video, now what I usually do is click on the "Select Range Only" and under it, it asks how many frames you want, I normally choose 2 like it's on there, and there's sometimes that I don't click it, I leave as it is. If you select the 2 frames he will decrease the number of frames, the more you choose the less frames will appear so I suggest you choosing only 2 or none.

6. Then, when you want to gif a scene, you need to choose which scene you want, like I have on the picture above, see the red circule? The lil black triangle is what helps you to select the part you wan to gif, when you find the scene and push the lil triangles between the scene you want, you click ok! (Photoshop will ask you something about how big the scene frames are but you click continue nonetheless)

7. So here it is all the frames of the scene I want, now you will only choose the particular part to gif, be careful not choosing too many frames or it will be too heavy and will not upload on tumblr. On the timeline under Dabi you select and then delete the parts you don’t want. You then select the time you want, it’s on each frame, you select all and add the time. Then you click on here:
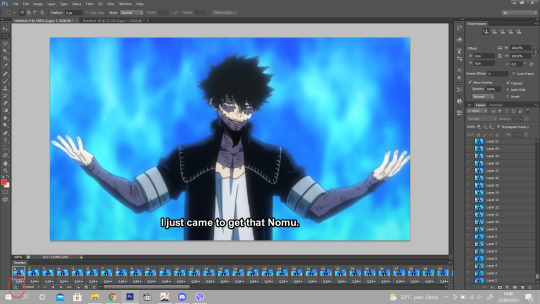
8. where the red circle is, so that you can make the animation.

9. On the right section, you have all the layer frames, the ones who doesn’t have the little eye, are to be deleted cause they were the ones you deleted earlier on the timeline, so those are to discard, like this:

10. Now you have to select all the layer frames on the right section,click on tight click of the mouse and choose the option “Convert to Smart Object”

11. Then you have your animation done

12. Now to do the frame so that it can be the right size to post in tumblr and to cut the subs lol XD You go to image, and choose the “Canvas Size” and it appear this

13. You go to the height and try to make it shorter on the height size so that you won’t let the subs be seen on the gifs. And you can do on the width too so that the gif frame won’t look too long. Like this, it has 25,4 on height and 45,16 on width, so I will add 22,5 on height and 38 on width and you click on the arrow like I have bellow

14. And with that it cuts a lil on the width and the height and it cuts the subs :D You then go to the Image option and select the “Image Size” you then put 540px on the size. the sizes of tumblr.

15. Now it’s the time we play a bit with colors haha XD I already have a psd so, I just add and play a bit with the colors and see how the quality looks
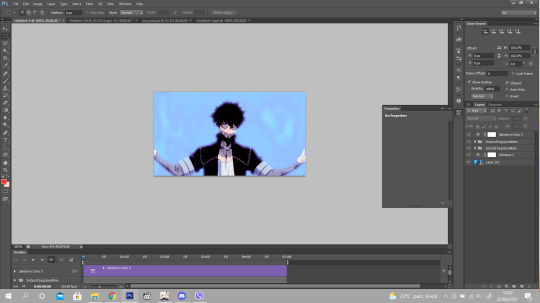
16. If it looks with some bad quality you just go to “Filter” then choose the option “Blur” and then “Surface Blur”
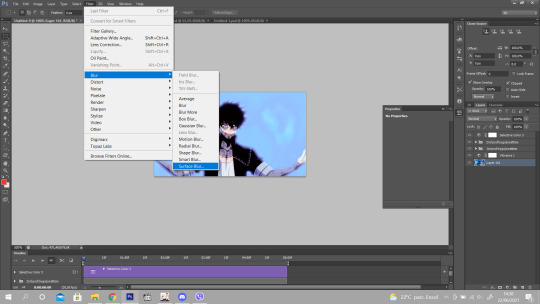
17. It opens this window and add the same option as I have, it’s sufficient for the bad quality ^^

18. And finally you go to filter again, go to “Sharpen” option and click on “Smart Sharpen” so the gif lines look more sharpen and gives a more quality and see more the details on the gif.
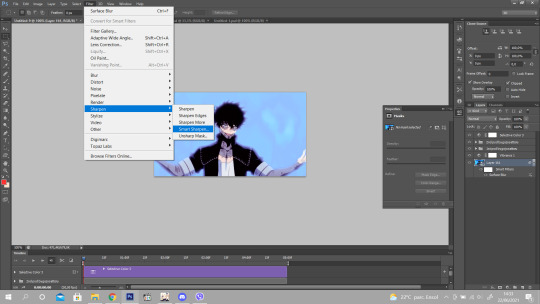
19. Add the same as I have and it’s finished! :)

20. To save you go to File and click on “Save for Web”

Done! ^^ Hope this helps you babe and that I was able to explain well since I’m bad at it lol! Anything you need just ask <3 Thank you again.
272 notes
·
View notes
Note
hi :) how do you get such good quality when making your gifs? thank you :)
Hello anon!
I'm gonna try my best to give a simple explanation of how I make my gifs, although there are most definitely amazing tutorials out there that explain this better than me. But I'll try to give a quick rundown ♡ I use photoshop to make my gifs by the way!
Downloading the clip: Usually I screen-record from whatever the source is, like youtube for instance, but I know a lot of gif-makers use screencaps instead (but I've never done it like that, so I don't know how this works). I also trim it to contain just the part I want to gif. You can normally do this directly in the video program you use or use something like imovie even!
Importing into Photoshop: Next I import the little video into Photoshop. I click 'file', hold the cursor over 'import' and click the thing about video-images to layers (my photoshop is in Norwegian so I don't know exactly what it's called in English sorry ♡). Then I click 'okay' to import the entire video.
Converting to timeline and smart object: When the video is uploaded, I make sure to have the timeline window open. I click the button in the bottom left of that window that says 'convert to video timeline' (or something along those lines). Then in the right menu thing, I select all the layers, left click, and convert to smart object.
Cropping and changing the size: Next, I click the 'rectangle select' in the menu to the left. This has a 'fixed ratio' option, which I then set to the ratio I want. Normally I use the free option on the first gif I make from a set to decide the ratio for the next gifs. Let's say I decide to go for a 540 x 390 ratio, I set the fixed ratio to that, so when I crop the rest of the gifs in my set, they're all the same size. I recommend for posting on tumblr to use the width 540px or 268px for two gifs in one row. Anyway, after I've selected the area with the 'rectangle select', I click on 'Image' and then 'crop'. Next, I click 'Image' again, and then 'Image size'. Here I change the image width to be 540, so that the gif itself is now also the correct size.
Editing: Next I edit the gif however I want in terms of colouring and lighting.
Sharpening: Lastly, I click 'filter', then 'sharpen', and select 'smart sharpen'. Here I normally go for Amount: 500% and Ratio: 0.2 px, but this depends on the gif itself. Sometimes I also have the ratio be 0.1 or 0.3. I'm still figuring out exactly how to get the gifs to look the way I want in terms of sharpness, so feel free to experiment a bit! ♡
Anyway, I think that's it! Sorry this got super long.. And also sorry for being terrible at explaining haha but I hope it was understandable. Also, I'm sure there are other ways to do this, but this is the method I use for now at least. I'm also learning new things about gif making all the time and trying to improve :) There are so many amazing gifing tutorials out there that I'm sure can also help you tons ♡ Hope this helps!!
10 notes
·
View notes
Note
Is there an analysis of Ji when Jong*dae mentioned KS kissing scene on knowing bros, or analysis of the whole thing? I noticed that Ji acted weirdly but I want to read something more informative. If there's none, can you please analyze that moment? Thanks in advance)
Idk if there’s an analysis, can’t remember. But I can make one. It’s a subject I thought for a while anyways.
So, as I recently found out, this kissing topic comes from even before Tempo comeback. When I was at All*pop, found this interesting article from xo’s showcase. There, Jong*dae mentioned this about the kiss:

A really random and weird comment because, OF COURSE it would be the first time he saw his bandmate kiss unless it isn’t. In any case, I can’t find the video for this, since it was deleted, unfortunately.
So, let’s do a flash forward to knowing bros episode. My gifing abilities are unexistent, so I will just put the video.
youtube
So, again, Jong*dae was the person who brought up KS kissing scene. All this episode put spotlight on KS anyways. But, moving on. It’s impressive how, again, Jong*dae keeps insisting he got surprised with this “new side” of KS because it was, again “the first time he saw him kissing”. In the way it was praised, it looked more like Jong*dae is insisting to the viewers that’s new to him instead of just commenting about it naturally. We know it’s part of the game to aknowledge other members sucess, but it came out weirdly.
You can see the members already got because it’s, probably Jong*dae’s sentence starter. Both BH and MK showed they were aware of his thoughts.

Loved KS’s expression when JD said, AGAIN, he never saw his friends kissing anyone LOLOLOLOL

Now JI lmaoooo, closing his face (not smiling) and guarding his body putting the arms around himself. It’s a mix of not enjoying what he’s listening and not allowing himself to express what he really feels (plus KS at the background aware of his side).
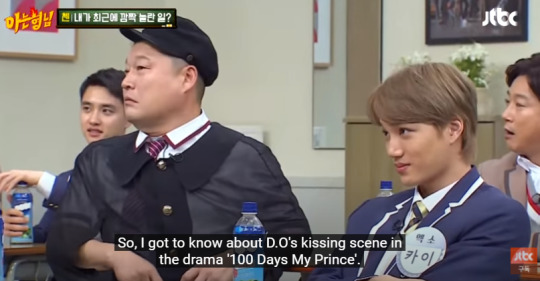
JI smiling here it’s definetly a polite smile, not a sincere one. It’s interesting that, after they focus on JI, they put a KS lonely shot and he mimics the same expression JI done above (looking down and up (again, can’t put a gif but it’s visible on the video).

The difference again. KS started lo laugh because’s of Jong*dae’s swearing. JI also smiles, but he keeps his guard down, with the left arm around himself (again in a defensive posture). At the same time he keeps moving the water bottle, which could be a pacifying gesture.
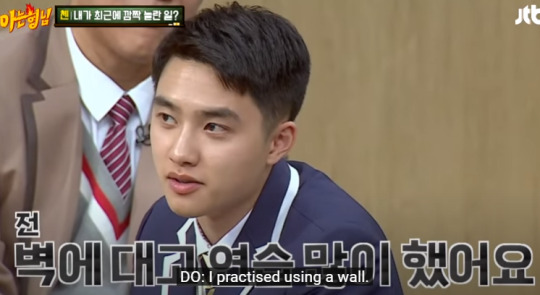
Thought this interesting to mention, when KS replied about practicing the kiss with a wall. JD acted surprised until KS replied it was a joke. You can see he rearranging his body, making it seem bigger like it normally is. It’s the feeling of satisfaction/pleasure because his joke was accepted into the group.

Meanwhile, JI started to look at KS’s direction but didn’t put his guarded posture down. For the contrary. He put the right arm around himself again.
After that, they praise KS’s acting and that was it, basically.
So, the points I can bring to you about this are the following:
How JD and the other members praised the kiss as a way to aknowledge KS’s sucess at the drama;
It was also an opportunity for, weirdly, keep commenting about how it was the first time JD saw him kissing at all (which is logical since they’re working colleagues. Unless they go partying together or JD has opportunities to see KS with his partner(s) in a environment he can see, there won’t be any way to see him kissing other people);
JI closed off posture, smiling in a polite/social way (but looking more of a pout than a smile tbh) and closing himself while put his arms around himself;
KS observing the whole thing, telling a joke about it and reacting once his joke was accepted;
There was also a moment he mirroed JI’s expression but it can be debatable;
I wish I could see Tempo’s press conference even without subs. I’m super curious to see their expressions while mention this subject for the first time.
74 notes
·
View notes
Text
THE ONGOING SAGA...
So a wonderful friend of mine offered to pay my way to the Patreon content so I could, and I quote, “pirate tf out of it”. BLESS YOU, MY FRIEND.
She Chimed me the money, but I don’t have a debit card, so I can’t accept Chime payments. She had to send it again via Paypal, but she is a saintly saint and she did so <3
So off I went to Patreon to (begrudgingly) give them their $10 ransom to release the Colin Content to me... and they refused the payment.
THEY WOULD NOT TAKE MY TEN DOLLAH.
So I refunded my friend’s Paypal payment and looked into it. Turns out Patreon won’t take payment via Paypal accounts without a valid debit/credit card attached, because since it’s a subscription, they have to ensure that they can, you know, continue taking your money.
THEY DON’T WANT TEN DOLLAH, THEY WANT TEN DOLLAH+.
I italicized that + for emphasis, but I feel like it didn’t work.
ANYWAY! At this point, it’s now a feud between Patreon and me, only they don’t know they’re in a feud, but *I* do and that’s all that matters. My mom’s like, “I will GIVE you $10″ and the neighbor’s dog is like, “I’ll give you $20 if you shut up” and I’m like BUT I NEED A CREDIT CARD T_T and my Mom now, she wisely doesn’t trust me and “that pirate computer” of mine with her credit card number, but even SHE was like, “okay, maybe...” but then I remembered that I had a Visa gift card I got from MyPoints after, like, FIVE FUCKING YEARS of clicking on ads and doing surveys (I’m not even kidding, that’s how long it took) that happens to be... wait for it... TEN DOLLAH!!!
So I head back over to Patreon like “ten dollah ten dollah ten dollah” and enter the info and pay and... I’M HERE!!! I made it!!
LET THE PIRATING BEGIN!!!
...except it didn’t. Now look, I’m not a pirating expert by any means, but I’m pretty good at ripping and scraping shit off of websites that don’t want you to take their shit. I was pretty confident in my abilities here. Except none of the “easy mode” steps worked. None of the “medium mode” steps worked. “No problem,” I thought. “Some things need a little extra finessing to cough up the goods.”
But it didn’t cough up the goods. It coughed up blobs.
I PAID TEN DOLLAH FOR BLOBS. MFING BLOBS!!!
My additional programs were useless. My pirating pals could offer nothing more profound than, “Oh. Blobs. No, that won’t work with blobs.”
I feel it’s pertinent at this point to let you all know that “blobs” is not a euphemism here, either. They’re literally, actually called blobs.
See, Patreon serves video from exterior video sites in a lot of cases, but in other cases... they serve the video in blobs. There isn’t a file address to scrape, because it starts with “blob” before where the address would be - and the file itself is served in itty bitty teeny weeny yellow polka dot bikinis snippets of randomly named media files. Blobs. Sure, you can access the blobs, say to watch them in something like VLC, but you can’t do much of anything meaningful with them. I couldn’t convert them to a more useable format, and I wouldn’t even begin to know where to start with trying to compile them into one full file - which I’m sure would be a nightmare with the random names, as well.
So now I’m stuck with the rudimentary basic of... screen recording. That’s it. That’s my only feasible option for sharing this thing. I confess, I’ve never done this before. I don’t have an app or a program to do it with, aside from a small GIFing app that’s limited to recording a snippet of the screen for 3 minutes or so. Windows has a Game Bar, as it turns out, that has a screen recorder in it - but it seems to only be able to record my entire browser window... and at a rate of 1mb per second of video. That’s 60mb per minute. 40 minute video... 60 mb per minute...
THAT’S 2.4 GIGABYTES, YOU ASSHOLES.
I think my computer would die trying to record it, and I don’t wanna upload it, and no one in their right mind wants to download 2.4 gb of celebrities playing party games on motherfucking zoom.
So here I am now. Short $10 with nothing to show for it. I haven’t even watched the video, because I don’t feel right watching it when I’ve failed in my mission to make it accessible to everyone else as well. I’m thinking I’ll maybe watch it and do a transcript/write up of what’s going on, at least share it that way... maybe see if I can screen record parts of it to either GIF or upload for you guys, so you can see parts...
I don’t know. I’ve failed. I’m a failure. I feel awful.
AND THOSE PATREON FUCKERS HAVE MY TEN DOLLAH.
11 notes
·
View notes
Text
GIF Making Tutorial Using Photoshop CC

Here’s my GIF making tutorial, hope it helps you guys :).
Hey all, since people on Twitter and on Tumblr keep asking me how to make GIFs, I’ve decided to make a Stephen Amell / Arrow GIF tutorial.
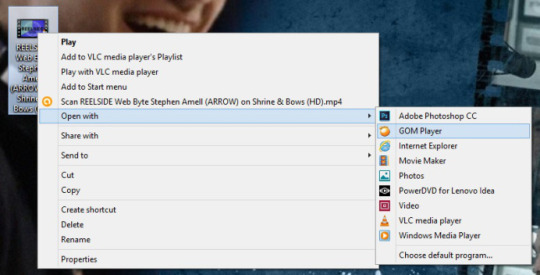
Everyone makes GIFs differently, but here is how I make mine. I’m also on PC, if you’re using a Mac GOM player won’t work for you, so you need to find a method to make your screencaps. If you’re able to make them just skip to the GOM player part.
What you need:
GOM Player – You can download it here.
Photoshop CC – You can get a free trial of Photoshop CC for a month. Click here.
What you need to know:
Tumblr GIF sizes: For big GIFs the size is 500p x 500p. For GIF sets, people normally use 245p x 245p, for GIF sets that have three small GIFs in a row, one next to each other the size is 160p x 160p. Tumblr will not accept GIFs that are over 2mb in size. You’ll be able to upload the GIF, however it won’t play.
GIFs on Twitter: On twitter the size of your GIF needs to be 500p. Anything below that will look distorted. I think the maximum size for GIFs on Twitter is 3mb.
GIF colouring & PSDs: Keep in mind that Arrow is a dark show, which makes colouring the GIFs harder. You can colour your own GIFs (which I’ll show you how to do below) or use PSDs which you can find on tumblr. You can search “Arrow PSDs” on Tumblr and you should be able to find some. I prefer to colour my own GIFs.
Video size: Keep in mind that the video size you should be using should be either 720p or 1080p. The higher the quality, the better your GIF will look. Sometimes people GIFing in lower resolutions will use darker PSDs.
Let’s get started shall we? I’ll start by GIFing a scene from Stephen Amell on Reel Side
Open your video with GOM Player. You could always open your video directly in Photoshop, but I don’t like doing that and this is my tutorial lol.
Go to the scene you want to GIF hit pause, then hit Ctrl+G, the screencap menu will pop up and here are the settings you should set, for GIFs. Make sure your “Burst Interval Sec.” is at 0.05 (this is the speed for normal GIFs), “Quality” should be at 255 and for Burst Capture Image you can set it to the amount of frames you want. I just keep my settings like the ones below and just delete the frames I don’t want. Also, make sure to check in which folder your screencaps are going to go.
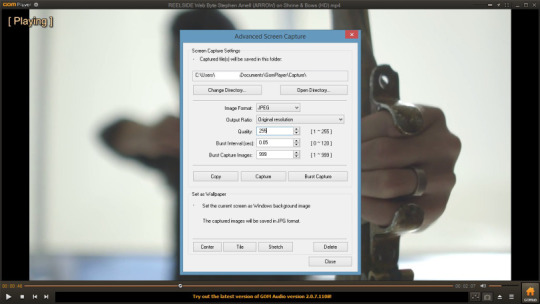
Start by playing the video and hit the “Burst capture” button. Once the scene is done, close GOM player.
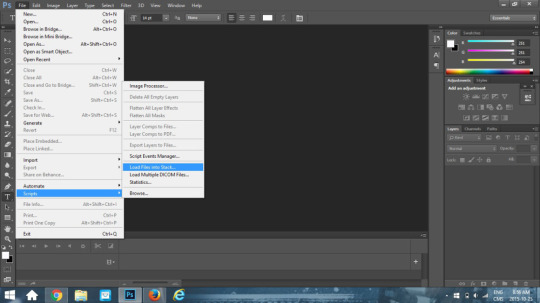
Open photoshop, click “File” scroll down to “Script” and select “Load Files into Stack…”
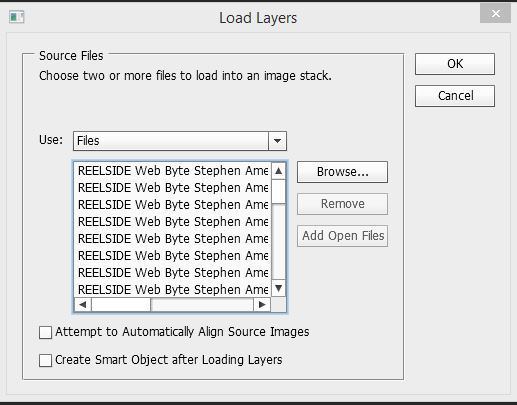
It will bring you to a browse button so you can go find your screencaps on your computer. Select all the ones you want to use for the GIF. The above menu should pop up, click “Ok” and let Photoshop load the layers.
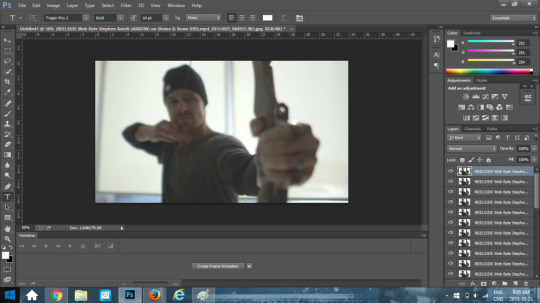
This is my screen after doing the steps above. You can see all my screencaps loaded on the sidebar on the right. You guys ready? We’re going to go through a series of steps now, it might seem complicated at first but once you get the hang of it, you’ll do it automatically. Click on the “Create Frame Animation Button”. One screencap will load.
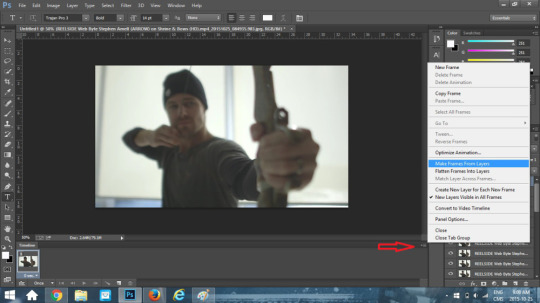
Click on the little button where the red arrow is, a menu will pop up, click on “Make Frames From Layers”. All your screencaps will load at the bottom.
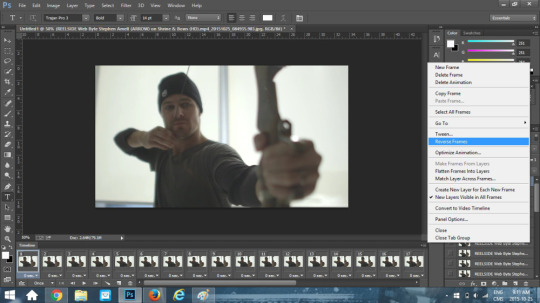
Click on the button again and then click on “Reverse Frames”. For some reason, Photoshop, always loads frames in reverse order. Again, click on the button and this time click “Select all Frames”.
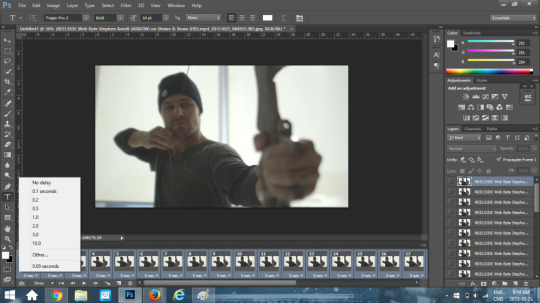
Now that all your frames are selected, click on the little downward arrow at the bottom of a frame where the speed is, it should be written “0 sec.”. Click “Other”
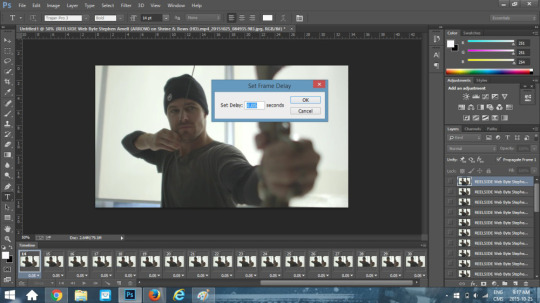
Another menu will pop up to let you chose your speed. If I’m making a GIF at normal speed I’m going to enter 0.1. Choose your speed and click “OK”. Still following me? Let’s continue ;)
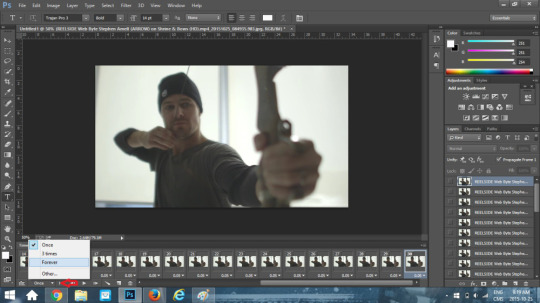
See the button at the bottom that says “Once”? If you keep the “Once” setting, your GIF is just going to run one time and stop. You want a GIF with a loop. So click on the “Forever” button. At this point if you click the play button arrow at the bottom you should see your GIF animation.
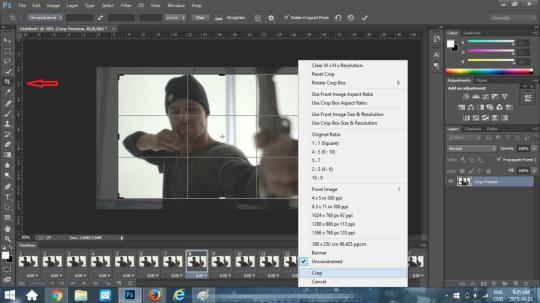
I’m going to crop my GIF first, so I’m going to click on the crop button on the left and then crop my GIF according to what I want in the frame. Once I’ve select the area I want cropped out, I’m going to click “Crop”.
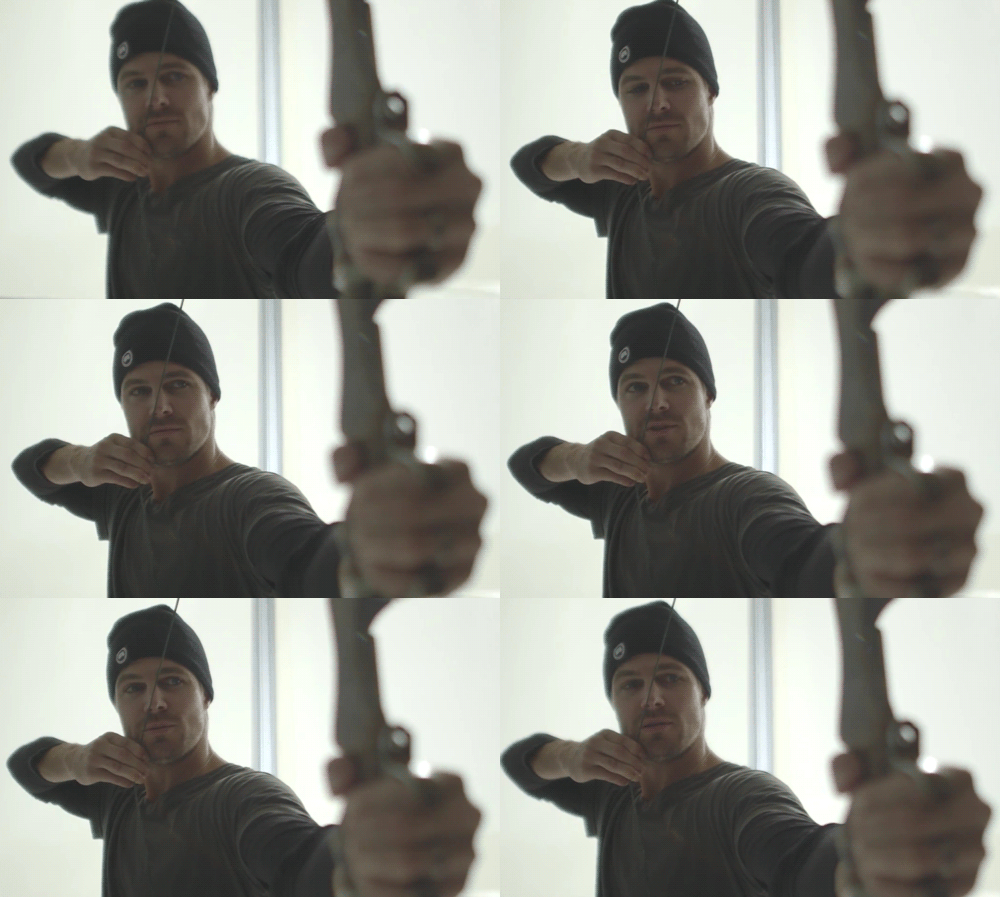
This is what my GIF looks like now. I think it’s a little too fast, so I’m going to go back to the step about speed and set my speed to 0.15.

This is my GIF at 0.15. I like the GIF speed now, however, look at the colouring. It’s kind of meh right? We’re going to go change the colour. At this point you could just add a PSDs over it, but like I mentioned I like making my own. Also, I probably should have used a different video to do make a tutorial, as this one is dark. But too late.
Still with me? Okay, let’s keep going.
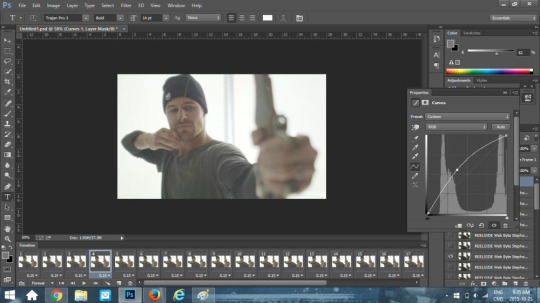
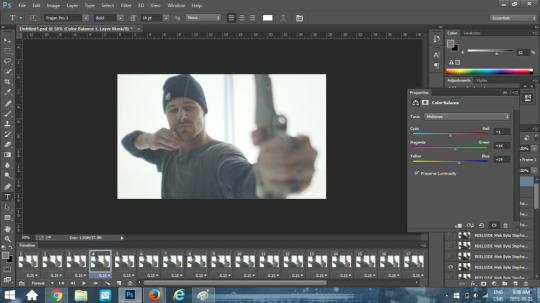
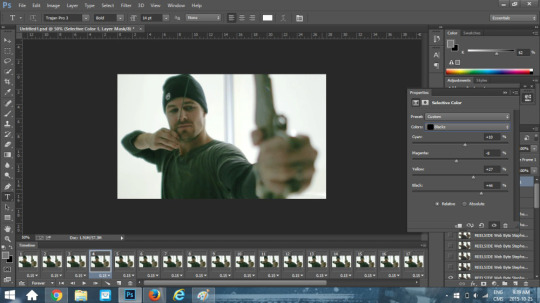
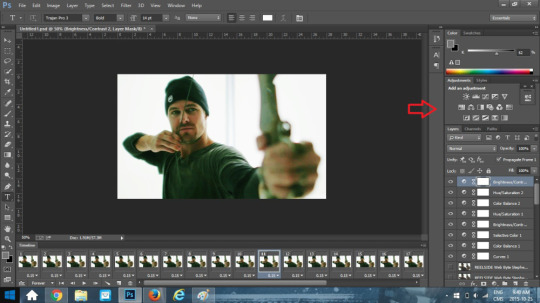
As you can see from above, I went to play in the curves, colour balance, selective colour and I also went in the brightness/contrast. All of these are available where the red arrow is. You can see all the changes I’ve made in the sidebar. Also note that in selective colour, you go colour by colour changing the tone as you go. Choose what looks best to you.

This is my GIF now. It’s a little greenish, but since this is a tutorial and it’s already taking me forever I’m going to let it be. If you wanted to stop at this point and not add text you could click on “File” and then “Save for Web”.
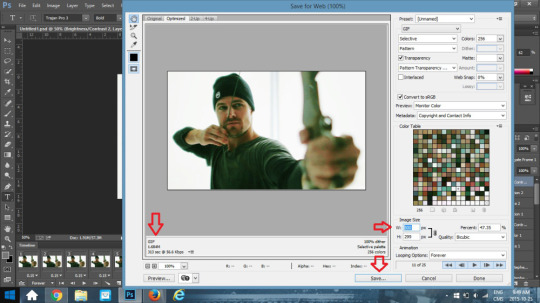
A menu will pop up, make sure the setting are as above. Check the size of your GIF to make sure it’s the correct size to be uploaded on Tumblr or Twitter. If it isn’t, go back and delete some frames. I wasn’t going for a square GIF, if so I would have cropped it as a square. I wanted a GIF with a width of 500p, so if you look where the “W:” is I entered a width of 500p. If I would have done a square crop the “H:” would have automatically re-adjusted to 500p as well, once I entered 500p for the width.
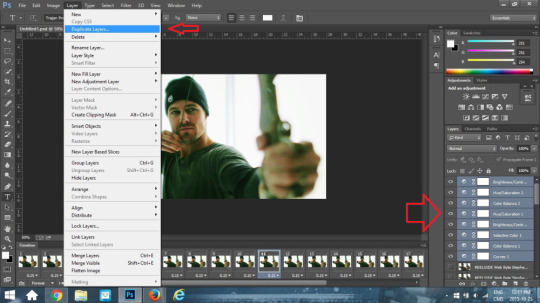
If you’re making a GIF set, you’re going to want to save your layers so your colours remain the same throughout the GIF set. To do that, you need to make a PSDs file. Select all your layers on the right side bar (don’t select the frames). Click the “Layer” button at the top and go down and click on “Duplicate Layers”
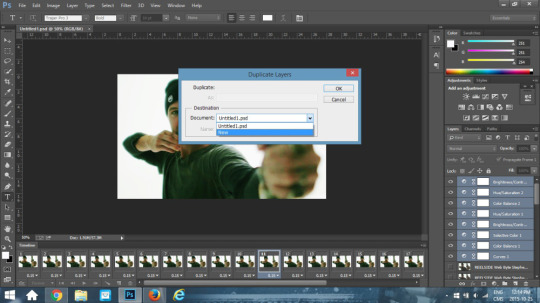
A drop down menu will appear, click “New”, then add a name. I’m going to name mine SA Reel Side.
18 notes
·
View notes
Note
drop ur top TSCO moments
ok this is literally gonna make zero sense to anyone here but since u asked i will indulge!
1. canada in a day
youtube
this is 1 min 54 secs of tsco, no filters, just pure unrivaled joy. they open with “hello, canada!” and scott sings “it’s meeee” which is like the cheesiest thing ever BUT he makes her laugh which is a win for all of canada. in the next scene scott asks the iconic “what do you love?” and tessa is like “canada!” bc cmon they r doing this vid for canada in a day! little does tessa know that virtuemoir IS canada and scott rightfully calls her out by saying “ooh, thought it was gonna be me!” and i 100% AGREE bc they did not spent 20 years of their lives being announced as “representing canada, tessa virtue and scott moir” for tessa to say that, i rest my case. moving on, do u realise that after every question scott manages to make! her! laugh! and also i love this format where they ask each other questions they should do this all the time and i’m filing this video in my folder titled “reasons_why_vm_should_host_a_podcast”. there r many more moments esp all the eye contact but literally tessa laughs every .2 seconds and they r obvs v happy and therefore i am happy! listen, i don’t know what they ate before this video, but can i have some of that plz bc i want to be this happy all the time & even though there’s uncopyrighted music playing in the background it is truly a piece of art and will 4ever be my fav video of them.
2. newlywed game
youtube
firstly, on a completely self indulgent and superficial note, they look so good here. like this is latch!Scott and prince!Tessa united and i am so glad my parents found each other at last. i know i know, ofc we have to talk abt the “sometimes you’re just so restless,,,, I READ” quote that has been gifed to a ridiculous degree, history books will talk about this moment and i can’t say i’m mad about it. BUT we r here to talk about tsco not “shippy moments” so let’s get down to business. in this vid scott is clearly trying to make tessa laugh throughout and he SUCCEEDS so we get 3 mins of tessa virtue laughing and scott teasing her so this is tsco certified! also i want to personally thank whoever’s idea this was bc i googled and NO OTHER SKATER (besides the ummm shibsibs????? cosmopolitan i have QUESTIONS) did this so i am calling it right now that skate canada is a vmie thru and thru also idk what it is w putting uncopyrighted music behind these vids but u know what v/m really make anything work!!
3. 2015 canadian nationals
youtube
this is honestly what i want in life. i just want to skate around an ice rink w my soulmate when it is dark at night and have him compliment me IS THAT TOO MUCH TO ASK??? at 23 seconds in right before the camera cuts u see tessa leaning towards him and i’m not saying that it has to be anything but the camera cuts so we will never know! can u imagine turning on ur tv and being like ooh nationals is on and then seeing this? i just think that no other opening will ever top this one bc they don’t even say anything about the nationals for all i know this could be some ad bc it’s just them goofing around an ice rink but it WORKS and here’s to hoping skate canada will open nationals like this every year bc i would watch the whole thing. when scott tells me to enjoy my commercial break i will gladly do so bc i just witnessed the best 40 seconds in my life.
4. worlds 2017 post fd interview
youtube
the real tsco moment starts at 2:02 and even though it is only 15 secs long that 15 secs just extended my life span by 5 years. i watch this daily to get a free boost of serotonin and i highly recommend u do too!
5. the soi proposal
as u can tell, i do not have a video/gif to accompany this bc 1. i do not want to go looking for it 2. like scott, i prefer to think of it as a fever dream. this is hands down the most chaotic thing that vm has ever done and i don’t think i’ll ever recover. the power that that has, the intelligence that that has, the clearance that that has, the access that that has, the influence that that has, the profile that that has, the international implications that that has. omg. it is literally the COLLAPSE of the vm fandom i was watching it in class one day and one of my classmates yelled OH MY GOD SHE PROPOSED TO HIM and started freaking out even though i have mentioned vm probably once to her.
side note: i didn’t tell her it wasn’t real.
#for those confused#tsco is a mindset#it is a lifestyle#it is what u wish for every person to have#ask
41 notes
·
View notes
Note
hey hey how are you? I'm super new to gif making, and whenever I go to save a file as a gif all the quality disappears and it becomes horrifically blurry and grainy. I was wondering how you keep the quality of your gifs after you save?
Hii!
I’m well, just finished with today’s work. Hope you are doing well too!
Firstly, I wanna share this gif tutorial that’s really helpful and covers most of the things to consider: LINK
The tutorial above is in Photoshop and my knowledge is for Photoshop gifing as well, but if I’m not missing anything the following 3 are the main things that matter in gif quality:
source quality - i try to always use videos that are 1080p (only time i use 720p is if I cannot find 1080p or I’m making small stuff + it saves local storage as well - looking at what frames i have right now ~1000 frames at 720p is 4GB while ~400 frames at 1080p is 3GB)
gif saving settings, see the link above for this!!
adjustments can end up making gifs look pixelated, especially backgrounds and dark scenes that you try to lighten
Something else to keep in mind is that gifs are a lower quality than images and use less colors — see bicubic setting regarding how Photoshop handles going from a larger color spectrum to gif’s 256 colors - THIS article has a section on gif’s limited color spectrum)
You are also welcome to IM me! I am no expert but we could look over what’s happening :)
Hope this helped and have a great day!!
— kya
8 notes
·
View notes
Note
hello, hi! thank you so much for this blog, and your fantastic gifs : i've never seen somebody as passionate for bayo as much as you are ! can i ask how you manage to make your gifs so crisp and clear? are you using gameplay that you yourself recorded? o: thank you in advance, & i hope you have a wonderful day !
yes, you are correct! to get the best quality on gifs you need to have your recording and have a right settings in adobe (it’s the program i use)!! i used this tutorial for high quality
if you go back into gifs tag, you can actually see that before only bayo1 gifs were pure hd and bayo2 were a bit different and that is because before i was using someone elses clips to gif bayonetta 2 (mostly just a walkthrought i found on torrent that was in native 1080), i capture my videos by nvidia’s shadow or bandicam depending on if i want to record for big gifs or simple gifs
althought it doesn’t matter right now, cause tumblr converts dashboard gif format in gifv and the actual quality only seen on blog page
currently i’m using CEMU to record bayo2 stuff, it’s working from time to time and because i use older version I do NOT have shadows and sometimes get textures glitch, but overall it’s really unnoticable on gifs and having your own clips (without subtitles to cut and camera without HUD) is really really useful in gifing, i tested CEMU before, if being real honest, and my video card couldn’t handle it but after upgrade everything is ok!! and also graphics are a bit different from swithh cause CEMU emulating WiiU
other way you can get HD clips is by capturing from console by capture card (which i, in theory, plan to do so with bayo3) but that’s the talk in future ^^
thank you for your sweet words btw!! hope I answered your questions corretly and didn’t blabbed a lot gjkdfljhdfkl
hope, you’re having a wonderful day as well and thank you for your presence on here 💖💖💖
14 notes
·
View notes
Note
ah thank you 😭💗 i'd love that!! but only if you want/can 😔💕
I’d love to! If it can help you improve in any way then I am totally down to help you out, just tell me if there’s something you don’t understand and I’ll try to break it down to you!!
Okay then, I’ll begin explaining the basics first then I’ll break my way of giffing down to you. For starters:
Video version: https://www.youtube.com/watch?v=zT_XPPDQEak&feature=youtu.be
1. You have to have Photoshop. I use PS CS6 but since i don’t really know if you have Photoshop or not, I’m just going to explain my style with the kind of PS i use. If you don’t have Photoshop I suggest you search for some trustworthy links and get yourself one because giffing without it is…well, it isn’t impossible but it’s unlikely that they’ll end up coming out as HQ as you want them to.
2. You don’t actually have to have this one, but it’s what I and some of (if not all) of my giffer friends use and it’s called Avisynth. I’m not sure if you’ve heard of it or not but it’s a, I call it an extension but it’s called something else I just can’t remember what it’s name is. It’s important because it can give you an extra sharp look on your gifs like the one’s mine have and make it into focus but it’s also essential for making performance gifs so I will highly suggest you consider it or something like Vaporsynth but giffing without it is also possible.
3. Video quality is seriously important when you’re gifing, almost as important as having PS if you’re on a goal to achieve HQ gifs. Most videos are released in either 720 pixels or 1080 pixels but recently 2160px has come in but it’s not as used so you don’t have to worry about it right now unless you’re giffing fancams or sometimes MVs that are released in 2160 like ASTRO’s All Night or NUESTs Love Paint. But I have to stress you download your videos in 1080px or if there’s none 720px, don’t settle for anything less than that unless you ABSOLUTELY have to.
Okay, now I’ll explain how I gif my videos using the information above that i’ve briefly talked about, I’ll try to break down my style of giffing here but remeber majority of my gifs rely on my coloring and psds rather than my sharpening or something like that.
For starters when I’m giffing a video, say an episode of a group: the video is always downloaded in the highest quality regardless of how long it can take (some videos can end up being 1GB or higher so be careful about your space as well because PS can slow down from your computer being too full and if you’re in a rush that won’t be good for you.) and then I pick the scenes I want to gif.
When I know what I want to gif I input it into Avisynth ‘normalweb or normalwebrange’ this will make sense once you get an Avisynth but for now it’s like a cmd action that takes you to Resizer that will now help you sharpen your gif and pck the dimensions you want it to come in. For dimensions there’s all kind of sizes (268 by 350, 540w by 250 or higher height, etc.) but it’s all up to the kind of gifs you want to make, I’ll link some so that you understand what I mean.
While I’m in avisynth’s resizer (it opens on a web browser so you have to set it on which browser you’re most comfortable with. I use Chrome if you want to try it) I set my dimensions and increase the extra sharpening to 25 or 30 and then I copy the code at the bottom and close the page. I’ll try to explain this part since I know I haven’t made much sense.
When you open the folder where your avisynth is supposed to be (There’s another tutorial for putting avisynth in your computer if you want) there should be several windows batch files that go like ‘normalwebm’ or ‘normalwebm32′ etc. I use the webm32 because it captures more frames but the choice, in the end, is yours. The normalwebm32 should redirect you to the browser settings to Avisynth either by you or by the program itself and it’ll open a page called resizer where you can resize your gif, choose the placement and sharpening. The size of the gif is up to you so you can put whatever kind of dimensions you want, choose the placement and also set your own extra sharpening. At the bottom of the extra sharpening, there should be a white page with words like a code on it, those words should change each time you change something about the placement or sharpening and in some cases the speed but it’s best reserved for performance gifs. You need to copy that entire code and make sure you’ve left nothing out and then close the page. Avisynth will then redirect you to another app called Avspmod that will help you cut out the unnecessary parts of your gifs you don’t need or want. You can also preview it so you can check how it looks. After that you need to Ctrl+S and the script, basically what you’ve been doing will be saved and after closing the app, it should begin getting processed by another app called VirtualDub that will do all the work for you and then you would need to go to a folder where your avisynth is and look for somewhere called vdub and there you will find another app called VirtualDub. You need to click on it and it’ll show you your gif but in video format. Don’t worry, this is okay and is should come out moving as a video but with no sound and should be classified as a .avi. This part I’ll demonstrate it to you later with a video but this is how you do it.
After doing all of that and converting your video into a gif, you just need to input it into PS by a script which you’ll find in the File at the top left corner of PS. You’ll need to browse and find where your gif was transformed into and select the frames you need and then they’ll be loaded into PS as a single file.
From here, I can’t explain it with words, therefore, I’ll record how I do it and put it in this ask. I know I didn’t do much to help and probably made it worse but trust me, it’ll make sense once you can see examples of it.
#if you can give me a day until tomorrow morning I can show all of this to you#tumblr is refusing me to put a keep reading link so i'm really sorry#i can also lend you some of my psds but i'd suggest you learn how to tweak them soon cause you'll discover your own style soon#i promise i will help you just give me one day!#ask#anon#anonask#*gifhelp
2 notes
·
View notes
Text
°˖✧◝(⁰▿⁰)◜✧˖° The Queen Does A PS Tutorial: Actions! °˖✧◝(⁰▿⁰)◜✧˖°
Wonderful little anon asked me to do a tutorial on the PS actions that I released in my last tutorial. So let’s give this a whirl! In this tutorial, I’ll teach you how to produce something like this using my action pack:

TW for the lengthy post below the cut! Please like/reblog this post if you found it helpful! // Buy me a coffee?
What You’ll Need:
Mac
A clip/movie/video that you want to GIF
Photoshop CC 2019 (or Photoshop version that allows Video to Frames conversion)
This ATN Pack, by yours truly— Please like/reblog this post if using!
Step One: Load Up Everything You’ll Need
Did you download that ATN Pack (action pack)? If you did, then open it up too (double-click is what I mean by open it up)! It should automatically start up your photoshop, but if it doesn’t then open photoshop. You’re gonna want to go to File > Import > Video Frames to Layers and ready your clip. If you’re not sure how to do that, check out Step 3 in > this tutorial <
Step Two: Crop!
I included a cropping action in the pack, but for this tutorial, I’m gonna teach y’all a different way to crop. It’s just as easy and doesn’t take much time. You’re gonna focus on the left toolbar and the top one for this. Press the letter C, just once, on your keyboard; or you can click the funky looking square aka the cropping tool that looks like this:

You’ll notice that the top bar will now show a couple of options. What’s really cool about this is that you can create presets for GIF Making, Icon Making, GIF Sets, Promos, Edits, and just about anything that you regularly make. I’m not sure what the original preset is, but here’s what mine are:

If you select W x H x Resolution from the first drop down, you can enter the width x height and resolution of what you want your GIFs to be— be sure to enter px after the numbers! Why I like this? This option keeps the ratio that you enter, crops, AND resizes it as well! So I just went from a 1080px x 720px to this:
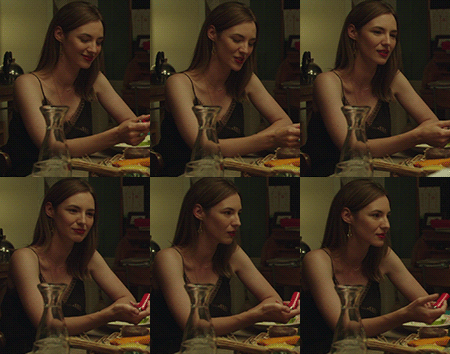
Yes, it’s super fast. Video frames to layers conversion usually results in that. So now, onto step 3!
Step Three: Timeline Action!
The second action in my pack is called Timeline. Before you use it, you need to delete any frames that you won’t be using AND select all layers. To select all layers, you click on Layer 1, hold down the SHIFT key, scroll to the top, and click on the top layer. If you did it right, every layer in between 1 and whatever the last one is, will now be highlighted. Like so:

You’ll notice that there’s like 2 awkward layers of a guy in my layers. I deleted some frames in which he popped up (plus a little extra to keep the GIF under 3MB), but it’s not necessary to delete the layers, so don’t freak out.
After all layers have been selected, open up the action menu and reveal the actions in my pack. If the action menu is not open, go to the top bar, then go to Window > Actions. It’ll open up on the side (looks like a play button) and if you did step one, then my action pack should be loaded on there! The action menu looks like this:
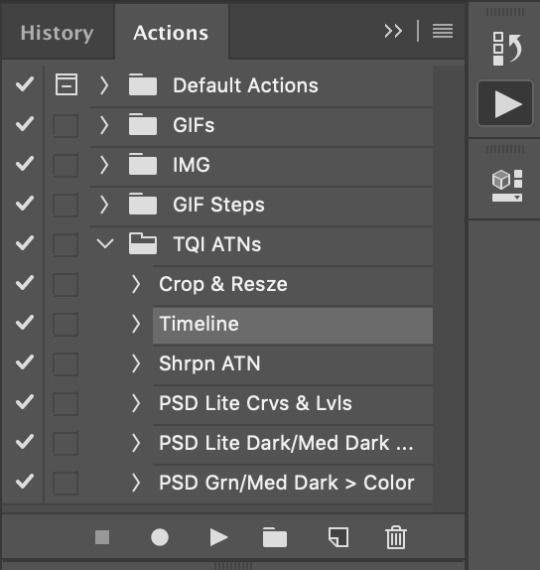
Click on Timeline (NOT the arrow next to it). Then play the press button. This action will adjust the speed in frames, convert the frames into a timeline, and convert the layers into a smart object. This is what my GIF looks like now:

Step Four: Sharpen!
The third action in my pack is called Sharpen, and you guessed it— it sharpens your GIF. Run it the same way you did Timeline. Click on Sharpen, then the play button under it. My GIF looks like this:

Step Five: Color!
I included 3 different coloring actions. Try them all and see what works. I can’t guarantee that they’ll work for everything, adjustment will always be needed. But they seem to work about 80% of the time for what I’m GIFing. Run one the same way you would any other action. The first one is titled ‘PSD Lite Crvs & Lvls’ and does this to my GIF:

Ok, not bad. Second one is called ‘PSD Lite Dark/Med Dark >> Lite’ and does this to my GIF:

That’s super bright. Kind of makes the scene look cloudy, but it’s not bad? And the last PSD Action is called ‘PSD Grn/Med Dark > Color’ and does this:

Not a huge fan of this one— at least, not for this scene.
Step Six: Save For Web!
Quick shortcut: Press the CMD + Alt/Option + Shift + S keys at the same time. It’ll open up this window:

Take a look at my settings on the right. That first drop down has preloaded preset settings. The one you’re looking at on the screen is one I saved on my PS. From that drop down, you’re gonna want to select ‘GIF 128 Dithered’. Then, you have the option of using those preloaded settings or you can copy mine; I’d play around with em to see what works best for you. NOTE(S): The two things you MUST select are the GIF option from the second drop down AND the Forever option from the Looping Options drop down at the bottom.
& Voila!
We went from this mess:

to this (I liked the first PSD Action):

°˖✧◝(⁰▿⁰)◜✧˖° found this helpful? please donate! °˖✧◝(⁰▿⁰)◜✧˖°
#rph#ps tutorial#dearindies#photoshop tutorial#gif tutorial#gif making#gif making help#gif help#photoshop#( my resources. )#tutorial#( mine. )#( requests. )#( my tutorials. )
10 notes
·
View notes
Text
Basic Kpop Gif Tutorial
Hello! So, an anon asked me if it was possible to post a gif tutorial the way I do mine. Something about them looking beautiful, which I’m still thankful people find them like that. I apologize for the wait, dear anon. I had finals, plus taking care of a family member who just had surgery. But I hope you like it! And remember, this is just my way of doing it. Make sure that when you do begin, that it’s all about fun! Be creative and try new things :D. Also, it’s nice to have a support system which I have in a few of my mutuals. They gave me their support and guidance through it. I wanted to give up but I didn’t because I wanted to improve. So, here it is!
So, for starters, I began with downloading vapoursynth for MAC, but I know they have avisynth for PC’s. It depends on what you use. Here is where you can get either. I’ve been told it needs patience when downloading, and it did. lol. Just along to the instructions and you’ll do just fine.
There is another way to follow along once you’ve downloaded. These mini-tutorials helped me a lot. Because who would have thought that it mattered whether the file was TS or whether it comes from Youtube. (I was a fool, guys). Here are the mini tutorials you can use as guidance. Honestly, it explains it more thoroughly than I could ever do.
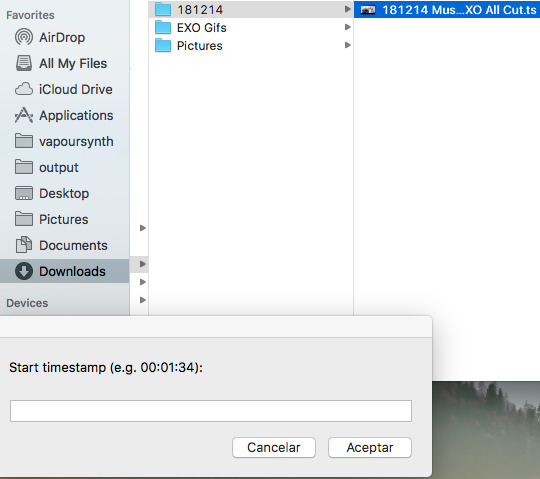
Now, this is where I can finally demonstrate how I do my gifs. After I finally selected, like the tutorial, I just place where in the video I want to gif. Try to make it less than 3 seconds. More than that might not be enough to stay under the 3.0mb Tumblr’s guidelines required for gifs.
Once that happens, the program will lead you to this screen:
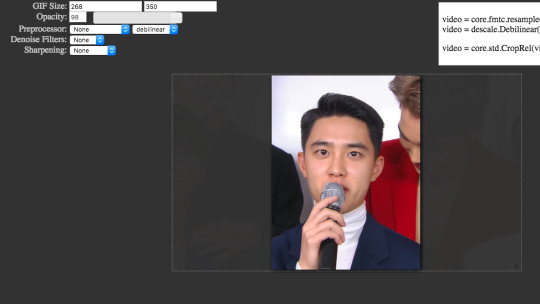
Then based on the Tumblr gif guidelines it depends on however big you want to make your gif. I was beginning to do Kyungsoo’s birthday post which I would need 9 gifs being 177 x (however big you want it) I chose 350. But make sure the middle ones are always 178 x ###, it’s just the rules lol.
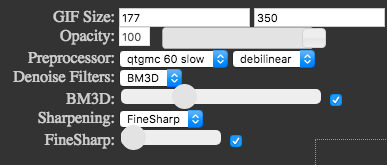
I set it like this because it’s worked so far and it makes my gifs really nice, but again, feel free to experiment and see what works for you.
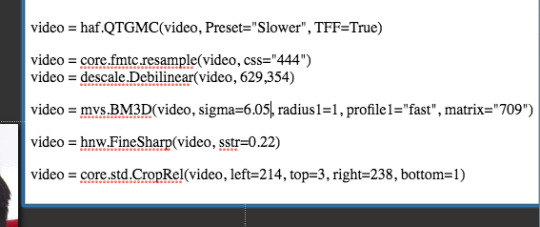
This will be on the right side of the screen after you’ve made the selections on the left side of it. Once you’re satisfied you highlight all of that and place it under portion which will finally encode your video.

So, you have to place it between the lines 22 and 25 just because it works that way and I placed #60fps on the end of line 22 because that will give you more frames and you’ll have more that you can work with. It’ll look like this:
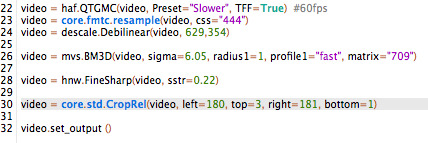
I just placed what I created with selections in the previous screen in the spaces I’ve said they’re needed in. Once that, you have to check your code to see if it’s good for the system to encode and you didn’t miss something you forgot to highlight.
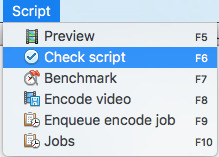

After checking it and seeing it successful, then that’s when you want to go under ‘Script’ again and ‘Encode video’
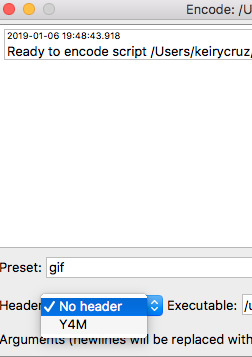
A screen will pop up, after that happens make sure under the ‘Header’ option, you click ‘Y4M’ and then click ‘Start’
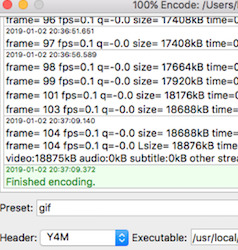
Once the encoding is done you have to go to your ‘Output’ folder which is where your encoded video will be.
You’ll open Photoshop, I use PS6. And then you’ll do File > Import > Video Frames into Layers.
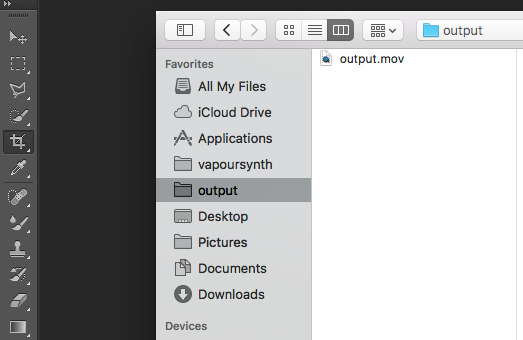
Now once there is where you’ll finally be able to start your gifing process but not before you finally choose where you want to begin your gif and you want it to end.
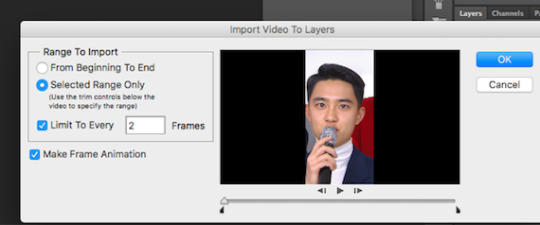
Make sure you do limit to ever 2 frames. Why? Because it’s easier and I’ve always been told this when gifing.
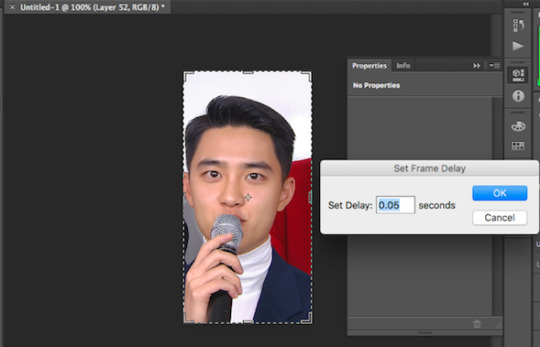
I select all of my frames and have it display under 0.05 seconds just because to me it looks really nice and isn’t as slow or fast. But some others do 0.03. It all depends on how you want your gif to look. It isn’t about comparison. After that is done, you can finally begin playing around with the features.
Me, being a lazy ass I just used a PSD I saved from my last gifset of Suho lolol. I wanted to see first if it’ll look nice with the new gif I was trying to edit. Once it did instantly, I was satisfied XD. Again, don’t be like me. lol. I sometimes just tweak a few things here and there depending on the gif until it looks great.
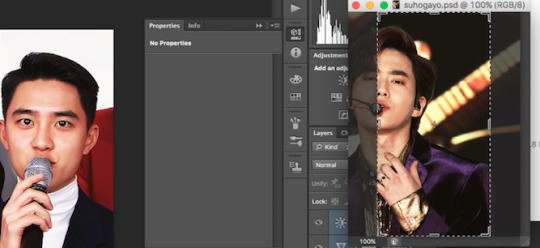
The end result is this:

I really really REALLY hope I was able to help you, dear anon. Or anyone in general. Even I’m still learning on how to make wonderful gifs. Some of my mutuals are outstanding but it’s best not to compare yourself to anyone. Of course, sometimes you wonder if you should even gif a performance or scenes other people have done so, but to be honest, you should do it because you want to. We need more people appreciating our favorite idols so don’t feel discourage :D You can do it! Ok...enough of about me, feel free to message me if you have questions!!
9 notes
·
View notes