#filerecovery
Explore tagged Tumblr posts
Text

laptop data recovery in Oman
Have you lost any important files? ScorpionFix provides expert laptop data recovery services in Oman, helping you recover damaged, erased, or lost data from external storage devices, USB drives, HDDs, and SSDs. Our skilled professionals restore important files, images, movies, and company records using modern recovery methods. We offer safe, efficient techniques with a high recovery success rate, no matter the cause of your data loss—inadvertent deletion, hardware malfunction, malware attacks, or system crashes. Your best choice for data recovery in Oman is ScorpionFix because of our quick service, affordable prices, and 100% confidentiality. Get in touch with us now.
#LaptopDataRecovery#Oman#ScorpionFix#DataRecovery#LaptopRepair#HardDriveRecovery#SSDRecovery#FileRecovery#TechSupport#OmanServices#DataRecoveryOman
0 notes
Text
#filerecovery#googledrive#googledrivehelp#datamanagement#recoverdeletedfiles#onlinestorage#datarecoverytips#digitalguide#saveyourdata#cloudstorage
0 notes
Text
0 notes
Text
How to Reset Your iPhone Without Losing Everything
Resetting your iPhone can be a useful step to resolve various issues, improve performance, or prepare for a new setup.
However, a common concern is losing personal data like photos, contacts, and apps during the process. Fortunately, it's possible to reset your iPhone without losing everything.
In this guide, we'll walk you through the steps to safely reset your iPhone while preserving your valuable data.
1. Backup Your iPhone
The most important step before resetting your iPhone is to create a backup. This ensures that all your data, including contacts, photos, videos, app data, and settings, is safely stored and can be restored after the reset.
You can back up your iPhone using iCloud or iTunes/Finder (for macOS Catalina and later).
Using iCloud:
Connect your iPhone to a Wi-Fi network.
Go to Settings > [your name] > iCloud.
Tap on iCloud Backup.
Toggle the iCloud Backup switch on if it isn't already, then tap Back Up Now.
Wait until the backup process is complete. You can check the progress and confirm completion in the settings.
Using iTunes/Finder:
Connect your iPhone to your computer using a USB cable.
Open iTunes (for Windows or macOS Mojave and earlier) or Finder (for macOS Catalina and later).
Select your iPhone when it appears in iTunes or Finder.
Under the Backups section, select This Computer to save the backup to your computer.
Click on Back Up Now.
Wait for the backup to complete, and ensure it's saved successfully before proceeding.
2. Reset Your iPhone
After creating a backup, you're ready to reset your iPhone. There are a few types of resets, but the most common and useful one is a soft reset or reset all settings, which won't delete your data but will reset your settings to default.
Reset All Settings:
Go to Settings > General.
Scroll down and tap on Reset.
Select Reset All Settings.
You will be prompted to enter your passcode. Enter it to proceed.
Confirm the reset when prompted.
This option resets your settings (such as Wi-Fi passwords, wallpapers, and accessibility settings) but leaves your data, apps, and personal information intact.
Factory Reset (Without Losing Data):
If you want to perform a full factory reset but don't want to lose your data, you must ensure you have a recent backup (as outlined above) and then follow these steps:
After backing up your iPhone, go to Settings > General.
Scroll down and tap on Reset.
Choose Erase All Content and Settings.
You will be asked to enter your passcode and Apple ID password to confirm.
Tap on Erase iPhone.
Your iPhone will then proceed with the reset. Once it has finished, the device will restart, and you'll be greeted with the setup screen.
3. Restore Your Data
Once your iPhone has been reset, you'll need to restore your data from the backup you created earlier.
Restoring from iCloud Backup:
During the setup process after resetting, choose Restore from iCloud Backup.
Sign in with your Apple ID.
Choose the most recent backup from the list.
The restoration process will begin, and your data will be downloaded from iCloud. Ensure you stay connected to Wi-Fi until the process completes.
Restoring from iTunes/Finder Backup:
Connect your iPhone to the computer where you saved your backup.
Open iTunes or Finder.
Select your iPhone when it appears.
In the Backups section, click Restore Backup.
Choose the most recent backup and click Restore.
Wait for the restore process to complete before disconnecting your iPhone.
4. Reinstall Apps and Settings
After restoring your data, you may need to reinstall apps or reconfigure certain settings that were reset. Open the App Store and go to Purchased to see all the apps you have downloaded previously. You can download them again from there.
5. Verify Your Data
After everything is set up, take a moment to go through your iPhone and verify that all your important data is back. Check your photos, contacts, messages, and any other critical information to ensure nothing is missing.
Conclusion
Resetting your iPhone without losing everything is entirely possible with a few careful steps. Always back up your data first, choose the right type of reset, and then restore your information from the backup. By following this guide, you can enjoy a fresh start on your iPhone while keeping all your important data safe and intact.
0 notes
Video
youtube
Best Data Recovery Software for Mac in 2024 | Wondershare Recoverit Tuto...
🚀 Recover Lost Data with Wondershare Recoverit V13!
Hey, Tumblr fam! Ever lost important files? As someone who creates tons of content, I know the pain of data loss all too well. That’s why I’m thrilled to introduce you to Wondershare Recoverit V13—the best data recovery software for Mac in 2024.
📥 Try Wondershare Recoverit Now: ➡️ Recover Your Lost Files 🎁 Win up to $2,000 in Prizes! ➡️ Join the Recoverit V13 Campaign
1 note
·
View note
Text

👑👑Dịch vụ Cứu Dữ Liệu Máy Tính Chuyên Nghiệp - cuudulieu.com👑👑
Là đơn vị tiên phong trong lĩnh vực phục hồi dữ liệu tại Việt Nam, sở hữu hơn 10 năm kinh nghiệm cùng đội ngũ kỹ thuật viên giàu chuyên môn và tận tâm. Chúng tôi tự hào mang đến giải pháp toàn diện cho mọi vấn đề mất dữ liệu từ các thiết bị lưu trữ đa dạng, bao gồm: -Ổ cứng HDD, SSD -USB, thẻ nhớ -RAID, máy chủ,... ⭐️⭐️Dịch vụ cứu dữ liệu của cuudulieu.com được tin tưởng bởi: ✅Hiệu quả cao: Tỷ lệ thành công ấn tượng trong việc khôi phục dữ liệu từ các trường hợp phức tạp. ✅An toàn tuyệt đối: Cam kết bảo mật thông tin cá nhân và dữ liệu của Quý khách. ✅Minh bạch rõ ràng: Báo giá chi tiết trước khi thực hiện, khách hàng được giám sát trực tiếp quá trình. Nhanh chóng tiện lợi: Hỗ trợ tư vấn 24/7, tiếp nhận và xử lý yêu cầu nhanh chóng. ✅Chi phí hợp lý: Cung cấp dịch vụ với mức giá cạnh tranh, phù hợp với mọi đối tượng khách hàng.
1 note
·
View note
Text
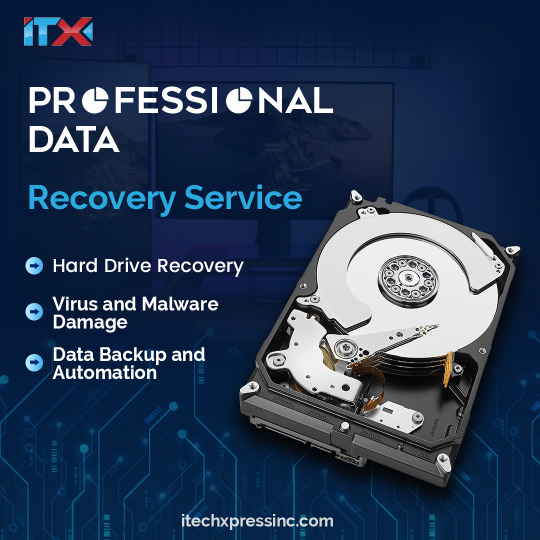
Don’t feel anxious after losing your data! Relax!
We are here to offer Hard drive recovery, data backup, and automation service for the people of LA County and the community of Glendora.
iTech Xpress provides same-day and high-quality service at affordable prices. We are also specialised in removing viruses and repairing Malware damage.
So, stop being hopeless and walk into our shop today!
Visit Our Website:-https://itechxpressinc.com/
0 notes
Text
#Breaking: Anyone who downloaded #FileRecovery & #DataRecovery or #FileManager are urged to #wipe the allegedly #compromised apps from their devices.
Anyone who downloaded File Recovery & Data Recovery or File Manager are urged to wipe the allegedly compromised apps from their devices. https://t.co/XHCDEAiWtT — The Hill (@thehill) July 16, 2023 Source: Twitter

View On WordPress
0 notes
Photo

🌟 Introducing SPACE RECOVERY , your ultimate destination for professional data recovery services in Oman! 🇴🇲 Whether it's accidental deletion, hardware failure, or any other data loss scenario, our skilled team is equipped with cutting-edge tools and expertise to retrieve your irreplaceable files. 🔬💾 Our state-of-the-art data recovery techniques ensure that your photos, videos, and documents are recovered with utmost precision and confidentiality. We understand the sentimental value and importance of your lost data, and our dedicated professionals go the extra mile to recover every byte. 💪 With years of experience in the industry, our reliable team has successfully recovered data from various storage media, including hard drives, SSDs, USB drives, memory cards, and more. We have a proven track record of satisfied clients, making us a trusted name in the data recovery field. 🕒 Time is of the essence when it comes to data recovery, which is why we offer fast turnaround times without compromising on quality. Once you entrust us with your data recovery needs, our experts work diligently to retrieve your files as quickly as possible, ensuring minimal downtime and maximum peace of mind. 💡 We prioritize customer satisfaction above all else. Our friendly and knowledgeable support team is available round the clock to address your queries and guide you through the data recovery process. We believe in transparent communication, keeping you informed at every step of the way. 🌐 Visit our website https://spacedatarecovery.com or give us a call at +968 963 12346 to learn more about our comprehensive data recovery solutions. Don't let data loss hold you back—let us help you recover your memories and get back to capturing new ones! 📸✨ #DataRecovery #FileRecovery #LostFiles #DataRescue #OmanDataRecovery #DataRecoveryServices #DataRecoveryOman #spacedatarecovery #spacerecovery
0 notes
Photo

It sometimes happens that the Word file you were working on gets deleted because you forgot to Save it or the current goes out and you didn’t have the opportunity to save it. You get very anxious about doing it again. So, there is a way to find unsaved word documents, just search for the .asd file under “MY PC” and you will find it.
www.iraitech.com
#microsoftoffice#msword#word#unsaveddocuments#recovery#datarecovery#iraitech#office#microsoft#asd#business#computer#tips#tipstuesday#hack#filerecovery#smallbusiness#tricks
0 notes
Text
Laptop Hard Drive Data Recovery Dubai
Lost some important files? The #1 laptop hard drive data recovery company in Dubai, ScorpionFix, specialises in restoring data from hard drives (HDD SSD) that have been damaged, broken, or formatted. Our professionals recover lost documents, images, videos, and company information using modern recovery techniques. We guarantee a high success rate for quick, safe, and dependable data recovery, regardless of the cause—inadvertent deletion, system failures, or hardware failure. Your best option for data recovery in Dubai is our company because of our careful handling and fast response times. Reach out to our company right now for expert and affordably priced data recovery services.
#DataRecoveryDubai#LaptopDataRecovery#ScorpionFix#HardDriveRecovery#DubaiTechSupport#LaptopRepairDubai#HDDRecovery#SSDRecovery#LostDataRecovery#TechExpertsDubai#FileRecovery#DataBackup#EmergencyDataRecovery#DubaiITSolutions#ProfessionalDataRecovery
0 notes
Text
#filerecovery#googledrive#digitalguide#googledrivehelp#onlinestorage#recoverdeletedfiles#datarecoverytips#saveyourdata#datamanagement#cloudstorage
0 notes
Photo
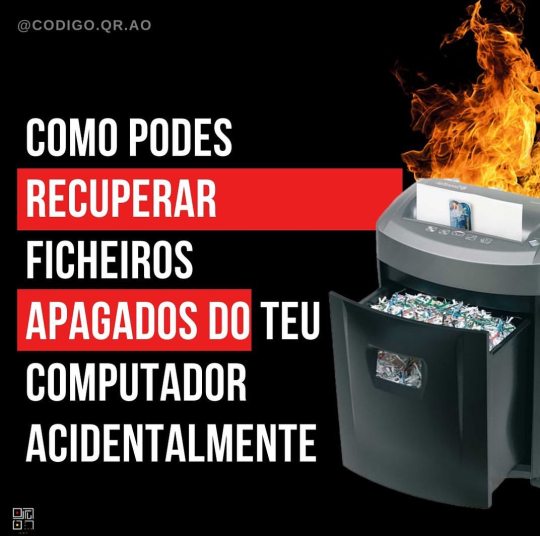
É simplesmente algo comum. Apagar ficheiros importantes acidentalmente é uma situação bastante delicada especialmente quando não se tem uma cópia ou foi um documento difícil de completar. Porém, por detrás das cortinas, o computador nem sempre apaga os seu ficheiro, muitas das vezes apenas apaga o ‘endereço’ do ficheiro mas ele lá ainda reside até que mais espaço seja necessário e outros ficheiros ocupem o espaço ocupado por ele de forma permanente. Para recuperar, pode usar os softwares EaseUS para Mac ou Recuva para Windows. O recuva é considerado o melhor entre os dois. Já apagou ficheiros acidentalmente? Como recuperou? Deixe o seu comentário #Recuva #easeus #filerecovery #recuperacaodeficheiros #segurancacibernetica #segurancadigital #software #cybersecurityawareness #dataprivacy #protecaodedados #cybersecurity #cybersecuritynews #dataprotection #datasecurity #privacy #codigoqrao #angola #segurancadigitalangola #angola🇦🇴 https://www.instagram.com/p/B9Ro9qWFj8g/?igshid=1epqvf6ww3kqr
#recuva#easeus#filerecovery#recuperacaodeficheiros#segurancacibernetica#segurancadigital#software#cybersecurityawareness#dataprivacy#protecaodedados#cybersecurity#cybersecuritynews#dataprotection#datasecurity#privacy#codigoqrao#angola#segurancadigitalangola#angola🇦🇴
0 notes
Photo
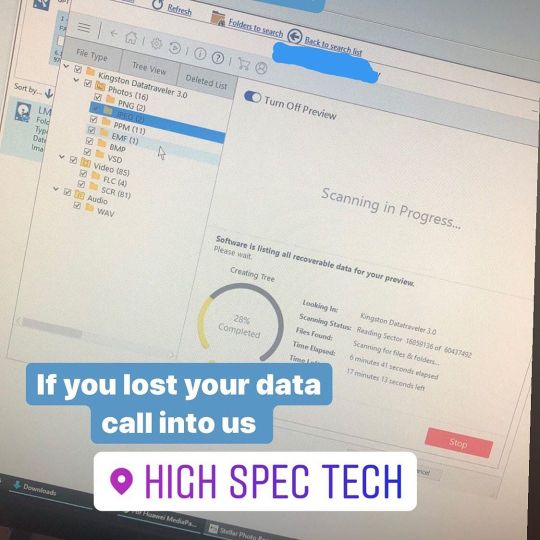
💾DATA RECOVERY💾 Today a very worried customer came into us after FORMATTING their USB key by accident thinking they were formatting another USB- the key contained very important photographs that meant a lot to them. After running this USB through our data recovery software we managed to recover all of their photographs, even photos and files that they previously deleted over time were recovered. If you find yourself in this unfortunate position, deleted or formatted your hard drive on your computer or Mac or even your your usb stick or SD card, we can help. Data and file recovery 🗂 Pictures and video recovery 📷 #datarecovery #datarecoveryservices #datarecoveryservice #recoverydata #recovermydata #datarecoveryspecialist #sensitivedata #dataprivacy #recoverydata #hddrecovery #sadrecover #ssdrecovery #usbrecovery #sdcardrecovery #filerecovery #macdatarecovery #desktopdatarecovery #laptopdatarecovery (at High Spec Tech) https://www.instagram.com/p/B7t6xZlnzl4/?igshid=njyh2z4zy8ku
#datarecovery#datarecoveryservices#datarecoveryservice#recoverydata#recovermydata#datarecoveryspecialist#sensitivedata#dataprivacy#hddrecovery#sadrecover#ssdrecovery#usbrecovery#sdcardrecovery#filerecovery#macdatarecovery#desktopdatarecovery#laptopdatarecovery
0 notes
Text
EaseUS Data Recovery Wizard - Recensione
Non c'è amministratore di sistema, professionista IT o esperto di applicazioni Windows che non si sia imbattuto almeno una volta in uno dei prodotti EaseUS: stiamo parlando infatti di una famiglia di strumenti di backup e data recovery che esistono sul mercato da oltre 15 anni e contano ormai milioni di utenti, grazie alla loro semplicità d'uso e (soprattutto) all'esistenza delle versioni free, ovvero edizioni grauite per l'utilizzo domestico e/o small business.
Introduzione
Fondata nel 2004, EaseUS è una azienda internazionale specializzata nella realizzazione e distribuzione di strumenti software per attività di backup, data recovery, gestione delle partizioni e operazioni similari: ogni prodotto di solito esce con una versione gratuita "di valutazione", quasi sempre con funzionalità limitate, coadiuvata da una o più edizioni professionali / aziendali prive di limitazioni e/o dotate di funzionalità aggiuntive: grazie a questa strategia di vendita, piuttosto comune per questo tipo di aziende, EaseUS è in grado di soddisfare le esigenze di ogni potenziale cliente, dagli utenti domestici, alle PMI, alle imprese, oltre ovviamente ai tecnici e professionisti di settore interessati all'utilizzo dei loro prodotti a beneficio dei propri clienti. In questo articolo eseguiremo ci occuperemo di effettuare un test-drive e una recensione approfondita di uno dei loro prodotti di punta: EaseUS Data Recovery Wizard, uno strumento che consente di ripristinare file e cartelle cancellati per errore (o da malware, o da utenti non autorizzati) da vari supporti di memorizzazione, tra cui: Hard Disk, Pendrive USB, schede di memoria, dispositivi iOS, lettori musicali, e così via.
Installazione
Installare EaseUS Data Recovery Wizard è piuttosto semplice: la prima cosa da fare è stabilire se siamo interessati alla versione gratuita (free trial), all'edizione professionale (professional edition) o alla versione per tecnici e amministratori di sistema (technician edition): EaseUS Data Recovery Wizard - Free Edition EaseUS Data Recovery Wizard - Professional Edition EaseUS Data Recovery Wizard - Technician Edition (aka Data Recovery Wizard Unlimited) Come si può vedere, l'azienda ha predisposto una pagina web dedicata per ciascuna edizione. Ci occuperemo del confronto tra le varie versioni tra poco: per il momento, ai fini del nostro test-drive, ci limiteremo a scaricare l'edizione gratuita. La procedura di installazione è estremamente semplice: il classico wizard nel quale dobbiamo fare click sul pulsante Prosegui o Continua fino a quando l'applicativo non sarà installato sul nostro sistema. Fortunatamente, anche nel caso dell'edizione gratuita, non ci sarà chiesto di installare alcun software aggiuntivo/promozionale/adware.
Dashboard
Una volta installato e lanciato l'applicativo, ci verrà mostrata a schermo la seguente dashboard, che rappresenta il punto d'ingresso di qualsiasi sessione di recupero dati:
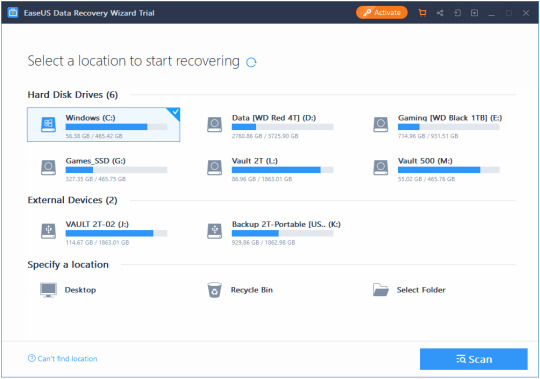
La schermata principale (Dashboard) di EaseUS Data Recovery Wizard Dashboard. La prima cosa degna di nota è che il software è interamente tradotto in italiano: per cambiare la lingua predefinita è sufficiente fare click su una delle icone poste in alto a sinistra e modificare l'impostazione predefinita, ovvero quella scelta al momento dell'installazione. Per quanto riguarda la dashboard, possiamo vedere come il software sia in grado di individuare automaticamente tutte le unità di data storage presenti localmente sul sistema: per iniziare una sessione di recupero dati, non dobbiamo fare altro che effettuare un doppio click sull'unità relativa, così da accedere al pannello successivo - il File Explorer.
File Explorer
Come si può vedere dalla screenshot seguente, il contenuto dell'unità di storage selezionata è mostrato a schermo utilizzando una sorta di File Manager visuale, molto simile all'Esplora Risorse di Windows ma dotata di un set di comandi specifici per poter gestire l'identificazione e il recupero dei file eliminati:
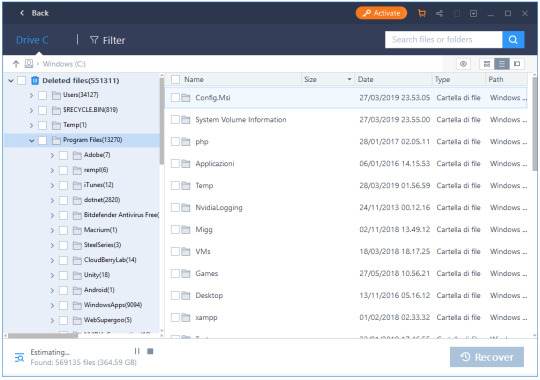
Nell'istante in cui la finestra relativa all'unità selezionata viene aperta, il programma farà partire una scansione veloce (quick scan) dei file eliminati: i risultati di questa scansione saranno mostrati a schermo in tempo reale. Tutti i file eliminati verranno sistemati all'interno di un albero di cartelle (directory tree) mantenendo la medesima gerarchia che avevano nel file system al momento della loro eliminazione. Questa modalità di visualizzazione è particolarmente utile perché facilita l'utente nell'attività di identificare agevolmente i file che vuole recuperare, distinguendoli da quelli che non ci interessano.
Filtri di ricerca
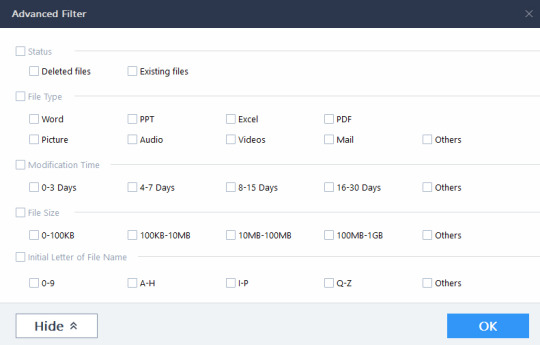
Nel menu in alto è presente una opzione "Filtro" (Filter) che può essere utilizzata per limitare la visualizzazione ad alcune particolari tipologie di file (più recenti di una certa data, solo documenti, solo video, etc.):
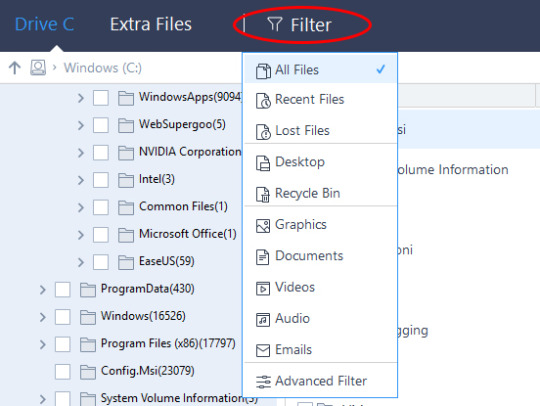
Nel caso in cui si abbia bisogno di applicare delle regole più complesse è possibile utilizzare il pannello Filtri Avanzati (Advanced Filters) facendo click sull'omonima opzione in basso. Operando in questo modo si potrà accedere a una finestra modale che consentirà di impostare una serie di parametri di ricerca aggiuntivi: data e ora della modifica, dimensioni del file, lettere o numeri contenuti all'interno dei nomi dei file da recuperare, e così via.
Scansione approfondita
Al termine della scansione semplice il software inizierà automaticamente una scansione approfondita (deep scan) dell'unità: si tratta di una modalità di scansione estremamente più precisa del quick scan, ma decisamente più pesante in termini di tempo e risorse: per scansionare l'unità da noi utilizzata nel test (SSD Samsung 970 Pro da 500 GB) il deep scan ha impiegato circa 5 minuti - un tempo in ogni caso più che dignitoso per una scansione sector-by-sector. La scansione approfondita di EaseUS Data Recovery Software è in buona sostanza una scansione settore-per-settore (sector-by-sector) realizzata in tecnologia proprietaria. Per ulteriori informazioni, consigliamo di dare un'occhiata a questo approfondimento tecnico presente sul sito ufficiale EaseUS. Il risultato della scansione è mostrato in tempo reale su un pannello a parte, situato a destra della finestra File Explorer.
Anteprima prima del recupero dati
Una funzionalità estremamente interessante, che ci ha soddisfatto in particolar modo, è quella che consente di visualizzare una anteprima del file prima di effettuare l'undelete, ovvero di recuperarlo. Per utilizzarla è sufficiente fare click con il tasto destro del mouse e selezionare l'opzione anteprima (preview, nella versione in lingua inglese) tra quelle presenti nella finestra contestuale:
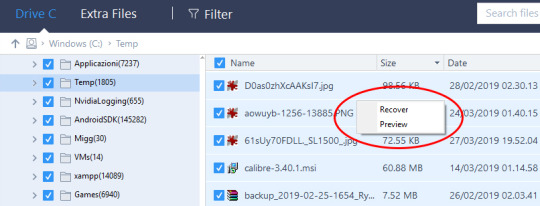
La preview contestuale è uno strumento che può rivelarsi molto comodo in alcune situazioni, come ad esempio quando si vuole effettuare l'undelete di una singola foto (o di un singolo file PDF) all'interno di una cartella piena di file eliminati che non si ha interesse a recuperare.
Confronto tra Edizioni
A differenza della maggior parte delle versioni demo e/o di valutazione rese disponibili da altre aziende software, la Data Recovery Wizard - Free Edition è una trialware che non ha scadenza, non costringe ad attendere fastidiosi nag screen e (soprattutto) risulta essere pienamente utilizzabile, in quanto consente di sfruttare a pieno le funzionalità del prodotto. L'unica limitazione funzionale è data dalla dimensione massima dei file che è possibile recuperare, ovvero un totale di 2GB: al tempo stesso, il programma potrà essere utilizzato anche al raggiungimento di tale limitazione in modalità "scan-only"... Una scelta molto comoda, visto che consentirà all'utente di sapere in anticipo - prima di effettuare l'acquisto - se il programma è in grado di recuperare i file di proprio interesse oppure no. Ovviamente, sia la professional edition che la technician edition non hanno alcuna limitazione e consentono pertanto il recupero di qualsiasi file. Funzionalità di Help-Desk L technician edition presenta le medesime caratteristiche e funzionalità della versione professional, con una caratteristica aggiuntiva che vale senz'altro la pena di approfondire: si tratta di una opzione "technical help-desk" offerta da EaseUS direttamente ai clienti di chi acquista il prodotto: si tratta in buona sostanza di una sorta di customer care offerto in outsourcing, pensato appositamente per rivenditori, provider di servizi e/o altre realtà di questo tipo interessate a rivendere il servizio di data recovery a utenti finali.
Dispositivi supportati
Ecco un elenco delle principali unità di memorizzazione supportate nativamente da EaseUS Data Recovery Wizard, a patto ovviamente che siano collegate al PC sul quale il software è stato installato: PC (desktop e laptop) Hard Disk Unità esterne (floppy, DAT, CD-ROM, etc.) Unità SSD Penne e dispositivi USB Micro Cards Camcorder e Videocamere digitali Lettori musicali digitali Lettori video RAIDs CF/SD Cards Altri dispositivi di data-storage
Requisiti Hardware e Software
File System FAT(FAT12,FAT16,FAT32) exFAT NTFS NTFS5 ext2/ext3 HFS+ ReFS Operating System Windows 10/8.1/8/7/Vista/XP Windows Server 2016/2012/2008/2003 CPU at least with x86 Disk Space 32MB minimum space for EaseUS Data Recovery Wizard installation RAM at least 128MB
Offerta speciale - Sconto del 50%
Nel caso in cui siate interessati all'acquisto dell'edizione professional o technician di EaseUS Data Recovery Wizard potete farlo utilizzando questo coupon sconto del 50%: un codice promozionale che consente di ottenere il software a metà prezzo (51,81 EUR anziché 103,64 EUR): si tratta di una offerta speciale introdotta da EaseUS a inizio 2019 e dovrebbe restare disponibile per i prossimi mesi.
Conclusione
EaseUS Data Recovery Wizard è sicuramente uno strumento valido per recuperare i file eliminati: il software si è comportato egregiamente in tutti i nostri test, consentendo il recupero di dati cancellati da una partizione esistente, da una partizione cancellata, da una partizione corrotta e persino da una partizione prima cancellata e poi sovrascritta con un altra. Siamo inoltre rimasti piacevolmente colpiti dall'interfaccia user-friendly, dalla correttezza della traduzione in lingua italiana e da alcuni "tocchi di classe" come l'anteprima prima del recupero e la versatilità dei filtri di ricerca: tutte cose che consentono ad EaseUS di mantenere un certo margine rispetto a prodotti similari offerti da aziende concorrenti.
Read the full article
0 notes
Text
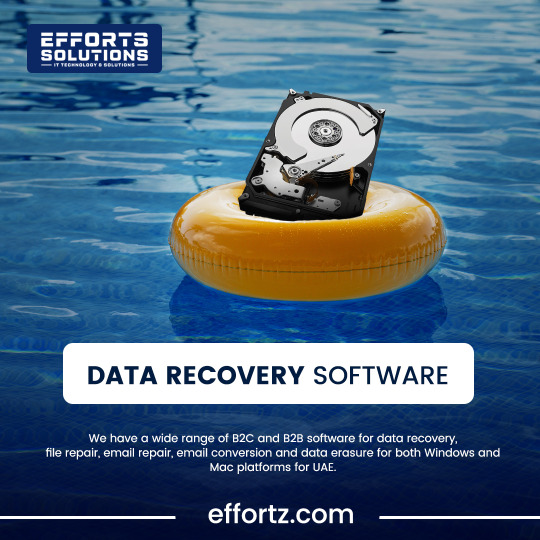
Everyone can experience data loss, whether they are a customer or a corporation. Do you worry about losing data?
Use our data recovery programme instead! You may feel secure knowing that your priceless data is always safe and recoverable thanks to cutting-edge features created exclusively for enterprises and consumers…
The applications in our category of data recovery software effectively restore permanently lost or destroyed data, including documents, emails, photographs, audio files, etc.
Want to know more?
Visit: https://effortz.com/service/best-data-recovery-software/ and get all the required details.
0 notes