#fabricmart
Explore tagged Tumblr posts
Photo


Gifts for the Dressmaker: Fabric Mart
Since the holiday season is upon is, you may be thinking of gifts for the dressmaker. It is not always easy to buy them fabric unless you actually can go shopping with them. Usually, a dressmaker or tailor has a specific garment they have imagined and they are willing to allow it to remain imaginary until they can find just the right fabric. But it is easy to get them a gift certificate, so see if they have a favorite local fabric store.
I thought I would feature some of the on-line places I go shopping this week. Fabric Mart offers discount fabric of all kinds from the ridiculous to the sublime. I have found lovely wools, silks, and cottons here, as well as utilitarian fabrics like Polarfleece. But you need to sort through fabrics that are discounted precisely because they are odd prints, less appealing fibers, what have you. Really nice fabrics can come and go quickly as they don’t always get a large stock of them. So check New Arrivals, and use the categories and the filters to look for what you have in mind.
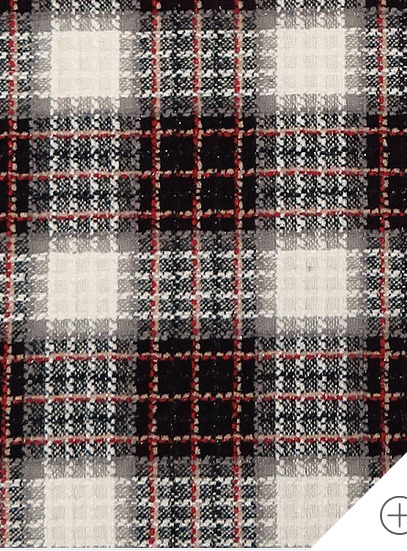
I give you here some things currently in stock: whimsical Liberty of London print in cotton, a silk scarf panel in a mosaic print, and a boucle plaid in a wool blend. Something for everyone, you could say.
For more info, go here: https://www.fabricmartfabrics.com/
Gift card info is at the bottom of the page off to the right. They also have a swatch club with special offerings, but I haven’t tried this one.
#giftsfordressmakers#giftsforsewers#giftsforsewists#giftsformakers#fashionfabric#fabricmart#fabricmartfabrics.com#sewing#dressmaking#tailoring#giftsfortailors#silkfabric#cottonfabric#libertyoflondon#woolfabric
8 notes
·
View notes
Text
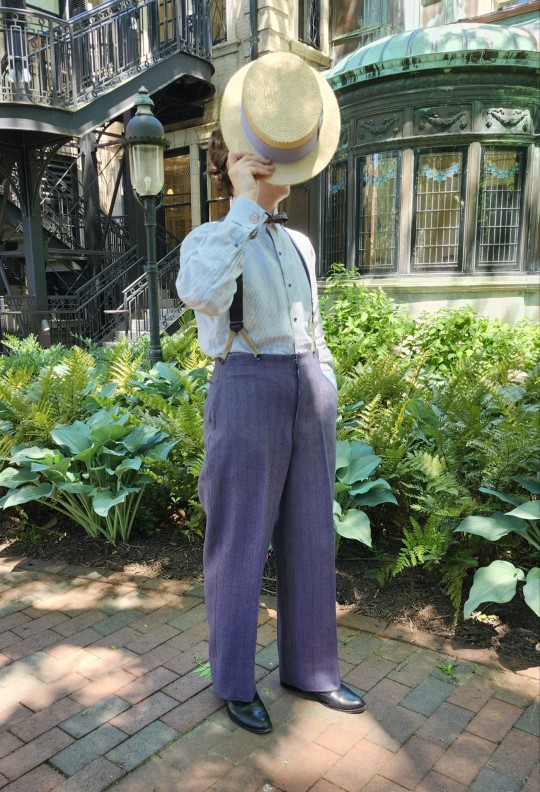
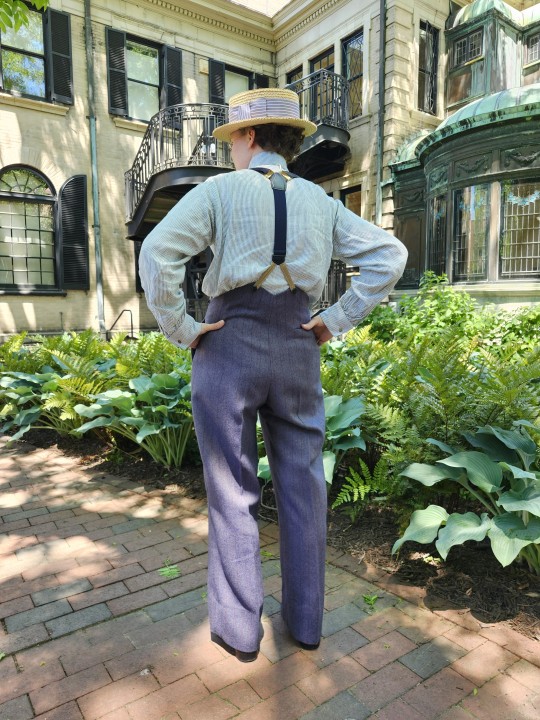
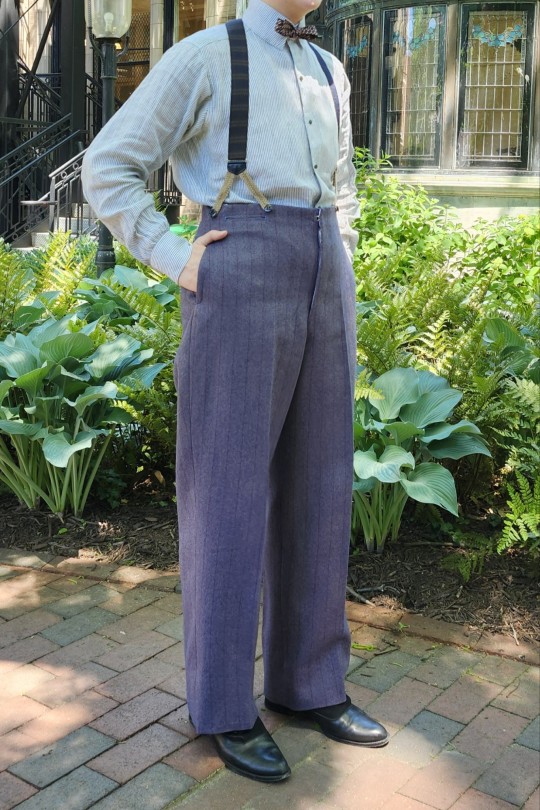
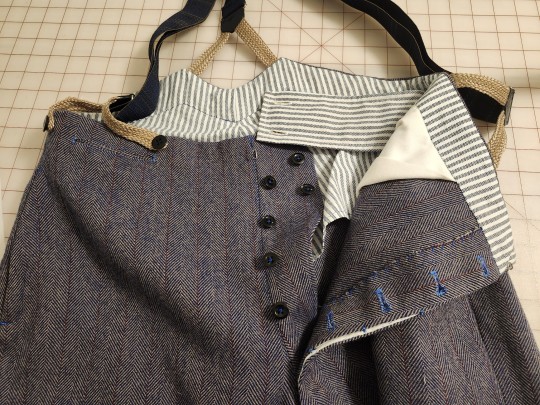
I've been meaning to post a picture of this shirt for a while, I made it almost a year ago. I just finished making the trousers as well. The shirt was copied from an original arrow shirt and collar I own. The trousers were drafted from an original 1890s manual online, and the construction methods were based on a pair of 1930s trousers I have to fill in the blanks. I replaced the hat band on my boater as well.
I got the fabric for both the shirt and trousers at Fabricmart. My buttons, cufflinks, other accessories/notions were gotten second hand or I already had them.
#vintage menswear#historical fashion#menswear#1890s#1910s#edwardian#victorian#victorian fashion#sewing#my post#I want to make a matching jacket for this at some point
159 notes
·
View notes
Text
FabricMart today (June 29, 2023) is doing 60% off everything and $1 standard shipping within the continental US
and I feel like some of you might be particularly interested in this

at $13.20/yard
8 notes
·
View notes
Text
Spring Jacket, Pants & Dress Shirt {For FabricMart}
Happy Thanksgiving! I’m on the FabricMart blog today, sharing a jacket I made for myself, and shirt and pants for my son! When I saw bright blue stretch twill in the Fabric Mart collection, I couldn’t resist the idea of making a jacket, even though I knew it probably wouldn’t get a whole lot of wear until next spring! My son is always in desperate need of pants too, so I bought another…
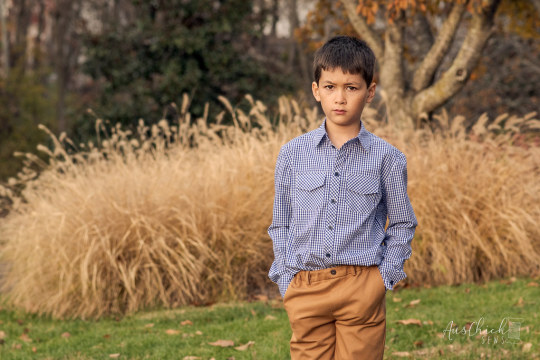
View On WordPress
0 notes
Text
Idk about buying linen garments in person, but I do know that you can sometimes find something on thredUp? Otherwise you could try and find a local store that carries linen fabric or try to order the fabric from places like FabricMart and make your own? (I set the fabricmart link to send directly to the linen search page, their website is a bit janky 😅) It's almost always a bit spendy with linen, but if you finish your seams right generally such garb will last a really long time. I also very strongly recommend prewashing your fabric at your typical wash settings if you go with making your own, as linen is a very hard wearing fiber, but it can shrink a lot in that 1st wash (which is why manufacturers never do it, since they get paid by the yard) don't forget to stitch (zigzag if you can) around the edges of your fabric before prewashing it, to keep the raw edges from fraying too much (the selvage is generally tight enough to escape unharmed, but I've seen some shitty, shitty fabric, so do what you will)
One last sewing tip for the road: Small Stitches disperse stress better, thus will preserve the integrity of your fabric better, which extends the life of the garment. Worth the time in my opinion.
Does anyone know where I can buy linen or hemp clothing? Goodwill isn't a great option as my town isn't large enough for there to be a lot of options there
185 notes
·
View notes
Photo

If you Don't know How to buy the best quality online fabric material then you are coming a right places we are offering best fabric material online which is very comfortable rate.
0 notes
Text
So while I was waiting on fabricmart to ship my fabric to work on the Migraine Sedai coat/possibly outfit, Bernadette Banner jumped in and did the whole dang thing
I’m not mad, but
okay I’m a little mad that now I’ll look like a copycat lmao
8 notes
·
View notes
Photo

SHE'S DONE! 108 days (2/21-6/8) 4 mockups 9 total yards of fabric (all layers & versions) 158 metal eyelets 34 stitched over metal eyelets 1 busk Countless pin and needle pricks And she was so worth it! As soon as my lacing ribbon arrives Friday, I can put her on and take pictures. Then I can finally start on the outer layers of my new 18th Century project! Pattern: Redthreaded Binding: @pennyrivercostumes Fabric: @fabricmart #historicalsewing #historicalcostuming #18thcentury #stays (at La Grande, Oregon) https://www.instagram.com/p/CBSASJ_A6Ck/?igshid=1vi45ji9j0klf
1 note
·
View note
Text
😁 That fabric showed up on FabricMart for $3.99 a yard because it had flaws. I am very picky about sequin fabrics, and this one checked most of the boxes for what I want, so I splurged and bought 5 yards of it

It looks so good on Phaedra,and the skirt you're making is fabulous


Andrea mail part 3! (See I'm on top of things today). Not as much of a preamble necessary for this one, so let's just get into it. This is the second of two jumpers @dollsahoy sent me, and I want you to look at it, REALLY look at it, and marvel at her sewing skills. At first glance it may just look like a normal doll shirt, but I'm telling you I was floored by just how GOOD the finishing is on this piece. At this scale. I just...well, let's just say I know I would never be able to produce a doll garment that looks this professionally made at my current sewing skill level XD Like when I first took it out of the package it took me a moment to process that this was something she made and not a factory piece. And with sequined fabric!!! Trust in my lowkey crafting trauma from past experience with similar fabric when I tell you this is an accomplishment.
ANYWAY, my incoherent gushing aside, as you can see this piece went to Phaedra. I started crocheting this skirt for her to wear over her stock bathing suit several months ago, but I'm so happy to have such a stunning top to pair with it instead! It's actually got me motivated to finish up the last few rows of the skirt sometime this week.
25 notes
·
View notes
Photo

My fabric has finally arrived! Items pictured are from @fabricmart #letssew #cotton #fabriccollector #retailtherapy #newproject https://www.instagram.com/p/CKxh76el4Ek/?igshid=14pnvc74cuamx
0 notes
Photo


Can a Pocket Be Luxurious? or Pocket Parity; Vogue 1939 in Red and Black
My aim in winter trousers was to make something warm, easy to wear, and practical, while being attractive, of course. I took a wool blend novelty weave, a dark red and black which creates tiny vertical stripes on one side of the weave. In a previous post, you saw my muslin test, made in a fabric nice enough to make a wearable garment if it turned out well, which it did. This is a Calvin Klein pattern from 1997 with two kinds of pants. One fitted at the hips and one cut as pleated trousers. I wanted the comfort of the trousers. But both would have been worn by working women as by the 1990s the pants suit was fully accepted on women.
I tweaked the fit along the way, waist and hips, including shortening the crotch length a full inch in total, and shortened the inseam an inch too. Apparently, I am stubbier than Vogue Patterns imagines a woman will be. I shifted the side zipper opening to the back and added a rayon lining as well. Which has made for a nice pair of trousers which fit perfectly. But the final touch was lengthening the pocket lining, which were a decent size to begin with, by a full inch. Now, they feel positively luxurious.
Too often women’s pants in ready-to-wear have no pockets because they are skin-tight and nothing would fit in a pocket, or they have pockets and are still skin-tight and nothing will fit in them which makes you wonder why they put them on in the first place, or they are sad, puny things that won’t fit much of anything as the pocket linings are so short. Men have it better when it comes to pockets. Yes, pocket parity, that is what I sought.
In fact, I stared hard at my husband’s summer shorts one day and realized their side-front pockets were exactly what I wanted. This pattern has side-front pockets and full legs, which I why I chose it, but I wanted pockets big enough for a pair of gloves or a hat. These trousers are part of a country suit to wear while vacationing up north when we will pop in and out of doors as we go.
Yes, there was a time when what one wore in the country was more casual, often made of wool tweeds that showed dirt less, than what one wore in the city. But then suburbia came along and blurred the lines in the 1950s, and then the 1960s came along and the Baby Boomers objected to all dress rules including the practical ones. I like stick to the older rules of place and occasion partly because of the practicality and partly because the clothes reflect my tasks and my mind. When I am relaxing on vacation, one of the pleasures is wearing my vacation clothes. They help free my mind of all thoughts of work.
The fabric was from Fabric Mart which has a wide range of ever-changing offerings. The tiny vertical stripes on one side turn into tiny horizontal stripes on the other. As I will be making a jacket to match, I am already pondering if I will play with the two sides of the fabric. Stay tuned.
You can find Fabric Mart here: https://www.fabricmartfabrics.com/
#sewing#tailoring#dressmaking#vogue patterns#sewing patterns#1990s fashion#Calvin Klein#making#makers#pocket parity#Fabricmart#woolens#trousers#womens suits#womens fashion#country fashion#country suit#1950s fashion#1960s fashions#dress rules#fashion rules
11 notes
·
View notes
Text


Leopard waistcoat I was able to make before getting busy again, fabric from Fabricmart and cravat from Burnely and Trowbridge. It was drafted from the same pattern as my pink waistcoat but closer to the actual draft.
#felt appropriate for miwackulous tye monday#historical fashion#1820s’ men’s fashion#menswear#regency fashion#sewing#my post
85 notes
·
View notes
Text
Cosigning all of this. If you’re looking for cheap fabric and your thrift store/local freecycle aren’t producing, FabricMart and Denver Fabrics Fashion Fabric Club frequently have $2/yd fabrics and other discounts. If you’re in the Boston area, Sewfisticated has stuff at phenomenal prices.
Please, I implore you, do not be intimidated by sewing.
If you try to make a thing and it turns out bad then it’s ok, you learned stuff by doing that. I see so many people say they want to sew stuff but are scared of screwing up, but it’s nothing to be afraid of!! Find some cheap thrift store fabric or secondhand clothes to cut up if you’re worried about wasting costly materials, but please just try sewing the things you want to!
7K notes
·
View notes
Text

behold this sequin fabric I got from FabricMart--purple! 100% cotton knit base fabric! $3.99/yard!...because it has flaws
(fabric examination and enthusiasm under the cut)
It looks like the sequin-sewing machine got misaligned for a section, for the entire length of the yardage, so that two sets of two rows of sequins, 6" apart, meander slightly--sometimes there's an extra wide space between the rows, sometimes they touch, sometimes they overlap

The irregular rows are visible in this image, and they're basically "not too obvious from a respectable distance," and the fabric is 60" wide with about 54" of sequin coverage, so there's enough width to work around the really obvious problem areas.
There are some areas of lint trapped under the sequins, but, so far, those that I've found and messed with have had the lint come out easily.
There's a section where Something Happened and the sequin stitching is missing about 4½" of sequins in one row and 6" in another, with a few more missing and loose threads between, but that's near a selvedge and close to one cut end, so will also be really easy to work around.
And then there's this, which I suspect is part of the process of maintaining the stitching so the next reel of sequins can be loaded without having to deal with any mid-row back-stitching weirdness. I am delighted to have this section, across the full width of the sequins, to work with.

The sequin mill end fabric precut I found in Wamart earlier this year (I'm still shocked) has the same thing (different shape) on one end

and I hope I can find a way to use that, too.
Shipping bumped the price up to averaging $6/yard, which is still an incredible price for sequins. Of course, FabricMart did a day of significantly lower shipping after my order had shipped. It's fine. I didn't want to risk the sequin fabric selling out while I would have potentially been waiting and hoping for a shipping price sale. I have a list of criteria for what I want in a sequin fabric, and the few requirements this purple fabric doesn't meet are made up for by having a cotton base.
I have several ideas for things to make for people from the purple sequin fabric, and the sequins are small enough to work for doll clothes.
(I have an idea for the pink sequins, too, but I don't have as much of that and the overall sequined width is narrower, so I'm still trying to figure out the best pattern to use, because I won't have a chance for do-overs.)
12 notes
·
View notes
Text
Spring into 2023 with Liberty of London {for FabricMart}
I’m excited to be a FabricMart Fabricista again this year, and I couldn’t resist sewing a second project with Liberty of London Tana Lawn! This fabric is so luxurious and wonderful to work with, I just can’t pass it up whenever I see it come on sale! With such a high thread count, Liberty of London doesn’t easily crush, and although it’s 100% cotton, it’s so flowy that it’s perfect for billowy…

View On WordPress
#dress#fabric mart fabrics#featured#knit patterns#liberty of london#peony patterns#sewing#skirt#tops#woven patterns
1 note
·
View note
Photo


The Last Jedi Rey Vest Tutorial
Alright guys! I’m going to do this tutorial a little bit different from other times. Instead of giving a picture of the pattern, I’m going to be putting the different pieces in throughout the process. Here is what I started with so you can get an idea of what piece is for what, but honestly I changed it a lot throughout making it. You’ll understand why

First here are the materials:
2 yards grey herringbone fabric, Grey Thread, batting or stuffing

My fabric is a little darker and has some metallic yarn in it. I got it for 3 dollars a yard at fabricmart and honestly as a broke college student that is a really nice deal and I knew this was not going to be made into a full-fledged cosplay.
1. First things first. We are going to be making what will turn out to be a&b in my sketch. I honestly was not sure how to go about this so I started with boxy patterns and refined it as I went. Now you are gonna need four of these pieces (2 mirrored). Figure out your measurements too in a small sketch.


How to figure out the arm hole

2. I decided to combine a&b into one big piece then add the seam in after. Here is how to do that. I always use chalk when working with patterns because it is always easy to come off. That works to our advantage here. Using the photos for reference, figure out where your seam is going to go. Make sure there is a lot of chalk because then you are going to match it up with the other three pieces and transfer the line to make them all symmetrical pieces. If your fabric is not double sided please understand which side is facing out. This Jacket is going to have an inside piece so anything that is going to be shown you want to make sure there is no seams being shown. Pin and sew. Be sure to only sew about a ¼ inch from the edge.


3. OKAY the Back Piece. I tried my best to not have the seam going down the center but the way I sewed it, there was no possible way I could have left it out. I also decided to only have one back piece instead of two just out of choice. So Instead of making a duplicate, you just need one. Look at the progression of the photos to help you out. Mostly, its just a lot of fitting to get the pattern the exact way you want it. The fit is very important in this vest because the shape of it is what originally caught my eye while watching the movie. Pin the two front pieces to the back and start figuring out how much needs to be taken in where. Use the front pieces to figure out where to chalk the same extra pattern piece. In the back and left/right seams in the back, you gotta utilize these to get shape. Hopefully the photos help. NOTE: I extended the middle back seam all the way down. I realize That is not pictured.


4. Okay some minor fixes to the front. I took the extra seams we made in the front in a little bit at the bottom to give it some extra shape. Also, look at the front and cut to what you need for the collar. To make it more true to the original I later adjusted the shape of my front from what is shown in the photo.


5. Okay so now we are going to put the inside and the outside together separately. When you sew the collar together, fit it to your neck. That would mean sewing the collar together at an angle. Once done to both, pin and sew the whole outside of the pieces. MAKE SURE THE GOOD SIDES ARE FACING TOGETHER AND THE UGLY SEAMS ARE FACING OUT.


6. Okay now attach the back! Make sure the collar and back are the same length so they can fit together nicely. OKAY NOW TAKE A LOOK AT THE PHOTO. I DID SOMETHING VERY FATALLY WRONG AND I HAD TO UNSTITCH AND RESEW BECAUSE mistakes were indeed made. The back is showing the good side facing out when either all the seams should be facing out or all of the good side. Please pay attention to what you are doing.

7. Alright time for the bottom half! The bottom half is also shaped very nicely. This is pieces c&d. Measure the front and back of the top half where the bottom is going to be attached. You want the seams to line up so keep in mind the fact that you have to make seams which will make the fabric a little shorter. I made d first then used the sides of that to give me the length of the one side for c. This will also be double lined so double everything. Sew the three pieces together, then do so again. Sew the two full bottoms together like a pillow but leave the top open. IRON!! IRON EVERY SEAM MADE. This is very important and will make EVERYTHING EASIER!!


how to get both sides symmetrical.


Use edge to get edge for c piece


8. Alright. Now all seams from the top of the vest that have exposed ends, you need to finish them off to prevent fraying. I used zig zag stitches here because they were not shown. In the future stitches I’m going to be using what’s called a blanket stitch. I’ll explain that later. Once you have all the loose ends stitched, sew the bottom half on. It is very important that everything lines up. Take careful notice to that.

9. Okay now that everything is basically put together except for the shoulders, use the blanket stitch all the way around including the bottom. This is what the stitch looks like. I put the size of the stitch up to as big as it can get on my machine.


(What the stitching and Rey’s actual fabric looks like)
10. Okay Now onto the shoulders. I ended up making three and picking the best two because these were some-what difficult. To get the size of the half circle, measure from your neck to how far out you want the shoulders to go. Double that and you have your diameter. My diameter was 11 inches with a 5 ½ inch radius. Sew like a pillow, meaning leave one edge open. To apply stuffing or batting. If using batting, cut the shape of the half circle and add it in. If you use stuffing, its going to be a little more difficult. This is what I used and you have to make sure it is even everywhere and do not make it too thick. Once the filling is in, fold in the hole and sew all the way around the piece. Now add lines as guides for you to sew. Take your time. It will be a little frustrating to get it all even.


11. Okay now jump back to the main form. Pin the shoulder pieces and determine how much of the shoulder you can remove underneath. Now that the arm hole is cut to size and still has raw ends, apply a zig zag stitch all the way around then fold under and secure with the blanket stitch as the bottom half of the hole will be visible. PLEASE make sure that the arm hole is big enough to be comfortable. These were always my down fall and before I did this I made my arm holes bigger. Okay now pin and sew the shoulder piece on making sure to sew on top of the seam that is already on the shoulder pad.


12. Alright. Cut any Loose thread and admire your handiwork


If you have any questions, feel free to ask. : )
#rey#the last jedi#tutorial#cosplay#cosplay tutorial#rey vest#rey vest tutorial#my tutorials#fun fact I listened to my weeb playlist basically the whole time haha#its interesting how that never gets old for me yet I can hardly stand to listen to my other music#star wars#star wars cosplay#star wars cosplay tutorial#Took a lot of photos this time#youre welcome#though I hope its not too long then#yikes. sorry everybody on mobile
176 notes
·
View notes