#esp32 wrover module
Explore tagged Tumblr posts
Link
For sale: ESP32-WROVER-B wireless module, perfect for IoT applications. This powerful Wi-Fi module is designed to enable secure, low-power connectivity for a variety of devices, making it an ideal choice for smart home automation, industrial control, and other wireless applications. With its dual-core processor and integrated Wi-Fi and Bluetooth capabilities, the ESP32-WROVER-B delivers reliable, high-speed wireless connectivity in a compact form factor. Whether you're a hobbyist or a professional developer, this versatile wireless module is sure to meet your needs. Don't miss out on this opportunity to add the ESP32-WROVER-B to your project today! Visit Campus Component https://www.campuscomponent.com/products/esp32-wroover-4mb/2208614000001840948
0 notes
Text
ESP32-CAM WROVER E
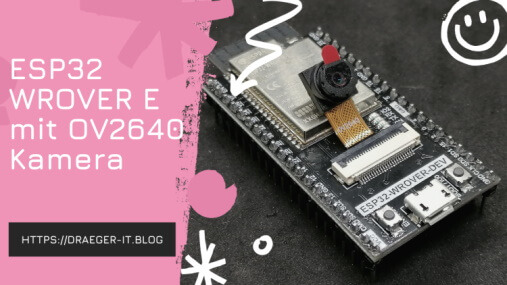
In diesem Beitrag möchte ich dir eine weitere ESP32-CAM vorstellen und zeigen, wie du diese programmierst.

Eine ESP32-CAM habe ich dir bereits im Beitrag Einrichten der ESP32-CAM und erster betrieb vorgestellt und auch gezeigt, wie du diese in der Arduino IDE programmierst.


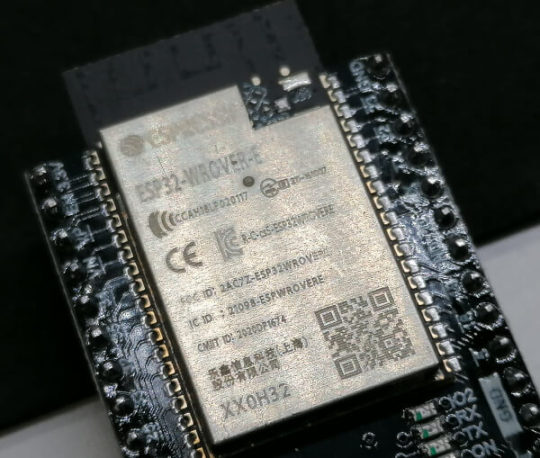
Bezug der ESP32-CAM WROVER DEV
Die mir vorliegende ESP32-CAM habe ich recht günstig über aliexpress.com für knapp 7 € zzgl. Versandkosten erstanden. Du findest die coole ESP32-CAM auch auf amazon.de für knapp 35 € als Set mit diversen Sensoren / Aktoren. Lieferumfang Zum Lieferumfang der ESP32-CAM gehört neben dem Mikrocontroller noch ein kleine 66° Kameralinse vom Typ OV2640.

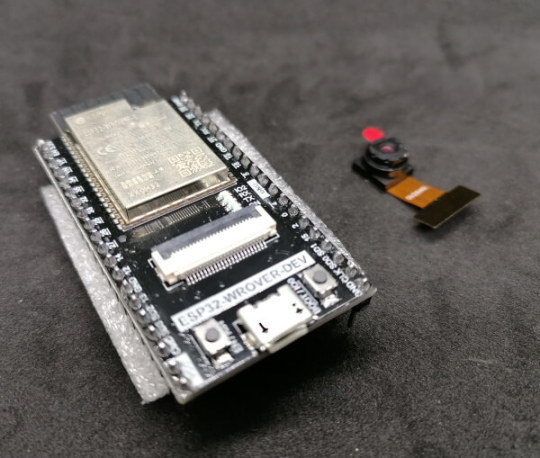
Anschluss der ESP32-CAM
Der Anschluss an den Computer erfolgt über eine Micro-USB Schnittstelle. In meinem Fall war kein passendes Kabel dabei (jedoch im verlinkten Amazon Produkt ist es enthalten). Im Geräte-Manager von Microsoft Windows 10 wird der Mikrocontroller als "USB-SERIAL CH340" angezeigt.

Geräte-Manager von Windows 10 mit angeschlossener ESP32-CAM Während des Betriebs der ESP32-CAM leuchtet eine kleine grüne SMD LED.
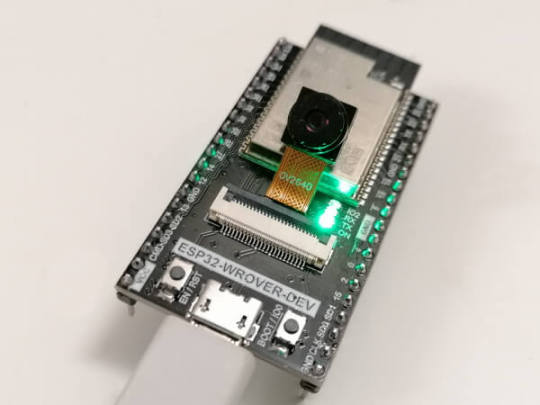
Technische Daten des ESP32 WROVER E
Hier nun ein kleiner Auszug aus den technischen Daten des ESP32 WROVER E. MicrochipESP32-D0WD-V3 Xtensa 32bit LX6Taktgeschwindigkeit240 MHzROM448 KBSRAM520 KBSRAM (in RTC)8 KBPSRAM8 MBSPI flash4 MBWiFiProtokolle - 802.11 b/g/n (802.11n bis zu 150 Mbps)Frequenzbereich - 2412 ~ 2484 MHzBluetoothProtokolle - Bluetooth v4.2 BR/EDR und Bluetooth LE (Low Energy)FeaturesUART, SPI, I²C, LED, PWM, Motor PWM, I²S, IR, Puls Counter, GPIO, kapazitiver Touch Sensor, ADC, DAC, TWAI (Two-Wire Automotive Interface), kompatibel mit ISO11898-1 (CAN-Bus Spezifikation 2.0)Hall SensorSpannungsaufnahme3.0 V ~ 3.6 VStromaufnahme500 mABetriebstemperatur-40 °C ~ 85 °C Im englischen Dokument ESP32WROVERE Datasheet findest du eine ausführliche Liste mit den technischen Daten zum ESP32 WROVER E.
Programmieren in der Arduino IDE
Das ESP32-CAM Beispiel aus der ESP32 Bibliothek beinhaltet eigentlich auch die Konfiguration für das vorliegende Modell, jedoch ist das Kompilat 10 % größer als der verfügbare Speicher des ESP32. text section exceeds available space in boardDer Sketch verwendet 1431461 Bytes (109%) des Programmspeicherplatzes. Das Maximum sind 1310720 Bytes. Globale Variablen verwenden 65344 Bytes (19%) des dynamischen Speichers, 262336 Bytes für lokale Variablen verbleiben. Das Maximum sind 327680 Bytes. Sketch too big; see https://support.arduino.cc/hc/en-us/articles/360013825179 for tips on reducing it. Fehler beim Kompilieren für das Board ESP32 Wrover Module. Auf der Seite https://freenove.com/fnk0060/ findest du eine ZIP-Datei mit allem, was du benötigst, um den ESP32 CAM vom Typ WROVER E zu programmieren und unter anderem ist dort auch eine komprimierte Version enthalten. Zum einen hat der vorliegende Mikrocontroller kein SD-Karten Slot und somit benötigen wir diese Konfiguration inkl. Bibliothek nicht.
Webinterface
Bevor du das Beispiel aus dem Ordner "Freenove_ESP32_WROVER_Board-mainCSketchesSketch_05.1_CameraWebServerSketch_05.1_CameraWebServer.ino" auf den ESP32 speicherst musst du lediglich die SSID & das Passwort von deinem WiFi Netzwerk eintragen. const char *ssid_Router = "********"; //input your wifi name const char *password_Router = "********"; //input your wifi passwords Während des Uploads musst, du, wenn die Ausgabe mit den vielen Punkten erscheint die Taste "EN/RST" betätigen und der Upload wird ausgeführt. Nachdem erfolgreichen Upload kannst du im seriellen Monitor der Arduino IDE die IP-Adresse des Mikrocontrollers ablesen. Über diese IP-Adresse kannst du das Webinterface erreichen und einen Stream deiner ESP32-CAM betrachten und auch Bilder speichern.

Webinterface der neuen ESP32-CAM von 2022
Vergleich mit dem Vorgängermodell
Wie bereits erwähnt habe ich dem Vorgängermodell bereits einige Beiträge gewidmet und auch gezeigt, wie du die Bilder / den Videostream per Python abgreifst und speichern kannst. Da das neue Modell sehr ähnlich funktioniert, kannst du die Beiträge auf den Mikrocontroller adaptieren.
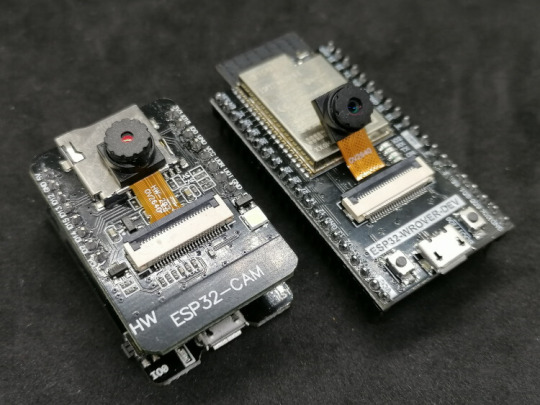
ESP32-CAM Modelle Was zunächst auffällt ist, das die neue ESP32-CAM ohne SD-Card Slot und LED Blitz daherkommt, jedoch bietet diese deutlich mehr GPIO Pins und somit kann man diese recht einfach nachrüsten. Zusätzlich bietet die neue ESP32-CAM vom Typ WROVER E einen onboard FTDI Chip CH340 welcher durch die vorhandene Micro-USB Buchse ohne ein zusätzliches, externes FTDI Modul t die Programmierung ermöglicht. Beim Vorgängermodell wurde dieses mit einem speziellen Board gelöst, auf welches der Mikrocontroller gesteckt wurde.
Vergleich der technischen Daten
Hier ein kleiner Vergleich der technischen Daten der beiden Mikrocontroller. ESP32-CAMESP32 WROVER E CAMMicrochip32Bit Dual Core CPU ESP32-D0WD-V3 Xtensa 32bit LX6Taktgeschwindigkeit240 MHz240 MHzPSRAM4 MB8 MBSPI flash4 MB4 MBWiFi802.11 b/g/n/e/i802.11 b/g/n (802.11n bis zu 150 Mbps)BluetoothBluetooth v4.2 BR/EDR und Bluetooth LE (Low Energy)Bluetooth v4.2 BR/EDR und Bluetooth LE (Low Energy)FeaturesUART, SPI, PWM, GPIO, kapazitiver Touch Sensor, ADC & DACUART, SPI, I²C, LED, PWM, Motor PWM, I²S, IR, Puls Counter, GPIO, kapazitiver Touch Sensor, ADC, DAC, TWAI (Two-Wire Automotive Interface), kompatibel mit ISO11898-1 (CAN-Bus Spezifikation 2.0)Auszug aus den technischen Daten der ESP32-CAMs Read the full article
0 notes
Text
ESP32-WROVER-B/ESP32 WROVER-IB 2.4G WiFi Bluetooth module SPI wireless Espressif 4MB Flash ESP32-WROVER-B/ESP32-WROVER-IB
ESP32-WROVER-B/ESP32 WROVER-IB 2.4G WiFi Bluetooth module SPI wireless Espressif 4MB Flash ESP32-WROVER-B/ESP32-WROVER-IB

ESP32-WROVER-B/ESP32 WROVER-IB 2.4G WiFi Bluetooth module SPI wireless Espressif 4MB Flash ESP32-WROVER-B/ESP32-WROVER-IB
Price
5.57 Catch me HERE
0 notes
Text
ESP32-WROVER-B/ESP32 WROVER-IB 2.4G WiFi Bluetooth module SPI wireless Espressif 4MB Flash ESP32-WROVER-B/ESP32-WROVER-IB
ESP32-WROVER-B/ESP32 WROVER-IB 2.4G WiFi Bluetooth module SPI wireless Espressif 4MB Flash ESP32-WROVER-B/ESP32-WROVER-IB

lastest_volume
0
Just For Today
Click Here To Visit The Shop
N€W ESP32-WROVER-B/ESP32 WROVER-IB 2.4G WiFi Bluetooth module SPI wireless Espressif 4MB Flash ESP32-WROVER-B/ESP32-WROVER-IB
0 notes
Text
LILYGO® TTGO T-Camera ESP32 WROVER & PSRAM Camera Module Data Cable
LILYGO® TTGO T-Camera ESP32 WROVER & PSRAM Camera Module Data Cable

LILYGO® TTGO T-Camera ESP32 WROVER & PSRAM Camera Module Data Cable
Price
1 Catch me HERE
0 notes
Text
Tree moisture meters
I had an interesting time last week attending the 4th Trees, People and the Built Environment (TPBE4) conference run by the Chartered Foresters. Some interesting sessions and worthy sentiments but I didnt get any sense of urgency.
A couple of the sessions addressed the use of technology in the urban forest. For example Nadina Galle talked about the Internet of Nature and the application of Smart City thinking, a city-wide network of sensors using AI to make better decisions about deployment of resources. GreenCityWatch have developed tools to create an inventory of urban trees using commercial high-resolution imagery and some open-source image analysis tools. Treemania aims to provide a network of moisture sensors to alert council staff to the need to water newly planted trees.
I have a love-hate relationship with these ideas. On the one hand they too often seem like expensive, irrelevant and authoritarian structures, all bright and shiny to lure unsuspected city councils desparate to show they are doing something towards the climate emergency. On the other hand, I’m a bit of a geek and love the idea of sensors to bring the life of trees to wider notice. Moisture sensors also fit well with a planned platform to assist citizens to look after new trees, in particular 590 trees being planted in deprived areas of Bristol, part-funded by the Urban Tree Challenge Fund.
Treemania’s sensor seemed from the pictures to use a common capacitive moisture sensor. I thought a remote sensor could be based on a board I’ve planned to use on the boat for remote sensing of water level and battery state. I’ve also been looking at it as a basis for a remote dendrometer. The board is an ESP32 with integrated GSM module, costing £15 or less. GSM (2G) is expected to continue to be supported in the UK through to 2025. Rui Santos has a great tutorial on using this board with Arduino code for just such a project. A capacitive soil moisture sensor costs a few quid, a temperature sensor likewise. The board has an integrated socket and charger for a 3.7v LiPo battery. In use the sensor will only need to report at a very low frequency - maybe only a few times a day, and with the ESP deep sleep mode the device should run unattended for a month or more. Soak testing is underway.
Acquiring a suitable SIM is challenging. Although mobile internet on a pay-monthly contract is down to £1 a Gb, minimum payment is around £10 a month. Given that only a Kb or so is used for a single HTTP GET to transmit the data, the device needs only a few Mbs a month. I found a couple of companies specialising in IoT connectivity. The cheapest is ThingsMobile, based in Milan and the cost is more like £10 per annum. Even here, the cost per Mb is 100s of times more expensive than your regular Pay monthly sim. It took ages to arrive but works fine and at E0.12 / Mb is pretty good.
So the bill of materials is:
TTGO T-Call ESP32 SIM800L board
Capacitive Moisture Sensor
DS18B20 Waterproof Digital sensor
3.7v LiPo
waterproof container
Overall cost for the components should be under £40.
Wiring is straightforward: The moisture meter needs 3.3v power and an A2D pin (ADC0) ; the thermometer is a one-wire interface needed a digital I/O pin (Pin25) with a 4K7 pull-up resistor. Rui also has a great tutorial on interfacing this sensor. I got stuck for a while on this, not realising which GPIO pins supported I/O. Accurate pin-out diagrams and the datasheet for the right variant of board are essential. A small auxiliary veroboard wired directly to the ESP32 board handles these connections. The ESP32 board is supplied with a simple aerial which worked fine. A better quality aerial costs a few quid.
This is the current lashup

Rough sketch of wiring: R is 4K7
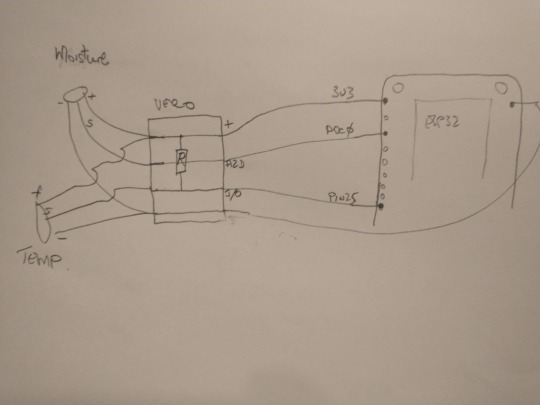
The Arduino script hard-codes the GPRS parameters, the HTTP parameters to use GET to send the data to the server and the sleep interval. This code is on GitHub
Periodic readings are sent to my server where they are logged and graphed and from where alerts can be generated. A test harness only at present so nothing worth sharing yet.
Summary
The prototype is working. The moisture sensor needs good waterproofing and seems a bit sensitive to placement. The power draw of the GSM is quite high high during transmission. I’m also running a WiFi version and of course its power draw is much less. It would be nice if the Bristol LoRaWAN network was up and running but that seems to have gone very quiet.
The main problem is with power. This board includes a (very small) JST connector for a LiPo and a charger, For a while it switched happily from USB power to battery and back without manual intervention. LiPos are small and expensive however and I’m currenly experimenting with 18650 batteries which offer better storage/£ .
References
T-Call pinout
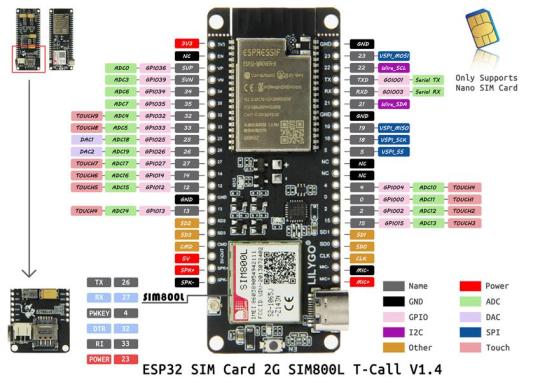
ESP32-WROVER datasheet
TTGO T-Call on GitHub
1 note
·
View note
Text
ESP-WROVER-KIT-Vb
Internet technology is progressing at a fast rate in the modern era. More innovations in this domain are expected to advanced the feature of IoT devices. Discussions surrounding the internet reveal that it is a connection between different computing devices to receive, analyze and share the data. Most of the time desired results are unachievable but, researchers aim to find a balanced approach. ESP-Wrover-Kit is an innovative device the allows this to occur. What are the functionalities of ESP-Wrover-Kit? A development board, the ESP-Wrover-Kit is built around the ESP32, compatible with multiple modules. This kit provides several functions on a single board. The ESP32 is low cost and low power on-chip microcontroller with features such as Bluetooth and Wi-Fi. The ESP-Wrover-Kit allows users to debug the ESP32 module and build a connection between the JTAG and ESP32 via a multi-protocol USB interface. A single kit utilizes connections between the different modules such as a camera, SD card, LCD, I/O expansion connectors and, LED. What are the features of the upgraded ESP-Wrover-KIT? The Esp-Wrover-Kit-VB is the latest version of the ESP-Wrover kits launched by Espressif.

The current version is considered an ultra-low-power board. There is an 8 Mbytes expansion of PSRAM. Moreover, the onboard Micro-SD card interface is also considered as one of the major advanced features due to its high speed. Input and output expansion capabilities are also enhanced in the latest version making the overall product more versatile, fast, and smart. Why ESP-Wrover-Kit is required? Such development boards are required to make convenient secondary development and are hugely cost-effective. Researchers usually need a prototype to test their algorithms and smart applications. For example for a smart pollution measurement system requirement would be; high computation speed, ESP32, and a display unit. ESP-Wrover-Kit-VB can fulfill the requirements on a single board this is due to its camera feature. Some other applications that require ESP32 modules and Wi-Fi connectivity are: · Smart surveillance · Teat measurement systems · Testing Security · Indoor positioning systems · Heart rate monitoring systems · Position regulation · Image recognition In a nutshell, as the industry continues to develop further innovative research ideas, the requirement for additional testing is equally heightened. The ESP-Wrover-Kit-VB provides advanced attainable innovation within the IoT domain aiding with both speed and accuracy required within precise solutions.
0 notes
Photo
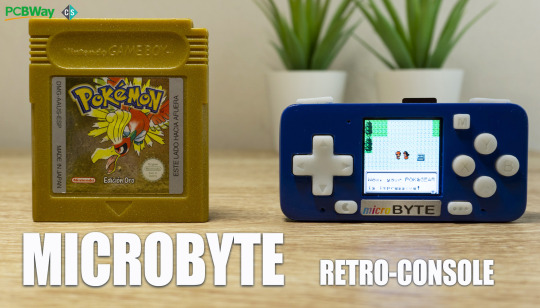


MicroByte
#CrowdSupply What is MicroByte?MicroByte is a hand-held, open-source retro-console, which can execute games from NES, GameBoy, GameBoy Color, Game Gear, and Sega Master System. It owns a powerful battery life of up to 6/7 hours with a colorful, high pixel density 1.3" IPS screen.MicroByte is controlled by an ESP32-WROVER E microcontroller module. And it is fully compatible with Arduino IDE.It maybe the tiniest hand-held console you have ever seen -- The entire console measures just 78 x 17 x 40 mm (3.07 x 0.67 x 1.57 inches). It seems a great choice to bring it when you are going out.
-
-Learn more: http://bit.ly/3c8pyrB -
0 notes
Link
0 notes
Link
Looking for a good deal on esp32 wrover module? According to Espressif, the ESP-WROVER-32 is a powerful, generic WiFi-BT-BLE MCU module that targets a wide variety of applications ranging from low-power sensor networks. Explore a wide range of the best esp32 wrover module on Campus Componentto find one that suits you! Visit https://www.campuscomponent.com/products/esp32-wroom-32d-4mb-wi-443-d/2208614000001840752
0 notes
Photo

Top Frameworks and Topics to Learn in 2019, Electron 4.0, and AVA 1.0
#418 — January 4, 2019
Read on the Web
JavaScript Weekly
RunJS: A JavaScript 'Scratchpad' Tool for macOS — Write and run JavaScript instantly. Useful for learning, experimenting, or perhaps even creating screencasts, tweets, or similar educational content.
Luke Haas
FBT: An Internationalization Framework from Facebook — Facebook has open sourced an internationalization framework that they’ve used internally till now. The goal is to be ‘both powerful and intuitive’. GitHub repo. Or see example usage code.
Facebook
Top JavaScript Frameworks and Topics to Learn in 2019 — We see a lot of ‘top X’ posts when editing JavaScript Weekly but this annual review of the JavaScript tech ecosystem by none other than Eric Elliott is always a crowd pleaser.
Eric Elliott
Make Magic with Creative Coding in Canvas & WebGL 🎩✨ — Use JavaScript to create generative art, interactive animations, 3D graphics with ThreeJS, and custom shaders in GLSL. ✨You'll learn the fundamentals for creative coding jobs like games, advertising, AR/VR and installation artwork!
Frontend Masters sponsor
Electron 4.0 Released — Electron is a popular project from GitHub that’s heavily used to create desktop apps with modern Web technologies. 4.0 introduces some new features but notably bumps up the underlying dependencies to Chromium 69, Node 10.11, and V8 6.9.
Michelle Tilley
Artificial Intelligence in JS with TensorFlow.js — A brief, high level explanation of one of the problems a system like TensorFlow.js can solve: the recognition of written numbers. (Note: This is one of the always great JavaScript January series that runs each year.)
Seth Juarez
What Happened with Node.js in 2018 — This week’s Node Weekly was dedicated to a month by month runthrough of the biggest things that happened in the world of Node.js. We also did a best frontend links of 2018 in Frontend Focus.
Node Weekly
💻 Jobs
JavaScript Developer at X-Team (Remote) — Join the most energizing community for developers. Work from anywhere with the world's leading brands.
X-Team
Find A Job Through Vettery — Vettery matches top tech talent with growing companies. Create your profile to get started.
Vettery
📘 Tutorials and Opinions
Fancy Function Parameters — The process behind making an opaque function call easier to understand using objects and optional arguments.
Jake Dohm
Creating and Filling Arrays of Arbitrary Lengths in JavaScript
Dr. Axel Rauschmayer
Creating a Reusable Accordion Component That Works Anywhere — How to make a web component using Angular Elements which can now be used with any or no framework.
Priyesh Patel
Read Now: the Ultimate Guide to Npm — Everything you need to know to know to use the npm CLI, from basic building blocks to time-saving tips and tricks.
NodeSource sponsor
Running Node.js 11 on AWS Lambda — With Lambda’s new Layers feature and custom runtimes you can now build your own custom artifacts, enabling you to share and manage common code between serverless functions.
Adnan Rahic
The Chronicles of JavaScript Objects — A back to basics tour of what objects are in JavaScript and how they behave.
Arfat Salman
Create Your First Custom Angular CLI Schematic with Nx — Nx is a toolkit for people building enterprise-grade Angular apps.
Sam Julien
Storing and Using the Last Known Route in Vue — How to keep a reference to the last known route a user visited in Vue. Also a good excuse to check out the all-new CSS Tricks redesign!
Mateusz Rybczonek
The Developer’s Guide to Not Losing the Metrics You Need
InfluxData sponsor
How Airbnb is Moving 10x Faster at Scale with GraphQL and Apollo
Adam Neary
Reluctant Gatekeeping: The Problem With 'Full Stack' — Thoughts I think a lot of us may have had but hadn’t put into words yet.
Heydon Pickering
🔧 Code and Tools
AVA 1.0: A Powerful Test Runner for Node — AVA is a test runner with a concise API, detailed error output, and process isolation that let you write tests more effectively. You may find the README more useful than these release notes if you aren’t familiar with it yet though.
Mark Wubben and Sindre Sorhus
Take the Pain Out of Acceptance Testing with Gauge by Thoughtworks
Gauge sponsor
Rollup.js 1.0: A Module Bundler for JavaScript
Low.js: A Node Port for Embedded Devices — Has far lower system requirements than standard Node and can now be flashed on to ESP32-WROVER boards. Here’s how.
neonious GmbH
string-similarity: Finds Degree of Similarity Between Two Strings — Uses the Sørensen–Dice coefficient which is better than Levenshtein distance for many use cases.
Akash K
Magic Grid: A Simple Library for Dynamic Grid Layouts — This has a slightly different use case than CSS Grids may be useful for as explained in this article
Emmanuel Olaojo
Brain.js: A Neural Network Library — If you’re looking for an excuse to play with neural networks, there’s an interactive 19 part course on using Brain.js to do just that.
Robert Plummer
🗓 Upcoming JavaScript Events
JS Kongress 2019 (March 11-12 in Munich, Germany)
VueConf US 2019 (March 25-27 in Tampa, FL) — Great speaker roster including Evan You (creator of Vue.js), Sarah Drasner and Gregg Pollack.
JSHeroes 2019 (April 11-12 in Romania) — Two days of conference talks and workshops.
JSConf EU (June 1-2 in Berlin, Germany) — Tickets that include diversity support are currently still available.
by via JavaScript Weekly http://bit.ly/2LRPDMb
0 notes
Text
Massgeschneidert für IoT Anwendungen
Massgeschneidert für IoT Anwendungen
Espressif’s ESP32 ist aus IoT Anwendungen kaum noch wegzudenken. Geringe Stromaufnahme, eine leistungsfähige CPU und WiFi- bzw. BLE-Connectivity sind der Schlüssel für den Erfolg in diesem Bereich.
Eine Vielzahl dieser Anwendungen setzt das ESP-WROOM-32x-Modul von Espressiff ein.
Die ESP32-WROVER Serie besticht durch einige Modifikationen der ESP32-WROOM-32x-Module, die unter anderem ein…
View On WordPress
0 notes
Text
Friday Product Post: No, I Am Your FPGA.
Today we are excited to bring you the new Arduino MKR Vidor 4000, which combines the benefits of the SAMD21 and an FPGA. We also have the Raspberry Shake Home Earthquake Monitor, two Neutis boards to help fill the hole in your heart from the Edison’s passing, and a few other new products to fill your cart!
youtube
Vidor… Darth Vidor!
added to your cart!
Arduino MKR Vidor 4000
In stock DEV-14870
The Arduino MKR Vidor 4000 is highly configurable and powerful, and it can perform high-speed digital audio and video process…
$74.95
Favorited Favorite 1
Wish List
The Arduino MKR Vidor 4000 is highly configurable and powerful, and it can perform high-speed digital audio and video processing. With the Vidor, you can configure it the way you want to essentially create your own controller board. It comes loaded with hardware and potential: an 8 MB SRAM, a 2 MB QSPI Flash chip (1 MB allocated for user applications), a Micro HDMI connector, an MIPI camera connector, and Wifi and BLE powered by U-BLOX NINA W10 Series. It also includes the classic MKR interface, where all pins are driven both by SAMD21 and FPGA. Plus, it has a Mini PCI Express connector with up to 25 user programmable pins.
youtube
This shake brings an easy-to-use earthquake monitor to the yard!
added to your cart!
Raspberry Shake - Home Earthquake Monitor (RS1D)
18 available SEN-14835
The Raspberry Shake is a highly accurate seismograph you can use in your home, office, and classroom.
$214.99
Favorited Favorite 0
Wish List
The Raspberry Shake is a highly accurate seismograph you can use in your home, office and classroom. This Raspberry Pi accessory uses a single, vertical geophone as its sensor – a very sensitive yet rugged Earth motion microphone, widely used in the oil and gas industry to detect seismic vibration. The Raspberry Shake was originally designed with citizen scientists and educational facilities in mind, but can easily be used by other hobbyists, makers and enthusiasts!
added to your cart!
Neutis Quad-Core Module
In stock DEV-14971
Introducing the Neutis N5 Module from Emlid! This Quad Core System on a Module is perfect for makers and developers!
$59.95
Favorited Favorite 0
Wish List
added to your cart!
Neutis Development Kit
In stock DEV-14972
Introducing the Neutis Development Kit from Emlid! This Quad Core System on a Module in a dev kit is perfect for makers and d…
$239.95
Favorited Favorite 0
Wish List
Even though we made these available at the end of last week, we wanted to bring attention to these “Edison replacements” this Friday! The Neutis Quad-Core Module and Development Kit are loaded with features. Utilizing Neutis’ BSP based on Yocto, the system arrives with an up-to-date Linux kernel. The module is powered by a 64-bit ARM Cortex-A53 and a ARM Mali450 MPR GPU. It has 512 MB of RAM and 8 GB of eMMC storage. For connectivity, there are a plethora of wired and wireless options at your disposal. For wireless needs, the system rocks 802.11 b/g/n and Bluetooth 4.0 Dual-mode BLE, all with the built-in antenna. For your wired needs, the module’s two connectors give you access to an incredible peripheral set, including over 50 GPIO and a multitude of interfaces.
added to your cart!
ESP-WROVER-KIT
In stock WRL-14917
The ESP-WROVER-KIT is a development board produced by Espressif built around ESP32.
$40.00
Favorited Favorite 0
Wish List
The ESP-WROVER-KIT is a development board produced by Espressif built around ESP32. This board is compatible with most ESP32 modules, including the ESP32-WROOM-32 and ESP32-WROVER (which you will find on the board itself). The ESP-WROVER-KIT features support for multiple amenities not typically found on other IoT devices, including a microSD card port, camera and LCD inputs, power mode selection and more. Each of the I/O pins have been broken out from the ESP32 module for easy extension, should you choose to use them.
We also have a few other new products to check out, so make sure to check out our New Products Page to see them all!
That’s it for this week, folks! As always, we can’t wait to see what you make! Shoot us a tweet @sparkfun, or let us know on Instagram or Facebook. We’d love to see what projects you’ve made!
We’ll be back next week with even more fantastic new products!
comments | comment feed
0 notes
Photo

Buy Espressif ESP Wrover kit & development board online at affordable price from Campus Component a leading electronic component provider in India. The ESP-WROVER-KIT-VB is a variant of ESP-WROVER-KIT that comes with an ESP32-WROVER-B module by default. This board features support for an LCD and Micro SD card. The I/O pins have been broken out from the ESP32-WROVER-B for easy extension.
The board carries an advanced multi-protocol USB bridge (the FTDI FT2232HL), enabling developers to use JTAG directly to debug the ESP32 module through the USB interface. The development board makes secondary development easy and cost-effective. Module is FCC/ CE/ KCC/ IC/ TELEC/ SRRC/NCC certified. To know more about this product call on
+919767444555
or visit website
https://www.campuscomponent.com/products/espressif-esp-wrover-kit-vb-2-4-ghz-wifi-and-bt-ble-development-board/2208614000001841096
#Espressif ESP Wrover#esp32 wrover#esp32 development board#esp 32 datasheet#esp32 espressif#esp8266 wifi module#esp module
0 notes
Link
Buy Espressif ESP Wrover kit & development board online at affordable price from Campus Component a leading electronic component provider in India. The ESP-WROVER-KIT-VB is a variant of ESP-WROVER-KIT that comes with an ESP32-WROVER-B module by default. This board features support for an LCD and Micro SD card. The I/O pins have been broken out from the ESP32-WROVER-B for easy extension.
The board carries an advanced multi-protocol USB bridge (the FTDI FT2232HL), enabling developers to use JTAG directly to debug the ESP32 module through the USB interface. The development board makes secondary development easy and cost-effective. Module is FCC/ CE/ KCC/ IC/ TELEC/ SRRC/NCC certified. To know more about this product call on
+919767444555
or visit website
https://www.campuscomponent.com/products/espressif-esp-wrover-kit-vb-2-4-ghz-wifi-and-bt-ble-development-board/2208614000001841096
#Espressif ESP Wrover#esp32 wrover#esp32 development board#esp 32 datasheet#esp32 espressif#esp8266 wifi module#esp module
0 notes
Text
ESP32 CAM, caméra connectée à moins de 20€
Un nouvel article à découvrir sur le blog habitat et domotique
ESP32 CAM, caméra connectée à moins de 20€ https://www.habitat-domotique.fr/2019/04/29/esp32-cam-camera-connectee-moins-20e/
Oui, vous avez bien compris, nous allons aujourd’hui parler d’une ESP32 CAM, une caméra connectée à base d’ESP32 à moins de 20 €. L’ESP32 n’est rien de moins que le grand frère de l’ESP8266, notre module WiFi domotique préférée.
Le module que nous allons voir ensemble est un des plus complets qu’il m’a été donné de voir. Il est bien sur possible de le reprogrammer pour l’adapter à ses besoins comme par exemple une intégration à notre box domotique Jeedom, mais on verra cela dans un prochain article.
ESP32 CAM de quoi parle t’on ?
L’ESP32 apporte de nombreuse améliorations par rapport à son prédécesseur, entre autres, il est muni d’un processeur double cœur, d’un SOC Wifi/Bluetooth BLE, de 36 GPIO et de bien d’autres caractéristiques supplémentaires. Bref tout cela pour dire qu’il n’y a pas photo l’ESP32 apporte un gain de performance considérable à votre projet comparé à l’ESP8266, et tout cela pour un prix toujours raisonnable de l’ordre de 6 à 9 €.
Le terme ESP32 CAM est un terme générique qui regroupe toutes les plateformes de développement qui contienne au moins un ESP32 et un module caméra. Il en existe trois principales et je vais vous parler d’une d’entre elle en particulier en provenance du fabricant TTGO. La TTGO ESP32 CAM est munie en plus de l’ESP32 et d’une caméra OV2640 (2MP), d’un détecteur de mouvement infrarouge, d’un microphone et d’un écran OLED. Oui rien que ça, le tout sur une board prête à l’emploi.
Spécifications
Module sans fil ESP32-WROVER-B
SoC – processeur ESP32 dual core Tensilica LX6
Mémoire – 8 Mo de PSRAM
Stockage – Flash de 4 Mo SPI
Connectivité – 2.4 GHz 802.11n WiFI, Bluetooth 4.2 LE
Caméra – Caméra 2MP OV2640 avec un objectif normal ou fisheye
Écran – Écran OLED 0,96 ″ 128 × 64 connecté via le contrôleur d’affichage SSD1306 I2C
Audio – Microphone
USB – 1x port micro USB pour l’alimentation et la programmation (CP2104)
Capteurs – Capteur I2C PIR AS312
Extension – embase I2C à 5 broches avec 5V, 3.3V et GND
Divers – Touches de réinitialisation et utilisateur (IO34), DEL
Alimentation – 5 V via un port micro USB,
Batterie – Batterie LiPo via un connecteur à 2 broches et une puce de chargement IP5306
Dimensions – 68 x 28 mm
Prise en main
Comme je le disais plus haut, La TTGO ESP32 CAM nous arrive déjà paramétré avec le firmware qui va bien. Il ne nous reste qu’a le brancher à notre chargeur de téléphone pour commencer à l’utiliser.
Par défaut, il créé un point d’accès wifi sur lequel nous nous connectons avec notre ordinateur ou smartphone. Puis on se rend sur la console web d’administration. On retrouve tous les paramètres de configuration de la caméra, ainsi d’un bouton nous permettant de prendre des captures photo ou de lancer un streaming vidéo.
Il est même possible de faire de la reconnaissance faciale avec la fonctionnalité “Enroll face”, mais attention cela consomme beaucoup de ressources.
Si vous souhaitez modifier le firmware pour l’adapter à vos besoins, vous retrouverez tout le nécessaire sur le Github du constructeur. Pour mes besoins, j’ai par exemple désactivé l’affichage sur l’écran OLED et ajouté l’appel à l’API HTTP de Jeedom quand le détecteur de mouvement est déclenché afin de créer une mini camera de sécurité connectée.
Conclusion sur notre TTGO ESP32 CAM
Pour moins de 20 €, c’est un très bon produit, facile à utiliser, mais surtout adaptatif. Rien qu’avec le firmware de base, on peut faire déjà beaucoup de chose mais avec un peut de travail on peut aller très loin. Et c’est sans parler de la possibilité de lui ajouter des modules complémentaires avec l’extension 5 broches disponibles à l’arrière.
La qualité de l’image est correcte et fluide (17fps), il ne faut pas oublier que c’est un modeste 2MP. J’apprécie particulièrement la version avec le fisheye qui permet d’avoir un angle de vue relativement large. Et si vous souhaitez agrémenter le tout d’un boîtier, il existe de très beau modèles disponible sur Thingiverse.
Bref, c’est une bonne petite carte comme on les aime, on se retrouve très vite pour un nouvel article sur ce produit.
#DétecteurPrésence, #Diy, #Domotique, #HighTech, #Iot, #Sécurité #DIY
0 notes