#Espressif ESP Wrover
Explore tagged Tumblr posts
Visit Tumblr Blog
Explore Tumblr blogs with no restrictions, modern design and the best experience.
Last Seen Tumblr Blogs


Fun Fact
Premium Tumblr themes are available from anywhere between $9 to $49.
Photo

Buy Espressif ESP Wrover kit & development board online at affordable price from Campus Component a leading electronic component provider in India. The ESP-WROVER-KIT-VB is a variant of ESP-WROVER-KIT that comes with an ESP32-WROVER-B module by default. This board features support for an LCD and Micro SD card. The I/O pins have been broken out from the ESP32-WROVER-B for easy extension.
The board carries an advanced multi-protocol USB bridge (the FTDI FT2232HL), enabling developers to use JTAG directly to debug the ESP32 module through the USB interface. The development board makes secondary development easy and cost-effective. Module is FCC/ CE/ KCC/ IC/ TELEC/ SRRC/NCC certified. To know more about this product call on
+919767444555
or visit website
https://www.campuscomponent.com/products/espressif-esp-wrover-kit-vb-2-4-ghz-wifi-and-bt-ble-development-board/2208614000001841096
#Espressif ESP Wrover#esp32 wrover#esp32 development board#esp 32 datasheet#esp32 espressif#esp8266 wifi module#esp module
0 notes
Text
ESP-WROVER-KIT-Vb
Internet technology is progressing at a fast rate in the modern era. More innovations in this domain are expected to advanced the feature of IoT devices. Discussions surrounding the internet reveal that it is a connection between different computing devices to receive, analyze and share the data. Most of the time desired results are unachievable but, researchers aim to find a balanced approach. ESP-Wrover-Kit is an innovative device the allows this to occur. What are the functionalities of ESP-Wrover-Kit? A development board, the ESP-Wrover-Kit is built around the ESP32, compatible with multiple modules. This kit provides several functions on a single board. The ESP32 is low cost and low power on-chip microcontroller with features such as Bluetooth and Wi-Fi. The ESP-Wrover-Kit allows users to debug the ESP32 module and build a connection between the JTAG and ESP32 via a multi-protocol USB interface. A single kit utilizes connections between the different modules such as a camera, SD card, LCD, I/O expansion connectors and, LED. What are the features of the upgraded ESP-Wrover-KIT? The Esp-Wrover-Kit-VB is the latest version of the ESP-Wrover kits launched by Espressif.

The current version is considered an ultra-low-power board. There is an 8 Mbytes expansion of PSRAM. Moreover, the onboard Micro-SD card interface is also considered as one of the major advanced features due to its high speed. Input and output expansion capabilities are also enhanced in the latest version making the overall product more versatile, fast, and smart. Why ESP-Wrover-Kit is required? Such development boards are required to make convenient secondary development and are hugely cost-effective. Researchers usually need a prototype to test their algorithms and smart applications. For example for a smart pollution measurement system requirement would be; high computation speed, ESP32, and a display unit. ESP-Wrover-Kit-VB can fulfill the requirements on a single board this is due to its camera feature. Some other applications that require ESP32 modules and Wi-Fi connectivity are: · Smart surveillance · Teat measurement systems · Testing Security · Indoor positioning systems · Heart rate monitoring systems · Position regulation · Image recognition In a nutshell, as the industry continues to develop further innovative research ideas, the requirement for additional testing is equally heightened. The ESP-Wrover-Kit-VB provides advanced attainable innovation within the IoT domain aiding with both speed and accuracy required within precise solutions.
0 notes
Photo
[Amazon Web Services] ESP32-DevKitCにAmazon FreeRTOSをインストールする https://ift.tt/33JmN95
Amazon FreeRTOS(以下FreeRTOS)は様々なデバイスにインストールすることができエッジ側にAWSの環境を拡張する手段を提供しているが、ここでは手に入りやすいEspressif ESP32-DevKitC(以下ESP32)にFreeRTOSをインストールする手順を示す。
Espressif ESP32-DevKitC と ESP-WROVER-KIT の開始方法 (Amazon Web Services)
waves ESP32 DevKitC V4 ESP-WROOM-32 ESP-32 WiFi BLE 技適取得済 国内発送AMAZON JP
動作環境
FreeRTOSを使うにあたりあらかじめ以下をインストールしておく。
⦿ Pytyoh 2.7.10以降 (3.xでよいが、2.xを使う場面あり) ⦿ pip ⦿ AWS SDK for Python (boto3) ⦿ AWS CLI
$ python --version Python 3.6.8 $ python2 --version Python 2.7.15+ $ pip --version pip 19.3.1 from /usr/local/lib/python3.6/dist-packages/pip (python 3.6) $ pip list | grep boto3 boto3 1.9.253 $ aws --version aws-cli/1.16.263 Python/3.6.8 Linux/4.15.0-65-generic botocore/1.12.253
ツールチェーンインストール
まずEspressif公式サイトからUbuntu用のツールチェーンをダウンロードしてインストールする。
https://docs.espressif.com/projects/esp-idf/en/v3.1.5/get-started-cmake/linux-setup.html
⦿ 以下をダウンロード & インストール
xtensa-esp32-elf-linux64-1.22.0-80-g6c4433a-5.2.0.tar.gz
$ mkdir ~/esp $ cd ~/esp $ tar zxvf ~/Downloads/xtensa-esp32-elf-linux64-1.22.0-80-g6c4433a-5.2.0.tar.gz
⦿ 環境変数設定
export PATH="$PATH:$HOME/esp/xtensa-esp32-elf/bin"
⦿ バージョン確認
$ xtensa-esp32-elf-gcc --version xtensa-esp32-elf-gcc (crosstool-NG crosstool-ng-1.22.0-80-g6c4433a) 5.2.0 Copyright (C) 2015 Free Software Foundation, Inc. This is free software; see the source for copying conditions. There is NO warranty; not even for MERCHANTABILITY or FITNESS FOR A PARTICULAR PURPOSE.
CMakeインストール
次にFreeRTOSビルド用のCMakeをインストールする。
Amazon FreeRTOSではCMake 3.13以降がサポートされるが、Ubuntuのパッケージリポジトリには3.10しか用意されていないためCMake公式サイトからダウンロードしてインストールする。
https://cmake.org/download/
⦿ 以下をダウンロード & インストール
cmake-3.15.4-Linux-x86_64.tar.gz
$ mkdir ~/tmp $ cd ~/tmp $ tar zxvf ~/Downloads/cmake-3.15.4-Linux-x86_64.tar.gz $ sudo cp -r cmake-3.15.4-Linux-x86_64/{bin,doc,share} /usr/local
manファイルについては格納場所/usr/local/manが/usr/local/share/manへのシンボリックリンクのためmanファイルのみ以下のようにしてコピーする。
$ sudo cp -r cmake-3.15.4-Linux-x86_64/man /usr/local/share
⦿ バージョン確認
$ cmake --version cmake version 3.15.4
Amazon FreeRTOSダウンロード & 設定
ビルドの準備が整ったらAmazon FreeRTOS公式GitHubからソース一式をダウンロードする。
https://github.com/aws/amazon-freertos
$ cd ~/tmp $ git clone https://github.com/aws/amazon-freertos.git --recurse-submodules
次にセットアップスクリプト用の設定ファイルを編集する。
$ cd amazon-freertos/tools/aws_config_quick_start $ vi configure.json { "afr_source_dir":"../..", <----------- 上記ダウンロードディレクトリ(amazon-freertosディレクトリのフルパス) "thing_name":"$thing_name", <--------- ESP32に付けるThing Name "wifi_ssid":"$wifi_ssid", <----------- Wi-FiネットワークのSSID "wifi_password":"$wifi_password", <--- Wi-Fiネットワークの接続パスワード "wifi_security":"$wifi_security" <---- Wi-Fiネットワークのセキュリティタイプ }
設定ファイルが編集できたらセットアップスクリプトを実行する。
$ python SetupAWS.py setup
これによりAWS IoT上のリソースが自動的に作られ、リソース間の関連付けも行われる。
⦿ モノ(Thing)作成

⦿ 証明書作成
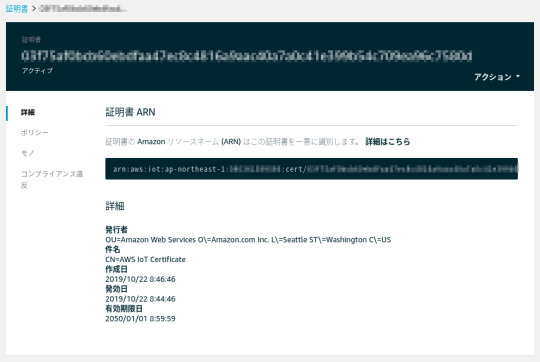
⦿ ポリシー作成
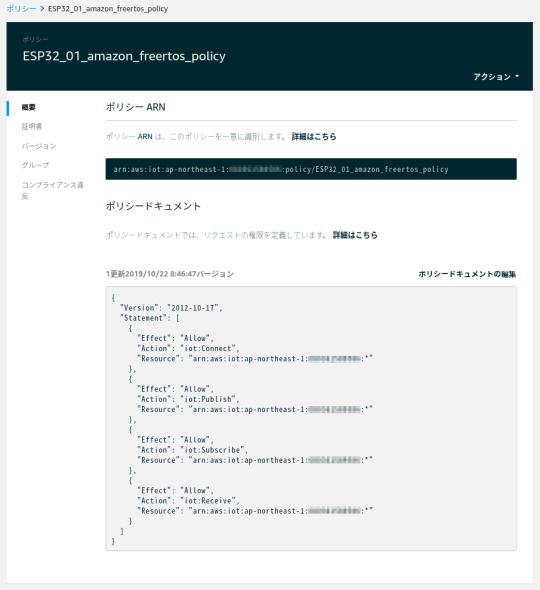
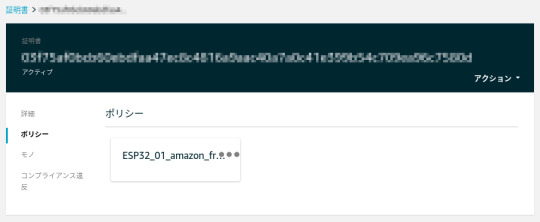
⦿ 証明書にポリシーをアタッチ
⦿ モノに証明書をアタッチ

⦿ 証明書関連のファイル作成
$ ls -l ESP32_01_* -r--r--r-- 1 xxx xxx 64 10月 22 08:46 ESP32_01_cert_id_file
⦿ MQTTエンドポイント、Wi-Fiネットワーク情報をデモ用aws_clientcredential.hファイルに追加
$ cat -n ../../demos/include/aws_clientcredential.h : 35 /* 36 * MQTT Broker endpoint. 37 */ 38 #define clientcredentialMQTT_BROKER_ENDPOINT "xxxxxxxxxxxxxx-ats.iot.ap-northeast-1.amazonaws.com" 39 40 41 /* Use of a "define" and not a "static const" here to be able to 42 * use pre-compile concatenation on the string. */ 43 #define clientcredentialIOT_THING_NAME "ESP32_01" : 56 /* 57 * Wi-Fi network to join. 58 */ 59 #define clientcredentialWIFI_SSID "xxxxxxxxxxxxxxxx" 60 61 /* 62 * Password needed to join Wi-Fi network. 63 */ 64 #define clientcredentialWIFI_PASSWORD "xxxxxxxxxxxxx" 65 66 /** 67 * @brief Security type 68 * WPA2 Security, @see WIFISecurity_t 69 * Possible values are - eWiFiSecurityOpen, eWiFiSecurityWEP, eWiFiSecurityWPA, 70 * eWiFiSecurityWPA2 71 */ 72 #define clientcredentialWIFI_SECURITY xxxxxxxxxxxxxxxxx 73 74 #endif
⦿ 証明書とプライベートキーをBase64エンコードしてデモ用
aws_clientcredential_keys.hファイルに追加
$ cat -n ../../demos/include/aws_clientcredential_keys.h : 29 /* 30 * PEM-encoded client certificate 31 * 32 * Must include the PEM header and footer: 33 * "-----BEGIN CERTIFICATE-----\n"\ 34 * "...base64 data...\n"\ 35 * "-----END CERTIFICATE-----\n" 36 */ 37 #define keyCLIENT_CERTIFICATE_PEM \ 38 "-----BEGIN CERTIFICATE-----\n"\ : 57 "-----END CERTIFICATE-----\n" 77 /* 78 * PEM-encoded client private key. 79 * 80 * Must include the PEM header and footer: 81 * "-----BEGIN RSA PRIVATE KEY-----\n"\ 82 * "...base64 data...\n"\ 83 * "-----END RSA PRIVATE KEY-----\n" 84 */ 85 #define keyCLIENT_PRIVATE_KEY_PEM \ 86 "-----BEGIN RSA PRIVATE KEY-----\n"\ : 112 "-----END RSA PRIVATE KEY-----\n" :
FreeRTOSデモプロジェクトビルド & ESP32書き込み & 実行
設定が終わったのでCMakeでFreeRTOSをビルドし、ESP32に書き込んで実行する。
⦿ ビルド
$ cd ../.. $ cmake -DVENDOR=espressif -DBOARD=esp32_devkitc -DCOMPILER=xtensa-esp32 -S . -B build $ cd build $ make all -j4 : [100%] Built target app
⦿ ESP32書き込み
ここでESP32をホストPCに接続し、まず以下を実行してESP32の中身を消去する。
$ cd .. $ ./vendors/espressif/esp-idf/tools/idf.py erase_flash -B build ESP-IDF currently only supports Python 2.7, and this is Python 3.6.8. Search for 'Setting the Python Interpreter' in the ESP-IDF docs for some tips to handle this.
ただ当該環境ではPython3がデフォルトな��で上記のエラーになる。
idf.pyを書き換えてPython2を明示的に指定して再度実行する。
$ vi ./vendors/espressif/esp-idf/tools/idf.py (変更前) #!/usr/bin/env python (変更後) #!/usr/bin/env python2 $ ./vendors/espressif/esp-idf/tools/idf.py erase_flash -B build Setting IDF_PATH environment variable: ... : Chip erase completed successfully in 3.8s Hard resetting via RTS pin... Done
続いてFreeRTOSをESP32に書き込む。
$ cd build $ make flash [ 0%] Built target blank_ota_data [ 1%] Built target partition_table [ 1%] Built target idf_component_ulp : Wrote 953520 bytes (585067 compressed) at 0x00020000 in 14.5 seconds (effective 526.8 kbit/s)... Hash of data verified. Leaving... Hard resetting via RTS pin... [100%] Built target flash
⦿ AWS上のMQTTメッセージのモニタリング
AWS IoTコンソールでMQTTクライアントを使ってESP32がAWSに送信するメッセージをサブスクライブしておく。
[テスト]をクリックするとMQTTクライアントが開くので[トピックのサブスクリプション]フィールドに「iotdemo/#」と入力して[トピックへのサブスクラ…]をクリックする。

いまサブスクライブしたトピックの[iotdemo/#]をクリックしてメッセージを待ち受ける。

⦿ デモプログラム実行
この状態でデモプログラムを実行するとMQTTでパブリッシュが行われ��AWS IoTコンソール上でもメッセージが受信できていることが確認できる。
$ cd .. $ ./vendors/espressif/esp-idf/tools/idf.py monitor -p /dev/ttyUSB0 -B build : 157 914 [iot_thread] [INFO ][DEMO][9140] Demo completed successfully. 158 918 [iot_thread] [INFO ][INIT][9180] SDK cleanup done. 159 918 [iot_thread] [INFO ][DEMO][9180] -------DEMO FINISHED------- -> Ctrl + ]で終了

参考サイト
AWS IoT情報 (Qiita)
元記事はこちら
「[Amazon Web Services] ESP32-DevKitCにAmazon FreeRTOSをインストールする 」
November 13, 2019 at 12:00PM
0 notes
Text
Massgeschneidert für IoT Anwendungen
Massgeschneidert für IoT Anwendungen
Espressif’s ESP32 ist aus IoT Anwendungen kaum noch wegzudenken. Geringe Stromaufnahme, eine leistungsfähige CPU und WiFi- bzw. BLE-Connectivity sind der Schlüssel für den Erfolg in diesem Bereich.
Eine Vielzahl dieser Anwendungen setzt das ESP-WROOM-32x-Modul von Espressiff ein.
Die ESP32-WROVER Serie besticht durch einige Modifikationen der ESP32-WROOM-32x-Module, die unter anderem ein…
View On WordPress
0 notes
Text
Friday Product Post: No, I Am Your FPGA.
Today we are excited to bring you the new Arduino MKR Vidor 4000, which combines the benefits of the SAMD21 and an FPGA. We also have the Raspberry Shake Home Earthquake Monitor, two Neutis boards to help fill the hole in your heart from the Edison’s passing, and a few other new products to fill your cart!
youtube
Vidor… Darth Vidor!
added to your cart!
Arduino MKR Vidor 4000
In stock DEV-14870
The Arduino MKR Vidor 4000 is highly configurable and powerful, and it can perform high-speed digital audio and video process…
$74.95
Favorited Favorite 1
Wish List
The Arduino MKR Vidor 4000 is highly configurable and powerful, and it can perform high-speed digital audio and video processing. With the Vidor, you can configure it the way you want to essentially create your own controller board. It comes loaded with hardware and potential: an 8 MB SRAM, a 2 MB QSPI Flash chip (1 MB allocated for user applications), a Micro HDMI connector, an MIPI camera connector, and Wifi and BLE powered by U-BLOX NINA W10 Series. It also includes the classic MKR interface, where all pins are driven both by SAMD21 and FPGA. Plus, it has a Mini PCI Express connector with up to 25 user programmable pins.
youtube
This shake brings an easy-to-use earthquake monitor to the yard!
added to your cart!
Raspberry Shake - Home Earthquake Monitor (RS1D)
18 available SEN-14835
The Raspberry Shake is a highly accurate seismograph you can use in your home, office, and classroom.
$214.99
Favorited Favorite 0
Wish List
The Raspberry Shake is a highly accurate seismograph you can use in your home, office and classroom. This Raspberry Pi accessory uses a single, vertical geophone as its sensor – a very sensitive yet rugged Earth motion microphone, widely used in the oil and gas industry to detect seismic vibration. The Raspberry Shake was originally designed with citizen scientists and educational facilities in mind, but can easily be used by other hobbyists, makers and enthusiasts!
added to your cart!
Neutis Quad-Core Module
In stock DEV-14971
Introducing the Neutis N5 Module from Emlid! This Quad Core System on a Module is perfect for makers and developers!
$59.95
Favorited Favorite 0
Wish List
added to your cart!
Neutis Development Kit
In stock DEV-14972
Introducing the Neutis Development Kit from Emlid! This Quad Core System on a Module in a dev kit is perfect for makers and d…
$239.95
Favorited Favorite 0
Wish List
Even though we made these available at the end of last week, we wanted to bring attention to these “Edison replacements” this Friday! The Neutis Quad-Core Module and Development Kit are loaded with features. Utilizing Neutis’ BSP based on Yocto, the system arrives with an up-to-date Linux kernel. The module is powered by a 64-bit ARM Cortex-A53 and a ARM Mali450 MPR GPU. It has 512 MB of RAM and 8 GB of eMMC storage. For connectivity, there are a plethora of wired and wireless options at your disposal. For wireless needs, the system rocks 802.11 b/g/n and Bluetooth 4.0 Dual-mode BLE, all with the built-in antenna. For your wired needs, the module’s two connectors give you access to an incredible peripheral set, including over 50 GPIO and a multitude of interfaces.
added to your cart!
ESP-WROVER-KIT
In stock WRL-14917
The ESP-WROVER-KIT is a development board produced by Espressif built around ESP32.
$40.00
Favorited Favorite 0
Wish List
The ESP-WROVER-KIT is a development board produced by Espressif built around ESP32. This board is compatible with most ESP32 modules, including the ESP32-WROOM-32 and ESP32-WROVER (which you will find on the board itself). The ESP-WROVER-KIT features support for multiple amenities not typically found on other IoT devices, including a microSD card port, camera and LCD inputs, power mode selection and more. Each of the I/O pins have been broken out from the ESP32 module for easy extension, should you choose to use them.
We also have a few other new products to check out, so make sure to check out our New Products Page to see them all!
That’s it for this week, folks! As always, we can’t wait to see what you make! Shoot us a tweet @sparkfun, or let us know on Instagram or Facebook. We’d love to see what projects you’ve made!
We’ll be back next week with even more fantastic new products!
comments | comment feed
0 notes
Link
Buy Espressif ESP Wrover kit & development board online at affordable price from Campus Component a leading electronic component provider in India. The ESP-WROVER-KIT-VB is a variant of ESP-WROVER-KIT that comes with an ESP32-WROVER-B module by default. This board features support for an LCD and Micro SD card. The I/O pins have been broken out from the ESP32-WROVER-B for easy extension.
The board carries an advanced multi-protocol USB bridge (the FTDI FT2232HL), enabling developers to use JTAG directly to debug the ESP32 module through the USB interface. The development board makes secondary development easy and cost-effective. Module is FCC/ CE/ KCC/ IC/ TELEC/ SRRC/NCC certified. To know more about this product call on
+919767444555
or visit website
https://www.campuscomponent.com/products/espressif-esp-wrover-kit-vb-2-4-ghz-wifi-and-bt-ble-development-board/2208614000001841096
#Espressif ESP Wrover#esp32 wrover#esp32 development board#esp 32 datasheet#esp32 espressif#esp8266 wifi module#esp module
0 notes