#embroidery type
Explore tagged Tumblr posts
Visit Tumblr Blog
Explore Tumblr blogs with no restrictions, modern design and the best experience.
Last Seen Tumblr Blogs


Fun Fact
Tumblr’s reach among the 26-to-35-year-olds in the US is 11%.
Text

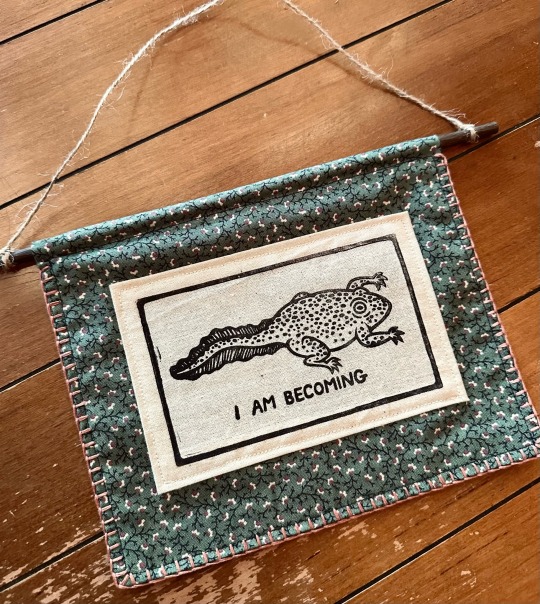
“becoming” banner by jasper alexander
linocut print on fabric, home sewn utilizing recycled textiles
#I am prepping for markets and my body is a constant state of motion#fingers always stitching or carving or packing or typing#linoprint#printmaker#block printing#printmaking#relief print#salted snail studio#block print#reliefprint#blanket stitch#embroidery#mixed media#relief printed fabric#relief printing#fabric printing#creativereuse#recycled textiles#linocut#linocut patch
10K notes
·
View notes
Text


Drifloon Pokemon Hoodie made by MatchaNeko
#pokemon#nintendo#fashion#anime#gaming#video games#sinnoh#drifloon#ghosts#ghost type#ds#nintendo ds#pokemon diamond and pearl#pokemon platinum#pokemon bdsp#switch#nintendo switch#2000s#00s#retro#nostalgia#nostalgic#sewing#embroidery#crafts#handmade#cute#kawaii#retrogaming#gen 4
693 notes
·
View notes
Text

Not Tolkien related, but I'm actually lowkey proud of how this self portrait embroidery is going 🤩 Ignore the eyes being proportionally and directionally "off" lol, and the too-long nose/anatomical mistakes. I'm more focusing on learning "thread painting" techniques than exact and accurate anatomy representation (or at least, that's my excuse 😅)
Also I chose to do a self portrait bc at the time of needing a reference photo to practice embroidered portraits, I have, in fact, the face most readily available to me lol
#embroidery#textiles#fiber arts#thread painting#hand embroidery#needlework#crafting#my art#not tolkien#I'm in my 'embroidery and cross stitch' hyper fixation phase y'all!#I'm a beginner embroiderer tho (and I haven't tried cross stitch yet) so I'm not very knowledgable of#official and proper technique/stitch types LOL but i enjoy thread painting bc it's the type of embroidery that makes the most sense to#my illustration brain? If that makes sense#Still want to learn proper embroidery tho!
297 notes
·
View notes
Text
you know. just like with specific terms and nicknames like clanker or shinie, clones must've come up with unique meanings for their armor paint. like with different meanings assigned to colors of mandalorian armor except since the choice of color is out of their control, all the importance lies in shapes and placement
#this is obviously based on fanon as well as personal speculation but knowing that clones are such a tight-knit society#plus knowing the circumstances of their “upbringing” it wouldn't be surprising#there must be a code to everything#if we take into the account the idea of clones developing their own dialect together with incorporating combat sign language into it#i just think for clones everything matters. the words they use the body language their ranks etc and that everything would include paintjob#so like that would mean that there are specific ways you could paint ur armor that have their own meaning#like with some types of traditional embroidery or other textile arts#like an outsider would look at a clone in full armor and see a collection of geometric shapes and simple designs#but another clone would see so much more#clones could incorporate some personal designs together with more well known “universal” symbols#a stripe across the pauldron for luck. another stripe down the chestplate to signify bravery on the battlefield so on so forth#doylist: they didn't want to make adjustments to their clone models and used copy and paste#watsonian: a group of clones would collectively decide on armor pattern that would best represent their battalion#star wars
215 notes
·
View notes
Text

My first major embroidery attempt, a scarlet king snake patch! Pretty rough obviously but I'm proud of it!
#until now my only embroidery has just been like lineart type stuff#also i have no idea of proper technique im just kinda goin#embroidery#crafting
466 notes
·
View notes
Text
Before voting spin the wheel and get one of these random types of embroidery.
Reblog for a Bigger Sample Size
147 notes
·
View notes
Text

#spiritomb#pokemon#halloween#halloween palette pokemon#pokemon halloween#kind of the shiny but also not#dark type#ghost type#the month of Halloween is drawing to a close#We'll see how much I draw once October is over#I should really work on this embroidery project I started for a friend of mine though#So will likely be pretty quiet after tomorrow#I have an actual excuse this time instead of just not posting like most times :P#Gen IV
45 notes
·
View notes
Photo

La Mode illustrée, no. 19, 12 mai 1862, Paris. Alphabet orné, au plumetis. Ville de Paris / Bibliothèque Forney
#La Mode illustrée#19th century#1860s#1862#on this day#May 12#periodical#fashion#design#pattern#embroidery#Forney#alphabet#type
599 notes
·
View notes
Text
You are free

Dandelion
Hope
Resilience/ Resistance
Healing
Forget Ne Nots
Memories
Hope
Lavender
Healing
-
#bucky barnes#The Winter Soldier#Bucky Barnes fanart#sebastian stan#Embroidery#I made this for Seb#I had more flowers planned but I ran out of time#Also had a different type of fabric planned but it was stuck in some postal transfer thingie#The holo thread is a pain to work with#The dandelion was fun to make#Had I had more time I would've made it differently#And add the 'you are free' to it#So I'm not too happy with it tbh#But I do like how the arm and dandelion turned out#Chaos' embroidery#Chaos' art
20 notes
·
View notes
Text

Acherontia atropos (the African death's-head hawkmoth) | cross stitch | august 2023
#isn't she beautiful?????#type; my posts#cute animals;#embroidery#cross stitch#needlework#diy#moths#insects#death's head hawkmoth
169 notes
·
View notes
Text
Finally, here's the official reveal of my finished battle jacket!!!!


I absoulutely LOVE how it came out!!!! I know it's not how a traditional battle jacket would be made, but I am super happy with it.
List of patches
Front left, from top to bottom
Meteora by Linkin Park, My Chemical Romance, Type O Negative, Slipknot, Pierce the Veil, Transformers Decepticons logo, Dookie by Green Day, and Brokencyde.
Front Right, from top to bottom
My Chemical Romance Killjoy spider, Taking Back Sunday, American Idiot by Green Day, Papercuts by Linkin Park, Conventional Weapons by My Chem, and Bauhaus.
The back patch of the bat wings turned out super cool I think!!!
All patches and embroidery are hand painted and hand sewn by yours truly, me!!!!!
#battle jacket#mcr#my chemical romance#taking back sunday#linkin park#meteora#transformers#decepticons#killjoys#type o negative#slipknot#green day#american idiot#bauhaus#pierce the veil#brokencyde#dookie#bat wings#embroidery#patchwork#patches#jacket#sewing#handmade#sodas art
25 notes
·
View notes
Text

Hm.
This looks like a thought I should scoop up and run far, far away with, don't you think?
#dragon age#dragon age: absolution#squirrel plays datv#not quite but sort of because i've been#thinking about my concept for#oc: tristan thorne#the protagonist for my necromancer/undead game of veilguard that i have planned#my old man/dead man yaoi game; as it were#trying to think of a consequence or a fitting end for him because. well. my guy by the time veilguard rolls around#has been sort of an undead Warden for like 22 years????#also i didn't have an internet connection yesterday#so instead i rewatched all of absolution and watched a movie and hammered out like 800 words of his story#and about twice as much of a character-building “interview”-type thing for Ver#before also finishing a piece of embroidery i've been doing of some of the veilguard faction insignia#truly the only thing holding me back from being at 300% at all times is internet connectivity
22 notes
·
View notes
Text
This one, contrary to that cat paw I've posted previously, really felt like I was just sort of tossing things together. But even despite that, I really enjoyed the heck out of the process of this mend, bit by bit making art out of something that's been bothering me.

Step one: get those holes to hole-d still! Threw some whip-stitches onto the fabric to get these three little cat-pokes to no longer expand through the fabric. Did this with some leftover scraps of light-purple thread from an earlier project we've seen around here, the finger guns mask! We don't quite know it at this point, but that color choice is going to make a lot of fuss later.

After a bit of digging around in RSN Stitchbank, I found an interesting pattern that I thought would be super fun to execute here, called the wild goose chase stitch: https://rsnstitchbank.org/stitch/wild-goose-chase-stitch So, following the pattern, we first lay down the blue stitching (counting rows of stitches in the tshirt instead of canvas openings).


Then, after a good little bit of fuss to get all those stitches to align Just So^tm over the hole, (seriously, it was a lot of wrangling horizontal stitches where they'd fit as anchoring points, knotting the vertical stitches in place so they'd fit right, etc, etc) since they didn't really have fabric to anchor in for a little bit there, we wound up with the purple stitching looking like so (quite good, I'd say, given I was improvising this while waiting in line at the DMV!), not quite perfectly saving that arrowed effect for one batch, but not half bad either.

Lastly but certainly not leastly for the wild goose chase here, we've got a third set of stitches, in a lovely pink color this time! But, trouble abounds, I measured completely wrong when setting this stitch up, there's still two more holes that need covering! Whatever shall I do?

Enter a very useful new tool we'll be seeing a lot of in future mends: dissolvable backing! This simply self-adheres to the fabric, and washes away quite easily with nothing more than water. The longer I was looking at the wild-goose chase stitch, wondering what I could put over the two holes, I honestly felt that the texture would fit right in along the border in a tetris arcade game.

So, I landed on a design that looks like a t-piece from everyone's favorite falling block game! First up, some simple black outline stitches, to make sure that the form makes sense as a tetris piece to the passing eye. Much, MUCH easier with the drawn-on guidelines here, even despite the pleasing geometric shape of tetrominos, I'm not sure that I could have nailed the stitch placement quite so nicely without the help of the dissolvable backing.

With the addition of some dark purple satin stitching, we've got a T tetromino! I haven't grabbed a good shot of this after it went into the wash, but I promise, the backing dissolved just fine after heading into the laundry. We'll be seeing a lot of that backing for future mends, it's super handy, especially for sashiko prep!
#Solarpunk#visible mending#clothing repair#mending#hand sewing#fiber arts#fabric arts#crafts#diy craft#Ecopunk#sustainable fashion#slow fashion#tetris#wild goose chase stitch#embroidery#traditional embroidery#queue.queue#a thousand words#nesterian lifestylings#this was SUCH a hard one to type because the n key on my keyboard has been misbehaving#I gotta fuss with the switch under there#very VERY fun mend though
21 notes
·
View notes
Text
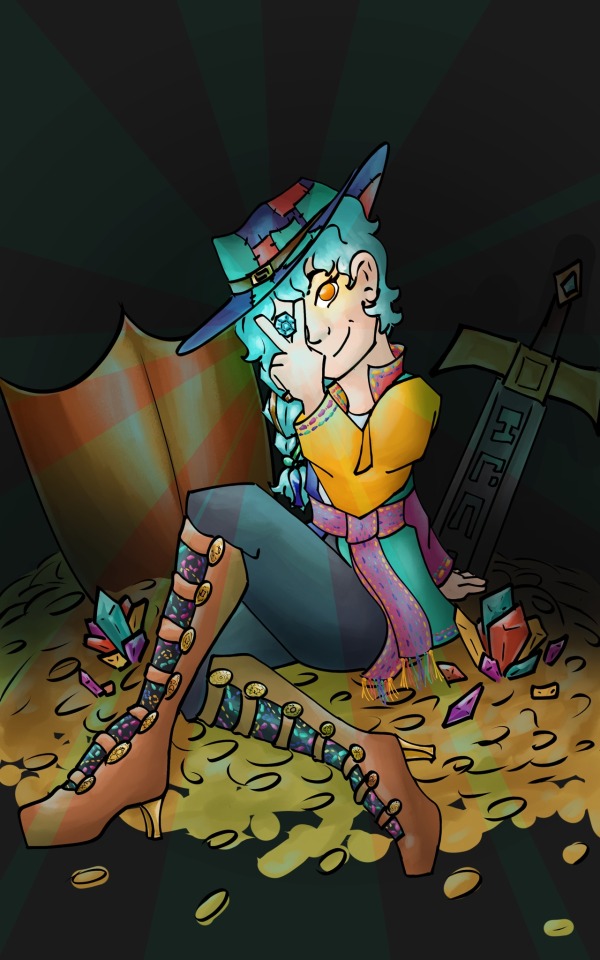
I made something for @doodle-list ‘s dtiys. Congrats to them for hitting 1k! It made me remember how much I wanted to draw Scott.
#empires smp#empires smp fanart#empires smp season 2#empires smp smajor#smajor95#smajor fanart#midway through making this I came up with a headcannon that his shoe buckles are just various coins that he’s stolen#also he just feels like the type of guy to wear embroidery#some of the lines are a bit shaky but yknow not every drawing can be a masterpiece#my art
97 notes
·
View notes
Photo
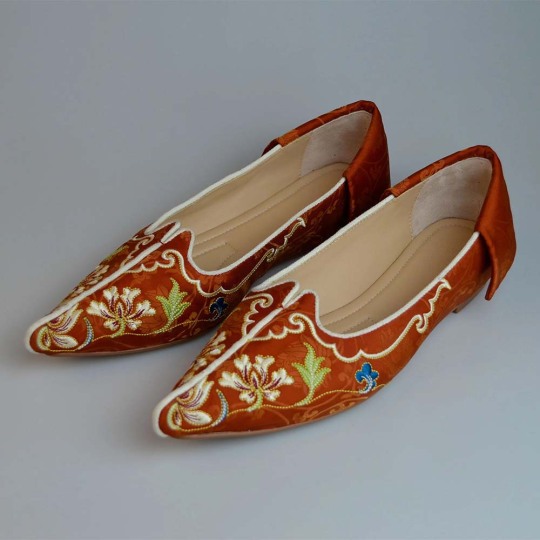
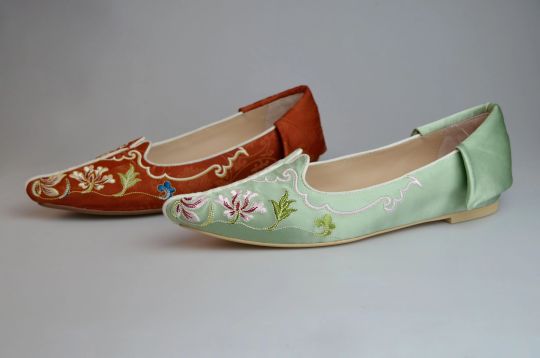
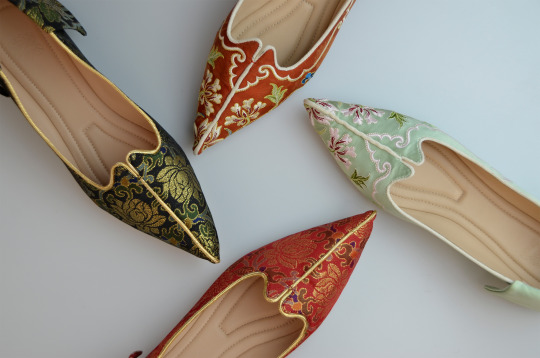
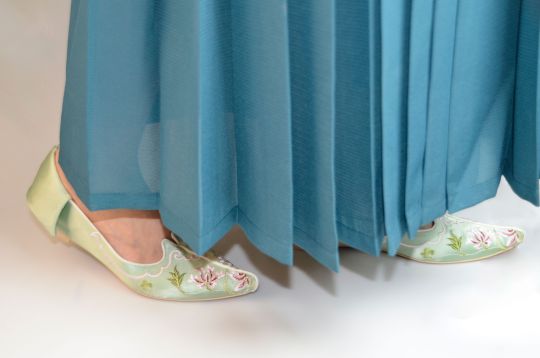

ming-style pointy shoes by 鶯梭
#鶯梭#hanfu accessories#hanfu#shoes#ming style#embroidery#complicated feelings for this type of shoes#太像三寸金莲#放这里做个记录好了
103 notes
·
View notes